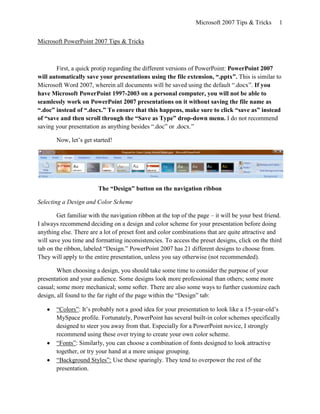
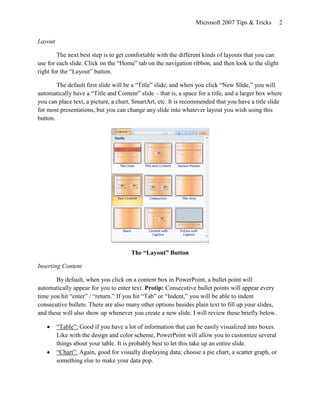
SlideShare a Scribd company logo
Microsoft 2007 Tips & Tricks       1


Microsoft PowerPoint 2007 Tips & Tricks


       First, a quick protip regarding the different versions of PowerPoint: PowerPoint 2007
will automatically save your presentations using the file extension, “.pptx”. This is similar to
Microsoft Word 2007, wherein all documents will be saved using the default “.docx”. If you
have Microsoft PowerPoint 1997-2003 on a personal computer, you will not be able to
seamlessly work on PowerPoint 2007 presentations on it without saving the file name as
“.doc” instead of “.docx.” To ensure that this happens, make sure to click “save as” instead
of “save and then scroll through the “Save as Type” drop-down menu. I do not recommend
saving your presentation as anything besides “.doc” or .docx.”

       Now, let’s get started!


                         The “Design” button on the navigation ribbon

Selecting a Design and Color Scheme

        Get familiar with the navigation ribbon at the top of the page – it will be your best friend.
I always recommend deciding on a design and color scheme for your presentation before doing
anything else. There are a lot of preset font and color combinations that are quite attractive and
will save you time and formatting inconsistencies. To access the preset designs, click on the third
tab on the ribbon, labeled “Design.” PowerPoint 2007 has 21 different designs to choose from.
They will apply to the entire presentation, unless you say otherwise (not recommended).

        When choosing a design, you should take some time to consider the purpose of your
presentation and your audience. Some designs look more professional than others; some more
casual; some more mechanical; some softer. There are also some ways to further customize each
design, all found to the far right of the page within the “Design” tab:

       “Colors”: It’s probably not a good idea for your presentation to look like a 15-year-old’s
       MySpace profile. Fortunately, PowerPoint has several built-in color schemes specifically
       designed to steer you away from that. Especially for a PowerPoint novice, I strongly
       recommend using these over trying to create your own color scheme.
       “Fonts”: Similarly, you can choose a combination of fonts designed to look attractive
       together, or try your hand at a more unique grouping.
       “Background Styles”: Use these sparingly. They tend to overpower the rest of the
       presentation.
Microsoft 2007 Tips & Tricks         2


Layout

        The next best step is to get comfortable with the different kinds of layouts that you can
use for each slide. Click on the “Home” tab on the navigation ribbon, and then look to the slight
right for the “Layout” button.

        The default first slide will be a “Title” slide, and when you click “New Slide,” you will
automatically have a “Title and Content” slide – that is, a space for a title, and a larger box where
you can place text, a picture, a chart, SmartArt, etc. It is recommended that you have a title slide
for most presentations, but you can change any slide into whatever layout you wish using this
button.


                                       The “Layout” Button

Inserting Content

       By default, when you click on a content box in PowerPoint, a bullet point will
automatically appear for you to enter text. Protip: Consecutive bullet points will appear every
time you hit “enter” / “return.” If you hit “Tab” or “Indent,” you will be able to indent
consecutive bullets. There are also many other options besides plain text to fill up your slides,
and these will also show up whenever you create a new slide. I will review these briefly below.

         “Table”: Good if you have a lot of information that can be easily visualized into boxes.
         Like with the design and color scheme, PowerPoint will allow you to customize several
         things about your table. It is probably best to let this take up an entire slide.
         “Chart”: Again, good for visually displaying data; choose a pie chart, a scatter graph, or
         something else to make your data pop.
Microsoft 2007 Tips & Tricks      3


“SmartArt Graphic”: With traditional PowerPoint slides, it’s always recommended that
you adhere to the “rule of sevens” or something similar to avoid text clutter: No more
than seven words per line, and no more than seven lines of text per slide. With SmartArt,
the text is not only organized in more a unique way, but it allows you to fit a lot more text
on a slide without it looking overwhelming.
“Insert Picture from File”: You must save a picture to your desktop or a flash drive in
order to use this feature. Once you insert a picture into a slide, a tab on the main
navigation ribbon called “Format” will appear. With this, you will be able to change the
border of the photo, as well as add a shadow or glow or various other effects to it. The
picture can also be stretched or shrunk or moved around to different parts of the slide. As
with the text, it is not stuck in only one place. You can also insert screen captures as
photos into your presentation.
“Insert Clip Art”: PowerPoint comes equipped with thousands of pre-saved photos. It is a
vast archive; for example, searching for “students” will bring up hundreds of results. Like
pictures saved on your computer, these can be altered using the “Format” tab. Protip: If
the picture does not have visible edges (e.g. it’s a transparent GIF), it is best not to use
border tools on it.
“Insert Media Clip”: This function will allow you to add a video or music file to your
presentation. You must have the clip previously saved on your computer. Protip:
Depending on the technology on your school’s computers, you may not be able to play
the media in your PowerPoint presentation the way you can on your home computer. This
is something you will want to pre-plan for.


                          Insert a “SmartArt” Graphic
Microsoft 2007 Tips & Tricks       4


Inserting a Hyperlink

        A hyperlink might be a suitable alternative to inserting a media clip into your
PowerPoint. In case you do not have the media clip saved to your computer and/or in case you
cannot use it on your school’s computers, you can easily link to a Web site such as YouTube and
load your media clip there. A hyperlink also works for non-media-based Web sites, or even other
slides. For example, you can create a Jeopardy!-esque game using hyperlinked PowerPoint
slides. However, the most common application for hyperlinks is to outside Web sites.

       Hyperlinked Text: To hyperlink text in your slide to something else, highlight the text-in-
       question. Once highlighted, you can either right-click the text, or go to the “Insert” tab on
       the navigation ribbon and click on “Hyperlink.” In the “address” bar that pops up, simply
       insert the URL/Web address where you would like the hyperlink to go.
       Hyperlinking a Picture: Click on the picture, and the click on the same “Hyperlink”
       button under the “Insert” tab. Protip: You will not be able to check that your hyperlink is
       correct without starting PowerPoint’s “Slide Show” function.
       Hyperlinking Between Slides: You will still need either a photo or a piece of text to serve
       as a hyperlink between slides. Once you click on those, go to the “Insert” slide and then
       hit “Action” instead of “Hyperlink.” Hit the “Hyperlink to …” radio button and use the
       drop-down menu to find the slide-in-question. Protip: If you are planning to create a
       game like Jeopardy!, the hyperlinking can be time-consuming.

Inserting a Text Box

       Click on the “Insert” tab and then “Insert Text Box.” Next, you will have to drop
approximately where you would like the text box on your slide. The font size and face can also
be modified.

Inserting a Header/Footer and/or Slide Number

        By clicking either “Insert Header & Footer” or “Insert Text Box,” you can accomplish
both tasks togerher or just one at a time. A footer might be helpful if you want to include your
name on every slide. Protip: It is recommended that you click the “Don’t Show on Title Slide”
button under “Slide Number,” since you will already have all of that information on the slide
itself.


                                        The “Insert” Tab
Microsoft 2007 Tips & Tricks       5


Animations

        The “Animations” tab has a lot of interesting effects, but it is recommended that you use
this sparingly so it does not otherwise distract from the point of your presentation. When you
click on the tab, a number of options will be presented for transitioning to one or all of your
slides.

        In addition, you can click the “Custom Animation” button on the left and use it to insert
specific animation for a piece of text or a picture. To do so, first highlight the text or click on the
picture you would like to modify. After you click “Custom Animation,” a box will pop up on the
right-hand side of the screen. Click “Add Effect” and use the drop-down menus to choose your
animation. You can also change the speed and use multiple animations for different pieces of
text/photos on a single slide. Protip: Numbers will appear on your slide next to each custom
animation in the order that you have set them up. When you play your presentation as a Slide
Show, they will disappear.


                                       The “Animation” Tab

Slide Show

        Click either the “Slide Show” or “View” tabs to show your presentation as a Slide Show.
The Slide Show is the best format to use to let your audience view your presentation because
they will only see the final product you have created. If you use the “Slide Show” tab, you can
also record your own narration or set a timer for each slide. However, this is not required.

        Under the “View” tab, there will also be a “Notes Page” button. This corresponds to the
blank white box underneath each slide, where you can type speaker notes. Again, when your
audience views the slide show, they will not be able to see your speaker notes. However, you can
print off the notes pages for personal use to facilitate your presentation. To return to the program
from the Slide Show, click the “Escape” key. You can navigate through your slide show using
either the mouse or the arrow keys on your keyboard, as well as a clicker/remote control, if your
classroom is equipped with one.

Questions, Comments & Suggestions

       I would love to hear your feedback on this presentation! Feel free to contact me via the
following e-mail address: jessica.haight-angelo@kirkwood.edu.

More Related Content

What's hot

Microsoft Powerpoint
Microsoft PowerpointMicrosoft Powerpoint
Microsoft Powerpoint
Mi L
 
Triad 2010 power_point_chapter_1
Triad 2010 power_point_chapter_1Triad 2010 power_point_chapter_1
Triad 2010 power_point_chapter_1
mindysholder
 
New features on microsoft ppt
New features on microsoft pptNew features on microsoft ppt
New features on microsoft ppt
Gosick
 
Microsoft Power Point
Microsoft Power PointMicrosoft Power Point
Microsoft Power Point
Owly Eyes
 

What's hot (20)

Powepoint
PowepointPowepoint
Powepoint
 
Microsoft Office PowerPoint 2007 - Lesson 1
Microsoft Office PowerPoint 2007 - Lesson 1Microsoft Office PowerPoint 2007 - Lesson 1
Microsoft Office PowerPoint 2007 - Lesson 1
 
Microsoft PowerPoint 2007: Create Your First Presentation
Microsoft PowerPoint 2007: Create Your First PresentationMicrosoft PowerPoint 2007: Create Your First Presentation
Microsoft PowerPoint 2007: Create Your First Presentation
 
Zekepowerpoint
ZekepowerpointZekepowerpoint
Zekepowerpoint
 
Microsoft Powerpoint
Microsoft PowerpointMicrosoft Powerpoint
Microsoft Powerpoint
 
How to Make a powerpoint
How to Make a powerpointHow to Make a powerpoint
How to Make a powerpoint
 
Microsoft PowerPoint 2013
Microsoft PowerPoint 2013Microsoft PowerPoint 2013
Microsoft PowerPoint 2013
 
Introducing PPT 2010
Introducing PPT 2010Introducing PPT 2010
Introducing PPT 2010
 
How to Create a Poster in Ms PowerPoint
How to Create a Poster in Ms PowerPointHow to Create a Poster in Ms PowerPoint
How to Create a Poster in Ms PowerPoint
 
My first power point
My first power pointMy first power point
My first power point
 
Ppt 2007 tutorial complete
Ppt 2007 tutorial completePpt 2007 tutorial complete
Ppt 2007 tutorial complete
 
Triad 2010 power_point_chapter_1
Triad 2010 power_point_chapter_1Triad 2010 power_point_chapter_1
Triad 2010 power_point_chapter_1
 
New features on microsoft ppt
New features on microsoft pptNew features on microsoft ppt
New features on microsoft ppt
 
ms-powerpoint 2010
ms-powerpoint 2010ms-powerpoint 2010
ms-powerpoint 2010
 
Jeopardy tutorial for PowerPoint
Jeopardy tutorial for PowerPointJeopardy tutorial for PowerPoint
Jeopardy tutorial for PowerPoint
 
A Power Point Tutorial
A Power Point TutorialA Power Point Tutorial
A Power Point Tutorial
 
Learning to Create a Power Point basics
Learning to Create a Power Point basicsLearning to Create a Power Point basics
Learning to Create a Power Point basics
 
Microsoft Powerpoint part 1
Microsoft Powerpoint part 1Microsoft Powerpoint part 1
Microsoft Powerpoint part 1
 
Microsoft Power Point
Microsoft Power PointMicrosoft Power Point
Microsoft Power Point
 
Creating a PowerPoint Presentation
Creating a PowerPoint PresentationCreating a PowerPoint Presentation
Creating a PowerPoint Presentation
 

Similar to Microsoft PowerPoint 2007 Tips & Tricks

Power point 1 oblepias
Power point 1  oblepiasPower point 1  oblepias
Power point 1 oblepias
ianoblepias
 
Effective use of powerpoint
Effective use of powerpointEffective use of powerpoint
Effective use of powerpoint
Maye Payumo
 
Microsoft office power_point_2007_tutorial
Microsoft office power_point_2007_tutorialMicrosoft office power_point_2007_tutorial
Microsoft office power_point_2007_tutorial
Mizuhashi Yuki
 
Attachments 2010 10_11
Attachments 2010 10_11Attachments 2010 10_11
Attachments 2010 10_11
khevs27
 
Power Point Presentation Free Templates
Power Point Presentation Free TemplatesPower Point Presentation Free Templates
Power Point Presentation Free Templates
Jobs in Pakistan
 
How to make a Power Point
How to make a Power PointHow to make a Power Point
How to make a Power Point
guest393c4e
 
Lesson 2 presentation basics
Lesson 2   presentation basicsLesson 2   presentation basics
Lesson 2 presentation basics
guevarra_2000
 
Lesson 2 presentation basics
Lesson 2   presentation basicsLesson 2   presentation basics
Lesson 2 presentation basics
guevarra_2000
 

Similar to Microsoft PowerPoint 2007 Tips & Tricks (20)

Making Powerpoint Presentation
Making Powerpoint PresentationMaking Powerpoint Presentation
Making Powerpoint Presentation
 
Power point 1 oblepias
Power point 1  oblepiasPower point 1  oblepias
Power point 1 oblepias
 
Power point by Gulshan K Maheshwari(QAU)
Power point by Gulshan  K Maheshwari(QAU)Power point by Gulshan  K Maheshwari(QAU)
Power point by Gulshan K Maheshwari(QAU)
 
Effective use of powerpoint
Effective use of powerpointEffective use of powerpoint
Effective use of powerpoint
 
PowerPoint help
PowerPoint helpPowerPoint help
PowerPoint help
 
Microsoft office power_point_2007_tutorial
Microsoft office power_point_2007_tutorialMicrosoft office power_point_2007_tutorial
Microsoft office power_point_2007_tutorial
 
Attachments 2010 10_11
Attachments 2010 10_11Attachments 2010 10_11
Attachments 2010 10_11
 
Templete Training
Templete TrainingTemplete Training
Templete Training
 
Power Point Presentation Free Templates
Power Point Presentation Free TemplatesPower Point Presentation Free Templates
Power Point Presentation Free Templates
 
MS PowerPoint Training
MS PowerPoint TrainingMS PowerPoint Training
MS PowerPoint Training
 
better_ppt_guide.pdfjjffjihfffghhuuggfyi
better_ppt_guide.pdfjjffjihfffghhuuggfyibetter_ppt_guide.pdfjjffjihfffghhuuggfyi
better_ppt_guide.pdfjjffjihfffghhuuggfyi
 
How to make a Power Point
How to make a Power PointHow to make a Power Point
How to make a Power Point
 
Microsoft Powerpoint 2003
Microsoft Powerpoint 2003Microsoft Powerpoint 2003
Microsoft Powerpoint 2003
 
Ms powerpoint
Ms powerpointMs powerpoint
Ms powerpoint
 
Presentation powerpoint
Presentation powerpointPresentation powerpoint
Presentation powerpoint
 
11. powerpointhandout
11. powerpointhandout11. powerpointhandout
11. powerpointhandout
 
Lesson 2 presentation basics
Lesson 2   presentation basicsLesson 2   presentation basics
Lesson 2 presentation basics
 
Lesson 2 presentation basics
Lesson 2   presentation basicsLesson 2   presentation basics
Lesson 2 presentation basics
 
Creating Power Point Presentations | www.sampleassignment.com
Creating Power Point Presentations | www.sampleassignment.comCreating Power Point Presentations | www.sampleassignment.com
Creating Power Point Presentations | www.sampleassignment.com
 
Mspowerpoint 111212103552-phpapp01
Mspowerpoint 111212103552-phpapp01Mspowerpoint 111212103552-phpapp01
Mspowerpoint 111212103552-phpapp01
 

More from Jessica Haight-Angelo (9)

KIN for Dummies
KIN for DummiesKIN for Dummies
KIN for Dummies
 
How to Link a YouTube Video to Your PowerPoint Presentation
How to Link a YouTube Video to Your PowerPoint PresentationHow to Link a YouTube Video to Your PowerPoint Presentation
How to Link a YouTube Video to Your PowerPoint Presentation
 
Motherhood, Multiculturalism & the Short Story
Motherhood, Multiculturalism & the Short StoryMotherhood, Multiculturalism & the Short Story
Motherhood, Multiculturalism & the Short Story
 
Maternal Relationships in Five Short Stories
Maternal Relationships in Five Short StoriesMaternal Relationships in Five Short Stories
Maternal Relationships in Five Short Stories
 
ICLC 2010 Presentation
ICLC 2010 PresentationICLC 2010 Presentation
ICLC 2010 Presentation
 
"Metalocalypse" PowerPoint Presentation
"Metalocalypse" PowerPoint Presentation"Metalocalypse" PowerPoint Presentation
"Metalocalypse" PowerPoint Presentation
 
Metalocalypse Paper
Metalocalypse PaperMetalocalypse Paper
Metalocalypse Paper
 
MPCA Conference Presentation PowerPoint
MPCA Conference Presentation PowerPointMPCA Conference Presentation PowerPoint
MPCA Conference Presentation PowerPoint
 
Fatlove
FatloveFatlove
Fatlove
 

Recently uploaded

Additional Benefits for Employee Website.pdf
Additional Benefits for Employee Website.pdfAdditional Benefits for Employee Website.pdf
Additional Benefits for Employee Website.pdf
joachimlavalley1
 

Recently uploaded (20)

[GDSC YCCE] Build with AI Online Presentation
[GDSC YCCE] Build with AI Online Presentation[GDSC YCCE] Build with AI Online Presentation
[GDSC YCCE] Build with AI Online Presentation
 
Matatag-Curriculum and the 21st Century Skills Presentation.pptx
Matatag-Curriculum and the 21st Century Skills Presentation.pptxMatatag-Curriculum and the 21st Century Skills Presentation.pptx
Matatag-Curriculum and the 21st Century Skills Presentation.pptx
 
How to Create Map Views in the Odoo 17 ERP
How to Create Map Views in the Odoo 17 ERPHow to Create Map Views in the Odoo 17 ERP
How to Create Map Views in the Odoo 17 ERP
 
Additional Benefits for Employee Website.pdf
Additional Benefits for Employee Website.pdfAdditional Benefits for Employee Website.pdf
Additional Benefits for Employee Website.pdf
 
Basic Civil Engg Notes_Chapter-6_Environment Pollution & Engineering
Basic Civil Engg Notes_Chapter-6_Environment Pollution & EngineeringBasic Civil Engg Notes_Chapter-6_Environment Pollution & Engineering
Basic Civil Engg Notes_Chapter-6_Environment Pollution & Engineering
 
Forest and Wildlife Resources Class 10 Free Study Material PDF
Forest and Wildlife Resources Class 10 Free Study Material PDFForest and Wildlife Resources Class 10 Free Study Material PDF
Forest and Wildlife Resources Class 10 Free Study Material PDF
 
How to Break the cycle of negative Thoughts
How to Break the cycle of negative ThoughtsHow to Break the cycle of negative Thoughts
How to Break the cycle of negative Thoughts
 
B.ed spl. HI pdusu exam paper-2023-24.pdf
B.ed spl. HI pdusu exam paper-2023-24.pdfB.ed spl. HI pdusu exam paper-2023-24.pdf
B.ed spl. HI pdusu exam paper-2023-24.pdf
 
Home assignment II on Spectroscopy 2024 Answers.pdf
Home assignment II on Spectroscopy 2024 Answers.pdfHome assignment II on Spectroscopy 2024 Answers.pdf
Home assignment II on Spectroscopy 2024 Answers.pdf
 
Phrasal Verbs.XXXXXXXXXXXXXXXXXXXXXXXXXX
Phrasal Verbs.XXXXXXXXXXXXXXXXXXXXXXXXXXPhrasal Verbs.XXXXXXXXXXXXXXXXXXXXXXXXXX
Phrasal Verbs.XXXXXXXXXXXXXXXXXXXXXXXXXX
 
slides CapTechTalks Webinar May 2024 Alexander Perry.pptx
slides CapTechTalks Webinar May 2024 Alexander Perry.pptxslides CapTechTalks Webinar May 2024 Alexander Perry.pptx
slides CapTechTalks Webinar May 2024 Alexander Perry.pptx
 
Operations Management - Book1.p - Dr. Abdulfatah A. Salem
Operations Management - Book1.p  - Dr. Abdulfatah A. SalemOperations Management - Book1.p  - Dr. Abdulfatah A. Salem
Operations Management - Book1.p - Dr. Abdulfatah A. Salem
 
INU_CAPSTONEDESIGN_비밀번호486_업로드용 발표자료.pdf
INU_CAPSTONEDESIGN_비밀번호486_업로드용 발표자료.pdfINU_CAPSTONEDESIGN_비밀번호486_업로드용 발표자료.pdf
INU_CAPSTONEDESIGN_비밀번호486_업로드용 발표자료.pdf
 
Danh sách HSG Bộ môn cấp trường - Cấp THPT.pdf
Danh sách HSG Bộ môn cấp trường - Cấp THPT.pdfDanh sách HSG Bộ môn cấp trường - Cấp THPT.pdf
Danh sách HSG Bộ môn cấp trường - Cấp THPT.pdf
 
2024_Student Session 2_ Set Plan Preparation.pptx
2024_Student Session 2_ Set Plan Preparation.pptx2024_Student Session 2_ Set Plan Preparation.pptx
2024_Student Session 2_ Set Plan Preparation.pptx
 
Sectors of the Indian Economy - Class 10 Study Notes pdf
Sectors of the Indian Economy - Class 10 Study Notes pdfSectors of the Indian Economy - Class 10 Study Notes pdf
Sectors of the Indian Economy - Class 10 Study Notes pdf
 
Basic_QTL_Marker-assisted_Selection_Sourabh.ppt
Basic_QTL_Marker-assisted_Selection_Sourabh.pptBasic_QTL_Marker-assisted_Selection_Sourabh.ppt
Basic_QTL_Marker-assisted_Selection_Sourabh.ppt
 
Benefits and Challenges of Using Open Educational Resources
Benefits and Challenges of Using Open Educational ResourcesBenefits and Challenges of Using Open Educational Resources
Benefits and Challenges of Using Open Educational Resources
 
aaaaaaaaaaaaaaaaaaaaaaaaaaaaaaaaaaaaaaaaa
aaaaaaaaaaaaaaaaaaaaaaaaaaaaaaaaaaaaaaaaaaaaaaaaaaaaaaaaaaaaaaaaaaaaaaaaaaaaaaaaaa
aaaaaaaaaaaaaaaaaaaaaaaaaaaaaaaaaaaaaaaaa
 
Solid waste management & Types of Basic civil Engineering notes by DJ Sir.pptx
Solid waste management & Types of Basic civil Engineering notes by DJ Sir.pptxSolid waste management & Types of Basic civil Engineering notes by DJ Sir.pptx
Solid waste management & Types of Basic civil Engineering notes by DJ Sir.pptx
 

Microsoft PowerPoint 2007 Tips & Tricks

  • 1. Microsoft 2007 Tips & Tricks 1 Microsoft PowerPoint 2007 Tips & Tricks First, a quick protip regarding the different versions of PowerPoint: PowerPoint 2007 will automatically save your presentations using the file extension, “.pptx”. This is similar to Microsoft Word 2007, wherein all documents will be saved using the default “.docx”. If you have Microsoft PowerPoint 1997-2003 on a personal computer, you will not be able to seamlessly work on PowerPoint 2007 presentations on it without saving the file name as “.doc” instead of “.docx.” To ensure that this happens, make sure to click “save as” instead of “save and then scroll through the “Save as Type” drop-down menu. I do not recommend saving your presentation as anything besides “.doc” or .docx.” Now, let’s get started! The “Design” button on the navigation ribbon Selecting a Design and Color Scheme Get familiar with the navigation ribbon at the top of the page – it will be your best friend. I always recommend deciding on a design and color scheme for your presentation before doing anything else. There are a lot of preset font and color combinations that are quite attractive and will save you time and formatting inconsistencies. To access the preset designs, click on the third tab on the ribbon, labeled “Design.” PowerPoint 2007 has 21 different designs to choose from. They will apply to the entire presentation, unless you say otherwise (not recommended). When choosing a design, you should take some time to consider the purpose of your presentation and your audience. Some designs look more professional than others; some more casual; some more mechanical; some softer. There are also some ways to further customize each design, all found to the far right of the page within the “Design” tab: “Colors”: It’s probably not a good idea for your presentation to look like a 15-year-old’s MySpace profile. Fortunately, PowerPoint has several built-in color schemes specifically designed to steer you away from that. Especially for a PowerPoint novice, I strongly recommend using these over trying to create your own color scheme. “Fonts”: Similarly, you can choose a combination of fonts designed to look attractive together, or try your hand at a more unique grouping. “Background Styles”: Use these sparingly. They tend to overpower the rest of the presentation.
  • 2. Microsoft 2007 Tips & Tricks 2 Layout The next best step is to get comfortable with the different kinds of layouts that you can use for each slide. Click on the “Home” tab on the navigation ribbon, and then look to the slight right for the “Layout” button. The default first slide will be a “Title” slide, and when you click “New Slide,” you will automatically have a “Title and Content” slide – that is, a space for a title, and a larger box where you can place text, a picture, a chart, SmartArt, etc. It is recommended that you have a title slide for most presentations, but you can change any slide into whatever layout you wish using this button. The “Layout” Button Inserting Content By default, when you click on a content box in PowerPoint, a bullet point will automatically appear for you to enter text. Protip: Consecutive bullet points will appear every time you hit “enter” / “return.” If you hit “Tab” or “Indent,” you will be able to indent consecutive bullets. There are also many other options besides plain text to fill up your slides, and these will also show up whenever you create a new slide. I will review these briefly below. “Table”: Good if you have a lot of information that can be easily visualized into boxes. Like with the design and color scheme, PowerPoint will allow you to customize several things about your table. It is probably best to let this take up an entire slide. “Chart”: Again, good for visually displaying data; choose a pie chart, a scatter graph, or something else to make your data pop.
  • 3. Microsoft 2007 Tips & Tricks 3 “SmartArt Graphic”: With traditional PowerPoint slides, it’s always recommended that you adhere to the “rule of sevens” or something similar to avoid text clutter: No more than seven words per line, and no more than seven lines of text per slide. With SmartArt, the text is not only organized in more a unique way, but it allows you to fit a lot more text on a slide without it looking overwhelming. “Insert Picture from File”: You must save a picture to your desktop or a flash drive in order to use this feature. Once you insert a picture into a slide, a tab on the main navigation ribbon called “Format” will appear. With this, you will be able to change the border of the photo, as well as add a shadow or glow or various other effects to it. The picture can also be stretched or shrunk or moved around to different parts of the slide. As with the text, it is not stuck in only one place. You can also insert screen captures as photos into your presentation. “Insert Clip Art”: PowerPoint comes equipped with thousands of pre-saved photos. It is a vast archive; for example, searching for “students” will bring up hundreds of results. Like pictures saved on your computer, these can be altered using the “Format” tab. Protip: If the picture does not have visible edges (e.g. it’s a transparent GIF), it is best not to use border tools on it. “Insert Media Clip”: This function will allow you to add a video or music file to your presentation. You must have the clip previously saved on your computer. Protip: Depending on the technology on your school’s computers, you may not be able to play the media in your PowerPoint presentation the way you can on your home computer. This is something you will want to pre-plan for. Insert a “SmartArt” Graphic
  • 4. Microsoft 2007 Tips & Tricks 4 Inserting a Hyperlink A hyperlink might be a suitable alternative to inserting a media clip into your PowerPoint. In case you do not have the media clip saved to your computer and/or in case you cannot use it on your school’s computers, you can easily link to a Web site such as YouTube and load your media clip there. A hyperlink also works for non-media-based Web sites, or even other slides. For example, you can create a Jeopardy!-esque game using hyperlinked PowerPoint slides. However, the most common application for hyperlinks is to outside Web sites. Hyperlinked Text: To hyperlink text in your slide to something else, highlight the text-in- question. Once highlighted, you can either right-click the text, or go to the “Insert” tab on the navigation ribbon and click on “Hyperlink.” In the “address” bar that pops up, simply insert the URL/Web address where you would like the hyperlink to go. Hyperlinking a Picture: Click on the picture, and the click on the same “Hyperlink” button under the “Insert” tab. Protip: You will not be able to check that your hyperlink is correct without starting PowerPoint’s “Slide Show” function. Hyperlinking Between Slides: You will still need either a photo or a piece of text to serve as a hyperlink between slides. Once you click on those, go to the “Insert” slide and then hit “Action” instead of “Hyperlink.” Hit the “Hyperlink to …” radio button and use the drop-down menu to find the slide-in-question. Protip: If you are planning to create a game like Jeopardy!, the hyperlinking can be time-consuming. Inserting a Text Box Click on the “Insert” tab and then “Insert Text Box.” Next, you will have to drop approximately where you would like the text box on your slide. The font size and face can also be modified. Inserting a Header/Footer and/or Slide Number By clicking either “Insert Header & Footer” or “Insert Text Box,” you can accomplish both tasks togerher or just one at a time. A footer might be helpful if you want to include your name on every slide. Protip: It is recommended that you click the “Don’t Show on Title Slide” button under “Slide Number,” since you will already have all of that information on the slide itself. The “Insert” Tab
  • 5. Microsoft 2007 Tips & Tricks 5 Animations The “Animations” tab has a lot of interesting effects, but it is recommended that you use this sparingly so it does not otherwise distract from the point of your presentation. When you click on the tab, a number of options will be presented for transitioning to one or all of your slides. In addition, you can click the “Custom Animation” button on the left and use it to insert specific animation for a piece of text or a picture. To do so, first highlight the text or click on the picture you would like to modify. After you click “Custom Animation,” a box will pop up on the right-hand side of the screen. Click “Add Effect” and use the drop-down menus to choose your animation. You can also change the speed and use multiple animations for different pieces of text/photos on a single slide. Protip: Numbers will appear on your slide next to each custom animation in the order that you have set them up. When you play your presentation as a Slide Show, they will disappear. The “Animation” Tab Slide Show Click either the “Slide Show” or “View” tabs to show your presentation as a Slide Show. The Slide Show is the best format to use to let your audience view your presentation because they will only see the final product you have created. If you use the “Slide Show” tab, you can also record your own narration or set a timer for each slide. However, this is not required. Under the “View” tab, there will also be a “Notes Page” button. This corresponds to the blank white box underneath each slide, where you can type speaker notes. Again, when your audience views the slide show, they will not be able to see your speaker notes. However, you can print off the notes pages for personal use to facilitate your presentation. To return to the program from the Slide Show, click the “Escape” key. You can navigate through your slide show using either the mouse or the arrow keys on your keyboard, as well as a clicker/remote control, if your classroom is equipped with one. Questions, Comments & Suggestions I would love to hear your feedback on this presentation! Feel free to contact me via the following e-mail address: jessica.haight-angelo@kirkwood.edu.