2. Microsoft PowerPoint
Microsoft PowerPoint is a slide show presentation program currently developed
by Microsoft, for use on both Microsoft and Apple Macintosh operating
systems. PowerPoint, initially named "Presenter", was created by Forethought
Inc.. Microsoft's version of PowerPoint was officially launched on May 22, 1990,
as a part of the Microsoft Office suite. PowerPoint is useful for helping develop
the slide-based presentation format and is currently one of the most commonly
used slide-based presentation programs available. Microsoft has also released
the PowerPoint mobile application for use on Apple and Android mobile
operating systems. Microsoft has also released the PowerPoint mobile
application for use on Apple and Android mobile operating systems.
Microsoft has also released the PowerPoint mobile application for use on Apple
and Android mobile operating systems.
3. Where are the menus and toolbars?
Even though more recent versions of PowerPoint look quite different than earlier versions, the commands and
functions that you're used to are still here. They’re all now in the ribbon, which is a kind of menu that organizes
them in a visual way.
Let’s first look at how the ribbon works, and then how to find where the features you want might be.
How do you work with the ribbon?
When you open a PowerPoint document, the ribbon appears as a row of labels, or what we call tabs.
When you go to a tab, the ribbon for that tab opens and you can see the tools and functions that were formerly in
menus and toolbars in earlier versions of PowerPoint.
When you see a feature with an arrow , you can click it to get more information or options.
You might also notice launchers at the corner of some of the ribbon’s groups – like in the Clipboard and Font groups.
Click those to open the dialog box related to that function – the launcher on the Font group, for example, opens
the Font box, where you set effects such as strikethrough, superscript, or character spacing.
What’s on the ribbon tabs?
The ribbon tabs group tools and features together based on their purpose. For example, to make your slides look
better, look for options on the Design tab. The tools that you use to animate things on your slide would be on the
Animations tab.
Here’s a look at what you’ll find in each of the PowerPoint ribbon tabs.
4. Home Insert Design Animations Slide Show Review View File Tools Tabs
Microsoft PowerPoint A to Z Exit
The Home tab holds the Cut and Paste features, Font and Paragraph options, and what you need to add and
organize slides.
Cut, Copy, and Paste should be easy to understand. Office 2007, however, adds extra power to the clipboard; by clicking on the dialog box
button, you can see the last 24 things that you copied or cut, and you can paste any one of them.
From here you can be able to add new slide. You formatting text change font size and color formatting
paragraph option, align them as your wish.
You also use shapes from here and also use quick styles from the style stock. Fill the shapes with different
colors and give them different kinds of effects.
You can also use SmartArt find any word and replace them with correct one.
From here you work with CLIPBOARD, SLIDES, FONT, PARAGRAPH, DRAWING, EDITING.
In a word by using Home Tab you edit, format your text and align your object and use SmartArt and others. Its a
powerful and most usable tabs in PowerPoint.
See some examples
5. Home Insert Design Animations Slide Show Review View File Tools Tabs
Microsoft PowerPoint A to Z Exit
Click Insert to add something to a slide. This includes pictures, shapes, charts, links, text boxes, video
and more.
Tables
You can select the number of columns and rows by dragging the mouse over the grid. Notice that while
you drag the mouse, the table dynamically draws itself in the slide, giving you a preview of what the
table will look like when you decide on a size.
Illustrations
This section of the Insert tab on the Ribbon lets you add special graphics. You can add Pictures, clip
art, Shape, SmartArt, Chart.
Text
This area allows you to add text in many forms. You can add link in the text and add header & footer.
Media Clips
Two buttons allow you to add movies and sounds to your presentation.
6. Home Insert Design Animations Slide Show Review View File Tools Tabs
Microsoft PowerPoint A to Z Exit
On the Design tab, you can add a theme or color scheme, or format the slide background.
Page Setup
You take your desired page size from here. This allows you to change basic page elements including slide sizes,
orientation, and slide numbering. The second button simply allows you to change the slide orientation quickly--from
horizontal to vertical ("landscape" to "portrait").You resize the page size as your wish.
Themes
Themes are an easy way to design a whole slide show. Every slide in the presentation will change to match the
background, font, colors, and effects chosen for each theme.
Background
Here, you can make quick changes to the background. The good point about themes is that they are easy and quick
and make your presentation look nice.
The bad point about themes is that there are only four or five really good ones, and everyone uses them again and
again. That is why I would suggest that you do as much of your theme design by yourself as possible--it is better to
be original, even if the end design is less professional-looking. You might even go looking on the Internet for more
interesting background "wallpaper" images.
7. Home Insert Design Animations Slide Show Review View File Tools Tabs
Microsoft PowerPoint A to Z Exit
Use the Animations tab to choreograph the movement of things on your slides. Note that you can see many possible
animations in the gallery in the Animation group, and see more of them by clicking More .
Preview
The Animations tab begins with a "Preview" button. This will show a preview of the animation or transition that you
made--but you have to make one first!
Animations
Here is the fun part of PowerPoint--but also the complex part: Animations of objects. You can make just about any
object move in and out and fly around and gesture in almost any way you can imagine.
There are dozens and dozens of options, so you have to practice a lot before you become comfortable in using all the
different functions. In the panel shown above, there are two actions. The one on top is a very limited set of animations,
in case you're doing a very simple animation and you want to do it quickly. Usually you will not use this one. The much
better choice is to click the bottom "Custom Animation" button. This will reveal the Custom Animation task pane: With
this, you can create many forms of animations.
Transitions
8. Transitions
Microsoft PowerPoint A to Z Exit
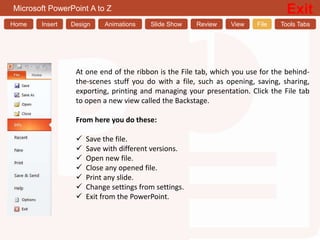
Set up how your slides change from one to the next on the Transitions tab. Find a gallery of the possible transitions in
the Transition to This Slide group – click More at the side of the gallery to see all of them.
This area allows you to make a transition for the selected slide.
the transition will appear at the beginning of the selected slide. In other words, if you select slide #2 and add a
transition, the transition will appear between slide #1 and slide #2. Automatically, the transition only will effect the
slide you have chosen, and not any other slides.
Just to the right of the transition choices, you can set:
Transition Sound: choose a pre-set sound, or choose "Other Sound..." to select a file on your disk. As with
only ".wav" files will work here.
Transition Speed: set how quickly the transition happens.
Apply to All: make the transition you chose for this slide appear on all slides.
Finally, on the right side, you can choose to "Advance [the] Slide"--in other words, after the transition ends, how long
should PowerPoint wait before automatically advancing to the next slide.
9. Home Insert Design Animations Slide Show Review View File Tools Tabs
Microsoft PowerPoint A to Z Exit
On the Slide Show tab, set up the way that you want to show your presentation to others.
Start Slide Show
From Beginning: the slide show begins on slide 1.
From Current Slide: the normal setting: the slide show begins from the slide you are currently looking at.
Custom Slide Show: this allows you to choose which slides will be shown and which ones will not. This is in case you
give a slide show, but you don't need all the slides.
Set Up
This section allows you to use some special features for the slide show.
Here, you can use several useful options:
Show Type: do you want the show to appear full-screen, or in a window?
Show Slides: set up a custom show, choosing only a range of slides (e.g., 4-9), or selected slides (e.g., 3-5-9-12-13-
Show Options: you can set the show up so that it repeats instead of ending, or turn off narration or animations.
Multiple Monitors: If you have more than one monitor--for example, your computer shows one screen on your
notebook computer, and a different screen on a TV set.
Performance: increase the graphics performance, or choose a "resolution" (screen size) for the slides.
Monitors
This area is similar to the "Set Up Slide Show" dialog box.
10. Home Insert Design Animations Slide Show Review View File Tools Tabs
Microsoft PowerPoint A to Z Exit
The Review tab lets you add comments, run spell-check, or compare one presentation with another (such as an earlier
version)
Proofing
First, we have the language options:
Spelling: perform a spell-check on your writing
Research: look up any word in a dictionary, thesaurus, or encyclopedia.
Thesaurus: look up synonyms for any word.
Translate: look up translations for any word, in several different languages (including Japanese).
Language: mark selected text as belonging to a certain language; this will allow for spell checking in that language.
Comments
Here, you can add small comments to the slide show. This is useful in proofreading, especially if you are doing it for a
friend.
11. Home Insert Design Animations Slide Show Review View File Tools Tabs
Microsoft PowerPoint A to Z Exit
Views allow you to look at your presentation in different ways, depending on where you are in the creation or delivery
process.
Presentation Views
First, we have various ways to view presentations
Normal: This is the view that PowerPoint naturally begins with. It allows you to see the current slide in detail,
slide thumbnails, and notes.
Slide Sorter: This view allows you to see large thumbnails of all your slides, so you can arrange them and modify
to your liking.
Notes Page: This view focuses on the Notes area. If you give your presentation in "Presenter" mode, with a TV
the full slide view, and your notebook/laptop screen showing an overview of your slide show, the Slide Show: This
starts the slide show.
Other View Buttons
Show/Hide
Zoom
Color/Grayscale
Window
Macros
12. Home Insert Design Animations Slide Show Review View File Tools Tabs
Microsoft PowerPoint A to Z Exit
At one end of the ribbon is the File tab, which you use for the behind-
the-scenes stuff you do with a file, such as opening, saving, sharing,
exporting, printing and managing your presentation. Click the File tab
to open a new view called the Backstage.
From here you do these:
Save the file.
Save with different versions.
Open new file.
Close any opened file.
Print any slide.
Change settings from settings.
Exit from the PowerPoint.
13. Home Insert Design Animations Slide Show Review View File Tools Tabs
Microsoft PowerPoint A to Z Exit
When you click some parts of your slides, such as pictures, shapes, SmartArt or text boxes,
you might see a colorful new tab appear.
In the example above, the Drawing Tools tab appears when you click a shape or text box.
When you click a picture, the Picture Tools tab appears. Other such tabs include SmartArt
Tools, Chart Tools, Table Tools and Video Tools. These tabs disappear or change when you
click something else in your presentation.
Next……..
14. Home Insert Design Animations Slide Show Review View File Tools Tabs
Microsoft PowerPoint A to Z Exit
Someworkbyusingshape
Next……..
15. Home Insert Design Animations Slide Show Review View File Tools Tabs
Microsoft PowerPoint A to Z Exit
Someexampleofgradients