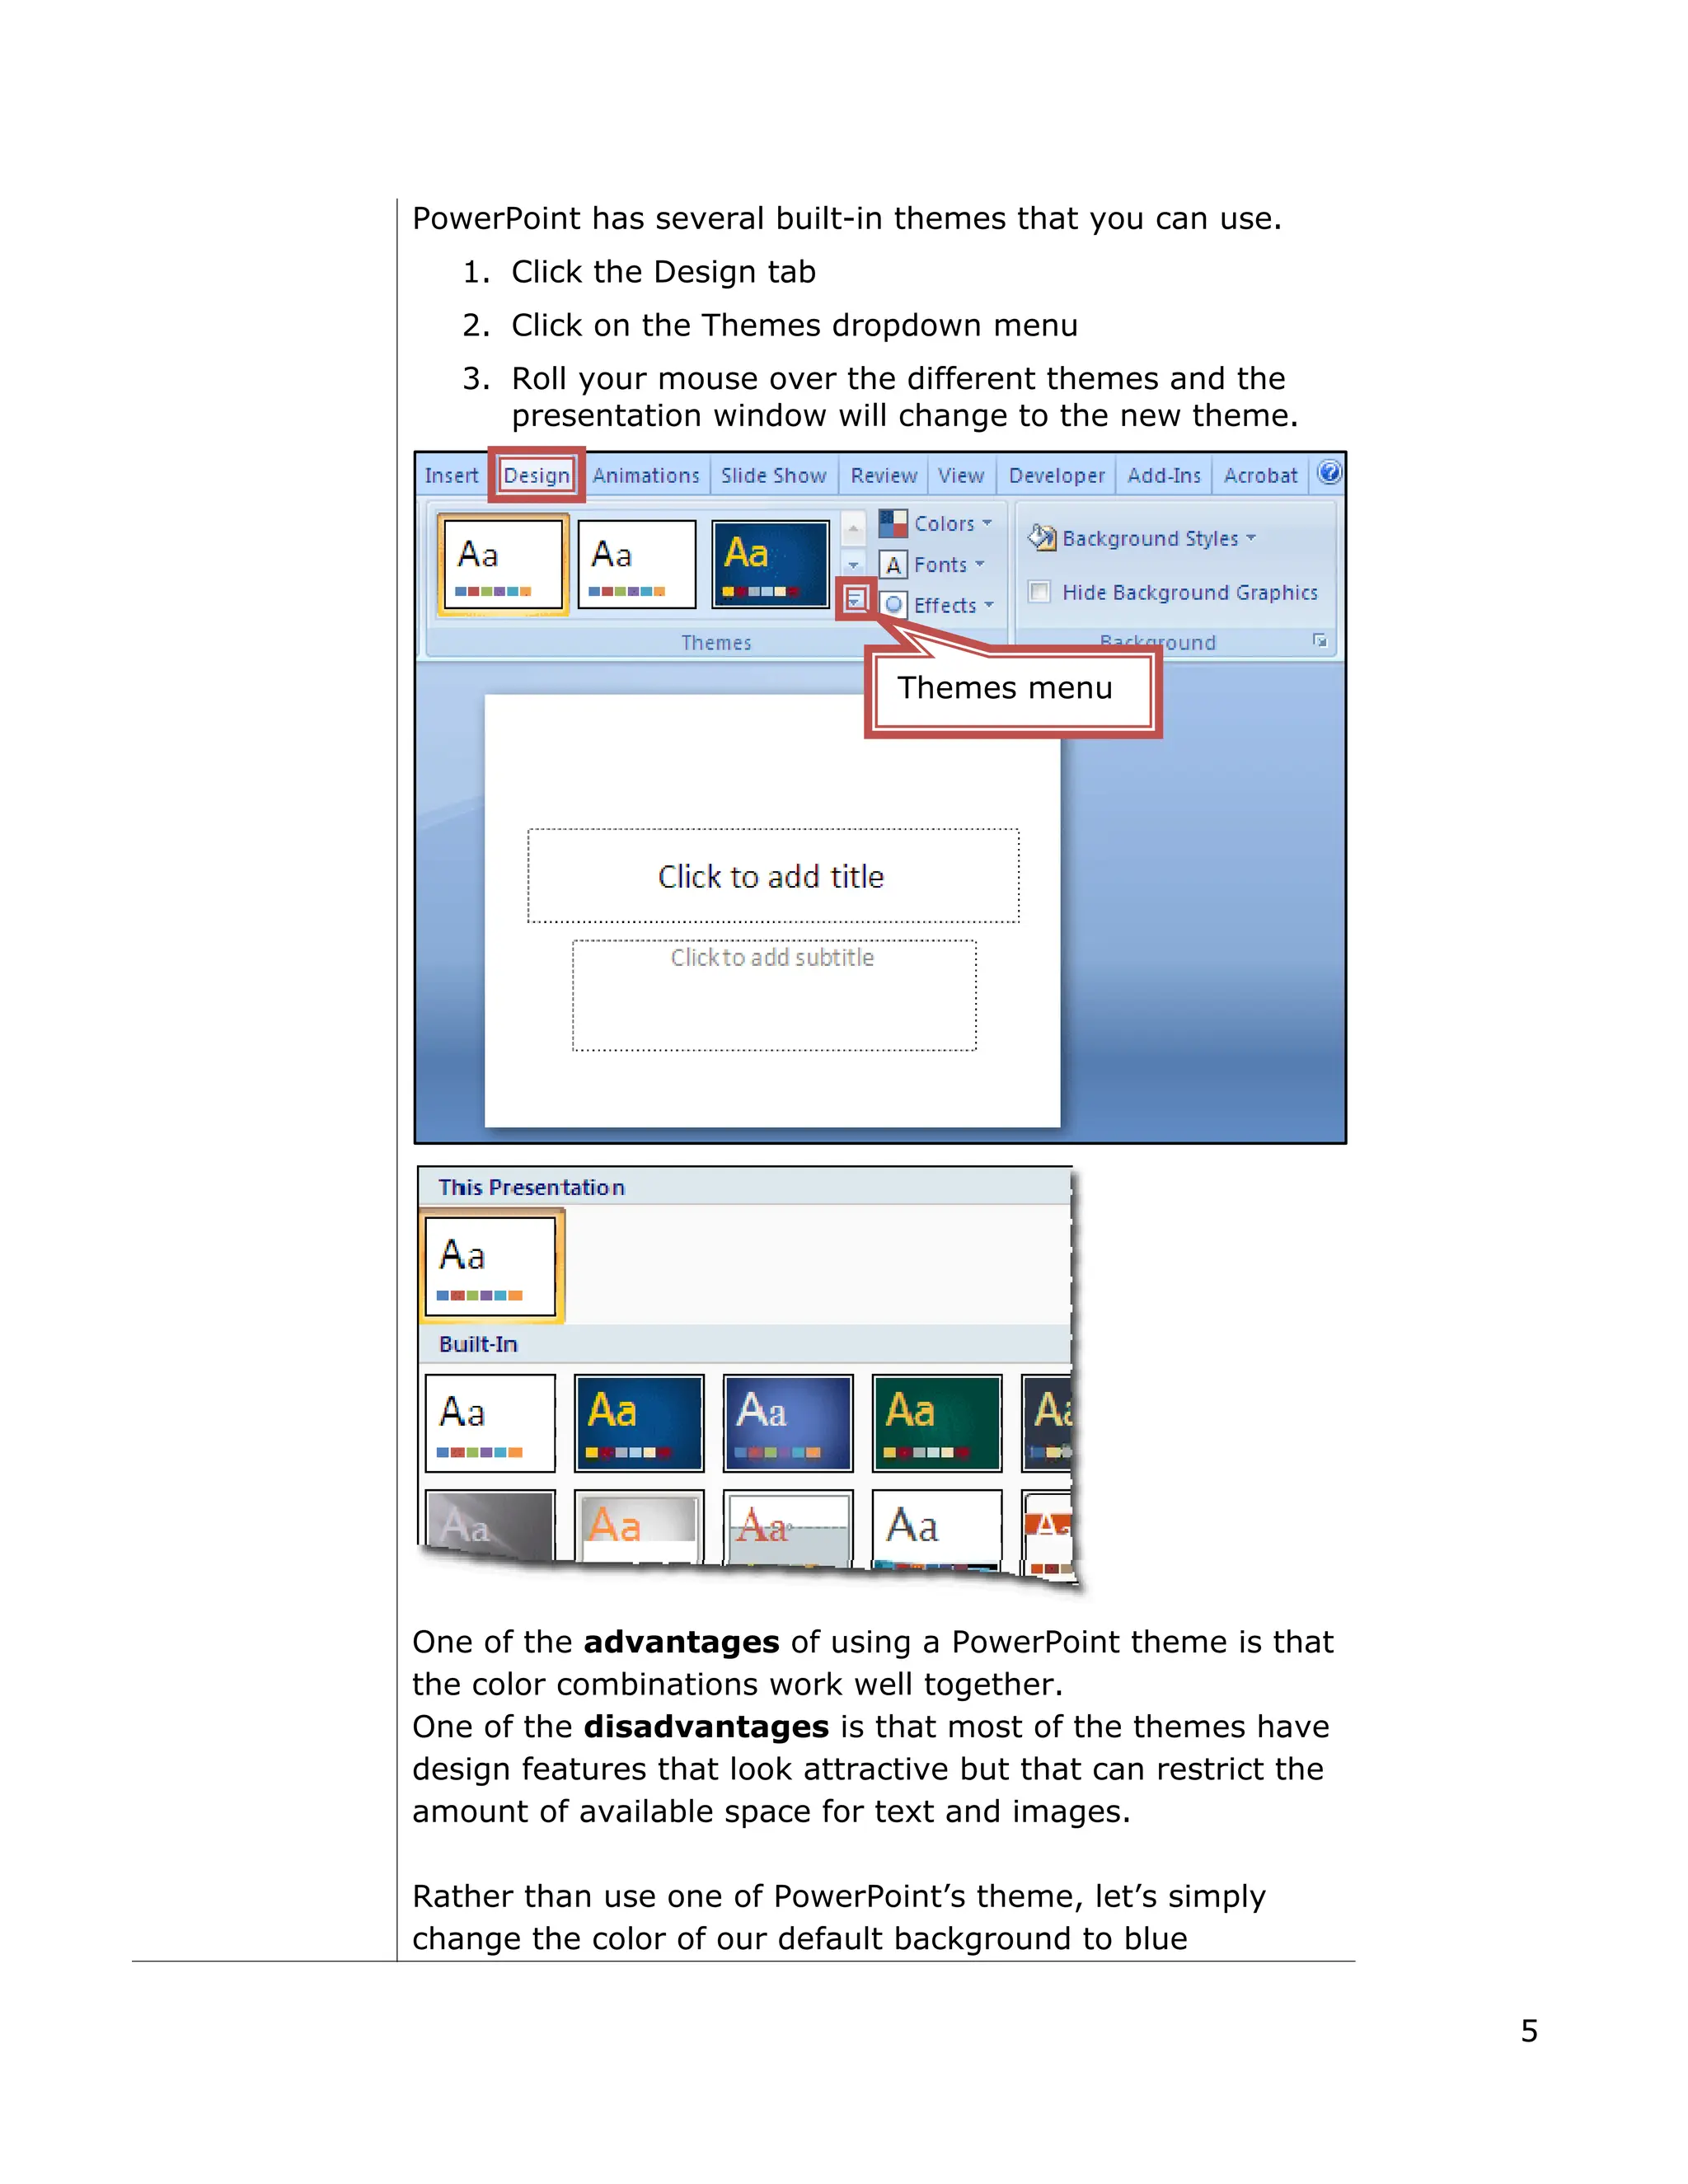
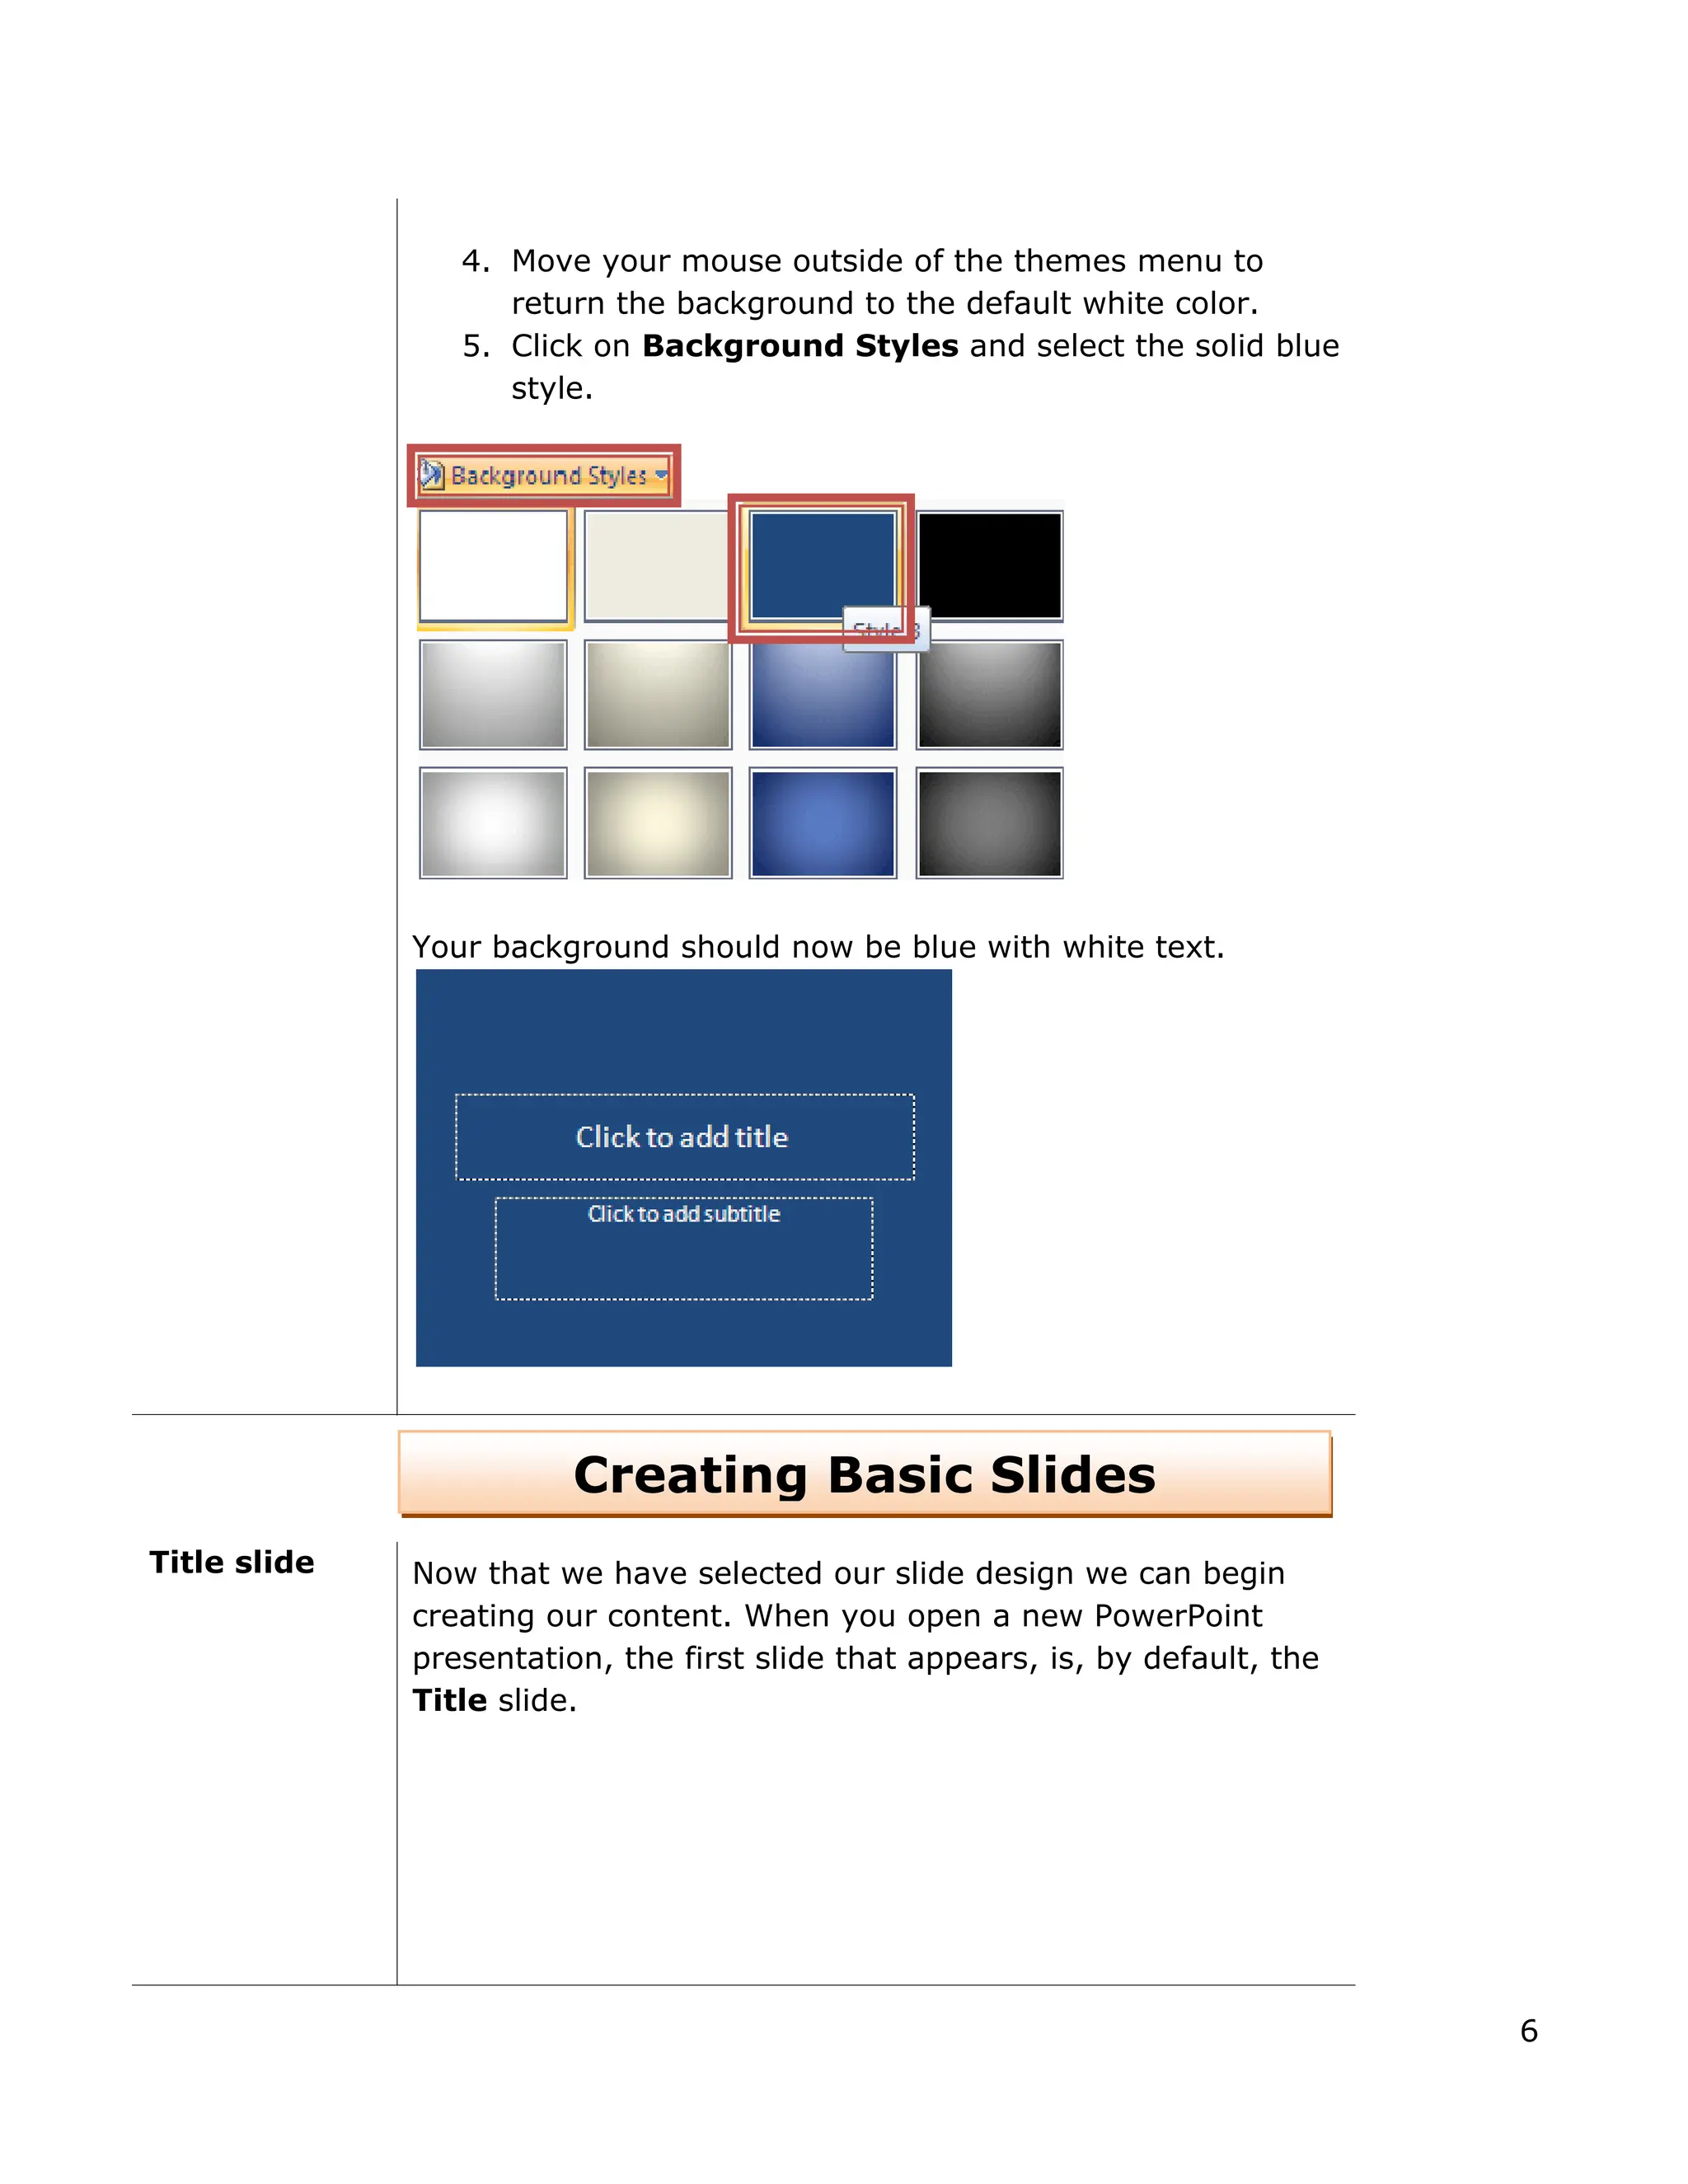
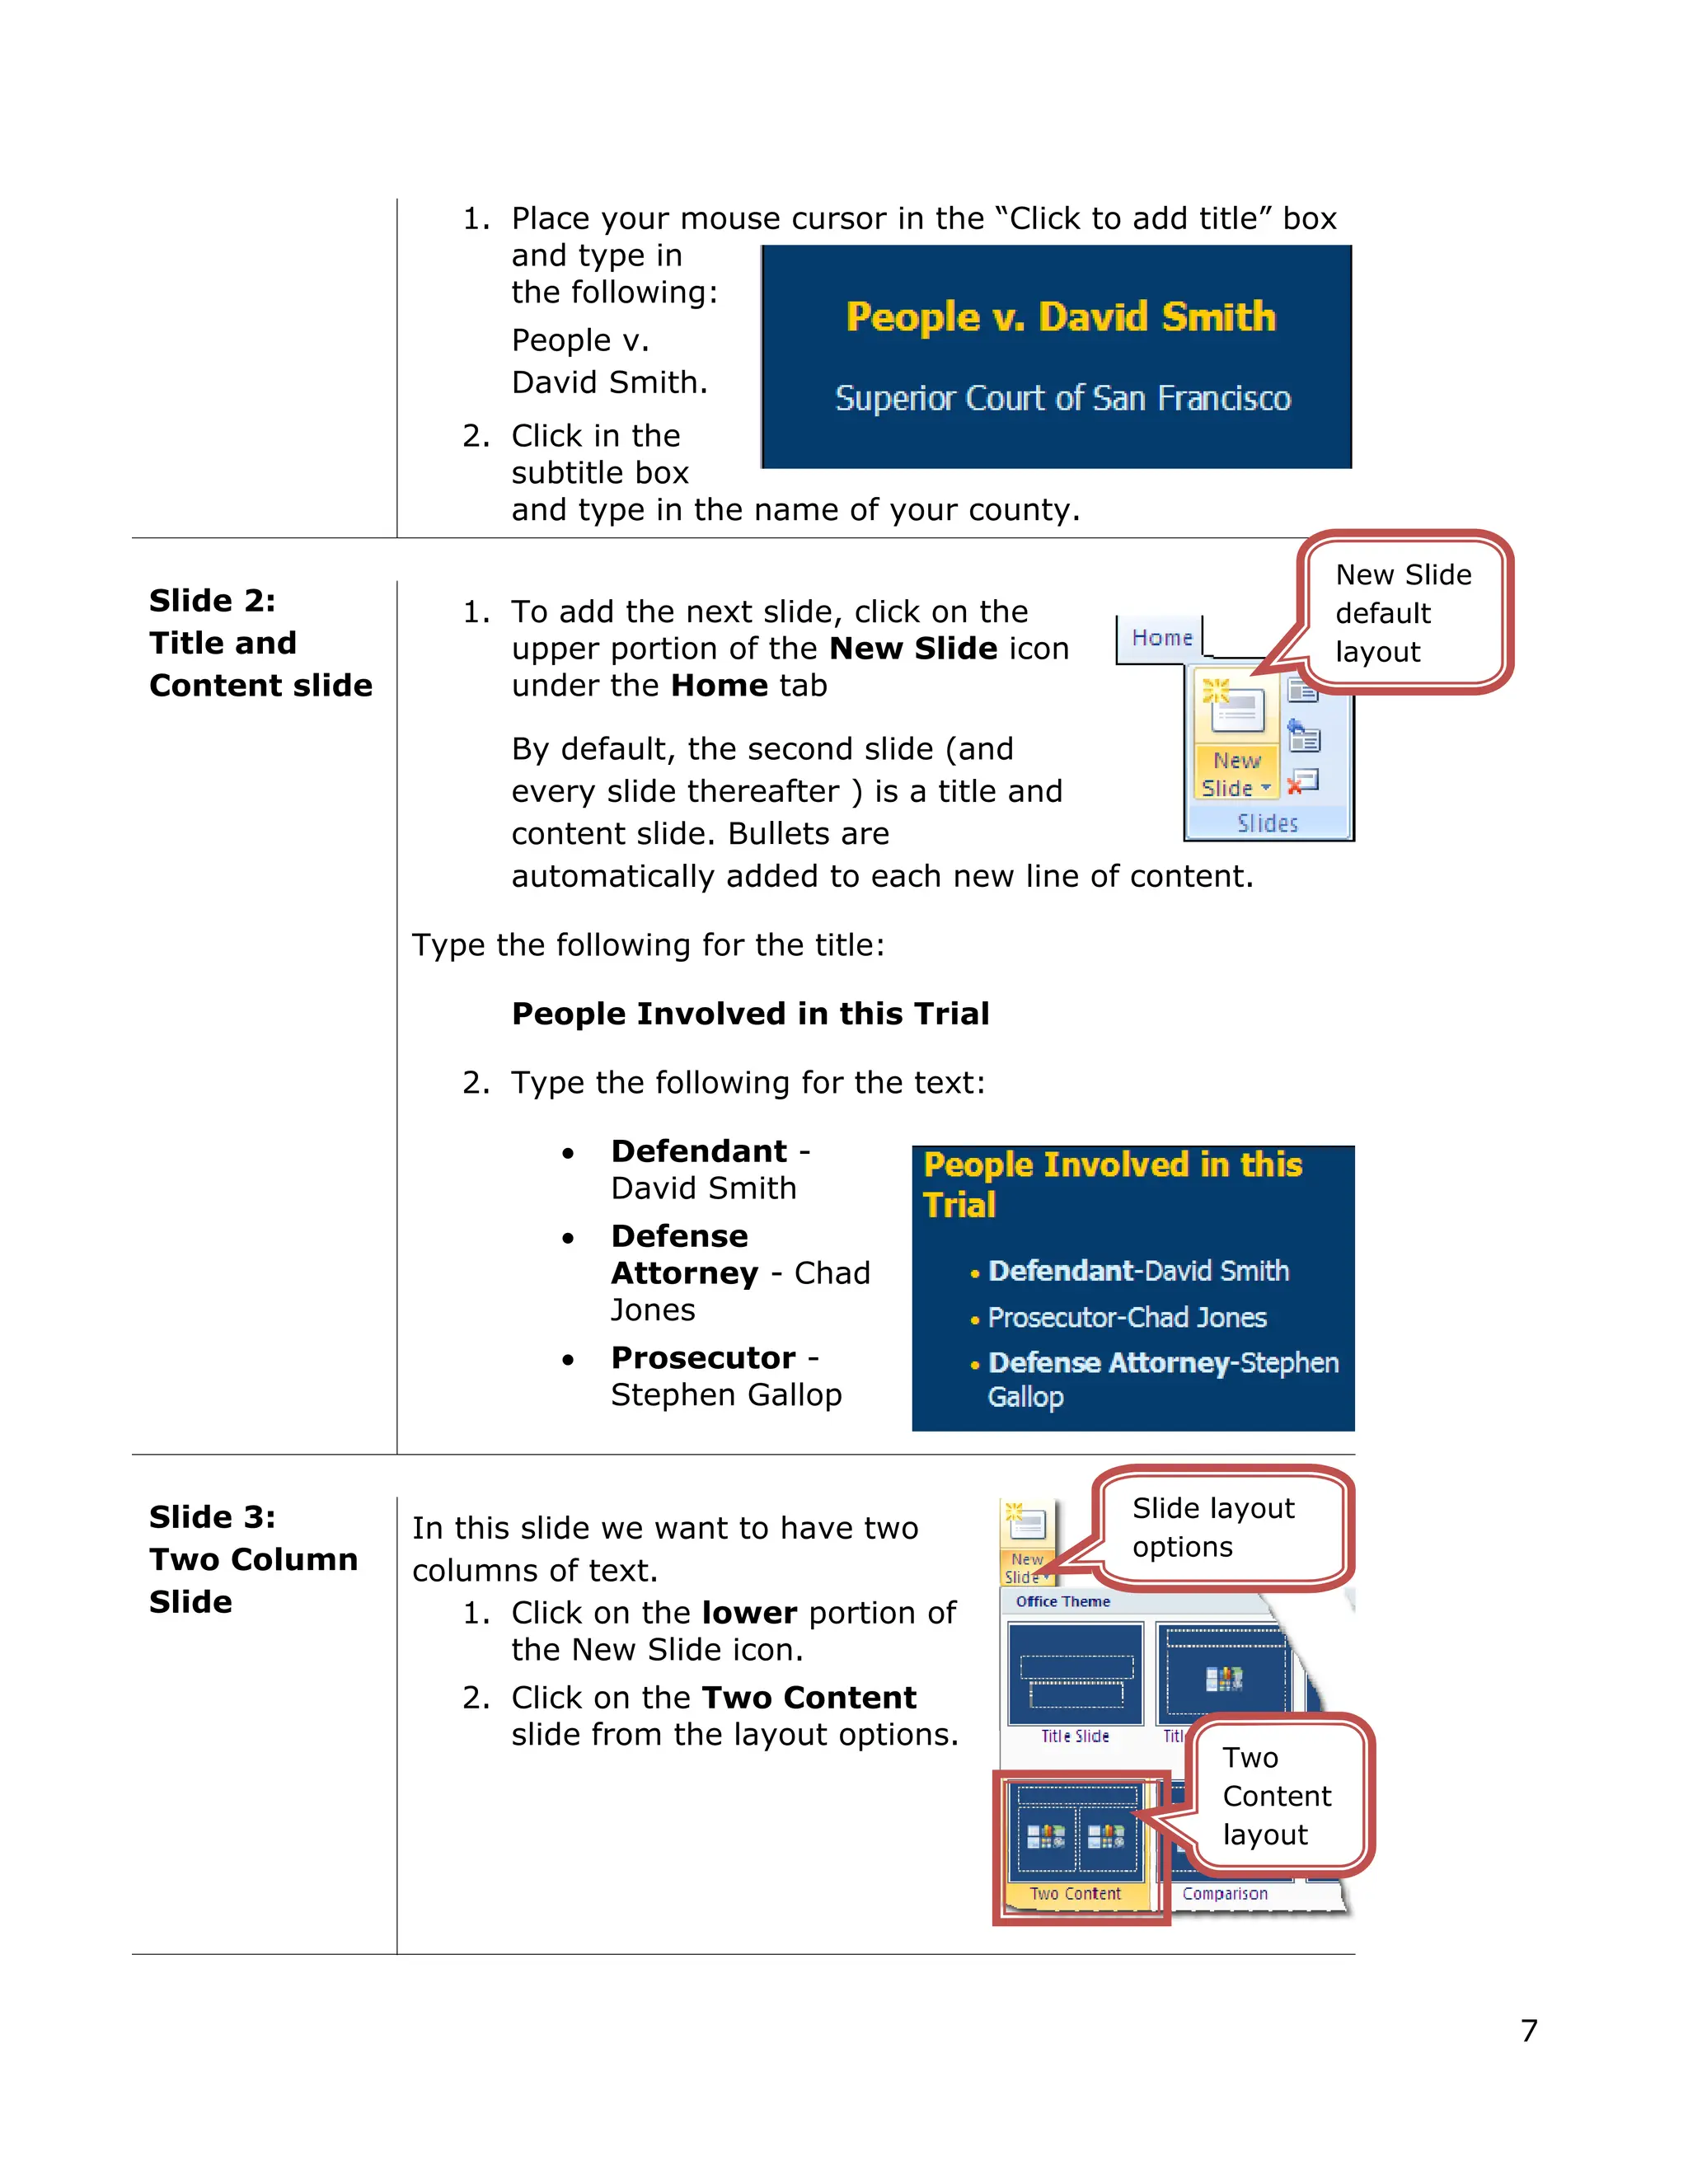
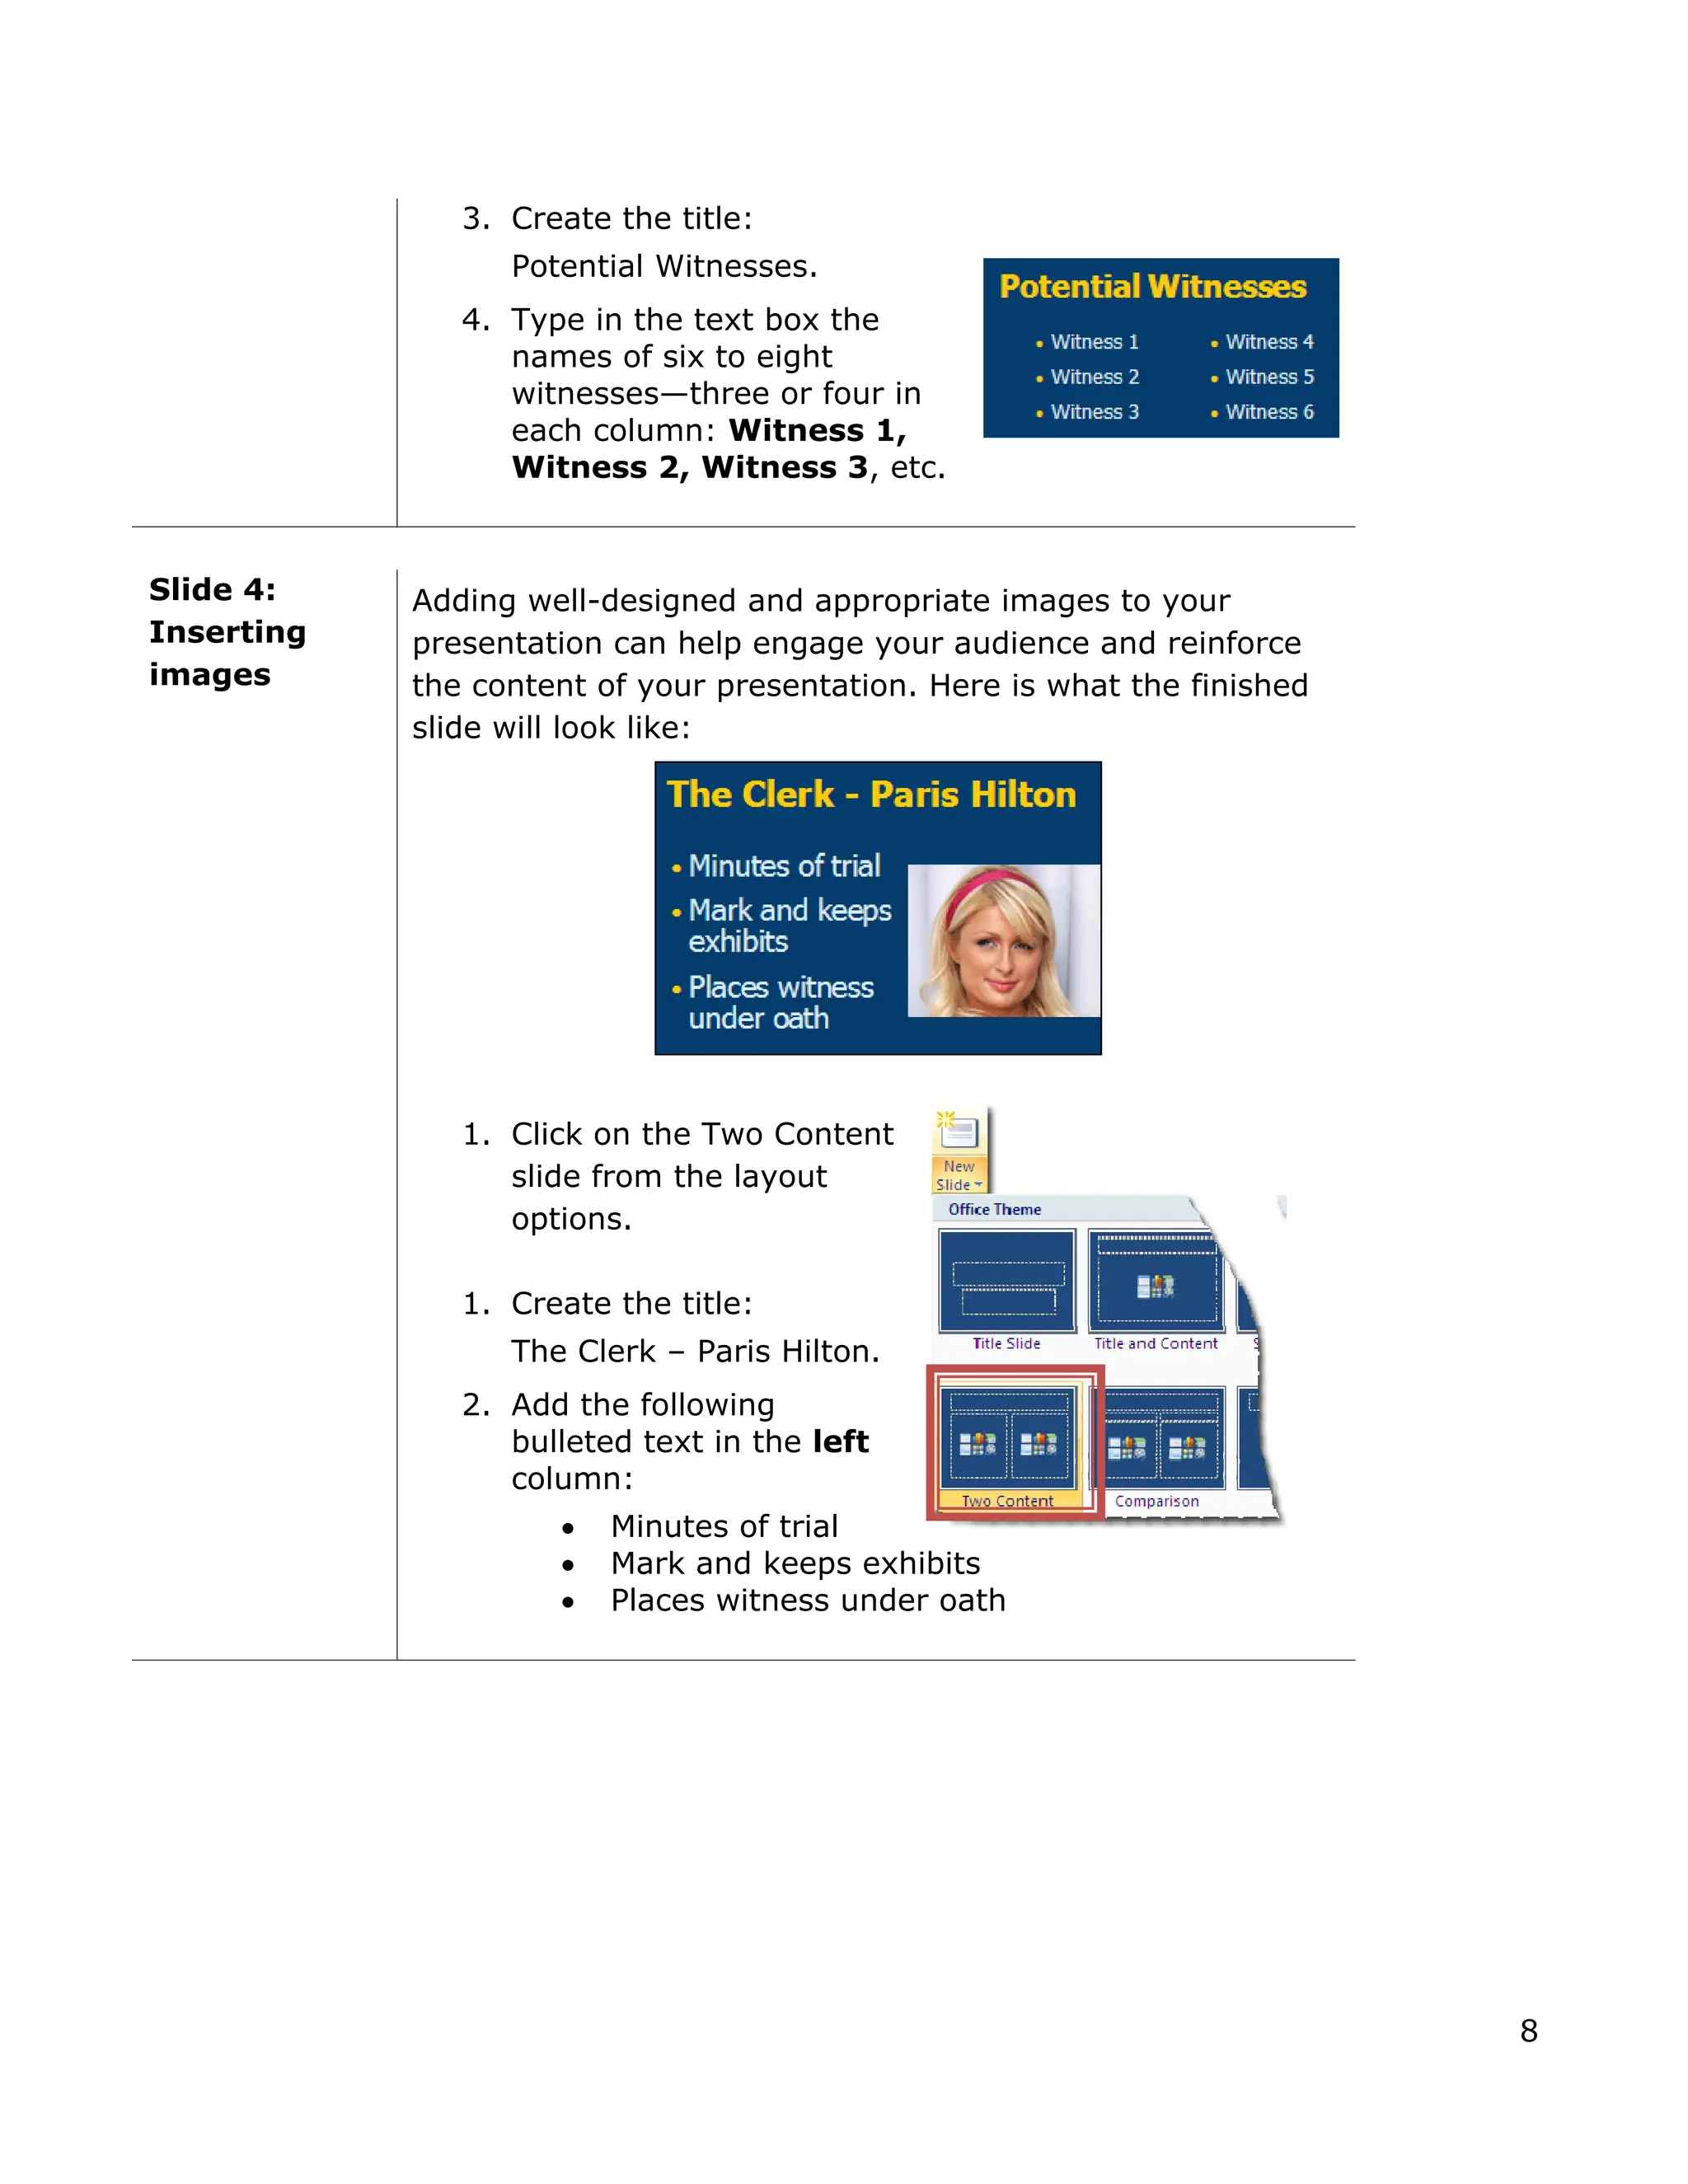
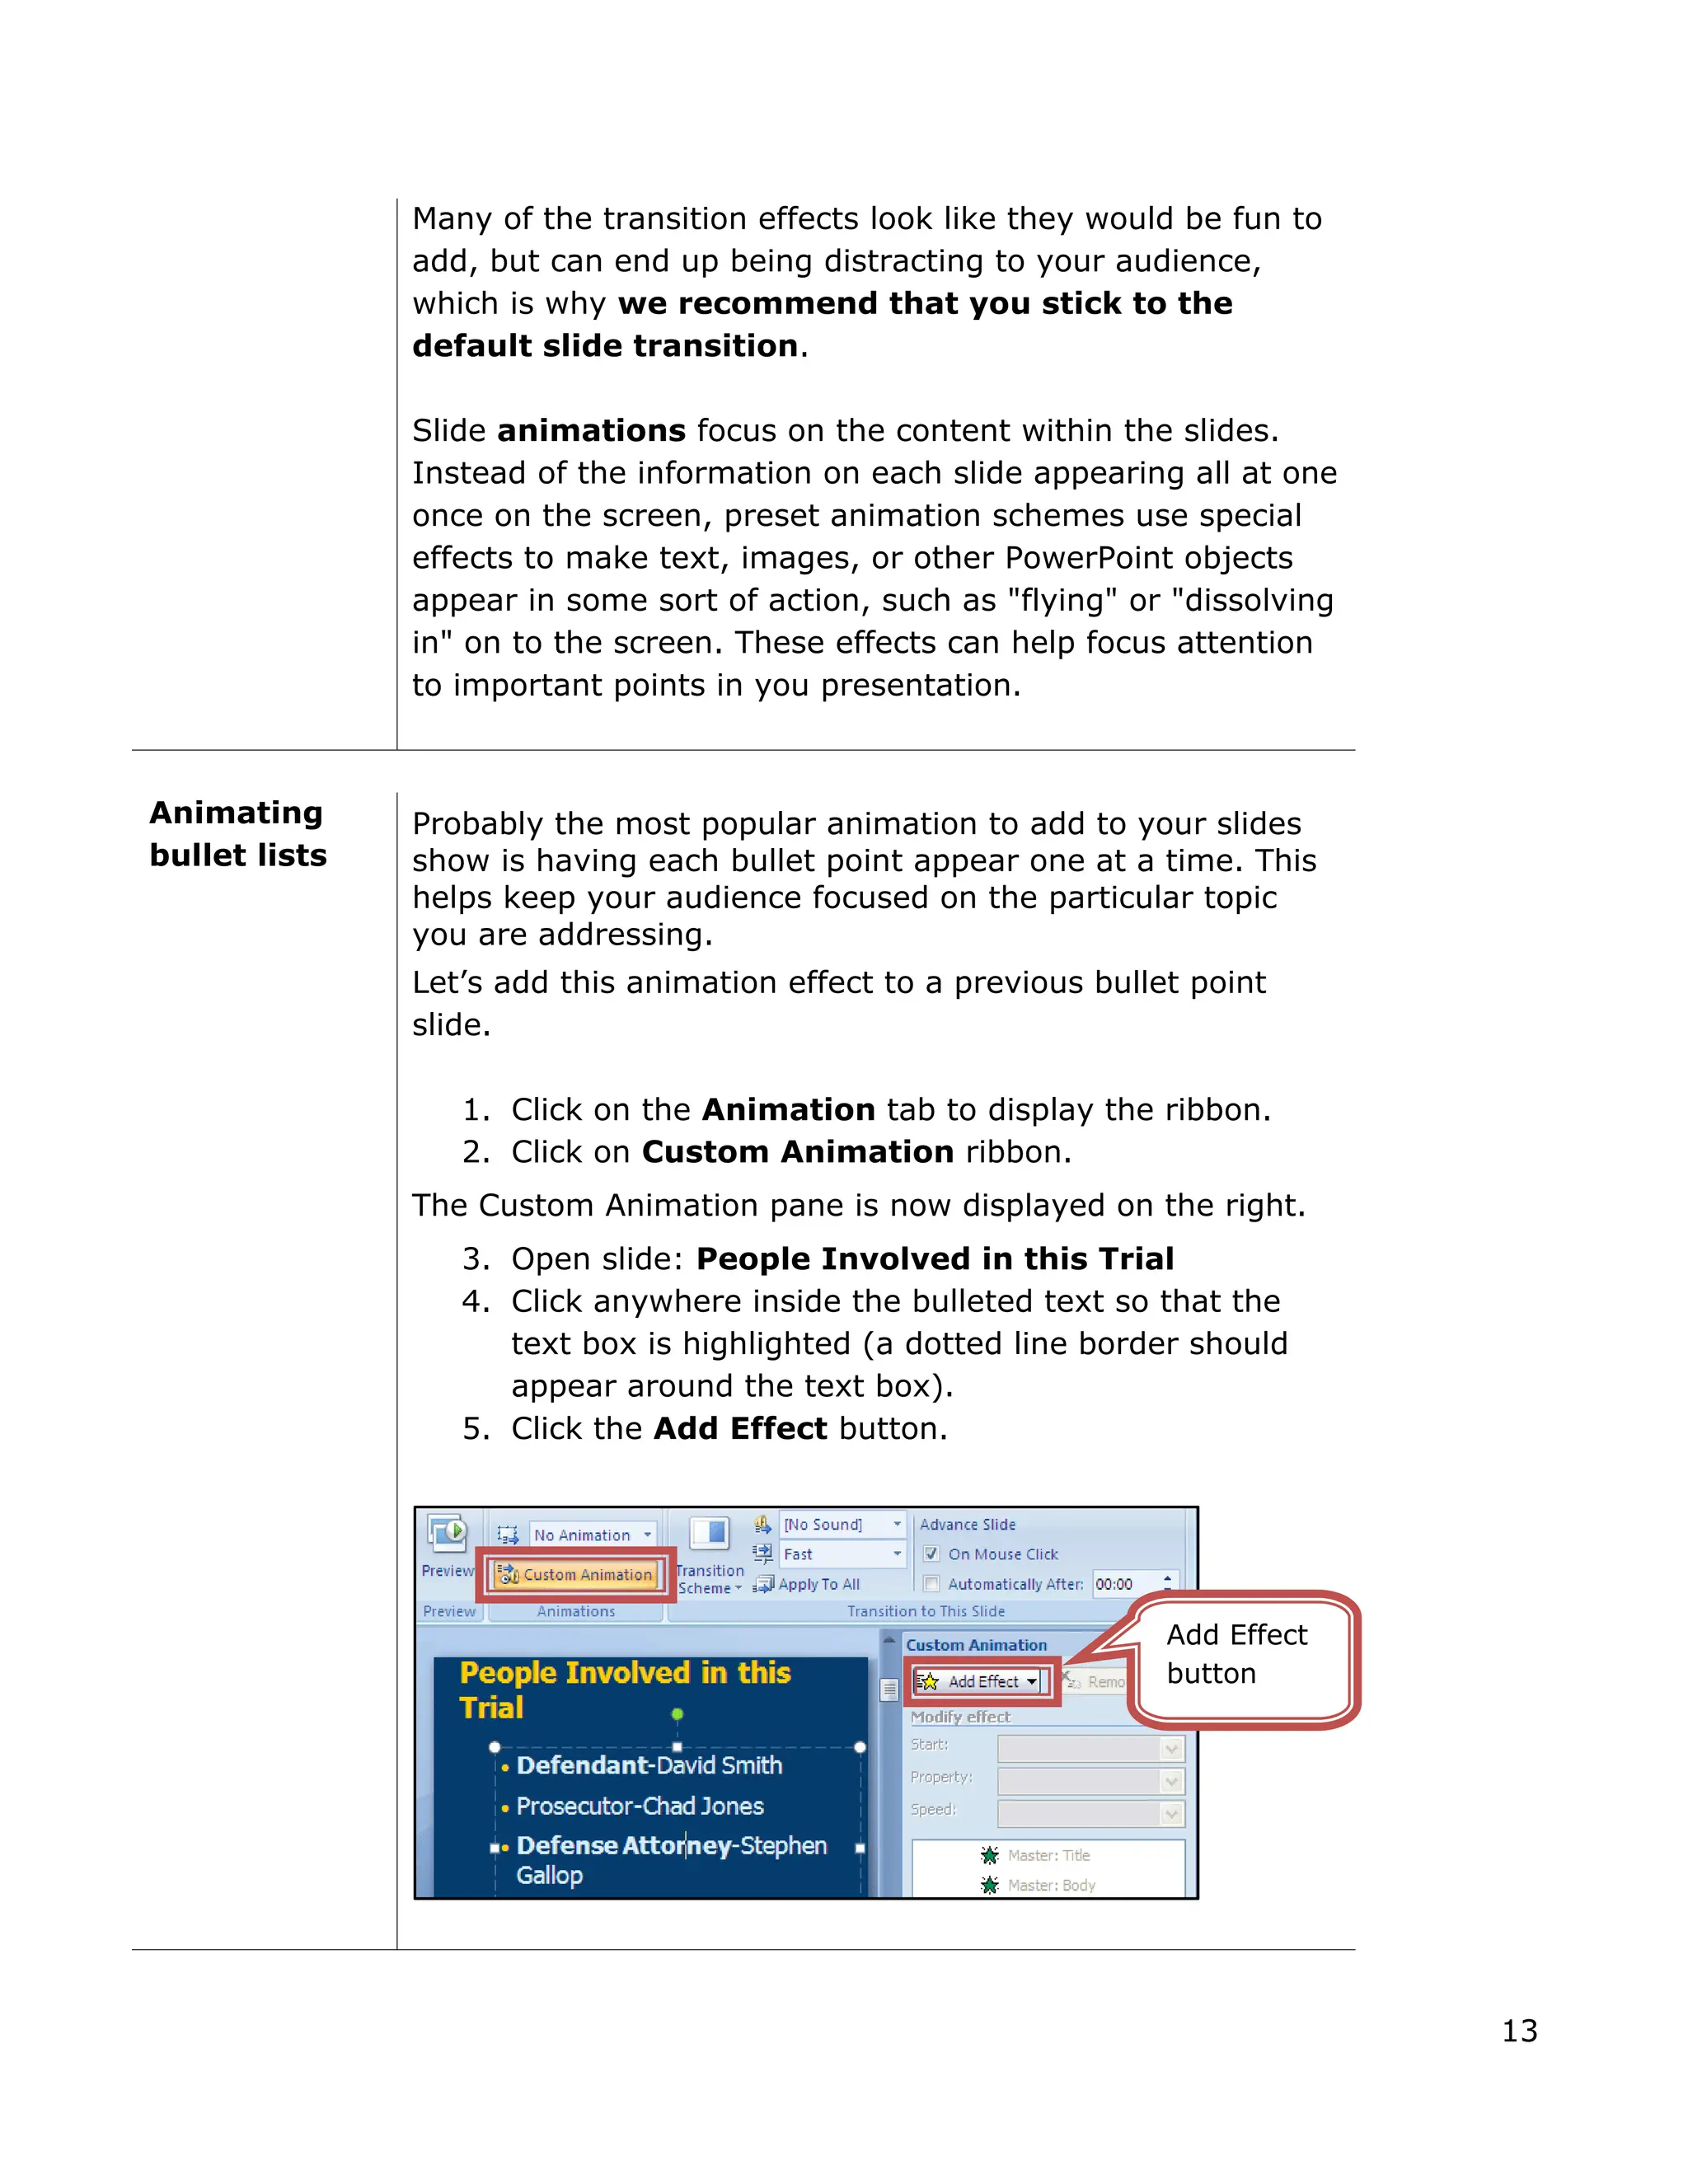
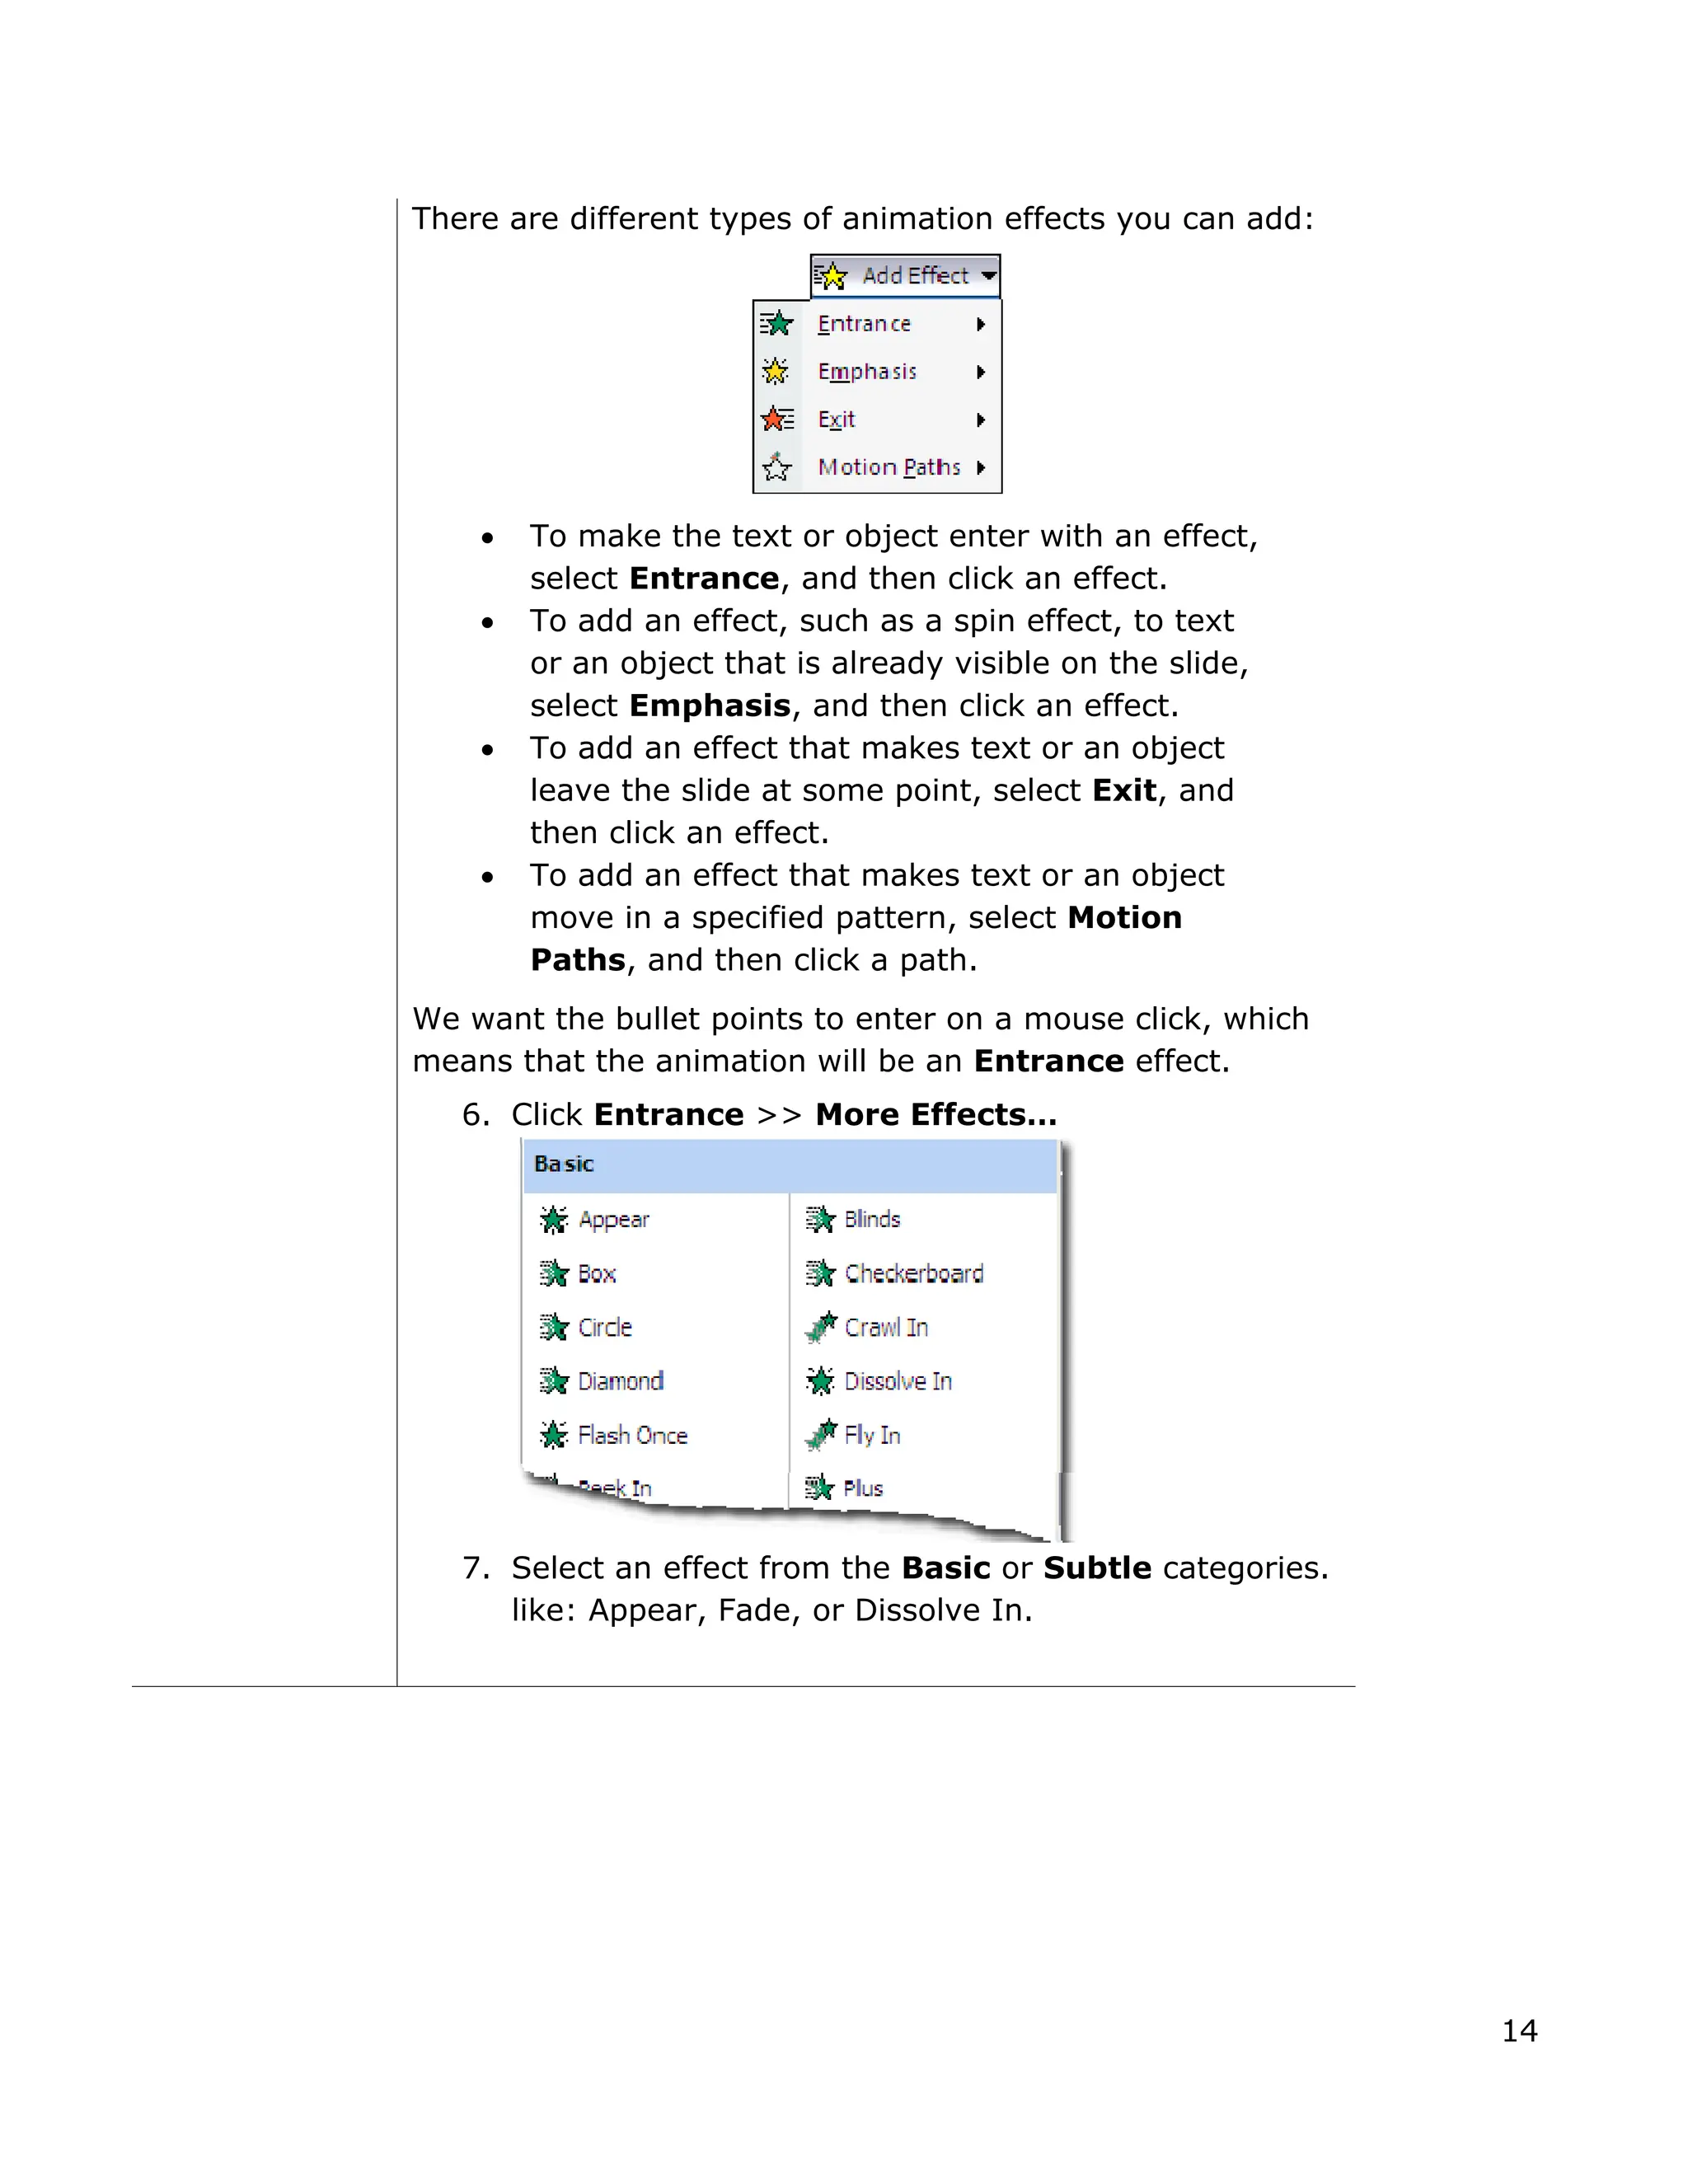
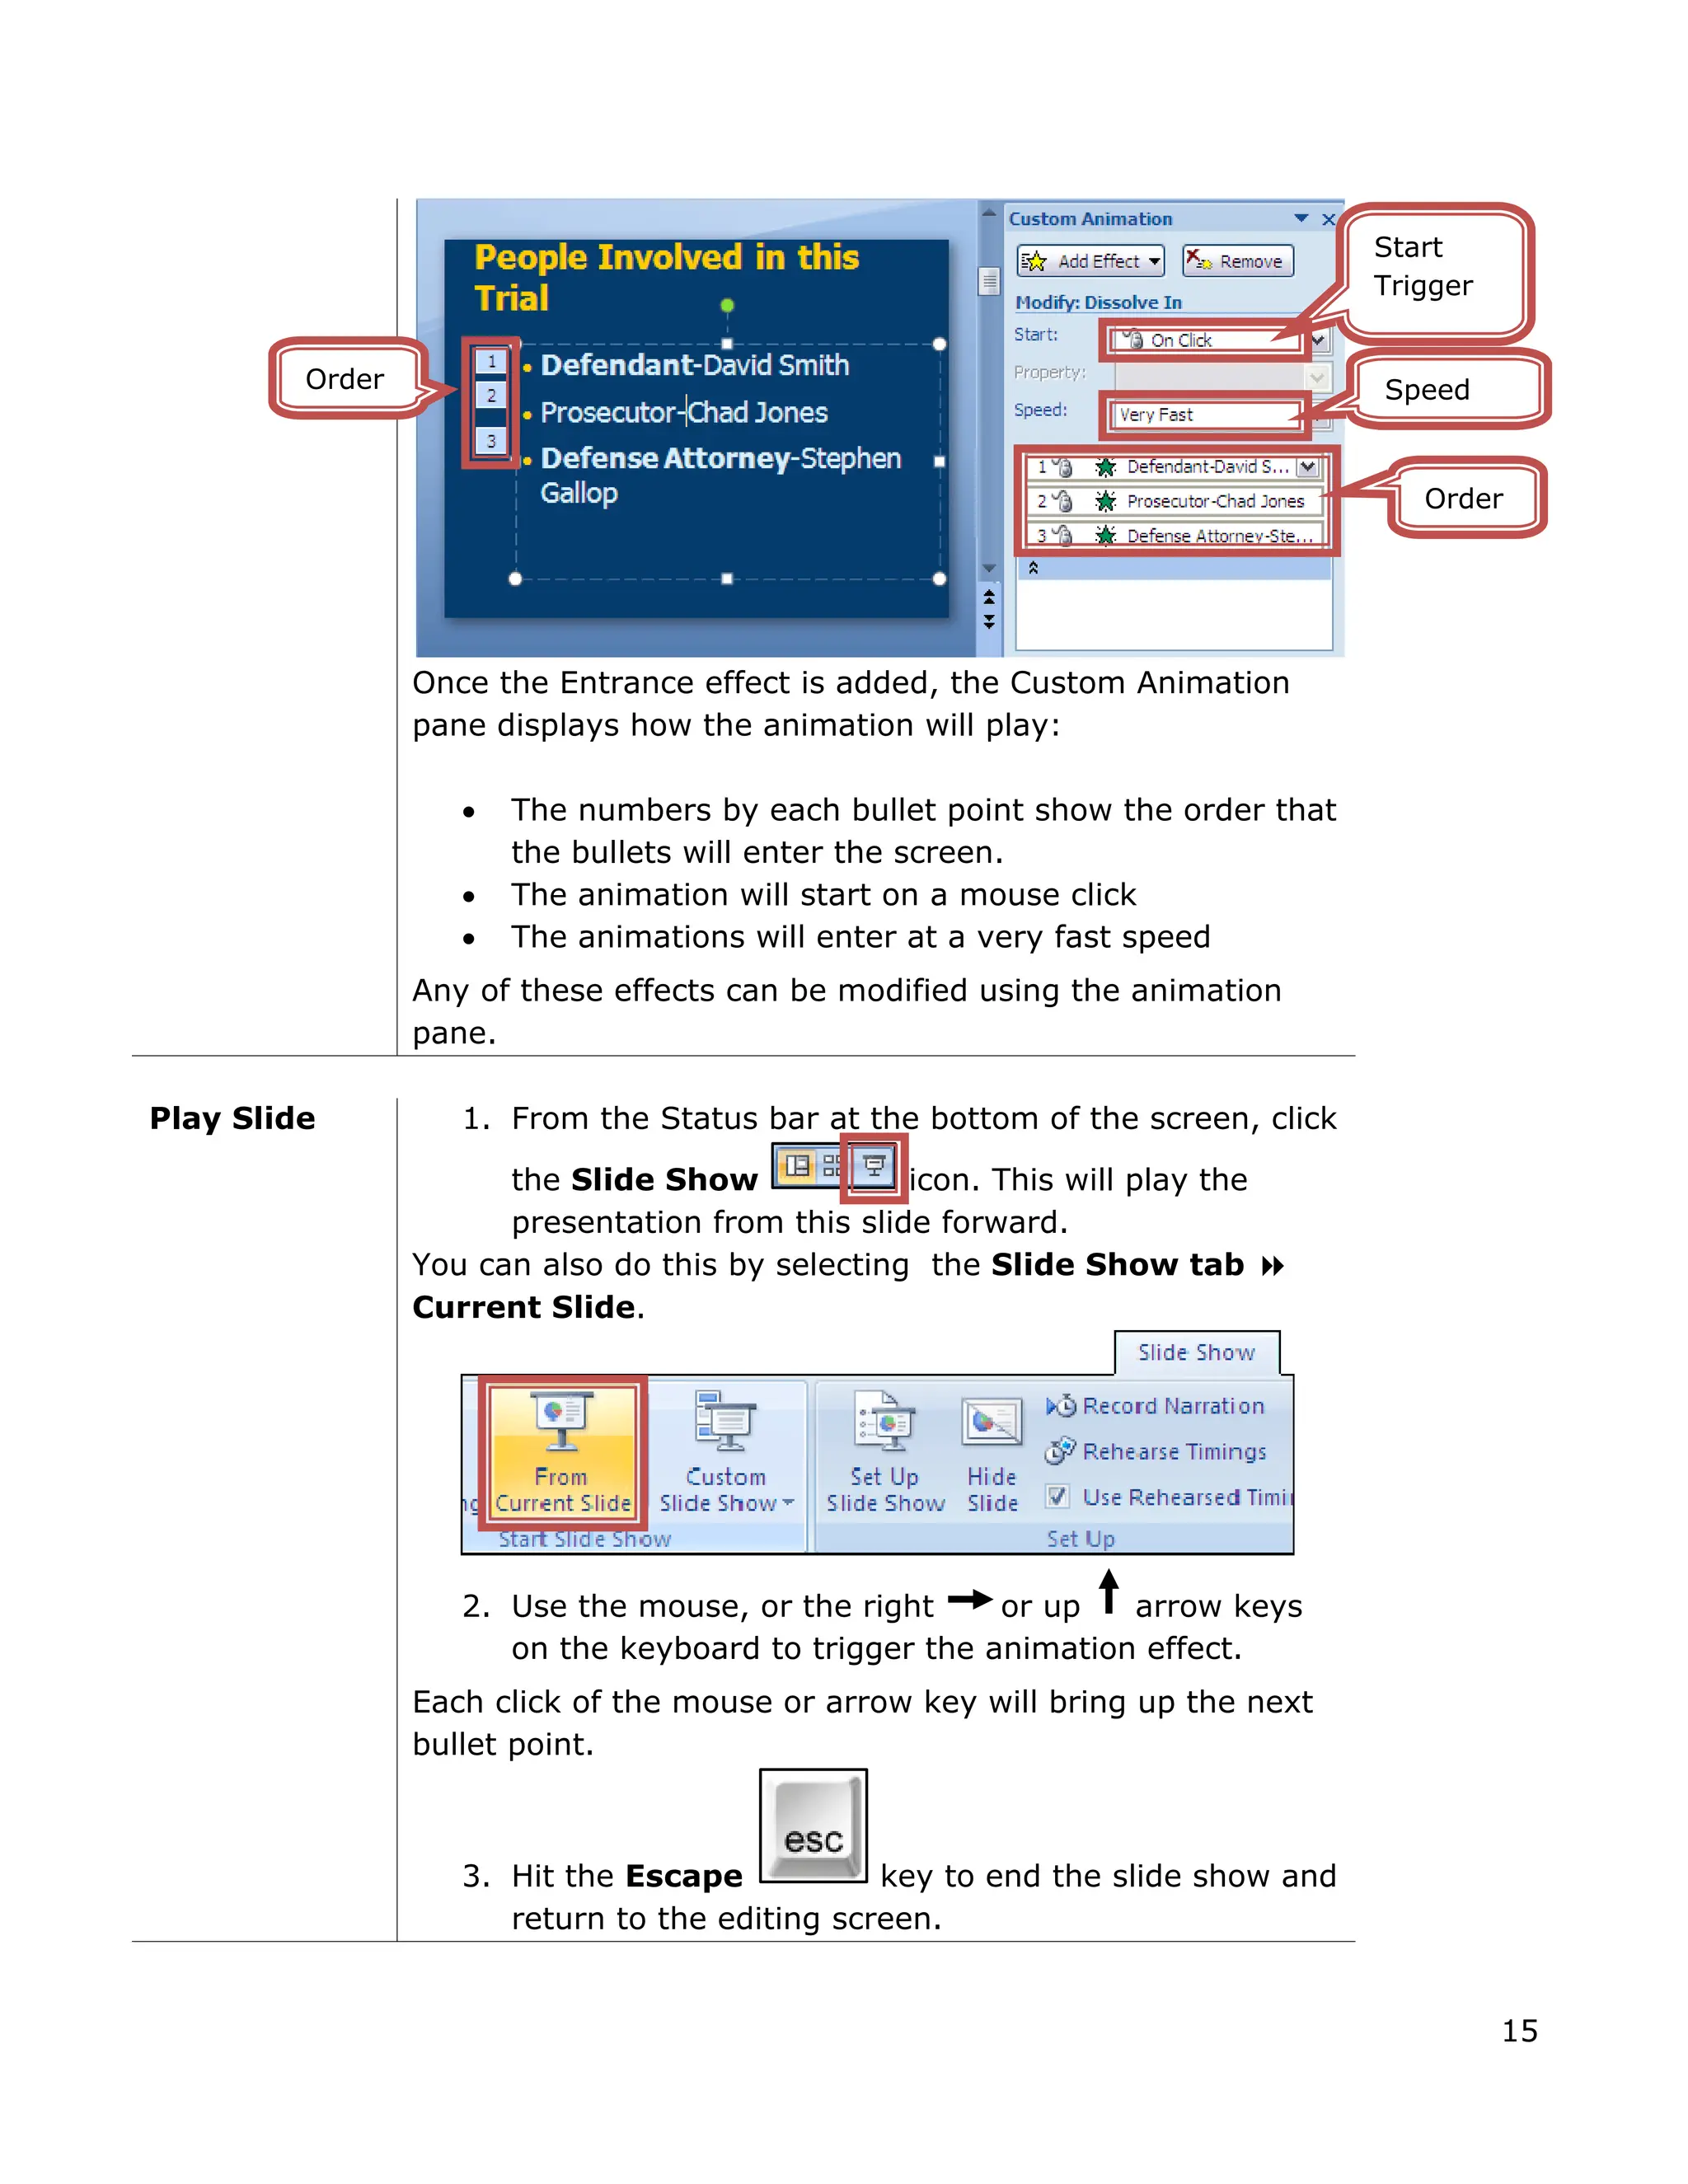
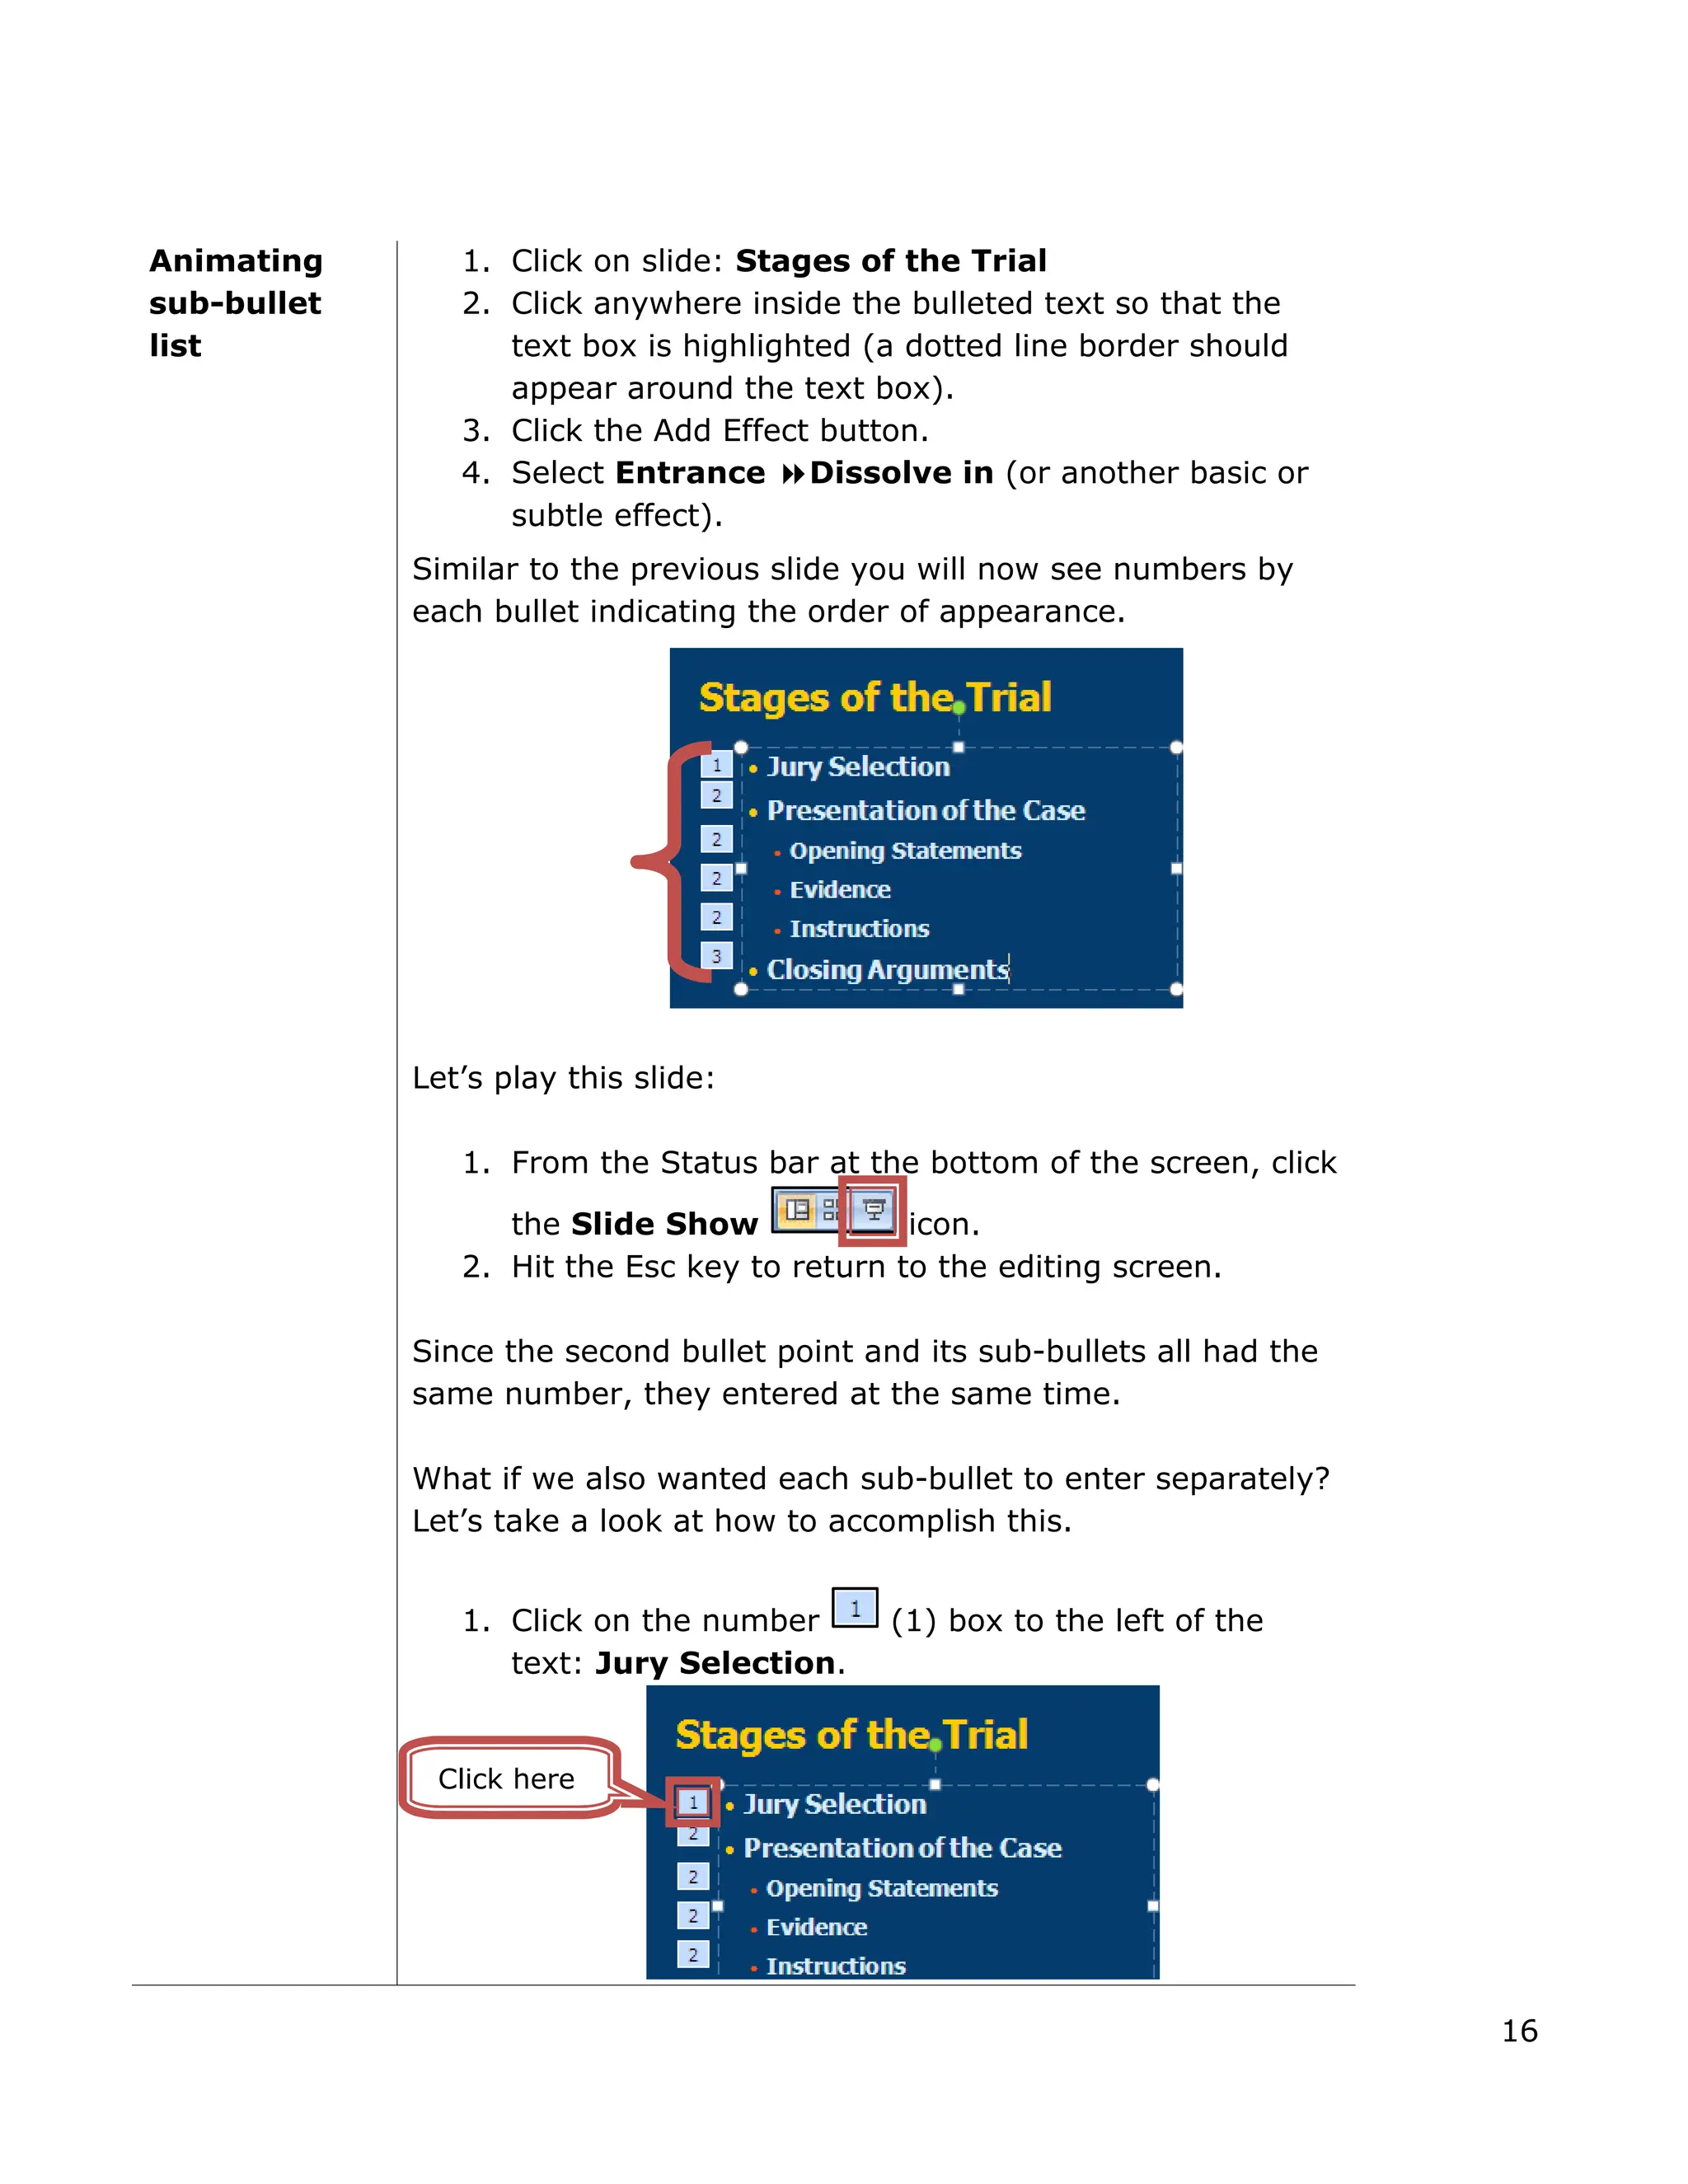
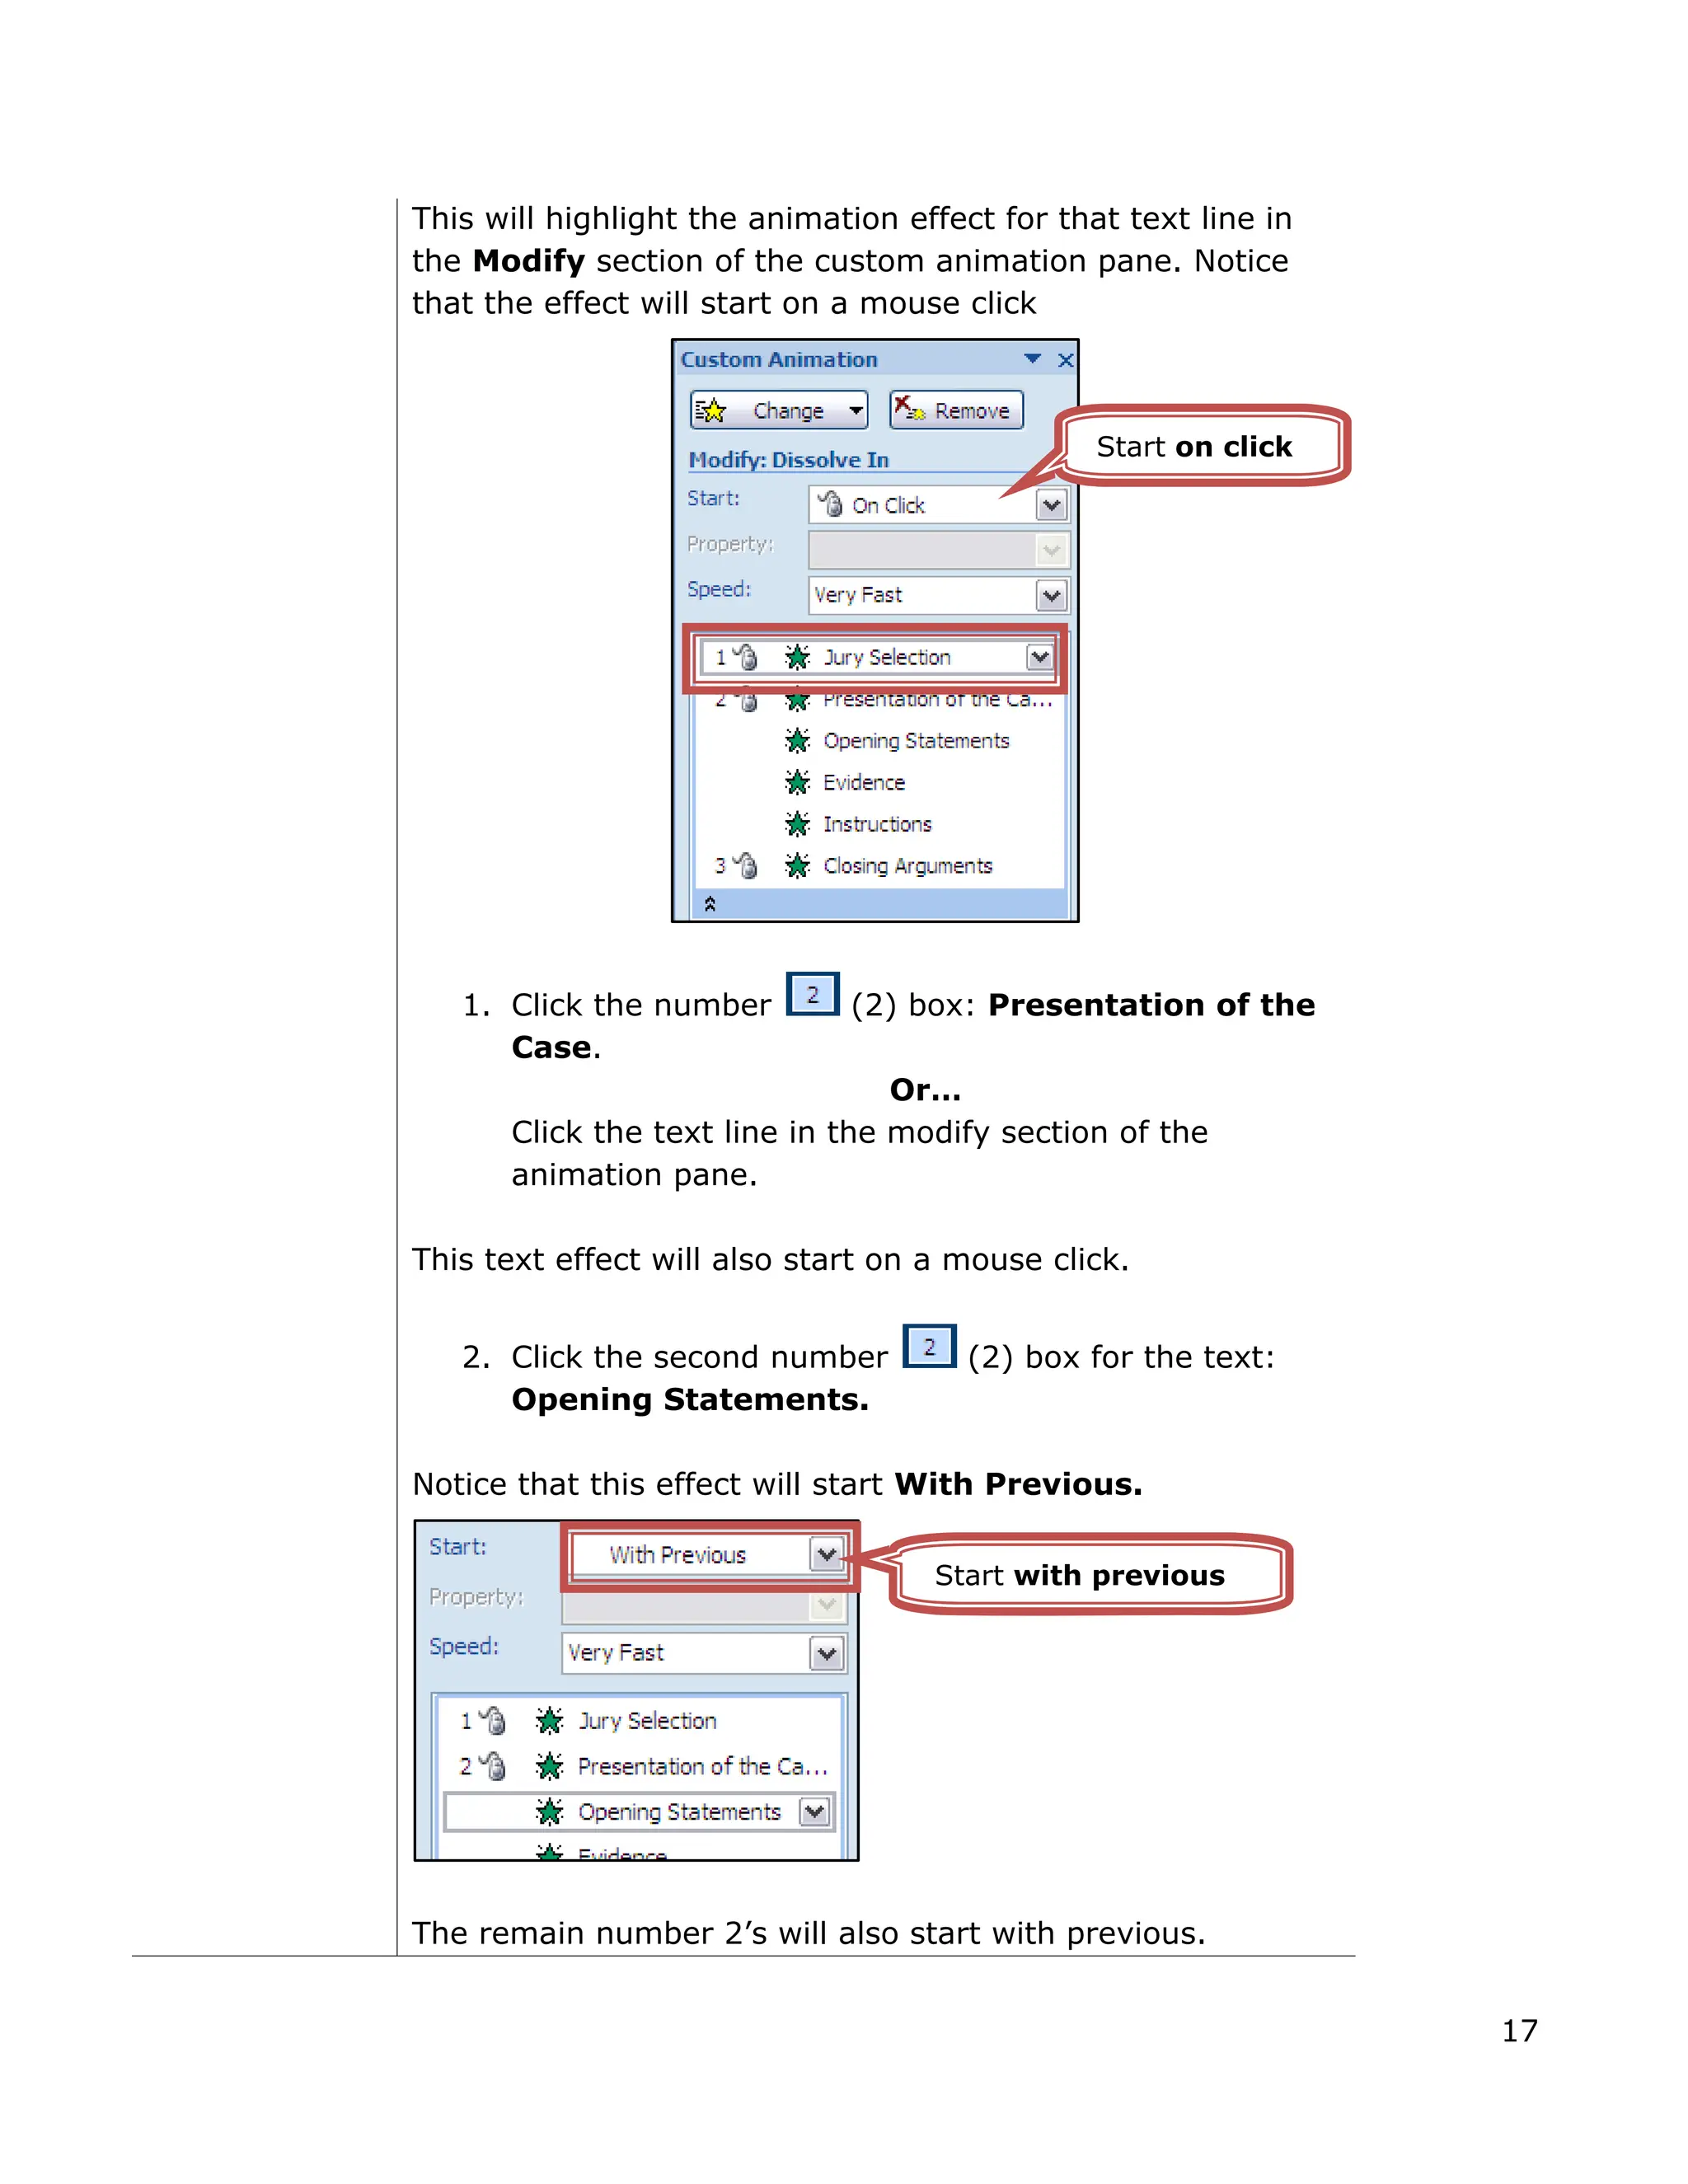
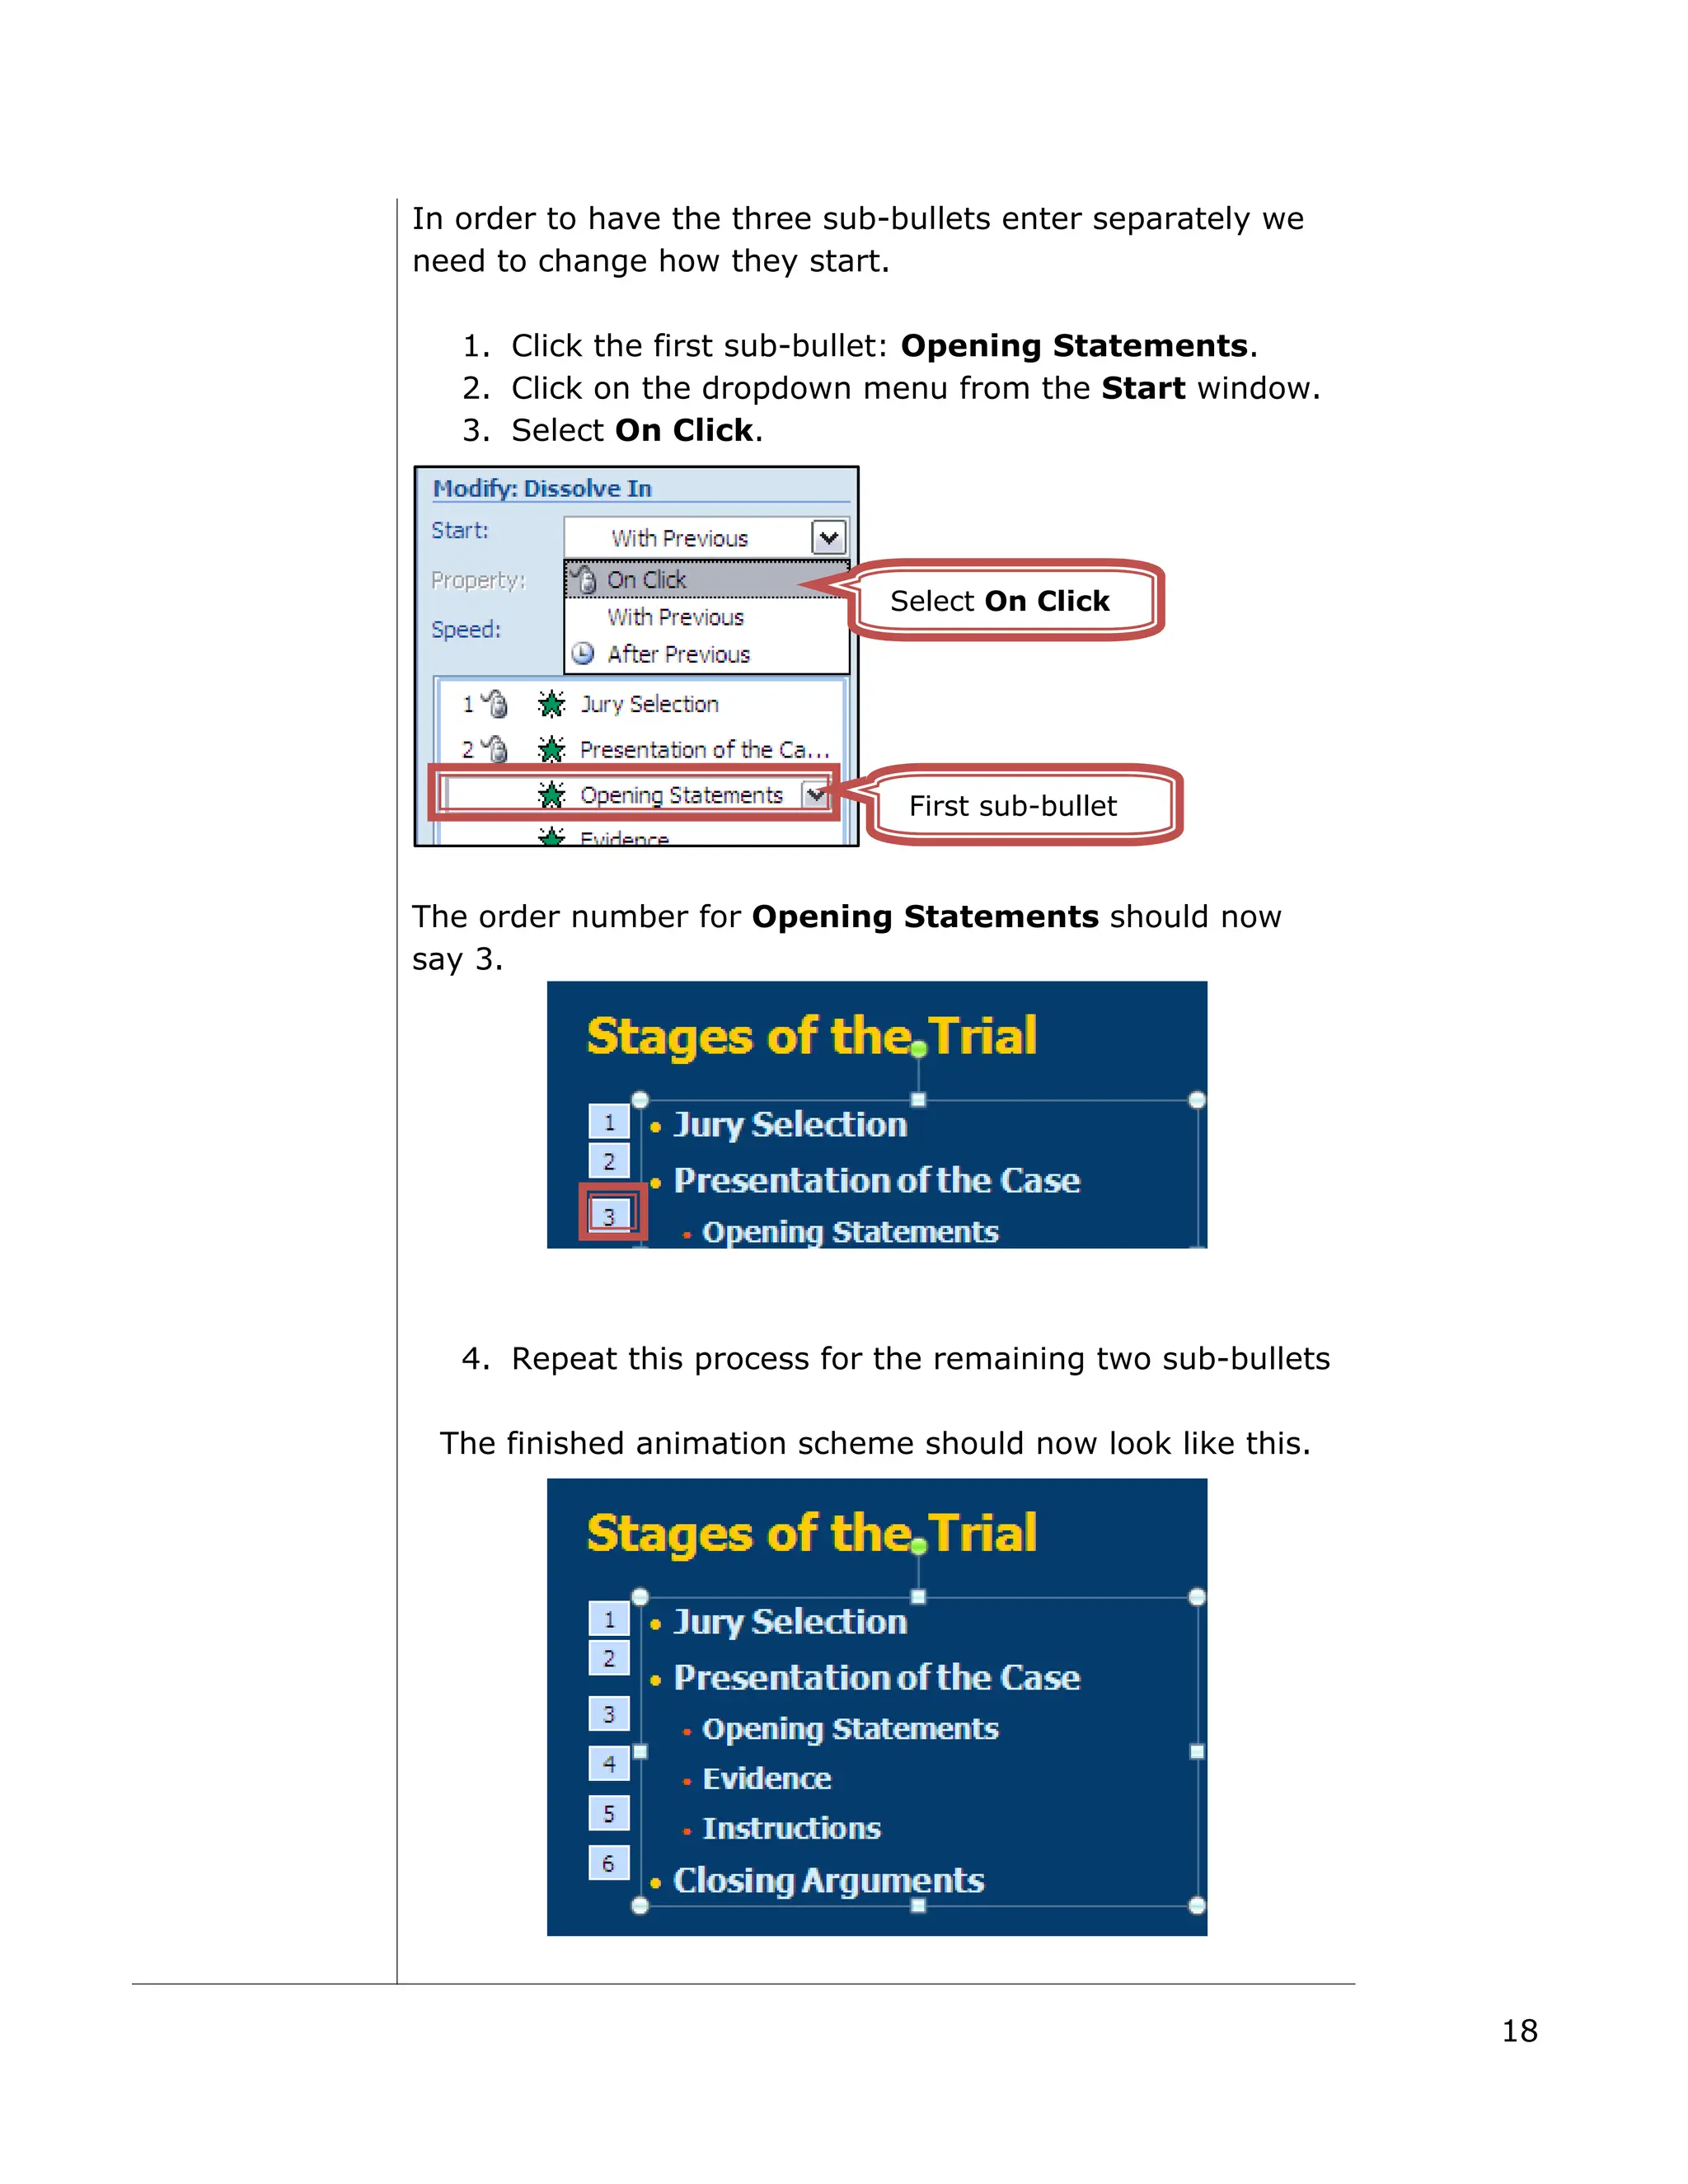
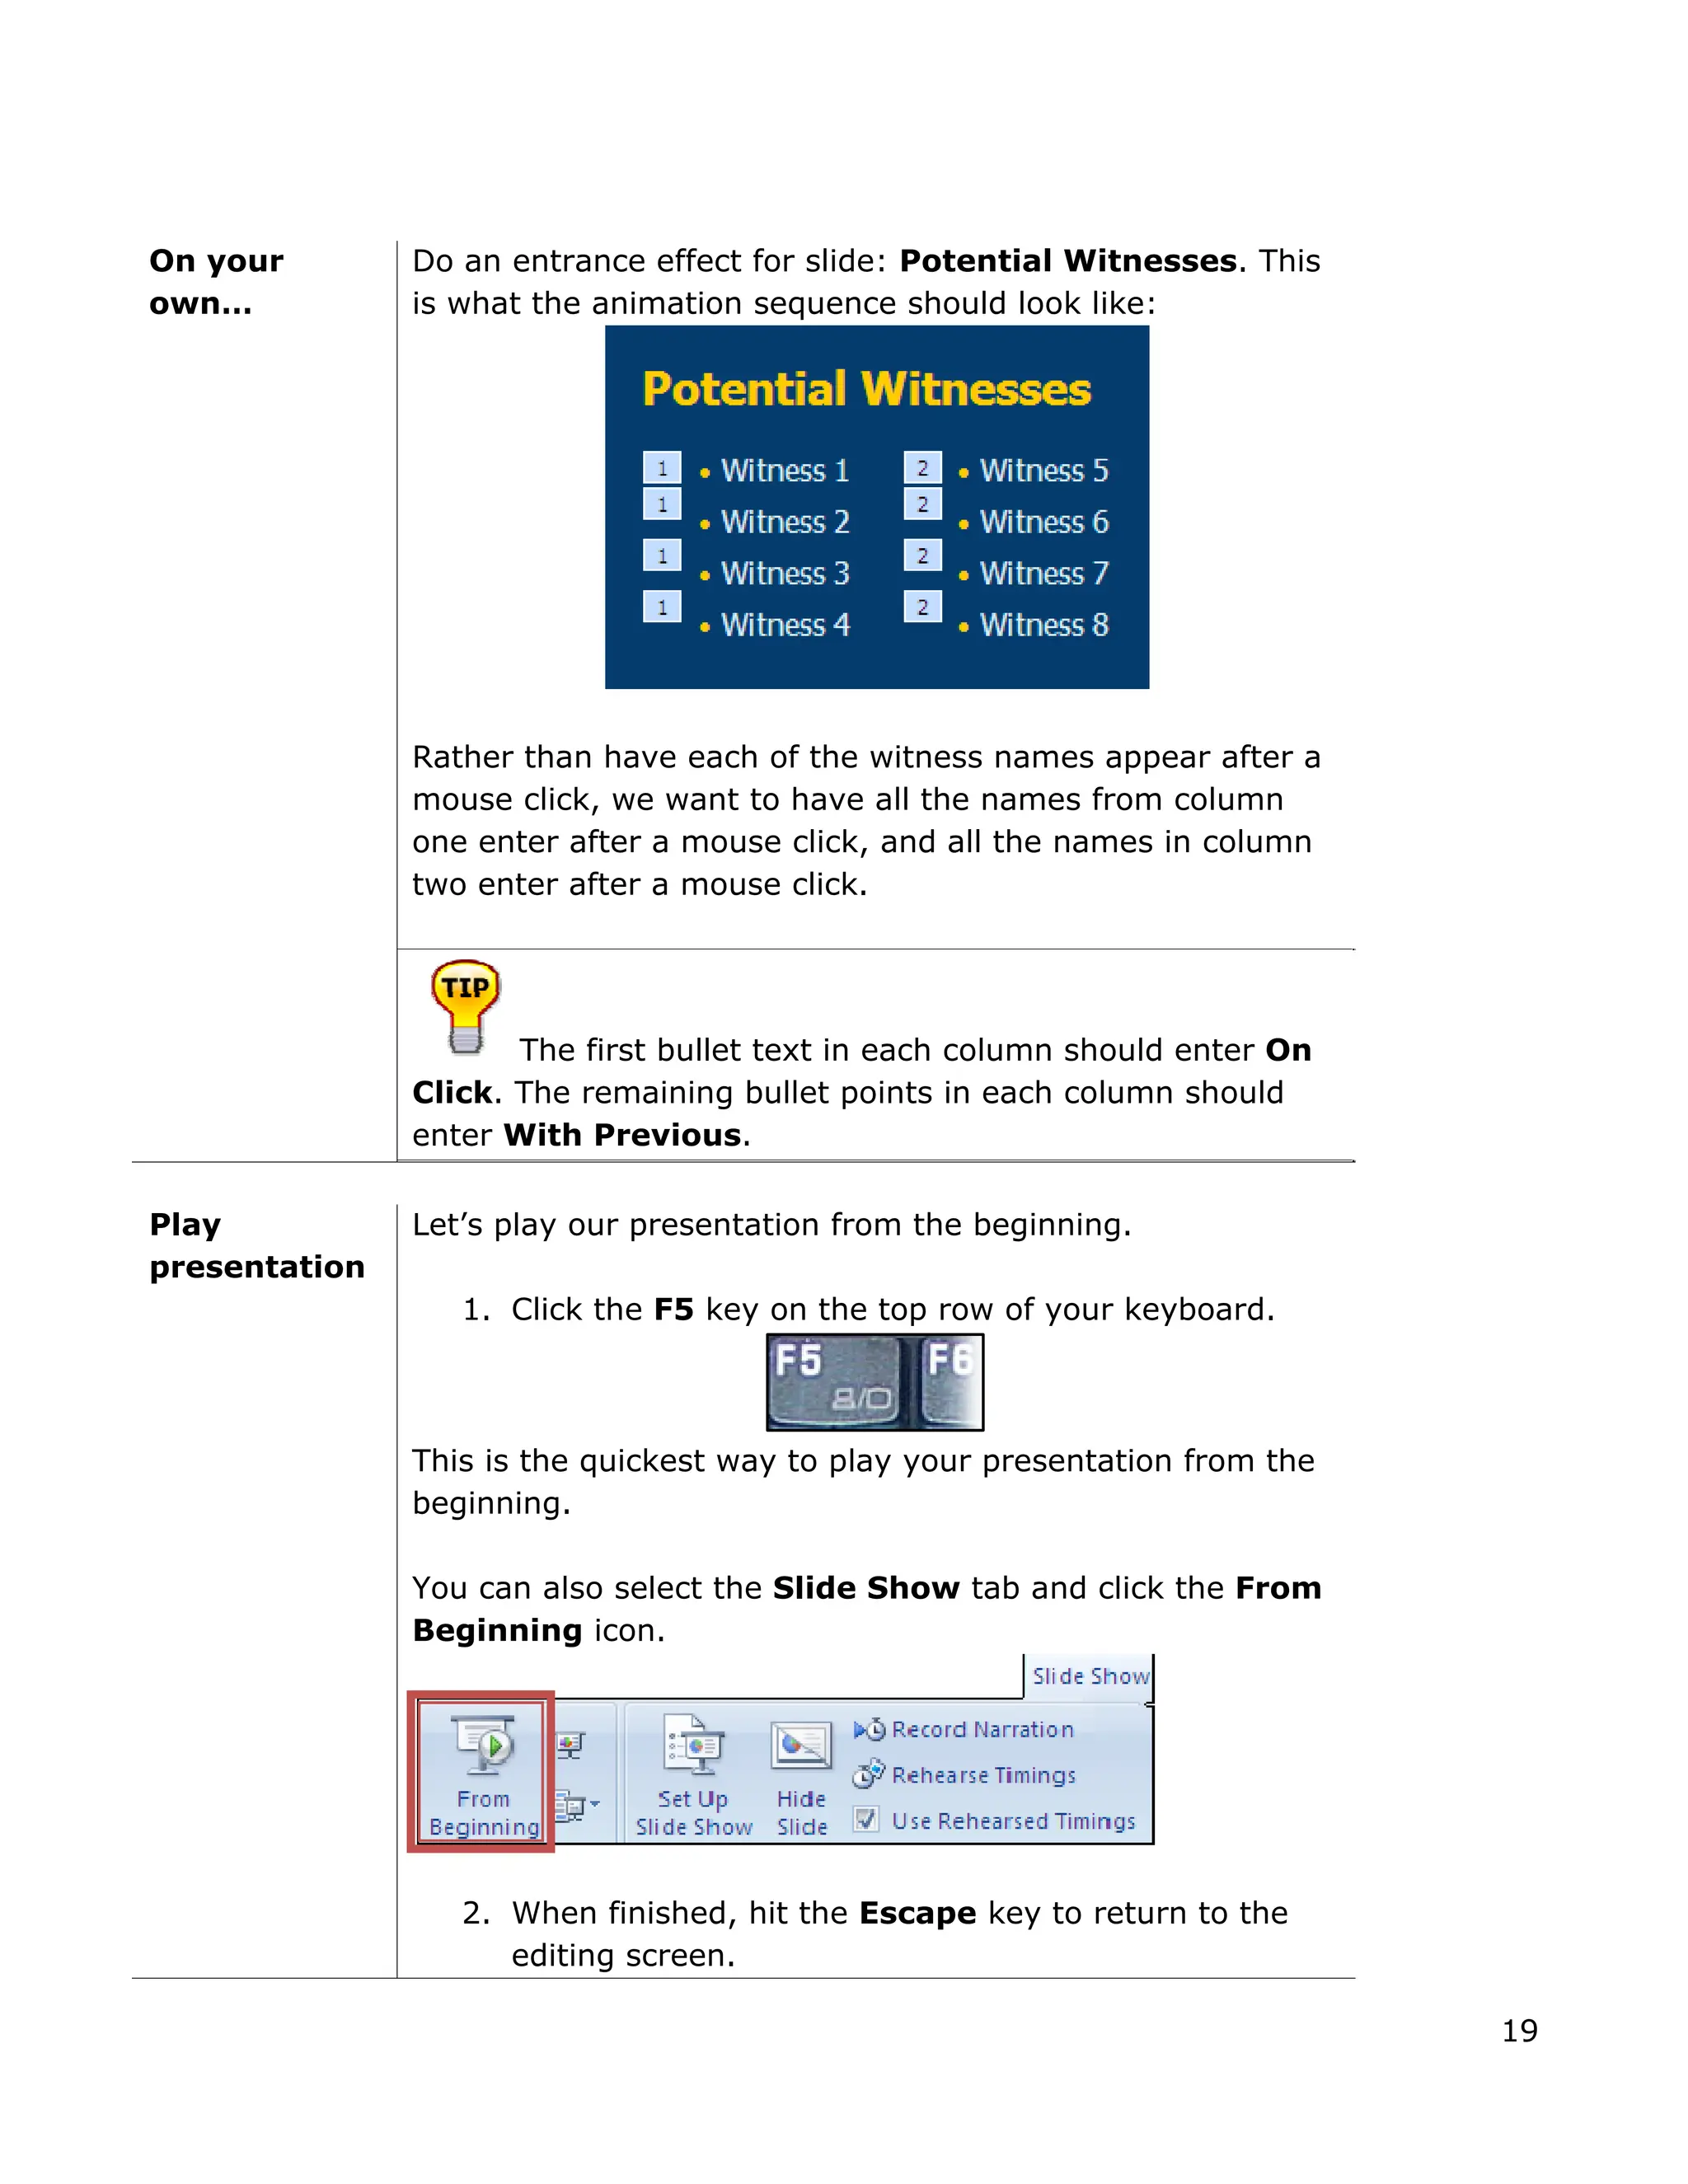
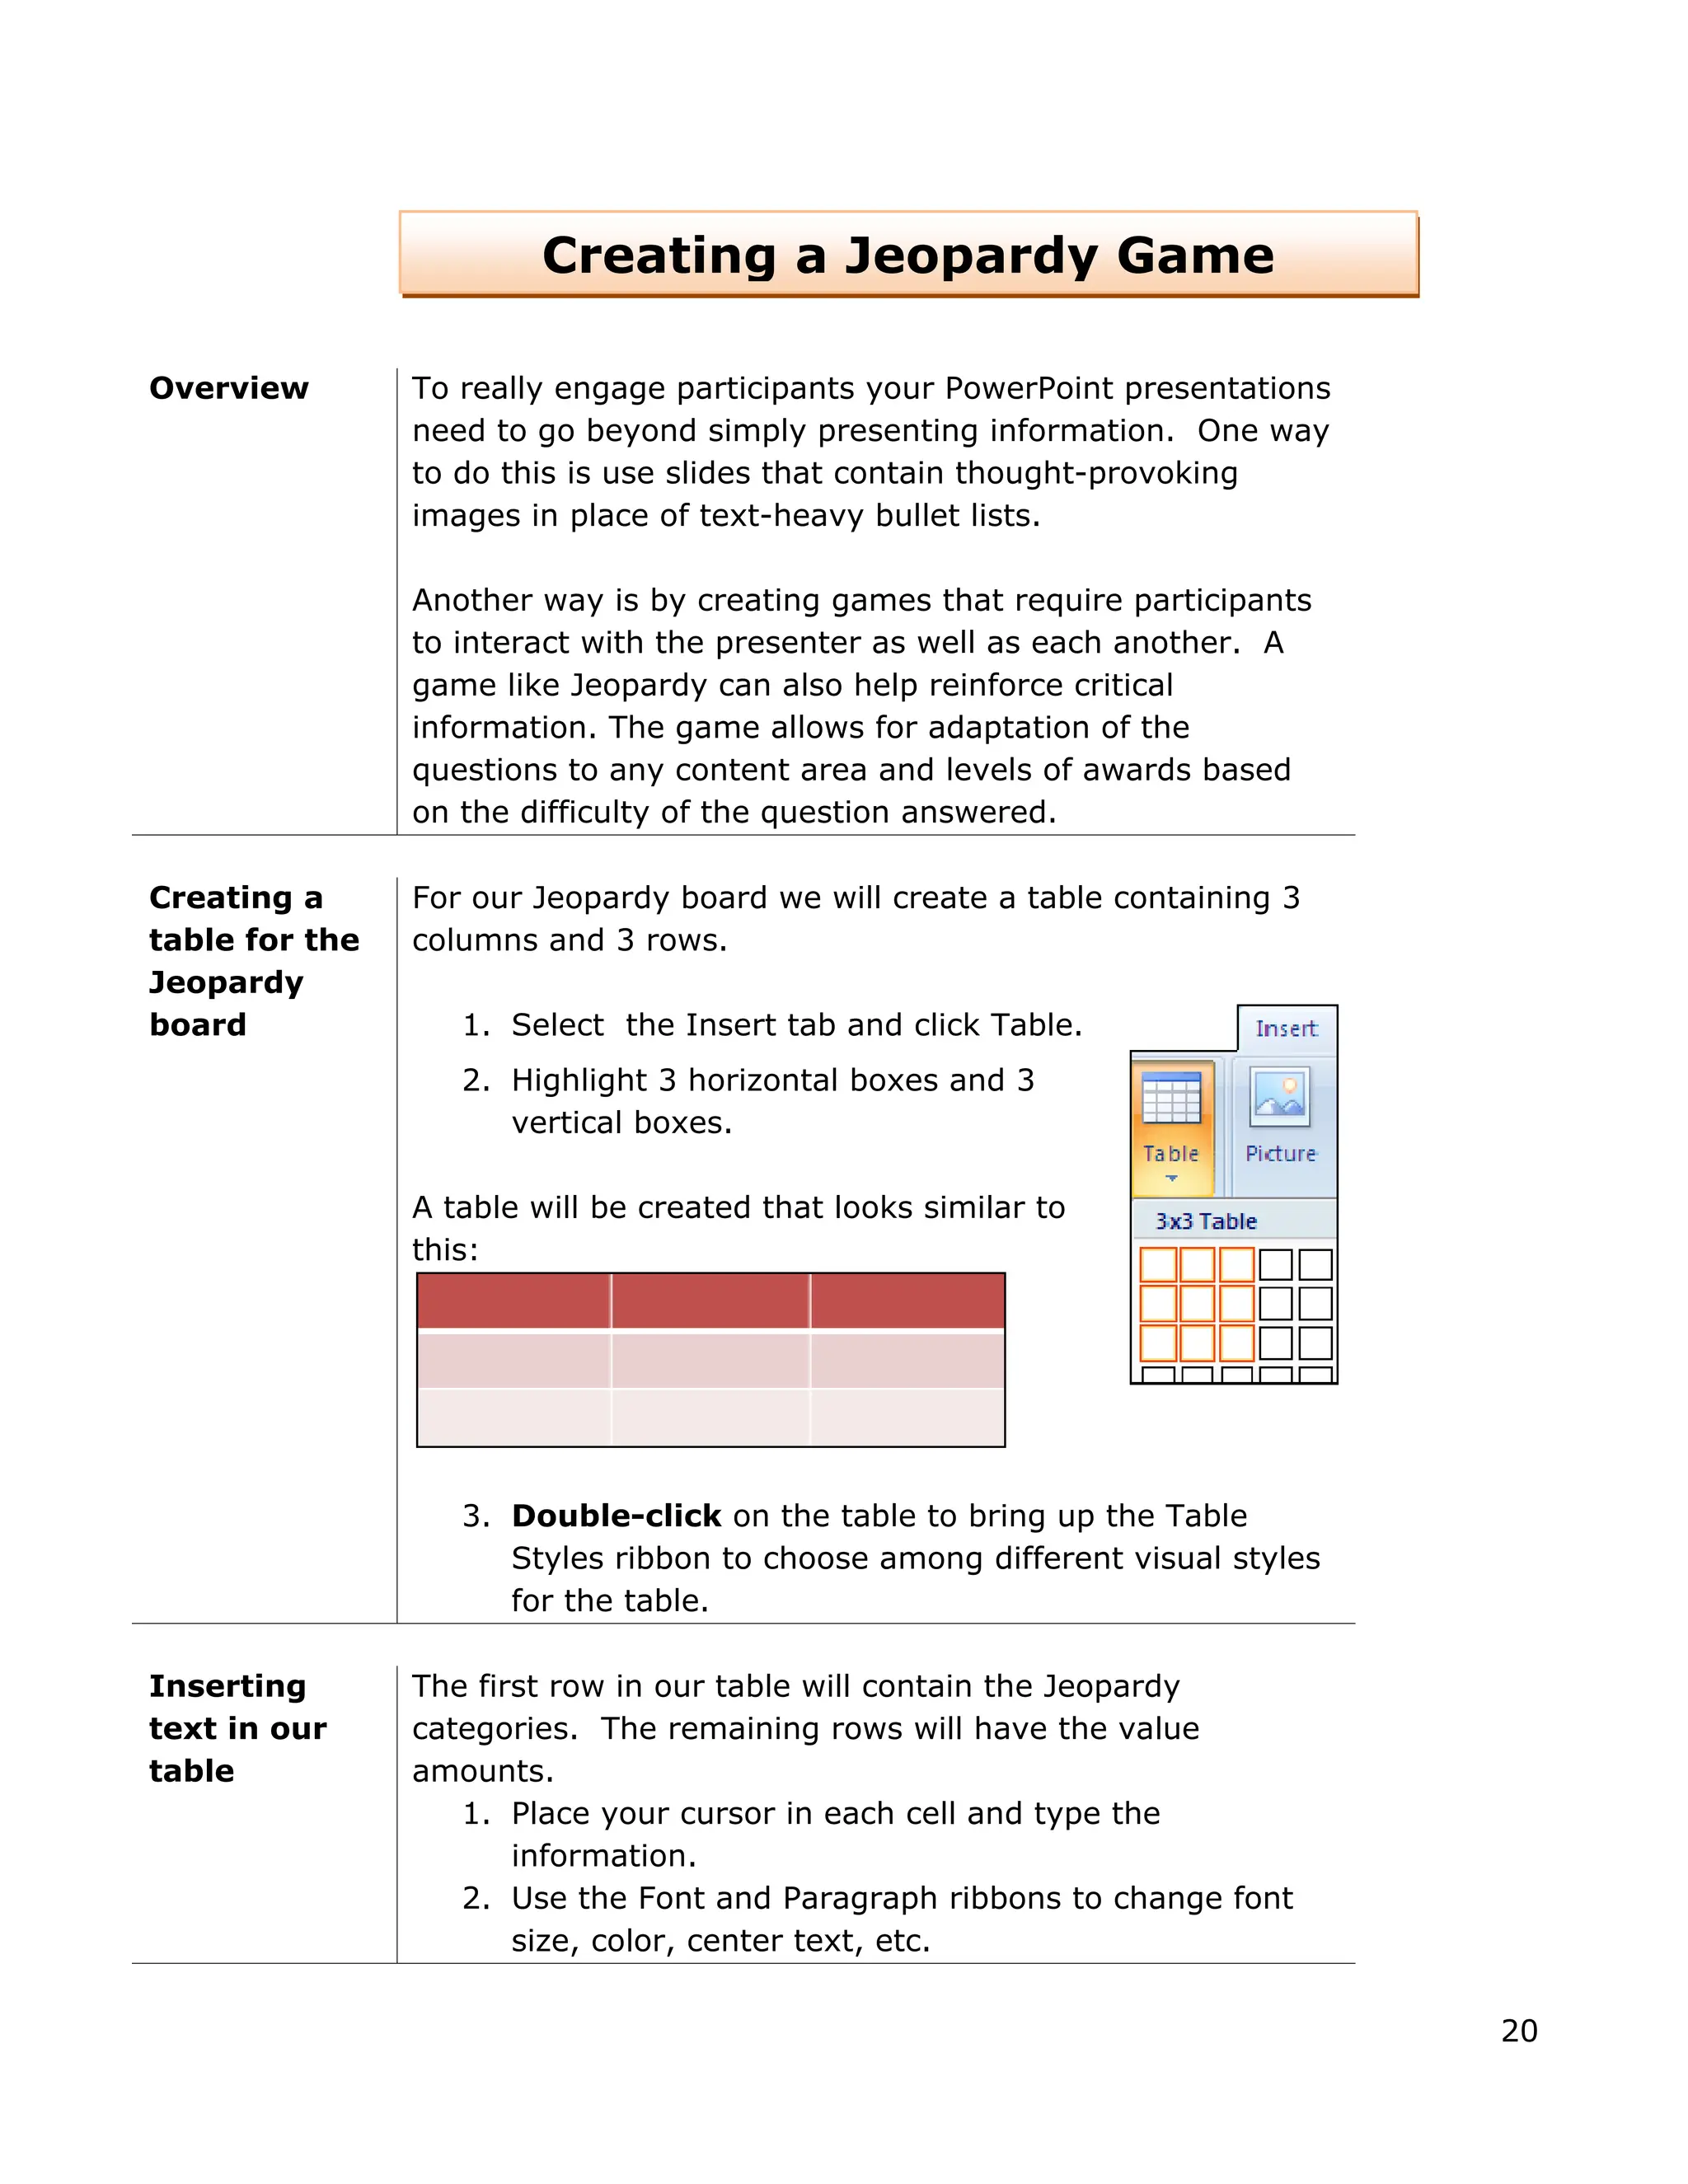
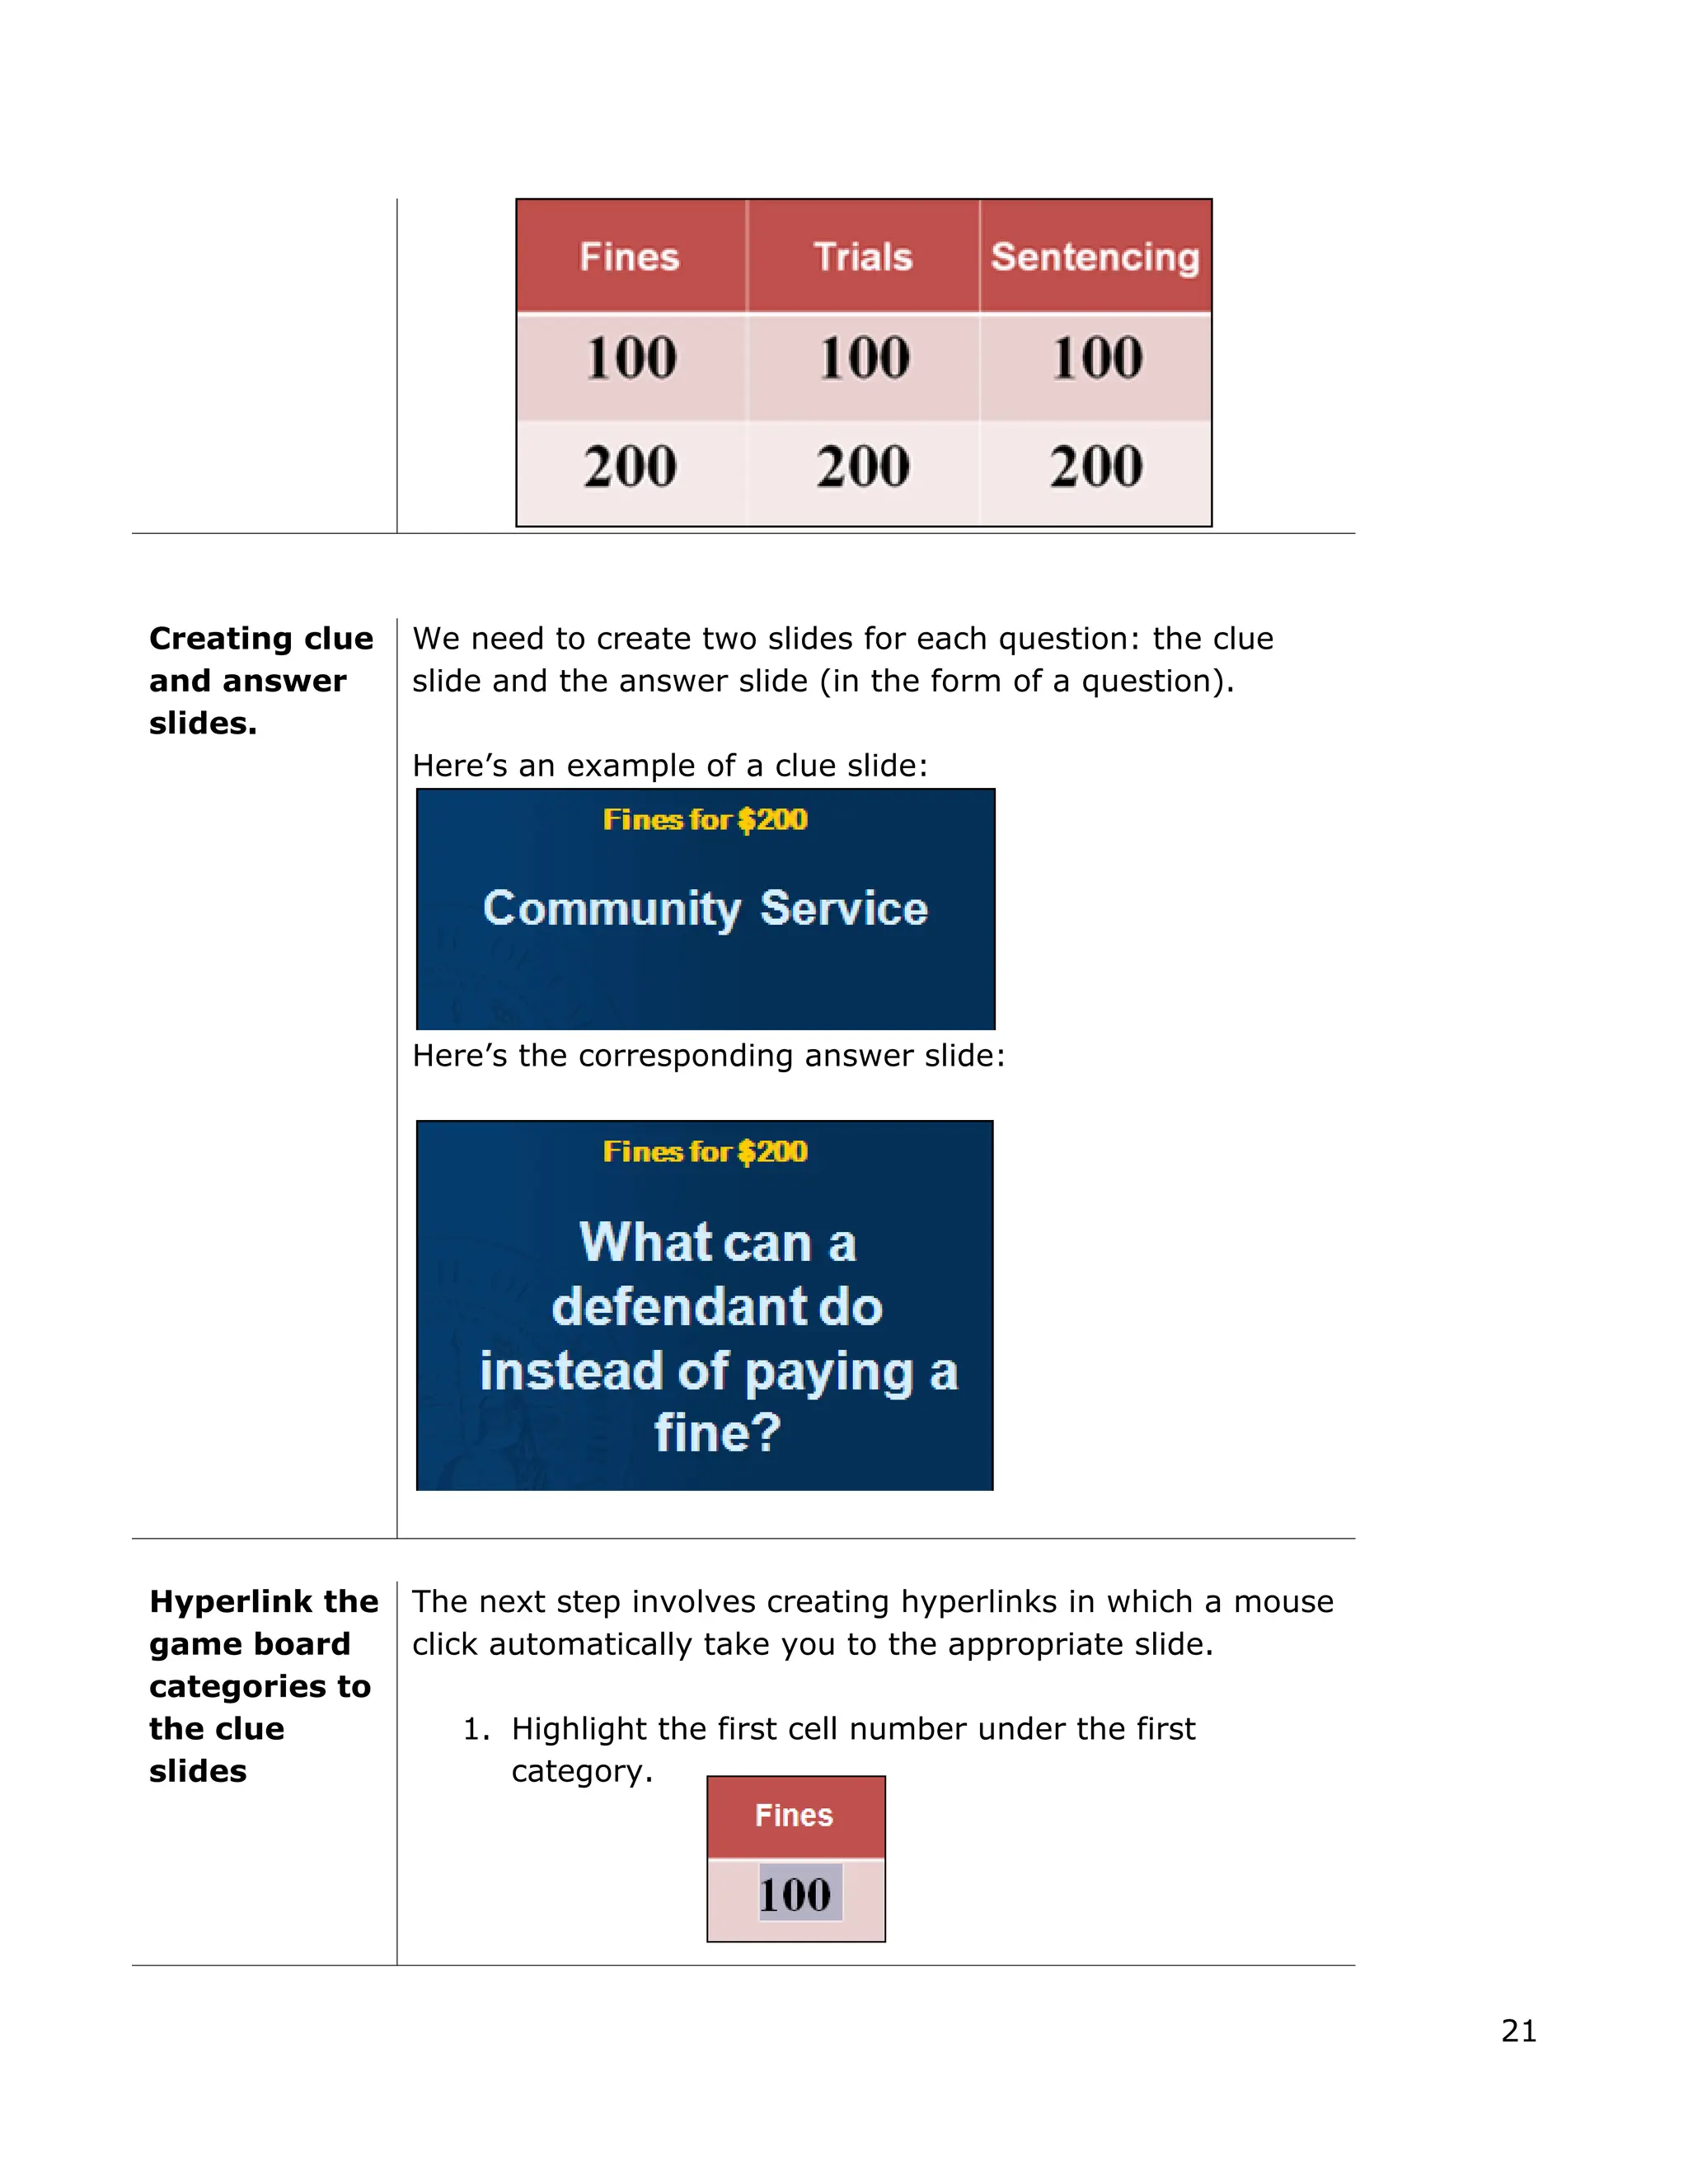
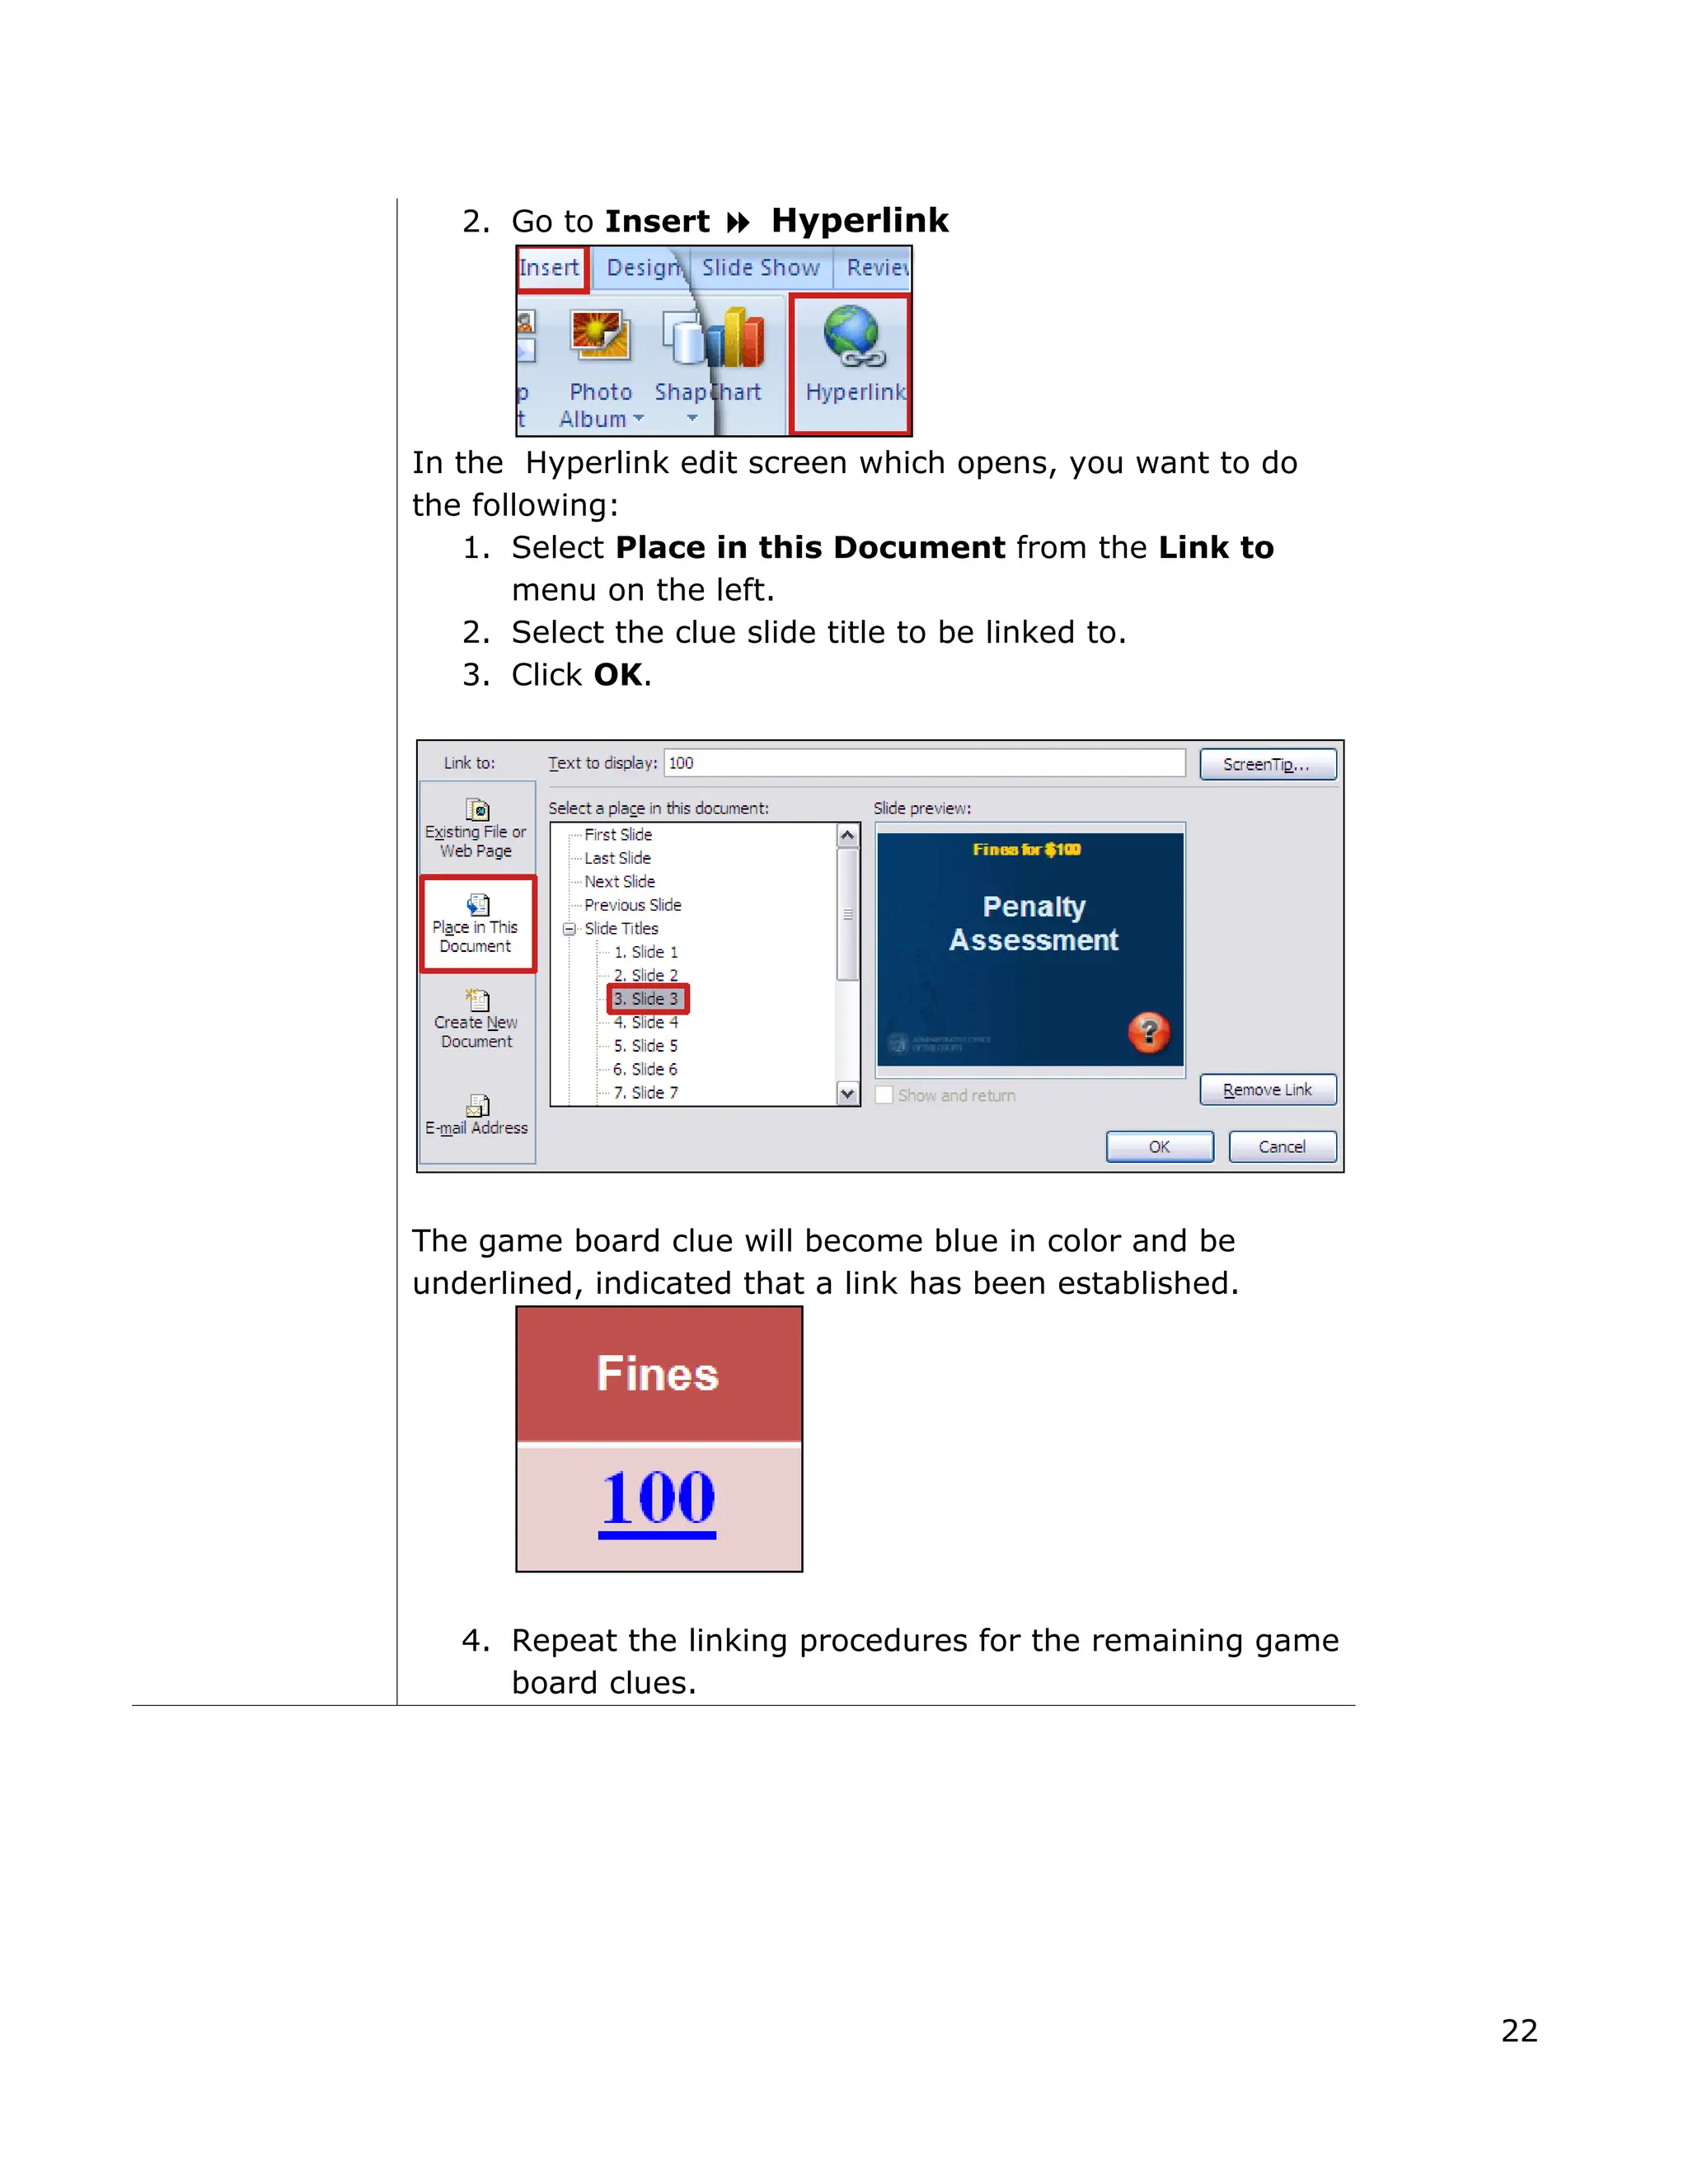
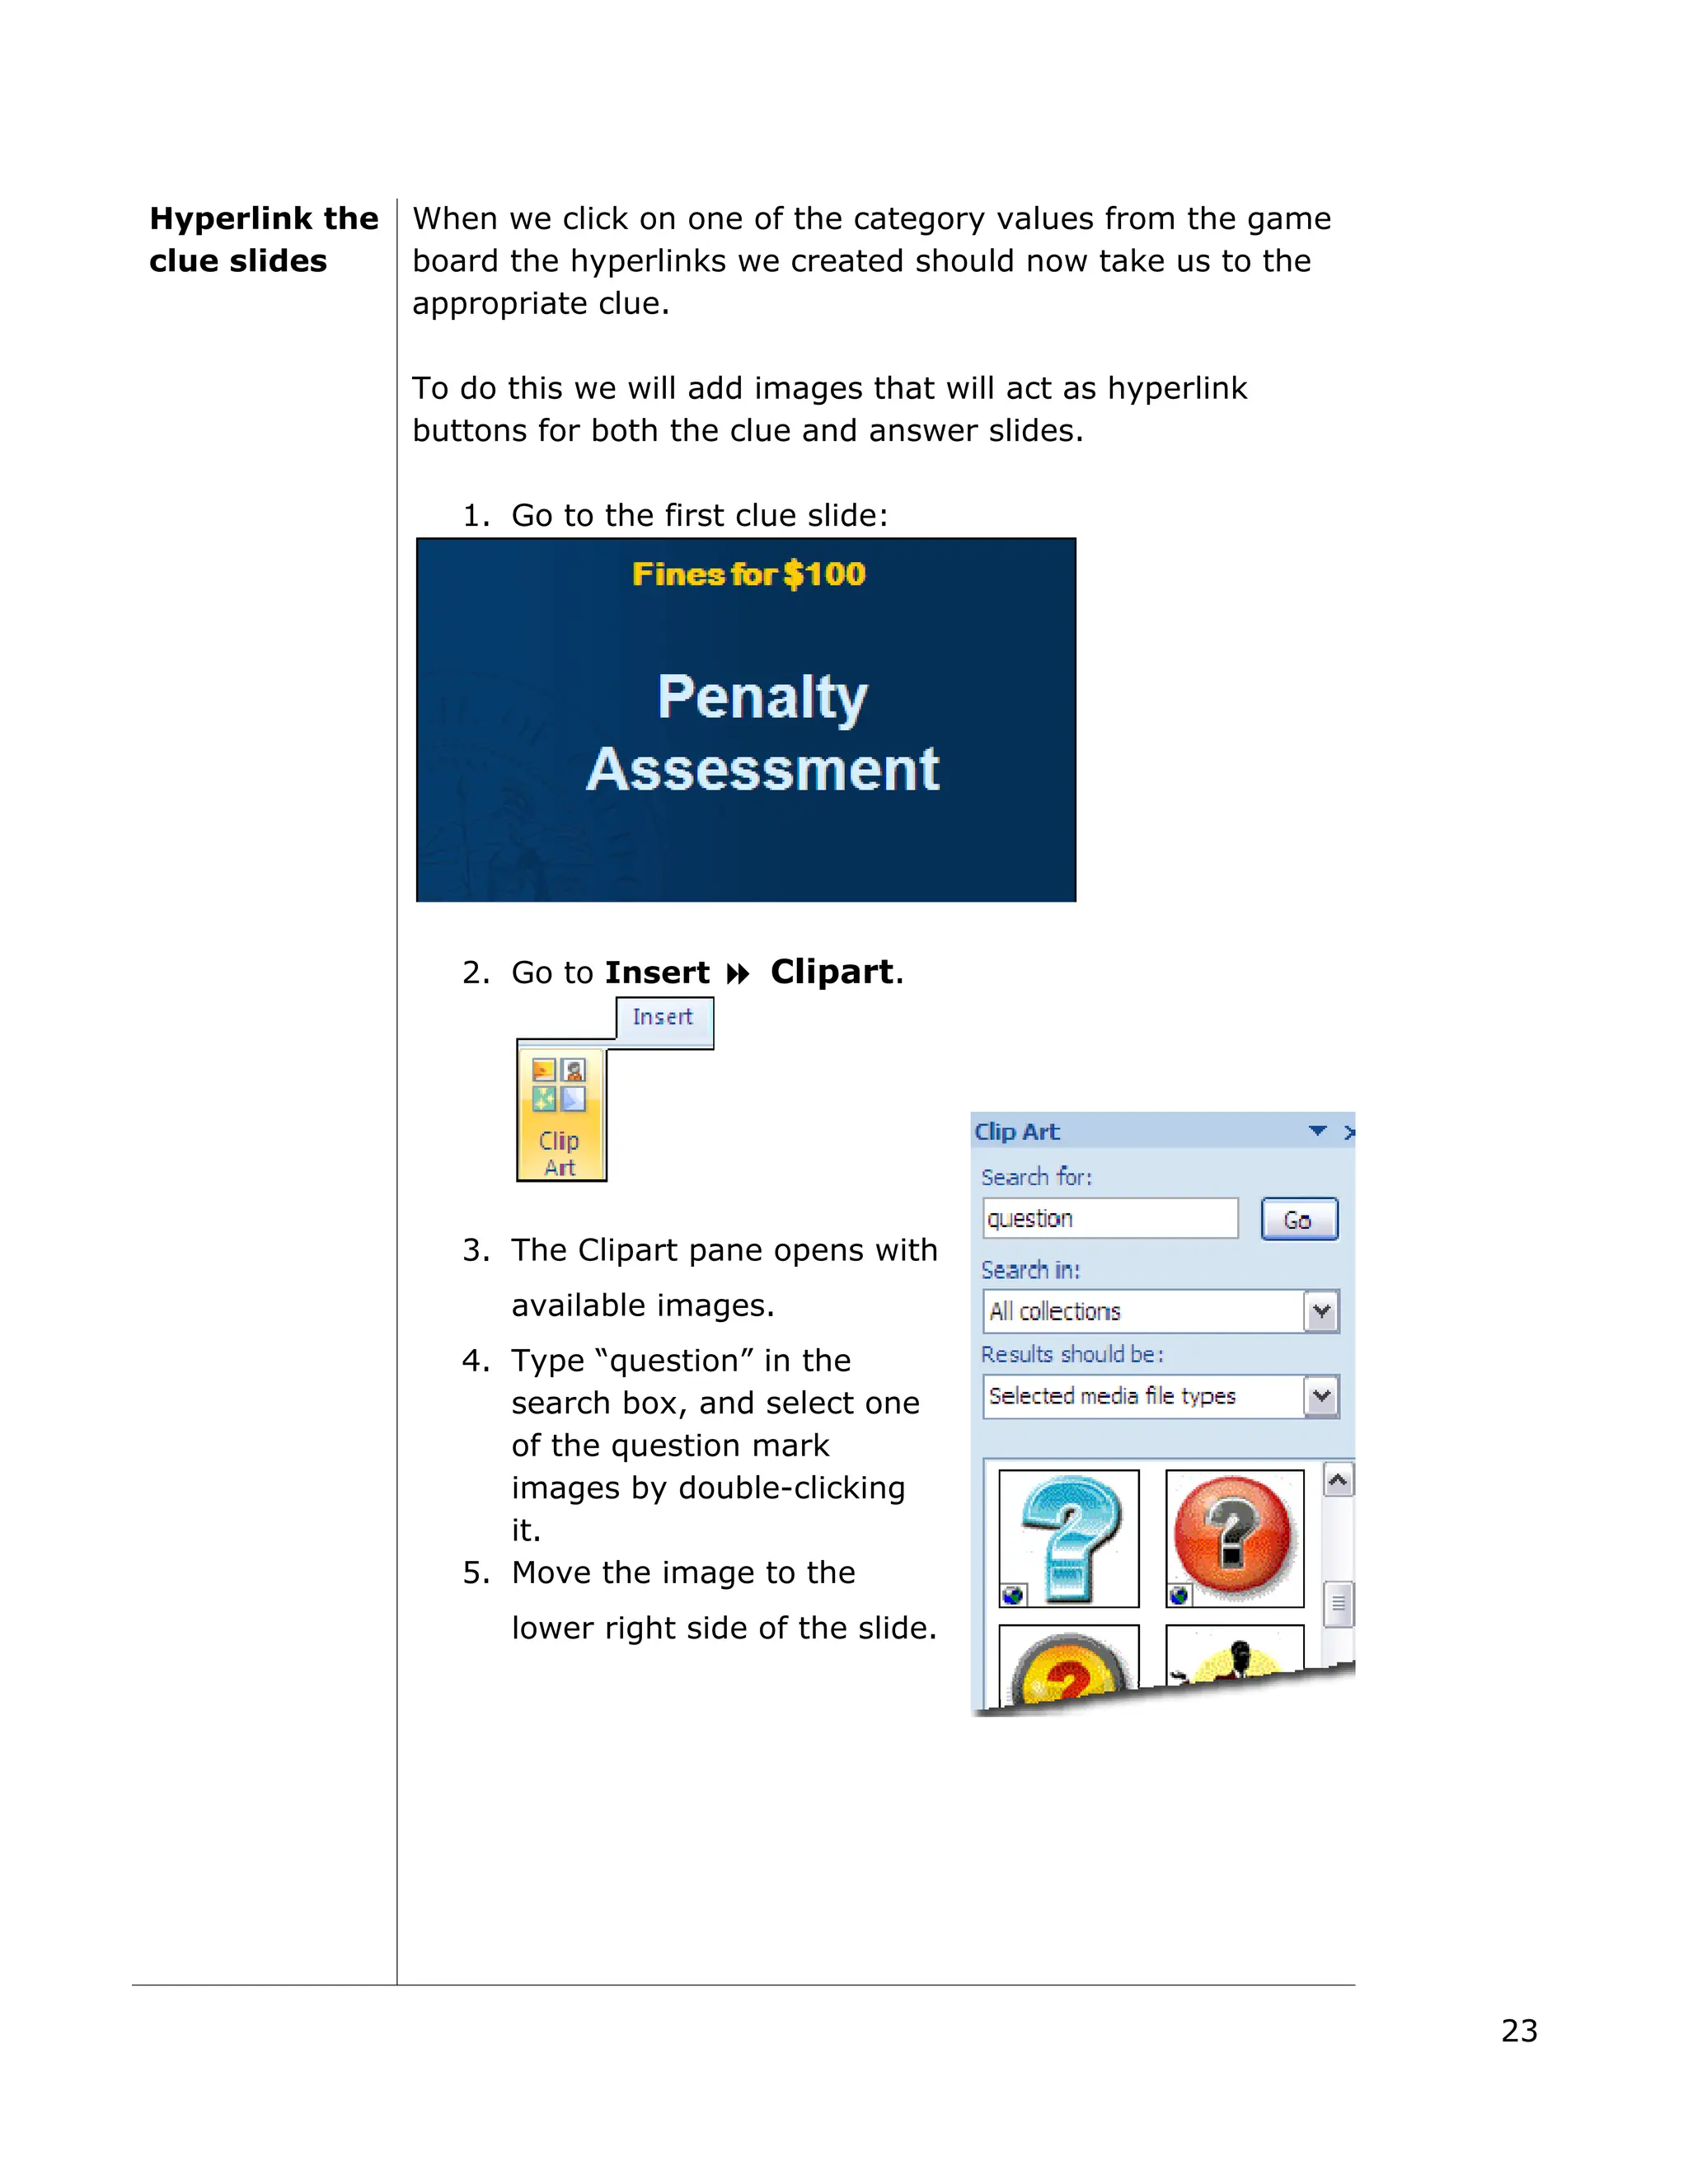
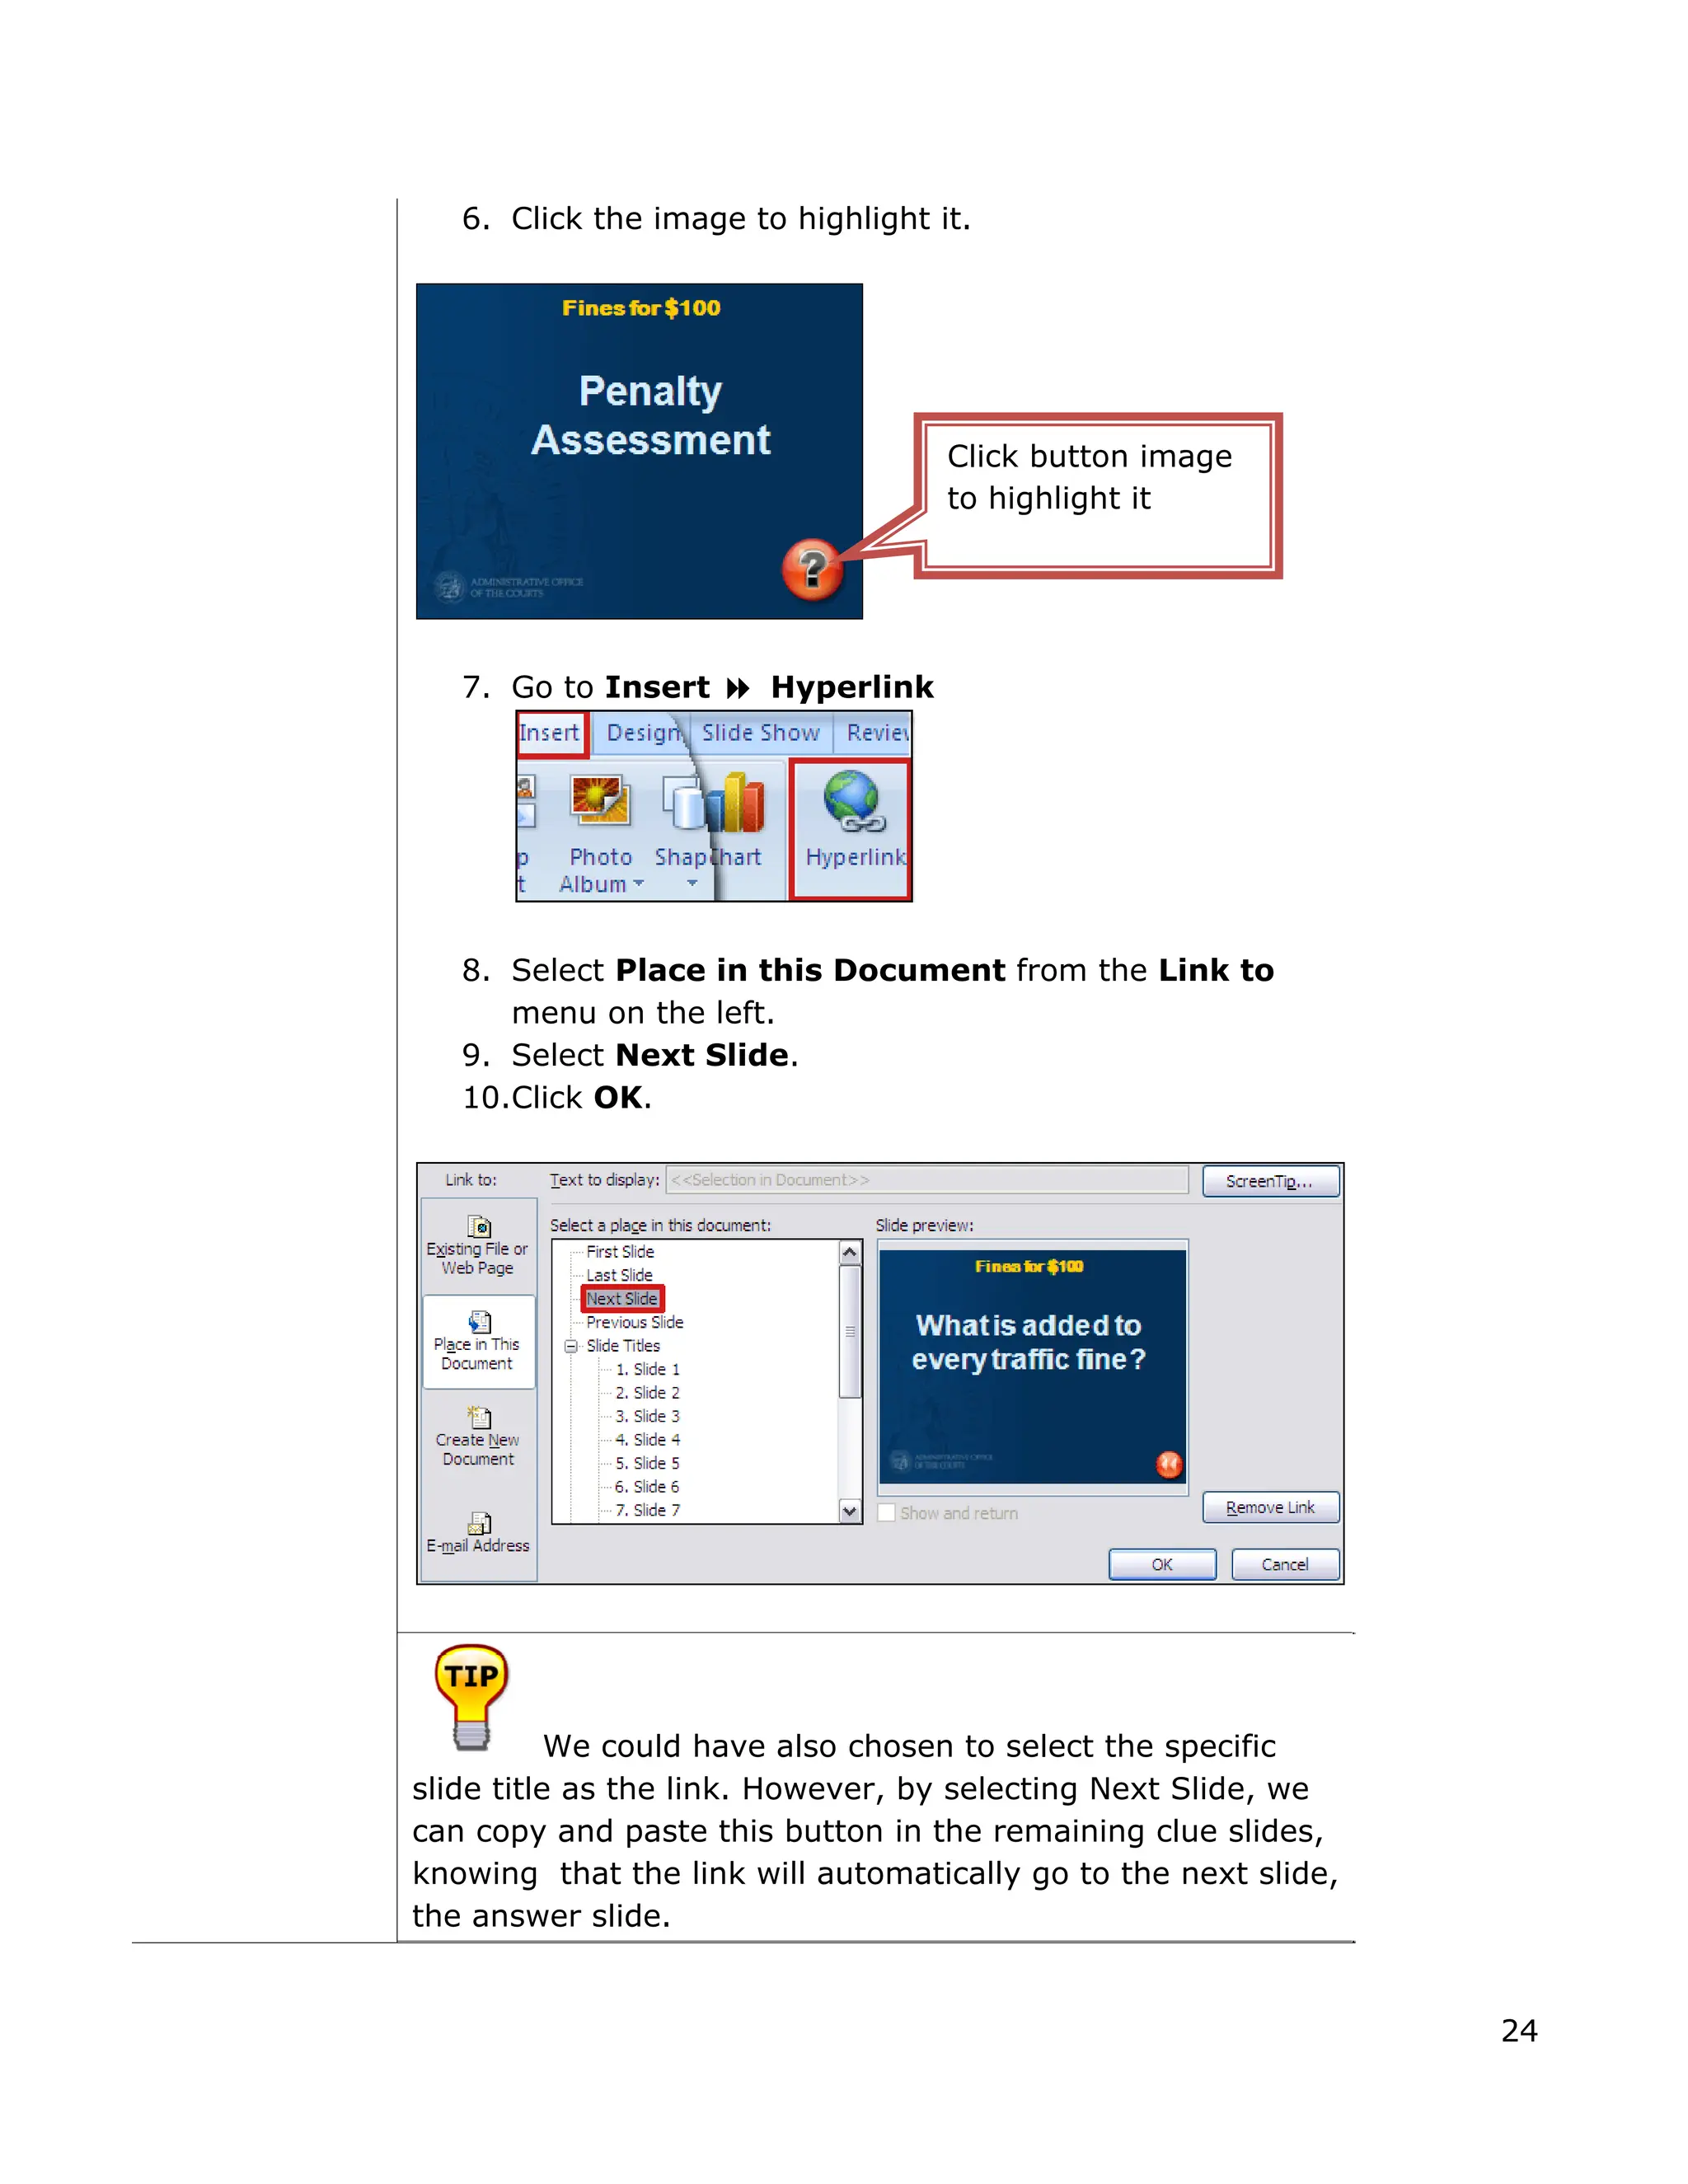
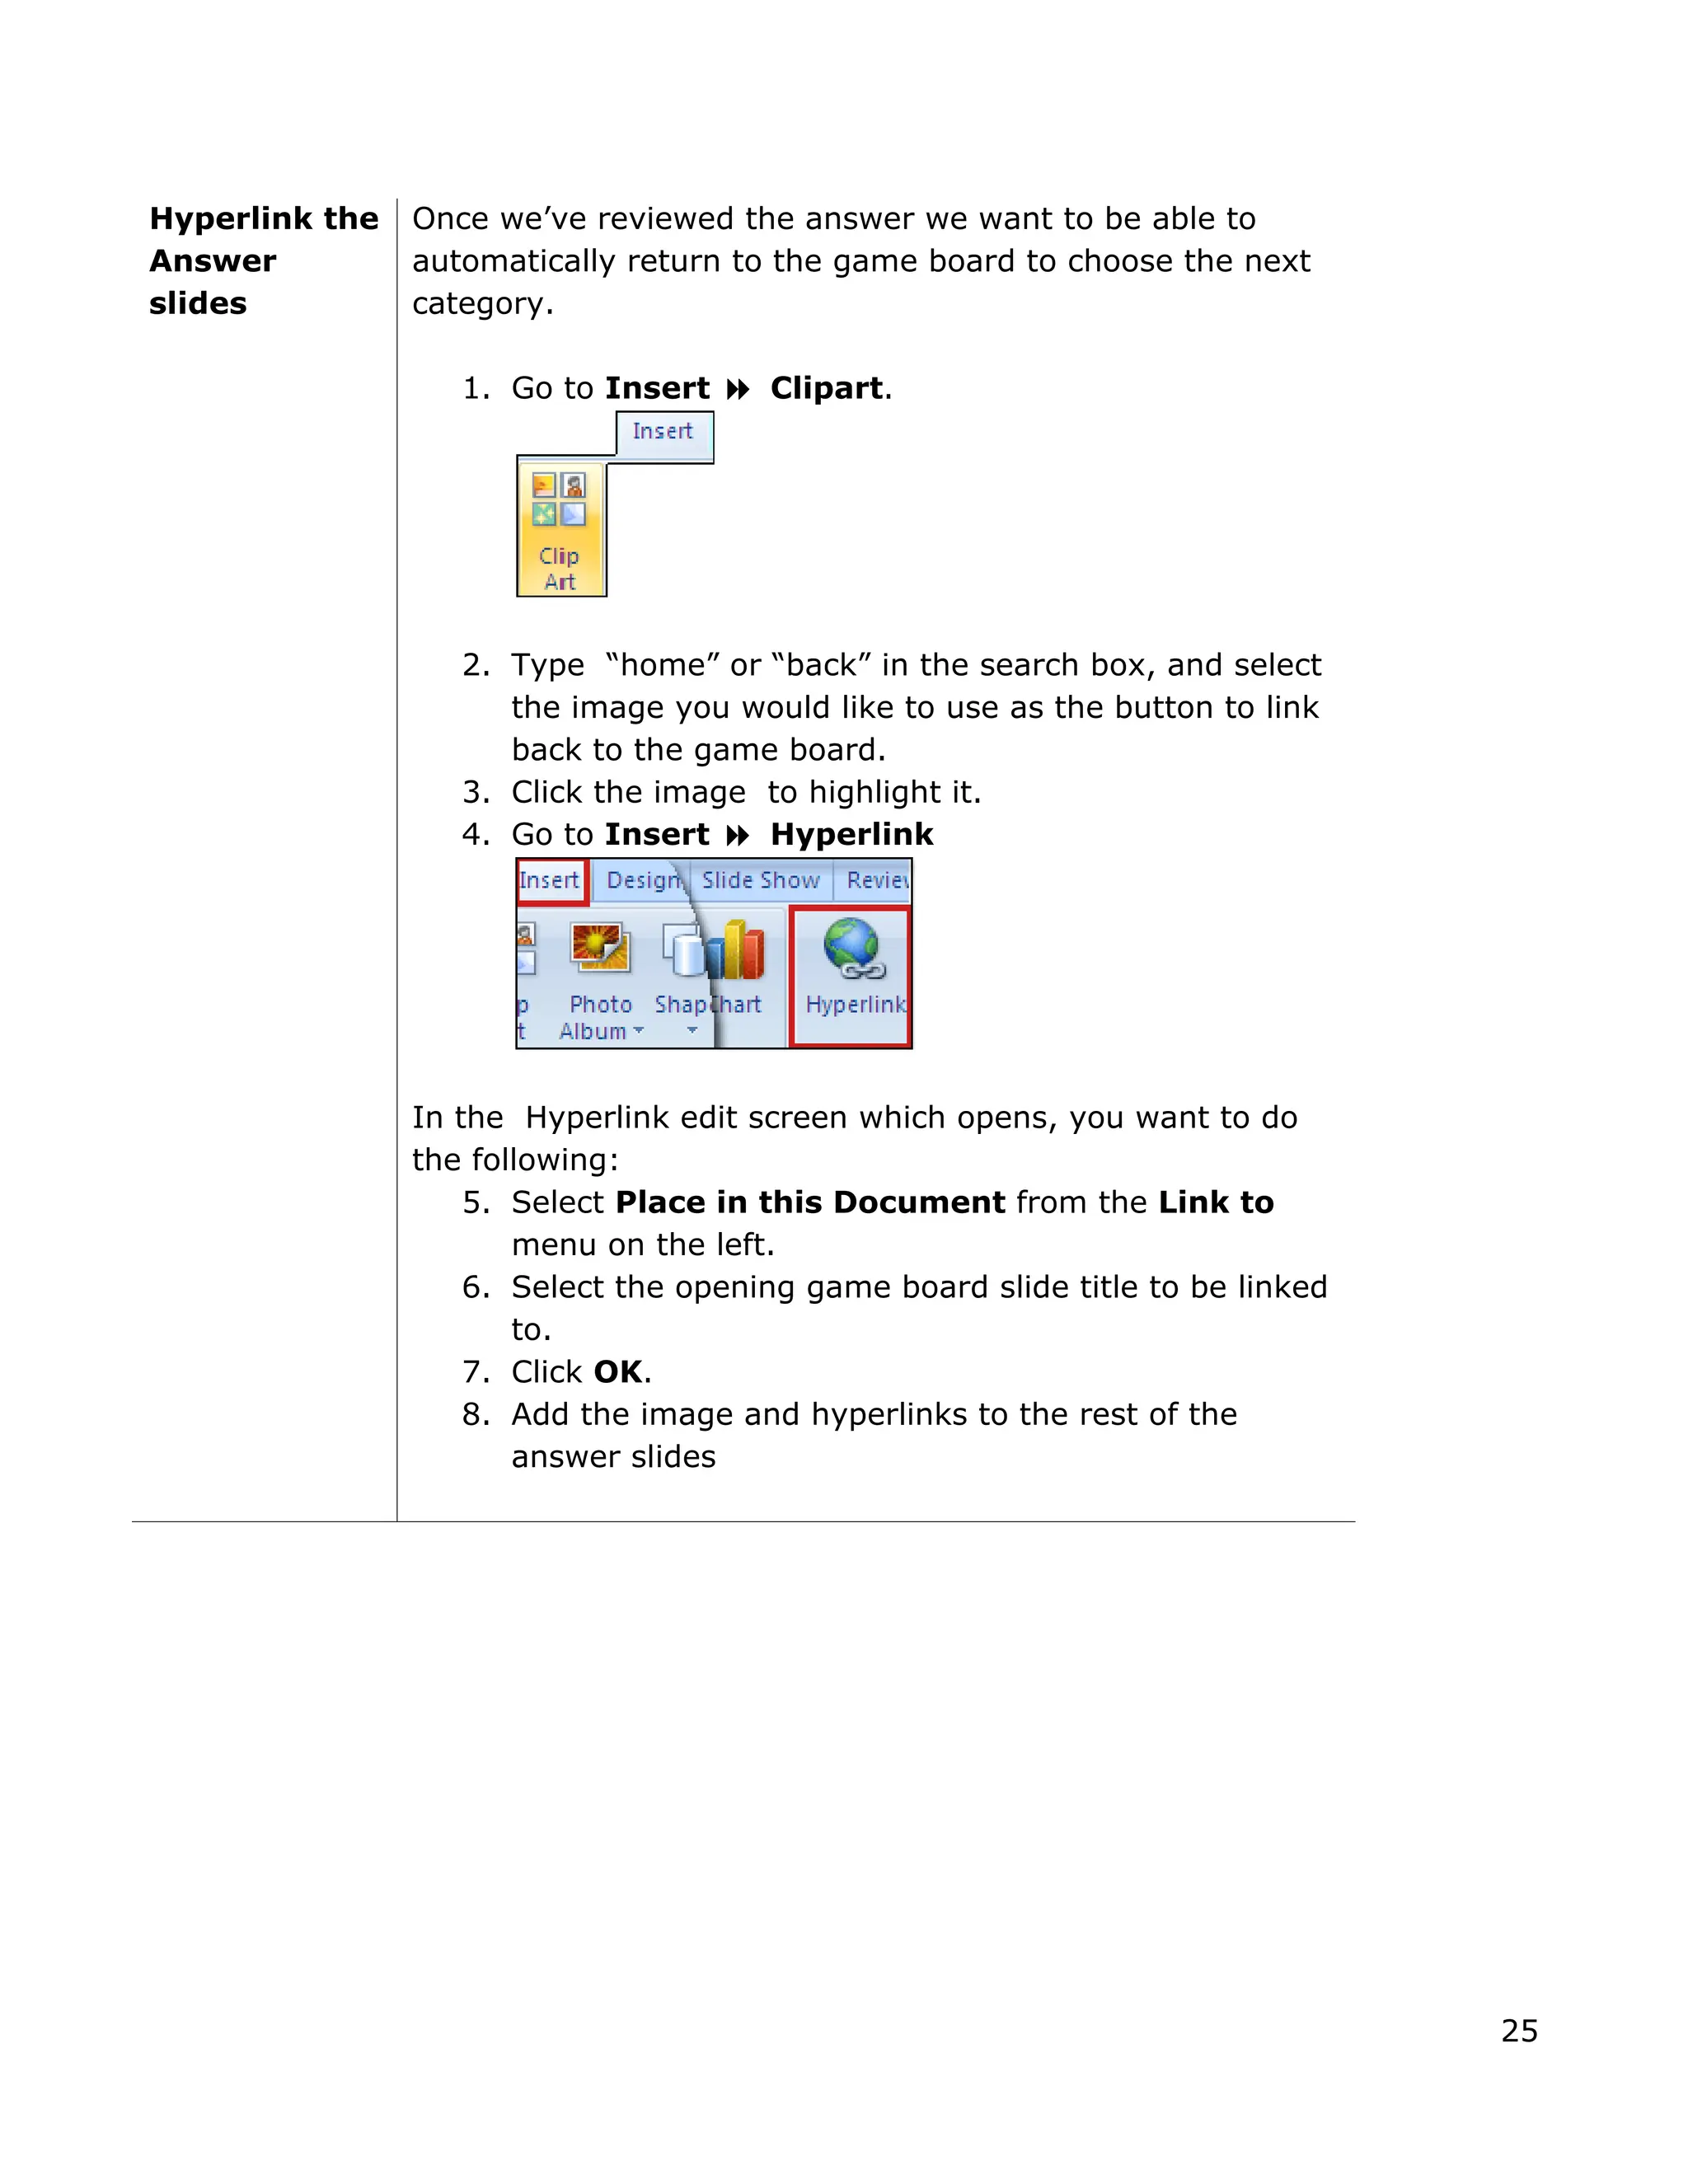
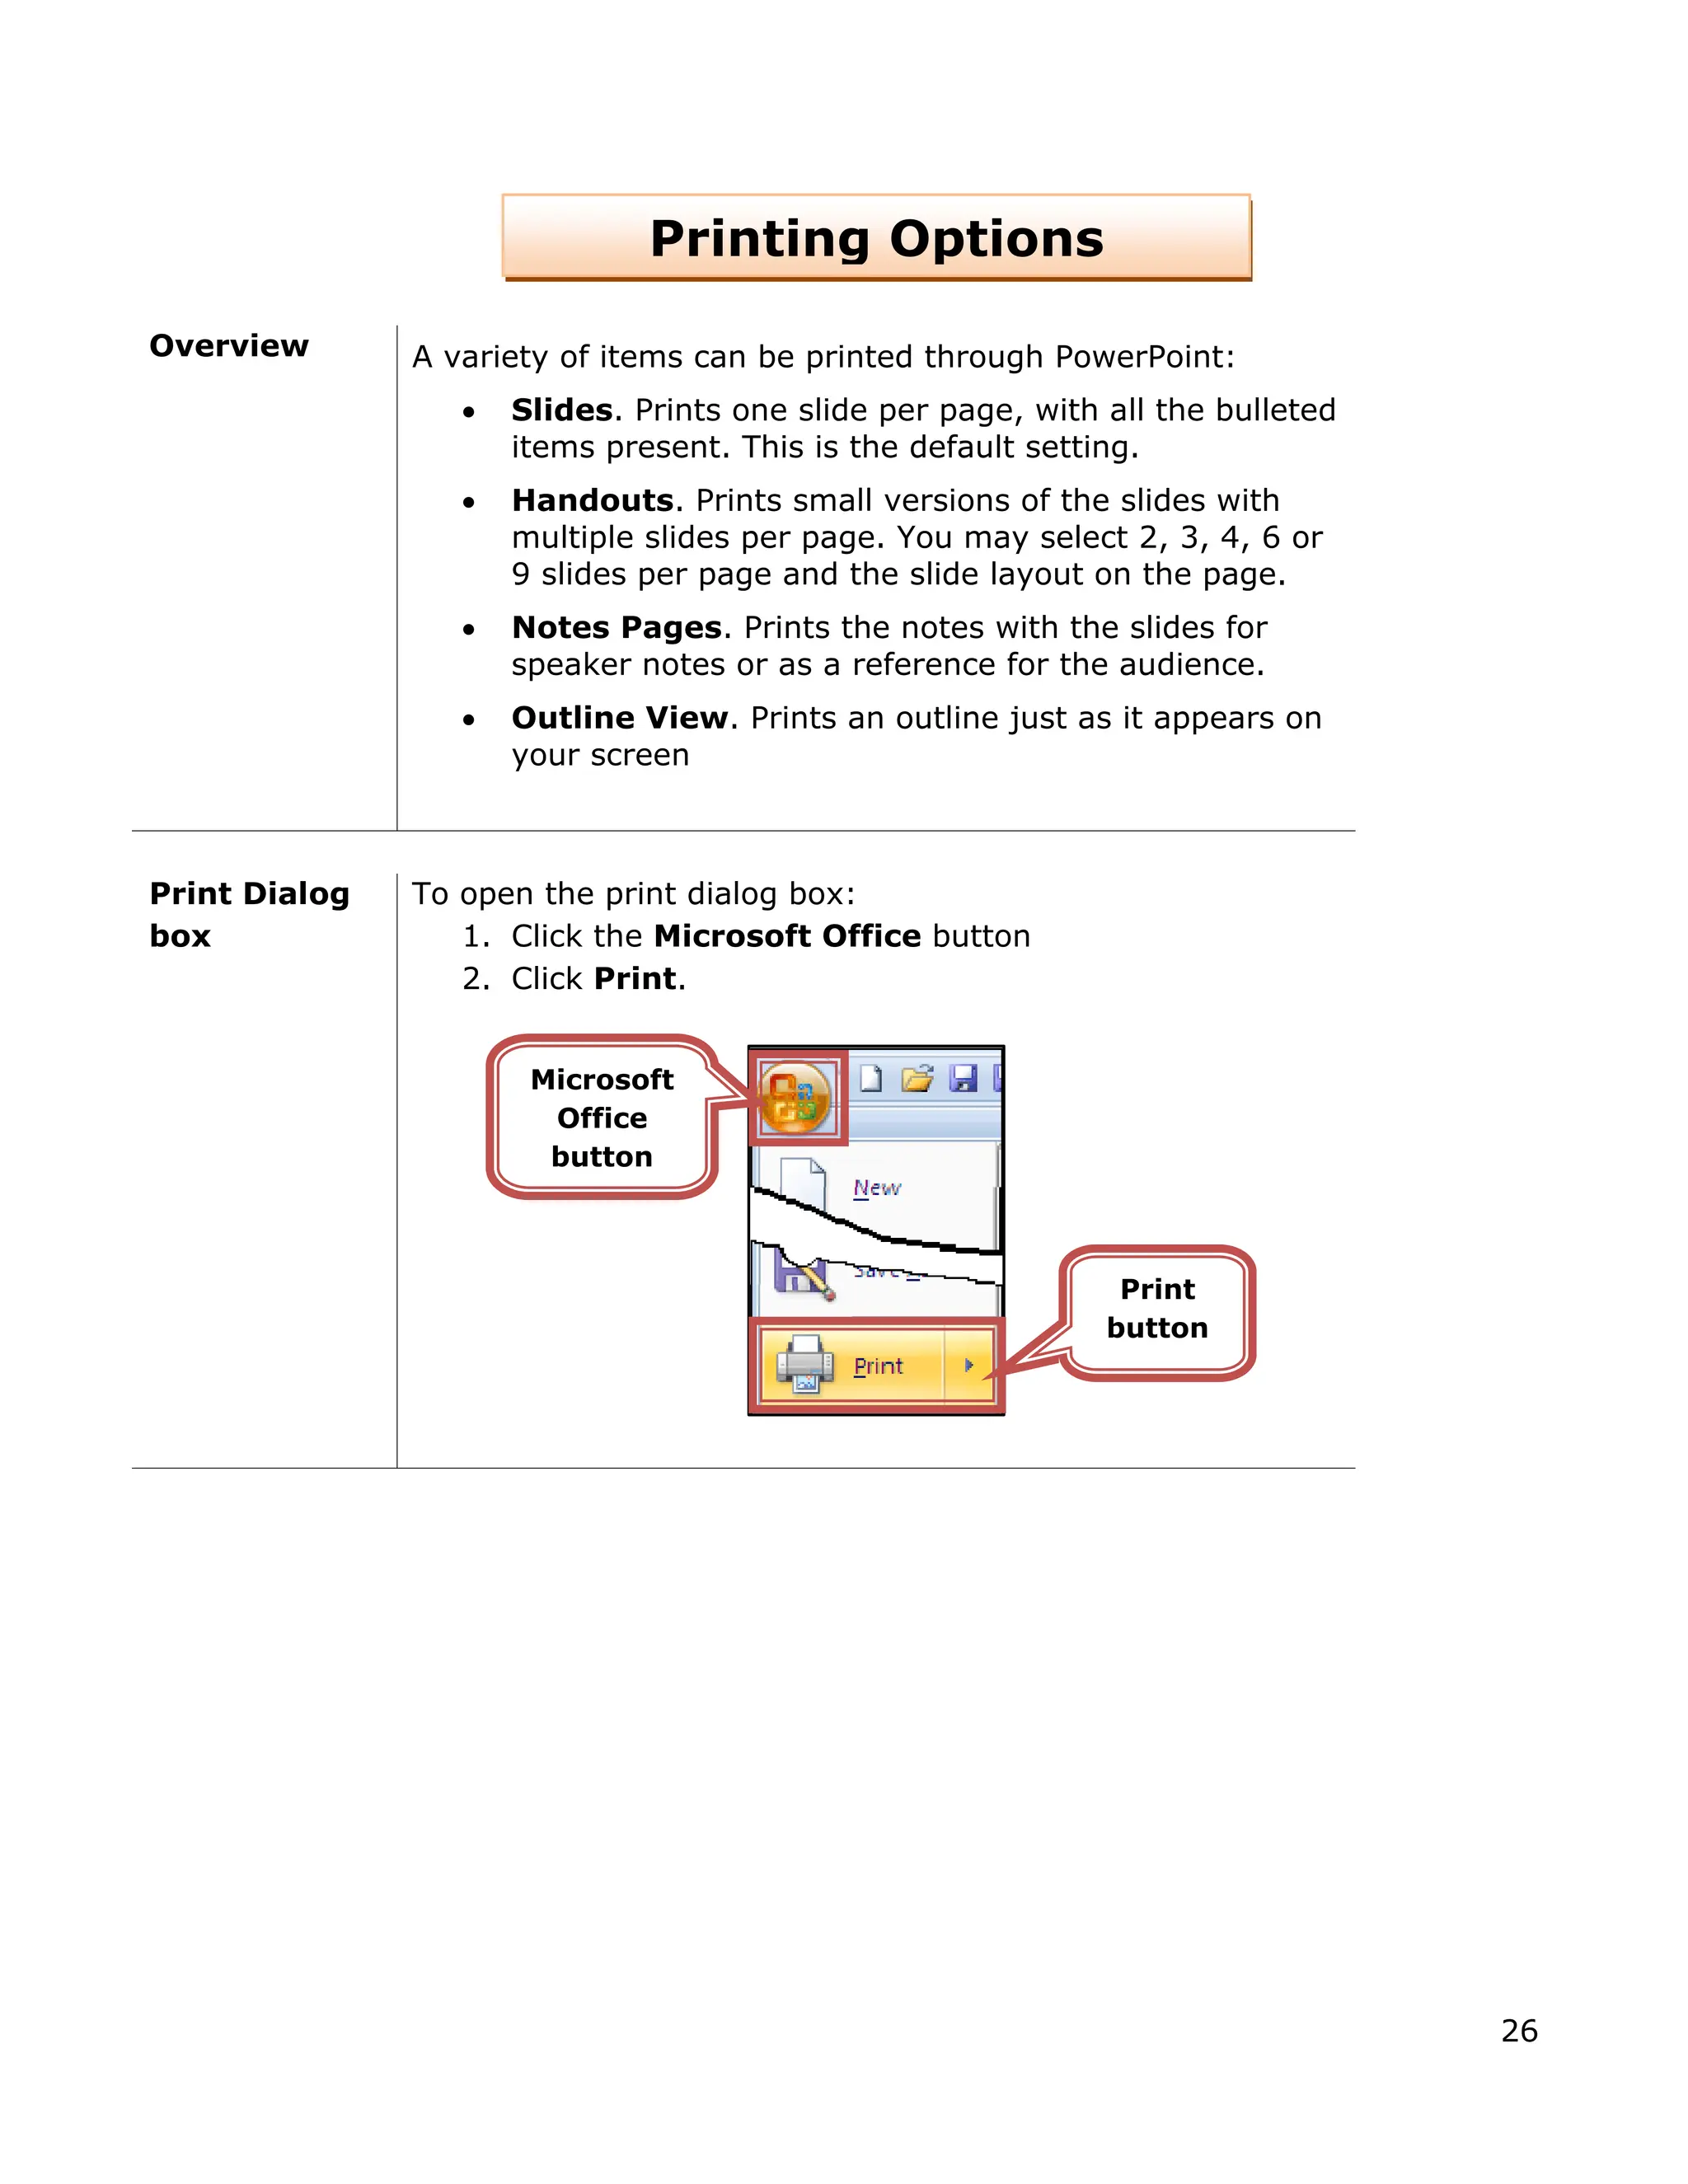
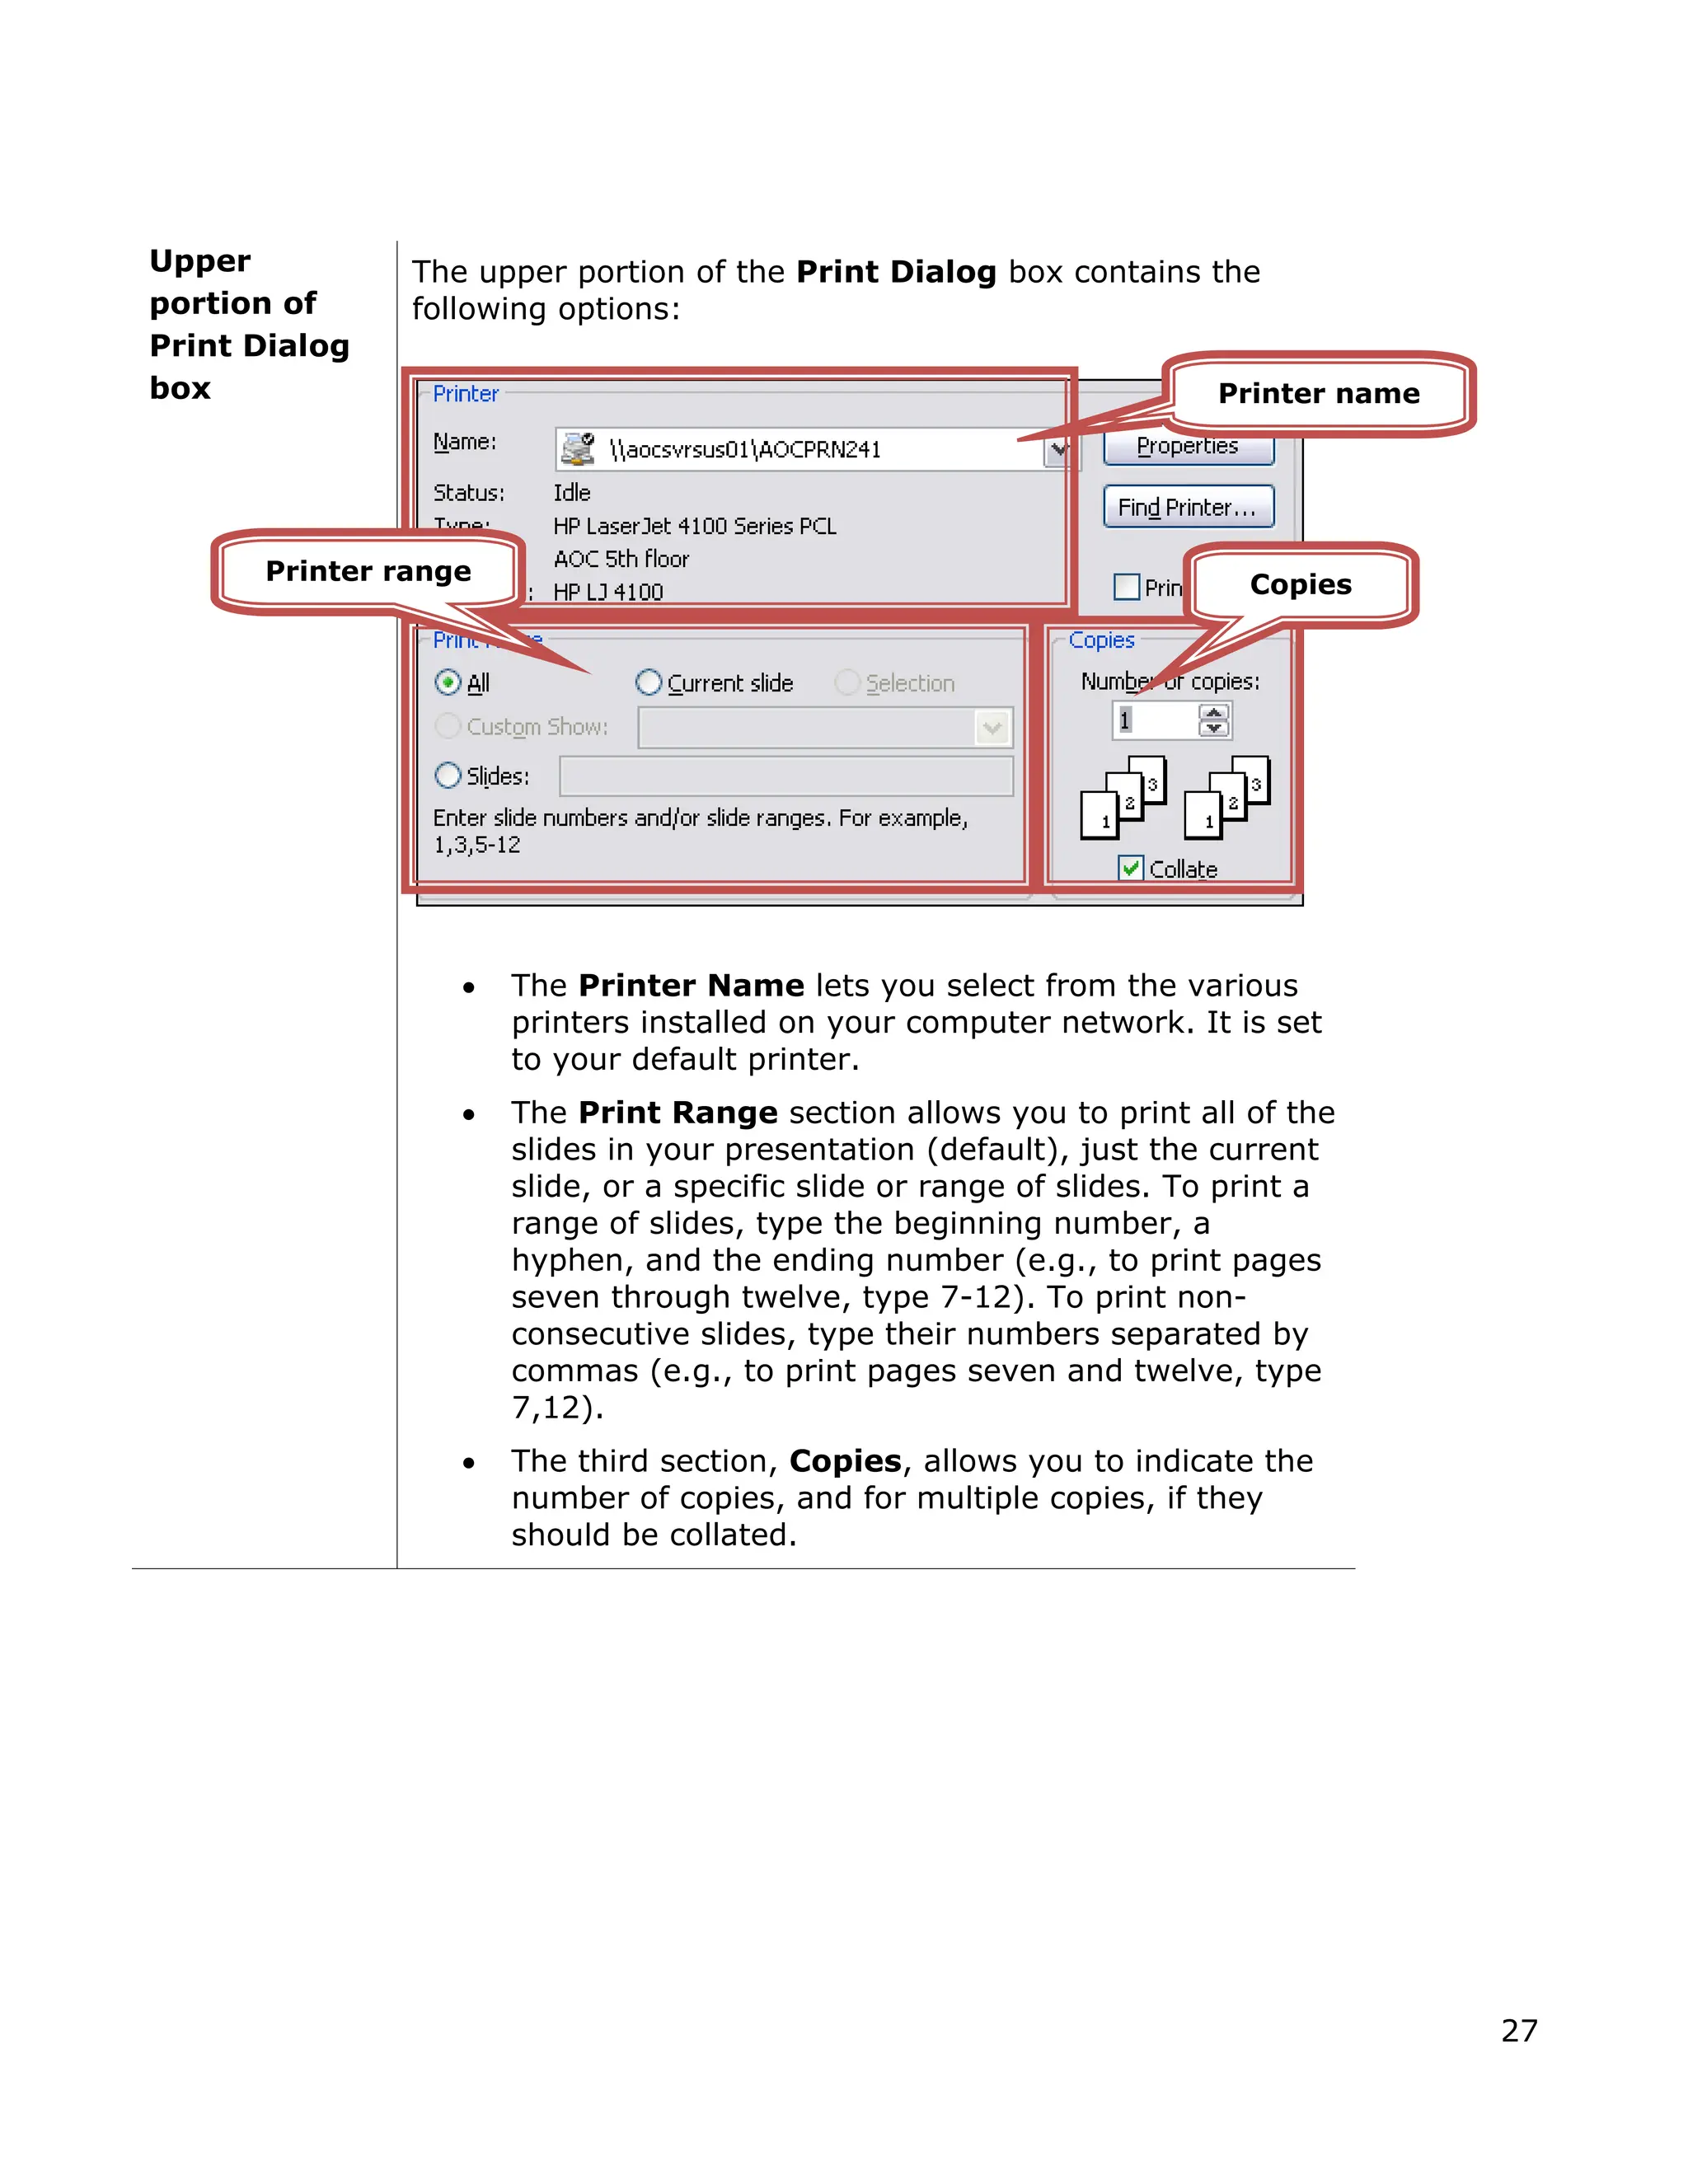
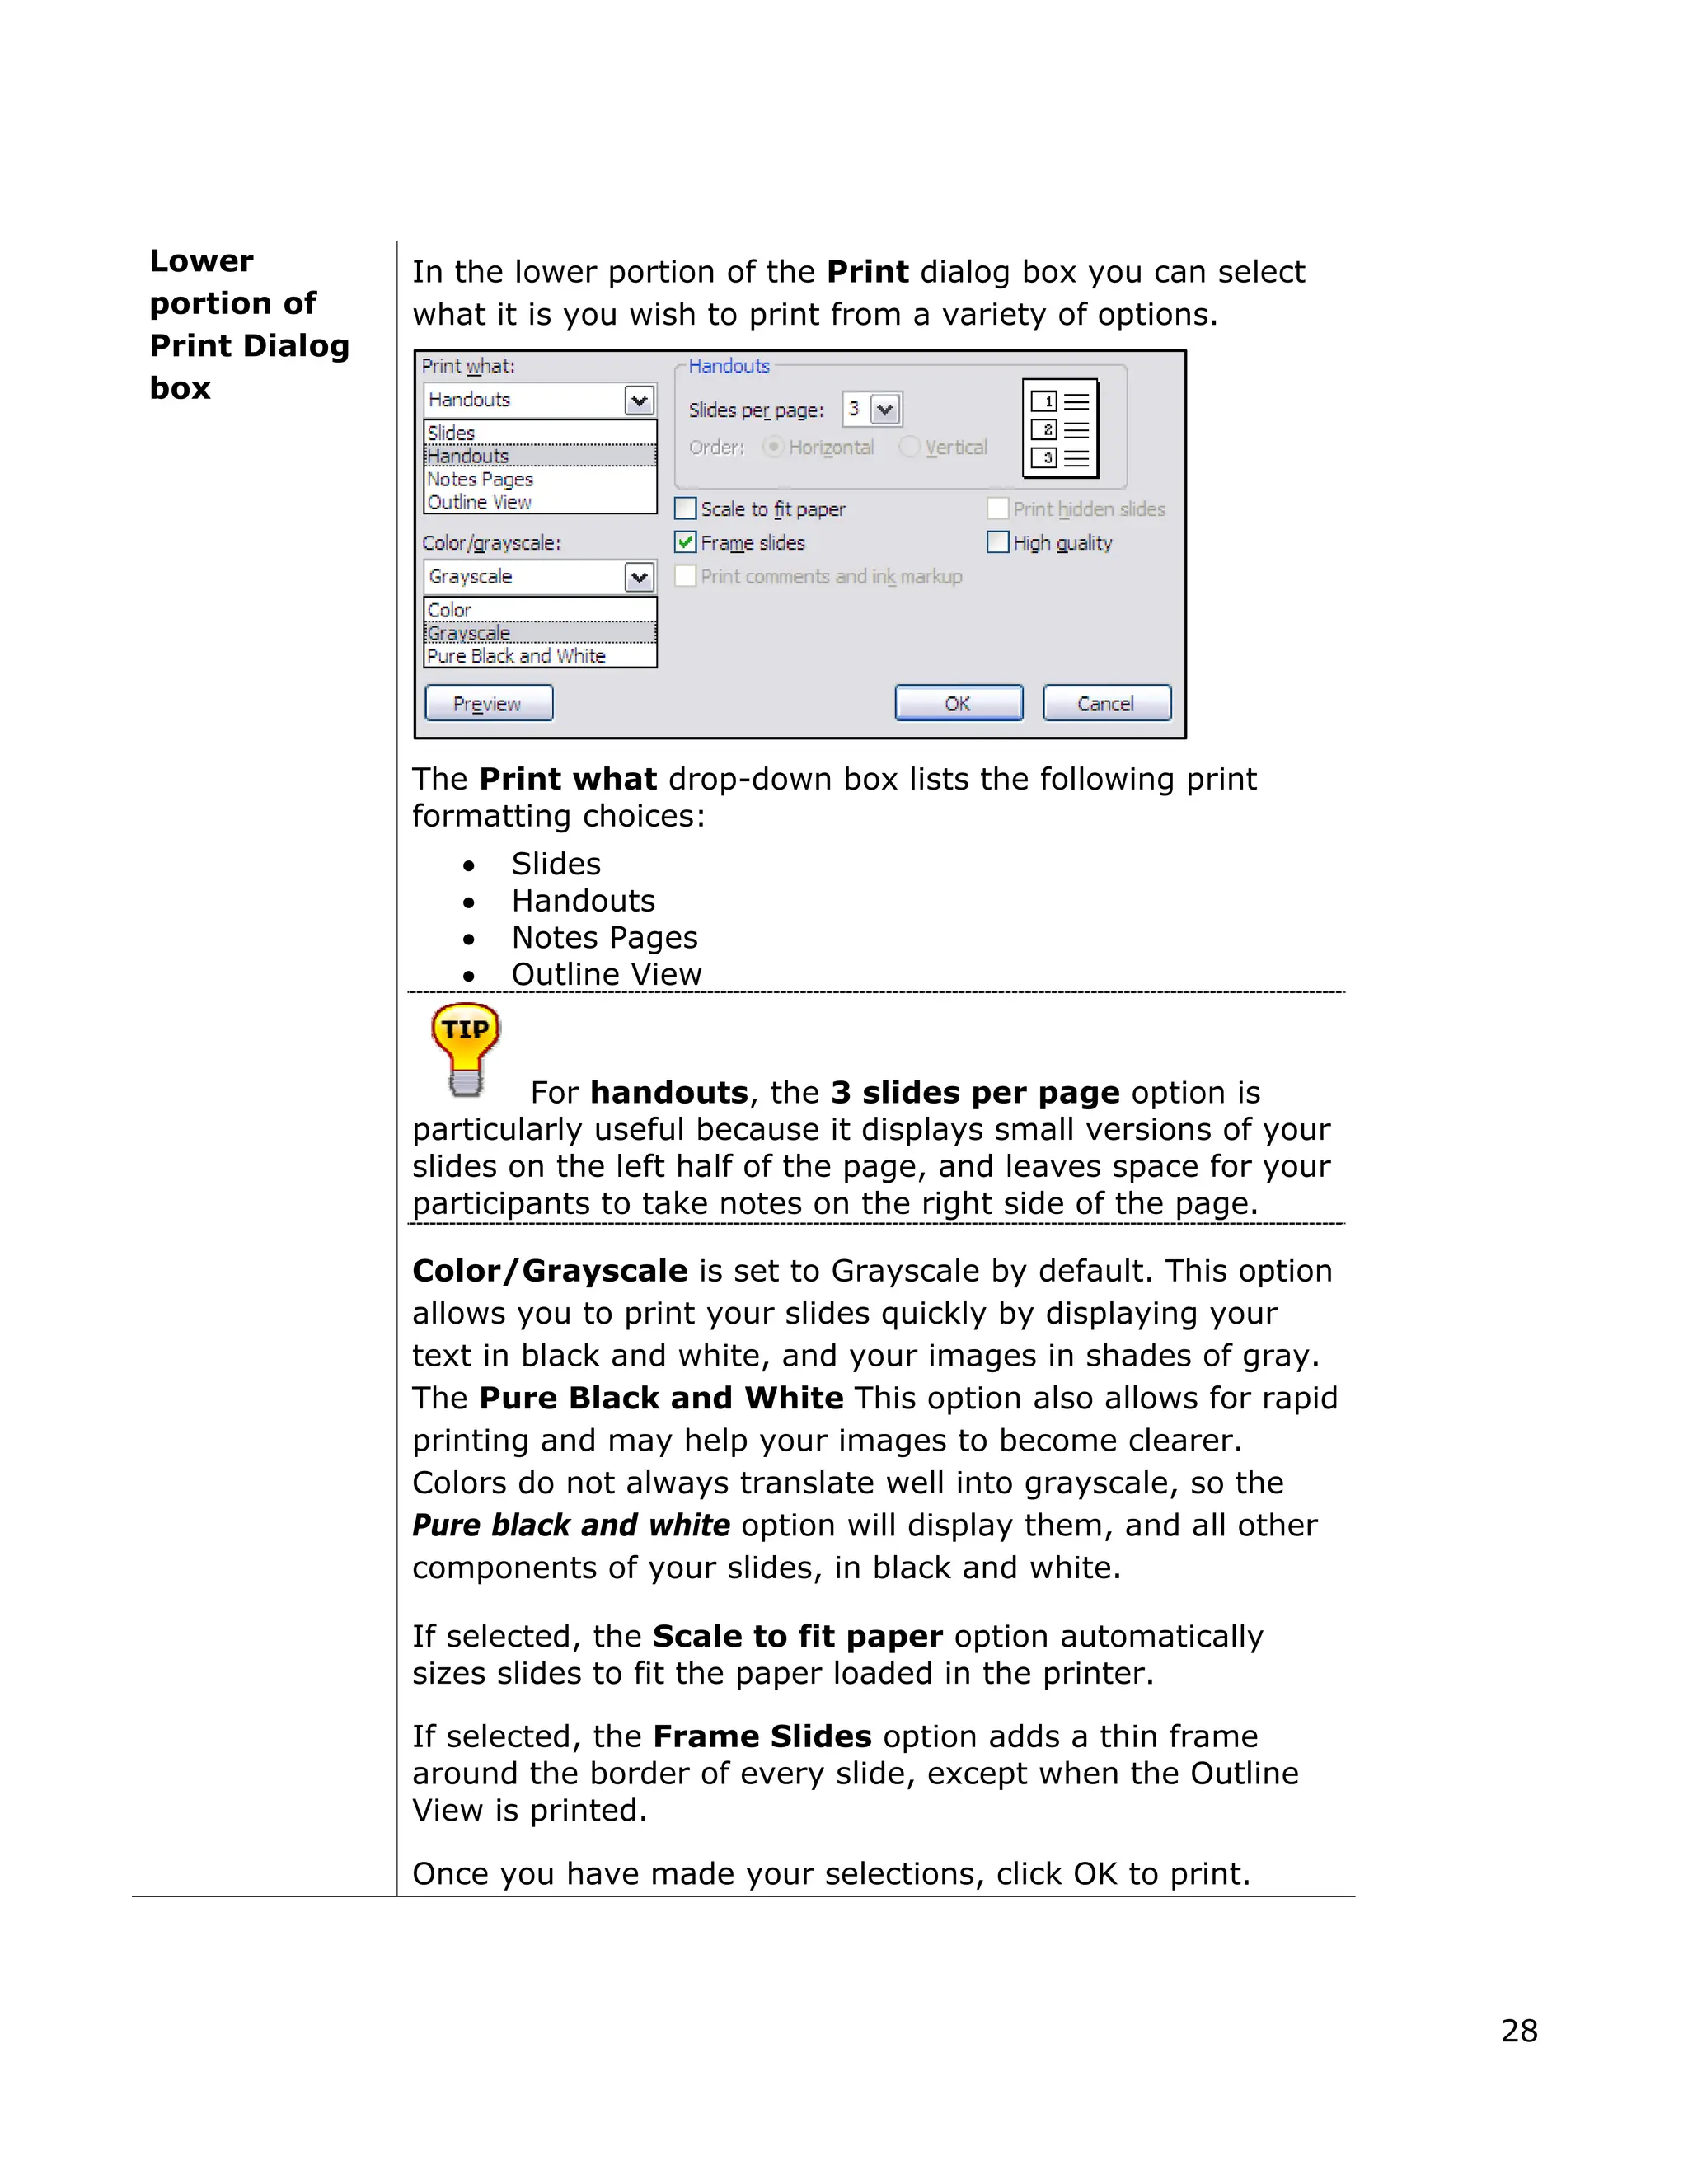
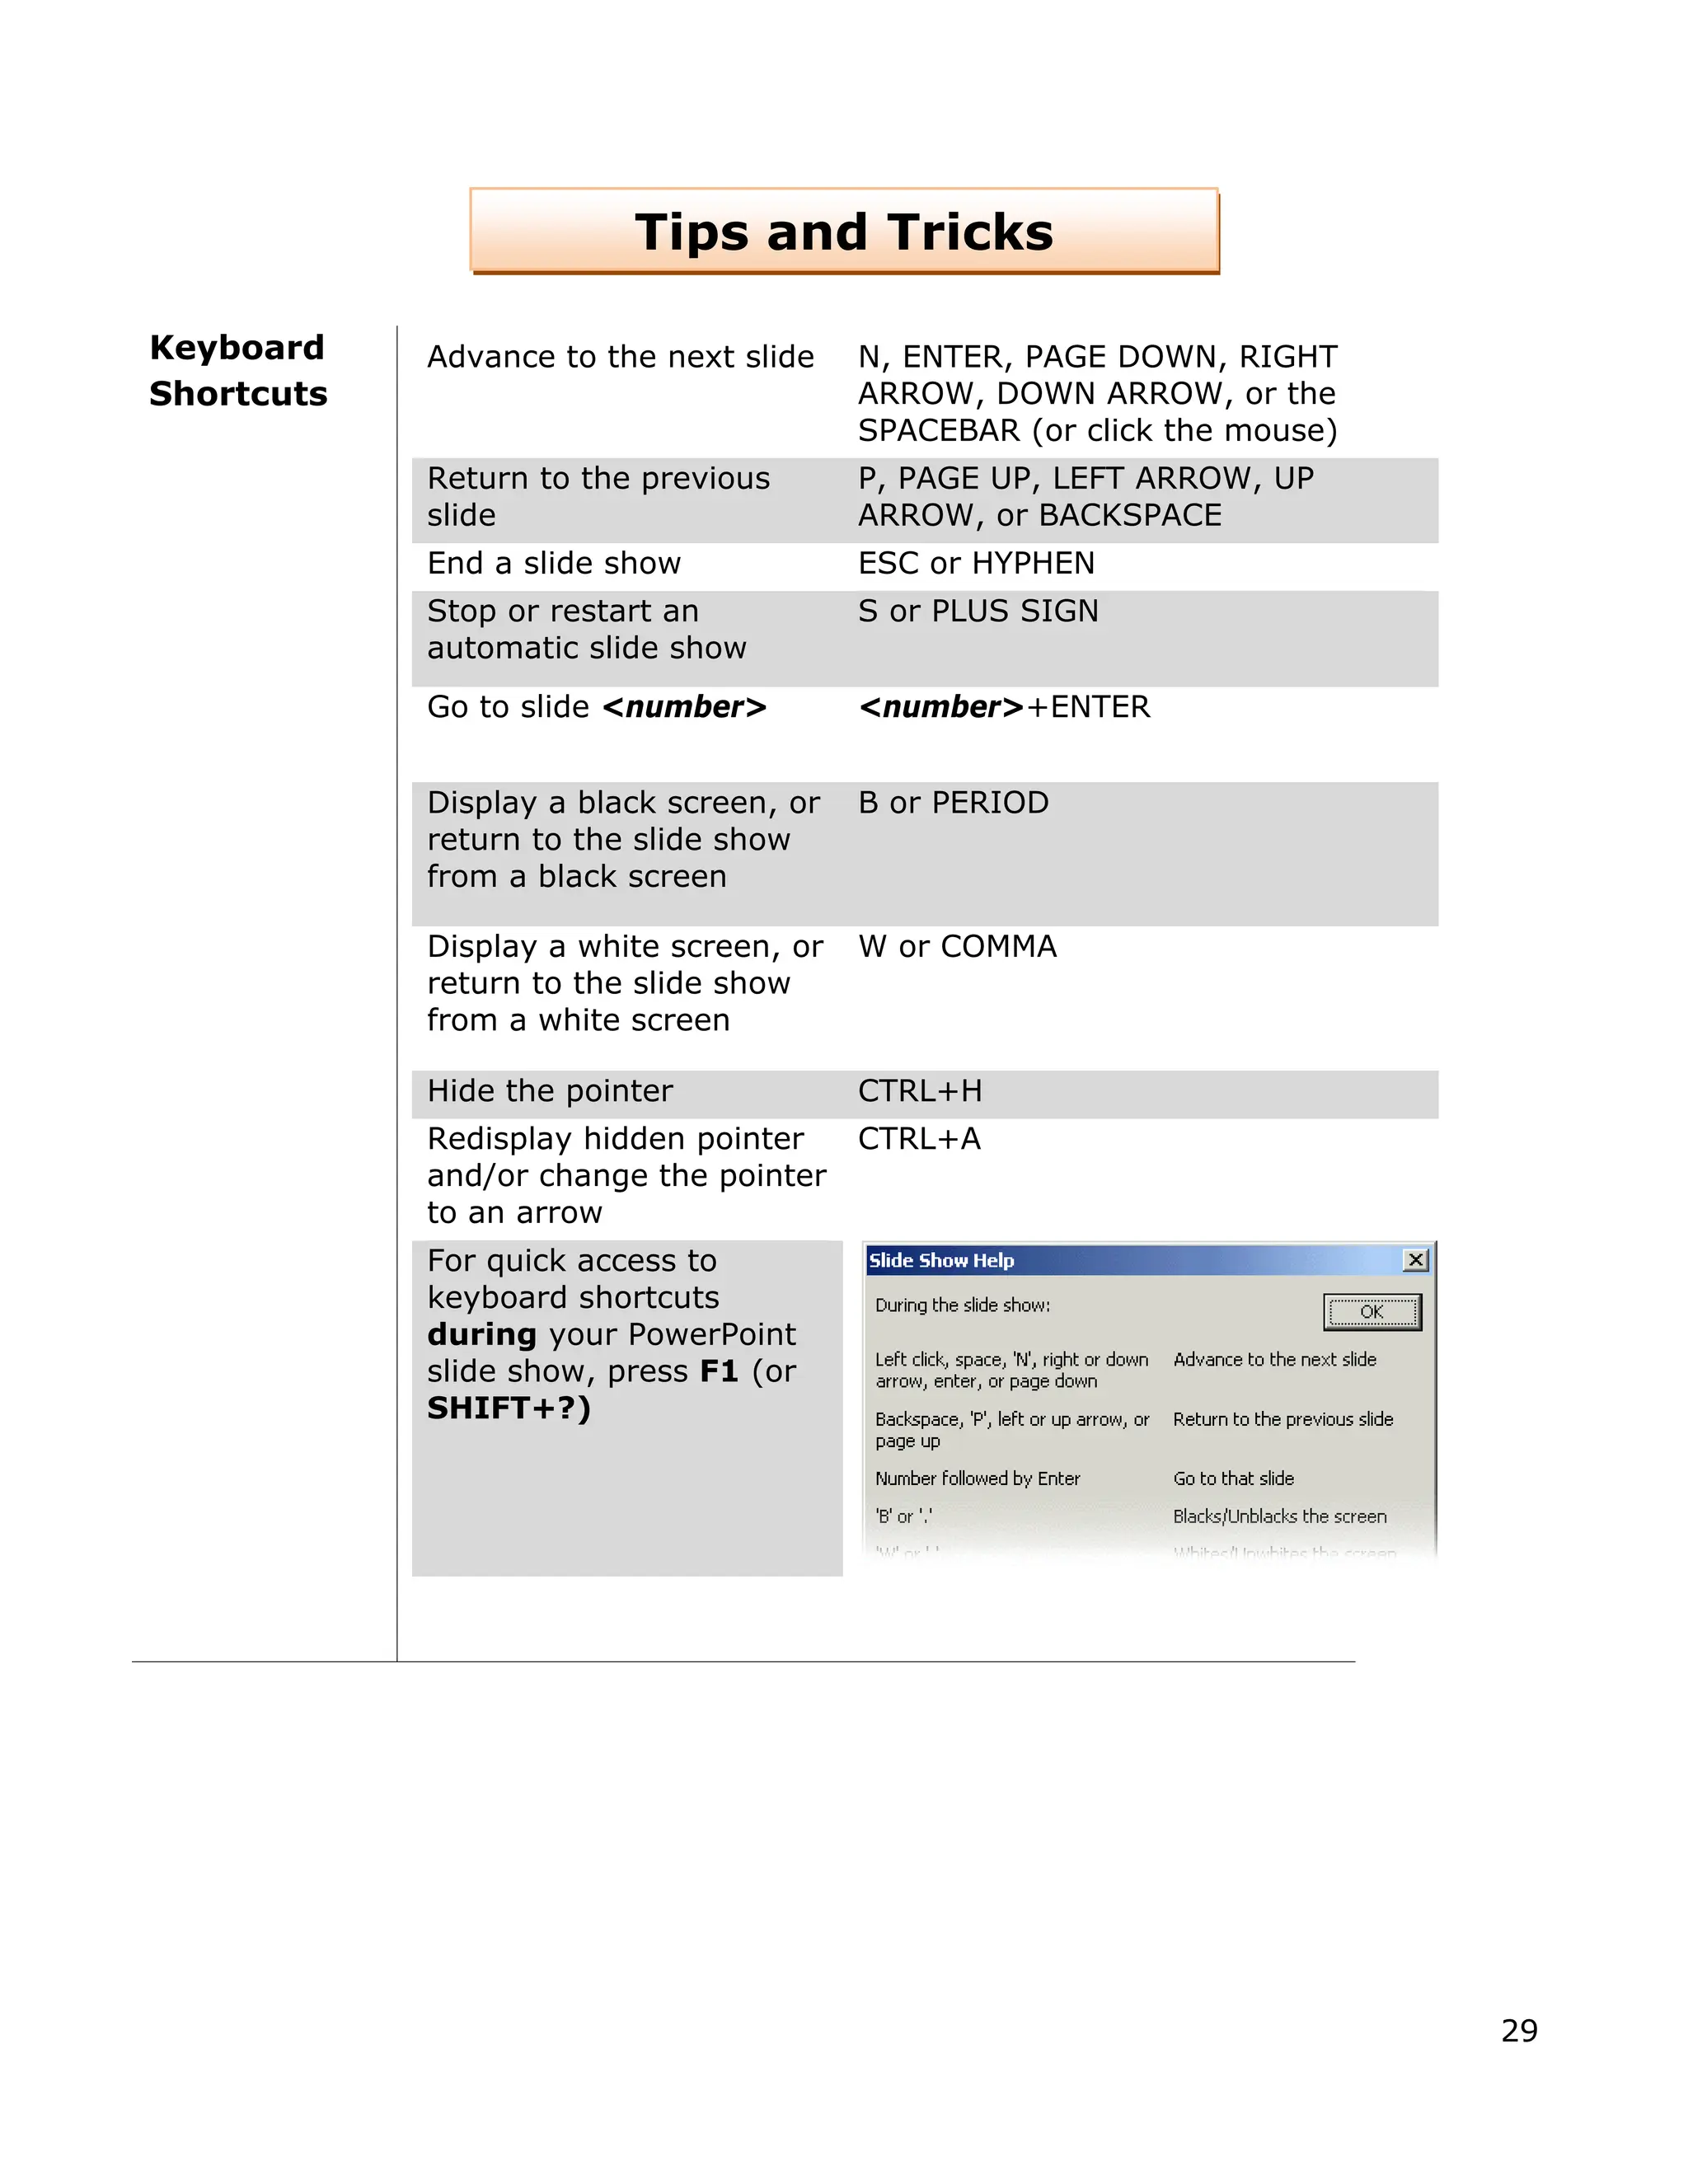
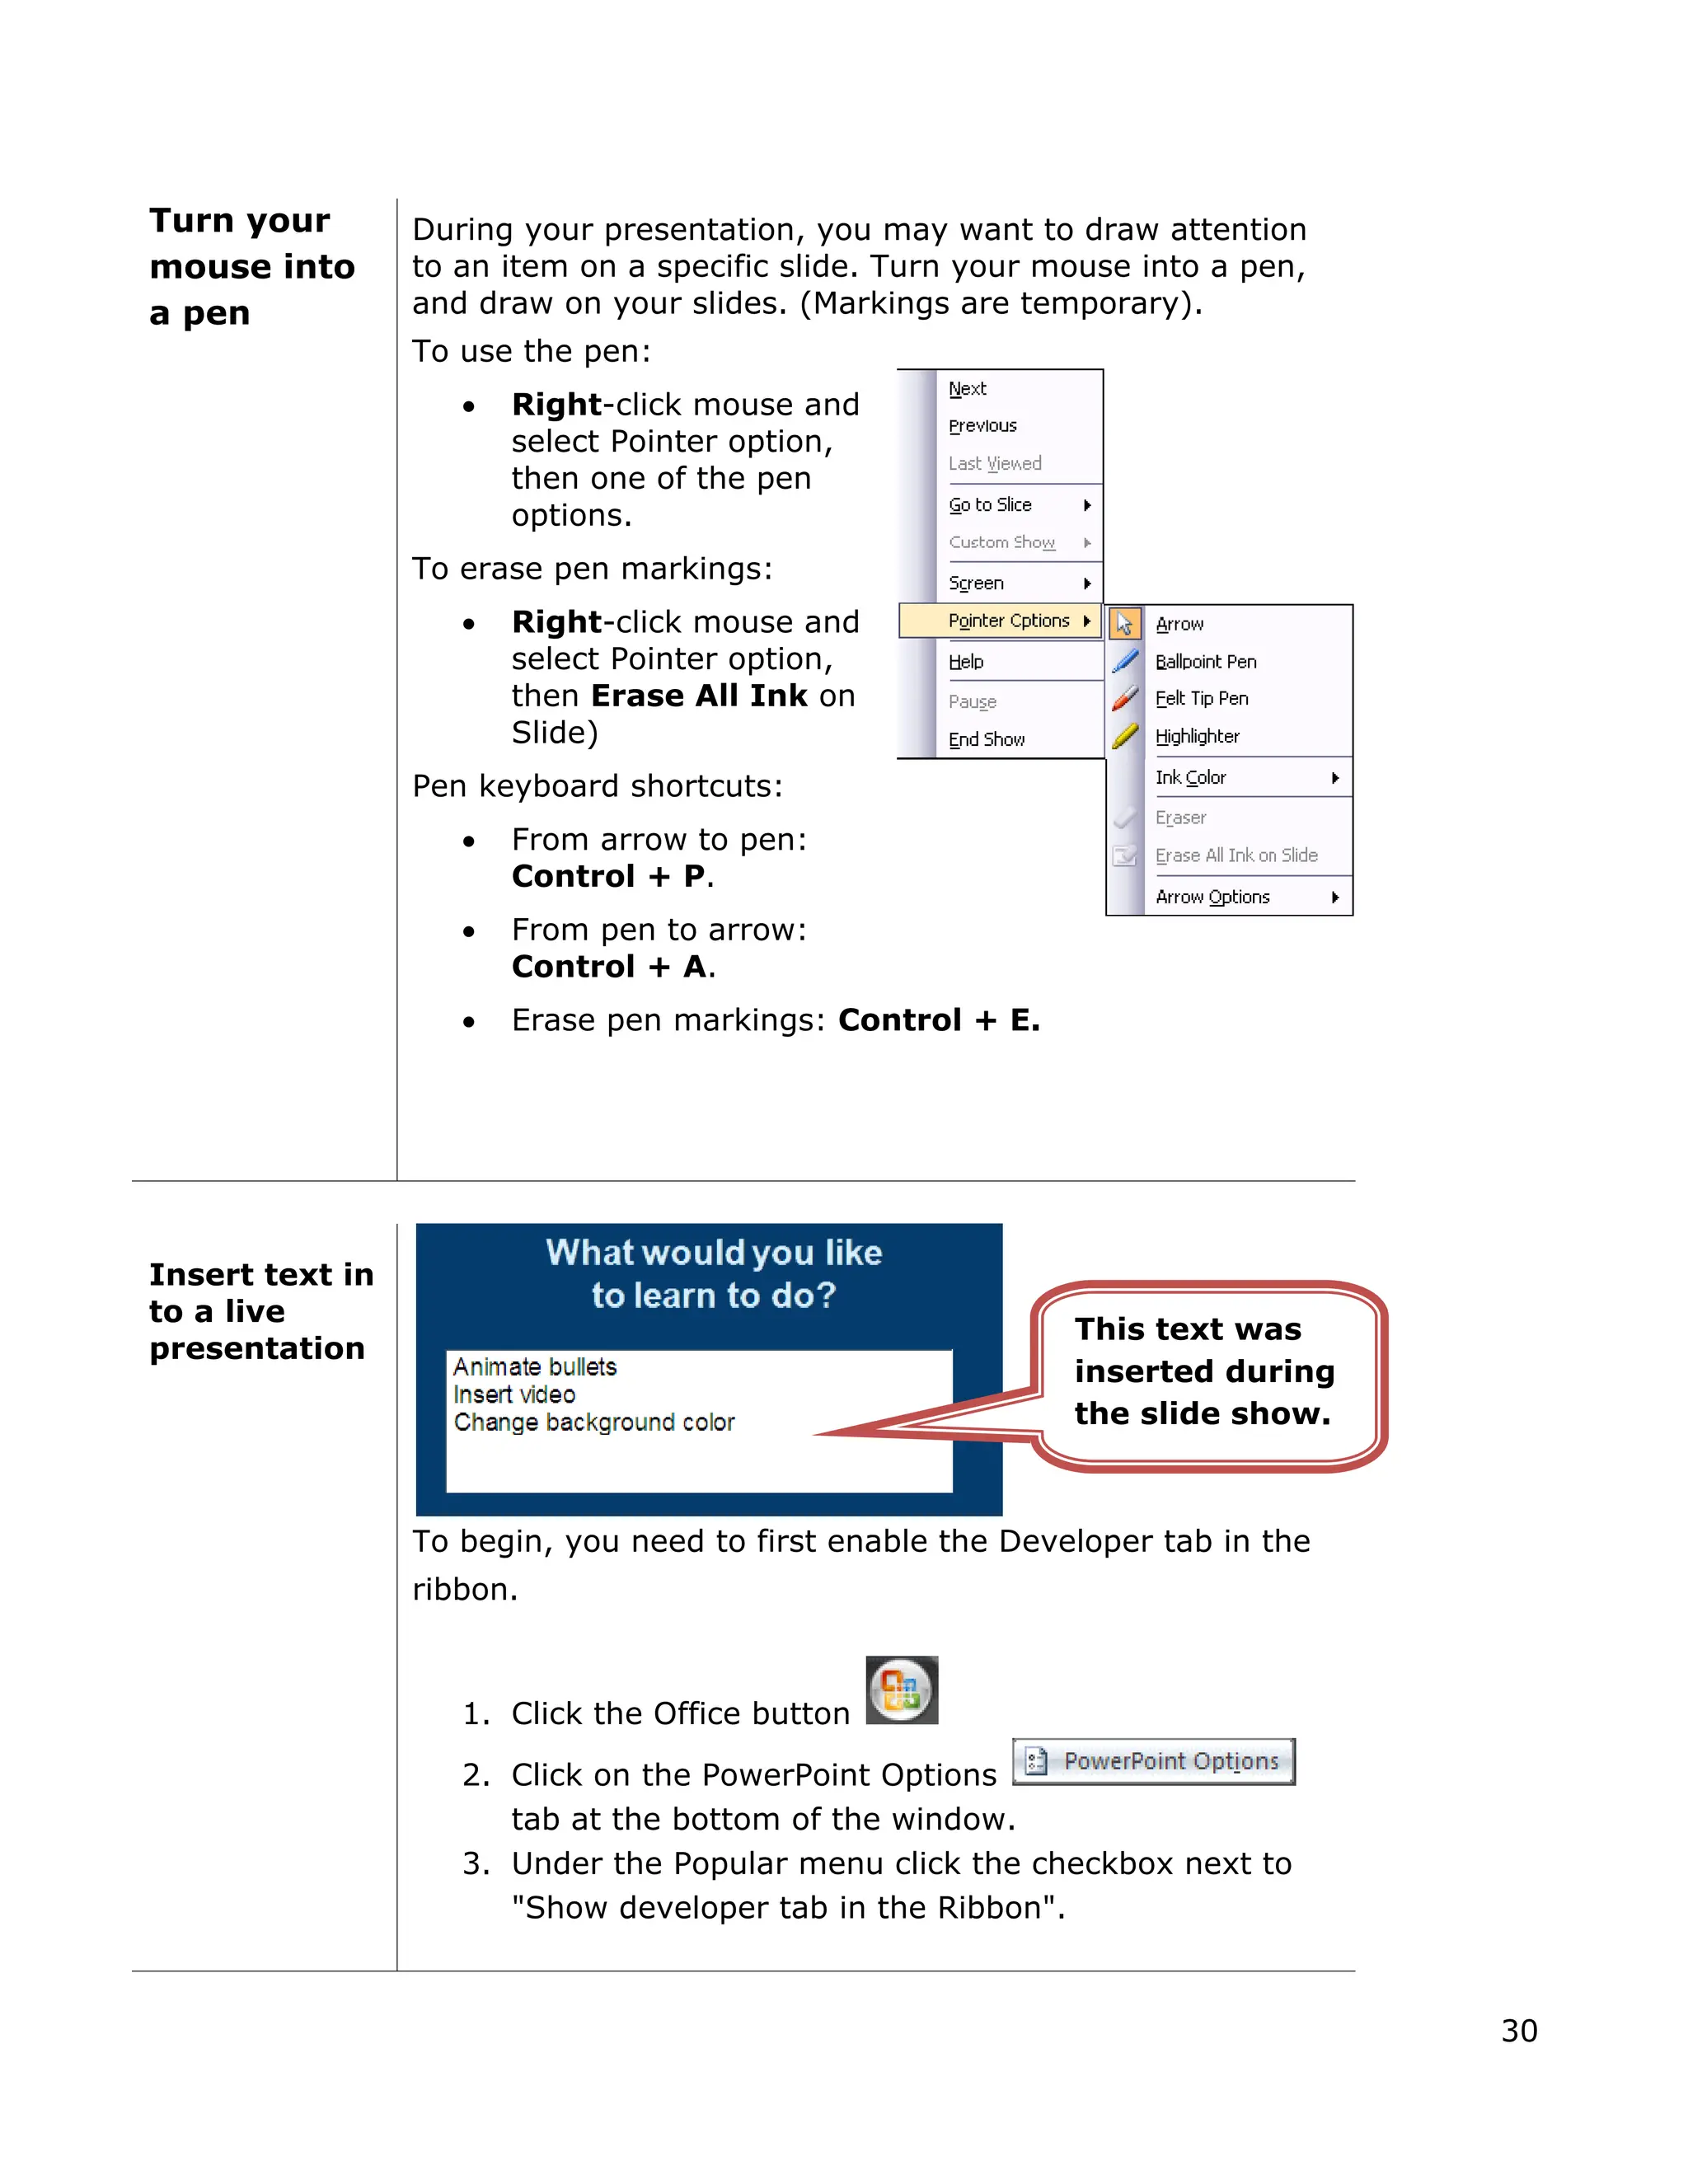
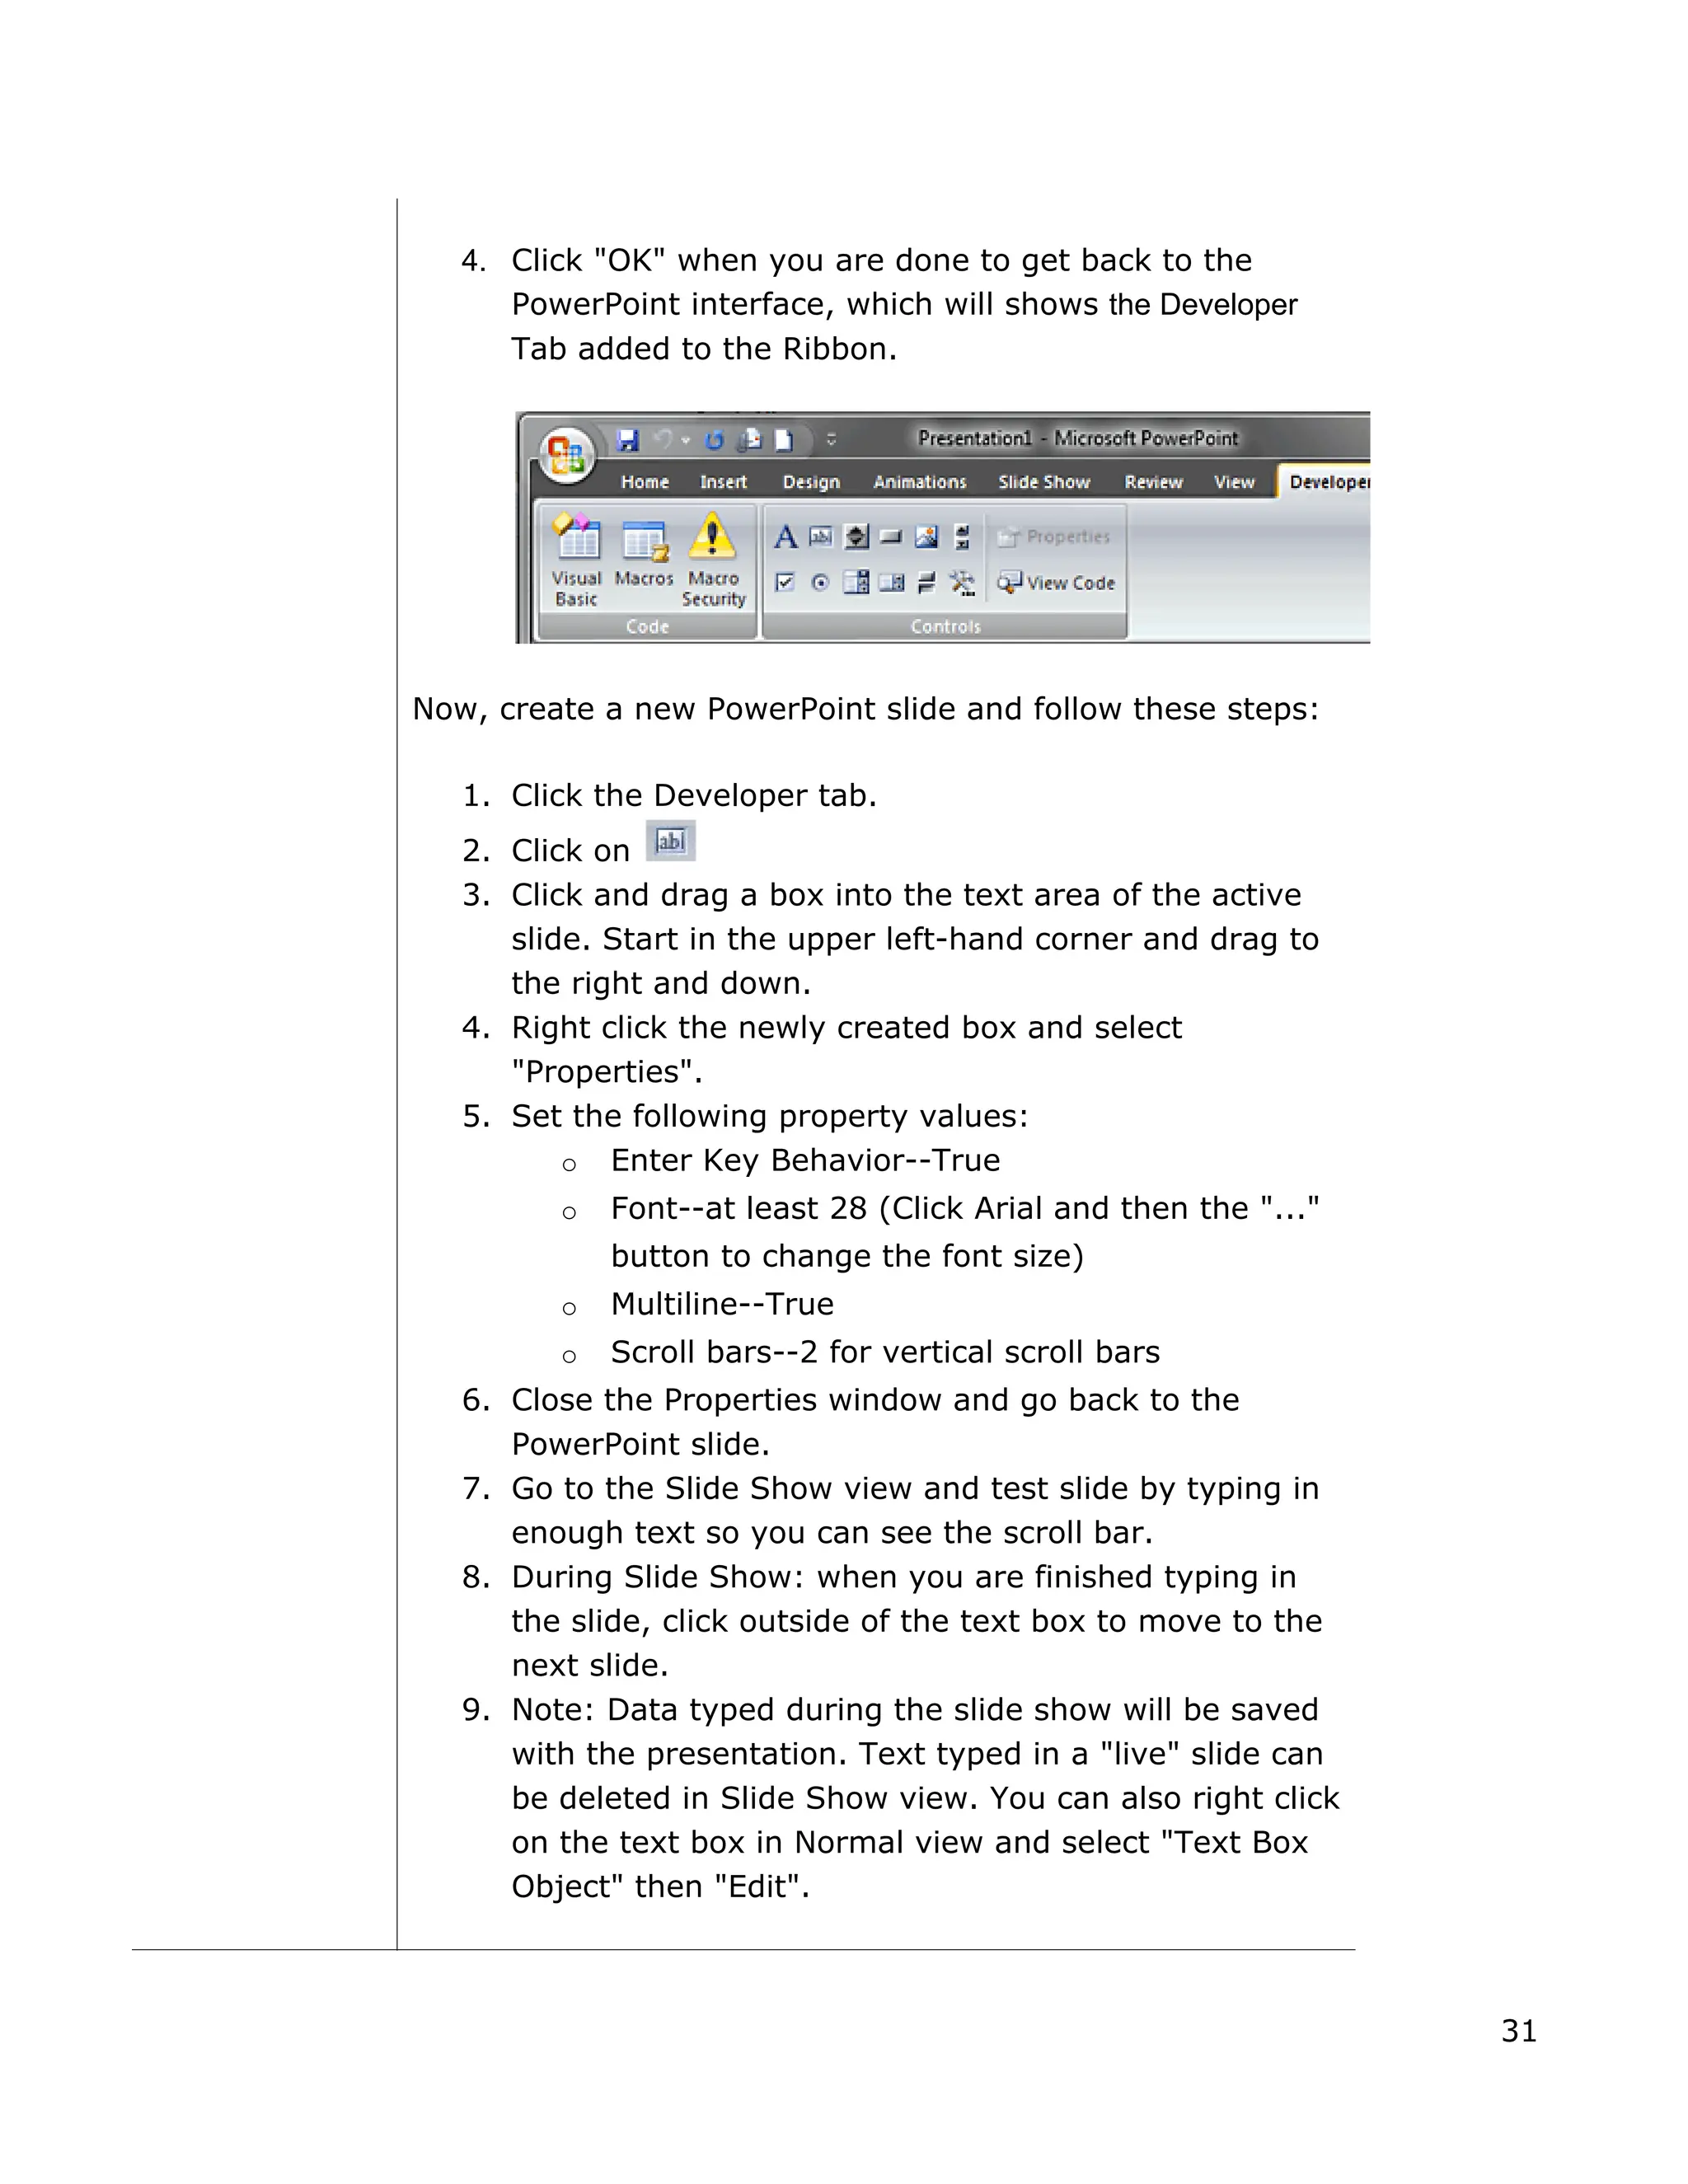
PowerPoint is a program used to create professional presentations that can include text, graphics, tables, charts, audio, video and other media. It allows users to easily enter and edit information, incorporate content from other sources, and present information in various ways. Effective presentations require planning, including determining the message, audience and delivery method. PowerPoint provides various views and tools to organize, design and deliver presentations.
This document provides instructions for using various features in Microsoft PowerPoint. It discusses how PowerPoint can be used to create presentations consisting of slides. It explains how to create and format slide content, organize slides, add animations and transitions, record speaker notes, and customize slide layouts and designs. The document covers topics such as selecting layouts, applying design themes and color schemes, changing fonts and backgrounds, hiding graphics, and inserting media like pictures and clip art onto slides.
Impress is the presentation (slide show) program included in LibreOffice. You can create slides that contain many different elements, including text, bulleted and numbered lists, tables, charts, and a wide range of graphic objects such as clip-art, drawings and photographs. Impress also includes a spelling checker, a thesaurus, text styles, and background styles.
What is Impress?
Starting a presentation.
Formatting a presentation.
Design a presentation.
Working with templates.
PowerPoint is presentation software that allows users to easily create slide shows. The PowerPoint window contains several key areas including the ribbon, which contains commands; slides where content is added; and placeholders that hold objects on slides. Users can customize their presentations with themes, backgrounds, animations, and transitions between slides. Presentations are created by adding text and objects to slides laid out using various layouts, and then run as a slide show.
PowerPoint is a presentation software package. With PowerPoint, you can easily create slide shows. Trainers and other presenters use slide shows to illustrate their presentations.
PowerPoint is a presentation software that allows users to create professional slideshows. It provides tools for adding text, images, graphs and other media. A PowerPoint presentation consists of a series of slides that convey a message or story. The document then outlines 17 basic steps for creating a PowerPoint presentation, such as opening PowerPoint, choosing a template or theme, adding titles and content to slides, formatting text, inserting pictures and shapes, and adding transitions and animations between slides. It concludes by explaining how to save and present the completed slideshow.
This document provides a step-by-step tutorial on how to use PowerPoint. It covers topics such as slide layouts, adding text, charts and pictures, changing slide backgrounds, using design themes, adding slide transitions and animations. The tutorial demonstrates how to insert music and sound files, and how to animate text. The overall purpose is to teach someone how to create and enhance a PowerPoint presentation.
Microsoft PowerPoint is a slide show presentation program developed by Microsoft for use on Windows and Mac operating systems. It was initially created by Forethought Inc. and launched by Microsoft in 1990 as part of the Microsoft Office suite. PowerPoint is useful for developing slide-based presentations and is one of the most commonly used presentation programs. Microsoft has also released a PowerPoint mobile app for iOS and Android. The ribbon interface organizes PowerPoint's commands into tabs like Home, Insert, Design, and Slide Show. Each tab contains tools for performing common tasks for that tab's purpose, like formatting text on the Home tab or adding transitions between slides on the Transitions tab.
Microsoft PowerPoint is a presentation program developed by Microsoft as part of its Office suite. Originally designed for Macintosh, it was later acquired by Microsoft. PowerPoint allows users to create slide presentations with text, images, and other media. This document provides step-by-step instructions on how to use PowerPoint's various features like inserting slides, pictures, charts, and SmartArt graphics. It also covers how to change slide layouts, apply themes, and modify fonts, colors, and backgrounds.
MS PowerPoint allows users to create slide presentations. It has various tools like themes, transitions, animations and charts to make the presentation appealing. Users can add text, pictures, tables, graphs and other media to the slides. Slides can be viewed in different modes like Normal, Notes Page etc. PowerPoint offers customization options to modify the user interface and settings. Users can also add slide effects like transitions and animations to engage the audience during a presentation.
This document provides an overview of basic slide presentation concepts in PowerPoint, including how to create and save a new presentation, insert and modify slides, and change slide views. Key points covered are how to start a new presentation, add text to placeholders on slides, insert new slides using different layouts, copy and move slides within a presentation, and save a presentation for the first time or subsequently. The document concludes with a challenge to practice these basic skills in PowerPoint.
This document provides an overview of basic slide presentation concepts in PowerPoint, including:
- Slides contain placeholders that hold text, images, charts and more. Placeholders are arranged in different layouts.
- To insert a new slide, select a layout from the Home tab. Existing slide layouts can also be modified.
- Slides can be copied, moved, and deleted by selecting them and using commands on the Home tab.
- The PowerPoint window has different views for editing, sorting, and presenting slides.
- Presentations are saved using the Save or Save As commands under the File tab.
This document provides an overview of MS PowerPoint and covers topics like understanding the ribbon interface, adding and formatting slide content, choosing slide layouts, inserting images and other objects, applying themes, and adding speaker notes. The main goals are to familiarize users with the PowerPoint interface and teach basic skills for creating and formatting presentation slides.
The document discusses various features of Microsoft PowerPoint for creating presentations including adding content and formatting to slides, adding transitions and animations, and previewing a presentation in Slide Show view. It also provides steps for inserting tables, charts, pictures, and SmartArt graphics into slides as well as adding notes, hyperlinks, and action buttons.
Section 1: Each slide in a PowerPoint presentation is called a slide. A new presentation opens with a Title slide ready for editing in Normal view.
Section 2: The Slides/Outline pane toggles between Slides view and Outline view. Slides view shows thumbnails of all slides while Outline view shows the text hierarchy.
Section 3: The new user interface in PowerPoint 2007 is called the Ribbon. The Ribbons replace toolbars and menus and provide access to all PowerPoint features.
This document provides an overview of how to use Microsoft PowerPoint to create and deliver effective presentations. It begins with objectives for learning PowerPoint and covers topics like creating and formatting slides, adding transitions between slides, animating text and objects, including multimedia elements, and delivering the presentation. The document provides instructions and examples for each topic and encourages the reader to do practice exercises along the way to reinforce their learning.
The document provides an agenda and overview of key MS PowerPoint features including:
1. Creating and saving presentations using templates, existing presentations, and Word outlines.
2. Customizing the ribbon, quick access toolbar, and themes.
3. Adding and formatting text, pictures, clipart, shapes, SmartArt, and photo albums.
4. Copying, pasting, undoing and redoing edits, and checking spelling.
The document provides an overview of key features in Microsoft PowerPoint, including how to use the ribbon interface, add and format slides, insert images and other content, choose themes, and add speaker notes. Some key points covered include:
- The ribbon is used to navigate menu items in PowerPoint similarly to other MS Office programs.
- New slides can be added by clicking the "New Slide" button and choosing a layout, which determines placeholder positions and formatting.
- Images and other content can be inserted either by clicking icons within placeholders or using options on the "Insert" tab.
- Themes determine the overall look of a presentation through features like color schemes, fonts, and placeholder positioning.
- Speaker
The document provides an introduction to creating mid-fidelity prototypes using PowerPoint, including examples of hospital, e-commerce, and CD player prototypes, and discusses various PowerPoint functions for adding and formatting text, images, backgrounds, and slide layouts.
This document provides an introduction and overview of using PowerPoint for mid-fidelity prototyping. It discusses how to create and format slides, including inserting text, pictures, backgrounds, colors and transitions. The document demonstrates how to add and manipulate objects on slides, as well as how to view and run slide shows. It provides guidance on animating slides using preset and custom animations.
This document provides an introduction and overview of using PowerPoint for mid-fidelity prototyping. It discusses how to create and format slides, including inserting text, pictures, backgrounds, colors and transitions. The document also covers customizing animations and slide shows, as well as practicing techniques like adding content, manipulating objects, and applying transitions. The goal is to demonstrate the basic features and functions of PowerPoint for creating interactive prototypes.
The document provides an introduction to creating mid-fidelity prototypes using PowerPoint, including examples of hospital, e-commerce, and CD player prototypes, and discusses various PowerPoint functions for adding and formatting text, images, backgrounds, and slide layouts.
Mid-Fi Prototyping with PowerPoint.PPTshahid1204as
The document provides an introduction to creating mid-fidelity prototypes using PowerPoint, including examples of hospital, e-commerce, and CD player prototypes, and discusses various PowerPoint functions for adding and formatting text, images, backgrounds, and slide layouts.
Creating Power Point Presentations | www.sampleassignment.comSample Assignment
This document provides instructions for creating and formatting effective PowerPoint presentations. It discusses:
- Using key phrases and limiting content to 3 bullet points per slide for clarity.
- Placing the title at the top and arranging content from top to bottom for readability.
- Choosing simple fonts like Arial or Times New Roman that are large enough to be read from the back of the room.
- Adding photos, charts and graphs to keep the audience interested while avoiding excessive animations and transitions.
- Formatting slides with themes, adding speaker notes, and inserting graphics, shapes and pictures to enhance the presentation.
The document provides instructions for creating a presentation about dream vacation destinations using Microsoft PowerPoint. It describes how to open PowerPoint, select a slide theme, add slides, insert pictures and text boxes, and save the presentation. The instructions guide the reader through adding details about two dream vacation locations such as facilities, amenities, food, and reasons for choosing each destination. The presentation can then be shared with others.
A digital presentation uses text, audio, video and graphics to provide information to an audience. It consists of slides that each display content separately. When creating a presentation, it is important to use an elegant font, contrasting text and background colors, and animations sparingly. PowerPoint allows creating presentations through features like slides, slide layouts, notes, and different views. A slide show can be run from the start or a specific slide and custom slide shows can also be created.
This document discusses effective use of PowerPoint as a presentation tool. It provides an overview of PowerPoint's features and capabilities, including its history and development over time. It also describes various slide layouts, content types, and animation/customization options that can be used to create engaging presentations. Tips are given for using PowerPoint to display worked examples, as well as formatting titles, adding new slides, and changing slide layouts.
PowerPoint 2013 is a slide show presentation program developed by Microsoft that allows users to create and deliver professional presentations. It offers tools for word processing, outlining, drawing, graphing, and presentation management. The document discusses how to create and open presentations in PowerPoint, save files, customize slides, apply themes, insert images, tables, charts, videos and other media, animate objects, and present slideshows. It also covers more advanced topics like grouping objects, customizing tables and charts, using SmartArt graphics, and applying slide timings and transitions.
Assessment and Planning in Educational technology.pptxKavitha Krishnan
In an education system, it is understood that assessment is only for the students, but on the other hand, the Assessment of teachers is also an important aspect of the education system that ensures teachers are providing high-quality instruction to students. The assessment process can be used to provide feedback and support for professional development, to inform decisions about teacher retention or promotion, or to evaluate teacher effectiveness for accountability purposes.
More Related Content
Similar to better_ppt_guide.pdfjjffjihfffghhuuggfyi
Microsoft PowerPoint is a presentation program developed by Microsoft as part of its Office suite. Originally designed for Macintosh, it was later acquired by Microsoft. PowerPoint allows users to create slide presentations with text, images, and other media. This document provides step-by-step instructions on how to use PowerPoint's various features like inserting slides, pictures, charts, and SmartArt graphics. It also covers how to change slide layouts, apply themes, and modify fonts, colors, and backgrounds.
MS PowerPoint allows users to create slide presentations. It has various tools like themes, transitions, animations and charts to make the presentation appealing. Users can add text, pictures, tables, graphs and other media to the slides. Slides can be viewed in different modes like Normal, Notes Page etc. PowerPoint offers customization options to modify the user interface and settings. Users can also add slide effects like transitions and animations to engage the audience during a presentation.
This document provides an overview of basic slide presentation concepts in PowerPoint, including how to create and save a new presentation, insert and modify slides, and change slide views. Key points covered are how to start a new presentation, add text to placeholders on slides, insert new slides using different layouts, copy and move slides within a presentation, and save a presentation for the first time or subsequently. The document concludes with a challenge to practice these basic skills in PowerPoint.
This document provides an overview of basic slide presentation concepts in PowerPoint, including:
- Slides contain placeholders that hold text, images, charts and more. Placeholders are arranged in different layouts.
- To insert a new slide, select a layout from the Home tab. Existing slide layouts can also be modified.
- Slides can be copied, moved, and deleted by selecting them and using commands on the Home tab.
- The PowerPoint window has different views for editing, sorting, and presenting slides.
- Presentations are saved using the Save or Save As commands under the File tab.
This document provides an overview of MS PowerPoint and covers topics like understanding the ribbon interface, adding and formatting slide content, choosing slide layouts, inserting images and other objects, applying themes, and adding speaker notes. The main goals are to familiarize users with the PowerPoint interface and teach basic skills for creating and formatting presentation slides.
The document discusses various features of Microsoft PowerPoint for creating presentations including adding content and formatting to slides, adding transitions and animations, and previewing a presentation in Slide Show view. It also provides steps for inserting tables, charts, pictures, and SmartArt graphics into slides as well as adding notes, hyperlinks, and action buttons.
Section 1: Each slide in a PowerPoint presentation is called a slide. A new presentation opens with a Title slide ready for editing in Normal view.
Section 2: The Slides/Outline pane toggles between Slides view and Outline view. Slides view shows thumbnails of all slides while Outline view shows the text hierarchy.
Section 3: The new user interface in PowerPoint 2007 is called the Ribbon. The Ribbons replace toolbars and menus and provide access to all PowerPoint features.
This document provides an overview of how to use Microsoft PowerPoint to create and deliver effective presentations. It begins with objectives for learning PowerPoint and covers topics like creating and formatting slides, adding transitions between slides, animating text and objects, including multimedia elements, and delivering the presentation. The document provides instructions and examples for each topic and encourages the reader to do practice exercises along the way to reinforce their learning.
The document provides an agenda and overview of key MS PowerPoint features including:
1. Creating and saving presentations using templates, existing presentations, and Word outlines.
2. Customizing the ribbon, quick access toolbar, and themes.
3. Adding and formatting text, pictures, clipart, shapes, SmartArt, and photo albums.
4. Copying, pasting, undoing and redoing edits, and checking spelling.
The document provides an overview of key features in Microsoft PowerPoint, including how to use the ribbon interface, add and format slides, insert images and other content, choose themes, and add speaker notes. Some key points covered include:
- The ribbon is used to navigate menu items in PowerPoint similarly to other MS Office programs.
- New slides can be added by clicking the "New Slide" button and choosing a layout, which determines placeholder positions and formatting.
- Images and other content can be inserted either by clicking icons within placeholders or using options on the "Insert" tab.
- Themes determine the overall look of a presentation through features like color schemes, fonts, and placeholder positioning.
- Speaker
The document provides an introduction to creating mid-fidelity prototypes using PowerPoint, including examples of hospital, e-commerce, and CD player prototypes, and discusses various PowerPoint functions for adding and formatting text, images, backgrounds, and slide layouts.
This document provides an introduction and overview of using PowerPoint for mid-fidelity prototyping. It discusses how to create and format slides, including inserting text, pictures, backgrounds, colors and transitions. The document demonstrates how to add and manipulate objects on slides, as well as how to view and run slide shows. It provides guidance on animating slides using preset and custom animations.
This document provides an introduction and overview of using PowerPoint for mid-fidelity prototyping. It discusses how to create and format slides, including inserting text, pictures, backgrounds, colors and transitions. The document also covers customizing animations and slide shows, as well as practicing techniques like adding content, manipulating objects, and applying transitions. The goal is to demonstrate the basic features and functions of PowerPoint for creating interactive prototypes.
The document provides an introduction to creating mid-fidelity prototypes using PowerPoint, including examples of hospital, e-commerce, and CD player prototypes, and discusses various PowerPoint functions for adding and formatting text, images, backgrounds, and slide layouts.
Mid-Fi Prototyping with PowerPoint.PPTshahid1204as
The document provides an introduction to creating mid-fidelity prototypes using PowerPoint, including examples of hospital, e-commerce, and CD player prototypes, and discusses various PowerPoint functions for adding and formatting text, images, backgrounds, and slide layouts.
Creating Power Point Presentations | www.sampleassignment.comSample Assignment
This document provides instructions for creating and formatting effective PowerPoint presentations. It discusses:
- Using key phrases and limiting content to 3 bullet points per slide for clarity.
- Placing the title at the top and arranging content from top to bottom for readability.
- Choosing simple fonts like Arial or Times New Roman that are large enough to be read from the back of the room.
- Adding photos, charts and graphs to keep the audience interested while avoiding excessive animations and transitions.
- Formatting slides with themes, adding speaker notes, and inserting graphics, shapes and pictures to enhance the presentation.
The document provides instructions for creating a presentation about dream vacation destinations using Microsoft PowerPoint. It describes how to open PowerPoint, select a slide theme, add slides, insert pictures and text boxes, and save the presentation. The instructions guide the reader through adding details about two dream vacation locations such as facilities, amenities, food, and reasons for choosing each destination. The presentation can then be shared with others.
A digital presentation uses text, audio, video and graphics to provide information to an audience. It consists of slides that each display content separately. When creating a presentation, it is important to use an elegant font, contrasting text and background colors, and animations sparingly. PowerPoint allows creating presentations through features like slides, slide layouts, notes, and different views. A slide show can be run from the start or a specific slide and custom slide shows can also be created.
This document discusses effective use of PowerPoint as a presentation tool. It provides an overview of PowerPoint's features and capabilities, including its history and development over time. It also describes various slide layouts, content types, and animation/customization options that can be used to create engaging presentations. Tips are given for using PowerPoint to display worked examples, as well as formatting titles, adding new slides, and changing slide layouts.
PowerPoint 2013 is a slide show presentation program developed by Microsoft that allows users to create and deliver professional presentations. It offers tools for word processing, outlining, drawing, graphing, and presentation management. The document discusses how to create and open presentations in PowerPoint, save files, customize slides, apply themes, insert images, tables, charts, videos and other media, animate objects, and present slideshows. It also covers more advanced topics like grouping objects, customizing tables and charts, using SmartArt graphics, and applying slide timings and transitions.
Similar to better_ppt_guide.pdfjjffjihfffghhuuggfyi (20)
Assessment and Planning in Educational technology.pptxKavitha Krishnan
In an education system, it is understood that assessment is only for the students, but on the other hand, the Assessment of teachers is also an important aspect of the education system that ensures teachers are providing high-quality instruction to students. The assessment process can be used to provide feedback and support for professional development, to inform decisions about teacher retention or promotion, or to evaluate teacher effectiveness for accountability purposes.
Macroeconomics- Movie Location
This will be used as part of your Personal Professional Portfolio once graded.
Objective:
Prepare a presentation or a paper using research, basic comparative analysis, data organization and application of economic information. You will make an informed assessment of an economic climate outside of the United States to accomplish an entertainment industry objective.
How to Manage Your Lost Opportunities in Odoo 17 CRMCeline George
Odoo 17 CRM allows us to track why we lose sales opportunities with "Lost Reasons." This helps analyze our sales process and identify areas for improvement. Here's how to configure lost reasons in Odoo 17 CRM
Introduction to AI for Nonprofits with Tapp NetworkTechSoup
Dive into the world of AI! Experts Jon Hill and Tareq Monaur will guide you through AI's role in enhancing nonprofit websites and basic marketing strategies, making it easy to understand and apply.
A workshop hosted by the South African Journal of Science aimed at postgraduate students and early career researchers with little or no experience in writing and publishing journal articles.
This slide is special for master students (MIBS & MIFB) in UUM. Also useful for readers who are interested in the topic of contemporary Islamic banking.
How to Fix the Import Error in the Odoo 17Celine George
An import error occurs when a program fails to import a module or library, disrupting its execution. In languages like Python, this issue arises when the specified module cannot be found or accessed, hindering the program's functionality. Resolving import errors is crucial for maintaining smooth software operation and uninterrupted development processes.
How to Build a Module in Odoo 17 Using the Scaffold MethodCeline George
Odoo provides an option for creating a module by using a single line command. By using this command the user can make a whole structure of a module. It is very easy for a beginner to make a module. There is no need to make each file manually. This slide will show how to create a module using the scaffold method.
it describes the bony anatomy including the femoral head , acetabulum, labrum . also discusses the capsule , ligaments . muscle that act on the hip joint and the range of motion are outlined. factors affecting hip joint stability and weight transmission through the joint are summarized.
This presentation was provided by Steph Pollock of The American Psychological Association’s Journals Program, and Damita Snow, of The American Society of Civil Engineers (ASCE), for the initial session of NISO's 2024 Training Series "DEIA in the Scholarly Landscape." Session One: 'Setting Expectations: a DEIA Primer,' was held June 6, 2024.
ISO/IEC 27001, ISO/IEC 42001, and GDPR: Best Practices for Implementation and...PECB
Denis is a dynamic and results-driven Chief Information Officer (CIO) with a distinguished career spanning information systems analysis and technical project management. With a proven track record of spearheading the design and delivery of cutting-edge Information Management solutions, he has consistently elevated business operations, streamlined reporting functions, and maximized process efficiency.
Certified as an ISO/IEC 27001: Information Security Management Systems (ISMS) Lead Implementer, Data Protection Officer, and Cyber Risks Analyst, Denis brings a heightened focus on data security, privacy, and cyber resilience to every endeavor.
His expertise extends across a diverse spectrum of reporting, database, and web development applications, underpinned by an exceptional grasp of data storage and virtualization technologies. His proficiency in application testing, database administration, and data cleansing ensures seamless execution of complex projects.
What sets Denis apart is his comprehensive understanding of Business and Systems Analysis technologies, honed through involvement in all phases of the Software Development Lifecycle (SDLC). From meticulous requirements gathering to precise analysis, innovative design, rigorous development, thorough testing, and successful implementation, he has consistently delivered exceptional results.
Throughout his career, he has taken on multifaceted roles, from leading technical project management teams to owning solutions that drive operational excellence. His conscientious and proactive approach is unwavering, whether he is working independently or collaboratively within a team. His ability to connect with colleagues on a personal level underscores his commitment to fostering a harmonious and productive workplace environment.
Date: May 29, 2024
Tags: Information Security, ISO/IEC 27001, ISO/IEC 42001, Artificial Intelligence, GDPR
-------------------------------------------------------------------------------
Find out more about ISO training and certification services
Training: ISO/IEC 27001 Information Security Management System - EN | PECB
ISO/IEC 42001 Artificial Intelligence Management System - EN | PECB
General Data Protection Regulation (GDPR) - Training Courses - EN | PECB
Webinars: https://pecb.com/webinars
Article: https://pecb.com/article
-------------------------------------------------------------------------------
For more information about PECB:
Website: https://pecb.com/
LinkedIn: https://www.linkedin.com/company/pecb/
Facebook: https://www.facebook.com/PECBInternational/
Slideshare: http://www.slideshare.net/PECBCERTIFICATION
2. About PowerPoint
Overview PowerPoint is the presentation graphics program bundled with
Microsoft Office (along with Word and Excel) that lets you
build, print, and deliver presentations. A PowerPoint
presentation only needs to be created once, but can be
delivered in several ways:
• Slide Show Presentation: A slide show presentation can
utilize the special effects available in PowerPoint including
slide transitions, animations, sounds, timings, and other
on-screen features.
• Online Presentation: A slide show presentation can be
saved as a Web page and published on the Internet.
• Supplemental Materials: Handouts, Notes Pages, and
Outline Views can be printed and distributed to an
audience to support the PowerPoint presentation.
• Overhead Transparencies: A presentation can be printed
directly on to transparencies using the same options as
paper printouts.
1
3. PowerPoint Slide Layout
Opening
PowerPoint:
default slide
view
1. Click the button (lower right corner of
screen), select Programs » Microsoft Office »
Microsoft PowerPoint. By default, the PowerPoint
window will open in the Home tab view. The
PowerPoint window can be divided into the following
areas:
Microsoft Office button
Performs many of the functions that were located in the File
menu of older versions of PowerPoint. This button allows
you to create a new presentation, open an existing
presentation, save and save as, print, send, or close.
Quick Access Toolbar
A customizable toolbar which contains several of the most
used buttons in Office applications – Save, Undo, Redo,
Print and Print Preview. You can customize this toolbar by
adding and removing as many Quick Access button choices
as you wish to display.
Quick Access
Ribbon
Tabs
Microsoft
Office
button
Slide and
Outline
tabs
Presentation
window
Notes
Pane
Status bar
2
4. Tabs and Ribbons
Tabs are similar to the Drop Down Menu choices in previous
versions of PowerPoint. Each tab displays what Microsoft
calls a Ribbon, which are PowerPoint commands related to
a particular tab’s activity. The Ribbon is designed to help
you quickly find the commands that you need to complete a
task. The standard tabs include:
• Home: formatting, editing and layout of slides.
PowerPoint always opens in the Home tab.
• Insert: insert shapes, more slides, tables, text,
movie and sound clips or anything else.
• Design: page orientation, add themes, change
background colors or arrangement of objects
• Animations: Add movement to slides or slide objects
here.
• Slide Show: Look here for anything to do with a
slide show ‐ rehearsals, custom shows, record
narrations, hide slides
• Review: More editing options‐ spell check, translate
text, editor's comments and markups can be added.
• View: show notes, slide sorter as well as the slide
masters, open more than one view of the same
document.
Slide and Outline Tabs
The default setting is for Slides. This shows thumbnail views
of the slides in your presentation.
Clicking on the Outline tab, will show a text
outline of each slide in your presentation.
You can edit text here as well.
3
5. Notes Pane
In this area you can type “speaker notes” for each slide,
which you can print out and refer to during your
presentation.
Status Bar
Located at the bottom of the screen, the Status bar contains
the following:
Information about the presentation
including slide number and design theme.
View Buttons to change between Normal view,
Slider Sorter view, and the Slide Show view
Zoom Control to shrink tor
enlarge slides.
To customize the Status Bar, right click on the bar. A list of
options will appear
Choosing
slide
background
and text
PowerPoint’s default
presentation screen uses a
white background with black
text.
However, a white background
can be harsh on the eyes,
especially in a dark room.
Color selections for background and text
Colors can be divided into two different types: warm and
cool. Warm colors—reds, yellows, and oranges—stand out
more to the eyes and work well for text. Cool colors—blues,
greens, and violets—are more soothing and work well as
background colors.
Slide Design
4
6. PowerPoint has several built-in themes that you can use.
1. Click the Design tab
2. Click on the Themes dropdown menu
3. Roll your mouse over the different themes and the
presentation window will change to the new theme.
One of the advantages of using a PowerPoint theme is that
the color combinations work well together.
One of the disadvantages is that most of the themes have
design features that look attractive but that can restrict the
amount of available space for text and images.
Rather than use one of PowerPoint’s theme, let’s simply
change the color of our default background to blue
Themes menu
5
7. 4. Move your mouse outside of the themes menu to
return the background to the default white color.
5. Click on Background Styles and select the solid blue
style.
Your background should now be blue with white text.
Creating Basic Slides
Title slide Now that we have selected our slide design we can begin
creating our content. When you open a new PowerPoint
presentation, the first slide that appears, is, by default, the
Title slide.
6
8. 1. Place your mouse cursor in the “Click to add title” box
and type in
the following:
People v.
David Smith.
2. Click in the
subtitle box
and type in the name of your county.
Slide 2:
Title and
Content slide
1. To add the next slide, click on the
upper portion of the New Slide icon
under the Home tab
By default, the second slide (and
every slide thereafter ) is a title and
content slide. Bullets are
automatically added to each new line of content.
Type the following for the title:
People Involved in this Trial
2. Type the following for the text:
• Defendant -
David Smith
• Defense
Attorney - Chad
Jones
• Prosecutor -
Stephen Gallop
Slide 3:
Two Column
Slide
In this slide we want to have two
columns of text.
1. Click on the lower portion of
the New Slide icon.
2. Click on the Two Content
slide from the layout options.
Two
Content
layout
Slide layout
options
New Slide
default
layout
7
9. 3. Create the title:
Potential Witnesses.
4. Type in the text box the
names of six to eight
witnesses—three or four in
each column: Witness 1,
Witness 2, Witness 3, etc.
Slide 4:
Inserting
images
Adding well-designed and appropriate images to your
presentation can help engage your audience and reinforce
the content of your presentation. Here is what the finished
slide will look like:
1. Click on the Two Content
slide from the layout
options.
1. Create the title:
The Clerk – Paris Hilton.
2. Add the following
bulleted text in the left
column:
• Minutes of trial
• Mark and keeps exhibits
• Places witness under oath
8
10. 3. In the right column, click on the Insert Picture
from File icon.
4. Locate and open the folder containing the image to
be inserted.
5. Double-click the image file.
The image is inserted into the middle of the slide and has
handles around it (eight small circles around the outside of
the image area).
• To move the image within the slide, point
anywhere within the handles, and when the
mouse pointer turns into a four-sided arrow
you can click and drag the image to any
location on the slide.
Insert Picture
from File
9
11. • To proportionally resize the image, place the
mouse pointer on one of the four corner
handles, and when it turns into a two-side
arrow click and drag the pointer.
• To rotate the image, place the mouse pointer
on the small green handle at the top of the
image, and when it turns into a circular arrow
click and rotate the pointer.
6. Resize and position the image where you want it to
appear on the slide.
Shapes
Inserting
Shapes
Select Insert Shapes to display a number of
different types of shapes that can be inserted
into your slides to help illustrate your points.
Once inserted, if you double-click the shape, the Format
ribbon opens, enabling you to add different effects to the
shape.
For example, the arrow to the left is the default color and
style. To the right is the modified arrow with a different
color along with 3-D effect.
10
12. Inserting a
picture inside
a shape
1. Go to Insert Shapes and insert a circle into your
slide:
2. Right-click on circle which opens this dialog box:
3. Click Format S
and select Fill
Picture or
texture.
hape
4. Locate the picture on your computer or network by
clicking on Insert from: File.
11
13. 5. Double-click the image and it will be inserted into
your shape.
Eddie, Beaver, and Wally
For circle shapes, if you hold the Shift key while
resizing, the circle will retain it’s circular shape.
Overview
PowerPoint’s animation effects fall into two categories: slide
transitions and slide animations. Both types of
animations are set from the Animations tab on the
PowerPoint ribbon.
A slide transition is how PowerPoint gets from one slide to
the next during a slide show. By default, PowerPoint’s way
to move from slide to slide is simply to cut to the new slide.
PowerPoint has dozens of slide transition effects, including
having slides fade out, dissolve into each other, open up like
Venetian blinds, or spin in like spokes on a wheel. You can
control the speed of each slide transition effect, and even
add sound.
Animation Effects
12
14. Many of the transition effects look like they would be fun to
add, but can end up being distracting to your audience,
which is why we recommend that you stick to the
default slide transition.
Slide animations focus on the content within the slides.
Instead of the information on each slide appearing all at one
once on the screen, preset animation schemes use special
effects to make text, images, or other PowerPoint objects
appear in some sort of action, such as "flying" or "dissolving
in" on to the screen. These effects can help focus attention
to important points in you presentation.
Animating
bullet lists
Probably the most popular animation to add to your slides
show is having each bullet point appear one at a time. This
helps keep your audience focused on the particular topic
you are addressing.
Let’s add this animation effect to a previous bullet point
slide.
1. Click on the Animation tab to display the ribbon.
2. Click on Custom Animation ribbon.
The Custom Animation pane is now displayed on the right.
3. Open slide: People Involved in this Trial
4. Click anywhere inside the bulleted text so that the
text box is highlighted (a dotted line border should
appear around the text box).
5. Click the Add Effect button.
Add Effect
button
13
15. There are different types of animation effects you can add:
• To make the text or object enter with an effect,
select Entrance, and then click an effect.
• To add an effect, such as a spin effect, to text
or an object that is already visible on the slide,
select Emphasis, and then click an effect.
• To add an effect that makes text or an object
leave the slide at some point, select Exit, and
then click an effect.
• To add an effect that makes text or an object
move in a specified pattern, select Motion
Paths, and then click a path.
We want the bullet points to enter on a mouse click, which
means that the animation will be an Entrance effect.
6. Click Entrance >> More Effects…
7. Select an effect from the Basic or Subtle categories.
like: Appear, Fade, or Dissolve In.
14
16. Once the Entrance effect is added, the Custom Animation
pane displays how the animation will play:
• The numbers by each bullet point show the order that
the bullets will enter the screen.
• The animation will start on a mouse click
• The animations will enter at a very fast speed
Any of these effects can be modified using the animation
pane.
Play Slide 1. From the Status bar at the bottom of the screen, click
the Slide Show icon. This will play the
presentation from this slide forward.
You can also do this by selecting the Slide Show tab
Current Slide.
2. Use the mouse, or the right or up arrow keys
on the keyboard to trigger the animation effect.
Each click of the mouse or arrow key will bring up the next
bullet point.
3. Hit the Escape key to end the slide show and
return to the editing screen.
Order
Speed
Start
Trigger
Order
15
17. Animating
sub-bullet
list
1. Click on slide: Stages of the Trial
2. Click anywhere inside the bulleted text so that the
text box is highlighted (a dotted line border should
appear around the text box).
3. Click the Add Effect button.
4. Select Entrance Dissolve in (or another basic or
subtle effect).
Similar to the previous slide you will now see numbers by
each bullet indicating the order of appearance.
Let’s play this slide:
1. From the Status bar at the bottom of the screen, click
the Slide Show icon.
2. Hit the Esc key to return to the editing screen.
Since the second bullet point and its sub-bullets all had the
same number, they entered at the same time.
What if we also wanted each sub-bullet to enter separately?
Let’s take a look at how to accomplish this.
1. Click on the number (1) box to the left of the
text: Jury Selection.
Click here
16
18. This will highlight the animation effect for that text line in
the Modify section of the custom animation pane. Notice
that the effect will start on a mouse click
1. Click the number (2) box: Presentation of the
Case.
Or…
Click the text line in the modify section of the
animation pane.
This text effect will also start on a mouse click.
2. Click the second number (2) box for the text:
Opening Statements.
Notice that this effect will start With Previous.
The remain number 2’s will also start with previous.
Start on click
Start with previous
17
19. In order to have the three sub-bullets enter separately we
need to change how they start.
1. Click the first sub-bullet: Opening Statements.
2. Click on the dropdown menu from the Start window.
3. Select On Click.
The order number for Opening Statements should now
say 3.
4. Repeat this process for the remaining two sub-bullets
The finished animation scheme should now look like this.
First sub-bullet
Select On Click
18
20. On your
own…
Do an entrance effect for slide: Potential Witnesses. This
is what the animation sequence should look like:
Rather than have each of the witness names appear after a
mouse click, we want to have all the names from column
one enter after a mouse click, and all the names in column
two enter after a mouse click.
The first bullet text in each column should enter On
Click. The remaining bullet points in each column should
enter With Previous.
Play
presentation
Let’s play our presentation from the beginning.
1. Click the F5 key on the top row of your keyboard.
This is the quickest way to play your presentation from the
beginning.
You can also select the Slide Show tab and click the From
Beginning icon.
2. When finished, hit the Escape key to return to the
editing screen.
19
21. Overview To really engage participants your PowerPoint presentations
need to go beyond simply presenting information. One way
to do this is use slides that contain thought-provoking
images in place of text-heavy bullet lists.
Another way is by creating games that require participants
to interact with the presenter as well as each another. A
game like Jeopardy can also help reinforce critical
information. The game allows for adaptation of the
questions to any content area and levels of awards based
on the difficulty of the question answered.
Creating a
table for the
Jeopardy
board
For our Jeopardy board we will create a table containing 3
columns and 3 rows.
1. Select the Insert tab and click Table.
2. Highlight 3 horizontal boxes and 3
vertical boxes.
A table will be created that looks similar to
this:
3. Double-click on the table to bring up the Table
Styles ribbon to choose among different visual styles
for the table.
Creating a Jeopardy Game
Inserting
text in our
table
The first row in our table will contain the Jeopardy
categories. The remaining rows will have the value
amounts.
1. Place your cursor in each cell and type the
information.
2. Use the Font and Paragraph ribbons to change font
size, color, center text, etc.
20
22. Creating clue
and answer
slides.
We need to create two slides for each question: the clue
slide and the answer slide (in the form of a question).
Here’s an example of a clue slide:
Here’s the corresponding answer slide:
Hyperlink the
game board
categories to
the clue
slides
The next step involves creating hyperlinks in which a mouse
click automatically take you to the appropriate slide.
1. Highlight the first cell number under the first
category.
21
23. 2. Go to Insert Hyperlink
In the Hyperlink edit screen which opens, you want to do
the following:
1. Select Place in this Document from the Link to
menu on the left.
2. Select the clue slide title to be linked to.
3. Click OK.
The game board clue will become blue in color and be
underlined, indicated that a link has been established.
4. Repeat the linking procedures for the remaining game
board clues.
22
24. Hyperlink the
clue slides
When we click on one of the category values from the game
board the hyperlinks we created should now take us to the
appropriate clue.
To do this we will add images that will act as hyperlink
buttons for both the clue and answer slides.
1. Go to the first clue slide:
2. Go to Insert Clipart.
3. The Clipart pane opens w
available images.
ith
lide.
4. Type “question” in the
search box, and select one
of the question mark
images by double-clicking
it.
5. Move the image to the
lower right side of the s
23
25. 6. Click the image to highlight it.
7. Go to Insert Hyperlink
8. elect Place in this Document from the Link to
We could have also chosen to select the specific
S
menu on the left.
9. Select Next Slide.
10.Click OK.
slide title as the link. However, by selecting Next Slide, we
can copy and paste this button in the remaining clue slides,
knowing that the link will automatically go to the next slide,
the answer slide.
Click button image
to highlight it
24
26. Hyperlink the
nswer
d the answer we want to be able to
automatically return to the game board to choose the next
o Insert Clipart.
2. Type “home” or “back” in the search box, and select
e image you would like to use as the button to link
k
In the Hyperlink edit screen which opens, you want to do
e following:
the left.
ed
the image and hyperlinks to the rest of the
es
Once we’ve reviewe
A
slides category.
1. Go t
th
back to the game board.
3. Click the image to highlight it.
4. Go to Insert Hyperlin
th
5. Select Place in this Document from the Link to
menu on
6. Select the opening game board slide title to be link
to.
7. Click OK.
8. Add
answer slid
25
27. Printing Options
Overview A variety of item rPoint:
• Slides. Prints one slide per page, with all the bulleted
items present. This is the default setting.
e page.
s can be printed through Powe
• Handouts. Prints small versions of the slides with
multiple slides per page. You may select 2, 3, 4, 6 or
9 slides per page and the slide layout on th
• Notes Pages. Prints the notes with the slides for
speaker notes or as a reference for the audience.
• Outline View. Prints an outline just as it appears on
your screen
Print Dialog
box
alog box:
1. Click the Microsoft Office button
2. Click Print.
To open the print di
Microsoft
Office
button
Print
button
26
28. Upper
ortion of
rint Dialog
The upper portion of the Print Dialog box contains the
following options:
• The Printer Name lets you select from the various
printers installed on your computer network. It is set
to your default printer.
e
r range of slides. To print a
be collated.
p
P
box
• The Print Range section allows you to print all of th
slides in your presentation (default), just the current
slide, or a specific slide o
range of slides, type the beginning number, a
hyphen, and the ending number (e.g., to print pages
seven through twelve, type 7-12). To print non-
consecutive slides, type their numbers separated by
commas (e.g., to print pages seven and twelve, type
7,12).
• The third section, Copies, allows you to indicate the
number of copies, and for multiple copies, if they
should
Printer name
Printer range Copies
27
29. Lower
ortion of
rint Dialog
In the lower portion of the Print dialog box you can select
what it is you wish to print from a variety of options.
The Print what drop-down box lists the following print
formatting choices:
• Slides
View
s, the 3 slides per page option is
p
P
box
• Handouts
• Notes Pages
• Outline
For handout
particularly useful because it displays small versions of your
slides on the left half of the page, and leaves space for your
participants to take notes on the right side of the page.
Color/Grayscale is set to Grayscale by default. This option
allows you to print your slides quickly by displaying your
text in black and white, and your images in shades of gray.
If selected, the Frame Slides option adds a thin frame
e
The Pure Black and White This option also allows for rapid
printing and may help your images to become clearer.
Colors do not always translate well into grayscale, so the
Pure black and white option will display them, and all other
components of your slides, in black and white.
If selected, the Scale to fit paper option automatically
sizes slides to fit the paper loaded in the printer.
around the border of every slide, except when the Outlin
View is printed.
Once you have made your selections, click OK to print.
28
30. eyboard
hortcuts
Advance to th E DOWN, RIGHT
SPACEBAR (or click the mouse)
K
S
e next slide N, ENTER, PAG
ARROW, DOWN ARROW, or the
Return to the previous
slide
P, PAGE UP, LEFT ARROW, UP
ARROW, or BACKSPACE
ESC or HYPHEN
End a slide show
Stop or restart an
automatic slide show
S or PLUS SIGN
Go to slide <number> R
<number>+ENTE
Display a black screen, or
return to the slide show
from a black screen
B or PERIOD
Display a white screen, or
return to the slide show
from a white screen
W or COMMA
Hide the pointer CTRL+H
Redisplay hidden pointer
and/or change the pointer
TRL+A
to an arrow
C
For quick access to
keyboard shortcuts
during your PowerPoint
slide show, press F1 (or
SHIFT+?)
Tips and Tricks
29
31. Turn your
ouse into
pen
During your presentation, you may want to draw attention
to an item on a specific slide. Turn your mouse into a pen,
and draw on your slides. (Markings are temporary).
f the pen
nd
n,
on
kings: Control + E.
m
a
To use the pen:
• Right-click mouse and
select Pointer option,
then one o
options.
To erase pen markings:
• Right-click mouse a
select Pointer optio
then Erase All Ink
Slide)
Pen keyboard shortcuts:
• From arrow to pen:
Control + P.
• From pen to arrow:
Control + A.
• Erase pen mar
Insert text in
to a live
presentation
To begin, you need to first enable the Developer tab in the
ribbon.
1. Click the Office button
2. Click on the PowerPoint Options
tab at the bottom of the window.
3. Under the Popular menu click the checkbox next to
"Show developer tab in the Ribbon".
This text was
inserted during
the slide show.
30
32. 4. Click "OK" when you are done to get back to the
PowerPoint interface, which will shows the Developer
Tab added to the Ribbon.
Now, create a new PowerPoint slide and follow these steps:
1. Click the Developer tab.
2. Click on
3. Click and drag a box into the text area of the active
slide. Start in the upper left-hand corner and drag to
the right and down.
4. Right click the newly created box and select
"Properties".
5. Set the following property values:
o Enter Key Behavior--True
o Font--at least 28 (Click Arial and then the "..."
button to change the font size)
o Multiline--True
o Scroll bars--2 for vertical scroll bars
6. to the
Close the Properties window and go back
PowerPoint slide.
7. Go to the Slide Show view and test slide by typing in
enough text so you can see the scroll bar.
8. During Slide Show: when you are finished typing in
the slide, click outside of the text box to move to the
next slide.
9. Note: Data typed during the slide show will be saved
with the presentation. Text typed in a "live" slide can
be deleted in Slide Show view. You can also right click
on the text box in Normal view and select "Text Box
Object" then "Edit".
31
33. ntroduction methods can greatly enhance the effectiveness of a
presentation. Simple visuals heighten interest and focus
on.
r
effectiveness of PowerPoint in a
resentation
Guidelines for Effective Presentations
Using a combination of oral and visual communication
I
audience attention on the main points of the presentati
The right visuals help the audience to listen to the
presenter’s explanation, and ultimately, the presenter’s
point of view.
What follows are some basic, recommended guidelines fo
maximizing the
p
lide layout 7 x 6 Rule. No more than 7 words per bullet point. No
more than 6 bullet points to a slide (4 if presenting to the
Judicial Council).
“excess” information. Less information means less
e
y lose
istically diverse versus
s
les
same way a punch line supports a joke.
S
Only critical information should be included in each slide.
PowerPoint presentations are most effective with less
distraction. Never try to answer every question visually, th
screen becomes too cluttered. The audience will quickl
interest and become bored.
Prune unnecessary text. Show only key words to
reinforce the narrative. But, be careful to keep context
intact (e.g., California is lingu
California is linguistically diverse - over 224 language
spoken).
Use emphatic headlines.
Concluding slide needs to be strong. Restate the “sa
pitch,” the
32
34. Typefaces:
style and
ize
As a general guide, select fonts from the Sans Serif family
of fonts. These are fonts that do not have the little feet or
curls at the bottom of letters. Examples include Arial,
s
Helvetica, Geneva, Verdana, Tahoma, and Avant-Garde.
Sans serif fonts are easier to read on-screen and from a
distance, which makes them best used for body text on
slide so that the viewer can quickly read the points and
a
return their attention to the speaker.
Serif fonts are those with feet on the letters. Typical serif
fonts include Times New Roman, Bookman, Courier,
Palatino, Century Schoolbook, and Garamond.
The feet on Serif fonts help make the letters flow together.
This makes them easier to read on the printed page,
especially when text is small and tight. The eye takes longer
to read a serif font, so it is best used as a title font on a
slide so that the viewer spends a little more time reading
the title to understand the topic of the slide. You may want
to use a serif font for your notes pages.
Typefaces and fonts affect the eye movement of the
audience. Use upper case and lower case. All caps leave no
room for emphasis. For example:
MORE THAN SEVEN CONSECUTIVE
UPPER CASE WORDS WILL FORCE THE
AUDIENCE TO READ AGAIN.
versus
More than seven consecutive UPPER CASE
words will force the audience to read
again.
With body text, u
You should try to use at it is
easy to read. Som for font sizes are as follows:
and 26
size 2 points for every foot of viewing distance
se only one typeface per slide.
as large a font as possible so th
e guidelines
• Title Font – between 40 and 44 point
• Main Body Font – between 32 and 38 point
• First Level Sub-Point Font – between 28 and 30
point
• Second Level Sub-Point Font – between 24
point
Increase font
from screen, starting with 12 point at 1 foot.
33
35. 34
Color es the
ttention span of the audience. But, use color with restraint.
Most readable color combinations: Dark blue background
topics, policy decisions may
olive, teal).
Incorporating color into a presentation increas
a
with yellow or white text.
Meanings commonly associated with background colors:
Green
Stimulates interaction, good for education or
management
become more visually effective (forest green,
C d
onveys neutrality, lack of commitment, an
Gray
frees presenter from determining audience
r rcoal/dark gray). Introductory
esponse (cha
visuals between sections: charcoal dark gray.
Stimulates and motivates the audience to
action (dark red, maroon, crimson tone).
Red
Conveys finality, no room for emotional
Black influence, control. Use as an end slide (fade
through black) to return audience attention to
the speaker.
T g a c
Avoid the fo
• Red/Green
• Blue/Purple
ry usin hange of color for a change of topic.
llowing background/text combinations:
• Brown/Green
• Blue/Black
Making Your
Presentation
Stand to the left side (audience’s left) of the screen
so the audience’s eyes move easily from the
presenter to the s le read left to write).
•
creen (peop
• Don’t read the visuals to the audience and say more
than you show.
• Use supporting documents—extensive details should
be part of your handouts.
Screen
You
Projector
Audience