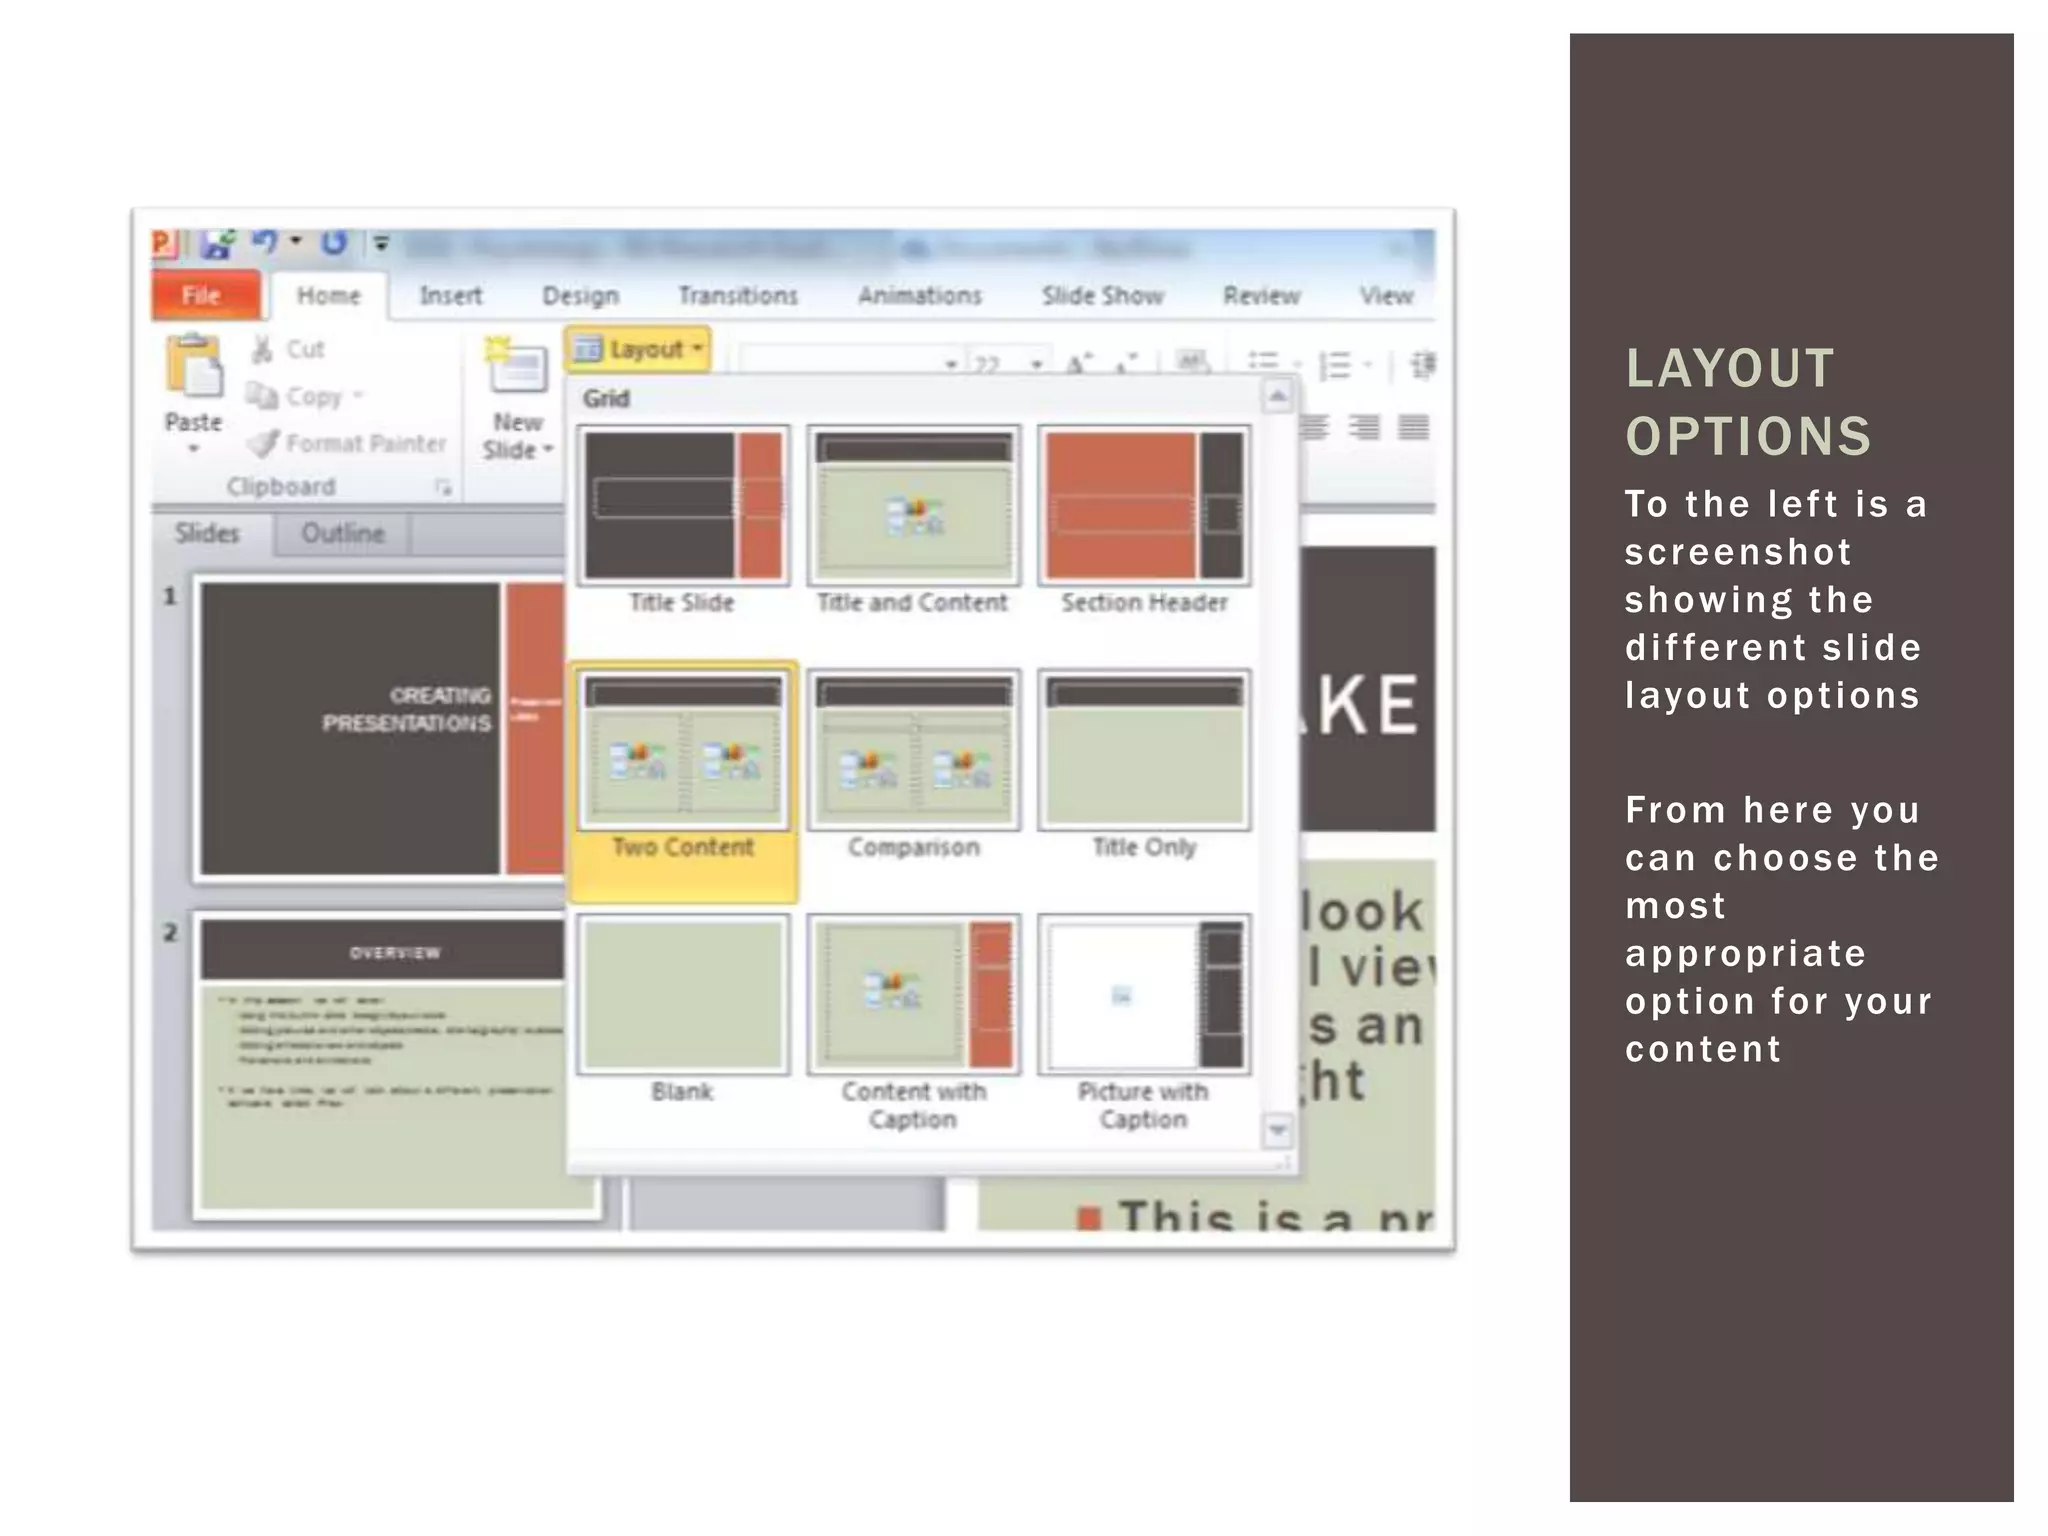
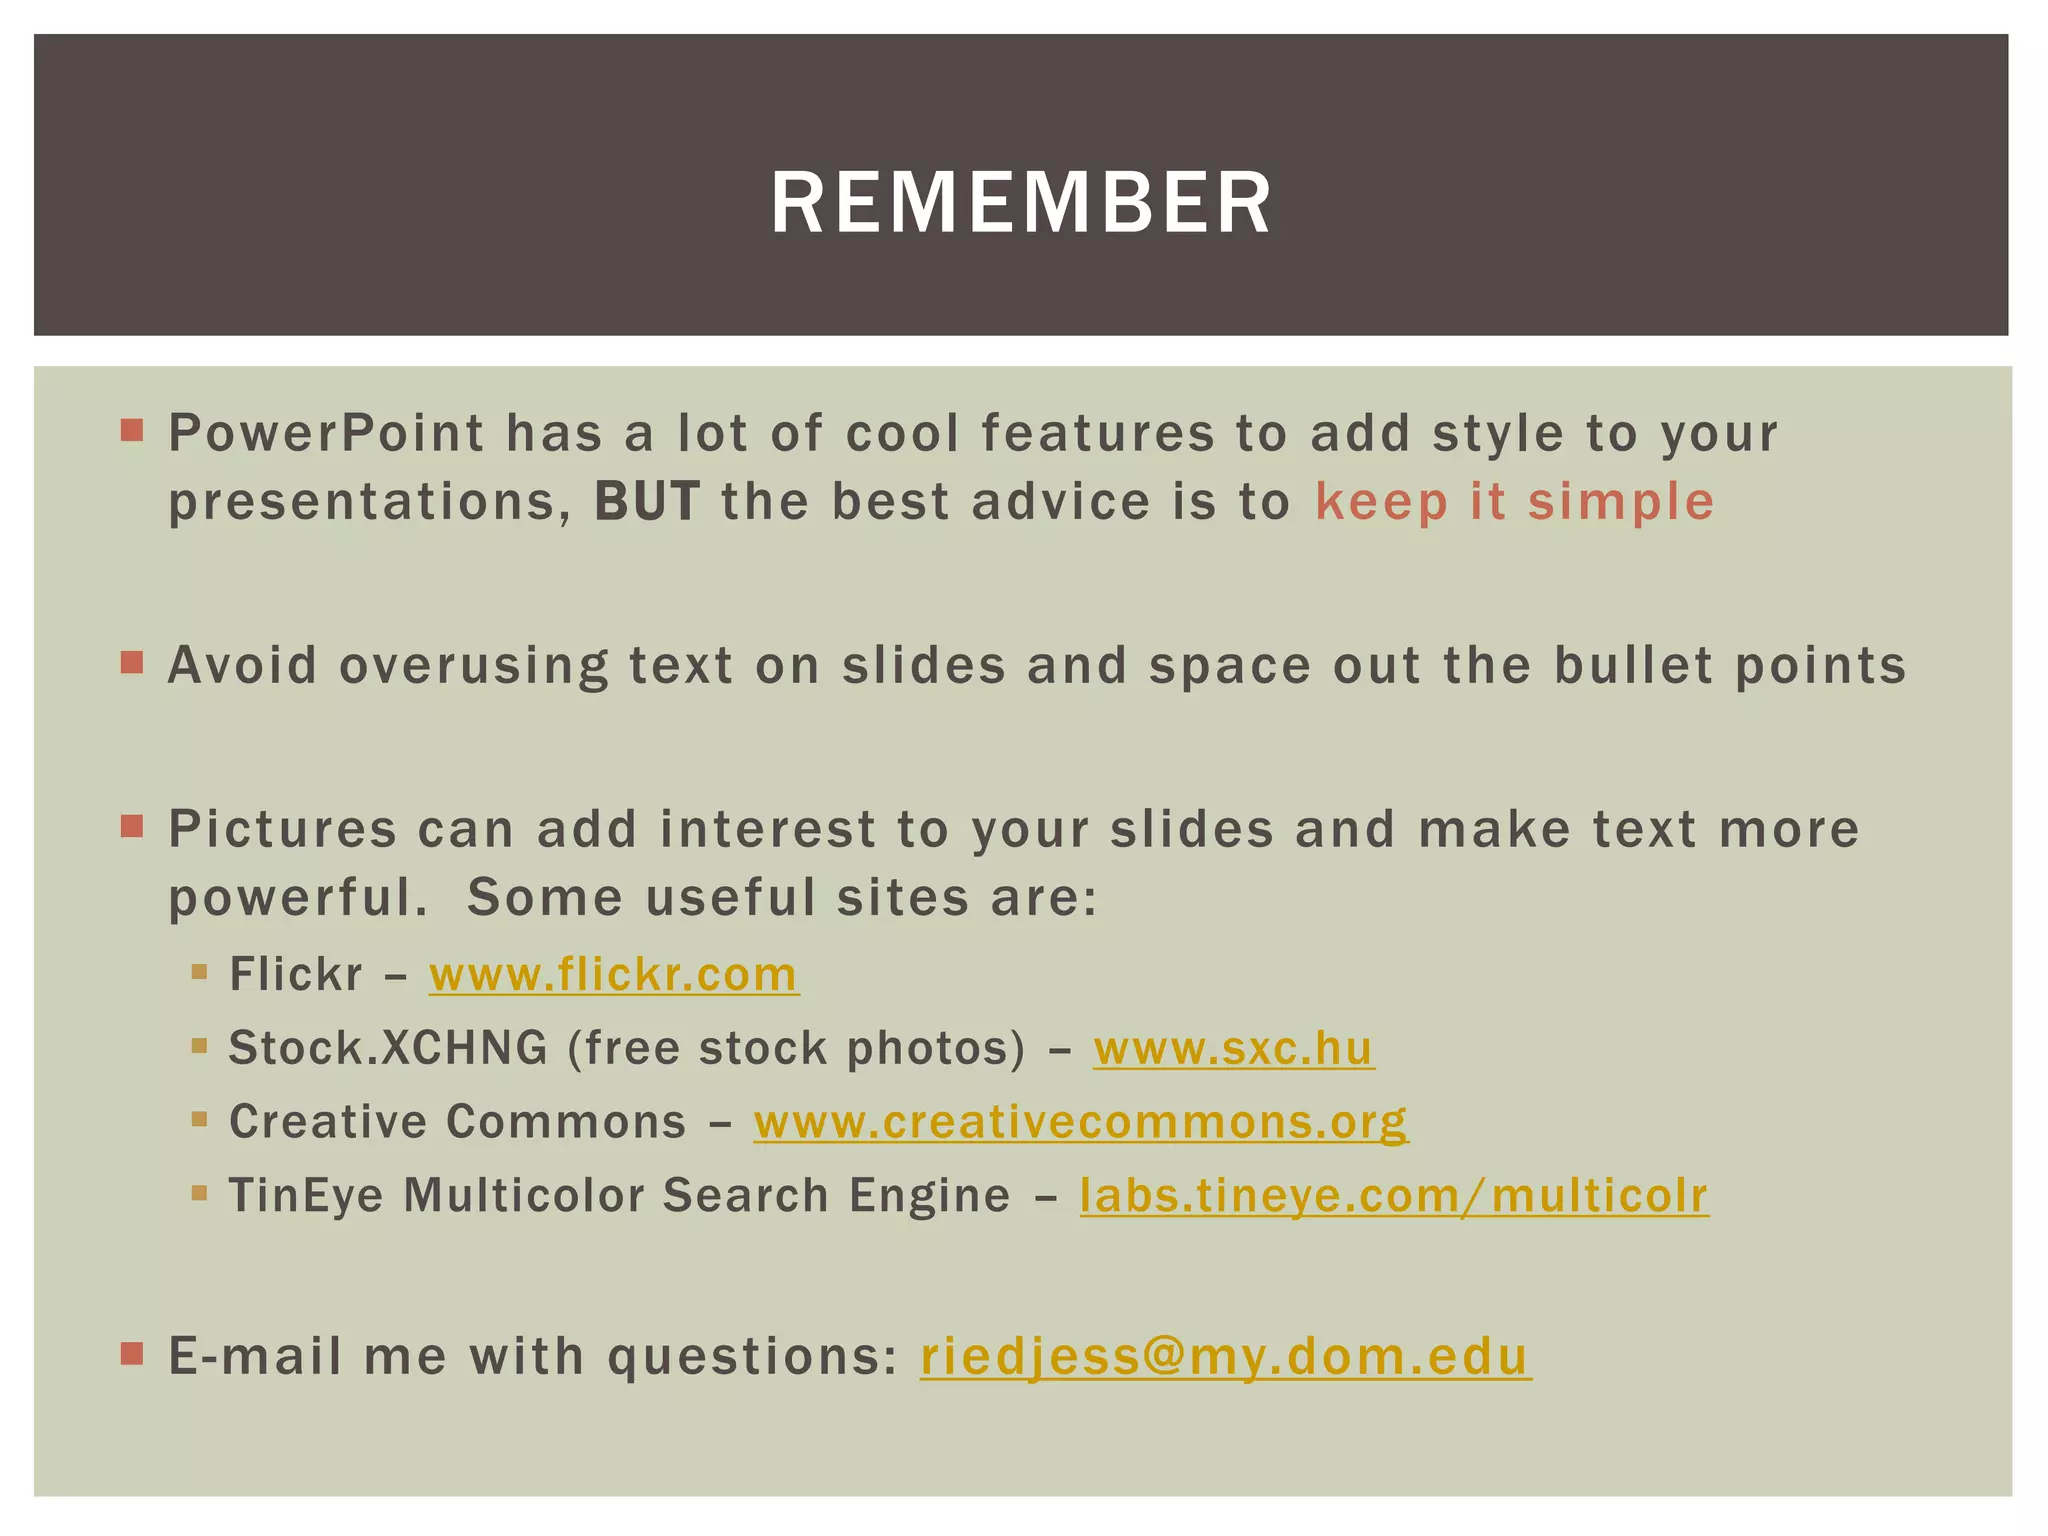
CREATING                   Presented by:
                                   Jessica
   PRESENTATIONS                   Riedmueller


LISSA TECHNOLOGY WORKSHOP SERIES
OVERVIEW

In this session we will cover:
  Using the built-in slide design/layout tools

  Adding pictures and other objects (charts/graphs,
  tables, media) to slides

  Adding effects to text and objects

  Transitions and animations
SLIDE DESIGN/LAYOUT

 The first thing to remember about creating ef fective
  presentation slides is that PowerPoint has a number of built -
  in tools to help you

 On the DESIGN tab, you can choose from a library of pre -
  formatted design options.
   Customize these using the Colors, Fonts, and Effects buttons
   Hover over an option to see how it would affect the slide contents
   Click on an option to make the change


 On the HOME tab, select the Layout button to make a change
  to the current slide or the New Slide button to choose a layout
  for the next slide to be created
MAKE POWERPOINT DO THE WORK

 If you look at this slide in
  normal view, you will see
  there is an empty box to
  the right
   Press “ESC” to view

 This is a pre-formatted
  content box that allows
  you to easily add text or
  objects to your slide

 Hover over each of the
  icons to see what they do,
  or click on the bullet
  point to add text
LAYOUT
OPTIONS
To t h e l e f t i s a
s c r e e n s h ot
showing the
d i f fe r e n t s l i d e
l ayo ut o p t i o n s

Fr o m h e r e yo u
can choose the
most
a p p r o p r i a te
o p t i o n f o r yo u r
c o n te n t
WAIT, HOW DID I ADD
      THAT PICTURE?
PICTURES AND OTHER OBJECTS

 Using PowerPoint’s pre -formatted content boxes makes
  adding pictures, graphs, charts, media, and other elements
  pretty easy

 It is best to have pictures saved somewhere before adding
  them to the PowerPoint. Copy and paste is possible, but may
  make formatting dif ficult

 Once you have a picture, use the picture tools menu to add
  enhancements like a frame or drop shadow to the picture
PICTURE EXAMPLE

         The image to the left
          has a white border
          and a drop shadow
          that was added simply
          by using the Picture
          Tools menu

         In normal view, click
          on the picture to see
          what other changes
          can be made
PICTURE ADJUSTMENTS

    Reduced saturation:            Pencil Sketch Ef fect:
select Color Saturation from   Use the Artistic Ef fects menu
       the Color menu
WHAT ABOUT OTHER
        OBJECTS?
6

5

4
           CHART FUN
           Charts can be
3          c r e a te d d i r e c t l y
           i n Po w e r Po i n t
2   2011
    2012   W h e n yo u
           s e l e c t t h e c h ar t
1   2013   icon, an Excel
           file will open in
           a n o t h e r w i n d ow
0
           To m a ke
           c h a n g e s to t h e
           chart, select
           the chart and
           click the Chart
           To o l s m e n u f o r
           editing options
SMART ART
CALLING ATTENTION TO TEXT

 One of the most effective text effects is the Drop
  Shadow
     To create this, click on the S button in the font menu


 You can also highlight important words with color

   M   aking the first letter of a word larger will also create
    impact
TRANSITIONS AND
    ANIMATIONS
TRANSITIONS

 Transitions are the animations that occur between slide
  changes
   The different options are found on the Transitions tab


 From this tab, you can change the transition type, the
  duration of the transition, and the action controlling the slide
  change (on mouse click or after a specified amount of time)

 A rule of thumb is to stick with one or two transition types for
  a short presentation, and no more than four for a long one
ANIMATIONS

 Animations refer to any actions applied to the slide content
   The different options are found on the Animations tab


 From this tab you can choose how you want the slide contents
  to appear on the slide
   For instance, this text can Float in
   And this text can Bounce in

 It even works on pictures

 As with the transitions, keep the
  number of dif ferent animations to a
  minimum, otherwise they lose their
  impact
RECAP AND WRAP-UP
REMEMBER

 PowerPoint has a lot of cool features to add style to your
  presentations, BUT the best advice is to keep it simple

 Avoid overusing text on slides and space out the bullet points

 Pictures can add interest to your slides and make text more
  powerful. Some useful sites are:
     Flickr – www.flickr.com
     Stock.XCHNG (free stock photos) – www.sxc.hu
     Creative Commons – www.creativecommons.org
     TinEye Multicolor Search Engine – labs.tineye.com/multicolr


 E-mail me with questions: riedjess@my.dom.edu

LISSA PowerPoint Workshop

  • 1.
    CREATING Presented by: Jessica PRESENTATIONS Riedmueller LISSA TECHNOLOGY WORKSHOP SERIES
  • 2.
    OVERVIEW In this sessionwe will cover:  Using the built-in slide design/layout tools  Adding pictures and other objects (charts/graphs, tables, media) to slides  Adding effects to text and objects  Transitions and animations
  • 3.
    SLIDE DESIGN/LAYOUT  Thefirst thing to remember about creating ef fective presentation slides is that PowerPoint has a number of built - in tools to help you  On the DESIGN tab, you can choose from a library of pre - formatted design options.  Customize these using the Colors, Fonts, and Effects buttons  Hover over an option to see how it would affect the slide contents  Click on an option to make the change  On the HOME tab, select the Layout button to make a change to the current slide or the New Slide button to choose a layout for the next slide to be created
  • 4.
    MAKE POWERPOINT DOTHE WORK  If you look at this slide in normal view, you will see there is an empty box to the right  Press “ESC” to view  This is a pre-formatted content box that allows you to easily add text or objects to your slide  Hover over each of the icons to see what they do, or click on the bullet point to add text
  • 5.
    LAYOUT OPTIONS To t he l e f t i s a s c r e e n s h ot showing the d i f fe r e n t s l i d e l ayo ut o p t i o n s Fr o m h e r e yo u can choose the most a p p r o p r i a te o p t i o n f o r yo u r c o n te n t
  • 6.
    WAIT, HOW DIDI ADD THAT PICTURE?
  • 7.
    PICTURES AND OTHEROBJECTS  Using PowerPoint’s pre -formatted content boxes makes adding pictures, graphs, charts, media, and other elements pretty easy  It is best to have pictures saved somewhere before adding them to the PowerPoint. Copy and paste is possible, but may make formatting dif ficult  Once you have a picture, use the picture tools menu to add enhancements like a frame or drop shadow to the picture
  • 8.
    PICTURE EXAMPLE  The image to the left has a white border and a drop shadow that was added simply by using the Picture Tools menu  In normal view, click on the picture to see what other changes can be made
  • 9.
    PICTURE ADJUSTMENTS Reduced saturation: Pencil Sketch Ef fect: select Color Saturation from Use the Artistic Ef fects menu the Color menu
  • 10.
  • 11.
    6 5 4 CHART FUN Charts can be 3 c r e a te d d i r e c t l y i n Po w e r Po i n t 2 2011 2012 W h e n yo u s e l e c t t h e c h ar t 1 2013 icon, an Excel file will open in a n o t h e r w i n d ow 0 To m a ke c h a n g e s to t h e chart, select the chart and click the Chart To o l s m e n u f o r editing options
  • 12.
  • 13.
    CALLING ATTENTION TOTEXT  One of the most effective text effects is the Drop Shadow  To create this, click on the S button in the font menu  You can also highlight important words with color  M aking the first letter of a word larger will also create impact
  • 14.
    TRANSITIONS AND ANIMATIONS
  • 15.
    TRANSITIONS  Transitions arethe animations that occur between slide changes  The different options are found on the Transitions tab  From this tab, you can change the transition type, the duration of the transition, and the action controlling the slide change (on mouse click or after a specified amount of time)  A rule of thumb is to stick with one or two transition types for a short presentation, and no more than four for a long one
  • 16.
    ANIMATIONS  Animations referto any actions applied to the slide content  The different options are found on the Animations tab  From this tab you can choose how you want the slide contents to appear on the slide  For instance, this text can Float in  And this text can Bounce in  It even works on pictures  As with the transitions, keep the number of dif ferent animations to a minimum, otherwise they lose their impact
  • 17.
  • 18.
    REMEMBER  PowerPoint hasa lot of cool features to add style to your presentations, BUT the best advice is to keep it simple  Avoid overusing text on slides and space out the bullet points  Pictures can add interest to your slides and make text more powerful. Some useful sites are:  Flickr – www.flickr.com  Stock.XCHNG (free stock photos) – www.sxc.hu  Creative Commons – www.creativecommons.org  TinEye Multicolor Search Engine – labs.tineye.com/multicolr  E-mail me with questions: riedjess@my.dom.edu