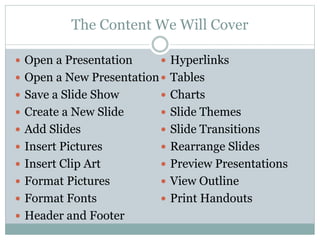
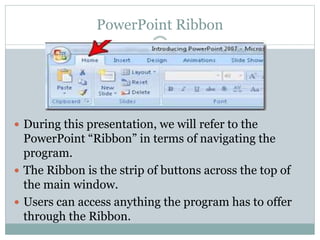
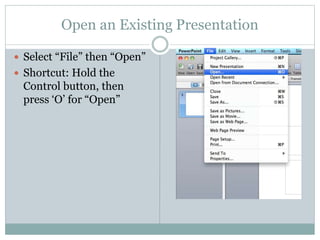
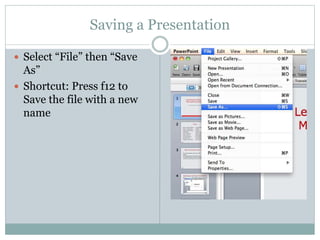
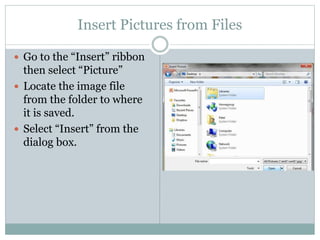
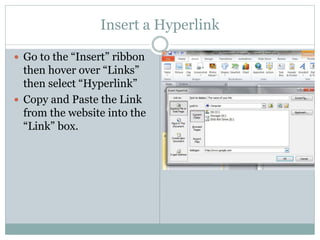
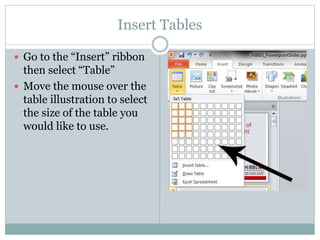
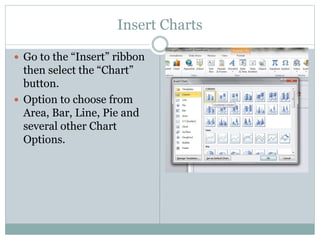
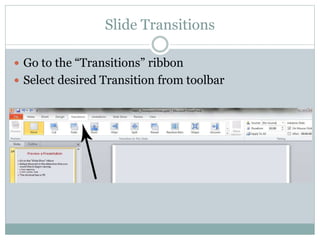
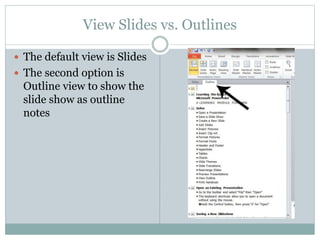
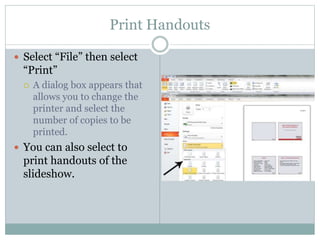
Mrs.S.SUMATHI ,
Assistant Professor,
Department of Information Technology
EMG Yadava Women’s College,
Madurai-14.
Microsoft PowerPoint 2010
for Microsoft Windows
What is PowerPoint?
 PowerPoint is a closed source commercial
presentation program developed by Microsoft.
The Content We Will Cover
 Open a Presentation
 Open a New Presentation
 Save a Slide Show
 Create a New Slide
 Add Slides
 Insert Pictures
 Insert Clip Art
 Format Pictures
 Format Fonts
 Header and Footer
 Hyperlinks
 Tables
 Charts
 Slide Themes
 Slide Transitions
 Rearrange Slides
 Preview Presentations
 View Outline
 Print Handouts
PowerPoint Ribbon
 During this presentation, we will refer to the
PowerPoint “Ribbon” in terms of navigating the
program.
 The Ribbon is the strip of buttons across the top of
the main window.
 Users can access anything the program has to offer
through the Ribbon.
Create a New Presentation
 Select “File” then “New”
 Shortcut: Hold the
Control button, then
press ‘N’ for “New”
Open an Existing Presentation
 Select “File” then “Open”
 Shortcut: Hold the
Control button, then
press ‘O’ for “Open”
Saving a Presentation
 Select “File” then “Save
As”
 Shortcut: Press f12 to
Save the file with a new
name
Add a Slide
 Go to the “Home” ribbon
and select the “New
Slide” button
 Select the Slide Pane and
press “Enter”
Insert Pictures from Files
 Go to the “Insert” ribbon
then select “Picture”
 Locate the image file
from the folder to where
it is saved.
 Select “Insert” from the
dialog box.
Insert Clip Art
 Go to the “Insert” ribbon then select “Clip Art”
 Enter search terms in Clip Art search pane on the
right and select image.
Format Pictures
 To resize the image, click on the picture to surround
the image with a blue box.
 Drag the corner dot away from the center to make it
larger and toward the center to make it smaller.
Format Fonts
 Go to the “Home” ribbon
then make changes to the
font size and style of the
text.
 This Home tab also
allows you to change all
aspects of the font size
and style.
Insert a Header and Footer
 Go to “Insert” then “Header and Footer”
 This dialog box allows you to add a date and time on
the slide.
Insert a Hyperlink
 Go to the “Insert” ribbon
then hover over “Links”
then select “Hyperlink”
 Copy and Paste the Link
from the website into the
“Link” box.
Insert Tables
 Go to the “Insert” ribbon
then select “Table”
 Move the mouse over the
table illustration to select
the size of the table you
would like to use.
Insert Charts
 Go to the “Insert” ribbon
then select the “Chart”
button.
 Option to choose from
Area, Bar, Line, Pie and
several other Chart
Options.
Add a Slide Theme from Gallery
 Go to the “Design” ribbon
 Select a design theme from the Theme toolbar.
Slide Transitions
 Go to the “Transitions” ribbon
 Select desired Transition from toolbar
Rearrange Slides
 To move a slide, click on the slide thumbnail in the
left column
 Drag and drop the slide at the desired location.
 To move consecutive slides at one time, click and
hold the Shift key as you select the slides you want to
move.
 Drag and drop the slides at the desired location.
Preview a Presentation
 Go to the “Slide Show” ribbon
 Select the point in the slide show that you would like
to begin viewing.
 From beginning
 From current slide
 The shortcut key is F5
View Slides vs. Outlines
 The default view is Slides
 The second option is
Outline view to show the
slide show as outline
notes
Print Handouts
 Select “File” then select
“Print”
 A dialog box appears that
allows you to change the
printer and select the
number of copies to be
printed.
 You can also select to
print handouts of the
slideshow.
T h i s d a y 1 m o d u l e w a s c r e a t e d f o r O n e W e e k
W o r k s h o p a s a C o n s u l t a n c y P r o g r a m b y
D e p a r t m e n t o f I n f o r m a t i o n T e c h n o l o g y ,
E M G Y a d a v a W o m e n ’ s C o l l e g e , M a d u r a i – 1 4 .
Thanks for watching!

Power Point Presentation Notes

  • 1.
    Mrs.S.SUMATHI , Assistant Professor, Departmentof Information Technology EMG Yadava Women’s College, Madurai-14. Microsoft PowerPoint 2010 for Microsoft Windows
  • 2.
    What is PowerPoint? PowerPoint is a closed source commercial presentation program developed by Microsoft.
  • 3.
    The Content WeWill Cover  Open a Presentation  Open a New Presentation  Save a Slide Show  Create a New Slide  Add Slides  Insert Pictures  Insert Clip Art  Format Pictures  Format Fonts  Header and Footer  Hyperlinks  Tables  Charts  Slide Themes  Slide Transitions  Rearrange Slides  Preview Presentations  View Outline  Print Handouts
  • 4.
    PowerPoint Ribbon  Duringthis presentation, we will refer to the PowerPoint “Ribbon” in terms of navigating the program.  The Ribbon is the strip of buttons across the top of the main window.  Users can access anything the program has to offer through the Ribbon.
  • 5.
    Create a NewPresentation  Select “File” then “New”  Shortcut: Hold the Control button, then press ‘N’ for “New”
  • 6.
    Open an ExistingPresentation  Select “File” then “Open”  Shortcut: Hold the Control button, then press ‘O’ for “Open”
  • 7.
    Saving a Presentation Select “File” then “Save As”  Shortcut: Press f12 to Save the file with a new name
  • 8.
    Add a Slide Go to the “Home” ribbon and select the “New Slide” button  Select the Slide Pane and press “Enter”
  • 9.
    Insert Pictures fromFiles  Go to the “Insert” ribbon then select “Picture”  Locate the image file from the folder to where it is saved.  Select “Insert” from the dialog box.
  • 10.
    Insert Clip Art Go to the “Insert” ribbon then select “Clip Art”  Enter search terms in Clip Art search pane on the right and select image.
  • 11.
    Format Pictures  Toresize the image, click on the picture to surround the image with a blue box.  Drag the corner dot away from the center to make it larger and toward the center to make it smaller.
  • 12.
    Format Fonts  Goto the “Home” ribbon then make changes to the font size and style of the text.  This Home tab also allows you to change all aspects of the font size and style.
  • 13.
    Insert a Headerand Footer  Go to “Insert” then “Header and Footer”  This dialog box allows you to add a date and time on the slide.
  • 14.
    Insert a Hyperlink Go to the “Insert” ribbon then hover over “Links” then select “Hyperlink”  Copy and Paste the Link from the website into the “Link” box.
  • 15.
    Insert Tables  Goto the “Insert” ribbon then select “Table”  Move the mouse over the table illustration to select the size of the table you would like to use.
  • 16.
    Insert Charts  Goto the “Insert” ribbon then select the “Chart” button.  Option to choose from Area, Bar, Line, Pie and several other Chart Options.
  • 17.
    Add a SlideTheme from Gallery  Go to the “Design” ribbon  Select a design theme from the Theme toolbar.
  • 18.
    Slide Transitions  Goto the “Transitions” ribbon  Select desired Transition from toolbar
  • 19.
    Rearrange Slides  Tomove a slide, click on the slide thumbnail in the left column  Drag and drop the slide at the desired location.  To move consecutive slides at one time, click and hold the Shift key as you select the slides you want to move.  Drag and drop the slides at the desired location.
  • 20.
    Preview a Presentation Go to the “Slide Show” ribbon  Select the point in the slide show that you would like to begin viewing.  From beginning  From current slide  The shortcut key is F5
  • 21.
    View Slides vs.Outlines  The default view is Slides  The second option is Outline view to show the slide show as outline notes
  • 22.
    Print Handouts  Select“File” then select “Print”  A dialog box appears that allows you to change the printer and select the number of copies to be printed.  You can also select to print handouts of the slideshow.
  • 23.
    T h is d a y 1 m o d u l e w a s c r e a t e d f o r O n e W e e k W o r k s h o p a s a C o n s u l t a n c y P r o g r a m b y D e p a r t m e n t o f I n f o r m a t i o n T e c h n o l o g y , E M G Y a d a v a W o m e n ’ s C o l l e g e , M a d u r a i – 1 4 . Thanks for watching!