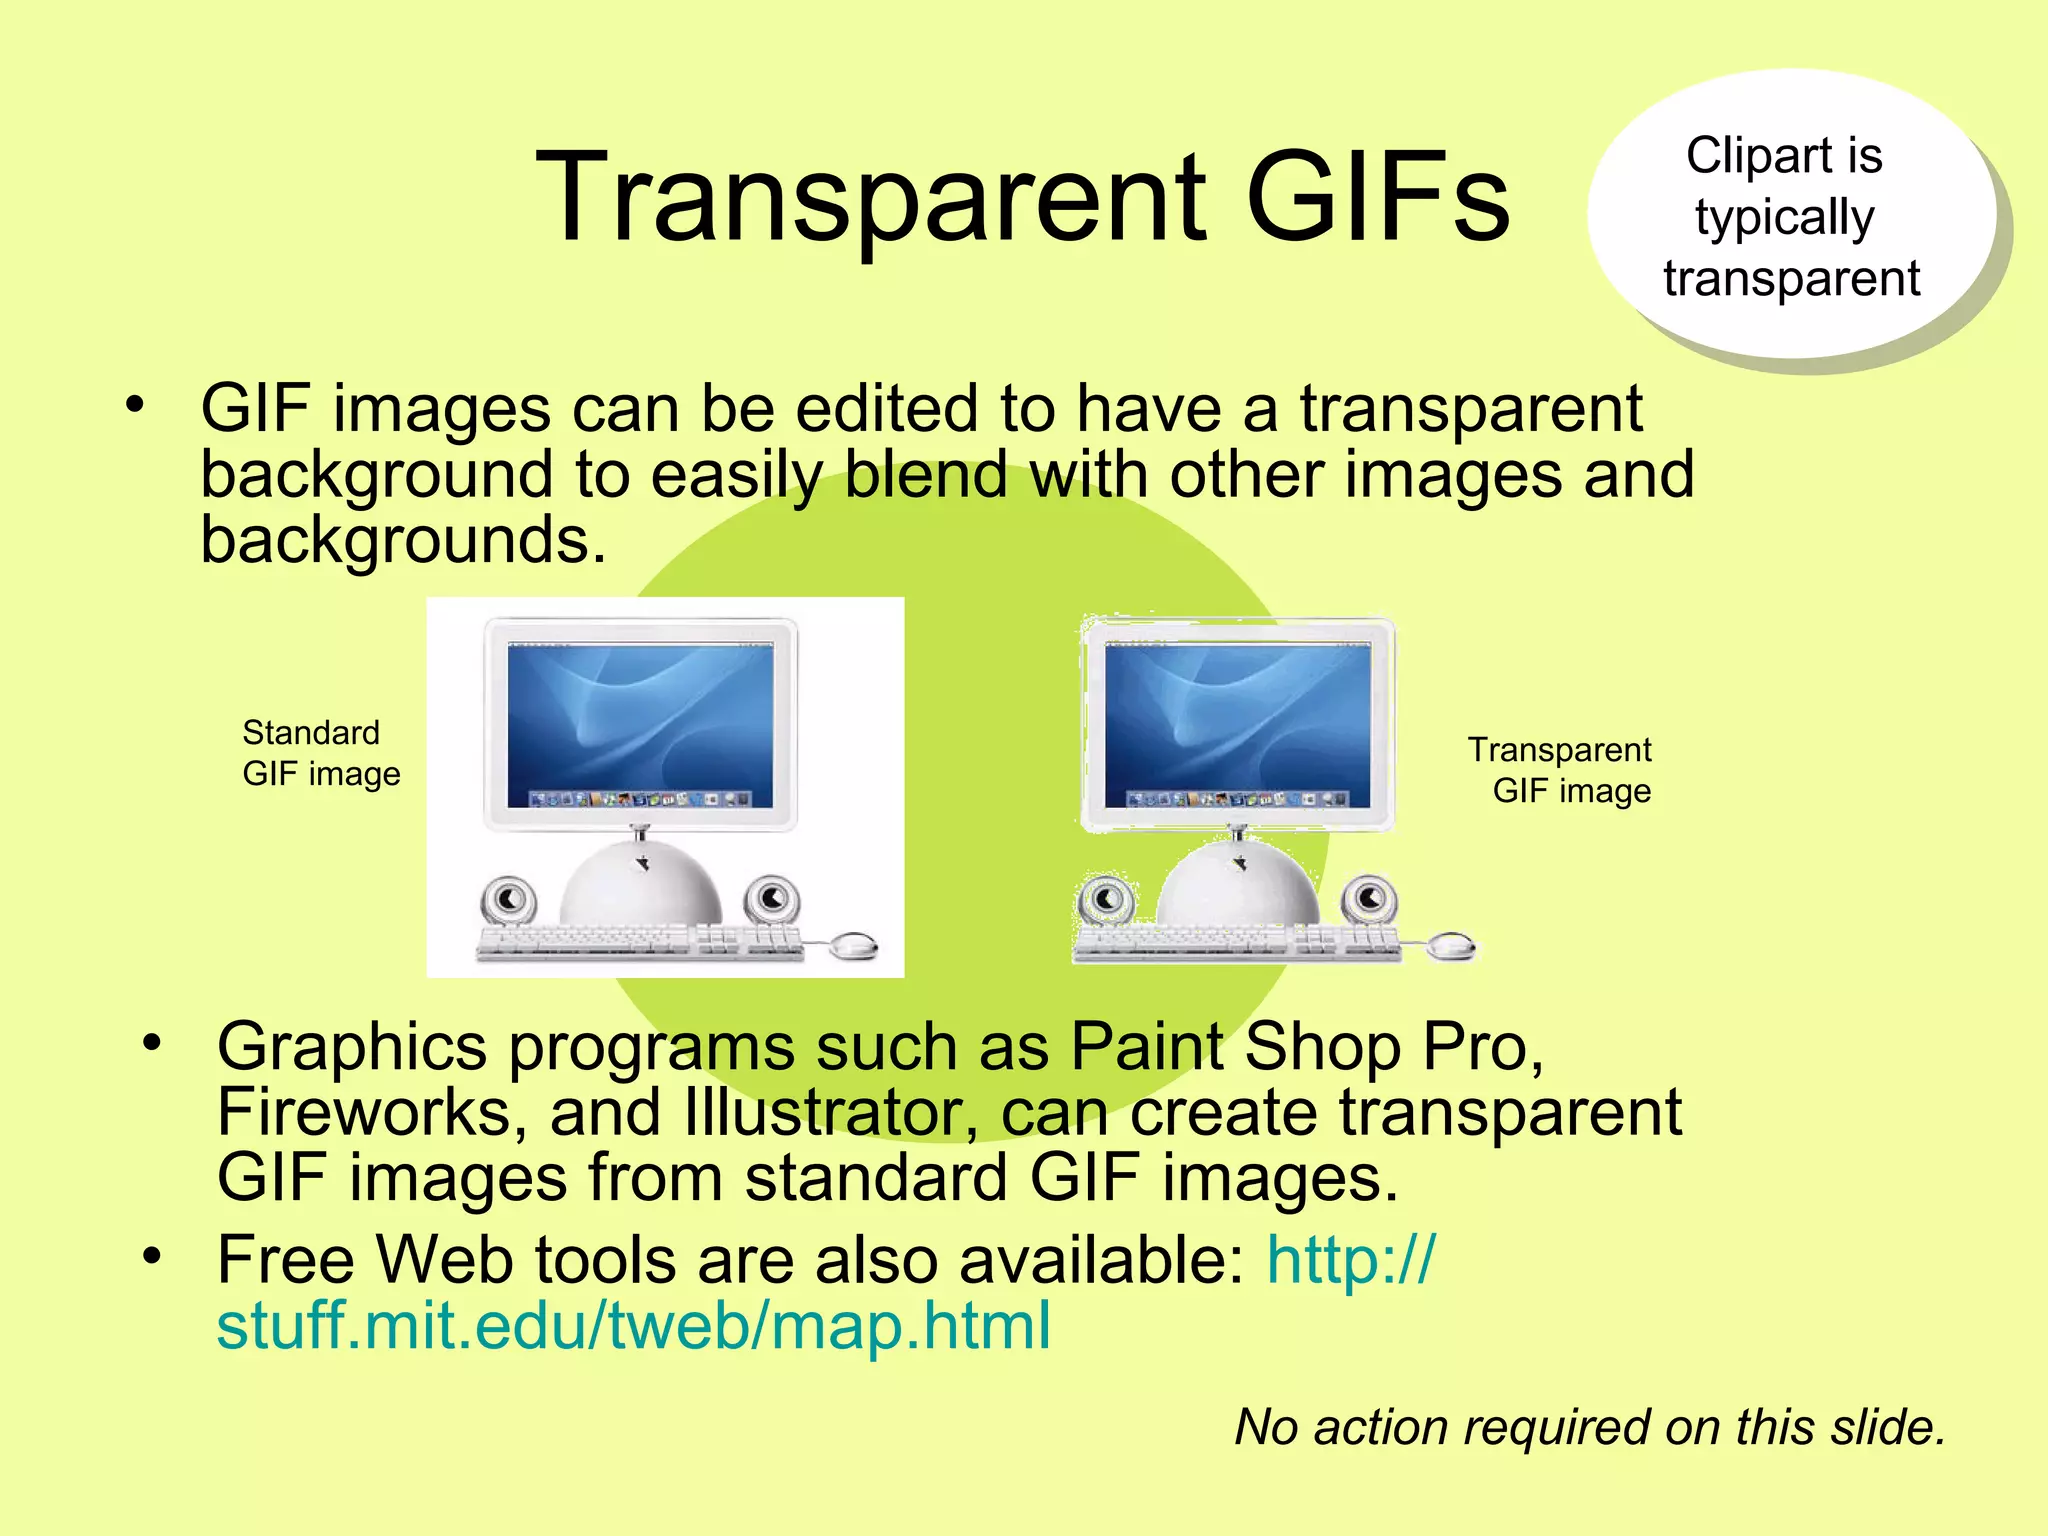
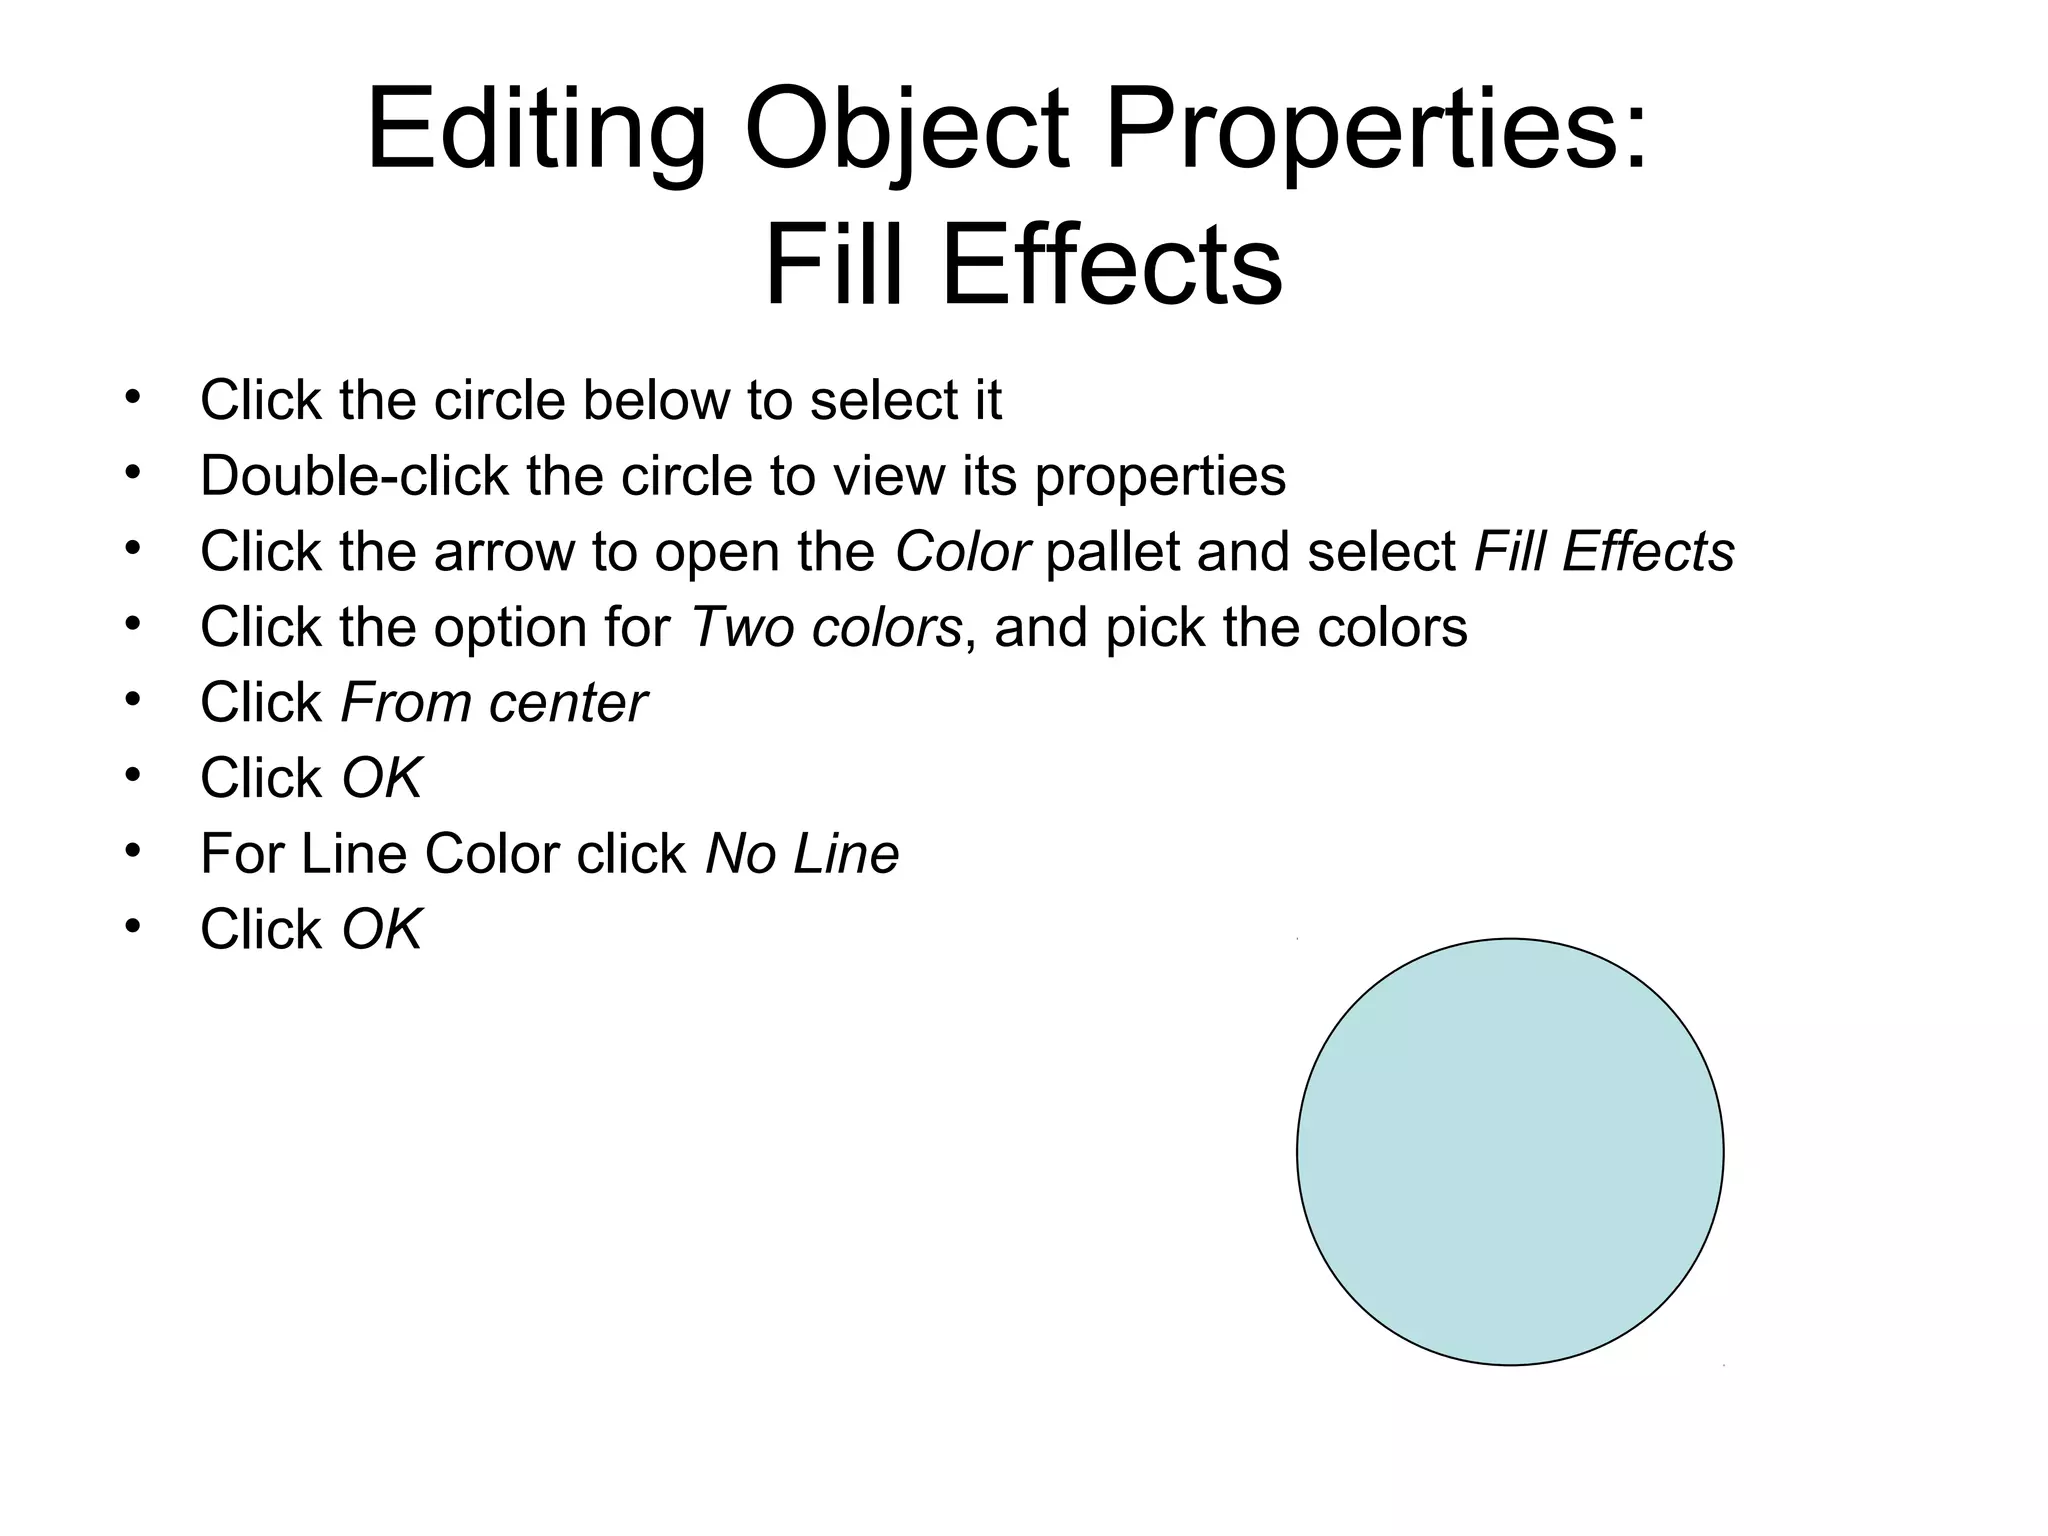
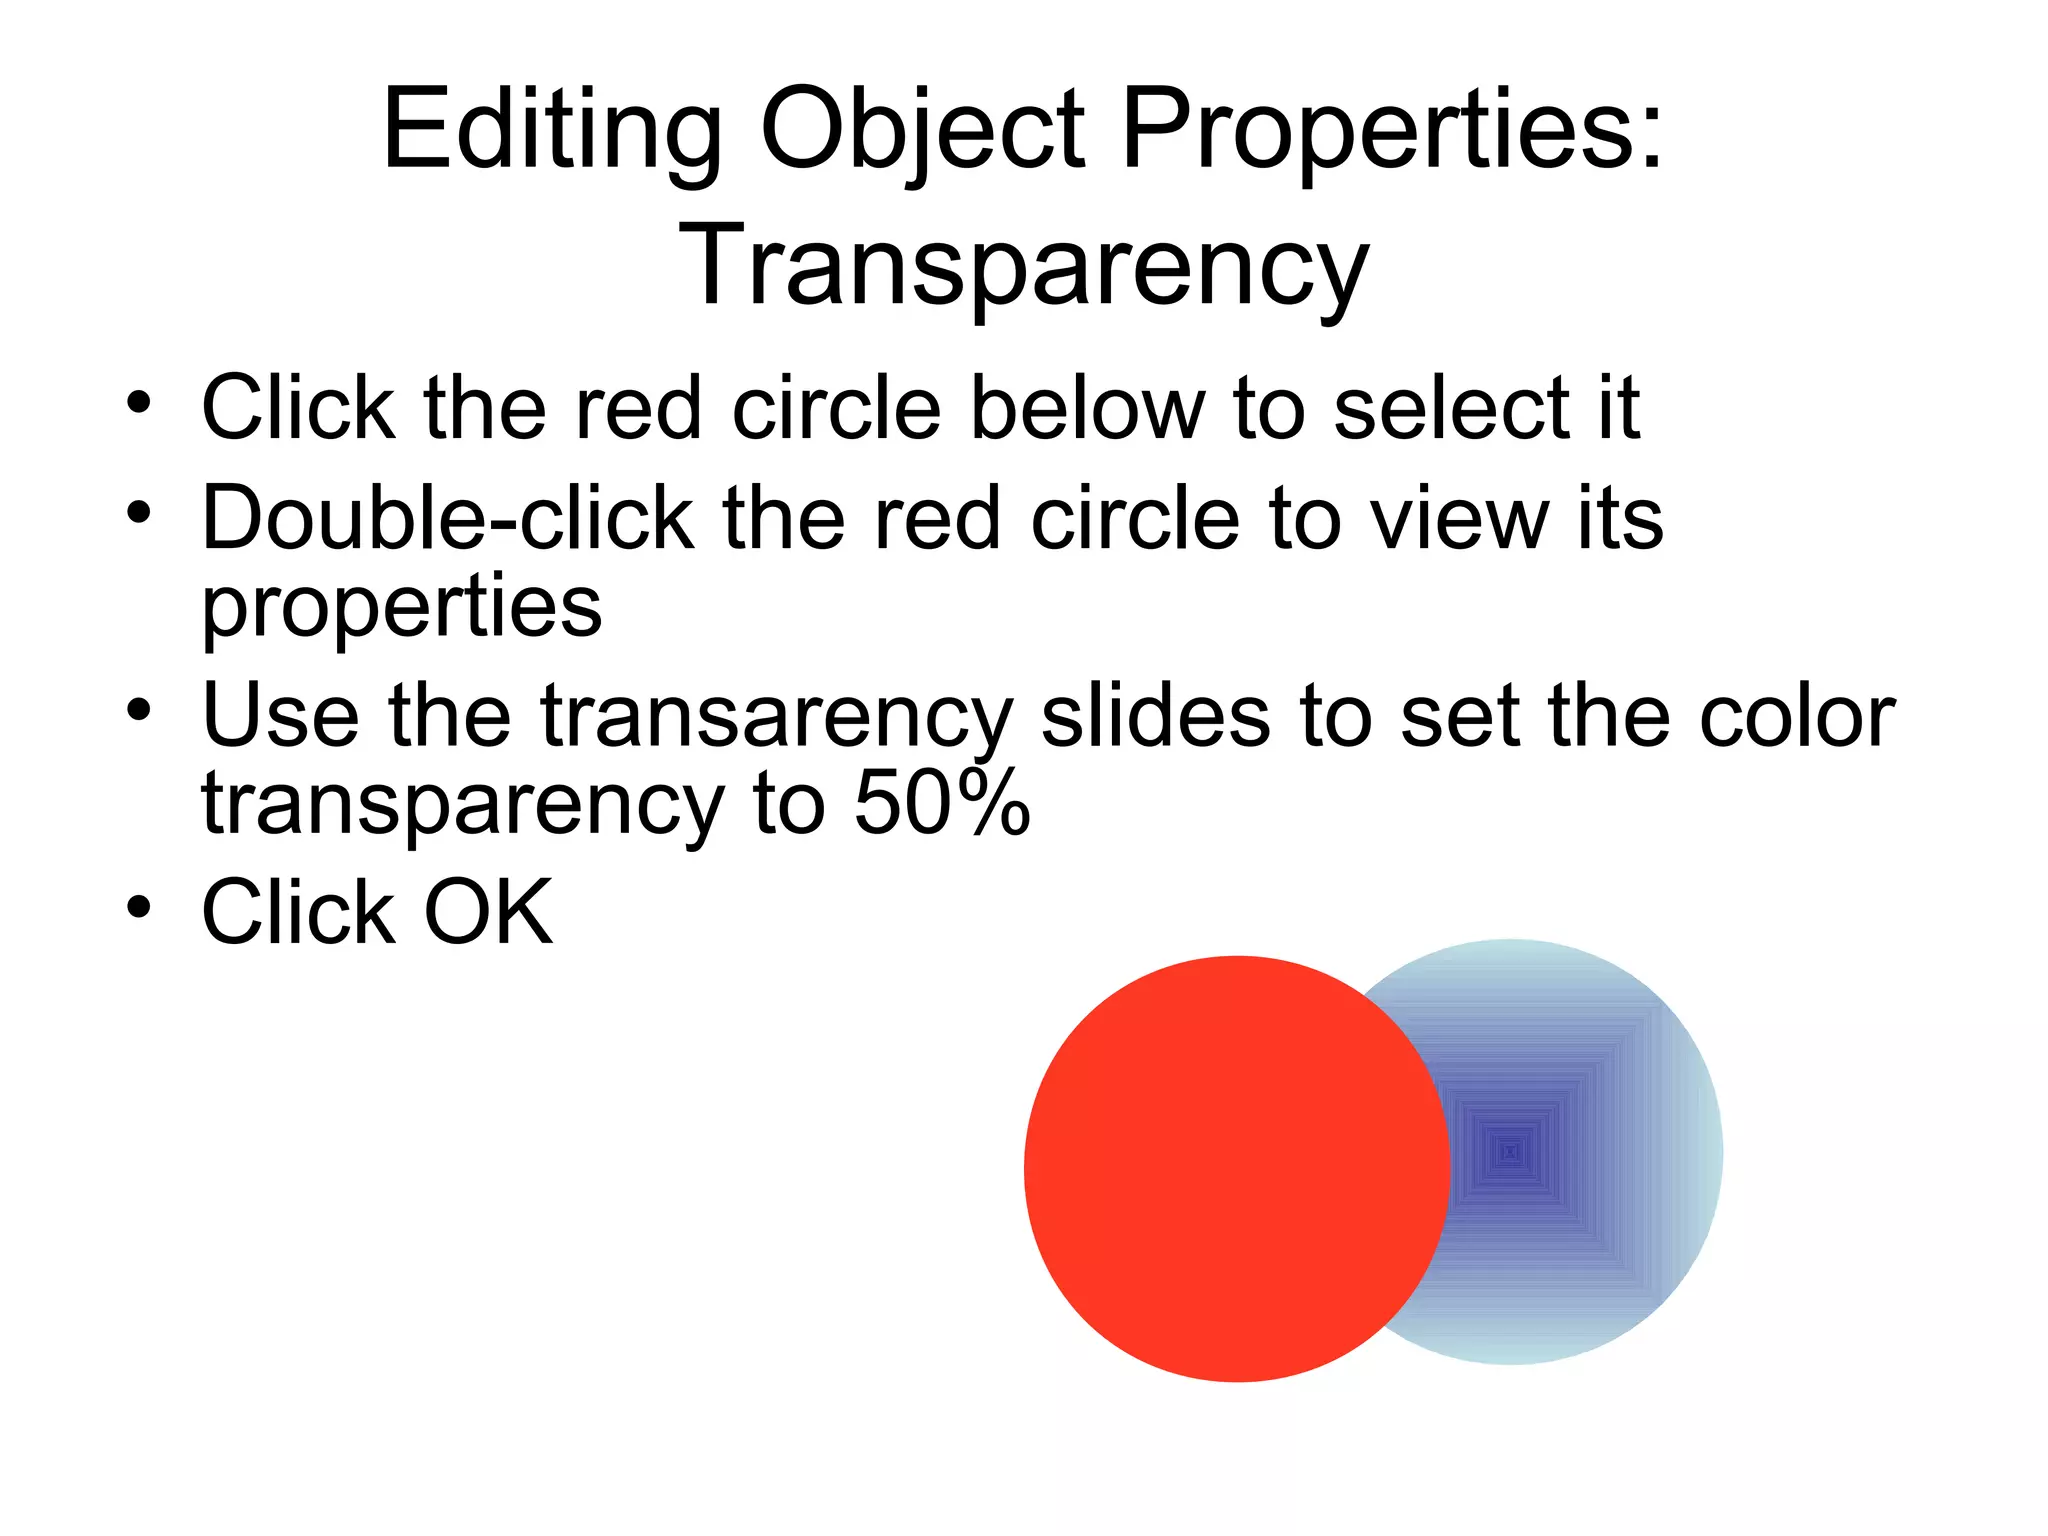
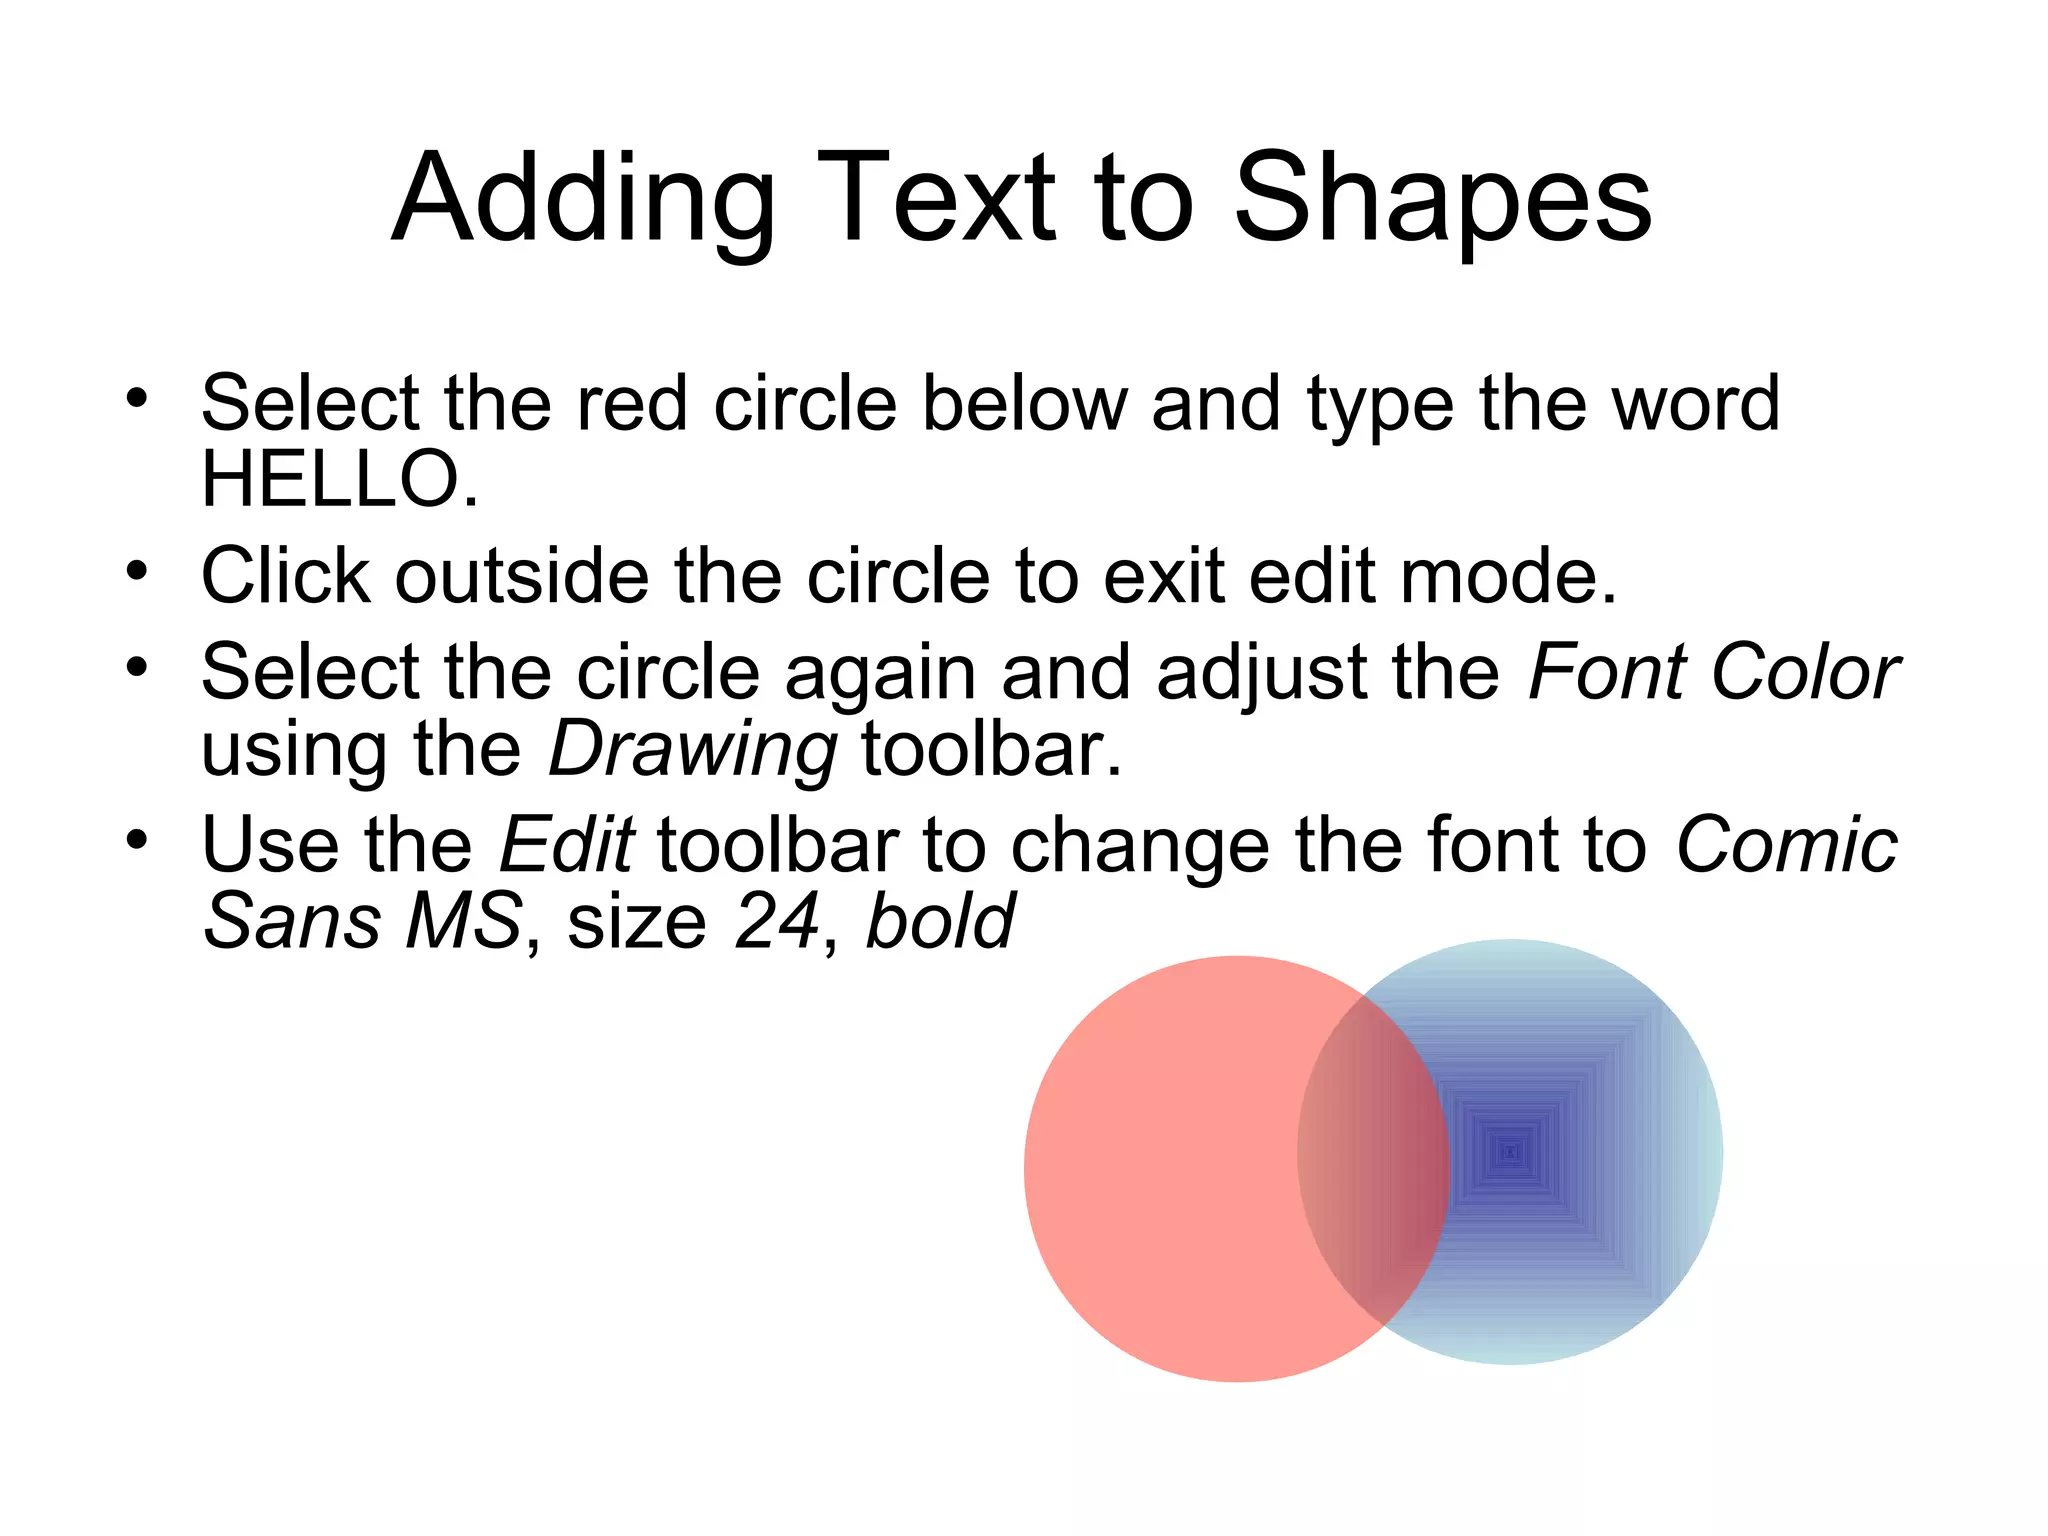
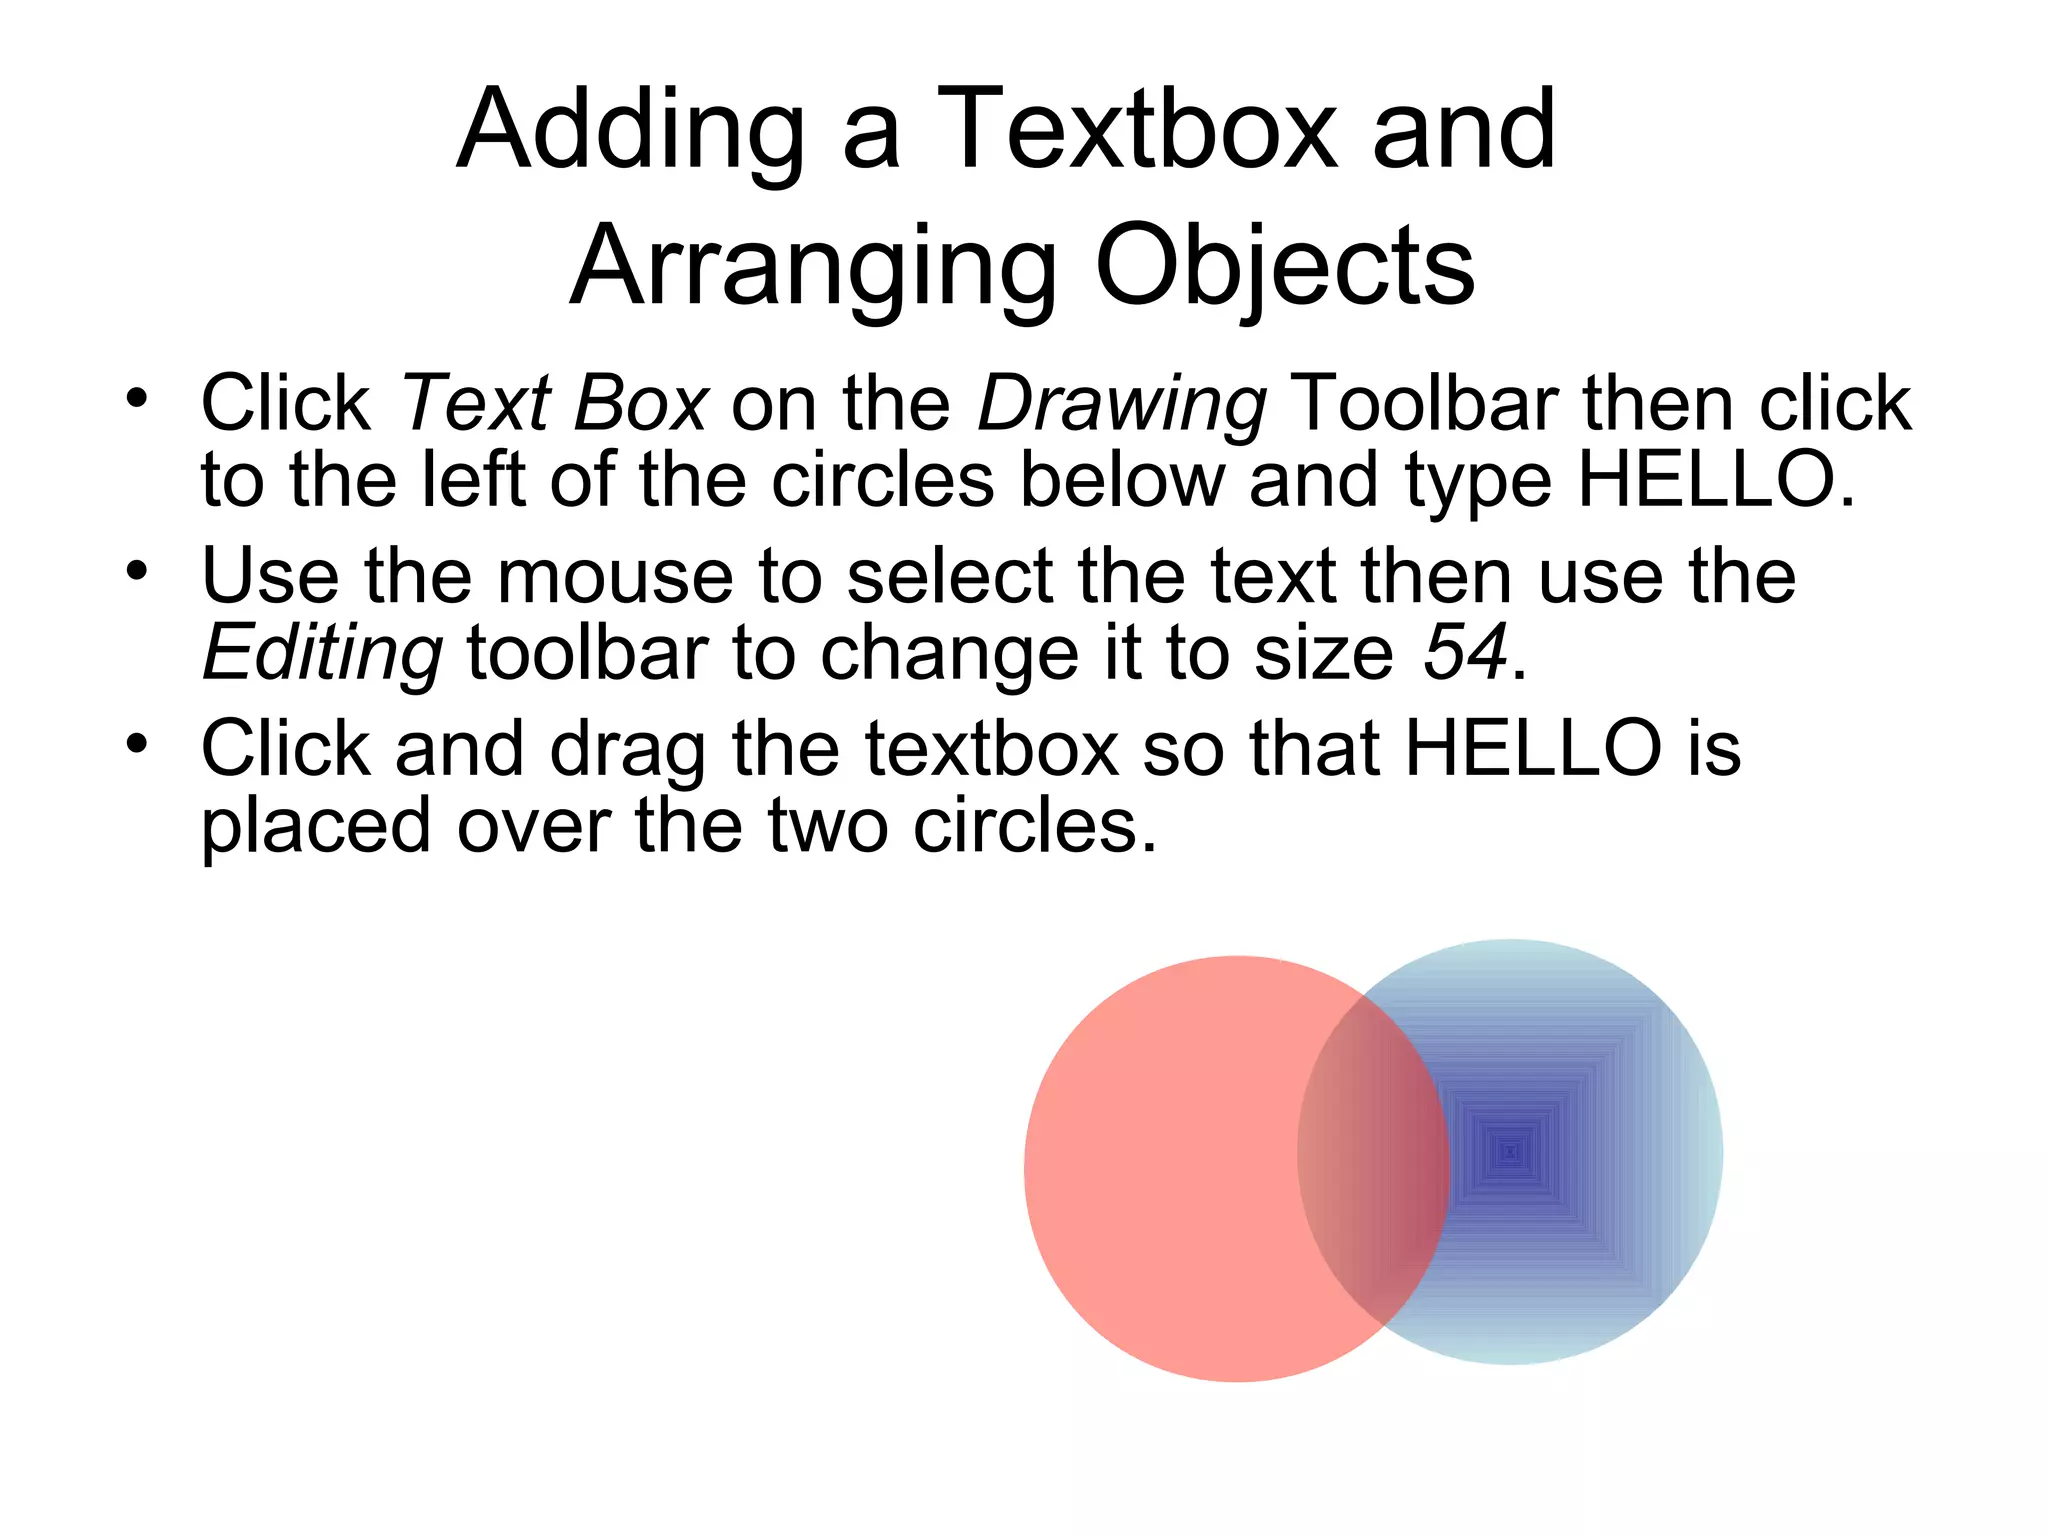
SlideShare a Scribd company logo
PowerPoint Practice Exercise
1. Save this file on your computer.
2. Open this file in PowerPoint
3. Edit each slide according to the instructions
provided in the slides in order to learn the skills
required for assignment 4.
Adding and Deleting Slides
• Slides are added to a presentation by opening the Insert
menu above and clicking New Slide. You might also use
the New Slide button on the toolbar if it is available.
• New slides are inserted following the current slide.
Notice the current slide is highlighted in the left pane.
• Slides are deleted by selecting them in the left pane and
pressing the Delete key to delete it.
• Try inserting a slide. After inserting a slide progress over
the new slide to the next slide by either clicking it in the
left pane or pressing the PgDn key.
Slide Formats: Clip Art
• Open the Format menu and select Slide Layout. Click
the slide format named Title, Text & Clip Art (under
Other Layouts) to Apply it to this slide
• Insert a Clip Art image of your choice
• Progress to the next slide
Slide Formats: Chart
• Apply the slide format named Title, Text & Chart
to this slide.
• Click the chart button and edit the data in the
chart table however you like.
• Close the chart table to complete the chart
insertion.
• Progress to the next slide
Slide Formats: Organizational
Chart
• Use the Insert menu to Insert a New Slide
– select the Organizational Chart format.
• Add some data to the chart and
experiment with the chart tool then
progress to the next slide.
Applying a Design Template
• Select Format/Slide Design. Select a
design of your choice and apply it to the
presentation by clicking the arrow bar next
to the slide of your choice and clicking
Apply to All Slides
• Select Color Schemes, select a color
scheme of your choice, and Apply to All
Slides Now we’re crankin’!!
Acquiring Graphics from the Web
• Open your Web browser and go to
http://www.fsu.edu/%7Eunicomm/pages/seal_
• Right-click and save the FSU Seal located
in the upper left corner of the page.
• We’ll use this graphic later in the exercise.
Transparent GIFs
• GIF images can be edited to have a transparent
background to easily blend with other images and
backgrounds.
Transparent
GIF image
Standard
GIF image
No action required on this slide.
Clipart is
typically
transparent
Clipart is
typically
transparent
• Graphics programs such as Paint Shop Pro,
Fireworks, and Illustrator, can create transparent
GIF images from standard GIF images.
• Free Web tools are also available: http://
stuff.mit.edu/tweb/map.html
Editing the Slide Master
• View the Slide Master by clicking View then
Master then Slide Master
• Add your name to the footer
• Insert the FSU Seal image that you saved earlier
in the upper right corner of the Slide Master
• Resize the Seal to make it very small and
unobtrusive.
• Click “Close Master View” on the Slide Master
View toolbar.
• Observe the results on all slides
Changes made to Slide Masters effect all slides of that type
in the presentation.
Editing Object Properties:
Fill Effects
• Click the circle below to select it
• Double-click the circle to view its properties
• Click the arrow to open the Color pallet and select Fill Effects
• Click the option for Two colors, and pick the colors
• Click From center
• Click OK
• For Line Color click No Line
• Click OK
Editing Object Properties:
Transparency
• Click the red circle below to select it
• Double-click the red circle to view its
properties
• Use the transarency slides to set the color
transparency to 50%
• Click OK
Using the Drawing Toolbar
• Use the options on the Drawing toolbar to
adjust the following attributes of the red
circle:
– Fill Color
– Line color
– Line Style
– Shadow Style
– 3-D Style
Adding Text to Shapes
• Select the red circle below and type the word
HELLO.
• Click outside the circle to exit edit mode.
• Select the circle again and adjust the Font Color
using the Drawing toolbar.
• Use the Edit toolbar to change the font to Comic
Sans MS, size 24, bold
Adding a Textbox and
Arranging Objects
• Click Text Box on the Drawing Toolbar then click
to the left of the circles below and type HELLO.
• Use the mouse to select the text then use the
Editing toolbar to change it to size 54.
• Click and drag the textbox so that HELLO is
placed over the two circles.
Selecting Groups of Objects
• So far, we have selected and operated on one object at a time.
Multiple objects can be selected at once either by holding shift and
clicking each object, or by clicking and dragging the mouse pointer
over all desired objects.
• Using the Drawing toolbar, insert four AutoShapes below, then try
selecting them together by using both methods described above.
• While all four objects are selected, add a shadow effect using the
Shadow tool on the drawing toolbar.
Setting Order and Groupings
• Insert a square next to the circle below by clicking the Rectangle tool button
on the Drawing toolbar (bottom of display) then clicking and dragging on the
slide.
• Click and drag the square to move it so that it is partially covering the circle.
• Right-click the circle and choose Order/Bring to Front
• Select both the circle and square by holding the shift key and clicking them
both one after the other
• Click Draw on the Drawing toolbar, then choose Group.
• Click and drag the figures to see that they are now grouped together as one
object.
Lines, Arrows, & WordArt
• Experiment with the line, arrow, and WordArt buttons on the
Drawing toolbar.
Rotating and Animating Objects
• Rotate the star by selecting it, and clicking and dragging the green
handle on the star.
• Select both the moon and star and group them together as one
object
• With the grouped objects selected open the Slide Show menu, click
Custom Animation
• Click Add Effect, then Entrance, and select an animation effect (Fly
In, Stretch, Wipe, etc).
• Try out the animation by clicking the button on the bottom labeled
Slide show (then exit the show by pressing the Esc key).
Advanced Animation:
Effect Options
• Use the Custom Animation options to Add an
Effect to this bulleted list so that each bulleted
item Flies In one at a time with each mouse
click.
• Click the arrow button next to the animation
setting for this text to access the Effect Options.
In the After Animation settings select a light
color.
• Use the Slide show button to view the effect.
Advanced Animation: Timing
• Using the Custom Animation pane
– Set an animation for this bulleted list so that each 1st
and 2nd
bullet
level Appear one at a time with each mouse click (you will need
to change Group Text settings in Effect Options).
– Set the below picture objects to Fly In one after the other, one
from the left and the other from the right, automaticcaly (without
clicking the mouse) with a 1 second delay on each (you will need
to change the Direction and Timing settings in Effect Options)
Advanced Animation:
Fades and Timing
• Set the below images so that the one on the
left dissolves in, pauses for two seconds, then
disappears as the second dissolves in. Set it
so it all happens automatically.
Slide Transitions
• Select Slide Show/Slide Transition. Try out the
various transition effects.
• Experiment with Speed and Sound
• Select Random Transition and Apply to All
slides.
Setting Up AutoPlay
• You can set the timings for progressing through a
presentation by selecting Slide Show/Rehearse Timings.
• Run the show at the pace that you feel is appropriate,
clicking the mouse to progress through all slides.
PowerPoint will record your timings for use in auto-
playing the presentation.
• Save the timings when you are finished.
• Upon exit, your slideshow will be displayed in Slide
Sorter view. Note the timings associated with each slide.
• Double-click this slide to return to Normal View.
• Select View/Slide Show to auto-play this presentation.
Setting Up AutoPlay
• For some environments, such as a public kiosk
or trade show, you may wish to have your
automated slide show loop back to the beginning
when it concludes. To set your presentation to
loop:
– Select Slide Show/Set Up Show
– Check the box by Loop continuously until “Esc”
– Click OK
• Try it out on this presentation.

More Related Content

What's hot

TUTORIAL ON PHOTOSHOP
TUTORIAL ON PHOTOSHOPTUTORIAL ON PHOTOSHOP
TUTORIAL ON PHOTOSHOP
Anamika Chauhan
 
Adobe Premiere Pro: An Introduction to the Basics_Mujeeb Riaz
Adobe Premiere Pro: An Introduction to the Basics_Mujeeb RiazAdobe Premiere Pro: An Introduction to the Basics_Mujeeb Riaz
Adobe Premiere Pro: An Introduction to the Basics_Mujeeb Riaz
Mujeeb Riaz
 
Adope Photoshop Tool Bar (By: Shujaat Abbas)
Adope Photoshop Tool Bar (By: Shujaat Abbas)Adope Photoshop Tool Bar (By: Shujaat Abbas)
Adope Photoshop Tool Bar (By: Shujaat Abbas)
Shujaat Abbas
 
Introducing Adobe Animate CC
Introducing Adobe Animate CCIntroducing Adobe Animate CC
Introducing Adobe Animate CC
Joseph Labrecque
 
Features Of PowerPoint
Features Of PowerPointFeatures Of PowerPoint
Features Of PowerPoint
Udit Mittal
 
Microsoft Powerpoint
Microsoft PowerpointMicrosoft Powerpoint
Microsoft Powerpoint
Jack Frost
 
PowerPoint on Powerpoint
PowerPoint on PowerpointPowerPoint on Powerpoint
PowerPoint on Powerpoint
KBLibrary
 
Animation in power point
Animation in power pointAnimation in power point
Animation in power pointleoleogo
 
Microsoft power point 2010 publish
Microsoft power point 2010 publishMicrosoft power point 2010 publish
Microsoft power point 2010 publish
Razif Rahman
 
Learn MS Powerpoint basics
Learn MS Powerpoint basicsLearn MS Powerpoint basics
Learn MS Powerpoint basics
vethics
 
Ms PowerPoint 2010 Training in Ambala ! Batra Computer Centre
Ms PowerPoint 2010 Training in Ambala ! Batra Computer CentreMs PowerPoint 2010 Training in Ambala ! Batra Computer Centre
Ms PowerPoint 2010 Training in Ambala ! Batra Computer Centre
jatin batra
 
MS Word - Paragraph Indenting and Line Spacing
MS Word - Paragraph Indenting and Line SpacingMS Word - Paragraph Indenting and Line Spacing
MS Word - Paragraph Indenting and Line Spacing
kross015
 
Adobe illustrator getting started
Adobe illustrator getting startedAdobe illustrator getting started
Adobe illustrator getting started
Danielle Oser, APR
 
Ms powerpoint 2013
Ms powerpoint 2013Ms powerpoint 2013
Ms powerpoint 2013
Noor Azman Muhammad
 
All about shortcut keys
All about shortcut keysAll about shortcut keys
All about shortcut keysNilabh Verma
 
Microsoft Power Point 2007 (Basics)
Microsoft Power Point 2007 (Basics)Microsoft Power Point 2007 (Basics)
Microsoft Power Point 2007 (Basics)
NikitaSharma332
 
Adobe Photoshop Toolbox definition term
Adobe Photoshop Toolbox definition termAdobe Photoshop Toolbox definition term
Adobe Photoshop Toolbox definition termAllan Roloma
 
Learning Photoshop CS6 with 100 practical exercises
Learning Photoshop CS6 with 100 practical exercisesLearning Photoshop CS6 with 100 practical exercises
Learning Photoshop CS6 with 100 practical exercises
MCB Press
 
Adobe Photoshop Toolbar Introduction
Adobe Photoshop Toolbar IntroductionAdobe Photoshop Toolbar Introduction
Adobe Photoshop Toolbar Introduction
Sidrah Noor
 
Microsoft Power Point 2010
Microsoft Power Point 2010Microsoft Power Point 2010
Microsoft Power Point 2010
home
 

What's hot (20)

TUTORIAL ON PHOTOSHOP
TUTORIAL ON PHOTOSHOPTUTORIAL ON PHOTOSHOP
TUTORIAL ON PHOTOSHOP
 
Adobe Premiere Pro: An Introduction to the Basics_Mujeeb Riaz
Adobe Premiere Pro: An Introduction to the Basics_Mujeeb RiazAdobe Premiere Pro: An Introduction to the Basics_Mujeeb Riaz
Adobe Premiere Pro: An Introduction to the Basics_Mujeeb Riaz
 
Adope Photoshop Tool Bar (By: Shujaat Abbas)
Adope Photoshop Tool Bar (By: Shujaat Abbas)Adope Photoshop Tool Bar (By: Shujaat Abbas)
Adope Photoshop Tool Bar (By: Shujaat Abbas)
 
Introducing Adobe Animate CC
Introducing Adobe Animate CCIntroducing Adobe Animate CC
Introducing Adobe Animate CC
 
Features Of PowerPoint
Features Of PowerPointFeatures Of PowerPoint
Features Of PowerPoint
 
Microsoft Powerpoint
Microsoft PowerpointMicrosoft Powerpoint
Microsoft Powerpoint
 
PowerPoint on Powerpoint
PowerPoint on PowerpointPowerPoint on Powerpoint
PowerPoint on Powerpoint
 
Animation in power point
Animation in power pointAnimation in power point
Animation in power point
 
Microsoft power point 2010 publish
Microsoft power point 2010 publishMicrosoft power point 2010 publish
Microsoft power point 2010 publish
 
Learn MS Powerpoint basics
Learn MS Powerpoint basicsLearn MS Powerpoint basics
Learn MS Powerpoint basics
 
Ms PowerPoint 2010 Training in Ambala ! Batra Computer Centre
Ms PowerPoint 2010 Training in Ambala ! Batra Computer CentreMs PowerPoint 2010 Training in Ambala ! Batra Computer Centre
Ms PowerPoint 2010 Training in Ambala ! Batra Computer Centre
 
MS Word - Paragraph Indenting and Line Spacing
MS Word - Paragraph Indenting and Line SpacingMS Word - Paragraph Indenting and Line Spacing
MS Word - Paragraph Indenting and Line Spacing
 
Adobe illustrator getting started
Adobe illustrator getting startedAdobe illustrator getting started
Adobe illustrator getting started
 
Ms powerpoint 2013
Ms powerpoint 2013Ms powerpoint 2013
Ms powerpoint 2013
 
All about shortcut keys
All about shortcut keysAll about shortcut keys
All about shortcut keys
 
Microsoft Power Point 2007 (Basics)
Microsoft Power Point 2007 (Basics)Microsoft Power Point 2007 (Basics)
Microsoft Power Point 2007 (Basics)
 
Adobe Photoshop Toolbox definition term
Adobe Photoshop Toolbox definition termAdobe Photoshop Toolbox definition term
Adobe Photoshop Toolbox definition term
 
Learning Photoshop CS6 with 100 practical exercises
Learning Photoshop CS6 with 100 practical exercisesLearning Photoshop CS6 with 100 practical exercises
Learning Photoshop CS6 with 100 practical exercises
 
Adobe Photoshop Toolbar Introduction
Adobe Photoshop Toolbar IntroductionAdobe Photoshop Toolbar Introduction
Adobe Photoshop Toolbar Introduction
 
Microsoft Power Point 2010
Microsoft Power Point 2010Microsoft Power Point 2010
Microsoft Power Point 2010
 

Similar to Ppt exercise

Powerpoint exercise
Powerpoint exercisePowerpoint exercise
Powerpoint exerciseLindaTobago
 
Power point for beginner
Power point for beginnerPower point for beginner
Power point for beginnerAzy Softie
 
PowerPoint 2013
PowerPoint 2013PowerPoint 2013
PowerPoint 2013
Jahnavee Parmar
 
ms-powerpoint 2010
ms-powerpoint 2010ms-powerpoint 2010
ms-powerpoint 2010
Tarun Singhal
 
Photoshop basics
Photoshop basicsPhotoshop basics
Photoshop basics
Janani Satheshkumar
 
Powerpoint instructions
Powerpoint instructionsPowerpoint instructions
Powerpoint instructionsDerek D'Angelo
 
Writing De Materials
Writing De MaterialsWriting De Materials
Writing De Materialsu068704
 
Introtopowerpoint
IntrotopowerpointIntrotopowerpoint
Introtopowerpointjengossman
 
how to use design by software.pptx
how to use design by software.pptxhow to use design by software.pptx
how to use design by software.pptx
NitinKumar12570
 
Microsoftpowerpoint 140206084416-phpapp01
Microsoftpowerpoint 140206084416-phpapp01Microsoftpowerpoint 140206084416-phpapp01
Microsoftpowerpoint 140206084416-phpapp01
jagan reddy
 
Sample presentation for library
Sample presentation for librarySample presentation for library
Sample presentation for library
Michele Zenkowich
 
Power Point presentation workshop, 2018
Power Point presentation workshop, 2018Power Point presentation workshop, 2018
Power Point presentation workshop, 2018
Clearly Blue Digital Pvt. Ltd.
 
Photoshop Layer Styles
Photoshop Layer StylesPhotoshop Layer Styles
Photoshop Layer Styles
Michael Soliday
 
Power point2007instruction for Jr III
Power point2007instruction for Jr IIIPower point2007instruction for Jr III
Power point2007instruction for Jr III
Sadaf Walliyani
 
Flip
FlipFlip
Flip
vjigar
 
Power pointlabs quick tutorial
Power pointlabs quick tutorialPower pointlabs quick tutorial
Power pointlabs quick tutorial
Da Huang
 

Similar to Ppt exercise (20)

Powerpoint exercise
Powerpoint exercisePowerpoint exercise
Powerpoint exercise
 
Power point for beginner
Power point for beginnerPower point for beginner
Power point for beginner
 
PowerPoint 2013
PowerPoint 2013PowerPoint 2013
PowerPoint 2013
 
ms-powerpoint 2010
ms-powerpoint 2010ms-powerpoint 2010
ms-powerpoint 2010
 
Photoshop basics
Photoshop basicsPhotoshop basics
Photoshop basics
 
Powerpoint instructions
Powerpoint instructionsPowerpoint instructions
Powerpoint instructions
 
Writing De Materials
Writing De MaterialsWriting De Materials
Writing De Materials
 
Introtopowerpoint
IntrotopowerpointIntrotopowerpoint
Introtopowerpoint
 
Slide Design
Slide DesignSlide Design
Slide Design
 
how to use design by software.pptx
how to use design by software.pptxhow to use design by software.pptx
how to use design by software.pptx
 
Microsoftpowerpoint 140206084416-phpapp01
Microsoftpowerpoint 140206084416-phpapp01Microsoftpowerpoint 140206084416-phpapp01
Microsoftpowerpoint 140206084416-phpapp01
 
Sample presentation for library
Sample presentation for librarySample presentation for library
Sample presentation for library
 
Flip
FlipFlip
Flip
 
Power Point presentation workshop, 2018
Power Point presentation workshop, 2018Power Point presentation workshop, 2018
Power Point presentation workshop, 2018
 
Photoshop Layer Styles
Photoshop Layer StylesPhotoshop Layer Styles
Photoshop Layer Styles
 
Power point2007instruction for Jr III
Power point2007instruction for Jr IIIPower point2007instruction for Jr III
Power point2007instruction for Jr III
 
Flip
FlipFlip
Flip
 
What is Powerpoint
What is PowerpointWhat is Powerpoint
What is Powerpoint
 
Power pointlabs quick tutorial
Power pointlabs quick tutorialPower pointlabs quick tutorial
Power pointlabs quick tutorial
 
Hanzila
HanzilaHanzila
Hanzila
 

Recently uploaded

How libraries can support authors with open access requirements for UKRI fund...
How libraries can support authors with open access requirements for UKRI fund...How libraries can support authors with open access requirements for UKRI fund...
How libraries can support authors with open access requirements for UKRI fund...
Jisc
 
Language Across the Curriculm LAC B.Ed.
Language Across the  Curriculm LAC B.Ed.Language Across the  Curriculm LAC B.Ed.
Language Across the Curriculm LAC B.Ed.
Atul Kumar Singh
 
Digital Tools and AI for Teaching Learning and Research
Digital Tools and AI for Teaching Learning and ResearchDigital Tools and AI for Teaching Learning and Research
Digital Tools and AI for Teaching Learning and Research
Vikramjit Singh
 
Thesis Statement for students diagnonsed withADHD.ppt
Thesis Statement for students diagnonsed withADHD.pptThesis Statement for students diagnonsed withADHD.ppt
Thesis Statement for students diagnonsed withADHD.ppt
EverAndrsGuerraGuerr
 
June 3, 2024 Anti-Semitism Letter Sent to MIT President Kornbluth and MIT Cor...
June 3, 2024 Anti-Semitism Letter Sent to MIT President Kornbluth and MIT Cor...June 3, 2024 Anti-Semitism Letter Sent to MIT President Kornbluth and MIT Cor...
June 3, 2024 Anti-Semitism Letter Sent to MIT President Kornbluth and MIT Cor...
Levi Shapiro
 
The French Revolution Class 9 Study Material pdf free download
The French Revolution Class 9 Study Material pdf free downloadThe French Revolution Class 9 Study Material pdf free download
The French Revolution Class 9 Study Material pdf free download
Vivekanand Anglo Vedic Academy
 
Overview on Edible Vaccine: Pros & Cons with Mechanism
Overview on Edible Vaccine: Pros & Cons with MechanismOverview on Edible Vaccine: Pros & Cons with Mechanism
Overview on Edible Vaccine: Pros & Cons with Mechanism
DeeptiGupta154
 
Normal Labour/ Stages of Labour/ Mechanism of Labour
Normal Labour/ Stages of Labour/ Mechanism of LabourNormal Labour/ Stages of Labour/ Mechanism of Labour
Normal Labour/ Stages of Labour/ Mechanism of Labour
Wasim Ak
 
Unit 8 - Information and Communication Technology (Paper I).pdf
Unit 8 - Information and Communication Technology (Paper I).pdfUnit 8 - Information and Communication Technology (Paper I).pdf
Unit 8 - Information and Communication Technology (Paper I).pdf
Thiyagu K
 
Guidance_and_Counselling.pdf B.Ed. 4th Semester
Guidance_and_Counselling.pdf B.Ed. 4th SemesterGuidance_and_Counselling.pdf B.Ed. 4th Semester
Guidance_and_Counselling.pdf B.Ed. 4th Semester
Atul Kumar Singh
 
Digital Artifact 2 - Investigating Pavilion Designs
Digital Artifact 2 - Investigating Pavilion DesignsDigital Artifact 2 - Investigating Pavilion Designs
Digital Artifact 2 - Investigating Pavilion Designs
chanes7
 
Lapbook sobre os Regimes Totalitários.pdf
Lapbook sobre os Regimes Totalitários.pdfLapbook sobre os Regimes Totalitários.pdf
Lapbook sobre os Regimes Totalitários.pdf
Jean Carlos Nunes Paixão
 
Embracing GenAI - A Strategic Imperative
Embracing GenAI - A Strategic ImperativeEmbracing GenAI - A Strategic Imperative
Embracing GenAI - A Strategic Imperative
Peter Windle
 
Honest Reviews of Tim Han LMA Course Program.pptx
Honest Reviews of Tim Han LMA Course Program.pptxHonest Reviews of Tim Han LMA Course Program.pptx
Honest Reviews of Tim Han LMA Course Program.pptx
timhan337
 
Chapter -12, Antibiotics (One Page Notes).pdf
Chapter -12, Antibiotics (One Page Notes).pdfChapter -12, Antibiotics (One Page Notes).pdf
Chapter -12, Antibiotics (One Page Notes).pdf
Kartik Tiwari
 
1.4 modern child centered education - mahatma gandhi-2.pptx
1.4 modern child centered education - mahatma gandhi-2.pptx1.4 modern child centered education - mahatma gandhi-2.pptx
1.4 modern child centered education - mahatma gandhi-2.pptx
JosvitaDsouza2
 
How to Make a Field invisible in Odoo 17
How to Make a Field invisible in Odoo 17How to Make a Field invisible in Odoo 17
How to Make a Field invisible in Odoo 17
Celine George
 
Synthetic Fiber Construction in lab .pptx
Synthetic Fiber Construction in lab .pptxSynthetic Fiber Construction in lab .pptx
Synthetic Fiber Construction in lab .pptx
Pavel ( NSTU)
 
aaaaaaaaaaaaaaaaaaaaaaaaaaaaaaaaaaaaaaaaa
aaaaaaaaaaaaaaaaaaaaaaaaaaaaaaaaaaaaaaaaaaaaaaaaaaaaaaaaaaaaaaaaaaaaaaaaaaaaaaaaaa
aaaaaaaaaaaaaaaaaaaaaaaaaaaaaaaaaaaaaaaaa
siemaillard
 
Welcome to TechSoup New Member Orientation and Q&A (May 2024).pdf
Welcome to TechSoup   New Member Orientation and Q&A (May 2024).pdfWelcome to TechSoup   New Member Orientation and Q&A (May 2024).pdf
Welcome to TechSoup New Member Orientation and Q&A (May 2024).pdf
TechSoup
 

Recently uploaded (20)

How libraries can support authors with open access requirements for UKRI fund...
How libraries can support authors with open access requirements for UKRI fund...How libraries can support authors with open access requirements for UKRI fund...
How libraries can support authors with open access requirements for UKRI fund...
 
Language Across the Curriculm LAC B.Ed.
Language Across the  Curriculm LAC B.Ed.Language Across the  Curriculm LAC B.Ed.
Language Across the Curriculm LAC B.Ed.
 
Digital Tools and AI for Teaching Learning and Research
Digital Tools and AI for Teaching Learning and ResearchDigital Tools and AI for Teaching Learning and Research
Digital Tools and AI for Teaching Learning and Research
 
Thesis Statement for students diagnonsed withADHD.ppt
Thesis Statement for students diagnonsed withADHD.pptThesis Statement for students diagnonsed withADHD.ppt
Thesis Statement for students diagnonsed withADHD.ppt
 
June 3, 2024 Anti-Semitism Letter Sent to MIT President Kornbluth and MIT Cor...
June 3, 2024 Anti-Semitism Letter Sent to MIT President Kornbluth and MIT Cor...June 3, 2024 Anti-Semitism Letter Sent to MIT President Kornbluth and MIT Cor...
June 3, 2024 Anti-Semitism Letter Sent to MIT President Kornbluth and MIT Cor...
 
The French Revolution Class 9 Study Material pdf free download
The French Revolution Class 9 Study Material pdf free downloadThe French Revolution Class 9 Study Material pdf free download
The French Revolution Class 9 Study Material pdf free download
 
Overview on Edible Vaccine: Pros & Cons with Mechanism
Overview on Edible Vaccine: Pros & Cons with MechanismOverview on Edible Vaccine: Pros & Cons with Mechanism
Overview on Edible Vaccine: Pros & Cons with Mechanism
 
Normal Labour/ Stages of Labour/ Mechanism of Labour
Normal Labour/ Stages of Labour/ Mechanism of LabourNormal Labour/ Stages of Labour/ Mechanism of Labour
Normal Labour/ Stages of Labour/ Mechanism of Labour
 
Unit 8 - Information and Communication Technology (Paper I).pdf
Unit 8 - Information and Communication Technology (Paper I).pdfUnit 8 - Information and Communication Technology (Paper I).pdf
Unit 8 - Information and Communication Technology (Paper I).pdf
 
Guidance_and_Counselling.pdf B.Ed. 4th Semester
Guidance_and_Counselling.pdf B.Ed. 4th SemesterGuidance_and_Counselling.pdf B.Ed. 4th Semester
Guidance_and_Counselling.pdf B.Ed. 4th Semester
 
Digital Artifact 2 - Investigating Pavilion Designs
Digital Artifact 2 - Investigating Pavilion DesignsDigital Artifact 2 - Investigating Pavilion Designs
Digital Artifact 2 - Investigating Pavilion Designs
 
Lapbook sobre os Regimes Totalitários.pdf
Lapbook sobre os Regimes Totalitários.pdfLapbook sobre os Regimes Totalitários.pdf
Lapbook sobre os Regimes Totalitários.pdf
 
Embracing GenAI - A Strategic Imperative
Embracing GenAI - A Strategic ImperativeEmbracing GenAI - A Strategic Imperative
Embracing GenAI - A Strategic Imperative
 
Honest Reviews of Tim Han LMA Course Program.pptx
Honest Reviews of Tim Han LMA Course Program.pptxHonest Reviews of Tim Han LMA Course Program.pptx
Honest Reviews of Tim Han LMA Course Program.pptx
 
Chapter -12, Antibiotics (One Page Notes).pdf
Chapter -12, Antibiotics (One Page Notes).pdfChapter -12, Antibiotics (One Page Notes).pdf
Chapter -12, Antibiotics (One Page Notes).pdf
 
1.4 modern child centered education - mahatma gandhi-2.pptx
1.4 modern child centered education - mahatma gandhi-2.pptx1.4 modern child centered education - mahatma gandhi-2.pptx
1.4 modern child centered education - mahatma gandhi-2.pptx
 
How to Make a Field invisible in Odoo 17
How to Make a Field invisible in Odoo 17How to Make a Field invisible in Odoo 17
How to Make a Field invisible in Odoo 17
 
Synthetic Fiber Construction in lab .pptx
Synthetic Fiber Construction in lab .pptxSynthetic Fiber Construction in lab .pptx
Synthetic Fiber Construction in lab .pptx
 
aaaaaaaaaaaaaaaaaaaaaaaaaaaaaaaaaaaaaaaaa
aaaaaaaaaaaaaaaaaaaaaaaaaaaaaaaaaaaaaaaaaaaaaaaaaaaaaaaaaaaaaaaaaaaaaaaaaaaaaaaaaa
aaaaaaaaaaaaaaaaaaaaaaaaaaaaaaaaaaaaaaaaa
 
Welcome to TechSoup New Member Orientation and Q&A (May 2024).pdf
Welcome to TechSoup   New Member Orientation and Q&A (May 2024).pdfWelcome to TechSoup   New Member Orientation and Q&A (May 2024).pdf
Welcome to TechSoup New Member Orientation and Q&A (May 2024).pdf
 

Ppt exercise

  • 1. PowerPoint Practice Exercise 1. Save this file on your computer. 2. Open this file in PowerPoint 3. Edit each slide according to the instructions provided in the slides in order to learn the skills required for assignment 4.
  • 2. Adding and Deleting Slides • Slides are added to a presentation by opening the Insert menu above and clicking New Slide. You might also use the New Slide button on the toolbar if it is available. • New slides are inserted following the current slide. Notice the current slide is highlighted in the left pane. • Slides are deleted by selecting them in the left pane and pressing the Delete key to delete it. • Try inserting a slide. After inserting a slide progress over the new slide to the next slide by either clicking it in the left pane or pressing the PgDn key.
  • 3. Slide Formats: Clip Art • Open the Format menu and select Slide Layout. Click the slide format named Title, Text & Clip Art (under Other Layouts) to Apply it to this slide • Insert a Clip Art image of your choice • Progress to the next slide
  • 4. Slide Formats: Chart • Apply the slide format named Title, Text & Chart to this slide. • Click the chart button and edit the data in the chart table however you like. • Close the chart table to complete the chart insertion. • Progress to the next slide
  • 5. Slide Formats: Organizational Chart • Use the Insert menu to Insert a New Slide – select the Organizational Chart format. • Add some data to the chart and experiment with the chart tool then progress to the next slide.
  • 6. Applying a Design Template • Select Format/Slide Design. Select a design of your choice and apply it to the presentation by clicking the arrow bar next to the slide of your choice and clicking Apply to All Slides • Select Color Schemes, select a color scheme of your choice, and Apply to All Slides Now we’re crankin’!!
  • 7. Acquiring Graphics from the Web • Open your Web browser and go to http://www.fsu.edu/%7Eunicomm/pages/seal_ • Right-click and save the FSU Seal located in the upper left corner of the page. • We’ll use this graphic later in the exercise.
  • 8. Transparent GIFs • GIF images can be edited to have a transparent background to easily blend with other images and backgrounds. Transparent GIF image Standard GIF image No action required on this slide. Clipart is typically transparent Clipart is typically transparent • Graphics programs such as Paint Shop Pro, Fireworks, and Illustrator, can create transparent GIF images from standard GIF images. • Free Web tools are also available: http:// stuff.mit.edu/tweb/map.html
  • 9. Editing the Slide Master • View the Slide Master by clicking View then Master then Slide Master • Add your name to the footer • Insert the FSU Seal image that you saved earlier in the upper right corner of the Slide Master • Resize the Seal to make it very small and unobtrusive. • Click “Close Master View” on the Slide Master View toolbar. • Observe the results on all slides Changes made to Slide Masters effect all slides of that type in the presentation.
  • 10. Editing Object Properties: Fill Effects • Click the circle below to select it • Double-click the circle to view its properties • Click the arrow to open the Color pallet and select Fill Effects • Click the option for Two colors, and pick the colors • Click From center • Click OK • For Line Color click No Line • Click OK
  • 11. Editing Object Properties: Transparency • Click the red circle below to select it • Double-click the red circle to view its properties • Use the transarency slides to set the color transparency to 50% • Click OK
  • 12. Using the Drawing Toolbar • Use the options on the Drawing toolbar to adjust the following attributes of the red circle: – Fill Color – Line color – Line Style – Shadow Style – 3-D Style
  • 13. Adding Text to Shapes • Select the red circle below and type the word HELLO. • Click outside the circle to exit edit mode. • Select the circle again and adjust the Font Color using the Drawing toolbar. • Use the Edit toolbar to change the font to Comic Sans MS, size 24, bold
  • 14. Adding a Textbox and Arranging Objects • Click Text Box on the Drawing Toolbar then click to the left of the circles below and type HELLO. • Use the mouse to select the text then use the Editing toolbar to change it to size 54. • Click and drag the textbox so that HELLO is placed over the two circles.
  • 15. Selecting Groups of Objects • So far, we have selected and operated on one object at a time. Multiple objects can be selected at once either by holding shift and clicking each object, or by clicking and dragging the mouse pointer over all desired objects. • Using the Drawing toolbar, insert four AutoShapes below, then try selecting them together by using both methods described above. • While all four objects are selected, add a shadow effect using the Shadow tool on the drawing toolbar.
  • 16. Setting Order and Groupings • Insert a square next to the circle below by clicking the Rectangle tool button on the Drawing toolbar (bottom of display) then clicking and dragging on the slide. • Click and drag the square to move it so that it is partially covering the circle. • Right-click the circle and choose Order/Bring to Front • Select both the circle and square by holding the shift key and clicking them both one after the other • Click Draw on the Drawing toolbar, then choose Group. • Click and drag the figures to see that they are now grouped together as one object.
  • 17. Lines, Arrows, & WordArt • Experiment with the line, arrow, and WordArt buttons on the Drawing toolbar.
  • 18. Rotating and Animating Objects • Rotate the star by selecting it, and clicking and dragging the green handle on the star. • Select both the moon and star and group them together as one object • With the grouped objects selected open the Slide Show menu, click Custom Animation • Click Add Effect, then Entrance, and select an animation effect (Fly In, Stretch, Wipe, etc). • Try out the animation by clicking the button on the bottom labeled Slide show (then exit the show by pressing the Esc key).
  • 19. Advanced Animation: Effect Options • Use the Custom Animation options to Add an Effect to this bulleted list so that each bulleted item Flies In one at a time with each mouse click. • Click the arrow button next to the animation setting for this text to access the Effect Options. In the After Animation settings select a light color. • Use the Slide show button to view the effect.
  • 20. Advanced Animation: Timing • Using the Custom Animation pane – Set an animation for this bulleted list so that each 1st and 2nd bullet level Appear one at a time with each mouse click (you will need to change Group Text settings in Effect Options). – Set the below picture objects to Fly In one after the other, one from the left and the other from the right, automaticcaly (without clicking the mouse) with a 1 second delay on each (you will need to change the Direction and Timing settings in Effect Options)
  • 21. Advanced Animation: Fades and Timing • Set the below images so that the one on the left dissolves in, pauses for two seconds, then disappears as the second dissolves in. Set it so it all happens automatically.
  • 22. Slide Transitions • Select Slide Show/Slide Transition. Try out the various transition effects. • Experiment with Speed and Sound • Select Random Transition and Apply to All slides.
  • 23. Setting Up AutoPlay • You can set the timings for progressing through a presentation by selecting Slide Show/Rehearse Timings. • Run the show at the pace that you feel is appropriate, clicking the mouse to progress through all slides. PowerPoint will record your timings for use in auto- playing the presentation. • Save the timings when you are finished. • Upon exit, your slideshow will be displayed in Slide Sorter view. Note the timings associated with each slide. • Double-click this slide to return to Normal View. • Select View/Slide Show to auto-play this presentation.
  • 24. Setting Up AutoPlay • For some environments, such as a public kiosk or trade show, you may wish to have your automated slide show loop back to the beginning when it concludes. To set your presentation to loop: – Select Slide Show/Set Up Show – Check the box by Loop continuously until “Esc” – Click OK • Try it out on this presentation.