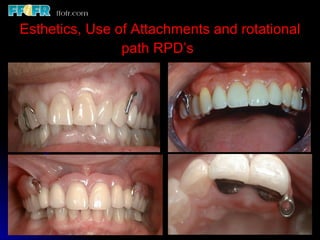
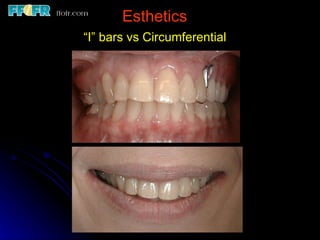
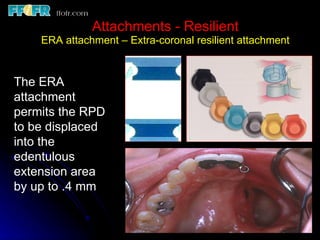
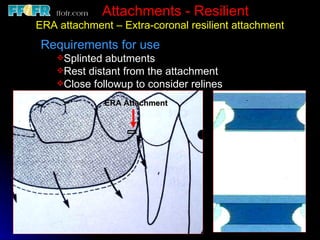
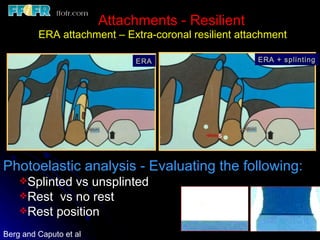
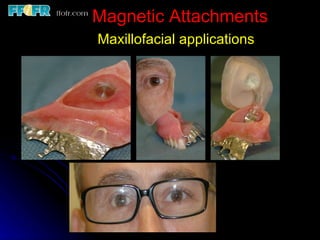
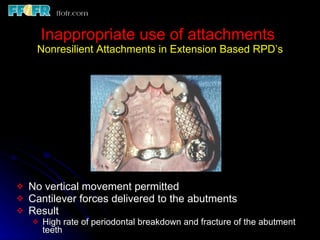
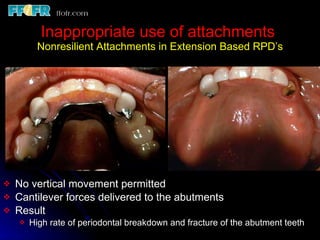
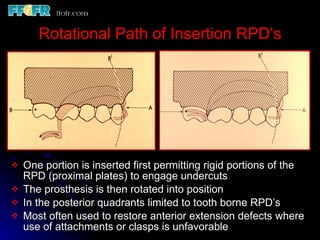
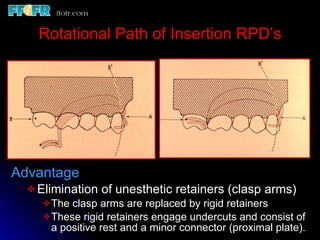
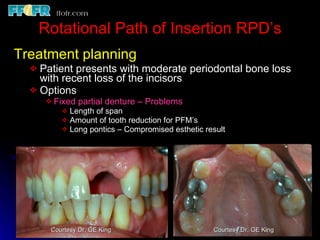
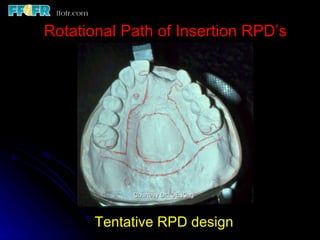
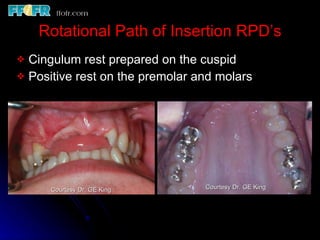
Esthetics, Use of Attachments and Rotational Path RPD’s John Beumer III DDS, MS Division of Advanced Prosthodontics, Biomaterials and Hospital Dentistry UCLA School of Dentistry This program of instruction is protected by copyright ©.  No portion of this program of instruction may be reproduced, recorded or transferred by any means electronic, digital, photographic, mechanical etc., or by any information storage or retrieval system, without prior permission.
Esthetics, Use of Attachments and rotational path RPD’s
“ I” bar vs Circumferential clasp Circumferential clasp on the cuspid
Esthetics “ I” bars vs Circumferential
Esthetics Low smile line Cuspid –lateral splinted Occlusion Anterior guidance Posterior – Lingualized with centric only contact
Esthetics – I” bars   Note low smile line Widened major connector Positive cingulum rests Occlusion Anterior guidance using the  cuspids Lingualized posterior  occlusion with centric only  contact 5 year post delivery followup.
Esthetics-”I” Bars
Esthetics – “I” Bars   Extension Base RPD opposing implant supported fixed hybrid prosthesis Occlusion Anterior guidance with the anterior teeth Posterior occlusion-lingualized with centric only contact
RPD Attachments Advantages: Elimination of visible clasp arms Disadvantages: Additional expense Increased frequency of adjustment and failure Increased technical expertise required Unpredictable or unfavorable distribution of forces
Attachment Classification Rigid attachments No movement is possible between the parts.  Used in situations where the abutment teeth fully support the occlusal forces (tooth borne RPD’s and fixed partial dentures) Resilient attachments Allows movement to take place between the parts, thus providing stress-breaking.  An example is the ERA attachment
Attachments - Resilient ERA attachment – Extra-coronal resilient attachment The ERA attachment permits the RPD to be displaced into the edentulous extension area by up to .4 mm
Attachments - Resilient ERA attachment – Extra-coronal resilient attachment Plastic burnout pattern Metal housing ERA attachment Various levels of  retention
Attachments - Resilient ERA attachment – Extra-coronal resilient attachment Requirements for use Splinted abutments Rest distant from the attachment Close followup to consider relines ERA Attachment
Attachments - Resilient ERA attachment – Extra-coronal resilient attachment ERA ERA + splinting Photoelastic analysis - Evaluating the following: Splinted vs unsplinted Rest  vs no rest Rest position Berg and Caputo et al
Attachments - Resilient ERA attachment – Extra-coronal resilient attachment ERA ERA+splinting Summary and conclusions Attachment best used when: Adjacent teeth splinted Positive rests Light retention (white and orange attachment)
Splinting the abutments helps distribute the forces Positive rests away from the extension area helps  direct the forces vertically onto the abutment and into the edentulous bearing surfaces Less wear of ERA attachment Attachments - Resilient ERA attachment – Extra-coronal resilient attachment
Overlay denture attachments Advantages Improved esthetics Maintain support More favorable biomechanics - Improved crown-root ratio
Overlay denture attachments   Problems  Copings become loose Attachment wear, loss & breakage Alveolar resorption Overdenture breakage Pt. maintenance problems Pt. oral hygiene problems
Attachments - Resilient ERA attachment – Extra-coronal resilient attachment This patient is status post partial palatectomy for a benign tumor of the left hard palate.  The left tuberosity remains and it contains a third molar
Surveyor used to determine the path of insertion for the attachments
Surveyor used to prepare the path of insertion for the attachments
Attachments - Resilient ERA attachment – Extra-coronal resilient attachment Note the bracing arm through the proximal of #5 and #6. It is non- retentive but keeps the RPD framework from being displaced lingually in this region and with the cingulum rest on #8, keeps the framework centered over the ERA attachment. ERA attachment Cingulum rest Bracing arm Rest
Attachments - Resilient ERA attachment – Extra-coronal resilient attachment The two central incisors have been splinted together.  A cingulum rest is positioned on the mesial side of #8.  The ERA attachment is incorporated within the crown of #9. High smile Bracing arm
Attachments - Resilient ERA attachment – Extra-coronal resilient attachment Note the attachment associated with third molar.  This serves as an occlusal stop and has a retentive attachment incorporated within.  The ERA should not be used  unless a positive occlusal stop is present on the defect side, either from a tooth or an implant .
Attachments - Resilient ERA attachment – Extra-coronal resilient attachment Occlusion Right side – Anterior guidance Left side – Mutually protected occlusion
Magnetic Attachments Advantages : Ease of insertion and removal Simple laboratory work & economic cost Reduced lateral forces No leverage No fragile parts for fracture No activation necessary Do not need special equipment parallelometer etc.). Easy to maintain oral hygiene
Magnetic Attachments Applications Retained roots Implants Maxillofacial Prosthetic Applications
Magnetic Attachments Maxillofacial applications
  Magnetic Attachments   Maxillofacial applications
Inappropriate use of attachments Insufficient vertical movement allowed Cantilever forces delivered to the abutments Result High rate of periodontal breakdown and abutment tooth fracture
Inappropriate use of attachments Cantilever forces delivered to the abutments Result High rate of periodontal breakdown and fracture of the abutment teeth
Inappropriate use of attachments  Nonresilient Attachments in Extension Based RPD’s No vertical movement permitted Cantilever forces delivered to the abutments Result High rate of periodontal breakdown and fracture
Inappropriate use of attachments  Nonresilient Attachments in Extension Based RPD’s No vertical movement permitted Cantilever forces delivered to the abutments Result High rate of periodontal breakdown and fracture of the abutment teeth
Kennedy Class IV RPD’s Rotational Path of Insertion RPD’s Courtesy Dr. GE King Courtesy Dr. GE King
Rotational Path of Insertion RPD’s One portion is inserted first permitting rigid portions of the RPD (proximal plates) to engage undercuts The prosthesis is then rotated into position In the posterior quadrants limited to tooth borne RPD’s Most often used to restore anterior extension defects where use of attachments or clasps is unfavorable
Rotational Path of Insertion RPD’s Advantage Elimination of unesthetic retainers (clasp arms) The clasp arms are replaced by rigid retainers These rigid retainers engage undercuts and consist of a positive rest and a minor connector (proximal plate).
Rotational Path of Insertion RPD’s Caution Little tolerance for error.  It requires a high level of sophistication on the part of both the dentist and the lab technician Requires well prepared positive rests seats.  May require restorations to develop an acceptable rest seat Undercuts in posterior rest seats will prevent proper seating
Rotational Path of Insertion RPD’s They can also be used to restore Kennedy Class III RPD’s with missing posterior teeth Disadvantage Bracing from guide planes is compromised
Rotational Path of Insertion RPD’s Treatment planning   Patient presents with moderate periodontal bone loss with recent loss of the incisors  Options Fixed partial denture Implant supported fixed partial denture Rotational path of insertion RPD Courtesy Dr. GE King Courtesy Dr. GE King
Rotational Path of Insertion RPD’s Treatment planning   Patient presents with moderate periodontal bone loss with recent loss of the incisors  Options Fixed partial denture – Problems Length of span Amount of tooth reduction for PFM’s  Long pontics – Compromised esthetic result Courtesy Dr. GE King Courtesy Dr. GE King
Rotational Path of Insertion RPD’s Treatment planning   Patient presents with moderate periodontal bone loss with recent loss of the incisors  Options Implant supported fixed partial denture – Problems Difficult to predictably restore vertical and horizontal boney contours with grafting Esthetic result will not be acceptable without restoration of  bone and soft contours Cost Courtesy Dr. GE King Courtesy Dr. GE King
Rotational Path of Insertion RPD’s Treatment planning   Patient presents with moderate periodontal bone loss with recent loss of the incisors  Options Rotational path of insertion RPD -Best solution Minimal reduction of tooth structure Best esthetic result Least costly Courtesy Dr. GE King Courtesy Dr. GE King
Tentative RPD design Rotational Path of Insertion RPD’s Courtesy Dr. GE King
Rotational Path of Insertion RPD’s Surveying the cast Identify the cast orientation that results in at least a .25 mm undercut on each of the anterior abutments Courtesy Dr. GE King Courtesy Dr. GE King
Rotational Path of Insertion RPD’s Surveying the cast Tilt cast to determine initial path of insertion. Courtesy Dr. GE King Courtesy Dr. GE King
Rotational Path of Insertion RPD’s Surveying the cast Verify that at this cast inclination, proper rests can be developed consistent with the initial path of insertion. The rests must not be undercut in relation to the path of insertion Courtesy Dr. GE King Courtesy Dr. GE King
Prepare the anterior and posterior rests. The rests must be positive Beware of excessive buccal inclination of the maxillary molars. The rests must be positive but should not be undercut in relation to the path of insertion Rotational Path of Insertion RPD’s
Fabricate the RPD casting and verify the adaptation Rotational Path of Insertion RPD’s Courtesy Dr. GE King Courtesy Dr. GE King
Rotational Path of Insertion RPD’s Completed RPD Important factors for long term success Positive rests Survey  for appropriate undercuts and proper rotational path of insertion Courtesy Dr. GE King Courtesy Dr. GE King
Rotational Path of Insertion RPD’s In this patient circular concave rests were used on the cuspids Guidance in lateral excursion provided by the cuspids and premolars Courtesy T Berg Courtesy Dr. GE King Courtesy Dr. GE King
Rotational Path of Insertion RPD’s Cingulum rests prepared on the cuspids Positive rests prepared on the distal side of the molars Courtesy Dr. GE King Courtesy Dr. GE King
Rotational Path of Insertion RPD’s Positive rests on the cuspids and the molars Lingual “I” bars used for reciprocation and encirclement of the molars Guidance in lateral excursion provide by the cuspids and premolars Courtesy Dr. GE King Courtesy Dr. GE King
Rotational Path of Insertion RPD’s Cingulum rest prepared on the cuspid Positive rest on the premolar and molars Courtesy Dr. GE King Courtesy Dr. GE King
Rotational Path of Insertion RPD’s Guidance provided by the cuspid and lateral incisor on the left the premolar and molar on the right Courtesy Dr. GE King
Lateral Rotational Path on Insertion Patient presents status post anterior mandibular resection The posterior segments of mandible are rotated to the lingual
Lateral Rotational Path on Insertion Retention provided by the lingual surfaces of the right molars and the “I” bar on the left Reciprocation and encirclement for the right molar provided by the trans-occlusal rest
Lateral Rotational Path on Insertion Trial denture Completed RPD is inserted right to left
Lateral Rotational Path on Insertion Courtesy Dr. GE King Courtesy Dr. GE King
Lateral Rotational Path on Insertion Surveying the cast.  Note the lingual undercuts Courtesy Dr. GE King Courtesy Dr. GE King
Lateral Rotational Path on Insertion Completed RPD with lingual retention Insertion path is from right to left Courtesy Dr. GE King Courtesy Dr. GE King
Visit ffofr.org for hundreds of additional lectures on Complete Dentures, Implant Dentistry, Removable Partial Dentures, Esthetic Dentistry and Maxillofacial Prosthetics. The lectures are free.  Our objective is to create the best and most comprehensive online programs of instruction in Prosthodontics

Esthetics, rotational path, attachments

  • 1.
    Esthetics, Use ofAttachments and Rotational Path RPD’s John Beumer III DDS, MS Division of Advanced Prosthodontics, Biomaterials and Hospital Dentistry UCLA School of Dentistry This program of instruction is protected by copyright ©. No portion of this program of instruction may be reproduced, recorded or transferred by any means electronic, digital, photographic, mechanical etc., or by any information storage or retrieval system, without prior permission.
  • 2.
    Esthetics, Use ofAttachments and rotational path RPD’s
  • 3.
    “ I” barvs Circumferential clasp Circumferential clasp on the cuspid
  • 4.
    Esthetics “ I”bars vs Circumferential
  • 5.
    Esthetics Low smileline Cuspid –lateral splinted Occlusion Anterior guidance Posterior – Lingualized with centric only contact
  • 6.
    Esthetics – I”bars Note low smile line Widened major connector Positive cingulum rests Occlusion Anterior guidance using the cuspids Lingualized posterior occlusion with centric only contact 5 year post delivery followup.
  • 7.
  • 8.
    Esthetics – “I”Bars Extension Base RPD opposing implant supported fixed hybrid prosthesis Occlusion Anterior guidance with the anterior teeth Posterior occlusion-lingualized with centric only contact
  • 9.
    RPD Attachments Advantages:Elimination of visible clasp arms Disadvantages: Additional expense Increased frequency of adjustment and failure Increased technical expertise required Unpredictable or unfavorable distribution of forces
  • 10.
    Attachment Classification Rigidattachments No movement is possible between the parts. Used in situations where the abutment teeth fully support the occlusal forces (tooth borne RPD’s and fixed partial dentures) Resilient attachments Allows movement to take place between the parts, thus providing stress-breaking. An example is the ERA attachment
  • 11.
    Attachments - ResilientERA attachment – Extra-coronal resilient attachment The ERA attachment permits the RPD to be displaced into the edentulous extension area by up to .4 mm
  • 12.
    Attachments - ResilientERA attachment – Extra-coronal resilient attachment Plastic burnout pattern Metal housing ERA attachment Various levels of retention
  • 13.
    Attachments - ResilientERA attachment – Extra-coronal resilient attachment Requirements for use Splinted abutments Rest distant from the attachment Close followup to consider relines ERA Attachment
  • 14.
    Attachments - ResilientERA attachment – Extra-coronal resilient attachment ERA ERA + splinting Photoelastic analysis - Evaluating the following: Splinted vs unsplinted Rest vs no rest Rest position Berg and Caputo et al
  • 15.
    Attachments - ResilientERA attachment – Extra-coronal resilient attachment ERA ERA+splinting Summary and conclusions Attachment best used when: Adjacent teeth splinted Positive rests Light retention (white and orange attachment)
  • 16.
    Splinting the abutmentshelps distribute the forces Positive rests away from the extension area helps direct the forces vertically onto the abutment and into the edentulous bearing surfaces Less wear of ERA attachment Attachments - Resilient ERA attachment – Extra-coronal resilient attachment
  • 17.
    Overlay denture attachmentsAdvantages Improved esthetics Maintain support More favorable biomechanics - Improved crown-root ratio
  • 18.
    Overlay denture attachments Problems Copings become loose Attachment wear, loss & breakage Alveolar resorption Overdenture breakage Pt. maintenance problems Pt. oral hygiene problems
  • 19.
    Attachments - ResilientERA attachment – Extra-coronal resilient attachment This patient is status post partial palatectomy for a benign tumor of the left hard palate. The left tuberosity remains and it contains a third molar
  • 20.
    Surveyor used todetermine the path of insertion for the attachments
  • 21.
    Surveyor used toprepare the path of insertion for the attachments
  • 22.
    Attachments - ResilientERA attachment – Extra-coronal resilient attachment Note the bracing arm through the proximal of #5 and #6. It is non- retentive but keeps the RPD framework from being displaced lingually in this region and with the cingulum rest on #8, keeps the framework centered over the ERA attachment. ERA attachment Cingulum rest Bracing arm Rest
  • 23.
    Attachments - ResilientERA attachment – Extra-coronal resilient attachment The two central incisors have been splinted together. A cingulum rest is positioned on the mesial side of #8. The ERA attachment is incorporated within the crown of #9. High smile Bracing arm
  • 24.
    Attachments - ResilientERA attachment – Extra-coronal resilient attachment Note the attachment associated with third molar. This serves as an occlusal stop and has a retentive attachment incorporated within. The ERA should not be used unless a positive occlusal stop is present on the defect side, either from a tooth or an implant .
  • 25.
    Attachments - ResilientERA attachment – Extra-coronal resilient attachment Occlusion Right side – Anterior guidance Left side – Mutually protected occlusion
  • 26.
    Magnetic Attachments Advantages: Ease of insertion and removal Simple laboratory work & economic cost Reduced lateral forces No leverage No fragile parts for fracture No activation necessary Do not need special equipment parallelometer etc.). Easy to maintain oral hygiene
  • 27.
    Magnetic Attachments ApplicationsRetained roots Implants Maxillofacial Prosthetic Applications
  • 28.
  • 29.
  • 30.
  • 31.
    MagneticAttachments Maxillofacial applications
  • 32.
    Inappropriate use ofattachments Insufficient vertical movement allowed Cantilever forces delivered to the abutments Result High rate of periodontal breakdown and abutment tooth fracture
  • 33.
    Inappropriate use ofattachments Cantilever forces delivered to the abutments Result High rate of periodontal breakdown and fracture of the abutment teeth
  • 34.
    Inappropriate use ofattachments Nonresilient Attachments in Extension Based RPD’s No vertical movement permitted Cantilever forces delivered to the abutments Result High rate of periodontal breakdown and fracture
  • 35.
    Inappropriate use ofattachments Nonresilient Attachments in Extension Based RPD’s No vertical movement permitted Cantilever forces delivered to the abutments Result High rate of periodontal breakdown and fracture of the abutment teeth
  • 36.
    Inappropriate use ofattachments Nonresilient Attachments in Extension Based RPD’s No vertical movement permitted Cantilever forces delivered to the abutments Result High rate of periodontal breakdown and fracture of the abutment teeth
  • 37.
    Kennedy Class IVRPD’s Rotational Path of Insertion RPD’s Courtesy Dr. GE King Courtesy Dr. GE King
  • 38.
    Rotational Path ofInsertion RPD’s One portion is inserted first permitting rigid portions of the RPD (proximal plates) to engage undercuts The prosthesis is then rotated into position In the posterior quadrants limited to tooth borne RPD’s Most often used to restore anterior extension defects where use of attachments or clasps is unfavorable
  • 39.
    Rotational Path ofInsertion RPD’s Advantage Elimination of unesthetic retainers (clasp arms) The clasp arms are replaced by rigid retainers These rigid retainers engage undercuts and consist of a positive rest and a minor connector (proximal plate).
  • 40.
    Rotational Path ofInsertion RPD’s Caution Little tolerance for error. It requires a high level of sophistication on the part of both the dentist and the lab technician Requires well prepared positive rests seats. May require restorations to develop an acceptable rest seat Undercuts in posterior rest seats will prevent proper seating
  • 41.
    Rotational Path ofInsertion RPD’s They can also be used to restore Kennedy Class III RPD’s with missing posterior teeth Disadvantage Bracing from guide planes is compromised
  • 42.
    Rotational Path ofInsertion RPD’s Treatment planning Patient presents with moderate periodontal bone loss with recent loss of the incisors Options Fixed partial denture Implant supported fixed partial denture Rotational path of insertion RPD Courtesy Dr. GE King Courtesy Dr. GE King
  • 43.
    Rotational Path ofInsertion RPD’s Treatment planning Patient presents with moderate periodontal bone loss with recent loss of the incisors Options Fixed partial denture – Problems Length of span Amount of tooth reduction for PFM’s Long pontics – Compromised esthetic result Courtesy Dr. GE King Courtesy Dr. GE King
  • 44.
    Rotational Path ofInsertion RPD’s Treatment planning Patient presents with moderate periodontal bone loss with recent loss of the incisors Options Implant supported fixed partial denture – Problems Difficult to predictably restore vertical and horizontal boney contours with grafting Esthetic result will not be acceptable without restoration of bone and soft contours Cost Courtesy Dr. GE King Courtesy Dr. GE King
  • 45.
    Rotational Path ofInsertion RPD’s Treatment planning Patient presents with moderate periodontal bone loss with recent loss of the incisors Options Rotational path of insertion RPD -Best solution Minimal reduction of tooth structure Best esthetic result Least costly Courtesy Dr. GE King Courtesy Dr. GE King
  • 46.
    Tentative RPD designRotational Path of Insertion RPD’s Courtesy Dr. GE King
  • 47.
    Rotational Path ofInsertion RPD’s Surveying the cast Identify the cast orientation that results in at least a .25 mm undercut on each of the anterior abutments Courtesy Dr. GE King Courtesy Dr. GE King
  • 48.
    Rotational Path ofInsertion RPD’s Surveying the cast Tilt cast to determine initial path of insertion. Courtesy Dr. GE King Courtesy Dr. GE King
  • 49.
    Rotational Path ofInsertion RPD’s Surveying the cast Verify that at this cast inclination, proper rests can be developed consistent with the initial path of insertion. The rests must not be undercut in relation to the path of insertion Courtesy Dr. GE King Courtesy Dr. GE King
  • 50.
    Prepare the anteriorand posterior rests. The rests must be positive Beware of excessive buccal inclination of the maxillary molars. The rests must be positive but should not be undercut in relation to the path of insertion Rotational Path of Insertion RPD’s
  • 51.
    Fabricate the RPDcasting and verify the adaptation Rotational Path of Insertion RPD’s Courtesy Dr. GE King Courtesy Dr. GE King
  • 52.
    Rotational Path ofInsertion RPD’s Completed RPD Important factors for long term success Positive rests Survey for appropriate undercuts and proper rotational path of insertion Courtesy Dr. GE King Courtesy Dr. GE King
  • 53.
    Rotational Path ofInsertion RPD’s In this patient circular concave rests were used on the cuspids Guidance in lateral excursion provided by the cuspids and premolars Courtesy T Berg Courtesy Dr. GE King Courtesy Dr. GE King
  • 54.
    Rotational Path ofInsertion RPD’s Cingulum rests prepared on the cuspids Positive rests prepared on the distal side of the molars Courtesy Dr. GE King Courtesy Dr. GE King
  • 55.
    Rotational Path ofInsertion RPD’s Positive rests on the cuspids and the molars Lingual “I” bars used for reciprocation and encirclement of the molars Guidance in lateral excursion provide by the cuspids and premolars Courtesy Dr. GE King Courtesy Dr. GE King
  • 56.
    Rotational Path ofInsertion RPD’s Cingulum rest prepared on the cuspid Positive rest on the premolar and molars Courtesy Dr. GE King Courtesy Dr. GE King
  • 57.
    Rotational Path ofInsertion RPD’s Guidance provided by the cuspid and lateral incisor on the left the premolar and molar on the right Courtesy Dr. GE King
  • 58.
    Lateral Rotational Pathon Insertion Patient presents status post anterior mandibular resection The posterior segments of mandible are rotated to the lingual
  • 59.
    Lateral Rotational Pathon Insertion Retention provided by the lingual surfaces of the right molars and the “I” bar on the left Reciprocation and encirclement for the right molar provided by the trans-occlusal rest
  • 60.
    Lateral Rotational Pathon Insertion Trial denture Completed RPD is inserted right to left
  • 61.
    Lateral Rotational Pathon Insertion Courtesy Dr. GE King Courtesy Dr. GE King
  • 62.
    Lateral Rotational Pathon Insertion Surveying the cast. Note the lingual undercuts Courtesy Dr. GE King Courtesy Dr. GE King
  • 63.
    Lateral Rotational Pathon Insertion Completed RPD with lingual retention Insertion path is from right to left Courtesy Dr. GE King Courtesy Dr. GE King
  • 64.
    Visit ffofr.org forhundreds of additional lectures on Complete Dentures, Implant Dentistry, Removable Partial Dentures, Esthetic Dentistry and Maxillofacial Prosthetics. The lectures are free. Our objective is to create the best and most comprehensive online programs of instruction in Prosthodontics