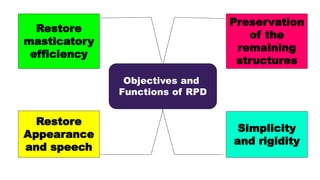
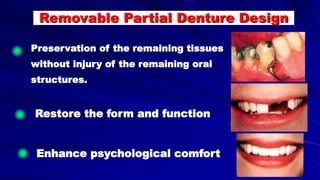
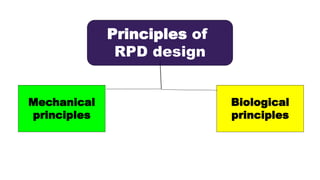
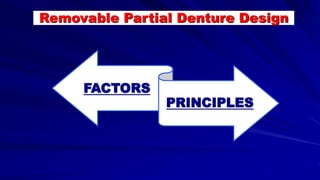
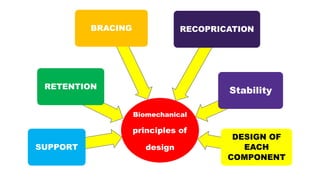
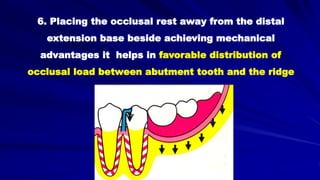
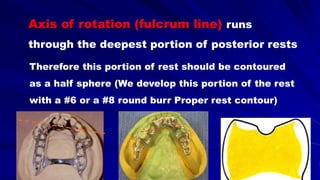
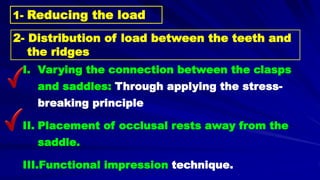
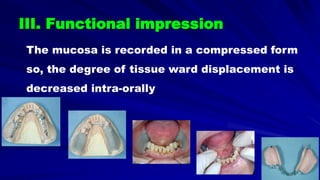
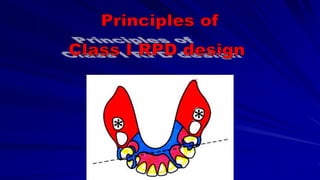
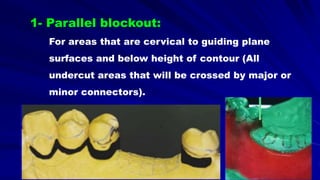
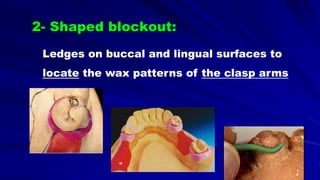
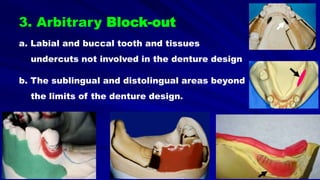
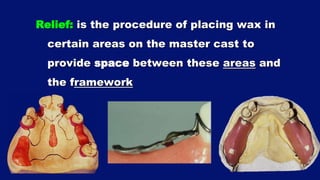
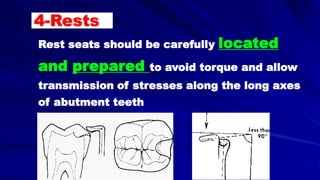
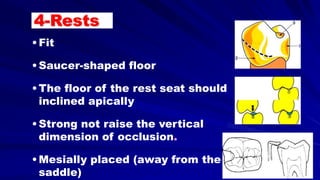
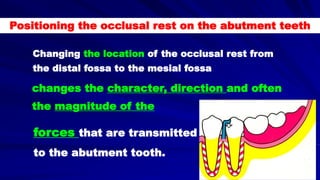
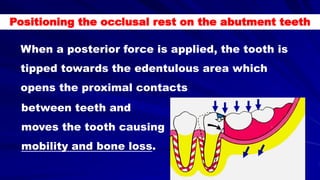
Content:
Basic principles for removable partial dentures’ designs
1.Objectives and functions of removable partial dentures.
2.Factors that affect removable partial dentures’ design.
a. Abutment condition
b. Ridge condition
c. Patients’ needs, Gender and advanced age
d. Forces acting on removable partial dentures.
3. Biomechanical principles of the distal extension partial denture design
4.Damaging effect of removable partial dentures.
5.Problems of support associated with free-end saddles removable partial dentures.
6.How to control these problems (solutions).
a. Reduction of the load.
b. Distribution of the load between abutment teeth and residual ridges.
c. Wide distribution of the load
d. Providing posterior abutment
7.Principles of Class I RPD design
8.Selecting components for designing free extension removable partial dentures
(Basic Principles of a Properly Designed Components)
a. Denture base and Artificial Teeth
b. Proximal plates
c. Rests
d. Direct retainers and Indirect Retainers
e. Major connector and Minor connectors
9.Conclusion
Minimizing and controlling strain on the residual ridge
Minimizing and controlling strain on the abutment teeth
10. Bibliographies
Indian Dental Academy: will be one of the most relevant and exciting
training center with best faculty and flexible training programs
for dental professionals who wish to advance in their dental
practice,Offers certified courses in Dental
implants,Orthodontics,Endodontics,Cosmetic Dentistry, Prosthetic
Dentistry, Periodontics and General Dentistry.
2- b. Basic principles for designing Kennedy class II, III and IV Removable P...AmalKaddah1
1-a. Basic principles for designing the removable partial denture (class I partial denture design)
Introduction.
Objectives and Functions of RPD.
Factors that affect RPD design.
Basic principles for designing Kennedy class I partial denture.
2- b. Basic principles for designing Kennedy class II, III and IV Removable Partial Denture(RPD)
This seminar is of postgraduate level, which will be helpful for students. The presenter has added the information from various sources and the references are quoted in the last few slides of the seminar to gather more information about the seminar.
Fixed partial dentures transmit forces through the abutments to the periodontium. Failures are due to poor engineering, the use of improper materials, inadequate tooth preparation, and faulty fabrication. Of particular concern to prosthodontist is the selection of teeth for abutments. They must recognize the forces developed by the oral mechanism, and resistance.
Successful selection of abutments for fixed partial dentures requires sensitive diagnostic ability. Thorough knowledge of anatomy, ceramics, the chemistry and physics of dental materials, metallurgy, Periodontics, phonetics, physiology, radiology and the mechanics of oral function is fundamental.
3- Basic principles for designing the removable partial denture Amal Kaddah
Clinical course of Partial Denture
3- Basic principles for designing the removable partial denture
a- Problems and General Principles Applied for Kennedy Class I
Support in complete dentures /certified fixed orthodontic courses by Indian d...Indian dental academy
The Indian Dental Academy is the Leader in continuing dental education , training dentists in all aspects of dentistry and offering a wide range of dental certified courses in different formats.for more details please visit www.indiandentalacademy.com
The scope of fixed prosthodontics treatment can range from the restoration of a single tooth to the rehabilitation of the entire occlusion. Single teeth can be restored to full function, and improvement in
esthetics can be achieved. Missing teeth can be replaced with fixed prostheses that will improve patient comfort and masticatory ability, maintain the health and integrity of the dental arches, and, in many instances, elevate the patient’s self-image.
Management of stresses in rpd / orthodontic course by indian dental academyIndian dental academy
Indian Dental Academy: will be one of the most relevant and exciting training center with best faculty and flexible training programs for dental professionals who wish to advance in their dental practice,Offers certified courses in Dental implants,Orthodontics,Endodontics,Cosmetic Dentistry, Prosthetic Dentistry, Periodontics and General Dentistry.
Stability /certified fixed orthodontic courses by Indian dental academy Indian dental academy
The Indian Dental Academy is the Leader in continuing dental education , training dentists in all aspects of dentistry and offering a wide range of dental certified courses in different formats.
Indian dental academy provides dental crown & Bridge,rotary endodontics,fixed orthodontics,
Dental implants courses.for details pls visit www.indiandentalacademy.com ,or call
0091-9248678078
Indian Dental Academy: will be one of the most relevant and exciting training center with best faculty and flexible training programs for dental professionals who wish to advance in their dental practice,Offers certified courses in Dental implants,Orthodontics,Endodontics,Cosmetic Dentistry, Prosthetic Dentistry, Periodontics and General Dentistry.
6- Prosthetic Problems and possible solutions in Setting –up of teeth for ske...Amal Kaddah
COMPLETE DENTURE CONSTRUCTION
1- Diagnosis and Treatment Planning for Removable Prosthodontics
2- Preliminary Maxillary and mandibular impression procedures
3- Final Maxillary and mandibular impression procedures
4- Jaw Relation Registration
a. Introduction and the stomatognathic system
What 'occlusion' is and why it is important
b. Definitions.
c. Check denture foundation and Establishment of facial contour.
d. Establishment of the occlusal plane.
e. Importance of mounting the maxillary cast using Maxillary face-bow record and transfer.
f. Determination of vertical dimension of centric occluding relation.
g. Determination of centric and eccentric relations at the accepted vertical dimension.
5- Selection of Artificial Teeth
6- Prosthetic Problems and possible solutions in Setting –up of teeth for skeletal Class I, II and Class III arch relationship of completely edentulous patients.
7- Try-in of the wax trial complete denture.
8- Complete denture insertion (Delivery)
9- Occlusal corrections.
10- Managements of Post Insertion Problems and Complaints.
11- Single denture and Kelly's Syndrome
12- Denture Processing and Laboratory Errors.
Introduction to AI for Nonprofits with Tapp NetworkTechSoup
Dive into the world of AI! Experts Jon Hill and Tareq Monaur will guide you through AI's role in enhancing nonprofit websites and basic marketing strategies, making it easy to understand and apply.
Acetabularia Information For Class 9 .docxvaibhavrinwa19
Acetabularia acetabulum is a single-celled green alga that in its vegetative state is morphologically differentiated into a basal rhizoid and an axially elongated stalk, which bears whorls of branching hairs. The single diploid nucleus resides in the rhizoid.
June 3, 2024 Anti-Semitism Letter Sent to MIT President Kornbluth and MIT Cor...Levi Shapiro
Letter from the Congress of the United States regarding Anti-Semitism sent June 3rd to MIT President Sally Kornbluth, MIT Corp Chair, Mark Gorenberg
Dear Dr. Kornbluth and Mr. Gorenberg,
The US House of Representatives is deeply concerned by ongoing and pervasive acts of antisemitic
harassment and intimidation at the Massachusetts Institute of Technology (MIT). Failing to act decisively to ensure a safe learning environment for all students would be a grave dereliction of your responsibilities as President of MIT and Chair of the MIT Corporation.
This Congress will not stand idly by and allow an environment hostile to Jewish students to persist. The House believes that your institution is in violation of Title VI of the Civil Rights Act, and the inability or
unwillingness to rectify this violation through action requires accountability.
Postsecondary education is a unique opportunity for students to learn and have their ideas and beliefs challenged. However, universities receiving hundreds of millions of federal funds annually have denied
students that opportunity and have been hijacked to become venues for the promotion of terrorism, antisemitic harassment and intimidation, unlawful encampments, and in some cases, assaults and riots.
The House of Representatives will not countenance the use of federal funds to indoctrinate students into hateful, antisemitic, anti-American supporters of terrorism. Investigations into campus antisemitism by the Committee on Education and the Workforce and the Committee on Ways and Means have been expanded into a Congress-wide probe across all relevant jurisdictions to address this national crisis. The undersigned Committees will conduct oversight into the use of federal funds at MIT and its learning environment under authorities granted to each Committee.
• The Committee on Education and the Workforce has been investigating your institution since December 7, 2023. The Committee has broad jurisdiction over postsecondary education, including its compliance with Title VI of the Civil Rights Act, campus safety concerns over disruptions to the learning environment, and the awarding of federal student aid under the Higher Education Act.
• The Committee on Oversight and Accountability is investigating the sources of funding and other support flowing to groups espousing pro-Hamas propaganda and engaged in antisemitic harassment and intimidation of students. The Committee on Oversight and Accountability is the principal oversight committee of the US House of Representatives and has broad authority to investigate “any matter” at “any time” under House Rule X.
• The Committee on Ways and Means has been investigating several universities since November 15, 2023, when the Committee held a hearing entitled From Ivory Towers to Dark Corners: Investigating the Nexus Between Antisemitism, Tax-Exempt Universities, and Terror Financing. The Committee followed the hearing with letters to those institutions on January 10, 202
How to Make a Field invisible in Odoo 17Celine George
It is possible to hide or invisible some fields in odoo. Commonly using “invisible” attribute in the field definition to invisible the fields. This slide will show how to make a field invisible in odoo 17.
Macroeconomics- Movie Location
This will be used as part of your Personal Professional Portfolio once graded.
Objective:
Prepare a presentation or a paper using research, basic comparative analysis, data organization and application of economic information. You will make an informed assessment of an economic climate outside of the United States to accomplish an entertainment industry objective.
Biological screening of herbal drugs: Introduction and Need for
Phyto-Pharmacological Screening, New Strategies for evaluating
Natural Products, In vitro evaluation techniques for Antioxidants, Antimicrobial and Anticancer drugs. In vivo evaluation techniques
for Anti-inflammatory, Antiulcer, Anticancer, Wound healing, Antidiabetic, Hepatoprotective, Cardio protective, Diuretics and
Antifertility, Toxicity studies as per OECD guidelines
2024.06.01 Introducing a competency framework for languag learning materials ...Sandy Millin
http://sandymillin.wordpress.com/iateflwebinar2024
Published classroom materials form the basis of syllabuses, drive teacher professional development, and have a potentially huge influence on learners, teachers and education systems. All teachers also create their own materials, whether a few sentences on a blackboard, a highly-structured fully-realised online course, or anything in between. Despite this, the knowledge and skills needed to create effective language learning materials are rarely part of teacher training, and are mostly learnt by trial and error.
Knowledge and skills frameworks, generally called competency frameworks, for ELT teachers, trainers and managers have existed for a few years now. However, until I created one for my MA dissertation, there wasn’t one drawing together what we need to know and do to be able to effectively produce language learning materials.
This webinar will introduce you to my framework, highlighting the key competencies I identified from my research. It will also show how anybody involved in language teaching (any language, not just English!), teacher training, managing schools or developing language learning materials can benefit from using the framework.
Read| The latest issue of The Challenger is here! We are thrilled to announce that our school paper has qualified for the NATIONAL SCHOOLS PRESS CONFERENCE (NSPC) 2024. Thank you for your unwavering support and trust. Dive into the stories that made us stand out!
The Roman Empire A Historical Colossus.pdfkaushalkr1407
The Roman Empire, a vast and enduring power, stands as one of history's most remarkable civilizations, leaving an indelible imprint on the world. It emerged from the Roman Republic, transitioning into an imperial powerhouse under the leadership of Augustus Caesar in 27 BCE. This transformation marked the beginning of an era defined by unprecedented territorial expansion, architectural marvels, and profound cultural influence.
The empire's roots lie in the city of Rome, founded, according to legend, by Romulus in 753 BCE. Over centuries, Rome evolved from a small settlement to a formidable republic, characterized by a complex political system with elected officials and checks on power. However, internal strife, class conflicts, and military ambitions paved the way for the end of the Republic. Julius Caesar’s dictatorship and subsequent assassination in 44 BCE created a power vacuum, leading to a civil war. Octavian, later Augustus, emerged victorious, heralding the Roman Empire’s birth.
Under Augustus, the empire experienced the Pax Romana, a 200-year period of relative peace and stability. Augustus reformed the military, established efficient administrative systems, and initiated grand construction projects. The empire's borders expanded, encompassing territories from Britain to Egypt and from Spain to the Euphrates. Roman legions, renowned for their discipline and engineering prowess, secured and maintained these vast territories, building roads, fortifications, and cities that facilitated control and integration.
The Roman Empire’s society was hierarchical, with a rigid class system. At the top were the patricians, wealthy elites who held significant political power. Below them were the plebeians, free citizens with limited political influence, and the vast numbers of slaves who formed the backbone of the economy. The family unit was central, governed by the paterfamilias, the male head who held absolute authority.
Culturally, the Romans were eclectic, absorbing and adapting elements from the civilizations they encountered, particularly the Greeks. Roman art, literature, and philosophy reflected this synthesis, creating a rich cultural tapestry. Latin, the Roman language, became the lingua franca of the Western world, influencing numerous modern languages.
Roman architecture and engineering achievements were monumental. They perfected the arch, vault, and dome, constructing enduring structures like the Colosseum, Pantheon, and aqueducts. These engineering marvels not only showcased Roman ingenuity but also served practical purposes, from public entertainment to water supply.
Operation “Blue Star” is the only event in the history of Independent India where the state went into war with its own people. Even after about 40 years it is not clear if it was culmination of states anger over people of the region, a political game of power or start of dictatorial chapter in the democratic setup.
The people of Punjab felt alienated from main stream due to denial of their just demands during a long democratic struggle since independence. As it happen all over the word, it led to militant struggle with great loss of lives of military, police and civilian personnel. Killing of Indira Gandhi and massacre of innocent Sikhs in Delhi and other India cities was also associated with this movement.
6. The first step in a successful partial
denture is to design and plan the
case very carefully.
The more time taken with this
important step, the more secure
and functional the resulting partial.
7. The prosthesis must be designed
following the most favorable
biomechanical principles, as the
simple and proper design helps in
reducing the harmful effects on
the supporting structures
8. The simple and proper design
helps in replacing what is
missing and preserve
remaining tissues
9. Objectives and
Functions of RPD
Preservation
of the
remaining
structures
Simplicity
and rigidity
Restore
masticatory
efficiency
Restore
Appearance
and speech
10. Preservation of the remaining tissues
without injury of the remaining oral
structures.
Restore the form and function
Enhance psychological comfort
Removable Partial Denture Design
12. Factors that affect RPD design
Are conditions and forces found
in the patients mouth, that affect
the partial denture design.
Removable Partial Denture Design
13. Principles of RPD design
Are certain rules placed by the
dentist to cope with the oral factors
and achieve the biomechanical
consideration of the design.
Removable Partial Denture Design
15. * Mechanical p. >>> related to resistance of
forces and its application to object >> looseness
of teeth, bon resorption……etc
Biomechanical principles of RPD design
* Bio >>> biological p. pertaining
to living systems >>> inflammation,
Caries, bone resorption….etc
Removable Partial Denture Design
17. Number of abutments
Tipped teeth
Crown root ratio
Periodontal condition of abutments
Rests
Retainers
Mouth preparation
needed
1- Abutment condition
18. The health of the periodontal ligament:
Periodontally weak abutment require the
use of flexible clasps (e.g. wrought wire)
Sound abutments permit the use of more
rigid forms (e.g. Aker)
Abutment condition
19. Tooth undercuts
Root configurations
Type and position
of retainers
Abutment condition
20. The presence and degree of undercut:
The flexibility of the clasp used depends
on the degree of the undercut, and the
orientation of the survey line
Undercuts should be present on the zero
tilt, otherwise they should be created
22. Combination of RPD and FPD (e.g. a modification
of either a Class I or Class II arch exists anterior to a
lone-standing abutment tooth, the splinting of this
abutment to the nearest tooth by FPD is mandatory.
Pier
abutment
Fixed
bridge
24. Distortion of tissues over the edentulous ridge will
be approximately 500 µm under 4 newtons of force,
whereas abutment teeth will
demonstrate approximately 20 µm
of intrusion under the same load.
Resiliency
25. Ridge span
The longer the edentulous area covered by
the denture base, the greater the potential
lever action on the abutment teeth.
26. Ridge shape
B, The flat ridge will provide good support, poor
stability. C, The sharp spiny ridge will provide poor
support, poor to fair stability. D, Displaceable tissue on
the ridge will provide poor support and poor stability.
27. Shape of the sulcus
Deep tissue undercuts close to the
gingival margin contraindicates the use
of gingivally approaching clasps
28. Systemic health problems
Acceptable oral hygiene
Reliable recall candidate
Treatment simplification
Economic Considerations
3. Patients’ needs, Gender and advanced age
29. Gender and age
Appearance
Gingivally app clasps provide better
esthetics
For occlusally approaching clasps it is
better esthetically and mechanically for
the clasp arm to start from a more gingival
position
31. Masticatory stresses.
Gravity acting against maxillary prosthesis
The action of Sticky Food tends to pull the
denture occlusally away from the tissues
Muscle pull and tongue action tend to displace a
denture from its position.
Intercuspation of teeth may tend to produce
horizontal and rotational stresses unless the
occlusion is balanced. (Resolved forces from
lateral movements).
4. FORCES ACTING to displace the RPDs
32. MOVEMENTS OF RPDs DURING FUNCTION
All should be within the physiological
limits of the tissues involved
FORCES ACTING ON RPDs
33. The magnitude and intensity
The duration
The direction
The frequency
of these forces
The ability of living tissues to tolerate forces is
largely dependent upon
Maxfield
FORCES ACTING ON RPDs
34. Fibers of periodontal ligament are
arranged such that their resistance to
vertical forces is much greater than
that to horizontal forces
Tissues are adapted to receive
and absorb forces within their
physiological tolerance
FORCES ACTING ON RPDs
35. The amount of stress transmitted to the
abutment depend on:
Length and surface area of the edentulous span
Quality of the supporting ridge: The thickness and
compressibility of the supporting mucosa.
The adaptation of the denture base to the tissues of
the extension base
Clasp type
Opposing occlusion
36. Class I Lever
Class II Lever
Class III Lever
1.Tissue-ward movements
2.Tissue-away movements
3.Horizontal movements:
a) Lateral movements
b) Antero-posterior movements.
4. Rotational movements around fulcrum:
MOVEMENTS OF REMOVABLE PARTIAL DENTURES
DURING FUNCTION
45. Damaging effect of RPD
Teeth (caries, periodontal
breakdown, looseness)
Bone (bone resorption)
Soft tissue (gingivitis, hyperplasia)
46. Over stresses
Food and plaque accumulation
Soft tissue irritation
Damaging effect of RPD
47. Therefore, forces falling on RPD should
be properly:
Directed vertically on both ridge and
abutment
Decreased, to reduce the force /unit area
within the physiological tolerance of the
tissues.
Distributed widely
48. Prevent food accumulation
Guide plane
Beading
Intimate fit of the saddle
Distance between vertical components
Relation between clasp type and tissue
undercut
Avoid poor clasp designs
49. Prevent soft tissue irritation
Reduce the number of components crossing the
gingival margin
Any component crossing the gingival margin
should be relieved
The retentive tip should be placed 1-1.5 mm away
from the gingival margin
Distance between major connector and gingival
margin
52. Tooth-mucosa support
Support is derived from two different
tissues, the non-displaceable teeth and
the displaceable soft tissues covering the
residual ridge.
54. This results in vertical movement of the
denture base either in tissue-ward or tissue-
away direction when occlusal forces act on
artificial teeth.
55. This means that in distal extension RPD
there are problems of:
• Support (maimly)
• Retention
• Bracing and reciprocation
• Stabilization (tipping and rotational
movements)
56. Problems of support associated with free-
end saddles RPD is due to:
1. Lack of posterior abutment
2. Support is derived from both the residual ridge and
abutment teeth
3.Major support is obtained from the residual ridge
4.If resorption occurs and relining of the denture is
neglected further bone resorption occurs with
subsequent torque acting on the abutments.
58. During mastication or parafunction
(clenching and bruxing) the
periosteum is compressed, the
underlying bone subjected to stress
and strain, and a resorptive
remodeling response is provoked.
59. Ridge resorption is likely to happen.
The abutment teeth are subjected to torque
in both antero-posterior and buccolingual
directions.
With improper designs >> movement of the
denture base during mastication or
parafunction is destructive to the underlying
bone and soft tissue
61. Problems of the distal extension
bases can be controlled by
1. Reduction of the load.
2. Distribution of the load between
abutment teeth and residual ridges.
3. Wide distribution of the load
4. Providing posterior abutment
62. 1- Reducing the load
1. Broad tissue coverage
2. Fitness and intimate adaptation of the denture
base
3. Use of small and narrow teeth
4. Replacing premolars with canines, and molars
with premolars.
5. Harmonious occlusion and reducing the cusp
angle of artificial teeth.
6. Leaving a tooth off the saddle.
7. Improving the condition of the residual ridge
63. 1. Broad tissue coverage and maximum
extension of the denture base within the
functional limits of muscular movements.
Lateral and posterior borders must be well extended to provide
support, retention, bracing and stability for distal-extension RPDs.
Posterior borders
Lateral borders
64. An extension base of the mandibular
RPD must cover the buccal shelf and
the retromolar pad
65. It is constant, relatively unchanging structure
on the mandibular denture bearing surface.
The pad contains glandular tissue, loose
areolar connective tissue, the lower margin of
the pterygomandibular raphe, fibers of the
buccinator, and superiorconstrictor and fibers
of the temporal tendon.
Retromolar Pad:
66. The bone beneath does not resorb due
to the pressure associated with denture
use.
It is one of the two
primary support areas
of the mandible
Retromolar Pad:
67. Boundaries of the buccal shelf:
The external oblique line and the
crest of the alveolar ridge.
Buccal Shelf
Masseter Groove
Buccinator limits the
extension in this area
68. The buccal shelf is a prime support
area because it is parallel to the
occlusal plane. It is composed of dense
cortical bone and is relatively resistant
to vertical forces.
Buccal Shelf
69. Amount of movement is dependent upon:
The surface area of the mucosal support area
The compressibility of the bearing surface tissues
Therefore, we must maximize the coverage of the
edentulous extension area with fully extended impressions.
By two methods:
Altered cast impressions
Fully extended impressions with
a custom tray
70. 2. Fitness and intimate adaptation of
the denture base to the tissue.
Impression Technique
Relining
Maximize the surface area and
cover key anatomic structures
with altered cast impressions
71. 3. Use of small and narrow teeth to increase
the masticatory efficiency and reduce the
masticatory Load
72. Less muscular force will be required to
penetrate food bolus with reduced occlusal
table, thereby >> reducing forces to
supporting oral structures
75. 6. Harmonious occlusion and reducing the cusp
angle of artificial teeth.
Anterior guidance – Centric only contact posteriorly.
This practice will reduce the lateral forces delivered.
76. 7. Improving the condition of the residual
ridge e.g. correction of abusive
condition of hyperplastic tissues.
77.
78. Problems of the distal extension
bases can be controlled by
1. Reduction of the load. (7 points)
2. Distribution of the load between
abutment teeth and residual ridges.
3. Wide distribution of the load
4. Providing posterior abutment
79. I. Varying the connection between the clasps
and saddles: Through applying the stress-
breaking principle
II. Placement of occlusal rests away from the
saddle.
III. Functional impression technique.
2- Distribution of load between the teeth and
the ridges
80. I. Varying the connection between the
clasps and saddles:
81. Varying the connection between the clasps and
saddles:
Stress breaker (stress equalizers)
Movable joint
Flexible connection
82. RPD having a movable joint between the
direct retainer and the denture base
This joint may be in the form of
Hinges
Ball and socket devices or
Sleeves and cylinders
Hinged type stress
breakers allows
vertical and hinge
movement of the base
83. Dalbo Extra coronal precision attachment:
Ball and socket type of joint in which the ball is
cantilevered off the abutment tooth and the
socket is attached to the prosthesis.
Hinged type stress breakers allows vertical and
hinge movement of the base to prevent direct
transmission of tipping forces to the abutment
Chrisman intracoronal retainer
84. Split major connectors
A lower partial denture framework with partial
division of a lingual plate to achieve stress breaking
action
Flexible connection
85. 1. Gingivally approaching clasp R.P.I. >>
except T, U bar and Devan clasps
2. Reverse Aker Clasp
3. R.P.A.
4. ROUGHT WIRE CLASP
5. Back action and Reverse back action clasps ? ?
Clasps with stress breaking action. More load
transferred to residual ridge
The clasps disengage during tissue-ward movement
86. If can’t use I-bar: RPA
High frenal attachment, soft tissue undercut,
shallow vestibule
If can’t use the mesial rest: Combination Clasp
Restoration, heavy occlusion, rotated tooth
RPI RPA, Combination Clasp
Clasp of Choice: RPI
87. Varying the connection between the clasps and
saddles:
Gingivally approaching clasp >> R.P.I.
The clasps disengage during tissue-ward movement
Flexible
88. Varying the connection between the clasps and
saddles:
Reverse Aker clasp
The clasps disengage during tissue-ward movement
Rigid connection
F
89. Varying the connection between the clasps and
saddles:
Combination clasp consists of cast reciprocal
arm and tapered, round wrought-wire retentive
clasp arm
90. WROUGHT WIRE CLASP
During function, Loading force (F) causes clasp to rotate,
where minor connector breaks contact with tooth. WW clasp
arm tip moves occlusally and directs a distal torqueing force
to the tooth. Flexibility of WW arm limits torqueing.
91. RPA clasp provides bilateral bracing, commonly
used in tooth-mucosa borne RPDs where an RPI
clasp is contraindicated.
92. Properly designed RPA clasp showing movement from
occlusal forces. Proximal plate (C) drops gingivally and slightly
mesially as rotation occurs around mesial rest with approximate
center of rotation (B).
Rigid portion of retentive arm
contacts tooth only along survey
line (A) and moves gingivally and
mesially. Retentive end of clasp
arm moves mesially and slightly
gingivally
B
A C
94. I. Varying the connection between the clasps
and saddles: Through applying the stress-
breaking principle
II. Placement of occlusal rests away from the
saddle.
III. Functional impression technique.
2- Distribution of load between the teeth and
the ridges
96. Positioning the occlusal rest on the abutment teeth
If the rest is placed on the distal side of the
abutment (near the edentulous area), the
forces are not vertical but almost horizontal
in the region just next to
the abutment.
causing mobility and bone
loss.
97. When force is directed against unsupported end of
beam, cantilever can act as first class lever >>
Torque on the abutment tooth. A cantilever design
allows also excessive vertical movement toward
the residual ridge causing mobility and bone loss.
Aker Clasp
98. Positioning the occlusal rest on the abutment teeth
Changing the location of the occlusal rest from
the distal fossa to the mesial fossa
changes the character, direction and often
the magnitude of the
forces that are transmitted
to the abutment tooth.
100. Changing the direction of torque on the abutment
from the distal to the mesial side of the tooth, the
force tends to move the tooth towards the adjacent
tooth mesially. Thus the adjacent tooth absorbs
some of the forces of occlusion. (Buttressing effect )
101. Reverse Aker Clasp
F
2- Changing the stresses acting on the saddle
and Transfer the design from Lever I to
favorable Lever II decrease Torque on
the abutment tooth.
102. 3. Disengagement of the clasp during tissue
ward forces (elimination of the torque)
a. Proximal plate should contact approximately 1
mm of the gingival portion of the guiding plane in
distal extension cases
RPIRPI Clasp
103. b. Clasp Disengagement
Reverse Aker
The circumferential clasp arm and proximal
plate move in mesiogingival direction
disengaging from the tooth
RPA
104.
105. 4. Increase the length of the arc of rotation, so
the forces transmitted to the ridge are more
vertical A vertical force in better tolerated by
ridge than is a horizontal oblique force
Increase the length of lever arm
106.
107. 5. The area of support is increased
(decrease force /unit area)
108. 6. Placing the occlusal rest away from the distal
extension base beside achieving mechanical
advantages it helps in favorable distribution of
occlusal load between abutment tooth and the ridge
109. Axis of rotation (fulcrum line) runs
through the deepest portion of posterior rests
Therefore this portion of rest should be contoured
as a half sphere (We develop this portion of the rest
with a #6 or a #8 round burr Proper rest contour)
110. Problems of the distal extension
bases can be controlled by
1. Reduction of the load.
2. Distribution of the load between
abutment teeth and residual ridges.
3. Wide distribution of the load
4. Providing posterior abutment
111. I. Varying the connection between the clasps
and saddles: Through applying the stress-
breaking principle
II. Placement of occlusal rests away from the
saddle.
III.Functional impression technique.
2- Distribution of load between the teeth and
the ridges
1- Reducing the load
112. III. Functional impression
The mucosa is recorded in a compressed form
so, the degree of tissue ward displacement is
decreased intra-orally
113. Problems of the distal extension
bases can be controlled by
1. Reduction of the load.
2. Distribution of the load between
abutment teeth and residual ridges
3. Wide distribution of the load
4. Providing posterior abutment
114. a- Maximum area covering of the ridge
3. Wide distribution of the load
116. C- by a splinting of one or more teeth,
either by fixed partial dentures or by soldering
two or more individual restoration together.
Fixed
bridgePier
abutment
117. d- Using a Kennedy bar to distribute the
lateral load on multiple teeth.
118. Problems of the distal extension
bases can be controlled by
1. Reduction of the load.
2. Distribution of the load between
abutment teeth and residual ridges
3. Wide distribution of the load
4. Providing posterior abutment
123. Five Parts of RPD
1. Rests
2. Minor connectors
(including proximal plates)
3. Major connector
4. Denture base and Artificial
Teeth
5. Retainers
Direct retainers
Indirect Retainers
Max. Connectors
Man. Connectors
124. 1.Combined metal-acrylic bases used to allow
for future relining as bone resorption is
usually anticipated.
1-Denture base
125.
126. 2. The metal part is designed either in ladder-
like configuration or in the form of meshwork,
to allow for mechanical retention with acrylic
resin
1-Denture base
127. 3. Attain maximum coverage and
extension within the physiologic limits.
The base extends from the abutment to cover the
tuberosity in the maxillary arch.
1-Denture base
128. If the denture border is underextended in the buccal shelf
area. Therefore, it will not be able to occupy the buccal
pouch. A space will occur between the denture border
and the lower muscle bundle of the buccinator, resulting
in food accumulation
129. Border molding of the mylohyoid ridge area
should be performed 4-6 mm below this ridge
The impression surface of the denture on the
mylohyoid ridge area is relieved
Relief
area
Relief
area
130. A denture border short of the mytohyoid ridge
digs into the residual ridge and causes pain. If
shortened, the denture border will impinge
again upon the ridge.
131. 4. Either constructed over mucosa
in its displaced functional form
or in the static form if the stress
breaking principle is applied.
132. The accuracy and type of impression
registration (anatomical or functional)
Has greater area coverage
More stability under rotating and/or torquing forces
Maintain its occlusal relation with the opposing
teeth.
No rapid settling of the denture base
Distribute the occlusal load equitably and diminish
the rotational movement.
A denture base processed to the functional form
is generally
133. 5. Concave Polished surface
The properly shaped polished surface
contour which is important for the retention
and stability of the denture
134. 6- The denture base and the artificial
teeth should be placed in the neutral
zone.
135. The neutral zone concept is based on the belief
that the muscles should functionally mold not only the
border and the artificial teeth but also the entire
polished surface > facial and lingual forces generated
by the musculature of the lips, cheeks and tongue are
balanced
136. The tongue brings the food onto the occlusal plane, then it
holds the food between the upper and lower teeth by
cooperating with the buccinator muscle so that the food can
easily crushed.
The food is held between the bucc. (its middle fibres) and the
tongue, and crushed.
138. Open or closed design
Ideal base/abutment tooth relationship
1-Close contact between the denture and the proximal
surface of the abutment
2- Open Contact. Enough spaces are self-cleansing
139. 8. Tissue stops:
•Are essential parts in the fitting surface of
minor connectors. They are usually two or
three in number that contact the cast.
140. •They are “legs” formed by making holes in the
relief wax placed over the ridge during preparation
of the master cast before duplication.
8. Tissue stops:
141. •Elevate the minor connectors, forming the
denture base, from the ridge, by a space equal
to the thickness of acrylic bases.
8. Tissue stops:
142. •Stabilize the framework on the master
cast during processing as acrylic resin is
packed in the retention spaces.
8. Tissue stops:
143. The refractory cast
The study cast The Master cast
Modified M. cast
Duplication of
Waxing up
Spruing Metal
Framework
144. Blockout of the master cast
Relief
Internal Finishing Lines
Tissue stoppers
Modification of the Mater cast
a. Spraying: seal the cast and protect against
scratches
b. Beading: provides Seal and retention
c. Waxing the master cast:
145. Beading:
Beading is produced by scraping a groove
approximately 0.5 to 1mm. wide and deep at the
edge of the design of the maxillary major connector.
146. 1.Prevent food particles from collecting beneath the
framework, that produce discomfort to the patient.
2.Provides seal and increases retention.
3.Helps in prevention of overgrowth of the thick
keratinized palatal epithelium.
4.Helps in transferring the major c. design to the inv. cast.
Beading serves to:
147. It is the elimination of the undesirable undercut
areas. Only the retentive clasp terminals
undercuts are the desirable undercuts.
Blockout of the master cast:
148. 1- Parallel blockout
2- Shaped blockout
(Ledges for clasp arms)
3. Arbitrary blockout
Types of Blockout:
149. For areas that are cervical to guiding plane
surfaces and below height of contour (All
undercut areas that will be crossed by major or
minor connectors).
1- Parallel blockout:
151. a. Labial and buccal tooth and tissues
undercuts not involved in the denture design
b. The sublingual and distolingual areas beyond
the limits of the denture design.
3. Arbitrary Block-out
152. Arbitrary block out is done to:
Facilitate the removal of the cast from the
impression during duplication.
Prevent distortion of duplicating
mold when the master cast is
removed.
3. Arbitrary Block-out
153. Relief: is the procedure of placing wax in
certain areas on the master cast to
provide space between these areas and
the framework
154. Beneath lingual major connectors.
Beneath framework extension
onto ridge areas for attachment
of resin bases.
Relief:
155. Hard or sensitive areas in which
major connectors will contact.
Relief:
156. 9. Finishing Lines:
Are butt joints created at the junction of
major connectors with the denture bases.
1- The internal finish line
2- The external finish line
158. 1- Internal finish line is carved in the relief wax
covering the edentulous ridge at the metal resin junction.
This line is trimmed with blade held at 90° to the cast
surface in order to produce a sharp junction having a
uniform depth of at least 1mm
161. The internal finish line is placed approximately
at the junction of the vertical and horizontal
planes of the palate to permit relining (A).
int.
F.L.
ext.
F.L.
Acryl
162. 2- The external finish line is located on
the polished surface of a partial denture
and is formed in the wax pattern.
ext.
F.L.
163. ext.
F.L.
2- The external finish are the junction of
major connector and minor connectors
of the denture base.
164. Should never be placed directly over the internal finish
line. It should be placed superiorly to the internal
finish line so that a minimum amount of denture base
resin is used on the lingual (palatal) aspect of the
teeth.
Palatal
Buccal
The external finish lines
165. The palatal finishing line should be located 2 mm
medial from an imaginary line that would contacts
lingual surfaces of missing posterior teeth.
Natural contours of palate will be altered.
Palatal
Buccal
Correct:
Incorrect:
The external finish lines
166. 1.Smaller teeth and narrow bucco-lingually are
usually preferred to reduce the occlusal load.
2.Teeth should exhibit sharp cutting edges
Total occlusal load applied may be reduced by using comparatively smaller
posterior teeth >>> less muscular force will be required to penetrate food bolus
with reduced occlusal table, thereby reducing forces to supporting oral
2- Artificial teeth and Occlusion for class I RPD
167. 3. Lower teeth should be placed over the crest
of the ridge to enhance denture stability.
Vertical height of mandibular
posterior Teeth
2- Artificial teeth and Occlusion for class I RPD
168. 4. Position of the maxillary buccal cusps:
favorably placed over the buccal turning point
of the ridge crest.
5. Avoid contact on inclines: No teeth set
over ascending portion of ramus
Artificial posterior teeth
should not be arranged
farther distally
2- Artificial teeth and Occlusion for class I RPD
169. 6. Centric occlusion of teeth should
coincide with centric relation
7. Simultaneous bilateral contacts
2- Artificial teeth and Occlusion for class I RPD
170. They are 2-4 mm in height, extending from the
marginal ridge to the junction of the middle
and gingival third of the abutment tooth
3- Proximal plates (Guiding Plates)
171. A guide surface should be produced by
removing a minimal and fairly uniform
thickness of enamel, usually not more
than 0.5m.m. from around
the appropriate part of the
circumference of the tooth.
172. The bucco-lingual width of the proximal
plate is determined by the proximal
contour of the tooth
173. 1/3
1/3
1/3
Tip of the GP Contact approximately 1 mm of the gingival
portion of the guiding plane in distal extension cases. a
slight degree of movement of the base and the clasp is
permitted without transmitting torsional stress to the tooth
Clasp Disengage Vertically with
extension base loading.
Free end
Saddle
Guiding
plane
G. plate
174. The proximal plate together with the
mesiolingually placed minor connector provides
stabilization and reciprocation of the assembly
RPI
Lingual view
175. Contact approximately 1 mm of the gingival portion of the
guiding plane in distal extension cases. a slight degree of
movement of the base and the clasp is permitted without
transmitting torsional stress to the tooth
Vertically disengage with
extension base loading.
176. As the prosthesis is
inserted and removed,
thus horizontal
wedging is eliminated
Long parallel surfaces
are contraindicated to
avoid overstressing
abutment teeth
The length of the guide plane range from 2-3 mm onlyRPI Kratochvil Clasp
177. GPs are parallel to the path of insertion
and removal of the partial denture.
Initial contacts on the abutment teeth Continuously
follow the same path guided by the proximal plates
Parallel guiding surfaces
Terminal resting position
179. Rest seats should be carefully located
and prepared to avoid torque and allow
transmission of stresses along the long axes
of abutment teeth
4-Rests
180. •Fit
•Saucer-shaped floor
•The floor of the rest seat should
inclined apically
•Strong not raise the vertical
dimension of occlusion.
•Mesially placed (away from the
saddle)
4-Rests
181. Positioning the occlusal rest on the abutment teeth
Changing the location of the occlusal rest from
the distal fossa to the mesial fossa
changes the character, direction and often
the magnitude of the
forces that are transmitted
to the abutment tooth.
182. When a posterior force is applied, the tooth is
tipped towards the edentulous area which
opens the proximal contacts
between teeth and
moves the tooth causing
mobility and bone loss.
Positioning the occlusal rest on the abutment teeth
184. Changing the direction of torque on the abutment from
the distal to the mesial side of the tooth, the force tends
to move the tooth towards the adjacent tooth mesially.
Thus the adjacent tooth absorbs some of the forces of
occlusion. (Buttressing effect )
185. Reverse Aker Clasp
F
2- Changing the stresses acting on the saddle
and Transfer the design from Lever I to
favorable Lever II decrease Torque on
the abutment tooth.
186. Depression of the base disallowing harmful
engagement of the RPI retentive clasp arm
and proximal plate
3- Clasp and proximal plate disengagement
from the tooth
RPI Clasp
187.
188. Clasp Disengagement
Reverse Aker
The circumferential clasp arm and proximal
plate move in mesiogingival direction
disengaging from the tooth
RPA
190. From occlusal view, the retainer is placed at the point
of greatest mesial- distal curvature of the tooth
Point of greatest
Position of the retainer
mesial distal curvature
If the retainer is placed
behind the greatest
curvature the retainer
will move forward during
function and torque the
tooth and loosen the
retention
191. 4- Increase the length of lever arm, represented
by distance from rest to denture base. This
makes rotational action caused by up-and down
movement of denture base in function more
vertical. A vertical force in better tolerated by
ridge than is a horizontal oblique force
Increase the length of the arc of rotation
192. As you move the rest anteriorly, The tooth and the
edentulous area are better able to tolerate
vertically directed forces than horizontal forces.
193.
194. 5- As rest is moved anteriorly this will increase the
area of support (decrease the force /unit area)
6- Wide distribution of the load in an antero-posterior
direction. The bone near the abutment will thus
share the distal part of the ridge in bearing the
occlusal load.
195. The Lingual Rest is Preferred than the Incisal Rest because:
1.It is placed closer to the center of
rotation of the abutment tooth, thus
it will exert less leverage and
reducing its tendency to tipping.
2.More esthetic, as it can be
discreetly hidden from view.
3.It tends to be less bothersome to a
curious tongue.
199. Basic Principles of a Properly Designed Clasp
1- Simplicity
The simplest type of the clasp that
will accomplish the design
objectives should be employed
R.P.AR.P.I
200. 2- Encirclement
Each clasp assembly must encircle more
than 180 degrees of abutment tooth
Tooth can't move horizontally away from the clasp
201. The clasp assembly must encircle the
prepared tooth 180o or half of the
circumference of the tooth in a manner that
prevents movement of the tooth away from
the associated clasp assembly.
It may be continuous
(circumferential) or broken (bar
clasp). If broken it must contact
at least 3 different areas of tooth.
202. The retentive clasp arm should
remain passive and should not
exert any pressure against the
tooth until activated when
dislodging force is applied.
3- Passivity:
203. 4. Number of the clasps
The best retention is not proportional to
the number of clasps. Satisfactory
amount of retention, is that required to
keep or just to retain the denture in its
place during function
Maximum retention with the minimum retainer
204. Class I usually required only two retentive
clasp arms one on each terminal tooth).
In Class I the clasps exert little neutralizing
effect on the leverage-induced stresses
generated by the base, and they must be
controlled by some other means.
5. Strategically positioned:
205. 6- Support
Occlusal rest support prevents clasp from
being displaced in gingival direction.
lack of support
206. Secure the clasp in its proper position
The occlusal rest must be designed to
prevent movement of the clasp arms
cervically.
207. For a clasp to be retentive its arm must flex as it
passes over the height of contour of tooth and
engage undercut in infrabulge area of the teeth
7- Retention
208. The amount of retention should always
be the minimum necessary to resist
reasonable dislodging forces.
209. The more flexible the retentive arm of
the clasp, the less stress is
transmitted to the abutment tooth.
As the flexibility of the
clasp increases, both
vertical and lateral
stresses transmitted to the
residual ridge increase.
210. An I bar with its tip placed below the cross-
over point of the survey lines will provide
retention in both direction
211. Retentive clasps should be bilaterally
opposed (i.e., buccal retention on one
side of the arch should be opposed by
buccal retention
on the other, or lingual on
one side opposed by
lingual on the other).
212. Usually mesial or distal line angle or Mid-buccal
position, preferably the facial surface.
Location of Retentive Terminal:
Molar teeth exhibit undercut on either or both
of facial or lingual surfaces so retention may be
used on buccal or lingual
Maxillary premolar rarely shows lingual
inclination. So buccal retentive area is used.
213. Clasps should have good bracing and
stabilizing qualities
8. Bracing and Stabilization
214. All rigid parts of clasps contribute to
this property and resist displacement of
clasp in horizontal direction
215. 9- Reciprocation
Each retentive terminal should be opposed by a
reciprocal arm to resist any orthodontic pressure
exerted by the retentive arm during placement and
removal as it flexes about the height of contour
216. Stabilizing and reciprocal components must be
rigidly connected bilaterally (cross-arch) to
realize reciprocation of the retentive elements
217. A fundamental aspect of clasp design is that
the arms should be placed as low on the
crown, within limits, as the survey line
will permit, in order to reduce the effect of
leverage.
10- Leverage and Esthetics in clasp design:
Clasp arms’ location
218. Reciprocal elements of the clasp assembly
should be located at the junction of the
gingival and middle thirds of the crowns of
abutment teeth.
219. The terminal end of the retentive arm is
optimally placed in the gingival third of the
crown. These locations permit better
resistance to horizontal and torqueing forces
caused by a reduction in the effort arm.
220. Fencepost is more readily removed by application
of force near its top than by applying same force
nearer ground level (decrease the effort arm)
A B
221. Undercut is better be found within the
GINGIVAL1/3 for better esthetics & mechanics
Bracing arm better located In the apical
portion of the Middle 1/3
222. The clasp should not interfere with normal
gingival stimulation and its terminal should be
away from the gingival margin
X
3-4mm
3-4mm
There should be at least 3- 4 mm. Clearance between
the clasp arm the gingival margin.
224. 11- Minor connector (or proximal plate) must contact a
definite guiding plane to dictate path of insertion
225. Guiding planes are positively control the
path of removal and stabilize abutments
against rotational movement
226. The path of escapement for each retentive
clasp terminal must be other than parallel
to the path of removal for the prosthesis to
require clasp engagement with the
resistance to deformation that is retention.
227. Contact of the saddle with this guide surface
would provide very positive retention
1- Path of insertion and removal
2- Path of displacement
228. Part of the saddle engaging teeth undercut:
This obtained by choosing an antero-posterior
tilt rather than the zero tilt when setting up
the path of insertion
Without guiding planes, Clasps designed are
ineffective when restoration is subject to dislodging
forces in occlusal direction.
Dr. Amr Hosny
229. Insertion of RPD: Follow ?
Initial contacts on the abutment
teeth
Continuously follow the same path
guided by the proximal plates
Parallel guiding surfaces
Terminal resting position
230. Why do we survey dental casts ?
and What are the objectives ?
A partial denture must be designed so that
it can be easily inserted and removed by
the patient, will be retained against
reasonable dislodging forces and will have
the best possible appearance.
231. This RPD cannot be inserted
in the mouth because of
failure to eliminate unwanted
undercut on the cast.
This denture has been processed
on a correctly prepared cast and,
as a result, there is no
interference with insertion.
232. Selection of Clasp form depends on
1-Position of the tooth (ant. or post)
2-Condition of the tooth (periodontal condition)
3-Position of the edentulous area (mod. area).
4-Axial inclination of the abutment.
5-Position of occlusal rest (far from free-end areas).
6-Position of retentive undercut.
12- Selection of Clasp form:
233. Position of retentive undercut:
• If the abutment tooth exhibits an undercut on the disto-
buccal side, then a reverse circlet clasp can be used.
• If the undercut is on the mesio buccal side, a combination
wrought wire clasp, RPI clasp or back action can be used.
• If the undercut is on the distolingual side, RLS clasp can be
used.
• If precision attachments or rigid clasping are used to retain
a class I partial denture, a stress breaker should be used.
234. Changing the location of the occlusal rest from the
distal to the mesial fossa changes the character,
direction and often the magnitude of the forces
that are transmitted to the abutment tooth.
The RPI and the reverse circlet clasps have mesially located rests
which can fulfill these requirements.
13.Positioning the occlusal rest on the abutment teeth
235. 14. Clasps with stress breaking action
Gingivally approaching clasps except Devan clasp
Occlusally approaching clasps
– Reverse Aker clasp
– R.P.A.
– R L S
– Back action clasp
– Reverse back action clasp
– Ring (bounded saddle, isolated, tilted molar)
Combination clasps (wrought wire + casted)
236. Clasp retainers on abutment teeth adjacent to
distal extension bases should be designed as
stress-breakers
237. (1) The I bar placed on the distal cannot move
freely away from the tooth thereby producing a
torqueing action
Occlusal view of an RPI clasp.
a- R.P.I.
(2) Placement of the I bar at
the greatest prominence or
to the mesial
(3) Permits the I bar under
function to move freely away
238. Occlusal view of an RPI clasp.
From the Mechanical point of view
Mesiobuccal position
From the Biological point of view
Midbuccal position
239. P.P minor connector should contact
approximately 1 mm of the gingival portion of
the g. p. in distal extension cases
240. Changing the position of the guiding plates changes
the center of rotation (.) indicates center of rotation
R.P.I.
241. Contraindications for the use of
gingivally approaching clasps
A. Severe buccal or lingual tilts of abutment teeth
B. Severe tissue undercut to avoid food or tissue trap.
C. Shallow vestibule and High floor of the mouth
242. b- Reverse Aker Clasp
F
Changing the stresses acting on the saddle
and Transfer the design from Class I Lever to
favorable Class II Lever
243. A mesial occlusal rest .
A proximal plate
An Aker retentive arm arising from
the superior portion of the proximal
plate.
Indication:
•In distal extension RPDs presented with shallow
vestibule or severe tissue undercut
c- RPA clasp Eliason, C. 1983
244. 1.Mesio-occlusal surface of the tooth, permitting the other
components to release from the tooth and drop into
undercuts when occlusal loads are placed on the denture
base.
Advantages:
c- RPA clasp
2.This in turn prevents tipping of the abutment.
3.Absence of a lingual rigid reciprocal arm
minimizes rotational forces falling on the
abutment.
245. d. RLS Clasp
Mesio-occlusal Rest
A distolingual L-bar direct retainer
Distobuccal Stabilizer
Advantages:
• Reduces torque on the abutment tooth.
• Clasp disengagement as the distal
extension base moves tissue-ward in
function
Hiding Denture Clasp,
System by Aviv L. et al. 1990
246. The design of clasp for a distal extension
RPD that helps in preserving both
the abutment teeth and
the tissues of the
edentulous ridge
d. RLS Clasp
247. e- Combination clasp
Consists of cast reciprocal arm and tapered,
round wrought-wire retentive clasp arm applicable
when disto-buccal undercut cannot be found or
created, or tissue undercut contraindicate
placing bar type. It would
be kinder to periodontal
Ligament than would a
cast clasp.
248. I. Retainers are supportive elements, designed
to counteract displacing rotational forces.
They may be in the form of rests or palatal
connectors.
6- Indirect Retention
249. Two rests one on each side are generally
used, they should be located as far
anterior to the fulcrum axis as possible
6- Indirect Retention
253. 3- Effectiveness of the Supporting
Structures
4- Rigidity of the Denture Frame
254. STRAPSBARS PALATAL PLATES
• 6- 8mm
• Cross section is
half round
• 8 – 12 mm
• 1.5 mm thickness
•Covers more than
half of the palate
•Anterior
•Middle
•Posterior
•Anteroposterior
•Middle
•Posterior
•Anteroposterior
•Metallic
•Nonmetallic
•Combination
7-Maxillary Major connectors
255. Rigidity
Must be properly located
Uniform metal thickness should
be throughout the palate.
The metal should not be highly
polished on the tissue side
Requirements of Maxillary Major Connectors
(The prime requirement)
256. a- Placed at least 6 mm away from the gingival
margin.
b. The borders should run parallel in order to
produce the least possible soft tissue
coverage.
The borders should be
257. c. All borders should be tapered
d. Should be smoothly curved.
e. The borders should be beaded.
Relief is avoided except in the
presence of palatal tori or
prominent median palatine
raphe.
258. Maxillary Major connector used for distal
extension removable partial denture
Palatal strap
Anteroposterior
palatal bars
Palatal plate
259. Rigidity and strength of the connector
allow the metal to be used in thinner
sections. Support due to wide palatal
coverage. Good retention and
stability.
Palatal strap
260. MIDDLE PALATAL STRAP
•Rigid.
•Reduces gingival margin coverage to a
minimum
•Well tolerated
•Away from the tactile receptors
•Rarely annoying to the patient.
•Relatively narrow
•Minimal interference with phonetics.
The most versatile and
widely used maxillary
major connector
261. The strap lies on the central
portion of the hard palate
MIDDLE PALATAL STRAP
A minimum of 8 mm. in width,
and 1.5mm thickness
Has a thicker central area for
increased rigidity.
Cross section of posterior palatal
strap showing a thicker central
area for increased rigidity
262. • Rigid, Wide and thin
• More than 8 mm in width to gain
the necessary rigidity
• Having a uniform thickness,
• Well tolerated
•Helps in distribution of stresses
over a wider area thus provides
support
AP PALATAL STRAPS
263. Plates: More strength, less liability of food trapping,
better tolerance, and broader distribution of load
(maximum support) in addition to providing direct
and indirect retention.
Covering two thirds of the palate
264. ANTERIOR PALATAL STRAP
Disadvantages: a poor connector because it lacks
the rigidity, that causes movement or spreading of
the lateral borders of the connector when
vertical force is applied.
Interfere with phonetics and might
cause discomfort , only used with
the presence of torus palatinus or
sharp MPraphe
265. 8-Mandibular Major Connectors
Mandibular Major connector should be
relieved while Max MC should be beaded???
Lingual bar is preferred
due to its simplicity,
limited coverage and
patient's tolerance.
266. A lingual bar connector should be tapered
superiorly with a half-pear shape in cross
section and should be relieved sufficiently.
267. 4- The superior border of the lingual bar should
be placed 3-5 mm
5- The borders should run parallel to the
gingival margin
268. 6- The inferior border should be gently rounded
above the moving tissues of the floor of the
mouth.
7- Impingement of gingival tissues should be
avoided.
269. Lingual plate
• Most rigid mand. M. c.
• Better bracing
• Splinting for weak teeth.
It should be extends to the cingulae
of the anterior teeth in which the
gingival margin should be relieved.
270. Lingual plate
High floor of the mouth and
high frenal attachment.
When future teeth
replacement is anticipated.
271. Sublingual Bar Dental barKennedy bar
Sublingual bar: When Want to avoid torus
Kennedy bar Used to add to the strength and
rigidity of the denture, It is neither a major
connector nor indirect retainer by itself
273. Ant. Modification spaces of class I are preferably restored
separately with fixed bridge. This helps in
• Simplifying the partial denture design.
• Saving the anterior ridge from resorption and the anterior abutments
from torque resulting due to movements of the anterior saddle
occurring as a result of rotation of the posterior free end saddle.
Pier
abutment
??
275. Remember: to solve class I RPD problems
Improve denture support. how
Decrease torque by using stress
equalization and placement of
the rests away from the saddle.
Improve bracing.
Need of indirect retention.
Resin base to accept relining.
?
?
276. Interproximal space
9. Minor Connectors
Minor connectors are designed to
connect the framework components
either to the denture base or to the major
connector.
277. Interproximal space
9. Minor Connectors
Must be rigid.
Should be triangle in cross section,
positioned to enhance comfort,
cleanliness and placement of artificial
teeth.
278. They should be inconspicuous to the tongue.
Therefore they are placed on the guiding
planes of abutments or in the embrasure
between teeth. Should taper towards the
contact area
279. They should be inconspicuous to the tongue.
Therefore they are placed on the guiding planes of
abutments or in the embrasure between teeth.
They should join the major connector at right angle
to cover as little as possible of the gingiva.
280. There should be a minimum of 4 - 5mm
space between any two neighboring
minor connectors.
283. Strain on the residual ridge is minimized through
1.Broad tissue coverage and maximum extension of the
denture base within the functional limits of muscular
movements.
2.Fitness and intimate adaptation of the denture base to
the tissue.
3.Functional basing. Mucocompression impression
recording of the residual ridges.
4.Improving the condition of the residual ridge e.g.
correction of abusive condition of tori and hyperplastic
tissues.
284. 6. Harmonious occlusion and reducing the cusp
angle Leaving a tooth off the saddle
7.Placing the artificial teeth on the anterior two-
thirds of the base
8.Placement of occlusal rests away from the saddle.
9.Providing Posterior Abutments
a. Using an implant at the distal part of the ridge.
b. Salvaging a hopeless badly decayed tooth (an
overdenture abutments)
5. Use of small and narrow teeth to increase the
masticatory efficiency and reduce the mast. load
285. 1.Correct choice of the abut. Tooth with
sufficient alveolar bone support and crown
and root morphology
2.Placement of occlusal rests away from the
saddle (6 benefits ????).
3. Correct choice of direct retainer (flexible
clasping).
4. Using stress equalizing design.
Strain on the abutment teeth is minimized through
286. 5. Wide distribution of the load over the teeth:
a- By placing additional rests, or
b- by a splinting of one or more teeth, either
by fixed partial dentures or by soldering
two or more individual restoration together.
6- Using a Kennedy bar to distribute the
lateral load on multiple teeth.
287. 7. Preparation and restoration of the abutment
teeth to accommodate the most ideal design of PD
this include
a- Proper form of occ. rest seats
b- Tooth prep. and modification to withstand the
functional stresses ( guiding planes, ………..)
8. Providing Posterior Abutments
a- Using an implant at the distal part of the ridge.
b- Salvaging a hopeless badly decayed tooth, an
overdenture abutment
288. Advantages of Placing the occlusal rest away from
the distal extension base
1.Buttressing effect
2.Changing the stresses from the cantilever action or
class I lever to class II lever.
3.Clasp disengagement from the tooth during function
4.The more vertical will be the forces, the less are the
horizontal components of force falling on the ridge.
5.Increase the area of support (decrease the force /unit
area)
6.Less stresses on the ridge and less torque on the
abutments.
7.Wide distribution of the load antero-posteriorly