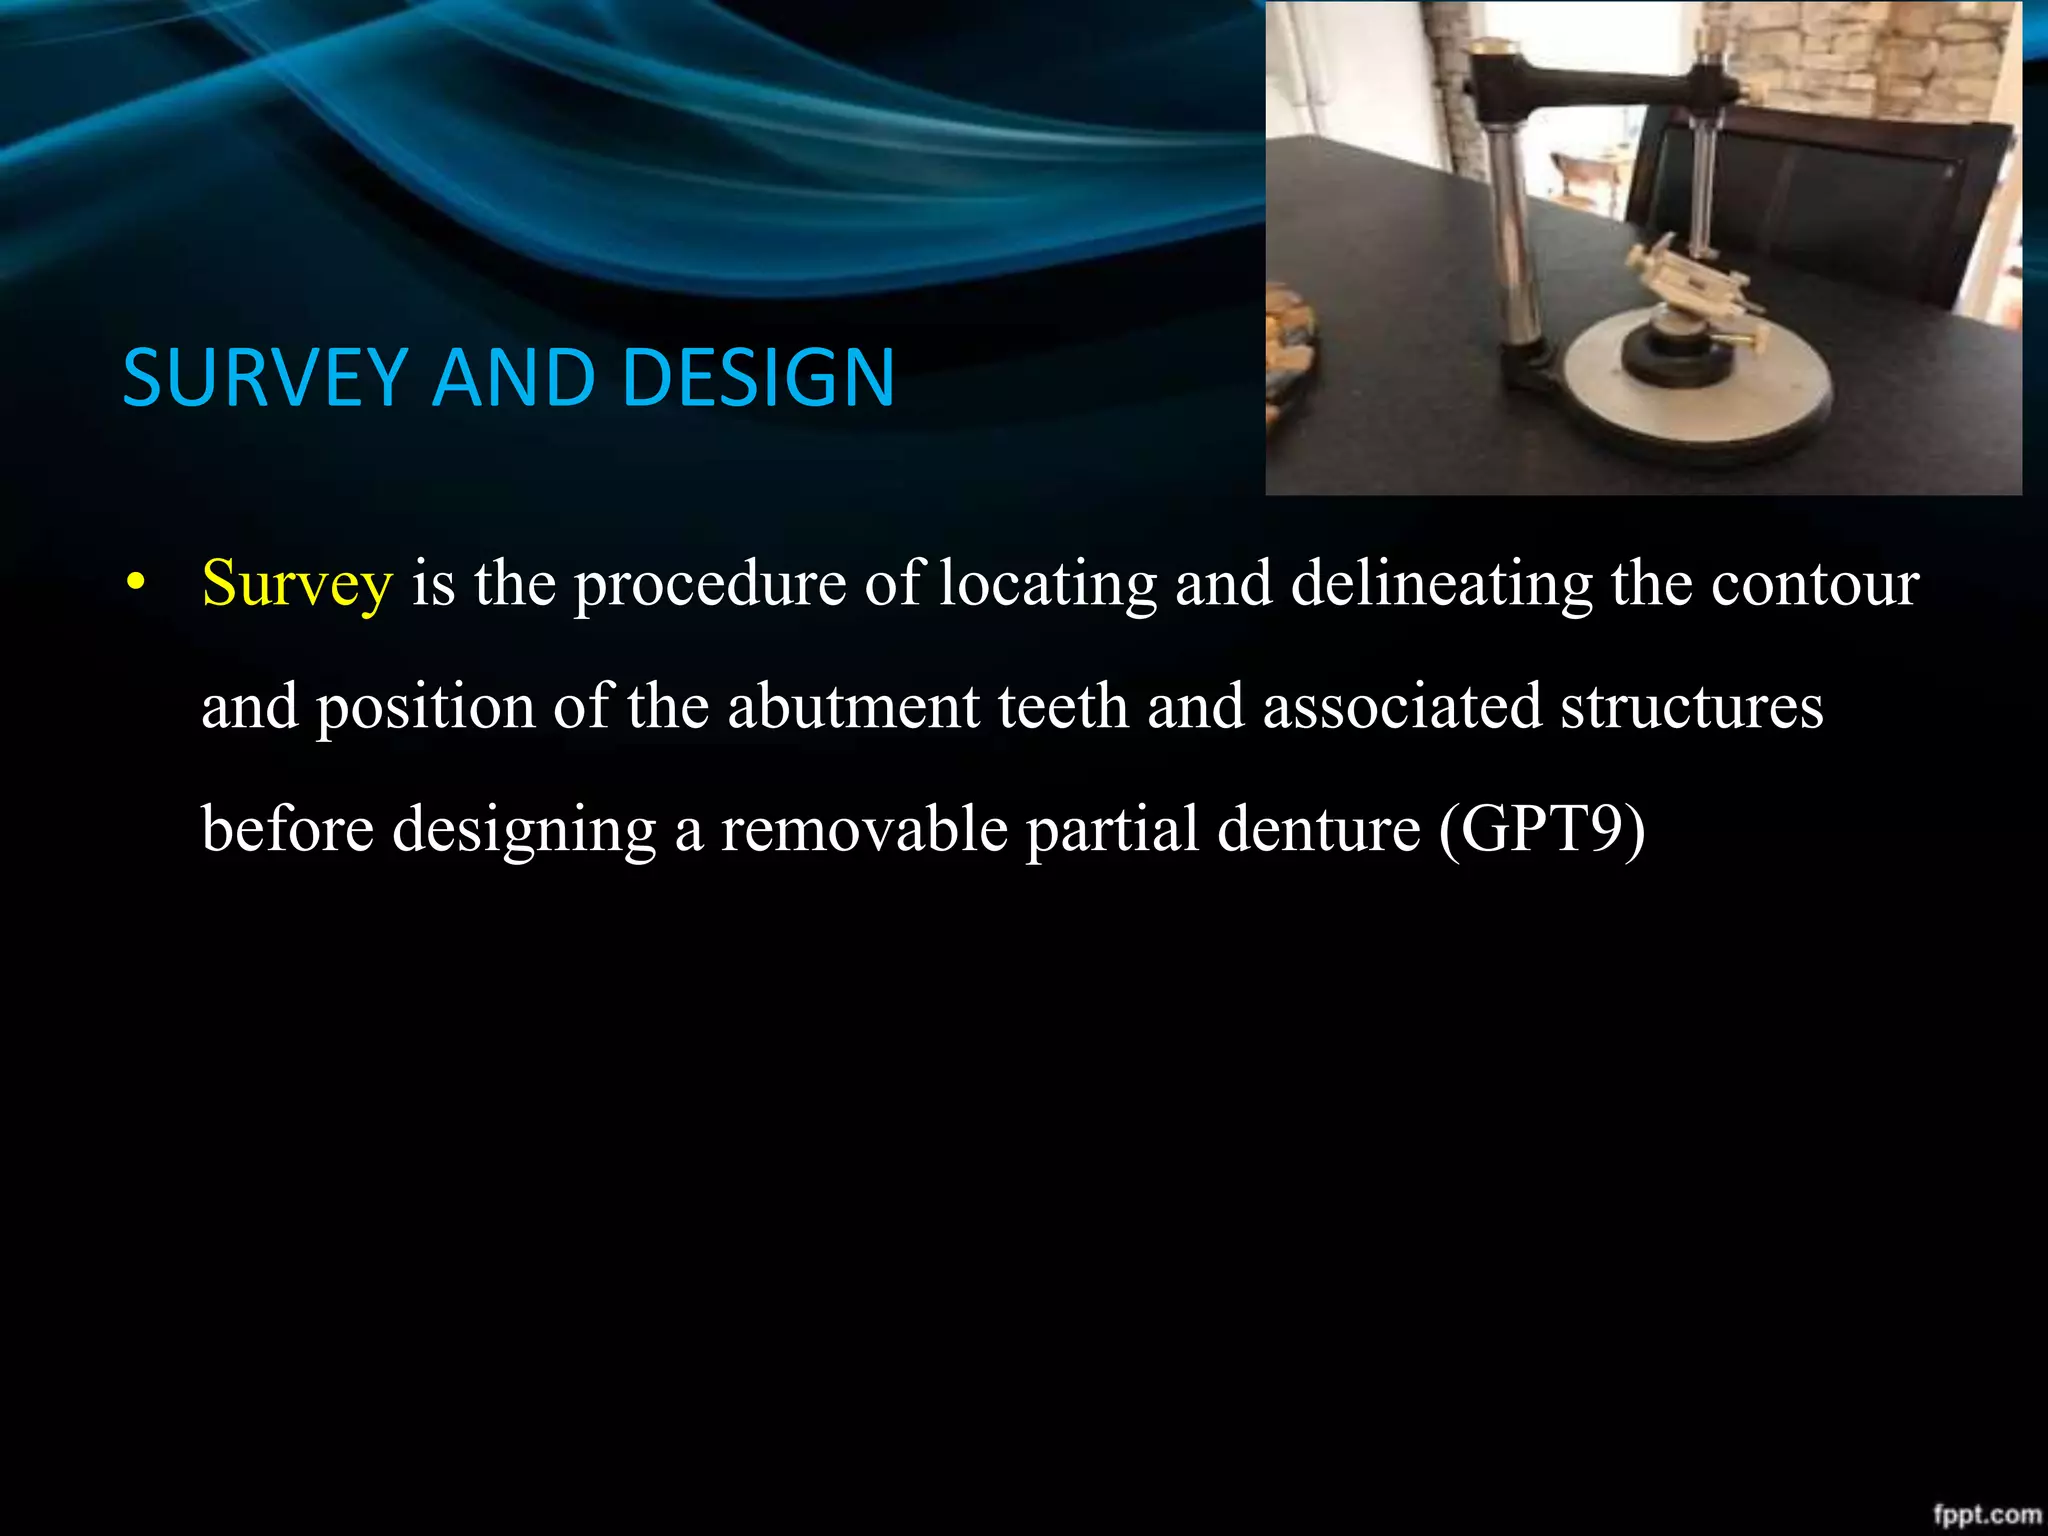
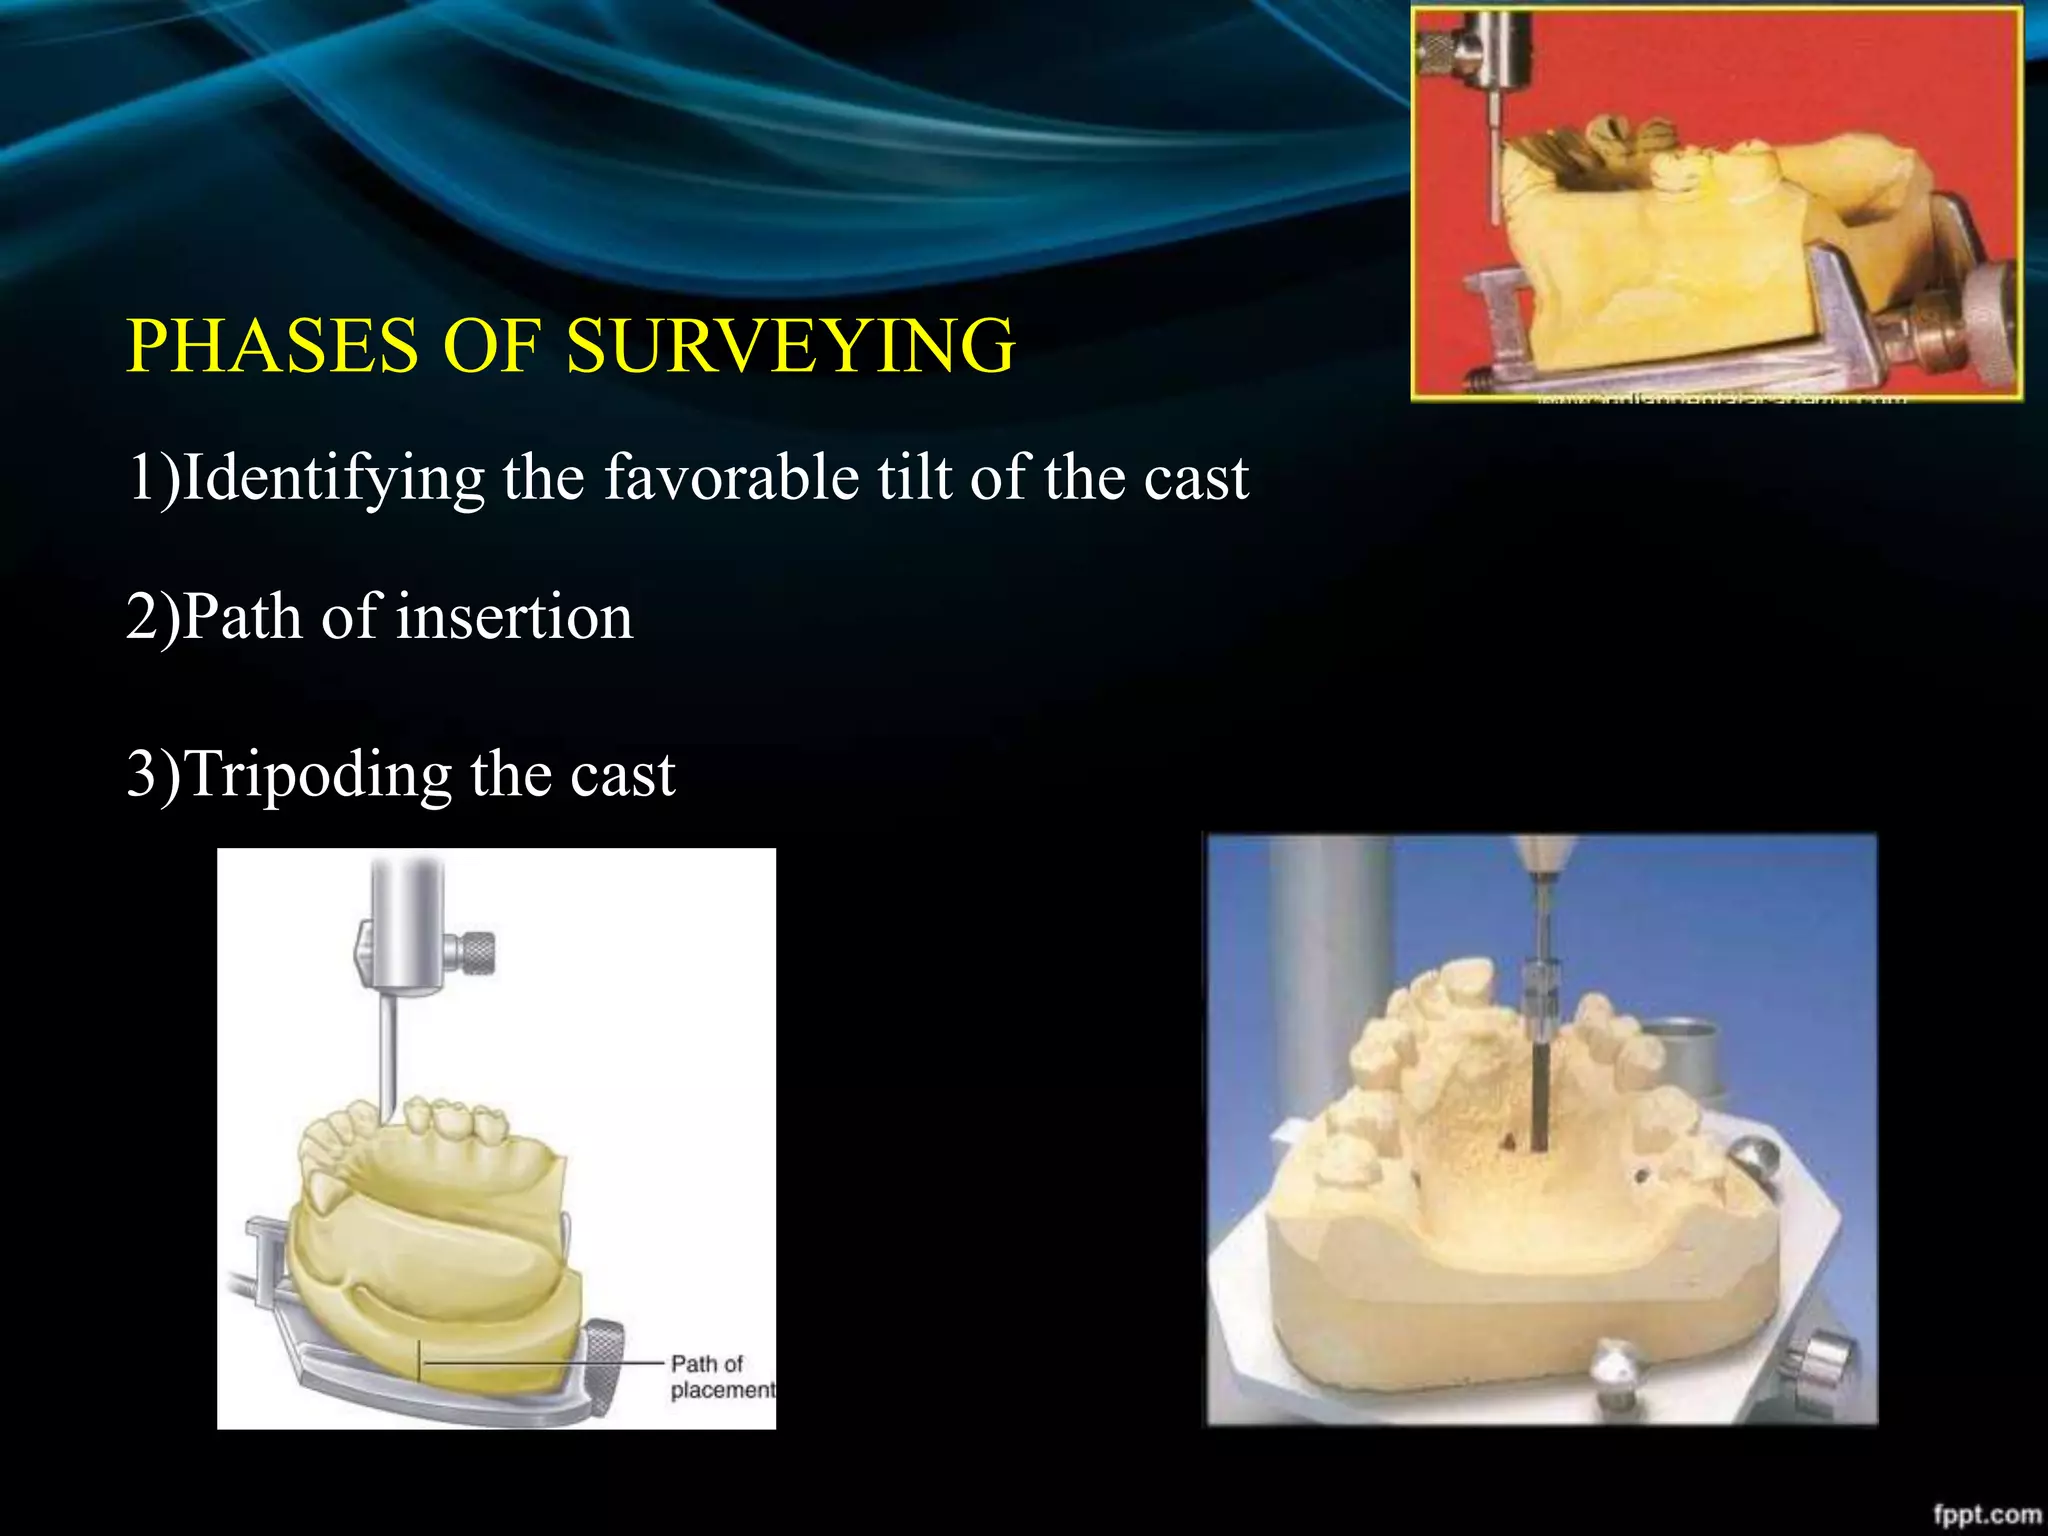
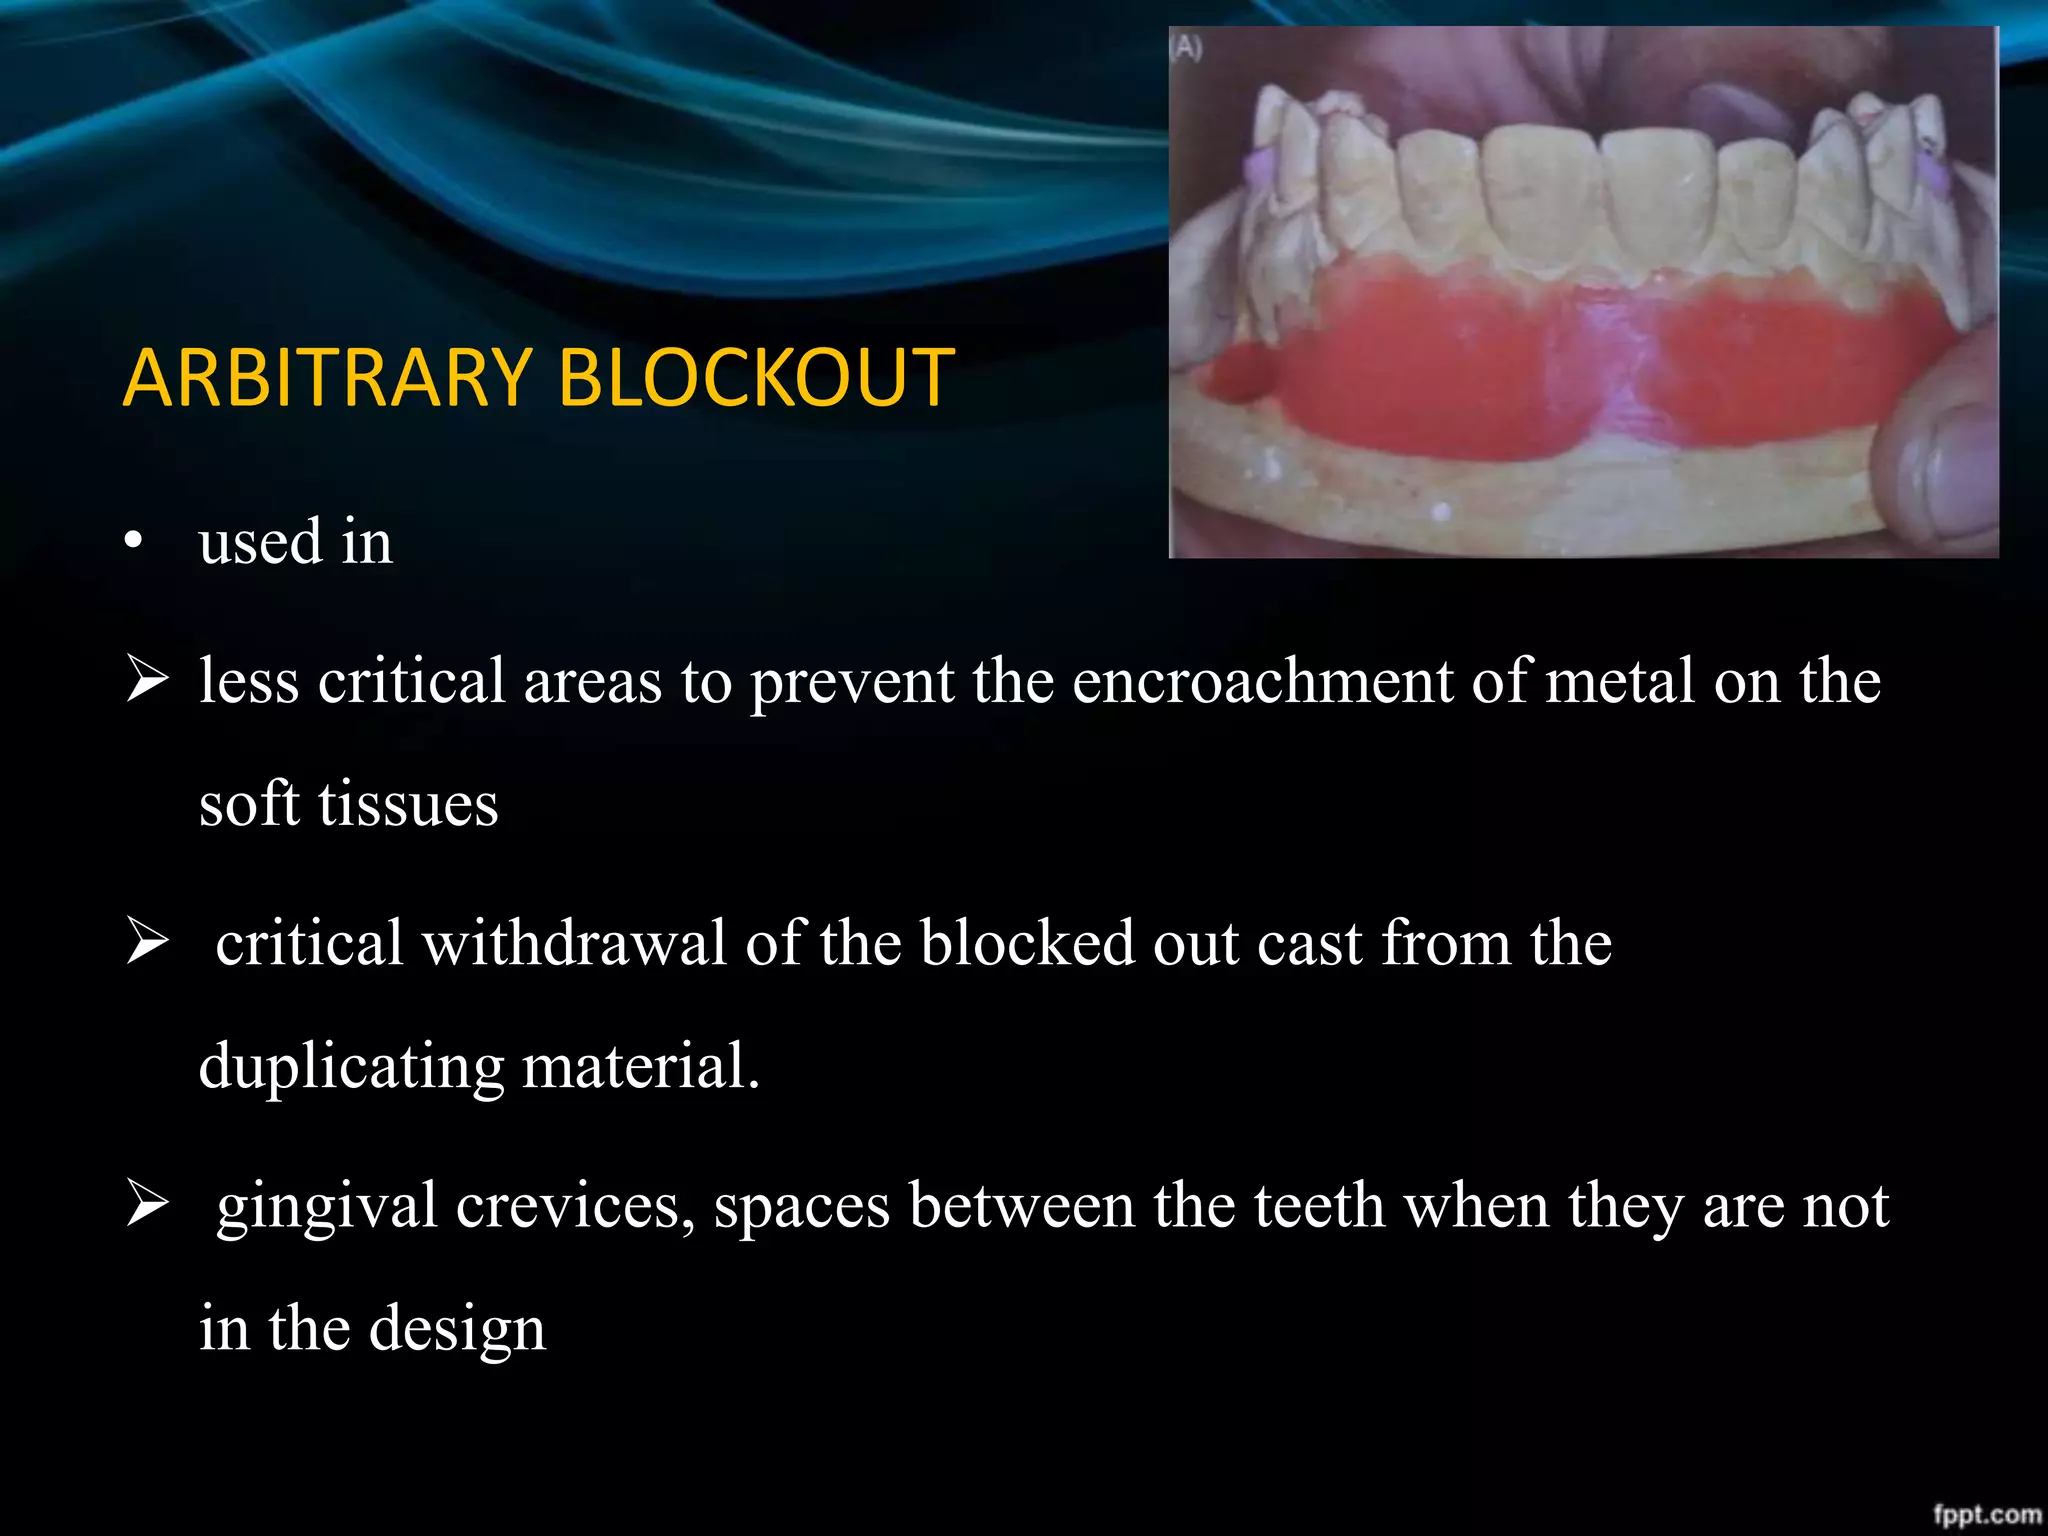
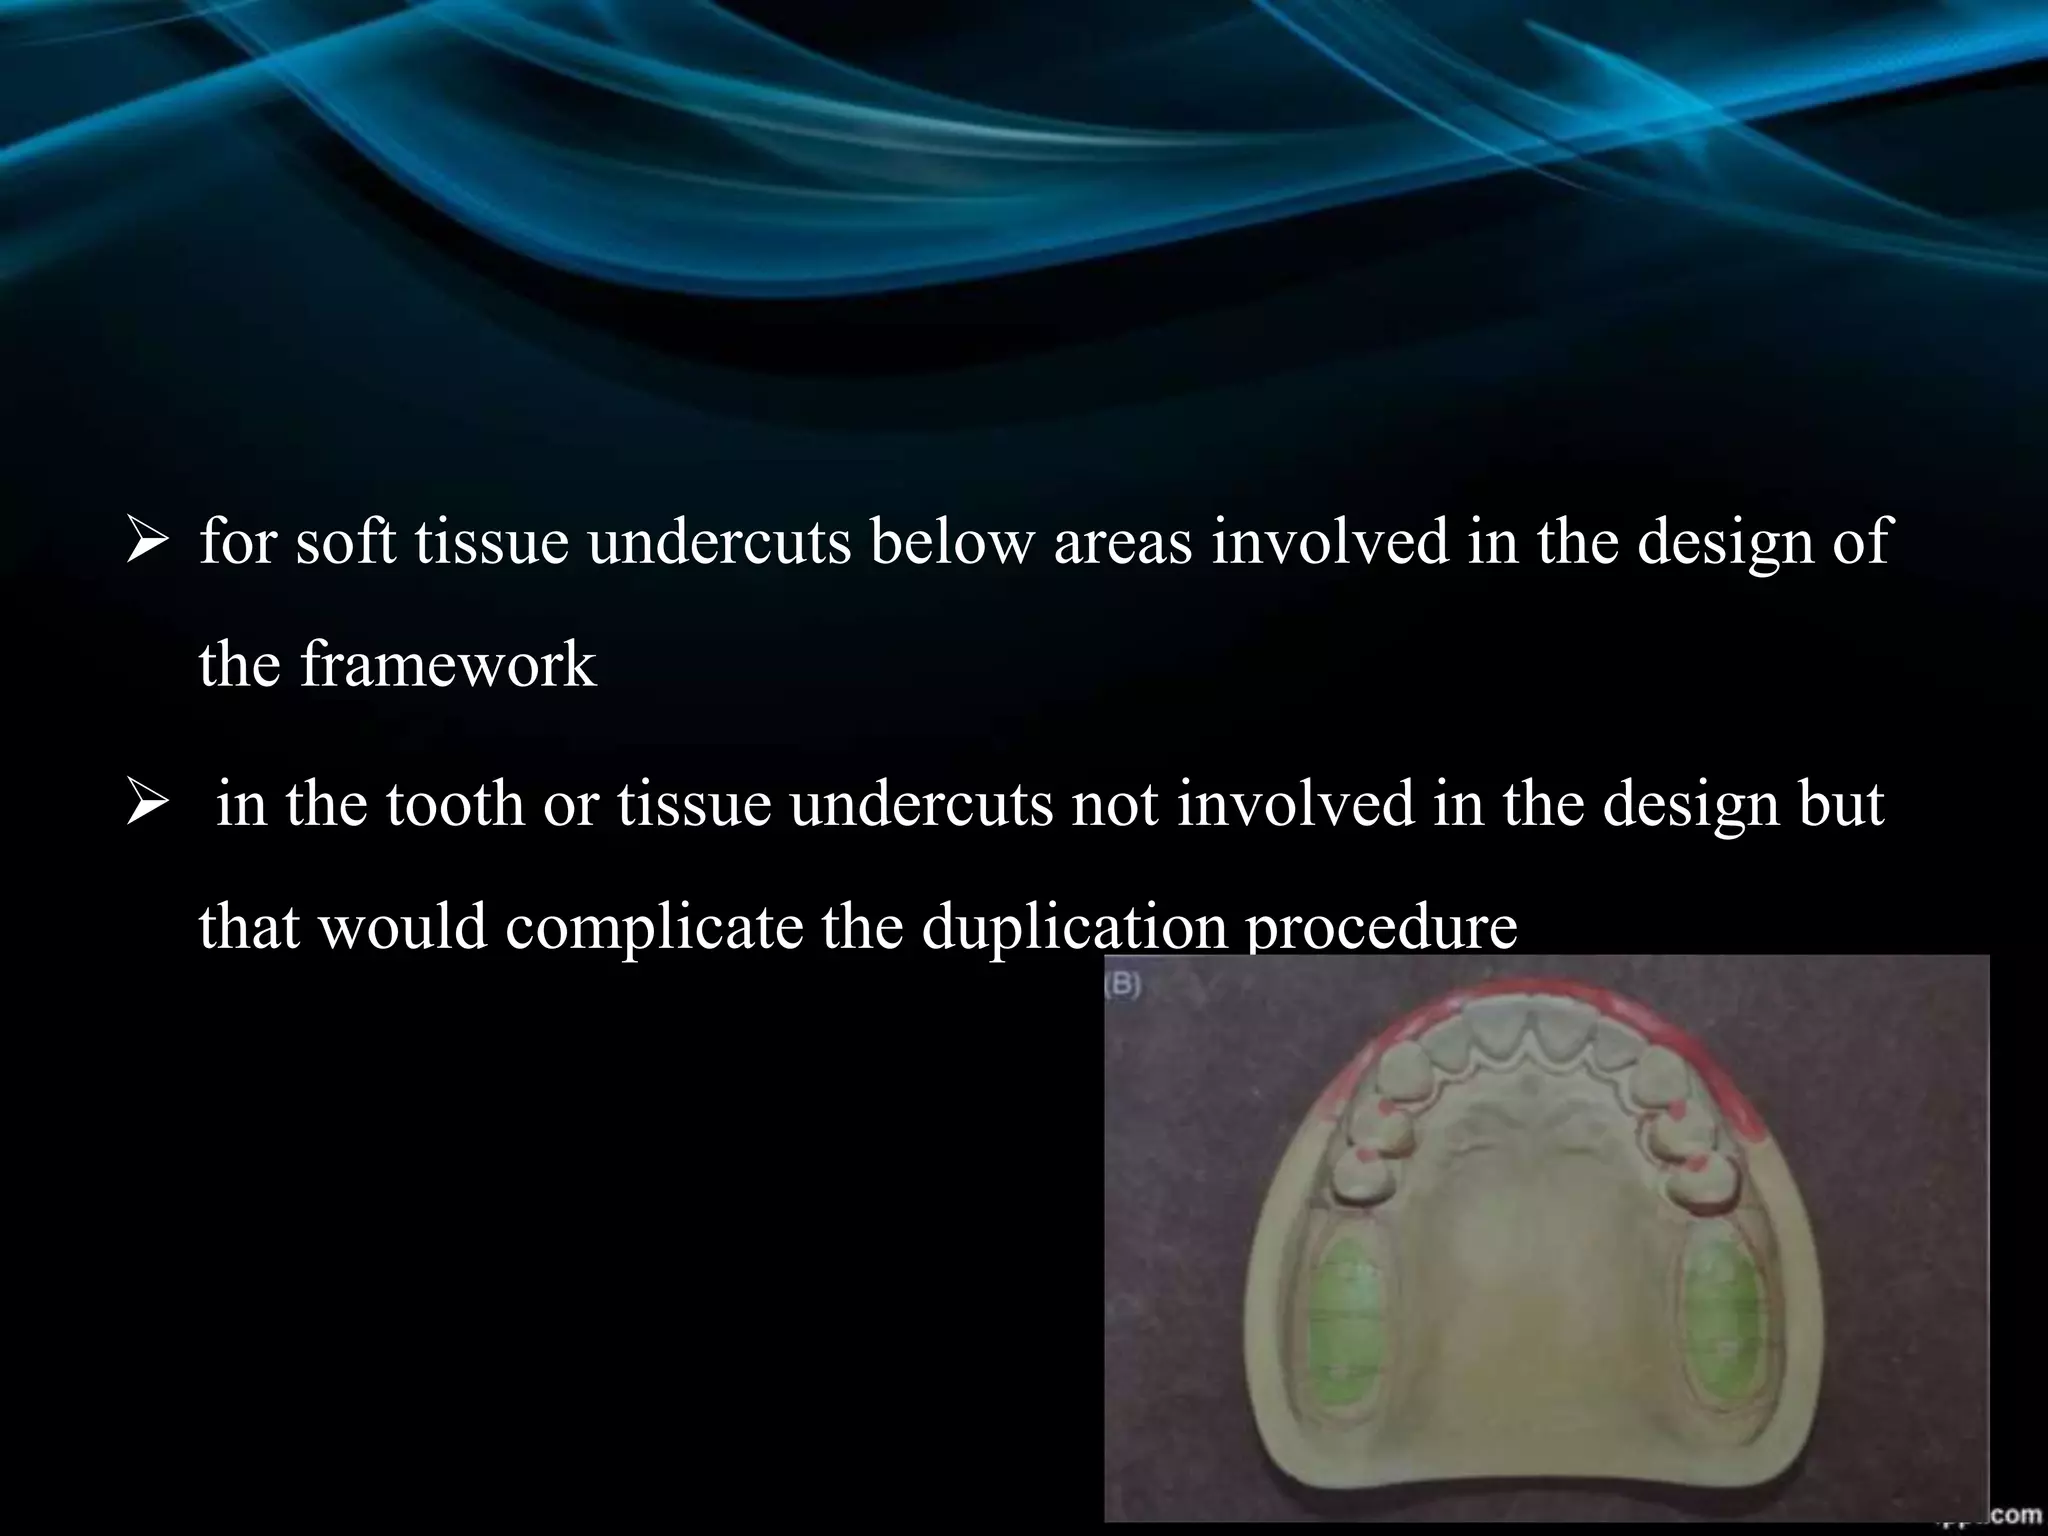
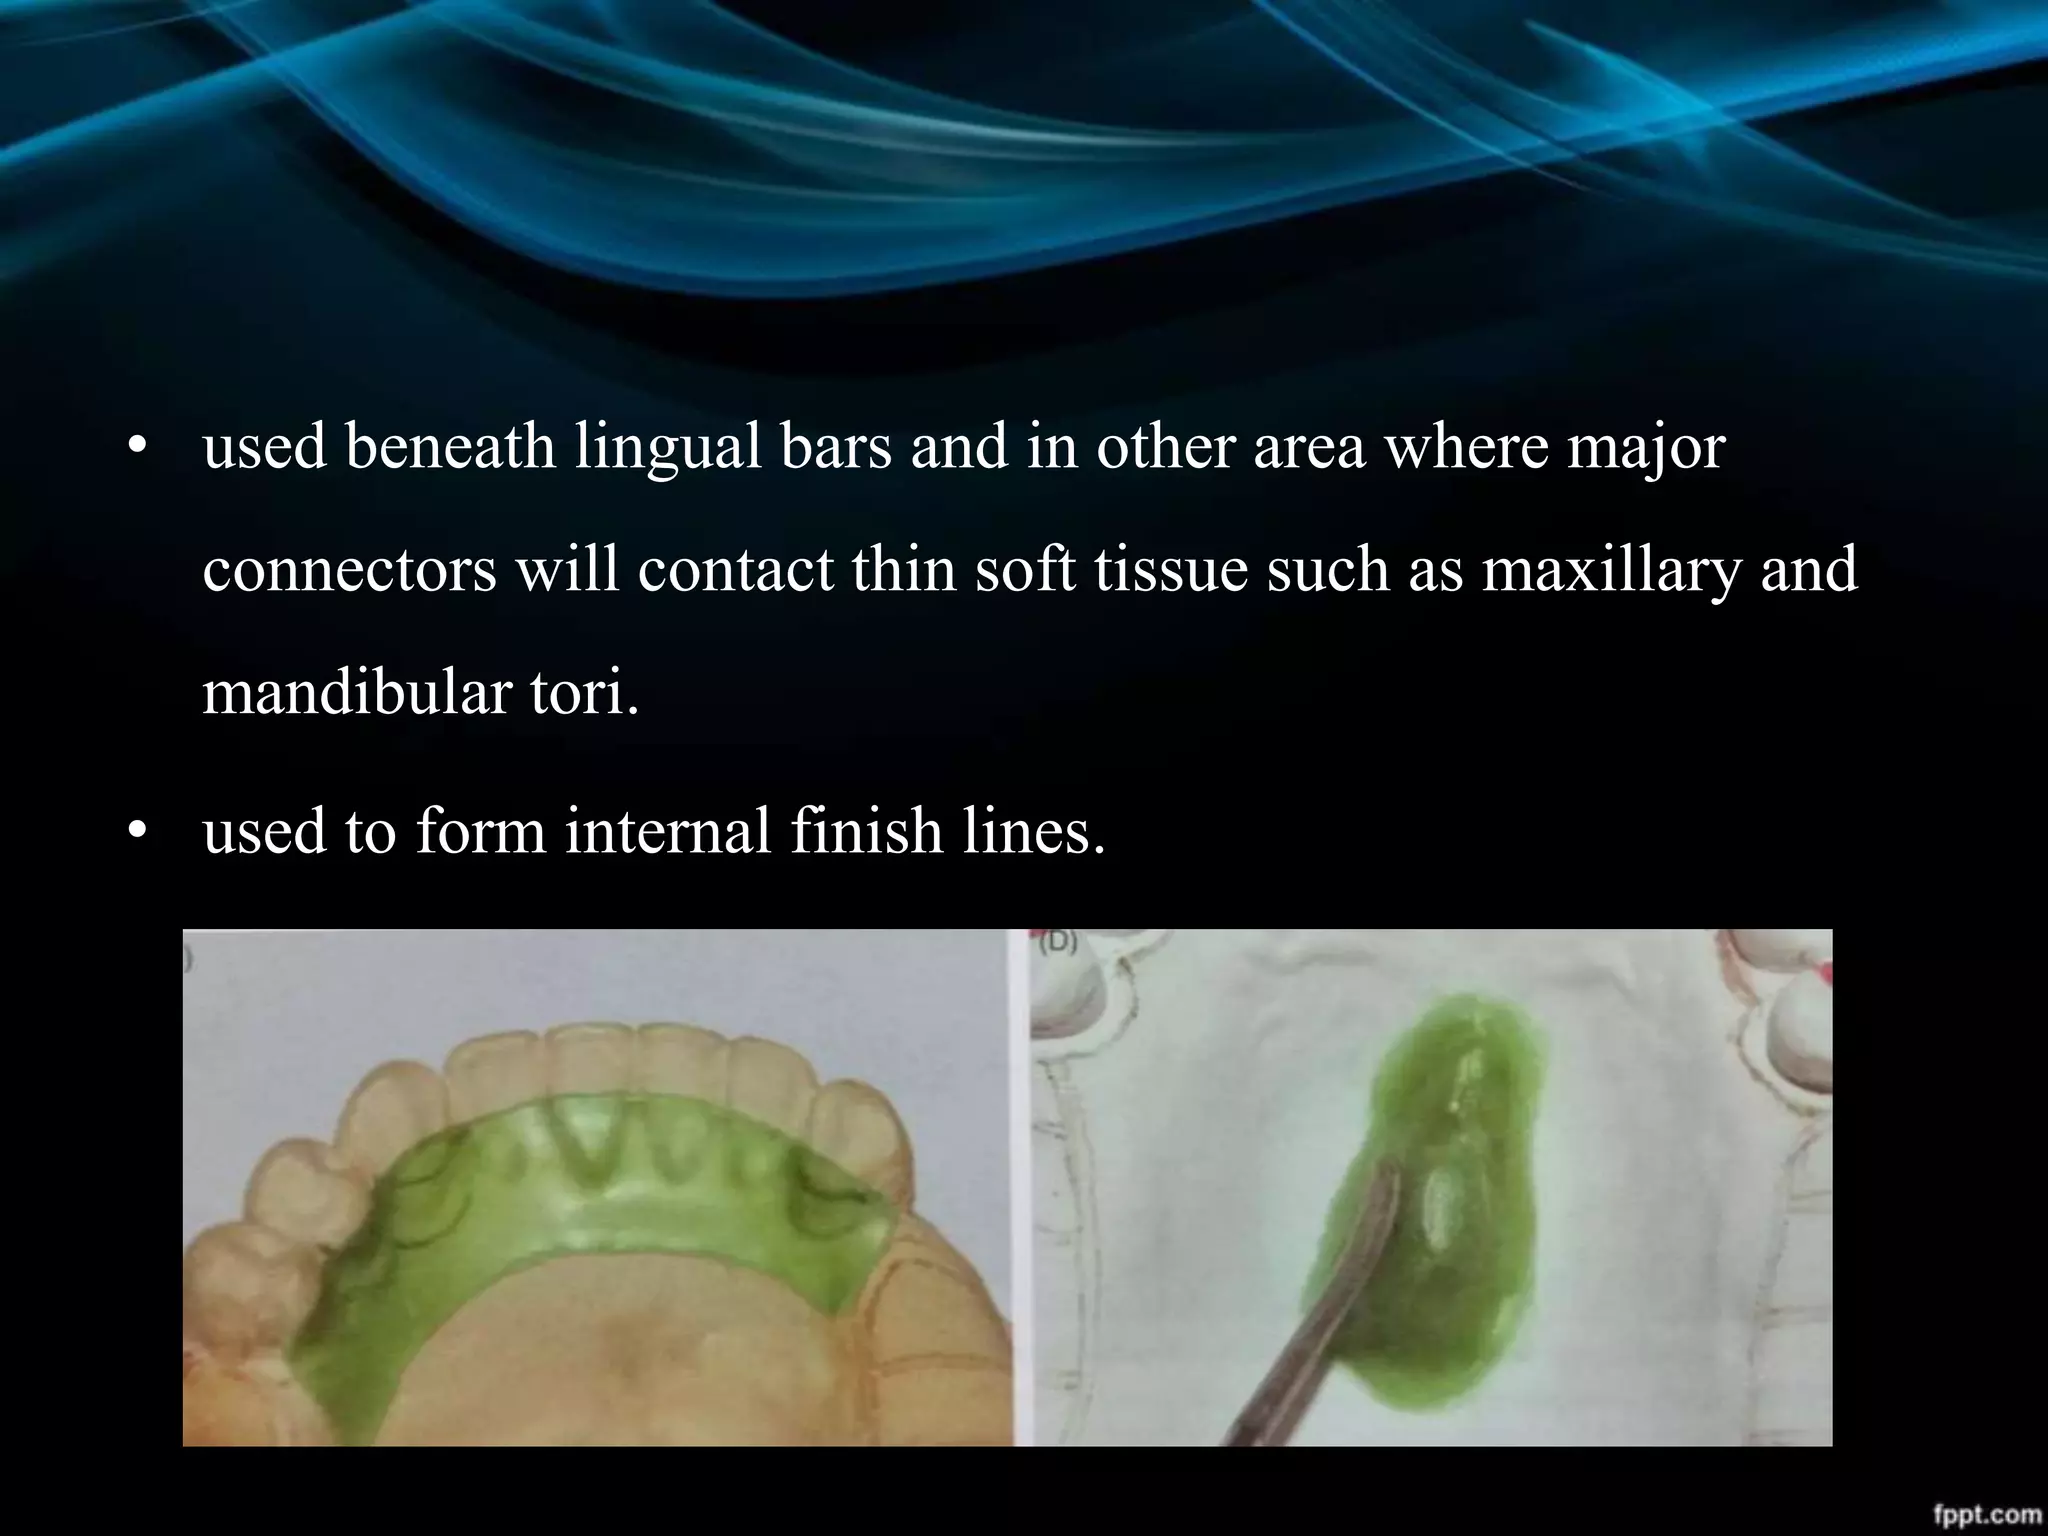
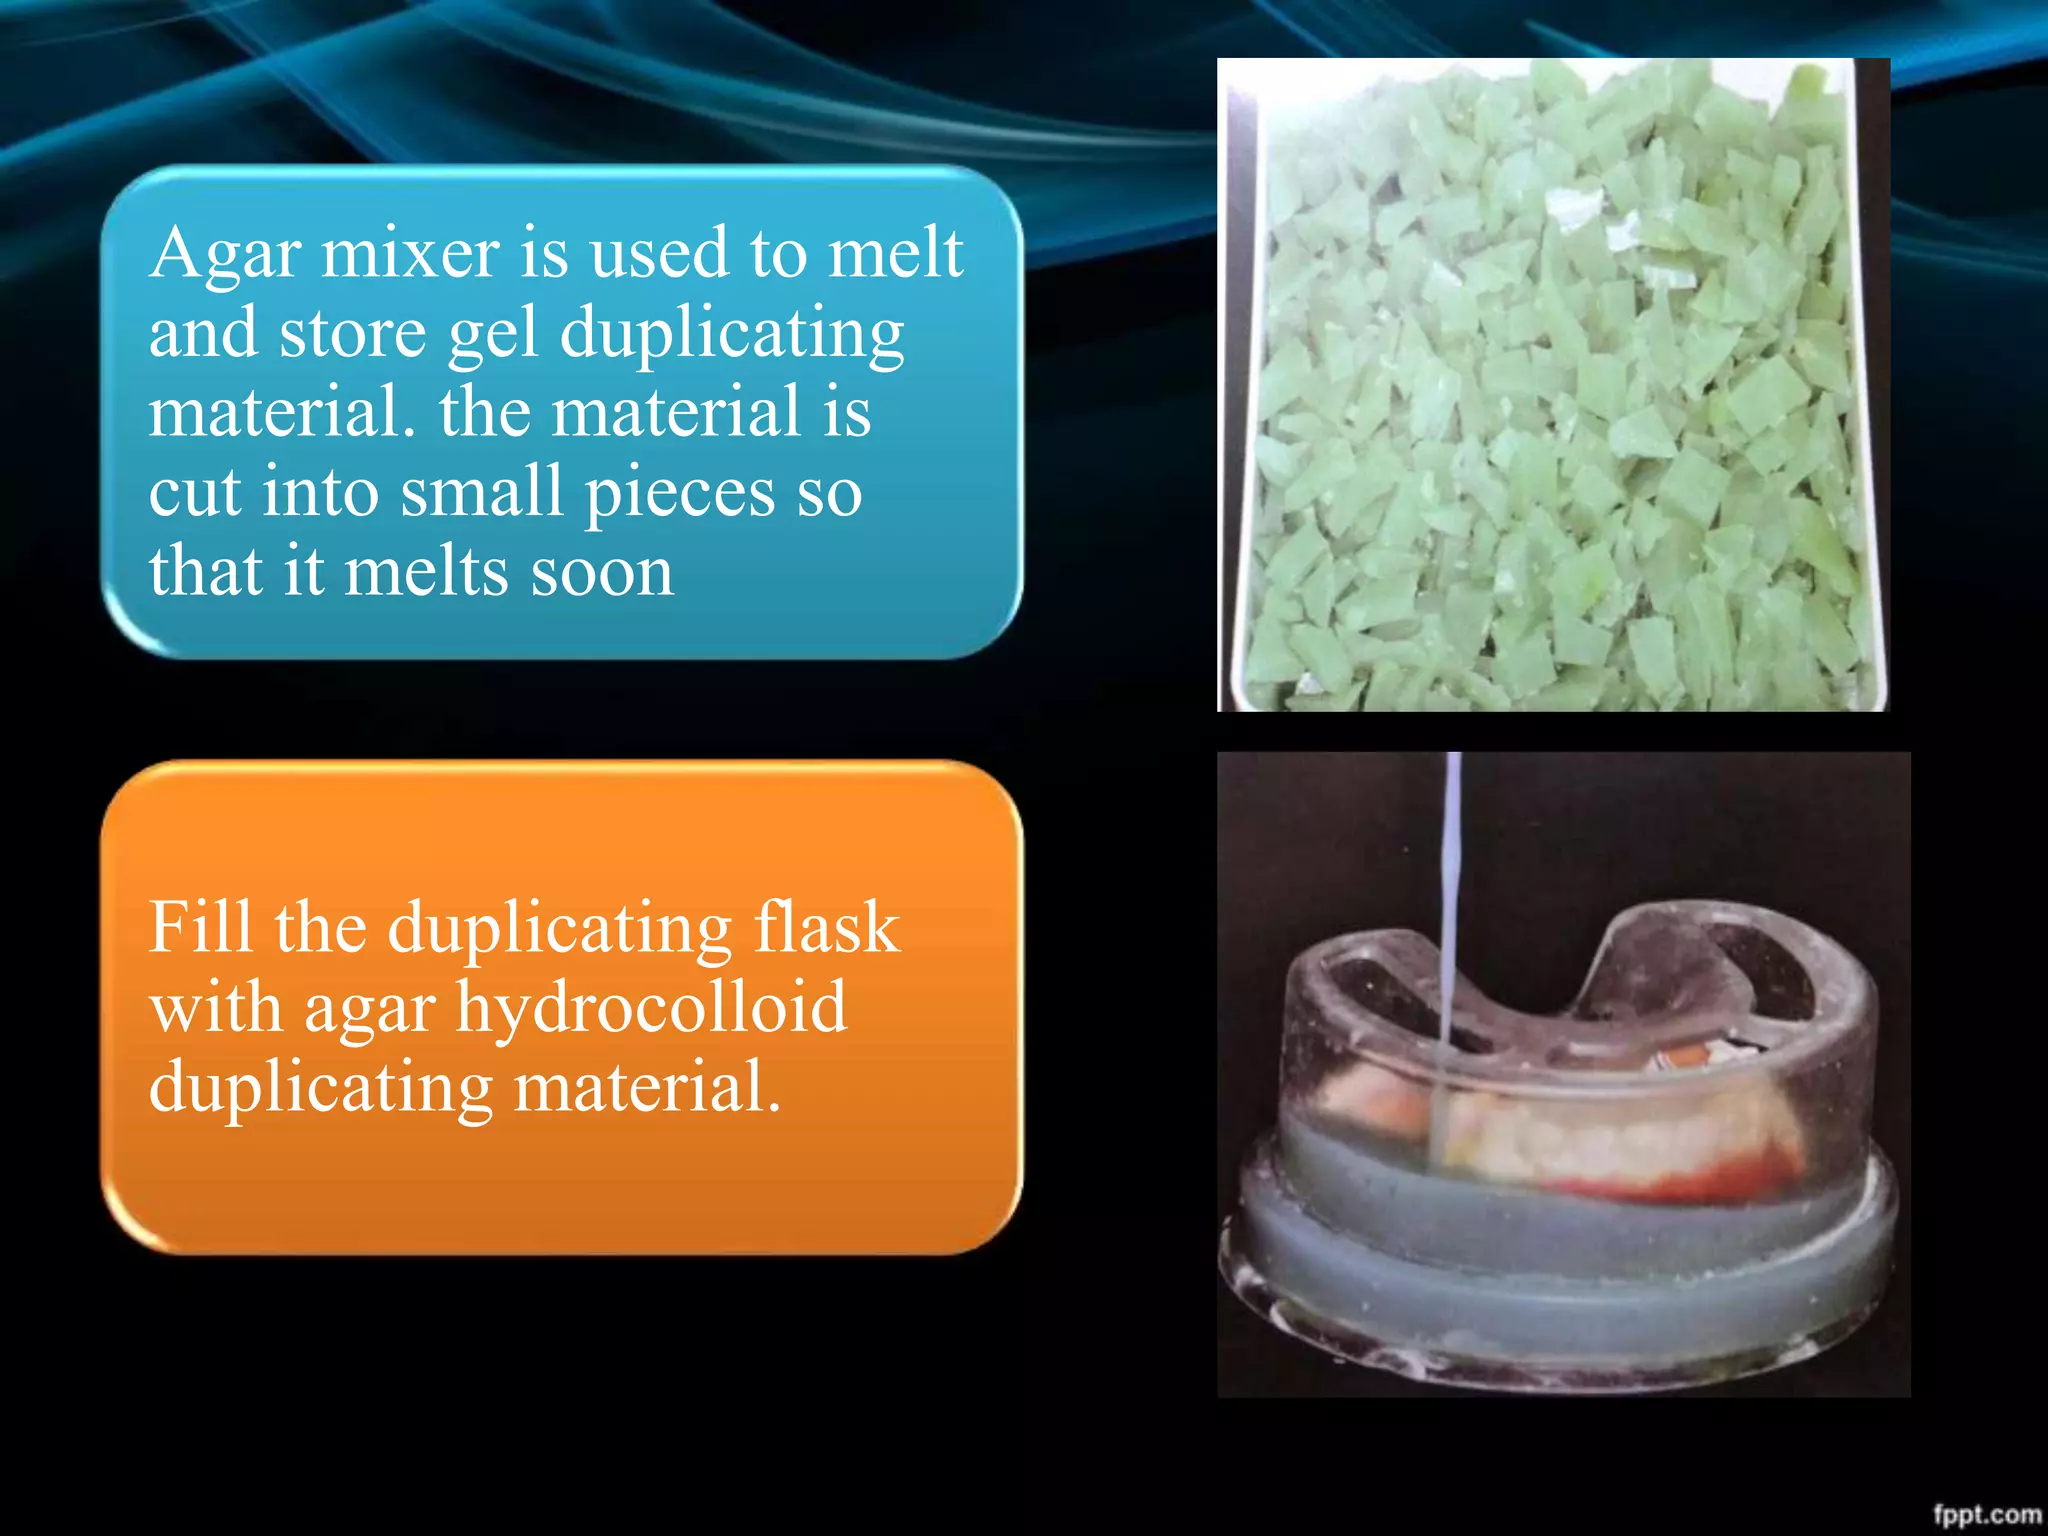
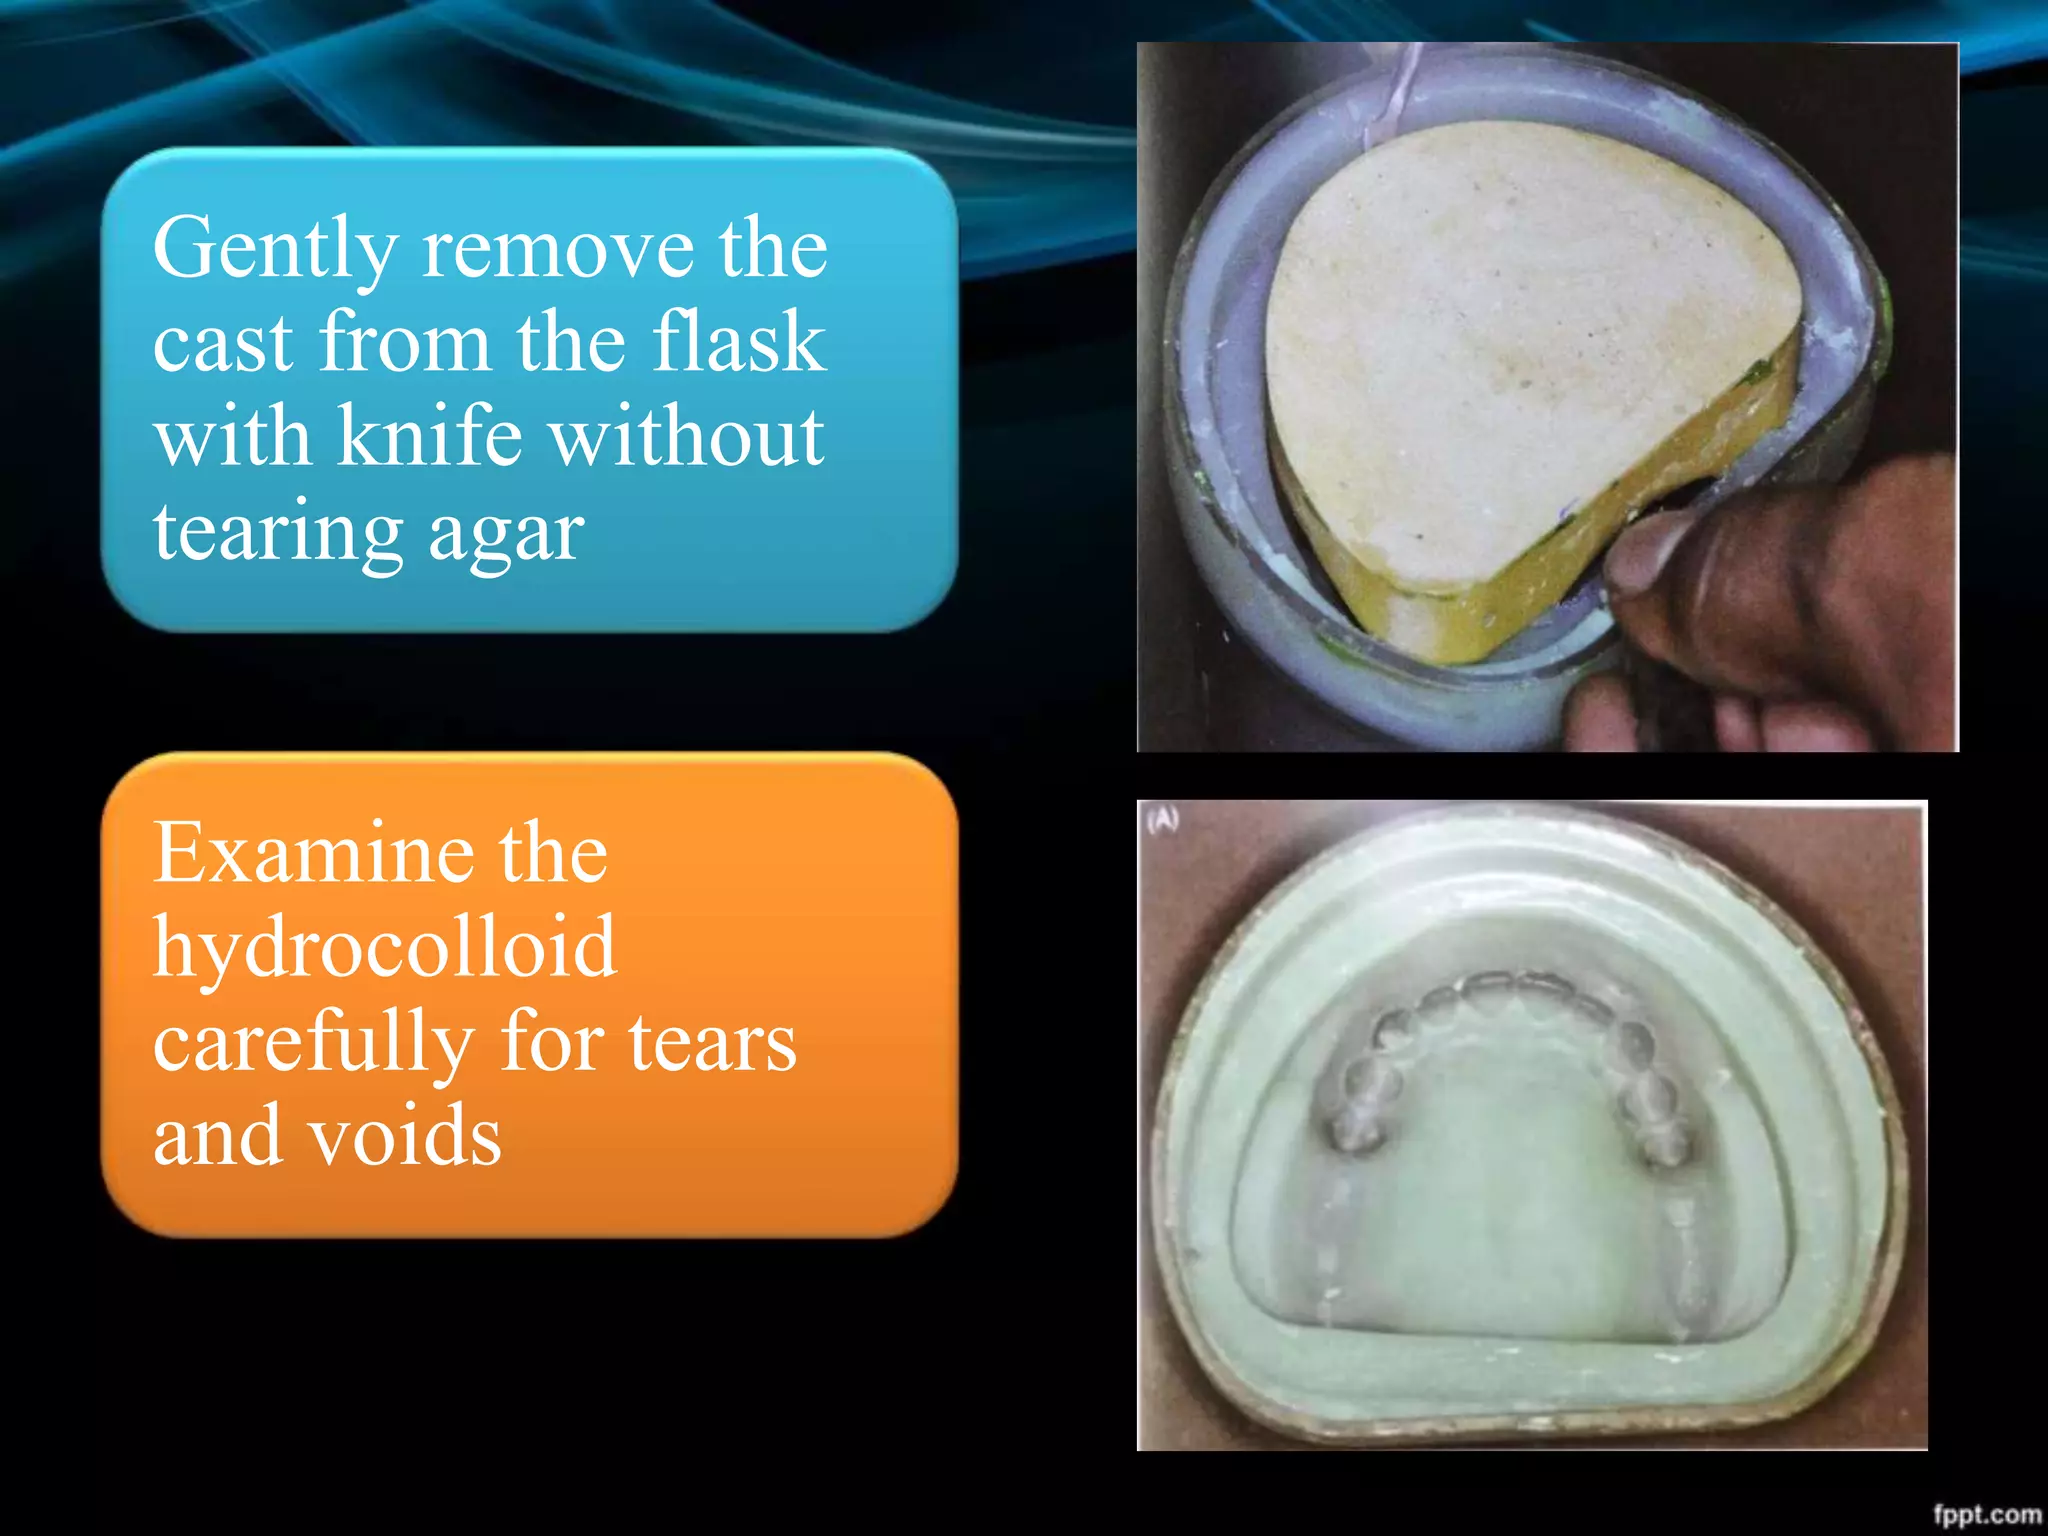
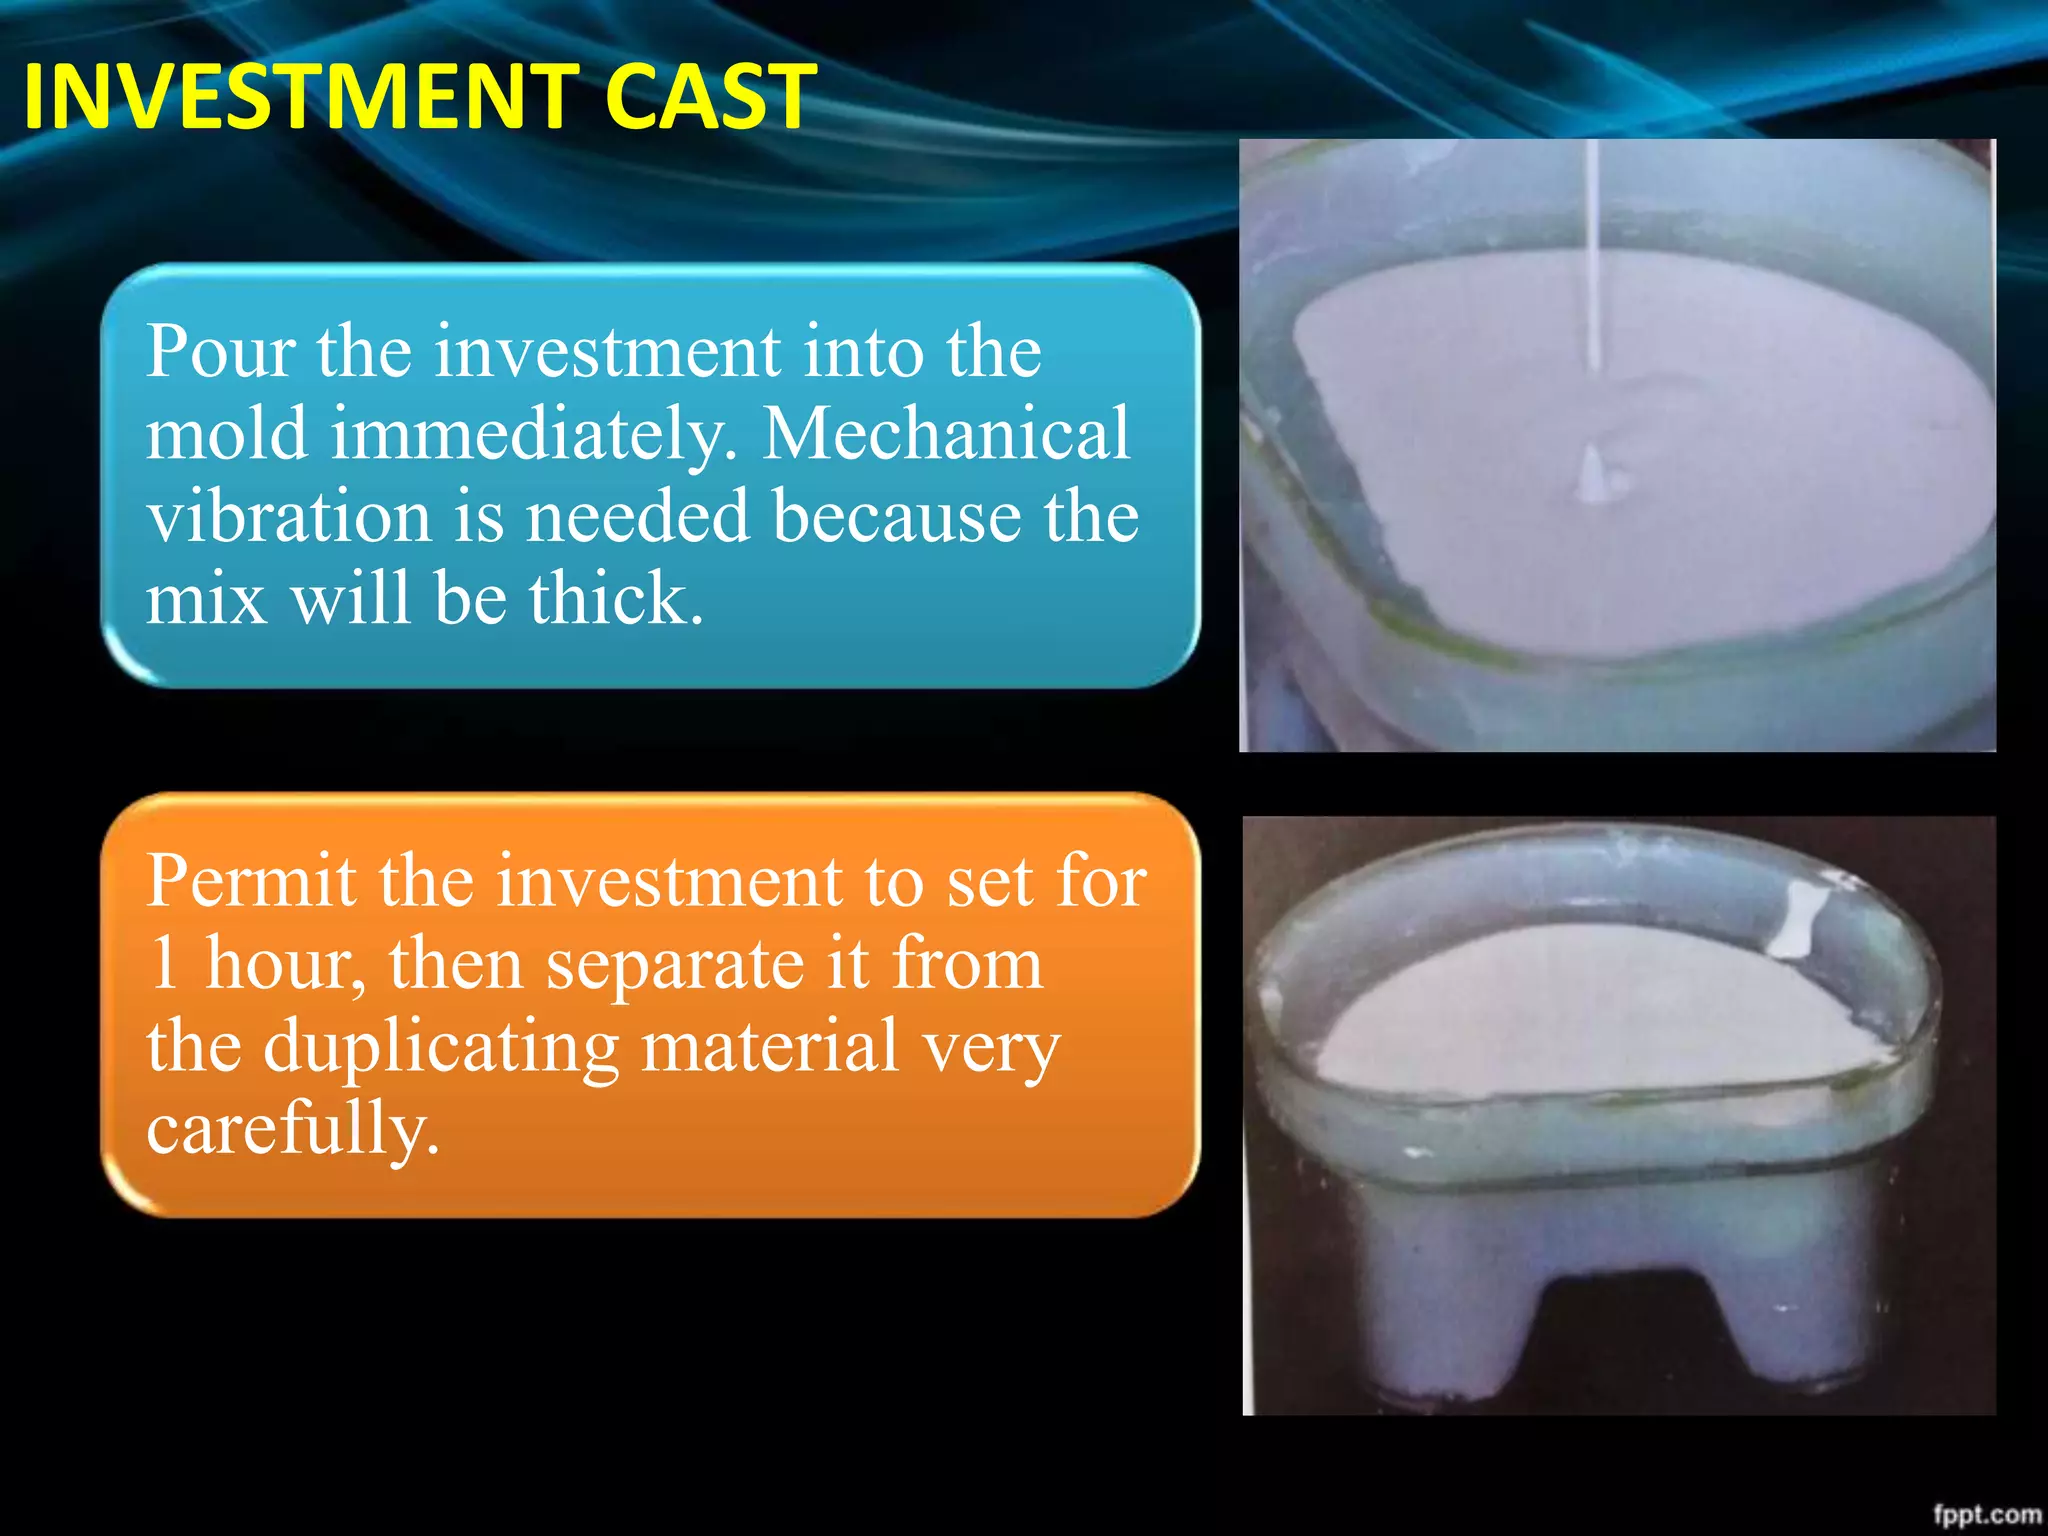
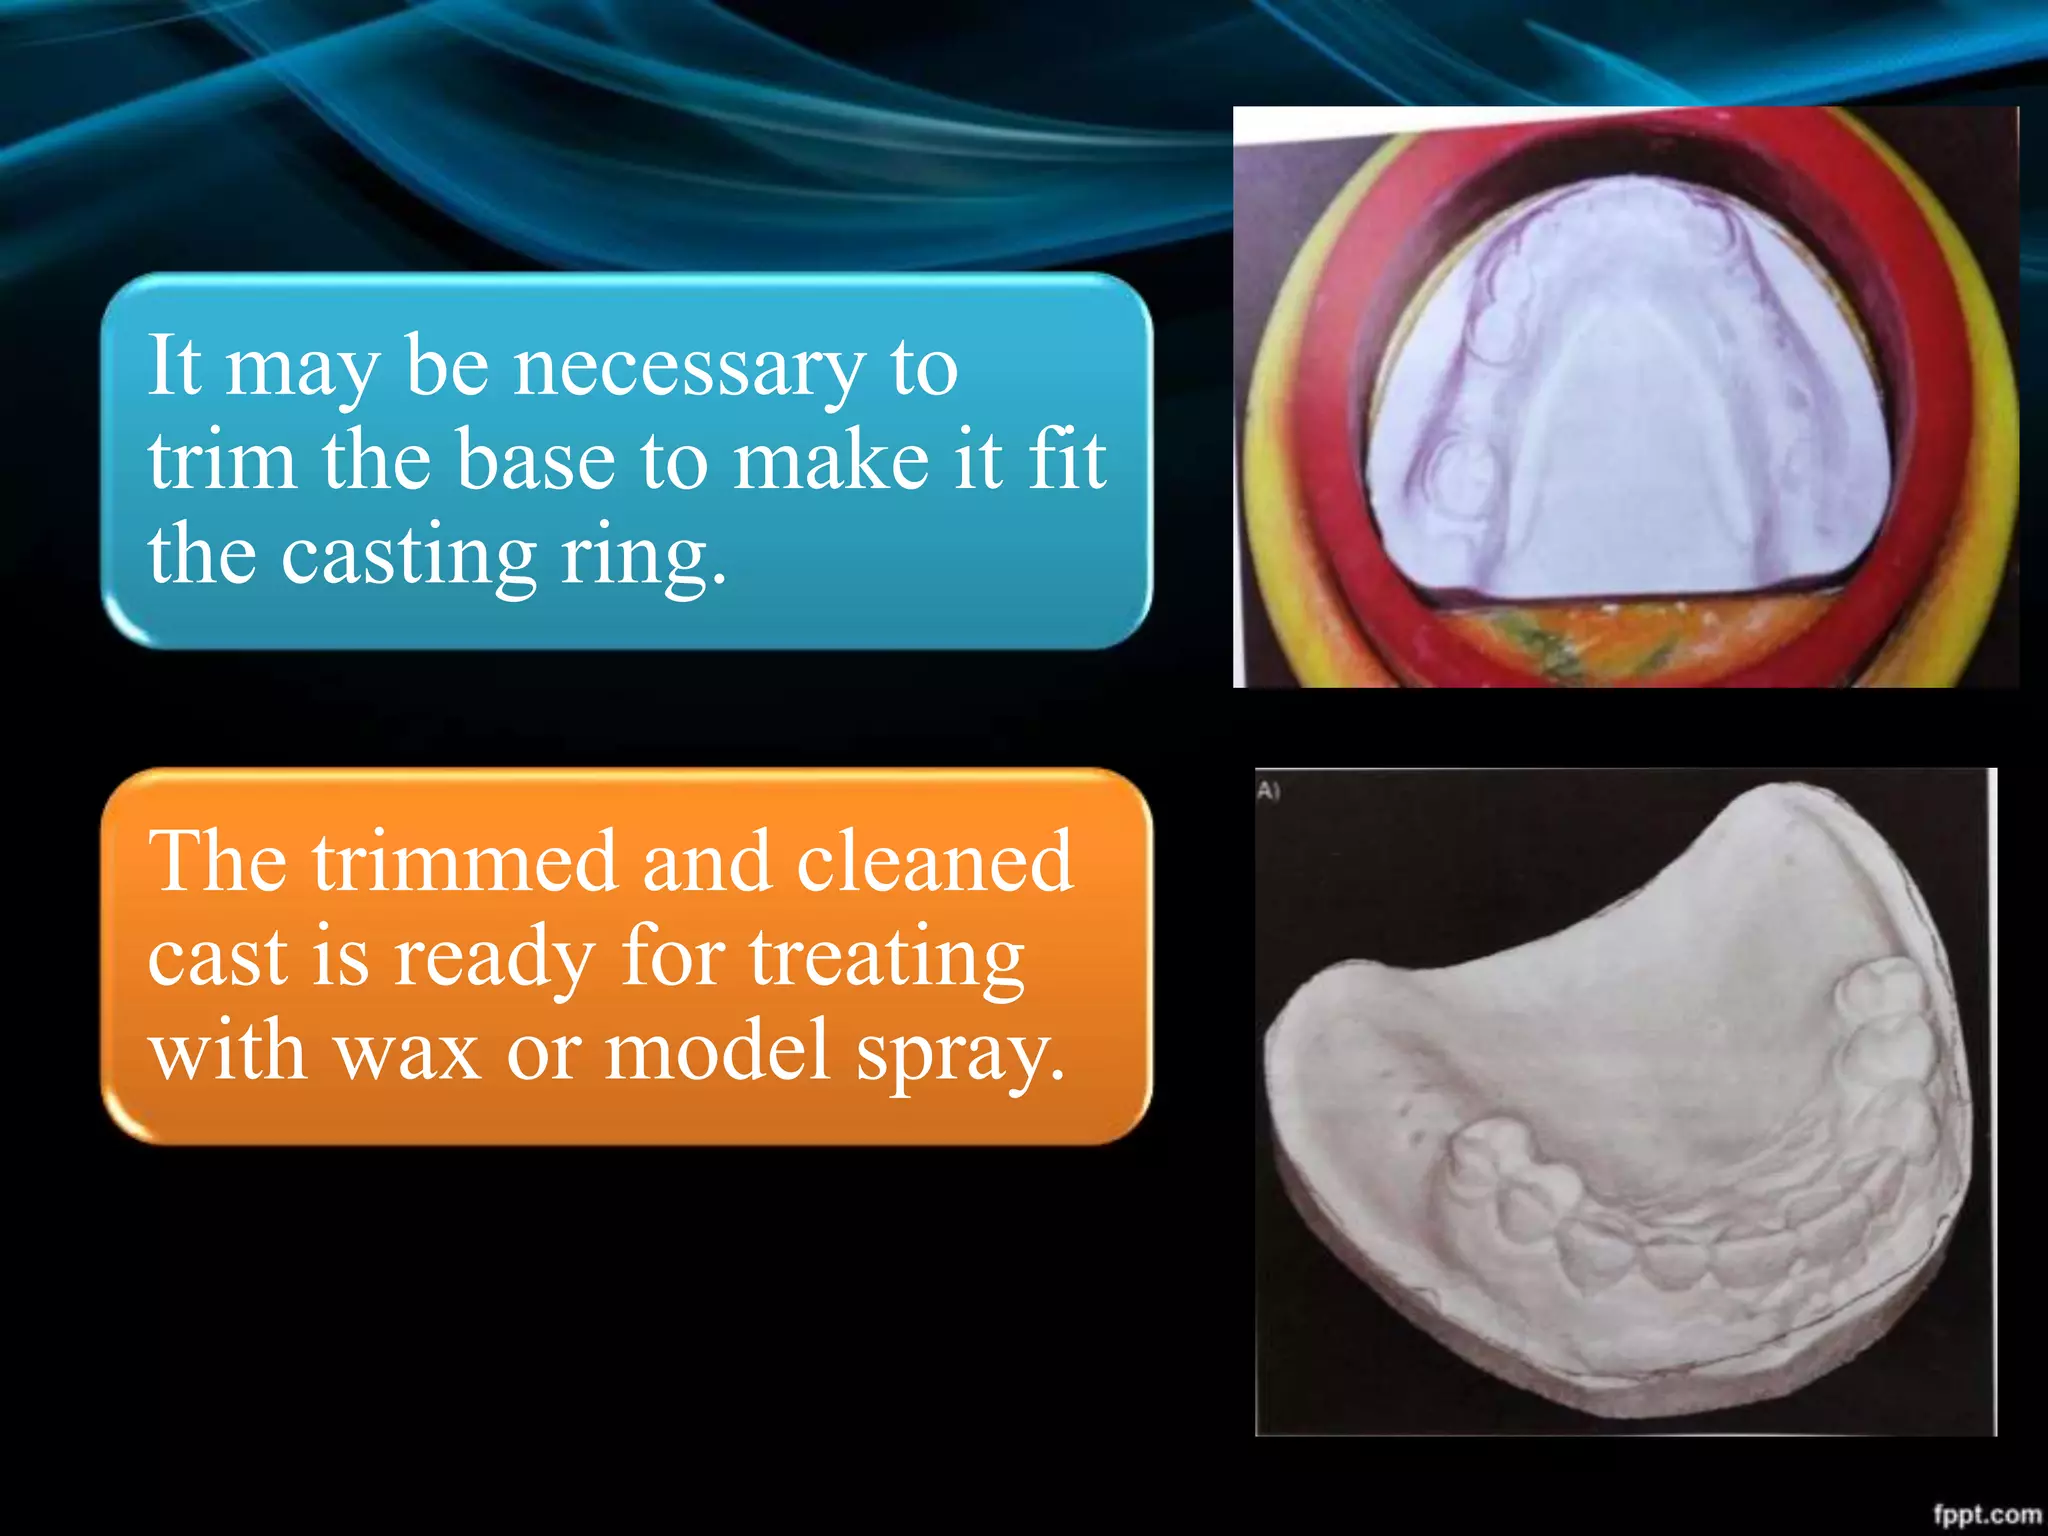
LABORATORY PROCEDURES IN
FABRICATION OF CPD
Dr Prathibha Prasad
Postgraduate
Dept of Prosthodontics
KCDS
INTRODUCTION
• Dental Laboratory techniques are varied and require a great
amount of skill and concentration to accomplish
• Each step in the making of a cast partial denture if carefully
controlled and basic principles are followed final results will
be superior
Synopsis of Laboratory procedures
1.Care of Impression and Making casts
2.Pouring corrected cast impressions
3.Stock and Custom Impression trays
4.Record Bases and Mounting casts
5.Survey and design
6.Design transfer,Blockout ,Relief and Beading
7.Duplication and refractory casts
8.Waxing and Spruing
9.Investing,Burnout and Casting
10.Finishing and polishing the framework
11.Selecting and arranging teeth
12.Flasking,processing,deflasking and finishing
In prosthodontia ,few restoration are made to fit patient directly,
most restoration are made to fit a cast. If the cast is not accurate
the restoration cannot possibly fit the patient satisfactorily
REQUISITES OF CAST
• All surfaces to be contacted by the prosthesis should be
accurate and free of voids or nodules
• The surface of the cast should be hard, dense
• The base of the cast should be not less than 15 mm thick at the
thinnest place
IMPRESSION MATERIALS THAT ARE USED COMMONLY:
• Alginate irreversible hydrocolloid
• Elastomeric material
CARE OF THE IMPRESSION
• Impression is rinsed thoroughly in 2% glutaraldehyde solution
to remove impurities.
• Boxing of the impression with wax or pumice should not be
done
• Pouring the cast in two stages results in improved cast surface
over the one stage method (Anatomical portion – first
pour/Base – Second pour )
• After 45 minutes to 1 hour from the first pour the cast is
removed from the impression
POURING CORRECTED CAST IMPRESSIONS
• CORRECTED CAST : a cast made from a master cast on
which the residual ridges have been recorded by means of a
functional impression
• FUNCTIONAL IMPRESSION : a secondary impression that
is made for the purpose of recording the residual ridges in their
functional form and recording the optimum length and width
of the flanges of the denture bases
• A functional impression is generally made by adding an
impression base to the removable partial denture framework.
• made by a variety of impression materials, including
impression wax, zinc oxide eugenol paste, rubber base, and
silicone impression materials
TECHNIQUES OF POURING
• Plaster Pumice Mix And Wax
• Beading And Boxing With Wax
• Beading With Wax And The Two Stage Pour
• North Carolina Technique
BOXING CORRECTED CAST IMPRESSION WITH
PLASTER/PUMICE MIX AND WAX
Completed Corrected cast
BEADING AND BOXING CORRECTED CAST
IMPRESSION WITH WAX
BEADING CORRECTED CAST IMPRESSION WITH
WAX AND TWO STAGE POUR
CORRECTED CAST
NORTH CAROLINA TECHNIQUE
CORRECTED CAST
IMPRESSION TRAYS
STOCK
TRAYS
Metal rim
lock
Perforated
Water cooled
Plastic stock
CUSTOM
TRAYS
Acrylic resin
Thermoplastic
vaccum
adapted
Visible light
cured plastic
trays
RECORD BASES AND MOUNTING CASTS
• Record bases with attached occlusion rims are used to record
important information for the laboratory technician such as
maxillo-mandibular jaw relationship and verification
occlusal plane
mid-line
degree of vertical and horizontal overlap
RECORD BASE REQUIREMENTS
• same adaptation to the basal seat area as the finished
denture base
• same border form
• sufficient rigidity to withstand occlusal forces
• dimensional stability,
• construction that permits use as a base for tooth
arrangement
• easy,quick, and inexpensive
RECORD
BASE
MATERIALS
auto
polymerizing
resins
shellac
baseplate
heat-cured
resins
baseplate wax
Metal
Methods of
fabrication
Sprinkle-on
Method
Finger adapted
Dough Method
Wax Confined
Dough Method
SURVEY AND DESIGN
• Survey is the procedure of locating and delineating the contour
and position of the abutment teeth and associated structures
before designing a removable partial denture (GPT9)
• Surveyor is a paralleling instrument used in making a dental
prosthesis to locate and delineate the contours and relative
position of abutment teeth and associated structures. (GPT9)
WHY???
To determine :
• Acceptable path of placement
• Guiding planes
• Location and measurement of retentive undercuts
• Location of tooth and bony interferences favourable design
• Location of occlusal contacts relative to design
• Placement of tripodal marks
PHASES OF SURVEYING
1)Identifying the favorable tilt of the cast
2)Path of insertion
3)Tripoding the cast
RECENT ADVANCES
• 3D SCANNERS
• ELECTRONIC SURVEYING
• CAD/CAM
• CNC MILLING
• RAPID PROTOTYPING
DESIGN TRANSFER
• Designed diagnostic casts should accompany the master casts
to the dental laboratory.
• Using the designed casts and work order, the laboratory
technician will examine the design and casts, consult with the
dentist if needed, and then transfer the design of the metal
framework to the master casts
Designed maxillary and mandibular diagnostic
cast
PROCEDURE
• Examine the master casts to determine
acceptability.
• Remount the diagnostic casts on the
surveying table by the aligning the tripod
marks
• New tripod marks touched by the stylus
when it is locked in one position are
chosen. placed on tooth landmarks that are
easily and accurately located on both the
diagnostic and master casts
• Place three widely separated marks on the diagnostic casts.
• Mark three spots on the master cast in exactly the same place
as on the diagnostic casts
• Master cast is tripoded using these three marks. Since tripod
marks are the same on both casts, the master cast will be
tripoded in the same plane as the diagnostic cast.
• Survey lines should be marked on all teeth that will be
contacted by metal & Soft tissue undercuts near teeth are also
marked
• Retentive undercuts are marked in the master cast in red to
locate the tips of the retentive clasps
• Rests are marked on the master cast in red to unmistakably
identify them for the person waxing the framework
• Using the diagnostic cast as a guide, draw the metallic portion
of the design on the master cast with a brown pencil and resin
finish lines with blue pencil.
• The design on the master cast should be the same as the design
on the diagnostic cast.
BLOCKOUT AND DUPLICATION
Preparing the casts for duplication
• Casts are blocked out to eliminate undercut areas on the
master cast that will be crossed by rigid parts of the
partial denture
• All parts of the framework, except the retentive clasp tips,
are nonflexible and will not spring into an undercut.
Additional areas to be blocked out:
• Ledges on which clasp patterns will be placed
• beneath connectors to avoid soft tissues impingement
• To provide for later attachment of the denture base to
the framework
Types of blockout
• Parallel
• shaped (ledging )
• Arbitrary
• relief.
PARALLEL BLOCKOUTS
• made by using different styli in the surveyor to establish 0-
degree, or 6degree taper in the blockout wax
• Parallel blockout extends from the survey line to the gingiva.
• Parallel blockout is used
1)Beneath minor connectors
2)soft tissue undercuts that may be crossed by rigid connectors
• In Undercut areas On teeth that will be crossed by clasp arm
SHAPED BLOCKOUT OR LEDGING
• used on buccal or lingual surfaces to facilitate accurate
placement of plastic or waxpatterns for clasp arms
• The blockout wax may be placed in the undercut and trimmed
flush with the survey line using the proper stylus or wax
trimmer.
• Ledging may be done only in the area of the tip of the clasp;
this is the most desirable method.
• It permits more flexibility in the waxing procedure, and, if the
refractory cast is well made, there is no difficulty in placing
the bracing portion of the clasp.
• The ledge can be used as guide for positioning the entire
length of the clasp on the tooth. In this method, the wax must
be placed very accurately, since the ledge cannot be changed
on the refractory cast if improperly placed
ARBITRARY BLOCKOUT
• used in
 less critical areas to prevent the encroachment of metal on the
soft tissues
 critical withdrawal of the blocked out cast from the
duplicating material.
 gingival crevices, spaces between the teeth when they are not
in the design
 for soft tissue undercuts below areas involved in the design of
the framework
 in the tooth or tissue undercuts not involved in the design but
that would complicate the duplication procedure
RELIEF
• Relief is used to create a space between the framework and the
cast or soft tissue
USED IN:
• beneath framework extensions, in edentulous area to provide
for attachment of denture bases, and to form internal finish
lines
• used beneath lingual bars and in other area where major
connectors will contact thin soft tissue such as maxillary and
mandibular tori.
• used to form internal finish lines.
• required when altered cast impression procedures will be used
• used when ridge to be covered by denture base is not well
healed
Relief – Where not to use
• Under Metal Complete Denture Bases
• Bead or Nailhead Retention
• Open Retention when the outer support is against the cast
BEADING
• to prevent food particles from collecting beneath the
framework and producing discomfort for the patient.
• depth should not exceed 1mm
• should fade out as the gingival margins are approached or as
prominent area in the midline of the palate
Cast ready for duplication
DUPLICATION AND REFRACTORY CAST
• Master cast is duplicated in refractory material so that it can
withstand burnout temperatures of about 1300 F
• Framework pattern is formed on the refractory cast using wax
and plastic.
Refractory cast
Duplication of waxed up master cast
Relief and block out
Surveying and design transfer from diagnostic cast to master cast
Master cast
Surveying and designing
Diagnostic cast
REVERSIBLE HYDROCOLLOID (AGAR) MOLDS
• used most often to make the mold for duplication
• prepared by grinding or chopping the colloid into small pieces
and heating it until it liquefies at 212 degree F(100degree C).
• The melted colloid can be stored for a few days in a
hydrocolloid storage unit at 135degree to 140degree F
A duplicating flask will be used
to support the cast and confine
the hydrocolloid, since it aids in
controlling shrinkage
Cast is placed on the base of the
duplicating flask to make sure
that space around and above
cast is sufficient for the
duplicating material.
Agar mixer is used to melt
and store gel duplicating
material. the material is
cut into small pieces so
that it melts soon
Fill the duplicating flask
with agar hydrocolloid
duplicating material.
Continue to fill the flask
until the agar starts to
run out of the holes on
tip of the flask.
Cool the duplicating
material in the flask in
tray of cool running tap
water
Gently remove the
cast from the flask
with knife without
tearing agar
Examine the
hydrocolloid
carefully for tears
and voids
INVESTMENT CAST
Pour the investment into the
mold immediately. Mechanical
vibration is needed because the
mix will be thick.
Permit the investment to set for
1 hour, then separate it from
the duplicating material very
carefully.
It may be necessary to
trim the base to make it fit
the casting ring.
The trimmed and cleaned
cast is ready for treating
with wax or model spray.
HARDENING OF REFRACTORY CAST
• DUROL hardening liquid is used to harden the refractory cast.
• Cast is dipped in it for 2 mins qand left to dry out at room
temperature.
• Casts placed in drying oven at temperature between 180 and
200 degree F for 15-20 min
• After removing the casts they are ready for wax up
WAXING AND SPRUING
• After the master cast is duplicated to make a refractory cast, it
is necessary to transfer the design to the refractory cast and
complete the wax pattern
• The outline of the framework can be transferred from the
master cast to the refractory cast and positioned quite
accurately without using a surveyor
• The relief, blockout, and beading can be easily seen on the
refractory cast
Design transferred to
refractory cast
WAXING THE FRAMEWORK
• Full palate, 26 gauge
• Palatal strap, 22 gauge
• Horseshoe and double palatal bar, 24 gauge
• Lingual plating, 6 gauge half pear shape with 28 gauge wax
adapted over it and extending onto the teeth
• Lingual bar, 6 gauge half pear shape reinforced with a layer of
28 gauge wax
SPRUING
Spruing for casting of removable partial dentures involves a
large quantity of metal, so special attention must be given :
• points of attachment
• directions of the sprues
• the direction of flow of the molten metal.
PROCEDURE
• Check the size of the investment cast in the investment flask
• When the wax pattern is centered in the ring there should be at
least 7mm clearance between the wax pattern and the side of
the ring.
8 or 10 gauge Flat sprue
attached to the junction
major and minor connector
of either side of the cast
14 gauge sprue attached one
from the indirect retainer
and lingual bar junction and
one from I bar clasp and
minor connector junction
Preformed casting
funnel attached
Add a casting channel
wire of 4mm thick at
the transition to the
retaining elements on
the framework
1.2 mm wax wire
attached as a ventilation
and pressure
compensation method
Casting funnel is
attached
INVESTING SPRUED WAX PATTERN
• Investing is the process of covering or enveloping wholly or in
part an object such as trial denture tooth,wax pattern or crown
with an investment material.
PURPOSE
• To provide necessary strength
• To make a smooth surface for mould cavity
• To establish an avenue of escape for most of the gases created
by burnout and casting procedure
• To compensate for dimensional changes
Soak the cast
for 5 minutes
in room
temperature
water
Attach the
waxed
refractory cast
on the base of
silicone casting
ring
Spray the wax
pattern and
sprues with a
wetting agent
Connect the
silicone ring
to the silicone
base and
ensure that
there is no
water
leakage
Mix
investment
and coat
pattern
uniformly
with paint
brush
Fill ring
with
investment
under mild
vibration
Set investment ready for burnout
Place the ring in a cool furnace
sprue side down
Turn on the furnace and adjust it to
reach 500 deg c in about 1 hour
Increase temperature to 850-1030 C
based on metal used
Mold must heat soak at this
temperatutre for atleast half an hour
Mold is ready to cast
CASTING
Prepare and balance the casting machine
before casting ring is placed in burnout oven
Place metal in crucible
Light the torch and adjust it to form a
reducing flame
Heat the metal keeping tip of the blue cone on surface of metal
When surface of the metal is clean and a swirling action is seen
position the casting ring in the casting machine
Release the casting machine
When the machine stops remove ring and allow it to bench cool
FINISHING AND POLISHING
• Process of smoothing the metal with progressively finer
abrasive agents to remove scratches and to give a high lustre to
the completed framework
• Cobalt chromium casting – high speed lathes
• Avoid use of heavy pressure- warpage of casting
Cut the sprues from the casting with
separating disc
Grind off sprue stumps with grinding
wheel
Smooth framework surface with mounted
stones
Refine butt joints with inverted cone
stone
Use series of sand paper disc to
smoothen the surface
Finish casting with rubber wheels
Disclosing agent applied over cast
Electropolishing framework
Universal polishing paste
FINISHED FRAMEWORK
SELECTING AND ARRANGING TEETH
• Acrylic is the material of choice for denture teeth
• Acrylic retentive devices do not interfere with the desired
tooth position
• If porcelain teeth given – severely abrade gold and amalgam
restorations as well as the natural dentition.
PROCESSING
• FLASKING
• WAX ELIMINATION
• PACKING
• PROCESSING
REMOUNTING
FINISHING AND POLISHING
• Vulcanite bur
• Pumice
• Dry clean cloth with
resin polishing agents
DUPLICATE MASTER CASTS
• Made at the time when refractory casts are made
• After cast has been removed from duplicating medium for
refractory cast remove any block out or relief on soft tissue
areas of denture base
• Place the casts in duplicating flasks and pour hydrocolloid.
• This cast can be used for fitting the metal framework when
polishing.
• Partial dentures can be processed on duplicated master cast
remounted and occlusion corrected
• Finish and polish
• Master casts will be intact so finished partial denture can be
fitted and sent to dentist.
• This article provides proof of concept for the use of intraoral
scanning technology to record hard and soft tissue morphology
for the fabrication of a cast partial removable dental prosthesis.
• An open source intraoral scanner was used to scan the hard
and soft tissues to create a stereolithographic file that was
subsequently imported into a computer-aided design software
program for the digital/virtual design of a partial denture
framework.
• Computer-aided design and computer-aided manufacturing
technology was then used to fabricate a resin framework that
was trial placed to evaluate accuracy and for conventional
investing and casting with a cobalt-chromium alloy.
SUMMARY
• In this example, the resulting resin framework was judged to
fit the digitally fabricated polyurethane cast as well as the
mouth accurately. The finished definitive prosthesis was
successfully placed in the mouth and is being used by the
patient.
CONCLUSION
Those who have worked in the dental laboratory whether in a
office or a commercial laboratory know that techniques are varied
and one requires a great amount of skill and concentration to
accomplish
As long as one remembers that the most important step in
prosthodontics is the one being done at any given time the end
result will be well fitting restoration in which the dentist and
technician can take pride
REFERENCES
• Rhoads JE, Rudd KD, Morrow RM. Dental laboratory
procedures: removable partial dentures. St. Louis, Missouri:
CV Mosby. 1986.
• Kattadiyil MT, Mursic Z, AlRumaih H, Goodacre CJ. Intraoral
scanning of hard and soft tissues for partial removable dental
prosthesis fabrication. Journal of Prosthetic Dentistry. 2014
Sep 1;112(3):444-8.

Lab procedures in fabrication of CPD- Dr Prathibha

  • 1.
    LABORATORY PROCEDURES IN FABRICATIONOF CPD Dr Prathibha Prasad Postgraduate Dept of Prosthodontics KCDS
  • 2.
    INTRODUCTION • Dental Laboratorytechniques are varied and require a great amount of skill and concentration to accomplish • Each step in the making of a cast partial denture if carefully controlled and basic principles are followed final results will be superior
  • 3.
    Synopsis of Laboratoryprocedures 1.Care of Impression and Making casts 2.Pouring corrected cast impressions 3.Stock and Custom Impression trays 4.Record Bases and Mounting casts 5.Survey and design 6.Design transfer,Blockout ,Relief and Beading 7.Duplication and refractory casts
  • 4.
    8.Waxing and Spruing 9.Investing,Burnoutand Casting 10.Finishing and polishing the framework 11.Selecting and arranging teeth 12.Flasking,processing,deflasking and finishing
  • 5.
    In prosthodontia ,fewrestoration are made to fit patient directly, most restoration are made to fit a cast. If the cast is not accurate the restoration cannot possibly fit the patient satisfactorily REQUISITES OF CAST • All surfaces to be contacted by the prosthesis should be accurate and free of voids or nodules • The surface of the cast should be hard, dense • The base of the cast should be not less than 15 mm thick at the thinnest place
  • 6.
    IMPRESSION MATERIALS THATARE USED COMMONLY: • Alginate irreversible hydrocolloid • Elastomeric material CARE OF THE IMPRESSION • Impression is rinsed thoroughly in 2% glutaraldehyde solution to remove impurities. • Boxing of the impression with wax or pumice should not be done
  • 7.
    • Pouring thecast in two stages results in improved cast surface over the one stage method (Anatomical portion – first pour/Base – Second pour ) • After 45 minutes to 1 hour from the first pour the cast is removed from the impression
  • 8.
    POURING CORRECTED CASTIMPRESSIONS • CORRECTED CAST : a cast made from a master cast on which the residual ridges have been recorded by means of a functional impression • FUNCTIONAL IMPRESSION : a secondary impression that is made for the purpose of recording the residual ridges in their functional form and recording the optimum length and width of the flanges of the denture bases
  • 9.
    • A functionalimpression is generally made by adding an impression base to the removable partial denture framework. • made by a variety of impression materials, including impression wax, zinc oxide eugenol paste, rubber base, and silicone impression materials
  • 10.
    TECHNIQUES OF POURING •Plaster Pumice Mix And Wax • Beading And Boxing With Wax • Beading With Wax And The Two Stage Pour • North Carolina Technique
  • 11.
    BOXING CORRECTED CASTIMPRESSION WITH PLASTER/PUMICE MIX AND WAX
  • 15.
  • 16.
    BEADING AND BOXINGCORRECTED CAST IMPRESSION WITH WAX
  • 19.
    BEADING CORRECTED CASTIMPRESSION WITH WAX AND TWO STAGE POUR
  • 22.
  • 23.
  • 26.
  • 27.
    IMPRESSION TRAYS STOCK TRAYS Metal rim lock Perforated Watercooled Plastic stock CUSTOM TRAYS Acrylic resin Thermoplastic vaccum adapted Visible light cured plastic trays
  • 28.
    RECORD BASES ANDMOUNTING CASTS • Record bases with attached occlusion rims are used to record important information for the laboratory technician such as maxillo-mandibular jaw relationship and verification occlusal plane mid-line degree of vertical and horizontal overlap
  • 29.
    RECORD BASE REQUIREMENTS •same adaptation to the basal seat area as the finished denture base • same border form • sufficient rigidity to withstand occlusal forces • dimensional stability, • construction that permits use as a base for tooth arrangement • easy,quick, and inexpensive
  • 30.
  • 31.
    SURVEY AND DESIGN •Survey is the procedure of locating and delineating the contour and position of the abutment teeth and associated structures before designing a removable partial denture (GPT9)
  • 32.
    • Surveyor isa paralleling instrument used in making a dental prosthesis to locate and delineate the contours and relative position of abutment teeth and associated structures. (GPT9)
  • 33.
    WHY??? To determine : •Acceptable path of placement • Guiding planes • Location and measurement of retentive undercuts • Location of tooth and bony interferences favourable design • Location of occlusal contacts relative to design • Placement of tripodal marks
  • 34.
    PHASES OF SURVEYING 1)Identifyingthe favorable tilt of the cast 2)Path of insertion 3)Tripoding the cast
  • 35.
    RECENT ADVANCES • 3DSCANNERS • ELECTRONIC SURVEYING • CAD/CAM • CNC MILLING • RAPID PROTOTYPING
  • 36.
    DESIGN TRANSFER • Designeddiagnostic casts should accompany the master casts to the dental laboratory. • Using the designed casts and work order, the laboratory technician will examine the design and casts, consult with the dentist if needed, and then transfer the design of the metal framework to the master casts
  • 37.
    Designed maxillary andmandibular diagnostic cast
  • 38.
    PROCEDURE • Examine themaster casts to determine acceptability. • Remount the diagnostic casts on the surveying table by the aligning the tripod marks • New tripod marks touched by the stylus when it is locked in one position are chosen. placed on tooth landmarks that are easily and accurately located on both the diagnostic and master casts
  • 39.
    • Place threewidely separated marks on the diagnostic casts. • Mark three spots on the master cast in exactly the same place as on the diagnostic casts • Master cast is tripoded using these three marks. Since tripod marks are the same on both casts, the master cast will be tripoded in the same plane as the diagnostic cast.
  • 41.
    • Survey linesshould be marked on all teeth that will be contacted by metal & Soft tissue undercuts near teeth are also marked • Retentive undercuts are marked in the master cast in red to locate the tips of the retentive clasps
  • 42.
    • Rests aremarked on the master cast in red to unmistakably identify them for the person waxing the framework • Using the diagnostic cast as a guide, draw the metallic portion of the design on the master cast with a brown pencil and resin finish lines with blue pencil.
  • 43.
    • The designon the master cast should be the same as the design on the diagnostic cast.
  • 44.
    BLOCKOUT AND DUPLICATION Preparingthe casts for duplication • Casts are blocked out to eliminate undercut areas on the master cast that will be crossed by rigid parts of the partial denture • All parts of the framework, except the retentive clasp tips, are nonflexible and will not spring into an undercut.
  • 45.
    Additional areas tobe blocked out: • Ledges on which clasp patterns will be placed • beneath connectors to avoid soft tissues impingement • To provide for later attachment of the denture base to the framework
  • 46.
    Types of blockout •Parallel • shaped (ledging ) • Arbitrary • relief.
  • 47.
    PARALLEL BLOCKOUTS • madeby using different styli in the surveyor to establish 0- degree, or 6degree taper in the blockout wax
  • 48.
    • Parallel blockoutextends from the survey line to the gingiva. • Parallel blockout is used 1)Beneath minor connectors 2)soft tissue undercuts that may be crossed by rigid connectors
  • 49.
    • In Undercutareas On teeth that will be crossed by clasp arm
  • 50.
    SHAPED BLOCKOUT ORLEDGING • used on buccal or lingual surfaces to facilitate accurate placement of plastic or waxpatterns for clasp arms • The blockout wax may be placed in the undercut and trimmed flush with the survey line using the proper stylus or wax trimmer.
  • 51.
    • Ledging maybe done only in the area of the tip of the clasp; this is the most desirable method. • It permits more flexibility in the waxing procedure, and, if the refractory cast is well made, there is no difficulty in placing the bracing portion of the clasp.
  • 52.
    • The ledgecan be used as guide for positioning the entire length of the clasp on the tooth. In this method, the wax must be placed very accurately, since the ledge cannot be changed on the refractory cast if improperly placed
  • 53.
    ARBITRARY BLOCKOUT • usedin  less critical areas to prevent the encroachment of metal on the soft tissues  critical withdrawal of the blocked out cast from the duplicating material.  gingival crevices, spaces between the teeth when they are not in the design
  • 54.
     for softtissue undercuts below areas involved in the design of the framework  in the tooth or tissue undercuts not involved in the design but that would complicate the duplication procedure
  • 55.
    RELIEF • Relief isused to create a space between the framework and the cast or soft tissue USED IN: • beneath framework extensions, in edentulous area to provide for attachment of denture bases, and to form internal finish lines
  • 56.
    • used beneathlingual bars and in other area where major connectors will contact thin soft tissue such as maxillary and mandibular tori. • used to form internal finish lines.
  • 57.
    • required whenaltered cast impression procedures will be used • used when ridge to be covered by denture base is not well healed
  • 58.
    Relief – Wherenot to use • Under Metal Complete Denture Bases • Bead or Nailhead Retention • Open Retention when the outer support is against the cast
  • 60.
    BEADING • to preventfood particles from collecting beneath the framework and producing discomfort for the patient. • depth should not exceed 1mm • should fade out as the gingival margins are approached or as prominent area in the midline of the palate
  • 61.
    Cast ready forduplication
  • 62.
    DUPLICATION AND REFRACTORYCAST • Master cast is duplicated in refractory material so that it can withstand burnout temperatures of about 1300 F • Framework pattern is formed on the refractory cast using wax and plastic.
  • 63.
    Refractory cast Duplication ofwaxed up master cast Relief and block out Surveying and design transfer from diagnostic cast to master cast Master cast Surveying and designing Diagnostic cast
  • 64.
    REVERSIBLE HYDROCOLLOID (AGAR)MOLDS • used most often to make the mold for duplication • prepared by grinding or chopping the colloid into small pieces and heating it until it liquefies at 212 degree F(100degree C). • The melted colloid can be stored for a few days in a hydrocolloid storage unit at 135degree to 140degree F
  • 65.
    A duplicating flaskwill be used to support the cast and confine the hydrocolloid, since it aids in controlling shrinkage Cast is placed on the base of the duplicating flask to make sure that space around and above cast is sufficient for the duplicating material.
  • 66.
    Agar mixer isused to melt and store gel duplicating material. the material is cut into small pieces so that it melts soon Fill the duplicating flask with agar hydrocolloid duplicating material.
  • 67.
    Continue to fillthe flask until the agar starts to run out of the holes on tip of the flask. Cool the duplicating material in the flask in tray of cool running tap water
  • 68.
    Gently remove the castfrom the flask with knife without tearing agar Examine the hydrocolloid carefully for tears and voids
  • 69.
    INVESTMENT CAST Pour theinvestment into the mold immediately. Mechanical vibration is needed because the mix will be thick. Permit the investment to set for 1 hour, then separate it from the duplicating material very carefully.
  • 70.
    It may benecessary to trim the base to make it fit the casting ring. The trimmed and cleaned cast is ready for treating with wax or model spray.
  • 71.
    HARDENING OF REFRACTORYCAST • DUROL hardening liquid is used to harden the refractory cast. • Cast is dipped in it for 2 mins qand left to dry out at room temperature. • Casts placed in drying oven at temperature between 180 and 200 degree F for 15-20 min • After removing the casts they are ready for wax up
  • 73.
    WAXING AND SPRUING •After the master cast is duplicated to make a refractory cast, it is necessary to transfer the design to the refractory cast and complete the wax pattern • The outline of the framework can be transferred from the master cast to the refractory cast and positioned quite accurately without using a surveyor • The relief, blockout, and beading can be easily seen on the refractory cast
  • 74.
  • 75.
    WAXING THE FRAMEWORK •Full palate, 26 gauge • Palatal strap, 22 gauge • Horseshoe and double palatal bar, 24 gauge • Lingual plating, 6 gauge half pear shape with 28 gauge wax adapted over it and extending onto the teeth • Lingual bar, 6 gauge half pear shape reinforced with a layer of 28 gauge wax
  • 78.
    SPRUING Spruing for castingof removable partial dentures involves a large quantity of metal, so special attention must be given : • points of attachment • directions of the sprues • the direction of flow of the molten metal.
  • 79.
    PROCEDURE • Check thesize of the investment cast in the investment flask • When the wax pattern is centered in the ring there should be at least 7mm clearance between the wax pattern and the side of the ring.
  • 80.
    8 or 10gauge Flat sprue attached to the junction major and minor connector of either side of the cast 14 gauge sprue attached one from the indirect retainer and lingual bar junction and one from I bar clasp and minor connector junction
  • 81.
    Preformed casting funnel attached Adda casting channel wire of 4mm thick at the transition to the retaining elements on the framework
  • 82.
    1.2 mm waxwire attached as a ventilation and pressure compensation method Casting funnel is attached
  • 83.
    INVESTING SPRUED WAXPATTERN • Investing is the process of covering or enveloping wholly or in part an object such as trial denture tooth,wax pattern or crown with an investment material.
  • 84.
    PURPOSE • To providenecessary strength • To make a smooth surface for mould cavity • To establish an avenue of escape for most of the gases created by burnout and casting procedure • To compensate for dimensional changes
  • 85.
    Soak the cast for5 minutes in room temperature water Attach the waxed refractory cast on the base of silicone casting ring Spray the wax pattern and sprues with a wetting agent
  • 86.
    Connect the silicone ring tothe silicone base and ensure that there is no water leakage Mix investment and coat pattern uniformly with paint brush Fill ring with investment under mild vibration
  • 87.
  • 88.
    Place the ringin a cool furnace sprue side down Turn on the furnace and adjust it to reach 500 deg c in about 1 hour Increase temperature to 850-1030 C based on metal used Mold must heat soak at this temperatutre for atleast half an hour Mold is ready to cast
  • 89.
    CASTING Prepare and balancethe casting machine before casting ring is placed in burnout oven Place metal in crucible Light the torch and adjust it to form a reducing flame
  • 90.
    Heat the metalkeeping tip of the blue cone on surface of metal When surface of the metal is clean and a swirling action is seen position the casting ring in the casting machine Release the casting machine When the machine stops remove ring and allow it to bench cool
  • 91.
    FINISHING AND POLISHING •Process of smoothing the metal with progressively finer abrasive agents to remove scratches and to give a high lustre to the completed framework • Cobalt chromium casting – high speed lathes • Avoid use of heavy pressure- warpage of casting
  • 92.
    Cut the spruesfrom the casting with separating disc Grind off sprue stumps with grinding wheel Smooth framework surface with mounted stones
  • 93.
    Refine butt jointswith inverted cone stone Use series of sand paper disc to smoothen the surface Finish casting with rubber wheels
  • 94.
    Disclosing agent appliedover cast Electropolishing framework Universal polishing paste
  • 95.
  • 96.
    SELECTING AND ARRANGINGTEETH • Acrylic is the material of choice for denture teeth • Acrylic retentive devices do not interfere with the desired tooth position • If porcelain teeth given – severely abrade gold and amalgam restorations as well as the natural dentition.
  • 98.
    PROCESSING • FLASKING • WAXELIMINATION • PACKING • PROCESSING
  • 99.
  • 100.
    FINISHING AND POLISHING •Vulcanite bur • Pumice • Dry clean cloth with resin polishing agents
  • 101.
    DUPLICATE MASTER CASTS •Made at the time when refractory casts are made • After cast has been removed from duplicating medium for refractory cast remove any block out or relief on soft tissue areas of denture base • Place the casts in duplicating flasks and pour hydrocolloid.
  • 102.
    • This castcan be used for fitting the metal framework when polishing. • Partial dentures can be processed on duplicated master cast remounted and occlusion corrected • Finish and polish • Master casts will be intact so finished partial denture can be fitted and sent to dentist.
  • 104.
    • This articleprovides proof of concept for the use of intraoral scanning technology to record hard and soft tissue morphology for the fabrication of a cast partial removable dental prosthesis. • An open source intraoral scanner was used to scan the hard and soft tissues to create a stereolithographic file that was subsequently imported into a computer-aided design software program for the digital/virtual design of a partial denture framework.
  • 105.
    • Computer-aided designand computer-aided manufacturing technology was then used to fabricate a resin framework that was trial placed to evaluate accuracy and for conventional investing and casting with a cobalt-chromium alloy.
  • 108.
    SUMMARY • In thisexample, the resulting resin framework was judged to fit the digitally fabricated polyurethane cast as well as the mouth accurately. The finished definitive prosthesis was successfully placed in the mouth and is being used by the patient.
  • 109.
    CONCLUSION Those who haveworked in the dental laboratory whether in a office or a commercial laboratory know that techniques are varied and one requires a great amount of skill and concentration to accomplish As long as one remembers that the most important step in prosthodontics is the one being done at any given time the end result will be well fitting restoration in which the dentist and technician can take pride
  • 110.
    REFERENCES • Rhoads JE,Rudd KD, Morrow RM. Dental laboratory procedures: removable partial dentures. St. Louis, Missouri: CV Mosby. 1986. • Kattadiyil MT, Mursic Z, AlRumaih H, Goodacre CJ. Intraoral scanning of hard and soft tissues for partial removable dental prosthesis fabrication. Journal of Prosthetic Dentistry. 2014 Sep 1;112(3):444-8.

Editor's Notes

  • #3 Dental Laboratory Technology is both a science and an art. Since each dental patient's needs are different, the duties of a dentist and a dental laboratory technician are comprehensive and varied
  • #8 Problem areas: cast appears to be distorted then the reason will be impression material getting separated from tray. Numerous voids- air trapped during pouring. Use vibrator to avoid air entrapment
  • #9 Also called as altered cast or modified cast Distal extension bases allow rotation of the rpd towards the tissue due to reswilient mucosa and the differential support offered by hard and soft tissues. To maximise the support distal extn has to be recordeed in ots functional form to limit rotation and to maintain occlusal contact btwn artificial and natursl dentition. Since its not possible to record both types in a single impression we follow altered cast impression technique.
  • #11 Mainly used when the impression is made with rubber base or elastomeric materials 2nd and 3rd when impr is of zoe and imp plaster
  • #14 Soaked in slurry water so that the new stone and old stone union occurs properly
  • #28 Properly selected impr trays contribyte in obtainning a acceptable impression and accurate cast as a result
  • #35 Various tilts posterior anterior lateral rt nd lft zero
  • #36 Used to scan the stone cast after taking imp and transfer details to software where tretmnt protocol s rmade Done by point cloud analysis cnc subtractive method where a part is made from whole wastage more Rapid- additive process cad designconverted to 3d model contains stereolithography and selective laser melting.
  • #42 mark survey lines on the master cast.
  • #59 Also in open lattice cases
  • #61 Beading on the borders of the maxillary major connectors serves
  • #65 Since this material is heat reversible, it may be reused a number of times to make a duplicate casts. After each used, it should be washed under cool water to remove all traces of stone and investment, cut into small pieces, and stored in a closed container to prevent loss of water.  If the material is permitted to dry out, it cannot be used again. 
  • #66 Alginate irreversible hydrocolloid may also be used by increasing the volume of water to three times the volume used for a regular impression is as accurate as the agar hydrocolloid; however, it is much more expensive for volume duplication, since it is not reversible and only one duplicate can be made from each mix. Reversible hydrocolloid also seems to produce a smoother cast surface with some investment materials. 
  • #70 All investments or refractory casts abrade easily and must be handled carefully to preserve the accuracy of their surfaces. For cpds usually phosphate bonded investments are used.
  • #71  Do not touch the anatomic portion of the refractory cast at this time because it will be very soft 
  • #76 . . Both wax and plastic patterns can be purchased in a large variety of shapes, sizes, and thick nesses. When waxing the framework for a gold casting, the patterns should be slightly heavier than those used for cobalt- chromium castings. 
  • #77 Wax sheets shapes patterns spools
  • #79 There are two basic types of sprues, single and multiple. Multiple sprues are used if the metal must get to a thicker section by passing through a thin section 
  • #80 A heavy sprue is an additional aid for offsetting this shrinkage.  It acts as a reservoir for the casting because its bulk remains molten longer than the rest of the casting and supplies molten metal to those areas which solidify and shrink first. Main sprues should always be attached to bulky sections of the wax patterns. Never attempt to feed a thick section through a thin section to reach a heavy section, an additional or auxillary sprue should be used
  • #85 Tomresist the froces created by stream of molten metal Casting will require only little finishing Dimensional changes occur when it goes from molten to solid state
  • #107 The digital scan file was then sent to Cadent iTero with a laboratory work authorization form for processing and cast manufacturing. After image processing by Cadent iTero, a milled polyurethane maxillary cast was made along with the opposing mandibular cast. The framework was designed. Once the design was approved, a resin pattern of the virtually designed PRDP framework was created with RP (3D printing) and then cast in a cobaltchromium alloy (Wironium Plus; Bego) with the conventional lost wax casting technique.
  • #108 The cast metal framework was adjusted, finished, and polished in a conventional manner a resin duplicate of the framework (optional) After the trial placement of the metal framework, interocclusal records were made, the maxillary and mandibular polyurethane casts were articulated, and denture teeth were arranged. processing was completed on the milled polyurethane cast