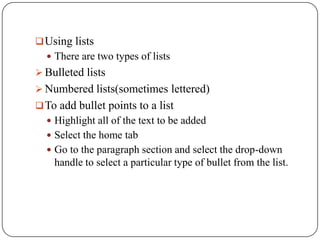
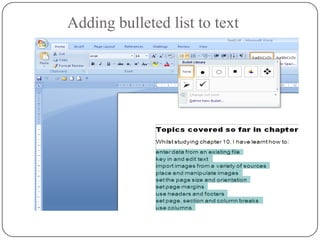
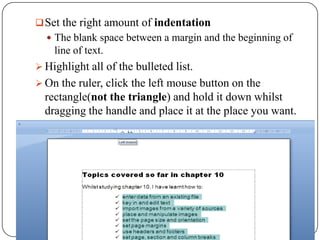
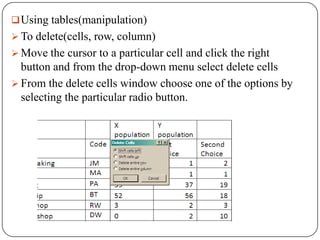
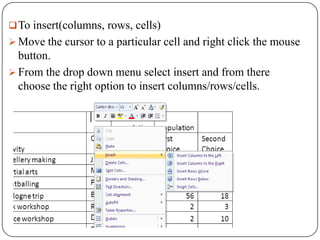
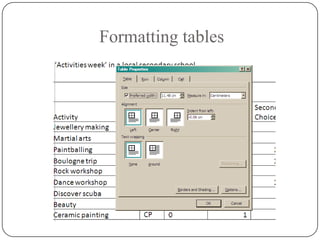
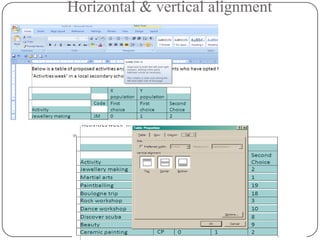
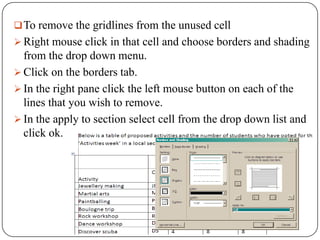
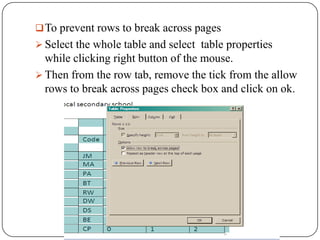
BAF Shaheen English Medium
      School(SEMS)
Std: Ѵ
             Section : Bluebell/Lavender
              Subject: Computer Studies
Subject Teacher: Shah Md. Shariful Islam
                          Date: 04-04-12
 Using lists
   There are two types of lists
 Bulleted lists
 Numbered lists(sometimes lettered)
 To add bullet points to a list
   Highlight all of the text to be added
   Select the home tab
   Go to the paragraph section and select the drop-down
    handle to select a particular type of bullet from the list.
Adding bulleted list to text
 Set the right amount of indentation
   The blank space between a margin and the beginning of
    line of text.
 Highlight all of the bulleted list.
 On the ruler, click the left mouse button on the
  rectangle(not the triangle) and hold it down whilst
  dragging the handle and place it at the place you want.
 Using tables(manipulation)
 To delete(cells, row, column)
 Move the cursor to a particular cell and click the right
  button and from the drop-down menu select delete cells
 From the delete cells window choose one of the options by
  selecting the particular radio button.
 To insert(columns, rows, cells)
 Move the cursor to a particular cell and right click the mouse
  button.
 From the drop down menu select insert and from there
  choose the right option to insert columns/rows/cells.
 To merge cells
 Highlight the cells you want to be merged and then click
  the right mouse button on one of the highlighted cells to
  get the drop-down menu.
 Select merge cells from the menu.
 Formatting tables
   Tables can be formatted so that they can be aligned left, right
    or centrally between the margins.
 Click the right mouse button in the cell of the table.
 Then select table properties and the table tab within the
  table properties window.
 The table alignment can be selected in the alignment
  section and text wrapping around the bale cab switched on
  or off in the text wrapping section.
Formatting tables
 Formatting cells
   Cells can be formatted so that the contents can be aligned both
    horizontally and vertically within the cell.
 Horizontal alignment
 Select the relevant cells
 Click on home tab and go to the paragraph section.
 From there select the alignment you want for those
  particular cells.
 Vertical alignment
 Highlight the cells that require vertical alignments.
 Right mouse click in the table, select table properties and
  select the cell tab.
 Select the relevant options where you want to put your text
  on.
Horizontal & vertical alignment
 To remove wrapped text within cells
 Place your cursor over the gridline between the cells.
  Make sure no cell within the table is selected before
  placing the cursor over the gridline.
 Without moving the mouse double click the left mouse
  button.
 Repeat this for each for each column that needs
  resizing.
 To remove the gridlines from the unused cell
 Right mouse click in that cell and choose borders and shading
  from the drop down menu.
 Click on the borders tab.
 In the right pane click the left mouse button on each of the
  lines that you wish to remove.
 In the apply to section select cell from the drop down list and
  click ok.
 To prevent rows to break across pages
 Select the whole table and select table properties
  while clicking right button of the mouse.
 Then from the row tab, remove the tick from the allow
  rows to break across pages check box and click on ok.

Document production(4th April)

  • 1.
    BAF Shaheen EnglishMedium School(SEMS)
  • 2.
    Std: Ѵ Section : Bluebell/Lavender Subject: Computer Studies Subject Teacher: Shah Md. Shariful Islam Date: 04-04-12
  • 3.
     Using lists  There are two types of lists  Bulleted lists  Numbered lists(sometimes lettered)  To add bullet points to a list  Highlight all of the text to be added  Select the home tab  Go to the paragraph section and select the drop-down handle to select a particular type of bullet from the list.
  • 4.
  • 5.
     Set theright amount of indentation  The blank space between a margin and the beginning of line of text.  Highlight all of the bulleted list.  On the ruler, click the left mouse button on the rectangle(not the triangle) and hold it down whilst dragging the handle and place it at the place you want.
  • 6.
     Using tables(manipulation) To delete(cells, row, column)  Move the cursor to a particular cell and click the right button and from the drop-down menu select delete cells  From the delete cells window choose one of the options by selecting the particular radio button.
  • 7.
     To insert(columns,rows, cells)  Move the cursor to a particular cell and right click the mouse button.  From the drop down menu select insert and from there choose the right option to insert columns/rows/cells.
  • 8.
     To mergecells  Highlight the cells you want to be merged and then click the right mouse button on one of the highlighted cells to get the drop-down menu.  Select merge cells from the menu.
  • 9.
     Formatting tables  Tables can be formatted so that they can be aligned left, right or centrally between the margins.  Click the right mouse button in the cell of the table.  Then select table properties and the table tab within the table properties window.  The table alignment can be selected in the alignment section and text wrapping around the bale cab switched on or off in the text wrapping section.
  • 10.
  • 11.
     Formatting cells  Cells can be formatted so that the contents can be aligned both horizontally and vertically within the cell.  Horizontal alignment  Select the relevant cells  Click on home tab and go to the paragraph section.  From there select the alignment you want for those particular cells.  Vertical alignment  Highlight the cells that require vertical alignments.  Right mouse click in the table, select table properties and select the cell tab.  Select the relevant options where you want to put your text on.
  • 12.
  • 13.
     To removewrapped text within cells  Place your cursor over the gridline between the cells. Make sure no cell within the table is selected before placing the cursor over the gridline.  Without moving the mouse double click the left mouse button.  Repeat this for each for each column that needs resizing.
  • 14.
     To removethe gridlines from the unused cell  Right mouse click in that cell and choose borders and shading from the drop down menu.  Click on the borders tab.  In the right pane click the left mouse button on each of the lines that you wish to remove.  In the apply to section select cell from the drop down list and click ok.
  • 15.
     To preventrows to break across pages  Select the whole table and select table properties while clicking right button of the mouse.  Then from the row tab, remove the tick from the allow rows to break across pages check box and click on ok.