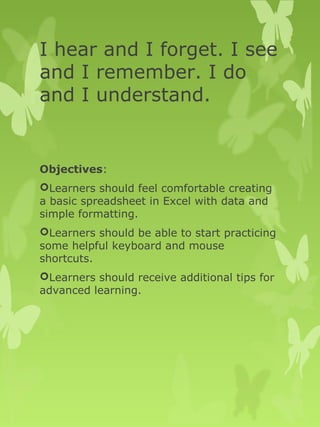
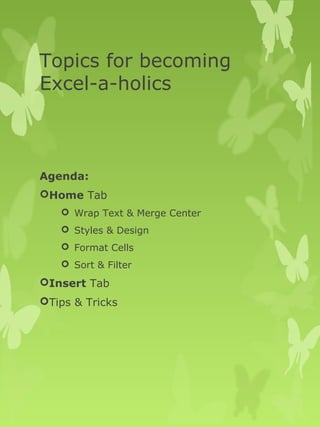
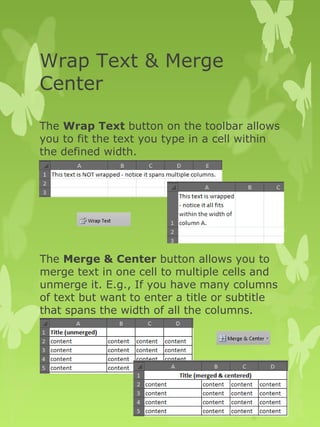
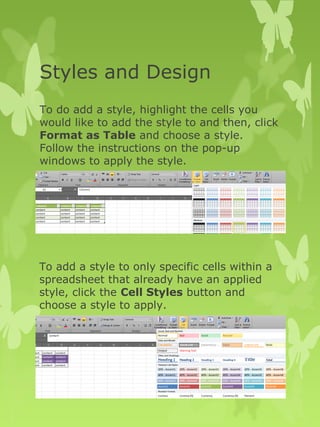
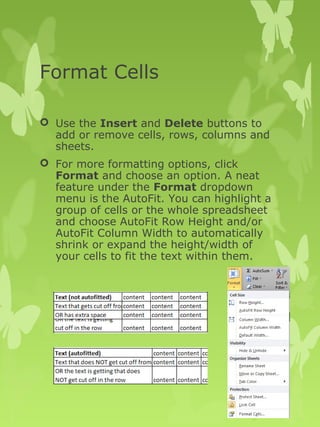
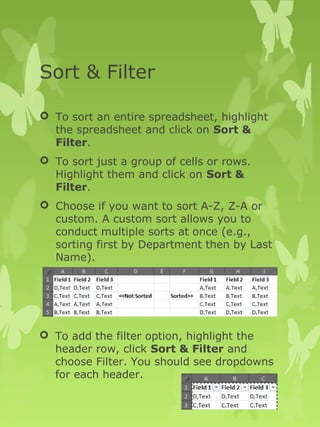
Excel Basics 
@lotus_yon
I hear and I forget. I see 
and I remember. I do 
and I understand. 
Objectives: 
Learners should feel comfortable creating 
a basic spreadsheet in Excel with data and 
simple formatting. 
Learners should be able to start practicing 
some helpful keyboard and mouse 
shortcuts. 
Learners should receive additional tips for 
advanced learning.
Topics for becoming 
Excel-a-holics 
Agenda: 
Home Tab 
 Wrap Text & Merge Center 
 Styles & Design 
 Format Cells 
 Sort & Filter 
Insert Tab 
Tips & Tricks
There’s no place like 
Home. 
 The Home tab in Excel has almost 
everything you need to do basic 
spreadsheet tasks. 
 You’ll find similar options to Word & 
Power Point such as the Clipboard, Font 
and Alignment sections. 
 You’ll also find some other useful 
sections specific to Excel.
Wrap Text & Merge 
Center 
The Wrap Text button on the toolbar allows 
you to fit the text you type in a cell within 
the defined width. 
The Merge & Center button allows you to 
merge text in one cell to multiple cells and 
unmerge it. E.g., If you have many columns 
of text but want to enter a title or subtitle 
that spans the width of all the columns.
Styles and Design 
To do add a style, highlight the cells you 
would like to add the style to and then, click 
Format as Table and choose a style. 
Follow the instructions on the pop-up 
windows to apply the style. 
To add a style to only specific cells within a 
spreadsheet that already have an applied 
style, click the Cell Styles button and 
choose a style to apply.
Format Cells 
 Use the Insert and Delete buttons to 
add or remove cells, rows, columns and 
sheets. 
 For more formatting options, click 
Format and choose an option. A neat 
feature under the Format dropdown 
menu is the AutoFit. You can highlight a 
group of cells or the whole spreadsheet 
and choose AutoFit Row Height and/or 
AutoFit Column Width to automatically 
shrink or expand the height/width of 
your cells to fit the text within them.
Sort & Filter 
 To sort an entire spreadsheet, highlight 
the spreadsheet and click on Sort & 
Filter. 
 To sort just a group of cells or rows. 
Highlight them and click on Sort & 
Filter. 
 Choose if you want to sort A-Z, Z-A or 
custom. A custom sort allows you to 
conduct multiple sorts at once (e.g., 
sorting first by Department then by Last 
Name). 
 To add the filter option, highlight the 
header row, click Sort & Filter and 
choose Filter. You should see dropdowns 
for each header.
Data not enough? 
Insert some stuff! 
 The Insert tab in Excel is another great 
place to look if you want to do more 
things. 
 Insert pictures, shapes, screenshots, 
hyperlinks, wordart, equations, symbols 
and much more! 
 Use the Charts section to convert your 
data into charts and graphs. Highlight 
the data you want to incorporate. Then, 
choose one of the chart/graph options.
A tip, a trick and some 
ways to make you quick. 
 Keyboard shortcuts that work across all 
Microsoft Programs and more (e.g. internet 
browsers): 
 Ctrl+C = Copy 
 Ctrl+P = Paste 
 Ctrl+Z = Undo 
 Ctrl+O = Open a new document 
 Ctrl+P = Print 
 Alt+Enter = allows you to enter a new line of 
text within a cell 
 Alt+Tab = to toggle between windows 
 Alt+= allows you to automatically sum the 
numbers you have in a column 
 Use Format Painter (Home tab) to copy 
formatting from one cell to others. Start by 
highlighting the cell with the formatting you 
want to copy. Then do one of the following: 
 Click the Format Painter button once to 
copy it and click the cell you want to format. 
 Double-click the Format Painter button to 
keep the formatting on and click on multiple 
cells to duplicate the formatting onto several 
cells.
A tip, a trick and some 
ways to make you quick. 
 Quickly copy data or formulas to multiple 
cells. 
 Select the cell you want to copy. 
 Hover your mouse over the bottom right 
corner of the cell (there is a very small 
square) until you see a plus sign. Hold and 
drag your mouse to the cells you want to 
copy to. Let go. It should have copied. 
Held 
and 
dragged 
down
Thank you! 
Follow Me: 
@lotus_yon 
odadvocate.wordpress.com 
www.facebook.com/odadvocate

Excel basics

  • 1.
  • 2.
    I hear andI forget. I see and I remember. I do and I understand. Objectives: Learners should feel comfortable creating a basic spreadsheet in Excel with data and simple formatting. Learners should be able to start practicing some helpful keyboard and mouse shortcuts. Learners should receive additional tips for advanced learning.
  • 3.
    Topics for becoming Excel-a-holics Agenda: Home Tab  Wrap Text & Merge Center  Styles & Design  Format Cells  Sort & Filter Insert Tab Tips & Tricks
  • 4.
    There’s no placelike Home.  The Home tab in Excel has almost everything you need to do basic spreadsheet tasks.  You’ll find similar options to Word & Power Point such as the Clipboard, Font and Alignment sections.  You’ll also find some other useful sections specific to Excel.
  • 5.
    Wrap Text &Merge Center The Wrap Text button on the toolbar allows you to fit the text you type in a cell within the defined width. The Merge & Center button allows you to merge text in one cell to multiple cells and unmerge it. E.g., If you have many columns of text but want to enter a title or subtitle that spans the width of all the columns.
  • 6.
    Styles and Design To do add a style, highlight the cells you would like to add the style to and then, click Format as Table and choose a style. Follow the instructions on the pop-up windows to apply the style. To add a style to only specific cells within a spreadsheet that already have an applied style, click the Cell Styles button and choose a style to apply.
  • 7.
    Format Cells Use the Insert and Delete buttons to add or remove cells, rows, columns and sheets.  For more formatting options, click Format and choose an option. A neat feature under the Format dropdown menu is the AutoFit. You can highlight a group of cells or the whole spreadsheet and choose AutoFit Row Height and/or AutoFit Column Width to automatically shrink or expand the height/width of your cells to fit the text within them.
  • 8.
    Sort & Filter  To sort an entire spreadsheet, highlight the spreadsheet and click on Sort & Filter.  To sort just a group of cells or rows. Highlight them and click on Sort & Filter.  Choose if you want to sort A-Z, Z-A or custom. A custom sort allows you to conduct multiple sorts at once (e.g., sorting first by Department then by Last Name).  To add the filter option, highlight the header row, click Sort & Filter and choose Filter. You should see dropdowns for each header.
  • 9.
    Data not enough? Insert some stuff!  The Insert tab in Excel is another great place to look if you want to do more things.  Insert pictures, shapes, screenshots, hyperlinks, wordart, equations, symbols and much more!  Use the Charts section to convert your data into charts and graphs. Highlight the data you want to incorporate. Then, choose one of the chart/graph options.
  • 10.
    A tip, atrick and some ways to make you quick.  Keyboard shortcuts that work across all Microsoft Programs and more (e.g. internet browsers):  Ctrl+C = Copy  Ctrl+P = Paste  Ctrl+Z = Undo  Ctrl+O = Open a new document  Ctrl+P = Print  Alt+Enter = allows you to enter a new line of text within a cell  Alt+Tab = to toggle between windows  Alt+= allows you to automatically sum the numbers you have in a column  Use Format Painter (Home tab) to copy formatting from one cell to others. Start by highlighting the cell with the formatting you want to copy. Then do one of the following:  Click the Format Painter button once to copy it and click the cell you want to format.  Double-click the Format Painter button to keep the formatting on and click on multiple cells to duplicate the formatting onto several cells.
  • 11.
    A tip, atrick and some ways to make you quick.  Quickly copy data or formulas to multiple cells.  Select the cell you want to copy.  Hover your mouse over the bottom right corner of the cell (there is a very small square) until you see a plus sign. Hold and drag your mouse to the cells you want to copy to. Let go. It should have copied. Held and dragged down
  • 12.
    Thank you! FollowMe: @lotus_yon odadvocate.wordpress.com www.facebook.com/odadvocate