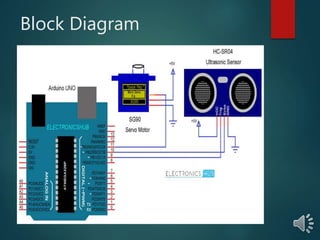
PROJECT TITLE:-
 Arduino Based Ultrasonic Radar System
Group Members #
syed umar Huraira UW-17-EE-BSc-019
Kamran ali bacha UW-17-EE-BSc-024
Table of Contents
Abstract:
Components
 INTRODUCTION
 Block Diagram
 Working
 Application
Abstract:
 The ultrasonic sensors are used to
detect the object, to measure the
distance of the object and has many
applications.
 The Ultrasonic sensor provides the
easiest method of object detection and
gives the perfect measurement
between stationary or moving objects.
Abstract
 Radar is a long-range object detection
system that uses radio waves to
establish certain parameters of an
object like its range, speed and
position.
 Radar technology is used in aircrafts,
missiles, marine, weather predictions
and automobiles.
Components
 Arduino UNO
 HC-SR04 Ultrasonic Sensor
 Servo Motor
 Mounting Bracket for Ultrasonic Sensor
(optional)
 Connecting Wires
 Jumper Cables
 5V Power Supply
 USB Cable (for Arduino)
Introduction
 The Arduino Radar Project is more of a
visual project than it is a circuit
implementation. Of course, I will be
using different hardware like Arduino
UNO, HC-SR04 Ultrasonic Sensor and a
Servo Motor but the main aspect is the
visual representation in the Processing
Application.
Introduction
 Even though the title says Arduino
Radar Project, technically the project is
based on Sonar technology as I will be
using an Ultrasonic Sensor to
determine the presence of any object
in a particular range.
Block Diagram
Cont…
 The control pin of the servo is connected to Pin 11
 the Arduino while the TRIG and ECHO Pins of the
Ultrasonic Sensor are connected to Pins 9 & 10 of
Arduino respectively.
 After making the connections, there is one important
step in the construction you need to perform (not
mandatory).
 Since the Ultrasonic Sensor must sweep an arc of
1800 (with the help of the Servo), I have used a
mounting bracket as shown in the image below to fix
the Ultrasonic Sensor.
 As the bracket and the Ultrasonic Sensor adds weight
to the servo, make sure to use a double-sided-tape to
fix the Servo firmly to the surface.
working
 Initially, upload the code to Arduino after making the
connections.
 You can observe the servo sweeping from 00 to 1800 and
again back to 00. Since the Ultrasonic Sensor is mounted
over the Servo, it will also participate in the sweeping
action.
 If you note the Processing Sketch, I have used the output
display size as 1280×720 (assuming almost all computers
now-a-days have a minimum resolution of 1366×768) and
made calculation with respect to this resolution.
 Now, run the sketch in the Processing and if everything
goes well
Application’s
 Used to develop security systems.
 Used interactive animated exhibits.
 Used in parking assistance systems.
 Used in robotic navigation.
Cs project ppt

Cs project ppt

  • 2.
    PROJECT TITLE:-  ArduinoBased Ultrasonic Radar System
  • 3.
    Group Members # syedumar Huraira UW-17-EE-BSc-019 Kamran ali bacha UW-17-EE-BSc-024
  • 4.
    Table of Contents Abstract: Components INTRODUCTION  Block Diagram  Working  Application
  • 5.
    Abstract:  The ultrasonicsensors are used to detect the object, to measure the distance of the object and has many applications.  The Ultrasonic sensor provides the easiest method of object detection and gives the perfect measurement between stationary or moving objects.
  • 6.
    Abstract  Radar isa long-range object detection system that uses radio waves to establish certain parameters of an object like its range, speed and position.  Radar technology is used in aircrafts, missiles, marine, weather predictions and automobiles.
  • 7.
    Components  Arduino UNO HC-SR04 Ultrasonic Sensor  Servo Motor  Mounting Bracket for Ultrasonic Sensor (optional)  Connecting Wires  Jumper Cables  5V Power Supply  USB Cable (for Arduino)
  • 8.
    Introduction  The ArduinoRadar Project is more of a visual project than it is a circuit implementation. Of course, I will be using different hardware like Arduino UNO, HC-SR04 Ultrasonic Sensor and a Servo Motor but the main aspect is the visual representation in the Processing Application.
  • 9.
    Introduction  Even thoughthe title says Arduino Radar Project, technically the project is based on Sonar technology as I will be using an Ultrasonic Sensor to determine the presence of any object in a particular range.
  • 10.
  • 11.
    Cont…  The controlpin of the servo is connected to Pin 11  the Arduino while the TRIG and ECHO Pins of the Ultrasonic Sensor are connected to Pins 9 & 10 of Arduino respectively.  After making the connections, there is one important step in the construction you need to perform (not mandatory).  Since the Ultrasonic Sensor must sweep an arc of 1800 (with the help of the Servo), I have used a mounting bracket as shown in the image below to fix the Ultrasonic Sensor.  As the bracket and the Ultrasonic Sensor adds weight to the servo, make sure to use a double-sided-tape to fix the Servo firmly to the surface.
  • 12.
    working  Initially, uploadthe code to Arduino after making the connections.  You can observe the servo sweeping from 00 to 1800 and again back to 00. Since the Ultrasonic Sensor is mounted over the Servo, it will also participate in the sweeping action.  If you note the Processing Sketch, I have used the output display size as 1280×720 (assuming almost all computers now-a-days have a minimum resolution of 1366×768) and made calculation with respect to this resolution.  Now, run the sketch in the Processing and if everything goes well
  • 13.
    Application’s  Used todevelop security systems.  Used interactive animated exhibits.  Used in parking assistance systems.  Used in robotic navigation.