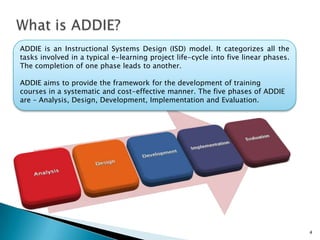
Eshika Chattopadhyay
April 2014
2
In this presentation, we will use ADDIE
as a guide to discuss the life-cycle of
an e-learning project, with special
focus on your role in each phase.
3
At the end of this lesson, you will be
able to:
1. Identify the five phases of ADDIE.
2. Identify the advantages of ADDIE.
3. Identify the advantages of Rapid
Prototyping.
4. Identify the tasks involved in each
phase of ADDIE.
4
ADDIE is an Instructional Systems Design (ISD) model. It categorizes all the
tasks involved in a typical e-learning project life-cycle into five linear phases.
The completion of one phase leads to another.
ADDIE aims to provide the framework for the development of training
courses in a systematic and cost-effective manner. The five phases of ADDIE
are – Analysis, Design, Development, Implementation and Evaluation.
5
Advantages of ADDIE
1. ADDIE is a generic Instructional
Design model that can be used to
develop a wide range of
instructional materials.
2. The neat arrangement of ADDIE
ensures that none of the tasks are
left-out for a later stage, thereby
saving time and effort.
3. By freezing the Design phase
before Development starts, the
model avoids expensive re-works.
Disadvantages of ADDIE
6
The critics argue that ADDIE
does not allow any room for
design improvements. In
cases where client inputs and
feedback are received in
installments, design
improvements are a necessity.
In such cases, the ADDIE
model can lead to expensive
re-works.
7
Rapid Prototyping
Rapid Prototyping is a popular variation of the ADDIE model. It is a non-
linear model in which a prototype (a functional model) of the final product
is used to identify design and functional defects at an early stage. This
makes it easier to rectify the errors.
Consequently, the design and development is carried out simultaneously,
leaving adequate room for improvements and early revisions.
8
Advantages of Rapid Prototyping
1. Identifying errors earlier during the design and
development phase reduces cost and risk.
2. In a prototype, you can see content, graphics
and technical elements together for the first
time. This makes it easier for the end-user to
visualize the whole course and provide more
constructive feedback.
3. Design and development occur simultaneously,
encouraging greater collaboration between the
design and development team.
4. The continuous process of evaluation results in
frequent inputs from the end-user, making the
training much more effective.
9
Disadvantages of Rapid Prototyping
According to critics, rapid prototyping is
not without its risks. A prototype reflects a
few select features of the final product,
leaving out other important details. These
can result in costly revisions later on.
Another major disadvantage is that
building multiple prototypes can take up
precious production time. So, it might not
work for large projects.
Sometimes a prototype can result in too
many revisions, which can delay the
production process.
A construction company
wants to train their
employees on safety
measures to be adopted at
construction sites.
10
Analysis is the first phase of ADDIE
and by far the most important
phase. In this phase, you gather all
the necessary information and
materials required to design the
course.
Let’s look at an example to
understand this better.
11
Gap Analysis
Step 1- Study the current training
method and identify the gaps.
Your first task in this phase is to find
out why the course is needed in the
first place. For that, you need to
analyze the current training method
and test the existing skills of the
target audience.
The workers in our example have no
knowledge of the safety measures that
make their work environment safe. They
also need to recognize certain hazards in
construction sites that can jeopardize
their safety.
 In our example, the
construction workers are trained
by instructors on the use of
safety equipments.
 Tests and workshops reveal that
the workers cannot identify the
specific factors, like railing
position and scaffold height that
make their work area unsafe.
 A good training on safety
regulations, with the aid of
practical examples, will address
the problem.
12
Performing a Gap Analysis
 Take part in the current training
program and go through the
materials carefully.
 Analyze the current performance
level. Prepare tests, conduct
workshops and interview a
representative section of the target
audience.
 Identify the problem. Identify how
much of the problem can be
addressed with training.
13
Step 2- Identify the desired outcome.
Now that we have identified the problem,
it’s time to identify the desired outcome.
Identify some measurable changes in
knowledge, attitude, skills or behavior that
the learners need to achieve in order to
overcome the gaps in their performance.
Identifying the learning
objectives at the beginning
will help you move in the
right direction.
It will help you gather
adequate materials and
prepare the relevant
questionnaire for further
analysis.
14
Step 3- Frame an Assessment strategy.
Now that we have identified the desired
outcome, it’s time to frame an assessment
strategy. The assessment module will
measure the changes in knowledge,
attitude, skills or behavior that the learners
achieve after the completion of the course.
Identifying the assessments at the
beginning will help you gather content and
align the course design and development
to the core objectives.
15
Know Your Audience
Step 4- Develop a good understanding of you target audience.
Your target audience will play a crucial role in your search for the best training
program. A good understanding of their background and current skills will lead
you to the training that will best suit their taste and requirements. Some of the
key areas you need to focus on are listed below.
16
Role of the Learner
Interviews and workshops
revealed that the construction
site workers hail from different
communities and educational
backgrounds. Nevertheless,
they belong to the same age
group and have similar
preferences. Their computer
skills are limited.
Role of the Instructor: The
role of the instructor is also
very important and should
be taken into account.
Interview the instructors to
find out what they expect
from the training. In
Instructor-led training, they
are the ones interacting with
the learner and
implementing your design
ideas. Consequently, their
input regarding learner
preferences and capabilities
are invaluable.
The data collected will provide
invaluable input in the design and
development of a suitable training
program for the construction
workers.
17
Know Your Restraints
Step 5- Identify the restraints.
Before you move on to the next
phase, it is important to make a
note of the resources available
for the implementation of the
course. This includes the
technical or financial
constraints which might have
an impact on your course.
This is also a good time
to do a thorough content
analysis to identify the
gaps in the material
available to you.
It will be a good idea to
establish a sound query
exchange process at this
stage.
18
Design
In the design phase, you primarily
answer one simple question - ‘How
do I make this course engaging and
effective?’
To make the course appealing, you
can use a variety of design
strategies. In this section, we will use
practical examples to understand
how you can apply various design
strategies to make you training
program more appealing.
Let’s look at an example to understand this better. In
this example, a restaurant chain wants to train their
employees on fire safety regulations.
19
Step 1- Come up with a central theme.
The first result of your brainstorming
session will be an overarching concept that
sets the tone for your course. This theme
will be your guide in arranging the content,
graphic and technical elements throughout
the course.
The Theme
Select a method that will hold
throughout the course and give you
enough scope to fit in everything
you wish to present in the course.
In our example, we will
use the restaurant
kitchen as the theme—a
backdrop for all the case
studies and scenarios.
20
Design Strategies
Step 2- Select Design Strategies.
Within a central theme, you can
engage various design strategies.
The popular design strategies
employed by designers are
threaded-scenarios, branched
scenarios, role-play, stories,
games, and so on. Animation
and simulations are also used
frequently.
All these methods allow ample
room for the learners to guide
their own learning process. This
gives them an opportunity to test
and evaluate their own skills.
In our example, we will place the
learner in a real-life situation where
a fire has broken out in the kitchen.
We will then ask them to select a
possible course of action.
Here we are using threaded scenario
and role-play as our design strategy.
21
Course Structure
Step 3- Arrange the content in a logical order.
After you have selected the design strategies, try
to break-up the training material to small
independent learning units that will be arranged
in sequence. This will be your course structure.
While arranging the learning units, keep in mind
the technical requirements of the course.
You can put all these in a design document that
will serve as a blue-print at the Development
stage.
22
Deliverables
In the rapid-prototyping model, you will go
through an evaluation phase at the end of this
phase. Which means you will have a set of
deliverables which will be evaluated.
At this stage, you can deliver a design
document which will be evaluated for flow,
design flaws and compliance with client
specifications.
23
Development
In the Development stage, you will
put all your plans in action.
You will now start building along the
design blueprint created in the
previous phase. The success of this
phase depends on how good and
detailed the design plan is. The
design gaps identified now can be
used to improve the design plan,
saving expensive re-works later on.
Let us discuss some of the methods
that make developing courses faster
and easier.
24
Tools
In recent years, the use of software
tools has simplified the development
process to a large extent.
These tools allow an individual to
produce high-quality training
materials, without the need of coding.
The developer has a large selection of
templates at his disposal, to which he
can add a huge number of
interactivities and then publish the
course.
25
Templates
Another way of reducing production time
is the use of templates. If you maintain a
repository of reusable templates, you will
be able to select from a vast selection of
templates when you build a course.
This is also for reusable graphic elements,
that can be used after minor
modifications.
26
Step 1- Start storyboarding.
In a storyboard, the course design is translated
into screens, which are arranged in a
chronological order. Each screen contains
detailed description of all the elements, such as,
script, image, animation, audio, transitions, etc.
and the order in which they appear on the
screen.
If you are using tools, the storyboarding stage
will directly lead to the development stage.
Otherwise, the storyboard will go to the
production team for the final production.
27
Editing
Step 2 – Conduct a self-review.
Self review is a must. After finishing a part, take a break and then come
back to review your work. You will be amazed at the number of
misspellings, typos and small errors you will discover. You can also check
if each screen maintains continuity with the screens that precede or follow
it.
A compliance check also ensures that all the graphic and technical
elements are functioning properly.
28
Testing
Step 3- Testing
Testing is usually done on a fully
functional product. However, testing
small pilot versions will save you
time and effort in the long run.
For testing, use the same
environment that will be used at the
learner’s end. This will ensure that
the product will perform flawlessly in
the customer’s learning environment.
29
Deliverables
In the rapid-prototyping model, you will go
through an evaluation phase at the end of this
phase. Which means you will have a set of
deliverables which will be evaluated.
At this stage, you will deliver different versions
of the finished product which will be evaluated
for flow, design flaws and compliance with client
specifications.
30
Implementation
This is the Delivery stage that we have been working towards so far.
Implementation involves the successful deployment of a training course in
the client’s learning environment. Sometimes the implementation of a course
also includes providing support for trouble-shooting purposes.
Before implementing a whole course, try to implement a pilot course to a
small audience. This will help identify the technical or content related issues,
giving you an opportunity to make the necessary changes.
31
Evaluation
The evaluation of an e-learning product
happens in two phases. Formative evaluation
occurs throughout the project life-cycles. The
deliverables are tested for design and
functional flaws.
Summative evaluation occurs after successful
implementation. Summative evaluation is based
on the feedback provided by the users on the
overall effectiveness of the course.
32
Summary
We have now come to the end of this
presentation.
You should now be able to:
1. Identify the five phases of ADDIE.
2. Identify the advantages of ADDIE.
3. Identify the advantages of Rapid
Prototyping.
4. Identify the tasks involved in each
phase of ADDIE.

ADDIE- An Instructional Systems Design Model

  • 1.
  • 2.
    2 In this presentation,we will use ADDIE as a guide to discuss the life-cycle of an e-learning project, with special focus on your role in each phase.
  • 3.
    3 At the endof this lesson, you will be able to: 1. Identify the five phases of ADDIE. 2. Identify the advantages of ADDIE. 3. Identify the advantages of Rapid Prototyping. 4. Identify the tasks involved in each phase of ADDIE.
  • 4.
    4 ADDIE is anInstructional Systems Design (ISD) model. It categorizes all the tasks involved in a typical e-learning project life-cycle into five linear phases. The completion of one phase leads to another. ADDIE aims to provide the framework for the development of training courses in a systematic and cost-effective manner. The five phases of ADDIE are – Analysis, Design, Development, Implementation and Evaluation.
  • 5.
    5 Advantages of ADDIE 1.ADDIE is a generic Instructional Design model that can be used to develop a wide range of instructional materials. 2. The neat arrangement of ADDIE ensures that none of the tasks are left-out for a later stage, thereby saving time and effort. 3. By freezing the Design phase before Development starts, the model avoids expensive re-works.
  • 6.
    Disadvantages of ADDIE 6 Thecritics argue that ADDIE does not allow any room for design improvements. In cases where client inputs and feedback are received in installments, design improvements are a necessity. In such cases, the ADDIE model can lead to expensive re-works.
  • 7.
    7 Rapid Prototyping Rapid Prototypingis a popular variation of the ADDIE model. It is a non- linear model in which a prototype (a functional model) of the final product is used to identify design and functional defects at an early stage. This makes it easier to rectify the errors. Consequently, the design and development is carried out simultaneously, leaving adequate room for improvements and early revisions.
  • 8.
    8 Advantages of RapidPrototyping 1. Identifying errors earlier during the design and development phase reduces cost and risk. 2. In a prototype, you can see content, graphics and technical elements together for the first time. This makes it easier for the end-user to visualize the whole course and provide more constructive feedback. 3. Design and development occur simultaneously, encouraging greater collaboration between the design and development team. 4. The continuous process of evaluation results in frequent inputs from the end-user, making the training much more effective.
  • 9.
    9 Disadvantages of RapidPrototyping According to critics, rapid prototyping is not without its risks. A prototype reflects a few select features of the final product, leaving out other important details. These can result in costly revisions later on. Another major disadvantage is that building multiple prototypes can take up precious production time. So, it might not work for large projects. Sometimes a prototype can result in too many revisions, which can delay the production process.
  • 10.
    A construction company wantsto train their employees on safety measures to be adopted at construction sites. 10 Analysis is the first phase of ADDIE and by far the most important phase. In this phase, you gather all the necessary information and materials required to design the course. Let’s look at an example to understand this better.
  • 11.
    11 Gap Analysis Step 1-Study the current training method and identify the gaps. Your first task in this phase is to find out why the course is needed in the first place. For that, you need to analyze the current training method and test the existing skills of the target audience. The workers in our example have no knowledge of the safety measures that make their work environment safe. They also need to recognize certain hazards in construction sites that can jeopardize their safety.
  • 12.
     In ourexample, the construction workers are trained by instructors on the use of safety equipments.  Tests and workshops reveal that the workers cannot identify the specific factors, like railing position and scaffold height that make their work area unsafe.  A good training on safety regulations, with the aid of practical examples, will address the problem. 12 Performing a Gap Analysis  Take part in the current training program and go through the materials carefully.  Analyze the current performance level. Prepare tests, conduct workshops and interview a representative section of the target audience.  Identify the problem. Identify how much of the problem can be addressed with training.
  • 13.
    13 Step 2- Identifythe desired outcome. Now that we have identified the problem, it’s time to identify the desired outcome. Identify some measurable changes in knowledge, attitude, skills or behavior that the learners need to achieve in order to overcome the gaps in their performance. Identifying the learning objectives at the beginning will help you move in the right direction. It will help you gather adequate materials and prepare the relevant questionnaire for further analysis.
  • 14.
    14 Step 3- Framean Assessment strategy. Now that we have identified the desired outcome, it’s time to frame an assessment strategy. The assessment module will measure the changes in knowledge, attitude, skills or behavior that the learners achieve after the completion of the course. Identifying the assessments at the beginning will help you gather content and align the course design and development to the core objectives.
  • 15.
    15 Know Your Audience Step4- Develop a good understanding of you target audience. Your target audience will play a crucial role in your search for the best training program. A good understanding of their background and current skills will lead you to the training that will best suit their taste and requirements. Some of the key areas you need to focus on are listed below.
  • 16.
    16 Role of theLearner Interviews and workshops revealed that the construction site workers hail from different communities and educational backgrounds. Nevertheless, they belong to the same age group and have similar preferences. Their computer skills are limited. Role of the Instructor: The role of the instructor is also very important and should be taken into account. Interview the instructors to find out what they expect from the training. In Instructor-led training, they are the ones interacting with the learner and implementing your design ideas. Consequently, their input regarding learner preferences and capabilities are invaluable. The data collected will provide invaluable input in the design and development of a suitable training program for the construction workers.
  • 17.
    17 Know Your Restraints Step5- Identify the restraints. Before you move on to the next phase, it is important to make a note of the resources available for the implementation of the course. This includes the technical or financial constraints which might have an impact on your course. This is also a good time to do a thorough content analysis to identify the gaps in the material available to you. It will be a good idea to establish a sound query exchange process at this stage.
  • 18.
    18 Design In the designphase, you primarily answer one simple question - ‘How do I make this course engaging and effective?’ To make the course appealing, you can use a variety of design strategies. In this section, we will use practical examples to understand how you can apply various design strategies to make you training program more appealing. Let’s look at an example to understand this better. In this example, a restaurant chain wants to train their employees on fire safety regulations.
  • 19.
    19 Step 1- Comeup with a central theme. The first result of your brainstorming session will be an overarching concept that sets the tone for your course. This theme will be your guide in arranging the content, graphic and technical elements throughout the course. The Theme Select a method that will hold throughout the course and give you enough scope to fit in everything you wish to present in the course. In our example, we will use the restaurant kitchen as the theme—a backdrop for all the case studies and scenarios.
  • 20.
    20 Design Strategies Step 2-Select Design Strategies. Within a central theme, you can engage various design strategies. The popular design strategies employed by designers are threaded-scenarios, branched scenarios, role-play, stories, games, and so on. Animation and simulations are also used frequently. All these methods allow ample room for the learners to guide their own learning process. This gives them an opportunity to test and evaluate their own skills. In our example, we will place the learner in a real-life situation where a fire has broken out in the kitchen. We will then ask them to select a possible course of action. Here we are using threaded scenario and role-play as our design strategy.
  • 21.
    21 Course Structure Step 3-Arrange the content in a logical order. After you have selected the design strategies, try to break-up the training material to small independent learning units that will be arranged in sequence. This will be your course structure. While arranging the learning units, keep in mind the technical requirements of the course. You can put all these in a design document that will serve as a blue-print at the Development stage.
  • 22.
    22 Deliverables In the rapid-prototypingmodel, you will go through an evaluation phase at the end of this phase. Which means you will have a set of deliverables which will be evaluated. At this stage, you can deliver a design document which will be evaluated for flow, design flaws and compliance with client specifications.
  • 23.
    23 Development In the Developmentstage, you will put all your plans in action. You will now start building along the design blueprint created in the previous phase. The success of this phase depends on how good and detailed the design plan is. The design gaps identified now can be used to improve the design plan, saving expensive re-works later on. Let us discuss some of the methods that make developing courses faster and easier.
  • 24.
    24 Tools In recent years,the use of software tools has simplified the development process to a large extent. These tools allow an individual to produce high-quality training materials, without the need of coding. The developer has a large selection of templates at his disposal, to which he can add a huge number of interactivities and then publish the course.
  • 25.
    25 Templates Another way ofreducing production time is the use of templates. If you maintain a repository of reusable templates, you will be able to select from a vast selection of templates when you build a course. This is also for reusable graphic elements, that can be used after minor modifications.
  • 26.
    26 Step 1- Startstoryboarding. In a storyboard, the course design is translated into screens, which are arranged in a chronological order. Each screen contains detailed description of all the elements, such as, script, image, animation, audio, transitions, etc. and the order in which they appear on the screen. If you are using tools, the storyboarding stage will directly lead to the development stage. Otherwise, the storyboard will go to the production team for the final production.
  • 27.
    27 Editing Step 2 –Conduct a self-review. Self review is a must. After finishing a part, take a break and then come back to review your work. You will be amazed at the number of misspellings, typos and small errors you will discover. You can also check if each screen maintains continuity with the screens that precede or follow it. A compliance check also ensures that all the graphic and technical elements are functioning properly.
  • 28.
    28 Testing Step 3- Testing Testingis usually done on a fully functional product. However, testing small pilot versions will save you time and effort in the long run. For testing, use the same environment that will be used at the learner’s end. This will ensure that the product will perform flawlessly in the customer’s learning environment.
  • 29.
    29 Deliverables In the rapid-prototypingmodel, you will go through an evaluation phase at the end of this phase. Which means you will have a set of deliverables which will be evaluated. At this stage, you will deliver different versions of the finished product which will be evaluated for flow, design flaws and compliance with client specifications.
  • 30.
    30 Implementation This is theDelivery stage that we have been working towards so far. Implementation involves the successful deployment of a training course in the client’s learning environment. Sometimes the implementation of a course also includes providing support for trouble-shooting purposes. Before implementing a whole course, try to implement a pilot course to a small audience. This will help identify the technical or content related issues, giving you an opportunity to make the necessary changes.
  • 31.
    31 Evaluation The evaluation ofan e-learning product happens in two phases. Formative evaluation occurs throughout the project life-cycles. The deliverables are tested for design and functional flaws. Summative evaluation occurs after successful implementation. Summative evaluation is based on the feedback provided by the users on the overall effectiveness of the course.
  • 32.
    32 Summary We have nowcome to the end of this presentation. You should now be able to: 1. Identify the five phases of ADDIE. 2. Identify the advantages of ADDIE. 3. Identify the advantages of Rapid Prototyping. 4. Identify the tasks involved in each phase of ADDIE.