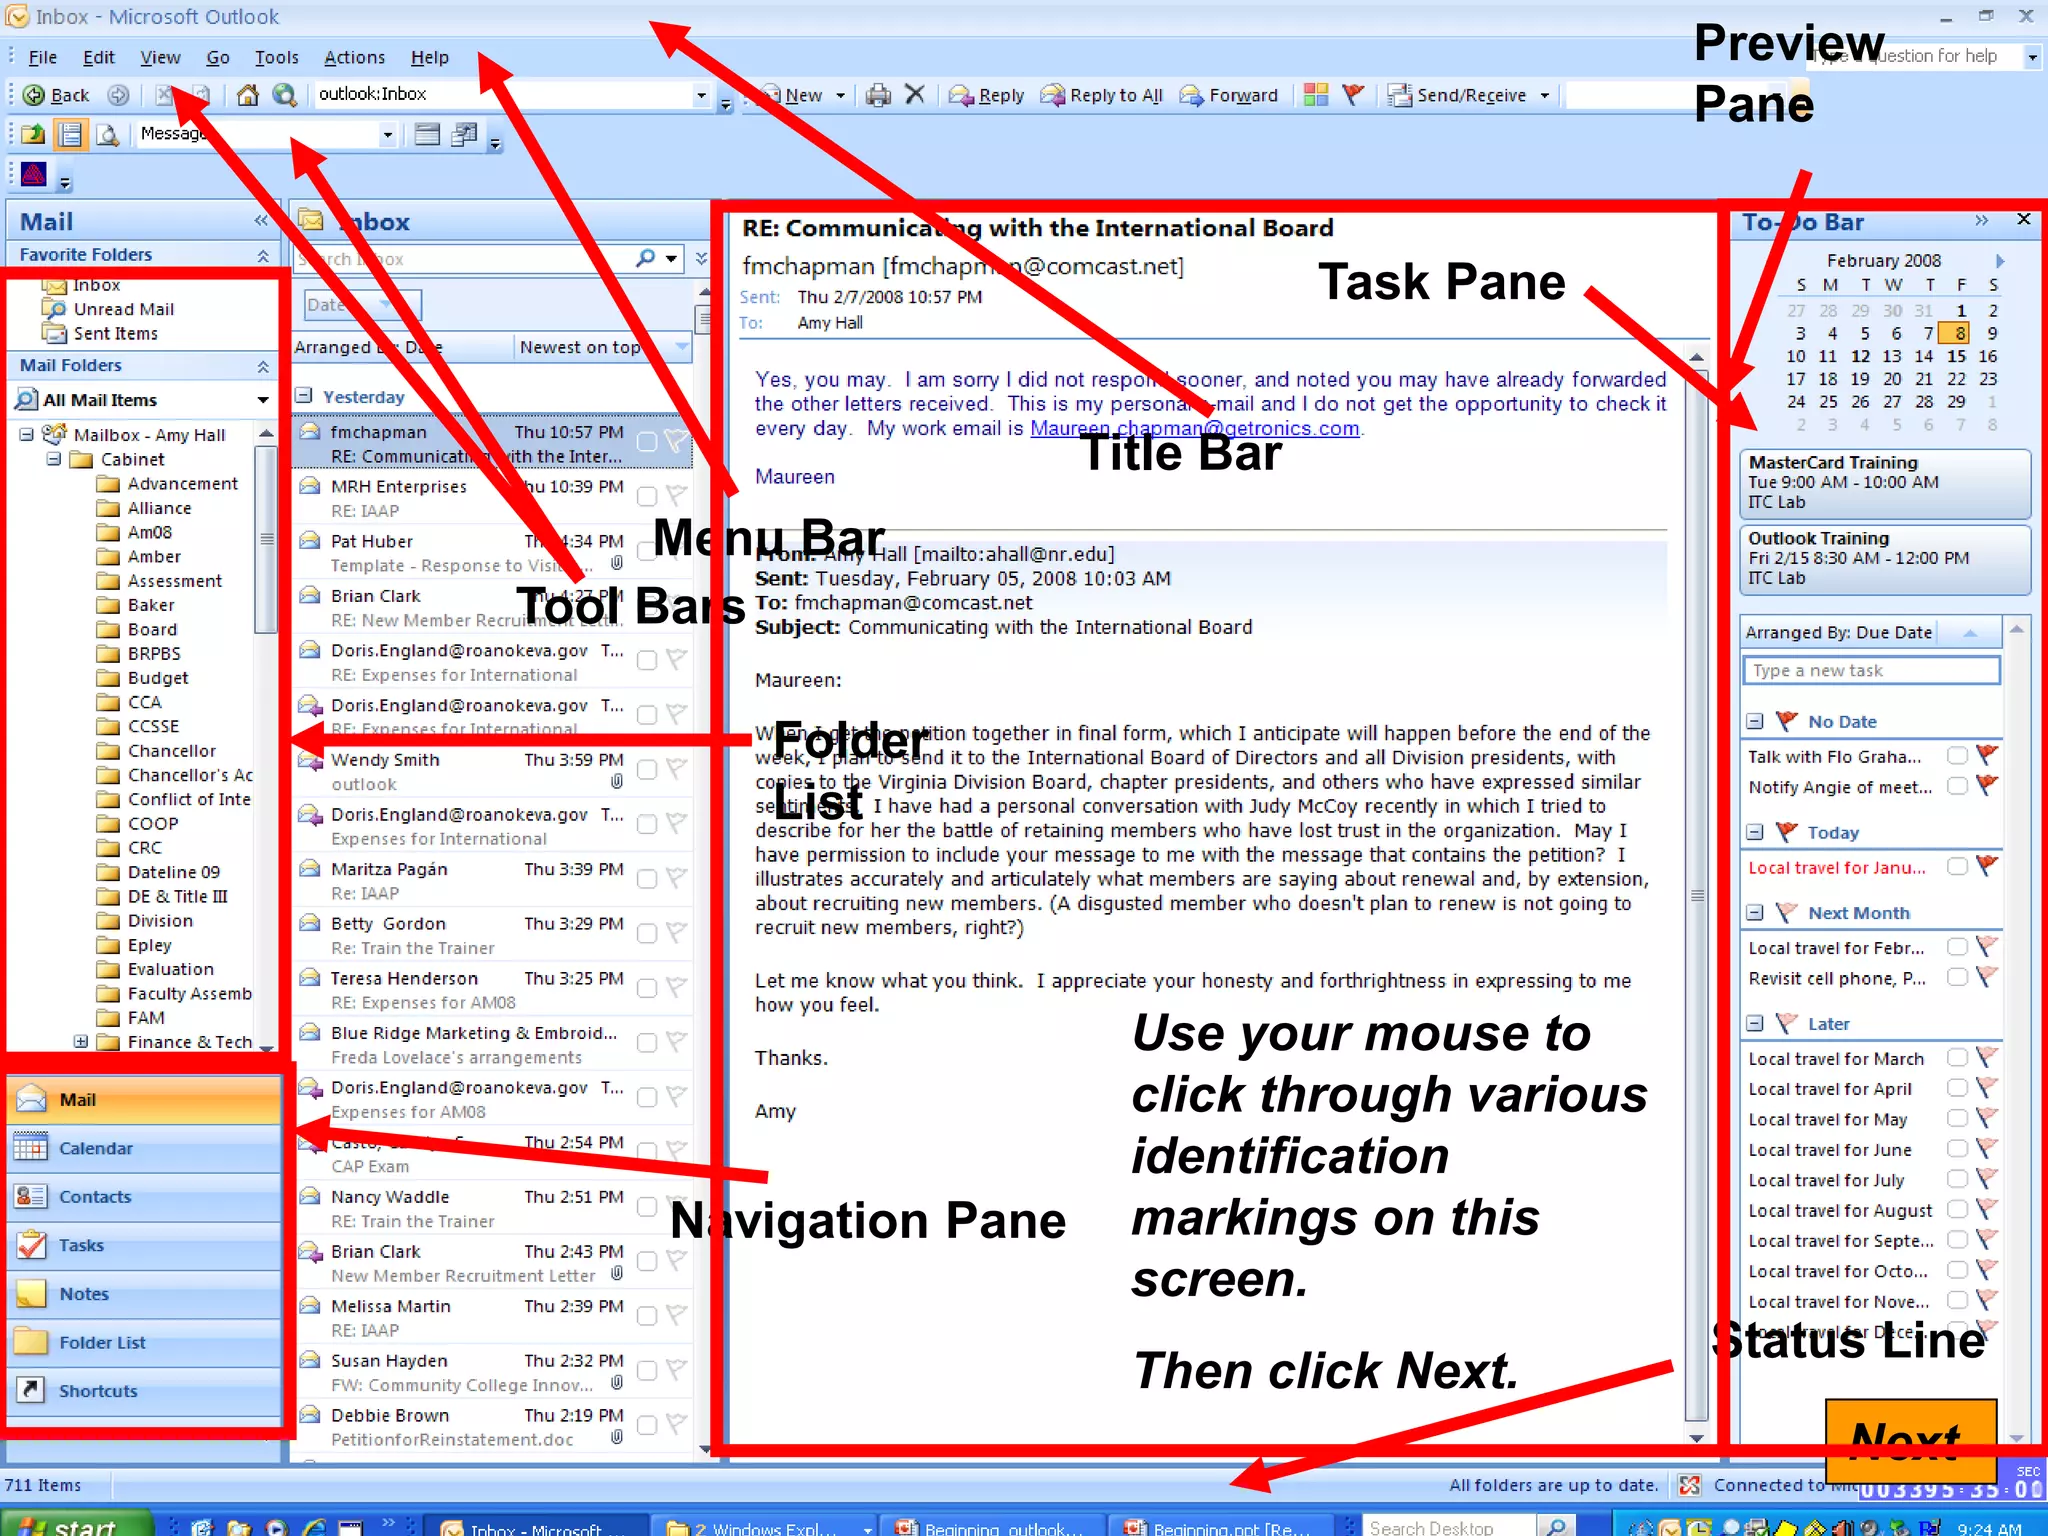
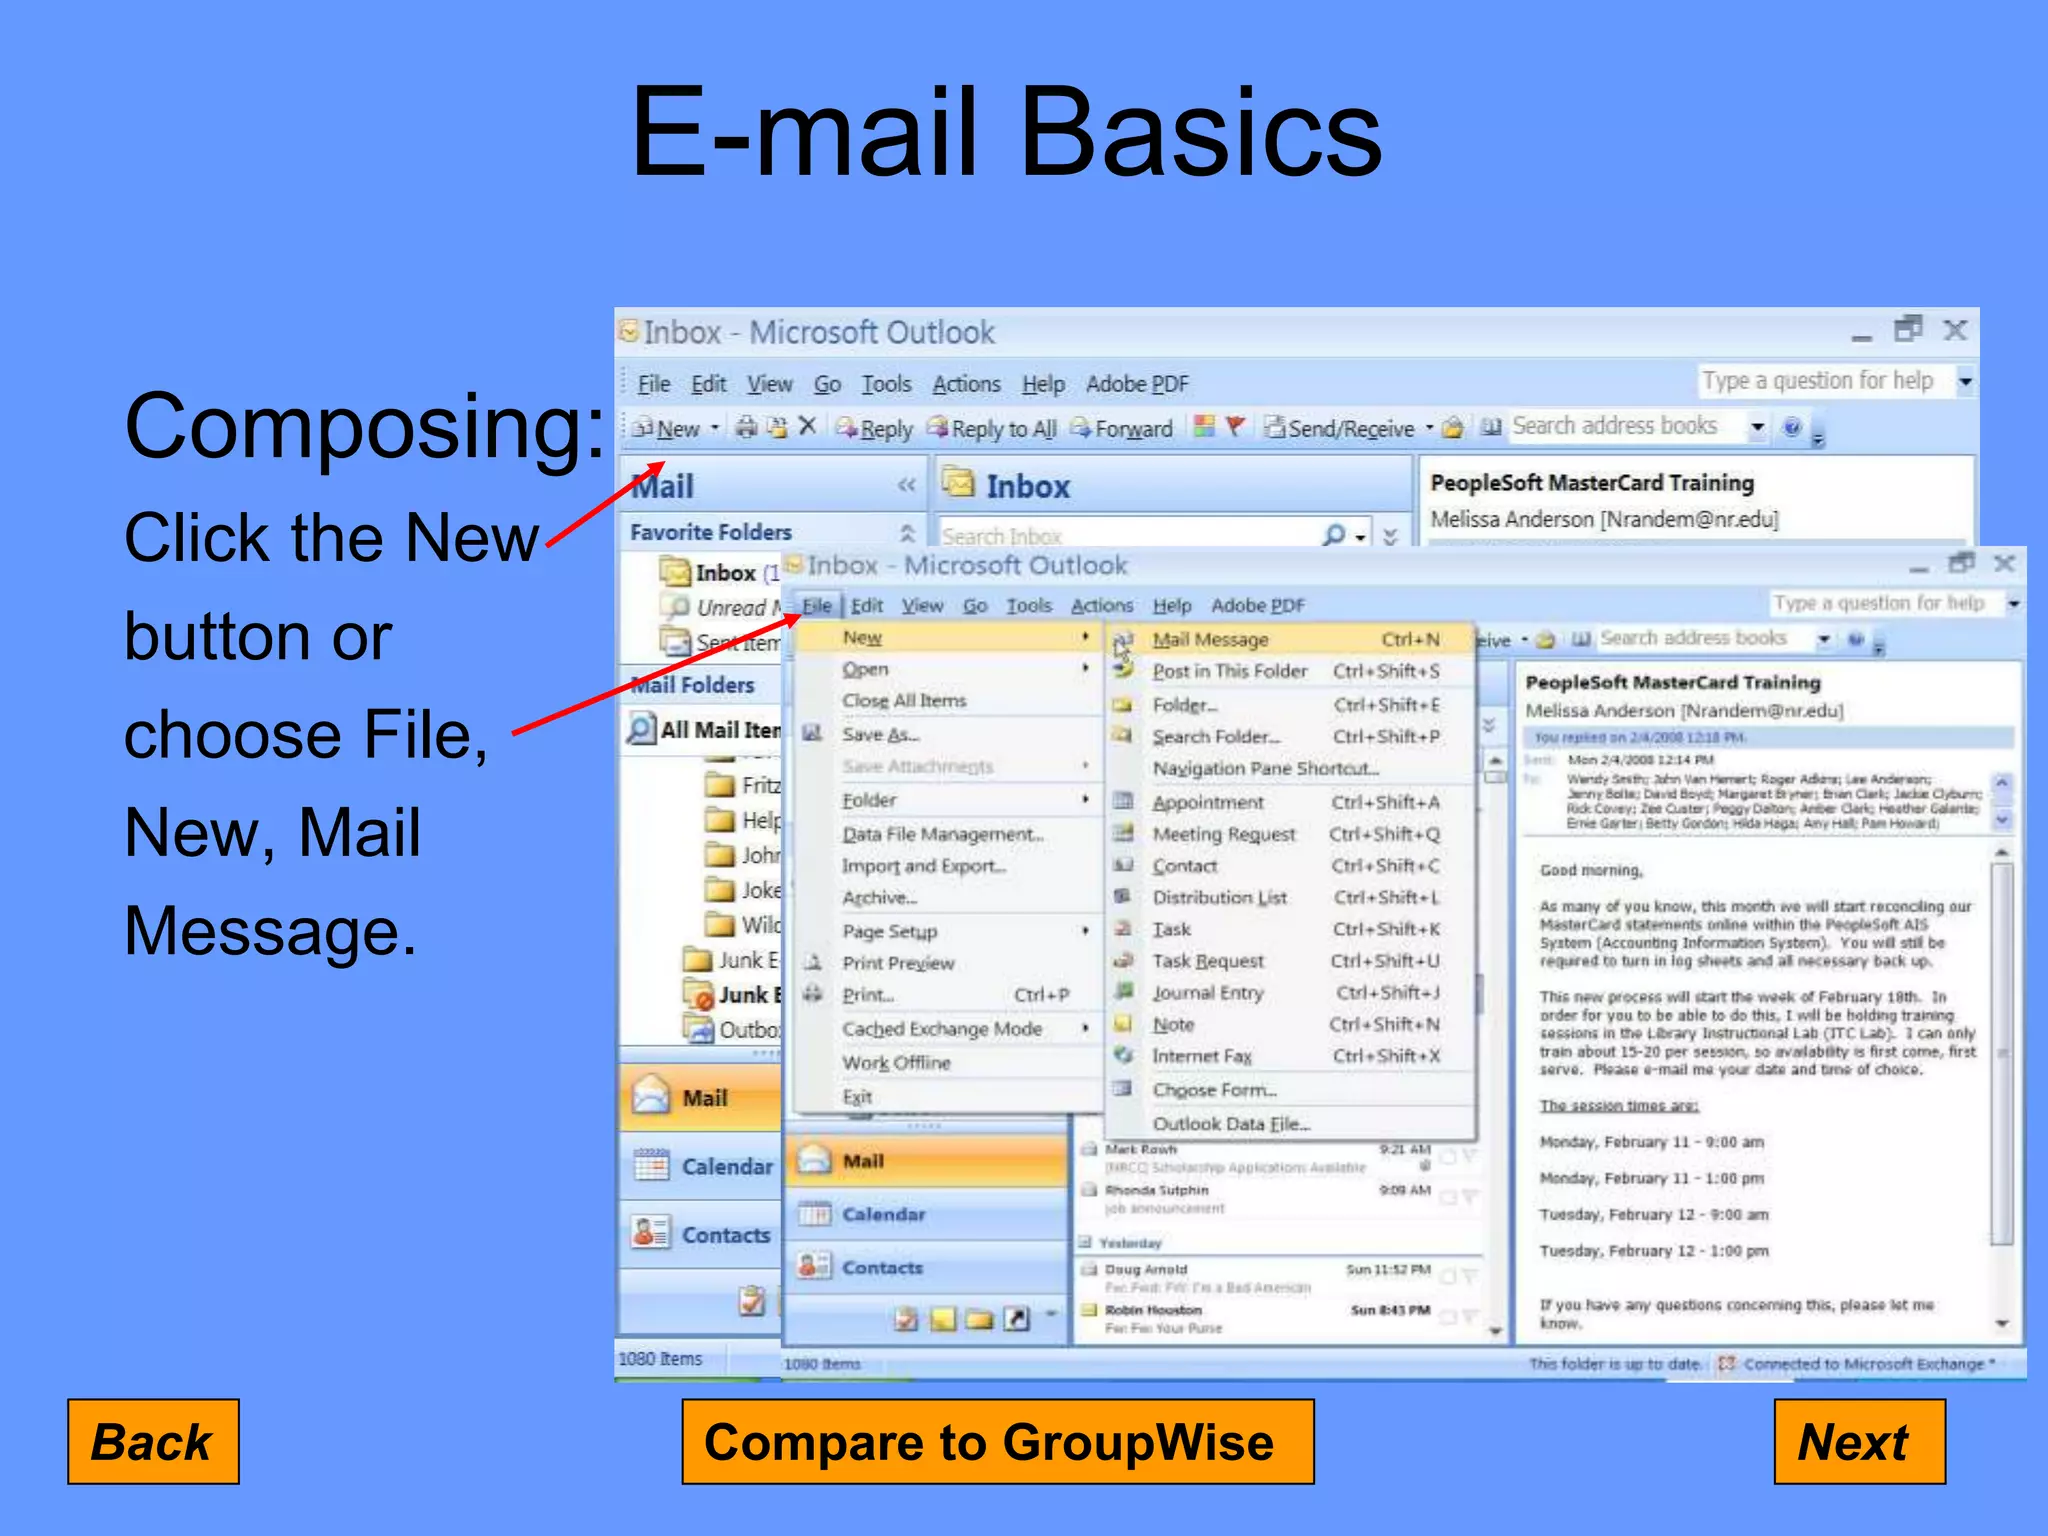
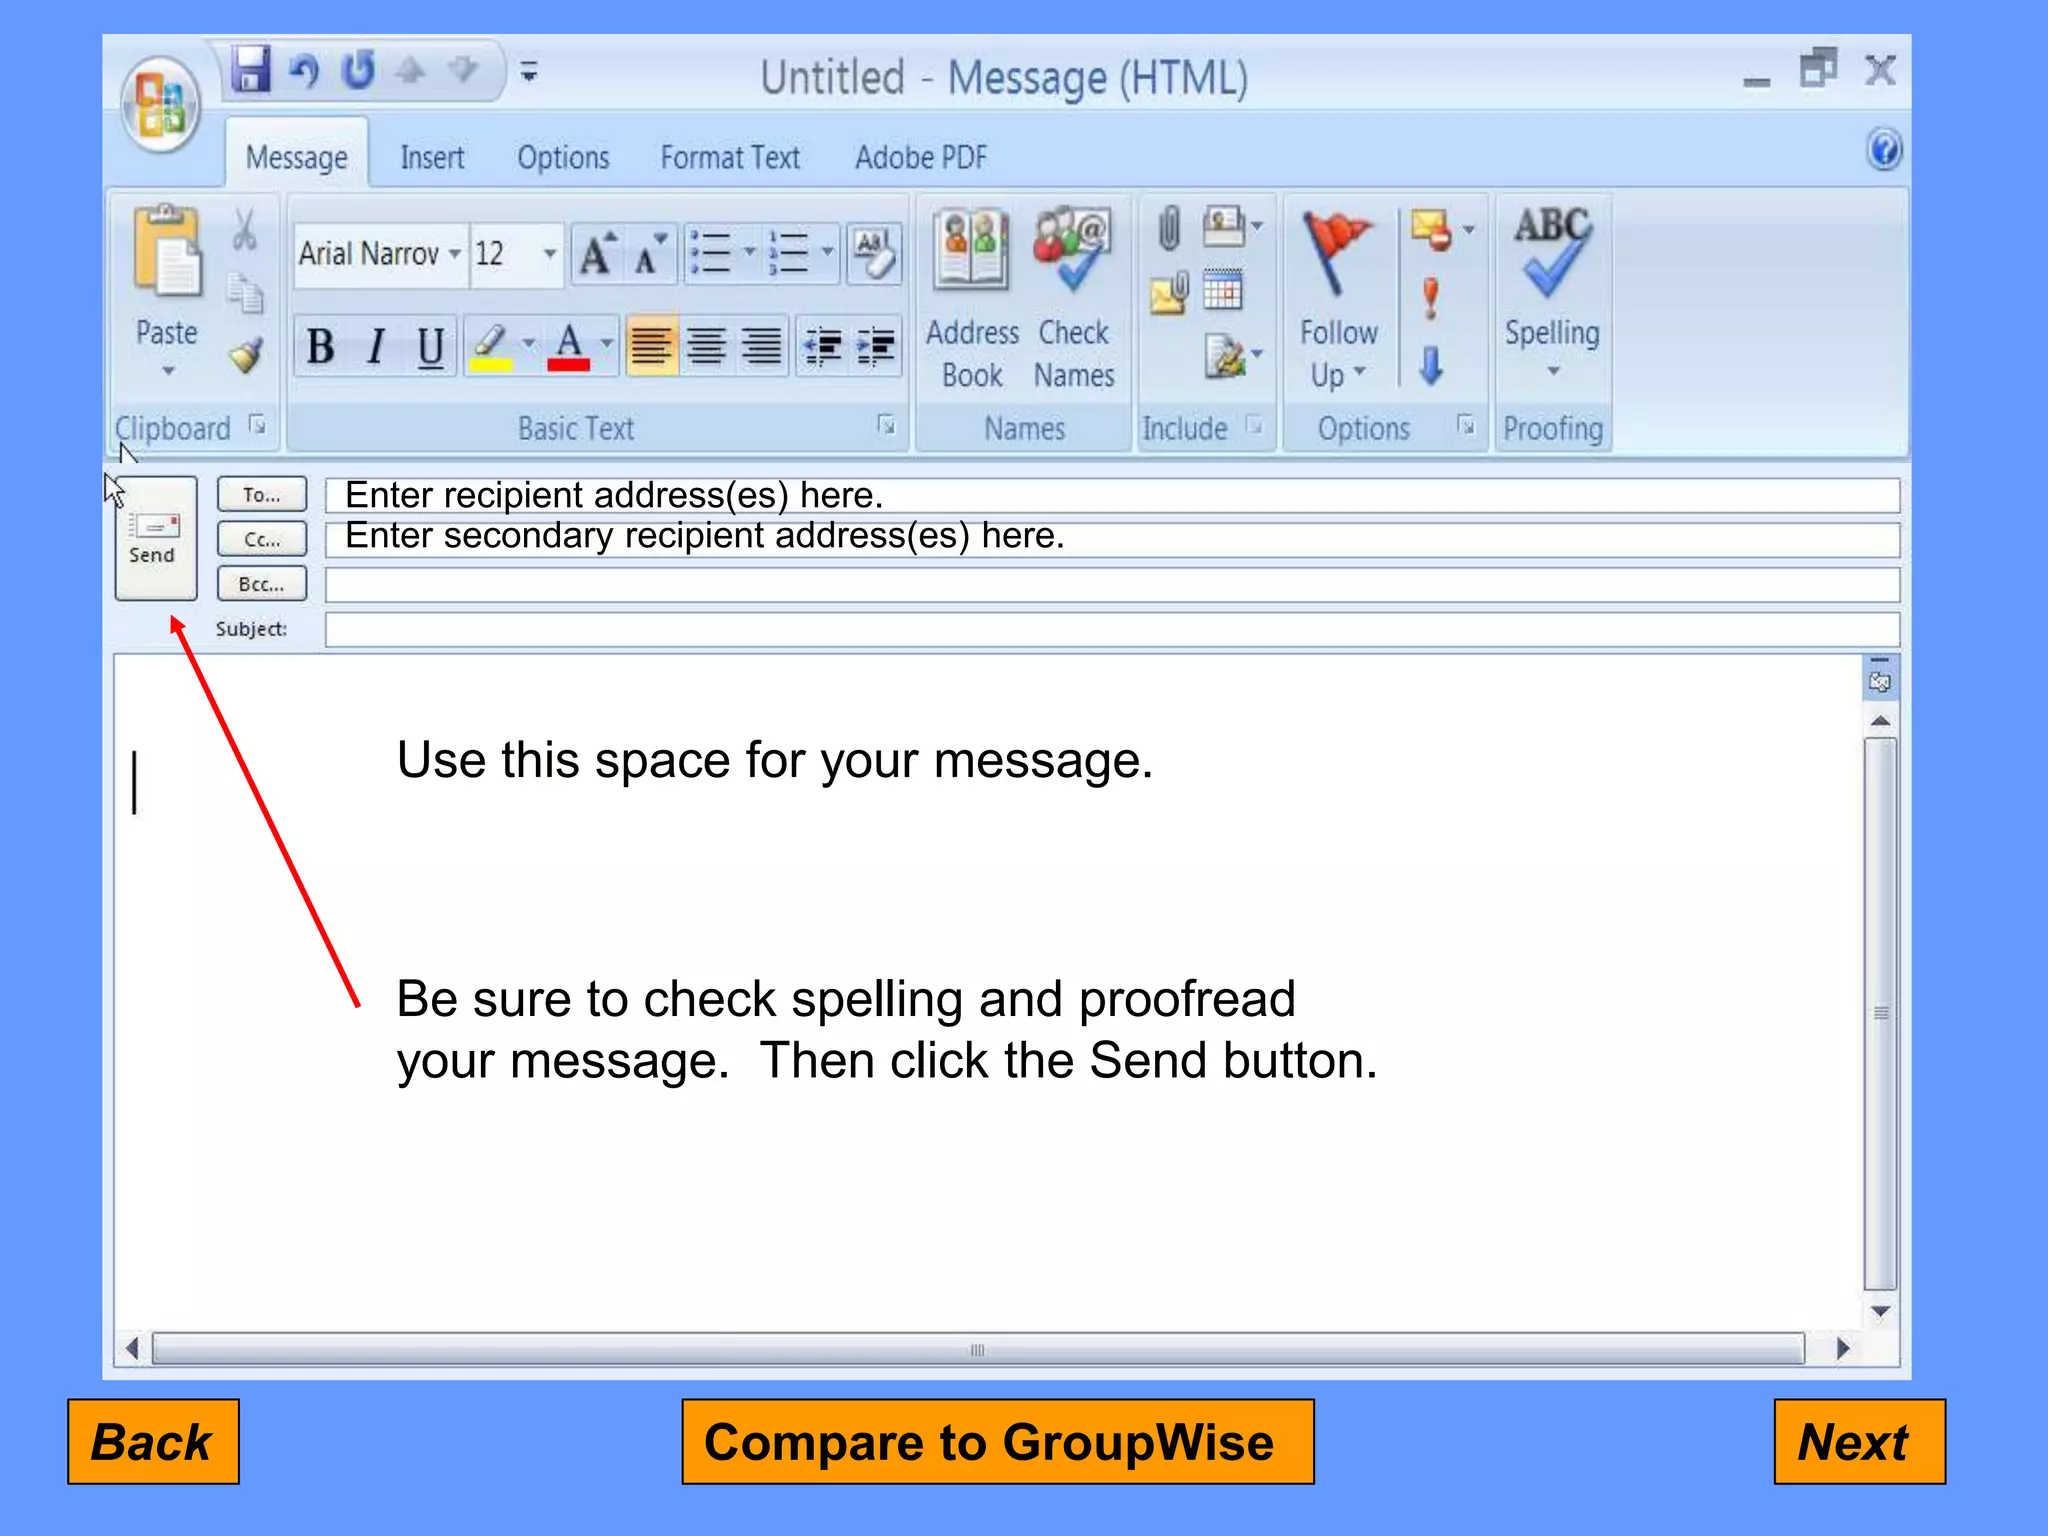
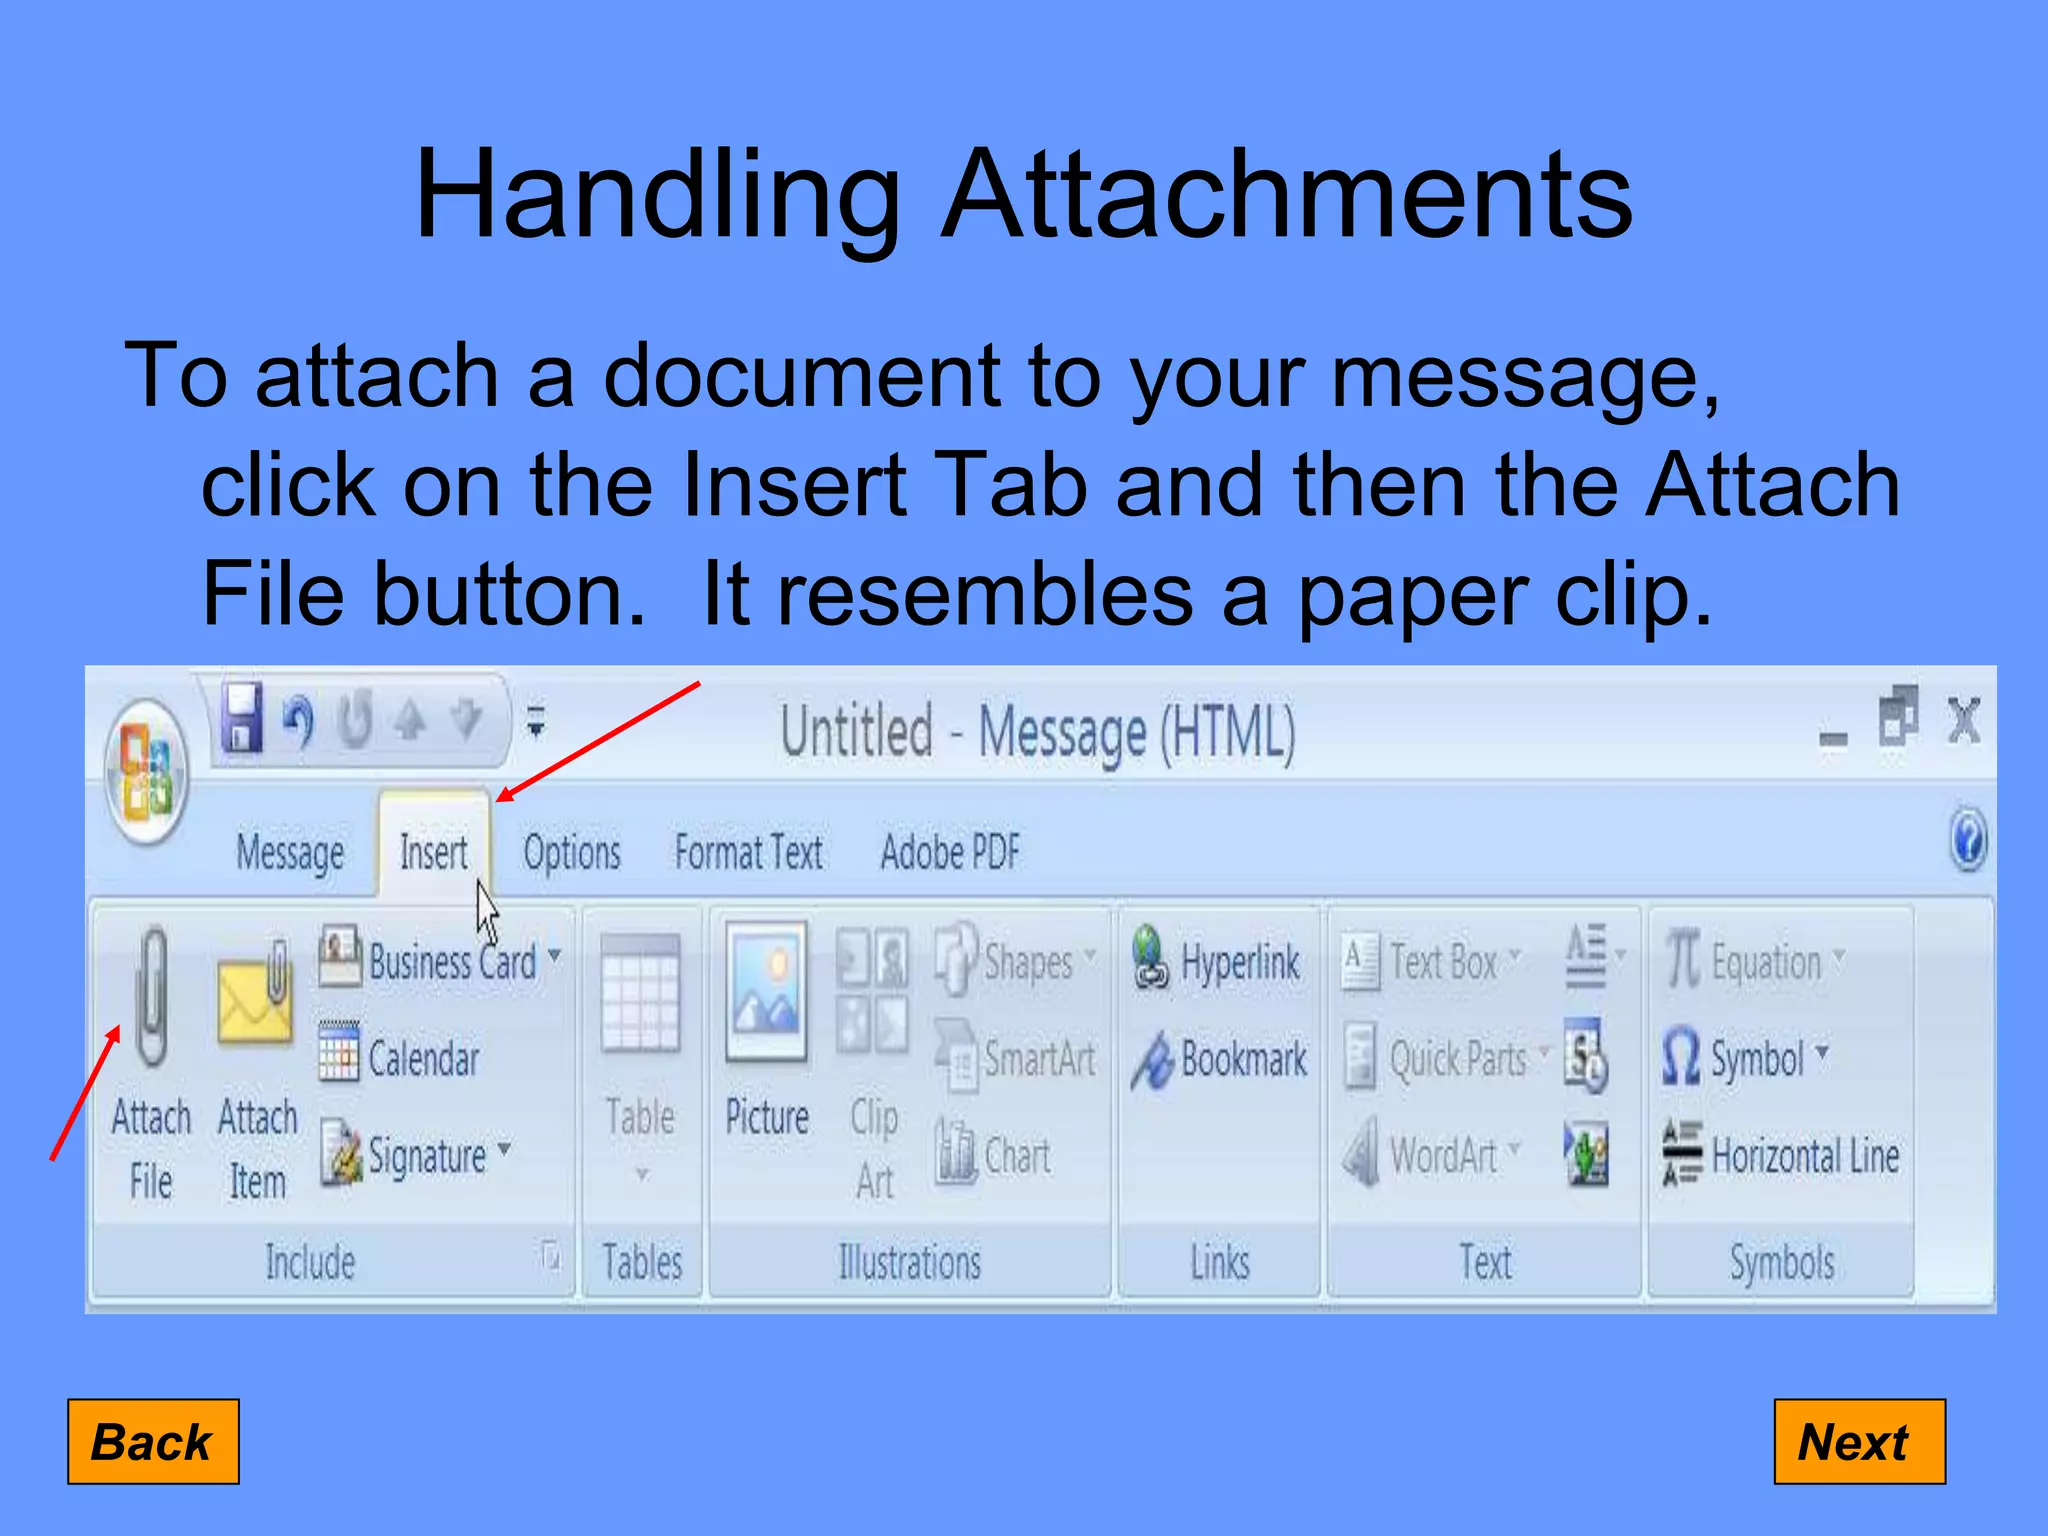
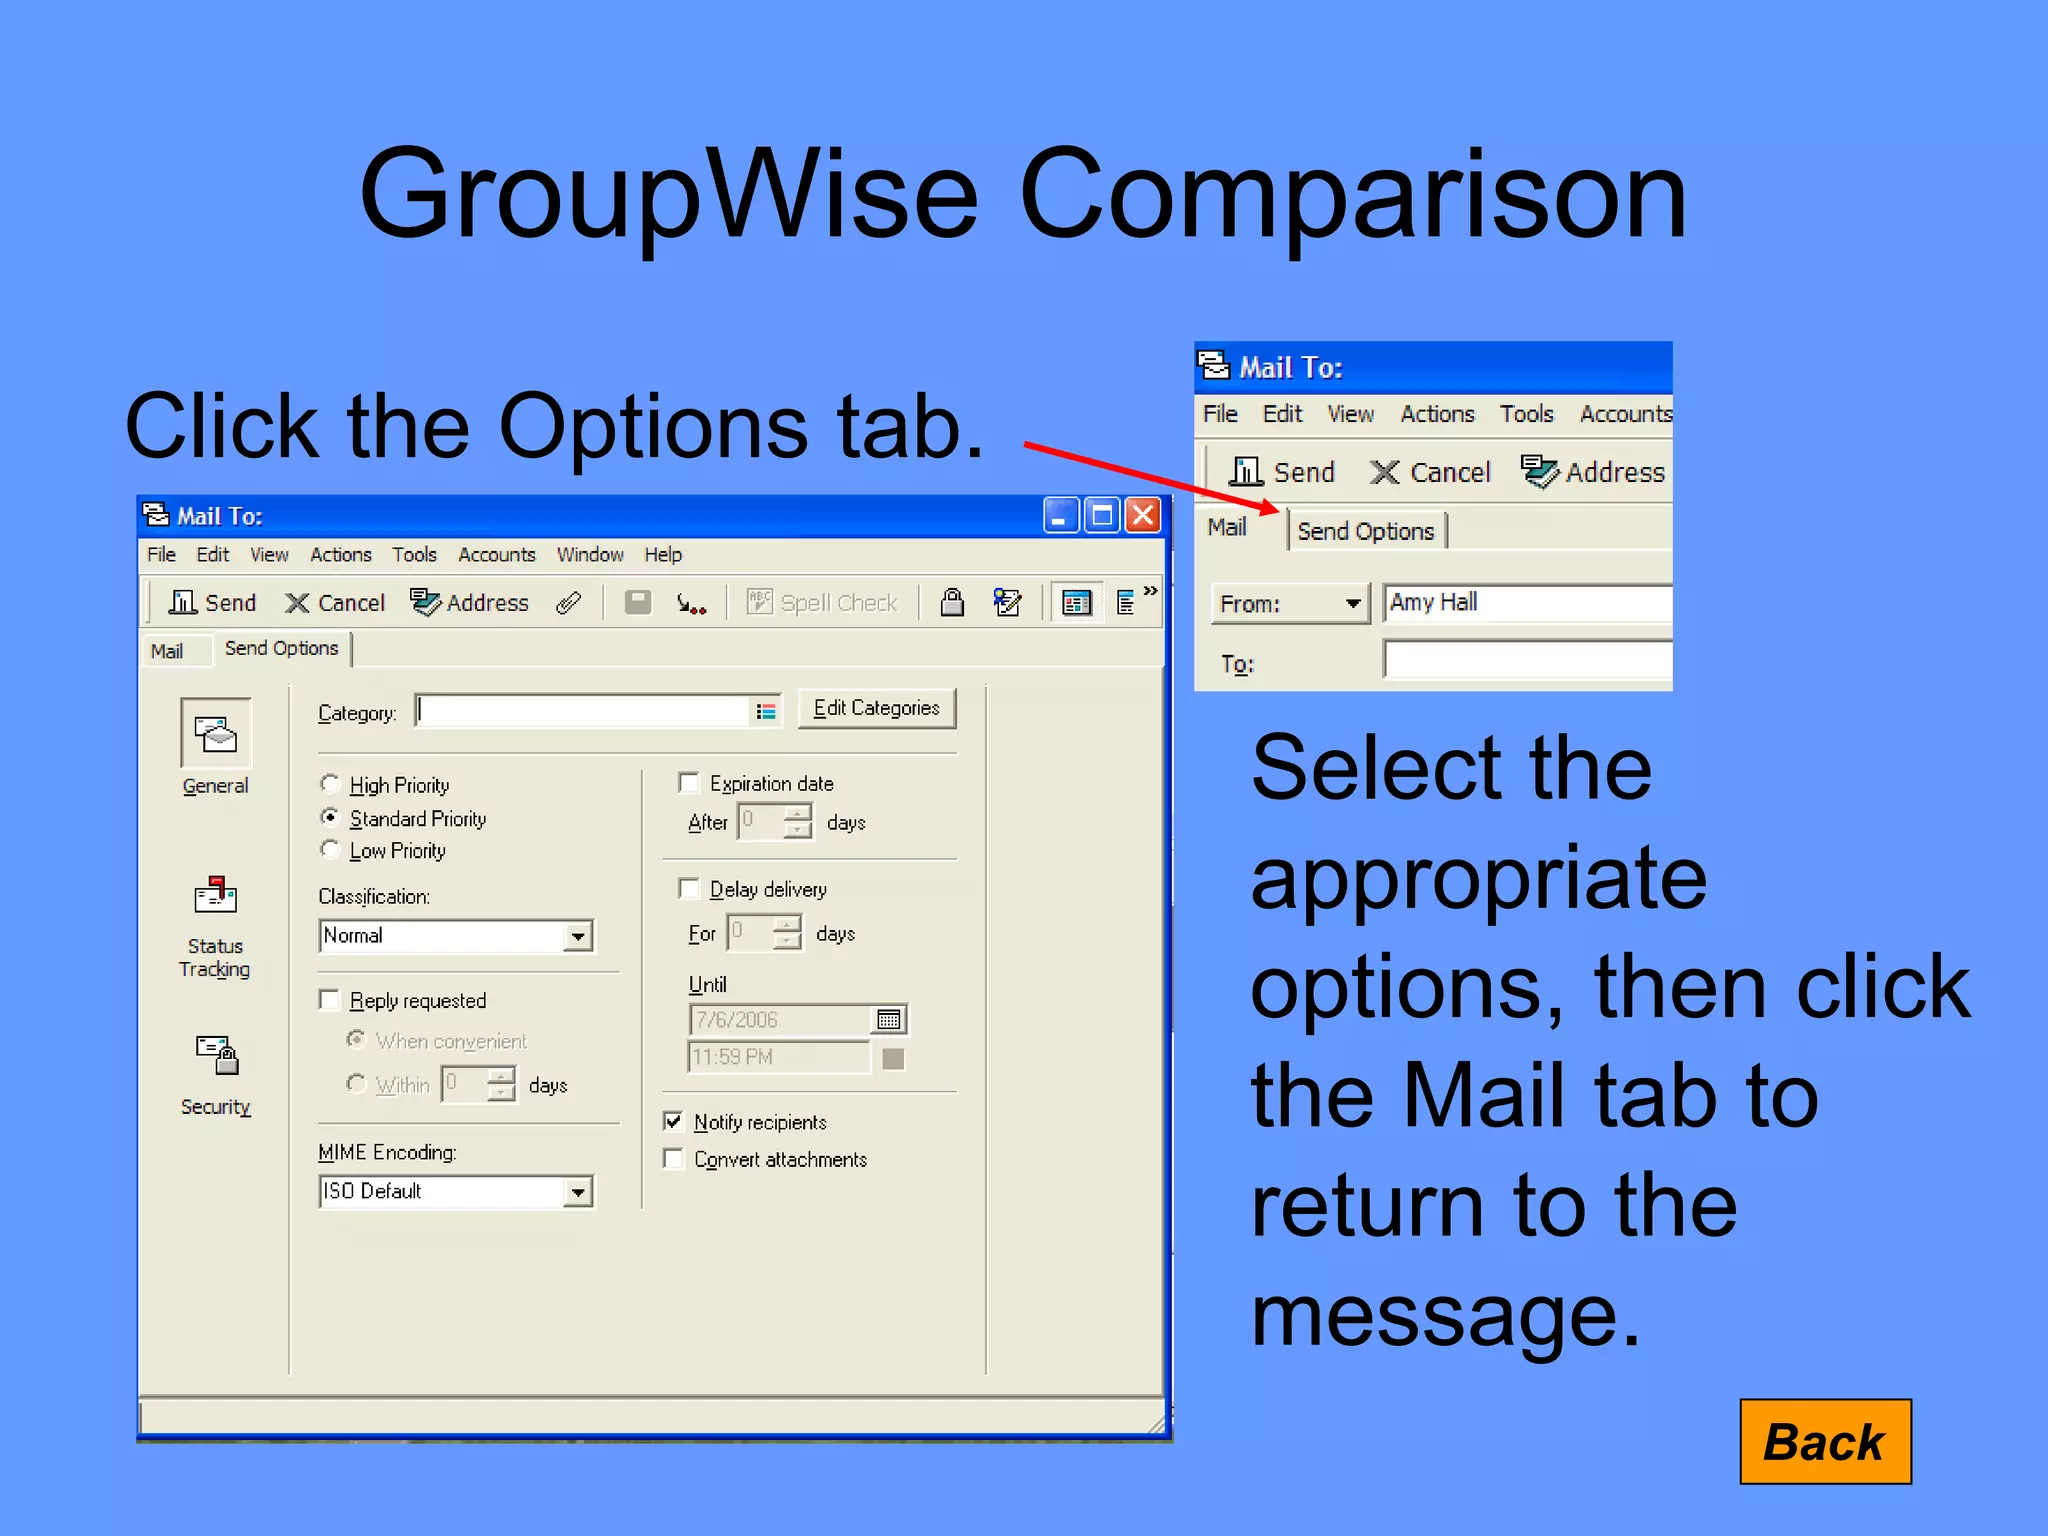
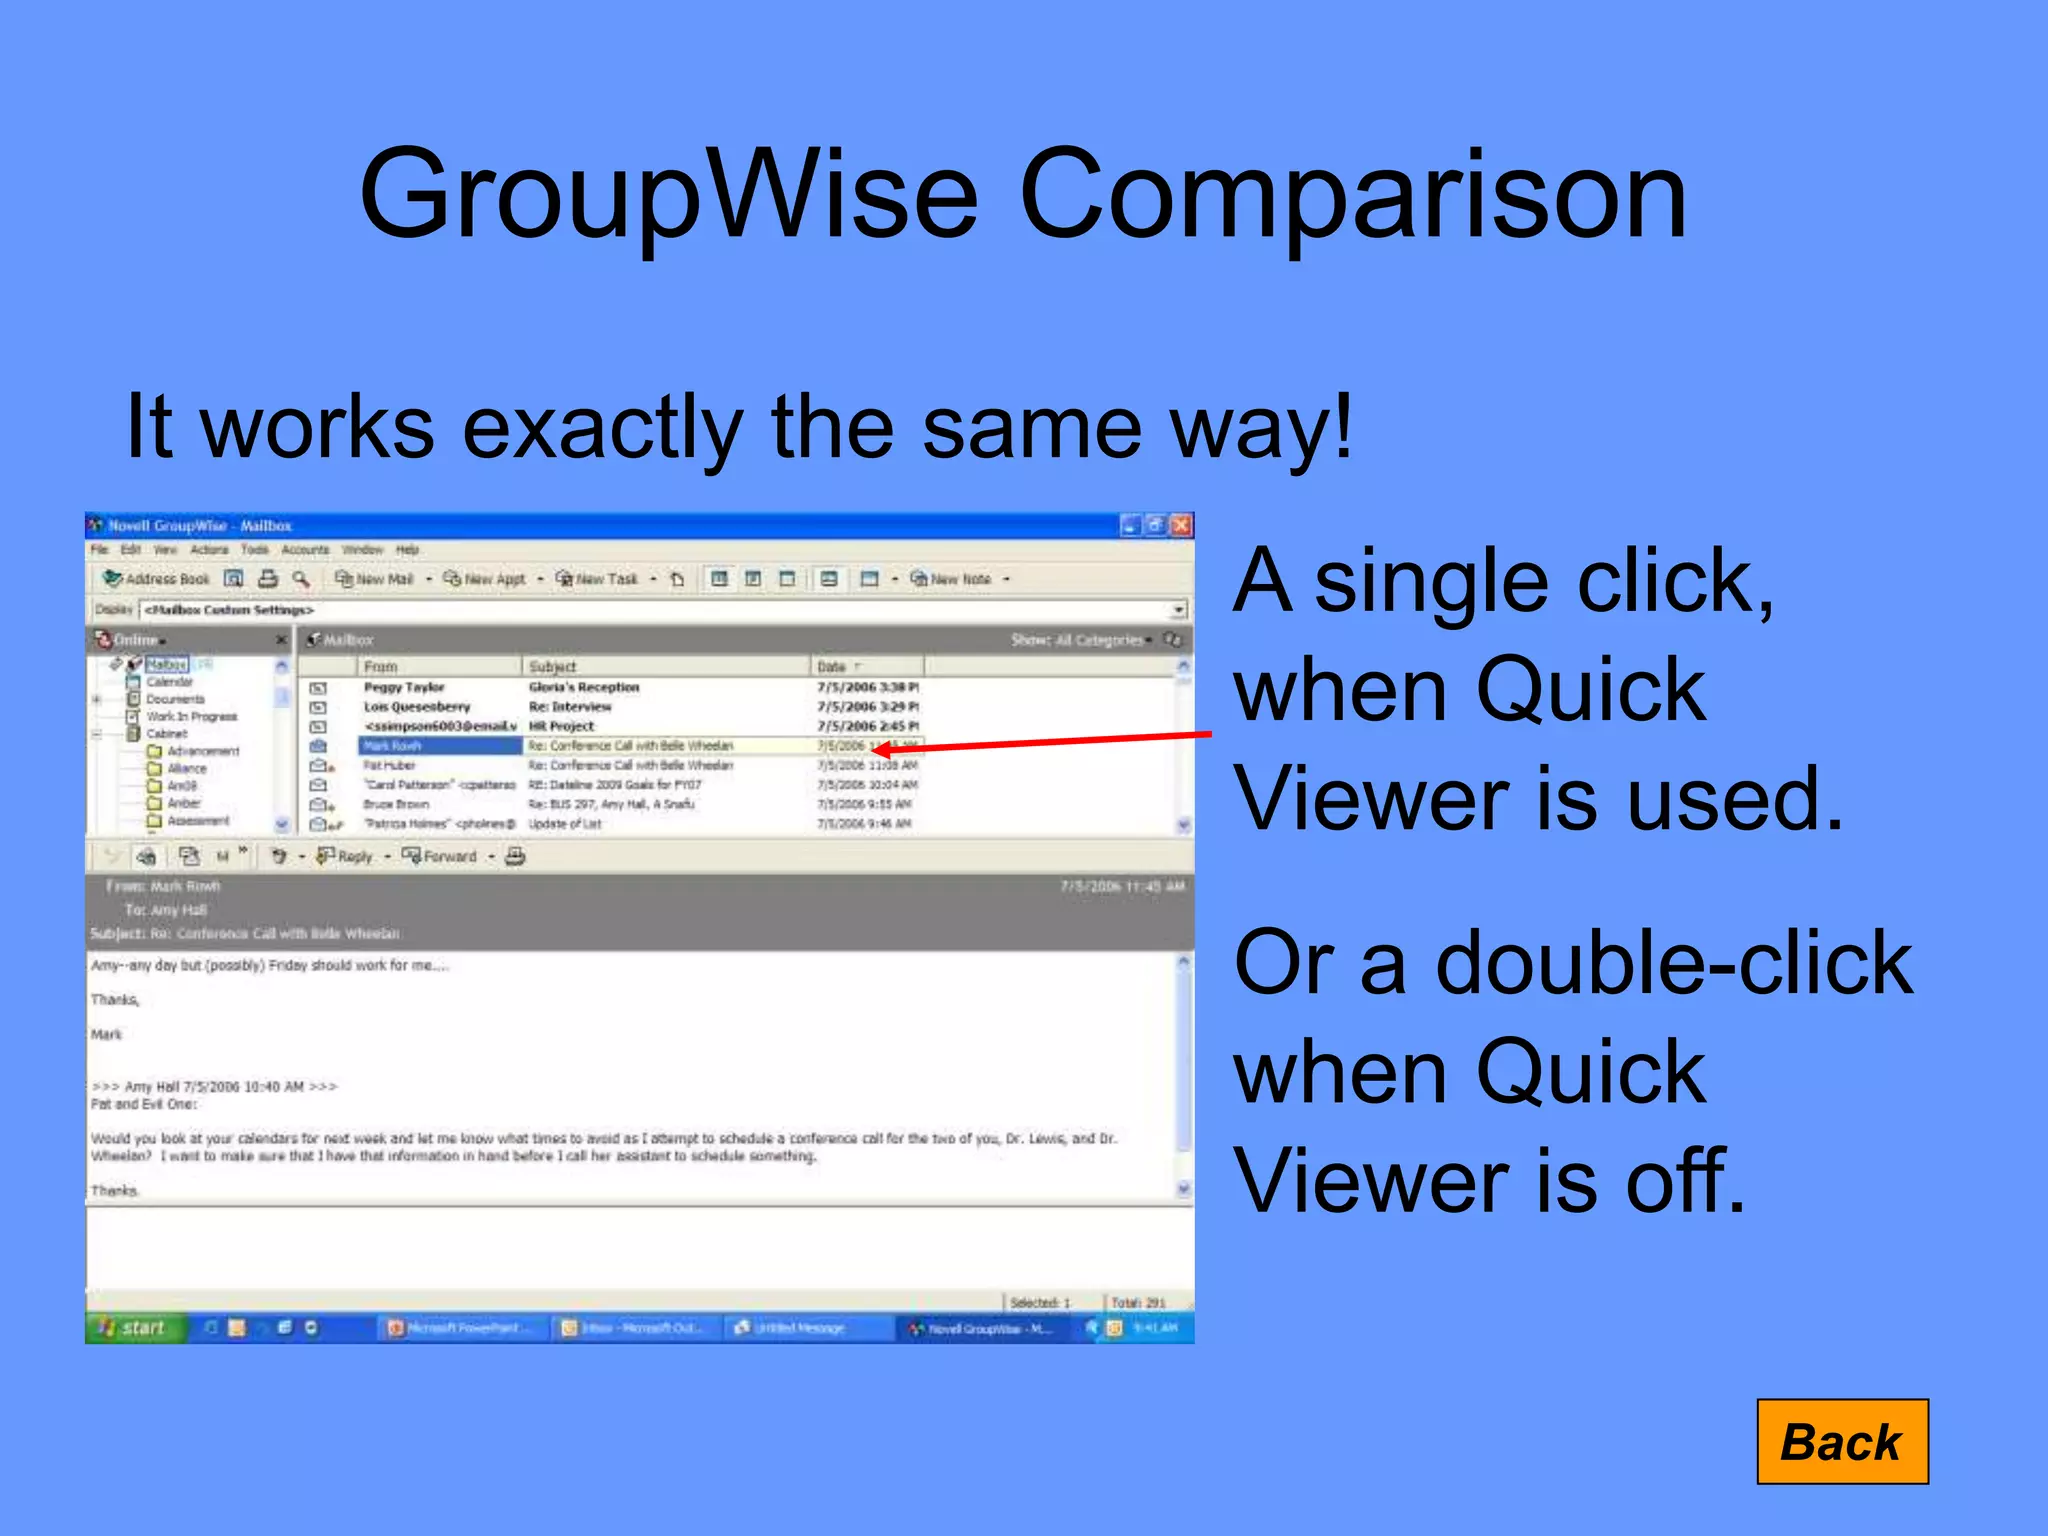
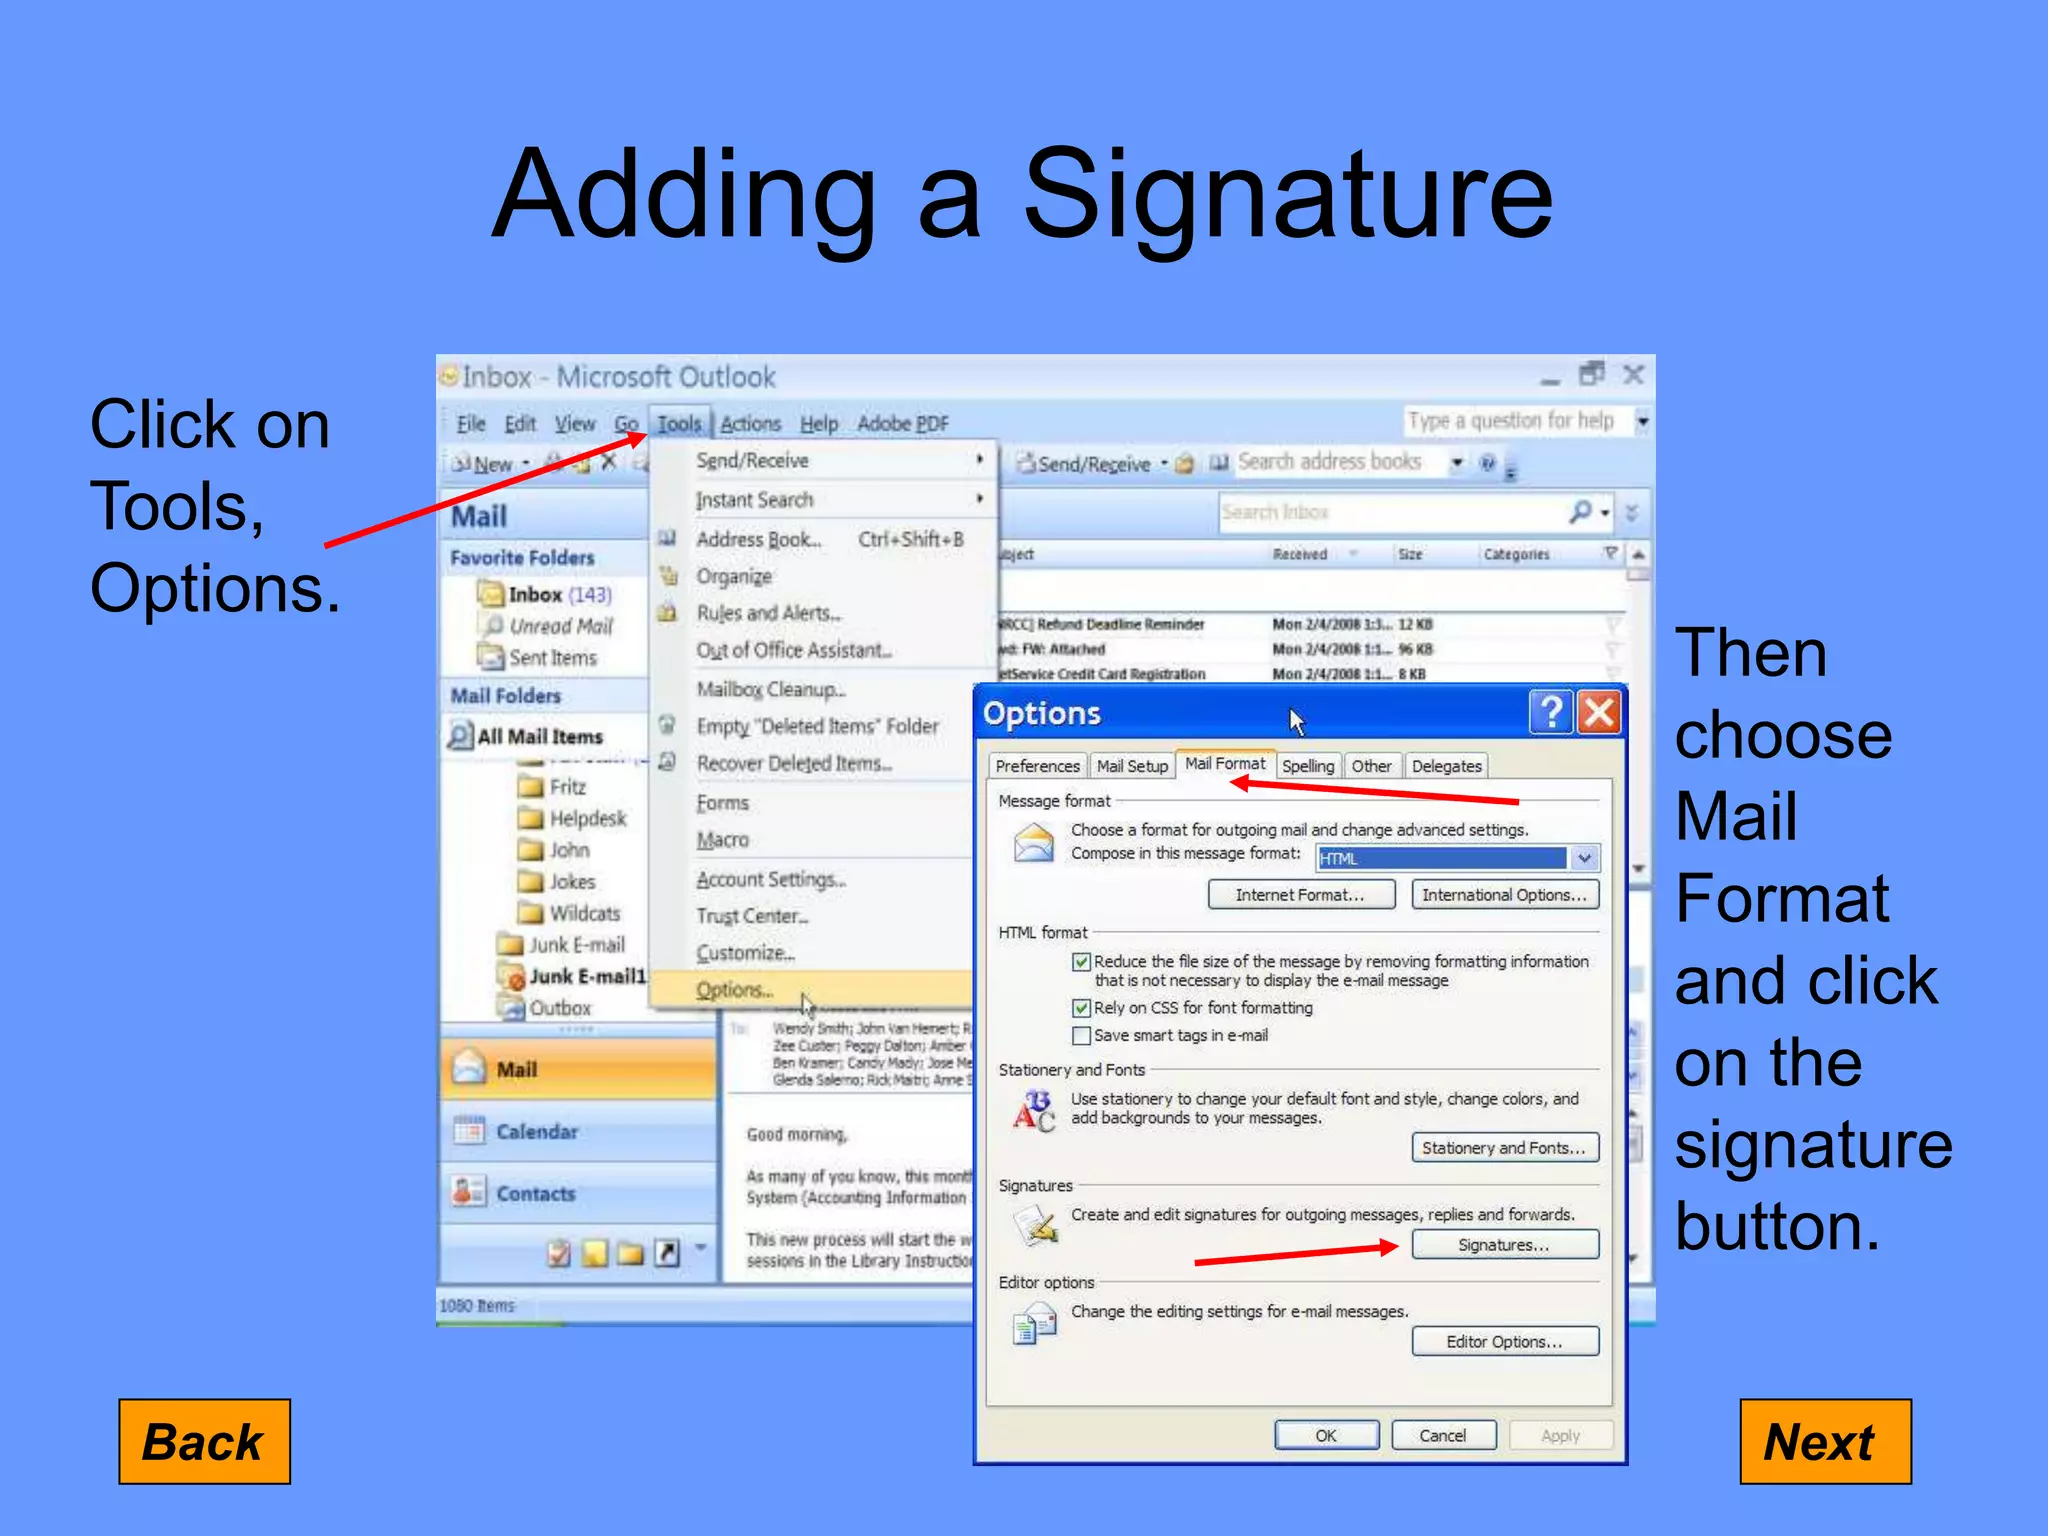
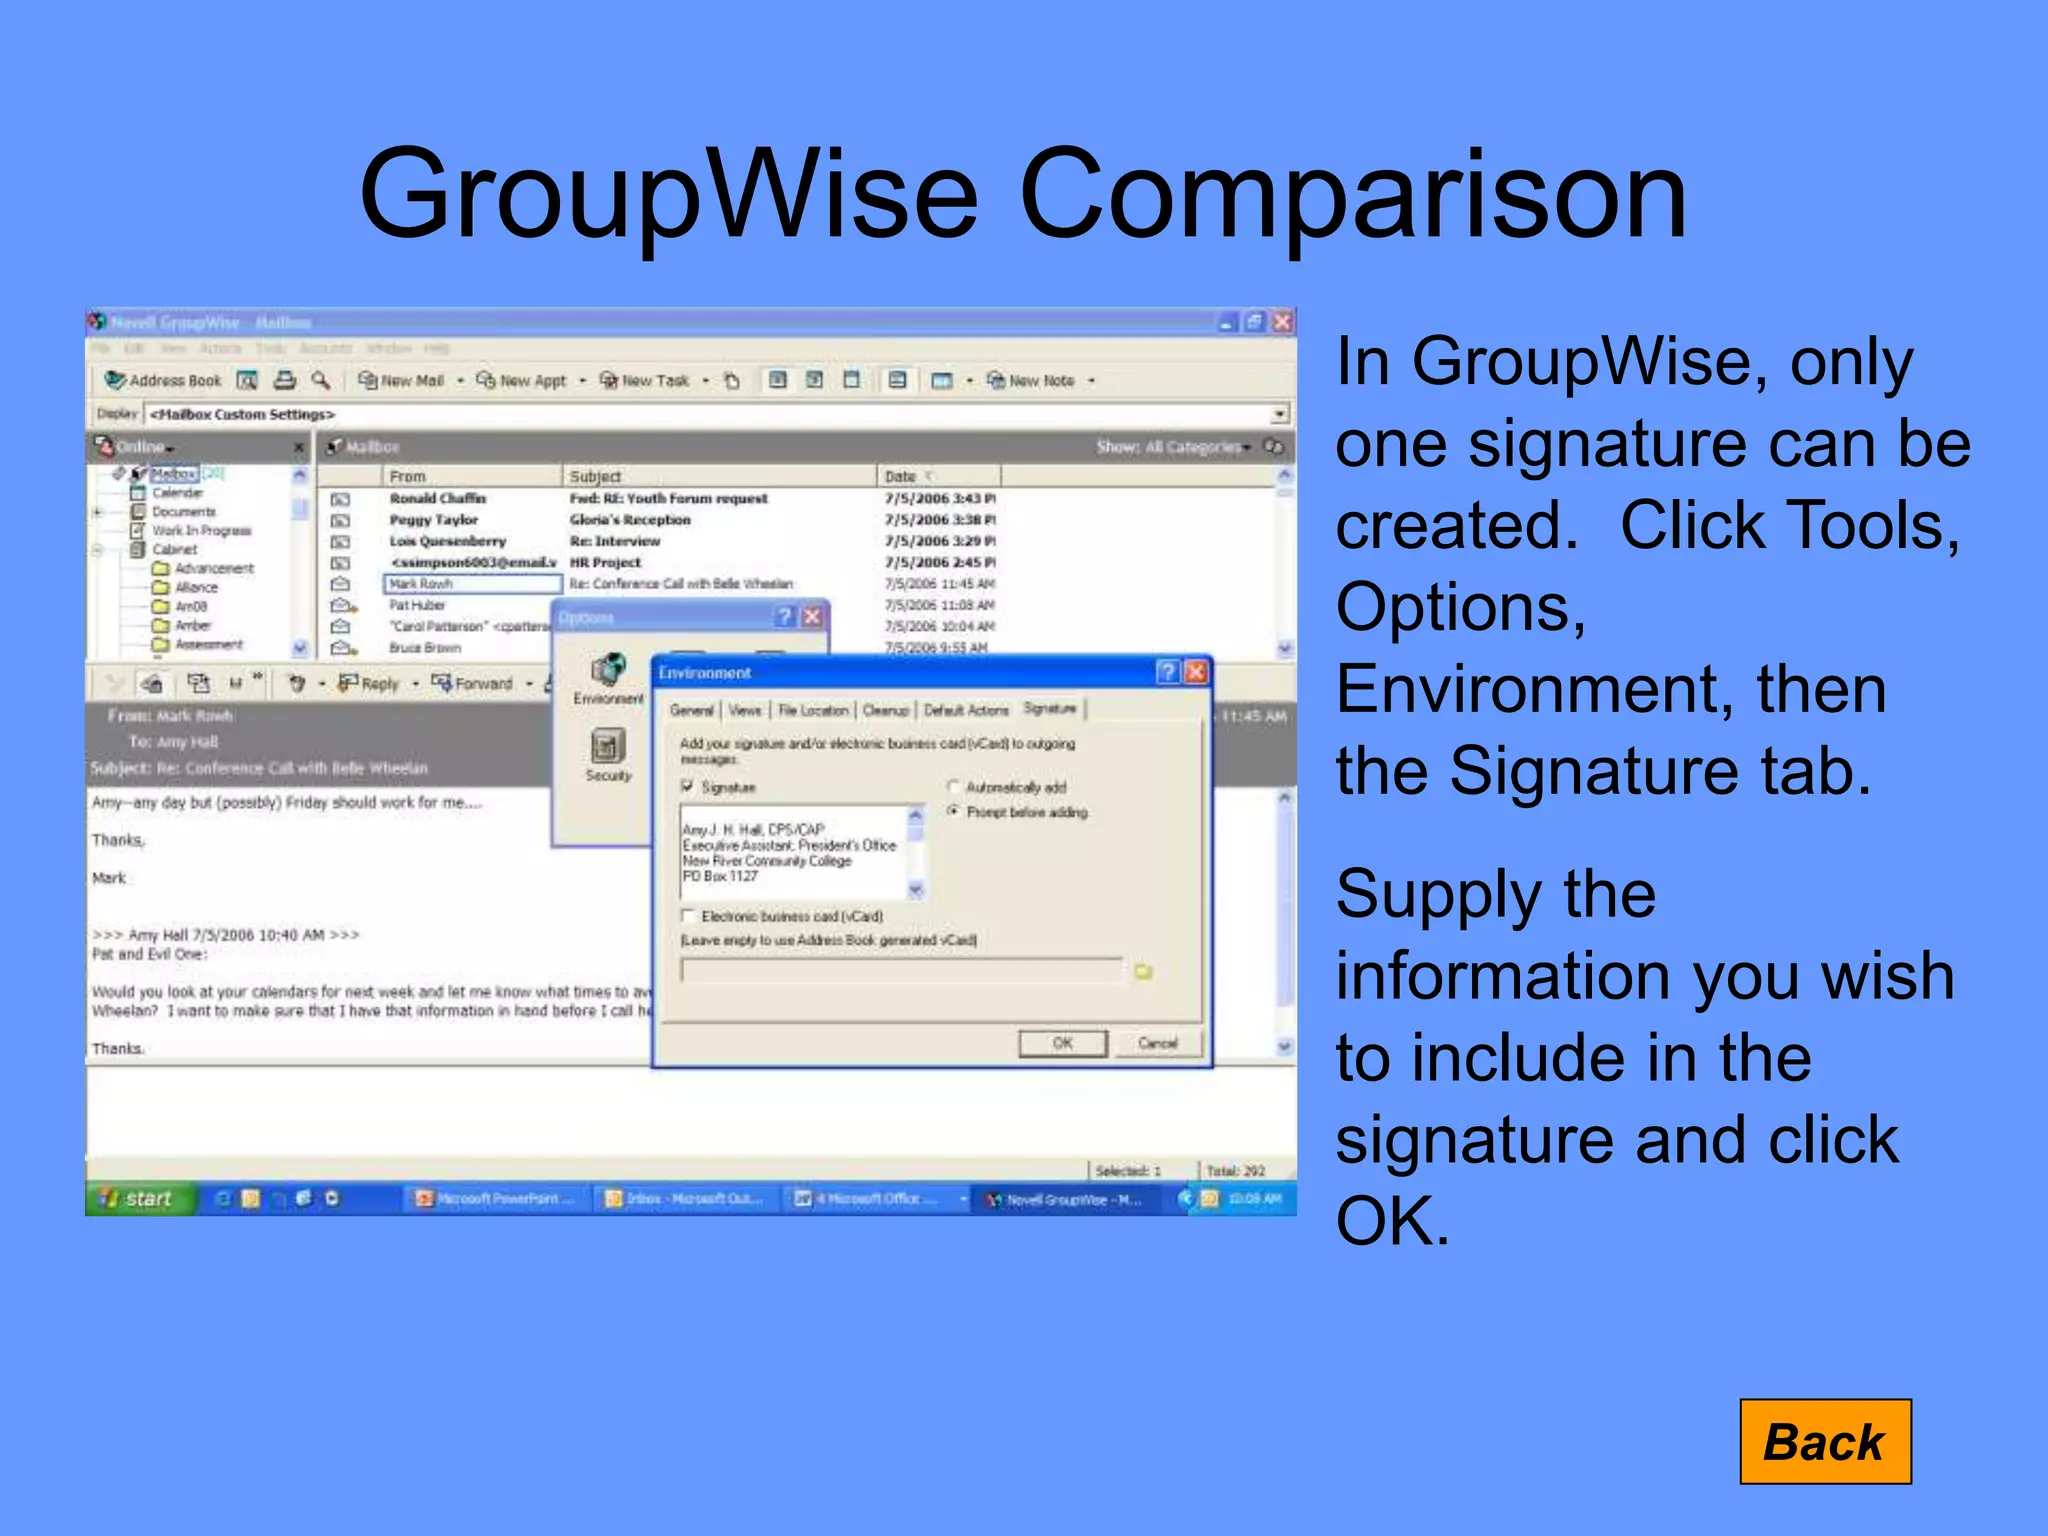
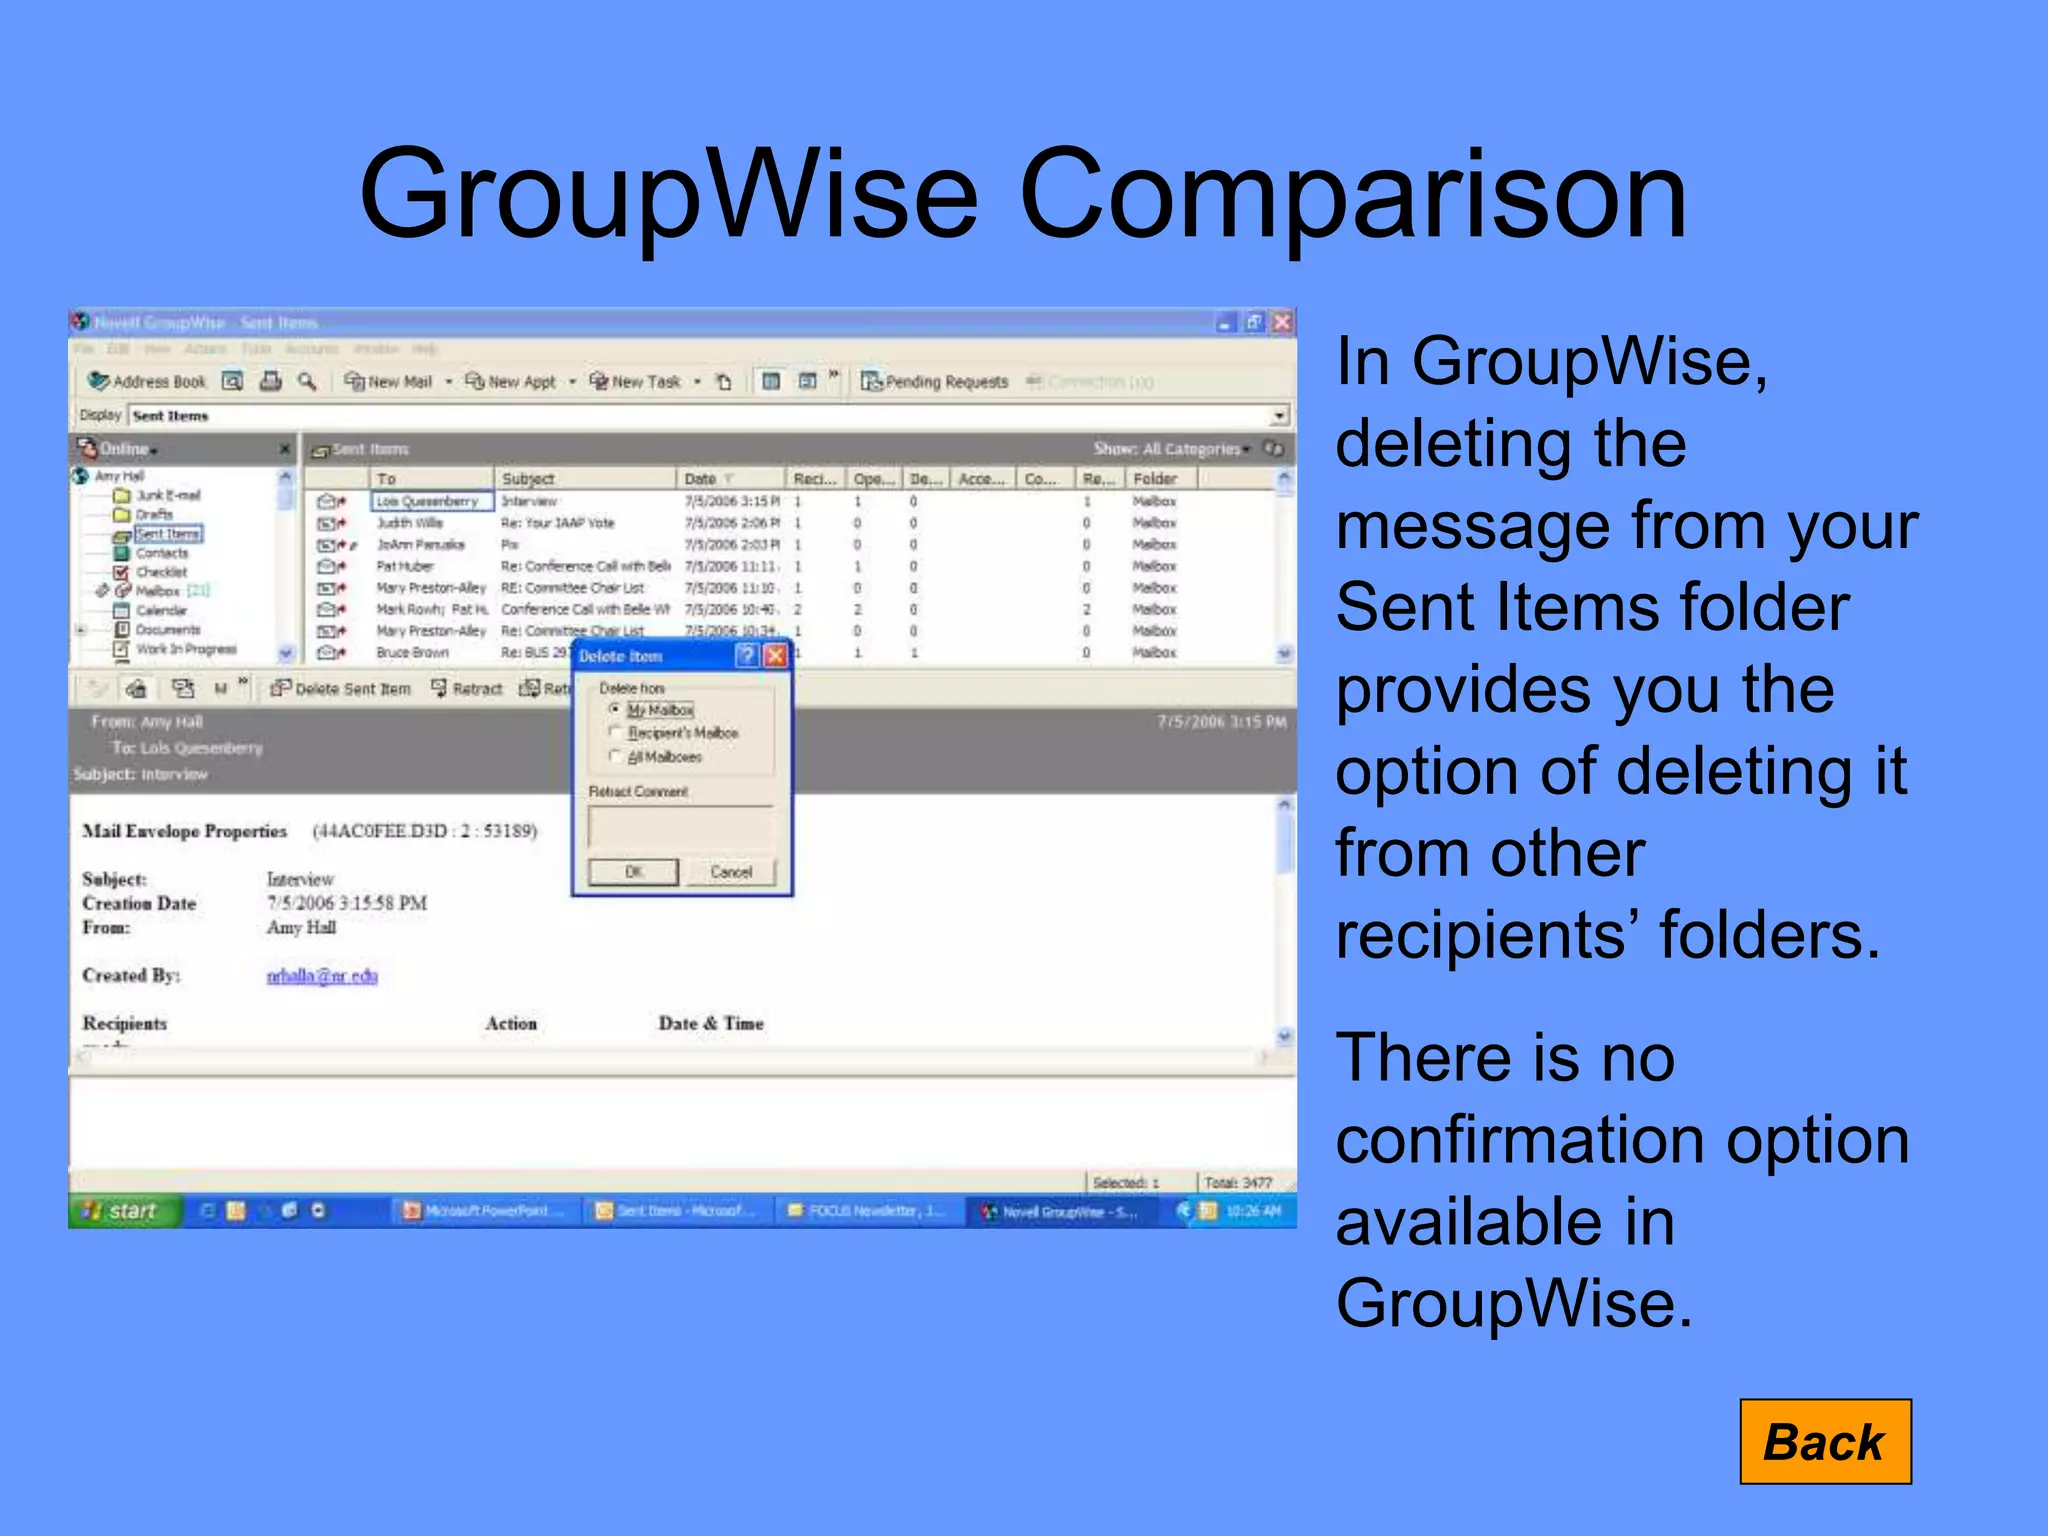
Using
Microsoft Outlook:
E-mail Basics
Objectives
• Guided Tour of Outlook
– Identification
– Views
• E-mail Basics
– Contacts
– Folders
– Web Access
• Q&A
Title Bar
Menu Bar
Tool Bars
Navigation Pane
Folder
List
Preview
Pane
Status Line
Next
Use your mouse to
click through various
identification
markings on this
screen.
Then click Next.
Task Pane
Modifying What You See
To move the Preview Pane, simply:
• Click View, Reading Pane.
Then choose Right
(or Off) from the drop-
down menu to modify
the location of the
pane.
Back Next
Compare to GroupWise
Modifying What You See
Let’s try it!
Move your
Preview pane
to the right
side of the
screen.
Back Next
What Else Can We Change?
• Remove preview pane completely
• Arrange your inbox
• Size your navigation pane
• Add a toolbar
• Remove a toolbar
• Follow the status line through
these moves
Back Next
Navigation
Let’s practice!
• Calendar
• Contacts
• Mail
• Journal
• Notes
• Tasks
Back Next
E-mail Basics
Composing:
Click the New
button or
choose File,
New, Mail
Message.
Back Next
Compare to GroupWise
Use this space for your message.
Be sure to check spelling and proofread
your message. Then click the Send button.
Back Next
Compare to GroupWise
Enter recipient address(es) here.
Enter secondary recipient address(es) here.
Handling Blind Copies
To send a blind copy in Outlook, click on
Options, then choose Bcc from the menu.
Back Compare to GroupWise Next
Outlook automatically adds a line for the
blind copy address.
Handling Attachments
To attach a document to your message,
click on the Insert Tab and then the Attach
File button. It resembles a paper clip.
Back Next
Handling Attachments
Choose a file,
then click the
Insert button.
Outlook inserts
the file into your
message.
Back Next
Compare to GroupWise
GroupWise Comparison
The process is identical in
GroupWise. Click on the
Attachment button (paper
clip). Then choose the file to
attach and click OK.
GroupWise uses a graphical
display for the attachment.
Back
Send Options
• HTML
• Plain Text
• Rich Text
Back Next
More Send Options
Click on the Options button.
Back Next
Compare to GroupWise
GroupWise Comparison
Click the Options tab.
Back
Select the
appropriate
options, then click
the Mail tab to
return to the
message.
Reading Messages
Without the Preview Pane:
Back Next
Simply
double-
click on
the
message.
Reading Messages
• With the Preview Pane:
A single click
on the
message will
cause it to be
displayed in
the Preview
Pane.
Back Next
Compare to GroupWise
GroupWise Comparison
It works exactly the same way!
Back
A single click,
when Quick
Viewer is used.
Or a double-click
when Quick
Viewer is off.
Replying/Forwarding
Whether or not you are using the Preview
Pane, the Reply, Reply to All, and Forward
options will be displayed.
Back Compare to GroupWise Next
The Reply and Reply to All options
automatically fill in the addressees.
GroupWise Comparison
• Again, Outlook works the same way as
GroupWise with only one exception.
Back
When you click the Reply
button, a second window
appears in which you
must select whether you
wish to reply to a single
person or to all recipients.
Adding a Signature
Next
Back
Click on
Tools,
Options.
Then
choose
Mail
Format
and click
on the
signature
button.
Creating a Signature
Compare to GroupWise
Back Next
Assign a brief
description to the
signature (first name,
or internal use) then
click OK.
Then simply create
the information you
want to include in
the edit signature
box, and click OK.
GroupWise Comparison
Back
In GroupWise, only
one signature can be
created. Click Tools,
Options,
Environment, then
the Signature tab.
Supply the
information you wish
to include in the
signature and click
OK.
Out of Office Assistant
Back Next
On the Tools menu,
click Out of Office
Assistant. In the Out
of Office Assistant
dialog box, click Send
Out of Office auto-
replies. If desired,
select Only send
during this time
range, and then set
the appropriate Start
and End dates and
times.
Out of Office Assistant
Back Next
In the Out of Office Assistant
dialog box, there are two tabs for
messages: Inside My Organization
and Outside My Organization.
To send an Out of Office reply for
messages originating within the
college, create your reply in the text
window of Inside My Organization.
To send an Out of Office reply for
messages originating within the
college, create your reply in the text
window of Outside My
Organization.
Recalling Messages
Back Next
To recall a
message you
have sent, open
(double-click) the
message from
your Sent Items
folder.
Then click Other
Actions, then
click on Recall
This Message.
Recalling Messages
Back Next
Compare to GroupWise
Specify the recall options, and click OK.
GroupWise Comparison
Back
In GroupWise,
deleting the
message from your
Sent Items folder
provides you the
option of deleting it
from other
recipients’ folders.
There is no
confirmation option
available in
GroupWise.
Managing Mail Folders
• If you have been using folders to
organize your mail in GroupWise,
you understand how their function
and benefit.
• Outlook folders function in much the
same way.
• Specific comparisons to GroupWise
will not be made in this section.
Next
Back
Creating Folders
In the Navigation Pane,
choose the parent folder. (Ex.:
Inbox)
Right-click the parent folder,
then choose New Folder from
the drop-down list.
Back Next
Creating Folders
Give the folder a
name.
Describe its contents.
Click OK.
It’s that simple!
Back Next
Using Folders
Using folders is
even easier than
creating them!
Simply drag items
from the Inbox (or
other location) to
the folder in
which you wish to
store them.
Back Next
Tracking Sent Messages
In Outlook, as in GroupWise,
certain information about your
message can be tracked using
“Properties.”
In Outlook, you must open the
item, click the Office Button,
then Properties.
(GroupWise item properties can
be displayed by simply right-
clicking on the item and
choosing Properties.)
Next
Back
Deleting Messages and Folders
This is the easiest part yet!
Simply click on any item – message, folder,
task, etc. – and press the Delete key.
Back Next
Summary
• Outlook e-mail is simple to use
• Outlook views can be customized
• Using Outlook e-mail is very
similar to using GroupWise e-mail
Back
Next topic: Managing Contacts
Managing Contacts
• Versatile tool for managing people data
• Initialized for NRCC contacts (similar to
the GroupWise Address Book)
• Usable across applications
• Searchable
• Share-able
Back Next
Click on Contacts.
Or choose Go, Contacts.
Back Next
Contacts View
Contact record
(can be much
larger)
Sorting
options
Directory
buttons
Back Next
The General Tab
Back
Next
This is the same
information you
find in the
GroupWise
Address Book.
The Details Tab
Back
Next
The Details Tab provides some
additional information that can be useful
in maintaining contacts.
The All Fields Tab
Back
Next
The All Fields Tab
provides
customizable
search options.
Users can select
the fields to
display for
Contacts records,
or use the fields
to search for
specific
information.
Creating New Contacts
Outlook provides three ways to create
contacts:
• Importing information to the Contacts
database
• Manually creating new records
• Creating new records from incoming
messages.
Next
Back
Importing New Contacts
Back
Next
From any Outlook view,
click File, then Import and
Export, to launch the
Wizard displayed here.
Let’s try importing some
data, using:
Q:itclabitcoutlookdata.ac
cdb
as the data source.
Follow the instructions in
the Wizard.
Manually Creating Contacts
To manually create a new contact…
Back
Next
1. Open the Contacts folder.
2. Click the New Contact
button.
3. Enter as much or as little
information as you need
for the new contact.
4. Click the Save and Close
button.
Using E-mail to Create Contacts
Perhaps the easiest method…
Back
Next
While reading a
message, right-click on
the sender’s name,
then choose Add to
Contacts.
Using Contacts
Back
Next
There are multiple uses for your
Contacts database. Examples include:
• Search/sort
• Create messages
• Integrate with other Office applications
Sorting Contacts
One option for
sorting Contacts
is displayed.
Click on the
other options
and observe
changes in the
listing.
Back Next
Searching Contacts
Back
Next
Option 1: QuickFind
Simply click inside the QuickFind box
and type all or part of the contact’s
name.
Searching Contacts
Option 2: Find
Back
Next
Click on the Find button.
Type all or part of the contact’s name, address,
category, company or other field data.
Removing Contacts
To remove/delete a contact, simply click on
the contact’s name (which turns blue), and
press the Delete key on your keyboard.
Back
Next
Outlook Web Access
https://webmail.nr.edu/exchange
Questions??
Back Next
What’s Next?
Intermediate Outlook training
covers:
• Using the Outlook calendar
• Tasks
• Outlook’s Journal feature
• Notes and Reminders

Beginning outlook

  • 1.
  • 2.
    Objectives • Guided Tourof Outlook – Identification – Views • E-mail Basics – Contacts – Folders – Web Access • Q&A
  • 3.
    Title Bar Menu Bar ToolBars Navigation Pane Folder List Preview Pane Status Line Next Use your mouse to click through various identification markings on this screen. Then click Next. Task Pane
  • 4.
    Modifying What YouSee To move the Preview Pane, simply: • Click View, Reading Pane. Then choose Right (or Off) from the drop- down menu to modify the location of the pane. Back Next Compare to GroupWise
  • 5.
    Modifying What YouSee Let’s try it! Move your Preview pane to the right side of the screen. Back Next
  • 6.
    What Else CanWe Change? • Remove preview pane completely • Arrange your inbox • Size your navigation pane • Add a toolbar • Remove a toolbar • Follow the status line through these moves Back Next
  • 7.
    Navigation Let’s practice! • Calendar •Contacts • Mail • Journal • Notes • Tasks Back Next
  • 8.
    E-mail Basics Composing: Click theNew button or choose File, New, Mail Message. Back Next Compare to GroupWise
  • 9.
    Use this spacefor your message. Be sure to check spelling and proofread your message. Then click the Send button. Back Next Compare to GroupWise Enter recipient address(es) here. Enter secondary recipient address(es) here.
  • 10.
    Handling Blind Copies Tosend a blind copy in Outlook, click on Options, then choose Bcc from the menu. Back Compare to GroupWise Next Outlook automatically adds a line for the blind copy address.
  • 11.
    Handling Attachments To attacha document to your message, click on the Insert Tab and then the Attach File button. It resembles a paper clip. Back Next
  • 12.
    Handling Attachments Choose afile, then click the Insert button. Outlook inserts the file into your message. Back Next Compare to GroupWise
  • 13.
    GroupWise Comparison The processis identical in GroupWise. Click on the Attachment button (paper clip). Then choose the file to attach and click OK. GroupWise uses a graphical display for the attachment. Back
  • 14.
    Send Options • HTML •Plain Text • Rich Text Back Next
  • 15.
    More Send Options Clickon the Options button. Back Next Compare to GroupWise
  • 16.
    GroupWise Comparison Click theOptions tab. Back Select the appropriate options, then click the Mail tab to return to the message.
  • 17.
    Reading Messages Without thePreview Pane: Back Next Simply double- click on the message.
  • 18.
    Reading Messages • Withthe Preview Pane: A single click on the message will cause it to be displayed in the Preview Pane. Back Next Compare to GroupWise
  • 19.
    GroupWise Comparison It worksexactly the same way! Back A single click, when Quick Viewer is used. Or a double-click when Quick Viewer is off.
  • 20.
    Replying/Forwarding Whether or notyou are using the Preview Pane, the Reply, Reply to All, and Forward options will be displayed. Back Compare to GroupWise Next The Reply and Reply to All options automatically fill in the addressees.
  • 21.
    GroupWise Comparison • Again,Outlook works the same way as GroupWise with only one exception. Back When you click the Reply button, a second window appears in which you must select whether you wish to reply to a single person or to all recipients.
  • 22.
    Adding a Signature Next Back Clickon Tools, Options. Then choose Mail Format and click on the signature button.
  • 23.
    Creating a Signature Compareto GroupWise Back Next Assign a brief description to the signature (first name, or internal use) then click OK. Then simply create the information you want to include in the edit signature box, and click OK.
  • 24.
    GroupWise Comparison Back In GroupWise,only one signature can be created. Click Tools, Options, Environment, then the Signature tab. Supply the information you wish to include in the signature and click OK.
  • 25.
    Out of OfficeAssistant Back Next On the Tools menu, click Out of Office Assistant. In the Out of Office Assistant dialog box, click Send Out of Office auto- replies. If desired, select Only send during this time range, and then set the appropriate Start and End dates and times.
  • 26.
    Out of OfficeAssistant Back Next In the Out of Office Assistant dialog box, there are two tabs for messages: Inside My Organization and Outside My Organization. To send an Out of Office reply for messages originating within the college, create your reply in the text window of Inside My Organization. To send an Out of Office reply for messages originating within the college, create your reply in the text window of Outside My Organization.
  • 27.
    Recalling Messages Back Next Torecall a message you have sent, open (double-click) the message from your Sent Items folder. Then click Other Actions, then click on Recall This Message.
  • 28.
    Recalling Messages Back Next Compareto GroupWise Specify the recall options, and click OK.
  • 29.
    GroupWise Comparison Back In GroupWise, deletingthe message from your Sent Items folder provides you the option of deleting it from other recipients’ folders. There is no confirmation option available in GroupWise.
  • 30.
    Managing Mail Folders •If you have been using folders to organize your mail in GroupWise, you understand how their function and benefit. • Outlook folders function in much the same way. • Specific comparisons to GroupWise will not be made in this section. Next Back
  • 31.
    Creating Folders In theNavigation Pane, choose the parent folder. (Ex.: Inbox) Right-click the parent folder, then choose New Folder from the drop-down list. Back Next
  • 32.
    Creating Folders Give thefolder a name. Describe its contents. Click OK. It’s that simple! Back Next
  • 33.
    Using Folders Using foldersis even easier than creating them! Simply drag items from the Inbox (or other location) to the folder in which you wish to store them. Back Next
  • 34.
    Tracking Sent Messages InOutlook, as in GroupWise, certain information about your message can be tracked using “Properties.” In Outlook, you must open the item, click the Office Button, then Properties. (GroupWise item properties can be displayed by simply right- clicking on the item and choosing Properties.) Next Back
  • 35.
    Deleting Messages andFolders This is the easiest part yet! Simply click on any item – message, folder, task, etc. – and press the Delete key. Back Next
  • 36.
    Summary • Outlook e-mailis simple to use • Outlook views can be customized • Using Outlook e-mail is very similar to using GroupWise e-mail Back Next topic: Managing Contacts
  • 37.
    Managing Contacts • Versatiletool for managing people data • Initialized for NRCC contacts (similar to the GroupWise Address Book) • Usable across applications • Searchable • Share-able Back Next
  • 38.
    Click on Contacts. Orchoose Go, Contacts. Back Next
  • 39.
    Contacts View Contact record (canbe much larger) Sorting options Directory buttons Back Next
  • 40.
    The General Tab Back Next Thisis the same information you find in the GroupWise Address Book.
  • 41.
    The Details Tab Back Next TheDetails Tab provides some additional information that can be useful in maintaining contacts.
  • 42.
    The All FieldsTab Back Next The All Fields Tab provides customizable search options. Users can select the fields to display for Contacts records, or use the fields to search for specific information.
  • 43.
    Creating New Contacts Outlookprovides three ways to create contacts: • Importing information to the Contacts database • Manually creating new records • Creating new records from incoming messages. Next Back
  • 44.
    Importing New Contacts Back Next Fromany Outlook view, click File, then Import and Export, to launch the Wizard displayed here. Let’s try importing some data, using: Q:itclabitcoutlookdata.ac cdb as the data source. Follow the instructions in the Wizard.
  • 45.
    Manually Creating Contacts Tomanually create a new contact… Back Next 1. Open the Contacts folder. 2. Click the New Contact button. 3. Enter as much or as little information as you need for the new contact. 4. Click the Save and Close button.
  • 46.
    Using E-mail toCreate Contacts Perhaps the easiest method… Back Next While reading a message, right-click on the sender’s name, then choose Add to Contacts.
  • 47.
    Using Contacts Back Next There aremultiple uses for your Contacts database. Examples include: • Search/sort • Create messages • Integrate with other Office applications
  • 48.
    Sorting Contacts One optionfor sorting Contacts is displayed. Click on the other options and observe changes in the listing. Back Next
  • 49.
    Searching Contacts Back Next Option 1:QuickFind Simply click inside the QuickFind box and type all or part of the contact’s name.
  • 50.
    Searching Contacts Option 2:Find Back Next Click on the Find button. Type all or part of the contact’s name, address, category, company or other field data.
  • 51.
    Removing Contacts To remove/deletea contact, simply click on the contact’s name (which turns blue), and press the Delete key on your keyboard. Back Next
  • 52.
  • 53.
    What’s Next? Intermediate Outlooktraining covers: • Using the Outlook calendar • Tasks • Outlook’s Journal feature • Notes and Reminders