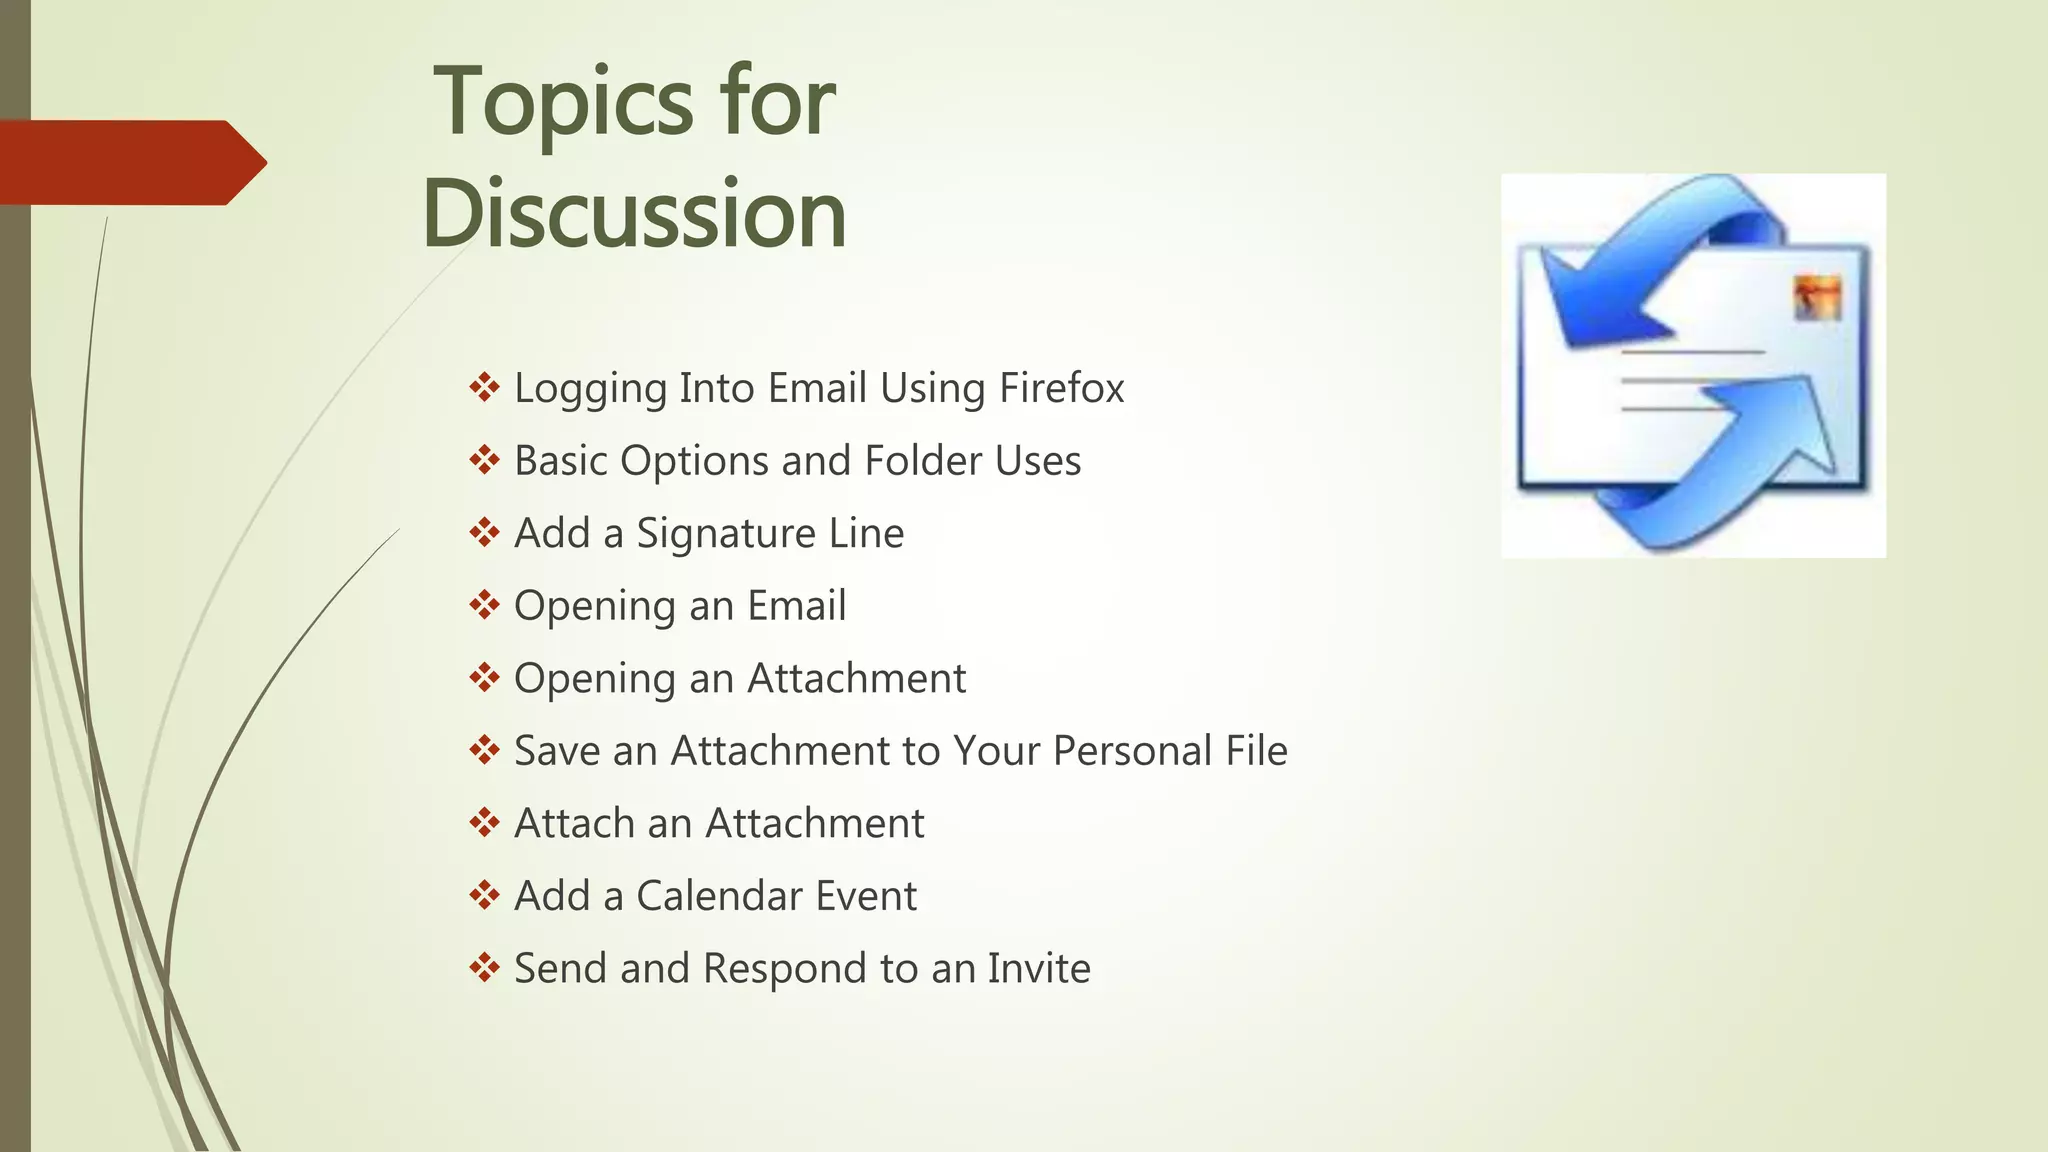
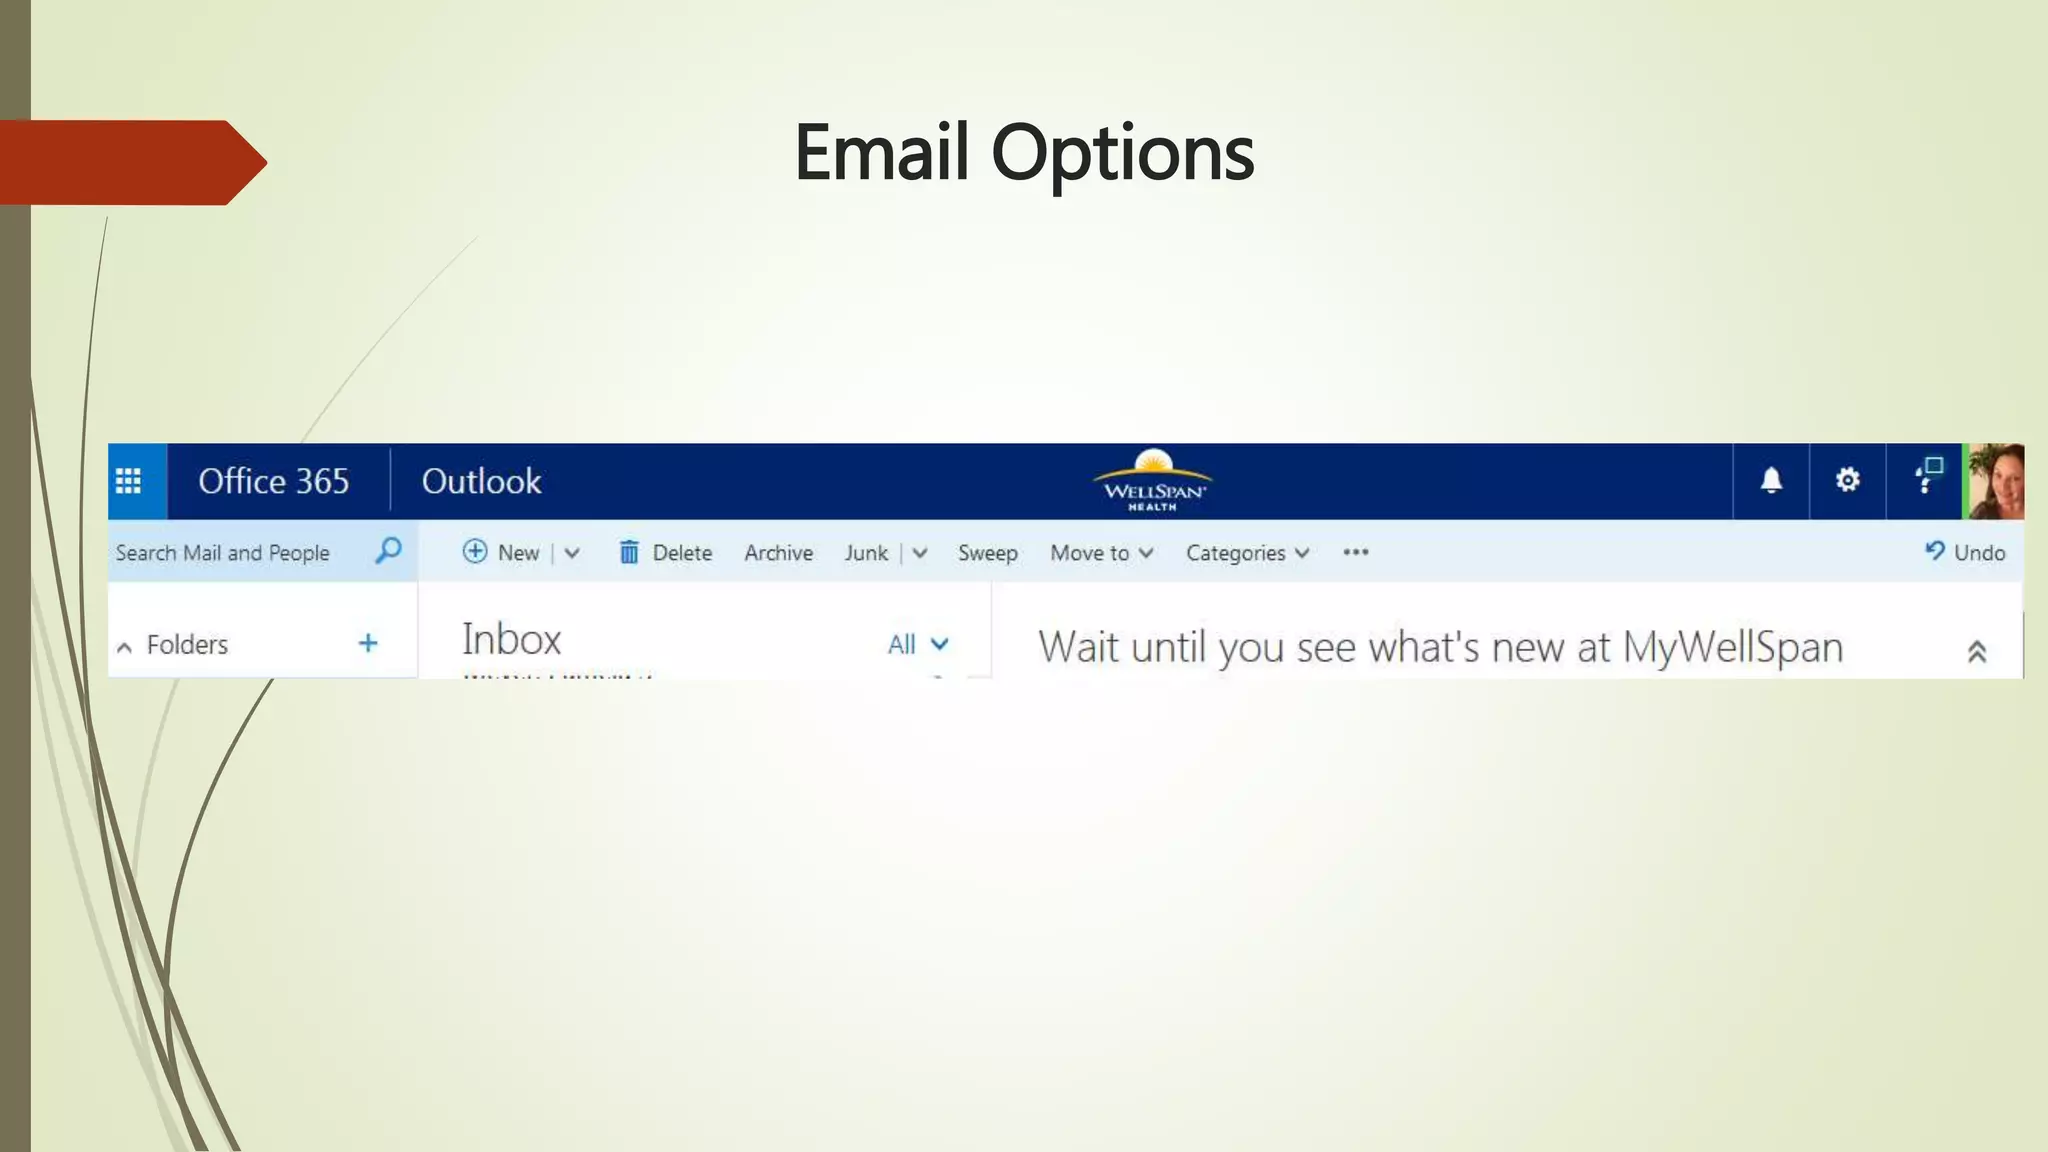
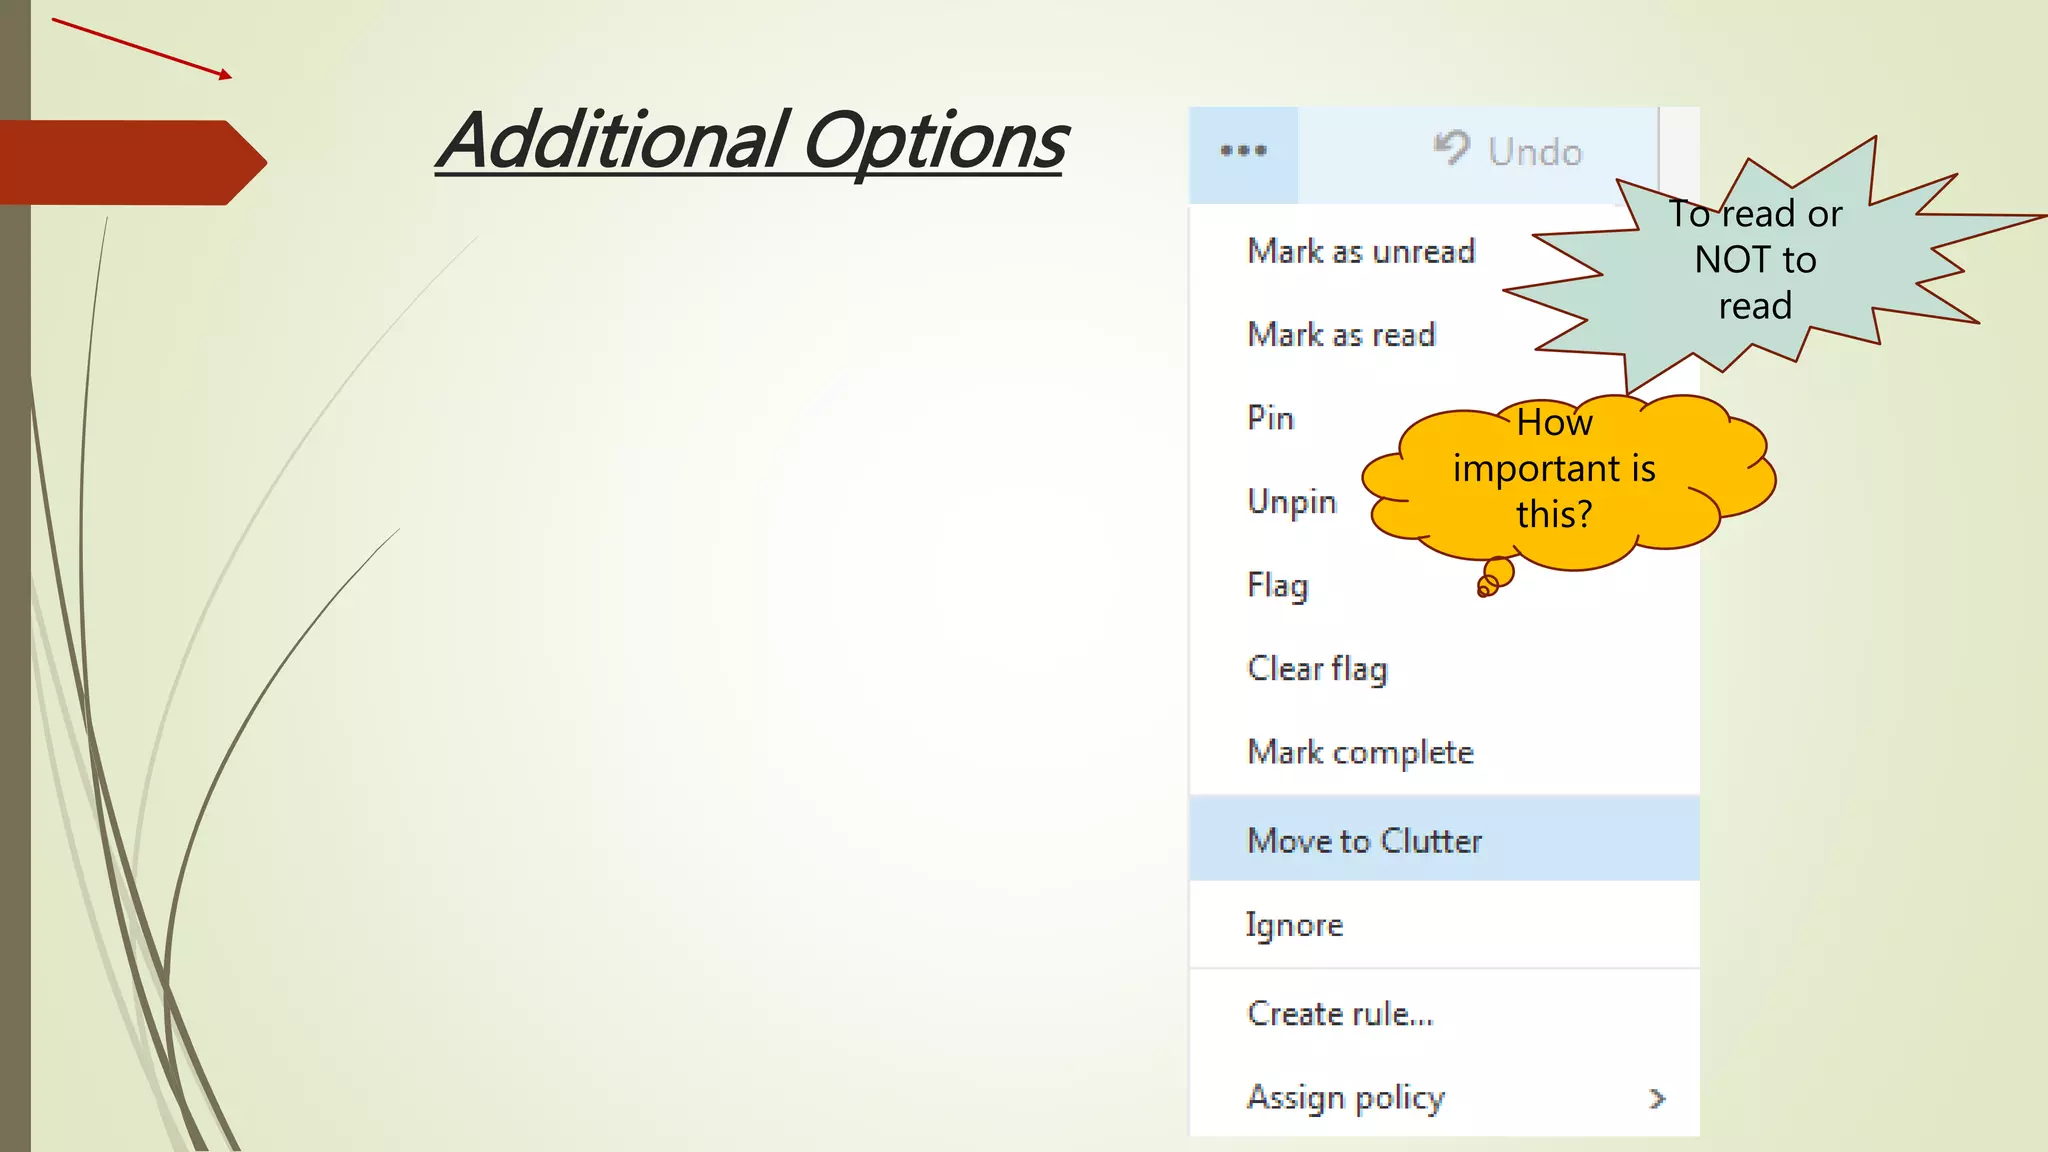
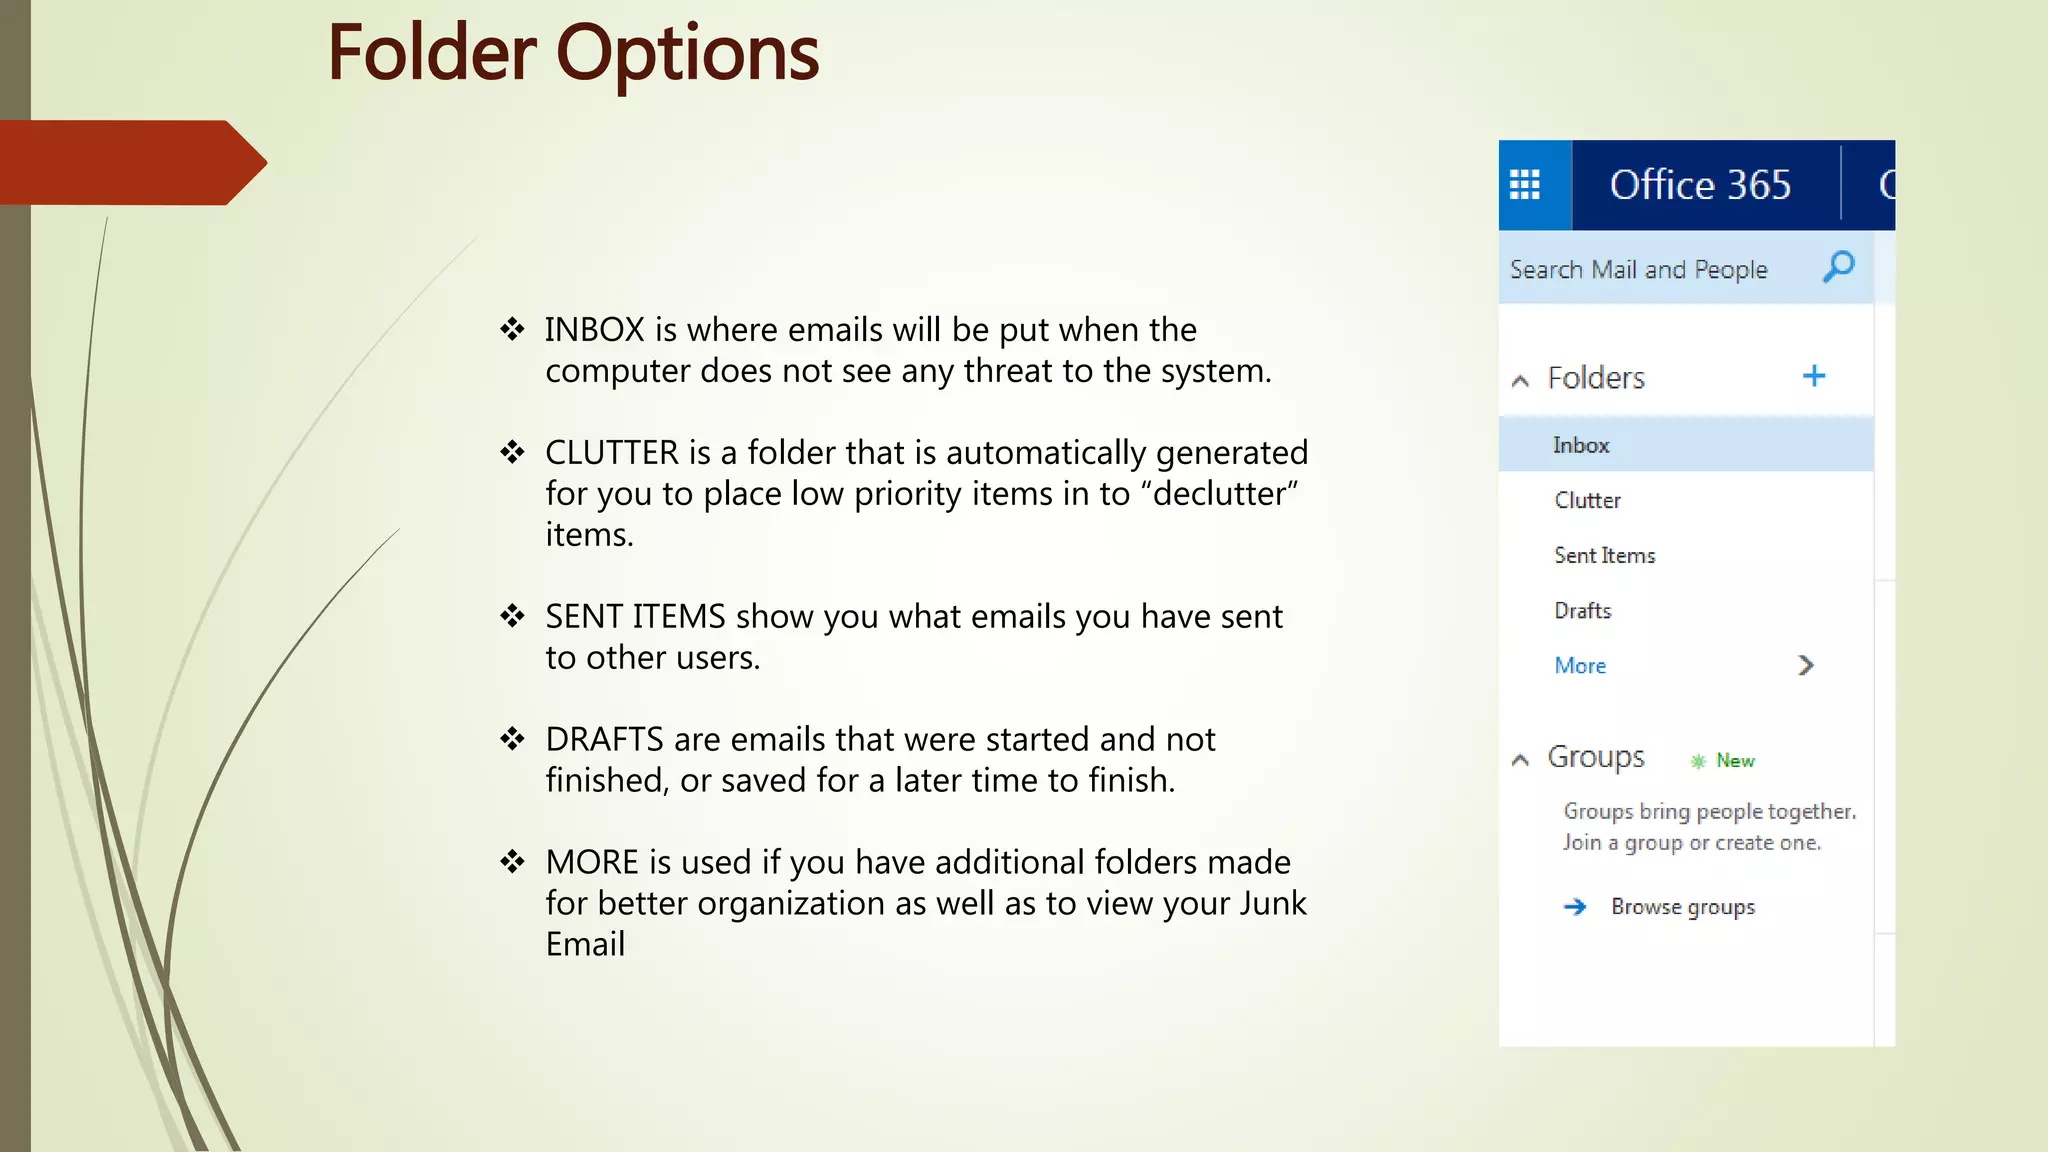
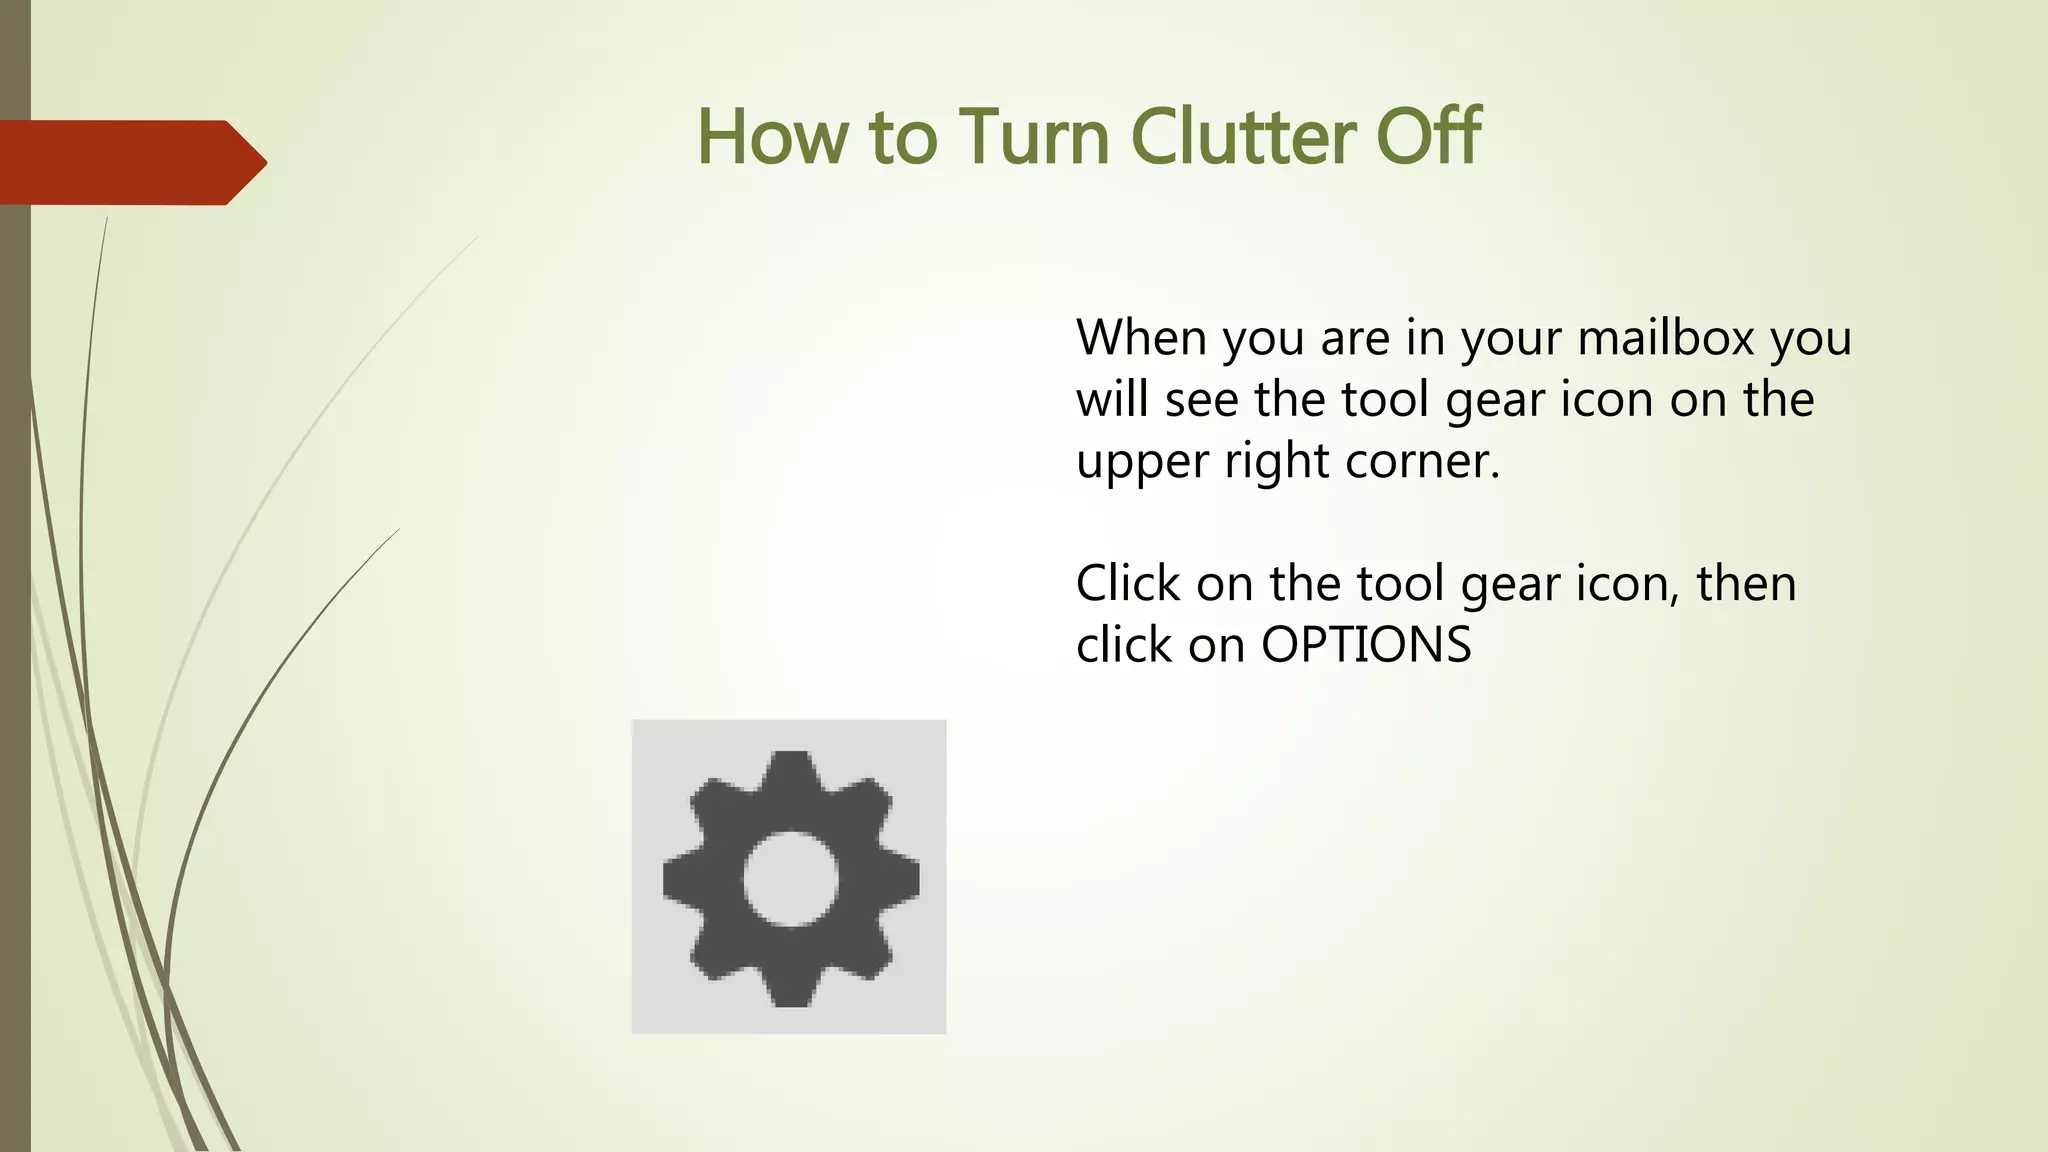
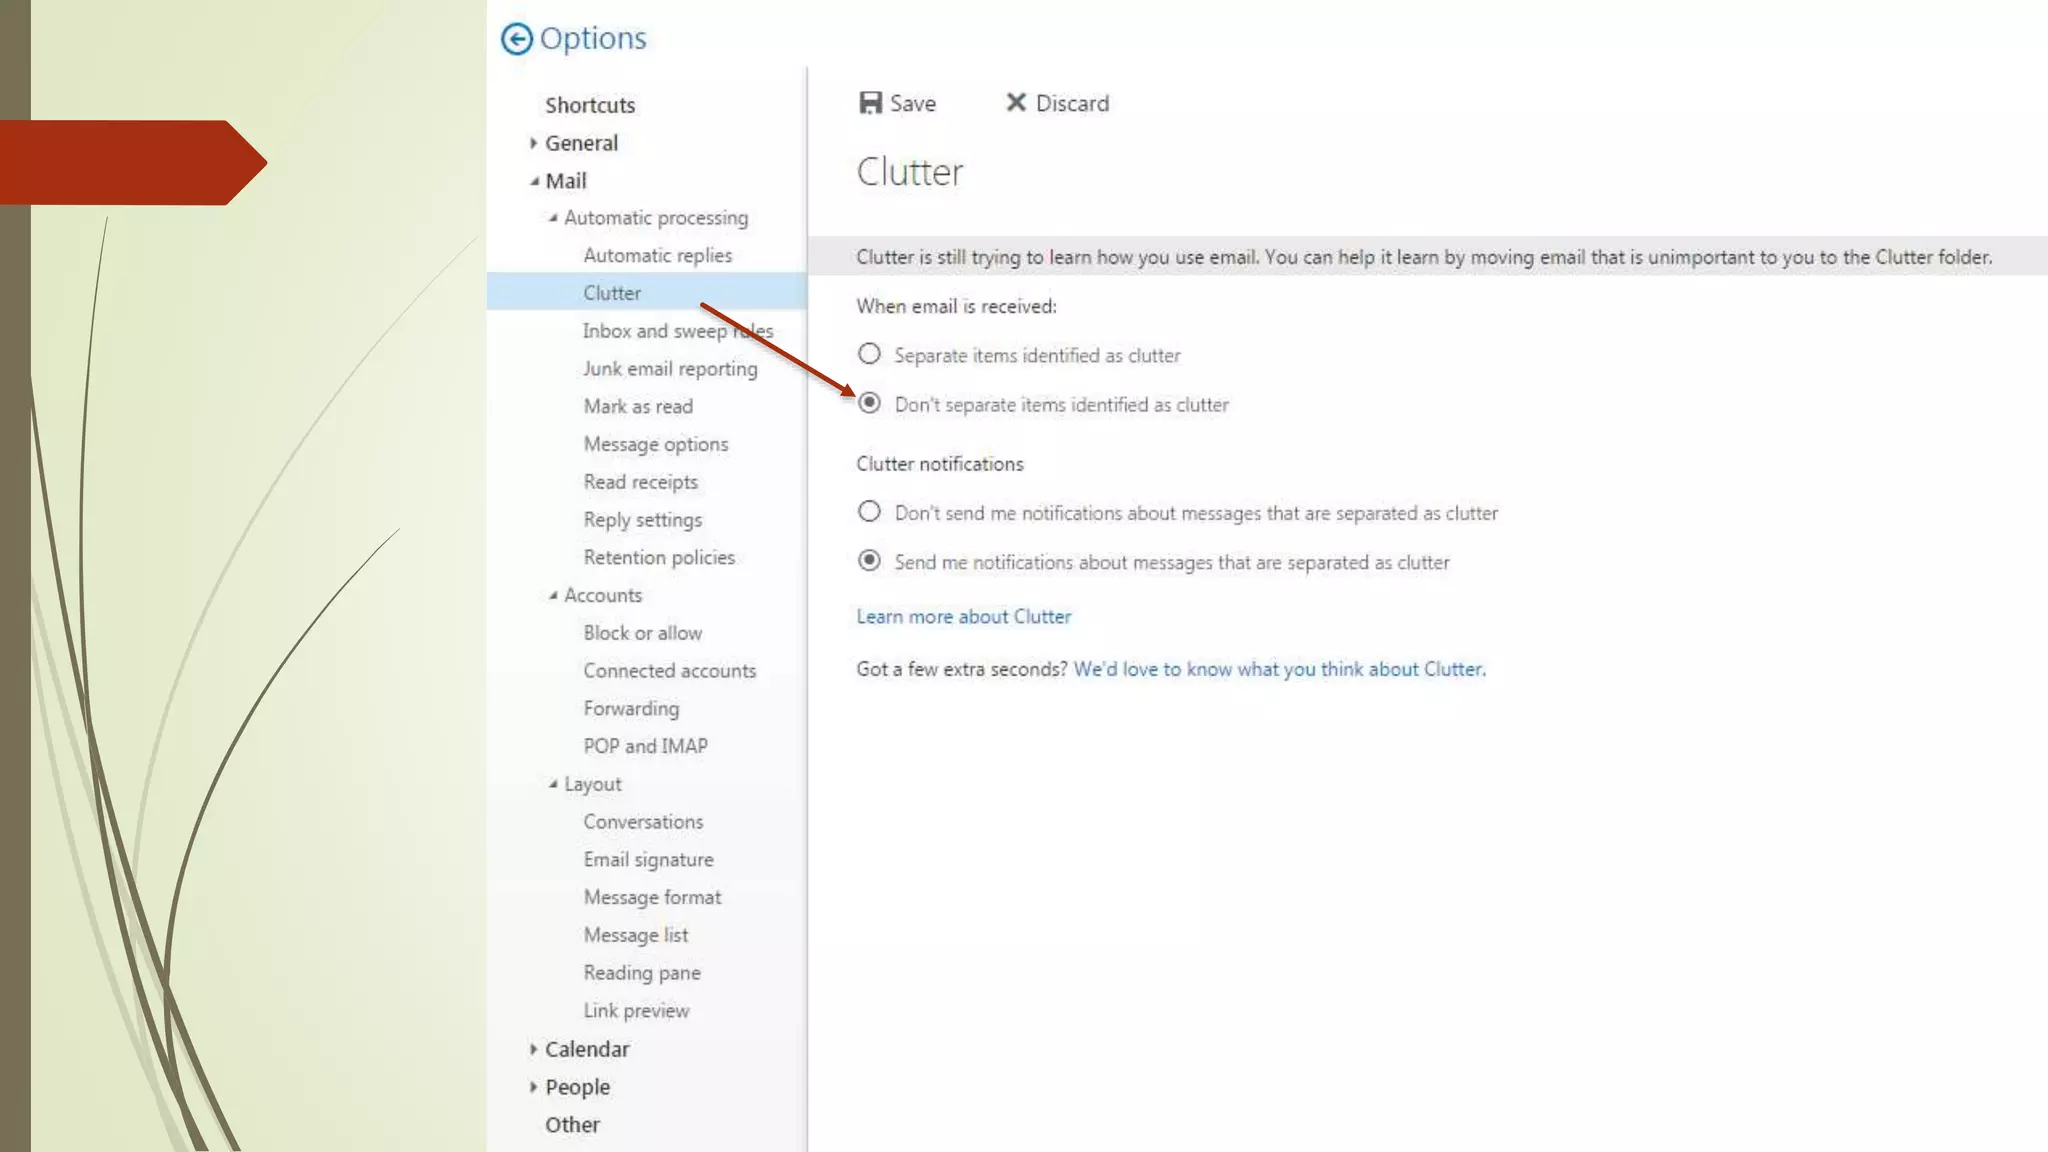
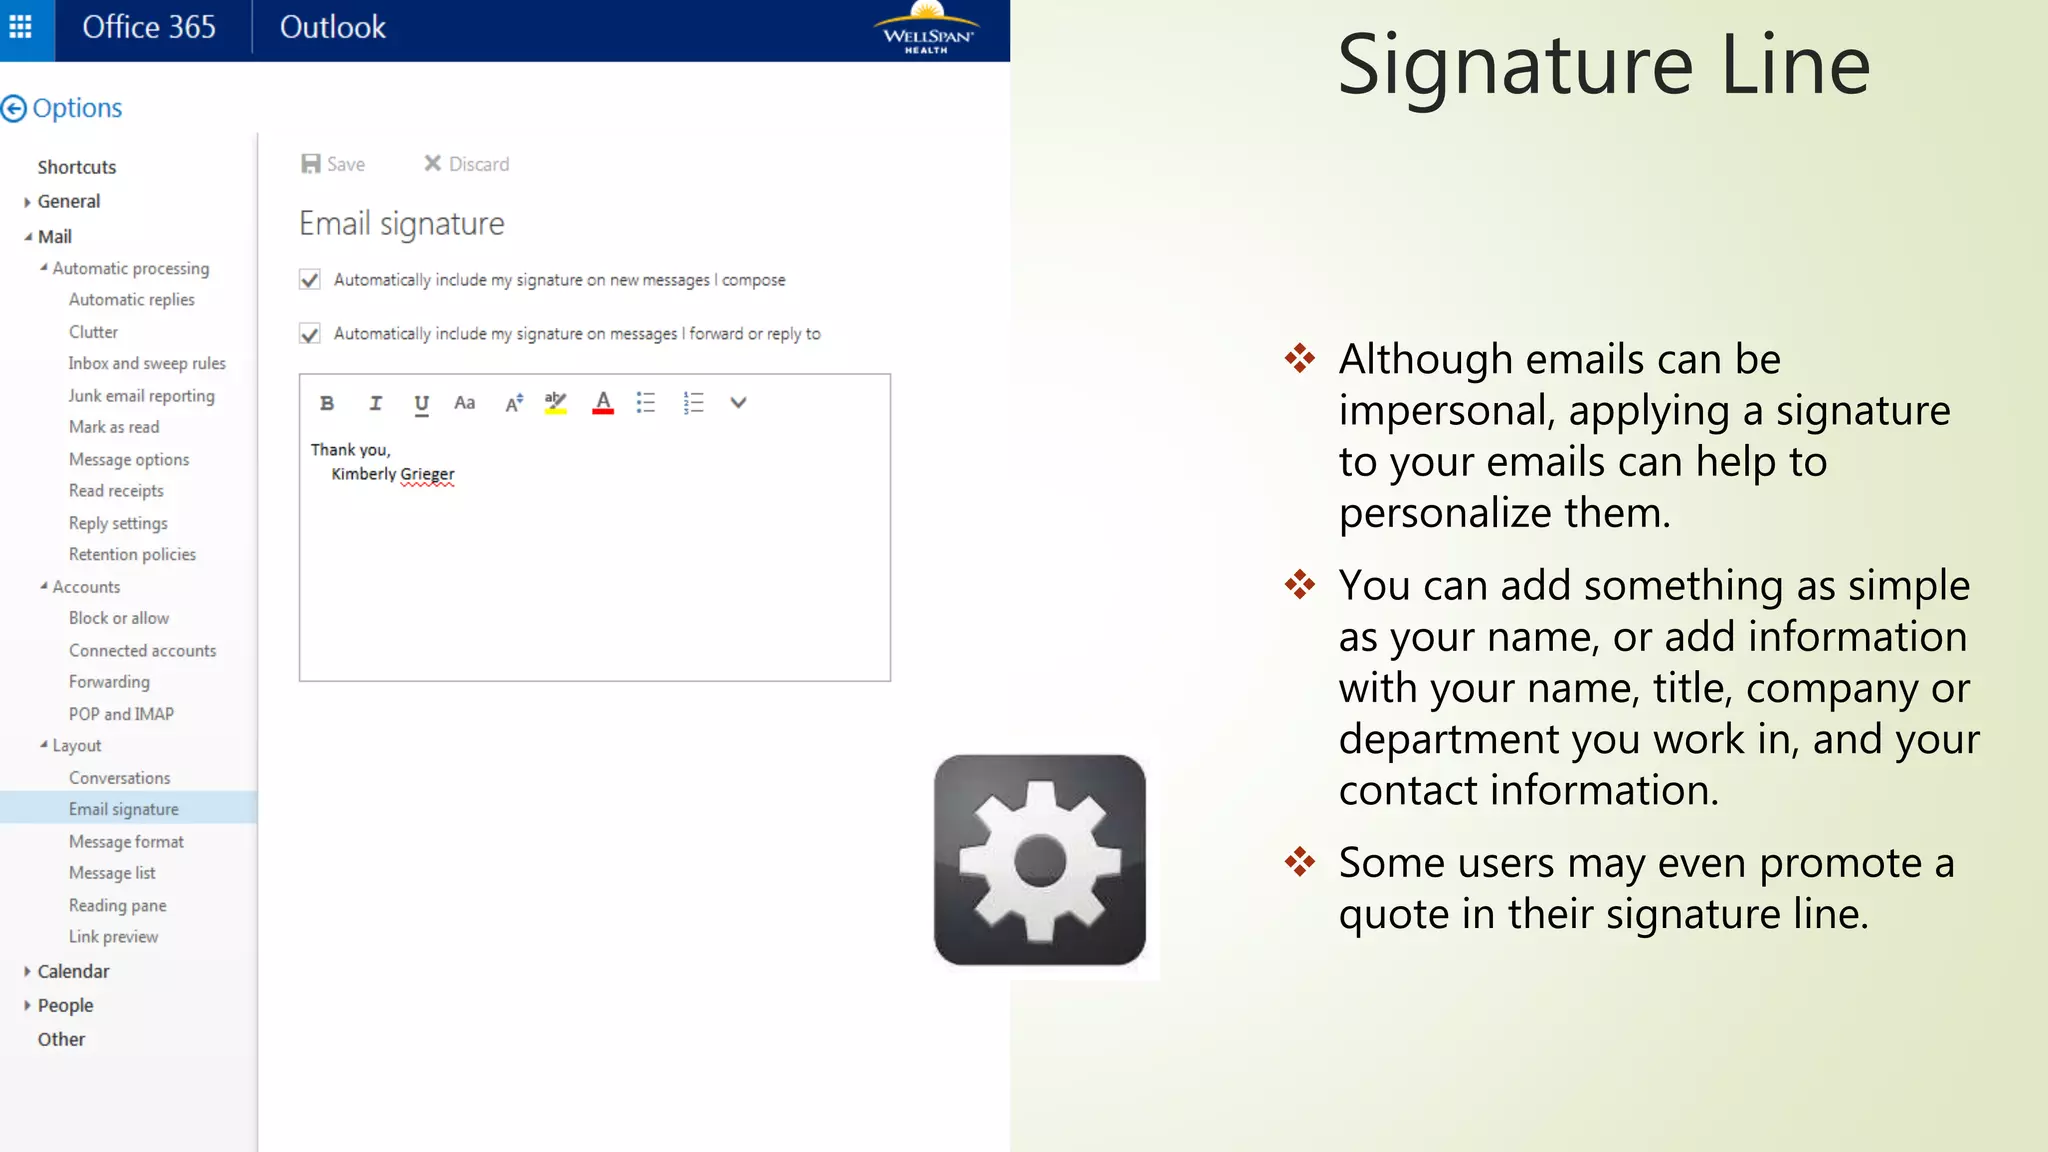
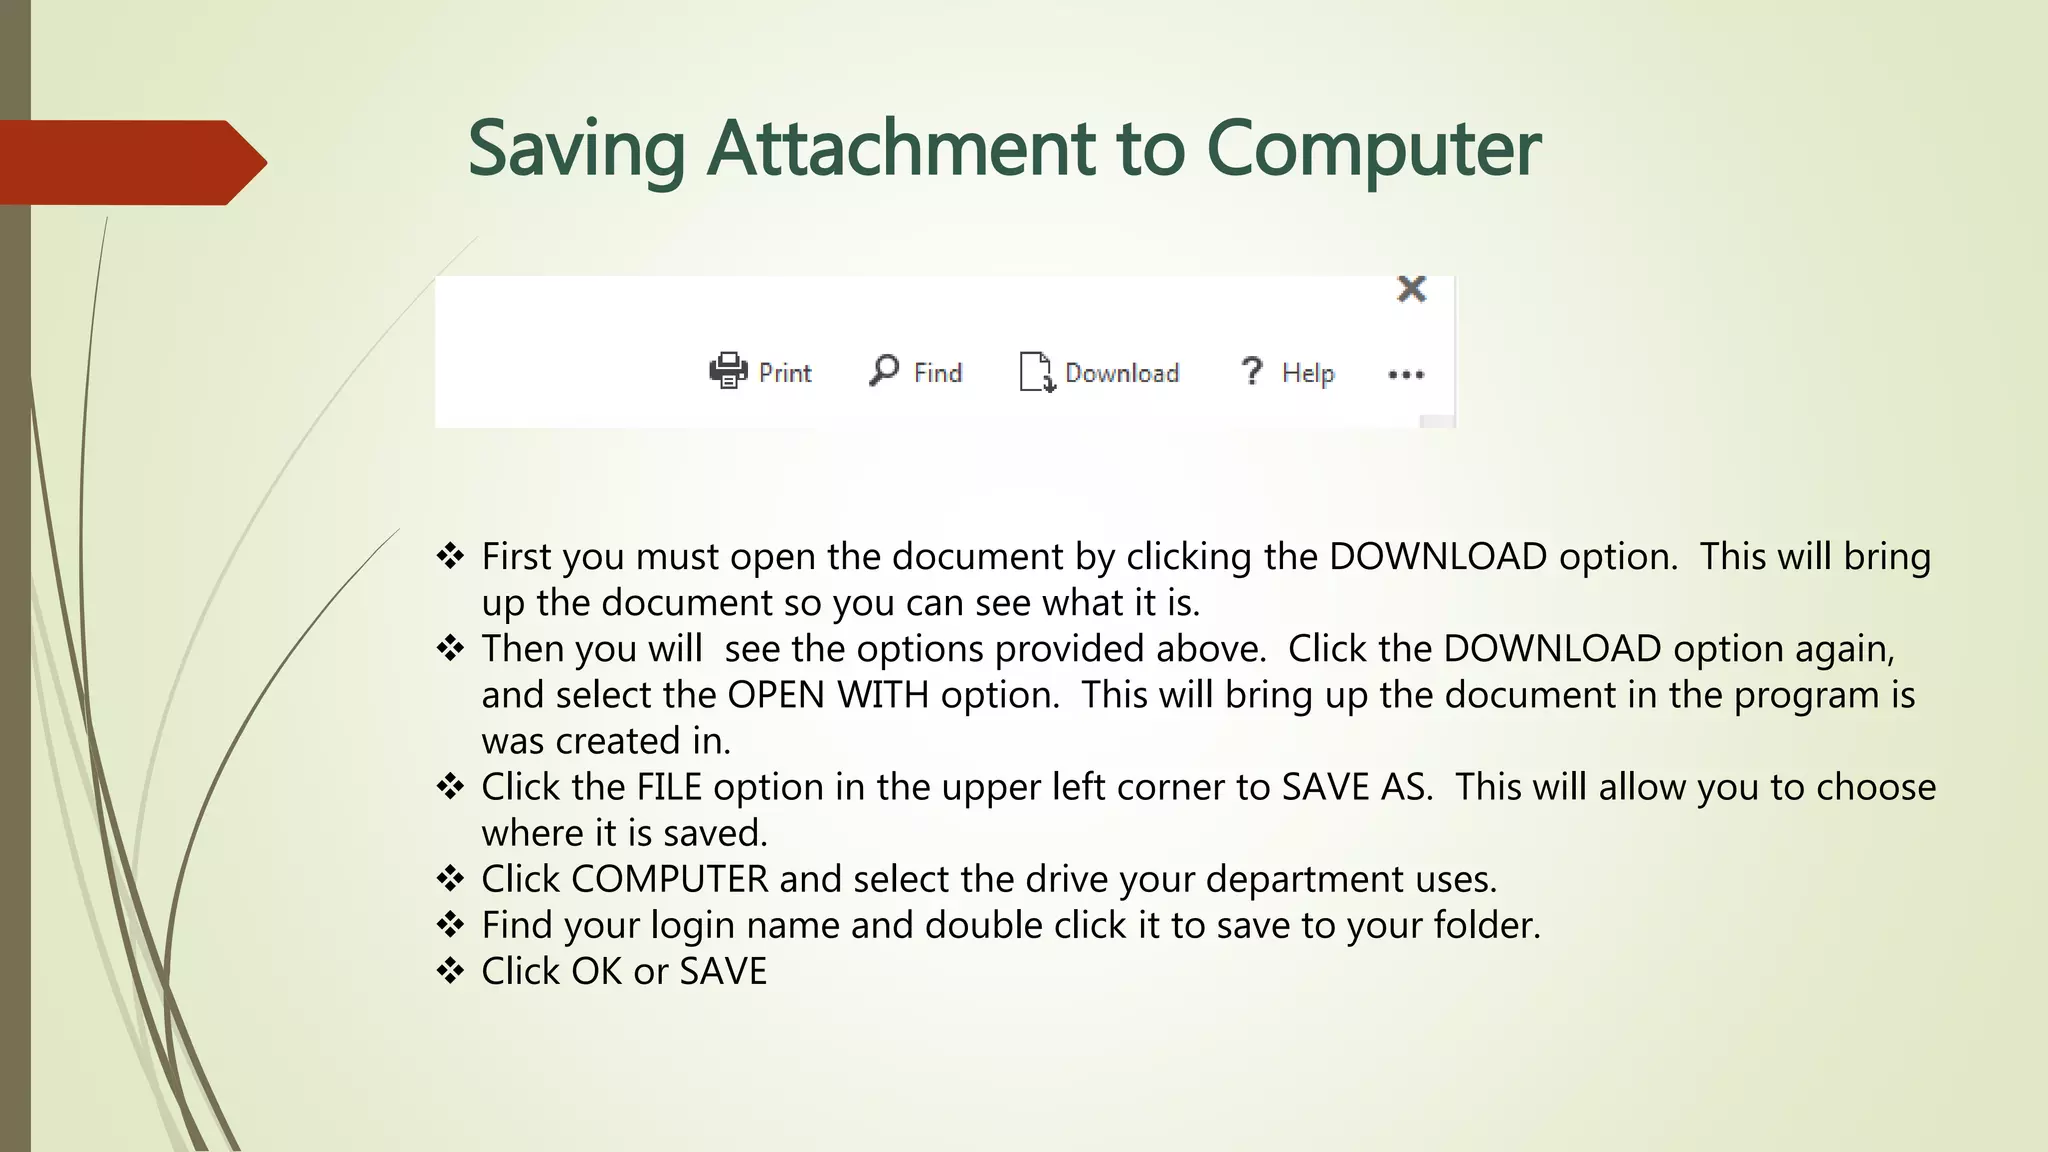
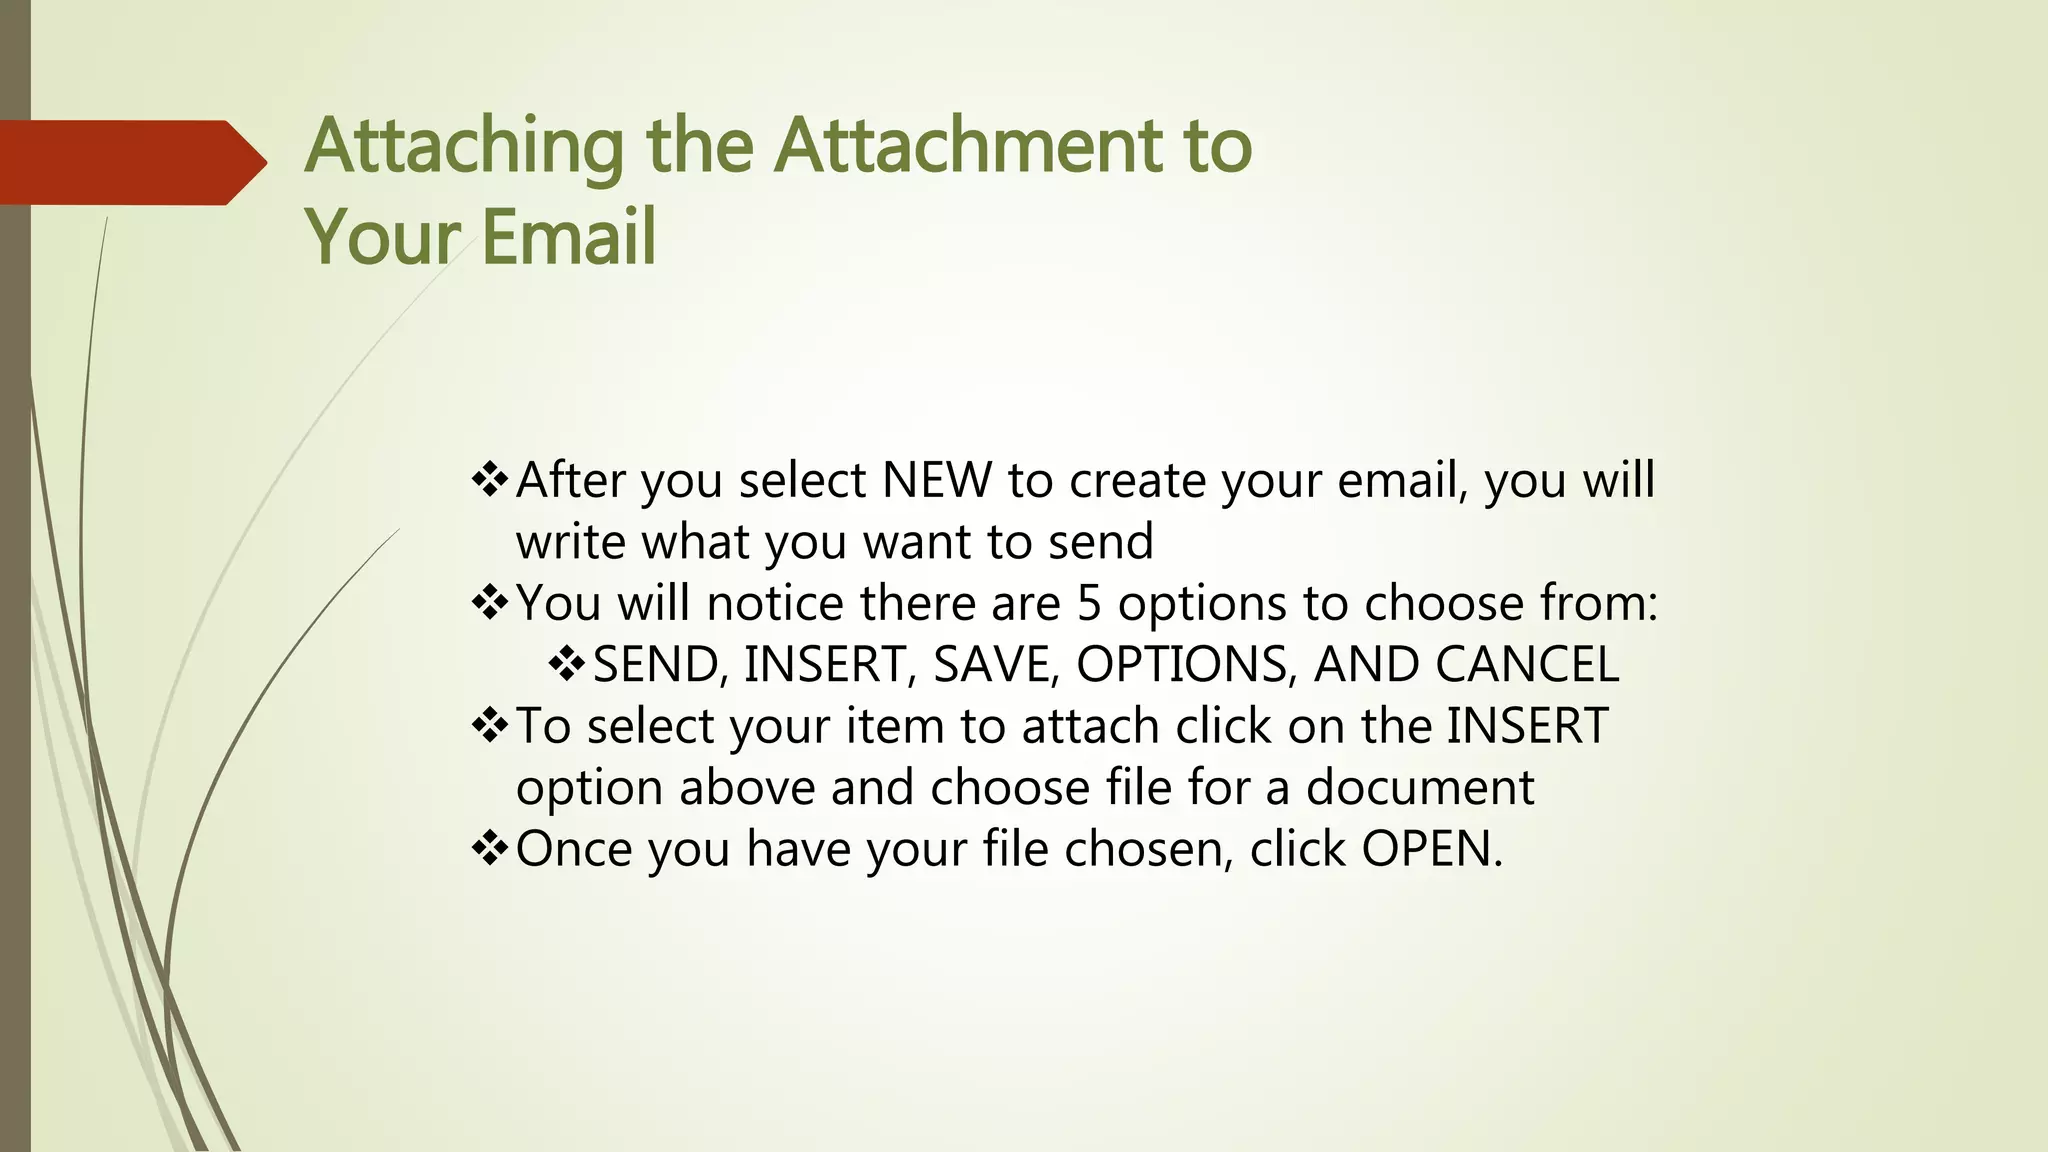
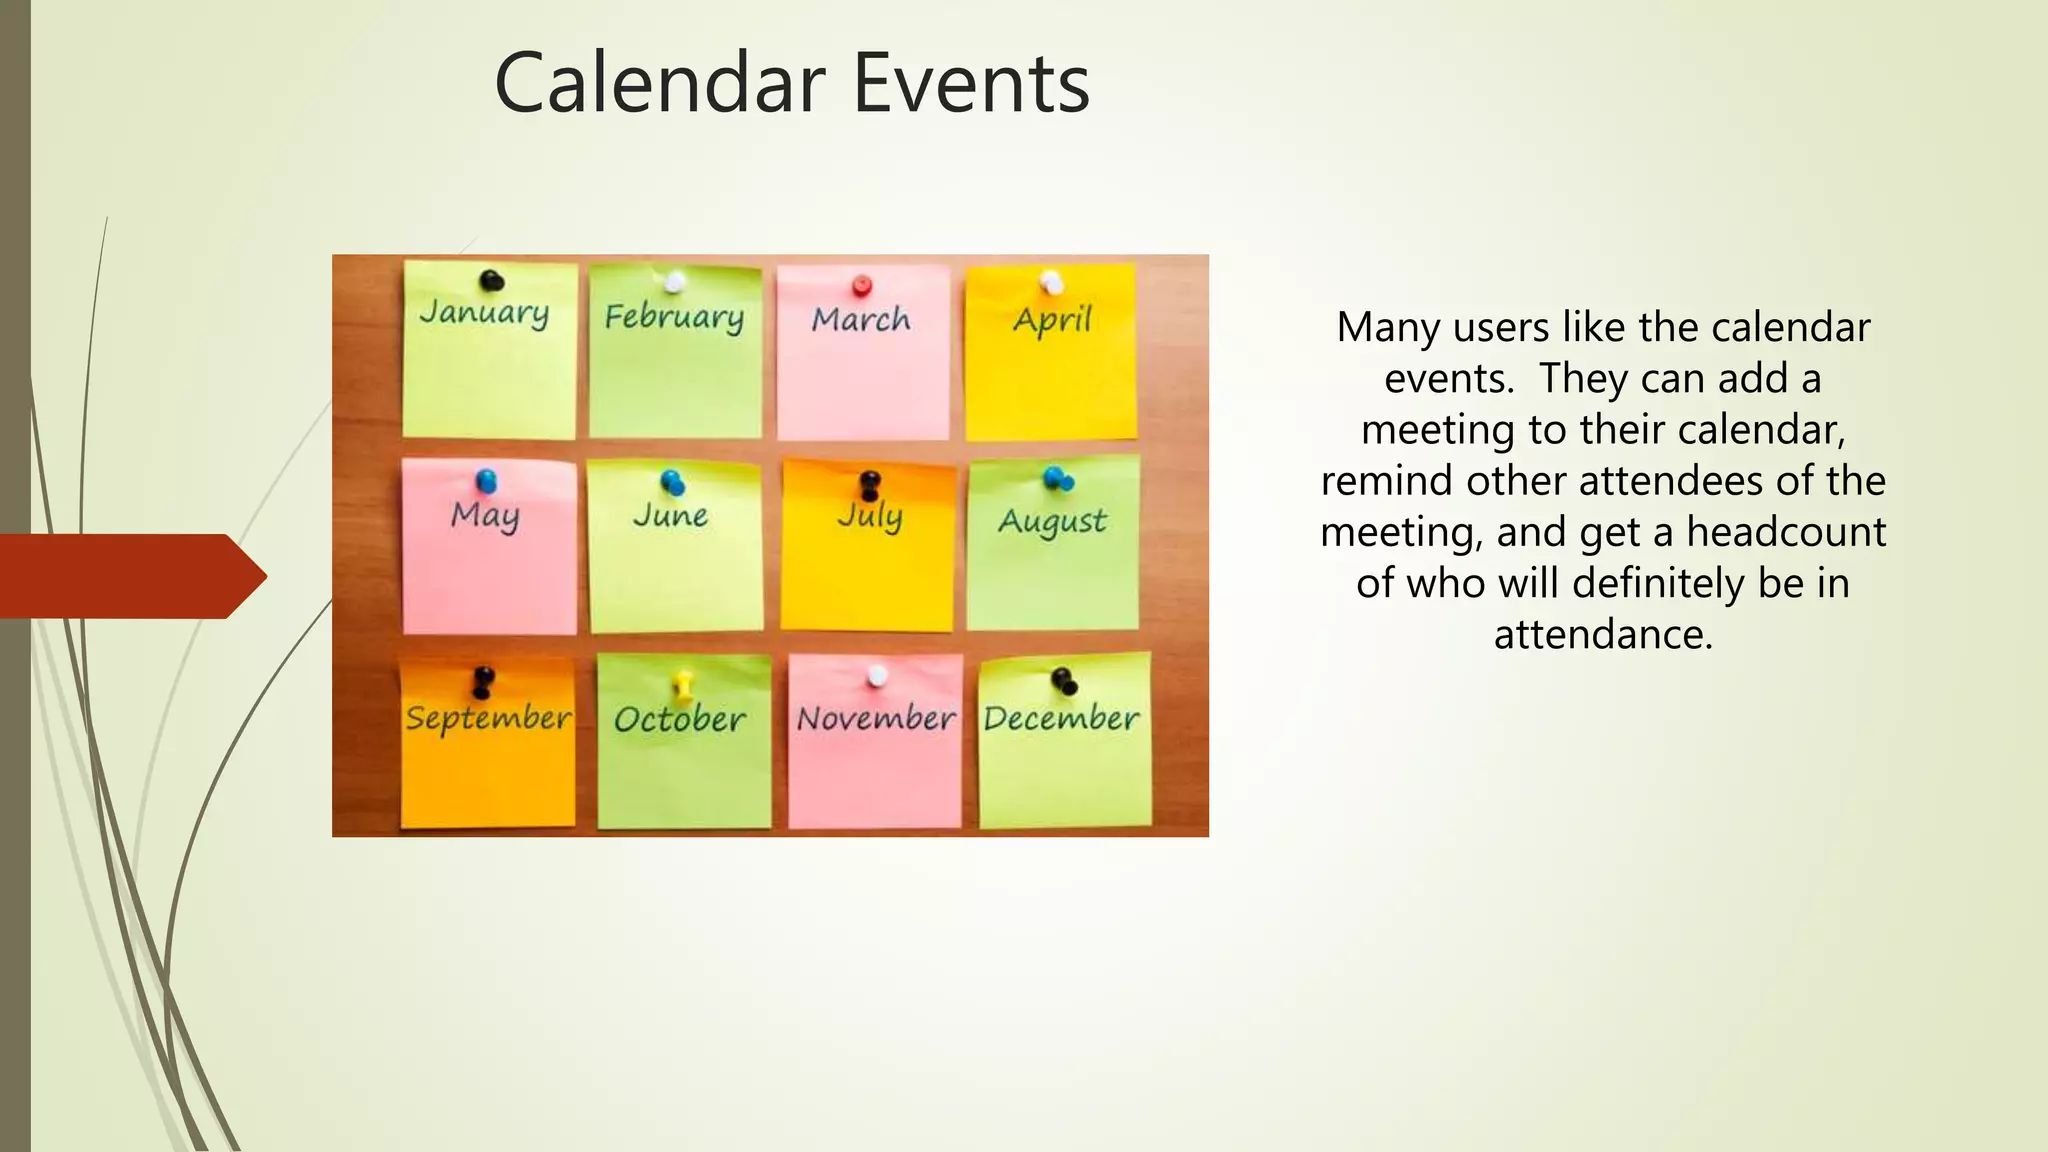
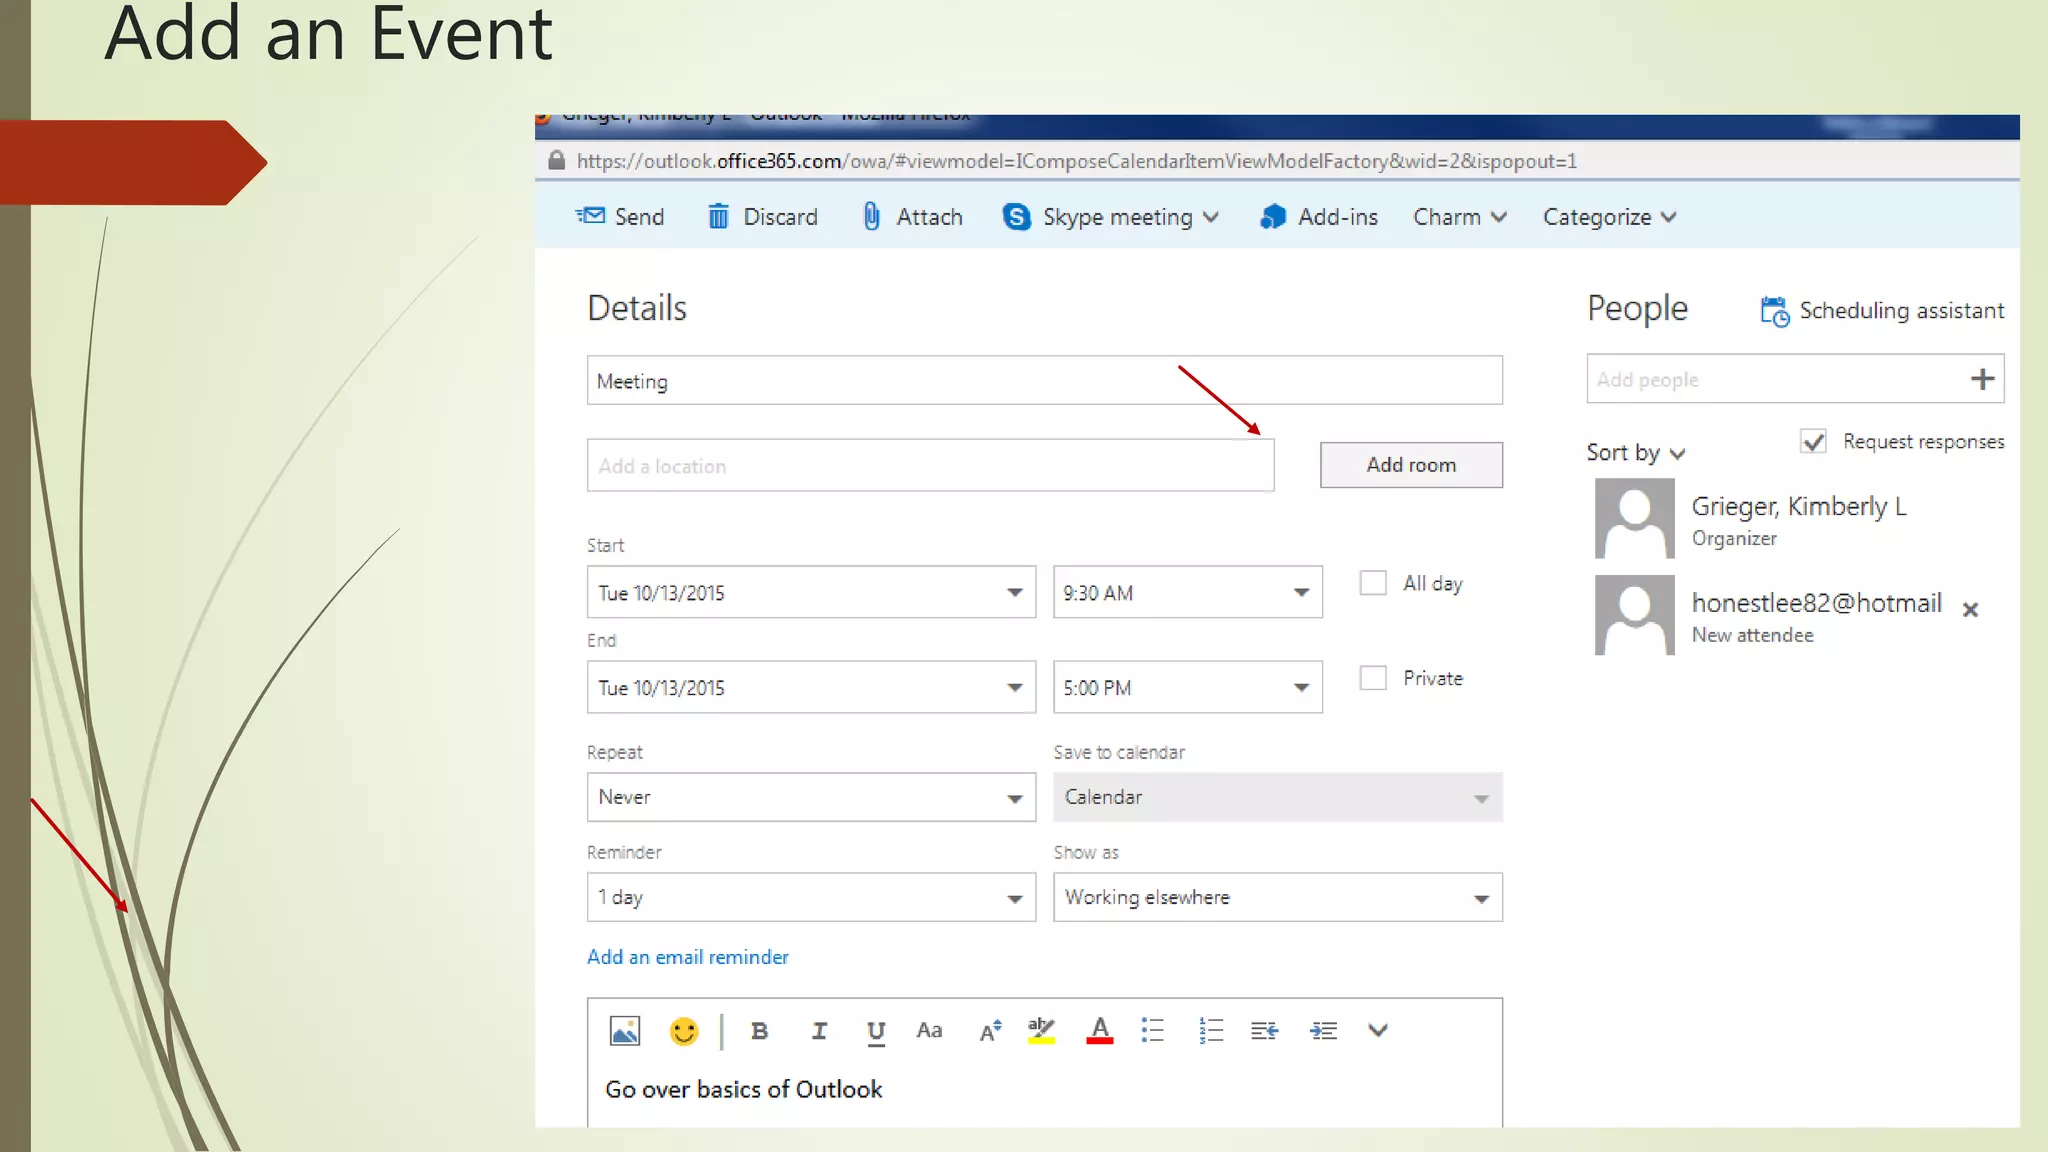
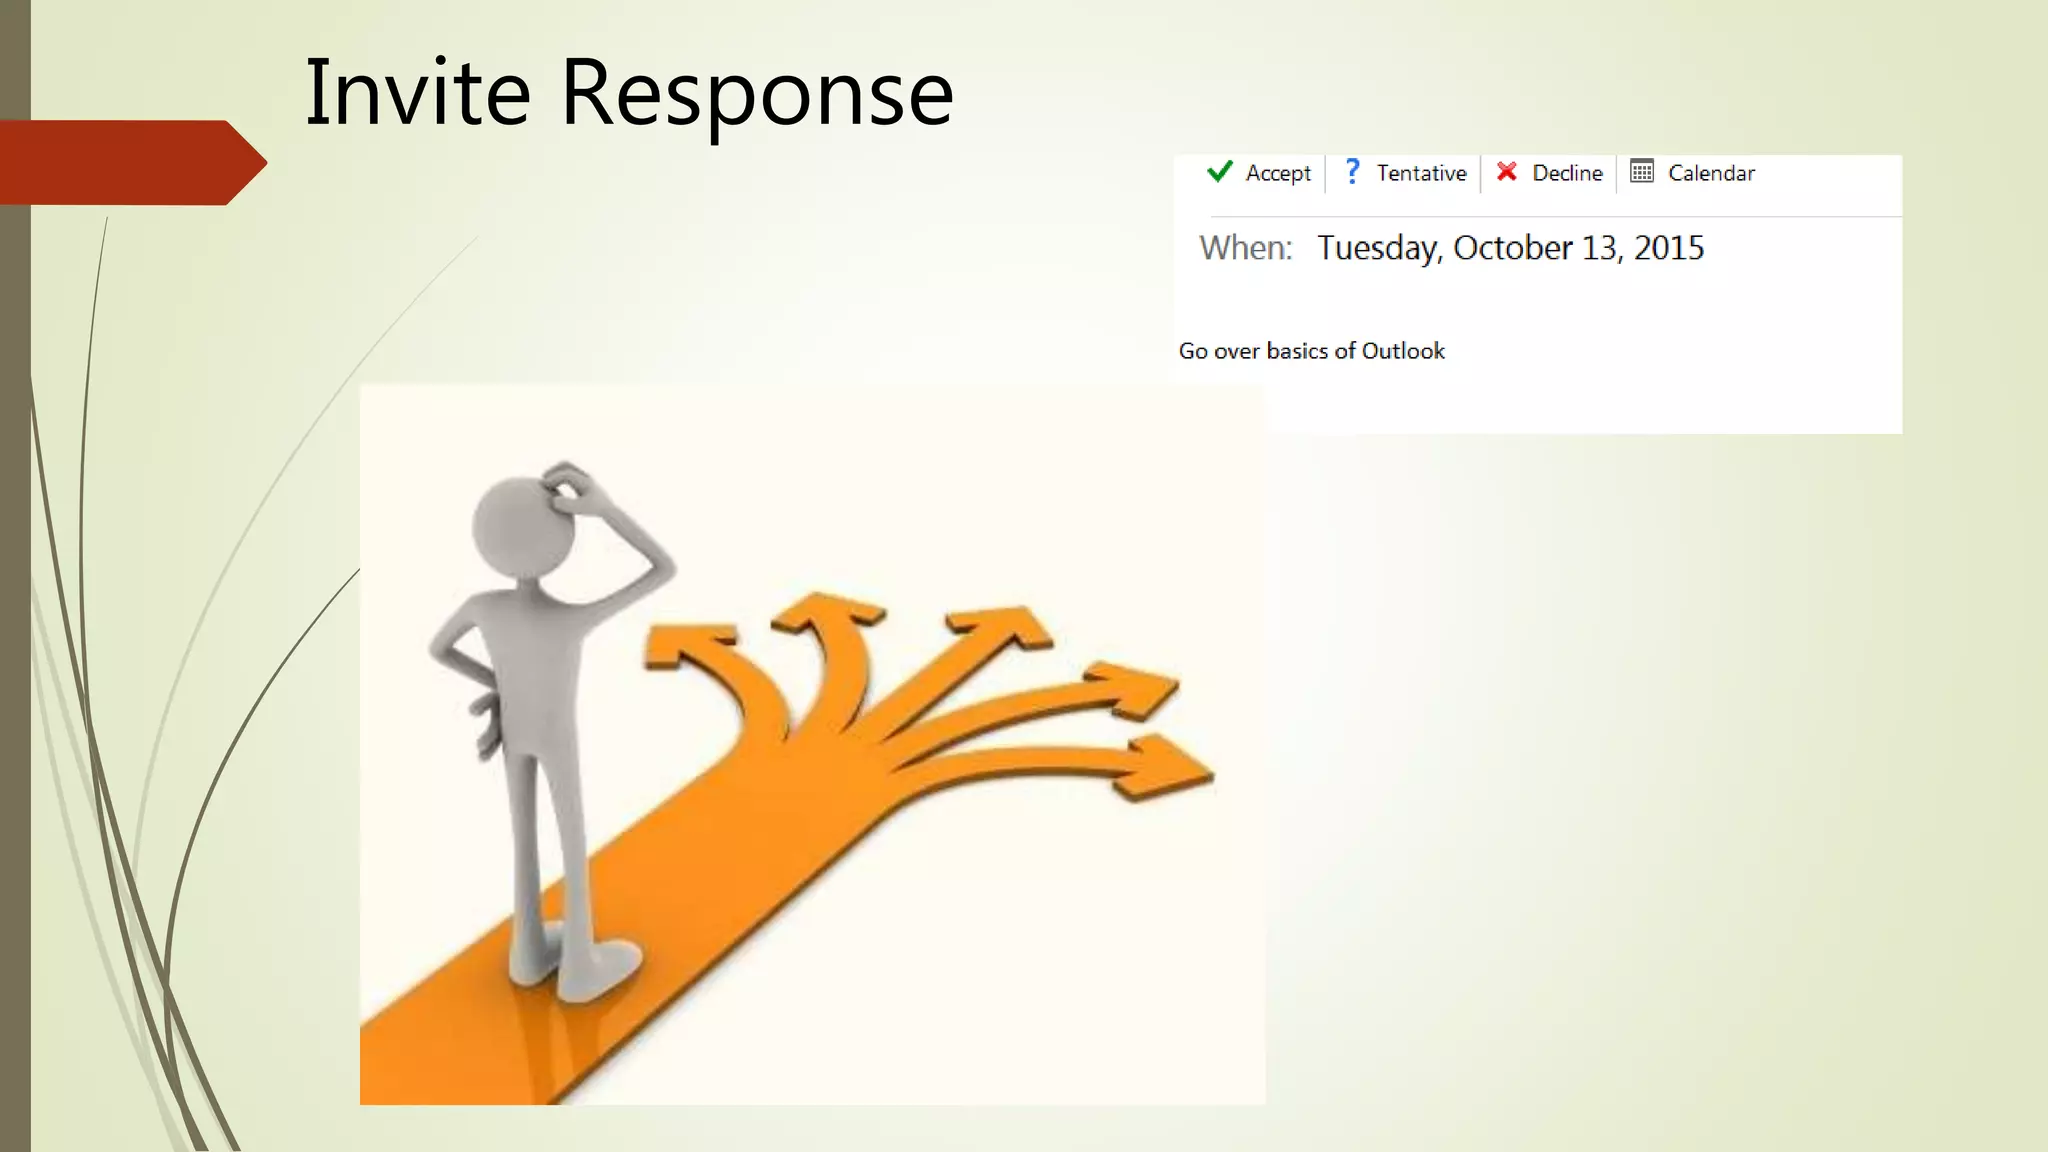
Basic Outlook Skills
Presented By Kimberly Grieger
DeVry University Student/WellSpan Employee
Topics for
Discussion
 Logging Into Email Using Firefox
 Basic Options and Folder Uses
 Add a Signature Line
 Opening an Email
 Opening an Attachment
 Save an Attachment to Your Personal File
 Attach an Attachment
 Add a Calendar Event
 Send and Respond to an Invite
Logging Into Outlook
When you are logging into Outlook, the format may look different depending on the web browser you
are using. For this presentation we will use Firefox.
Click on the Office 365/Email icon on the upper left corner and sign in using your login credentials.
You will then select MAIL since we will be explaining the email options.
Logging In
Email Options
Additional Options
To read or
NOT to
read
How
important is
this?
Folder Options
 INBOX is where emails will be put when the
computer does not see any threat to the system.
 CLUTTER is a folder that is automatically generated
for you to place low priority items in to “declutter”
items.
 SENT ITEMS show you what emails you have sent
to other users.
 DRAFTS are emails that were started and not
finished, or saved for a later time to finish.
 MORE is used if you have additional folders made
for better organization as well as to view your Junk
Email
How to Turn Clutter Off
When you are in your mailbox you
will see the tool gear icon on the
upper right corner.
Click on the tool gear icon, then
click on OPTIONS
Signature Line
 Although emails can be
impersonal, applying a signature
to your emails can help to
personalize them.
 You can add something as simple
as your name, or add information
with your name, title, company or
department you work in, and your
contact information.
 Some users may even promote a
quote in their signature line.
Attachments
An email that has an attachment will have a paperclip
icon above the date
Once you click on the email, it will show the
attachment under the person’s name
Saving Attachment to Computer
 First you must open the document by clicking the DOWNLOAD option. This will bring
up the document so you can see what it is.
 Then you will see the options provided above. Click the DOWNLOAD option again,
and select the OPEN WITH option. This will bring up the document in the program is
was created in.
 Click the FILE option in the upper left corner to SAVE AS. This will allow you to choose
where it is saved.
 Click COMPUTER and select the drive your department uses.
 Find your login name and double click it to save to your folder.
 Click OK or SAVE
Attaching the Attachment to
Your Email
After you select NEW to create your email, you will
write what you want to send
You will notice there are 5 options to choose from:
SEND, INSERT, SAVE, OPTIONS, AND CANCEL
To select your item to attach click on the INSERT
option above and choose file for a document
Once you have your file chosen, click OPEN.
Calendar Events
Many users like the calendar
events. They can add a
meeting to their calendar,
remind other attendees of the
meeting, and get a headcount
of who will definitely be in
attendance.
Add an Event
Invite Response
Basic Outlook Skills

Basic Outlook Skills

  • 1.
    Basic Outlook Skills PresentedBy Kimberly Grieger DeVry University Student/WellSpan Employee
  • 2.
    Topics for Discussion  LoggingInto Email Using Firefox  Basic Options and Folder Uses  Add a Signature Line  Opening an Email  Opening an Attachment  Save an Attachment to Your Personal File  Attach an Attachment  Add a Calendar Event  Send and Respond to an Invite
  • 3.
    Logging Into Outlook Whenyou are logging into Outlook, the format may look different depending on the web browser you are using. For this presentation we will use Firefox. Click on the Office 365/Email icon on the upper left corner and sign in using your login credentials. You will then select MAIL since we will be explaining the email options. Logging In
  • 4.
  • 5.
    Additional Options To reador NOT to read How important is this?
  • 6.
    Folder Options  INBOXis where emails will be put when the computer does not see any threat to the system.  CLUTTER is a folder that is automatically generated for you to place low priority items in to “declutter” items.  SENT ITEMS show you what emails you have sent to other users.  DRAFTS are emails that were started and not finished, or saved for a later time to finish.  MORE is used if you have additional folders made for better organization as well as to view your Junk Email
  • 7.
    How to TurnClutter Off When you are in your mailbox you will see the tool gear icon on the upper right corner. Click on the tool gear icon, then click on OPTIONS
  • 9.
    Signature Line  Althoughemails can be impersonal, applying a signature to your emails can help to personalize them.  You can add something as simple as your name, or add information with your name, title, company or department you work in, and your contact information.  Some users may even promote a quote in their signature line.
  • 11.
    Attachments An email thathas an attachment will have a paperclip icon above the date Once you click on the email, it will show the attachment under the person’s name
  • 12.
    Saving Attachment toComputer  First you must open the document by clicking the DOWNLOAD option. This will bring up the document so you can see what it is.  Then you will see the options provided above. Click the DOWNLOAD option again, and select the OPEN WITH option. This will bring up the document in the program is was created in.  Click the FILE option in the upper left corner to SAVE AS. This will allow you to choose where it is saved.  Click COMPUTER and select the drive your department uses.  Find your login name and double click it to save to your folder.  Click OK or SAVE
  • 13.
    Attaching the Attachmentto Your Email After you select NEW to create your email, you will write what you want to send You will notice there are 5 options to choose from: SEND, INSERT, SAVE, OPTIONS, AND CANCEL To select your item to attach click on the INSERT option above and choose file for a document Once you have your file chosen, click OPEN.
  • 14.
    Calendar Events Many userslike the calendar events. They can add a meeting to their calendar, remind other attendees of the meeting, and get a headcount of who will definitely be in attendance.
  • 15.
  • 16.

Editor's Notes

  • #2 Today we will be discussing the basic skills for Microsoft Outlook 365
  • #3 The topics we will cover are logging into the email, basic options and uses, how to apply a signature line, how to open and respond to an email, as well as how to open and save an attachment. We will also go over how to add a calendar event, sending invites and responding to invites.
  • #4 The browser you choose may give a different format for Outlook, so we will focus on the Firefox browser. When you are in INET, choose the OFFICE 365/EMAIL option in the upper right corner and sign in with your email login credentials. Then select MAIL to view the email options.
  • #5 First you must understand what options you have available. On the top are several tabs. NEW is to create a new email. However the drop down option next to it will show you that you have additional options. This allows you to create a new email or a new calendar appointment. Next is a TRASHCAN the word DELETE. This allows you to delete the selected item from your email. Notice I said SELECTED; you must first select the email you want to delete. If you want to delete multiple emails, you may do this by putting a checkmark in the box associated with those emails and hitting DELETE. The next option is ARCHIVE. If this is chosen, the selected email will go to an ARCHIVE folder. Next you have the JUNK tab. This option is your way to communicate to the computer system that this message is not something you need to see, or need to keep. Outlook will remember this email address and try to put any emails from that user in the junk box in the future. Next to the JUNK tab is another drop down option. This will allow you to tell the computer if it’s PHISHING SPAM. That will send an alert to the IT department as well as eliminate any future emails from that sender. SWEEP is used to block, delete or archive email messages. The prompting will guide you through your options. If you want to move the email to another folder to organize what you want to keep the MOVE TO tab is available. Once selected you can choose what folder you would like the email to go into. The last tab is CATEGORIES. This allows you to choose different ways of categorizing the emails in your INBOX. It can be based on colors, folders, titles, or any other options you choose if you personalize it.
  • #6 At the far left you will see three “…” to show additional options. When an email is selected, you can choose to make it appear as READ or UNREAD. This will allow the sender to see if it was acknowledged or not. You can choose to PIN or UNPIN an email. This means that you can choose the email to stay at the top of your email list. When you no longer wish it to maintain that position, you can unpin it. FLAG is an option that will allow you to see that you “flagged” it for a specific reason. That reason can be up to you. When you are done, you may CLEAR FLAG that email. The option MARK COMPLETE is pertaining to items that you flag. When you mark the item complete, it will automatically remove the flag from the email. The other options listed here are for more advanced users, so I will not go over them today.
  • #7 On the left hand side you will see several folders available to view. This is how you can organize the emails you receive or view the ones you have sent. INBOX is where emails will be put when the computer does not see any threat to the system. CLUTTER is a folder that is automatically generated for you to place low priority items in to “declutter” items. This is supposed to allow you to view the more important messages and uses the activity from your account to determine the messages you are most likely to ignore and puts those in the Clutter folder to review at a later time. SENT ITEMS show you what emails you have sent to other users. DRAFTS are emails that were started and not finished, or saved for a later time to finish. MORE is used if you have additional folders made for better organization as well as to view your Junk Email Once you open any of these folders, you will see the emails listed. You can sort these emails by DATE, FROM, TO, SUBJECT, ATTACHMENTS, IMPORTANCE, or SIZE. This of course, is up to you and your own personal preferences.
  • #8 Due to some confusion that the Clutter folder is creating, we will show you how to turn if OFF. When you are in your mailbox you will see the tool gear icon on the upper right corner. Click on the tool gear icon, then click on OPTIONS
  • #9 On the upper left side, MAIL is already selected as a default since you were in the mail section of outlook to begin with. You will see Automatic Processing has also been expanded to show the options in that section. You want to click on CLUTTER. That will open up the option to personalize your settings. To turn Clutter Off, click on the option that says “Don’t separate items identified as clutter.” Then click SAVE. This will not remove the clutter option from the outlook program, this simply keeps it from interfering from how email is handled.
  • #10 Signature lines are when you want something specific to be displayed at the bottom of any email you send. You can have just one or several email signatures, but we will focus on just one. To apply a SIGNATURE LINE, you will go to this same area. Under MAIL, choose LAYOUT, and then EMAIL SIGNATURE. You will see two choices an when to apply the signature. You can choose one or both. In the text box you can type the content you want to appear. As you see above, I chose to say Thank you, and my full name. After you apply the signature you desire, you can click on SAVE. To get back to the mail section, click the upper left hand OPTIONS with the arrow pointing left.
  • #11 So what do you do when you get email? When you click on the email, the details will then be shown on the right side of the screen. On the top right corner of the email details, there is an option to REPLY ALL along with a drop down arrow. If you need to reply to the email, you must click the arrow and select REPLY, to allow you to type a response to only the person who wrote the email. If you select REPLY ALL, it will allow you to type a response to the person who wrote the email, as well as any other persons who were sent the same email. If you select FORWARD, the selected email will be sent to a person of your choosing. In this option field, you may also choose to print the email. This will allow the print out version to be the email content and not all the information on the screen that is not valid to that particular email.
  • #12 An email that has an attachment will have a paperclip icon above the date. Once you click on the email, it will show the attachment under the person’s name. You can choose to VIEW, DOWNLOAD or SAVE TO ONEDRIVE. OneDrive is an option you can use that will save the document to your email documents that is available only to you (unless you choose to SHARE it, but that is a bit more advanced). VIEW option will let you view the document. DOWNLOAD will let you save it to a specific location, and view it when it’s downloaded.
  • #13 First you must open the document by clicking the DOWNLOAD option. This will bring up the document so you can see what it is. Then you will see the options provided above. Click the DOWNLOAD option again, and select the OPEN WITH option. This will bring up the document in the program is was created in. Click the FILE option in the upper left corner to SAVE AS. This will allow you to choose where it is saved. Each employee has a file folder under their user name. You should see a window that pops up that is the “Library”. You will see COMPUTER and select the drive your department uses. It will be different depending on what department you work in, so if you’re not sure, ask a coworker or supervisor. Next you will see employee login names. You want the one that belongs to you. You may use the slide option on the right to drag the curser to your name, or you may click in the active box area and begin typing your name. Once you see your name, click on it to save to your folder. You may save the document with the title name you want by clicking next to FILE NAME and type the name of your choice. Click OK or SAVE and CONGRATULATIONS! You’re all finished saving that document.
  • #14 After you select NEW to create your email, you will write what you want to send You will notice there are 5 options to choose from: SEND, INSERT, SAVE, OPTIONS, AND CANCEL: Send is to be used when you are ready to send the item, Insert is to be used to insert the item you want to attach such as a file, picture, or to save it to the OneDrive account. You also have Save, Options (for text), and Cancel) To select your item to attach click on the INSERT option above and choose file for a document Once you have your file chosen, click OPEN. Now you will see it above the message as an attachment link. Once it is completely done uploading to the document, you may hit SEND.
  • #15 Many users like the calendar events. They can add a meeting to their calendar, remind other attendees of the meeting, and get a headcount of who will definitely be in attendance.
  • #16 To add an event, click on the drop down option next to NEW and choose CALENDAR EVENT. It will bring up a screen like shown above. You can add the details, such as the name for the event (I choose MEETING), the location, the day and time the event will be, if you would like it to repeat, when you would like a reminder, and what you would like your status to show for other viewers. You can choose this to be an ALL DAY event, which you won’t need the time to be selected. You can also choose for this event to be PRIVATE. This means other users won’t be able to see it in your calendar. As you can see on the right, I am listed as the organizer. I also invited another person. By having the REQUEST RESPONSES checked, the users will have to respond when they get this event in their email. You can choose to add attendees by clicking the plus sign and it will allow you to choose from your contacts in your email. If this is for something like a project where you may want several reminders, you may choose ADD AN EMAIL REMINDER to put in additional reminder alerts. There is an option at the top to ATTACH, and this is when you would attach a document that the attendees may need to review or have access to prior to the event. When you are happy with everything, you may select SAVE and it will be added to your calendar.
  • #17 When you are the recipient of an invite email, it will show you all the details the organizer included when making the event. You will have several options to respond. You may select ACCEPT meaning that you will be there, TENTATIVE meaning that you will try to be there, but are unsure at this time, and DECLINE meaning that you will not be able to make the event at all. When you select your option, you will have to hit SEND for a reply to be forwarded to the organizer. This will then alert the organizer of how many people will be attending. If your status changes you may go back into the event or the email and change your status, then hit SEND. This will update the organizer that your status has changed in “real time”. If the meeting is canceled, the organizer will be able to email all of those who accepted the invite a generalized message, making it easier to maintain any changes.
  • #18 Thank you for letting me present this information today, does anyone have any questions?