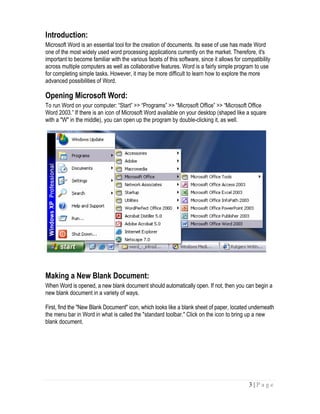
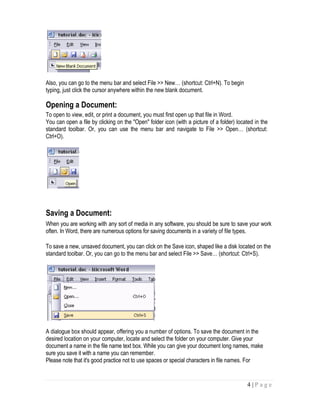
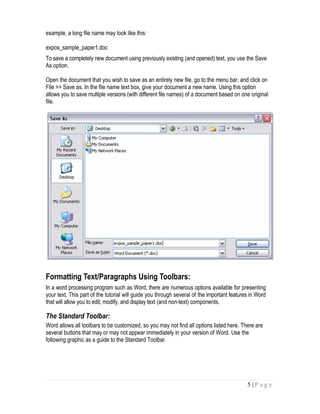
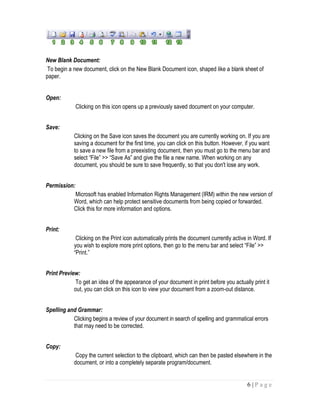
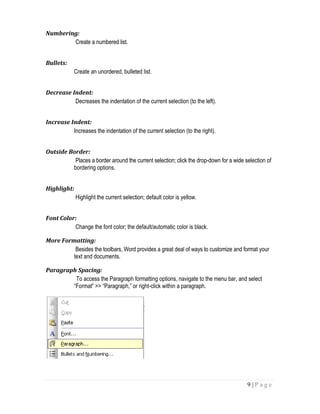
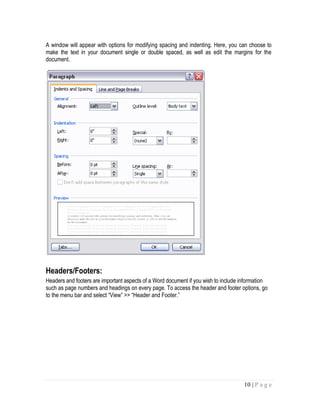
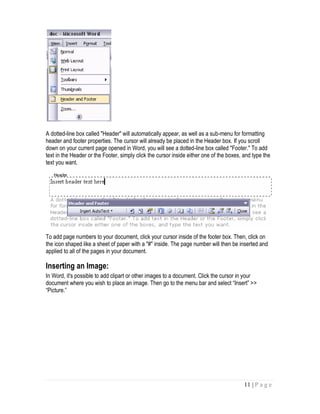
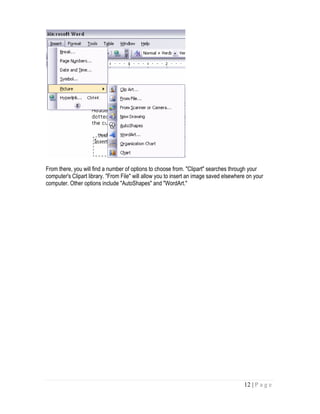
SlideShare a Scribd company logo
1 | P a g e
Computing Fundamentals
Lab Manual #1
Microsoft Office Word Introduction
2 | P a g e
Table of Contents
Introduction: .............................................................................................................................3
Opening Microsoft Word: ...........................................................................................................3
Making a New Blank Document:.................................................................................................3
Opening a Document:................................................................................................................4
Saving a Document:..................................................................................................................4
Formatting Text/Paragraphs Using Toolbars:...............................................................................5
The Standard Toolbar:...........................................................................................................5
New Blank Document: .......................................................................................................6
Open:...............................................................................................................................6
Save: ...............................................................................................................................6
Permission: ......................................................................................................................6
Print:................................................................................................................................6
Print Preview: ...................................................................................................................6
Spelling and Grammar:......................................................................................................6
Copy:...............................................................................................................................6
Paste: ..............................................................................................................................7
Undo Typing:....................................................................................................................7
Insert Hyperlink:................................................................................................................7
Insert Table: .....................................................................................................................7
The Formatting Toolbar: ........................................................................................................7
Style: ..............................................................................................................................7
Font: ...............................................................................................................................8
Font Size: .......................................................................................................................8
Bold:...............................................................................................................................8
Italic: ..............................................................................................................................8
Underline: ......................................................................................................................8
Align Left:......................................................................................................................8
Center:............................................................................................................................8
Align Right: ...................................................................................................................8
Justify:............................................................................................................................8
Line Spacing: .................................................................................................................8
Numbering: ....................................................................................................................9
Bullets: ...........................................................................................................................9
Decrease Indent:.............................................................................................................9
Increase Indent:..............................................................................................................9
Outside Border:..............................................................................................................9
Highlight: .......................................................................................................................9
Font Color:.....................................................................................................................9
More Formatting:...........................................................................................................9
Paragraph Spacing: ........................................................................................................9
Headers/Footers: ....................................................................................................................10
Inserting an Image:..................................................................................................................11
3 | P a g e
Introduction:
Microsoft Word is an essential tool for the creation of documents. Its ease of use has made Word
one of the most widely used word processing applications currently on the market. Therefore, it's
important to become familiar with the various facets of this software, since it allows for compatibility
across multiple computers as well as collaborative features. Word is a fairly simple program to use
for completing simple tasks. However, it may be more difficult to learn how to explore the more
advanced possibilities of Word.
Opening Microsoft Word:
To run Word on your computer: “Start” >> “Programs” >> “Microsoft Office” >> “Microsoft Office
Word 2003.” If there is an icon of Microsoft Word available on your desktop (shaped like a square
with a "W" in the middle), you can open up the program by double-clicking it, as well.
Making a New Blank Document:
When Word is opened, a new blank document should automatically open. If not, then you can begin a
new blank document in a variety of ways.
First, find the "New Blank Document" icon, which looks like a blank sheet of paper, located underneath
the menu bar in Word in what is called the "standard toolbar." Click on the icon to bring up a new
blank document.
4 | P a g e
Also, you can go to the menu bar and select File >> New… (shortcut: Ctrl+N). To begin
typing, just click the cursor anywhere within the new blank document.
Opening a Document:
To open to view, edit, or print a document, you must first open up that file in Word.
You can open a file by clicking on the "Open" folder icon (with a picture of a folder) located in the
standard toolbar. Or, you can use the menu bar and navigate to File >> Open… (shortcut:
Ctrl+O).
Saving a Document:
When you are working with any sort of media in any software, you should be sure to save your work
often. In Word, there are numerous options for saving documents in a variety of file types.
To save a new, unsaved document, you can click on the Save icon, shaped like a disk located on the
standard toolbar. Or, you can go to the menu bar and select File >> Save… (shortcut: Ctrl+S).
A dialogue box should appear, offering you a number of options. To save the document in the
desired location on your computer, locate and select the folder on your computer. Give your
document a name in the file name text box. While you can give your document long names, make
sure you save it with a name you can remember.
Please note that it's good practice not to use spaces or special characters in file names. For
5 | P a g e
example, a long file name may look like this:
expos_sample_paper1.doc
To save a completely new document using previously existing (and opened) text, you use the Save
As option.
Open the document that you wish to save as an entirely new file, go to the menu bar, and click on
File >> Save as. In the file name text box, give your document a new name. Using this option
allows you to save multiple versions (with different file names) of a document based on one original
file.
Formatting Text/Paragraphs Using Toolbars:
In a word processing program such as Word, there are numerous options available for presenting
your text. This part of the tutorial will guide you through several of the important features in Word
that will allow you to edit, modify, and display text (and non-text) components.
The Standard Toolbar:
Word allows all toolbars to be customized, so you may not find all options listed here. There are
several buttons that may or may not appear immediately in your version of Word. Use the
following graphic as a guide to the Standard Toolbar.
6 | P a g e
New Blank Document:
To begin a new document, click on the New Blank Document icon, shaped like a blank sheet of
paper.
Open:
Clicking on this icon opens up a previously saved document on your computer.
Save:
Clicking on the Save icon saves the document you are currently working on. If you are
saving a document for the first time, you can click on this button. However, if you want
to save a new file from a preexisting document, then you must go to the menu bar and
select “File” >> “Save As” and give the file a new name. When working on any
document, you should be sure to save frequently, so that you don't lose any work.
Permission:
Microsoft has enabled Information Rights Management (IRM) within the new version of
Word, which can help protect sensitive documents from being copied or forwarded.
Click this for more information and options.
Print:
Clicking on the Print icon automatically prints the document currently active in Word. If
you wish to explore more print options, then go to the menu bar and select “File” >>
“Print.”
Print Preview:
To get an idea of the appearance of your document in print before you actually print it
out, you can click on this icon to view your document from a zoom-out distance.
Spelling and Grammar:
Clicking begins a review of your document in search of spelling and grammatical errors
that may need to be corrected.
Copy:
Copy the current selection to the clipboard, which can then be pasted elsewhere in the
document, or into a completely separate program/document.
7 | P a g e
Paste:
Clicking on the Paste button inserts the text that has been most recently added to the
Clipboard (the text would have been added there by Cutting or Copying). With Paste,
you can either insert the copied text into a document or replace selected text.
Undo Typing:
The Undo Typing button goes back and removes the last addition or change made to
your document.
Insert Hyperlink:
You may find that you want to make links to a particular web site, web page, or some
other kind of online file in your Word document. Using the Insert Hyperlink button, you
can turn selected text into hyperlinks. When the icon is clicked, a window will appear
that will allow you to insert the URL (web address) of the web page you want to link to.
You can type in the URL yourself or insert a preexisting bookmark. Once the link is
inserted, the link in your Word document can be clicked and the web page will open up
in a web browser.
Insert Table:
When this icon is clicked, a small window will appear in the form of a grid of squares.
Use this window as a guide to indicate how many rows and columns you would like your
table to contain. Once selected, a table will automatically appear in Word. Clicking the
Tables and Borders button will allow you to modify the table. To modify an aspect of the
table, select, or place the cursor in, the area and apply changes such as borders and
colors.
The Formatting Toolbar:
Word allows all toolbars to be customized, so you may not find all options listed here. There are
several buttons that may or may not appear immediately in your version of Word. Use the
following graphic as a guide to the Formatting Toolbar.
Style:
Styles in Word are used to quickly format portions of text. For example, you could use
the "Normal" or "Default Paragraph Font" for the body text in a document. There are
also three preset styles made for headings.
8 | P a g e
Font:
Font is a simple but important factor in Word documents. The choice of font (the style
of the text itself) can influence the way others view documents, either on the screen
or in print. For example, Arial font looks better on screen, while Times New Roman
is clearer in print. To apply a font to text, select desired text with your cursor, and
choose a font from the font drop down menu.
Font Size:
You may encounter times in which you need to display some text larger or smaller than
other text. Selecting desired text with the cursor and choosing a font size from the drop
down menu changes the size of text.
Bold:
Places the text in bold.
Italic:
Places the text in italics.
Underline:
Underlines the text.
Align Left:
Aligns the selection to the left of the screen/paper.
Center:
Aligns the selection to the center of the screen/paper.
Align Right:
Aligns the selection to the right of the screen/paper.
Justify:
Aligns the selection to both the left and right of the screen/paper.
Line Spacing:
Adjust the line spacing (single-spaced, double-spaced, etc.)
9 | P a g e
Numbering:
Create a numbered list.
Bullets:
Create an unordered, bulleted list.
Decrease Indent:
Decreases the indentation of the current selection (to the left).
Increase Indent:
Increases the indentation of the current selection (to the right).
Outside Border:
Places a border around the current selection; click the drop-down for a wide selection of
bordering options.
Highlight:
Highlight the current selection; default color is yellow.
Font Color:
Change the font color; the default/automatic color is black.
More Formatting:
Besides the toolbars, Word provides a great deal of ways to customize and format your
text and documents.
Paragraph Spacing:
To access the Paragraph formatting options, navigate to the menu bar, and select
“Format” >> “Paragraph,” or right-click within a paragraph.
10 | P a g e
A window will appear with options for modifying spacing and indenting. Here, you can choose to
make the text in your document single or double spaced, as well as edit the margins for the
document.
Headers/Footers:
Headers and footers are important aspects of a Word document if you wish to include information
such as page numbers and headings on every page. To access the header and footer options, go
to the menu bar and select “View” >> “Header and Footer.”
11 | P a g e
A dotted-line box called "Header" will automatically appear, as well as a sub-menu for formatting
header and footer properties. The cursor will already be placed in the Header box. If you scroll
down on your current page opened in Word, you will see a dotted-line box called "Footer." To add
text in the Header or the Footer, simply click the cursor inside either one of the boxes, and type the
text you want.
To add page numbers to your document, click your cursor inside of the footer box. Then, click on
the icon shaped like a sheet of paper with a "#" inside. The page number will then be inserted and
applied to all of the pages in your document.
Inserting an Image:
In Word, it's possible to add clipart or other images to a document. Click the cursor in your
document where you wish to place an image. Then go to the menu bar and select “Insert” >>
“Picture.”
12 | P a g e
From there, you will find a number of options to choose from. "Clipart" searches through your
computer's Clipart library. "From File" will allow you to insert an image saved elsewhere on your
computer. Other options include "AutoShapes" and "WordArt."

More Related Content

What's hot

Excel 2011-cheat-sheet
Excel 2011-cheat-sheetExcel 2011-cheat-sheet
Excel 2011-cheat-sheet
SchoolVision Inc.
 
Microsoft word tutorials COMPLETE by Gulshan K Maheshwari(QAU)
Microsoft word tutorials COMPLETE by Gulshan  K Maheshwari(QAU)Microsoft word tutorials COMPLETE by Gulshan  K Maheshwari(QAU)
Microsoft word tutorials COMPLETE by Gulshan K Maheshwari(QAU)
GulshanKumar368
 
Users Guide To Microsoft Word Tables
Users Guide To Microsoft Word TablesUsers Guide To Microsoft Word Tables
Users Guide To Microsoft Word Tables
Madhubanti Dasgupta
 
Word pad
Word padWord pad
Word pad
Muhammad Ramzan
 
Microsoft Word Basic Features
Microsoft Word Basic FeaturesMicrosoft Word Basic Features
Microsoft Word Basic Features
AkashMeghwar2
 
Microsoft Office
Microsoft OfficeMicrosoft Office
Microsoft Office
Usman Bashir
 
7 features in word 2010 you need to know
7 features in word 2010 you need to know7 features in word 2010 you need to know
7 features in word 2010 you need to know
NR Computer Learning Center
 
Microsoft Word Home tab Presentation
Microsoft Word Home tab PresentationMicrosoft Word Home tab Presentation
Microsoft Word Home tab Presentation
Tanveer Ahmed
 
Microsoft PowerPoint Advance Features
Microsoft PowerPoint Advance FeaturesMicrosoft PowerPoint Advance Features
Microsoft PowerPoint Advance Features
AkashMeghwar2
 
PC Literacy & E-learning Training workshop & presentation
PC Literacy & E-learning Training workshop & presentationPC Literacy & E-learning Training workshop & presentation
PC Literacy & E-learning Training workshop & presentation
Edumax Solutions
 
Microsoft Word intermediate
Microsoft Word intermediateMicrosoft Word intermediate
Microsoft Word intermediate
NR Computer Learning Center
 
Microsoft word-getting-started-basics
Microsoft word-getting-started-basicsMicrosoft word-getting-started-basics
Microsoft word-getting-started-basics
Praveen Sudarsan
 
Chap4 notes
Chap4 notesChap4 notes
Chap4 notes
Ashish Pandey
 
Module 3 open office writer
Module 3 open office writerModule 3 open office writer
Module 3 open office writer
jaimemgarcia
 
Microsoft Office Word Tutorial
Microsoft Office Word TutorialMicrosoft Office Word Tutorial
Microsoft Office Word Tutorial
virtualMaryam
 
Libre Office Writer Lesson 3: Using Styles and Templates
Libre Office Writer Lesson 3: Using Styles and TemplatesLibre Office Writer Lesson 3: Using Styles and Templates
Libre Office Writer Lesson 3: Using Styles and Templates
Smart Chicago Collaborative
 
010 power point
010 power point010 power point
010 power point
SMS2007
 

What's hot (20)

Excel 2011-cheat-sheet
Excel 2011-cheat-sheetExcel 2011-cheat-sheet
Excel 2011-cheat-sheet
 
Microsoft word tutorials COMPLETE by Gulshan K Maheshwari(QAU)
Microsoft word tutorials COMPLETE by Gulshan  K Maheshwari(QAU)Microsoft word tutorials COMPLETE by Gulshan  K Maheshwari(QAU)
Microsoft word tutorials COMPLETE by Gulshan K Maheshwari(QAU)
 
Users Guide To Microsoft Word Tables
Users Guide To Microsoft Word TablesUsers Guide To Microsoft Word Tables
Users Guide To Microsoft Word Tables
 
Word pad
Word padWord pad
Word pad
 
Microsoft Word Basic Features
Microsoft Word Basic FeaturesMicrosoft Word Basic Features
Microsoft Word Basic Features
 
Microsoft Office
Microsoft OfficeMicrosoft Office
Microsoft Office
 
Introduction to microsoft word 2007
Introduction to microsoft word 2007Introduction to microsoft word 2007
Introduction to microsoft word 2007
 
7 features in word 2010 you need to know
7 features in word 2010 you need to know7 features in word 2010 you need to know
7 features in word 2010 you need to know
 
Chapter.09
Chapter.09Chapter.09
Chapter.09
 
Microsoft Word Home tab Presentation
Microsoft Word Home tab PresentationMicrosoft Word Home tab Presentation
Microsoft Word Home tab Presentation
 
Microsoft PowerPoint Advance Features
Microsoft PowerPoint Advance FeaturesMicrosoft PowerPoint Advance Features
Microsoft PowerPoint Advance Features
 
Chapter.10
Chapter.10Chapter.10
Chapter.10
 
PC Literacy & E-learning Training workshop & presentation
PC Literacy & E-learning Training workshop & presentationPC Literacy & E-learning Training workshop & presentation
PC Literacy & E-learning Training workshop & presentation
 
Microsoft Word intermediate
Microsoft Word intermediateMicrosoft Word intermediate
Microsoft Word intermediate
 
Microsoft word-getting-started-basics
Microsoft word-getting-started-basicsMicrosoft word-getting-started-basics
Microsoft word-getting-started-basics
 
Chap4 notes
Chap4 notesChap4 notes
Chap4 notes
 
Module 3 open office writer
Module 3 open office writerModule 3 open office writer
Module 3 open office writer
 
Microsoft Office Word Tutorial
Microsoft Office Word TutorialMicrosoft Office Word Tutorial
Microsoft Office Word Tutorial
 
Libre Office Writer Lesson 3: Using Styles and Templates
Libre Office Writer Lesson 3: Using Styles and TemplatesLibre Office Writer Lesson 3: Using Styles and Templates
Libre Office Writer Lesson 3: Using Styles and Templates
 
010 power point
010 power point010 power point
010 power point
 

Similar to Computer fundamentals lab 1

MS Word Intermediate Training
MS Word Intermediate TrainingMS Word Intermediate Training
MS Word Intermediate Training
Michael Sheyahshe
 
ICT SKILLS.pptx
ICT SKILLS.pptxICT SKILLS.pptx
ICT SKILLS.pptx
sagarJuneja4
 
Windows Basic Computer Skills
Windows Basic Computer SkillsWindows Basic Computer Skills
Windows Basic Computer Skills
Marvin Nurse
 
WORD LESSON (1).pptx
WORD LESSON (1).pptxWORD LESSON (1).pptx
WORD LESSON (1).pptx
JustusEkeneNwaka
 
An introduction to microsoft_word
An introduction to microsoft_wordAn introduction to microsoft_word
An introduction to microsoft_worduzmabb12045
 
week 1.docx
week 1.docxweek 1.docx
week 1.docx
rom barcia
 
Understanding File Management and Editing Documents in WordThe edi.docx
Understanding File Management and Editing Documents in WordThe edi.docxUnderstanding File Management and Editing Documents in WordThe edi.docx
Understanding File Management and Editing Documents in WordThe edi.docx
TakishaPeck109
 
Com6 recalling ms word
Com6 recalling ms wordCom6 recalling ms word
Com6 recalling ms word
Jason Ruelo
 
Presentation111122222.pptx
Presentation111122222.pptxPresentation111122222.pptx
Presentation111122222.pptx
JustusEkeneNwaka
 
Word processing in english ms word
Word processing in english   ms wordWord processing in english   ms word
Word processing in english ms word
eVidhya
 
Powerpoint tutorial
Powerpoint tutorialPowerpoint tutorial
Powerpoint tutorial
VTC
 
JoAnn Rizzo Practicum
JoAnn Rizzo PracticumJoAnn Rizzo Practicum
JoAnn Rizzo Practicumriztwin1
 
Microsoft Office Word 2007 - Lesson 3
Microsoft Office Word 2007 - Lesson 3Microsoft Office Word 2007 - Lesson 3
Microsoft Office Word 2007 - Lesson 3
Samantha TerBeest
 
Basics of Microsoft Word.ppt
Basics of Microsoft Word.pptBasics of Microsoft Word.ppt
Basics of Microsoft Word.ppt
ssuser1d41c52
 
Basic interview questions for skills tests
Basic interview questions for skills testsBasic interview questions for skills tests
Basic interview questions for skills tests
Durga Balaji M
 
Using microsoftword2 gettingstartedwithword
Using microsoftword2 gettingstartedwithwordUsing microsoftword2 gettingstartedwithword
Using microsoftword2 gettingstartedwithwordmasood2k2
 
Types of presentation+file+home
Types of presentation+file+homeTypes of presentation+file+home
Types of presentation+file+home
rimshailyas1
 

Similar to Computer fundamentals lab 1 (20)

MS Word Intermediate Training
MS Word Intermediate TrainingMS Word Intermediate Training
MS Word Intermediate Training
 
ICT SKILLS.pptx
ICT SKILLS.pptxICT SKILLS.pptx
ICT SKILLS.pptx
 
Windows Basic Computer Skills
Windows Basic Computer SkillsWindows Basic Computer Skills
Windows Basic Computer Skills
 
WORD LESSON (1).pptx
WORD LESSON (1).pptxWORD LESSON (1).pptx
WORD LESSON (1).pptx
 
An introduction to microsoft_word
An introduction to microsoft_wordAn introduction to microsoft_word
An introduction to microsoft_word
 
week 1.docx
week 1.docxweek 1.docx
week 1.docx
 
Understanding File Management and Editing Documents in WordThe edi.docx
Understanding File Management and Editing Documents in WordThe edi.docxUnderstanding File Management and Editing Documents in WordThe edi.docx
Understanding File Management and Editing Documents in WordThe edi.docx
 
Com6 recalling ms word
Com6 recalling ms wordCom6 recalling ms word
Com6 recalling ms word
 
Word 2007
Word 2007Word 2007
Word 2007
 
Presentation111122222.pptx
Presentation111122222.pptxPresentation111122222.pptx
Presentation111122222.pptx
 
Word processing in english ms word
Word processing in english   ms wordWord processing in english   ms word
Word processing in english ms word
 
Powerpoint tutorial
Powerpoint tutorialPowerpoint tutorial
Powerpoint tutorial
 
Form 1 Term 2 Week 1.2
Form 1   Term 2   Week 1.2Form 1   Term 2   Week 1.2
Form 1 Term 2 Week 1.2
 
JoAnn Rizzo Practicum
JoAnn Rizzo PracticumJoAnn Rizzo Practicum
JoAnn Rizzo Practicum
 
Microsoft Office Word 2007 - Lesson 3
Microsoft Office Word 2007 - Lesson 3Microsoft Office Word 2007 - Lesson 3
Microsoft Office Word 2007 - Lesson 3
 
Basics of Microsoft Word.ppt
Basics of Microsoft Word.pptBasics of Microsoft Word.ppt
Basics of Microsoft Word.ppt
 
1stQtr-1stMeeting-travel
1stQtr-1stMeeting-travel1stQtr-1stMeeting-travel
1stQtr-1stMeeting-travel
 
Basic interview questions for skills tests
Basic interview questions for skills testsBasic interview questions for skills tests
Basic interview questions for skills tests
 
Using microsoftword2 gettingstartedwithword
Using microsoftword2 gettingstartedwithwordUsing microsoftword2 gettingstartedwithword
Using microsoftword2 gettingstartedwithword
 
Types of presentation+file+home
Types of presentation+file+homeTypes of presentation+file+home
Types of presentation+file+home
 

Recently uploaded

欧洲杯冠军-欧洲杯冠军网站-欧洲杯冠军|【​网址​🎉ac123.net🎉​】领先全球的买球投注平台
欧洲杯冠军-欧洲杯冠军网站-欧洲杯冠军|【​网址​🎉ac123.net🎉​】领先全球的买球投注平台欧洲杯冠军-欧洲杯冠军网站-欧洲杯冠军|【​网址​🎉ac123.net🎉​】领先全球的买球投注平台
欧洲杯冠军-欧洲杯冠军网站-欧洲杯冠军|【​网址​🎉ac123.net🎉​】领先全球的买球投注平台
andreassenrolf537
 
一比一原版(UCSB毕业证)圣塔芭芭拉社区大学毕业证如何办理
一比一原版(UCSB毕业证)圣塔芭芭拉社区大学毕业证如何办理一比一原版(UCSB毕业证)圣塔芭芭拉社区大学毕业证如何办理
一比一原版(UCSB毕业证)圣塔芭芭拉社区大学毕业证如何办理
aozcue
 
一比一原版(UMich毕业证)密歇根大学|安娜堡分校毕业证如何办理
一比一原版(UMich毕业证)密歇根大学|安娜堡分校毕业证如何办理一比一原版(UMich毕业证)密歇根大学|安娜堡分校毕业证如何办理
一比一原版(UMich毕业证)密歇根大学|安娜堡分校毕业证如何办理
peuce
 
Schematic Diagram MSI MS-7309 - REV 1.0 PDF .pdf
Schematic Diagram MSI MS-7309 - REV 1.0 PDF .pdfSchematic Diagram MSI MS-7309 - REV 1.0 PDF .pdf
Schematic Diagram MSI MS-7309 - REV 1.0 PDF .pdf
nikoloco007
 
加急办理美国南加州大学毕业证文凭毕业证原版一模一样
加急办理美国南加州大学毕业证文凭毕业证原版一模一样加急办理美国南加州大学毕业证文凭毕业证原版一模一样
加急办理美国南加州大学毕业证文凭毕业证原版一模一样
u0g33km
 
LORRAINE ANDREI_LEQUIGAN_GOOGLE CALENDAR
LORRAINE ANDREI_LEQUIGAN_GOOGLE CALENDARLORRAINE ANDREI_LEQUIGAN_GOOGLE CALENDAR
LORRAINE ANDREI_LEQUIGAN_GOOGLE CALENDAR
lorraineandreiamcidl
 
Building a Raspberry Pi Robot with Dot NET 8, Blazor and SignalR - Slides Onl...
Building a Raspberry Pi Robot with Dot NET 8, Blazor and SignalR - Slides Onl...Building a Raspberry Pi Robot with Dot NET 8, Blazor and SignalR - Slides Onl...
Building a Raspberry Pi Robot with Dot NET 8, Blazor and SignalR - Slides Onl...
Peter Gallagher
 
一比一原版(IIT毕业证)伊利诺伊理工大学毕业证如何办理
一比一原版(IIT毕业证)伊利诺伊理工大学毕业证如何办理一比一原版(IIT毕业证)伊利诺伊理工大学毕业证如何办理
一比一原版(IIT毕业证)伊利诺伊理工大学毕业证如何办理
aozcue
 
Production.pptxd dddddddddddddddddddddddddddddddddd
Production.pptxd ddddddddddddddddddddddddddddddddddProduction.pptxd dddddddddddddddddddddddddddddddddd
Production.pptxd dddddddddddddddddddddddddddddddddd
DanielOliver74
 

Recently uploaded (9)

欧洲杯冠军-欧洲杯冠军网站-欧洲杯冠军|【​网址​🎉ac123.net🎉​】领先全球的买球投注平台
欧洲杯冠军-欧洲杯冠军网站-欧洲杯冠军|【​网址​🎉ac123.net🎉​】领先全球的买球投注平台欧洲杯冠军-欧洲杯冠军网站-欧洲杯冠军|【​网址​🎉ac123.net🎉​】领先全球的买球投注平台
欧洲杯冠军-欧洲杯冠军网站-欧洲杯冠军|【​网址​🎉ac123.net🎉​】领先全球的买球投注平台
 
一比一原版(UCSB毕业证)圣塔芭芭拉社区大学毕业证如何办理
一比一原版(UCSB毕业证)圣塔芭芭拉社区大学毕业证如何办理一比一原版(UCSB毕业证)圣塔芭芭拉社区大学毕业证如何办理
一比一原版(UCSB毕业证)圣塔芭芭拉社区大学毕业证如何办理
 
一比一原版(UMich毕业证)密歇根大学|安娜堡分校毕业证如何办理
一比一原版(UMich毕业证)密歇根大学|安娜堡分校毕业证如何办理一比一原版(UMich毕业证)密歇根大学|安娜堡分校毕业证如何办理
一比一原版(UMich毕业证)密歇根大学|安娜堡分校毕业证如何办理
 
Schematic Diagram MSI MS-7309 - REV 1.0 PDF .pdf
Schematic Diagram MSI MS-7309 - REV 1.0 PDF .pdfSchematic Diagram MSI MS-7309 - REV 1.0 PDF .pdf
Schematic Diagram MSI MS-7309 - REV 1.0 PDF .pdf
 
加急办理美国南加州大学毕业证文凭毕业证原版一模一样
加急办理美国南加州大学毕业证文凭毕业证原版一模一样加急办理美国南加州大学毕业证文凭毕业证原版一模一样
加急办理美国南加州大学毕业证文凭毕业证原版一模一样
 
LORRAINE ANDREI_LEQUIGAN_GOOGLE CALENDAR
LORRAINE ANDREI_LEQUIGAN_GOOGLE CALENDARLORRAINE ANDREI_LEQUIGAN_GOOGLE CALENDAR
LORRAINE ANDREI_LEQUIGAN_GOOGLE CALENDAR
 
Building a Raspberry Pi Robot with Dot NET 8, Blazor and SignalR - Slides Onl...
Building a Raspberry Pi Robot with Dot NET 8, Blazor and SignalR - Slides Onl...Building a Raspberry Pi Robot with Dot NET 8, Blazor and SignalR - Slides Onl...
Building a Raspberry Pi Robot with Dot NET 8, Blazor and SignalR - Slides Onl...
 
一比一原版(IIT毕业证)伊利诺伊理工大学毕业证如何办理
一比一原版(IIT毕业证)伊利诺伊理工大学毕业证如何办理一比一原版(IIT毕业证)伊利诺伊理工大学毕业证如何办理
一比一原版(IIT毕业证)伊利诺伊理工大学毕业证如何办理
 
Production.pptxd dddddddddddddddddddddddddddddddddd
Production.pptxd ddddddddddddddddddddddddddddddddddProduction.pptxd dddddddddddddddddddddddddddddddddd
Production.pptxd dddddddddddddddddddddddddddddddddd
 

Computer fundamentals lab 1

  • 1. 1 | P a g e Computing Fundamentals Lab Manual #1 Microsoft Office Word Introduction
  • 2. 2 | P a g e Table of Contents Introduction: .............................................................................................................................3 Opening Microsoft Word: ...........................................................................................................3 Making a New Blank Document:.................................................................................................3 Opening a Document:................................................................................................................4 Saving a Document:..................................................................................................................4 Formatting Text/Paragraphs Using Toolbars:...............................................................................5 The Standard Toolbar:...........................................................................................................5 New Blank Document: .......................................................................................................6 Open:...............................................................................................................................6 Save: ...............................................................................................................................6 Permission: ......................................................................................................................6 Print:................................................................................................................................6 Print Preview: ...................................................................................................................6 Spelling and Grammar:......................................................................................................6 Copy:...............................................................................................................................6 Paste: ..............................................................................................................................7 Undo Typing:....................................................................................................................7 Insert Hyperlink:................................................................................................................7 Insert Table: .....................................................................................................................7 The Formatting Toolbar: ........................................................................................................7 Style: ..............................................................................................................................7 Font: ...............................................................................................................................8 Font Size: .......................................................................................................................8 Bold:...............................................................................................................................8 Italic: ..............................................................................................................................8 Underline: ......................................................................................................................8 Align Left:......................................................................................................................8 Center:............................................................................................................................8 Align Right: ...................................................................................................................8 Justify:............................................................................................................................8 Line Spacing: .................................................................................................................8 Numbering: ....................................................................................................................9 Bullets: ...........................................................................................................................9 Decrease Indent:.............................................................................................................9 Increase Indent:..............................................................................................................9 Outside Border:..............................................................................................................9 Highlight: .......................................................................................................................9 Font Color:.....................................................................................................................9 More Formatting:...........................................................................................................9 Paragraph Spacing: ........................................................................................................9 Headers/Footers: ....................................................................................................................10 Inserting an Image:..................................................................................................................11
  • 3. 3 | P a g e Introduction: Microsoft Word is an essential tool for the creation of documents. Its ease of use has made Word one of the most widely used word processing applications currently on the market. Therefore, it's important to become familiar with the various facets of this software, since it allows for compatibility across multiple computers as well as collaborative features. Word is a fairly simple program to use for completing simple tasks. However, it may be more difficult to learn how to explore the more advanced possibilities of Word. Opening Microsoft Word: To run Word on your computer: “Start” >> “Programs” >> “Microsoft Office” >> “Microsoft Office Word 2003.” If there is an icon of Microsoft Word available on your desktop (shaped like a square with a "W" in the middle), you can open up the program by double-clicking it, as well. Making a New Blank Document: When Word is opened, a new blank document should automatically open. If not, then you can begin a new blank document in a variety of ways. First, find the "New Blank Document" icon, which looks like a blank sheet of paper, located underneath the menu bar in Word in what is called the "standard toolbar." Click on the icon to bring up a new blank document.
  • 4. 4 | P a g e Also, you can go to the menu bar and select File >> New… (shortcut: Ctrl+N). To begin typing, just click the cursor anywhere within the new blank document. Opening a Document: To open to view, edit, or print a document, you must first open up that file in Word. You can open a file by clicking on the "Open" folder icon (with a picture of a folder) located in the standard toolbar. Or, you can use the menu bar and navigate to File >> Open… (shortcut: Ctrl+O). Saving a Document: When you are working with any sort of media in any software, you should be sure to save your work often. In Word, there are numerous options for saving documents in a variety of file types. To save a new, unsaved document, you can click on the Save icon, shaped like a disk located on the standard toolbar. Or, you can go to the menu bar and select File >> Save… (shortcut: Ctrl+S). A dialogue box should appear, offering you a number of options. To save the document in the desired location on your computer, locate and select the folder on your computer. Give your document a name in the file name text box. While you can give your document long names, make sure you save it with a name you can remember. Please note that it's good practice not to use spaces or special characters in file names. For
  • 5. 5 | P a g e example, a long file name may look like this: expos_sample_paper1.doc To save a completely new document using previously existing (and opened) text, you use the Save As option. Open the document that you wish to save as an entirely new file, go to the menu bar, and click on File >> Save as. In the file name text box, give your document a new name. Using this option allows you to save multiple versions (with different file names) of a document based on one original file. Formatting Text/Paragraphs Using Toolbars: In a word processing program such as Word, there are numerous options available for presenting your text. This part of the tutorial will guide you through several of the important features in Word that will allow you to edit, modify, and display text (and non-text) components. The Standard Toolbar: Word allows all toolbars to be customized, so you may not find all options listed here. There are several buttons that may or may not appear immediately in your version of Word. Use the following graphic as a guide to the Standard Toolbar.
  • 6. 6 | P a g e New Blank Document: To begin a new document, click on the New Blank Document icon, shaped like a blank sheet of paper. Open: Clicking on this icon opens up a previously saved document on your computer. Save: Clicking on the Save icon saves the document you are currently working on. If you are saving a document for the first time, you can click on this button. However, if you want to save a new file from a preexisting document, then you must go to the menu bar and select “File” >> “Save As” and give the file a new name. When working on any document, you should be sure to save frequently, so that you don't lose any work. Permission: Microsoft has enabled Information Rights Management (IRM) within the new version of Word, which can help protect sensitive documents from being copied or forwarded. Click this for more information and options. Print: Clicking on the Print icon automatically prints the document currently active in Word. If you wish to explore more print options, then go to the menu bar and select “File” >> “Print.” Print Preview: To get an idea of the appearance of your document in print before you actually print it out, you can click on this icon to view your document from a zoom-out distance. Spelling and Grammar: Clicking begins a review of your document in search of spelling and grammatical errors that may need to be corrected. Copy: Copy the current selection to the clipboard, which can then be pasted elsewhere in the document, or into a completely separate program/document.
  • 7. 7 | P a g e Paste: Clicking on the Paste button inserts the text that has been most recently added to the Clipboard (the text would have been added there by Cutting or Copying). With Paste, you can either insert the copied text into a document or replace selected text. Undo Typing: The Undo Typing button goes back and removes the last addition or change made to your document. Insert Hyperlink: You may find that you want to make links to a particular web site, web page, or some other kind of online file in your Word document. Using the Insert Hyperlink button, you can turn selected text into hyperlinks. When the icon is clicked, a window will appear that will allow you to insert the URL (web address) of the web page you want to link to. You can type in the URL yourself or insert a preexisting bookmark. Once the link is inserted, the link in your Word document can be clicked and the web page will open up in a web browser. Insert Table: When this icon is clicked, a small window will appear in the form of a grid of squares. Use this window as a guide to indicate how many rows and columns you would like your table to contain. Once selected, a table will automatically appear in Word. Clicking the Tables and Borders button will allow you to modify the table. To modify an aspect of the table, select, or place the cursor in, the area and apply changes such as borders and colors. The Formatting Toolbar: Word allows all toolbars to be customized, so you may not find all options listed here. There are several buttons that may or may not appear immediately in your version of Word. Use the following graphic as a guide to the Formatting Toolbar. Style: Styles in Word are used to quickly format portions of text. For example, you could use the "Normal" or "Default Paragraph Font" for the body text in a document. There are also three preset styles made for headings.
  • 8. 8 | P a g e Font: Font is a simple but important factor in Word documents. The choice of font (the style of the text itself) can influence the way others view documents, either on the screen or in print. For example, Arial font looks better on screen, while Times New Roman is clearer in print. To apply a font to text, select desired text with your cursor, and choose a font from the font drop down menu. Font Size: You may encounter times in which you need to display some text larger or smaller than other text. Selecting desired text with the cursor and choosing a font size from the drop down menu changes the size of text. Bold: Places the text in bold. Italic: Places the text in italics. Underline: Underlines the text. Align Left: Aligns the selection to the left of the screen/paper. Center: Aligns the selection to the center of the screen/paper. Align Right: Aligns the selection to the right of the screen/paper. Justify: Aligns the selection to both the left and right of the screen/paper. Line Spacing: Adjust the line spacing (single-spaced, double-spaced, etc.)
  • 9. 9 | P a g e Numbering: Create a numbered list. Bullets: Create an unordered, bulleted list. Decrease Indent: Decreases the indentation of the current selection (to the left). Increase Indent: Increases the indentation of the current selection (to the right). Outside Border: Places a border around the current selection; click the drop-down for a wide selection of bordering options. Highlight: Highlight the current selection; default color is yellow. Font Color: Change the font color; the default/automatic color is black. More Formatting: Besides the toolbars, Word provides a great deal of ways to customize and format your text and documents. Paragraph Spacing: To access the Paragraph formatting options, navigate to the menu bar, and select “Format” >> “Paragraph,” or right-click within a paragraph.
  • 10. 10 | P a g e A window will appear with options for modifying spacing and indenting. Here, you can choose to make the text in your document single or double spaced, as well as edit the margins for the document. Headers/Footers: Headers and footers are important aspects of a Word document if you wish to include information such as page numbers and headings on every page. To access the header and footer options, go to the menu bar and select “View” >> “Header and Footer.”
  • 11. 11 | P a g e A dotted-line box called "Header" will automatically appear, as well as a sub-menu for formatting header and footer properties. The cursor will already be placed in the Header box. If you scroll down on your current page opened in Word, you will see a dotted-line box called "Footer." To add text in the Header or the Footer, simply click the cursor inside either one of the boxes, and type the text you want. To add page numbers to your document, click your cursor inside of the footer box. Then, click on the icon shaped like a sheet of paper with a "#" inside. The page number will then be inserted and applied to all of the pages in your document. Inserting an Image: In Word, it's possible to add clipart or other images to a document. Click the cursor in your document where you wish to place an image. Then go to the menu bar and select “Insert” >> “Picture.”
  • 12. 12 | P a g e From there, you will find a number of options to choose from. "Clipart" searches through your computer's Clipart library. "From File" will allow you to insert an image saved elsewhere on your computer. Other options include "AutoShapes" and "WordArt."