SlideShare a Scribd company logo
1 of 18
Introduction to Microsoft Access
                                 Part 1 - Tables

Tables are a fundamental requirement of any database. To get valuable information
 from a database, you first have to have data. All your data will be stored in tables.


1. Creating a Relational Database in 30 Seconds!


1. Start up Access

2. Use the Database Wizard


3. Select the Music Collection wizard


4. Save the database file in your My Work folder

5. The Wizard starts. Click Next.


Page 1 of 18                                                                 7/4/2012
6. The Wizard then tells you what tables there will be in your database and what
Fields each table will contain. You can tick or un-tick any field to customise your
database. Click Next when done.

7. You then get to select a colour scheme. Click Next when you’re happy.

8. You will then be asked to choose a report style and finally you will be invited to
name the database. Click Finish when you have answered all the questions in the
Wizard. The database will then be created.

Your database is now created and, as promised, the whole process should have taken
no more than 30 seconds. We will now take a tour of the database window.

9. You are presented with a Switchboard window. This is an interface, which can be
created to make the database user-friendly.


10. Click the Enter/View Recordings button. The Recordings Form is opened.
Try entering details of some of your favourite albums.

11. Close the Recordings Form and close down the Switchboard (click the cross in
the top-right corner of a window to close it down).

12. Although you have closed the Switchboard, the database is still open. Double-
click the Music Collection Database window, which is currently minimised in the
bottom-left of the Access window.


Page 2 of 18                                                                7/4/2012
13. You will see that an Access Database consists of Tables, Queries, Forms,
Reports, Macros and Modules, all of which are stored in the Database Window as
separate objects. If you take a tour of this window, you should see that the wizard has
created tables, forms and reports in the music collection database. You can double-
click each object to open it. Some of the forms should be familiar to you because you
have previously opened them via the Switchboard.

14. If you open the Tables, you should see that the only data in the database, is the
sample data you entered into the Recordings Form. Although you entered this data
in the Recordings Form, you should see that this data is being stored in several tables.
The form was created to provide an easy interface for the user to enter the data.

You should, by now, realise that data entry forms and switchboard forms are provided
for the convenience of the user. As a database designer, you will want to make your
database very easy to use. You will also see that good database design can ensure that
the data entered is accurate.

                              --------------------------------

2. Start with a Blank Database


Unfortunately, you won’t learn how to be a database designer by using the Database
Wizard! Now is the time to create a database from scratch.

1. Click on File and New Database.

2. Create a New Database using the Blank Database.

3. Give your database a Filename.

4. You should now have a blank database Window open at the Tables tab. Click New
to create a new table and select Table Wizard.


5. Click OK and you should see a screen, which gives you a wide choice of sample
tables and fields for business and personal use.


Page 3 of 18                                                                  7/4/2012
6. Choose a personal table and select all the fields from the Recording Artists sample
table. Your screen should look like this:


7. Allow the Wizard to set a Primary Key and change the selection on the last screen,
so that you are going to modify the table’s design after the wizard is finished. You
should finish with a screen that looks something like this:


It is worth studying this screen for a while. You should see that the Wizard has set
the Fields, including RecordingArtistID, which is a Primary Key. You should see
that each field has a Data Type (e.g. Text, Number, Date/Time) and they also have
Field Properties, which includes a Field Size setting.

8. Close the Table’s Design View and you will see that the Recording Artists table is
now shown in the database window. Click the Right Mouse Button on the table and
select Rename. Change the name to Artists.


Page 4 of 18                                                                 7/4/2012
3. Understanding Your New Table


1. First, let us try to understand what the Wizard did. You now have one table in your
database (called Artists). If you open this table in Datasheet View you can start
entering data into it.


You might notice several things:
   • The RecordingArtistID field assigns a unique number to each record that you
      enter.
   • The Birth Date field only allows you to enter valid dates. Try entering an
      invalid date (e.g. 45/13/02). The birth dates entered above are made up. Try
      using the Internet to research the real D.O.B.s for your favourite artists.
   • You can write as much as you want in the Notes field. It would be a good
      idea to adjust the width and height of the columns (as above).

2. Once you have entered several records, you can try to search your table. To do
this, click in the column in which you wish to search and press CTRL+F (or select
Find from the Edit menu). Perform a few simple searches using this method.

3. If you don’t understand these terms already, it is high time that you learnt the
jargon:

Data               Stuff you put into your database
Fields             A place for your data to live
                   e.g. a database of footballers would have fields such as
                   FirstName, LastName, Position, Team etc.
Records            A record groups data together in an order
                   If it wasn’t for records, your database wouldn’t know which last
                   name went with which first name.
Table              A collection of records that describe similar data
                   In a flat-file database, all the data goes into a single table.
                   However, Access is a “relational” database, meaning that you
                   can create many tables and link them together.
Database File      A collection of tables and also various other tools to assist in the
                   use of the data e.g. queries, forms, reports
                   Everything is compressed together in a single file with an MDB
                   extension


Page 5 of 18                                                                 7/4/2012
4. Creating a Table Without the Wizard


1. Now you should try to create a table without any wizard help at all. To do this, you
create a new table in Design View.


You are presented again with the Table Design View screen but, this time, no fields
have been created for you.

2. Enter the fields as follows:


N.B. Make sure you do the following:
   • Make RecordingID a Primary Key (click the Right Mouse Button in the
      grey area next to the field name)
   • Make sure the correct Data Type is set for each field (these will be explained
      later)
   • The only field size you have to set is for the Title and Label fields. Select a
      suitable size (a little larger than you think you will need).
   • Leave no spaces between field names
   • Enter a description for each field

For Discussion

   •   Why should field sizes not be too big?
   •   Why should field sizes not be too small?
   •   How can you enter a Default Value for a field and what is the purpose of
       doing this?
   •   Why shouldn’t you put spaces in field names?
   •   Why bother entering a description?
   •   What is the purpose of a Primary Key?
   •   Can a table have more than one Primary Key?


Page 6 of 18                                                                  7/4/2012
4. Close the table design view and name the table Albums.

5. Re-open the Artists table in Datasheet View. Try adding a record. Then try
deleting an existing record.

6. Create a new table called Tracks with the following fields:
       TrackID (Primary Key, AutoNumber)
       RecordingID (Number)
       TrackNumber (Number)

7. Create a fourth table called Categories, as follows:
       CategoryID (Primary Key, AutoNumber)
       Category (Text)


                              --------------------------------

5. Help and Helplessness


1. You can press F1 for Help, at any time (try it)

2. The Office Assistant is now always as helpful as he could be. To get real help,
look in the Help Menu:


3. Select Contents and Index to see the full Help system. The Index tab gives you a
full alphabetical index of help topics. The Find tab, allows you to search for a topic
to get help on.

4. The What’s This? Feature is particularly useful. Select this item from the Help
menu and your cursor will change to an arrow with a question mark beside it. You
will get help on the first thing you click on. You can ask Access “What’s This?” at
any time. Try selecting What’s This and clicking on the Design button of the Table
Window:


Page 7 of 18                                                                 7/4/2012
5. Access has 22 button bars, which change depending on what you’re doing. There
are so many buttons that nobody could ever hope to remember what they all do. To
make life easier for you, there are Screen Tips, which pop up when you hold the
mouse button over a button (try it).


6. Get into the habit of using the Right Mouse
Button. In Access, when you click on something,
it invariably brings up a menu. For example, try
clicking the Right Mouse Button on one of your
tables. You can see that you now have options
such as renaming, printing or deleting the table.
You can also open the table in Design or Datasheet
view from this menu.


7. Saving your work in Access is very easy. Access Autosaves most things (for
example, each record is saved as soon as it is created). This is a benefit but also a
danger because, for example, if you delete something by accident, Access will not
question your decision! Pressing Ctrl+Z or select Undo from the Edit menu will
usually undo the very last thing you did but don’t rely on this to get you out of
trouble.


8. Backup is essential and also very easy. Access saves all your tables, queries,
reports etc. in one handy file with an MDB extension. Your early databases will
easily fit on a floppy disk:


Page 8 of 18                                                                7/4/2012
6. Data Types


You have now created four tables and you have set a data type for each field that you
have created. You have also tried entering data into the tables and you have noticed
that certain fields will not allow certain types of data. For example, you can’t enter an
invalid date into a date field. You can’t enter text into a number field.

In your tables, try to find examples of each of these data types (you will find most but
not all). Why have the data types been set in this way?


AutoNumber          Automatically generates a number each time you add a record.
                    This number is used as a unique identifier for each record.
Text                Stores letters, numbers and any combination thereof. Can be up to
                    255 characters in length
Memo                This is a really big text field. Holds up to 64,000 characters
                    (about 18 pages of text).
Number              Holds numbers and decimal points but nothing else. Set a field to
                    Number if you want to do calculations.
Currency            Formats money fields.
Date/Time           Either the date or the time or both, in a variety of formats
Yes/No              For fields where one of two answers is required. You can have
                    Yes/No, True/False or On/Off. It is possible to add your own
                    variants.
OLE Object          You can add photographs, sounds etc. in a field of this data type
Hyperlink           For webpage addresses
Lookup Wizard       Prevent errors by presenting the user with a list of acceptable
                    answers to choose from.


For Discussion

            •   Why are telephone number fields usually set to text?
            •   How does setting the right data type help prevent bad data being
                entered?
            •   You can enter numbers into a text field. Apart from the fact that it
                guards against bad data, why should anyone want to bother creating a
                number field?
            •   Why not set all text fields to Memo?


Page 9 of 18                                                                   7/4/2012
7. Flat File or Relational?


A Flat File database contains a single table. Flat File Databases are very easy to
create and use. They are ideal for simple things like databases of address books,
video collections, and so on. They are similar to the traditional desktop “card-file”.

Relational databases have multiple tables that are linked together with “key fields”.
Relational databases really shine when they are used to solve big business problems.
A whole business can use one database that integrates the whole organisation.

You need to understand why flat file databases are inadequate for big tasks.

This is a simple database for a library:


There are three tables – Books, Borrowers and Loans. When the library gets a new
book, it enters its details into the Books table. All the members of the library have
their details entered into the Borrowers table. When someone borrows a book, the
Loan table is used. The information about the book and the borrower does not have to
be entered each time a loan is made because this information is taken from the Book
and Borrower tables. This is indicated by the lines that link the tables together. These
links are known as relationships.

The symbols at each end of the line indicate what type of relationship exists:
One to One:          Each book can only be borrowed once
One to Many:         One borrower may borrow many books


Your Task

Imagine that you have to set up a database for a library but you only have a flat file
database application.
    • Design the table that you will use and describe how the system will work.
    • List all the problems you encounter
    • Write a report to the library committee telling them why they ought to invest
       in a relational database system, such as Access.


Page 10 of 18                                                                    7/4/2012
8. Build Relationships for the Music Database


1. Click the Relationships button on the toolbar or select Relationships from the
Tools menu.

2. The Show Table window will ask you which tables you want to display in the
Relationships Window. Select all four of your tables and then close the Show Table
window.

3. You can adjust the size and the position of the four tables in the Relationships
Window.

4. To build a relationship between fields, click on a field with the Left Mouse Button
and drag it onto the field you want to link to. A window appears asking you to
confirm the relationship. Here, you also have the chance to change the type of
relationship.

Things to watch out for:
   • Linked fields must be identical (same data type, same size, same name)
   • Select Enforce Referential Integrity and Cascade Update Related Fields if
       you want to update corresponding values in a related table when the primary
       key value is changed.


Your Task

You have to create relationships for your tables to reflect the following facts:
   • One album has many tracks
   • One artist may have recorded several albums
   • There may be several albums in the same musical category


When you have finished, you should have something like this:


If the symbols at the ends of the relationship lines don’t match, try changing your join
settings. To edit a relationship, double-click on a join line. To delete a relationship,
click the line once and press the Delete key. Close the Relationships Window when
you’re finished.


Page 11 of 18                                                                      7/4/2012
9. Index Your Fields


You will now return to the Table Design view to “tweak” your tables for greater
efficiency. The first thing to do is to index some of your fields.

The purpose of indexing your fields is to speed up sorts and queries. You should not
index every field because too many indexed fields slows down data entry.

You have to index each of your fields in turn. To do so, select a field and click the
Index section of the Field Properties.


Your three options are:

No                           Don’t index the field
Yes (DuplicatesOK)           Most of the time you want to allow duplicate records.
Yes (No Duplicates)          Key fields should be set to No Duplicates because a key
                             field must be unique. You don’t want two customers
                             with the same customer number.

You can see a list of indexed fields by clicking the Indexes button on the toolbar.


For Discussion

You should set the Index to No Duplicates when the records have to be unique (for
example, a key field must be unique.

What other fields could be set to No Duplicates?


Page 12 of 18                                                                  7/4/2012
10. Formats


Staying in the Field Properties, we will now check to see if a Data Format is
appropriate.

You use a format if you want to change the way your data appears on screen.

Each field type has its own set of formats. Some of the most commonly used are as
follows:


Text and Memo Formats

Symbol                      Meaning                       What it Does
            >               Greater than                  Makes all text appear in
                                                          upper case
            <               Less than                     Makes all text appear in
                                                          lower case


Number and Currency Formats

General Number         Default option
Currency               Displays numbers as currency
Fixed                  Locks the field to display a specified number of decimal
                       places
Standard               Adds a thousands separator
Percent                Displays decimal places as a percentage

In a number field, you can change the Field Size setting from Long Integer to Single
if you want to dispense with decimal places. However, if the field is part of a
relationship, you should be aware that an AutoNumber field must be set to Long
Integer.


Date/Time Formats

You have a choice of how the date/time is displayed


Yes/No Formats

You have three initial choices, which are Yes/No, True/False and On/Off. You can
add your own selections to this list.


Page 13 of 18                                                                 7/4/2012
11. Input Masks


The aim of an Input Mask is to prevent the user entering bad data. The great danger
in using them is that you might end up preventing the user from entering correct data.
For this reason, you must think carefully before deciding to set an input mask for a
field.

An input mask is a series of characters, which tells Access what kind of data to
expect. Each field can have an input mask, with the exception of a memo field.

Input Masks work best with highly consistent data, such as phone numbers, national
insurance numbers and postal codes.

You can either write your own input mask or you can use the Wizard. To use the
Wizard, click the Build button, which appears when you click the Input Mask
Property.


Your Task

Create an Input Mask for a telephone number and then test it. Try entering a variety
of valid postal codes and make sure they are accepted. Try international and mobile
telephone numbers.


For Discussion

Would the telephone number field be better off not having an input mask?


Page 14 of 18                                                                7/4/2012
12. Validation and Required Fields


Together with Input Masks, validation tests and required fields are your weapons in
the war against bad data.

Using the Required property is easy because there are only two choices – yes and no.
Set the Required property to Yes if you want to force the user to enter something in
this field.


For Discussion

When would you want to set a Required property to Yes?

What would happen if you set all fields to Required?


The Validation property is more sophisticated because it performs a test on incoming
data to make sure it’s what you want.

Two properties require your attention:

Validation Rule                            The test that will be applied to the data
Validation Text                            This is a message, which Access will
                                           display if the data is unacceptable (i.e. if
                                           it fails the validation test).


Validations work best with number, currency and date fields because the incoming
data is more predictable. The Validation Rule is written as an Expression.

An Expression is an instruction that you give to Access in a language that Access can
understand. For example, if you want to force users to enter only positive numbers in
a number field, the expression is “> 0” i.e. the number must be greater than zero.

Try some of these expressions on some of your fields and see what happens. Mix and
match the operators and see what you can come up with:

>0                                         Must be greater than zero
<> 0                                       Cannot be zero
>= 5                                       Greater than or equal to 5
>= 0 And <= 100                            Must be between 0 and 100 (inclusive)
<= 0 Or <= 100                             Must be less than 0 or greater than 100
                                           (inclusive)
>= Date ( )                                Must be today’s date or later
>= Date ( ) Or Is Null                     Must be today’s date or later or blank
>= #1/1/96# And <#1/1/97#                  Must be a date in 1996
Like "A????"                               Entry must contain 5 characters and start
                                           with the letter A


Page 15 of 18                                                                7/4/2012
To write a validation rule, you can either write the rule yourself, or you can use the
Expression Builder. To start the Expression Builder, click the Build button that
appears when you select the Validation Rule Property.


The Expression Builder helps you to write expressions. It lists functions and
operators that you can use. It can also prompt you to remind you what to do next and
it will stop you making common mistakes.


Your Task

1. Write an Validation Rule and Validation Text to apply the following tests:
   • Must be earlier than today’s date
   • Must be between January 1st 1990 and today’s date


For Discussion

1. What would happen if you set these validation rules:

                                         <= 0

                                        >= 100

2. Why would you probably not want to set a validation rule for a text field?


Page 16 of 18                                                                   7/4/2012
13. Keyboard Shortcuts


F2              Select an entire field
Ctrl+;          Insert the Current Date
Ctrl+:          Insert the Current Time
Ctrl+Enter      Insert a Line Break (use it in a memo or large text field)
Ctrl++          Add New Record
Ctrl+-          Delete the Current Record
Shift+Enter     Save the Record
Ctrl+Z          Undo the last change you made (don't rely on this)
Ctrl+Enter      Open the selected object in Design View
Alt+F4          Quit Access


14. Summary (from the Access Help file)


Page 17 of 18                                                                7/4/2012
Page 18 of 18   7/4/2012

More Related Content

What's hot

Database as information system
Database as information systemDatabase as information system
Database as information systemKAZEMBETVOnline
 
Chapter 3 Presentation
Chapter 3  PresentationChapter 3  Presentation
Chapter 3 PresentationMike Kettel
 
PC Literacy & E-learning Training workshop & presentation
PC Literacy & E-learning Training workshop & presentationPC Literacy & E-learning Training workshop & presentation
PC Literacy & E-learning Training workshop & presentationEdumax Solutions
 
Components of the word window
Components of the word windowComponents of the word window
Components of the word windowsusoav
 
Access Chapter 01
Access Chapter 01Access Chapter 01
Access Chapter 01jgardne4
 
Lesson 7 using my docs
Lesson 7   using my docsLesson 7   using my docs
Lesson 7 using my docsguevarra_2000
 
Power Point Lesson 09 Part 2
Power Point Lesson 09 Part 2Power Point Lesson 09 Part 2
Power Point Lesson 09 Part 2Nasir Jumani
 
Windows 7 - Unit A
Windows 7 - Unit AWindows 7 - Unit A
Windows 7 - Unit Ajdswitzer
 
PPT On MS-Access 2007 | Full Concepts |
PPT On MS-Access 2007 | Full Concepts |PPT On MS-Access 2007 | Full Concepts |
PPT On MS-Access 2007 | Full Concepts |Umesh Kumar
 
Microsoft word-getting-started-basics
Microsoft word-getting-started-basicsMicrosoft word-getting-started-basics
Microsoft word-getting-started-basicsPraveen Sudarsan
 
Microsoft office access 2003 Tutorial
Microsoft office access 2003 TutorialMicrosoft office access 2003 Tutorial
Microsoft office access 2003 Tutorialfransiscaericasudibyo
 
Ms 2010 tutorial topic 2 navigating the interface
Ms 2010 tutorial topic 2 navigating the interfaceMs 2010 tutorial topic 2 navigating the interface
Ms 2010 tutorial topic 2 navigating the interfaceJessicaRenslow
 
intro of ms word 2007
intro of ms word 2007intro of ms word 2007
intro of ms word 2007Pakeeza Noor
 

What's hot (19)

MS ACCESS (REPORT)
MS ACCESS (REPORT)MS ACCESS (REPORT)
MS ACCESS (REPORT)
 
Base1
Base1Base1
Base1
 
M s access
M s accessM s access
M s access
 
Database as information system
Database as information systemDatabase as information system
Database as information system
 
Chapter 3 Presentation
Chapter 3  PresentationChapter 3  Presentation
Chapter 3 Presentation
 
Introduction to microsoft word 2007
Introduction to microsoft word 2007Introduction to microsoft word 2007
Introduction to microsoft word 2007
 
Word 2003
Word 2003Word 2003
Word 2003
 
PC Literacy & E-learning Training workshop & presentation
PC Literacy & E-learning Training workshop & presentationPC Literacy & E-learning Training workshop & presentation
PC Literacy & E-learning Training workshop & presentation
 
Mac User Group Marina Dzougoutov
Mac User Group Marina DzougoutovMac User Group Marina Dzougoutov
Mac User Group Marina Dzougoutov
 
Components of the word window
Components of the word windowComponents of the word window
Components of the word window
 
Access Chapter 01
Access Chapter 01Access Chapter 01
Access Chapter 01
 
Lesson 7 using my docs
Lesson 7   using my docsLesson 7   using my docs
Lesson 7 using my docs
 
Power Point Lesson 09 Part 2
Power Point Lesson 09 Part 2Power Point Lesson 09 Part 2
Power Point Lesson 09 Part 2
 
Windows 7 - Unit A
Windows 7 - Unit AWindows 7 - Unit A
Windows 7 - Unit A
 
PPT On MS-Access 2007 | Full Concepts |
PPT On MS-Access 2007 | Full Concepts |PPT On MS-Access 2007 | Full Concepts |
PPT On MS-Access 2007 | Full Concepts |
 
Microsoft word-getting-started-basics
Microsoft word-getting-started-basicsMicrosoft word-getting-started-basics
Microsoft word-getting-started-basics
 
Microsoft office access 2003 Tutorial
Microsoft office access 2003 TutorialMicrosoft office access 2003 Tutorial
Microsoft office access 2003 Tutorial
 
Ms 2010 tutorial topic 2 navigating the interface
Ms 2010 tutorial topic 2 navigating the interfaceMs 2010 tutorial topic 2 navigating the interface
Ms 2010 tutorial topic 2 navigating the interface
 
intro of ms word 2007
intro of ms word 2007intro of ms word 2007
intro of ms word 2007
 

Similar to Access1

B.sc i agri u 4 introduction to ms access
B.sc i agri u 4 introduction to ms accessB.sc i agri u 4 introduction to ms access
B.sc i agri u 4 introduction to ms accessRai University
 
B.sc i micro bio u 4 introduction to ms access
B.sc i micro bio u 4 introduction to ms accessB.sc i micro bio u 4 introduction to ms access
B.sc i micro bio u 4 introduction to ms accessRai University
 
B.sc i bio tech u 4 introduction to ms access
B.sc i bio tech u 4 introduction to ms accessB.sc i bio tech u 4 introduction to ms access
B.sc i bio tech u 4 introduction to ms accessRai University
 
B.sc i bio chem u 4 introduction to ms access
B.sc i bio chem u 4 introduction to ms accessB.sc i bio chem u 4 introduction to ms access
B.sc i bio chem u 4 introduction to ms accessRai University
 
B.sc i cs u 4 introduction to ms access
B.sc i cs u 4 introduction to ms accessB.sc i cs u 4 introduction to ms access
B.sc i cs u 4 introduction to ms accessRai University
 
INTRODUCTION TO ACCESSOBJECTIVESDefine th.docx
INTRODUCTION TO ACCESSOBJECTIVESDefine th.docxINTRODUCTION TO ACCESSOBJECTIVESDefine th.docx
INTRODUCTION TO ACCESSOBJECTIVESDefine th.docxmariuse18nolet
 
Using microsoftaccess1 gettingstarted
Using microsoftaccess1 gettingstartedUsing microsoftaccess1 gettingstarted
Using microsoftaccess1 gettingstartedjcjo05
 
Introduction to Microsoft Access2.ppt
Introduction to Microsoft Access2.pptIntroduction to Microsoft Access2.ppt
Introduction to Microsoft Access2.pptJoshCasas1
 
Pks ms access unit 4_bcomcs
Pks ms access unit 4_bcomcsPks ms access unit 4_bcomcs
Pks ms access unit 4_bcomcsKALAISELVI P
 
msexcess-150903114645-lva1-app6892.pdf
msexcess-150903114645-lva1-app6892.pdfmsexcess-150903114645-lva1-app6892.pdf
msexcess-150903114645-lva1-app6892.pdfNamangupta562588
 
Ms access basics ppt
Ms access basics ppt Ms access basics ppt
Ms access basics ppt vethics
 
access1.ppt
access1.pptaccess1.ppt
access1.pptmayada34
 
Access2007 part1
Access2007 part1Access2007 part1
Access2007 part1jigeno
 
Acccesss notes
Acccesss notesAcccesss notes
Acccesss notesart02
 
Access Basics 01
Access Basics 01Access Basics 01
Access Basics 01Lets try
 
Access2003
Access2003Access2003
Access2003mrh1222
 
Access2003
Access2003Access2003
Access2003tanik363
 

Similar to Access1 (20)

B.sc i agri u 4 introduction to ms access
B.sc i agri u 4 introduction to ms accessB.sc i agri u 4 introduction to ms access
B.sc i agri u 4 introduction to ms access
 
B.sc i micro bio u 4 introduction to ms access
B.sc i micro bio u 4 introduction to ms accessB.sc i micro bio u 4 introduction to ms access
B.sc i micro bio u 4 introduction to ms access
 
B.sc i bio tech u 4 introduction to ms access
B.sc i bio tech u 4 introduction to ms accessB.sc i bio tech u 4 introduction to ms access
B.sc i bio tech u 4 introduction to ms access
 
B.sc i bio chem u 4 introduction to ms access
B.sc i bio chem u 4 introduction to ms accessB.sc i bio chem u 4 introduction to ms access
B.sc i bio chem u 4 introduction to ms access
 
B.sc i cs u 4 introduction to ms access
B.sc i cs u 4 introduction to ms accessB.sc i cs u 4 introduction to ms access
B.sc i cs u 4 introduction to ms access
 
INTRODUCTION TO ACCESSOBJECTIVESDefine th.docx
INTRODUCTION TO ACCESSOBJECTIVESDefine th.docxINTRODUCTION TO ACCESSOBJECTIVESDefine th.docx
INTRODUCTION TO ACCESSOBJECTIVESDefine th.docx
 
Using microsoftaccess1 gettingstarted
Using microsoftaccess1 gettingstartedUsing microsoftaccess1 gettingstarted
Using microsoftaccess1 gettingstarted
 
Introduction to Microsoft Access2.ppt
Introduction to Microsoft Access2.pptIntroduction to Microsoft Access2.ppt
Introduction to Microsoft Access2.ppt
 
Pks ms access unit 4_bcomcs
Pks ms access unit 4_bcomcsPks ms access unit 4_bcomcs
Pks ms access unit 4_bcomcs
 
Introduction to Microsoft Access2.ppt
Introduction to Microsoft Access2.pptIntroduction to Microsoft Access2.ppt
Introduction to Microsoft Access2.ppt
 
msexcess-150903114645-lva1-app6892.pdf
msexcess-150903114645-lva1-app6892.pdfmsexcess-150903114645-lva1-app6892.pdf
msexcess-150903114645-lva1-app6892.pdf
 
Access tutorial2
Access tutorial2Access tutorial2
Access tutorial2
 
Ms access basics ppt
Ms access basics ppt Ms access basics ppt
Ms access basics ppt
 
access1.ppt
access1.pptaccess1.ppt
access1.ppt
 
Access2007 part1
Access2007 part1Access2007 part1
Access2007 part1
 
Acccesss notes
Acccesss notesAcccesss notes
Acccesss notes
 
Access Basics 01
Access Basics 01Access Basics 01
Access Basics 01
 
Access2003
Access2003Access2003
Access2003
 
Access2003
Access2003Access2003
Access2003
 
lecture 5
 lecture 5 lecture 5
lecture 5
 

More from JTHSICT

Year 8 sow 2012 2013
Year 8 sow 2012 2013Year 8 sow 2012 2013
Year 8 sow 2012 2013JTHSICT
 
E book example
E book exampleE book example
E book exampleJTHSICT
 
Literacy glossary
Literacy glossaryLiteracy glossary
Literacy glossaryJTHSICT
 
Lookup table
Lookup tableLookup table
Lookup tableJTHSICT
 
Doublebookings2
Doublebookings2Doublebookings2
Doublebookings2JTHSICT
 
Doublebookings1
Doublebookings1Doublebookings1
Doublebookings1JTHSICT
 
Password
PasswordPassword
PasswordJTHSICT
 
Naming conventions
Naming conventionsNaming conventions
Naming conventionsJTHSICT
 
Validation
ValidationValidation
ValidationJTHSICT
 
Normalization
NormalizationNormalization
NormalizationJTHSICT
 
Calendar
CalendarCalendar
CalendarJTHSICT
 
It4 Coursework Help
It4 Coursework HelpIt4 Coursework Help
It4 Coursework HelpJTHSICT
 

More from JTHSICT (19)

Year 8 sow 2012 2013
Year 8 sow 2012 2013Year 8 sow 2012 2013
Year 8 sow 2012 2013
 
E book example
E book exampleE book example
E book example
 
Literacy glossary
Literacy glossaryLiteracy glossary
Literacy glossary
 
Lookup table
Lookup tableLookup table
Lookup table
 
Doublebookings2
Doublebookings2Doublebookings2
Doublebookings2
 
Doublebookings1
Doublebookings1Doublebookings1
Doublebookings1
 
Password
PasswordPassword
Password
 
Macros
MacrosMacros
Macros
 
Naming conventions
Naming conventionsNaming conventions
Naming conventions
 
Access1
Access1Access1
Access1
 
Access2
Access2Access2
Access2
 
Access3
Access3Access3
Access3
 
Access2
Access2Access2
Access2
 
Access5
Access5Access5
Access5
 
Access4
Access4Access4
Access4
 
Validation
ValidationValidation
Validation
 
Normalization
NormalizationNormalization
Normalization
 
Calendar
CalendarCalendar
Calendar
 
It4 Coursework Help
It4 Coursework HelpIt4 Coursework Help
It4 Coursework Help
 

Recently uploaded

ECONOMIC CONTEXT - LONG FORM TV DRAMA - PPT
ECONOMIC CONTEXT - LONG FORM TV DRAMA - PPTECONOMIC CONTEXT - LONG FORM TV DRAMA - PPT
ECONOMIC CONTEXT - LONG FORM TV DRAMA - PPTiammrhaywood
 
Solving Puzzles Benefits Everyone (English).pptx
Solving Puzzles Benefits Everyone (English).pptxSolving Puzzles Benefits Everyone (English).pptx
Solving Puzzles Benefits Everyone (English).pptxOH TEIK BIN
 
Accessible design: Minimum effort, maximum impact
Accessible design: Minimum effort, maximum impactAccessible design: Minimum effort, maximum impact
Accessible design: Minimum effort, maximum impactdawncurless
 
“Oh GOSH! Reflecting on Hackteria's Collaborative Practices in a Global Do-It...
“Oh GOSH! Reflecting on Hackteria's Collaborative Practices in a Global Do-It...“Oh GOSH! Reflecting on Hackteria's Collaborative Practices in a Global Do-It...
“Oh GOSH! Reflecting on Hackteria's Collaborative Practices in a Global Do-It...Marc Dusseiller Dusjagr
 
How to Make a Pirate ship Primary Education.pptx
How to Make a Pirate ship Primary Education.pptxHow to Make a Pirate ship Primary Education.pptx
How to Make a Pirate ship Primary Education.pptxmanuelaromero2013
 
Crayon Activity Handout For the Crayon A
Crayon Activity Handout For the Crayon ACrayon Activity Handout For the Crayon A
Crayon Activity Handout For the Crayon AUnboundStockton
 
Science 7 - LAND and SEA BREEZE and its Characteristics
Science 7 - LAND and SEA BREEZE and its CharacteristicsScience 7 - LAND and SEA BREEZE and its Characteristics
Science 7 - LAND and SEA BREEZE and its CharacteristicsKarinaGenton
 
Kisan Call Centre - To harness potential of ICT in Agriculture by answer farm...
Kisan Call Centre - To harness potential of ICT in Agriculture by answer farm...Kisan Call Centre - To harness potential of ICT in Agriculture by answer farm...
Kisan Call Centre - To harness potential of ICT in Agriculture by answer farm...Krashi Coaching
 
Contemporary philippine arts from the regions_PPT_Module_12 [Autosaved] (1).pptx
Contemporary philippine arts from the regions_PPT_Module_12 [Autosaved] (1).pptxContemporary philippine arts from the regions_PPT_Module_12 [Autosaved] (1).pptx
Contemporary philippine arts from the regions_PPT_Module_12 [Autosaved] (1).pptxRoyAbrique
 
POINT- BIOCHEMISTRY SEM 2 ENZYMES UNIT 5.pptx
POINT- BIOCHEMISTRY SEM 2 ENZYMES UNIT 5.pptxPOINT- BIOCHEMISTRY SEM 2 ENZYMES UNIT 5.pptx
POINT- BIOCHEMISTRY SEM 2 ENZYMES UNIT 5.pptxSayali Powar
 
Presentation by Andreas Schleicher Tackling the School Absenteeism Crisis 30 ...
Presentation by Andreas Schleicher Tackling the School Absenteeism Crisis 30 ...Presentation by Andreas Schleicher Tackling the School Absenteeism Crisis 30 ...
Presentation by Andreas Schleicher Tackling the School Absenteeism Crisis 30 ...EduSkills OECD
 
MENTAL STATUS EXAMINATION format.docx
MENTAL     STATUS EXAMINATION format.docxMENTAL     STATUS EXAMINATION format.docx
MENTAL STATUS EXAMINATION format.docxPoojaSen20
 
Introduction to AI in Higher Education_draft.pptx
Introduction to AI in Higher Education_draft.pptxIntroduction to AI in Higher Education_draft.pptx
Introduction to AI in Higher Education_draft.pptxpboyjonauth
 
Class 11 Legal Studies Ch-1 Concept of State .pdf
Class 11 Legal Studies Ch-1 Concept of State .pdfClass 11 Legal Studies Ch-1 Concept of State .pdf
Class 11 Legal Studies Ch-1 Concept of State .pdfakmcokerachita
 
Incoming and Outgoing Shipments in 1 STEP Using Odoo 17
Incoming and Outgoing Shipments in 1 STEP Using Odoo 17Incoming and Outgoing Shipments in 1 STEP Using Odoo 17
Incoming and Outgoing Shipments in 1 STEP Using Odoo 17Celine George
 
_Math 4-Q4 Week 5.pptx Steps in Collecting Data
_Math 4-Q4 Week 5.pptx Steps in Collecting Data_Math 4-Q4 Week 5.pptx Steps in Collecting Data
_Math 4-Q4 Week 5.pptx Steps in Collecting DataJhengPantaleon
 
Organic Name Reactions for the students and aspirants of Chemistry12th.pptx
Organic Name Reactions  for the students and aspirants of Chemistry12th.pptxOrganic Name Reactions  for the students and aspirants of Chemistry12th.pptx
Organic Name Reactions for the students and aspirants of Chemistry12th.pptxVS Mahajan Coaching Centre
 

Recently uploaded (20)

ECONOMIC CONTEXT - LONG FORM TV DRAMA - PPT
ECONOMIC CONTEXT - LONG FORM TV DRAMA - PPTECONOMIC CONTEXT - LONG FORM TV DRAMA - PPT
ECONOMIC CONTEXT - LONG FORM TV DRAMA - PPT
 
Solving Puzzles Benefits Everyone (English).pptx
Solving Puzzles Benefits Everyone (English).pptxSolving Puzzles Benefits Everyone (English).pptx
Solving Puzzles Benefits Everyone (English).pptx
 
Código Creativo y Arte de Software | Unidad 1
Código Creativo y Arte de Software | Unidad 1Código Creativo y Arte de Software | Unidad 1
Código Creativo y Arte de Software | Unidad 1
 
Accessible design: Minimum effort, maximum impact
Accessible design: Minimum effort, maximum impactAccessible design: Minimum effort, maximum impact
Accessible design: Minimum effort, maximum impact
 
“Oh GOSH! Reflecting on Hackteria's Collaborative Practices in a Global Do-It...
“Oh GOSH! Reflecting on Hackteria's Collaborative Practices in a Global Do-It...“Oh GOSH! Reflecting on Hackteria's Collaborative Practices in a Global Do-It...
“Oh GOSH! Reflecting on Hackteria's Collaborative Practices in a Global Do-It...
 
How to Make a Pirate ship Primary Education.pptx
How to Make a Pirate ship Primary Education.pptxHow to Make a Pirate ship Primary Education.pptx
How to Make a Pirate ship Primary Education.pptx
 
Crayon Activity Handout For the Crayon A
Crayon Activity Handout For the Crayon ACrayon Activity Handout For the Crayon A
Crayon Activity Handout For the Crayon A
 
Science 7 - LAND and SEA BREEZE and its Characteristics
Science 7 - LAND and SEA BREEZE and its CharacteristicsScience 7 - LAND and SEA BREEZE and its Characteristics
Science 7 - LAND and SEA BREEZE and its Characteristics
 
Kisan Call Centre - To harness potential of ICT in Agriculture by answer farm...
Kisan Call Centre - To harness potential of ICT in Agriculture by answer farm...Kisan Call Centre - To harness potential of ICT in Agriculture by answer farm...
Kisan Call Centre - To harness potential of ICT in Agriculture by answer farm...
 
Contemporary philippine arts from the regions_PPT_Module_12 [Autosaved] (1).pptx
Contemporary philippine arts from the regions_PPT_Module_12 [Autosaved] (1).pptxContemporary philippine arts from the regions_PPT_Module_12 [Autosaved] (1).pptx
Contemporary philippine arts from the regions_PPT_Module_12 [Autosaved] (1).pptx
 
9953330565 Low Rate Call Girls In Rohini Delhi NCR
9953330565 Low Rate Call Girls In Rohini  Delhi NCR9953330565 Low Rate Call Girls In Rohini  Delhi NCR
9953330565 Low Rate Call Girls In Rohini Delhi NCR
 
POINT- BIOCHEMISTRY SEM 2 ENZYMES UNIT 5.pptx
POINT- BIOCHEMISTRY SEM 2 ENZYMES UNIT 5.pptxPOINT- BIOCHEMISTRY SEM 2 ENZYMES UNIT 5.pptx
POINT- BIOCHEMISTRY SEM 2 ENZYMES UNIT 5.pptx
 
Presentation by Andreas Schleicher Tackling the School Absenteeism Crisis 30 ...
Presentation by Andreas Schleicher Tackling the School Absenteeism Crisis 30 ...Presentation by Andreas Schleicher Tackling the School Absenteeism Crisis 30 ...
Presentation by Andreas Schleicher Tackling the School Absenteeism Crisis 30 ...
 
MENTAL STATUS EXAMINATION format.docx
MENTAL     STATUS EXAMINATION format.docxMENTAL     STATUS EXAMINATION format.docx
MENTAL STATUS EXAMINATION format.docx
 
Introduction to AI in Higher Education_draft.pptx
Introduction to AI in Higher Education_draft.pptxIntroduction to AI in Higher Education_draft.pptx
Introduction to AI in Higher Education_draft.pptx
 
Model Call Girl in Bikash Puri Delhi reach out to us at 🔝9953056974🔝
Model Call Girl in Bikash Puri  Delhi reach out to us at 🔝9953056974🔝Model Call Girl in Bikash Puri  Delhi reach out to us at 🔝9953056974🔝
Model Call Girl in Bikash Puri Delhi reach out to us at 🔝9953056974🔝
 
Class 11 Legal Studies Ch-1 Concept of State .pdf
Class 11 Legal Studies Ch-1 Concept of State .pdfClass 11 Legal Studies Ch-1 Concept of State .pdf
Class 11 Legal Studies Ch-1 Concept of State .pdf
 
Incoming and Outgoing Shipments in 1 STEP Using Odoo 17
Incoming and Outgoing Shipments in 1 STEP Using Odoo 17Incoming and Outgoing Shipments in 1 STEP Using Odoo 17
Incoming and Outgoing Shipments in 1 STEP Using Odoo 17
 
_Math 4-Q4 Week 5.pptx Steps in Collecting Data
_Math 4-Q4 Week 5.pptx Steps in Collecting Data_Math 4-Q4 Week 5.pptx Steps in Collecting Data
_Math 4-Q4 Week 5.pptx Steps in Collecting Data
 
Organic Name Reactions for the students and aspirants of Chemistry12th.pptx
Organic Name Reactions  for the students and aspirants of Chemistry12th.pptxOrganic Name Reactions  for the students and aspirants of Chemistry12th.pptx
Organic Name Reactions for the students and aspirants of Chemistry12th.pptx
 

Access1

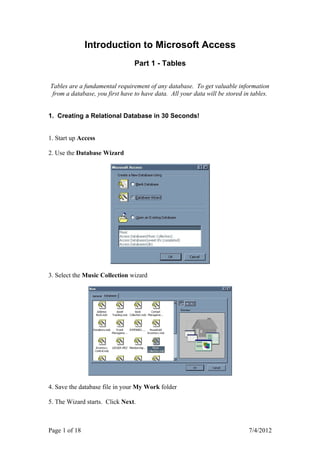
  • 1. Introduction to Microsoft Access Part 1 - Tables Tables are a fundamental requirement of any database. To get valuable information from a database, you first have to have data. All your data will be stored in tables. 1. Creating a Relational Database in 30 Seconds! 1. Start up Access 2. Use the Database Wizard 3. Select the Music Collection wizard 4. Save the database file in your My Work folder 5. The Wizard starts. Click Next. Page 1 of 18 7/4/2012
  • 2. 6. The Wizard then tells you what tables there will be in your database and what Fields each table will contain. You can tick or un-tick any field to customise your database. Click Next when done. 7. You then get to select a colour scheme. Click Next when you’re happy. 8. You will then be asked to choose a report style and finally you will be invited to name the database. Click Finish when you have answered all the questions in the Wizard. The database will then be created. Your database is now created and, as promised, the whole process should have taken no more than 30 seconds. We will now take a tour of the database window. 9. You are presented with a Switchboard window. This is an interface, which can be created to make the database user-friendly. 10. Click the Enter/View Recordings button. The Recordings Form is opened. Try entering details of some of your favourite albums. 11. Close the Recordings Form and close down the Switchboard (click the cross in the top-right corner of a window to close it down). 12. Although you have closed the Switchboard, the database is still open. Double- click the Music Collection Database window, which is currently minimised in the bottom-left of the Access window. Page 2 of 18 7/4/2012
  • 3. 13. You will see that an Access Database consists of Tables, Queries, Forms, Reports, Macros and Modules, all of which are stored in the Database Window as separate objects. If you take a tour of this window, you should see that the wizard has created tables, forms and reports in the music collection database. You can double- click each object to open it. Some of the forms should be familiar to you because you have previously opened them via the Switchboard. 14. If you open the Tables, you should see that the only data in the database, is the sample data you entered into the Recordings Form. Although you entered this data in the Recordings Form, you should see that this data is being stored in several tables. The form was created to provide an easy interface for the user to enter the data. You should, by now, realise that data entry forms and switchboard forms are provided for the convenience of the user. As a database designer, you will want to make your database very easy to use. You will also see that good database design can ensure that the data entered is accurate. -------------------------------- 2. Start with a Blank Database Unfortunately, you won’t learn how to be a database designer by using the Database Wizard! Now is the time to create a database from scratch. 1. Click on File and New Database. 2. Create a New Database using the Blank Database. 3. Give your database a Filename. 4. You should now have a blank database Window open at the Tables tab. Click New to create a new table and select Table Wizard. 5. Click OK and you should see a screen, which gives you a wide choice of sample tables and fields for business and personal use. Page 3 of 18 7/4/2012
  • 4. 6. Choose a personal table and select all the fields from the Recording Artists sample table. Your screen should look like this: 7. Allow the Wizard to set a Primary Key and change the selection on the last screen, so that you are going to modify the table’s design after the wizard is finished. You should finish with a screen that looks something like this: It is worth studying this screen for a while. You should see that the Wizard has set the Fields, including RecordingArtistID, which is a Primary Key. You should see that each field has a Data Type (e.g. Text, Number, Date/Time) and they also have Field Properties, which includes a Field Size setting. 8. Close the Table’s Design View and you will see that the Recording Artists table is now shown in the database window. Click the Right Mouse Button on the table and select Rename. Change the name to Artists. Page 4 of 18 7/4/2012
  • 5. 3. Understanding Your New Table 1. First, let us try to understand what the Wizard did. You now have one table in your database (called Artists). If you open this table in Datasheet View you can start entering data into it. You might notice several things: • The RecordingArtistID field assigns a unique number to each record that you enter. • The Birth Date field only allows you to enter valid dates. Try entering an invalid date (e.g. 45/13/02). The birth dates entered above are made up. Try using the Internet to research the real D.O.B.s for your favourite artists. • You can write as much as you want in the Notes field. It would be a good idea to adjust the width and height of the columns (as above). 2. Once you have entered several records, you can try to search your table. To do this, click in the column in which you wish to search and press CTRL+F (or select Find from the Edit menu). Perform a few simple searches using this method. 3. If you don’t understand these terms already, it is high time that you learnt the jargon: Data Stuff you put into your database Fields A place for your data to live e.g. a database of footballers would have fields such as FirstName, LastName, Position, Team etc. Records A record groups data together in an order If it wasn’t for records, your database wouldn’t know which last name went with which first name. Table A collection of records that describe similar data In a flat-file database, all the data goes into a single table. However, Access is a “relational” database, meaning that you can create many tables and link them together. Database File A collection of tables and also various other tools to assist in the use of the data e.g. queries, forms, reports Everything is compressed together in a single file with an MDB extension Page 5 of 18 7/4/2012
  • 6. 4. Creating a Table Without the Wizard 1. Now you should try to create a table without any wizard help at all. To do this, you create a new table in Design View. You are presented again with the Table Design View screen but, this time, no fields have been created for you. 2. Enter the fields as follows: N.B. Make sure you do the following: • Make RecordingID a Primary Key (click the Right Mouse Button in the grey area next to the field name) • Make sure the correct Data Type is set for each field (these will be explained later) • The only field size you have to set is for the Title and Label fields. Select a suitable size (a little larger than you think you will need). • Leave no spaces between field names • Enter a description for each field For Discussion • Why should field sizes not be too big? • Why should field sizes not be too small? • How can you enter a Default Value for a field and what is the purpose of doing this? • Why shouldn’t you put spaces in field names? • Why bother entering a description? • What is the purpose of a Primary Key? • Can a table have more than one Primary Key? Page 6 of 18 7/4/2012
  • 7. 4. Close the table design view and name the table Albums. 5. Re-open the Artists table in Datasheet View. Try adding a record. Then try deleting an existing record. 6. Create a new table called Tracks with the following fields: TrackID (Primary Key, AutoNumber) RecordingID (Number) TrackNumber (Number) 7. Create a fourth table called Categories, as follows: CategoryID (Primary Key, AutoNumber) Category (Text) -------------------------------- 5. Help and Helplessness 1. You can press F1 for Help, at any time (try it) 2. The Office Assistant is now always as helpful as he could be. To get real help, look in the Help Menu: 3. Select Contents and Index to see the full Help system. The Index tab gives you a full alphabetical index of help topics. The Find tab, allows you to search for a topic to get help on. 4. The What’s This? Feature is particularly useful. Select this item from the Help menu and your cursor will change to an arrow with a question mark beside it. You will get help on the first thing you click on. You can ask Access “What’s This?” at any time. Try selecting What’s This and clicking on the Design button of the Table Window: Page 7 of 18 7/4/2012
  • 8. 5. Access has 22 button bars, which change depending on what you’re doing. There are so many buttons that nobody could ever hope to remember what they all do. To make life easier for you, there are Screen Tips, which pop up when you hold the mouse button over a button (try it). 6. Get into the habit of using the Right Mouse Button. In Access, when you click on something, it invariably brings up a menu. For example, try clicking the Right Mouse Button on one of your tables. You can see that you now have options such as renaming, printing or deleting the table. You can also open the table in Design or Datasheet view from this menu. 7. Saving your work in Access is very easy. Access Autosaves most things (for example, each record is saved as soon as it is created). This is a benefit but also a danger because, for example, if you delete something by accident, Access will not question your decision! Pressing Ctrl+Z or select Undo from the Edit menu will usually undo the very last thing you did but don’t rely on this to get you out of trouble. 8. Backup is essential and also very easy. Access saves all your tables, queries, reports etc. in one handy file with an MDB extension. Your early databases will easily fit on a floppy disk: Page 8 of 18 7/4/2012
  • 9. 6. Data Types You have now created four tables and you have set a data type for each field that you have created. You have also tried entering data into the tables and you have noticed that certain fields will not allow certain types of data. For example, you can’t enter an invalid date into a date field. You can’t enter text into a number field. In your tables, try to find examples of each of these data types (you will find most but not all). Why have the data types been set in this way? AutoNumber Automatically generates a number each time you add a record. This number is used as a unique identifier for each record. Text Stores letters, numbers and any combination thereof. Can be up to 255 characters in length Memo This is a really big text field. Holds up to 64,000 characters (about 18 pages of text). Number Holds numbers and decimal points but nothing else. Set a field to Number if you want to do calculations. Currency Formats money fields. Date/Time Either the date or the time or both, in a variety of formats Yes/No For fields where one of two answers is required. You can have Yes/No, True/False or On/Off. It is possible to add your own variants. OLE Object You can add photographs, sounds etc. in a field of this data type Hyperlink For webpage addresses Lookup Wizard Prevent errors by presenting the user with a list of acceptable answers to choose from. For Discussion • Why are telephone number fields usually set to text? • How does setting the right data type help prevent bad data being entered? • You can enter numbers into a text field. Apart from the fact that it guards against bad data, why should anyone want to bother creating a number field? • Why not set all text fields to Memo? Page 9 of 18 7/4/2012
  • 10. 7. Flat File or Relational? A Flat File database contains a single table. Flat File Databases are very easy to create and use. They are ideal for simple things like databases of address books, video collections, and so on. They are similar to the traditional desktop “card-file”. Relational databases have multiple tables that are linked together with “key fields”. Relational databases really shine when they are used to solve big business problems. A whole business can use one database that integrates the whole organisation. You need to understand why flat file databases are inadequate for big tasks. This is a simple database for a library: There are three tables – Books, Borrowers and Loans. When the library gets a new book, it enters its details into the Books table. All the members of the library have their details entered into the Borrowers table. When someone borrows a book, the Loan table is used. The information about the book and the borrower does not have to be entered each time a loan is made because this information is taken from the Book and Borrower tables. This is indicated by the lines that link the tables together. These links are known as relationships. The symbols at each end of the line indicate what type of relationship exists: One to One: Each book can only be borrowed once One to Many: One borrower may borrow many books Your Task Imagine that you have to set up a database for a library but you only have a flat file database application. • Design the table that you will use and describe how the system will work. • List all the problems you encounter • Write a report to the library committee telling them why they ought to invest in a relational database system, such as Access. Page 10 of 18 7/4/2012
  • 11. 8. Build Relationships for the Music Database 1. Click the Relationships button on the toolbar or select Relationships from the Tools menu. 2. The Show Table window will ask you which tables you want to display in the Relationships Window. Select all four of your tables and then close the Show Table window. 3. You can adjust the size and the position of the four tables in the Relationships Window. 4. To build a relationship between fields, click on a field with the Left Mouse Button and drag it onto the field you want to link to. A window appears asking you to confirm the relationship. Here, you also have the chance to change the type of relationship. Things to watch out for: • Linked fields must be identical (same data type, same size, same name) • Select Enforce Referential Integrity and Cascade Update Related Fields if you want to update corresponding values in a related table when the primary key value is changed. Your Task You have to create relationships for your tables to reflect the following facts: • One album has many tracks • One artist may have recorded several albums • There may be several albums in the same musical category When you have finished, you should have something like this: If the symbols at the ends of the relationship lines don’t match, try changing your join settings. To edit a relationship, double-click on a join line. To delete a relationship, click the line once and press the Delete key. Close the Relationships Window when you’re finished. Page 11 of 18 7/4/2012
  • 12. 9. Index Your Fields You will now return to the Table Design view to “tweak” your tables for greater efficiency. The first thing to do is to index some of your fields. The purpose of indexing your fields is to speed up sorts and queries. You should not index every field because too many indexed fields slows down data entry. You have to index each of your fields in turn. To do so, select a field and click the Index section of the Field Properties. Your three options are: No Don’t index the field Yes (DuplicatesOK) Most of the time you want to allow duplicate records. Yes (No Duplicates) Key fields should be set to No Duplicates because a key field must be unique. You don’t want two customers with the same customer number. You can see a list of indexed fields by clicking the Indexes button on the toolbar. For Discussion You should set the Index to No Duplicates when the records have to be unique (for example, a key field must be unique. What other fields could be set to No Duplicates? Page 12 of 18 7/4/2012
  • 13. 10. Formats Staying in the Field Properties, we will now check to see if a Data Format is appropriate. You use a format if you want to change the way your data appears on screen. Each field type has its own set of formats. Some of the most commonly used are as follows: Text and Memo Formats Symbol Meaning What it Does > Greater than Makes all text appear in upper case < Less than Makes all text appear in lower case Number and Currency Formats General Number Default option Currency Displays numbers as currency Fixed Locks the field to display a specified number of decimal places Standard Adds a thousands separator Percent Displays decimal places as a percentage In a number field, you can change the Field Size setting from Long Integer to Single if you want to dispense with decimal places. However, if the field is part of a relationship, you should be aware that an AutoNumber field must be set to Long Integer. Date/Time Formats You have a choice of how the date/time is displayed Yes/No Formats You have three initial choices, which are Yes/No, True/False and On/Off. You can add your own selections to this list. Page 13 of 18 7/4/2012
  • 14. 11. Input Masks The aim of an Input Mask is to prevent the user entering bad data. The great danger in using them is that you might end up preventing the user from entering correct data. For this reason, you must think carefully before deciding to set an input mask for a field. An input mask is a series of characters, which tells Access what kind of data to expect. Each field can have an input mask, with the exception of a memo field. Input Masks work best with highly consistent data, such as phone numbers, national insurance numbers and postal codes. You can either write your own input mask or you can use the Wizard. To use the Wizard, click the Build button, which appears when you click the Input Mask Property. Your Task Create an Input Mask for a telephone number and then test it. Try entering a variety of valid postal codes and make sure they are accepted. Try international and mobile telephone numbers. For Discussion Would the telephone number field be better off not having an input mask? Page 14 of 18 7/4/2012
  • 15. 12. Validation and Required Fields Together with Input Masks, validation tests and required fields are your weapons in the war against bad data. Using the Required property is easy because there are only two choices – yes and no. Set the Required property to Yes if you want to force the user to enter something in this field. For Discussion When would you want to set a Required property to Yes? What would happen if you set all fields to Required? The Validation property is more sophisticated because it performs a test on incoming data to make sure it’s what you want. Two properties require your attention: Validation Rule The test that will be applied to the data Validation Text This is a message, which Access will display if the data is unacceptable (i.e. if it fails the validation test). Validations work best with number, currency and date fields because the incoming data is more predictable. The Validation Rule is written as an Expression. An Expression is an instruction that you give to Access in a language that Access can understand. For example, if you want to force users to enter only positive numbers in a number field, the expression is “> 0” i.e. the number must be greater than zero. Try some of these expressions on some of your fields and see what happens. Mix and match the operators and see what you can come up with: >0 Must be greater than zero <> 0 Cannot be zero >= 5 Greater than or equal to 5 >= 0 And <= 100 Must be between 0 and 100 (inclusive) <= 0 Or <= 100 Must be less than 0 or greater than 100 (inclusive) >= Date ( ) Must be today’s date or later >= Date ( ) Or Is Null Must be today’s date or later or blank >= #1/1/96# And <#1/1/97# Must be a date in 1996 Like "A????" Entry must contain 5 characters and start with the letter A Page 15 of 18 7/4/2012
  • 16. To write a validation rule, you can either write the rule yourself, or you can use the Expression Builder. To start the Expression Builder, click the Build button that appears when you select the Validation Rule Property. The Expression Builder helps you to write expressions. It lists functions and operators that you can use. It can also prompt you to remind you what to do next and it will stop you making common mistakes. Your Task 1. Write an Validation Rule and Validation Text to apply the following tests: • Must be earlier than today’s date • Must be between January 1st 1990 and today’s date For Discussion 1. What would happen if you set these validation rules: <= 0 >= 100 2. Why would you probably not want to set a validation rule for a text field? Page 16 of 18 7/4/2012
  • 17. 13. Keyboard Shortcuts F2 Select an entire field Ctrl+; Insert the Current Date Ctrl+: Insert the Current Time Ctrl+Enter Insert a Line Break (use it in a memo or large text field) Ctrl++ Add New Record Ctrl+- Delete the Current Record Shift+Enter Save the Record Ctrl+Z Undo the last change you made (don't rely on this) Ctrl+Enter Open the selected object in Design View Alt+F4 Quit Access 14. Summary (from the Access Help file) Page 17 of 18 7/4/2012
  • 18. Page 18 of 18 7/4/2012