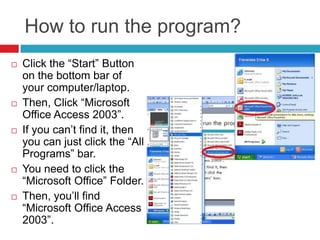
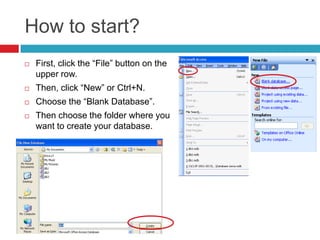
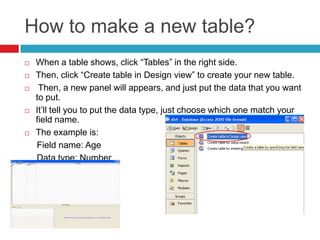
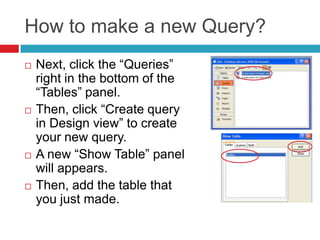
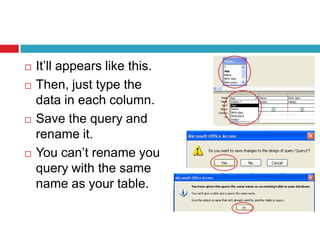
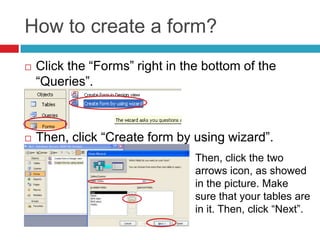
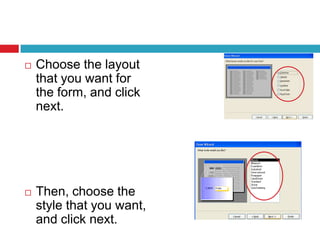
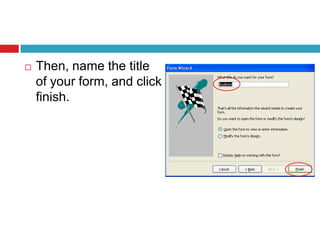
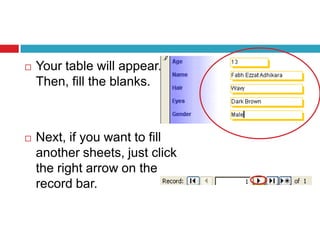
MICROSOFT OFFICE
ACCESS 2003
By: Fransisca Erica Sudibyo
Introduction
Menu Bar consists of:
 File: The options that will appear first are New, Open, File Search, file that you had
saved, exit, and others.
1. As the name, “New” supposed to make a new file. You can just click it or click Ctrl + N.
2. “Open” used to open the file that you had saved. You can just click it or Ctrl + O.
3. “File Search” used to search file that you needed. You can just click it.
4. The file that you saved, will appear automatically. You can just open it if you want to.
5. “Exit” used to exit your work.
6. “Save as” used to save your new work.
7. “Export” used to export your work.
8. “Page Setup” used if you want to change or edit your work (paper).
9. “Print Preview” used to edit or see what your work will look like when it’s printed.
10. “Print” used to print your work. You can just click print, or use the shortcut which is Ctrl +
P.
11. “Send to” used to send your work by e-mail and others.
12. “Database Properties” used to view or edit some data from the database such as
subject, author, category, and others.
13. “Back Up Database” used to backup your database so you won’t lose it.
 Edit consists of Undo, Cut, Copy, Office Clipboard,
Paste, Create Shortcut, Delete, Rename, Groups,
Add to group. All of them basically used to edit
things or objects that you’ve selected/your work.
 View consists of Database objects, Large icons,
Small icons, List, Details, Arrange icons, Line up
icons, Properties, Object Dependencies, Code, Task
Pane, Toolbars, Refresh. All of them basically used
to view options.
 Insert consists of Table, Query, Form, Report, Page,
Macro, Module, Class Module, AutoForm,
AutoReport. All of them basically used to insert
things that you want.
 Tools consists of Spelling, Relationships, Analyze,
Database Utilities, Security, Startup, Customize,
Options, and others. All of them basically used to
check or edit your work.
 Others.
How to run the program?
 Click the “Start” Button
on the bottom bar of
your computer/laptop.
 Then, Click “Microsoft
Office Access 2003”.
 If you can’t find it, then
you can just click the “All
Programs” bar.
 You need to click the
“Microsoft Office” Folder.
 Then, you’ll find
“Microsoft Office Access
2003”.
How to start?
 First, click the “File” button on the
upper row.
 Then, click “New” or Ctrl+N.
 Choose the “Blank Database”.
 Then choose the folder where you
want to create your database.
How to make a new table?
 When a table shows, click “Tables” in the right side.
 Then, click “Create table in Design view” to create your new table.
 Then, a new panel will appears, and just put the data that you want
to put.
 It’ll tell you to put the data type, just choose which one match your
field name.
 The example is:
Field name: Age
Data type: Number
How to save your table?
 Before you save your table, don’t forget to put
the primary key on the first row of your table.
 Then, click the “Close” icon.
 It’ll ask you to save the table, then just click
“Yes”.
How to make a new Query?
 Next, click the “Queries”
right in the bottom of the
“Tables” panel.
 Then, click “Create query
in Design view” to create
your new query.
 A new “Show Table” panel
will appears.
 Then, add the table that
you just made.
 It’ll appears like this.
 Then, just type the
data in each column.
 Save the query and
rename it.
 You can’t rename you
query with the same
name as your table.
How to create a form?
 Click the “Forms” right in the bottom of the
“Queries”.
 Then, click “Create form by using wizard”.
Then, click the two
arrows icon, as showed
in the picture. Make
sure that your tables are
in it. Then, click “Next”.
 Choose the layout
that you want for
the form, and click
next.
 Then, choose the
style that you want,
and click next.
 Then, name the title
of your form, and click
finish.
 Your table will appear.
Then, fill the blanks.
 Next, if you want to fill
another sheets, just click
the right arrow on the
record bar.
 Then, just fill the
blanks, just like
before.
 And your done.

Microsoft office access 2003 Tutorial

  • 1.
    MICROSOFT OFFICE ACCESS 2003 By:Fransisca Erica Sudibyo
  • 2.
    Introduction Menu Bar consistsof:  File: The options that will appear first are New, Open, File Search, file that you had saved, exit, and others. 1. As the name, “New” supposed to make a new file. You can just click it or click Ctrl + N. 2. “Open” used to open the file that you had saved. You can just click it or Ctrl + O. 3. “File Search” used to search file that you needed. You can just click it. 4. The file that you saved, will appear automatically. You can just open it if you want to. 5. “Exit” used to exit your work. 6. “Save as” used to save your new work. 7. “Export” used to export your work. 8. “Page Setup” used if you want to change or edit your work (paper). 9. “Print Preview” used to edit or see what your work will look like when it’s printed. 10. “Print” used to print your work. You can just click print, or use the shortcut which is Ctrl + P. 11. “Send to” used to send your work by e-mail and others. 12. “Database Properties” used to view or edit some data from the database such as subject, author, category, and others. 13. “Back Up Database” used to backup your database so you won’t lose it.
  • 3.
     Edit consistsof Undo, Cut, Copy, Office Clipboard, Paste, Create Shortcut, Delete, Rename, Groups, Add to group. All of them basically used to edit things or objects that you’ve selected/your work.  View consists of Database objects, Large icons, Small icons, List, Details, Arrange icons, Line up icons, Properties, Object Dependencies, Code, Task Pane, Toolbars, Refresh. All of them basically used to view options.  Insert consists of Table, Query, Form, Report, Page, Macro, Module, Class Module, AutoForm, AutoReport. All of them basically used to insert things that you want.  Tools consists of Spelling, Relationships, Analyze, Database Utilities, Security, Startup, Customize, Options, and others. All of them basically used to check or edit your work.  Others.
  • 4.
    How to runthe program?  Click the “Start” Button on the bottom bar of your computer/laptop.  Then, Click “Microsoft Office Access 2003”.  If you can’t find it, then you can just click the “All Programs” bar.  You need to click the “Microsoft Office” Folder.  Then, you’ll find “Microsoft Office Access 2003”.
  • 5.
    How to start? First, click the “File” button on the upper row.  Then, click “New” or Ctrl+N.  Choose the “Blank Database”.  Then choose the folder where you want to create your database.
  • 6.
    How to makea new table?  When a table shows, click “Tables” in the right side.  Then, click “Create table in Design view” to create your new table.  Then, a new panel will appears, and just put the data that you want to put.  It’ll tell you to put the data type, just choose which one match your field name.  The example is: Field name: Age Data type: Number
  • 7.
    How to saveyour table?  Before you save your table, don’t forget to put the primary key on the first row of your table.  Then, click the “Close” icon.  It’ll ask you to save the table, then just click “Yes”.
  • 8.
    How to makea new Query?  Next, click the “Queries” right in the bottom of the “Tables” panel.  Then, click “Create query in Design view” to create your new query.  A new “Show Table” panel will appears.  Then, add the table that you just made.
  • 9.
     It’ll appearslike this.  Then, just type the data in each column.  Save the query and rename it.  You can’t rename you query with the same name as your table.
  • 10.
    How to createa form?  Click the “Forms” right in the bottom of the “Queries”.  Then, click “Create form by using wizard”. Then, click the two arrows icon, as showed in the picture. Make sure that your tables are in it. Then, click “Next”.
  • 11.
     Choose thelayout that you want for the form, and click next.  Then, choose the style that you want, and click next.
  • 12.
     Then, namethe title of your form, and click finish.
  • 13.
     Your tablewill appear. Then, fill the blanks.  Next, if you want to fill another sheets, just click the right arrow on the record bar.
  • 14.
     Then, justfill the blanks, just like before.  And your done.