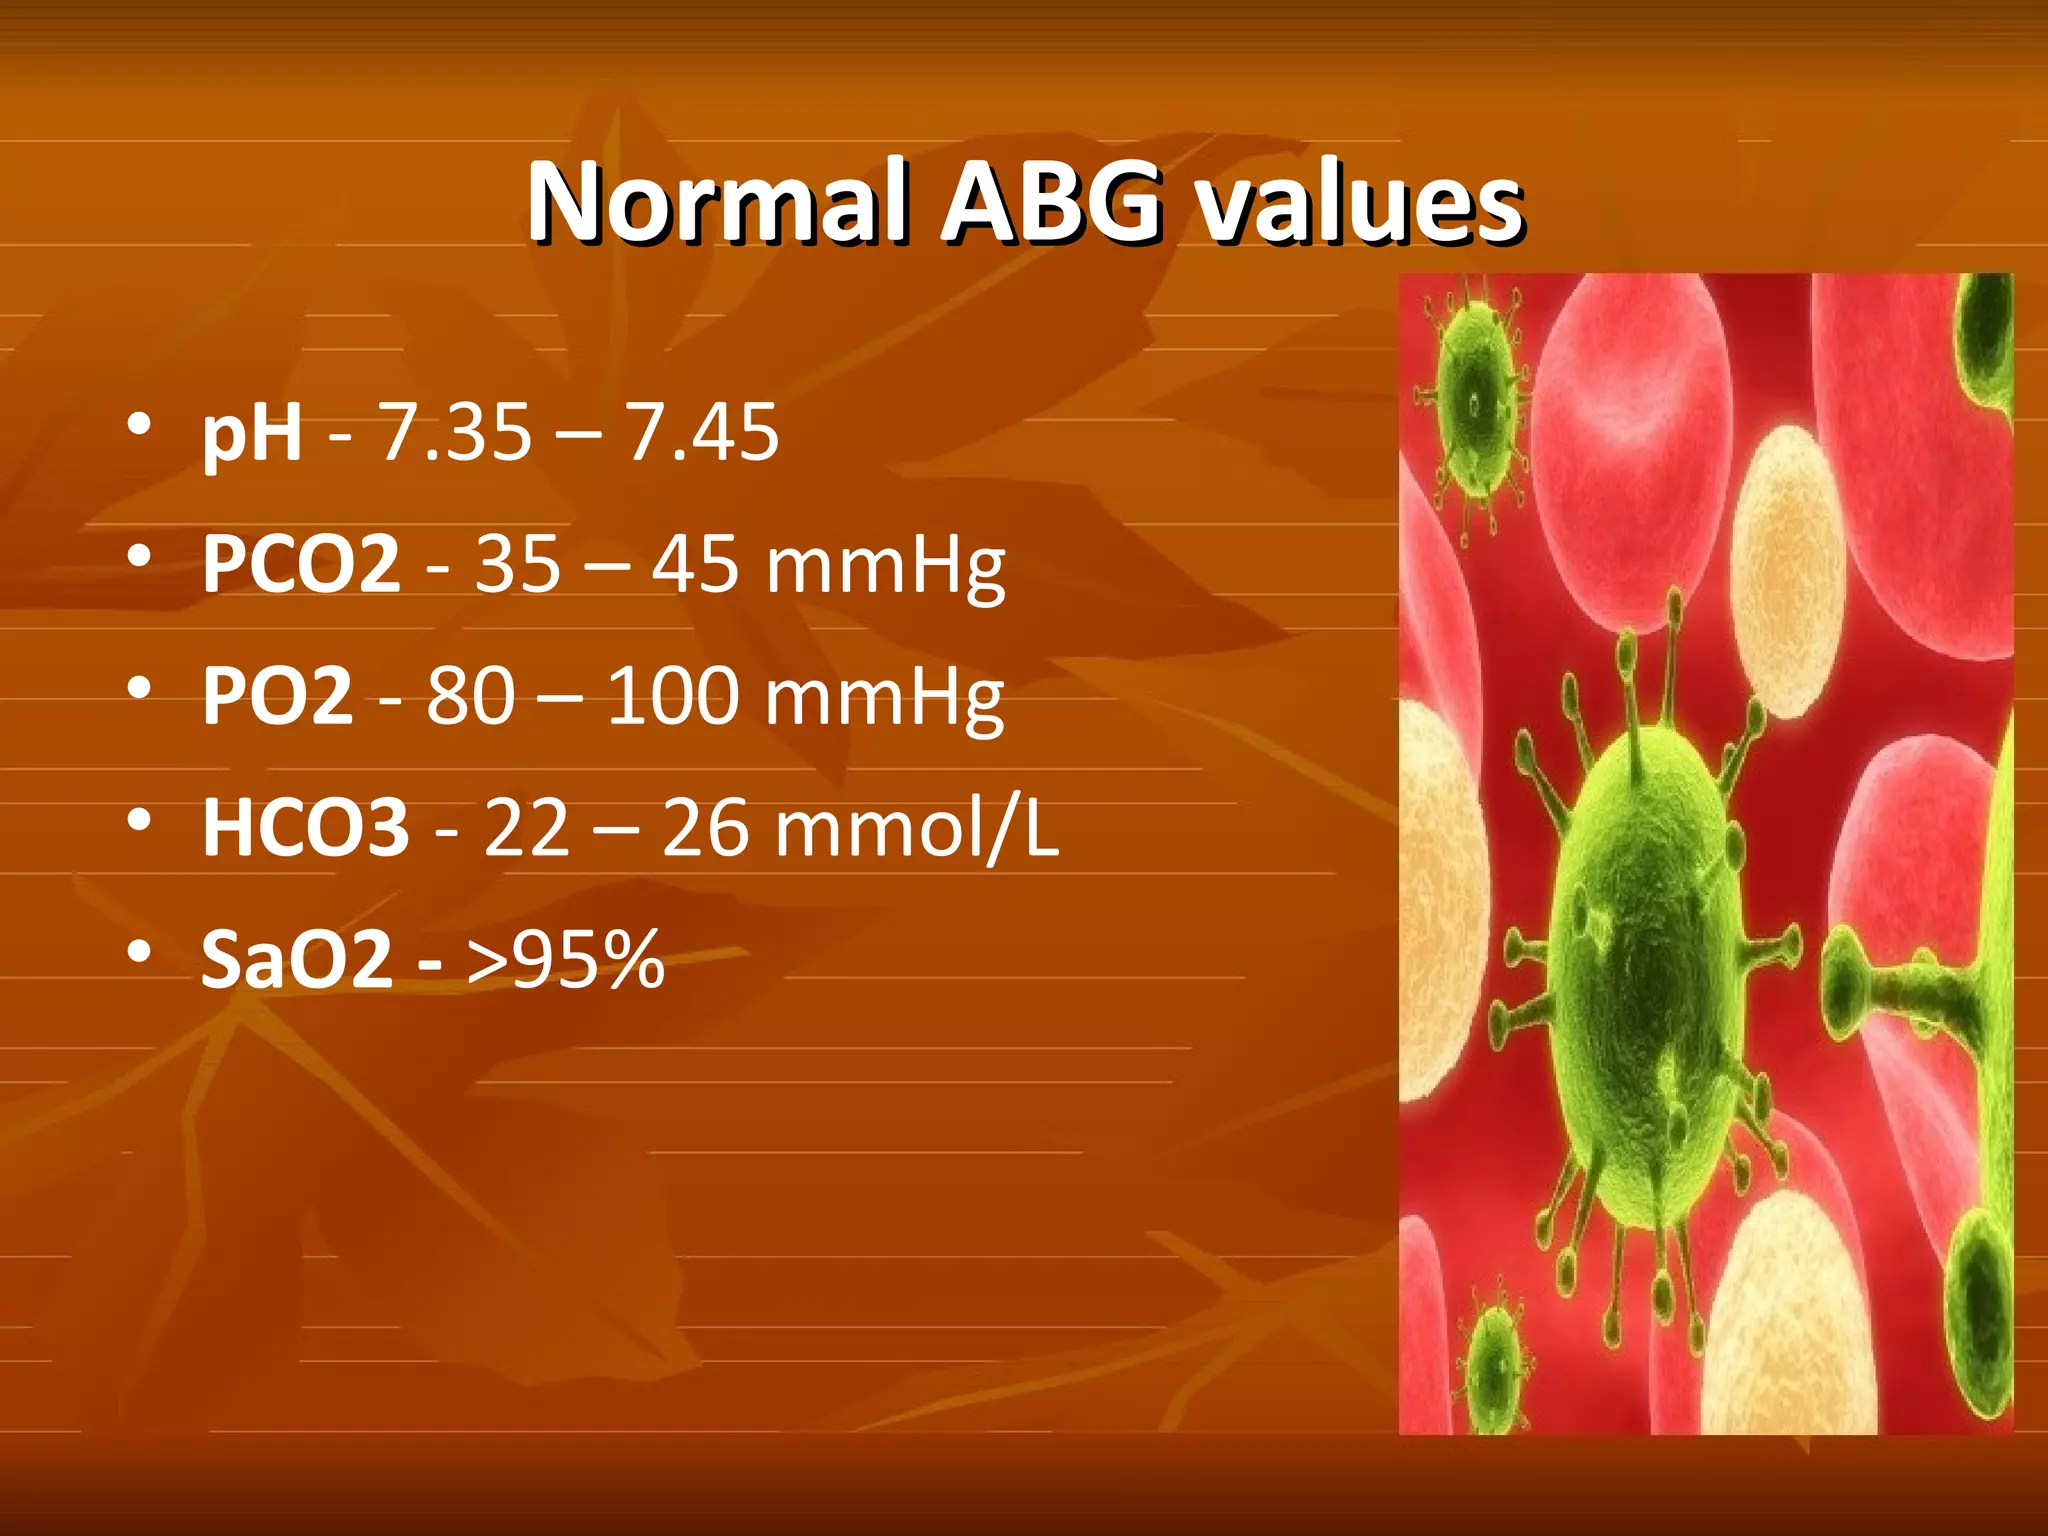
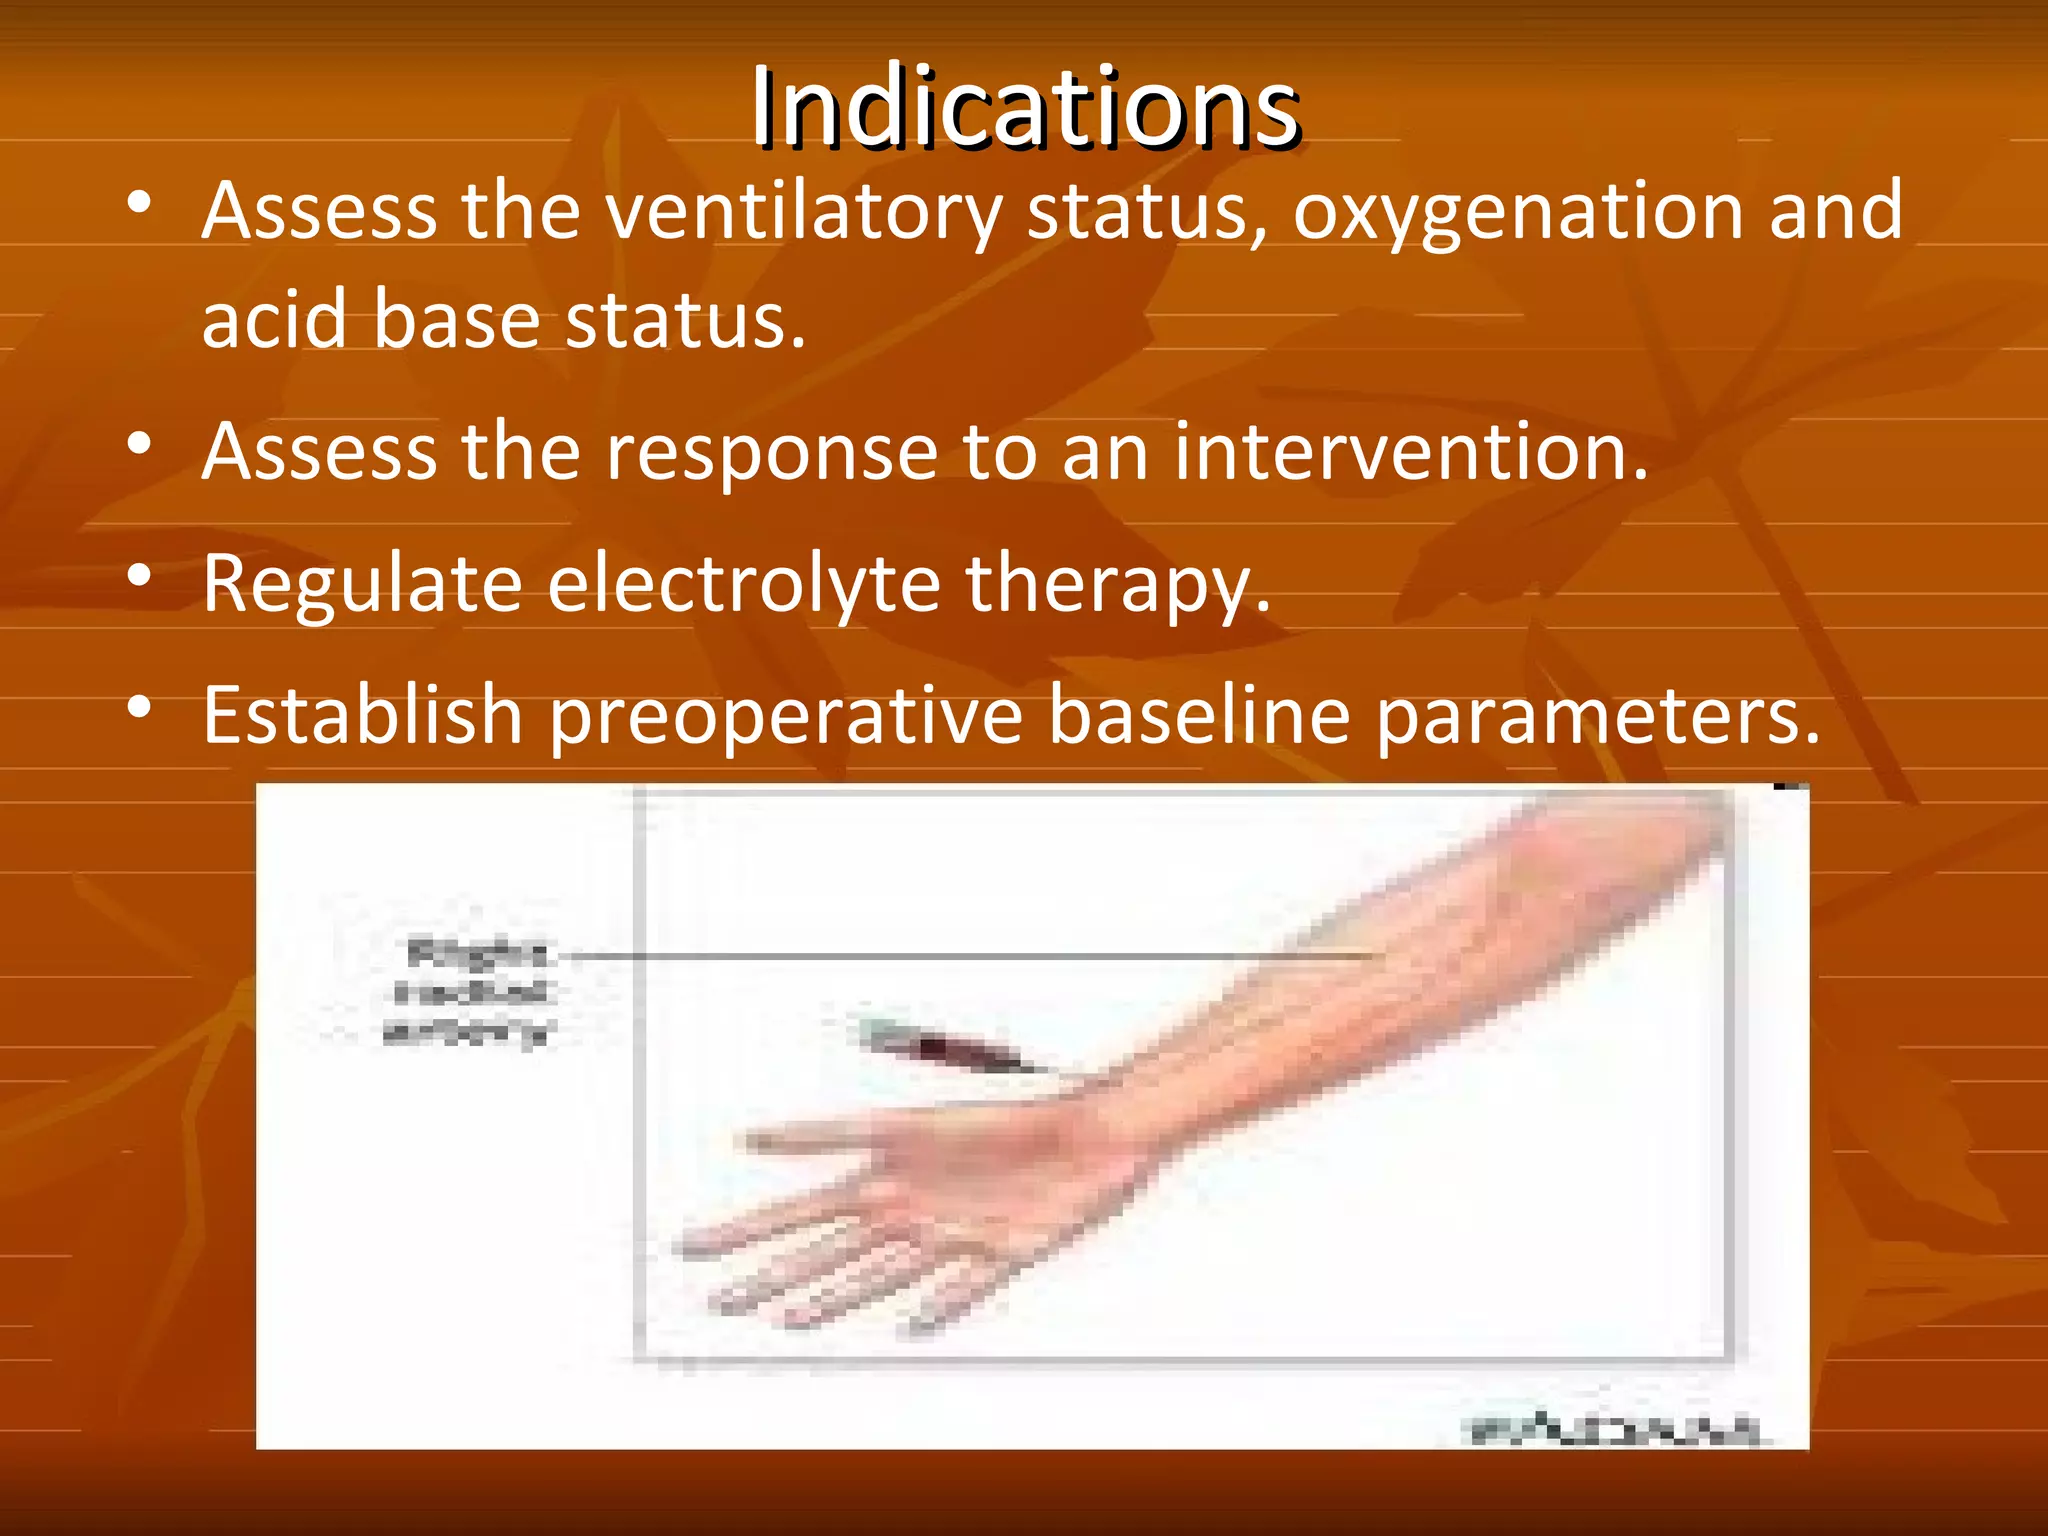
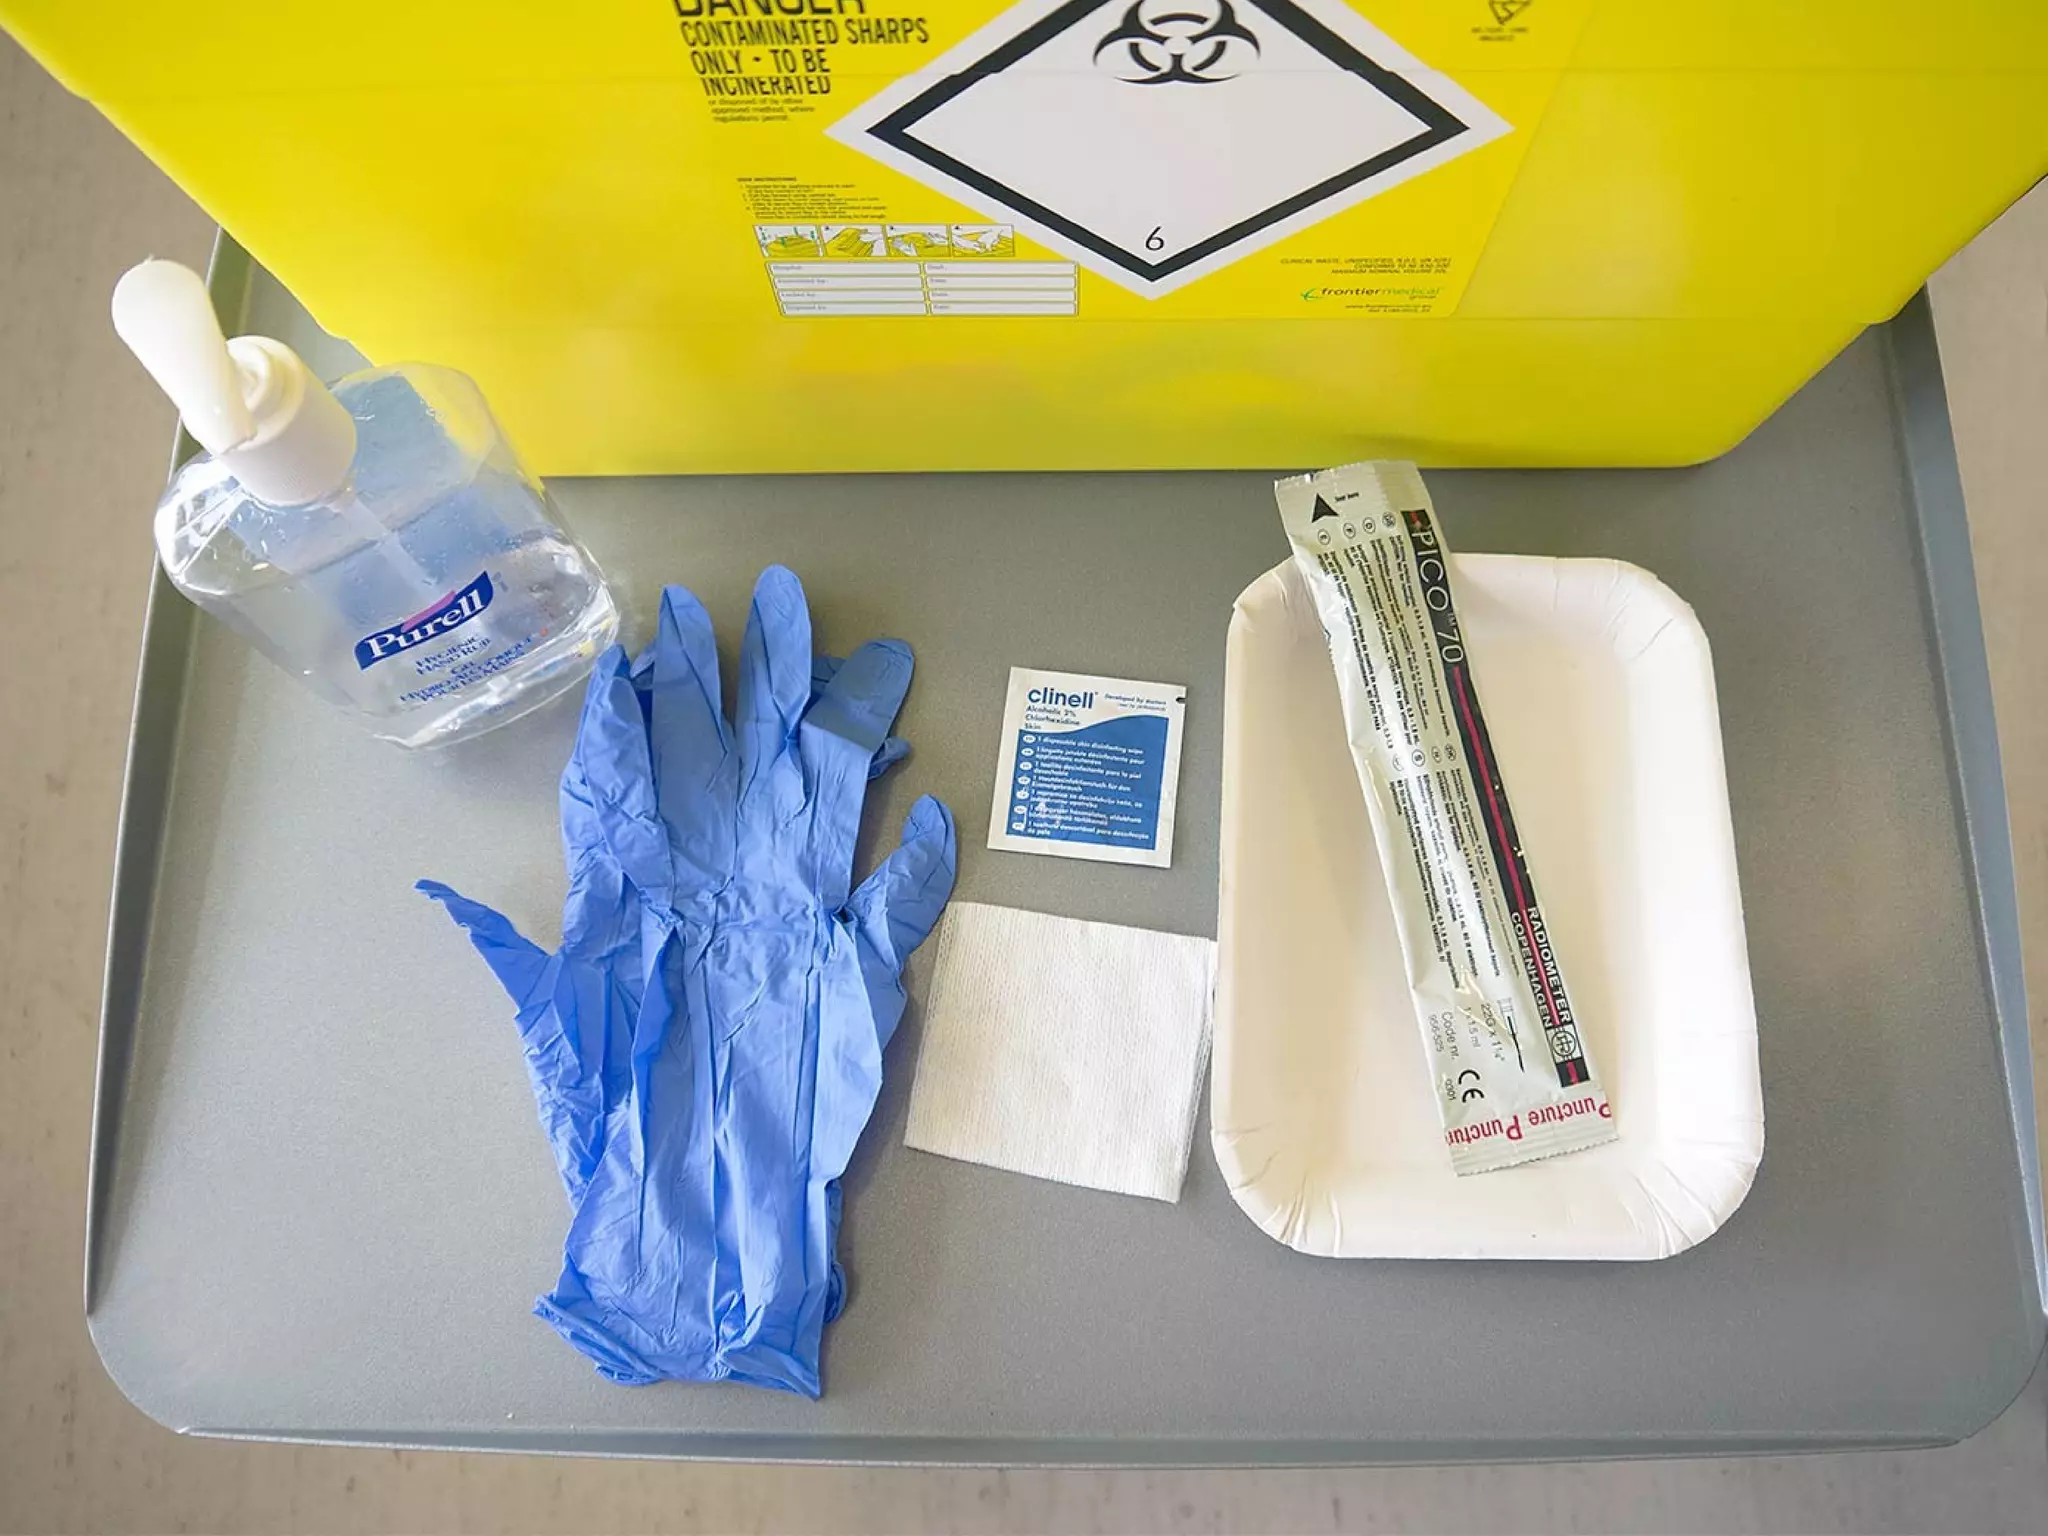
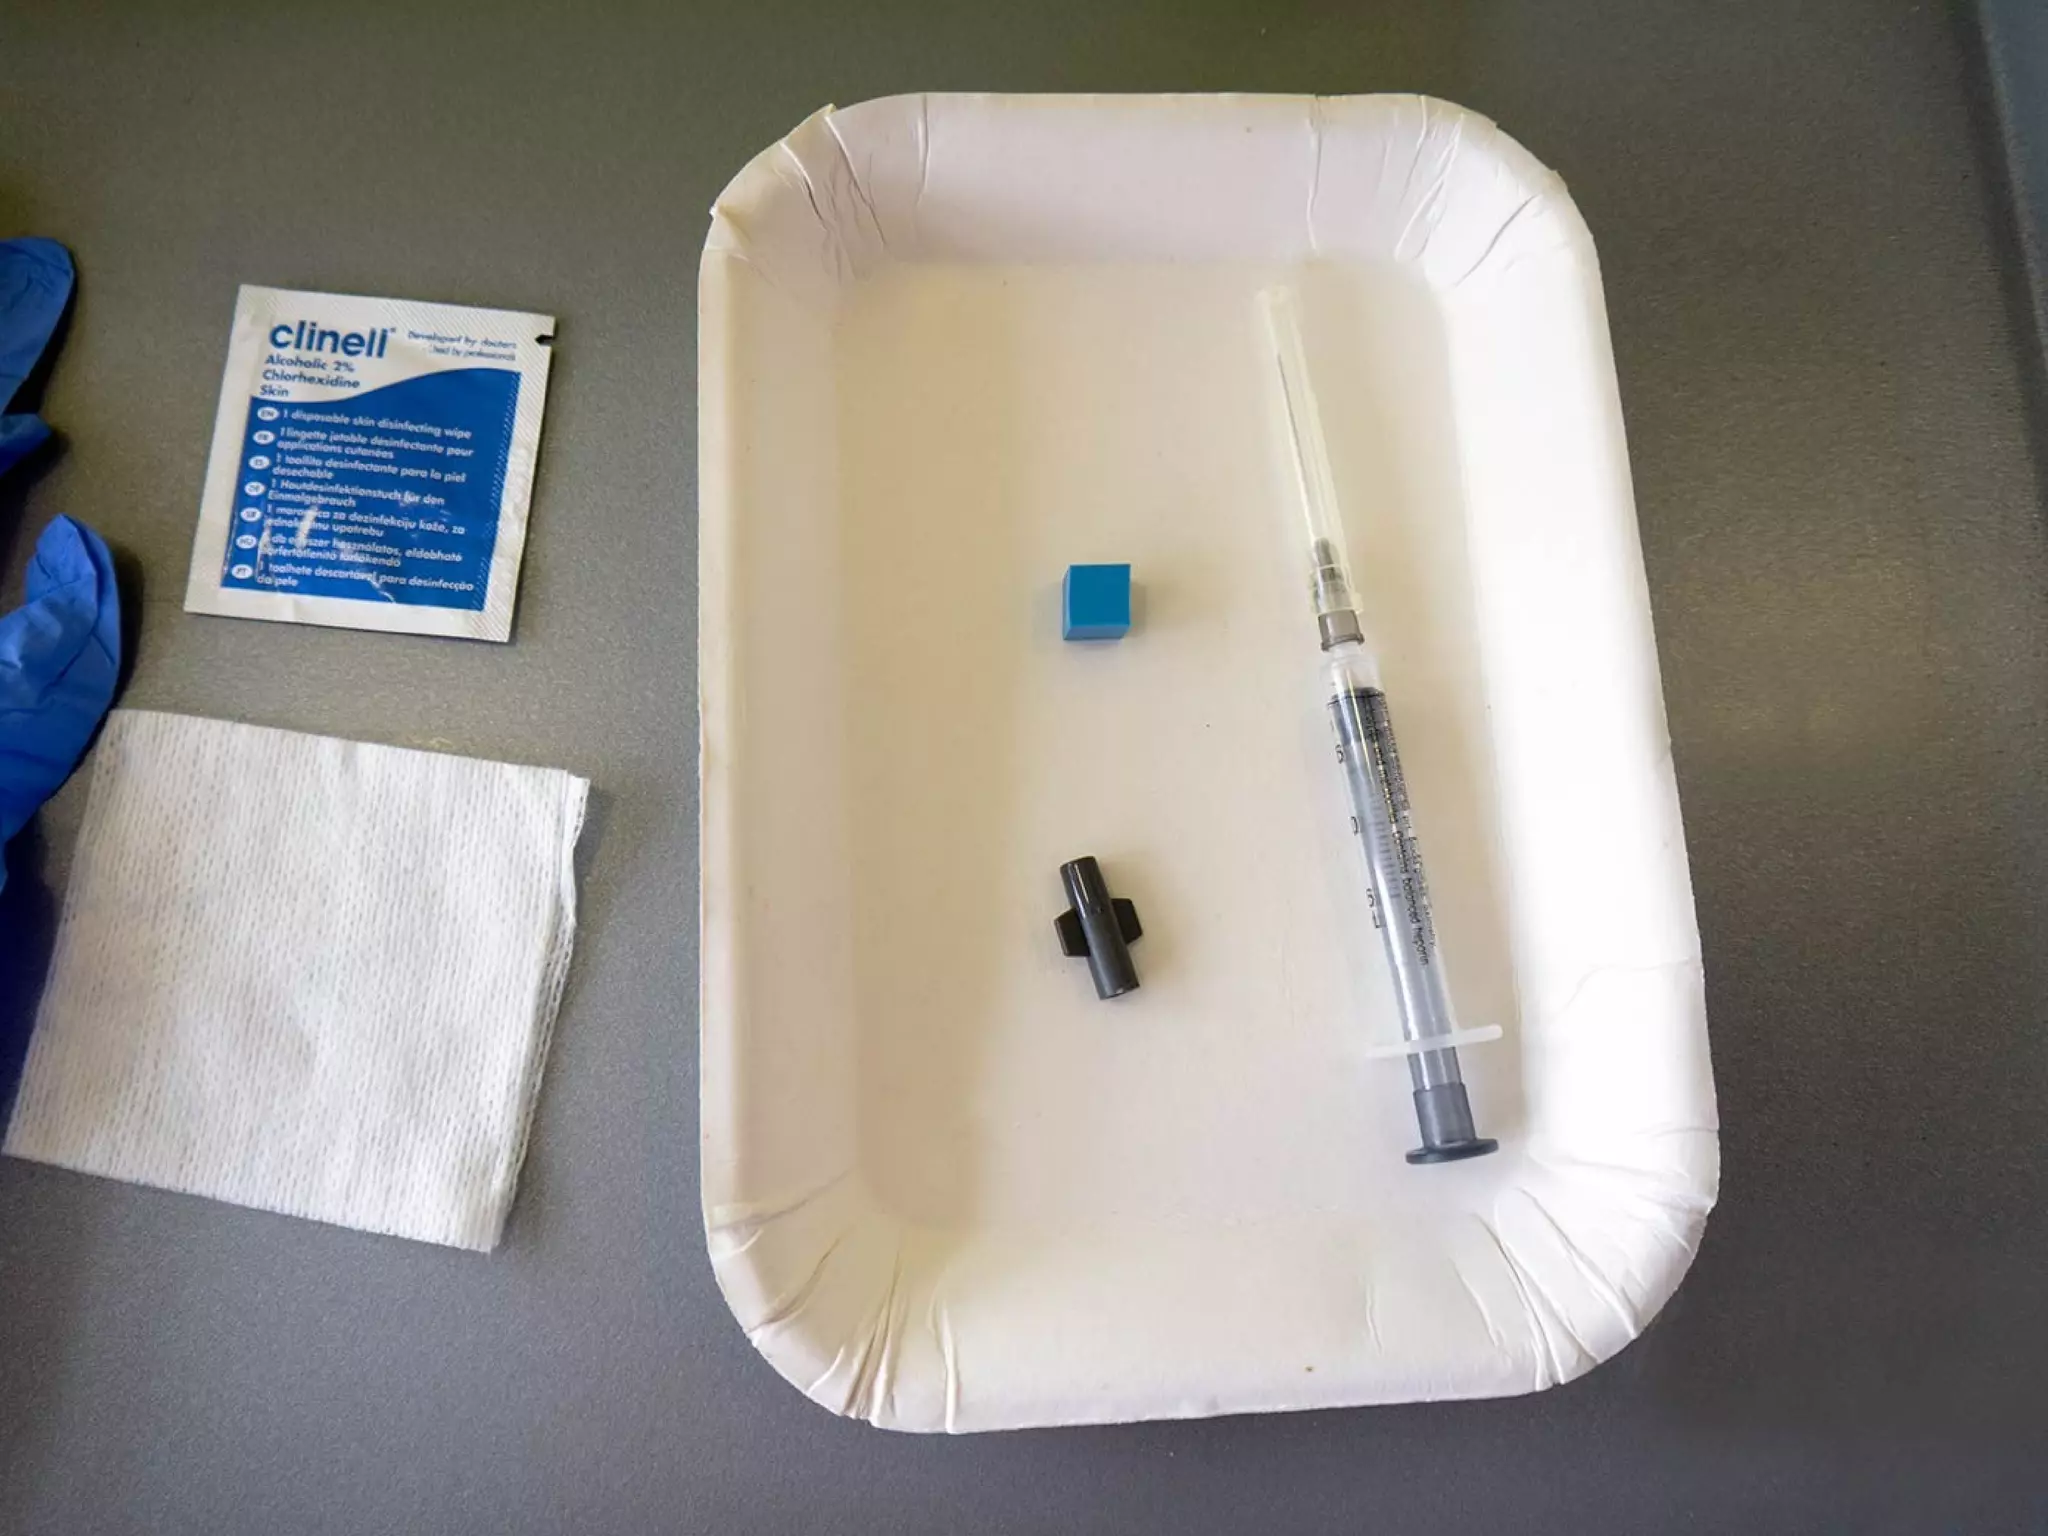
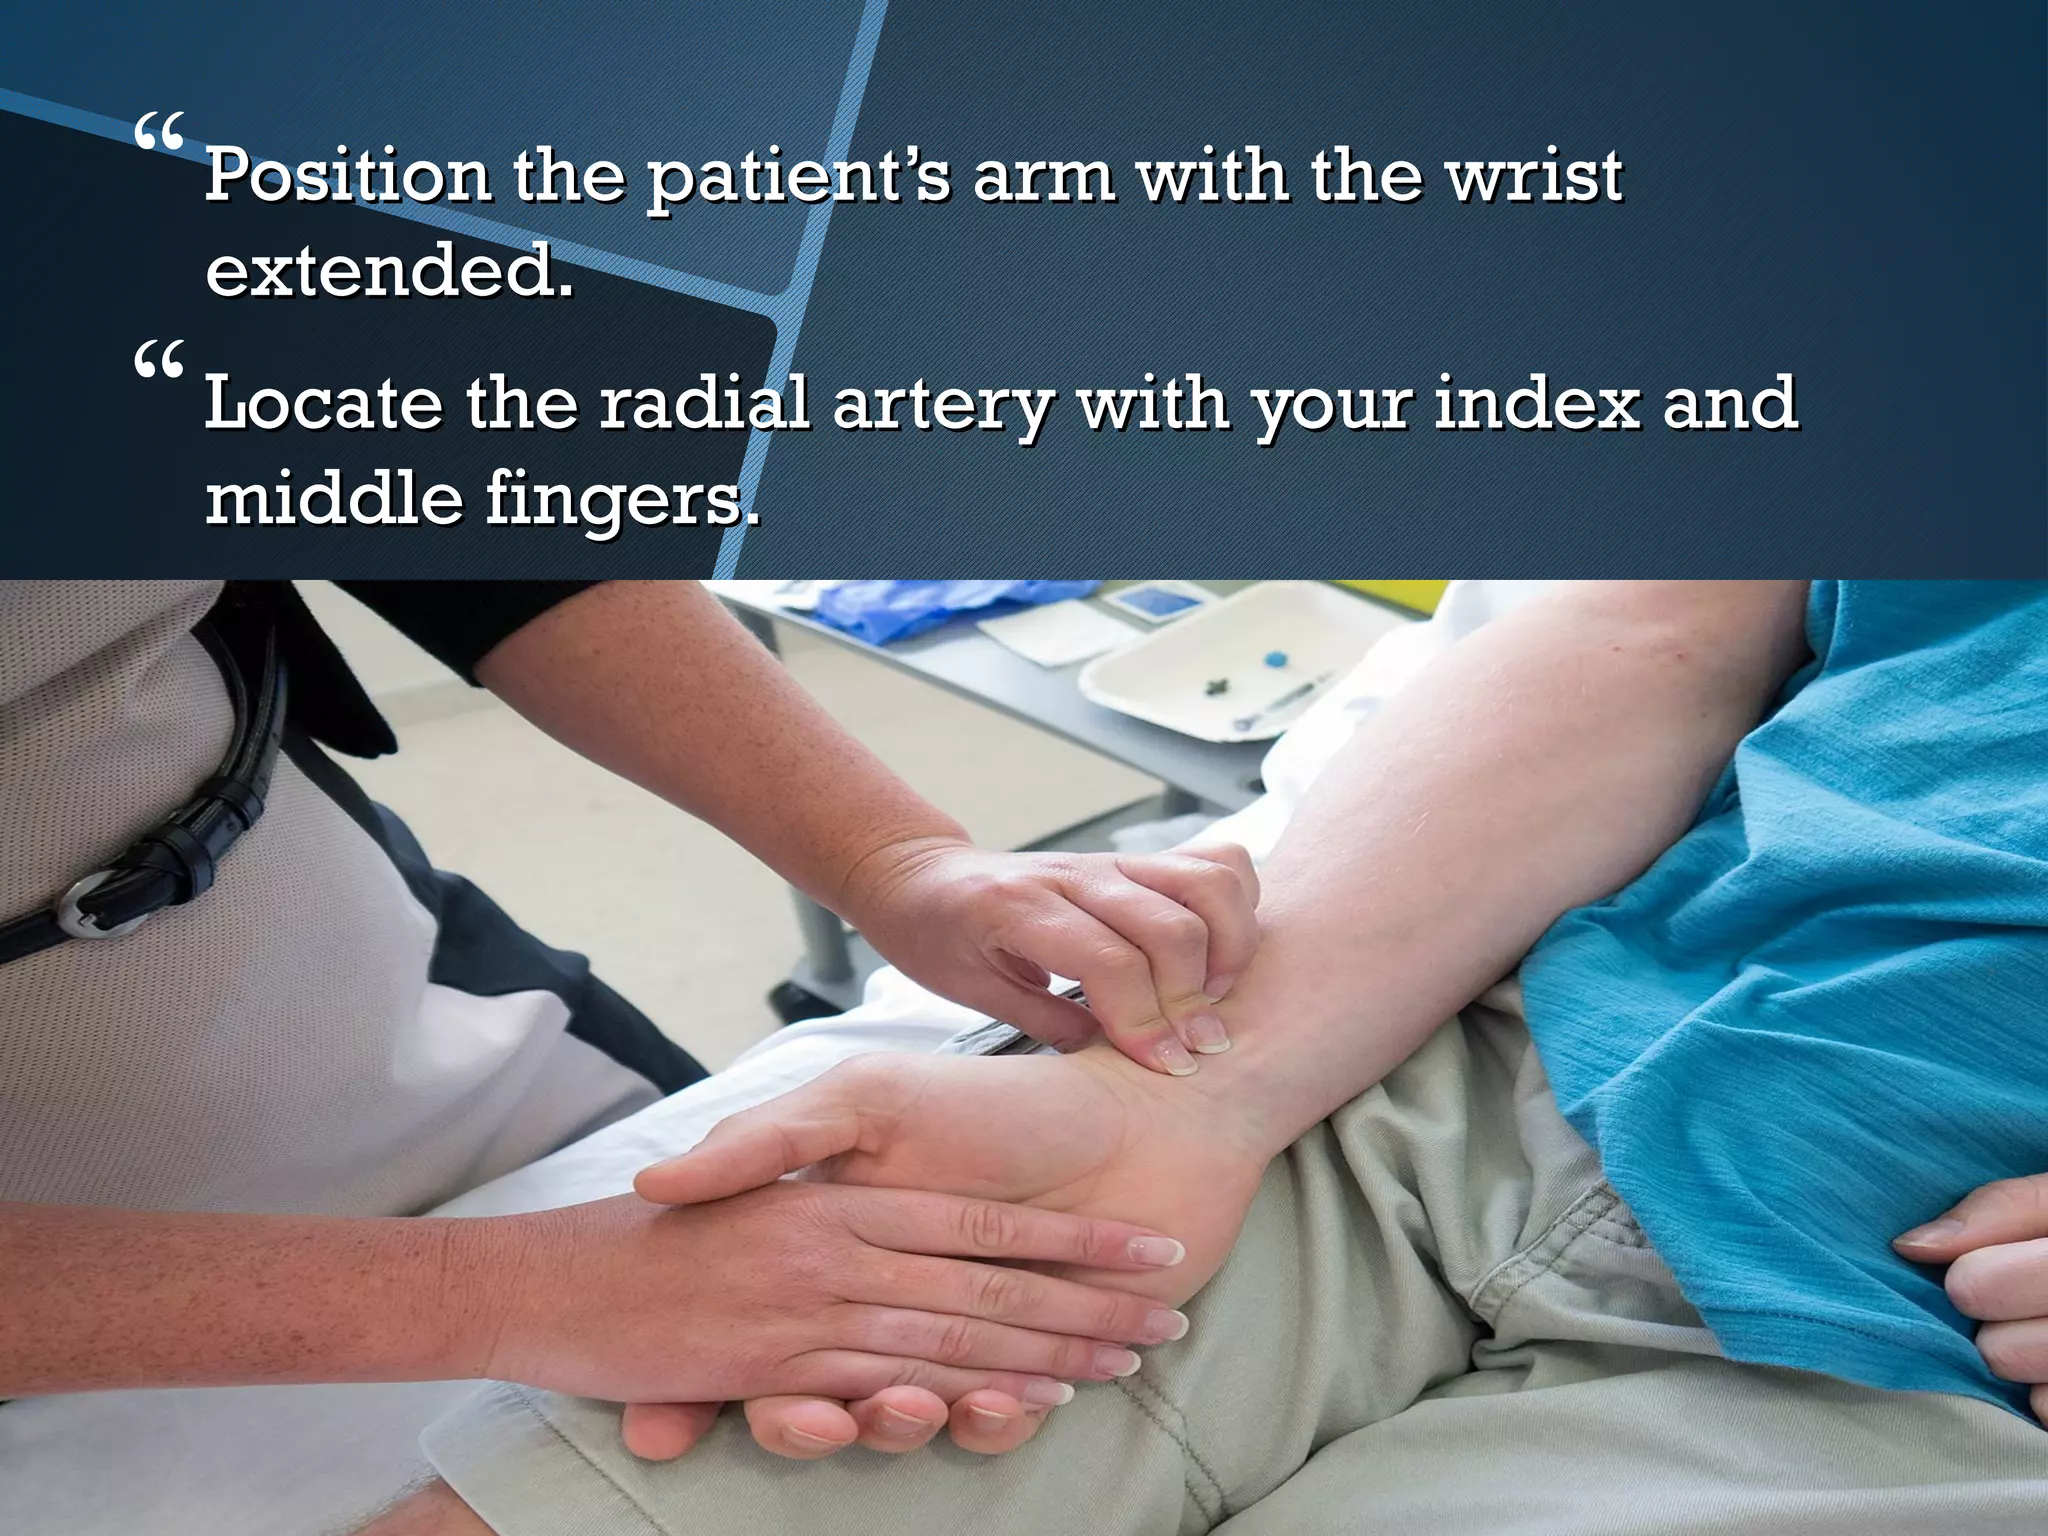
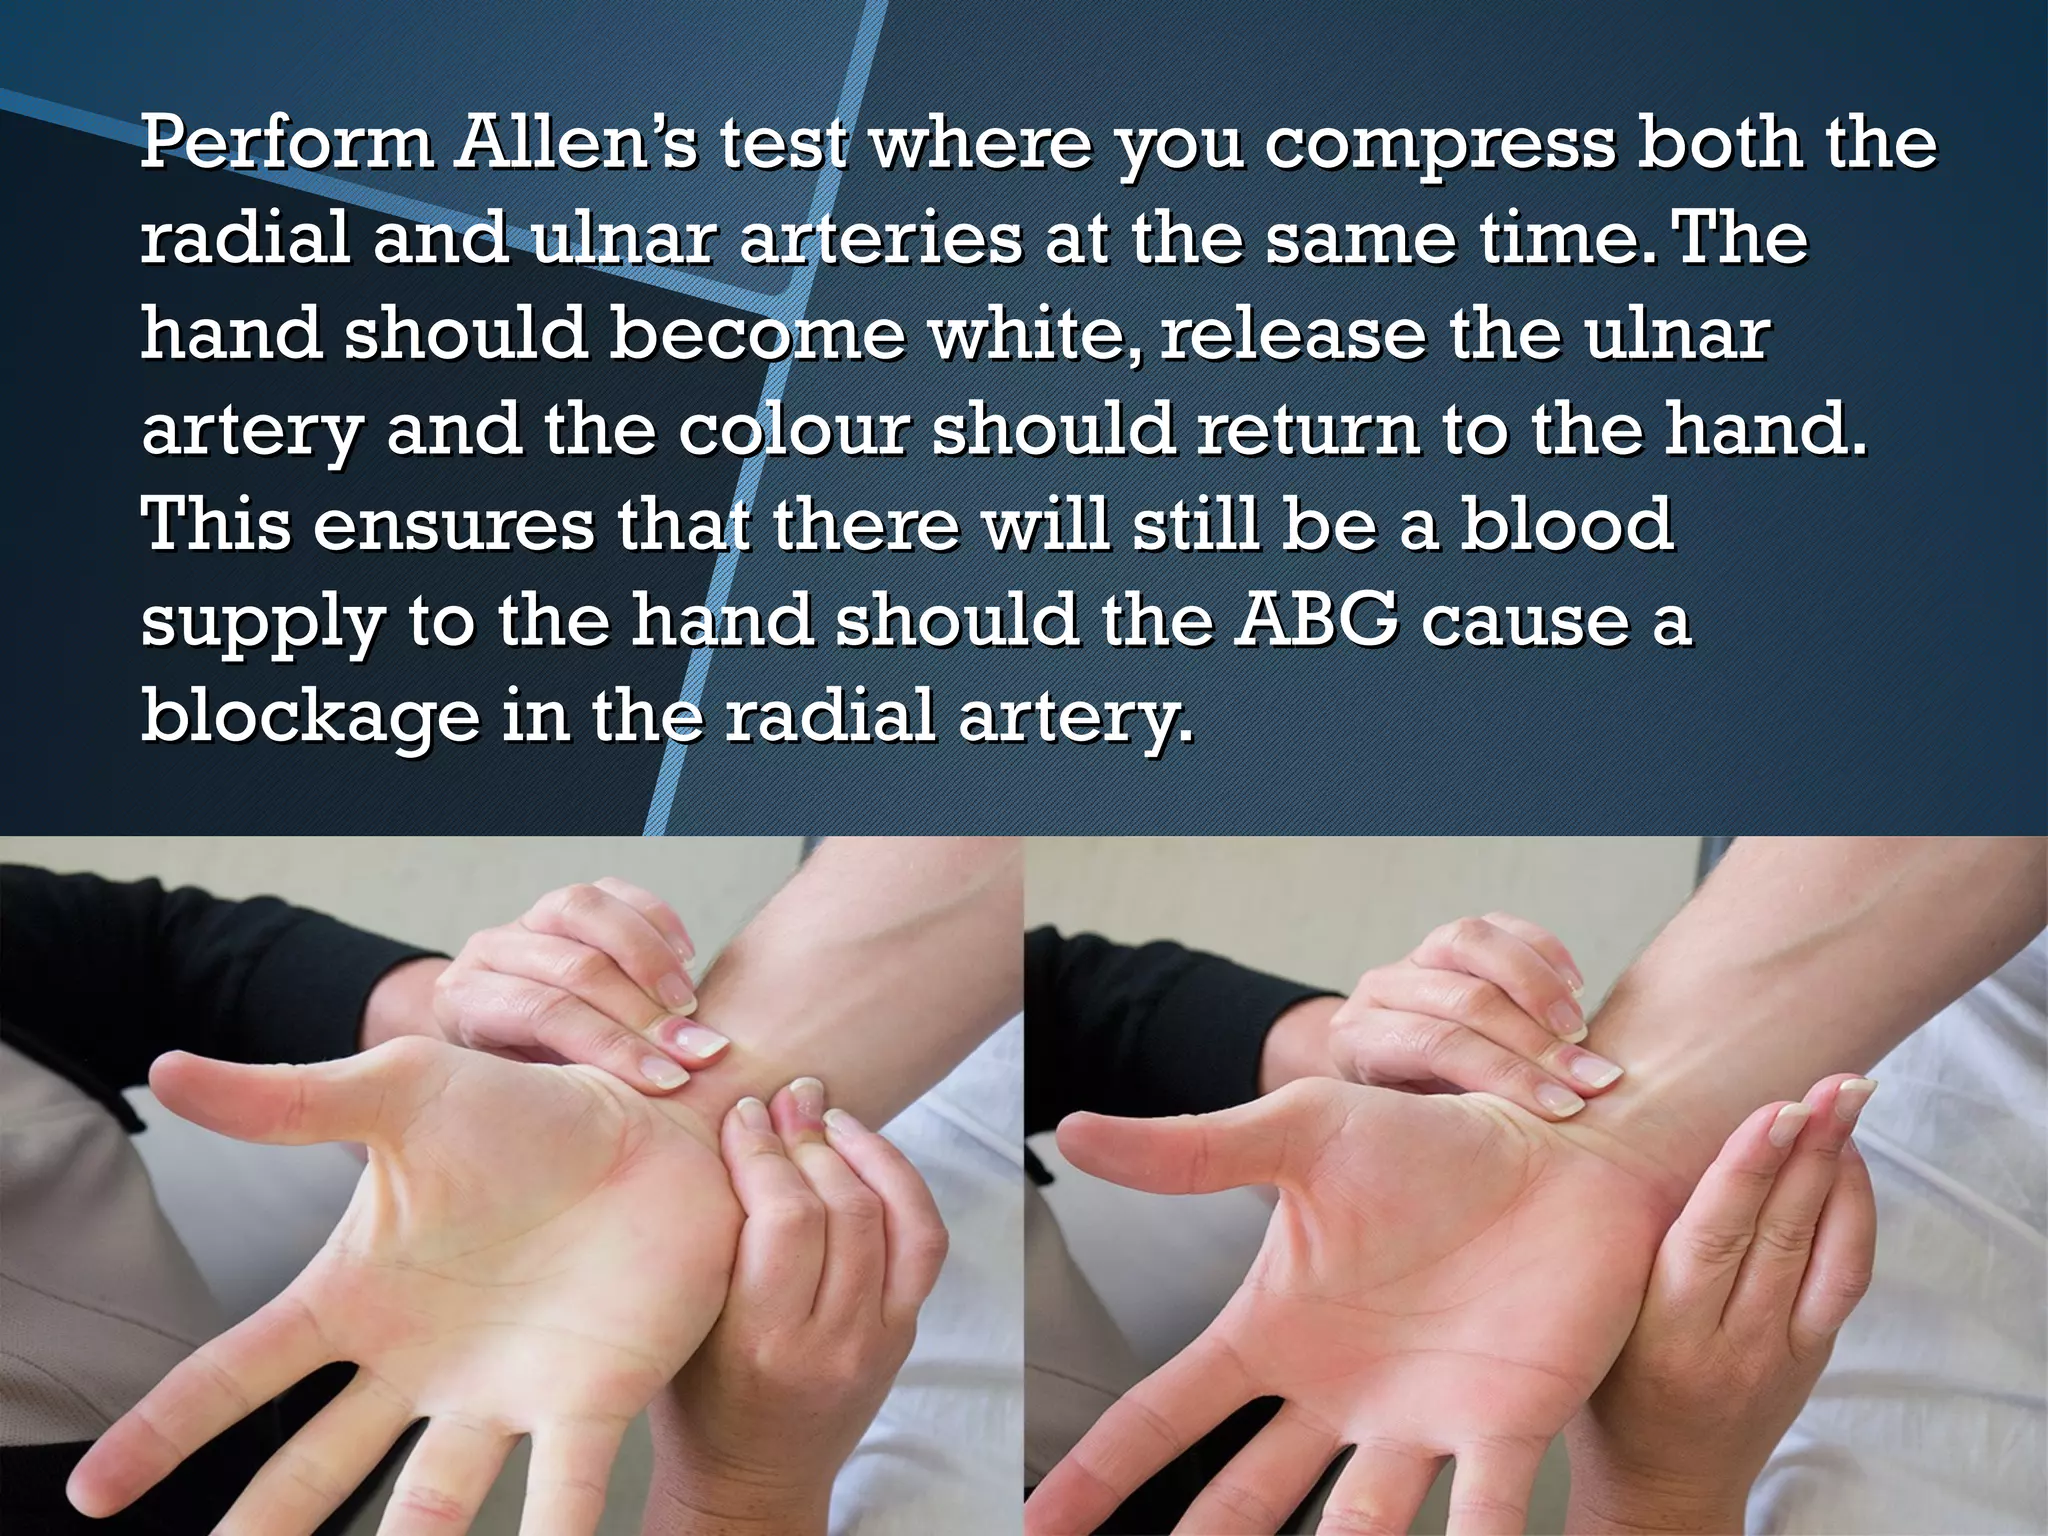
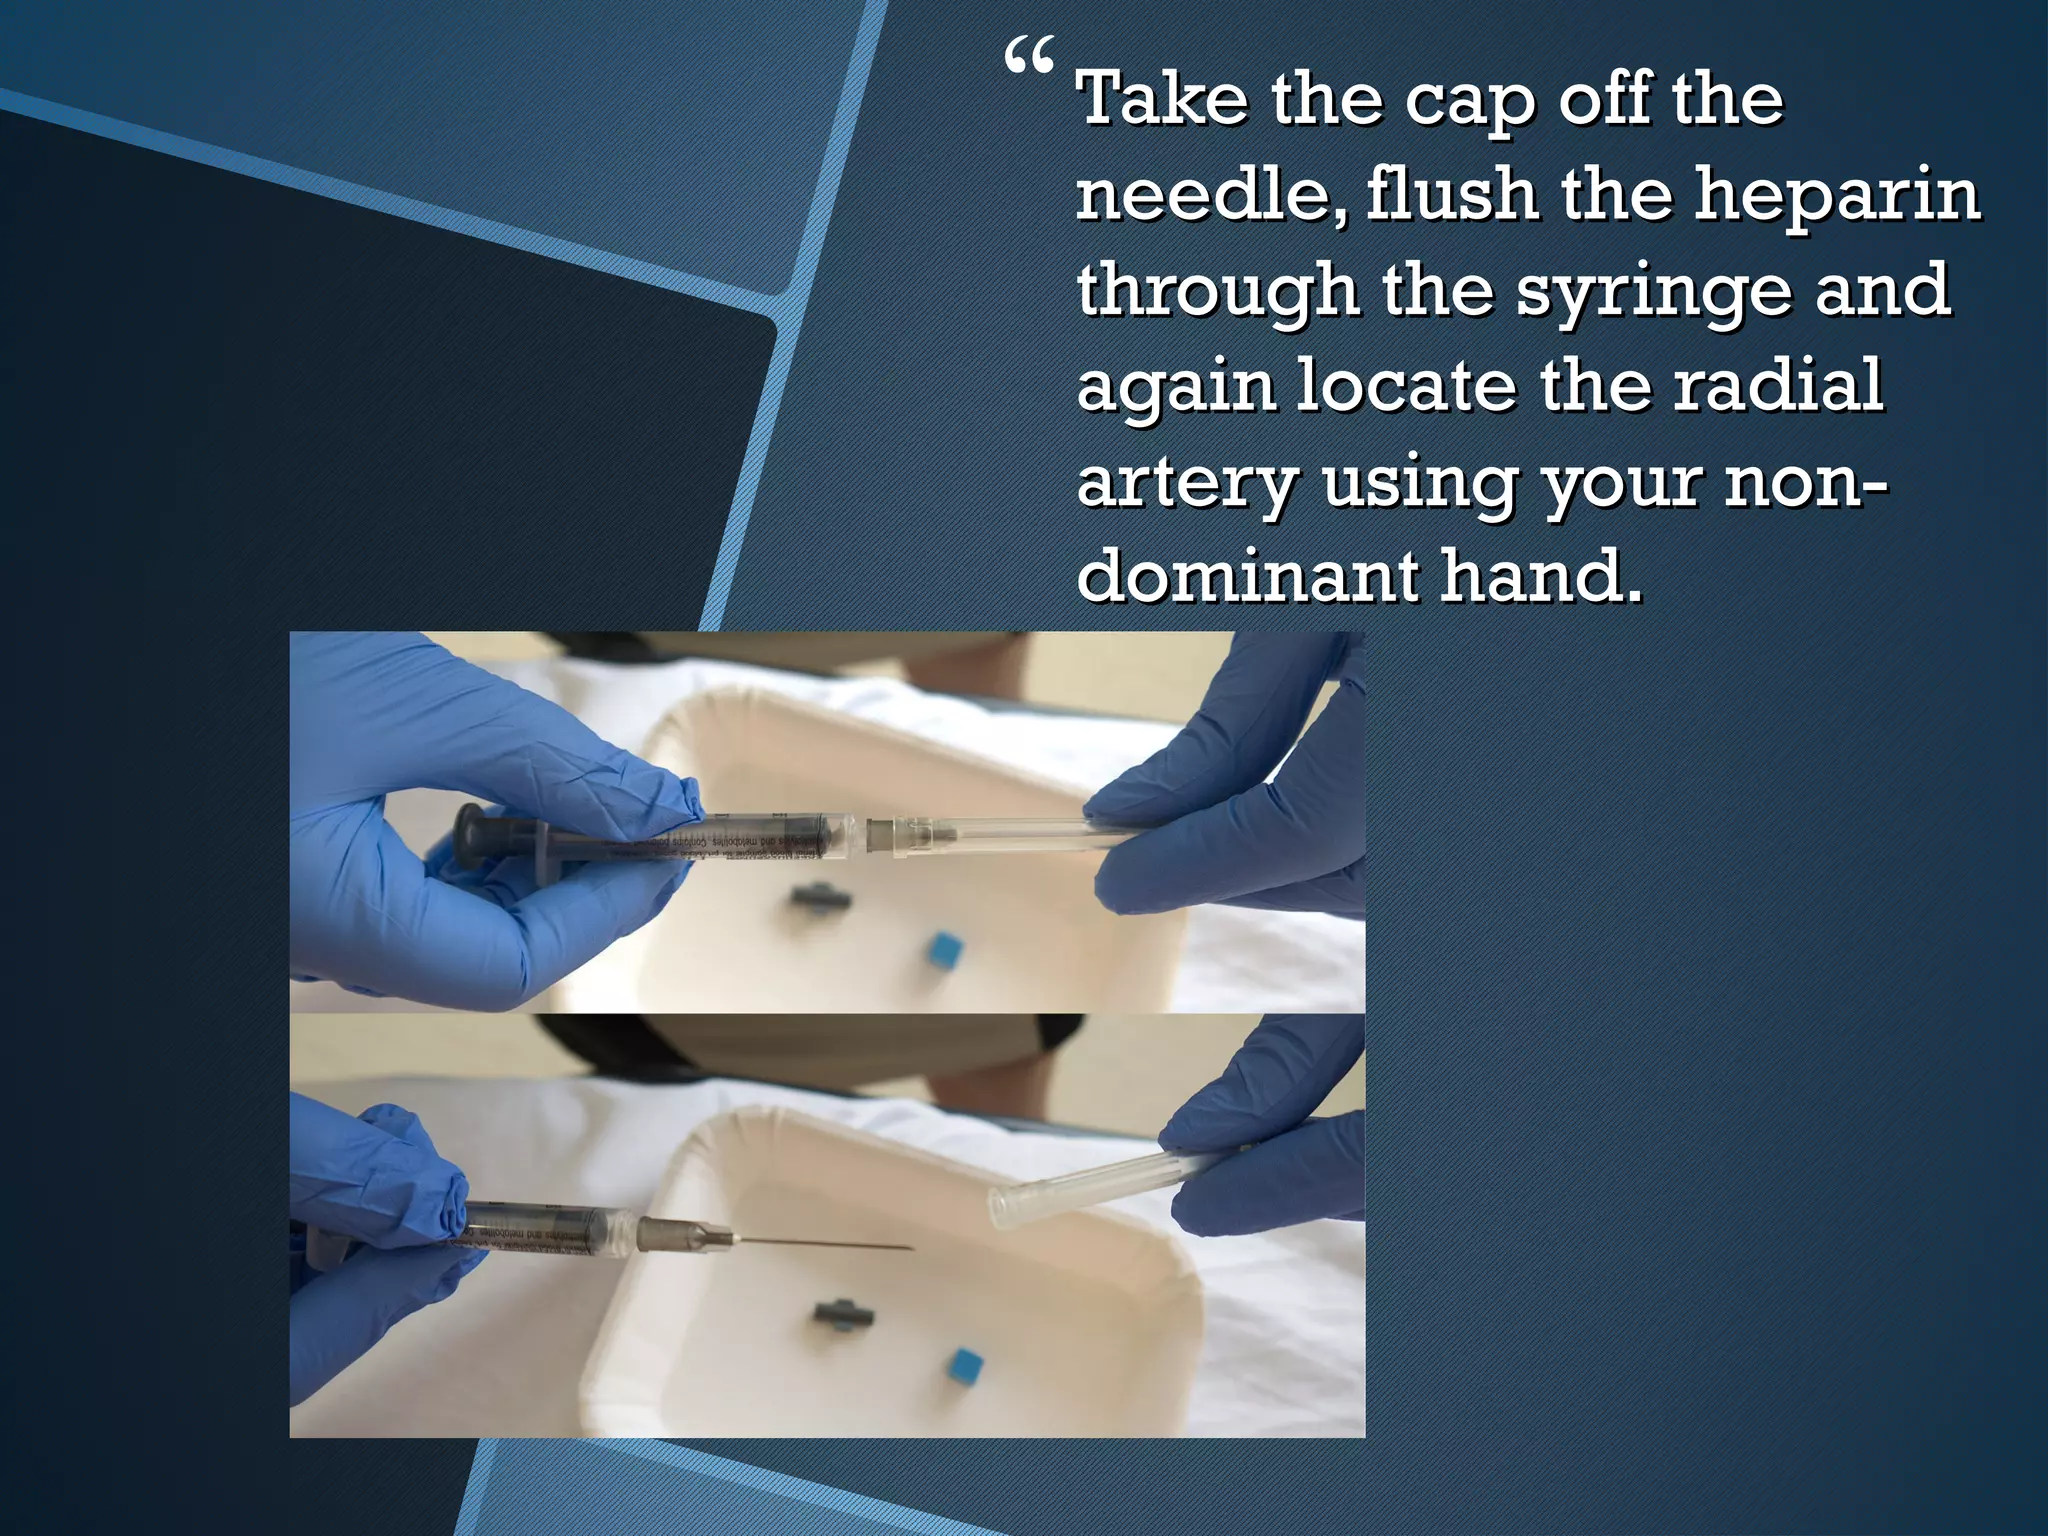
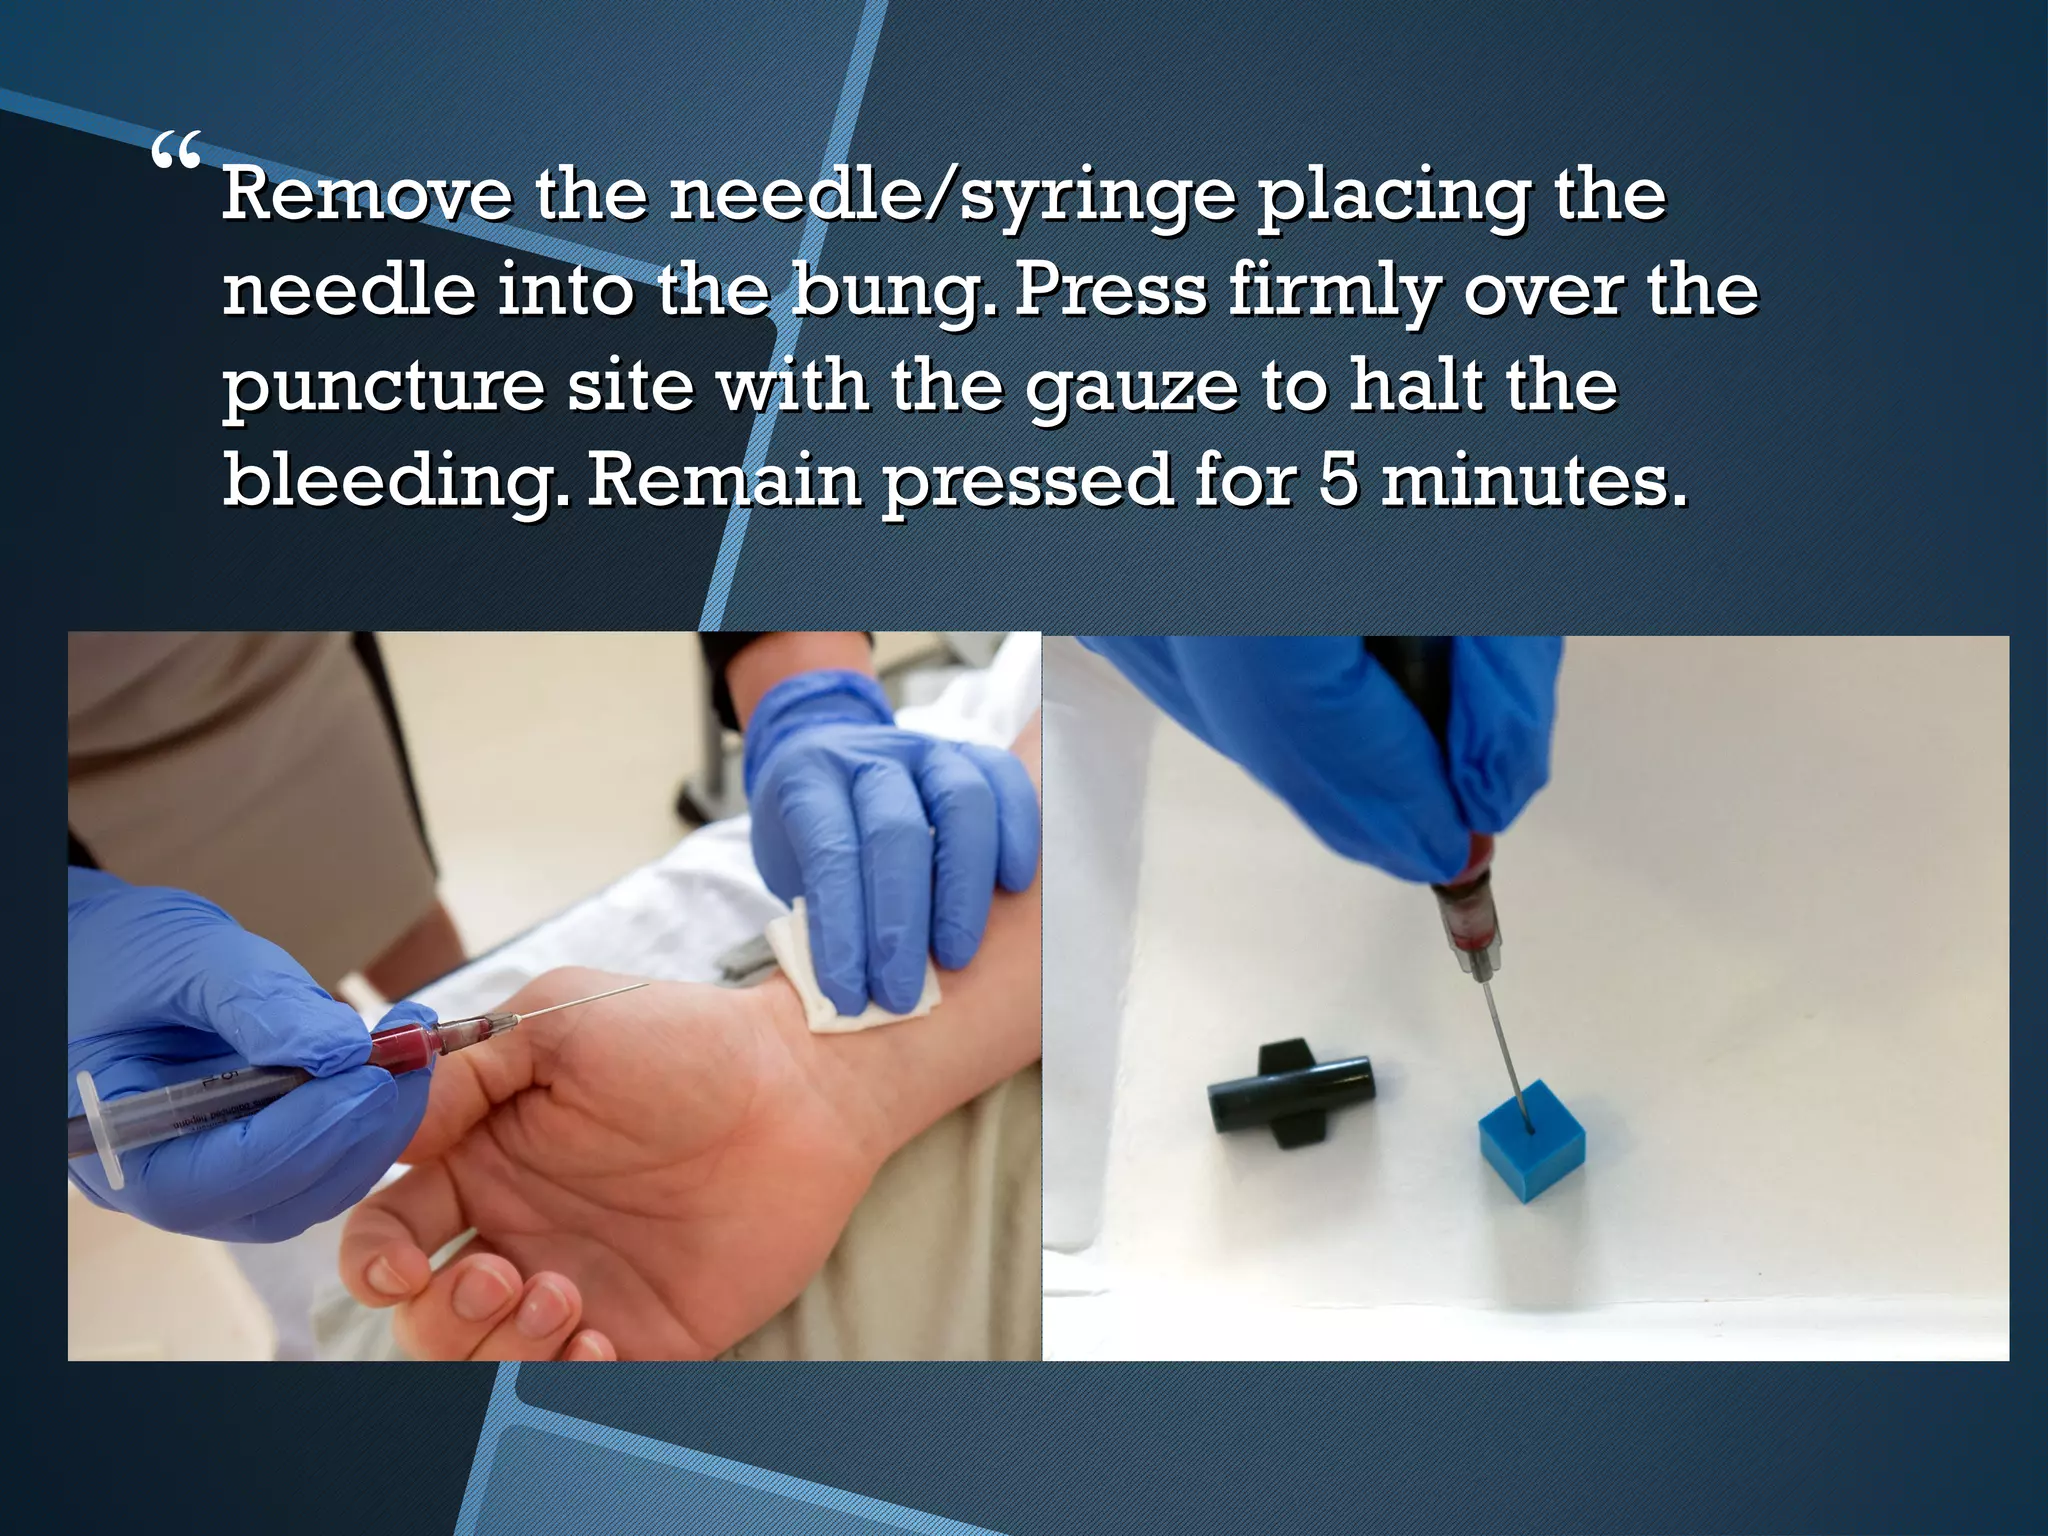
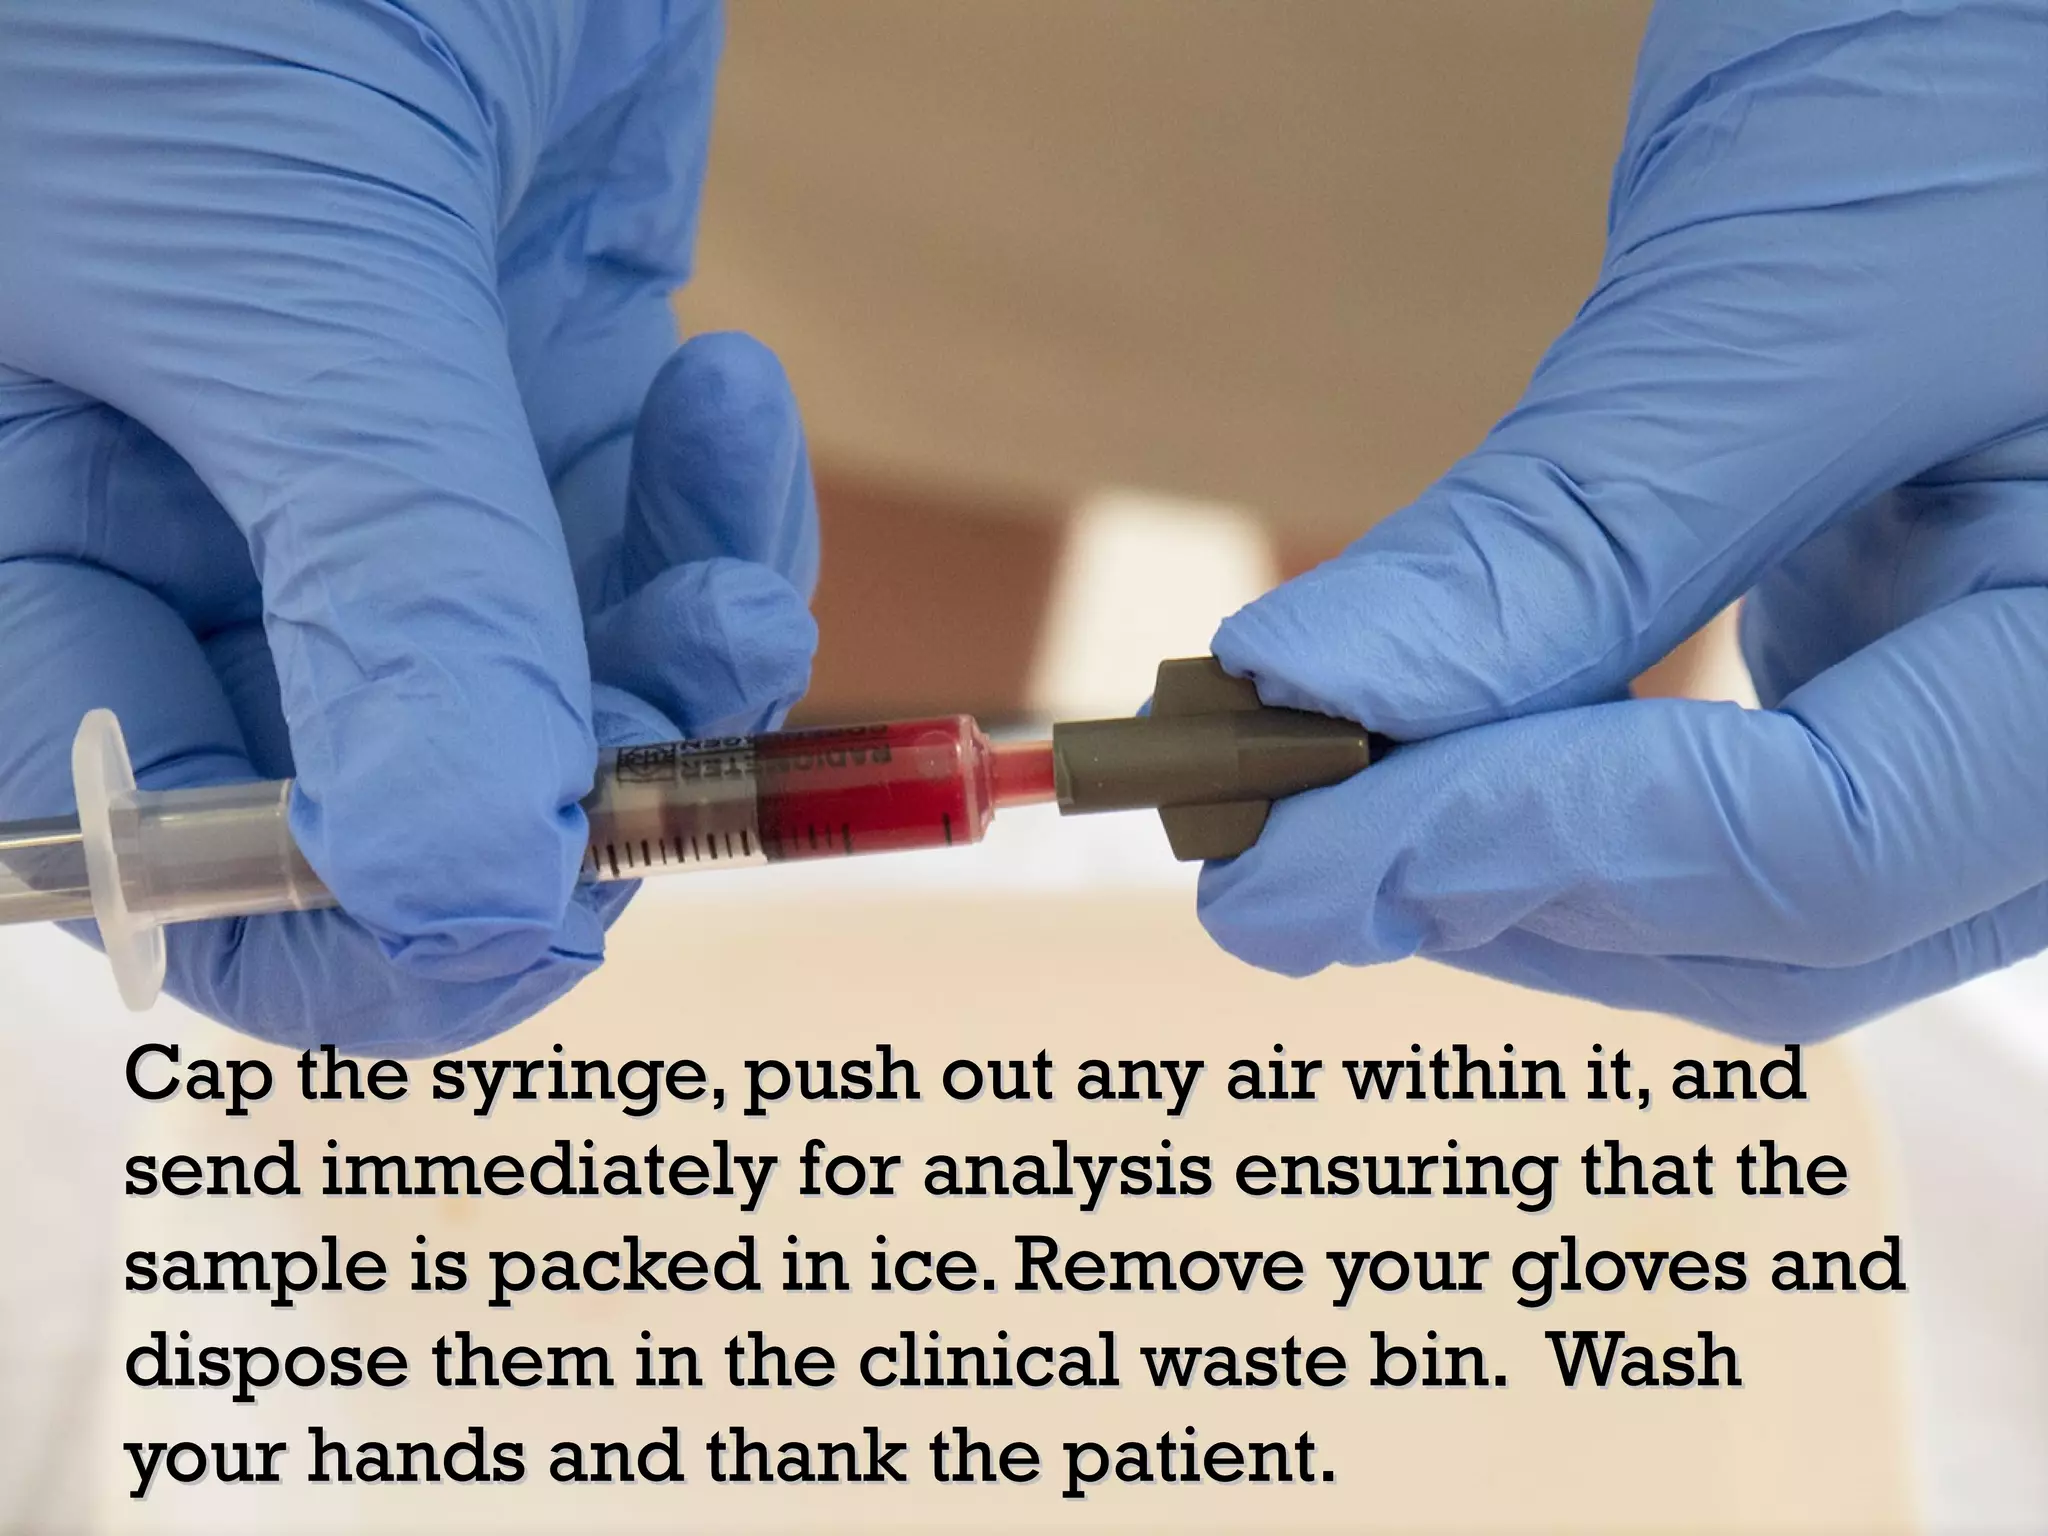
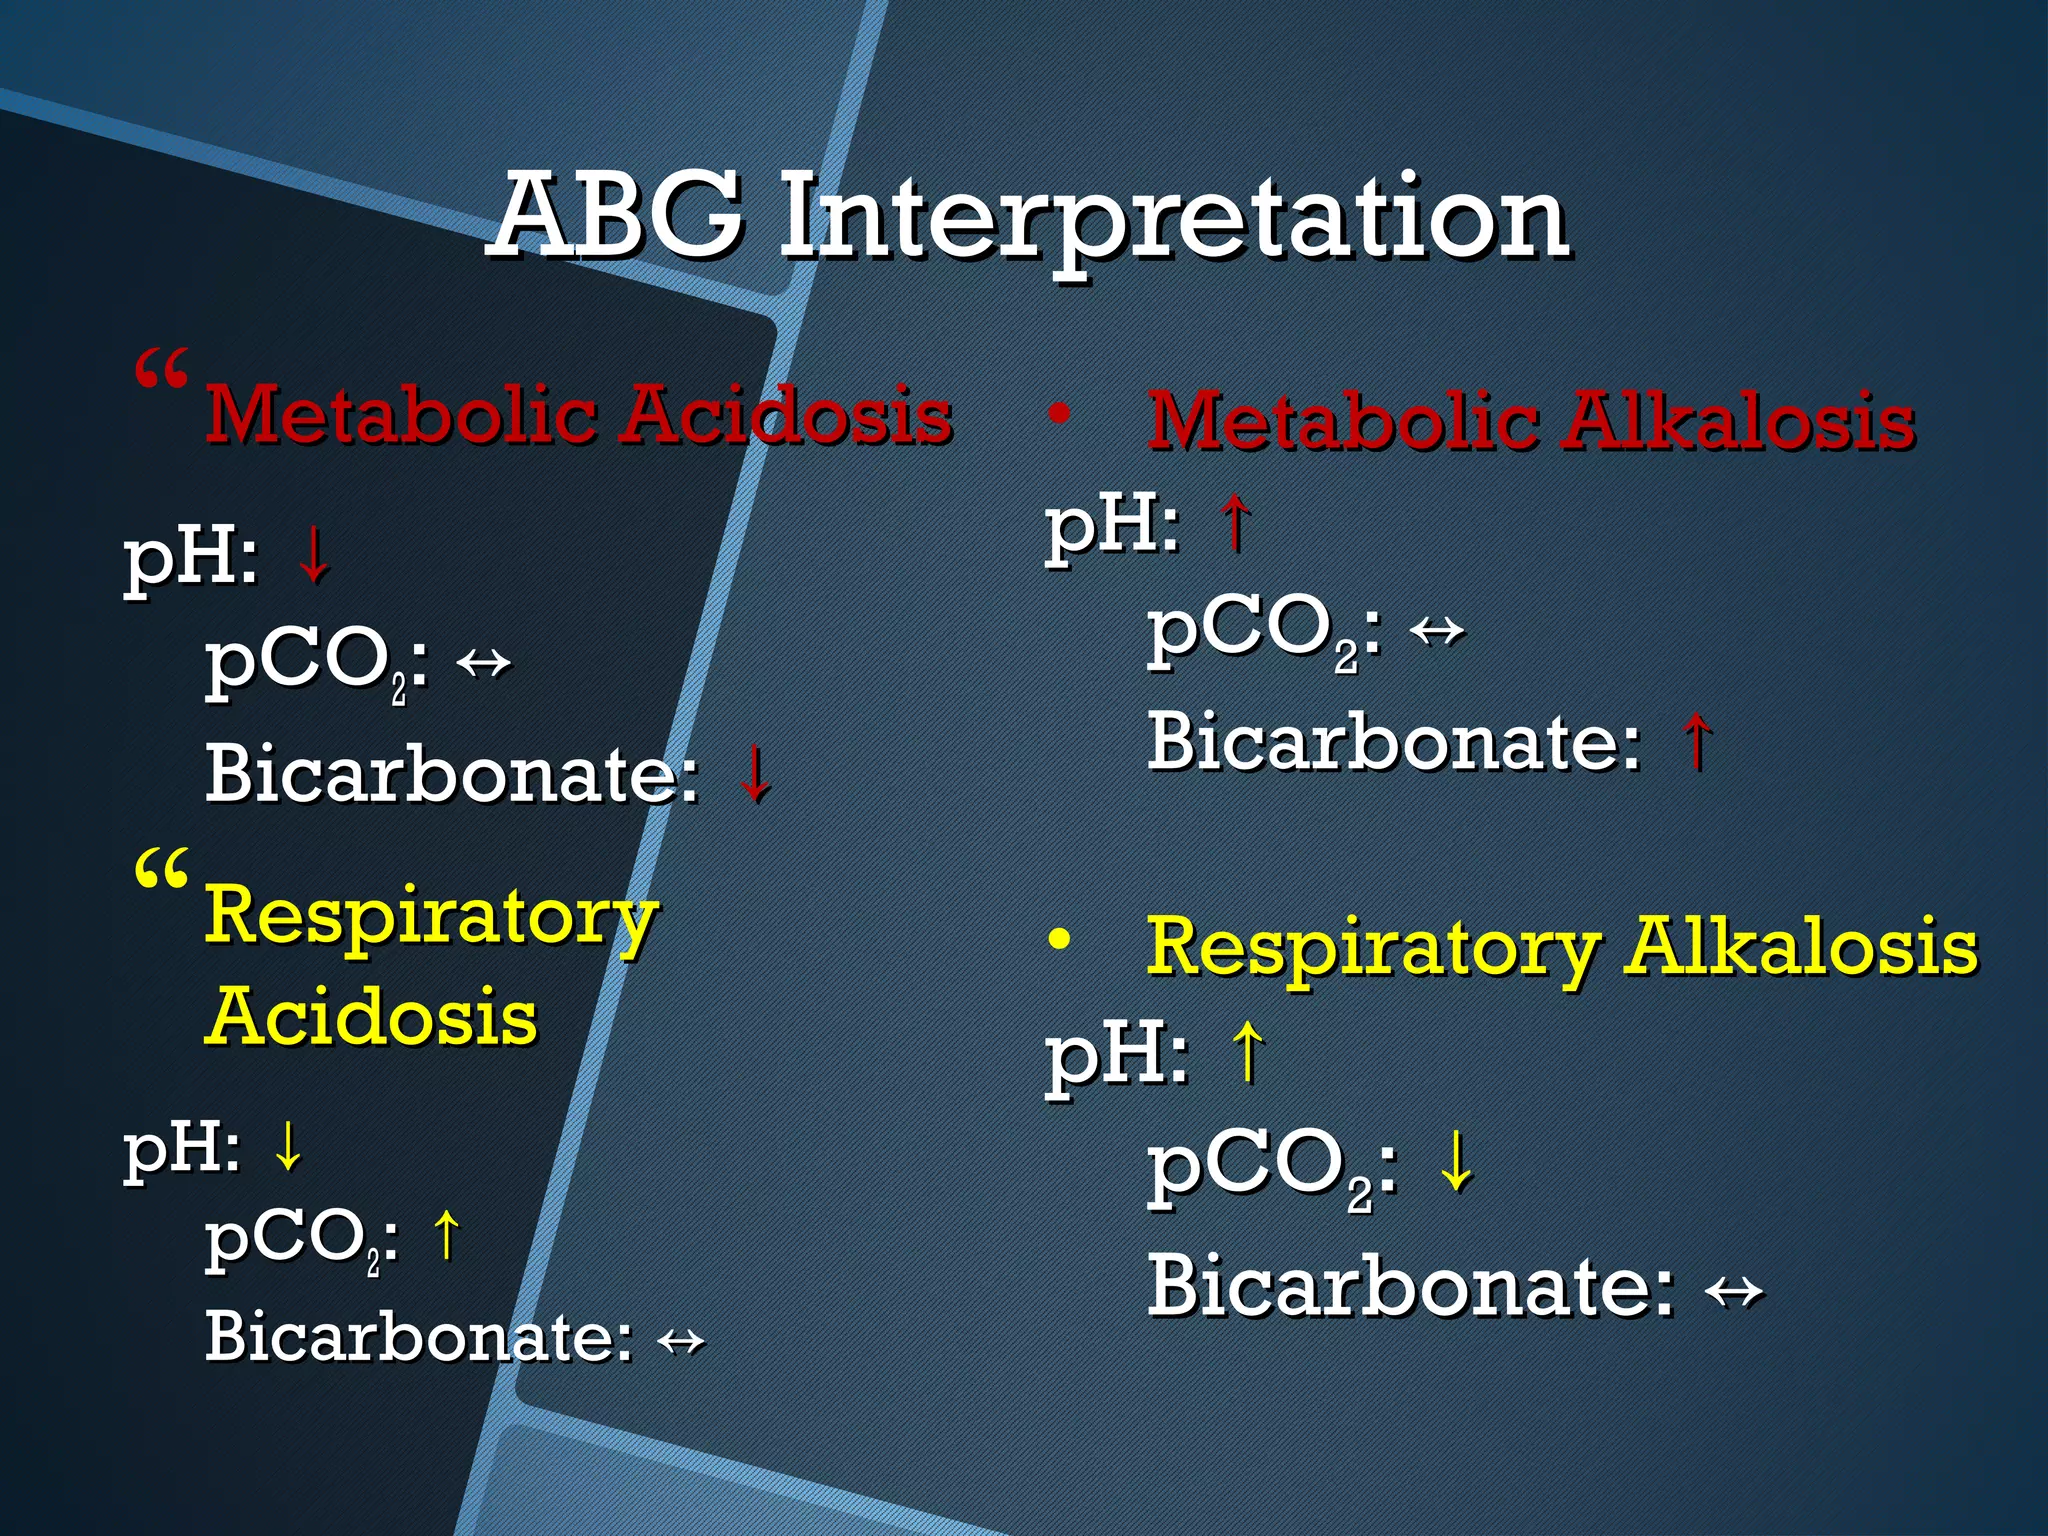
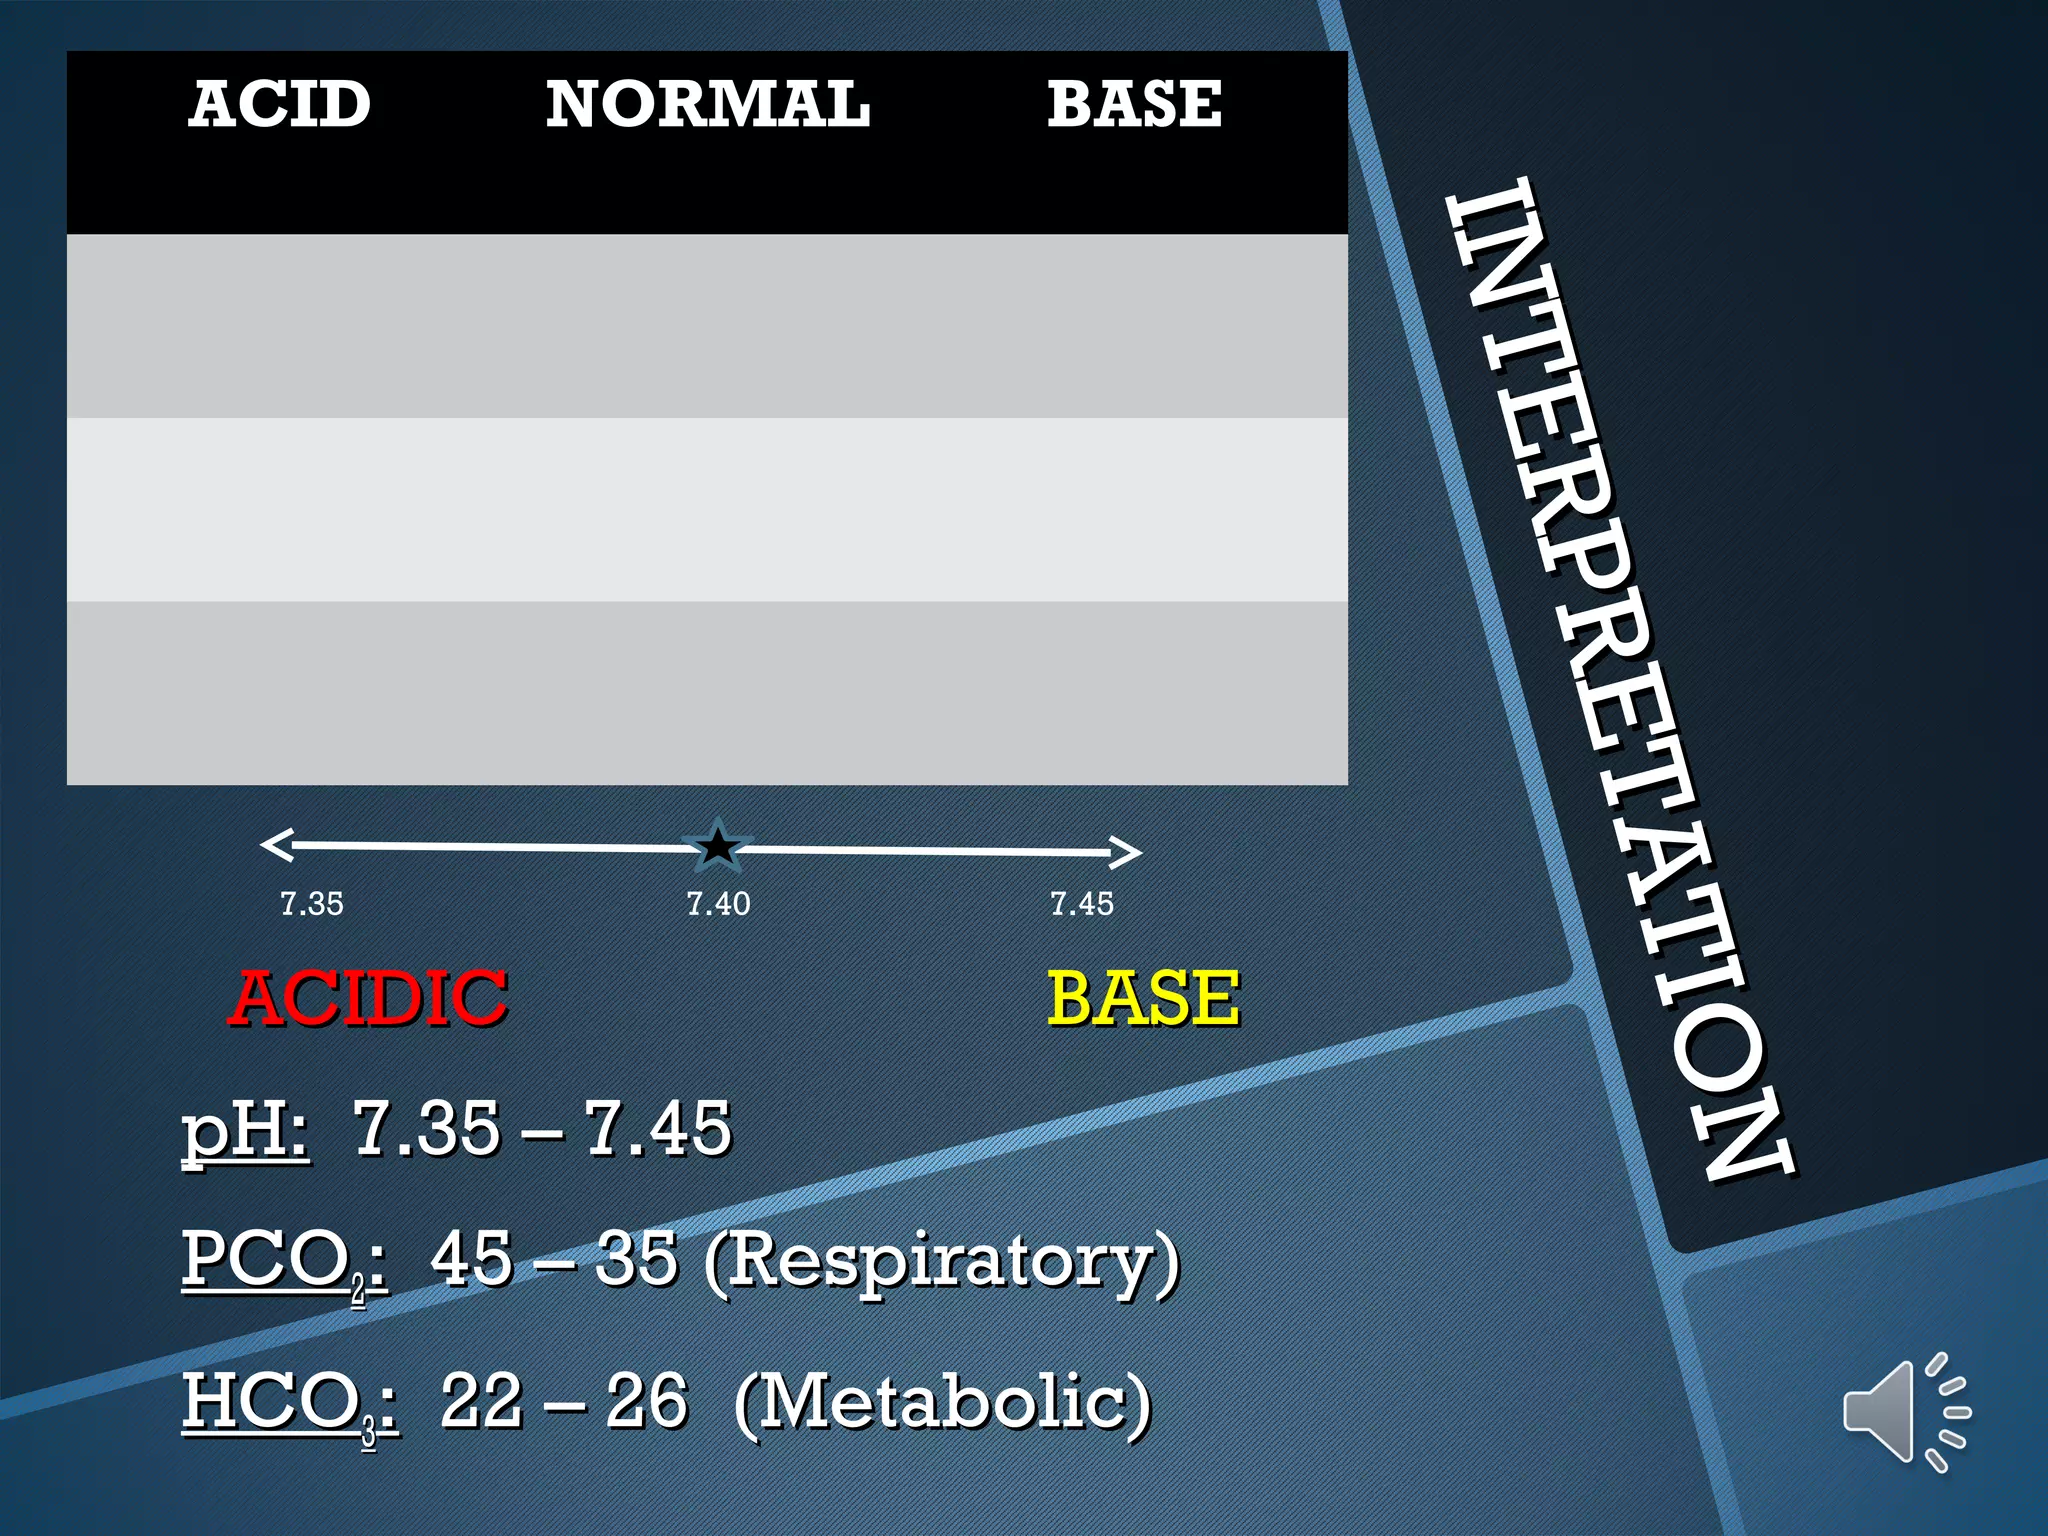
Arterial Blood Gas (ABG)
Procedure & Interpretation
November 29, 2014
Objectives:
1.Understand ABG and its terms
2.Know some of the indications and
contraindications for performing an
arterial puncture.
3.Be able to demonstrate the
technique for performing an arterial
puncture.
What is an ABGWhat is an ABG
• Arterial Blood Gas
• Drawn from artery- radial, brachial, femoral
• It is an invasive procedure
• Caution must be taken with patient
anticoagulants.
• Helps differentiate oxygen deficiencies
from primary ventilatory deficiencies from
primary metabolic acid-base abnormalities.
Common termsCommon terms
• PCO2 (ventilation) – Partial Carbon Dioxide
• PaO2 - (oxygenation) –Partial Oxygen
• HCO3 – (metabolism) -Bicarbonate
• O2Sat – Oxygen Saturation
• pH – Acid/Base balance
• BE – Base excess
Normal ABG valuesNormal ABG values
• pH - 7.35 – 7.45
• PCO2 - 35 – 45 mmHg
• PO2 - 80 – 100 mmHg
• HCO3 - 22 – 26 mmol/L
• SaO2 - >95%
Information Obtained from an ABGInformation Obtained from an ABG
• Acid base status
• Oxygenation
• Dissolved O2 (pO2)
• Saturation of hemoglobin
• CO2 elimination
• Levels of carboxyhemoglobin and
methemoglobin
IndicationsIndications
• Assess the ventilatory status, oxygenation and
acid base status.
• Assess the response to an intervention.
• Regulate electrolyte therapy.
• Establish preoperative baseline parameters.
Contraindications:
Contraindications:
Bleeding diathesisBleeding diathesis
AV fistulaAV fistula
Severe peripheralSevere peripheral
vascular disease,vascular disease,
absence of an arterialabsence of an arterial
pulsepulse
Infection over site.Infection over site.
Complications:
Complications:
The most commonThe most common
complication from ancomplication from an
arterial puncture isarterial puncture is
hematomahematoma at the site.at the site.
Less common butLess common but
important complicationsimportant complications
areare thrombus in thethrombus in the
artery and infection atartery and infection at
the sitethe site..
Allentestfor
Allentestforcollateralflow:
collateralflow:
WhichArteryto
WhichArterytoChoose?
Choose?
TheThe radial arteryradial artery isis
superficial, hassuperficial, has
collaterals and is easilycollaterals and is easily
compressed. It shouldcompressed. It should
almost always be the firstalmost always be the first
choice.choice.
Other arteries (femoral,Other arteries (femoral,
dorsalis pedis, brachial)dorsalis pedis, brachial)
can be used incan be used in
emergencies.emergencies.
The ProcedureThe Procedure
Wash your hands, introduce yourself to theWash your hands, introduce yourself to the
patient and clarify their identity.  Explain whatpatient and clarify their identity.  Explain what
you would like to do and obtain consent. Thisyou would like to do and obtain consent. This
is a slightly uncomfortable procedure so youis a slightly uncomfortable procedure so you
should let the patient know this.should let the patient know this.
Gatherthe
Gatherthe
necessaryfollowing
necessaryfollowingequipment:
equipment:
 a blue (23 G) needle
a blue (23 G) needle
 2ml syringe with heparin
2ml syringe with heparin
 a cap for the syringe
a cap for the syringe
 a plastic bung
a plastic bung local anaesthetic (plus needle
local anaesthetic (plus needle
and syringe for giving)
 alcohol gel
alcohol gel gauze
gauze
 gloves
gloves
 a sharps bin
a sharps bin Usually, the syringe, needle, cap
Usually, the syringe, needle, cap
and bung are all provided in
one pack.
one pack.
Position the patient’s arm with the wristPosition the patient’s arm with the wrist
extended.extended.
Locate the radial artery with your index andLocate the radial artery with your index and
middle fingers.middle fingers.
Perform Allen’s test where you compress both thePerform Allen’s test where you compress both the
radial and ulnar arteries at the same time.Theradial and ulnar arteries at the same time.The
hand should become white, release the ulnarhand should become white, release the ulnar
artery and the colour should return to the hand.artery and the colour should return to the hand.
This ensures that there will still be a bloodThis ensures that there will still be a blood
supply to the hand should the ABG cause asupply to the hand should the ABG cause a
blockage in the radial artery.blockage in the radial artery.
Put on your gloves
Put on your gloves
and attach the needle
to the heparinised
to the heparinised
syringe.
syringe.
Also prepare your
Also prepare your
local anaesthetic and
give a small amount
give a small amount
over the palpable
over the palpable
radial artery.
radial artery.
Take the cap off theTake the cap off the
needle, flush the heparinneedle, flush the heparin
through the syringe andthrough the syringe and
again locate the radialagain locate the radial
artery using your non-artery using your non-
dominant hand.dominant hand.
 Let the patient know you are about to proceed and toLet the patient know you are about to proceed and to
expect a sharp scratch.expect a sharp scratch.
 Insert the needle at 30 degrees to the skin at theInsert the needle at 30 degrees to the skin at the
point of maximum pulsation of the point of maximum pulsation of the radial arteryradial artery..
Advance the needle until arterial blood flushes intoAdvance the needle until arterial blood flushes into
the syringe.The arterial pressure will cause thethe syringe.The arterial pressure will cause the
blood to fill the syringe.blood to fill the syringe.
Remove the needle/syringe placing theRemove the needle/syringe placing the
needle into the bung. Press firmly over theneedle into the bung. Press firmly over the
puncture site with the gauze to halt thepuncture site with the gauze to halt the
bleeding. Remain pressed for 5 minutes.bleeding. Remain pressed for 5 minutes.
Remove the needle and discard safely in theRemove the needle and discard safely in the
sharps bin.sharps bin.
Cap the syringe, push out any air within it, andCap the syringe, push out any air within it, and
send immediately for analysis ensuring that thesend immediately for analysis ensuring that the
sample is packed in ice. Remove your gloves andsample is packed in ice. Remove your gloves and
dispose them in the clinical waste bin.  Washdispose them in the clinical waste bin.  Wash
your hands and thank the patient.your hands and thank the patient.
 An extension to this station
An extension to this station
could be 
could be Blood gas interpretation
Blood gas interpretation..
Before attempting to
interpret the results you
should know whether the
patient was on room air or
on oxygen when the
on oxygen when the
sample was taken, and if
on oxygen, what
on oxygen, what
concentration.
concentration. It is also useful to know
It is also useful to know
whether the patient has a
temperature or not, and
this should be clearly
written on the sample.
Obtaining ABG sampleObtaining ABG sample
ABG InterpretationABG Interpretation
Metabolic AcidosisMetabolic Acidosis
pH: pH: ↓↓
pCOpCO22: ↔: ↔
Bicarbonate: Bicarbonate: ↓↓
RespiratoryRespiratory
AcidosisAcidosis
pH: pH: ↓↓
pCOpCO22: : ↑↑
Bicarbonate: ↔Bicarbonate: ↔
• Metabolic AlkalosisMetabolic Alkalosis
pH: pH: ↑↑
pCOpCO22: ↔: ↔
Bicarbonate: Bicarbonate: ↑↑
• Respiratory AlkalosisRespiratory Alkalosis
pH: pH: ↑↑
pCOpCO22: : ↓↓
Bicarbonate: ↔Bicarbonate: ↔
INTERPRETATION
INTERPRETATION
ACID NORMAL BASE
ACIDICACIDIC BASEBASE
pH:pH: 7.35 – 7.457.35 – 7.45
PCOPCO22:: 45 – 35 (Respiratory)45 – 35 (Respiratory)
HCOHCO33:: 22 – 26 (Metabolic)22 – 26 (Metabolic)
7.35 7.40 7.45
Thankyou!!!
Thankyou!!! Louie Ray, R.N.
Louie Ray, R.N.
http://nursesinfosite.blogspot.com/
http://www.slideshare.net/blueash/

Arterial Blood Bas (ABG) Procedure and Interpretation

  • 1.
    Arterial Blood Gas(ABG) Procedure & Interpretation November 29, 2014
  • 2.
    Objectives: 1.Understand ABG andits terms 2.Know some of the indications and contraindications for performing an arterial puncture. 3.Be able to demonstrate the technique for performing an arterial puncture.
  • 3.
    What is anABGWhat is an ABG • Arterial Blood Gas • Drawn from artery- radial, brachial, femoral • It is an invasive procedure • Caution must be taken with patient anticoagulants. • Helps differentiate oxygen deficiencies from primary ventilatory deficiencies from primary metabolic acid-base abnormalities.
  • 4.
    Common termsCommon terms •PCO2 (ventilation) – Partial Carbon Dioxide • PaO2 - (oxygenation) –Partial Oxygen • HCO3 – (metabolism) -Bicarbonate • O2Sat – Oxygen Saturation • pH – Acid/Base balance • BE – Base excess
  • 5.
    Normal ABG valuesNormalABG values • pH - 7.35 – 7.45 • PCO2 - 35 – 45 mmHg • PO2 - 80 – 100 mmHg • HCO3 - 22 – 26 mmol/L • SaO2 - >95%
  • 6.
    Information Obtained froman ABGInformation Obtained from an ABG • Acid base status • Oxygenation • Dissolved O2 (pO2) • Saturation of hemoglobin • CO2 elimination • Levels of carboxyhemoglobin and methemoglobin
  • 7.
    IndicationsIndications • Assess theventilatory status, oxygenation and acid base status. • Assess the response to an intervention. • Regulate electrolyte therapy. • Establish preoperative baseline parameters.
  • 8.
    Contraindications: Contraindications: Bleeding diathesisBleeding diathesis AVfistulaAV fistula Severe peripheralSevere peripheral vascular disease,vascular disease, absence of an arterialabsence of an arterial pulsepulse Infection over site.Infection over site.
  • 9.
    Complications: Complications: The most commonThemost common complication from ancomplication from an arterial puncture isarterial puncture is hematomahematoma at the site.at the site. Less common butLess common but important complicationsimportant complications areare thrombus in thethrombus in the artery and infection atartery and infection at the sitethe site..
  • 10.
  • 11.
    WhichArteryto WhichArterytoChoose? Choose? TheThe radial arteryradialartery isis superficial, hassuperficial, has collaterals and is easilycollaterals and is easily compressed. It shouldcompressed. It should almost always be the firstalmost always be the first choice.choice. Other arteries (femoral,Other arteries (femoral, dorsalis pedis, brachial)dorsalis pedis, brachial) can be used incan be used in emergencies.emergencies.
  • 12.
  • 13.
    Wash your hands,introduce yourself to theWash your hands, introduce yourself to the patient and clarify their identity.  Explain whatpatient and clarify their identity.  Explain what you would like to do and obtain consent. Thisyou would like to do and obtain consent. This is a slightly uncomfortable procedure so youis a slightly uncomfortable procedure so you should let the patient know this.should let the patient know this.
  • 14.
    Gatherthe Gatherthe necessaryfollowing necessaryfollowingequipment: equipment:  a blue(23 G) needle a blue (23 G) needle  2ml syringe with heparin 2ml syringe with heparin  a cap for the syringe a cap for the syringe  a plastic bung a plastic bung local anaesthetic (plus needle local anaesthetic (plus needle and syringe for giving) and syringe for giving)  alcohol gel alcohol gel gauze gauze  gloves gloves  a sharps bin a sharps bin Usually, the syringe, needle, cap Usually, the syringe, needle, cap and bung are all provided in and bung are all provided in one pack. one pack.
  • 17.
    Position the patient’sarm with the wristPosition the patient’s arm with the wrist extended.extended. Locate the radial artery with your index andLocate the radial artery with your index and middle fingers.middle fingers.
  • 18.
    Perform Allen’s testwhere you compress both thePerform Allen’s test where you compress both the radial and ulnar arteries at the same time.Theradial and ulnar arteries at the same time.The hand should become white, release the ulnarhand should become white, release the ulnar artery and the colour should return to the hand.artery and the colour should return to the hand. This ensures that there will still be a bloodThis ensures that there will still be a blood supply to the hand should the ABG cause asupply to the hand should the ABG cause a blockage in the radial artery.blockage in the radial artery.
  • 19.
    Put on yourgloves Put on your gloves and attach the needle and attach the needle to the heparinised to the heparinised syringe. syringe. Also prepare your Also prepare your local anaesthetic and local anaesthetic and give a small amount give a small amount over the palpable over the palpable radial artery. radial artery.
  • 20.
    Take the capoff theTake the cap off the needle, flush the heparinneedle, flush the heparin through the syringe andthrough the syringe and again locate the radialagain locate the radial artery using your non-artery using your non- dominant hand.dominant hand.
  • 21.
     Let thepatient know you are about to proceed and toLet the patient know you are about to proceed and to expect a sharp scratch.expect a sharp scratch.  Insert the needle at 30 degrees to the skin at theInsert the needle at 30 degrees to the skin at the point of maximum pulsation of the point of maximum pulsation of the radial arteryradial artery.. Advance the needle until arterial blood flushes intoAdvance the needle until arterial blood flushes into the syringe.The arterial pressure will cause thethe syringe.The arterial pressure will cause the blood to fill the syringe.blood to fill the syringe.
  • 22.
    Remove the needle/syringeplacing theRemove the needle/syringe placing the needle into the bung. Press firmly over theneedle into the bung. Press firmly over the puncture site with the gauze to halt thepuncture site with the gauze to halt the bleeding. Remain pressed for 5 minutes.bleeding. Remain pressed for 5 minutes.
  • 23.
    Remove the needleand discard safely in theRemove the needle and discard safely in the sharps bin.sharps bin.
  • 24.
    Cap the syringe,push out any air within it, andCap the syringe, push out any air within it, and send immediately for analysis ensuring that thesend immediately for analysis ensuring that the sample is packed in ice. Remove your gloves andsample is packed in ice. Remove your gloves and dispose them in the clinical waste bin.  Washdispose them in the clinical waste bin.  Wash your hands and thank the patient.your hands and thank the patient.
  • 25.
     An extensionto this station An extension to this station could be  could be Blood gas interpretation Blood gas interpretation.. Before attempting to Before attempting to interpret the results you interpret the results you should know whether the should know whether the patient was on room air or patient was on room air or on oxygen when the on oxygen when the sample was taken, and if sample was taken, and if on oxygen, what on oxygen, what concentration. concentration. It is also useful to know It is also useful to know whether the patient has a whether the patient has a temperature or not, and temperature or not, and this should be clearly this should be clearly written on the sample. written on the sample.
  • 26.
  • 27.
    ABG InterpretationABG Interpretation MetabolicAcidosisMetabolic Acidosis pH: pH: ↓↓ pCOpCO22: ↔: ↔ Bicarbonate: Bicarbonate: ↓↓ RespiratoryRespiratory AcidosisAcidosis pH: pH: ↓↓ pCOpCO22: : ↑↑ Bicarbonate: ↔Bicarbonate: ↔ • Metabolic AlkalosisMetabolic Alkalosis pH: pH: ↑↑ pCOpCO22: ↔: ↔ Bicarbonate: Bicarbonate: ↑↑ • Respiratory AlkalosisRespiratory Alkalosis pH: pH: ↑↑ pCOpCO22: : ↓↓ Bicarbonate: ↔Bicarbonate: ↔
  • 28.
    INTERPRETATION INTERPRETATION ACID NORMAL BASE ACIDICACIDICBASEBASE pH:pH: 7.35 – 7.457.35 – 7.45 PCOPCO22:: 45 – 35 (Respiratory)45 – 35 (Respiratory) HCOHCO33:: 22 – 26 (Metabolic)22 – 26 (Metabolic) 7.35 7.40 7.45
  • 29.
    Thankyou!!! Thankyou!!! Louie Ray,R.N. Louie Ray, R.N. http://nursesinfosite.blogspot.com/ http://www.slideshare.net/blueash/