SlideShare a Scribd company logo
1 of 25
Download to read offline
LAB MANUAL
CYTOPATHOLOGY (Practical)
BATCH -
SUB CODE: BML651
DEPARTMENT OF MEDICAL LAB TECHNOLOGY
SMAS
FACULTY INCHARGE: Mr. A. VAMSI KUMR (Asst Prof)
PAP Smear Collection Microscopic Examination of PAP smear
SYLLABUS
List of Experiments
Catalog Description
This subject cytology is the branch of pathology, the medical specialty that deals with making
diagnoses of diseases and conditions through the examination of tissue samples from the body and
also involves study of cells in terms of structure, function
Experiment No Experiment Name
1. Collection & Preparation of Vaginal, Cervical, Sputum smears
2. Preparation of Wet film
3. Demonstration of Fixation
4. Demonstration of H&E Staining
5. Demonstration of Pap smear preparation
6. Demonstration of Fine Needle Aspiration Cytology (FNAC)
7. Demonstration of Vaginal, Cervical, Sputum staining
Text Books
1. Hand book of Exfoliative cytology; M.C. Lure, Lippincott
2. Clinical Diagnosis in Lab methods by Todd & Sanford ,1984
Reference Books
1. Lab Techniques WHO Manual Bio-safety ,2003
2. An Introduction to Medical Lab Technology by F J Baker and Silverton
COURSE OUTCOMES
On completion of this course the students will able to:
1. Understand preparation of Cytopathological reagents.
2. Wet film preparation.
3. Staining (H&E, Pap) of Vaginal, Cervical, Sputum, FNAC Etc.
Course Name/ code Cytopathology Practical / BML651
Experiment No 1
Title Collection & Preparation of Vaginal, Cervical, Sputum smears
Course Co-Ordinator / Faculty Mr. A. Vamsi Kumar
Department / School Medical lab technology, SMAS
Semester VI
1. COLLECTION & PREPARATION OF VAGINAL & CERVICAL SMEARS
INTRODUCTION:
Cervical cancer is predominantly sexually transmitted and the association between certain oncogenic
(high risk) strains of human papillomavirus (HPV) and cervical cancer is well documented.[1] It has
been shown worldwide that screening for precursors of cervical cancer by means of Papanicoloau
(Pap) smears substantially reduces the incidence of invasive cancer. [2]
DEFINITION
A Pap smear, also known as Papanicoloau smear, is a microscopic examination of cells scraped from
the cervix and is used to detect cancerous or pre-cancerous conditions of the cervix or other medical
conditions. It was named after Dr. George N. Papanicoloau, who first described it in 1928 and since
its introduction, the Pap smear has helped reduce cervical cancer incidence and mortality rates by
75%. The Pap smear is a screening tool that looks for changes in the transformation zone of the
cervix, which most often are caused by HPV.
METHOD OF SAMPLE COLLECTION
The cervix is composed of columnar epithelium, which lines the endocervical canal, and squamous
epithelium, which covers the exocervix. The point at which they meet is called the squamocolumnar
junction. Metaplasia advances from the original squamocolumnar junction inwards toward the
external os and over the columnar villi, which establishes an area called the transformation zone. It is
this area that the sample is taken from for the Pap smear. Screening with conventional Pap testing
should occur every year. If liquid-based cytology (LBC) is being used, screening can be extended to
every 2 years. Screening should begin at the age of 21 or within 3 years of the onset of sexual activity
and it can stop at the age of 70 years if there has been no abnormal Pap test result in the past 10
years.[3]
Pre-Test Procedure:
A Pap test should be performed during the second half of the menstrual cycle (Day 14). Sample
collection usually begins with appropriate instruction to the patient. Patients must abstain from sexual
intercourse and avoid using any vaginal medication or contraceptives 48 h before sample collection.
Procedure:
The patient is placed in lithotomy position and the cervix is visualized by means of a speculum. The
smaller end of the Ayre.s spatula is introduced through the external os and the squamocolumnar
junction is scraped by rotating the spatula to 360°. The scraping is then evenly spread onto a glass
slide, which is immediately fixed using 95% ethyl alcohol and ether to avoid air
drying artifacts.
QUALITIES OF AN ADEQUATE SMEAR
An adequate smear is the one with the following features:
1. Adequate numbers of squamous epithelial cells present.
2. Evidence that the transformation zone was sampled (i.e. the presence of endocervical cells on
the smear).
3. Spread in a relatively even monolayer.
4. Epithelial cells not obscured by blood, inflammatory cells, or foreign material such as lubricant or
talc.
5. Appropriately preserved.
INTERPRETATION OF A NORMAL PAP SMEAR
The following three types of cells are seen in a normal Pap smear:
1. Cells from the basal layer, which are small, rounded and basophilic with large nuclei,[5]
2. Cells from the intermediate layer, which are basophilic with vesicular nuclei[5] and
3. Cells from the superficial layer, which are acidophilic with pyknotic nuclei.[5]
In addition, endometrial cells, histiocytes, blood cells and bacteria may also be seen. The
presence of atypical cells indicates an abnormal Pap smear, which could be a result of either
inflammation caused by an infection or cervical atypia.
PAP SMEAR REPORTING
The Pap smear reporting classification has evolved and been refined over time. The current reporting
system is the Bethesda system, which was introduced in 1988[6] and later updated again in 1999
[Table 1]. Patients with abnormal Pap smear who do not have a gross cervical lesion are usually
evaluated by colposcopy- and colposcopy-directed biopsy. Colposcopy can detect low- and high-
grade dysplasia but does not detect microinvasive disease. Colposcopy is the study of cervical
morphology using stereoscopic binocular magnification provided by the colposcope.
This instrument provides a 3-dimensional image of the examined tissue surfaces and its use is now
routinely recommended for the evaluation of abnormal Pap smears. In screening programs aimed at
detecting and eliminating cervical cancer and pre-cancer, colposcopy plays an important adjunctive
role with cytology and histology. If no abnormalities are found or if the entire squamocolumnar
junction cannot be visualized, a cervical cone biopsy or HPV DNA test is performed.
LIMITATIONS OF PAP SMEAR
1. Inadequate samples constitute about 8% of the specimens received.
2. False-negative results as high as 20-30% have been reported, which occurred due to clumping of
cells when the cells are not uniformly spread on the glass slide.
3. Sometimes, other contents of the cervical specimen such as blood, bacteria and yeasts contaminate
the sample and prevent the detection of abnormal cells.
4. If exposed to air for too long before being fixed on the slide, cervical cells can become distorted.
5. Human error is probably the primary threat to accurate interpretation. An average Pap smear
slide contains 50,000-300,000 cells that must be examined and if the sample contains only a few
abnormal cells within a crowded background of healthy cells, the abnormal cells may be missed.
Reference:
1. Lab Techniques WHO Manual Bio-safety ,2003
2. An Introduction to Medical Lab Technology by F J Baker and Silverton
Course Name/ code Cytopathology Practical / BML651
Experiment No 1.2
Title Collection & Preparation of Sputum smears
Course Co-Ordinator / Faculty Mr. A. Vamsi Kumar
Department / School Medical lab technology, SMAS
Semester VI
1.2 COLLECTION & PREPARATION OF SPUTUM SMEARS
Aim:
The aim of sputum collection is to identify the bacterial, viral or fungal cause of a suspected infection
and its sensitivities to antibiotics. A specimen is indicated if patient has:
• Clinical signs of infection including a productive cough and purulent sputum;
• Signs of systemic infection;
• Pyrexia of unknown origin
Materials Required:
1. Wide open-mouthed clean container
2. PPEs (Gloves, apron, face mask, head mask)
3. other specialized equipment
Pre-Test preparations:
1. Sputum is material brought up from the lungs after a deep cough. It is not saliva.
2. Samples from first thing in the morning sample are preferred.
3. Depending on the test requested, the samples need to be collected multiple times over several days.
[If multiple samples are required, plan to collect the final sample on a day that allows the sample to
get the back to the lab during regular hours, and within the time limit.]
a. Use a separate container for each type of test each day. (Containers will be labeled by the
laboratory to indicate what type of test and what number of sample if more than one.)
b. Sputum C&S must be returned to the laboratory within 2 hours of collection (12 hours if
refrigerated at 40C)
c. Other samples can be stored refrigerated (40C) until the final sample has been collected,
then return all samples to the laboratory on the last day of collection
COLLECTION PROCEDURE:
1. Explain the procedure & obtain informed concern from the patient before collecting the sample
Rinse mouth thoroughly with water.
2. Instruct the patient to Cough deeply and expectorate sputum directly into sterile container. Do not
contaminate with saliva.
3. Except for cytology samples, do not cough repeatedly into container. One cough should produce
enough sample.
4. Do not transfer material from one container to another.
5. After collection, tighten lid, write the DATE OF COLLECTION on the container, and place it in
one of the bags provided. Each plastic bag must contain only one specimen.
6. Refrigerate samples unless bringing them to the lab within 2 hours.
II. Sputum Smear preparation:
Materials required:
1. clean glass slide
2. Bunsen burner
3. PPEs
Procedure:
Note: Make sure to use a pair of gloves when handling biological fluids like sputum.
• Carefully open the container (that contains the sputum sample) and using a laboratory burning
stick (dry) obtain and spread a small amount at the central part of a microscope glass slide -
Use rotational movement to create a good smear
• Place the slide on a drying rack and allow to dry for about 30 minutes or use a dryer to dry the
smear faster
• Pass the slide over the Bunsen burner flame 3 to 4 times to heat fix while avoiding to overheat
Reference:
1. https://medicalguidelines.msf.org/viewport/TUB/latest/appendix-1-sputum-specimen-
collection-storage-and-shipment-20323709.html
2. https://www.nursingtimes.net/clinical-archive/assessment-skills/specimen-collection-4-
procedure-for-obtaining-a-sputum-specimen-11-09-2017/
Course Name/ code Cytopathology Practical / BML651
Experiment No 2
Title Preparation of Wet film
Course Co-Ordinator / Faculty Mr. A. Vamsi Kumar
Department / School Medical lab technology, SMAS
Semester VI
2. PREPARATION OF WET FILM
Introduction:
The wet mount allows immediate examination and diagnostic evaluation of a specimen yielding
useful information at an early stage in laboratory procedures. Special staining procedures may be
indicated by observations on the wet mount, and extra preparations and proper fixation procedures can
be initiated while the specimen is fresh and during routine processing, avoiding an inefficient second
preparatory session. Further, if on wet mount examination specimen appears valuable for teaching
purposes, extra smears can be prepared during routine specimen processing.
Aim:
To prepare the wet mount for cytopathological examination of Exfoliate & Interventional cytological
smears .
Materials Required:
1. Centrifuged specimen
2. Pasteur pipette and bulb
3. Wooden applicator stick
4. Toluidine Blue stain
5. Coverslip
6. Clean glass slide
Procedure
1. Aspirate supernatant completely down to the cell button (do not disturb button).
2. Aspirate a drop of buffy coat and place on a clean glass slide. It may be desirable to prepare more
than one slide in order to sample different button layers.
3. Add a drop of Thionin or Toluidine Blue stain.
4. Mix stain and specimen well with a wooden applicator stick.
5. Place Coverslip avoiding air bubbles.
6. Carefully remove excess solution by draining onto a paper towel to prevent contamination of the
microscope and examining area.
7. Allow one to two minutes for maximum stain penetration; examine microscopically before the
specimen dries.
8. For longer preservation (photography or demonstration purposes), seal the edges of the coverslip
with mounting media or Vaseline to slow leakage and drying.
Observation:
……………………………………………………………………………………………………………
……………………………………………………………………………………………………………
Result:
……………………………………………………………………………………………………………
……………………………………………………………………………………………………………
Interpretation / Note:
Thionin and Toluidine Blue are excellent nuclear stains that allow immediate assessment of the
cellular composition of specimens. Cytologic detail is similar to that observed in the Papanicolaou
stained smear, with the exception that most cellular components stain the same color. However, with
Toluidine Blue, metachromasia is observed in the presence of mucin. Thionin stain readily forms
crystals that obscure microscopic examination. This necessitates filtration of the stain before each use.
The staining solution should also be stored in a tightly sealed bottle, since evaporation enhances
crystallization.
Toluidine blue stain in a vasculitic peripheral neuropathy.
Reference:
1. https://en.wikipedia.org/wiki/Toluidine_blue_stain
2. https://www.microscope.com/education-center/how-to-guides/mount-slides/
3. https://www.ncbi.nlm.nih.gov/pmc/articles/PMC1731171/
Course Name/ code Cytopathology Practical / BML651
Experiment No 3
Title Demonstration of Fixation
Course Co-Ordinator / Faculty Mr. A. Vamsi Kumar
Department / School Medical lab technology, SMAS
Semester VI
3. DEMONSTRATION OF FIXATION
Introduction:
Rapid fixation of smears is necessary to preserve cytologic details of cells spread on a glass slide.
Fixation means prevention of degeneration of cells and tissue by the autolytic enzymes present in the
cells and preservation of cells as close as possible to the living state. To achieve this smears are placed
in the fixative solutions for specific periods of time before the staining procedure is started. Fixation
changes the physical and chemical state of the cells and determines the subsequent staining reactions
that could be carried out on the smears.
Properties of Cytologic Fixatives
1. Do not excessively shrink or swell cells.
2. Do not distort or dissolve cellular components.
3. Inactivate enzymes and preserve nuclear details.
4. Kill microbes.
5. Improve optical differentiation and enhance staining
6. properties of the tissues and cell components.
Wet Fixation:
A. Routine Fixatives
The process of submerging of freshly prepared smears immediately in a liquid fixative is
called wet fixation. This is the ideal method for fixing all gynecological and non-gynecological
smears and any of the following alcohols can be used. All alcohol fixatives should be
discarded or filtered (Whatman No: I filter paper) after each use.
1. 95% Ethyl Alcohol (Ethanol):
The ideal fixative recommended in most of the laboratories for cytological specimen is 95% ethanol
alone. It produces the characteristic effect desired on nucleus. It is a dehydrating agent and causes cell
shrinkage as it replaces water. But it causes only the desired amount of cell contraction to yield
optimal chromatin detail characteristics of cytological preparations. Absolute (100%) ethanol
produces a similar effect on cells, but is much more expensive.
2. Ether alcohol mixture:
This fixative was originally recommended by Papanicolaou. It consists of equal parts of ether and
95% ethyl alcohol. It is an excellent fixative, but ether is not used in most of the laboratories because
of its safety hazards, odour and hygroscopic nature.
3. 100% Methanol: 100% methanol is an acceptable substitute for 95% ethanol. Methanol produces
less shrinkage than ethanol, but it is more expensive than ethanol.
4. 80% Propanol and Isopropanol: Propanol and Isopropanol cause slightly more cell shrinkage
than ether-ethanol or methanol. By using lower percentage of these alcohols the shrinkage is balanced
by the swelling effect of water on cells. Hence 80% propanol is a substitute for 95% ethanol.
5. Denatured alcohol: It is ethanol that has been changed by the addition of additives in order to
render it unsuitable for human consumption. There are many different formulae for denatured alcohol;
all of them contain ethanol as the main ingredient, and hence this can be used at a concentration of
95% or 100%. One formula is 90 parts of 95% ethanol + 5 parts of 100% methanol + 5 parts of 100%
isopropanol.
Time of Fixation:
Minimum 15 minutes fixation prior to staining is essential. Prolonged fixation for several days or
even few weeks will not affect the morphology of cells. If smears are to be preserved over a long
period of time in alcohol, it is better to store them in capped containers in the refrigerator.
B. Coating Fixative
Coating fixatives are substitutes for wet fixatives. They are either aerosols applied by spraying the
cellular samples or a liquid base, which is dropped onto the slide. They are composed of an alcohol
base, which fixes the cells and wax like substance, which forms a thin protective coating over the cells
e.g. Carbowax (Polyethylene Glycol) fixative. Diaphine fixative Spray coating fixative (Hairspray)
with high alcohol content and a minimum of lanolin or oil is also an effective fixative.
Most of these agents have a dual action in that they fix the cells and, when dry, form a thin protective
coating over the smear. These fixatives have practical value in situations where smears have to be
mailed to a distant cytology laboratory for evaluation. This method is not recommended for smears
prepared from fluid within the laboratory as in any good method of fixation the coating fixative
should be applied immediately on fresh smears. The distance from which the slides are sprayed with
an aerosol fixative affects the cytology details.10 to 12 inches (25-30 cm) is the optimum distance
recommended for aerosol fixative.
Aerosol sprays are not recommended for bloody smears, because they cause clumping of erythrocytes.
Waxes and oils from hair spray fixative alter staining reactions if they are not adequately removed.
Prior to staining, the slides have to be kept overnight in 95% alcohol for removal of the coating
fixative.
C. Special Purpose Fixative
1. Carnoy’s fixative: This is a special purpose fixative for haemorrhagic samples. The acetic acid in
the fixative haemolyses the red blood cells. It is an excellent nuclear fixative as well as preservative
for glycogen but results in considerable shrinkage of cells and tends to produce over staining in
hematoxylin. Overfixing in Carnoy’s also results in loss of chromatin material. Carnoy’s fixative must
be prepared fresh when needed and discarded after each use. It loses its effectiveness on long
standing, and chloroform can react with acetic acid to form hydrochloric acid
2. AAF Fixative: This is the ideal fixative used for cellblock preparation of fluid specimens
Reference:
1. Lab Techniques WHO Manual Bio-safety ,2003
2. An Introduction to Medical Lab Technology by F J Baker and Silverton
Course Name/ code Cytopathology Practical / BML651
Experiment No 4
Title Demonstration of H&E Staining
Course Co-Ordinator / Faculty Mr. A. Vamsi Kumar
Department / School Medical lab technology, SMAS
Semester VI
4. DEMONSTRATION OF H&E STAINING
Introduction:
• The haematoxylin and eosin stain (H&E) is the most widely used stain in histology and
histopathology laboratories.
• When it is properly performed it has the ability to demonstrate a wide range of normal and abnormal
cell and tissue components.
• The haematoxylin component stains the cell nuclei blue-black, showing good intra-nuclear detail.
• While the eosin stains cell cytoplasm and most connective tissue fibers in varying shades and
intensities of pink, orange, and red.
• Haematoxylin is extracted from the heartwood of the central American logwood Haematoxylin
campechianum Linnaeus. Haematoxylin is derived from Greek, haimatodec (blood - like) and xylon
(wood).
• Haematoxylin by itself cannot stain. It must first be oxidized to hematein.
• Eosin can be used to stain cytoplasm, collagen & muscle fibers for examination under the
microscope. Structure that stain readily with eosin are termed eosinophilic.
Aim:
To perform H & E staining on the given cytological sample.
Principle:
The acidic component of the cells has the affinity to basic dye and basic component of the cells has
the affinity to acidic dye. In hematoxylin and eosin stain, hematoxylin stains the acidic part of the cell,
i.e. Nucleus. So hematoxylin is called as nuclear stain . While eosin acts as a acidic stain and bind
with the basic part of the cell, i.e cytoplasm of the cells staining pink.
Materials Required:
o Xylene (I & II)
o 10% formalin
o Alcohol (70%, 80%, 90%, 95%, absolute I & absolute II)
o 1% lithium bi-carbonate
o Histokinate
o Microtome
o Microtome knife
o DPX ( mounting xylene)
o H&E stain
o Microscope
o Other PPEs.
Procedure for Staining:
Sections are first deparaffinised (removal of wax) by placing the slide in a jar of xylene for 10-15
minutes. As haematoxylin is a water-based dye, the sections before staining are rehydrated which is
done by passing the sections in a series of descending grades of alcohol and finally bringing the
section to water.
1. Place the slide in haematoxylin stain for 8-10 minutes.
2. Rinse in water.
3. Differentiation (i.e. selective removal of excess dye from the section) is done by putting the
slide in a solution of 1% acid alcohol for 10 seconds.
4. Rinse in water.
5. Blueing (i.e. bringing of required blue colour to the section) is done by putting the section in
Scott’s tap water (containing sodium bicarbonate and magnesium sulphate) or saturated
solution of lithium carbonate for 2-10 minutes.
6. Counterstain with 1% aqueous solution of eosin for 30 seconds to 1 minute.
7. One dip in tap water.
8. Before mounting, the sections have to be dehydrated which is done by passing the sections in
a series of ascending grades of alcohol and finally cleared in xylene, 2-3 dips in each solution.
9. Mount in DPX (dextrene polystyrene xylene) or Canada balsam.
10. Currently, modern laboratories employ automated programmable autostainers.
Results Interpretation:
1. Nuclei: Blue
2. Cytoplasm: Pink
3. Muscle, collagen, RBCs, keratin, : Pink
4. colloid protein : Pink
Observation:
……………………………………………………………………………………………………………
……………………………………………………………………………………………………………
Results :
……………………………………………………………………………………………………………
……………………………………………………………………………………………………………
Reference:
1. Hand book of Exfoliative cytology; M.C. Lure, Lippincott
2. Clinical Diagnosis in Lab methods by Todd & Sanford ,1984
3. https://www.slideshare.net/kanchanshrestha902/k-anchan-stha?from_action=save
Course Name/ code Cytopathology Practical / BML651
Experiment No 5
Title Demonstration of Pap smear preparation
Course Co-Ordinator / Faculty Mr. A. Vamsi Kumar
Department / School Medical lab technology, SMAS
Semester VI
5. DEMONSTRATION OF PAP SMEAR PREPARATION
Introduction:
Papanicolaou stain (also Papanicolaou’s stain or PAP stain) is the most important stain utilized in the
practice of Cytopathology. It is a polychromatic stain containing multiple dyes to differentially stain
various components of the cells. This technique was developed by George Papanicolaou, the father of
Cytopathology. This method is used to differentiate cells in the smear preparation of various
gynecological specimens (pap smears), materials containing exfoliative cells and material from fine
needle aspiration.
OBJECTIVES OF PAPANICOLAOU STAIN
Papanicolaou described three chief objectives for staining of cytological smears:
• Definition of nuclear details : Because of the widespread nuclear abnormalities of cancer
cells and their diagnostic significance, good staining of the nucleus is of primary importance.
• Transparency of cytoplasm: This is of particular importance because of the varying
thickness and the frequent overlapping of cells.
• Differentiation of cells: Differences in the staining reaction such as that between acidophilic
and basophilic cells help greatly in the identification of certain cell types found in smears.
PRINCIPLE OF PAPANICOLAOU STAIN
Papanicolaou stain includes both acidic and basic dyes. Acidic dye stains the basic components of the
cell and basic dye stain the acidic components of the cell. The polychromatic PAP stain involves five
dyes in three solutions.
1. Hematoxylin : Natural dye hematoxylin is the nuclear stain which stains cell nuclei blue. It
has affinity for chromatin, attaching to sulphate groups on the D.N.A. molecule. Harris’
hematoxylin is the commonest cytologically although Gills’ hematoxylin and Hematoxylin S
can be used.
2. Orange Green 6 : This is the first acidic counterstain (cytoplasmic stain) which stains
matured and keratinized cells. The target structures are staine d orange in different intensities.
3. Eosin Azure : This is the second counterstain which is a polychrome mixture of eosin Y,
light green SF and Bismarck brown.
Eosin Y gives a pink colour to cytoplasm of mature squamous cells, nucleoli, cilia and red blood
cells. Staining solutions commonly used in cytology are EA 31 and EA 50, while EA 65
Light green SF stains blue to cytoplasm of metabolically active cells like parabasal squamous cells,
intermediate squamous cells and columnar cells.
Bismarck brown Y stains nothing and sometimes it is often omitted.
PROCEDURE OF PAPANICOLAOU STAINING
Both progressive and regressive nuclear staining techniques can be used in Papanicolaou stain.
Before staining, Wet fixation immediately with Cytology spray fixative 96% ethanol for minimum 30
min is required.
I. Procedure of Progressive Papanicolaou Staining Method
In the progressive method, the nucleus is stained with hematoxylin to a intensity desired. The intensity of
the nuclear staining is controlled by the immersion of the slide into a blueing agent. Most commonly used
blueing agent is Sott’s tap water (pH 8.02).
Step Reagent Time
1. 95% Alcohol (Fixation) 15-30 minutes
2. 80% Alcohol 2 minutes
3. 60% Alcohol 2 minutes
4. Distilled Water 5 dips
5. Distilled Water 5 dips
6. Hematoxylin stain 3 minutes
7. Distilled Water 3 minutes
8. 60% Alcohol 2 minutes
9. 80% Alcohol 2 minutes
10. 95% Alcohol 2 minutes
11. Orange G Stain 3 minutes
12. 95% ALcohol 2 minutes
13. 95% Alcohol 2 minutes
14. Eosin Azure Stain 3 minutes
15. 95% Alcohol 2 minutes
16. 95% Alcohol 2 minutes
17. 95% Alcohol 2 minutes
18. 95% Alcohol 2 minutes
19. Absolute Alcohol 2 minutes
20. Absolute Alcohol 2 minutes
21. Absolute Alcohol 2 minutes
22. Absolute Alcohol+Xylene (1:1) 2 minutes
23. Xylene 2 minutes
24. Xylene 2 minutes
25. Xylene Till clear
26. Mount in D.P.X
II. Procedure of Regressive Papanicolaou Staining Method
When using the regressive staining method, the nucleus is deliberately over-stained with a non-acidified
haematoxylin. The excess stain is removed with dilute hydrochloric acid solution (acid water). The
decolourising process is then stopped by immersing the slide in running tap water. Timing is crucial in the
regressive method as de-staining may lead to a hyperchromatic nucleus becoming hypochromatic.
Step Reagent Time
1. 90% Alcohol (Fixation) 15-30 minutes
2. 80% Alcohol 2 minutes
3. 60% Alcohol 2 minutes
4. Distilled Water 5 dips
5. Distilled Water 5 dips
6. Hematoxylin stain 3 minutes
7. Distilled Water 10 seconds
8. 1% Acid Alcohol 10 seconds (1 dip)
9. Distilled Water 10 seconds
10. Scott’s Tap Water 2-3 minutes
11. Running Tap Water 2 minutes
12. 60% Alcohol 2 minutes
13. 80% Alcohol 2 minutes
14. 95% Alcohol 2 minutes
15. Orange G Stain 3 minutes
16. 95% ALcohol 2 minutes
17. 95% Alcohol 2 minutes
18. Eosin Azure Stain 3 minutes
19. 95% Alcohol 2 minutes
20. 95% Alcohol 2 minutes
21. 95% Alcohol 2 minutes
22. 95% Alcohol 2 minutes
23. Absolute Alcohol 2 minutes
24. Absolute Alcohol 2 minutes
25. Absolute Alcohol 2 minutes
26. Absolute Alcohol+Xylene (1:1) 2 minutes
27. Xylene 2 minutes
28. Xylene 2 minutes
29. Xylene Till clear
30. Mount in D.P.X
RESULTS AND INTERPRETATION OF PAPANICOLAOU STAINING
1. Nuclei : Blue
2. Acidophilic cells : Red
3. Basophilic cells : Blue Green
4. Erythrocytes : Orange-red
5. Keratin : Orange-red
6. Superficial cells : Pink
Reference:
1. Text book of Medical Laboratory Technology by Godkar
2. Introduction to Medical laboratory technology by J. Baker, R.E. Silverstone
3. Anatomy for Nurses By Asha Latha
Course Name/ code Cytopathology Practical / BML651
Experiment No 6
Title Demonstration of Fine Needle Aspiration Cytology(FNAC)
Course Co-Ordinator /
Faculty
Mr. A. Vamsi Kumar
Department / School Medical lab technology, SMAS
Semester VI
6. DEMONSTRATION OF FINE NEEDLE ASPIRATION CYTOLOGY (FNAC)
Introduction:
FNAC is the study of cellular samples obtained through a fine needle under negative pressure. The
technique is relatively painless and inexpensive. When performed by well-trained pathologists /
surgeons / clinicians and reported by experienced pathologists, it can provide unequivocal diagnosis
in most of the situations. It is useful in lesions that are easily palpable, like growth of skin,
subcutaneous soft tissue tumours, thyroid, lymph nodes, salivary glands and breast. Guided aspiration
by internal imaging techniques like C.T or ultrasonography allows FNA of lesions of internal organs
like lung, mediastinum, abdominal and retroperitoneal organs, prostate etc. The low risk of
complications allows it to be performed as an out-patient procedure. It is highly suitable in debilitated
patients, multiple lesions and easily repeatable.
The three pre-requisites for a meaningful diagnosis on FNAC are:
1. Proper technique - procedure, preparation of smears, fixation, staining.
2. Microscopic evaluation of smears.
3. Correlation of morphology with the clinical picture
(history, clinical features, radiological and laboratory findings).
The Technique: Attention to technique is necessary to optimize the yield of the sample,
making its interpretation easier and more reliable. Expertise regarding the technique comes from
constant practice and correlation of the smear technique with the results (feedback).
Equipment:
The success or failure of the aspiration procedure depends to some extent on the organization
of the set up. Some institutions set aside appropriately equipped areas dedicated to the procedure.
Otherwise, the materials can be arranged on movable carts or even in portable containers. Thus FNA
can be performed as an outpatient procedure or at the patient’s bedside.
Needles:
Standard disposable 22-24 gauge 1-1½-inch needles are used for plain FNAC. The length and
caliber of the needle should fit the size, depth, location and the consistency of the target. For small
subcutaneous lesions, one-inch 23-gauge needle is ideal while for a deep-seated breast lesion, longer
and larger needle is required. Finer needles are also recommended for children, and for vascular
organs like thyroid.
Syringes:
Standard disposable plastic syringes of 10ml are used. Syringe should be of good quality and
should produce good negative pressure. 5cc syringes can be used for vascular organs like thyroid. One
important factor is to check the tight fit of the needle on the syringe tip. A loosely fitting needle can
render the procedure useless and may injure the patient Syringe holder: A syringe piston handle can
be used, leaving one hand free to immobilize the lesion. This is not absolutely essential and is a matter
of choice of the aspirator.
Slides: Plain glass slides of good quality are used. Slides should be clean, dry, transparent and grease
free.
Fixative: 95% ethyl alcohol is recommended. Fixative is kept ready in Coplin jars.
Other supplies: Test tubes, pencil for marking, alcohol, swabs for skin, watchglass, saline, adhesive
dressing, gloves etc. are needed. All the materials required are assembled in advance before starting
the procedure. This is extremely important as delay in fixation can make interpretation of smears
difficult.
Aspiration Procedure
Steps to be followed before performing the aspiration
1. Relevant history and clinical details, radiological findings, provisional diagnosis etc. must be
entered in the requisition form. Site of FNA must be clearly stated.
2. Lesion to be aspirated is palpated and its suitability for aspiration assessed. The appropriate needle
is selected accordingly.
3. The procedure must be clearly explained to the patient and consent and co-operation ensured.
Patient may be anxious which needs to be allayed. Ignoring this simple but crucial step can result in
failure.
4. Before starting the procedure, ensure that all the required equipment, instruments and supplies are
available.
5. All universal precautions should be followed during the procedure.
Steps to be followed in the actual performance of the aspiration:
1. Positioning the patient: Any comfortable position can be chosen depending on the convenience to
palpate the lesion and the comfort of the patient. FNA is usually carried out with the patient lying
supine on an examination couch.
2. Immobilization of the lesion: Skin is cleansed firmly with an alcohol swab (as used for routine
injection). Local anesthetic may not be necessary. Apprehensive patients must be reassured about the
procedure.
The lesion is fixed between the thumb and index finger of the left hand, with the skin stretched. Try to
avoid significant muscle mass eg. sternocleidomastoid, while fixing the lesion because it is not only
painful, but also muscle tends to plug the needle tip, preventing further material from entering the
needle.
3.Penetrating the lesion: Fixing the lesion with one hand, grasp the syringe with the needle attached
(with or without syringe holder) by the dominant hand and introduce through the skin into the lesion,
carefully and swiftly. The angle and depth of entry varies with the type of lesion. For small lesions,
aspiration of central portion is indicated. For larger lesions that may have necrosis, cystic change or
hemorrhage in the center, aspiration may be done from the periphery. If pus or necrotic material alone
is aspirated from larger lesions, FNA can be repeated immediately from the periphery. With
experience, a change in tissue consistency will be felt as the needle enters the lesion. If the needle
goes tangentially missing a small slippery lesion or if penetrates beyond the lesion, representative
material will not be obtained.
Note: If the site of FNA is located near the thoracic cage e.g. axillary or supraclavicular swelings,
aspiration is better performed in a plane parallel to the thoracic cage to avoid pneumothrax. In thyroid
FNA, patient should be instructed not to swallow or talk when the needle is inside the nodule.
4.Creation of a vacuum and obtaining the material: Suction is applied after entering the lesion and
while maintaining the suction, needle is moved vigorously back and forth in a sawing or cutting
motion, changing the direction a few times, ensuring that the needle is inside the mass throughout; the
whole procedure taking only 4-8 seconds. Do not rotate the needle or pump the plunger in the syringe
in and out. Purpose of suction is to pull the tissue against the cutting edge of the needle and to pull the
dislodged tissue fragments and cells into the lumen of the needle. Material is procured by cutting
motion of the needle and not by suction. This is evident in the non-aspiration technique in which the
needle alone is moved back and forth in the lesion and withdrawn. Admixture with blood is less with
this technique and is useful in thyroid aspiration.
When the needle is moved in different directions, it samples a much wider area than a core biopsy
(FNA is thus more representative than a core biopsy). The to and fro movements and changing the
direction of the needle, while it is still inside the lesion are the two crucial steps in procuring an
adequate representative sample.
Movement of the needle is adjusted according to the type of lesion. A sclerotic lesion will require
more force than a soft tumor. A cyst will almost aspirate by itself. When fluid is aspirated, its color,
consistency and amount should be recorded in the requisition form, which allows the lesion to be
recognized as cystic. Fluid can be sent in a bottle for centrifugation and preparation of smear. In cystic
lesions, especially of breast and salivary gland, a large cyst may obscure a small malignant tumor.
Hence cysts should be completely aspirated (fluid is sent for centrifugation) and residual lump if any,
should be re-aspirated and labeled separately.
In sclerotic / fibrotic lesions e.g. Breast, little or no material will be obtained and the aspiration should
not be continued indefinitely. There is no use trying a wider bore needle; in fact a finer needle may
succeed in obtaining more material.
Vascular organs like thyroid must be sampled rapidly with minimal movement of the needle. If blood
appears in the barrel of the syringe, the procedure is discontinued as blood will dilute the sample and
render it diagnostically useless. Except for cystic lesions or vascular organs, nothing should be seen in
the barrel of the syringe. Thus the purpose of syringe is not to collect material, but to provide suction
facilitating entry of cells into the needle and then to expel them from the needle, while making
smears.
Observations while doing the aspiration regarding site, size, and consistency (solid / cystic/ soft /
sclerotic / vascular) must be correlated while interpreting the smears later. The clinician/ pathologist
should record all these relevant observations in the requisition form.
5.Release of vacuum and withdrawal of the needle: When material is seen in the hub of the needle,
procedure is discontinued. Before withdrawing the needle, suction is released and needle pulled
straight out. The piston is just allowed to slowly fall back by itself (never push). Failure to release
negative pressure within the lesion will cause the aspirated material to enter the syringe, which is
difficult to recover. In desperate situations, syringe and the needle can be rinsed with saline or fixative
and then centrifuged to prepare a smear. Immediately after withdrawing the needle, firm local
pressure is applied at the site for sometime, preferably by an assistant. This is to prevent bruising or
haematoma formation especially in thyroid, breast etc.
Note: If a cork of tissue is obtained during FNA or if the sample clots quickly, entrapping the cells,
the clot or tissue can be fixed in formalin and processed as for histology.
Observation:
……………………………………………………………………………………………………………
……………………………………………………………………………………………………………
Result:
……………………………………………………………………………………………………………
……………………………………………………………………………………………………………
Reference:
1. Text book of Medical Laboratory Technology by Godkar
2. Introduction to Medical laboratory technology by J. Baker, R.E. Silverstone
Course Name/ code Cytopathology Practical / BML651
Experiment No 7
Title Demonstration of Vaginal, Cervical, Sputum staining
Course Co-Ordinator /
Faculty
Mr. A. Vamsi Kumar
Department / School Medical lab technology, SMAS
Semester VI
7. DEMONSTRATION OF VAGINAL, CERVICAL, SPUTUM STAINING
Note: Refer Experiment No. 4 & 5 for Vaginal & Cervical smear Staining.
Aim:
To perform Ziehl-Nelson Stain in the given sputum smear.
Principle:
When the smear is stained with carbol fuchsin, it solubilizes the lipoidal material present in the
Mycobacterial cell wall but by the application of heat, carbol fuchsin further penetrates through
lipoidal wall and enters into cytoplasm. Then after all cell appears red. Then the smear is decolorized
with decolorizing agent (3% HCL in 95% alcohol) but the acid fast cells are resistant due to the
presence of large amount of lipoidal material in their cell wall which prevents the penetration of
decolorizing solution. The non-acid fast organism lack the lipoidal material in their cell wall due to
which they are easily decolorized, leaving the cells colorless. Then the smear is stained with
counterstain, methylene blue. Only decolorized cells absorb the counter stain and take its color and
appears blue while acid-fast cells retain the red color.
Materials & Reagents
1. Carbol fuschin (basic dye).
2. Bunsen Burner (heat).
3. 20% sulphuric acid (decolorizer).
4. Methylene blue (counter stain) or Malachite green.
5. Glass slide.
6. Staining rack.
7. Sputum Sample.
8. Other PPEs.
Procedure:
1. Make a thin smear of the material for study and heat fix by passing the slide 3-4 times
through the flame of a Bunsen burner or use a slide warmer at 65-75 C. Do not overheat.
2. Place the slide on staining rack and pour carbol fuschin over smear and heat gently underside
of the slide by passing a flame under the rack until fumes appear (without boiling!). Do not
overheat and allow it to stand for 5 minutes.
3. Rinse smears with water until no color appears in the effluent.
4. Pour 20% sulphuric acid, wait for one minute and keep on repeating this step until the slide
appears light pink in color (15-20 sec).
5. Wash well with clean water.
6. Cover the smear with methylene blue or malachite green stain for 1–2 minutes.
7. Wash off the stain with clean water.
8. Wipe the back of the slide clean, and place it in a draining rack for the smear to air-dry (do
not blot dry).
9. Examine the smear microscopically, using the 100x oil immersion objective.
Pattern of Examining Slides
Observation:
……………………………………………………………………………………………………………
……………………………………………………………………………………………………………
Result:
……………………………………………………………………………………………………………
……………………………………………………………………………………………………………
Interpretation of Results:
1. Acid Fast Bacilli : Red, straight or slightly curved rods, occurring singly or in small groups,
may appear beaded
2. Cells : Green (malachite green) or Blue (methylene blue)
3. Background material : Green (malachite green) or Blue (methylene blue)
REPORTING THE SPUTUM SMEAR
• When any definite red bacilli are seen :
Report the smear as ‘AFB POSITIVE’, and give an indication of the number of bacteria
present as follows:
Number of AFB seen (1000X Magnification) Reported As
0 AFB per 300 Field AFB Not Seen
1-2 AFB per 300 Fields Doubtful; repeat with another specimen
1-9 AFB per 100 Fields 1+
1-9 AFB per 10 Fields 2+
1-9 AFB per Field 3+
>9 AFB per Field 4+
• When very few AFB are seen:
E.g. when only one or two AFB are seen, request a further specimen to examine. Tap water
sometimes contain AFB that resemble tubercle bacilli, and occasionally stained scratches on a
slide can be mistaken for AFB. Occasionally AFB can be transferred from one smear to
another when the same piece of blotting paper is used to dry several smears.
• When no AFB are seen after examining 300 fields:
Report the smear as ‘AFB NOT SEEN’. Do not report ‘Negative’ because organisms may be
present but not seen in those fields examined. Up to three specimens (one collected as an
early morning specimen) may need to be examined to detect M. tuberculosis in sputum.
List of Acid Fast organisms
1. Mycobacterium spp: Acid Fast
2. Cyst of Cryptosporidium: Acid Fast
3. Cyst of Isospora: Acid Fast
4. Nocardia spp: Partial Acid Fast
5. Rhodococcus spp: Partial Acid Fast
6. Legionella micdadei: Partially acid fast in tissue
7. Head of the Sperm: Acid Fast
Mycobacterium tuberculosis visualization using the Ziehl–Neelsen stain.
Source: Wikipedia
Reference:
1. https://laboratoryinfo.com/zn-stain/
2. https://microbiologyinfo.com/acid-fast-stain-principle-procedure-interpretation-and-
examples/
3. https://microbeonline.com/ziehl-neelsen-technique-principle-procedure-reporting/
4. http://howmed.net/microbiology/ziehl-neelsen-staining-principle-procedure-and-
interpretations/
THE END
CONTACT DETAILS
Course Name/ code Immunology & Bacterial serology Lab / BML651
Course Co-Ordinator Mr. A. Vamsi Kumar (Asst Prof)
Phone Number +91 7416660584
Lab Assistant Mr. Manoj, Mr. Raja
Lab Assistant Contact No. +91 7088801539, +91 8218302946
Department / School Medical Lab Technology, SMAS
Semester VI

More Related Content

What's hot

What's hot (20)

Demonstration of le cells
Demonstration of le cellsDemonstration of le cells
Demonstration of le cells
 
Frozen section and cryostat
Frozen section and cryostatFrozen section and cryostat
Frozen section and cryostat
 
Museum techniques
Museum techniquesMuseum techniques
Museum techniques
 
General Organization and Basic Requirements of Histopathological Lab
General Organization and Basic Requirements of Histopathological LabGeneral Organization and Basic Requirements of Histopathological Lab
General Organization and Basic Requirements of Histopathological Lab
 
introduction of cytopathology
introduction of cytopathologyintroduction of cytopathology
introduction of cytopathology
 
Histopathology , Sample collection to Wax infiltration (Tissue Processing) Pa...
Histopathology , Sample collection to Wax infiltration (Tissue Processing) Pa...Histopathology , Sample collection to Wax infiltration (Tissue Processing) Pa...
Histopathology , Sample collection to Wax infiltration (Tissue Processing) Pa...
 
Histopathology - CRYOSTAT
Histopathology - CRYOSTATHistopathology - CRYOSTAT
Histopathology - CRYOSTAT
 
Decalcificaion
DecalcificaionDecalcificaion
Decalcificaion
 
Hormonal cytology
Hormonal cytologyHormonal cytology
Hormonal cytology
 
Safety rules for histopathology lab
Safety rules for histopathology labSafety rules for histopathology lab
Safety rules for histopathology lab
 
Decalcification
Decalcification  Decalcification
Decalcification
 
AUTOMATED STAINING DEVICE.pdf
AUTOMATED STAINING DEVICE.pdfAUTOMATED STAINING DEVICE.pdf
AUTOMATED STAINING DEVICE.pdf
 
Microtomes, Section cutting , Sharpening of Razors
Microtomes, Section cutting , Sharpening of RazorsMicrotomes, Section cutting , Sharpening of Razors
Microtomes, Section cutting , Sharpening of Razors
 
Fixation & fixatives in histopathology, dr naveen reddy
Fixation & fixatives in histopathology, dr naveen reddyFixation & fixatives in histopathology, dr naveen reddy
Fixation & fixatives in histopathology, dr naveen reddy
 
TISSUE PROCESSING SEMINAR
TISSUE PROCESSING SEMINARTISSUE PROCESSING SEMINAR
TISSUE PROCESSING SEMINAR
 
Embedding
EmbeddingEmbedding
Embedding
 
Special stain in histopathology
Special stain in histopathologySpecial stain in histopathology
Special stain in histopathology
 
Special stains in hematology
Special stains in hematologySpecial stains in hematology
Special stains in hematology
 
Honing And Stropping.pptx
Honing And Stropping.pptxHoning And Stropping.pptx
Honing And Stropping.pptx
 
Tissue Processing in Histopathology
Tissue Processing  in HistopathologyTissue Processing  in Histopathology
Tissue Processing in Histopathology
 

Similar to Cytopathology Lab manual for MLT Students

REPRODUCTIVE SYSTEM EXAM.pptx
REPRODUCTIVE SYSTEM EXAM.pptxREPRODUCTIVE SYSTEM EXAM.pptx
REPRODUCTIVE SYSTEM EXAM.pptx
Davy40
 
COLLECTION AND TRANSPORT OF SPECIMEN LATEST.pptx
COLLECTION AND TRANSPORT OF SPECIMEN LATEST.pptxCOLLECTION AND TRANSPORT OF SPECIMEN LATEST.pptx
COLLECTION AND TRANSPORT OF SPECIMEN LATEST.pptx
SereneVarghese1
 
diagnosinginfectiousdiseases-140317090826-phpapp01.pdf
diagnosinginfectiousdiseases-140317090826-phpapp01.pdfdiagnosinginfectiousdiseases-140317090826-phpapp01.pdf
diagnosinginfectiousdiseases-140317090826-phpapp01.pdf
Fatima Fasih
 
Automationinmicrobiology 100416000026-phpapp01
Automationinmicrobiology 100416000026-phpapp01Automationinmicrobiology 100416000026-phpapp01
Automationinmicrobiology 100416000026-phpapp01
shamsudin DrGez
 

Similar to Cytopathology Lab manual for MLT Students (20)

Madhuri ppt path
Madhuri ppt pathMadhuri ppt path
Madhuri ppt path
 
CYTOLOGY PPT.pptx
CYTOLOGY PPT.pptxCYTOLOGY PPT.pptx
CYTOLOGY PPT.pptx
 
REPRODUCTIVE SYSTEM EXAM.pptx
REPRODUCTIVE SYSTEM EXAM.pptxREPRODUCTIVE SYSTEM EXAM.pptx
REPRODUCTIVE SYSTEM EXAM.pptx
 
COLLECTION AND TRANSPORT OF SPECIMEN LATEST.pptx
COLLECTION AND TRANSPORT OF SPECIMEN LATEST.pptxCOLLECTION AND TRANSPORT OF SPECIMEN LATEST.pptx
COLLECTION AND TRANSPORT OF SPECIMEN LATEST.pptx
 
2021 laboratory diagnosis of infectious diseases dr.ihsan alsaimary
2021 laboratory diagnosis of infectious diseases dr.ihsan alsaimary2021 laboratory diagnosis of infectious diseases dr.ihsan alsaimary
2021 laboratory diagnosis of infectious diseases dr.ihsan alsaimary
 
Role of laboratory services in tb control
Role of laboratory services in tb control Role of laboratory services in tb control
Role of laboratory services in tb control
 
TISSUE COLLECTION AND FIXATION final.pptx
TISSUE COLLECTION AND FIXATION final.pptxTISSUE COLLECTION AND FIXATION final.pptx
TISSUE COLLECTION AND FIXATION final.pptx
 
Medical Microbiology Laboratory (sample collection)
Medical Microbiology Laboratory (sample collection)Medical Microbiology Laboratory (sample collection)
Medical Microbiology Laboratory (sample collection)
 
A.B.C. of Paps Smear Update (2016) ,DR. SUDHIR JAIN Consultant Pathologist
A.B.C. of Paps Smear Update (2016) ,DR. SUDHIR JAIN  Consultant Pathologist A.B.C. of Paps Smear Update (2016) ,DR. SUDHIR JAIN  Consultant Pathologist
A.B.C. of Paps Smear Update (2016) ,DR. SUDHIR JAIN Consultant Pathologist
 
Liquid based cytology ( l b c)
Liquid  based  cytology ( l b c)Liquid  based  cytology ( l b c)
Liquid based cytology ( l b c)
 
diagnosinginfectiousdiseases-140317090826-phpapp01.pdf
diagnosinginfectiousdiseases-140317090826-phpapp01.pdfdiagnosinginfectiousdiseases-140317090826-phpapp01.pdf
diagnosinginfectiousdiseases-140317090826-phpapp01.pdf
 
Chapter 13 Diagnosing Infectious Diseases
Chapter 13 Diagnosing Infectious DiseasesChapter 13 Diagnosing Infectious Diseases
Chapter 13 Diagnosing Infectious Diseases
 
Lab component of dx tb
Lab component of dx tbLab component of dx tb
Lab component of dx tb
 
Immunology & Bacterial serology Lab manual
Immunology & Bacterial serology Lab manual Immunology & Bacterial serology Lab manual
Immunology & Bacterial serology Lab manual
 
Pap Smear: A Bird's Eye View from a Cytopathologist
Pap Smear: A Bird's Eye View from a CytopathologistPap Smear: A Bird's Eye View from a Cytopathologist
Pap Smear: A Bird's Eye View from a Cytopathologist
 
surgical pathology
surgical pathologysurgical pathology
surgical pathology
 
pap smear and pelvic examination presentation
pap smear and pelvic examination presentationpap smear and pelvic examination presentation
pap smear and pelvic examination presentation
 
Sputum examination cytology and microscopy
Sputum examination cytology and microscopySputum examination cytology and microscopy
Sputum examination cytology and microscopy
 
Automationinmicrobiology 100416000026-phpapp01
Automationinmicrobiology 100416000026-phpapp01Automationinmicrobiology 100416000026-phpapp01
Automationinmicrobiology 100416000026-phpapp01
 
GYNAECOLOGY SKILLS.pptx
GYNAECOLOGY SKILLS.pptxGYNAECOLOGY SKILLS.pptx
GYNAECOLOGY SKILLS.pptx
 

More from Vamsi kumar

Complete Hematology Lab Manual_22MLH-201.pdf
Complete Hematology Lab Manual_22MLH-201.pdfComplete Hematology Lab Manual_22MLH-201.pdf
Complete Hematology Lab Manual_22MLH-201.pdf
Vamsi kumar
 

More from Vamsi kumar (20)

Study Material for Applications of Stem Cells In Health Care
Study Material for Applications of Stem Cells In Health CareStudy Material for Applications of Stem Cells In Health Care
Study Material for Applications of Stem Cells In Health Care
 
Future of Embryology by Attuluri Vamsi Kumar
Future of Embryology by Attuluri Vamsi KumarFuture of Embryology by Attuluri Vamsi Kumar
Future of Embryology by Attuluri Vamsi Kumar
 
Properties of White Blood Cells
Properties of White  Blood Cells Properties of White  Blood Cells
Properties of White Blood Cells
 
Notes of Shape and Size of RBCs, Structure of RBCs, Life Cycle of RBCs, Funct...
Notes of Shape and Size of RBCs, Structure of RBCs, Life Cycle of RBCs, Funct...Notes of Shape and Size of RBCs, Structure of RBCs, Life Cycle of RBCs, Funct...
Notes of Shape and Size of RBCs, Structure of RBCs, Life Cycle of RBCs, Funct...
 
Hematology notes
Hematology notes Hematology notes
Hematology notes
 
Complete Hematology Lab Manual_22MLH-201.pdf
Complete Hematology Lab Manual_22MLH-201.pdfComplete Hematology Lab Manual_22MLH-201.pdf
Complete Hematology Lab Manual_22MLH-201.pdf
 
52_Clinical Laboratory Visit - VI.pdf
52_Clinical Laboratory Visit - VI.pdf52_Clinical Laboratory Visit - VI.pdf
52_Clinical Laboratory Visit - VI.pdf
 
54_Research Project.pdf
54_Research Project.pdf54_Research Project.pdf
54_Research Project.pdf
 
51_Introduction to Artificial Intelligence and its applications.pdf
51_Introduction to Artificial Intelligence and its applications.pdf51_Introduction to Artificial Intelligence and its applications.pdf
51_Introduction to Artificial Intelligence and its applications.pdf
 
53_MLT Internship.pdf
53_MLT Internship.pdf53_MLT Internship.pdf
53_MLT Internship.pdf
 
48_Blood Bank and Genetics.pdf
48_Blood Bank and Genetics.pdf48_Blood Bank and Genetics.pdf
48_Blood Bank and Genetics.pdf
 
47_Medical Mycology and Virology.pdf
47_Medical Mycology and Virology.pdf47_Medical Mycology and Virology.pdf
47_Medical Mycology and Virology.pdf
 
50_Research methodology and Biostatistics.pdf
50_Research methodology and Biostatistics.pdf50_Research methodology and Biostatistics.pdf
50_Research methodology and Biostatistics.pdf
 
46_Clinical Laboratory Visit - V.pdf
46_Clinical Laboratory Visit -  V.pdf46_Clinical Laboratory Visit -  V.pdf
46_Clinical Laboratory Visit - V.pdf
 
44_Program Elective course - III (Introduction to NABL).pdf
44_Program Elective course - III  (Introduction to  NABL).pdf44_Program Elective course - III  (Introduction to  NABL).pdf
44_Program Elective course - III (Introduction to NABL).pdf
 
49_Immunopathology and Molecular Biology.pdf
49_Immunopathology and Molecular Biology.pdf49_Immunopathology and Molecular Biology.pdf
49_Immunopathology and Molecular Biology.pdf
 
41_Applied Clinical Biochemistry – II.pdf
41_Applied Clinical Biochemistry – II.pdf41_Applied Clinical Biochemistry – II.pdf
41_Applied Clinical Biochemistry – II.pdf
 
45_Program Elective course - III (Laboratory and Hospital information syste...
45_Program Elective course - III  (Laboratory and Hospital  information syste...45_Program Elective course - III  (Laboratory and Hospital  information syste...
45_Program Elective course - III (Laboratory and Hospital information syste...
 
43_Program Elective course - III (Community medicine).pdf
43_Program Elective course - III (Community medicine).pdf43_Program Elective course - III (Community medicine).pdf
43_Program Elective course - III (Community medicine).pdf
 
42_Cytopathology.pdf
42_Cytopathology.pdf42_Cytopathology.pdf
42_Cytopathology.pdf
 

Recently uploaded

Abortion pills Buy Farwaniya (+918133066128) Cytotec 200mg tablets Al AHMEDI
Abortion pills Buy Farwaniya (+918133066128) Cytotec 200mg tablets Al AHMEDIAbortion pills Buy Farwaniya (+918133066128) Cytotec 200mg tablets Al AHMEDI
Abortion pills Buy Farwaniya (+918133066128) Cytotec 200mg tablets Al AHMEDI
Abortion pills in Kuwait Cytotec pills in Kuwait
 
❤️ Chandigarh Call Girls Service ☎️99158-51334☎️ Escort service in Chandigarh...
❤️ Chandigarh Call Girls Service ☎️99158-51334☎️ Escort service in Chandigarh...❤️ Chandigarh Call Girls Service ☎️99158-51334☎️ Escort service in Chandigarh...
❤️ Chandigarh Call Girls Service ☎️99158-51334☎️ Escort service in Chandigarh...
rajveerescorts2022
 
Cara Menggugurkan Kandungan Secara Alami 3 Jam Tuntas
Cara Menggugurkan Kandungan Secara Alami 3 Jam TuntasCara Menggugurkan Kandungan Secara Alami 3 Jam Tuntas
Cara Menggugurkan Kandungan Secara Alami 3 Jam Tuntas
Cara Menggugurkan Kandungan 087776558899
 
Obat aborsi Jakarta Timur Wa 081225888346 Jual Obat aborsi Cytotec asli Di Ja...
Obat aborsi Jakarta Timur Wa 081225888346 Jual Obat aborsi Cytotec asli Di Ja...Obat aborsi Jakarta Timur Wa 081225888346 Jual Obat aborsi Cytotec asli Di Ja...
Obat aborsi Jakarta Timur Wa 081225888346 Jual Obat aborsi Cytotec asli Di Ja...
icha27638
 
@Safe Abortion pills IN Jeddah(+918133066128) Un_wanted kit Buy Jeddah
@Safe Abortion pills IN Jeddah(+918133066128) Un_wanted kit Buy Jeddah@Safe Abortion pills IN Jeddah(+918133066128) Un_wanted kit Buy Jeddah
@Safe Abortion pills IN Jeddah(+918133066128) Un_wanted kit Buy Jeddah
Abortion pills in Kuwait Cytotec pills in Kuwait
 
Independent Call Girl in 😋 Goa +9316020077 Goa Call Girl
Independent Call Girl in 😋 Goa  +9316020077 Goa Call GirlIndependent Call Girl in 😋 Goa  +9316020077 Goa Call Girl
Independent Call Girl in 😋 Goa +9316020077 Goa Call Girl
Real Sex Provide In Goa
 
❤️ Chandigarh Call Girls ☎️99158-51334☎️ Escort service in Chandigarh ☎️ Chan...
❤️ Chandigarh Call Girls ☎️99158-51334☎️ Escort service in Chandigarh ☎️ Chan...❤️ Chandigarh Call Girls ☎️99158-51334☎️ Escort service in Chandigarh ☎️ Chan...
❤️ Chandigarh Call Girls ☎️99158-51334☎️ Escort service in Chandigarh ☎️ Chan...
rajveerescorts2022
 
Obat Penggugur Kandungan Cytotec Dan Gastrul Harga Indomaret
Obat Penggugur Kandungan Cytotec Dan Gastrul Harga IndomaretObat Penggugur Kandungan Cytotec Dan Gastrul Harga Indomaret
Obat Penggugur Kandungan Cytotec Dan Gastrul Harga Indomaret
Cara Menggugurkan Kandungan 087776558899
 

Recently uploaded (20)

Abortion pills Buy Farwaniya (+918133066128) Cytotec 200mg tablets Al AHMEDI
Abortion pills Buy Farwaniya (+918133066128) Cytotec 200mg tablets Al AHMEDIAbortion pills Buy Farwaniya (+918133066128) Cytotec 200mg tablets Al AHMEDI
Abortion pills Buy Farwaniya (+918133066128) Cytotec 200mg tablets Al AHMEDI
 
TEST BANK For Little and Falace's Dental Management of the Medically Compromi...
TEST BANK For Little and Falace's Dental Management of the Medically Compromi...TEST BANK For Little and Falace's Dental Management of the Medically Compromi...
TEST BANK For Little and Falace's Dental Management of the Medically Compromi...
 
2024 PCP #IMPerative Updates in Rheumatology
2024 PCP #IMPerative Updates in Rheumatology2024 PCP #IMPerative Updates in Rheumatology
2024 PCP #IMPerative Updates in Rheumatology
 
Leading large scale change: a life at the interface between theory and practice
Leading large scale change: a life at the interface between theory and practiceLeading large scale change: a life at the interface between theory and practice
Leading large scale change: a life at the interface between theory and practice
 
Nursing Care Plan for Surgery (Risk for Infection)
Nursing Care Plan for Surgery (Risk for Infection)Nursing Care Plan for Surgery (Risk for Infection)
Nursing Care Plan for Surgery (Risk for Infection)
 
VIP Just Call 9548273370 Lucknow Top Class Call Girls Number | 8630512678 Esc...
VIP Just Call 9548273370 Lucknow Top Class Call Girls Number | 8630512678 Esc...VIP Just Call 9548273370 Lucknow Top Class Call Girls Number | 8630512678 Esc...
VIP Just Call 9548273370 Lucknow Top Class Call Girls Number | 8630512678 Esc...
 
❤️ Chandigarh Call Girls Service ☎️99158-51334☎️ Escort service in Chandigarh...
❤️ Chandigarh Call Girls Service ☎️99158-51334☎️ Escort service in Chandigarh...❤️ Chandigarh Call Girls Service ☎️99158-51334☎️ Escort service in Chandigarh...
❤️ Chandigarh Call Girls Service ☎️99158-51334☎️ Escort service in Chandigarh...
 
Cara Menggugurkan Kandungan Secara Alami 3 Jam Tuntas
Cara Menggugurkan Kandungan Secara Alami 3 Jam TuntasCara Menggugurkan Kandungan Secara Alami 3 Jam Tuntas
Cara Menggugurkan Kandungan Secara Alami 3 Jam Tuntas
 
Obat aborsi Jakarta Timur Wa 081225888346 Jual Obat aborsi Cytotec asli Di Ja...
Obat aborsi Jakarta Timur Wa 081225888346 Jual Obat aborsi Cytotec asli Di Ja...Obat aborsi Jakarta Timur Wa 081225888346 Jual Obat aborsi Cytotec asli Di Ja...
Obat aborsi Jakarta Timur Wa 081225888346 Jual Obat aborsi Cytotec asli Di Ja...
 
Making change happen: learning from "positive deviancts"
Making change happen: learning from "positive deviancts"Making change happen: learning from "positive deviancts"
Making change happen: learning from "positive deviancts"
 
TEST BANK For Robbins & Kumar Basic Pathology, 11th Edition by Vinay Kumar, A...
TEST BANK For Robbins & Kumar Basic Pathology, 11th Edition by Vinay Kumar, A...TEST BANK For Robbins & Kumar Basic Pathology, 11th Edition by Vinay Kumar, A...
TEST BANK For Robbins & Kumar Basic Pathology, 11th Edition by Vinay Kumar, A...
 
Test bank for community public health nursing evidence for practice 4TH editi...
Test bank for community public health nursing evidence for practice 4TH editi...Test bank for community public health nursing evidence for practice 4TH editi...
Test bank for community public health nursing evidence for practice 4TH editi...
 
ACNE VULGARIS , ALLERGIES, ECZEMA, PEMPHIGUS.pdf
ACNE VULGARIS , ALLERGIES, ECZEMA, PEMPHIGUS.pdfACNE VULGARIS , ALLERGIES, ECZEMA, PEMPHIGUS.pdf
ACNE VULGARIS , ALLERGIES, ECZEMA, PEMPHIGUS.pdf
 
CALCIUM - ELECTROLYTE IMBALANCE (HYPERCALCEMIA & HYPOCALCEMIA).pdf
CALCIUM - ELECTROLYTE IMBALANCE (HYPERCALCEMIA & HYPOCALCEMIA).pdfCALCIUM - ELECTROLYTE IMBALANCE (HYPERCALCEMIA & HYPOCALCEMIA).pdf
CALCIUM - ELECTROLYTE IMBALANCE (HYPERCALCEMIA & HYPOCALCEMIA).pdf
 
@Safe Abortion pills IN Jeddah(+918133066128) Un_wanted kit Buy Jeddah
@Safe Abortion pills IN Jeddah(+918133066128) Un_wanted kit Buy Jeddah@Safe Abortion pills IN Jeddah(+918133066128) Un_wanted kit Buy Jeddah
@Safe Abortion pills IN Jeddah(+918133066128) Un_wanted kit Buy Jeddah
 
Independent Call Girl in 😋 Goa +9316020077 Goa Call Girl
Independent Call Girl in 😋 Goa  +9316020077 Goa Call GirlIndependent Call Girl in 😋 Goa  +9316020077 Goa Call Girl
Independent Call Girl in 😋 Goa +9316020077 Goa Call Girl
 
Bobath Technique (Samrth Pareta) .ppt.pptx
Bobath Technique (Samrth Pareta) .ppt.pptxBobath Technique (Samrth Pareta) .ppt.pptx
Bobath Technique (Samrth Pareta) .ppt.pptx
 
❤️ Chandigarh Call Girls ☎️99158-51334☎️ Escort service in Chandigarh ☎️ Chan...
❤️ Chandigarh Call Girls ☎️99158-51334☎️ Escort service in Chandigarh ☎️ Chan...❤️ Chandigarh Call Girls ☎️99158-51334☎️ Escort service in Chandigarh ☎️ Chan...
❤️ Chandigarh Call Girls ☎️99158-51334☎️ Escort service in Chandigarh ☎️ Chan...
 
RESPIRATORY ALKALOSIS & RESPIRATORY ACIDOSIS.pdf
RESPIRATORY ALKALOSIS & RESPIRATORY ACIDOSIS.pdfRESPIRATORY ALKALOSIS & RESPIRATORY ACIDOSIS.pdf
RESPIRATORY ALKALOSIS & RESPIRATORY ACIDOSIS.pdf
 
Obat Penggugur Kandungan Cytotec Dan Gastrul Harga Indomaret
Obat Penggugur Kandungan Cytotec Dan Gastrul Harga IndomaretObat Penggugur Kandungan Cytotec Dan Gastrul Harga Indomaret
Obat Penggugur Kandungan Cytotec Dan Gastrul Harga Indomaret
 

Cytopathology Lab manual for MLT Students

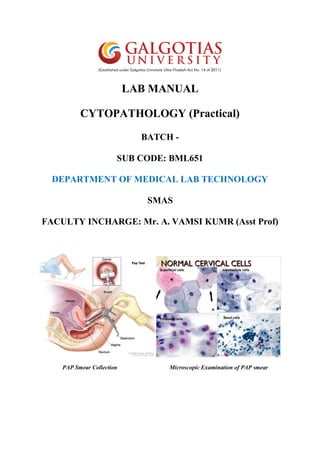
  • 1. LAB MANUAL CYTOPATHOLOGY (Practical) BATCH - SUB CODE: BML651 DEPARTMENT OF MEDICAL LAB TECHNOLOGY SMAS FACULTY INCHARGE: Mr. A. VAMSI KUMR (Asst Prof) PAP Smear Collection Microscopic Examination of PAP smear
  • 2. SYLLABUS List of Experiments Catalog Description This subject cytology is the branch of pathology, the medical specialty that deals with making diagnoses of diseases and conditions through the examination of tissue samples from the body and also involves study of cells in terms of structure, function Experiment No Experiment Name 1. Collection & Preparation of Vaginal, Cervical, Sputum smears 2. Preparation of Wet film 3. Demonstration of Fixation 4. Demonstration of H&E Staining 5. Demonstration of Pap smear preparation 6. Demonstration of Fine Needle Aspiration Cytology (FNAC) 7. Demonstration of Vaginal, Cervical, Sputum staining Text Books 1. Hand book of Exfoliative cytology; M.C. Lure, Lippincott 2. Clinical Diagnosis in Lab methods by Todd & Sanford ,1984 Reference Books 1. Lab Techniques WHO Manual Bio-safety ,2003 2. An Introduction to Medical Lab Technology by F J Baker and Silverton COURSE OUTCOMES On completion of this course the students will able to: 1. Understand preparation of Cytopathological reagents. 2. Wet film preparation. 3. Staining (H&E, Pap) of Vaginal, Cervical, Sputum, FNAC Etc.
  • 3. Course Name/ code Cytopathology Practical / BML651 Experiment No 1 Title Collection & Preparation of Vaginal, Cervical, Sputum smears Course Co-Ordinator / Faculty Mr. A. Vamsi Kumar Department / School Medical lab technology, SMAS Semester VI 1. COLLECTION & PREPARATION OF VAGINAL & CERVICAL SMEARS INTRODUCTION: Cervical cancer is predominantly sexually transmitted and the association between certain oncogenic (high risk) strains of human papillomavirus (HPV) and cervical cancer is well documented.[1] It has been shown worldwide that screening for precursors of cervical cancer by means of Papanicoloau (Pap) smears substantially reduces the incidence of invasive cancer. [2] DEFINITION A Pap smear, also known as Papanicoloau smear, is a microscopic examination of cells scraped from the cervix and is used to detect cancerous or pre-cancerous conditions of the cervix or other medical conditions. It was named after Dr. George N. Papanicoloau, who first described it in 1928 and since its introduction, the Pap smear has helped reduce cervical cancer incidence and mortality rates by 75%. The Pap smear is a screening tool that looks for changes in the transformation zone of the cervix, which most often are caused by HPV. METHOD OF SAMPLE COLLECTION The cervix is composed of columnar epithelium, which lines the endocervical canal, and squamous epithelium, which covers the exocervix. The point at which they meet is called the squamocolumnar junction. Metaplasia advances from the original squamocolumnar junction inwards toward the external os and over the columnar villi, which establishes an area called the transformation zone. It is this area that the sample is taken from for the Pap smear. Screening with conventional Pap testing should occur every year. If liquid-based cytology (LBC) is being used, screening can be extended to every 2 years. Screening should begin at the age of 21 or within 3 years of the onset of sexual activity and it can stop at the age of 70 years if there has been no abnormal Pap test result in the past 10 years.[3] Pre-Test Procedure: A Pap test should be performed during the second half of the menstrual cycle (Day 14). Sample collection usually begins with appropriate instruction to the patient. Patients must abstain from sexual intercourse and avoid using any vaginal medication or contraceptives 48 h before sample collection. Procedure: The patient is placed in lithotomy position and the cervix is visualized by means of a speculum. The smaller end of the Ayre.s spatula is introduced through the external os and the squamocolumnar junction is scraped by rotating the spatula to 360°. The scraping is then evenly spread onto a glass slide, which is immediately fixed using 95% ethyl alcohol and ether to avoid air drying artifacts. QUALITIES OF AN ADEQUATE SMEAR An adequate smear is the one with the following features:
  • 4. 1. Adequate numbers of squamous epithelial cells present. 2. Evidence that the transformation zone was sampled (i.e. the presence of endocervical cells on the smear). 3. Spread in a relatively even monolayer. 4. Epithelial cells not obscured by blood, inflammatory cells, or foreign material such as lubricant or talc. 5. Appropriately preserved. INTERPRETATION OF A NORMAL PAP SMEAR The following three types of cells are seen in a normal Pap smear: 1. Cells from the basal layer, which are small, rounded and basophilic with large nuclei,[5] 2. Cells from the intermediate layer, which are basophilic with vesicular nuclei[5] and 3. Cells from the superficial layer, which are acidophilic with pyknotic nuclei.[5] In addition, endometrial cells, histiocytes, blood cells and bacteria may also be seen. The presence of atypical cells indicates an abnormal Pap smear, which could be a result of either inflammation caused by an infection or cervical atypia. PAP SMEAR REPORTING The Pap smear reporting classification has evolved and been refined over time. The current reporting system is the Bethesda system, which was introduced in 1988[6] and later updated again in 1999 [Table 1]. Patients with abnormal Pap smear who do not have a gross cervical lesion are usually evaluated by colposcopy- and colposcopy-directed biopsy. Colposcopy can detect low- and high- grade dysplasia but does not detect microinvasive disease. Colposcopy is the study of cervical morphology using stereoscopic binocular magnification provided by the colposcope. This instrument provides a 3-dimensional image of the examined tissue surfaces and its use is now routinely recommended for the evaluation of abnormal Pap smears. In screening programs aimed at detecting and eliminating cervical cancer and pre-cancer, colposcopy plays an important adjunctive role with cytology and histology. If no abnormalities are found or if the entire squamocolumnar junction cannot be visualized, a cervical cone biopsy or HPV DNA test is performed.
  • 5. LIMITATIONS OF PAP SMEAR 1. Inadequate samples constitute about 8% of the specimens received. 2. False-negative results as high as 20-30% have been reported, which occurred due to clumping of cells when the cells are not uniformly spread on the glass slide. 3. Sometimes, other contents of the cervical specimen such as blood, bacteria and yeasts contaminate the sample and prevent the detection of abnormal cells. 4. If exposed to air for too long before being fixed on the slide, cervical cells can become distorted. 5. Human error is probably the primary threat to accurate interpretation. An average Pap smear slide contains 50,000-300,000 cells that must be examined and if the sample contains only a few abnormal cells within a crowded background of healthy cells, the abnormal cells may be missed. Reference: 1. Lab Techniques WHO Manual Bio-safety ,2003 2. An Introduction to Medical Lab Technology by F J Baker and Silverton
  • 6. Course Name/ code Cytopathology Practical / BML651 Experiment No 1.2 Title Collection & Preparation of Sputum smears Course Co-Ordinator / Faculty Mr. A. Vamsi Kumar Department / School Medical lab technology, SMAS Semester VI 1.2 COLLECTION & PREPARATION OF SPUTUM SMEARS Aim: The aim of sputum collection is to identify the bacterial, viral or fungal cause of a suspected infection and its sensitivities to antibiotics. A specimen is indicated if patient has: • Clinical signs of infection including a productive cough and purulent sputum; • Signs of systemic infection; • Pyrexia of unknown origin Materials Required: 1. Wide open-mouthed clean container 2. PPEs (Gloves, apron, face mask, head mask) 3. other specialized equipment Pre-Test preparations: 1. Sputum is material brought up from the lungs after a deep cough. It is not saliva. 2. Samples from first thing in the morning sample are preferred. 3. Depending on the test requested, the samples need to be collected multiple times over several days. [If multiple samples are required, plan to collect the final sample on a day that allows the sample to get the back to the lab during regular hours, and within the time limit.] a. Use a separate container for each type of test each day. (Containers will be labeled by the laboratory to indicate what type of test and what number of sample if more than one.) b. Sputum C&S must be returned to the laboratory within 2 hours of collection (12 hours if refrigerated at 40C) c. Other samples can be stored refrigerated (40C) until the final sample has been collected, then return all samples to the laboratory on the last day of collection COLLECTION PROCEDURE: 1. Explain the procedure & obtain informed concern from the patient before collecting the sample Rinse mouth thoroughly with water. 2. Instruct the patient to Cough deeply and expectorate sputum directly into sterile container. Do not contaminate with saliva.
  • 7. 3. Except for cytology samples, do not cough repeatedly into container. One cough should produce enough sample. 4. Do not transfer material from one container to another. 5. After collection, tighten lid, write the DATE OF COLLECTION on the container, and place it in one of the bags provided. Each plastic bag must contain only one specimen. 6. Refrigerate samples unless bringing them to the lab within 2 hours. II. Sputum Smear preparation: Materials required: 1. clean glass slide 2. Bunsen burner 3. PPEs Procedure: Note: Make sure to use a pair of gloves when handling biological fluids like sputum. • Carefully open the container (that contains the sputum sample) and using a laboratory burning stick (dry) obtain and spread a small amount at the central part of a microscope glass slide - Use rotational movement to create a good smear • Place the slide on a drying rack and allow to dry for about 30 minutes or use a dryer to dry the smear faster • Pass the slide over the Bunsen burner flame 3 to 4 times to heat fix while avoiding to overheat Reference: 1. https://medicalguidelines.msf.org/viewport/TUB/latest/appendix-1-sputum-specimen- collection-storage-and-shipment-20323709.html 2. https://www.nursingtimes.net/clinical-archive/assessment-skills/specimen-collection-4- procedure-for-obtaining-a-sputum-specimen-11-09-2017/
  • 8. Course Name/ code Cytopathology Practical / BML651 Experiment No 2 Title Preparation of Wet film Course Co-Ordinator / Faculty Mr. A. Vamsi Kumar Department / School Medical lab technology, SMAS Semester VI 2. PREPARATION OF WET FILM Introduction: The wet mount allows immediate examination and diagnostic evaluation of a specimen yielding useful information at an early stage in laboratory procedures. Special staining procedures may be indicated by observations on the wet mount, and extra preparations and proper fixation procedures can be initiated while the specimen is fresh and during routine processing, avoiding an inefficient second preparatory session. Further, if on wet mount examination specimen appears valuable for teaching purposes, extra smears can be prepared during routine specimen processing. Aim: To prepare the wet mount for cytopathological examination of Exfoliate & Interventional cytological smears . Materials Required: 1. Centrifuged specimen 2. Pasteur pipette and bulb 3. Wooden applicator stick 4. Toluidine Blue stain 5. Coverslip 6. Clean glass slide Procedure 1. Aspirate supernatant completely down to the cell button (do not disturb button). 2. Aspirate a drop of buffy coat and place on a clean glass slide. It may be desirable to prepare more than one slide in order to sample different button layers. 3. Add a drop of Thionin or Toluidine Blue stain. 4. Mix stain and specimen well with a wooden applicator stick. 5. Place Coverslip avoiding air bubbles. 6. Carefully remove excess solution by draining onto a paper towel to prevent contamination of the microscope and examining area. 7. Allow one to two minutes for maximum stain penetration; examine microscopically before the specimen dries. 8. For longer preservation (photography or demonstration purposes), seal the edges of the coverslip with mounting media or Vaseline to slow leakage and drying.
  • 9. Observation: …………………………………………………………………………………………………………… …………………………………………………………………………………………………………… Result: …………………………………………………………………………………………………………… …………………………………………………………………………………………………………… Interpretation / Note: Thionin and Toluidine Blue are excellent nuclear stains that allow immediate assessment of the cellular composition of specimens. Cytologic detail is similar to that observed in the Papanicolaou stained smear, with the exception that most cellular components stain the same color. However, with Toluidine Blue, metachromasia is observed in the presence of mucin. Thionin stain readily forms crystals that obscure microscopic examination. This necessitates filtration of the stain before each use. The staining solution should also be stored in a tightly sealed bottle, since evaporation enhances crystallization. Toluidine blue stain in a vasculitic peripheral neuropathy. Reference: 1. https://en.wikipedia.org/wiki/Toluidine_blue_stain 2. https://www.microscope.com/education-center/how-to-guides/mount-slides/ 3. https://www.ncbi.nlm.nih.gov/pmc/articles/PMC1731171/
  • 10. Course Name/ code Cytopathology Practical / BML651 Experiment No 3 Title Demonstration of Fixation Course Co-Ordinator / Faculty Mr. A. Vamsi Kumar Department / School Medical lab technology, SMAS Semester VI 3. DEMONSTRATION OF FIXATION Introduction: Rapid fixation of smears is necessary to preserve cytologic details of cells spread on a glass slide. Fixation means prevention of degeneration of cells and tissue by the autolytic enzymes present in the cells and preservation of cells as close as possible to the living state. To achieve this smears are placed in the fixative solutions for specific periods of time before the staining procedure is started. Fixation changes the physical and chemical state of the cells and determines the subsequent staining reactions that could be carried out on the smears. Properties of Cytologic Fixatives 1. Do not excessively shrink or swell cells. 2. Do not distort or dissolve cellular components. 3. Inactivate enzymes and preserve nuclear details. 4. Kill microbes. 5. Improve optical differentiation and enhance staining 6. properties of the tissues and cell components. Wet Fixation: A. Routine Fixatives The process of submerging of freshly prepared smears immediately in a liquid fixative is called wet fixation. This is the ideal method for fixing all gynecological and non-gynecological smears and any of the following alcohols can be used. All alcohol fixatives should be discarded or filtered (Whatman No: I filter paper) after each use. 1. 95% Ethyl Alcohol (Ethanol): The ideal fixative recommended in most of the laboratories for cytological specimen is 95% ethanol alone. It produces the characteristic effect desired on nucleus. It is a dehydrating agent and causes cell shrinkage as it replaces water. But it causes only the desired amount of cell contraction to yield optimal chromatin detail characteristics of cytological preparations. Absolute (100%) ethanol produces a similar effect on cells, but is much more expensive. 2. Ether alcohol mixture: This fixative was originally recommended by Papanicolaou. It consists of equal parts of ether and 95% ethyl alcohol. It is an excellent fixative, but ether is not used in most of the laboratories because of its safety hazards, odour and hygroscopic nature. 3. 100% Methanol: 100% methanol is an acceptable substitute for 95% ethanol. Methanol produces less shrinkage than ethanol, but it is more expensive than ethanol. 4. 80% Propanol and Isopropanol: Propanol and Isopropanol cause slightly more cell shrinkage than ether-ethanol or methanol. By using lower percentage of these alcohols the shrinkage is balanced by the swelling effect of water on cells. Hence 80% propanol is a substitute for 95% ethanol.
  • 11. 5. Denatured alcohol: It is ethanol that has been changed by the addition of additives in order to render it unsuitable for human consumption. There are many different formulae for denatured alcohol; all of them contain ethanol as the main ingredient, and hence this can be used at a concentration of 95% or 100%. One formula is 90 parts of 95% ethanol + 5 parts of 100% methanol + 5 parts of 100% isopropanol. Time of Fixation: Minimum 15 minutes fixation prior to staining is essential. Prolonged fixation for several days or even few weeks will not affect the morphology of cells. If smears are to be preserved over a long period of time in alcohol, it is better to store them in capped containers in the refrigerator. B. Coating Fixative Coating fixatives are substitutes for wet fixatives. They are either aerosols applied by spraying the cellular samples or a liquid base, which is dropped onto the slide. They are composed of an alcohol base, which fixes the cells and wax like substance, which forms a thin protective coating over the cells e.g. Carbowax (Polyethylene Glycol) fixative. Diaphine fixative Spray coating fixative (Hairspray) with high alcohol content and a minimum of lanolin or oil is also an effective fixative. Most of these agents have a dual action in that they fix the cells and, when dry, form a thin protective coating over the smear. These fixatives have practical value in situations where smears have to be mailed to a distant cytology laboratory for evaluation. This method is not recommended for smears prepared from fluid within the laboratory as in any good method of fixation the coating fixative should be applied immediately on fresh smears. The distance from which the slides are sprayed with an aerosol fixative affects the cytology details.10 to 12 inches (25-30 cm) is the optimum distance recommended for aerosol fixative. Aerosol sprays are not recommended for bloody smears, because they cause clumping of erythrocytes. Waxes and oils from hair spray fixative alter staining reactions if they are not adequately removed. Prior to staining, the slides have to be kept overnight in 95% alcohol for removal of the coating fixative. C. Special Purpose Fixative 1. Carnoy’s fixative: This is a special purpose fixative for haemorrhagic samples. The acetic acid in the fixative haemolyses the red blood cells. It is an excellent nuclear fixative as well as preservative for glycogen but results in considerable shrinkage of cells and tends to produce over staining in hematoxylin. Overfixing in Carnoy’s also results in loss of chromatin material. Carnoy’s fixative must be prepared fresh when needed and discarded after each use. It loses its effectiveness on long standing, and chloroform can react with acetic acid to form hydrochloric acid 2. AAF Fixative: This is the ideal fixative used for cellblock preparation of fluid specimens Reference: 1. Lab Techniques WHO Manual Bio-safety ,2003 2. An Introduction to Medical Lab Technology by F J Baker and Silverton
  • 12. Course Name/ code Cytopathology Practical / BML651 Experiment No 4 Title Demonstration of H&E Staining Course Co-Ordinator / Faculty Mr. A. Vamsi Kumar Department / School Medical lab technology, SMAS Semester VI 4. DEMONSTRATION OF H&E STAINING Introduction: • The haematoxylin and eosin stain (H&E) is the most widely used stain in histology and histopathology laboratories. • When it is properly performed it has the ability to demonstrate a wide range of normal and abnormal cell and tissue components. • The haematoxylin component stains the cell nuclei blue-black, showing good intra-nuclear detail. • While the eosin stains cell cytoplasm and most connective tissue fibers in varying shades and intensities of pink, orange, and red. • Haematoxylin is extracted from the heartwood of the central American logwood Haematoxylin campechianum Linnaeus. Haematoxylin is derived from Greek, haimatodec (blood - like) and xylon (wood). • Haematoxylin by itself cannot stain. It must first be oxidized to hematein. • Eosin can be used to stain cytoplasm, collagen & muscle fibers for examination under the microscope. Structure that stain readily with eosin are termed eosinophilic. Aim: To perform H & E staining on the given cytological sample. Principle: The acidic component of the cells has the affinity to basic dye and basic component of the cells has the affinity to acidic dye. In hematoxylin and eosin stain, hematoxylin stains the acidic part of the cell, i.e. Nucleus. So hematoxylin is called as nuclear stain . While eosin acts as a acidic stain and bind with the basic part of the cell, i.e cytoplasm of the cells staining pink. Materials Required: o Xylene (I & II) o 10% formalin o Alcohol (70%, 80%, 90%, 95%, absolute I & absolute II) o 1% lithium bi-carbonate o Histokinate o Microtome o Microtome knife o DPX ( mounting xylene) o H&E stain o Microscope o Other PPEs.
  • 13. Procedure for Staining: Sections are first deparaffinised (removal of wax) by placing the slide in a jar of xylene for 10-15 minutes. As haematoxylin is a water-based dye, the sections before staining are rehydrated which is done by passing the sections in a series of descending grades of alcohol and finally bringing the section to water. 1. Place the slide in haematoxylin stain for 8-10 minutes. 2. Rinse in water. 3. Differentiation (i.e. selective removal of excess dye from the section) is done by putting the slide in a solution of 1% acid alcohol for 10 seconds. 4. Rinse in water. 5. Blueing (i.e. bringing of required blue colour to the section) is done by putting the section in Scott’s tap water (containing sodium bicarbonate and magnesium sulphate) or saturated solution of lithium carbonate for 2-10 minutes. 6. Counterstain with 1% aqueous solution of eosin for 30 seconds to 1 minute. 7. One dip in tap water. 8. Before mounting, the sections have to be dehydrated which is done by passing the sections in a series of ascending grades of alcohol and finally cleared in xylene, 2-3 dips in each solution. 9. Mount in DPX (dextrene polystyrene xylene) or Canada balsam. 10. Currently, modern laboratories employ automated programmable autostainers. Results Interpretation: 1. Nuclei: Blue 2. Cytoplasm: Pink 3. Muscle, collagen, RBCs, keratin, : Pink 4. colloid protein : Pink Observation: …………………………………………………………………………………………………………… …………………………………………………………………………………………………………… Results : …………………………………………………………………………………………………………… …………………………………………………………………………………………………………… Reference: 1. Hand book of Exfoliative cytology; M.C. Lure, Lippincott 2. Clinical Diagnosis in Lab methods by Todd & Sanford ,1984 3. https://www.slideshare.net/kanchanshrestha902/k-anchan-stha?from_action=save
  • 14. Course Name/ code Cytopathology Practical / BML651 Experiment No 5 Title Demonstration of Pap smear preparation Course Co-Ordinator / Faculty Mr. A. Vamsi Kumar Department / School Medical lab technology, SMAS Semester VI 5. DEMONSTRATION OF PAP SMEAR PREPARATION Introduction: Papanicolaou stain (also Papanicolaou’s stain or PAP stain) is the most important stain utilized in the practice of Cytopathology. It is a polychromatic stain containing multiple dyes to differentially stain various components of the cells. This technique was developed by George Papanicolaou, the father of Cytopathology. This method is used to differentiate cells in the smear preparation of various gynecological specimens (pap smears), materials containing exfoliative cells and material from fine needle aspiration. OBJECTIVES OF PAPANICOLAOU STAIN Papanicolaou described three chief objectives for staining of cytological smears: • Definition of nuclear details : Because of the widespread nuclear abnormalities of cancer cells and their diagnostic significance, good staining of the nucleus is of primary importance. • Transparency of cytoplasm: This is of particular importance because of the varying thickness and the frequent overlapping of cells. • Differentiation of cells: Differences in the staining reaction such as that between acidophilic and basophilic cells help greatly in the identification of certain cell types found in smears. PRINCIPLE OF PAPANICOLAOU STAIN Papanicolaou stain includes both acidic and basic dyes. Acidic dye stains the basic components of the cell and basic dye stain the acidic components of the cell. The polychromatic PAP stain involves five dyes in three solutions. 1. Hematoxylin : Natural dye hematoxylin is the nuclear stain which stains cell nuclei blue. It has affinity for chromatin, attaching to sulphate groups on the D.N.A. molecule. Harris’ hematoxylin is the commonest cytologically although Gills’ hematoxylin and Hematoxylin S can be used. 2. Orange Green 6 : This is the first acidic counterstain (cytoplasmic stain) which stains matured and keratinized cells. The target structures are staine d orange in different intensities. 3. Eosin Azure : This is the second counterstain which is a polychrome mixture of eosin Y, light green SF and Bismarck brown. Eosin Y gives a pink colour to cytoplasm of mature squamous cells, nucleoli, cilia and red blood cells. Staining solutions commonly used in cytology are EA 31 and EA 50, while EA 65 Light green SF stains blue to cytoplasm of metabolically active cells like parabasal squamous cells, intermediate squamous cells and columnar cells. Bismarck brown Y stains nothing and sometimes it is often omitted.
  • 15. PROCEDURE OF PAPANICOLAOU STAINING Both progressive and regressive nuclear staining techniques can be used in Papanicolaou stain. Before staining, Wet fixation immediately with Cytology spray fixative 96% ethanol for minimum 30 min is required. I. Procedure of Progressive Papanicolaou Staining Method In the progressive method, the nucleus is stained with hematoxylin to a intensity desired. The intensity of the nuclear staining is controlled by the immersion of the slide into a blueing agent. Most commonly used blueing agent is Sott’s tap water (pH 8.02). Step Reagent Time 1. 95% Alcohol (Fixation) 15-30 minutes 2. 80% Alcohol 2 minutes 3. 60% Alcohol 2 minutes 4. Distilled Water 5 dips 5. Distilled Water 5 dips 6. Hematoxylin stain 3 minutes 7. Distilled Water 3 minutes 8. 60% Alcohol 2 minutes 9. 80% Alcohol 2 minutes 10. 95% Alcohol 2 minutes 11. Orange G Stain 3 minutes 12. 95% ALcohol 2 minutes 13. 95% Alcohol 2 minutes 14. Eosin Azure Stain 3 minutes 15. 95% Alcohol 2 minutes 16. 95% Alcohol 2 minutes
  • 16. 17. 95% Alcohol 2 minutes 18. 95% Alcohol 2 minutes 19. Absolute Alcohol 2 minutes 20. Absolute Alcohol 2 minutes 21. Absolute Alcohol 2 minutes 22. Absolute Alcohol+Xylene (1:1) 2 minutes 23. Xylene 2 minutes 24. Xylene 2 minutes 25. Xylene Till clear 26. Mount in D.P.X II. Procedure of Regressive Papanicolaou Staining Method When using the regressive staining method, the nucleus is deliberately over-stained with a non-acidified haematoxylin. The excess stain is removed with dilute hydrochloric acid solution (acid water). The decolourising process is then stopped by immersing the slide in running tap water. Timing is crucial in the regressive method as de-staining may lead to a hyperchromatic nucleus becoming hypochromatic. Step Reagent Time 1. 90% Alcohol (Fixation) 15-30 minutes 2. 80% Alcohol 2 minutes 3. 60% Alcohol 2 minutes 4. Distilled Water 5 dips 5. Distilled Water 5 dips 6. Hematoxylin stain 3 minutes 7. Distilled Water 10 seconds 8. 1% Acid Alcohol 10 seconds (1 dip) 9. Distilled Water 10 seconds 10. Scott’s Tap Water 2-3 minutes 11. Running Tap Water 2 minutes 12. 60% Alcohol 2 minutes 13. 80% Alcohol 2 minutes 14. 95% Alcohol 2 minutes 15. Orange G Stain 3 minutes 16. 95% ALcohol 2 minutes 17. 95% Alcohol 2 minutes 18. Eosin Azure Stain 3 minutes 19. 95% Alcohol 2 minutes 20. 95% Alcohol 2 minutes 21. 95% Alcohol 2 minutes 22. 95% Alcohol 2 minutes 23. Absolute Alcohol 2 minutes 24. Absolute Alcohol 2 minutes 25. Absolute Alcohol 2 minutes 26. Absolute Alcohol+Xylene (1:1) 2 minutes 27. Xylene 2 minutes 28. Xylene 2 minutes
  • 17. 29. Xylene Till clear 30. Mount in D.P.X RESULTS AND INTERPRETATION OF PAPANICOLAOU STAINING 1. Nuclei : Blue 2. Acidophilic cells : Red 3. Basophilic cells : Blue Green 4. Erythrocytes : Orange-red 5. Keratin : Orange-red 6. Superficial cells : Pink Reference: 1. Text book of Medical Laboratory Technology by Godkar 2. Introduction to Medical laboratory technology by J. Baker, R.E. Silverstone 3. Anatomy for Nurses By Asha Latha
  • 18. Course Name/ code Cytopathology Practical / BML651 Experiment No 6 Title Demonstration of Fine Needle Aspiration Cytology(FNAC) Course Co-Ordinator / Faculty Mr. A. Vamsi Kumar Department / School Medical lab technology, SMAS Semester VI 6. DEMONSTRATION OF FINE NEEDLE ASPIRATION CYTOLOGY (FNAC) Introduction: FNAC is the study of cellular samples obtained through a fine needle under negative pressure. The technique is relatively painless and inexpensive. When performed by well-trained pathologists / surgeons / clinicians and reported by experienced pathologists, it can provide unequivocal diagnosis in most of the situations. It is useful in lesions that are easily palpable, like growth of skin, subcutaneous soft tissue tumours, thyroid, lymph nodes, salivary glands and breast. Guided aspiration by internal imaging techniques like C.T or ultrasonography allows FNA of lesions of internal organs like lung, mediastinum, abdominal and retroperitoneal organs, prostate etc. The low risk of complications allows it to be performed as an out-patient procedure. It is highly suitable in debilitated patients, multiple lesions and easily repeatable. The three pre-requisites for a meaningful diagnosis on FNAC are: 1. Proper technique - procedure, preparation of smears, fixation, staining. 2. Microscopic evaluation of smears. 3. Correlation of morphology with the clinical picture (history, clinical features, radiological and laboratory findings). The Technique: Attention to technique is necessary to optimize the yield of the sample, making its interpretation easier and more reliable. Expertise regarding the technique comes from constant practice and correlation of the smear technique with the results (feedback). Equipment: The success or failure of the aspiration procedure depends to some extent on the organization of the set up. Some institutions set aside appropriately equipped areas dedicated to the procedure. Otherwise, the materials can be arranged on movable carts or even in portable containers. Thus FNA can be performed as an outpatient procedure or at the patient’s bedside. Needles: Standard disposable 22-24 gauge 1-1½-inch needles are used for plain FNAC. The length and caliber of the needle should fit the size, depth, location and the consistency of the target. For small subcutaneous lesions, one-inch 23-gauge needle is ideal while for a deep-seated breast lesion, longer and larger needle is required. Finer needles are also recommended for children, and for vascular organs like thyroid. Syringes: Standard disposable plastic syringes of 10ml are used. Syringe should be of good quality and should produce good negative pressure. 5cc syringes can be used for vascular organs like thyroid. One important factor is to check the tight fit of the needle on the syringe tip. A loosely fitting needle can render the procedure useless and may injure the patient Syringe holder: A syringe piston handle can be used, leaving one hand free to immobilize the lesion. This is not absolutely essential and is a matter of choice of the aspirator.
  • 19. Slides: Plain glass slides of good quality are used. Slides should be clean, dry, transparent and grease free. Fixative: 95% ethyl alcohol is recommended. Fixative is kept ready in Coplin jars. Other supplies: Test tubes, pencil for marking, alcohol, swabs for skin, watchglass, saline, adhesive dressing, gloves etc. are needed. All the materials required are assembled in advance before starting the procedure. This is extremely important as delay in fixation can make interpretation of smears difficult. Aspiration Procedure Steps to be followed before performing the aspiration 1. Relevant history and clinical details, radiological findings, provisional diagnosis etc. must be entered in the requisition form. Site of FNA must be clearly stated. 2. Lesion to be aspirated is palpated and its suitability for aspiration assessed. The appropriate needle is selected accordingly. 3. The procedure must be clearly explained to the patient and consent and co-operation ensured. Patient may be anxious which needs to be allayed. Ignoring this simple but crucial step can result in failure. 4. Before starting the procedure, ensure that all the required equipment, instruments and supplies are available. 5. All universal precautions should be followed during the procedure. Steps to be followed in the actual performance of the aspiration: 1. Positioning the patient: Any comfortable position can be chosen depending on the convenience to palpate the lesion and the comfort of the patient. FNA is usually carried out with the patient lying supine on an examination couch. 2. Immobilization of the lesion: Skin is cleansed firmly with an alcohol swab (as used for routine injection). Local anesthetic may not be necessary. Apprehensive patients must be reassured about the procedure. The lesion is fixed between the thumb and index finger of the left hand, with the skin stretched. Try to avoid significant muscle mass eg. sternocleidomastoid, while fixing the lesion because it is not only painful, but also muscle tends to plug the needle tip, preventing further material from entering the needle. 3.Penetrating the lesion: Fixing the lesion with one hand, grasp the syringe with the needle attached (with or without syringe holder) by the dominant hand and introduce through the skin into the lesion, carefully and swiftly. The angle and depth of entry varies with the type of lesion. For small lesions, aspiration of central portion is indicated. For larger lesions that may have necrosis, cystic change or hemorrhage in the center, aspiration may be done from the periphery. If pus or necrotic material alone is aspirated from larger lesions, FNA can be repeated immediately from the periphery. With experience, a change in tissue consistency will be felt as the needle enters the lesion. If the needle goes tangentially missing a small slippery lesion or if penetrates beyond the lesion, representative material will not be obtained.
  • 20. Note: If the site of FNA is located near the thoracic cage e.g. axillary or supraclavicular swelings, aspiration is better performed in a plane parallel to the thoracic cage to avoid pneumothrax. In thyroid FNA, patient should be instructed not to swallow or talk when the needle is inside the nodule. 4.Creation of a vacuum and obtaining the material: Suction is applied after entering the lesion and while maintaining the suction, needle is moved vigorously back and forth in a sawing or cutting motion, changing the direction a few times, ensuring that the needle is inside the mass throughout; the whole procedure taking only 4-8 seconds. Do not rotate the needle or pump the plunger in the syringe in and out. Purpose of suction is to pull the tissue against the cutting edge of the needle and to pull the dislodged tissue fragments and cells into the lumen of the needle. Material is procured by cutting motion of the needle and not by suction. This is evident in the non-aspiration technique in which the needle alone is moved back and forth in the lesion and withdrawn. Admixture with blood is less with this technique and is useful in thyroid aspiration. When the needle is moved in different directions, it samples a much wider area than a core biopsy (FNA is thus more representative than a core biopsy). The to and fro movements and changing the direction of the needle, while it is still inside the lesion are the two crucial steps in procuring an adequate representative sample. Movement of the needle is adjusted according to the type of lesion. A sclerotic lesion will require more force than a soft tumor. A cyst will almost aspirate by itself. When fluid is aspirated, its color, consistency and amount should be recorded in the requisition form, which allows the lesion to be recognized as cystic. Fluid can be sent in a bottle for centrifugation and preparation of smear. In cystic lesions, especially of breast and salivary gland, a large cyst may obscure a small malignant tumor. Hence cysts should be completely aspirated (fluid is sent for centrifugation) and residual lump if any, should be re-aspirated and labeled separately. In sclerotic / fibrotic lesions e.g. Breast, little or no material will be obtained and the aspiration should not be continued indefinitely. There is no use trying a wider bore needle; in fact a finer needle may succeed in obtaining more material. Vascular organs like thyroid must be sampled rapidly with minimal movement of the needle. If blood appears in the barrel of the syringe, the procedure is discontinued as blood will dilute the sample and render it diagnostically useless. Except for cystic lesions or vascular organs, nothing should be seen in the barrel of the syringe. Thus the purpose of syringe is not to collect material, but to provide suction facilitating entry of cells into the needle and then to expel them from the needle, while making smears. Observations while doing the aspiration regarding site, size, and consistency (solid / cystic/ soft / sclerotic / vascular) must be correlated while interpreting the smears later. The clinician/ pathologist should record all these relevant observations in the requisition form. 5.Release of vacuum and withdrawal of the needle: When material is seen in the hub of the needle, procedure is discontinued. Before withdrawing the needle, suction is released and needle pulled straight out. The piston is just allowed to slowly fall back by itself (never push). Failure to release negative pressure within the lesion will cause the aspirated material to enter the syringe, which is difficult to recover. In desperate situations, syringe and the needle can be rinsed with saline or fixative and then centrifuged to prepare a smear. Immediately after withdrawing the needle, firm local pressure is applied at the site for sometime, preferably by an assistant. This is to prevent bruising or haematoma formation especially in thyroid, breast etc. Note: If a cork of tissue is obtained during FNA or if the sample clots quickly, entrapping the cells, the clot or tissue can be fixed in formalin and processed as for histology.
  • 22. Course Name/ code Cytopathology Practical / BML651 Experiment No 7 Title Demonstration of Vaginal, Cervical, Sputum staining Course Co-Ordinator / Faculty Mr. A. Vamsi Kumar Department / School Medical lab technology, SMAS Semester VI 7. DEMONSTRATION OF VAGINAL, CERVICAL, SPUTUM STAINING Note: Refer Experiment No. 4 & 5 for Vaginal & Cervical smear Staining. Aim: To perform Ziehl-Nelson Stain in the given sputum smear. Principle: When the smear is stained with carbol fuchsin, it solubilizes the lipoidal material present in the Mycobacterial cell wall but by the application of heat, carbol fuchsin further penetrates through lipoidal wall and enters into cytoplasm. Then after all cell appears red. Then the smear is decolorized with decolorizing agent (3% HCL in 95% alcohol) but the acid fast cells are resistant due to the presence of large amount of lipoidal material in their cell wall which prevents the penetration of decolorizing solution. The non-acid fast organism lack the lipoidal material in their cell wall due to which they are easily decolorized, leaving the cells colorless. Then the smear is stained with counterstain, methylene blue. Only decolorized cells absorb the counter stain and take its color and appears blue while acid-fast cells retain the red color. Materials & Reagents 1. Carbol fuschin (basic dye). 2. Bunsen Burner (heat). 3. 20% sulphuric acid (decolorizer). 4. Methylene blue (counter stain) or Malachite green. 5. Glass slide. 6. Staining rack. 7. Sputum Sample. 8. Other PPEs. Procedure: 1. Make a thin smear of the material for study and heat fix by passing the slide 3-4 times through the flame of a Bunsen burner or use a slide warmer at 65-75 C. Do not overheat. 2. Place the slide on staining rack and pour carbol fuschin over smear and heat gently underside of the slide by passing a flame under the rack until fumes appear (without boiling!). Do not overheat and allow it to stand for 5 minutes. 3. Rinse smears with water until no color appears in the effluent. 4. Pour 20% sulphuric acid, wait for one minute and keep on repeating this step until the slide appears light pink in color (15-20 sec). 5. Wash well with clean water. 6. Cover the smear with methylene blue or malachite green stain for 1–2 minutes. 7. Wash off the stain with clean water.
  • 23. 8. Wipe the back of the slide clean, and place it in a draining rack for the smear to air-dry (do not blot dry). 9. Examine the smear microscopically, using the 100x oil immersion objective. Pattern of Examining Slides Observation: …………………………………………………………………………………………………………… …………………………………………………………………………………………………………… Result: …………………………………………………………………………………………………………… …………………………………………………………………………………………………………… Interpretation of Results: 1. Acid Fast Bacilli : Red, straight or slightly curved rods, occurring singly or in small groups, may appear beaded 2. Cells : Green (malachite green) or Blue (methylene blue) 3. Background material : Green (malachite green) or Blue (methylene blue) REPORTING THE SPUTUM SMEAR • When any definite red bacilli are seen : Report the smear as ‘AFB POSITIVE’, and give an indication of the number of bacteria present as follows: Number of AFB seen (1000X Magnification) Reported As 0 AFB per 300 Field AFB Not Seen 1-2 AFB per 300 Fields Doubtful; repeat with another specimen 1-9 AFB per 100 Fields 1+ 1-9 AFB per 10 Fields 2+ 1-9 AFB per Field 3+ >9 AFB per Field 4+ • When very few AFB are seen: E.g. when only one or two AFB are seen, request a further specimen to examine. Tap water sometimes contain AFB that resemble tubercle bacilli, and occasionally stained scratches on a slide can be mistaken for AFB. Occasionally AFB can be transferred from one smear to another when the same piece of blotting paper is used to dry several smears. • When no AFB are seen after examining 300 fields: Report the smear as ‘AFB NOT SEEN’. Do not report ‘Negative’ because organisms may be
  • 24. present but not seen in those fields examined. Up to three specimens (one collected as an early morning specimen) may need to be examined to detect M. tuberculosis in sputum. List of Acid Fast organisms 1. Mycobacterium spp: Acid Fast 2. Cyst of Cryptosporidium: Acid Fast 3. Cyst of Isospora: Acid Fast 4. Nocardia spp: Partial Acid Fast 5. Rhodococcus spp: Partial Acid Fast 6. Legionella micdadei: Partially acid fast in tissue 7. Head of the Sperm: Acid Fast Mycobacterium tuberculosis visualization using the Ziehl–Neelsen stain. Source: Wikipedia Reference: 1. https://laboratoryinfo.com/zn-stain/ 2. https://microbiologyinfo.com/acid-fast-stain-principle-procedure-interpretation-and- examples/ 3. https://microbeonline.com/ziehl-neelsen-technique-principle-procedure-reporting/ 4. http://howmed.net/microbiology/ziehl-neelsen-staining-principle-procedure-and- interpretations/ THE END
  • 25. CONTACT DETAILS Course Name/ code Immunology & Bacterial serology Lab / BML651 Course Co-Ordinator Mr. A. Vamsi Kumar (Asst Prof) Phone Number +91 7416660584 Lab Assistant Mr. Manoj, Mr. Raja Lab Assistant Contact No. +91 7088801539, +91 8218302946 Department / School Medical Lab Technology, SMAS Semester VI