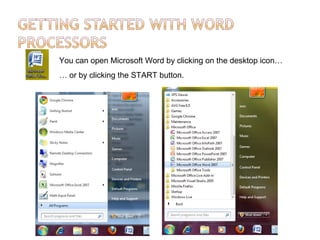
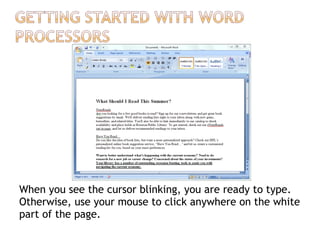
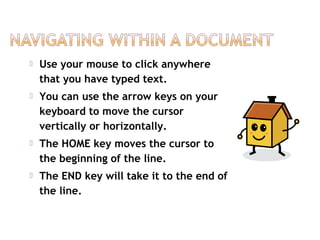
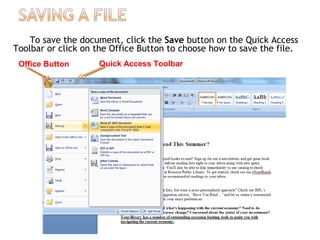
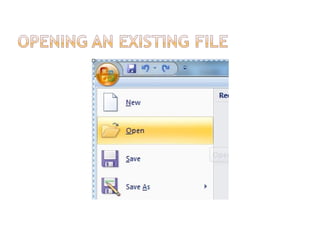
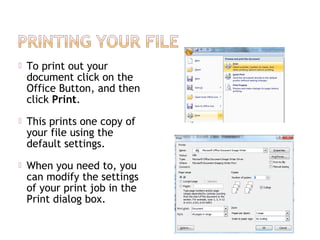
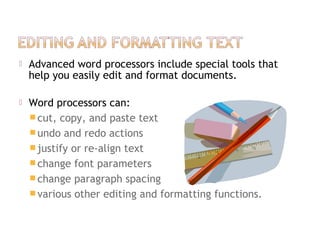
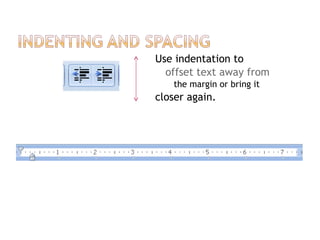
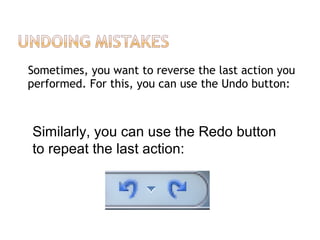
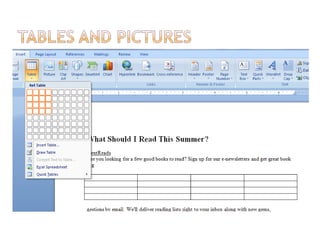
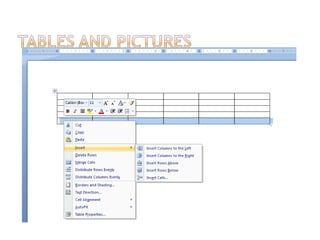
SlideShare a Scribd company logo
J. Anne Shirley
Assistant Professor
Bon Secours College, Thanjavur.
You can open Microsoft Word by clicking on the desktop icon…
… or by clicking the START button.
When you see the cursor blinking, you are ready to type.
Otherwise, use your mouse to click anywhere on the white
part of the page.
 Use your mouse to click anywhere
that you have typed text.
 You can use the arrow keys on your
keyboard to move the cursor
vertically or horizontally.
 The HOME key moves the cursor to
the beginning of the line.
 The END key will take it to the end of
the line.
To save the document, click the Save button on the Quick Access
Toolbar or click on the Office Button to choose how to save the file.
Office Button Quick Access Toolbar
On the Standard
toolbar, click the Open
button.
In the Open dialog box,
double-click the name of
the document you want
to open.
 To print out your
document click on the
Office Button, and then
click Print.
 This prints one copy of
your file using the
default settings.
 When you need to, you
can modify the settings
of your print job in the
Print dialog box.
 Advanced word processors include special tools that
help you easily edit and format documents.
 Word processors can:
cut, copy, and paste text
undo and redo actions
justify or re-align text
change font parameters
change paragraph spacing
various other editing and formatting functions.
1.Select
Hold down the left mouse button and drag the cursor OR
Hold down SHIFT and use the arrow keys on the keyboard.
1.Copy
You can find the Copy and Paste commands under the Home
Tab.
1.Paste
You can also copy and paste by clicking with the
right mouse button on a word you have selected
to pull up a shortcut menu.
Using Cut + Paste is like moving text
from one location to a new one.
The cut command is located :
 in the Home Tab
 or in a shortcut menu when you
right-click on a selected word
In the Font dialog box, you can
make changes to the type, style,
size, and color of font used in
the document.
Many of these text
options can also be
found on your Home
Ribbon in the Font
Group.
Font Size Color
You can specify the arrangement of
objects, text, and graphics, in
predetermined positions using the
alignment settings.
You can align the selected text to the
left, right, or center by using the left,
right, and center alignment buttons.
You can use the bullet or numbering options to
organize information into lists.
Bullets Numbering
• Aardvark
• Butterfly
• Cactus
• Daffodil
1. Aardvark
2. Butterfly
3. Cactus
4. Daffodil
Use indentation to
offset text away from
the margin or bring it
closer again.
Sometimes, you want to reverse the last action you
performed. For this, you can use the Undo button:
Similarly, you can use the Redo button
to repeat the last action:
Advanced word processors, such
as Word, can automatically
detect the language of the typed
text and then use the spelling
dictionary, grammar checker, and
punctuation rules for that
language.
Language tools are a convenient
way to perform certain tasks
automatically as you type, such
as checking spelling and
grammar.
• Wavy red lines=spelling
errors
• Wavy green
lines=grammatical
mistakes
• You can check the
spelling and grammar of
the entire document by
clicking the Spelling and
Grammar Button on the
Review Tab.
 Spelling suggestions
 Change All
 AutoCorrect
 Grammar suggestions
 Custom dictionary
 Ignoring instances

More Related Content

What's hot

Microsoft Word Home tab Presentation
Microsoft Word Home tab PresentationMicrosoft Word Home tab Presentation
Microsoft Word Home tab Presentation
Tanveer Ahmed
 
Ms word and Ms Excel Presentation
Ms word and Ms Excel PresentationMs word and Ms Excel Presentation
Ms word and Ms Excel Presentation
haris601
 
MS WORD
MS WORDMS WORD
Word Chapter 2 - Formatting Characters and Paragraphs
Word Chapter 2 - Formatting Characters and ParagraphsWord Chapter 2 - Formatting Characters and Paragraphs
Word Chapter 2 - Formatting Characters and Paragraphsdpd
 
application packages
application packagesapplication packages
application packages
umardanjumamaiwada
 
Practical File Itm
Practical File ItmPractical File Itm
Practical File Itm
RahulPersonality
 
Ms excel (page layout)
Ms excel (page layout)Ms excel (page layout)
Ms excel (page layout)
Saransh Arora
 
Microsoft word basics
Microsoft word basicsMicrosoft word basics
Microsoft word basics
Aitezaz Hassan
 
Word for Beginners
Word for BeginnersWord for Beginners
Word for Beginners
Katheryn Woodworth
 
Beginners: Microsoft Office Word 2007 Lesson 2
Beginners: Microsoft Office Word 2007 Lesson 2Beginners: Microsoft Office Word 2007 Lesson 2
Beginners: Microsoft Office Word 2007 Lesson 2
adultref
 
MS Word Introduction and Tools.
MS Word Introduction and Tools.MS Word Introduction and Tools.
MS Word Introduction and Tools.
Work? What is that?
 
Using ms word
Using ms wordUsing ms word
Using ms wordZahra Naz
 
Text formatting in ms word ppt
Text formatting in ms word pptText formatting in ms word ppt
Text formatting in ms word ppt
Josephclarin15
 
Microsoft word -_microsoft_word_exercise
Microsoft word -_microsoft_word_exerciseMicrosoft word -_microsoft_word_exercise
Microsoft word -_microsoft_word_exerciseSubeesh Up
 
intro of ms word 2007
intro of ms word 2007intro of ms word 2007
intro of ms word 2007Pakeeza Noor
 

What's hot (19)

Microsoft Word Home tab Presentation
Microsoft Word Home tab PresentationMicrosoft Word Home tab Presentation
Microsoft Word Home tab Presentation
 
Ms word and Ms Excel Presentation
Ms word and Ms Excel PresentationMs word and Ms Excel Presentation
Ms word and Ms Excel Presentation
 
MS WORD
MS WORDMS WORD
MS WORD
 
Word Chapter 2 - Formatting Characters and Paragraphs
Word Chapter 2 - Formatting Characters and ParagraphsWord Chapter 2 - Formatting Characters and Paragraphs
Word Chapter 2 - Formatting Characters and Paragraphs
 
MS WORD 2013
MS WORD 2013MS WORD 2013
MS WORD 2013
 
application packages
application packagesapplication packages
application packages
 
Practical File Itm
Practical File ItmPractical File Itm
Practical File Itm
 
Ms excel (page layout)
Ms excel (page layout)Ms excel (page layout)
Ms excel (page layout)
 
Lecture four
Lecture fourLecture four
Lecture four
 
Microsoft word basics
Microsoft word basicsMicrosoft word basics
Microsoft word basics
 
Word for Beginners
Word for BeginnersWord for Beginners
Word for Beginners
 
Beginners: Microsoft Office Word 2007 Lesson 2
Beginners: Microsoft Office Word 2007 Lesson 2Beginners: Microsoft Office Word 2007 Lesson 2
Beginners: Microsoft Office Word 2007 Lesson 2
 
Powerpoint class 1
Powerpoint class 1Powerpoint class 1
Powerpoint class 1
 
MS Word Introduction and Tools.
MS Word Introduction and Tools.MS Word Introduction and Tools.
MS Word Introduction and Tools.
 
Using ms word
Using ms wordUsing ms word
Using ms word
 
Text formatting in ms word ppt
Text formatting in ms word pptText formatting in ms word ppt
Text formatting in ms word ppt
 
Tables
TablesTables
Tables
 
Microsoft word -_microsoft_word_exercise
Microsoft word -_microsoft_word_exerciseMicrosoft word -_microsoft_word_exercise
Microsoft word -_microsoft_word_exercise
 
intro of ms word 2007
intro of ms word 2007intro of ms word 2007
intro of ms word 2007
 

Similar to Word07presentation

Introduction to word processing
Introduction to word processingIntroduction to word processing
Introduction to word processing
Iddrisu Issah
 
Microsoft office word 2003
Microsoft office word 2003Microsoft office word 2003
Microsoft office word 2003
sasika fernando
 
Ms word 2007
Ms word 2007Ms word 2007
1.0 Introduction to Information Technology
1.0 Introduction to Information Technology1.0 Introduction to Information Technology
1.0 Introduction to Information Technology
AIMIZAWANIZAINAL1
 
Microsoft Word Intermediate
Microsoft Word  IntermediateMicrosoft Word  Intermediate
Microsoft Word Intermediate
University of Puerto Rico
 
2020 Resume formatting Tips
2020 Resume formatting Tips 2020 Resume formatting Tips
2020 Resume formatting Tips
PrintableResumes.com
 
Microsoft Office
Microsoft OfficeMicrosoft Office
Microsoft Office
Swati Sinha
 
Lecture 05 (Word Processing).pptx
Lecture 05 (Word Processing).pptxLecture 05 (Word Processing).pptx
Lecture 05 (Word Processing).pptx
MwangaPrayGod
 
Ms word2013 complete
Ms word2013  completeMs word2013  complete
Ms word2013 complete
SOMITTUBE
 
03.ms word
03.ms word03.ms word
03.ms word
Juber Khan
 
Microsoft word for beginners
Microsoft word for beginnersMicrosoft word for beginners
Microsoft word for beginners
FritzOsongco1
 
MS WORD.pptx
MS WORD.pptxMS WORD.pptx
MS WORD.pptx
FrenzDelaCruz2
 
GRADE 7 LESSON 5 MS WORD INTRO.ppt
GRADE 7 LESSON 5 MS WORD INTRO.pptGRADE 7 LESSON 5 MS WORD INTRO.ppt
GRADE 7 LESSON 5 MS WORD INTRO.ppt
LimEchYrr
 
Components of the word window
Components of the word windowComponents of the word window
Components of the word windowsusoav
 
Office productivity tools (part i) (3.13 mb)
Office productivity tools (part i) (3.13 mb)Office productivity tools (part i) (3.13 mb)
Office productivity tools (part i) (3.13 mb)IMRAN KHAN
 
Microsoft word
Microsoft wordMicrosoft word
Microsoft word
RoshanMaharjan13
 
Customize Word Environment
Customize Word EnvironmentCustomize Word Environment
Customize Word EnvironmentCik Na Shohaili
 

Similar to Word07presentation (20)

Introduction to word processing
Introduction to word processingIntroduction to word processing
Introduction to word processing
 
Microsoft office word 2003
Microsoft office word 2003Microsoft office word 2003
Microsoft office word 2003
 
Ms word 2007
Ms word 2007Ms word 2007
Ms word 2007
 
1.0 Introduction to Information Technology
1.0 Introduction to Information Technology1.0 Introduction to Information Technology
1.0 Introduction to Information Technology
 
Microsoft Word Intermediate
Microsoft Word  IntermediateMicrosoft Word  Intermediate
Microsoft Word Intermediate
 
2020 Resume formatting Tips
2020 Resume formatting Tips 2020 Resume formatting Tips
2020 Resume formatting Tips
 
Microsoft Office
Microsoft OfficeMicrosoft Office
Microsoft Office
 
Microsoft word
Microsoft wordMicrosoft word
Microsoft word
 
Lecture 05 (Word Processing).pptx
Lecture 05 (Word Processing).pptxLecture 05 (Word Processing).pptx
Lecture 05 (Word Processing).pptx
 
Ms word2013 complete
Ms word2013  completeMs word2013  complete
Ms word2013 complete
 
03.ms word
03.ms word03.ms word
03.ms word
 
Microsoft word for beginners
Microsoft word for beginnersMicrosoft word for beginners
Microsoft word for beginners
 
Word presentation ict1b
Word presentation ict1bWord presentation ict1b
Word presentation ict1b
 
MS WORD.pptx
MS WORD.pptxMS WORD.pptx
MS WORD.pptx
 
GRADE 7 LESSON 5 MS WORD INTRO.ppt
GRADE 7 LESSON 5 MS WORD INTRO.pptGRADE 7 LESSON 5 MS WORD INTRO.ppt
GRADE 7 LESSON 5 MS WORD INTRO.ppt
 
Components of the word window
Components of the word windowComponents of the word window
Components of the word window
 
Office productivity tools (part i) (3.13 mb)
Office productivity tools (part i) (3.13 mb)Office productivity tools (part i) (3.13 mb)
Office productivity tools (part i) (3.13 mb)
 
Microsoft word
Microsoft wordMicrosoft word
Microsoft word
 
Introduction to microsoft word 2007
Introduction to microsoft word 2007Introduction to microsoft word 2007
Introduction to microsoft word 2007
 
Customize Word Environment
Customize Word EnvironmentCustomize Word Environment
Customize Word Environment
 

Recently uploaded

Azure Interview Questions and Answers PDF By ScholarHat
Azure Interview Questions and Answers PDF By ScholarHatAzure Interview Questions and Answers PDF By ScholarHat
Azure Interview Questions and Answers PDF By ScholarHat
Scholarhat
 
Lapbook sobre os Regimes Totalitários.pdf
Lapbook sobre os Regimes Totalitários.pdfLapbook sobre os Regimes Totalitários.pdf
Lapbook sobre os Regimes Totalitários.pdf
Jean Carlos Nunes Paixão
 
Digital Tools and AI for Teaching Learning and Research
Digital Tools and AI for Teaching Learning and ResearchDigital Tools and AI for Teaching Learning and Research
Digital Tools and AI for Teaching Learning and Research
Vikramjit Singh
 
How to Make a Field invisible in Odoo 17
How to Make a Field invisible in Odoo 17How to Make a Field invisible in Odoo 17
How to Make a Field invisible in Odoo 17
Celine George
 
TESDA TM1 REVIEWER FOR NATIONAL ASSESSMENT WRITTEN AND ORAL QUESTIONS WITH A...
TESDA TM1 REVIEWER  FOR NATIONAL ASSESSMENT WRITTEN AND ORAL QUESTIONS WITH A...TESDA TM1 REVIEWER  FOR NATIONAL ASSESSMENT WRITTEN AND ORAL QUESTIONS WITH A...
TESDA TM1 REVIEWER FOR NATIONAL ASSESSMENT WRITTEN AND ORAL QUESTIONS WITH A...
EugeneSaldivar
 
The Accursed House by Émile Gaboriau.pptx
The Accursed House by Émile Gaboriau.pptxThe Accursed House by Émile Gaboriau.pptx
The Accursed House by Émile Gaboriau.pptx
DhatriParmar
 
STRAND 3 HYGIENIC PRACTICES.pptx GRADE 7 CBC
STRAND 3 HYGIENIC PRACTICES.pptx GRADE 7 CBCSTRAND 3 HYGIENIC PRACTICES.pptx GRADE 7 CBC
STRAND 3 HYGIENIC PRACTICES.pptx GRADE 7 CBC
kimdan468
 
Mule 4.6 & Java 17 Upgrade | MuleSoft Mysore Meetup #46
Mule 4.6 & Java 17 Upgrade | MuleSoft Mysore Meetup #46Mule 4.6 & Java 17 Upgrade | MuleSoft Mysore Meetup #46
Mule 4.6 & Java 17 Upgrade | MuleSoft Mysore Meetup #46
MysoreMuleSoftMeetup
 
Guidance_and_Counselling.pdf B.Ed. 4th Semester
Guidance_and_Counselling.pdf B.Ed. 4th SemesterGuidance_and_Counselling.pdf B.Ed. 4th Semester
Guidance_and_Counselling.pdf B.Ed. 4th Semester
Atul Kumar Singh
 
BÀI TẬP BỔ TRỢ TIẾNG ANH GLOBAL SUCCESS LỚP 3 - CẢ NĂM (CÓ FILE NGHE VÀ ĐÁP Á...
BÀI TẬP BỔ TRỢ TIẾNG ANH GLOBAL SUCCESS LỚP 3 - CẢ NĂM (CÓ FILE NGHE VÀ ĐÁP Á...BÀI TẬP BỔ TRỢ TIẾNG ANH GLOBAL SUCCESS LỚP 3 - CẢ NĂM (CÓ FILE NGHE VÀ ĐÁP Á...
BÀI TẬP BỔ TRỢ TIẾNG ANH GLOBAL SUCCESS LỚP 3 - CẢ NĂM (CÓ FILE NGHE VÀ ĐÁP Á...
Nguyen Thanh Tu Collection
 
Supporting (UKRI) OA monographs at Salford.pptx
Supporting (UKRI) OA monographs at Salford.pptxSupporting (UKRI) OA monographs at Salford.pptx
Supporting (UKRI) OA monographs at Salford.pptx
Jisc
 
June 3, 2024 Anti-Semitism Letter Sent to MIT President Kornbluth and MIT Cor...
June 3, 2024 Anti-Semitism Letter Sent to MIT President Kornbluth and MIT Cor...June 3, 2024 Anti-Semitism Letter Sent to MIT President Kornbluth and MIT Cor...
June 3, 2024 Anti-Semitism Letter Sent to MIT President Kornbluth and MIT Cor...
Levi Shapiro
 
Marketing internship report file for MBA
Marketing internship report file for MBAMarketing internship report file for MBA
Marketing internship report file for MBA
gb193092
 
Francesca Gottschalk - How can education support child empowerment.pptx
Francesca Gottschalk - How can education support child empowerment.pptxFrancesca Gottschalk - How can education support child empowerment.pptx
Francesca Gottschalk - How can education support child empowerment.pptx
EduSkills OECD
 
Model Attribute Check Company Auto Property
Model Attribute  Check Company Auto PropertyModel Attribute  Check Company Auto Property
Model Attribute Check Company Auto Property
Celine George
 
Biological Screening of Herbal Drugs in detailed.
Biological Screening of Herbal Drugs in detailed.Biological Screening of Herbal Drugs in detailed.
Biological Screening of Herbal Drugs in detailed.
Ashokrao Mane college of Pharmacy Peth-Vadgaon
 
How libraries can support authors with open access requirements for UKRI fund...
How libraries can support authors with open access requirements for UKRI fund...How libraries can support authors with open access requirements for UKRI fund...
How libraries can support authors with open access requirements for UKRI fund...
Jisc
 
Unit 2- Research Aptitude (UGC NET Paper I).pdf
Unit 2- Research Aptitude (UGC NET Paper I).pdfUnit 2- Research Aptitude (UGC NET Paper I).pdf
Unit 2- Research Aptitude (UGC NET Paper I).pdf
Thiyagu K
 
S1-Introduction-Biopesticides in ICM.pptx
S1-Introduction-Biopesticides in ICM.pptxS1-Introduction-Biopesticides in ICM.pptx
S1-Introduction-Biopesticides in ICM.pptx
tarandeep35
 
Synthetic Fiber Construction in lab .pptx
Synthetic Fiber Construction in lab .pptxSynthetic Fiber Construction in lab .pptx
Synthetic Fiber Construction in lab .pptx
Pavel ( NSTU)
 

Recently uploaded (20)

Azure Interview Questions and Answers PDF By ScholarHat
Azure Interview Questions and Answers PDF By ScholarHatAzure Interview Questions and Answers PDF By ScholarHat
Azure Interview Questions and Answers PDF By ScholarHat
 
Lapbook sobre os Regimes Totalitários.pdf
Lapbook sobre os Regimes Totalitários.pdfLapbook sobre os Regimes Totalitários.pdf
Lapbook sobre os Regimes Totalitários.pdf
 
Digital Tools and AI for Teaching Learning and Research
Digital Tools and AI for Teaching Learning and ResearchDigital Tools and AI for Teaching Learning and Research
Digital Tools and AI for Teaching Learning and Research
 
How to Make a Field invisible in Odoo 17
How to Make a Field invisible in Odoo 17How to Make a Field invisible in Odoo 17
How to Make a Field invisible in Odoo 17
 
TESDA TM1 REVIEWER FOR NATIONAL ASSESSMENT WRITTEN AND ORAL QUESTIONS WITH A...
TESDA TM1 REVIEWER  FOR NATIONAL ASSESSMENT WRITTEN AND ORAL QUESTIONS WITH A...TESDA TM1 REVIEWER  FOR NATIONAL ASSESSMENT WRITTEN AND ORAL QUESTIONS WITH A...
TESDA TM1 REVIEWER FOR NATIONAL ASSESSMENT WRITTEN AND ORAL QUESTIONS WITH A...
 
The Accursed House by Émile Gaboriau.pptx
The Accursed House by Émile Gaboriau.pptxThe Accursed House by Émile Gaboriau.pptx
The Accursed House by Émile Gaboriau.pptx
 
STRAND 3 HYGIENIC PRACTICES.pptx GRADE 7 CBC
STRAND 3 HYGIENIC PRACTICES.pptx GRADE 7 CBCSTRAND 3 HYGIENIC PRACTICES.pptx GRADE 7 CBC
STRAND 3 HYGIENIC PRACTICES.pptx GRADE 7 CBC
 
Mule 4.6 & Java 17 Upgrade | MuleSoft Mysore Meetup #46
Mule 4.6 & Java 17 Upgrade | MuleSoft Mysore Meetup #46Mule 4.6 & Java 17 Upgrade | MuleSoft Mysore Meetup #46
Mule 4.6 & Java 17 Upgrade | MuleSoft Mysore Meetup #46
 
Guidance_and_Counselling.pdf B.Ed. 4th Semester
Guidance_and_Counselling.pdf B.Ed. 4th SemesterGuidance_and_Counselling.pdf B.Ed. 4th Semester
Guidance_and_Counselling.pdf B.Ed. 4th Semester
 
BÀI TẬP BỔ TRỢ TIẾNG ANH GLOBAL SUCCESS LỚP 3 - CẢ NĂM (CÓ FILE NGHE VÀ ĐÁP Á...
BÀI TẬP BỔ TRỢ TIẾNG ANH GLOBAL SUCCESS LỚP 3 - CẢ NĂM (CÓ FILE NGHE VÀ ĐÁP Á...BÀI TẬP BỔ TRỢ TIẾNG ANH GLOBAL SUCCESS LỚP 3 - CẢ NĂM (CÓ FILE NGHE VÀ ĐÁP Á...
BÀI TẬP BỔ TRỢ TIẾNG ANH GLOBAL SUCCESS LỚP 3 - CẢ NĂM (CÓ FILE NGHE VÀ ĐÁP Á...
 
Supporting (UKRI) OA monographs at Salford.pptx
Supporting (UKRI) OA monographs at Salford.pptxSupporting (UKRI) OA monographs at Salford.pptx
Supporting (UKRI) OA monographs at Salford.pptx
 
June 3, 2024 Anti-Semitism Letter Sent to MIT President Kornbluth and MIT Cor...
June 3, 2024 Anti-Semitism Letter Sent to MIT President Kornbluth and MIT Cor...June 3, 2024 Anti-Semitism Letter Sent to MIT President Kornbluth and MIT Cor...
June 3, 2024 Anti-Semitism Letter Sent to MIT President Kornbluth and MIT Cor...
 
Marketing internship report file for MBA
Marketing internship report file for MBAMarketing internship report file for MBA
Marketing internship report file for MBA
 
Francesca Gottschalk - How can education support child empowerment.pptx
Francesca Gottschalk - How can education support child empowerment.pptxFrancesca Gottschalk - How can education support child empowerment.pptx
Francesca Gottschalk - How can education support child empowerment.pptx
 
Model Attribute Check Company Auto Property
Model Attribute  Check Company Auto PropertyModel Attribute  Check Company Auto Property
Model Attribute Check Company Auto Property
 
Biological Screening of Herbal Drugs in detailed.
Biological Screening of Herbal Drugs in detailed.Biological Screening of Herbal Drugs in detailed.
Biological Screening of Herbal Drugs in detailed.
 
How libraries can support authors with open access requirements for UKRI fund...
How libraries can support authors with open access requirements for UKRI fund...How libraries can support authors with open access requirements for UKRI fund...
How libraries can support authors with open access requirements for UKRI fund...
 
Unit 2- Research Aptitude (UGC NET Paper I).pdf
Unit 2- Research Aptitude (UGC NET Paper I).pdfUnit 2- Research Aptitude (UGC NET Paper I).pdf
Unit 2- Research Aptitude (UGC NET Paper I).pdf
 
S1-Introduction-Biopesticides in ICM.pptx
S1-Introduction-Biopesticides in ICM.pptxS1-Introduction-Biopesticides in ICM.pptx
S1-Introduction-Biopesticides in ICM.pptx
 
Synthetic Fiber Construction in lab .pptx
Synthetic Fiber Construction in lab .pptxSynthetic Fiber Construction in lab .pptx
Synthetic Fiber Construction in lab .pptx
 

Word07presentation

  • 1. J. Anne Shirley Assistant Professor Bon Secours College, Thanjavur.
  • 2.
  • 3. You can open Microsoft Word by clicking on the desktop icon… … or by clicking the START button.
  • 4. When you see the cursor blinking, you are ready to type. Otherwise, use your mouse to click anywhere on the white part of the page.
  • 5.  Use your mouse to click anywhere that you have typed text.  You can use the arrow keys on your keyboard to move the cursor vertically or horizontally.  The HOME key moves the cursor to the beginning of the line.  The END key will take it to the end of the line.
  • 6. To save the document, click the Save button on the Quick Access Toolbar or click on the Office Button to choose how to save the file. Office Button Quick Access Toolbar
  • 7. On the Standard toolbar, click the Open button. In the Open dialog box, double-click the name of the document you want to open.
  • 8.  To print out your document click on the Office Button, and then click Print.  This prints one copy of your file using the default settings.  When you need to, you can modify the settings of your print job in the Print dialog box.
  • 9.  Advanced word processors include special tools that help you easily edit and format documents.  Word processors can: cut, copy, and paste text undo and redo actions justify or re-align text change font parameters change paragraph spacing various other editing and formatting functions.
  • 10. 1.Select Hold down the left mouse button and drag the cursor OR Hold down SHIFT and use the arrow keys on the keyboard. 1.Copy You can find the Copy and Paste commands under the Home Tab. 1.Paste You can also copy and paste by clicking with the right mouse button on a word you have selected to pull up a shortcut menu.
  • 11. Using Cut + Paste is like moving text from one location to a new one. The cut command is located :  in the Home Tab  or in a shortcut menu when you right-click on a selected word
  • 12. In the Font dialog box, you can make changes to the type, style, size, and color of font used in the document.
  • 13. Many of these text options can also be found on your Home Ribbon in the Font Group. Font Size Color
  • 14. You can specify the arrangement of objects, text, and graphics, in predetermined positions using the alignment settings. You can align the selected text to the left, right, or center by using the left, right, and center alignment buttons.
  • 15. You can use the bullet or numbering options to organize information into lists. Bullets Numbering • Aardvark • Butterfly • Cactus • Daffodil 1. Aardvark 2. Butterfly 3. Cactus 4. Daffodil
  • 16. Use indentation to offset text away from the margin or bring it closer again.
  • 17. Sometimes, you want to reverse the last action you performed. For this, you can use the Undo button: Similarly, you can use the Redo button to repeat the last action:
  • 18.
  • 19.
  • 20.
  • 21.
  • 22.
  • 23. Advanced word processors, such as Word, can automatically detect the language of the typed text and then use the spelling dictionary, grammar checker, and punctuation rules for that language. Language tools are a convenient way to perform certain tasks automatically as you type, such as checking spelling and grammar.
  • 24. • Wavy red lines=spelling errors • Wavy green lines=grammatical mistakes • You can check the spelling and grammar of the entire document by clicking the Spelling and Grammar Button on the Review Tab.
  • 25.  Spelling suggestions  Change All  AutoCorrect  Grammar suggestions  Custom dictionary  Ignoring instances

Editor's Notes

  1. To open Word, double click with the left mouse button on the Microsoft Word icon. OR click Start, point to All Programs, point to Microsoft Office, and then click Microsoft Office Word 2003.
  2. You can use different methods to navigate within a document. Use your mouse to click anywhere that you have typed text. Remember that you can use the scroll bar on the right side of the window to view more sections of your document. You can use the arrow keys on your keyboard to move the cursor vertically or horizontally. To move the insertion point to the beginning of the document, hold down the CTRL key, press the HOME key, and then release the CTRL key. To move the insertion point to the beginning of the line, press the HOME key. To move the insertion point to the end of the line, press the END key. To move the insertion point to the end of the document, hold down the CTRL key, press the END key, and then release the CTRL key.
  3. After creating the document, you want to save it so that you can find it again, and so you don’t lose any of the changes you make. To save the document, on the Standard toolbar, click the Save button, as indicated. The icon on it looks like a little hard disk. To select the folder in which the document should be stored, in the Save As dialog box, double-click the folder labeled School of Fine Art. To change the file name to Announcement Guidelines from the default file name, in the File name box, select School of Fine Art, and then type in the new title. To finish saving the file, in the Save As dialog box, click Save.
  4. To open an existing document, on the Standard toolbar, click the Open button– the icon looks like an opening folder. Then, in the Open dialog box, double-click the Sales Report document. Note: You can have multiple documents open at the same time. However, only one document window remains active at one time. To view a list of the files open in Word, click the Window menu. You can switch between files by clicking on the title of the file you want to work on. You can also close the active document without closing Word. At the right corner of the menu bar, click the Close Window button. Notice that this appears underneath the buttons that will minimize, resize, and close the Program window.
  5. You want to print copies of the Announcement Guidelines document and distribute it to your colleagues. To print one copy of the Announcement Guidelines document by using the default settings of your printer, click the File menu, and then click Print. The Print dialog box includes details about the name of the printer, range of pages, and the number of copies to be printed. You can modify these details to suit your requirements. To print four copies of this document, under Copies in the Print dialog box, double-click in the Number of copies box, and then press SPACEBAR to have the text typed for you. Then, to print the current document with the custom settings, in the Print dialog box, click OK.
  6. To start making changes to your document, you must first select the text before making any formatting or editing changes. Selecting text is easy. You can use the mouse or the keyboard to select a word, a sentence, a paragraph, or even the entire document. To select text using the mouse, move the insertion point to the space right before the text you want to select. Hold down the left mouse button—don’t let go!– while you drag the cursor over the text you want to select. You can use the copy and paste features provided in Word. This feature helps you duplicate information and reuse it in another part of the same document, in a different document, or in a different program. Copying text does not change the actual location of the original text. You can copy by clicking the Copy button on the standard toolbar. After copying the text, you can use the paste feature to insert text or a graphic that has been cut or copied from one document into a different location in the same or a different document. You can use the Paste button on the standard toolbar to paste text or graphics.
  7. You now want to move a portion of the document from one location and place it in a different location. For this, you can use the cut and paste feature. Unlike the Copy function, the Cut function removes the original text from the source. The computer can ‘remember’ the text that you have cut, even though it is deleted from the screen. You then paste the cut text into its new location using the Paste button.
  8. The Format menu includes options to change Font, Paragraph, and other style options. In the Font dialog box, you can make changes to the type, style, size, and color of font used in the document. Make sure you have selected the text you want to change before you try to format it. The Preview area allows you to view the text when making these changes.
  9. The Format menu includes options to change Font, Paragraph, and other style options. In the Font dialog box, you can make changes to the type, style, size, and color of font used in the document. Make sure you have selected the text you want to change before you try to format it. The Preview area allows you to view the text when making these changes.
  10. You can specify the arrangement of objects, text, and graphics, in predetermined positions using the alignment settings. You can align the selected text to the left, right, or center by using the left, right, and center alignment buttons, respectively. You now want to change the alignment of text in the document. You can use the Justify button to fit the text of a paragraph evenly between the left and right margins of a page. Note that when applying paragraph formatting, you can simply place the insertion point anywhere in the paragraph instead of selecting the entire paragraph. You can adjust the paragraph spacing in the Paragraph dialog box to make the text easily readable. You can also increase or decrease the line spacing within the paragraph. This also helps make the text easily readable.
  11. In this example, we will insert a 4x7 table into a Sales Report document. To begin inserting a table in this document, click the Table menu, point to Insert, and then click Table. The Insert Table dialog box appears. To set the number of columns for the table to 4, in the Number of columns box, click the Number of columns down arrow once. To set the number of rows for the table to 7, click the Number of rows up arrow five times, and then click OK. A table with 4 columns and 7 rows appears. To select the first row of the table, point to the selection area to the left of the row, and click when the shape of the mouse pointer changes to an arrow pointing to the right.
  12. A table with 4 columns and 7 rows appears. To select the first row of the table, point to the selection area to the left of the row, and click when the shape of the mouse pointer changes to an arrow pointing to the right. You can also merge cells in a table. To combine the cells in the first row into a single cell, click the Table menu, and then click Merge Cells. To insert a title for the table in the first row, press SPACEBAR to have the title typed for you. To enter text in the first cell of the second row and move the insertion point to the next cell, click in the cell, press SPACEBAR, and wait for text to be typed for you, and then press the TAB key. To insert the remaining entries in the table, press SPACEBAR to have the entries typed for you. To add two rows, drag down the selection area to the left of the sixth and seventh rows to select the rows, click the Table menu, point to Insert, and then click Rows Below. To delete the second last row, point to the selection area to the left of the row and click when the shape of the mouse pointer changes to an arrow pointing to the right. Next, click the Table menu, point to Delete, and then click Rows.
  13. After inserting a table, you can also add borders and shading to it. To start customizing the table borders, on the Format menu, click Borders and Shading, then in the Borders tab, under Setting, click the All icon. To change the line style of the border, in the Style box, click the Down scroll arrow, and then click the double-line style. To change the color of the border, click the Color box, click the indicated blue in the color palette, and then click OK. To start shading the cells of the table, on the Format menu, click Borders and Shading, and then in the Borders and Shading dialog box, click the Shading tab. To select a color for the shading, in the Fill area of the Borders and Shading dialog box, click the indicated yellow in the color palette, and then click OK.
  14. You can also insert a picture, such as the logo of a company, in a document. To start inserting a logo, place the insertion point below the heading, School of Fine Art, then click the Insert menu, point to Picture, and then click From File. To insert the logo, on the Places bar of the Insert Picture dialog box, double-click School of Fine Art, and then double-click logo. You can also insert pictures from clip art that is available with Word. To start inserting a clip art image, click the Down scroll arrow once, then click the Insert menu, point to Picture, and then click Clip Art. To search for an image corresponding to reports, in the Clip Art task pane, click in the Search for box, then press SPACEBAR to have the keyword typed for you, and then click GO. To select and insert a clip art image, in the Clip Art task pane, click the indicated drawing, and then click the Close button on the title bar of the task pane.
  15. After inserting a chart in the document, you now want to print it. Before printing, you want to view the orientation of the page and make changes to ensure that the text fits in one page. To start changing the page orientation, click the File menu, and then click Page Setup. To orient the page widthwise rather than the usual lengthwise, under Orientation in the Page Setup dialog box, click Landscape, and then click OK. To change the paper size to fit the text, click the File menu, click Page Setup, and then click the Paper tab. Click the Paper size arrow, click Legal, and then click OK.
  16. Advanced word processors, such as Word, can automatically detect the language of the typed text and then use the spelling dictionary, grammar checker, and punctuation rules for that language. This is a convenient way to perform certain tasks automatically as you type, such as checking spelling and grammar. Advanced word processors can support many languages, such as Chinese, English, French, and Spanish. Advanced word processors also help you to search for synonyms and variations of words by using the thesaurus. The thesaurus is a reference library for different words and their synonyms. Word also includes a built-in dictionary and a grammar and spelling checker feature that indicates a grammatical error or a misspelled word. In addition, you can configure the AutoCorrect function in Word to automatically correct misspellings and grammatical errors as soon as you start typing the text. For example, AutoCorrect can be set up to automatically correct misspellings, such as teh for the.
  17. You can check the spelling and grammar of your document by using the tools that Word provides. In this demonstration, the document has been opened for you. Note that wavy red and green lines appear under some words and phrases. The red underlines indicate spelling mistakes and the green underlines indicate grammatical errors. Word-processors provide features that help you correct spelling mistakes and also suggest alternative words. You can check the spelling and grammar of the entire document by moving the insertion point to the top of the document and clicking the Spelling and Grammar button.
  18. In the Spelling and Grammar dialog box, you can select the correct word from a list of proposed alternative spellings to correct the word and remove the wavy red underline that indicates a misspelled word. By using the Change All option in the Spelling and Grammar dialog box, you can correct all instances of the misspelled word in a document. This saves the time required to correct individual incorrect entries. You can add certain words to the AutoCorrect list. The next time you type the word incorrectly, Word automatically corrects it for you by referring to the AutoCorrect list entries. You can use this feature to automatically correct the words that you most commonly misspell. The Spelling and Grammar feature also helps you check and correct grammatical mistakes in your document. You can view the recommended text in the Suggestion box, make the changes, and save it in your document. You can add text from different languages in a built-in custom dictionary to avoid Word identifying them as misspellings. In this demonstration, you can include the Spanish word Sardana by using the Add to Dictionary button in the Spelling and Grammar dialog box. Some words, such as the names of people, companies, trees, medicines, and acronyms, are not included in the built-in dictionary against which Word checks the spellings. For such words, you can choose to either ignore the suggestions or add such words to the custom dictionary to ensure that these words do not appear as misspelled words. In this demonstration, you want to ignore all instances of the word Pilar because it is the name of a hall.