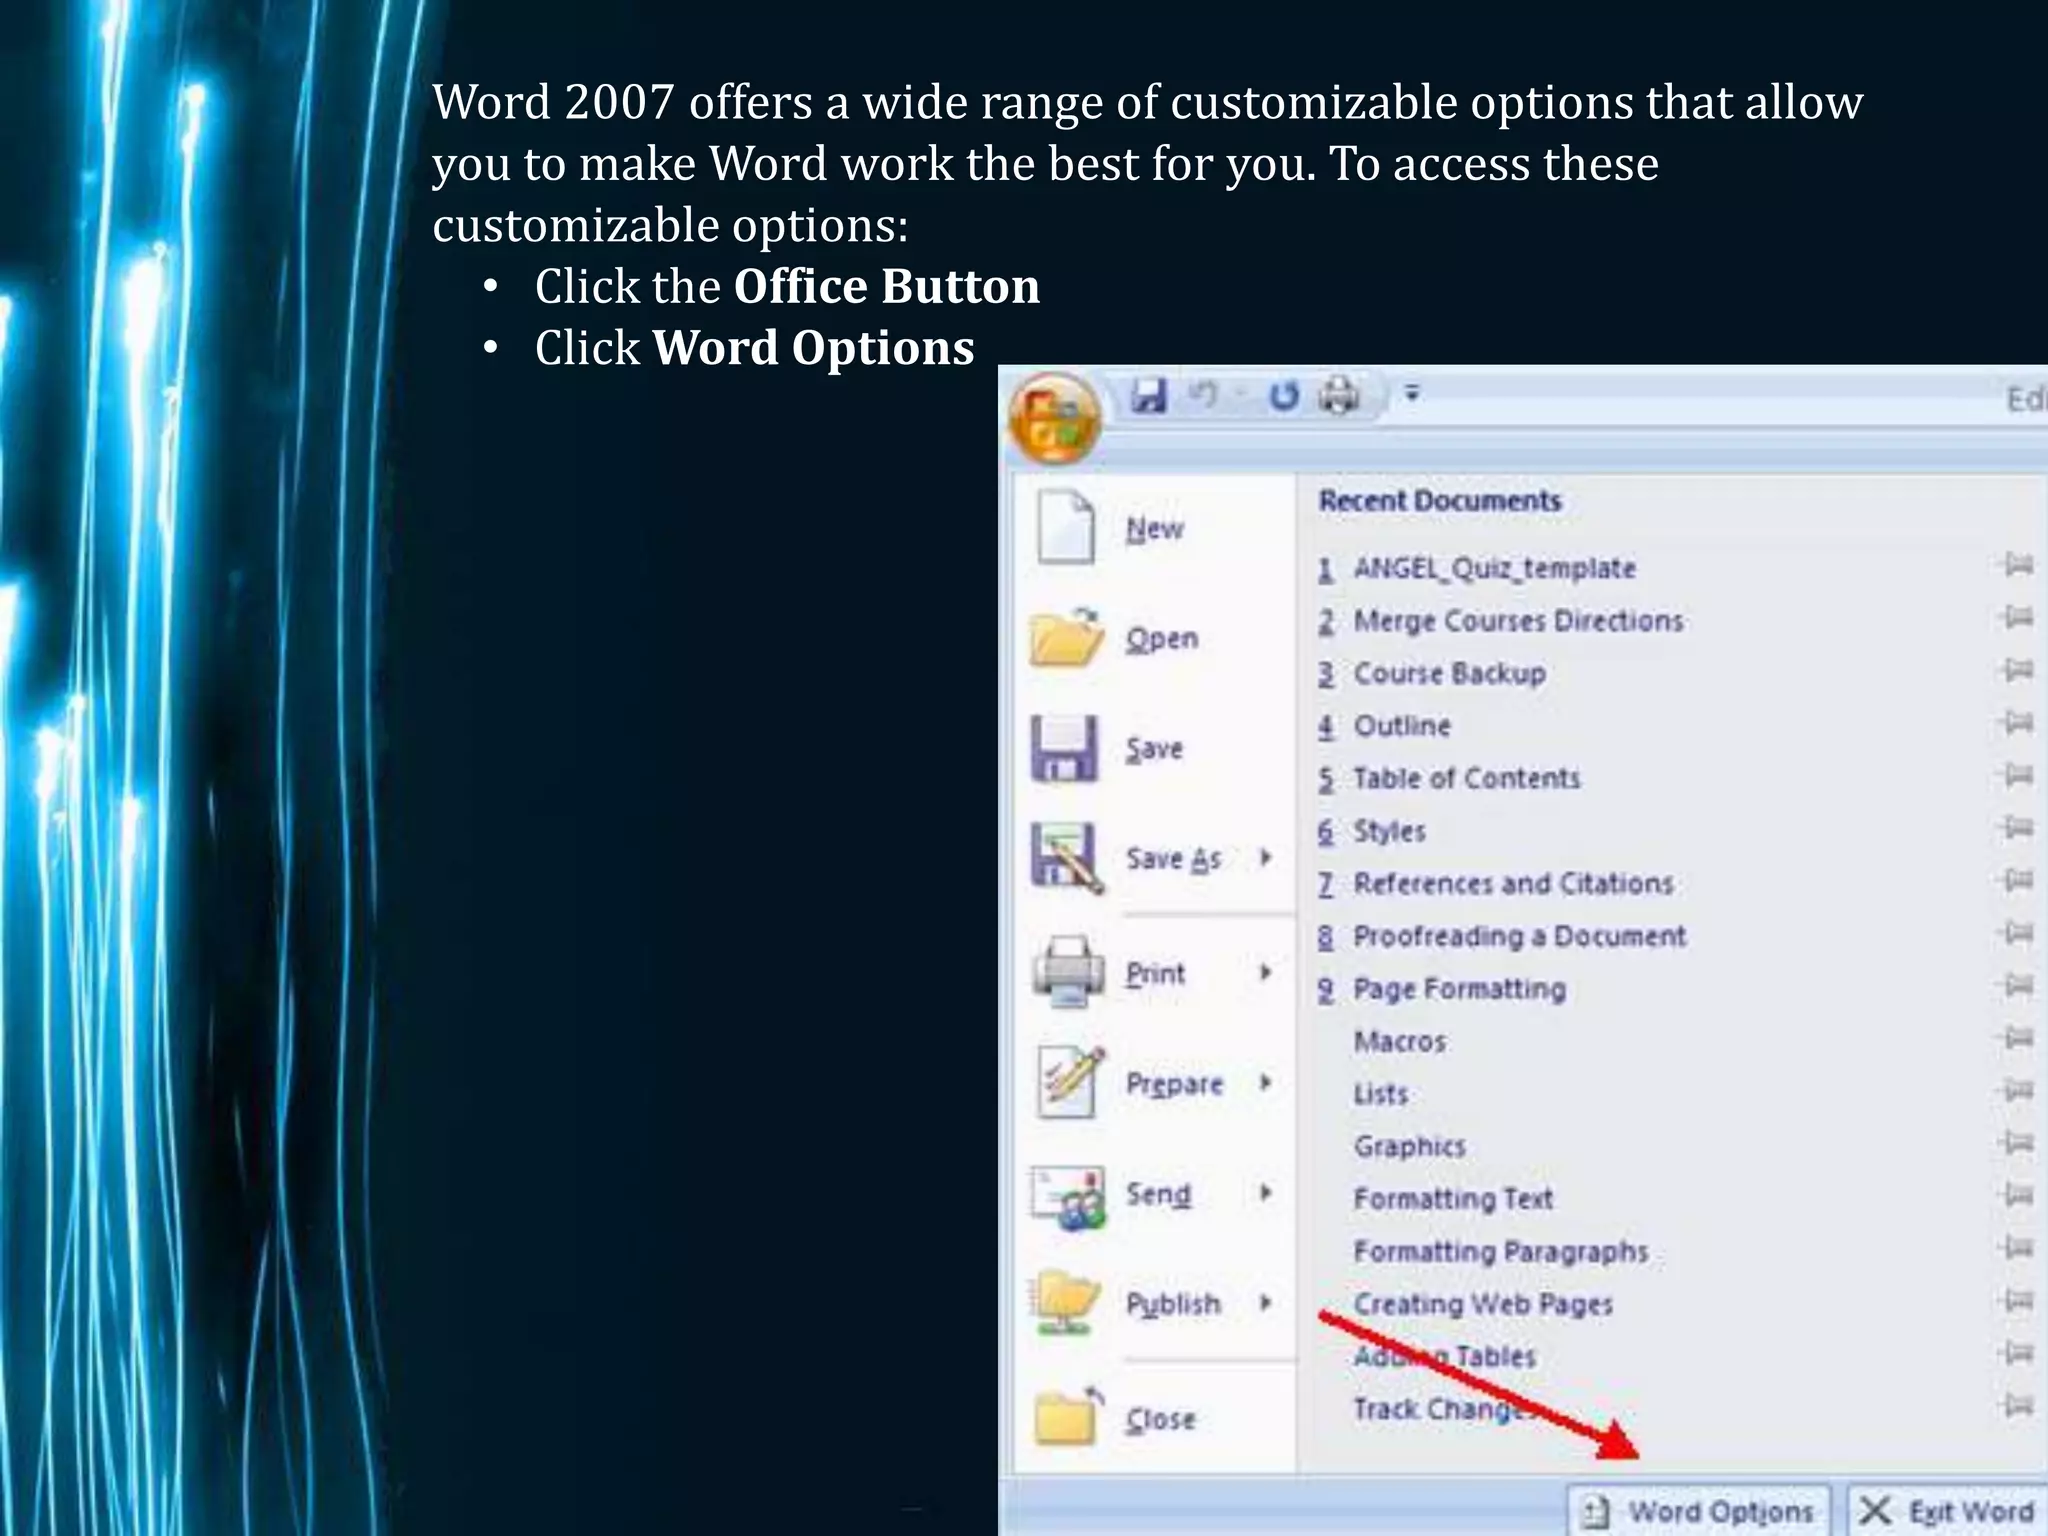
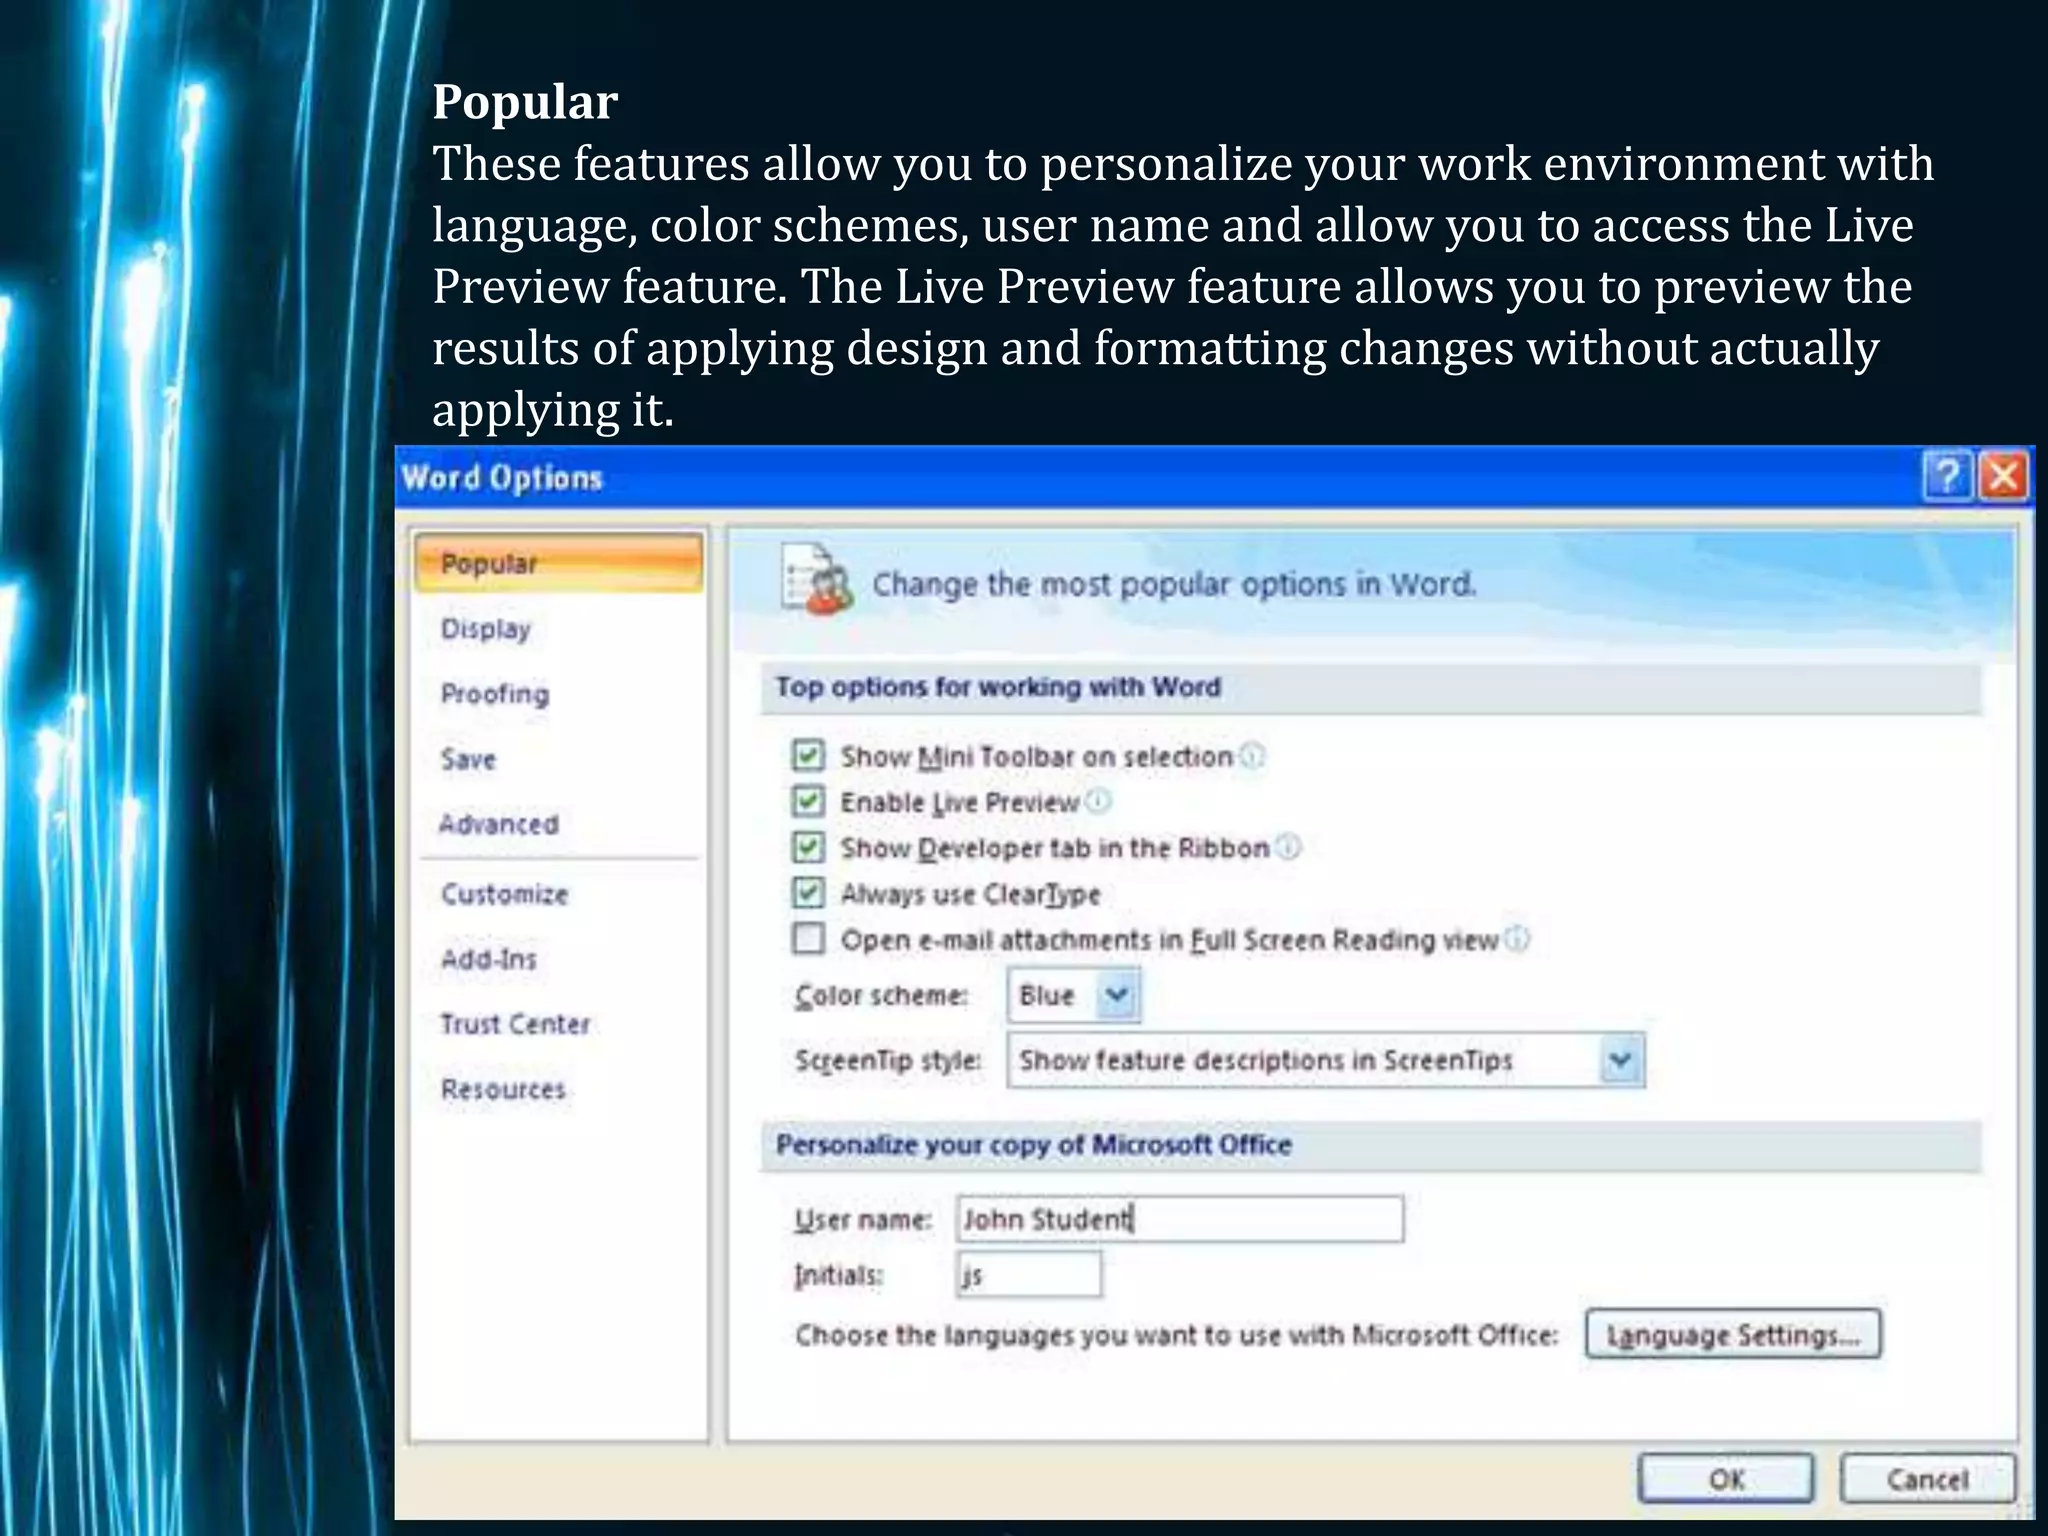
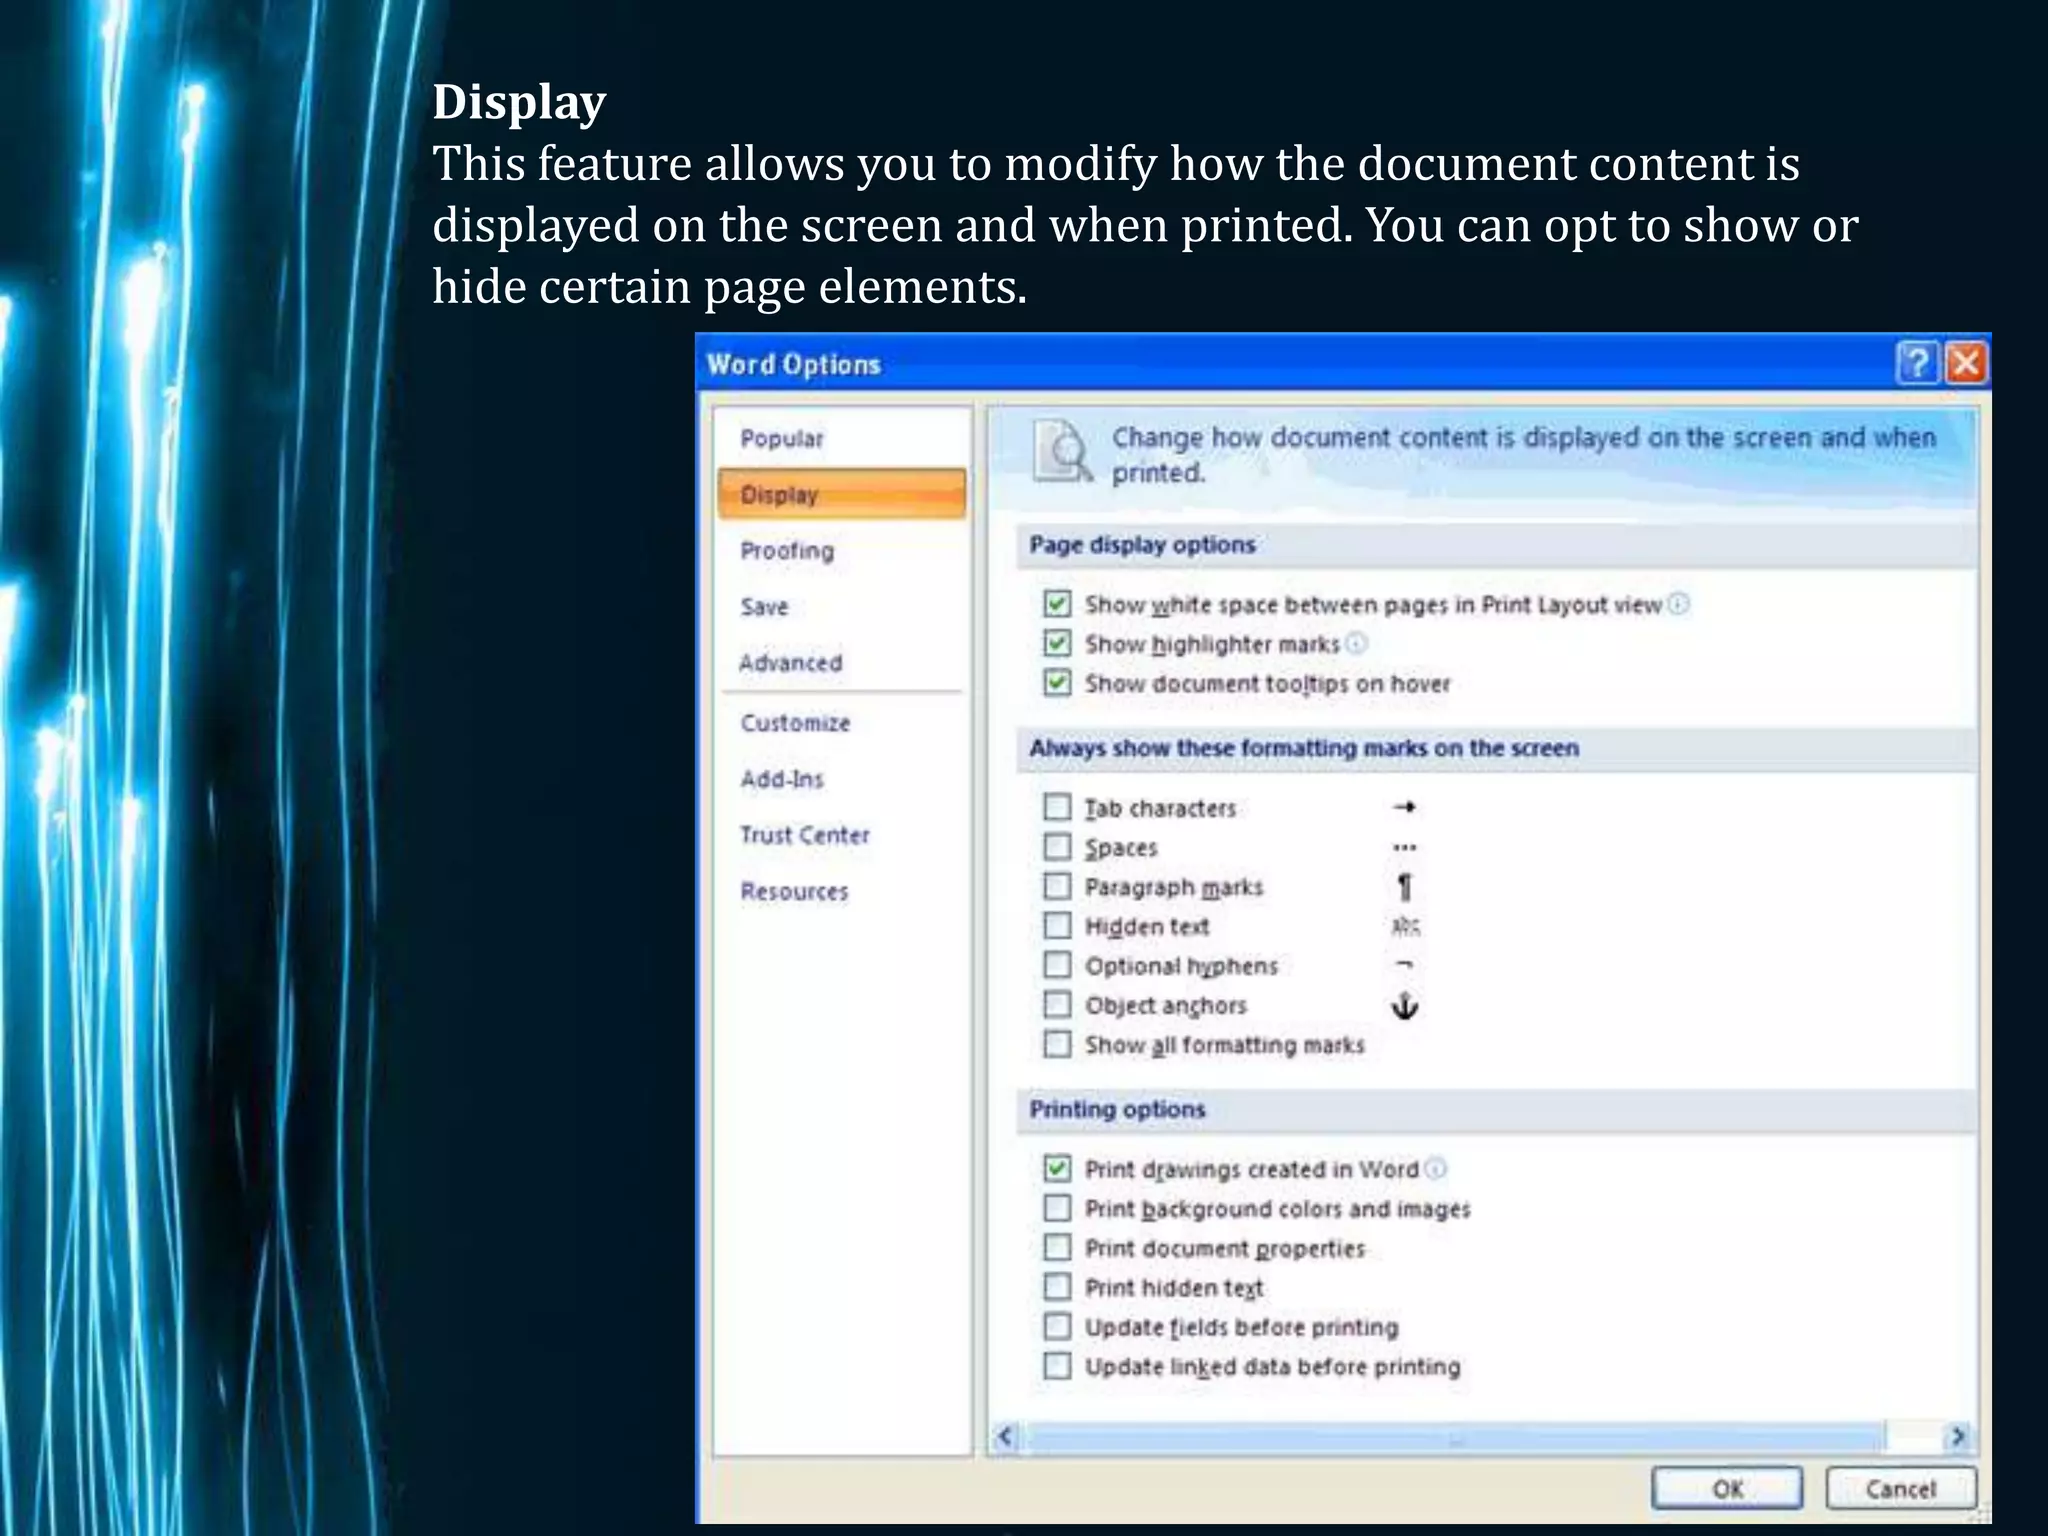
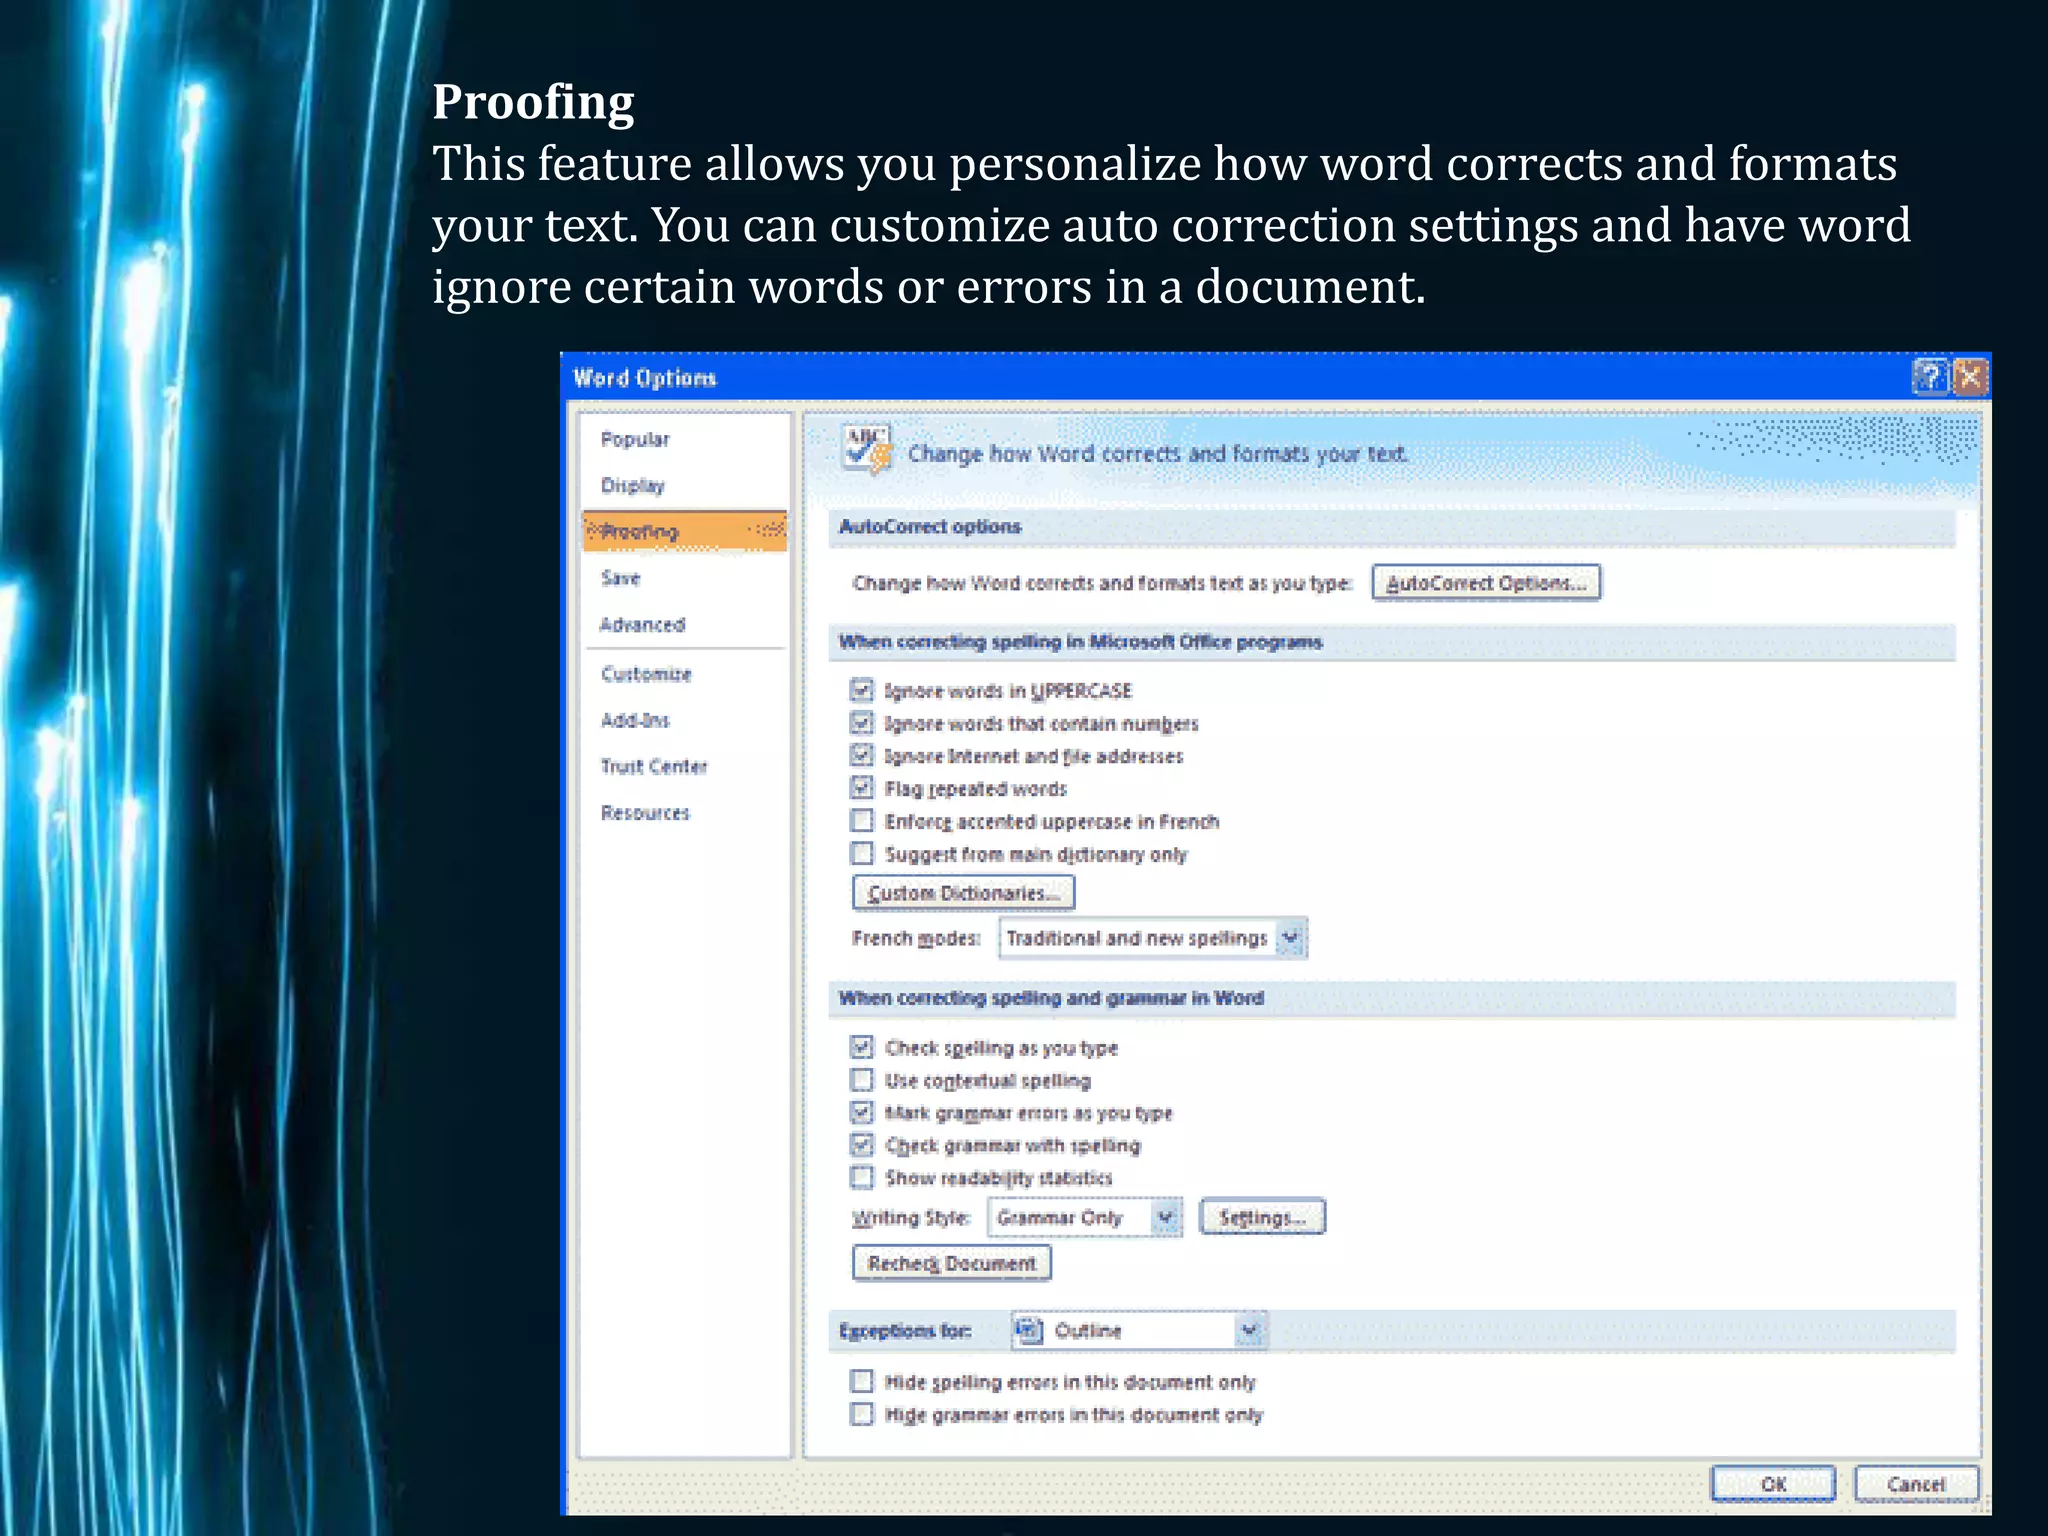
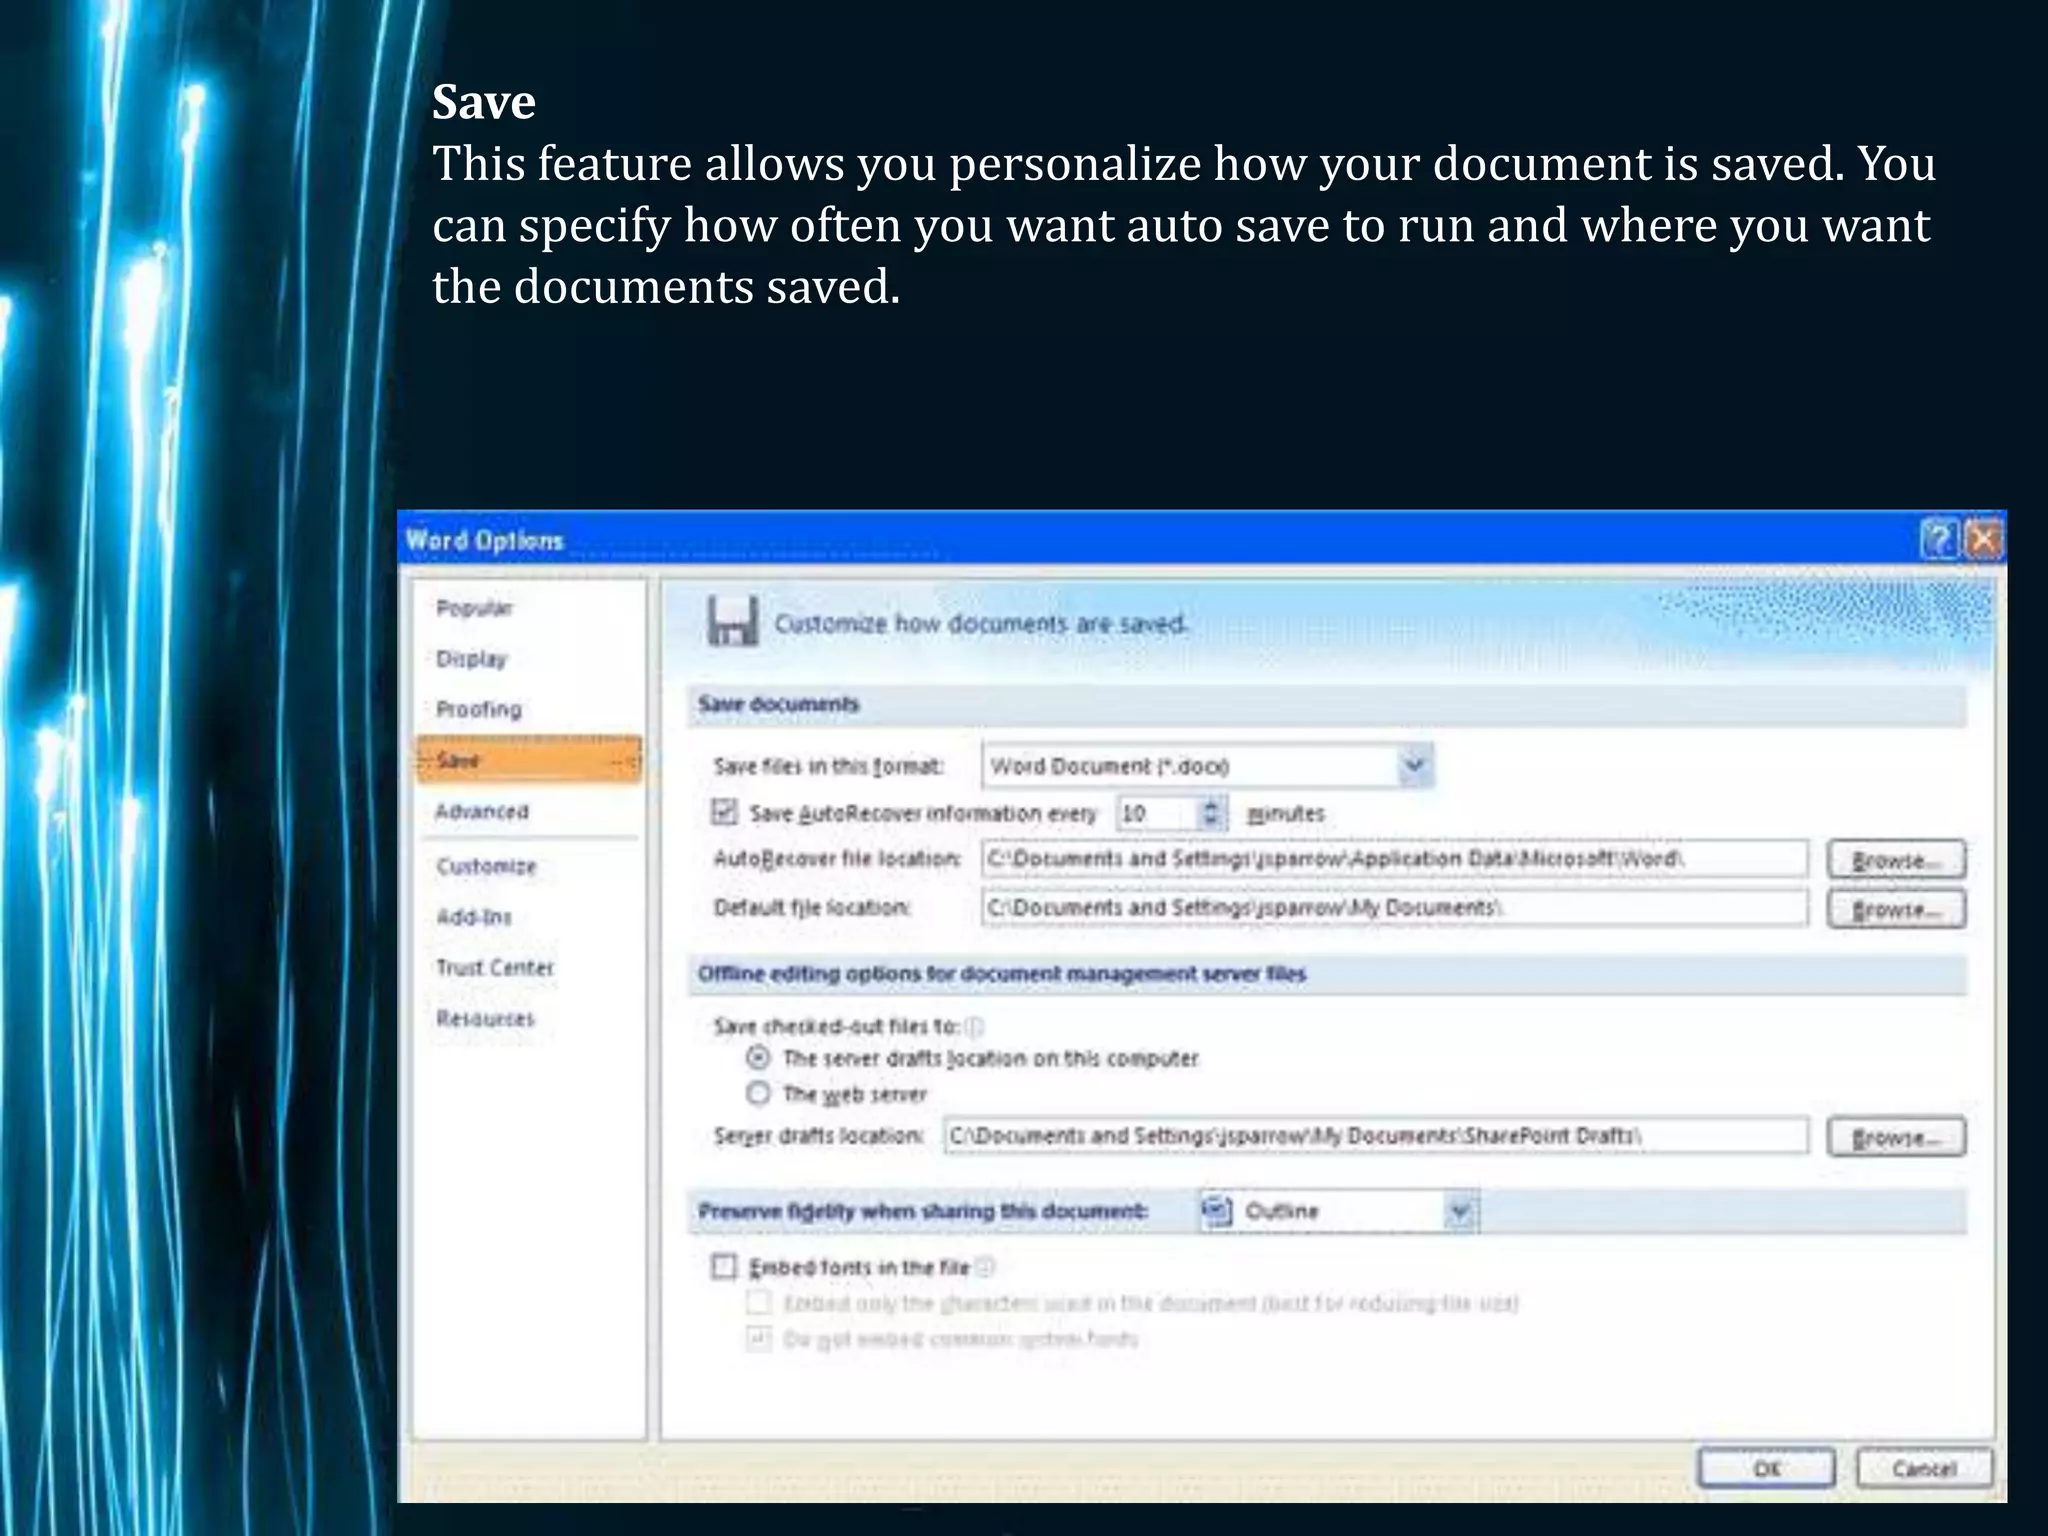
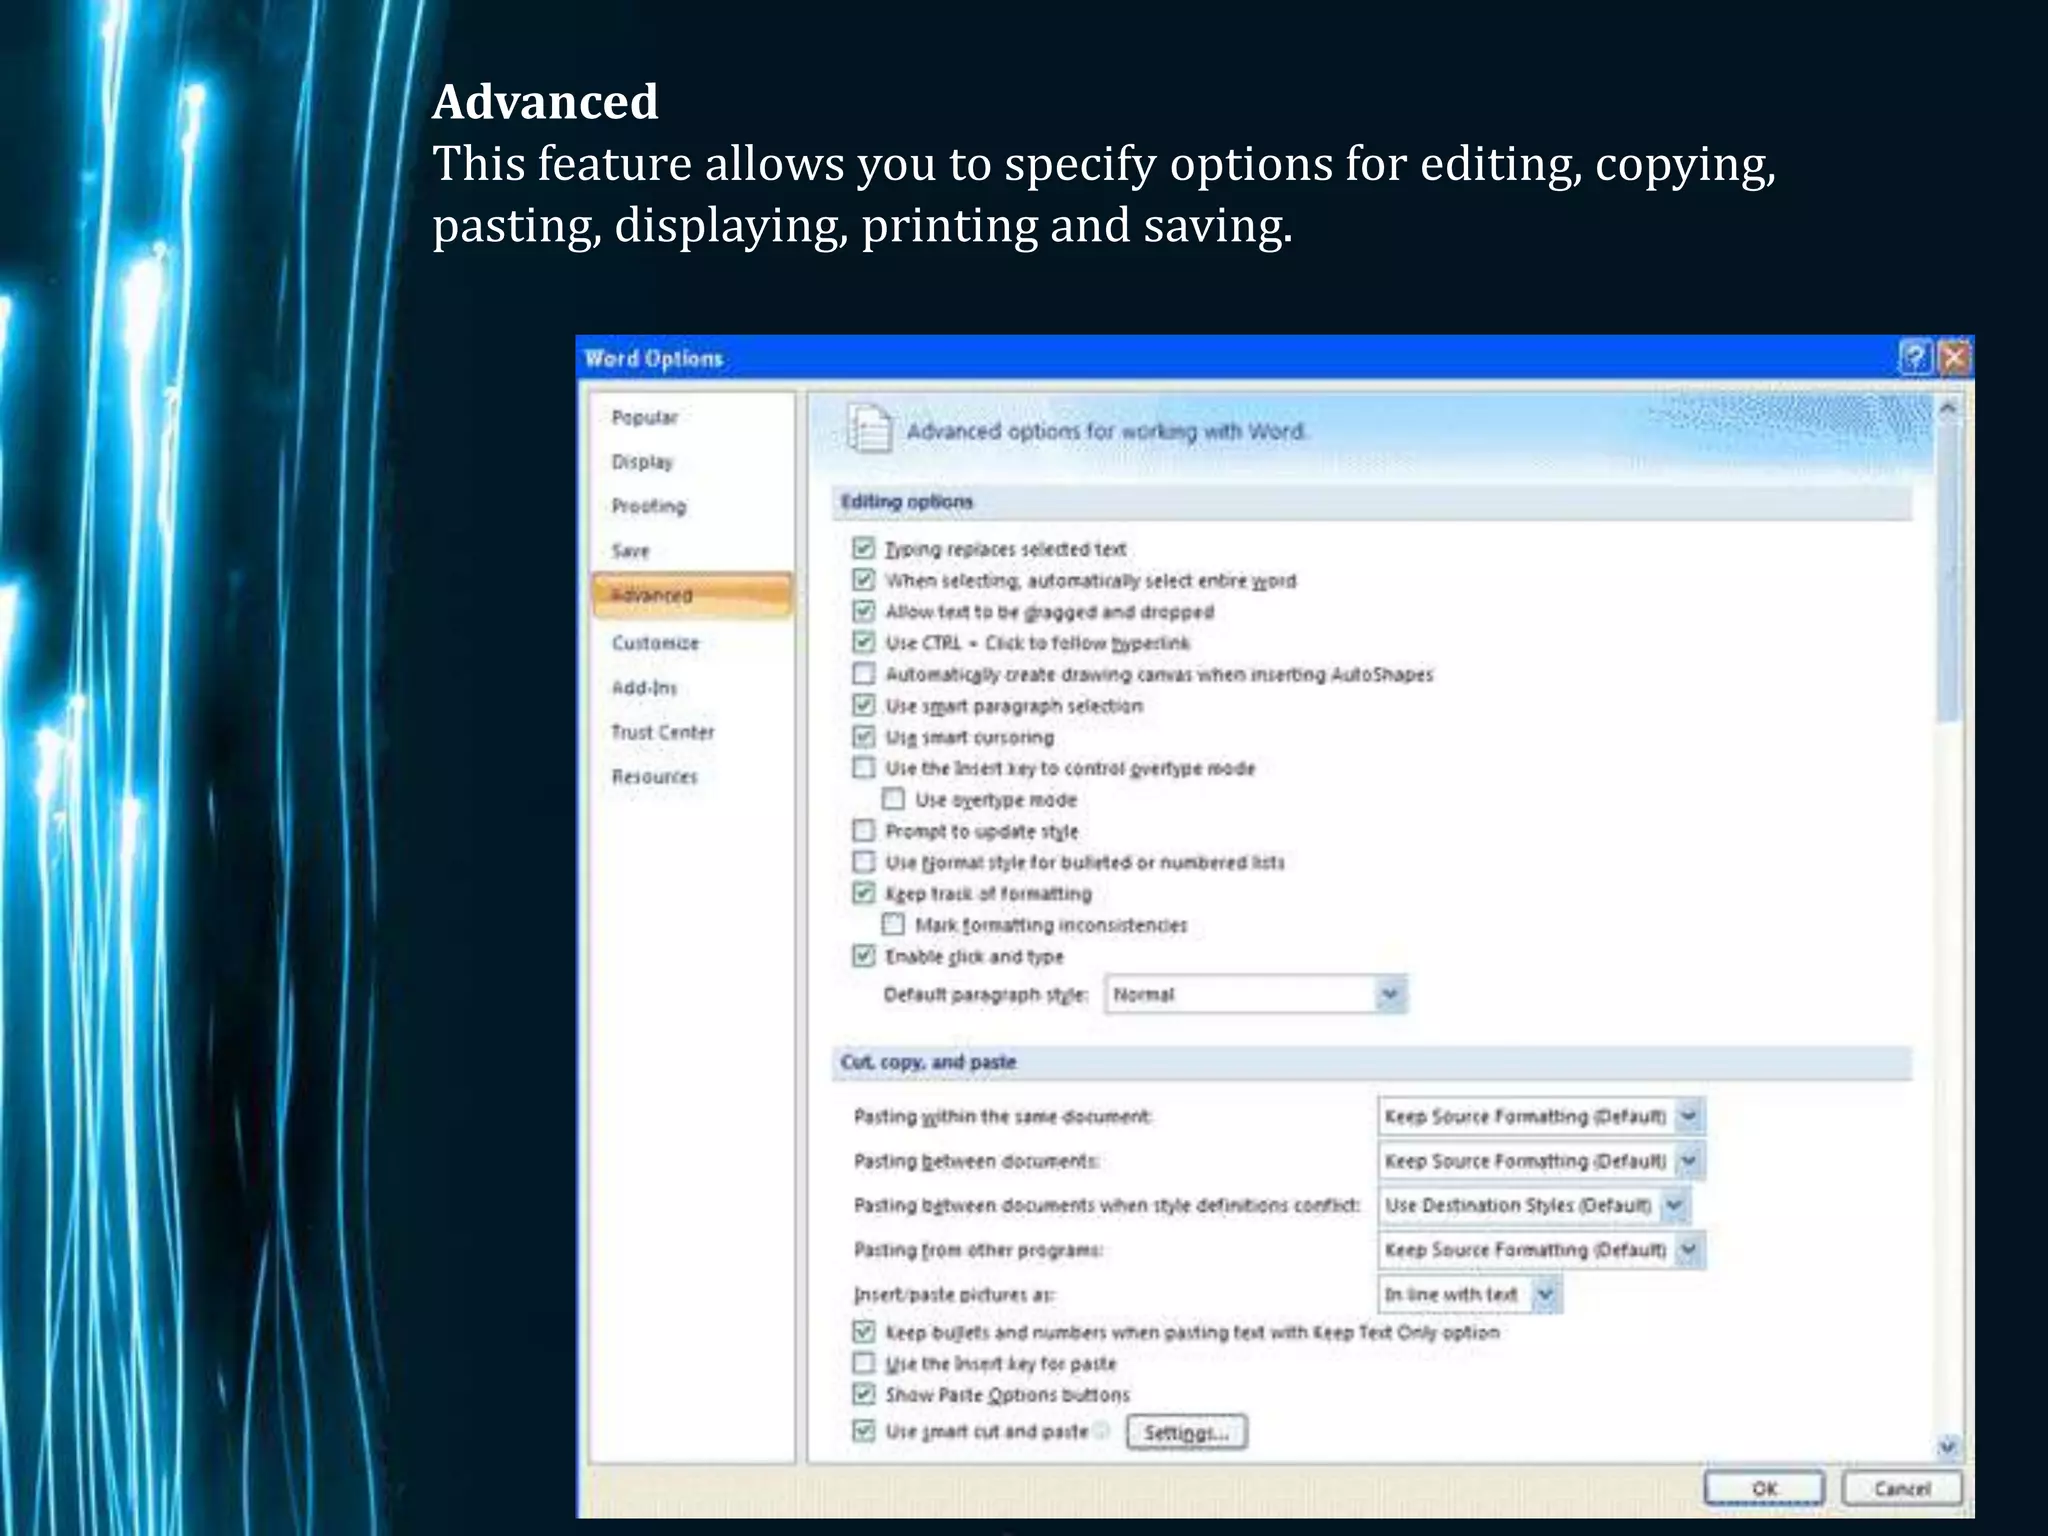
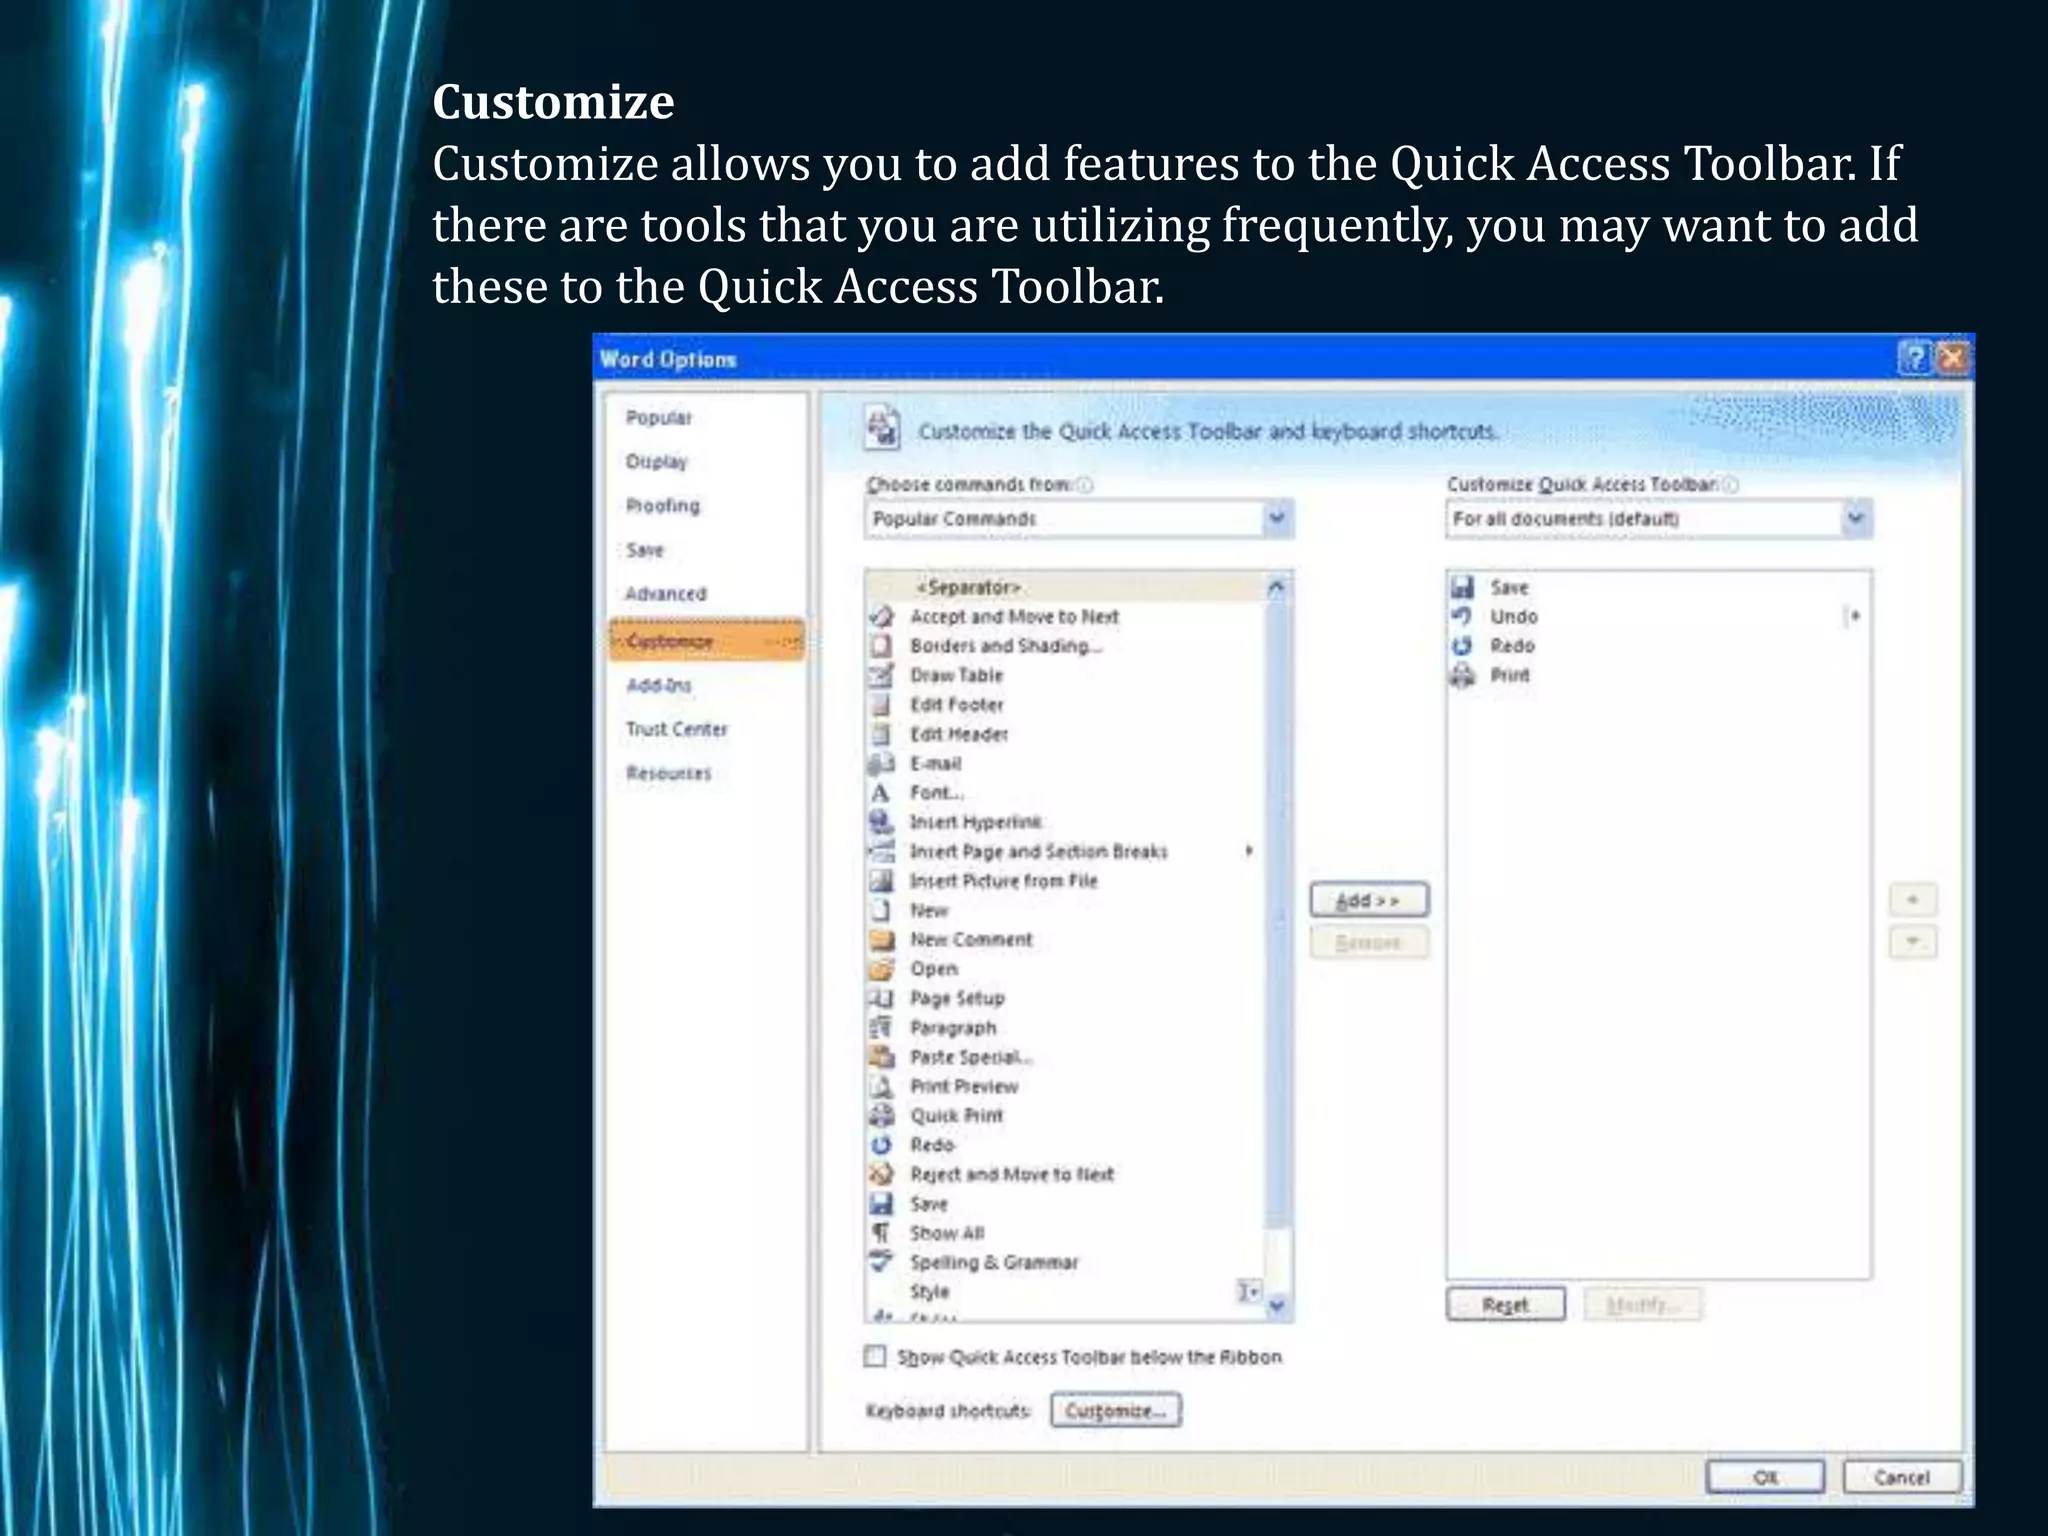
Customize Word
 Environment


             Page 1
Word 2007 offers a wide range of customizable options that allow
you to make Word work the best for you. To access these
customizable options:
  • Click the Office Button
  • Click Word Options


                                                             Page 2
Popular
These features allow you to personalize your work environment with
language, color schemes, user name and allow you to access the Live
Preview feature. The Live Preview feature allows you to preview the
results of applying design and formatting changes without actually
applying it.


                                                             Page 3
Display
This feature allows you to modify how the document content is
displayed on the screen and when printed. You can opt to show or
hide certain page elements.


                                                             Page 4
Proofing
This feature allows you personalize how word corrects and formats
your text. You can customize auto correction settings and have word
ignore certain words or errors in a document.


                                                              Page 5
Save
This feature allows you personalize how your document is saved. You
can specify how often you want auto save to run and where you want
the documents saved.


                                                             Page 6
Advanced
This feature allows you to specify options for editing, copying,
pasting, displaying, printing and saving.


                                                                   Page 7
Customize
Customize allows you to add features to the Quick Access Toolbar. If
there are tools that you are utilizing frequently, you may want to add
these to the Quick Access Toolbar.


                                                                Page 8
Editing A
Document


            Page 9
Typing and inserting Text
To enter text, just start typing! The text will appear where the
blinking cursor is located. Move the cursor by using the arrow
buttons on the keyboard or positioning the mouse and clicking the
left button. The keyboard shortcuts listed below are also helpful when
moving through the text of a document:


         Move Action                   Keystroke
     Beginning of the line         HOME
     End of the line               END

     Top of the document           CTRL+HOME

     End of the document           CTRL+END


                                                               Page 10
Selecting Text
To change any attributes of text it must be highlighted first. Select the
text by dragging the mouse over the desired text while keeping the
left mouse button depressed, or hold down the SHIFT key on the
keyboard while using the arrow buttons to highlight the text. The
following table contains shortcuts for selecting a portion of the text:

               Selection Technique

             Whole word double-click within the word

       Whole paragraph triple-click within the paragraph

  Several words or lines drag the mouse over the words, or hold
                         down SHIFT while using the arrow keys
       Entire documents choose Editing | Select | Select All from
                        the Ribbon, or press CTRL+A

Deselect the text by clicking anywhere outside of the selection on
the page or press an arrow key on the keyboard.


                                                                  Page 11
Inserting Additional Text
Text can be inserted in a document at
any point using any of the following
methods:
Type Text: Put your cursor where you
want to add the text and begin typing
Copy and Paste Text: Highlight the
text you wish to copy and right click
and click Copy, put your cursor where
you want the text in the document and
right click and click Paste.
Cut and Paste Text: Highlight the text
you wish to copy and right click and
click Cut, put your cursor where you
want the text in the document and
right click and click Paste.
Drag Text: Highlight the text you wish
to move, click on it and drag it to the
place where you want the text in the
document.
You will notice that you can also use
the Clipboard group on the Ribbon.
                                          Page 12
Deleting Blocks of Text
Use the BACKSPACE and DELETE keys on the keyboard to delete text.
Backspace will delete text to the left of the cursor and Delete will
erase text to the right. To delete a large selection of text, highlight it
using any of the methods outlined above and press the DELETE key.
Search and Replace Text
To find a particular word or phrase in a document:
Click Find on the Editing Group on the Ribbon
To find and replace a word or phrase in the document, click Replace
on the Editing Group of the Ribbon.


                                                                  Page 13
Undo Changes
To undo changes:
Click the Undo Button on the Quick Access Toolbar


                                                    Page 14
Formatting Text


              Page 15
Styles
A style is a format enhancing tool that includes font typefaces, font
size, effects (bold, italics, underline, etc.), colors and more. You will
notice that on the Home Tab of the Ribbon, that you have several
areas that will control the style of your document: Font, Paragraph,
and Styles..


                                                                    Page 16
Change Font Typeface and Size

• To change the font typeface:
  Click the arrow next to the font name and choose a font.


                                                             Page 17
Change Font Typeface and Size

To change the font typeface:

• Click the arrow next to the font name and choose a font.


• Remember that you can preview how the new font will look by
  highlighting the text, and hovering over the new font typeface.


                                                              Page 18
Change Font Typeface and Size

To change the font size:

• Click the arrow next to the font size and choose the appropriate
  size, or
• Click the increase or decrease font size buttons.


                                                              Page 19
Font Styles and Effects
Font styles are predefined formatting options that are used to
emphasize text. They include: Bold, Italic, and Underline. To add these
to text:
Select the text and click the Font Styles included on the Font Group of
the Ribbon, or
Select the text and right click to display the font tools


                                                                Page 20
Change Text Color
To change the text color:
Select the text and click the Colors button included on the Font Group
of the Ribbon, or
Highlight the text and right click and choose the colors tool.
Select the color by clicking the down arrow next to the font color
button..


                                                               Page 21
Highlight Text
Highlighting text allows you to use emphasize text as you would if you
had a marker. To highlight text:
Select the text
Click the Highlight Button on the Font Group of the Ribbon, or
Select the text and right click and select the highlight tool
To change the color of the highlighter click on down arrow next to the
highlight button.


                                                               Page 22
Copy Formatting
If you have already formatted text the way you want it and would like
another portion of the document to have the same formatting, you
can copy the formatting. To copy the formatting, do the following:
Select the text with the formatting you want to copy.
Copy the format of the text selected by clicking the Format Painter
button on the Clipboard Group of the Home Tab
Apply the copied format by selecting the text and clicking on it.


                                                              Page 23
Clear Formatting
To clear text formatting:
Select the text you wish to
clear the formatting
Click the Styles dialogue box
on the Styles Group on the
Home Tab
Click Clear All


                                Page 24
Microsoft Word Drawing Basic Test


               DINNER for
               Your
               Name!!!


                                Page 25

Customize Word Environment

  • 1.
  • 2.
    Word 2007 offersa wide range of customizable options that allow you to make Word work the best for you. To access these customizable options: • Click the Office Button • Click Word Options Page 2
  • 3.
    Popular These features allowyou to personalize your work environment with language, color schemes, user name and allow you to access the Live Preview feature. The Live Preview feature allows you to preview the results of applying design and formatting changes without actually applying it. Page 3
  • 4.
    Display This feature allowsyou to modify how the document content is displayed on the screen and when printed. You can opt to show or hide certain page elements. Page 4
  • 5.
    Proofing This feature allowsyou personalize how word corrects and formats your text. You can customize auto correction settings and have word ignore certain words or errors in a document. Page 5
  • 6.
    Save This feature allowsyou personalize how your document is saved. You can specify how often you want auto save to run and where you want the documents saved. Page 6
  • 7.
    Advanced This feature allowsyou to specify options for editing, copying, pasting, displaying, printing and saving. Page 7
  • 8.
    Customize Customize allows youto add features to the Quick Access Toolbar. If there are tools that you are utilizing frequently, you may want to add these to the Quick Access Toolbar. Page 8
  • 9.
  • 10.
    Typing and insertingText To enter text, just start typing! The text will appear where the blinking cursor is located. Move the cursor by using the arrow buttons on the keyboard or positioning the mouse and clicking the left button. The keyboard shortcuts listed below are also helpful when moving through the text of a document: Move Action Keystroke Beginning of the line HOME End of the line END Top of the document CTRL+HOME End of the document CTRL+END Page 10
  • 11.
    Selecting Text To changeany attributes of text it must be highlighted first. Select the text by dragging the mouse over the desired text while keeping the left mouse button depressed, or hold down the SHIFT key on the keyboard while using the arrow buttons to highlight the text. The following table contains shortcuts for selecting a portion of the text: Selection Technique Whole word double-click within the word Whole paragraph triple-click within the paragraph Several words or lines drag the mouse over the words, or hold down SHIFT while using the arrow keys Entire documents choose Editing | Select | Select All from the Ribbon, or press CTRL+A Deselect the text by clicking anywhere outside of the selection on the page or press an arrow key on the keyboard. Page 11
  • 12.
    Inserting Additional Text Textcan be inserted in a document at any point using any of the following methods: Type Text: Put your cursor where you want to add the text and begin typing Copy and Paste Text: Highlight the text you wish to copy and right click and click Copy, put your cursor where you want the text in the document and right click and click Paste. Cut and Paste Text: Highlight the text you wish to copy and right click and click Cut, put your cursor where you want the text in the document and right click and click Paste. Drag Text: Highlight the text you wish to move, click on it and drag it to the place where you want the text in the document. You will notice that you can also use the Clipboard group on the Ribbon. Page 12
  • 13.
    Deleting Blocks ofText Use the BACKSPACE and DELETE keys on the keyboard to delete text. Backspace will delete text to the left of the cursor and Delete will erase text to the right. To delete a large selection of text, highlight it using any of the methods outlined above and press the DELETE key. Search and Replace Text To find a particular word or phrase in a document: Click Find on the Editing Group on the Ribbon To find and replace a word or phrase in the document, click Replace on the Editing Group of the Ribbon. Page 13
  • 14.
    Undo Changes To undochanges: Click the Undo Button on the Quick Access Toolbar Page 14
  • 15.
  • 16.
    Styles A style isa format enhancing tool that includes font typefaces, font size, effects (bold, italics, underline, etc.), colors and more. You will notice that on the Home Tab of the Ribbon, that you have several areas that will control the style of your document: Font, Paragraph, and Styles.. Page 16
  • 17.
    Change Font Typefaceand Size • To change the font typeface: Click the arrow next to the font name and choose a font. Page 17
  • 18.
    Change Font Typefaceand Size To change the font typeface: • Click the arrow next to the font name and choose a font. • Remember that you can preview how the new font will look by highlighting the text, and hovering over the new font typeface. Page 18
  • 19.
    Change Font Typefaceand Size To change the font size: • Click the arrow next to the font size and choose the appropriate size, or • Click the increase or decrease font size buttons. Page 19
  • 20.
    Font Styles andEffects Font styles are predefined formatting options that are used to emphasize text. They include: Bold, Italic, and Underline. To add these to text: Select the text and click the Font Styles included on the Font Group of the Ribbon, or Select the text and right click to display the font tools Page 20
  • 21.
    Change Text Color Tochange the text color: Select the text and click the Colors button included on the Font Group of the Ribbon, or Highlight the text and right click and choose the colors tool. Select the color by clicking the down arrow next to the font color button.. Page 21
  • 22.
    Highlight Text Highlighting textallows you to use emphasize text as you would if you had a marker. To highlight text: Select the text Click the Highlight Button on the Font Group of the Ribbon, or Select the text and right click and select the highlight tool To change the color of the highlighter click on down arrow next to the highlight button. Page 22
  • 23.
    Copy Formatting If youhave already formatted text the way you want it and would like another portion of the document to have the same formatting, you can copy the formatting. To copy the formatting, do the following: Select the text with the formatting you want to copy. Copy the format of the text selected by clicking the Format Painter button on the Clipboard Group of the Home Tab Apply the copied format by selecting the text and clicking on it. Page 23
  • 24.
    Clear Formatting To cleartext formatting: Select the text you wish to clear the formatting Click the Styles dialogue box on the Styles Group on the Home Tab Click Clear All Page 24
  • 25.
    Microsoft Word DrawingBasic Test DINNER for Your Name!!! Page 25