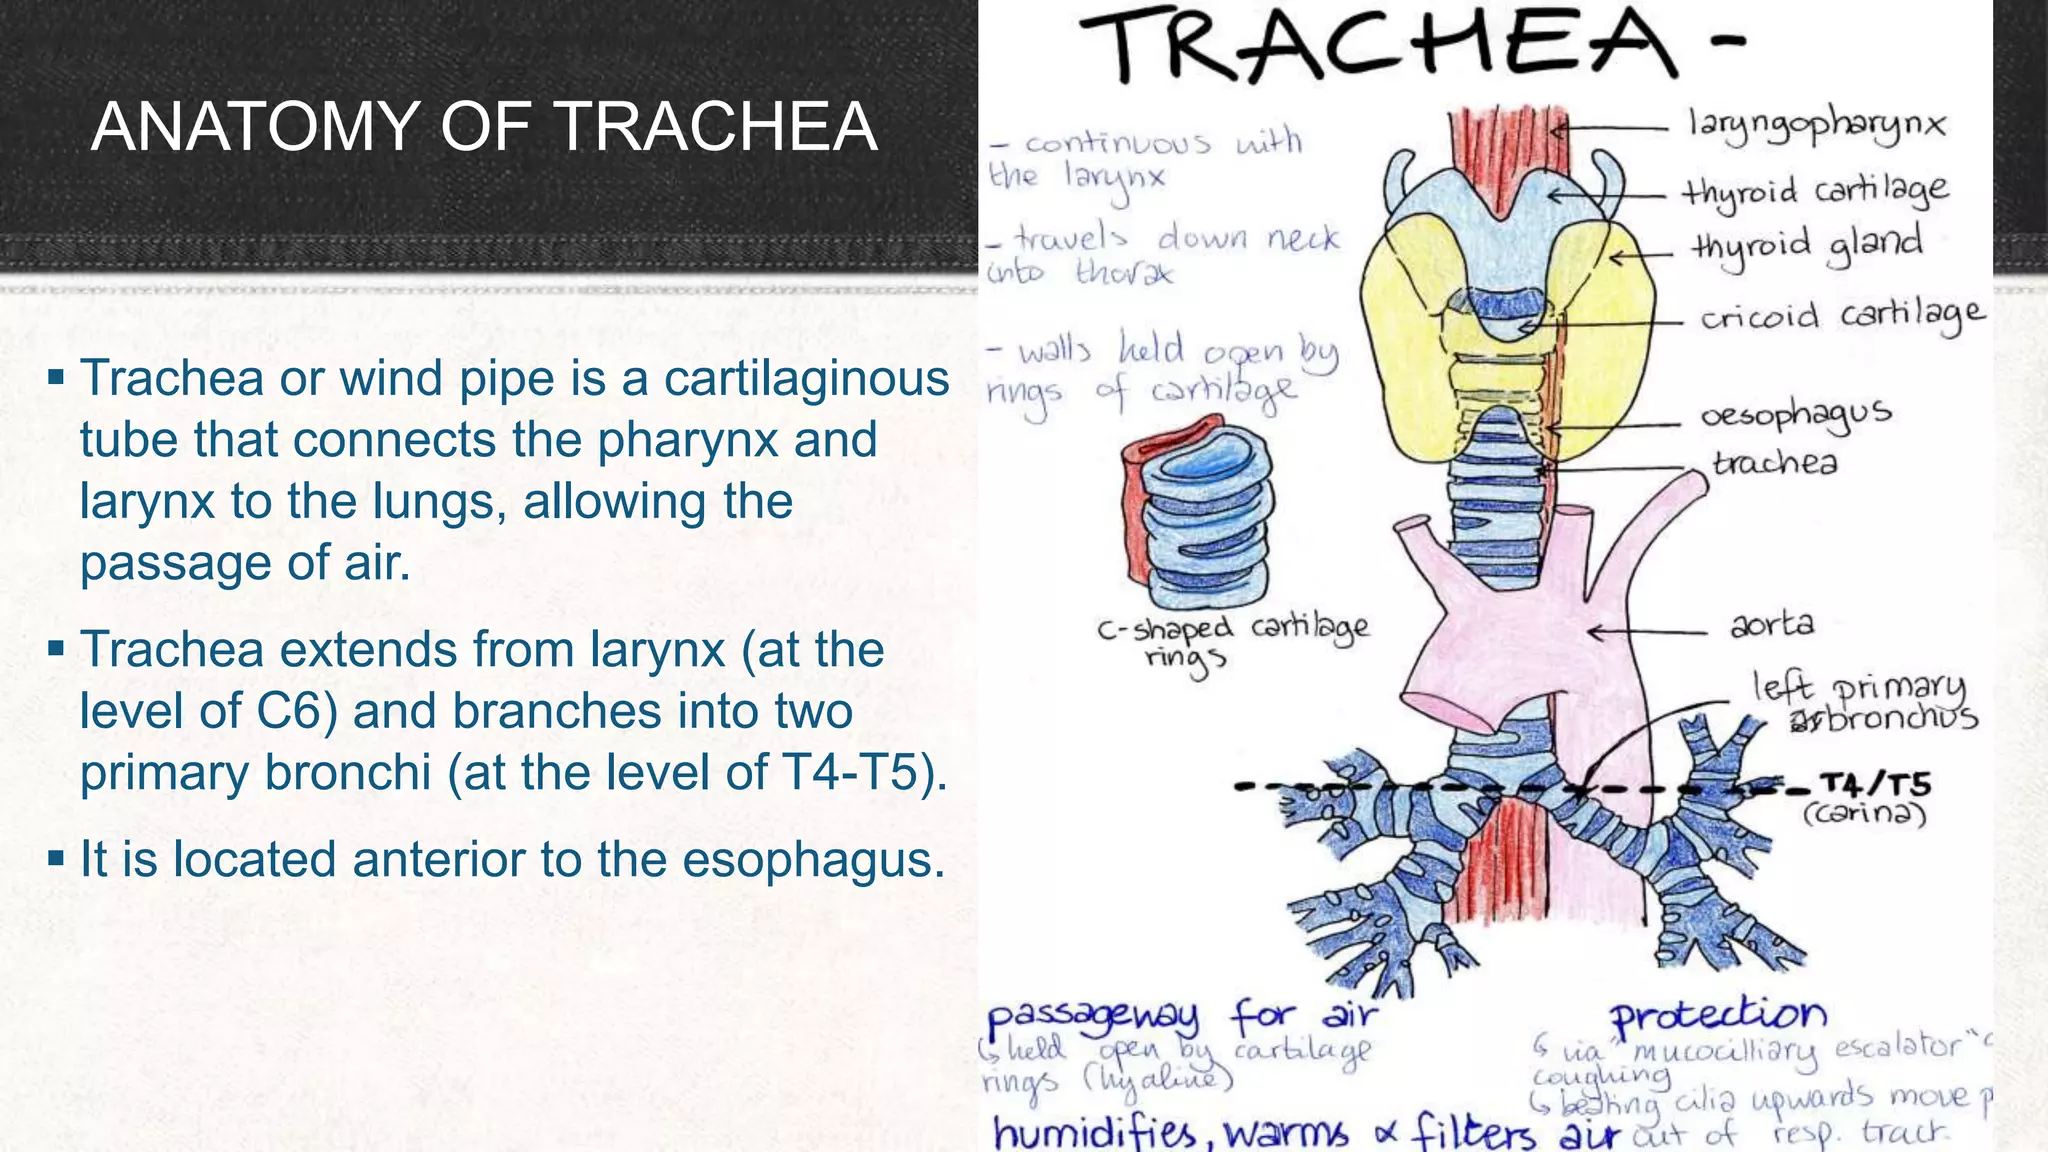
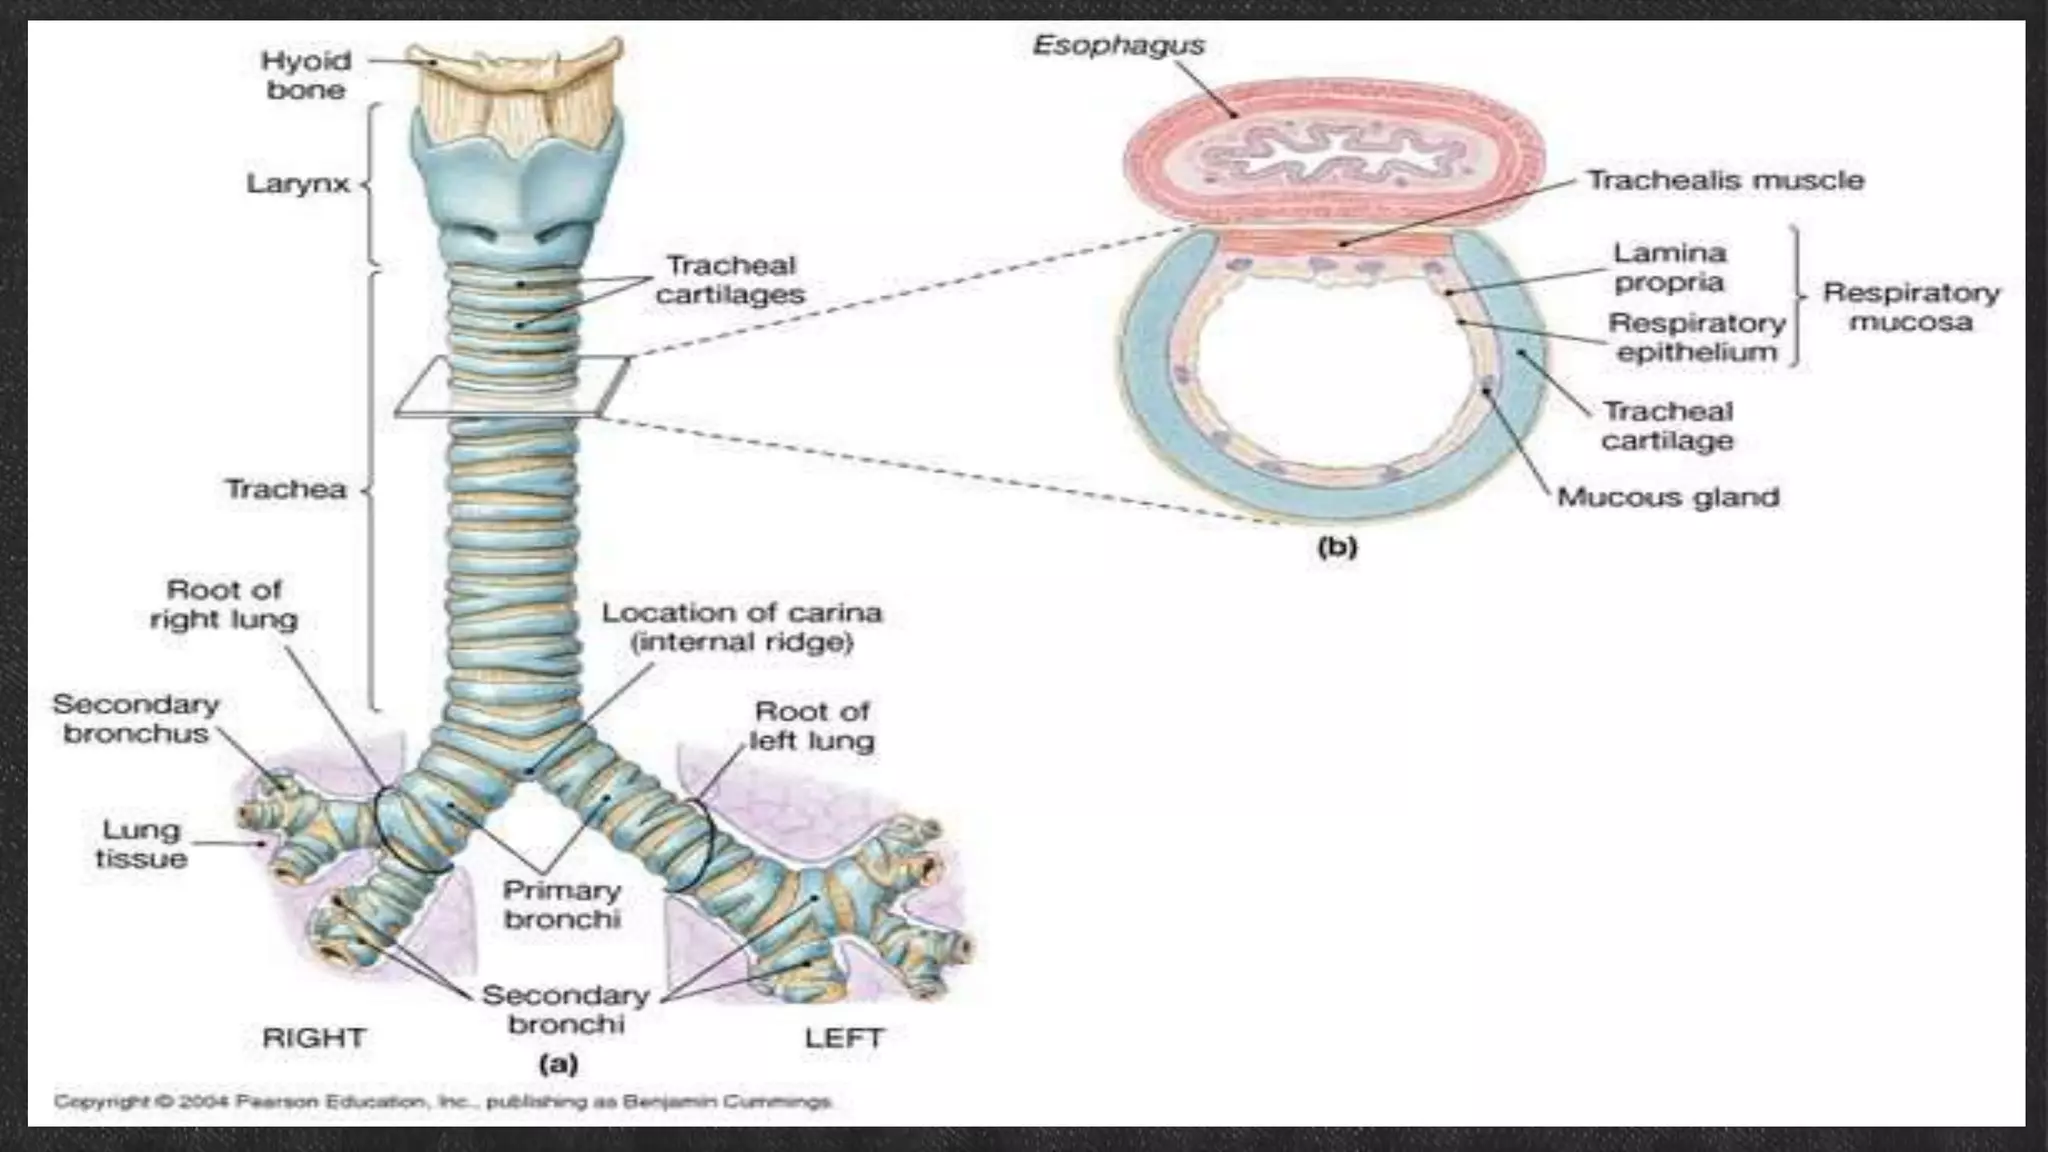
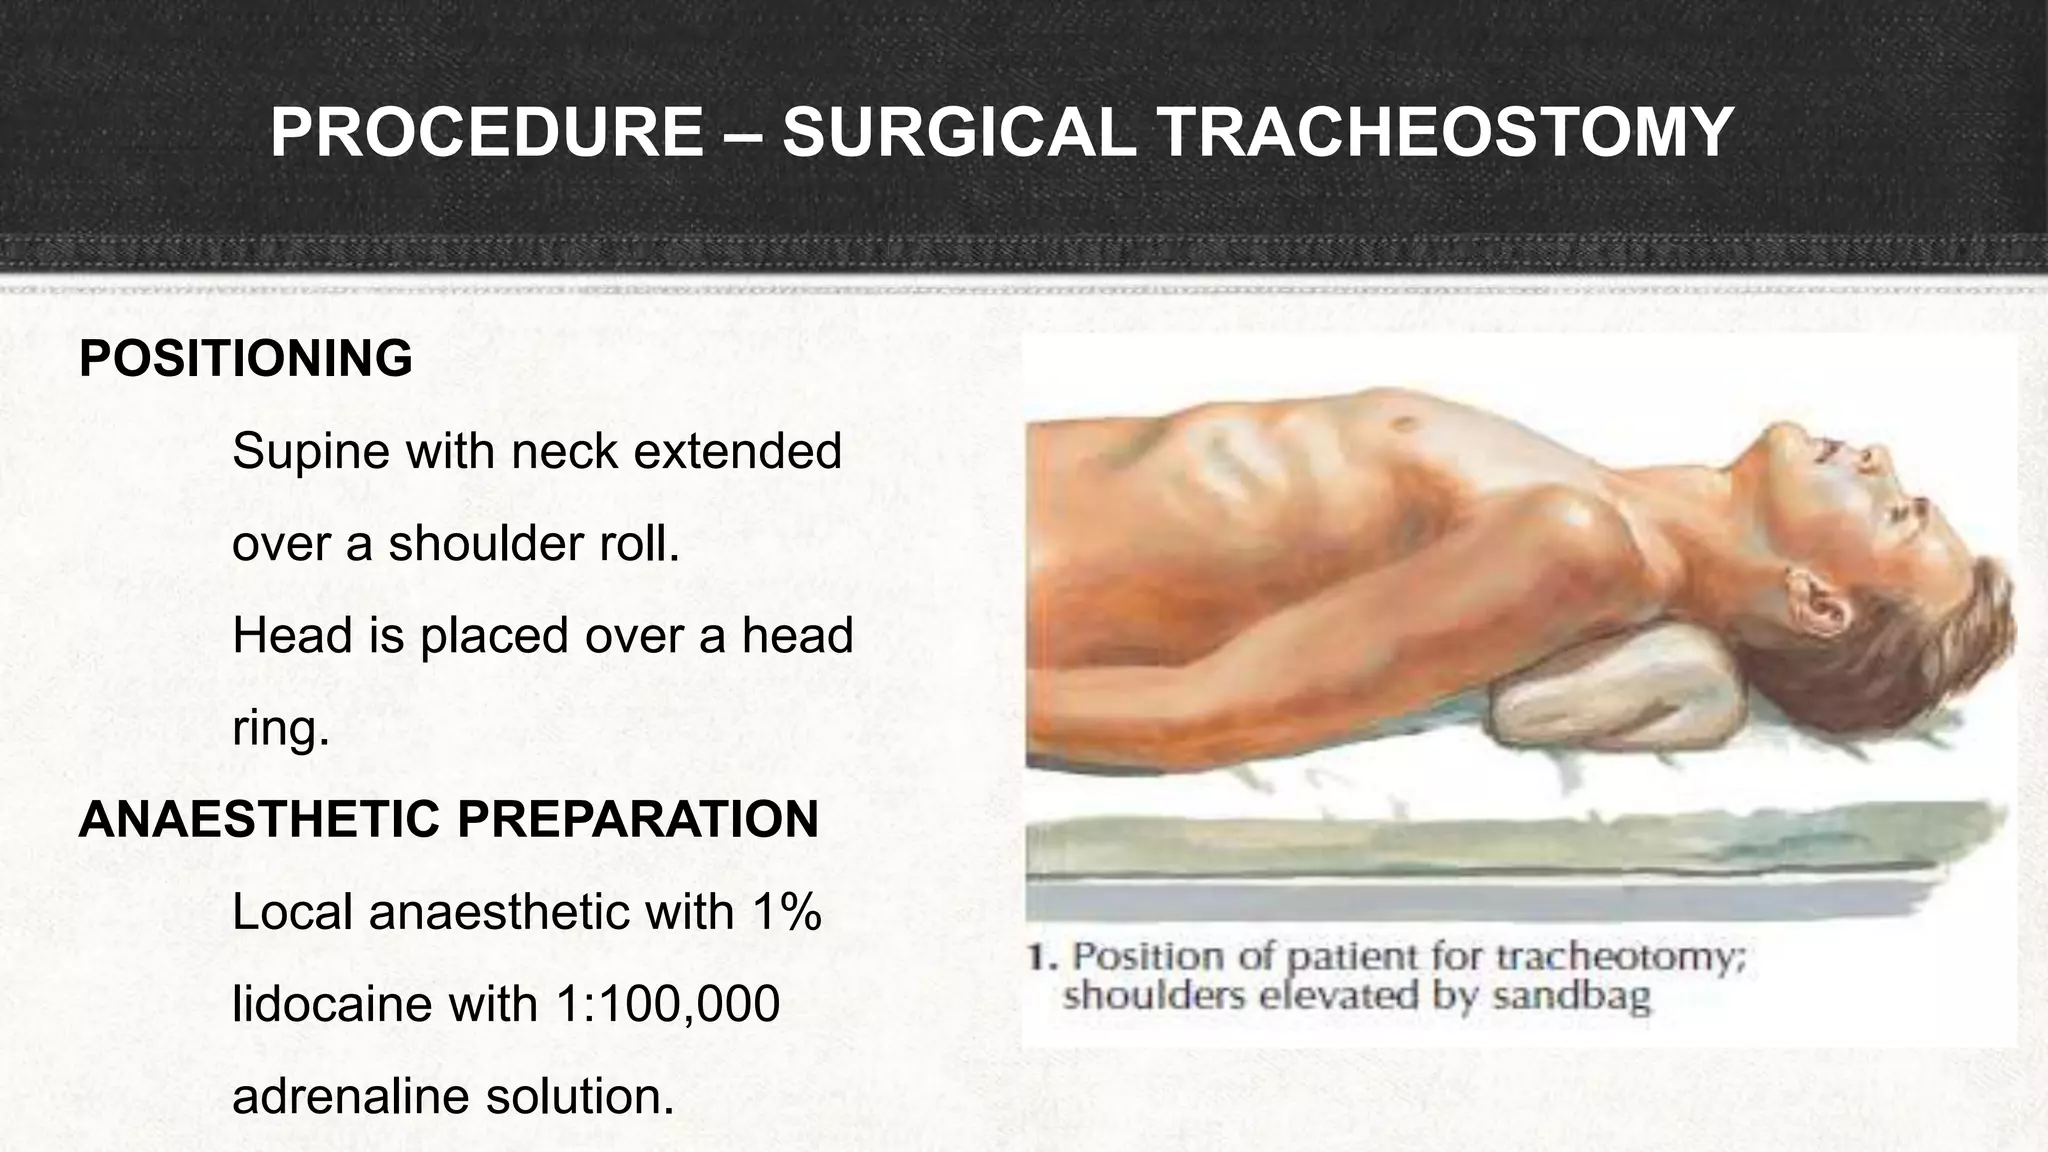
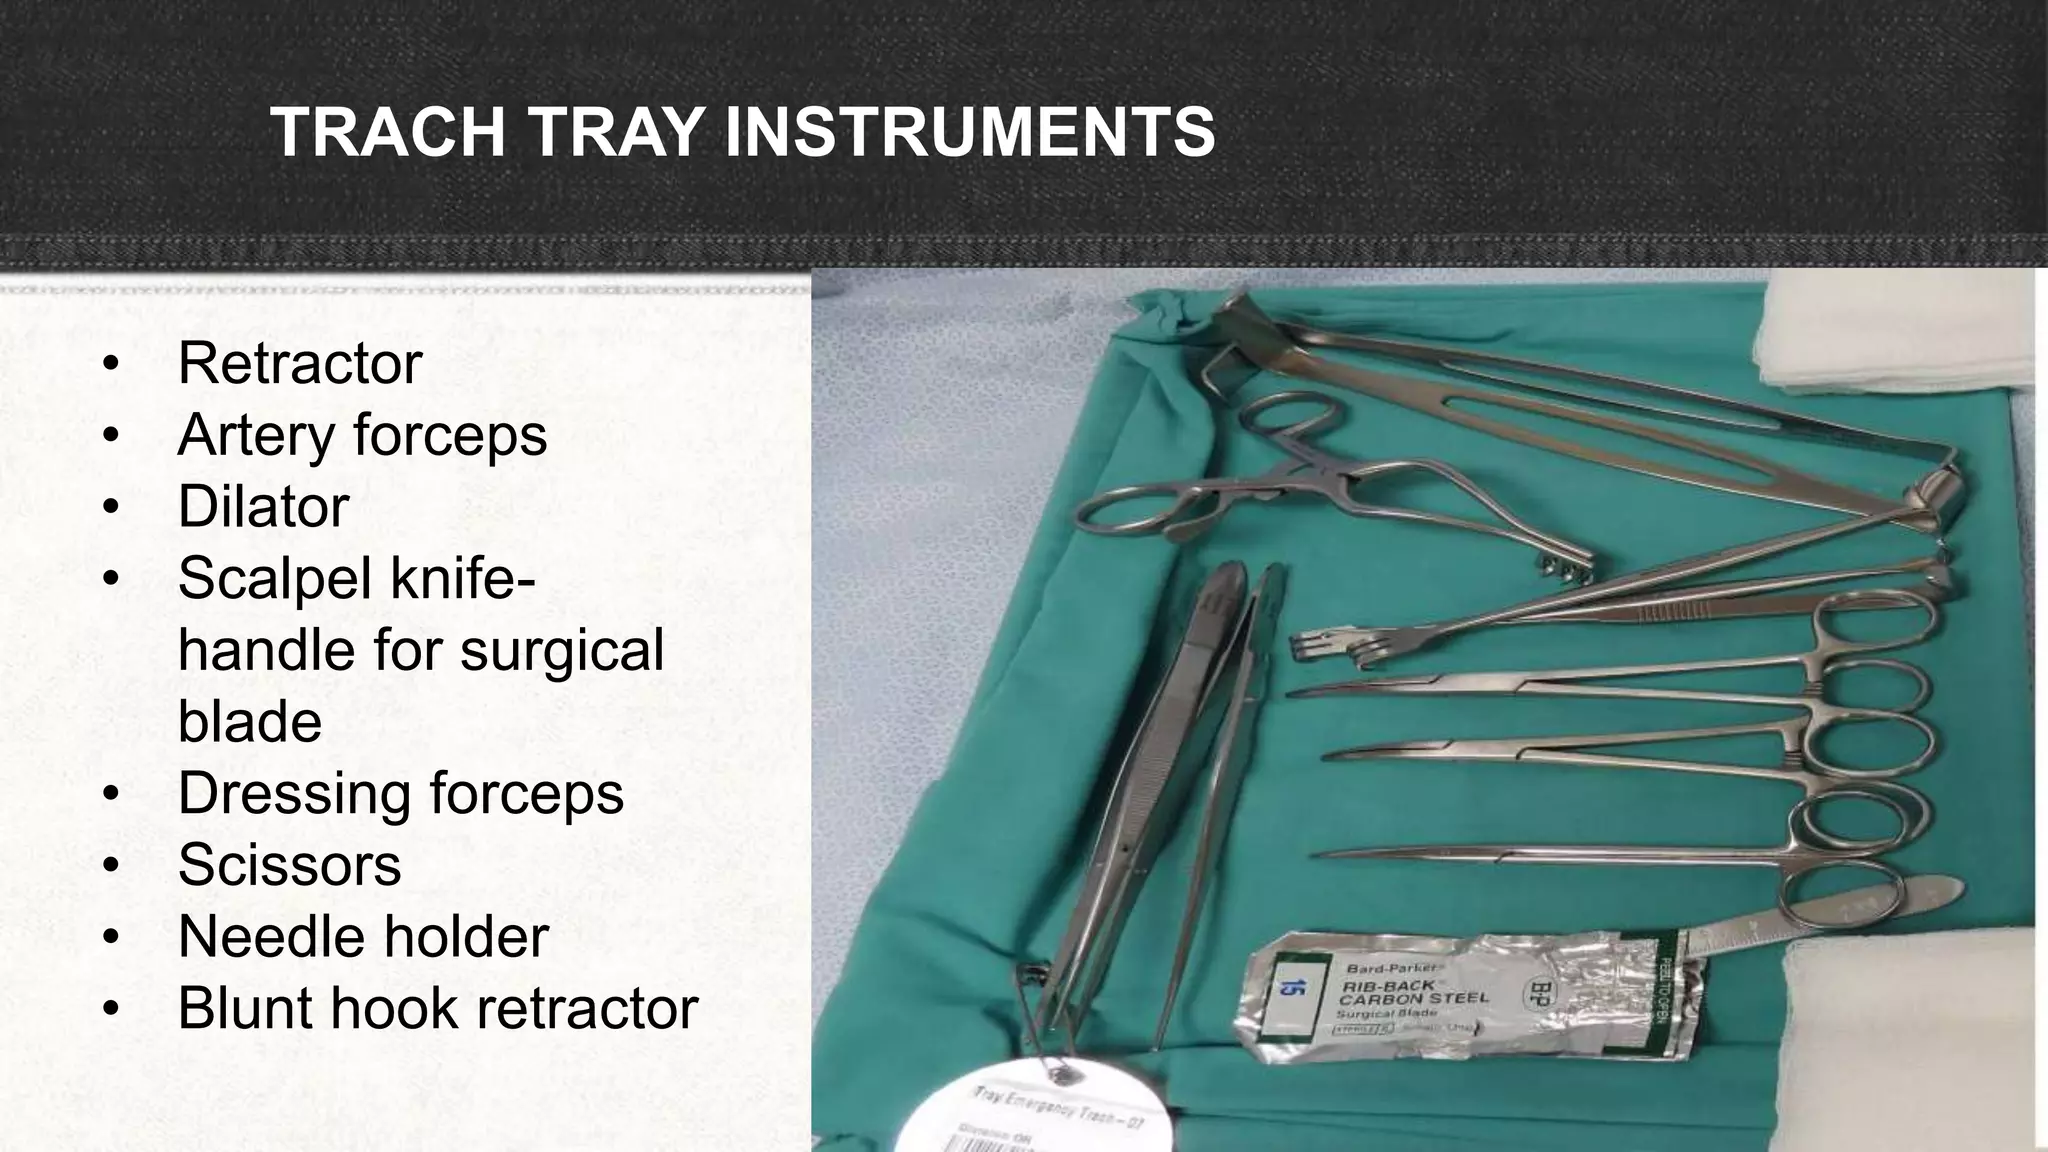
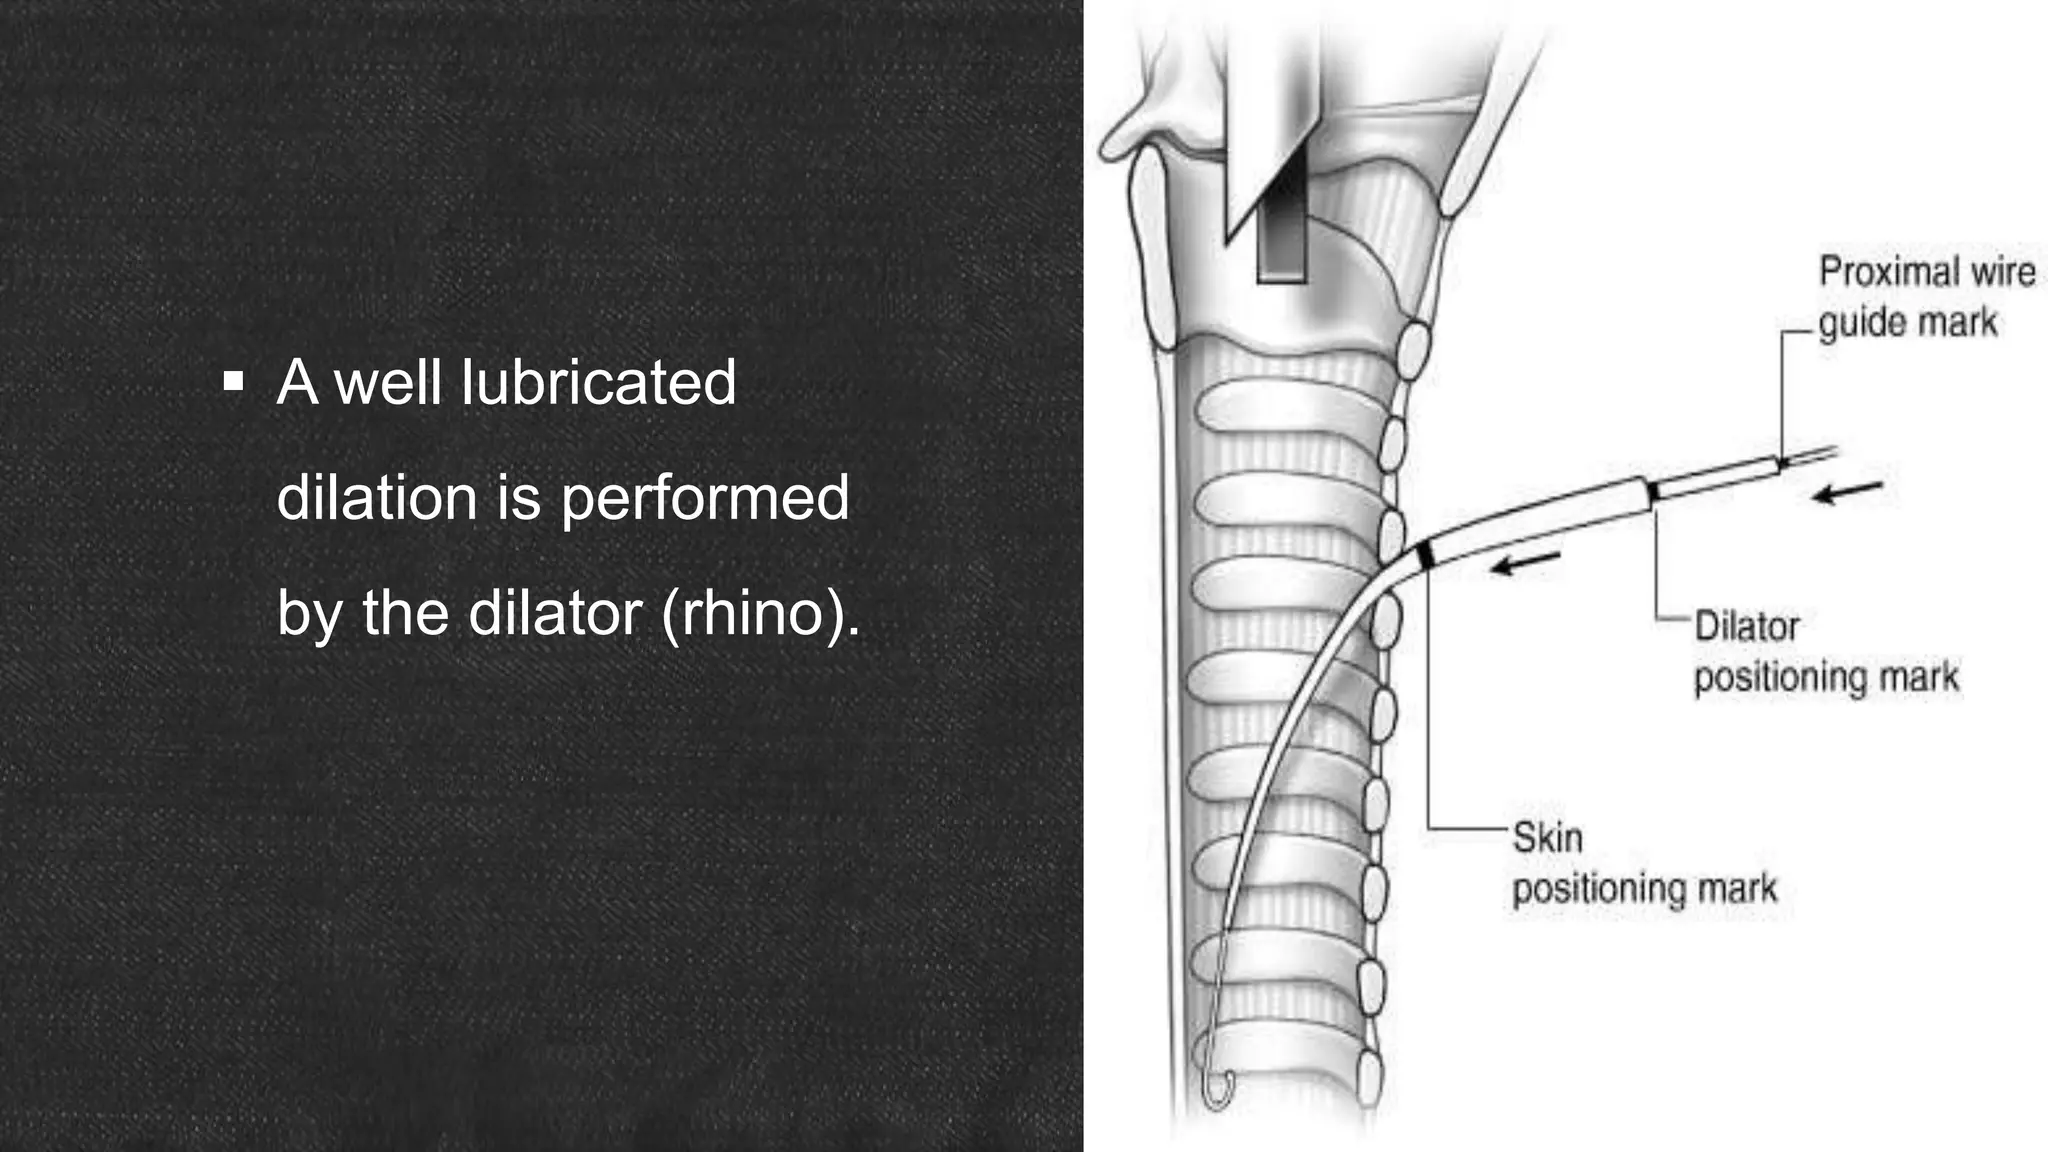
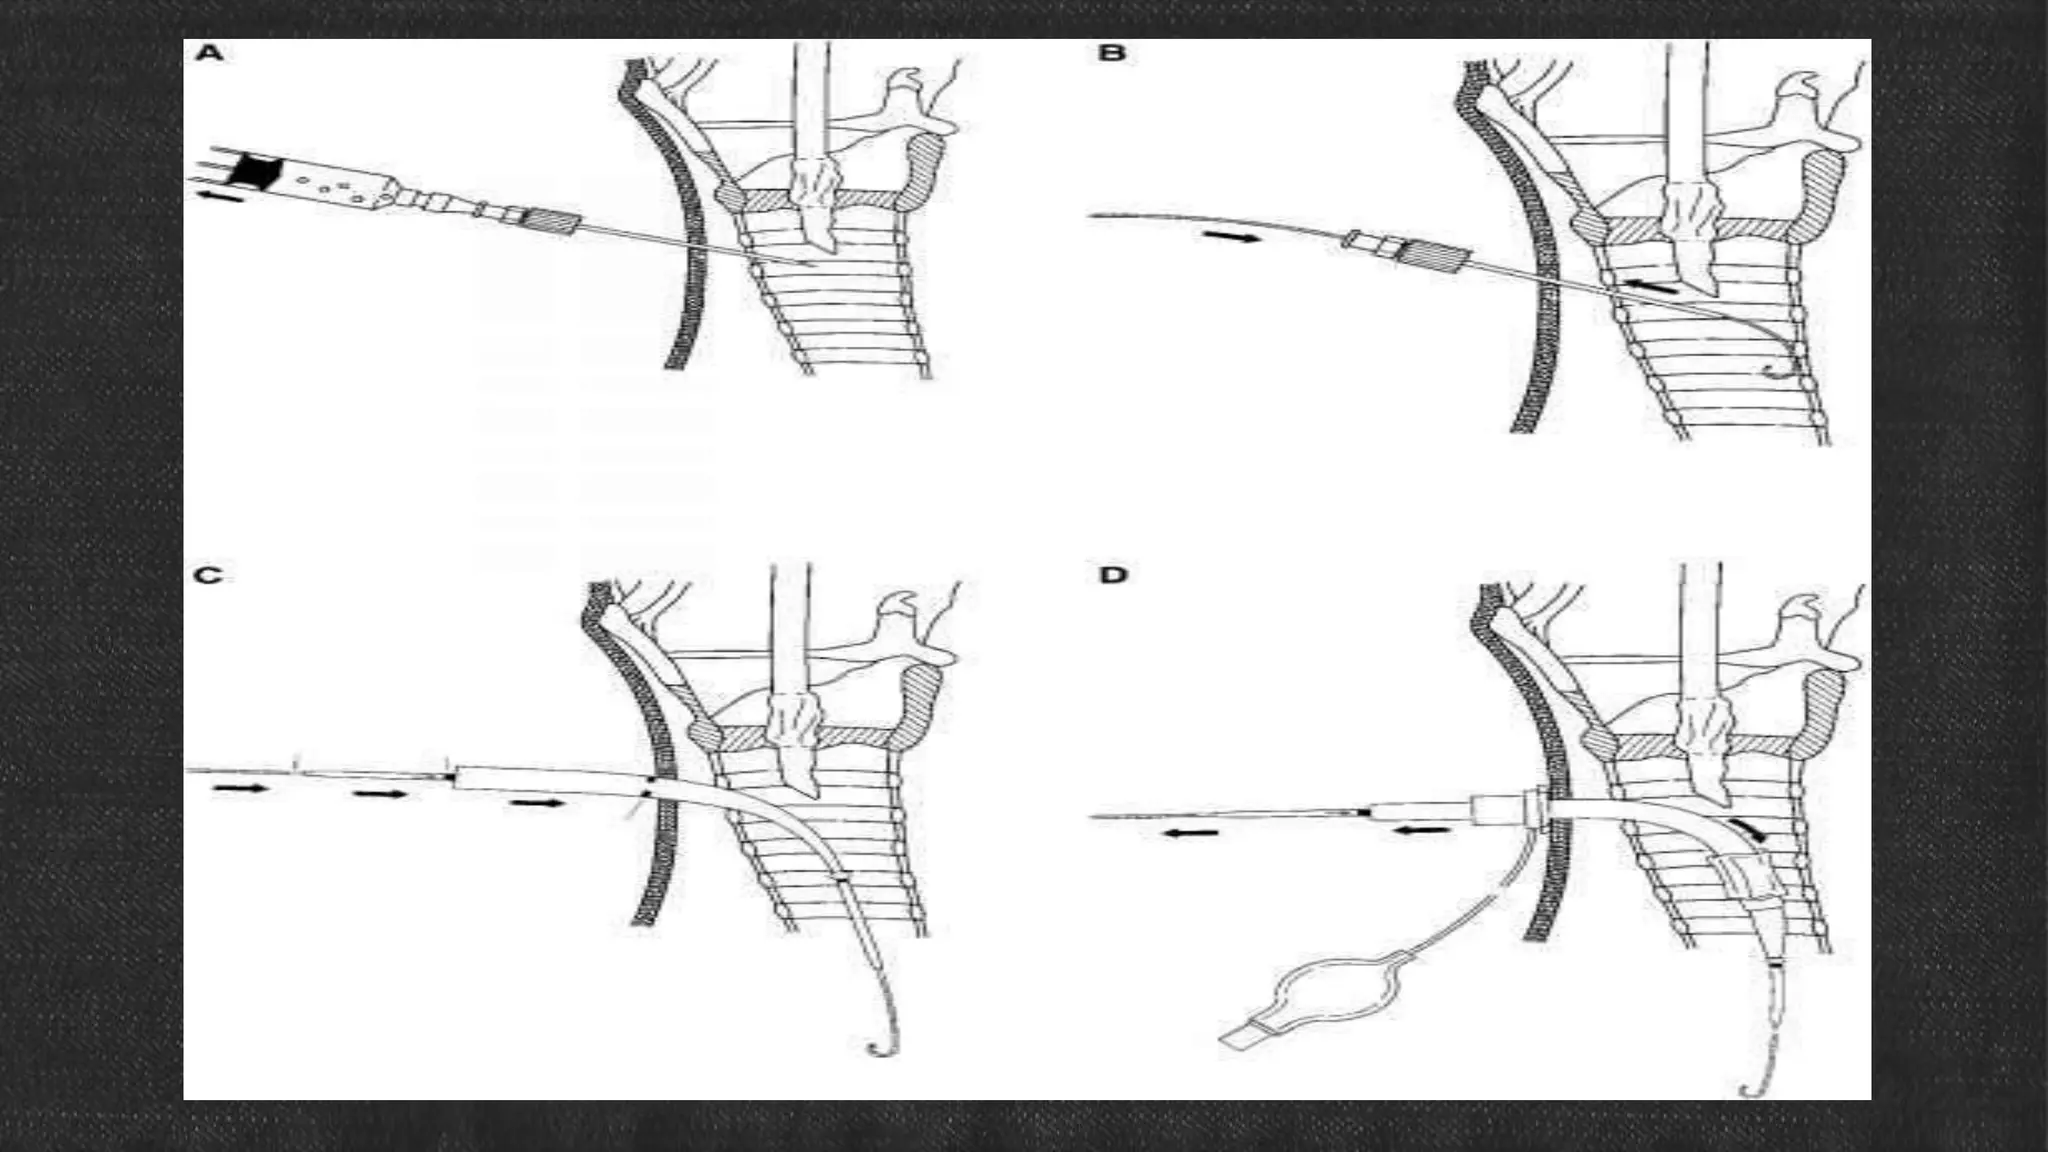
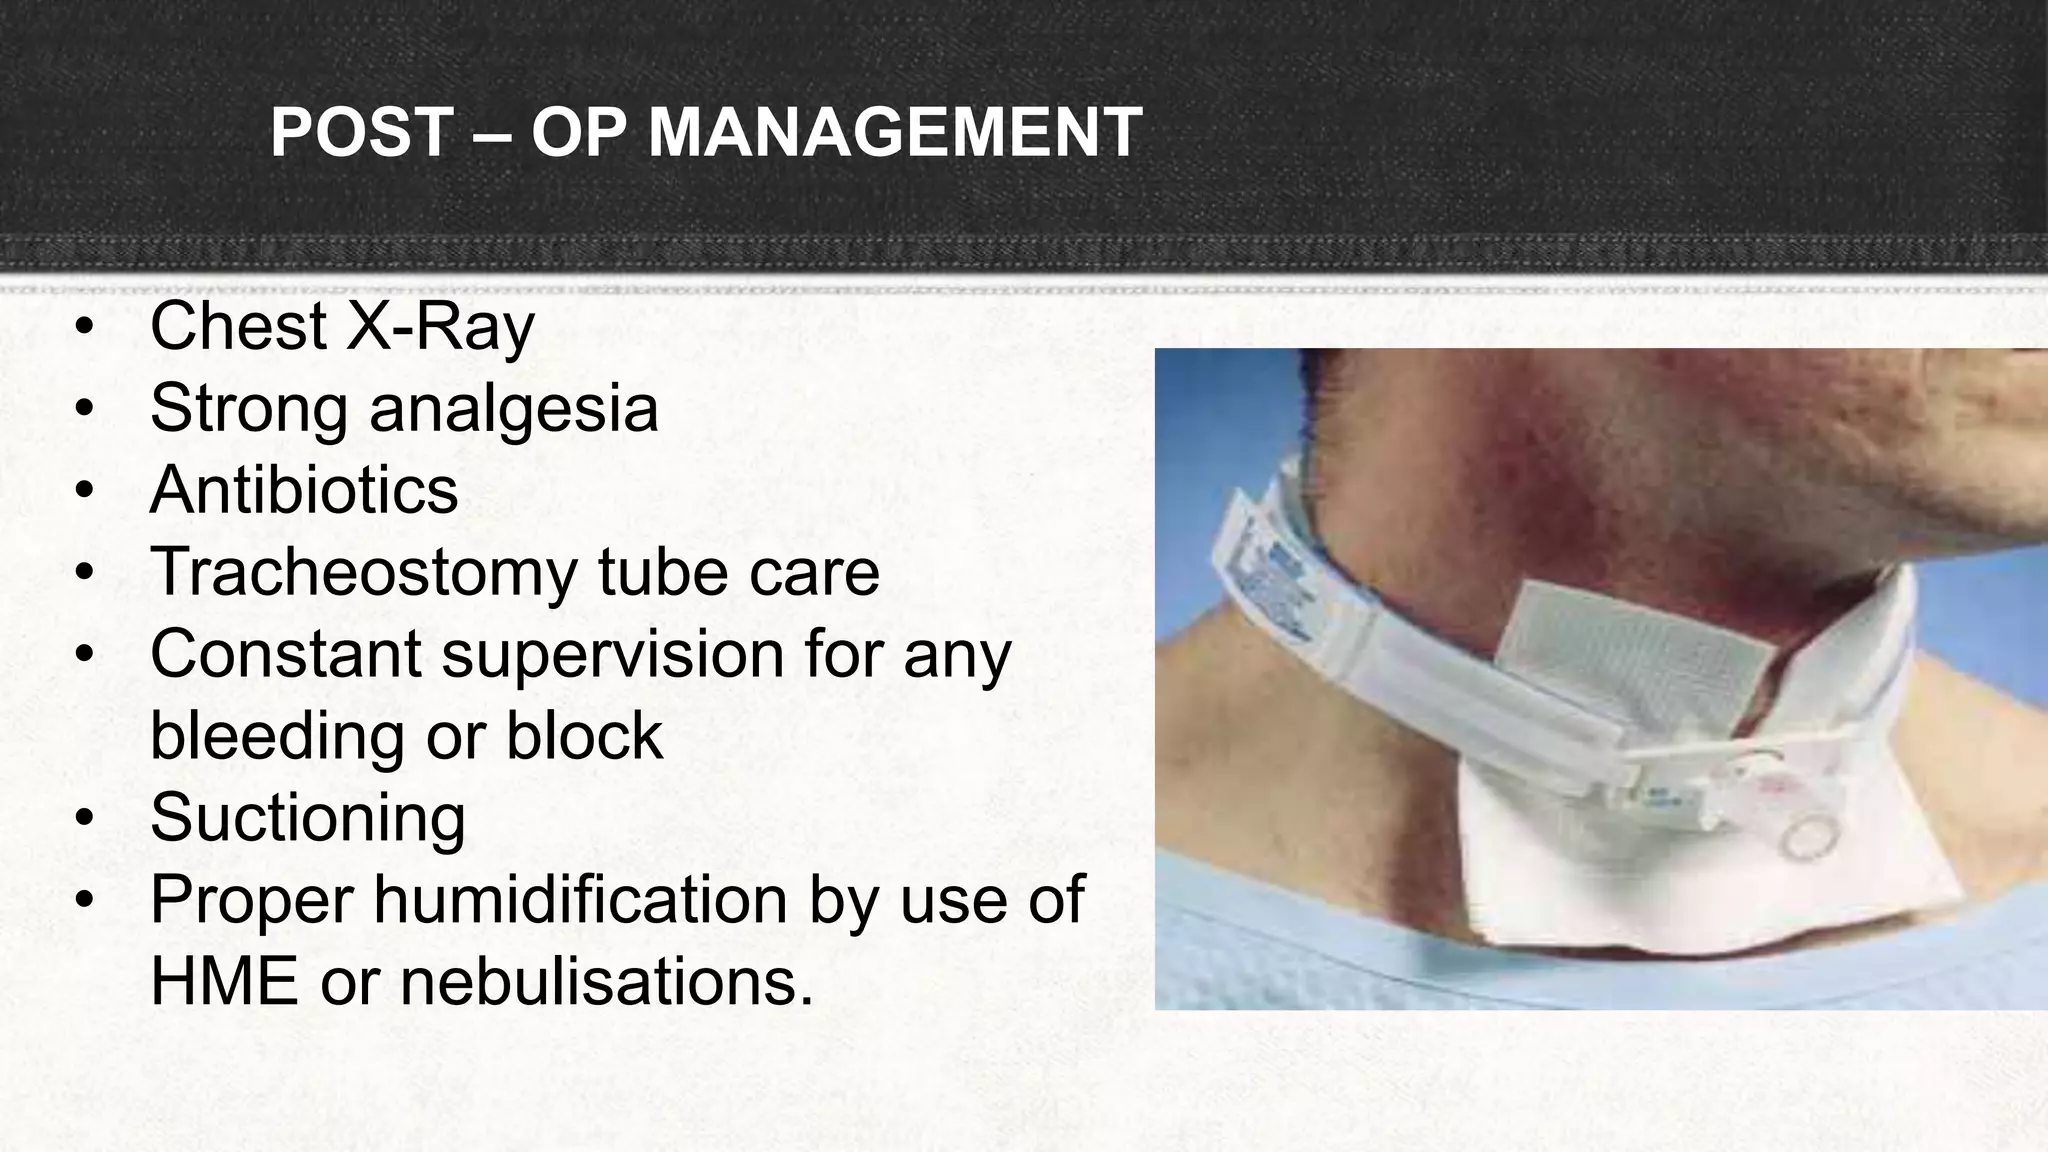
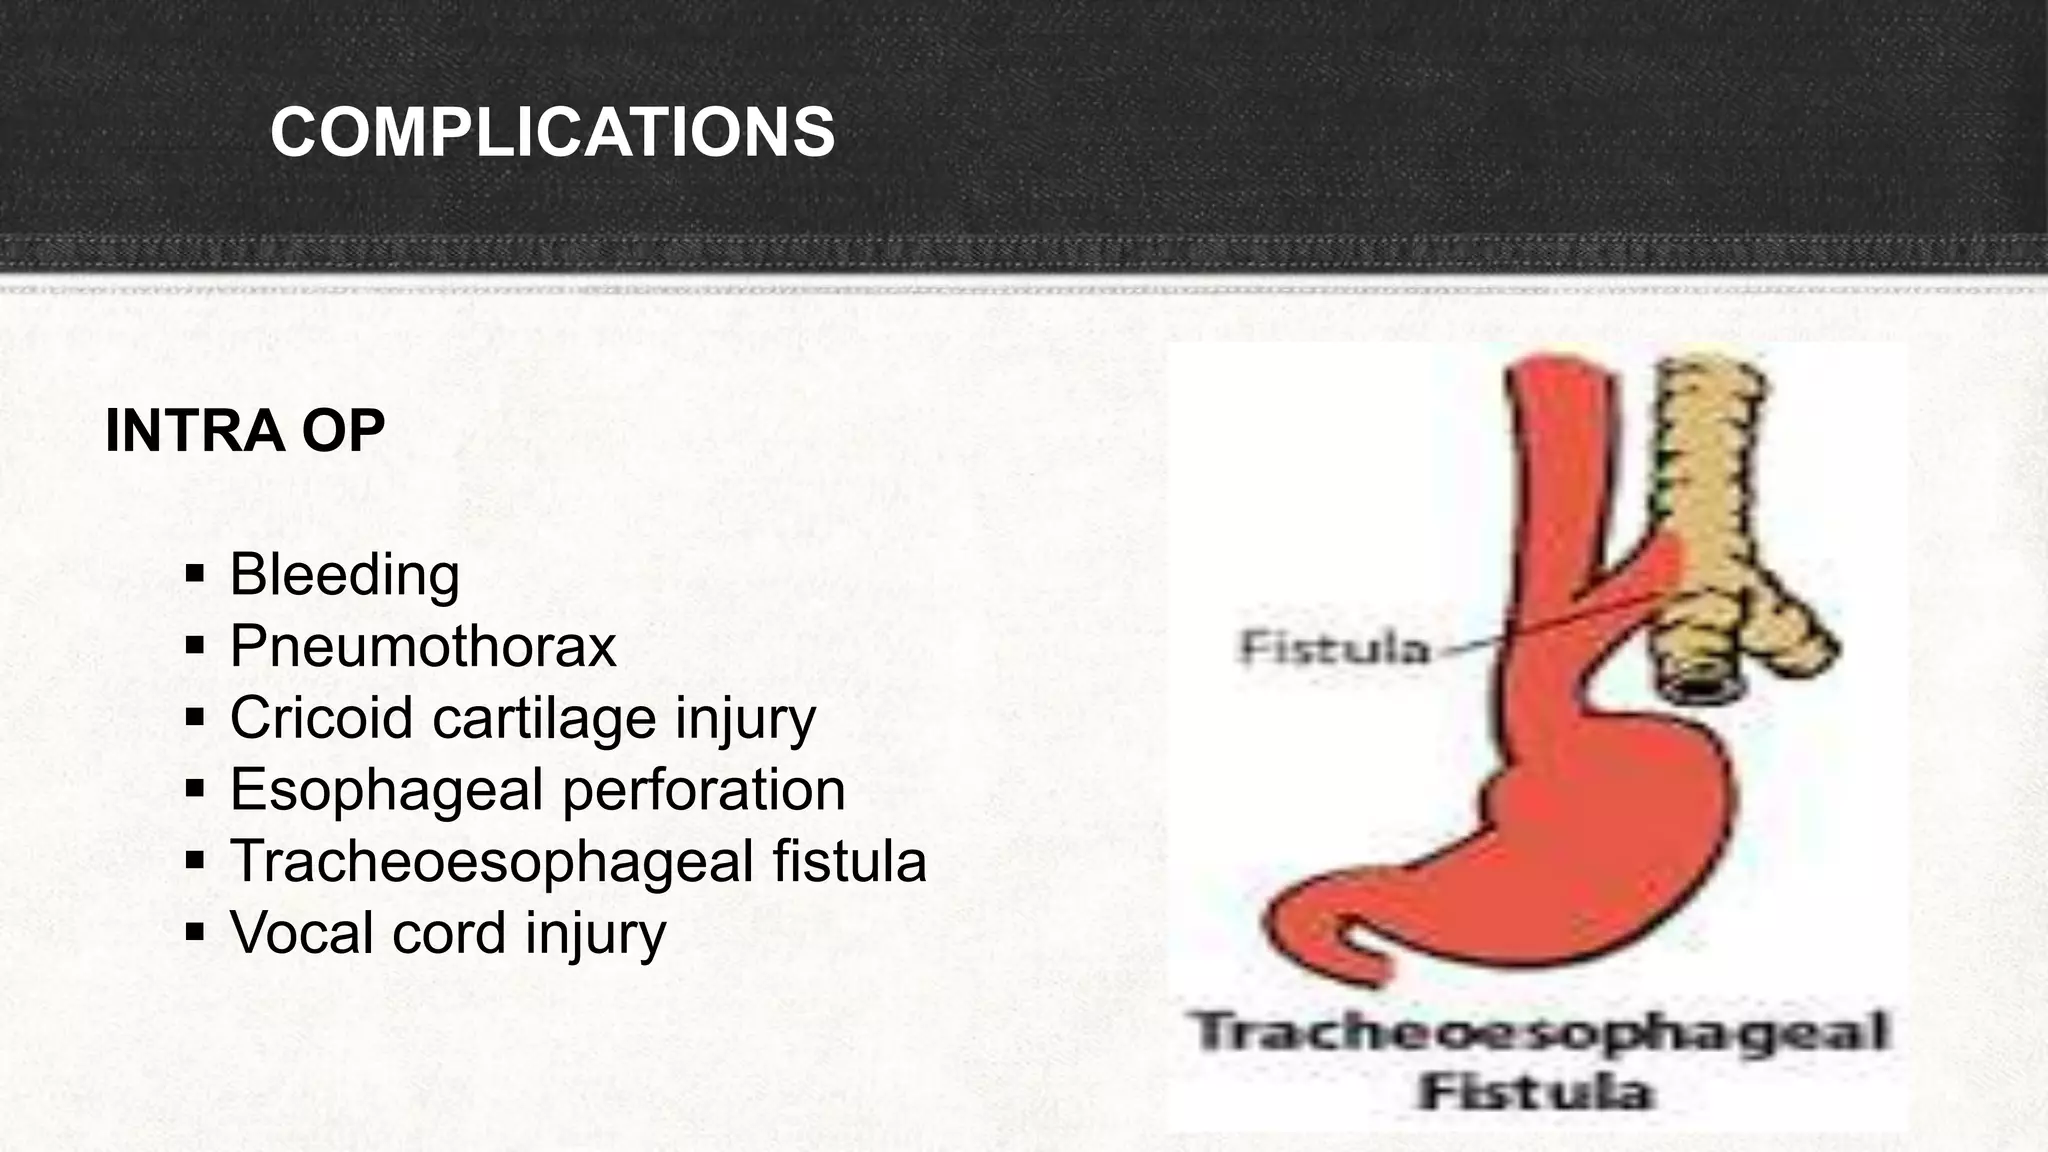
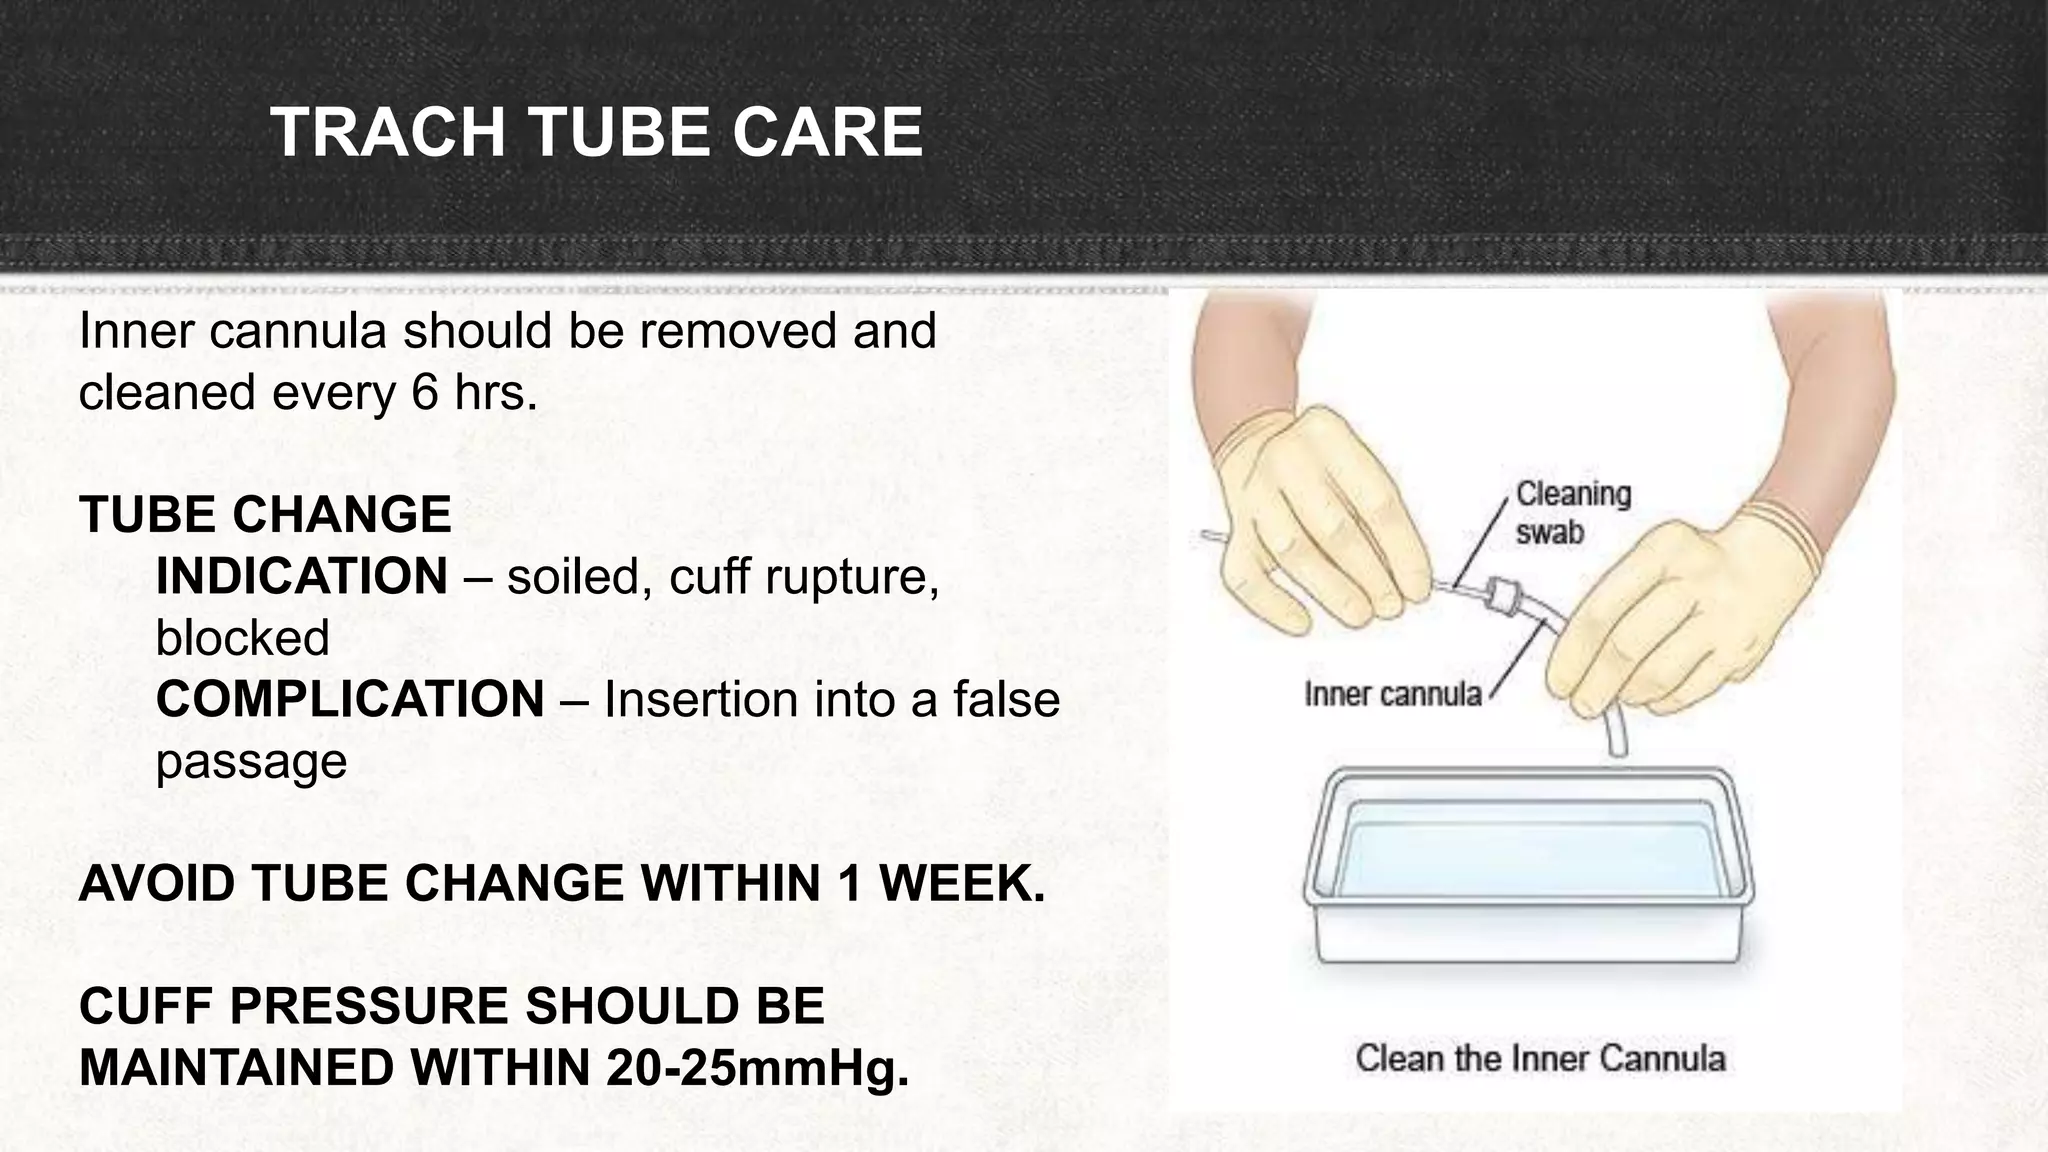
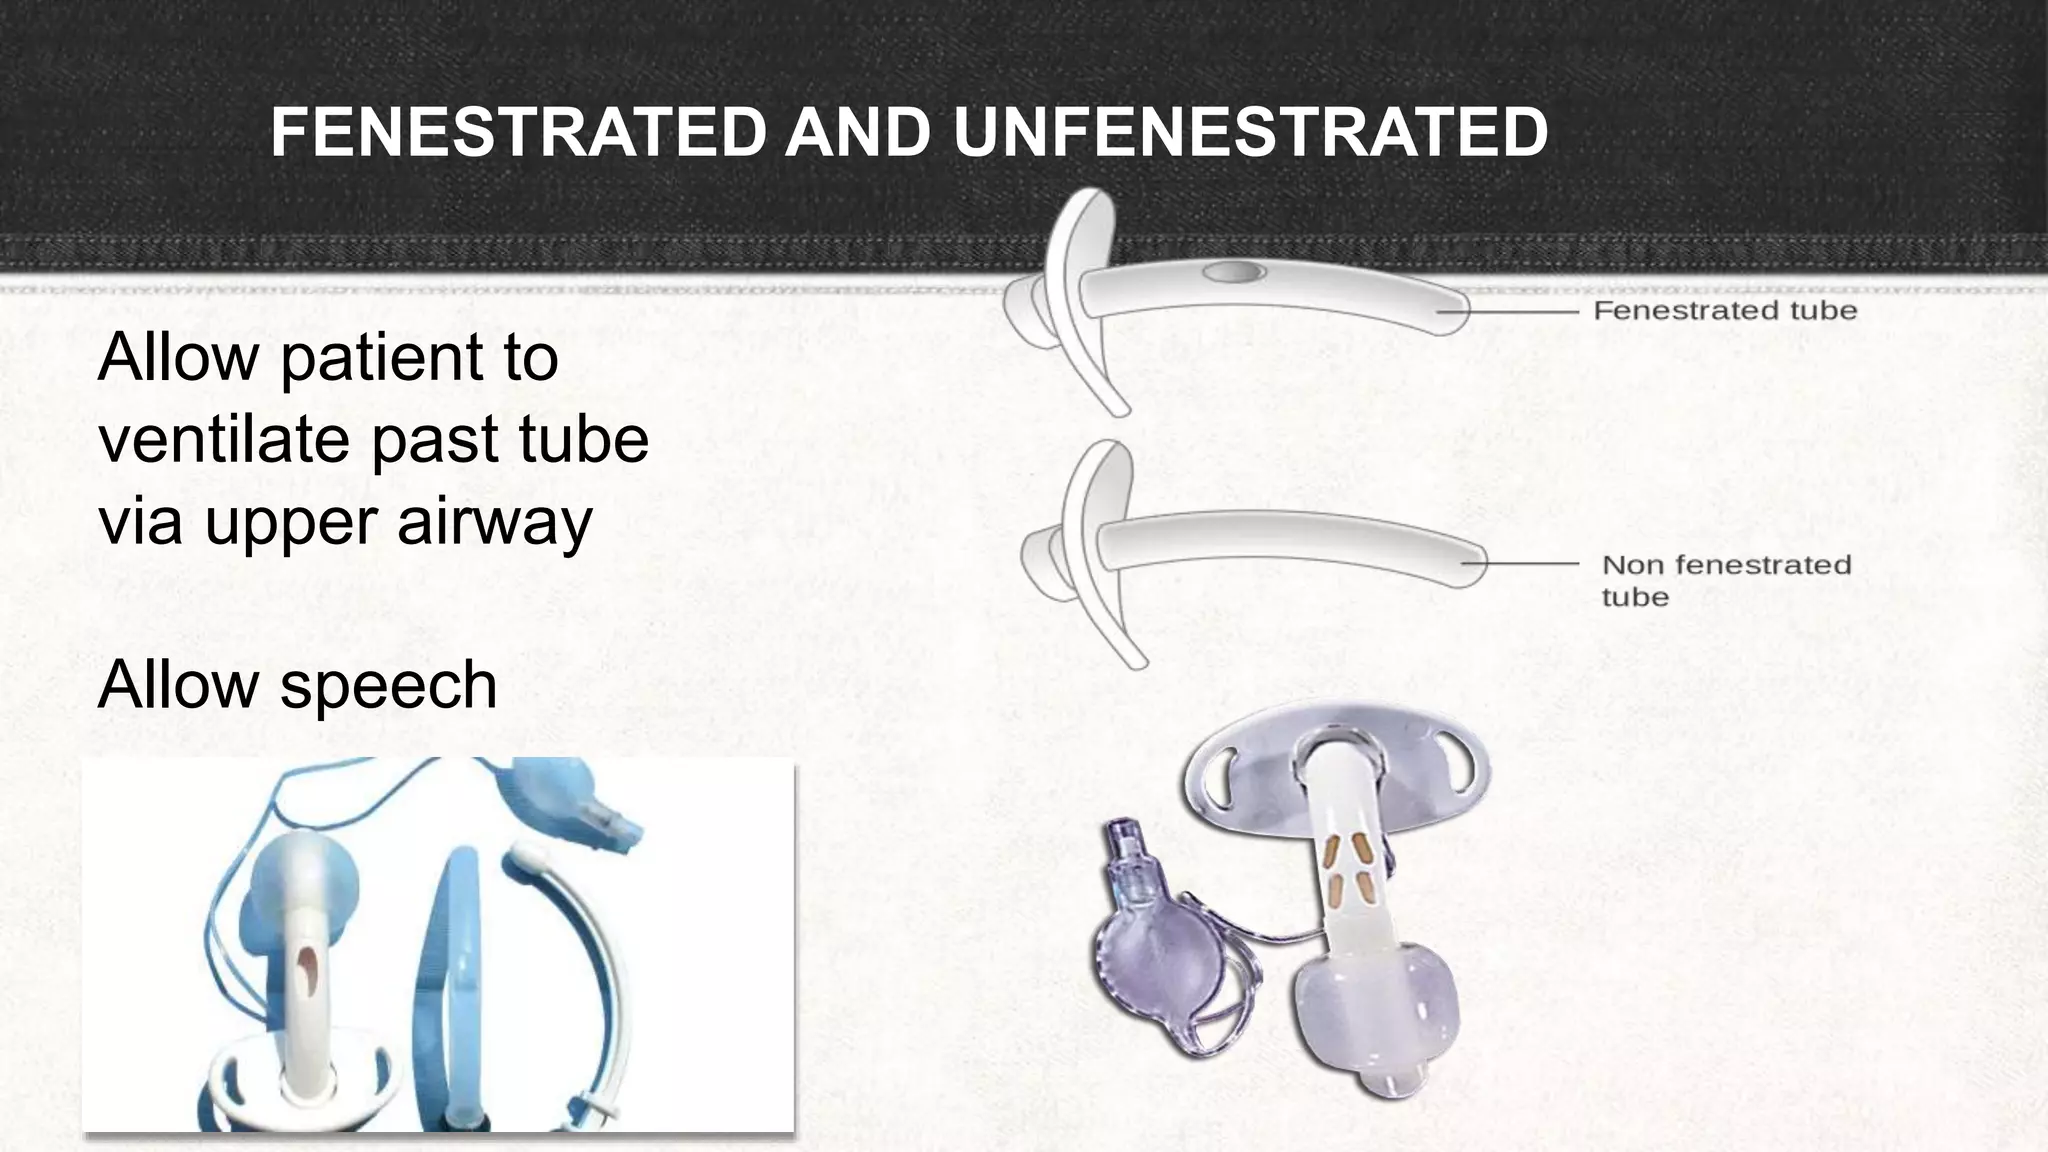
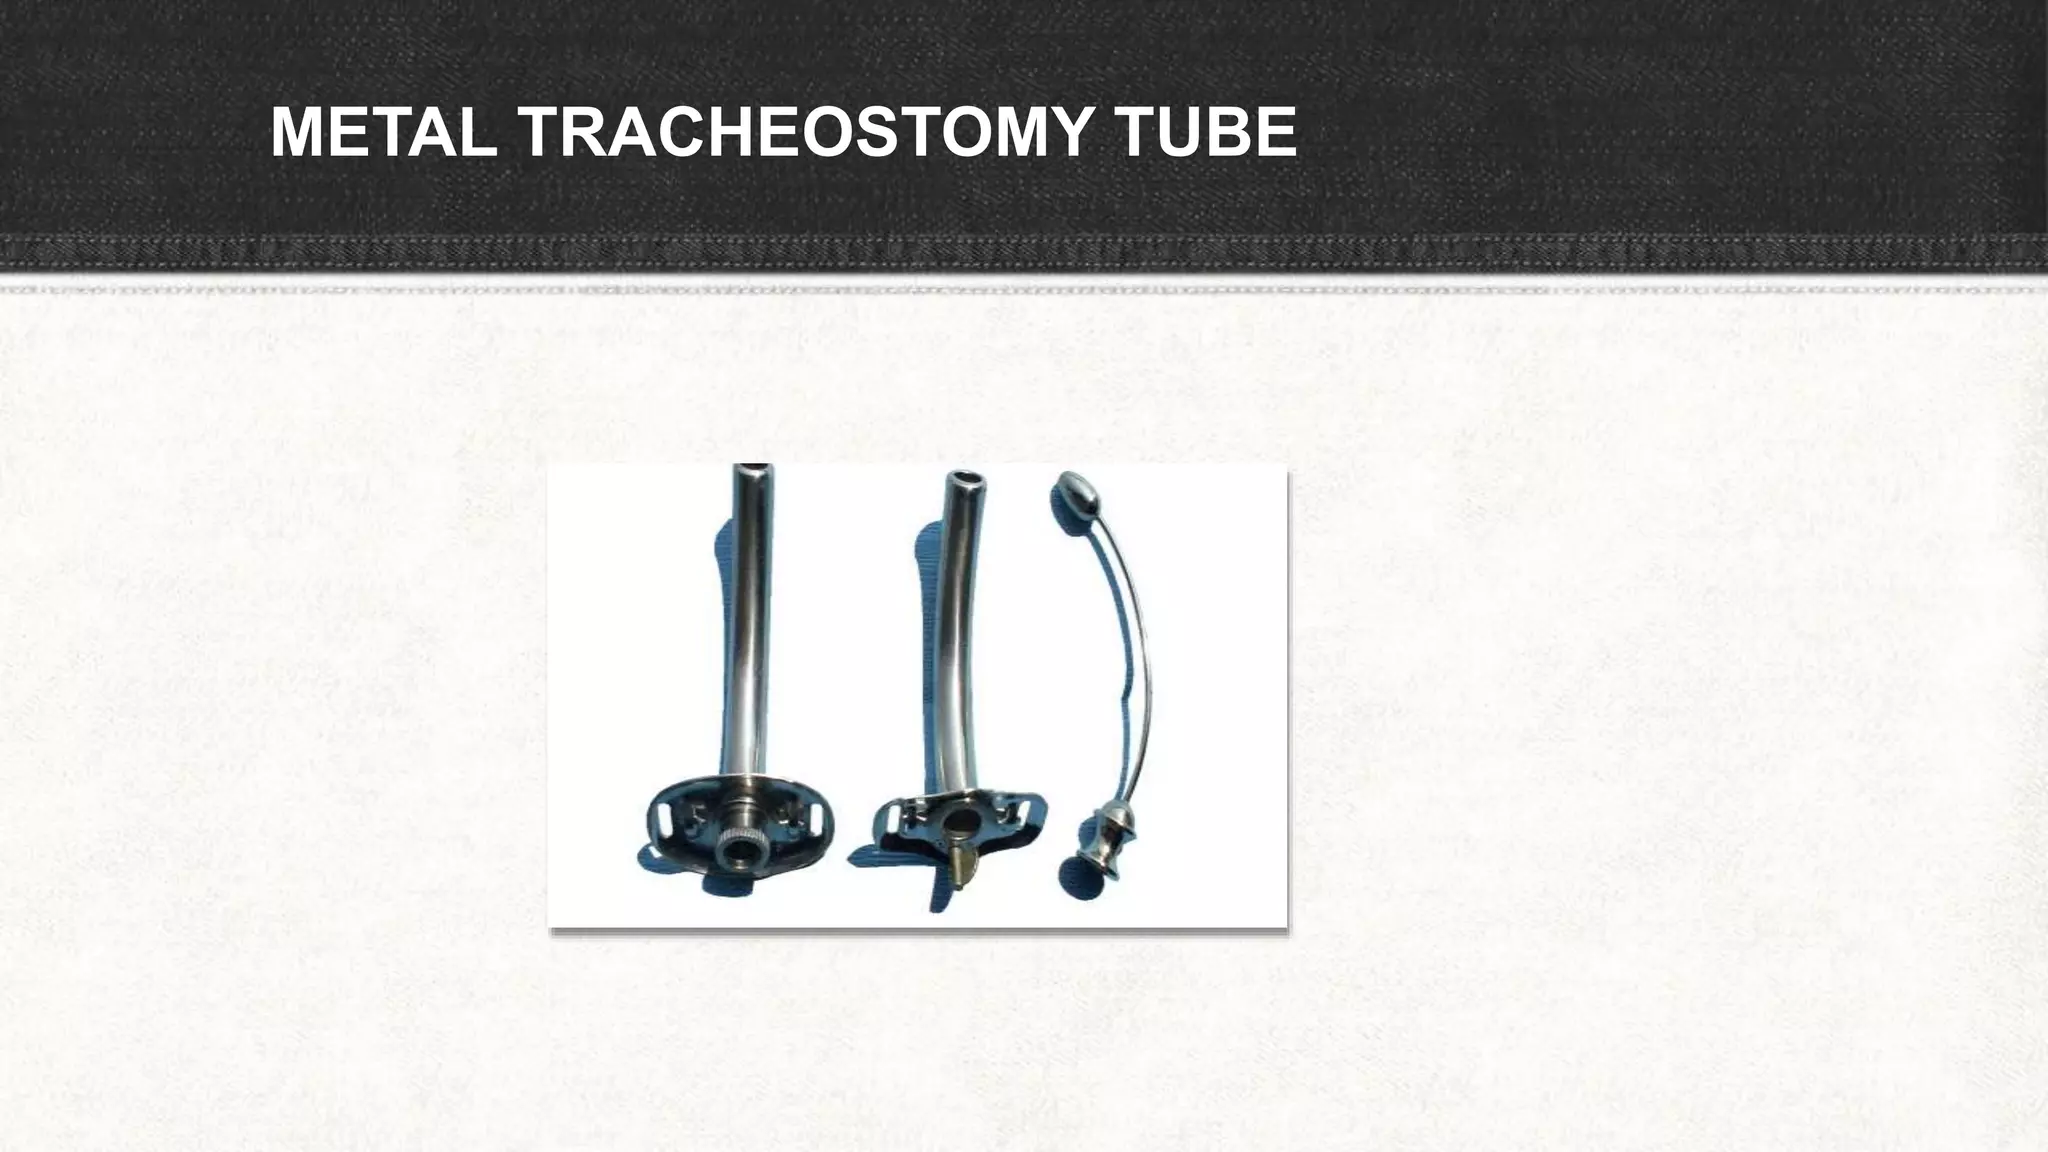
TRACHEOSTOMY
C.ABRAHAM BENSON RAJ
ANATOMY OF TRACHEA
 Trachea or wind pipe is a cartilaginous
tube that connects the pharynx and
larynx to the lungs, allowing the
passage of air.
 Trachea extends from larynx (at the
level of C6) and branches into two
primary bronchi (at the level of T4-T5).
 It is located anterior to the esophagus.
STRUCTURE
• Trachea contains rings of hyaline cartilage which are C shaped,
connected to each other by the smooth trachealis muscle.
• C shaped design of the trachea helps to ensure that the trachea will
not collapse.
• And the rings are joined vertically by a band of fibrous connective
tissue – The annular ligament of trachea.
• At the top of trachea the cricoid cartilage attaches it to the larynx –
the only complete ring.
• The crico tracheal ligament connects the cricoid cartilage with the
1st ring of trachea.
• Trachealis muscle overlies esophageal muscle and forms the
posterior wall of trachea.
• Trachea – length - 11 cm.
• Inner diameter – 1.5 to 2 cms.
• Outer diameter – 2.1 to 2.7 cms.
• Number of cartilages – 16 to 20.
WALL OF TRACHEA
The layers of tracheal
wall, from deep to
superficial are
1.Mucosa
2.Sub mucosa
3.Hyaline
cartilage
4.Adventitia
Mucosa
Consists of pseudo-stratified ciliated columnar epithelium with
goblet cells that produce mucus.
It warms and removes foreign particles from the air as it flows
through the trachea.
Submucosa
Consists of areolar connective tissue that contains seromucous
glands and their ducts.
The glands secretes a combination of water and mucus to that
secreted by the goblet cells.
Hyaline cartilage
A cartilaginous layer containing C-shaped cartilage rings.
Adventitia
Band of loose connective tissue that loosely bind the trachea to the
esophagus and other nearly organs.
TRACHEA - RELATIONS
CERVICAL TRACHEAL
POSTERIOR
Esophagus, Trachealis muscle
ANTERIOR
2nd and 4th rings are covered by the isthmus of thyroid.
LATERAL
2 lateral lobes (thyroid gland)
Posterior
Anterior and lateral
THORACIC TRACHEAL
ANTERIOR
Thymus gland
Left brachio cephalic vein, Aortic arch
LATERAL
Vagus nerve
Thoracic tracheal relations
TRACHEA
NERVE SUPPLY
Vagus and recurrent laryngeal nerves
BLOOD SUPPLY
Cervical portion – Inferior Thyroid Artery
Thoracic portion – Bronchial arteries
VENOUS DRAINAGE
Inferior Thyroid venous plexus
TRACHEOSTOMY – DEFINITION
Operative procedure that creates a surgical airway in the cervical
trachea.
Surgical procedure to bypass the airway in the patient with upper
airway obstruction, to make tracheobronchial toilet easier in the
patient with decreased consciousness or for the need of
mechanical ventilation.
Used in 2 types of conditions
1.Acute setting – usually in emergency to obtain an
airway and in ventilated patients who are having
difficulty in weaning.
2.Chronic setting – usually when the patient is to be
ventilated for the longer term.
INDICATIONS
GENERAL
1. To bypass an obstructed upper airway.
2. To clean and remove secretions from airway.
3. To more easily and usually more safely, deliver oxygen to the lungs.
1. AIRWAY BYPASS
 Severe inflammation of face, neck and larynx.
 Tracheal injury
 Upper airway tumour
 Neck radiotherapy
 Facial trauma – multiple fractures
 Severe head and neck operating procedures
2. BRONCHIAL TOILET
 Head trauma with consciousness disturbances
and ineffective cough
 Tracheobronchitis with an edema and lot of
secretions
 Thoracic trauma with ineffective cough
 Post surgical procedure with inadequate cough
3. EASIER VENTILATION
 Prolonged ventilation after intubation >7days.
 To reduce anatomic dead space and increases
the chance for mechanical ventilation withdrawal
 Neuro muscular diseases (GBS,MG,etc)
paralyzing or weakening chest muscles and
diaphragm
 COMA (GCS <8, risk of aspiration)
PRE OPERATIVE
INFORMED CONSENT – EXPLAIN ABOUT
Operating procedure
Loss of voice when tracheostomy tube is still in
trachea
Complication of procedure
Do blood tests and check levels of CBC, PT, PTT, INR.
TYPES OF TRACHEOSTOMY
1.OPEN PROCEDURE
High tracheostomy (cricothyroidectomy)
Low tracheostomy
2. PERCUTANEOUS PROCEDURE
PROCEDURE – SURGICAL TRACHEOSTOMY
POSITIONING
Supine with neck extended
over a shoulder roll.
Head is placed over a head
ring.
ANAESTHETIC PREPARATION
Local anaesthetic with 1%
lidocaine with 1:100,000
adrenaline solution.
TRACH TRAY INSTRUMENTS
• Retractor
• Artery forceps
• Dilator
• Scalpel knife-
handle for surgical
blade
• Dressing forceps
• Scissors
• Needle holder
• Blunt hook retractor
PARTS OF A TRACHEOSTOMY TUBE
PROCEDURE
 Before tracheostomy put patient on 100% FiO2 and continuously monitor
the patient.
 Follow strict aseptic process.
 Skin preparation with povidine iodine, chlorohexidine.
 Sterile drapping.
 Good light source and suction apparatus ready and tested to be
functional.
 Ambu bag, facemask and bains circuit – standby.
 Appropriate sized tracheostomy tubes must be available. If the patient is
obese and has a short, thick neck, a longer tracheostomy tube should be
used.
TRANSVERSE INCISION
 Incision 1 cm below the
cricoid or over the 2nd
tracheal ring.
 Incision length – 2 to 3
cm.
 Blunt dissection of
subcutaneous tissue.
 Transversely retracted
until the thyroid isthmus
is identified.
 If the gland lies superior to the 3rd
tracheal ring, it can be bluntly
undermined and retracted to gain
access to the trachea.
 If isthmus overlies the 2nd and 3rd
tracheal ring, it must be either
mobilised or a small incision is made
to clear a space for tracheostomy.
 A window of tracheal tissue is removed. This
window is approximately the size of desired
tracheostomy tube.
 The ETT should be withdrawn till it is just
visible above the proximal end of stoma, and
leave ETT in place.
 The ETT should not be completely removed
from the airway until the correct placement of
tracheostomy tube is confirmed and secured
 Trachea is maintained open with blunt hooks
on the right and left, clean existing secretions
by using suction catheter.
 While inserting the tracheostomy tube,
position the axis perpendicular to the TT, after
entering turn the direction parallel to the axis
of trachea, proceed according to the curve of
the TT into the lumen of trachea.
 Check TT into the lumen of trachea,
the whole latch is released,
assistant hold the TT, then it is fixed
with sutures at the right and left
flanges of TT to the skin of the neck
and installing a ribbon strap around
the neck.
 If the incision is too wide, skin is
sutured loosely.
 Between TT flange and skin, put a
sterile gauze cushion.
 Then TT is connected to the
ventilator and ETT is pulled out.
1. 2.
3.
4. 5.
6.
PROCEDURE – PERCUTANEOUS DILATATIONAL
TRACHEOSTOMY
Positioning, anaesthetic preparation and sterile drapping must be
followed as in open tracheostomy.
For percutaneous Tracheostomy, do laryngoscopy and
withdraw ETT till the cuff is just visible below the vocal
cords.
Assist withdrawal and refix ETT temporarily.
PDT SET - CONTENTS
• 14 G cannula
• Guide wire set with
introducer
• Initial dilator
• Stiffener
• Single stage dilator
(rhino)
• Trach tube
• Syringe for balloon
inflation
• A 1.5cm vertical incision is made at midline
space below cricoid cartilage.
• A minimal dissection is performed onto the
pretracheal tissues in order to push the
thyroid isthmus downward.
• A 14 gauge introducer needle is then
inserted into the trachea with constant
aspiration on the syringe between 1st and
2nd or 2nd and 3rd tracheal rings.
• The successful introduction of the needle
into the trachea confirmed by air bubbles
into the saline filled syringe during
aspiration.
 Once the introducer needle is
in correct position, a guide wire
is then inserted into the
tracheal lumen.
 The introducer
needle is withdrawn,
leaving the guide
wire in place.
 A well lubricated
dilation is performed
by the dilator (rhino).
 The TT mounted on the dilator is
then threaded over it and
introduced into the tracheal
lumen.
 The guide wire and dilator are
removed.
 The tracheostomy tube flanges
are then secured with suture
and ties around the neck.
POST – OP MANAGEMENT
• Chest X-Ray
• Strong analgesia
• Antibiotics
• Tracheostomy tube care
• Constant supervision for any
bleeding or block
• Suctioning
• Proper humidification by use of
HME or nebulisations.
COMPLICATIONS
INTRA OP
 Bleeding
 Pneumothorax
 Cricoid cartilage injury
 Esophageal perforation
 Tracheoesophageal fistula
 Vocal cord injury
POST OP
EARLY
 Infection at operating site
 Subcutaneous emphysema
 Impaired swallowing function
because of cuff
LATE
 Granuloma
 Laryngotracheal stenosis
 Scarring
 Failure to decannulate
CONTRAINDICATIONS
No absolute contraindications
Relative
Child <12 years
PEEP >15cm H2O
Abnormal anatomy
Occluding thyroid mass
TRACH TUBE CARE
Inner cannula should be removed and
cleaned every 6 hrs.
TUBE CHANGE
INDICATION – soiled, cuff rupture,
blocked
COMPLICATION – Insertion into a false
passage
AVOID TUBE CHANGE WITHIN 1 WEEK.
CUFF PRESSURE SHOULD BE
MAINTAINED WITHIN 20-25mmHg.
TYPES OF TRACH TUBES
Cuffed and uncuffed
Fenestrated and unfenestrated
Metal tracheostomy tube
CUFFED AND UNCUFFED TUBES
CUFFED
To protect airway
To allow ventilation
UNCUFFED
Used for patients with tracheal
problems
FENESTRATED AND UNFENESTRATED
Allow patient to
ventilate past tube
via upper airway
Allow speech
METAL TRACHEOSTOMY TUBE
DECANNULATION
The process by which a tracheostomy tube is
removed when the patient no longer needs it.
Resolution of pathology that necessitated the tracheostomy
(upper airway obstruction, pneumonia, etc.)
Normal protective laryngeal mechanisms (no aspirations
during normal swallowing, good cough)
No planned further interventions (radiotherapy, head and neck
operations)
No mechanical ventilation.
INDICATIONS
METHODS OF DECANNULATION
1.One step method
2.Sequential downsizing : This is a staged procedure when the
tracheostomy is performed for upper airway obstruction. Every 3 to 4 days,
a smaller size tracheostomy tube is inserted and the patient is assessed for
discomfort. If the patient is able to tolerate the smallest tube, the tube is
then capped overnight, the patient is decannulated the next morning.
Decannulation equipments
O2 Mask and suction with equipments
Tracheostomy tubes (one same size and one
size smaller)
Sterile gauze or dressing
Intubation tray in case of emergency
Scissors
PROCEDURE
 Procedure should only be performed between 8am and
4pm during working hours when more help is available.
 Monitor the patient continuously
 Position: pillow under the shoulder with head tilt and chin
lift.
 Explain the procedure to the patient.
 Suction tracheostomy and clean stoma.
 Undo ties and remove tracheostomy tube.
 Observe for any respiratory distress
Tachypnea
Stridor
Chest retraction
Tachycardia
Restlessness
 Apply occlusive dressing to the stoma site
 Reassess patient for signs of respiratory distress
 Sit patient up and encourage coughing.
FOLLOWING DECANNULATION
Monitor respiratory rate, heart rate, oxygen saturation and work of breathing
Observe for respiratory obstruction during sleep
Encourage coughing to clear secretions
Avoid suctioning the stoma unless otherwise indicated in an emergency
situation as this may cause trauma.
DECANNULATION FAILURE – CAUSES
• Blockage of stomal site with mucous plug because of inadequate cough.
• Tracheobronchomalacia
STOMA SITE CARE
DRESSING
The stoma site is covered with a small square
gauze and then by an occlusive dressing.
Stoma site to be assessed daily and cleaned.
Tracheostomy

Tracheostomy

  • 1.
  • 2.
    ANATOMY OF TRACHEA Trachea or wind pipe is a cartilaginous tube that connects the pharynx and larynx to the lungs, allowing the passage of air.  Trachea extends from larynx (at the level of C6) and branches into two primary bronchi (at the level of T4-T5).  It is located anterior to the esophagus.
  • 3.
    STRUCTURE • Trachea containsrings of hyaline cartilage which are C shaped, connected to each other by the smooth trachealis muscle. • C shaped design of the trachea helps to ensure that the trachea will not collapse. • And the rings are joined vertically by a band of fibrous connective tissue – The annular ligament of trachea. • At the top of trachea the cricoid cartilage attaches it to the larynx – the only complete ring.
  • 5.
    • The cricotracheal ligament connects the cricoid cartilage with the 1st ring of trachea. • Trachealis muscle overlies esophageal muscle and forms the posterior wall of trachea. • Trachea – length - 11 cm. • Inner diameter – 1.5 to 2 cms. • Outer diameter – 2.1 to 2.7 cms. • Number of cartilages – 16 to 20.
  • 6.
    WALL OF TRACHEA Thelayers of tracheal wall, from deep to superficial are 1.Mucosa 2.Sub mucosa 3.Hyaline cartilage 4.Adventitia
  • 7.
    Mucosa Consists of pseudo-stratifiedciliated columnar epithelium with goblet cells that produce mucus. It warms and removes foreign particles from the air as it flows through the trachea. Submucosa Consists of areolar connective tissue that contains seromucous glands and their ducts. The glands secretes a combination of water and mucus to that secreted by the goblet cells. Hyaline cartilage A cartilaginous layer containing C-shaped cartilage rings. Adventitia Band of loose connective tissue that loosely bind the trachea to the esophagus and other nearly organs.
  • 8.
    TRACHEA - RELATIONS CERVICALTRACHEAL POSTERIOR Esophagus, Trachealis muscle ANTERIOR 2nd and 4th rings are covered by the isthmus of thyroid. LATERAL 2 lateral lobes (thyroid gland) Posterior
  • 9.
  • 10.
    THORACIC TRACHEAL ANTERIOR Thymus gland Leftbrachio cephalic vein, Aortic arch LATERAL Vagus nerve
  • 11.
  • 12.
    TRACHEA NERVE SUPPLY Vagus andrecurrent laryngeal nerves BLOOD SUPPLY Cervical portion – Inferior Thyroid Artery Thoracic portion – Bronchial arteries VENOUS DRAINAGE Inferior Thyroid venous plexus
  • 13.
    TRACHEOSTOMY – DEFINITION Operativeprocedure that creates a surgical airway in the cervical trachea. Surgical procedure to bypass the airway in the patient with upper airway obstruction, to make tracheobronchial toilet easier in the patient with decreased consciousness or for the need of mechanical ventilation.
  • 14.
    Used in 2types of conditions 1.Acute setting – usually in emergency to obtain an airway and in ventilated patients who are having difficulty in weaning. 2.Chronic setting – usually when the patient is to be ventilated for the longer term.
  • 15.
    INDICATIONS GENERAL 1. To bypassan obstructed upper airway. 2. To clean and remove secretions from airway. 3. To more easily and usually more safely, deliver oxygen to the lungs. 1. AIRWAY BYPASS  Severe inflammation of face, neck and larynx.  Tracheal injury  Upper airway tumour  Neck radiotherapy  Facial trauma – multiple fractures  Severe head and neck operating procedures
  • 16.
    2. BRONCHIAL TOILET Head trauma with consciousness disturbances and ineffective cough  Tracheobronchitis with an edema and lot of secretions  Thoracic trauma with ineffective cough  Post surgical procedure with inadequate cough 3. EASIER VENTILATION  Prolonged ventilation after intubation >7days.  To reduce anatomic dead space and increases the chance for mechanical ventilation withdrawal  Neuro muscular diseases (GBS,MG,etc) paralyzing or weakening chest muscles and diaphragm  COMA (GCS <8, risk of aspiration)
  • 17.
    PRE OPERATIVE INFORMED CONSENT– EXPLAIN ABOUT Operating procedure Loss of voice when tracheostomy tube is still in trachea Complication of procedure Do blood tests and check levels of CBC, PT, PTT, INR.
  • 18.
    TYPES OF TRACHEOSTOMY 1.OPENPROCEDURE High tracheostomy (cricothyroidectomy) Low tracheostomy 2. PERCUTANEOUS PROCEDURE
  • 19.
    PROCEDURE – SURGICALTRACHEOSTOMY POSITIONING Supine with neck extended over a shoulder roll. Head is placed over a head ring. ANAESTHETIC PREPARATION Local anaesthetic with 1% lidocaine with 1:100,000 adrenaline solution.
  • 20.
    TRACH TRAY INSTRUMENTS •Retractor • Artery forceps • Dilator • Scalpel knife- handle for surgical blade • Dressing forceps • Scissors • Needle holder • Blunt hook retractor
  • 21.
    PARTS OF ATRACHEOSTOMY TUBE
  • 22.
    PROCEDURE  Before tracheostomyput patient on 100% FiO2 and continuously monitor the patient.  Follow strict aseptic process.  Skin preparation with povidine iodine, chlorohexidine.  Sterile drapping.  Good light source and suction apparatus ready and tested to be functional.  Ambu bag, facemask and bains circuit – standby.  Appropriate sized tracheostomy tubes must be available. If the patient is obese and has a short, thick neck, a longer tracheostomy tube should be used.
  • 23.
    TRANSVERSE INCISION  Incision1 cm below the cricoid or over the 2nd tracheal ring.  Incision length – 2 to 3 cm.
  • 24.
     Blunt dissectionof subcutaneous tissue.  Transversely retracted until the thyroid isthmus is identified.
  • 25.
     If thegland lies superior to the 3rd tracheal ring, it can be bluntly undermined and retracted to gain access to the trachea.  If isthmus overlies the 2nd and 3rd tracheal ring, it must be either mobilised or a small incision is made to clear a space for tracheostomy.
  • 26.
     A windowof tracheal tissue is removed. This window is approximately the size of desired tracheostomy tube.  The ETT should be withdrawn till it is just visible above the proximal end of stoma, and leave ETT in place.  The ETT should not be completely removed from the airway until the correct placement of tracheostomy tube is confirmed and secured  Trachea is maintained open with blunt hooks on the right and left, clean existing secretions by using suction catheter.  While inserting the tracheostomy tube, position the axis perpendicular to the TT, after entering turn the direction parallel to the axis of trachea, proceed according to the curve of the TT into the lumen of trachea.
  • 27.
     Check TTinto the lumen of trachea, the whole latch is released, assistant hold the TT, then it is fixed with sutures at the right and left flanges of TT to the skin of the neck and installing a ribbon strap around the neck.  If the incision is too wide, skin is sutured loosely.  Between TT flange and skin, put a sterile gauze cushion.  Then TT is connected to the ventilator and ETT is pulled out.
  • 28.
  • 29.
  • 30.
    PROCEDURE – PERCUTANEOUSDILATATIONAL TRACHEOSTOMY Positioning, anaesthetic preparation and sterile drapping must be followed as in open tracheostomy. For percutaneous Tracheostomy, do laryngoscopy and withdraw ETT till the cuff is just visible below the vocal cords. Assist withdrawal and refix ETT temporarily.
  • 31.
    PDT SET -CONTENTS • 14 G cannula • Guide wire set with introducer • Initial dilator • Stiffener • Single stage dilator (rhino) • Trach tube • Syringe for balloon inflation
  • 32.
    • A 1.5cmvertical incision is made at midline space below cricoid cartilage. • A minimal dissection is performed onto the pretracheal tissues in order to push the thyroid isthmus downward. • A 14 gauge introducer needle is then inserted into the trachea with constant aspiration on the syringe between 1st and 2nd or 2nd and 3rd tracheal rings. • The successful introduction of the needle into the trachea confirmed by air bubbles into the saline filled syringe during aspiration.
  • 33.
     Once theintroducer needle is in correct position, a guide wire is then inserted into the tracheal lumen.
  • 34.
     The introducer needleis withdrawn, leaving the guide wire in place.
  • 35.
     A welllubricated dilation is performed by the dilator (rhino).
  • 36.
     The TTmounted on the dilator is then threaded over it and introduced into the tracheal lumen.  The guide wire and dilator are removed.  The tracheostomy tube flanges are then secured with suture and ties around the neck.
  • 38.
    POST – OPMANAGEMENT • Chest X-Ray • Strong analgesia • Antibiotics • Tracheostomy tube care • Constant supervision for any bleeding or block • Suctioning • Proper humidification by use of HME or nebulisations.
  • 39.
    COMPLICATIONS INTRA OP  Bleeding Pneumothorax  Cricoid cartilage injury  Esophageal perforation  Tracheoesophageal fistula  Vocal cord injury
  • 40.
    POST OP EARLY  Infectionat operating site  Subcutaneous emphysema  Impaired swallowing function because of cuff LATE  Granuloma  Laryngotracheal stenosis  Scarring  Failure to decannulate
  • 41.
    CONTRAINDICATIONS No absolute contraindications Relative Child<12 years PEEP >15cm H2O Abnormal anatomy Occluding thyroid mass
  • 42.
    TRACH TUBE CARE Innercannula should be removed and cleaned every 6 hrs. TUBE CHANGE INDICATION – soiled, cuff rupture, blocked COMPLICATION – Insertion into a false passage AVOID TUBE CHANGE WITHIN 1 WEEK. CUFF PRESSURE SHOULD BE MAINTAINED WITHIN 20-25mmHg.
  • 43.
    TYPES OF TRACHTUBES Cuffed and uncuffed Fenestrated and unfenestrated Metal tracheostomy tube
  • 44.
    CUFFED AND UNCUFFEDTUBES CUFFED To protect airway To allow ventilation UNCUFFED Used for patients with tracheal problems
  • 45.
    FENESTRATED AND UNFENESTRATED Allowpatient to ventilate past tube via upper airway Allow speech
  • 46.
  • 47.
    DECANNULATION The process bywhich a tracheostomy tube is removed when the patient no longer needs it.
  • 48.
    Resolution of pathologythat necessitated the tracheostomy (upper airway obstruction, pneumonia, etc.) Normal protective laryngeal mechanisms (no aspirations during normal swallowing, good cough) No planned further interventions (radiotherapy, head and neck operations) No mechanical ventilation. INDICATIONS
  • 49.
    METHODS OF DECANNULATION 1.Onestep method 2.Sequential downsizing : This is a staged procedure when the tracheostomy is performed for upper airway obstruction. Every 3 to 4 days, a smaller size tracheostomy tube is inserted and the patient is assessed for discomfort. If the patient is able to tolerate the smallest tube, the tube is then capped overnight, the patient is decannulated the next morning.
  • 50.
    Decannulation equipments O2 Maskand suction with equipments Tracheostomy tubes (one same size and one size smaller) Sterile gauze or dressing Intubation tray in case of emergency Scissors
  • 51.
    PROCEDURE  Procedure shouldonly be performed between 8am and 4pm during working hours when more help is available.  Monitor the patient continuously  Position: pillow under the shoulder with head tilt and chin lift.  Explain the procedure to the patient.  Suction tracheostomy and clean stoma.  Undo ties and remove tracheostomy tube.
  • 53.
     Observe forany respiratory distress Tachypnea Stridor Chest retraction Tachycardia Restlessness  Apply occlusive dressing to the stoma site  Reassess patient for signs of respiratory distress  Sit patient up and encourage coughing.
  • 54.
    FOLLOWING DECANNULATION Monitor respiratoryrate, heart rate, oxygen saturation and work of breathing Observe for respiratory obstruction during sleep Encourage coughing to clear secretions Avoid suctioning the stoma unless otherwise indicated in an emergency situation as this may cause trauma. DECANNULATION FAILURE – CAUSES • Blockage of stomal site with mucous plug because of inadequate cough. • Tracheobronchomalacia
  • 55.
    STOMA SITE CARE DRESSING Thestoma site is covered with a small square gauze and then by an occlusive dressing. Stoma site to be assessed daily and cleaned.