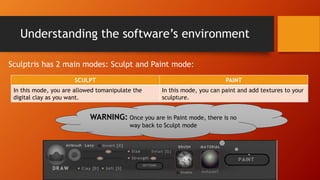
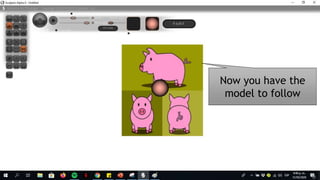
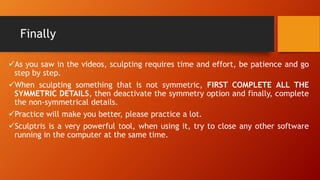
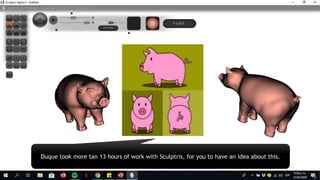
Sculptris
Nestor Benavides
Understanding the software’s environment
Sculptris has 2 main modes: Sculpt and Paint mode:
SCULPT PAINT
In this mode, you are allowed tomanipulate the
digital clay as you want.
In this mode, you can paint and add textures to your
sculpture.
WARNING: Once you are in Paint mode, there is no
way back to Sculpt mode
Understanding the software’s environment
.
Understanding the software’s environment
The brushes
Brushes work pretty much as you can infer from its name and symbol, the easiest
way to learn how to sculpt with them is to try. Here I will give you some tips to
use some of the tools.
Grab and rotate work differently when “Global” is activated/deactivated.
Create more material using GRAB.
Ctrl+Z is your best friend, every click and drag matters.
Size, strength and detail and shortcuts
For Sculptris, these 3 parameters affect the way the brush works on the material,
the only way to learn how to use them is by trying (and failing multiple times).
Shift+Scroll: Changes the brush size.
Ctrl+Scroll: Changes the brush Strength.
Shift+ClickAndDrag: Smoots the surface.
PressScrollAndDrag: Rotates the model.
Shift+PressScrollAndDrag: Moves the whole model.
Shift+RighClickAndDrag: Switches the view.
Click outside the model, then press the space bar to have a shortcut to the
parameters.
Before the software
Make sure to complete the following checklist:
Have a clear picture of the whole model that you want
to create; multiple views and specific characteristics.
Have at least one image that includes (at least) 2
orthogonal views of the model.
Create a plan with the holistic methodology (from
whole to details)
EX: First the main contour, then the ears, face, feet, tail
and finally the joints.
To begin
First step to do is to change the background image for an image that includes the
orthogonal views of the object to sculpt:
Google the image you need (front, side, top XXX, XXX views, XXX model views,
XXX orthogonal views, etc.).
Copy the image and paste it in Paint, in the middle of a contrasting canvas.
(Check next slide)
Save it.
In Sculptris: Options -> Background -> Set your background.
Like this
Now you have the
model to follow
Finally
As you saw in the videos, sculpting requires time and effort, be patience and go
step by step.
When sculpting something that is not symmetric, FIRST COMPLETE ALL THE
SYMMETRIC DETAILS, then deactivate the symmetry option and finally, complete
the non-symmetrical details.
Practice will make you better, please practice a lot.
Sculptris is a very powerful tool, when using it, try to close any other software
running in the computer at the same time.
Duque took more tan 13 hours of work with Sculptris, for you to have an idea about this.

Sculptris

  • 1.
  • 2.
    Understanding the software’senvironment Sculptris has 2 main modes: Sculpt and Paint mode: SCULPT PAINT In this mode, you are allowed tomanipulate the digital clay as you want. In this mode, you can paint and add textures to your sculpture. WARNING: Once you are in Paint mode, there is no way back to Sculpt mode
  • 3.
  • 4.
  • 5.
  • 6.
    The brushes Brushes workpretty much as you can infer from its name and symbol, the easiest way to learn how to sculpt with them is to try. Here I will give you some tips to use some of the tools. Grab and rotate work differently when “Global” is activated/deactivated. Create more material using GRAB. Ctrl+Z is your best friend, every click and drag matters.
  • 7.
    Size, strength anddetail and shortcuts For Sculptris, these 3 parameters affect the way the brush works on the material, the only way to learn how to use them is by trying (and failing multiple times). Shift+Scroll: Changes the brush size. Ctrl+Scroll: Changes the brush Strength. Shift+ClickAndDrag: Smoots the surface. PressScrollAndDrag: Rotates the model. Shift+PressScrollAndDrag: Moves the whole model. Shift+RighClickAndDrag: Switches the view. Click outside the model, then press the space bar to have a shortcut to the parameters.
  • 8.
    Before the software Makesure to complete the following checklist: Have a clear picture of the whole model that you want to create; multiple views and specific characteristics. Have at least one image that includes (at least) 2 orthogonal views of the model. Create a plan with the holistic methodology (from whole to details) EX: First the main contour, then the ears, face, feet, tail and finally the joints.
  • 9.
    To begin First stepto do is to change the background image for an image that includes the orthogonal views of the object to sculpt: Google the image you need (front, side, top XXX, XXX views, XXX model views, XXX orthogonal views, etc.). Copy the image and paste it in Paint, in the middle of a contrasting canvas. (Check next slide) Save it. In Sculptris: Options -> Background -> Set your background.
  • 10.
  • 11.
    Now you havethe model to follow
  • 12.
    Finally As you sawin the videos, sculpting requires time and effort, be patience and go step by step. When sculpting something that is not symmetric, FIRST COMPLETE ALL THE SYMMETRIC DETAILS, then deactivate the symmetry option and finally, complete the non-symmetrical details. Practice will make you better, please practice a lot. Sculptris is a very powerful tool, when using it, try to close any other software running in the computer at the same time.
  • 13.
    Duque took moretan 13 hours of work with Sculptris, for you to have an idea about this.