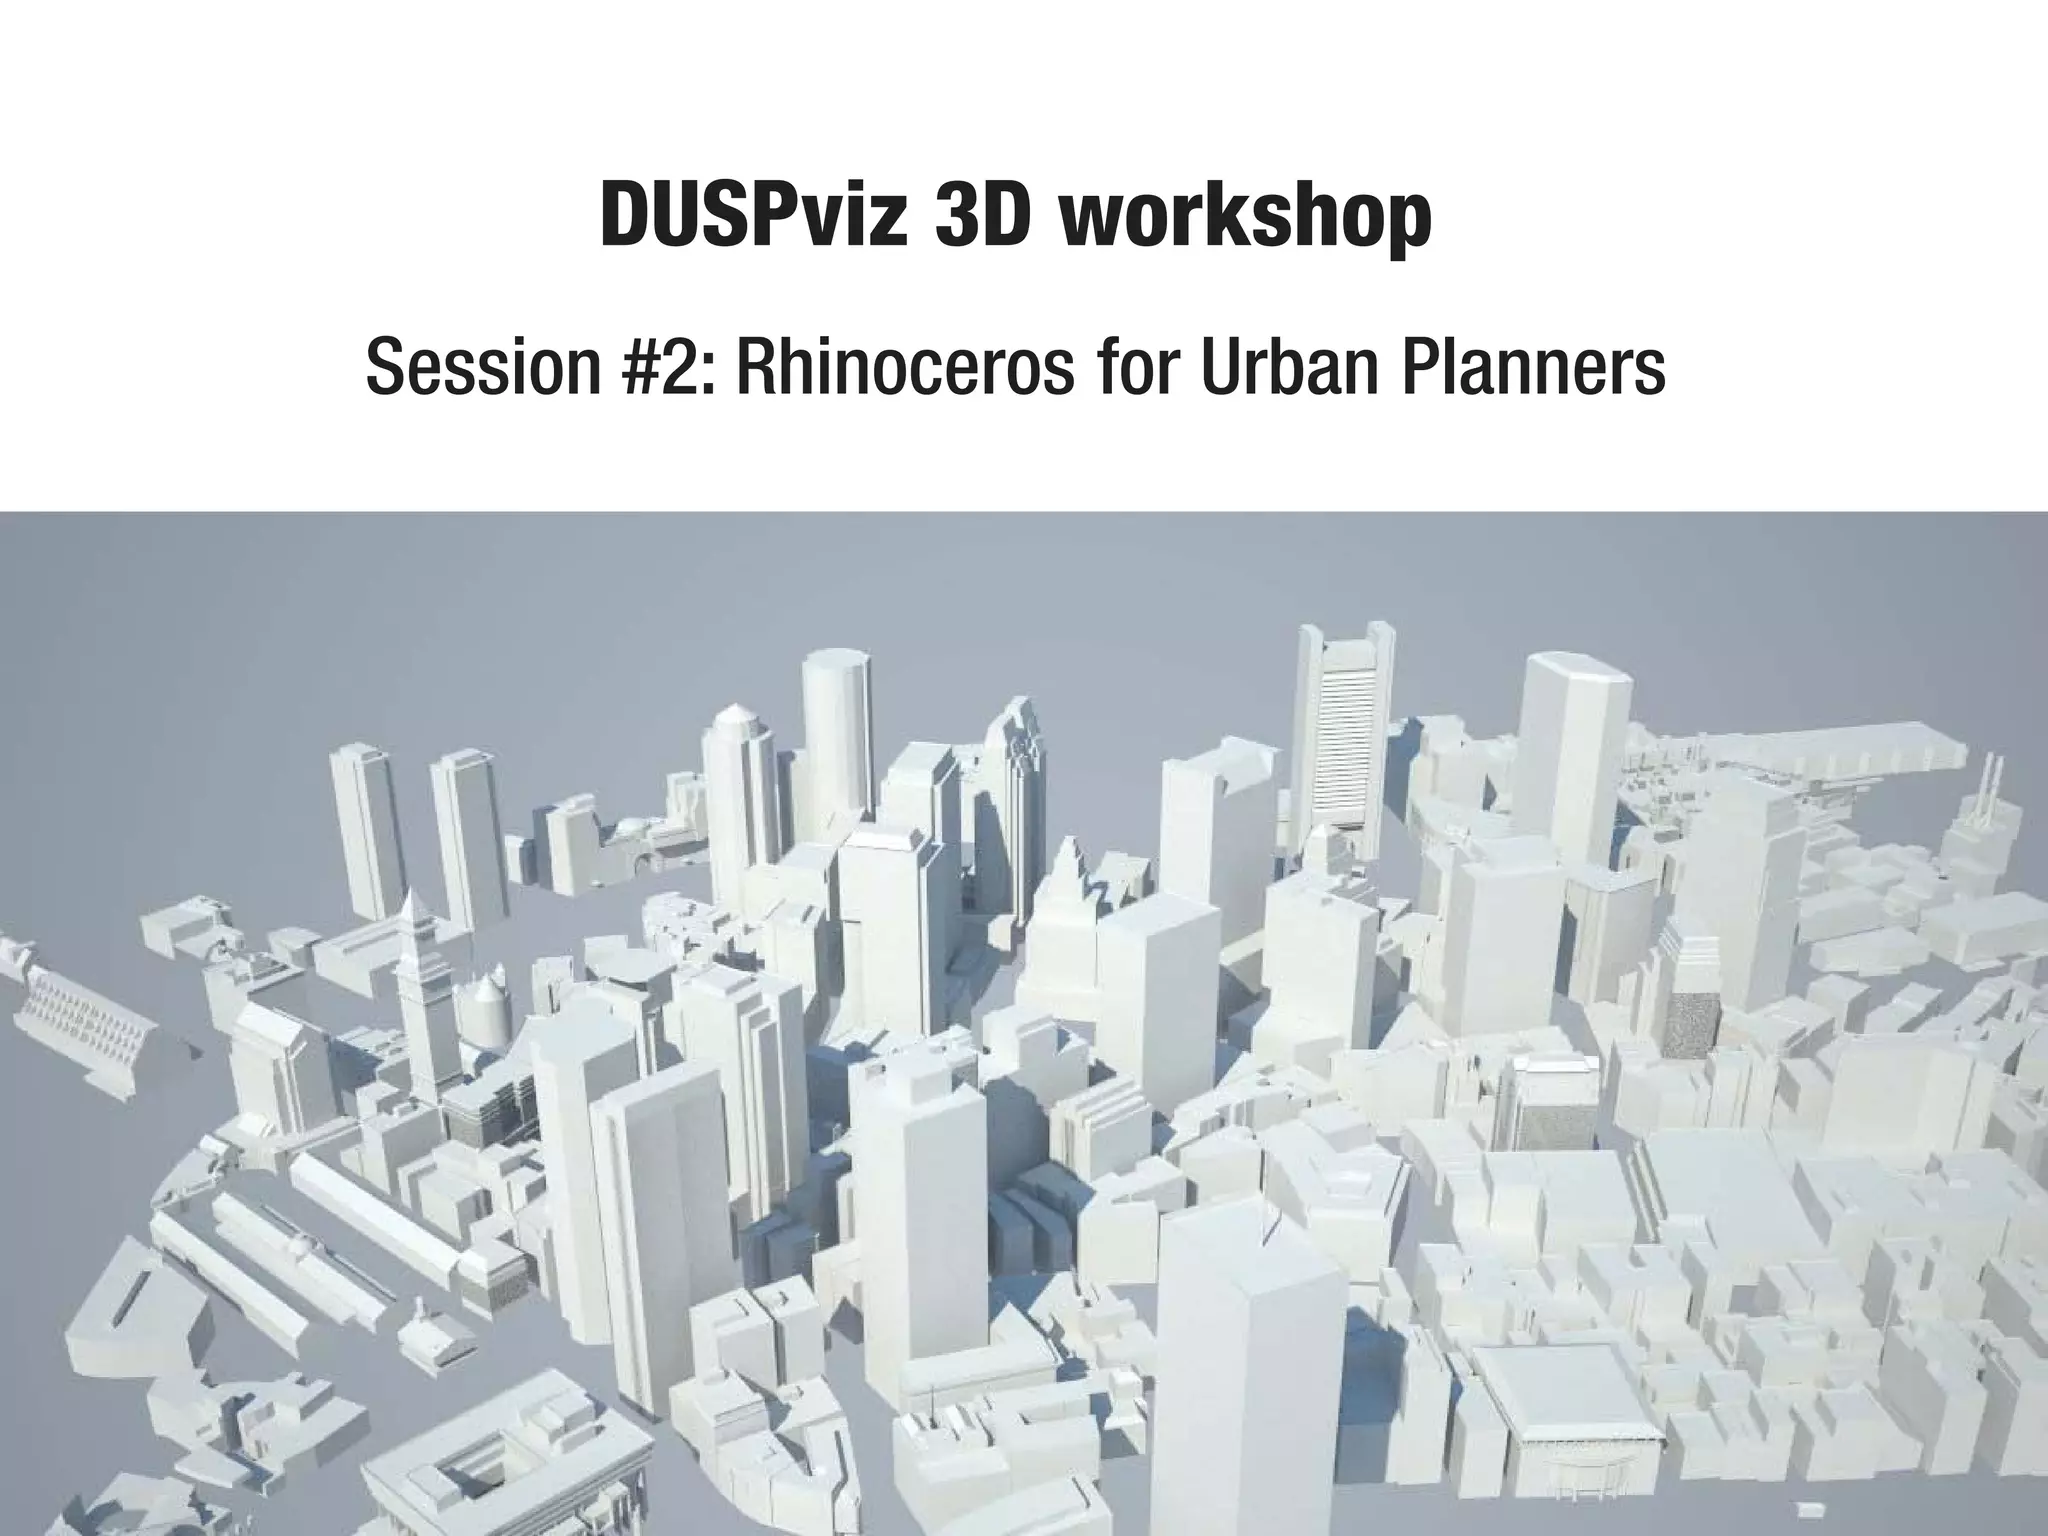
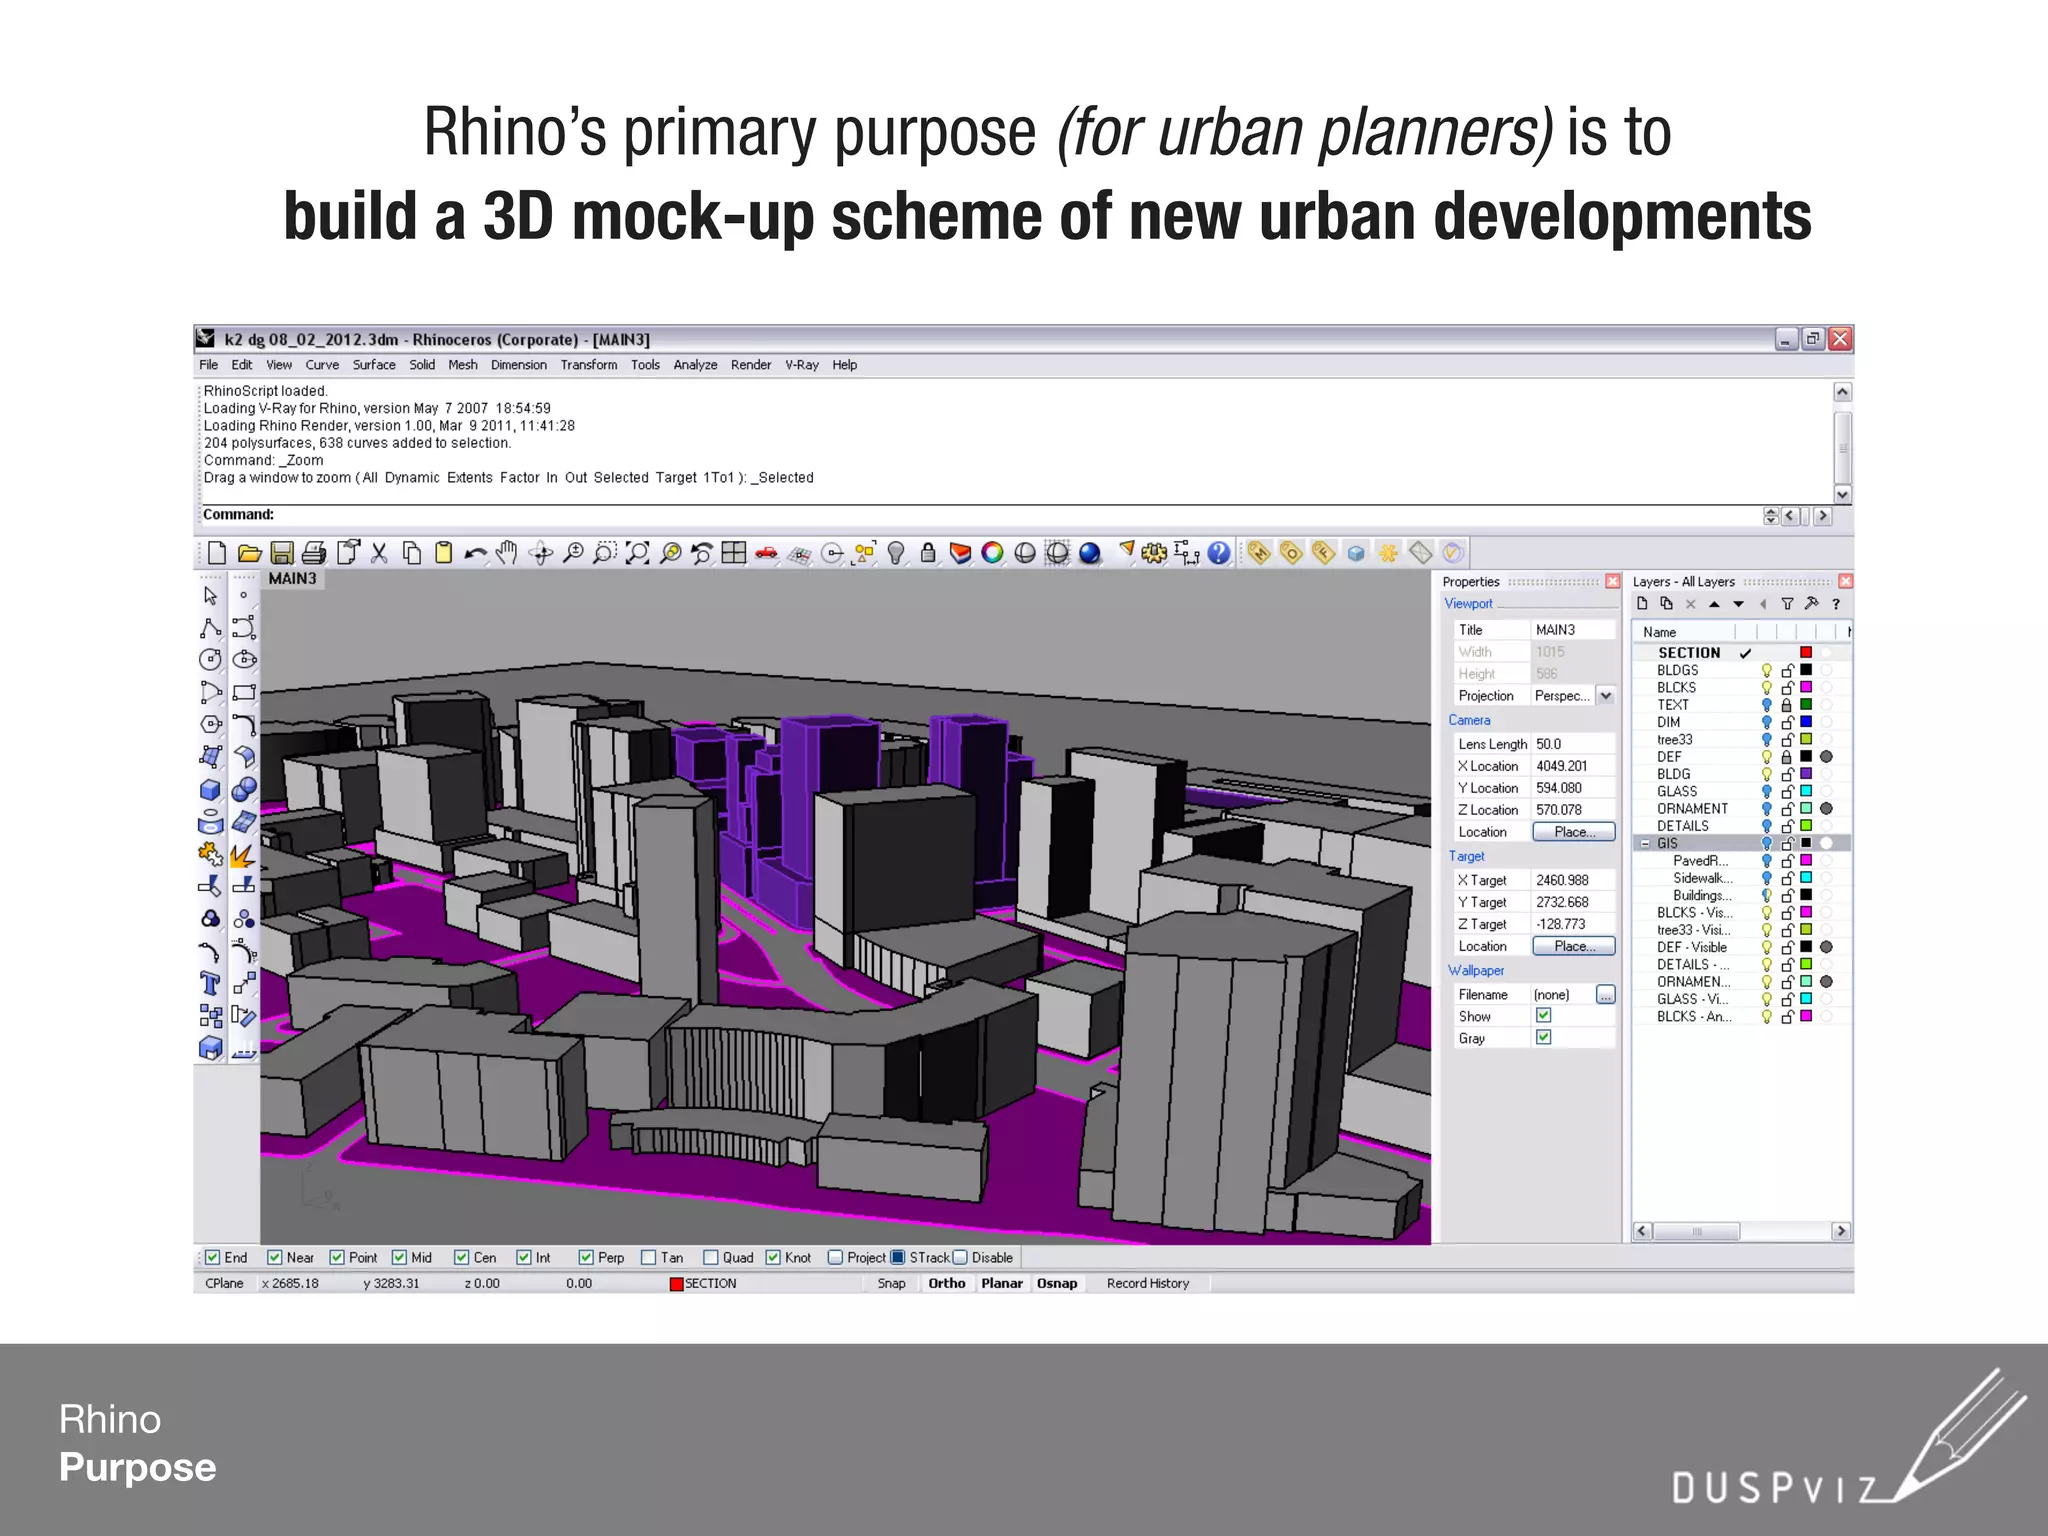
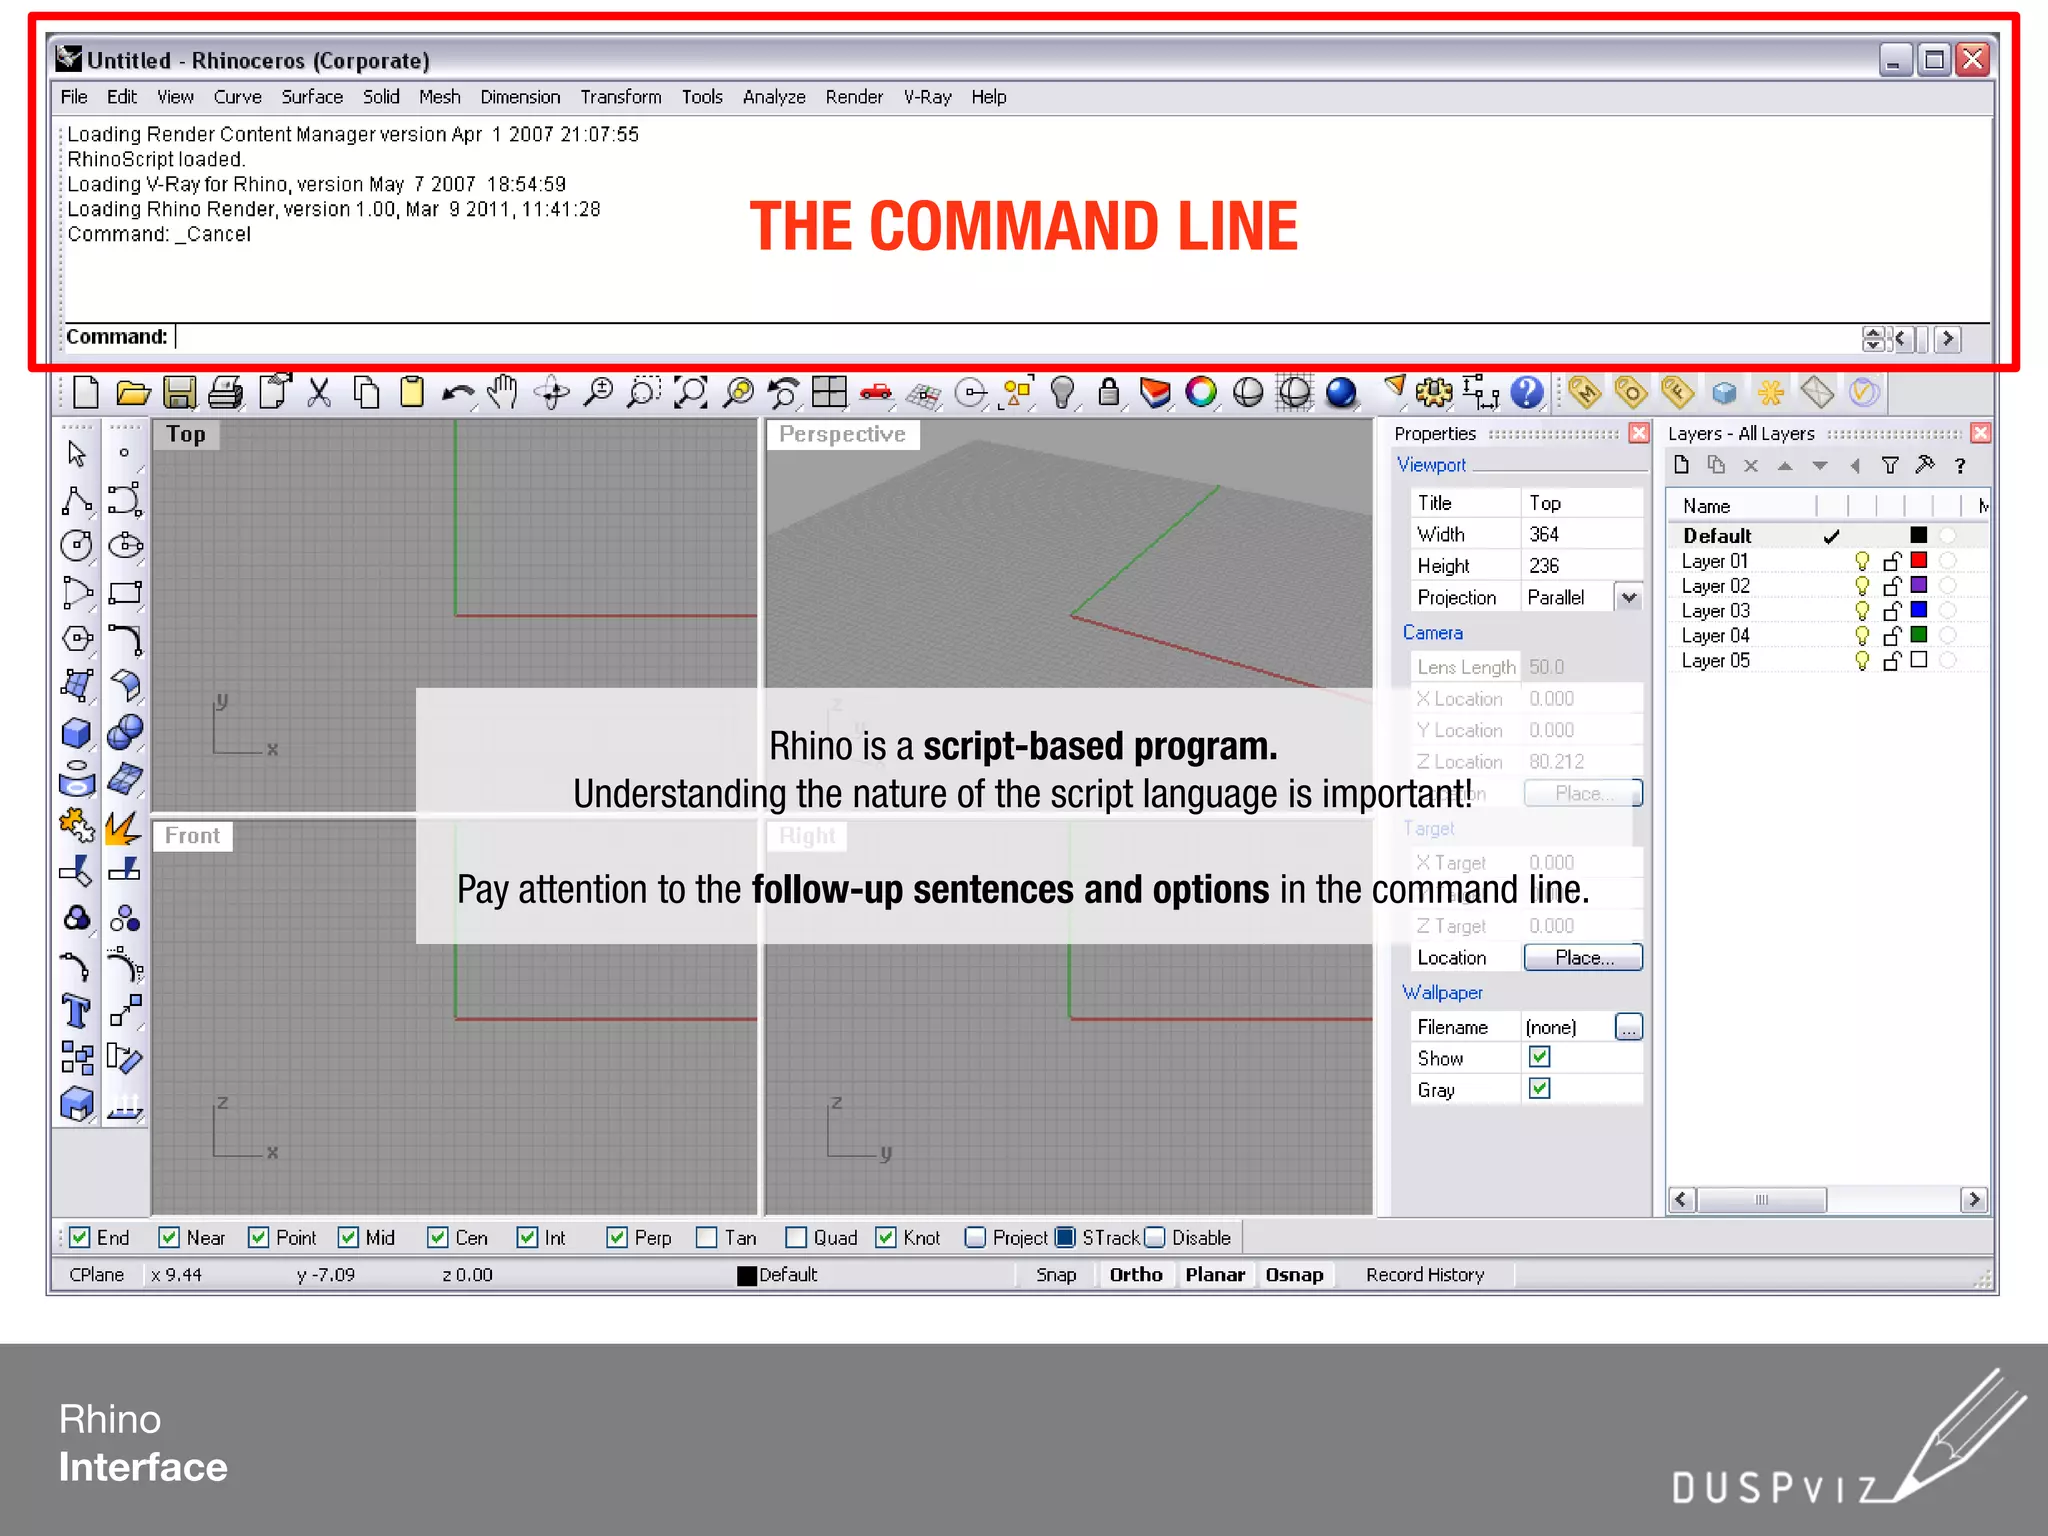
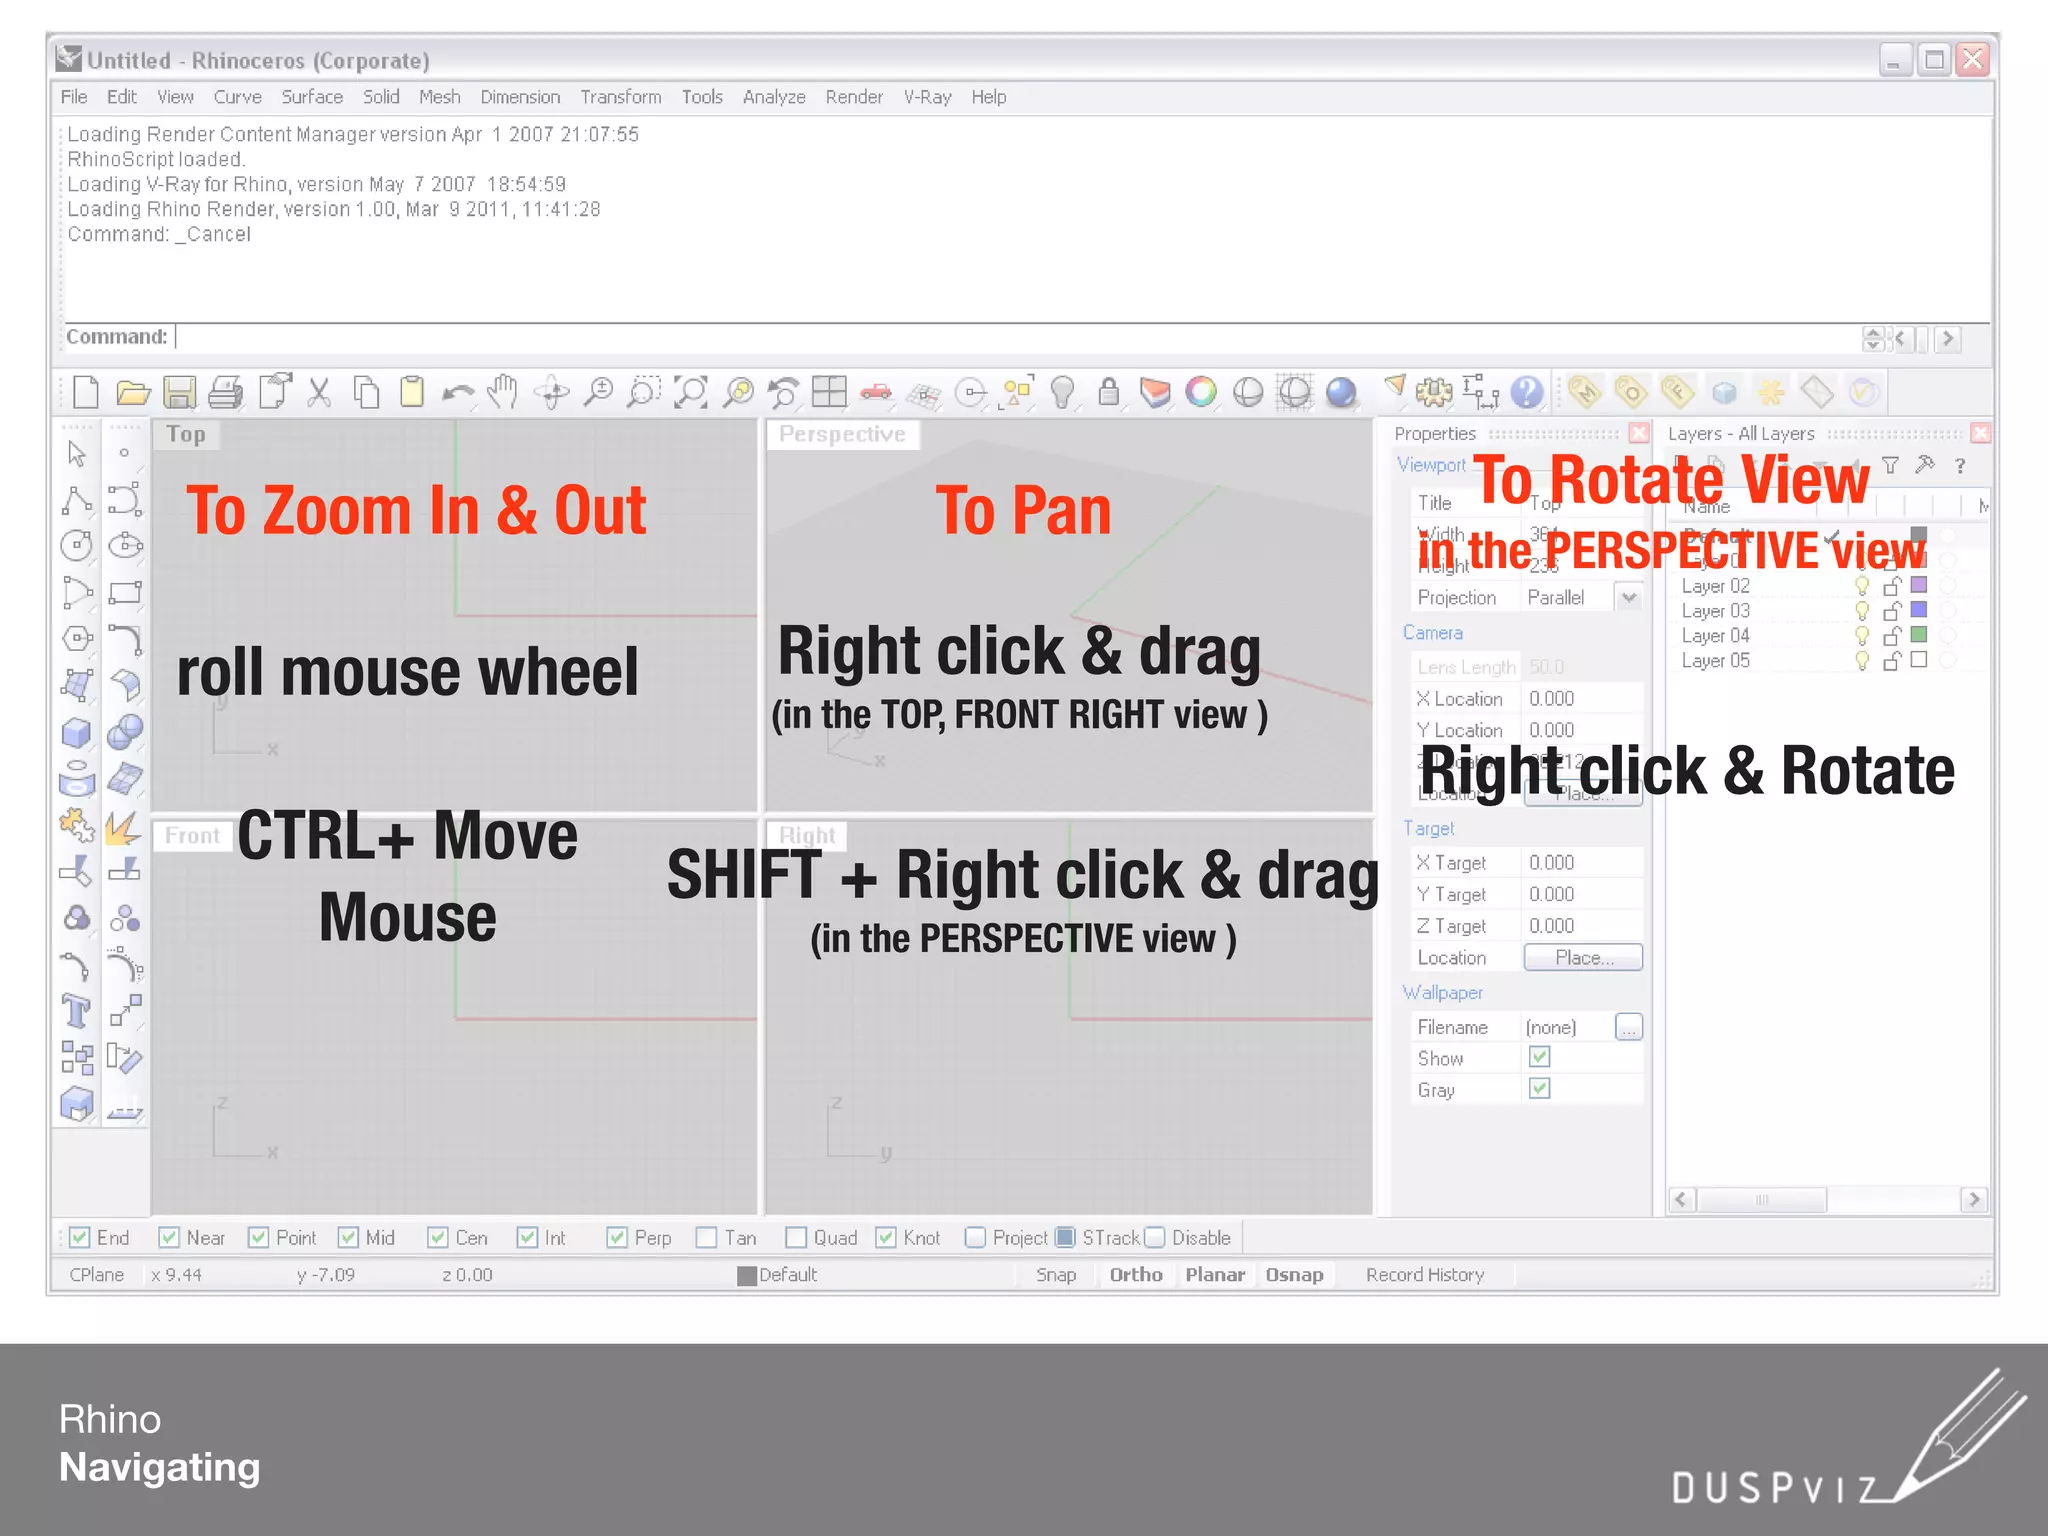
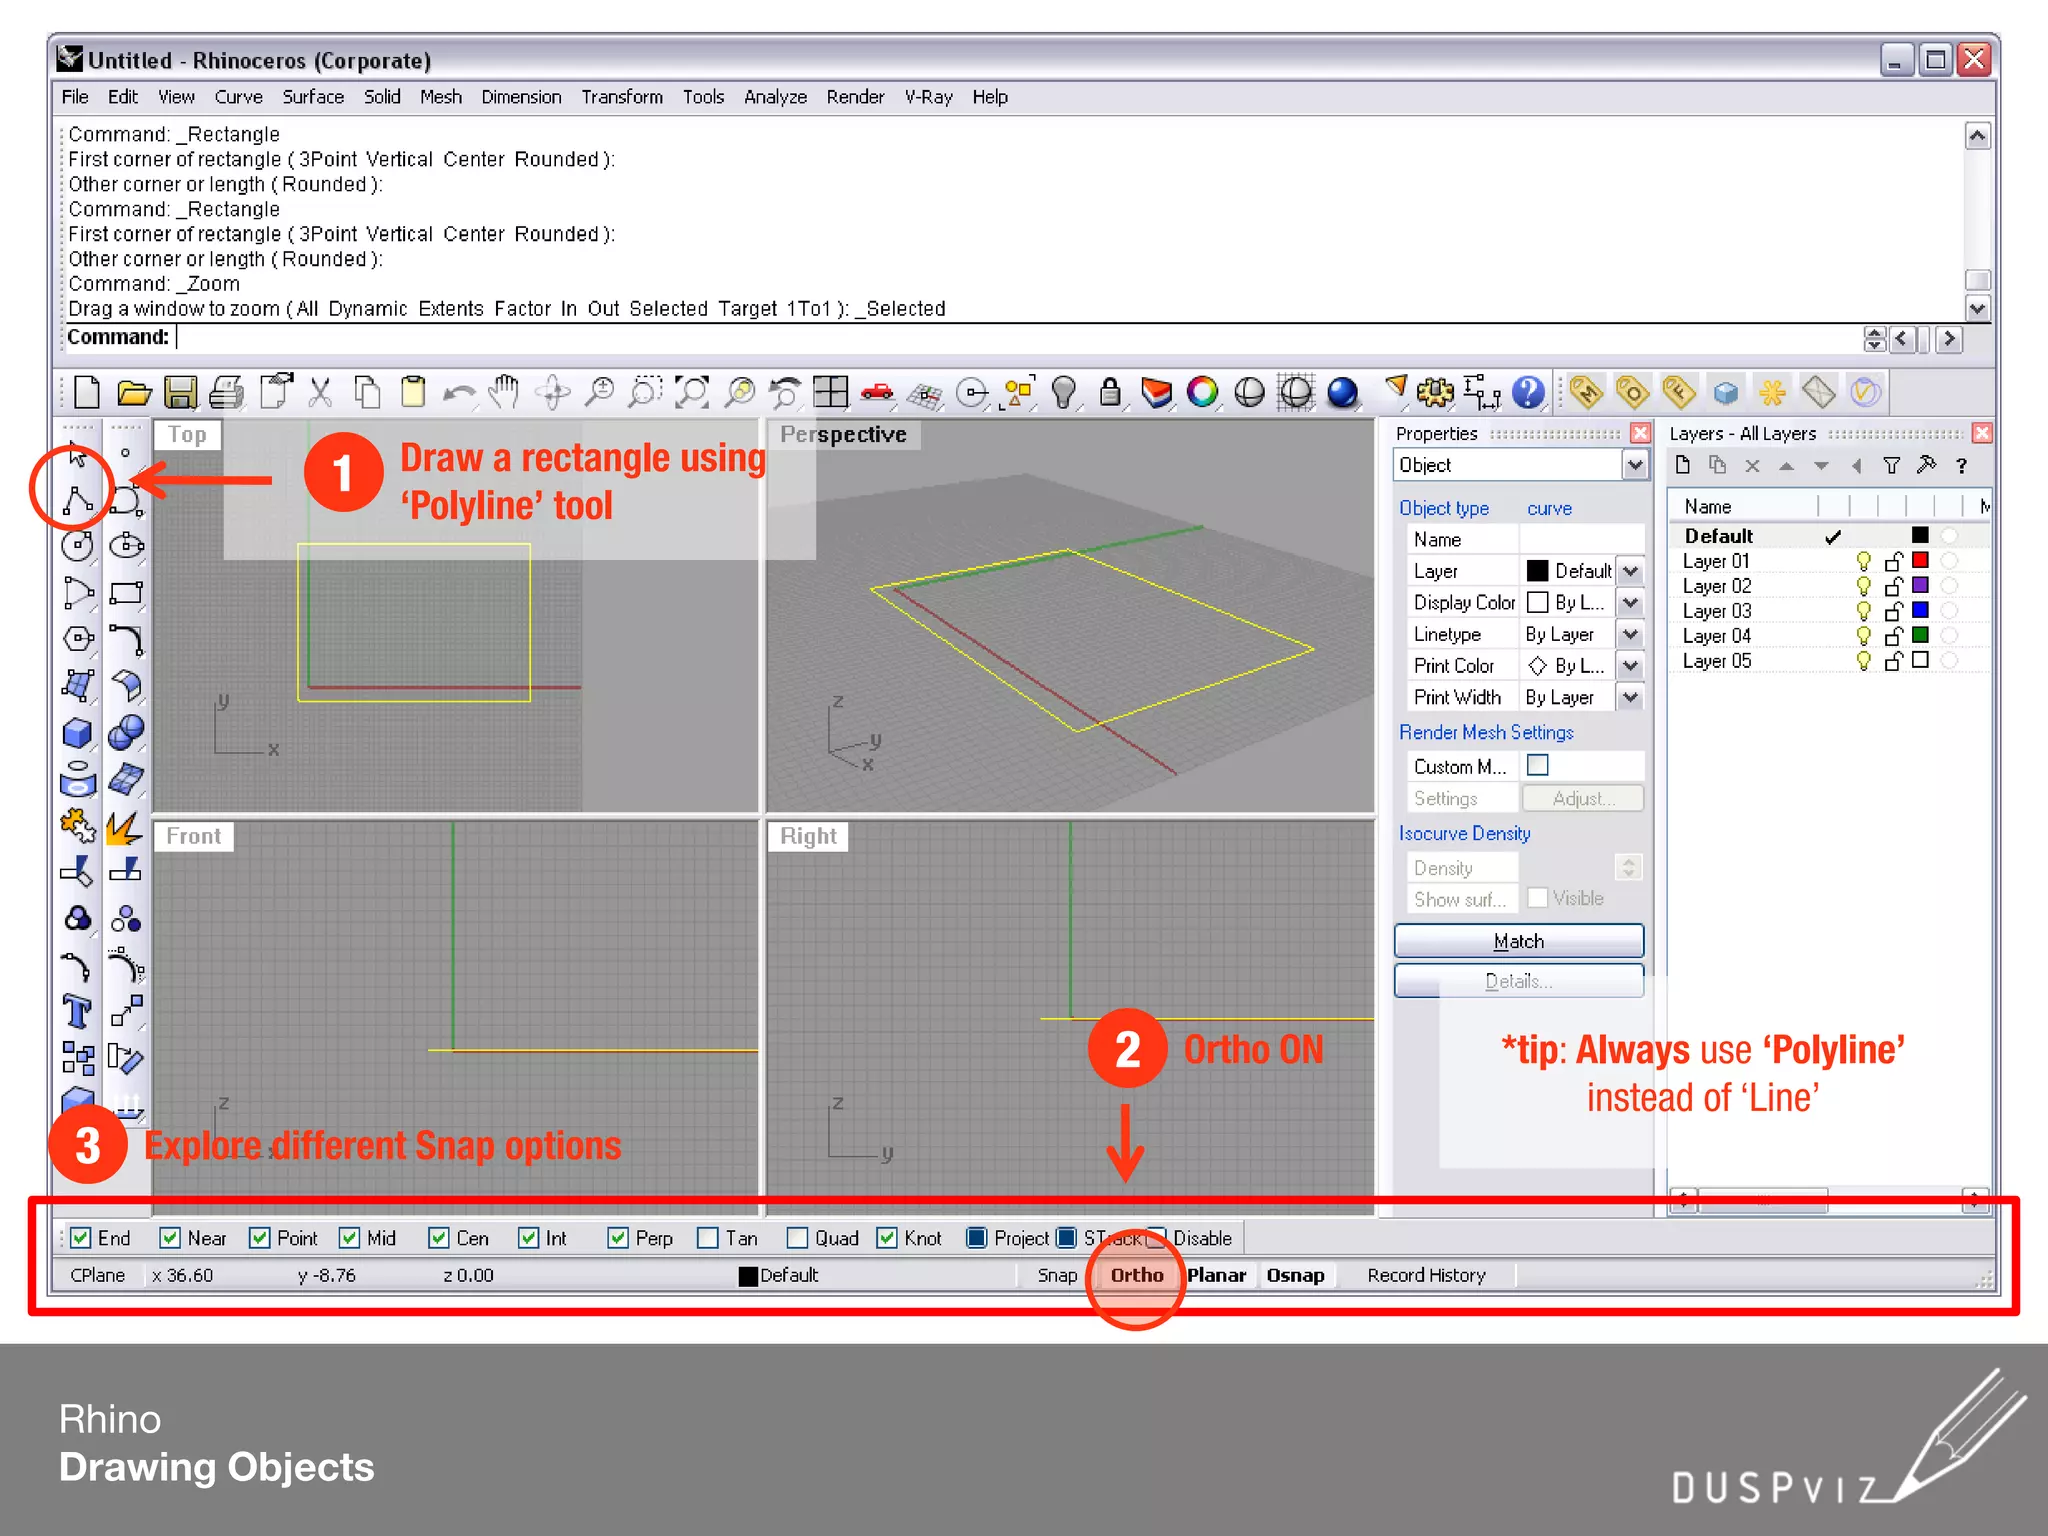
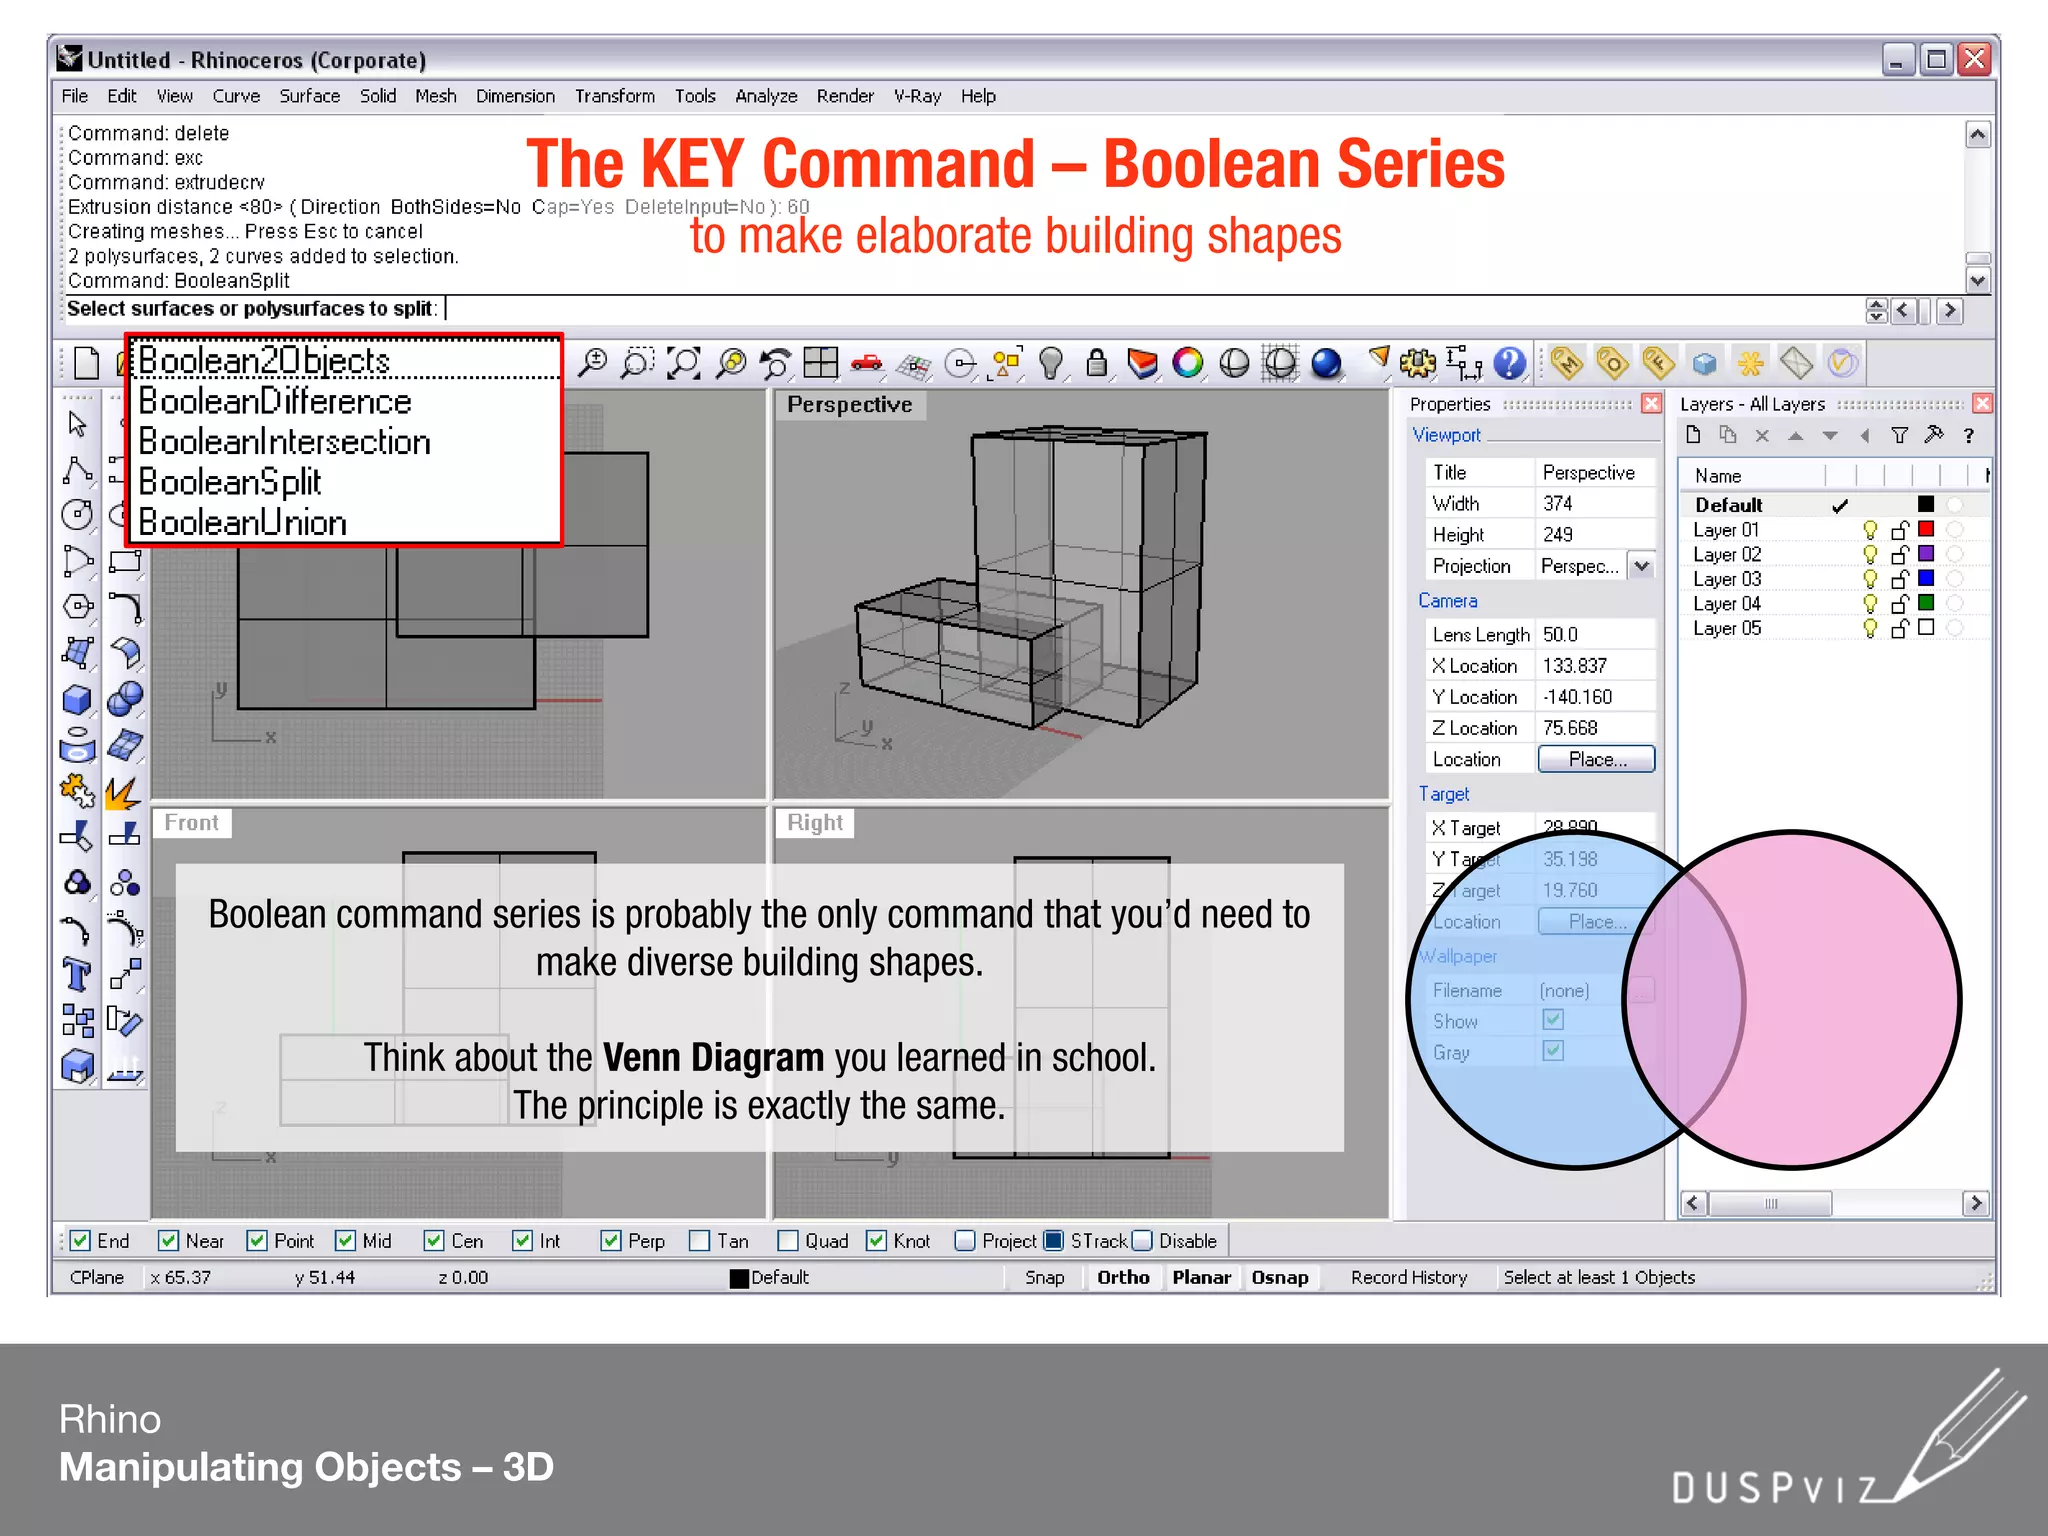
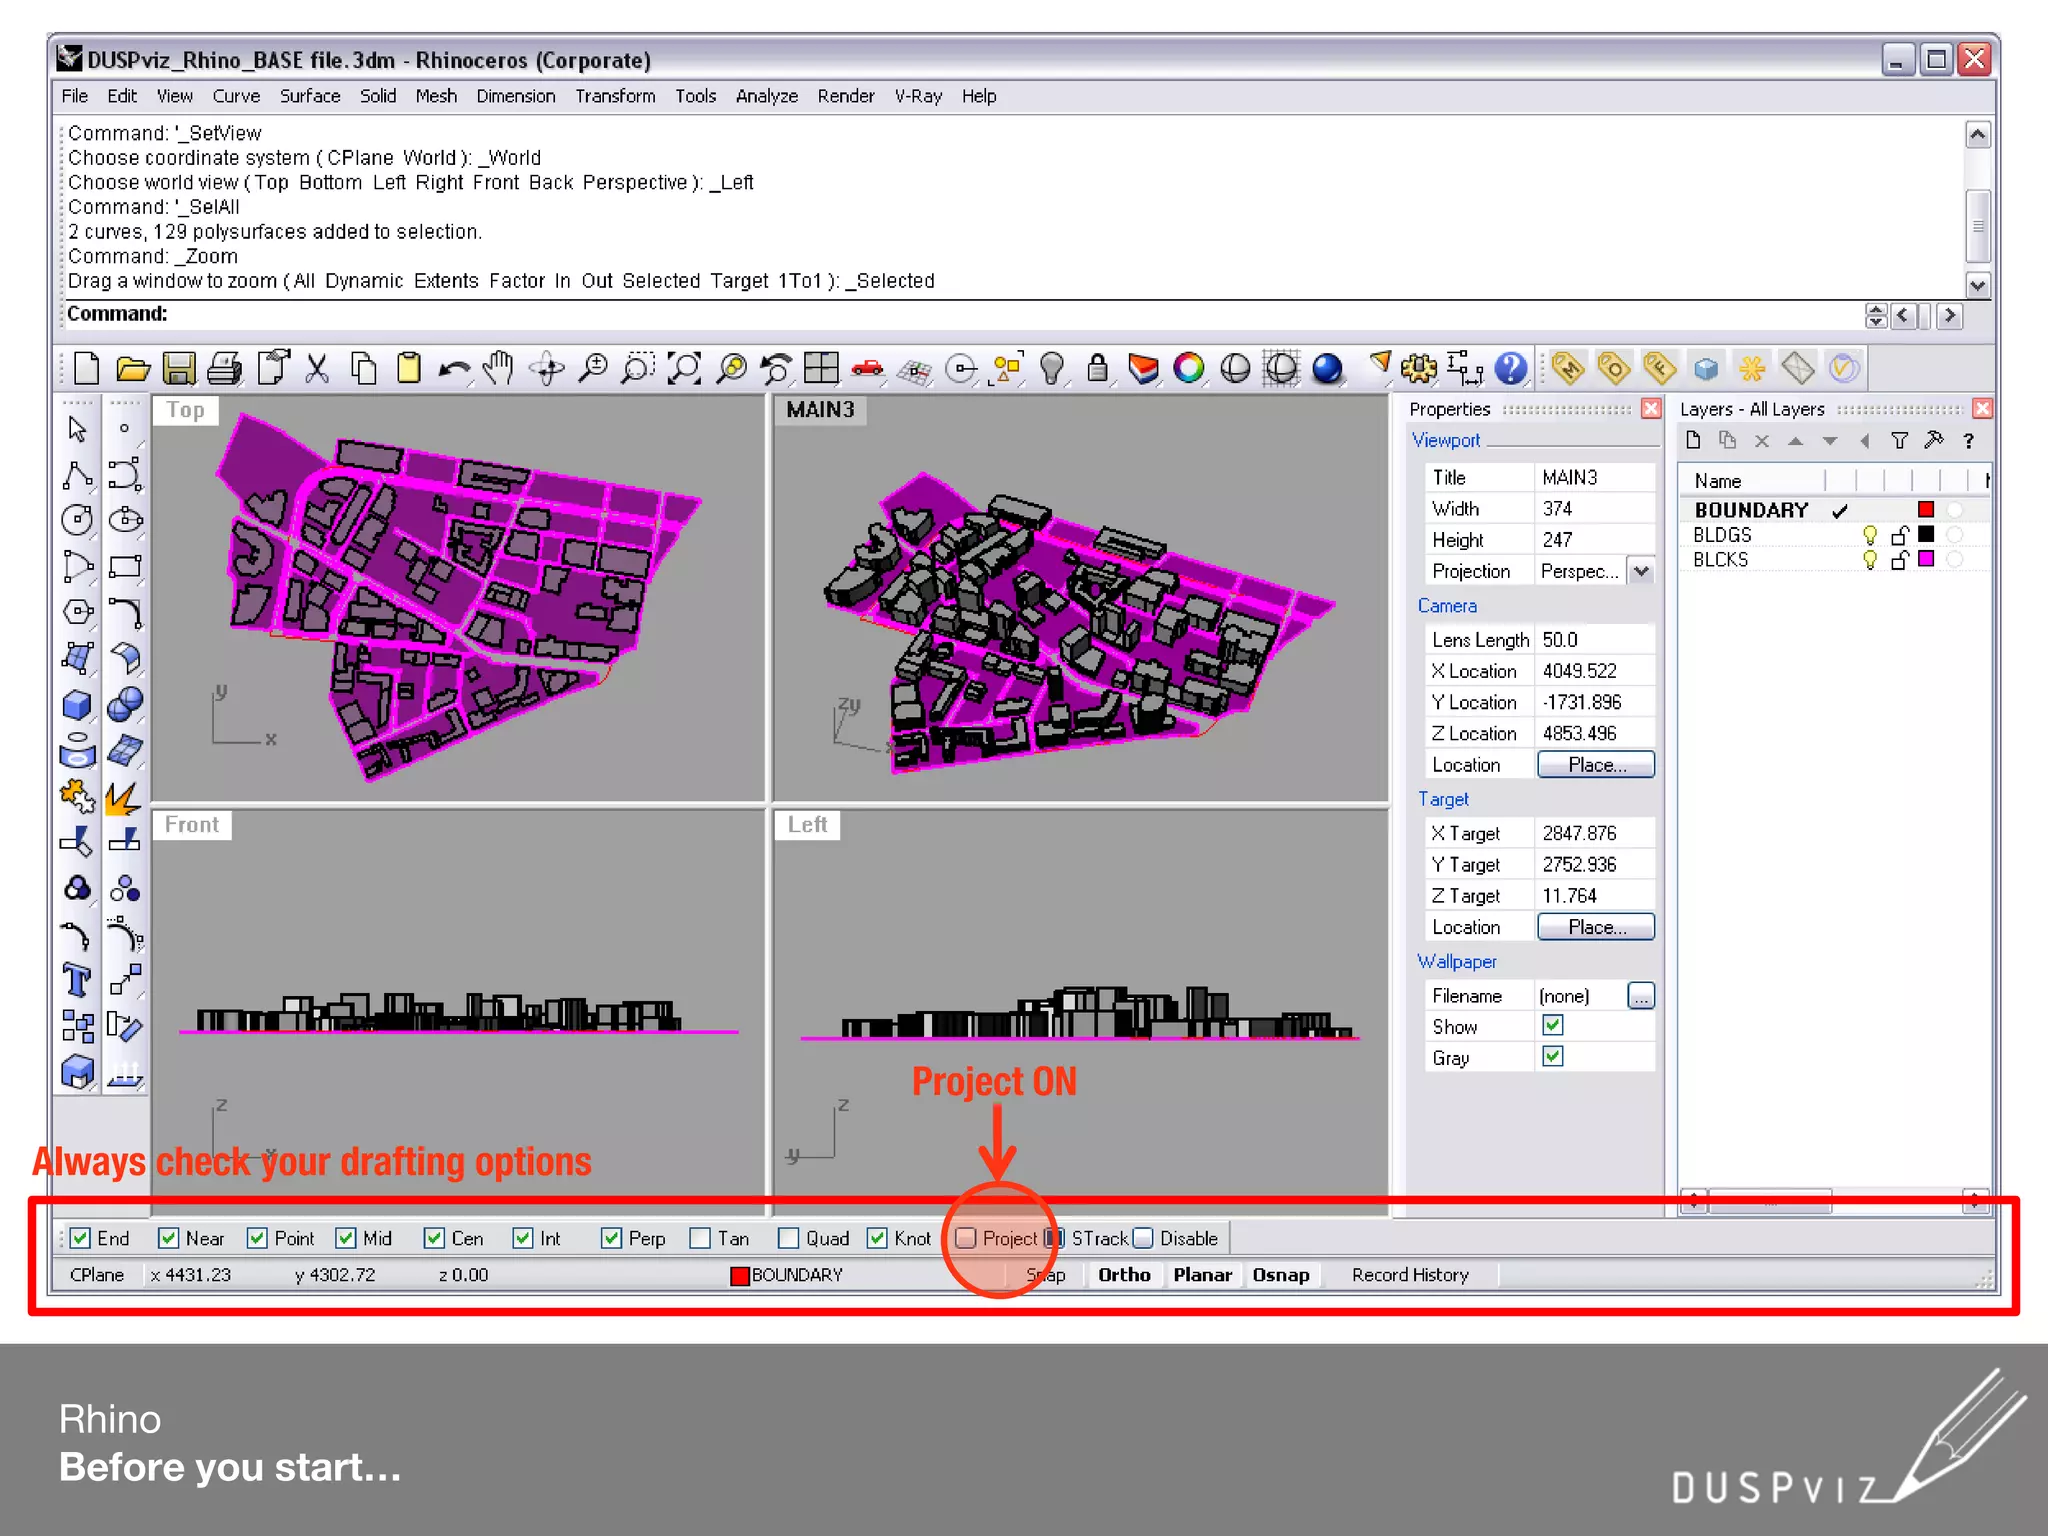
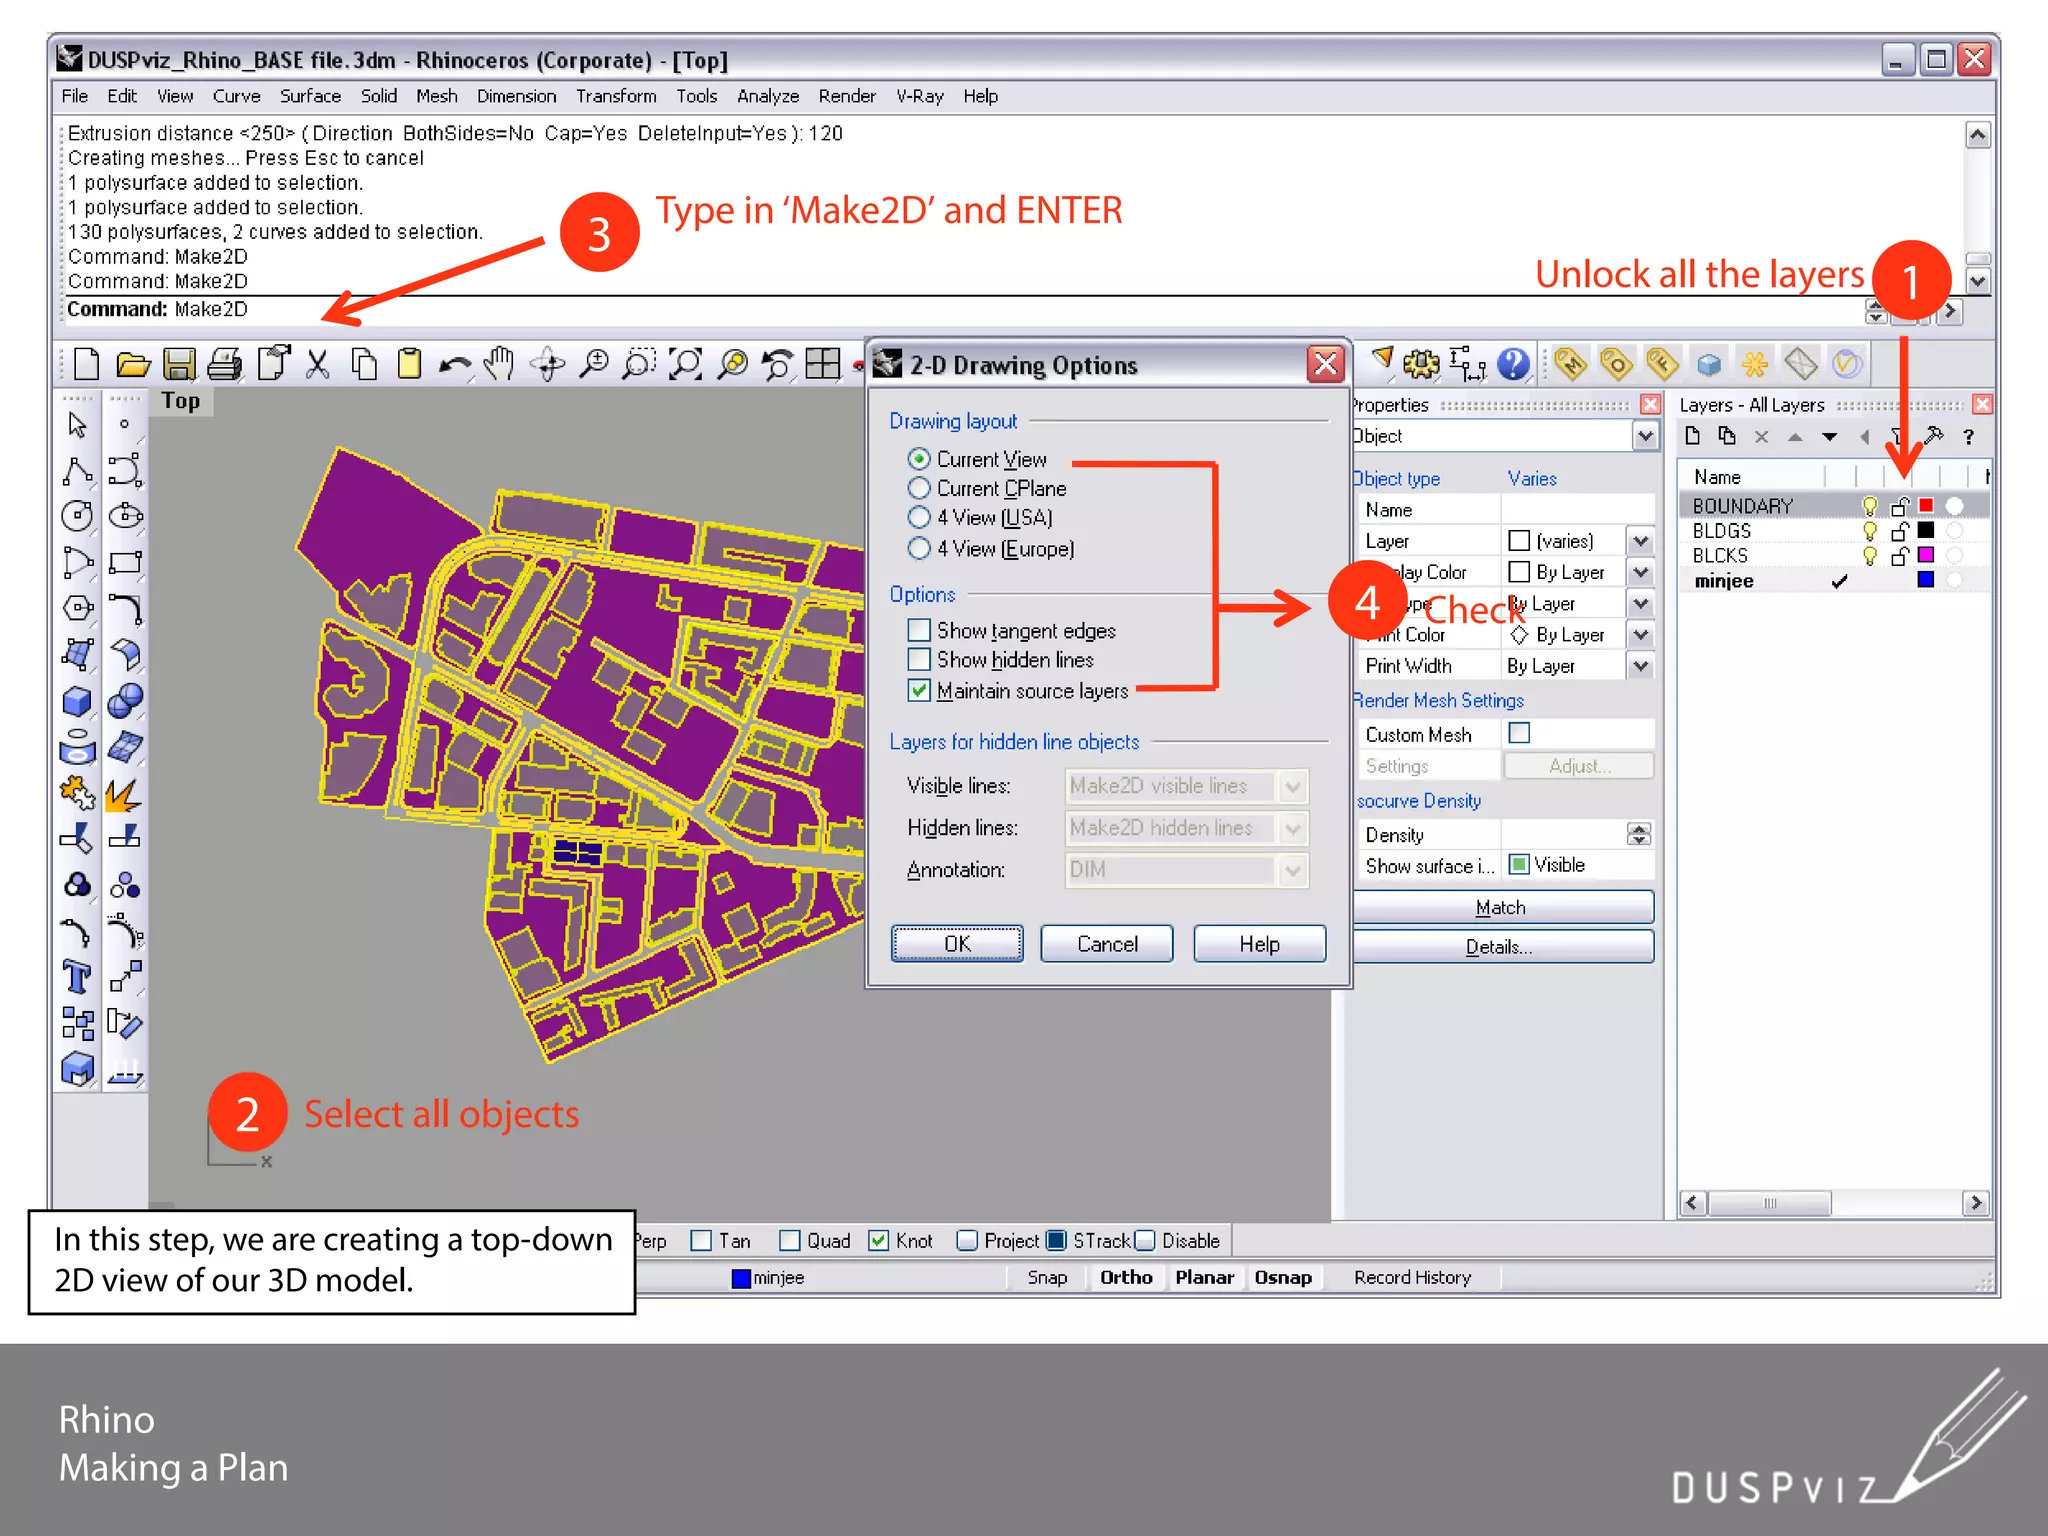
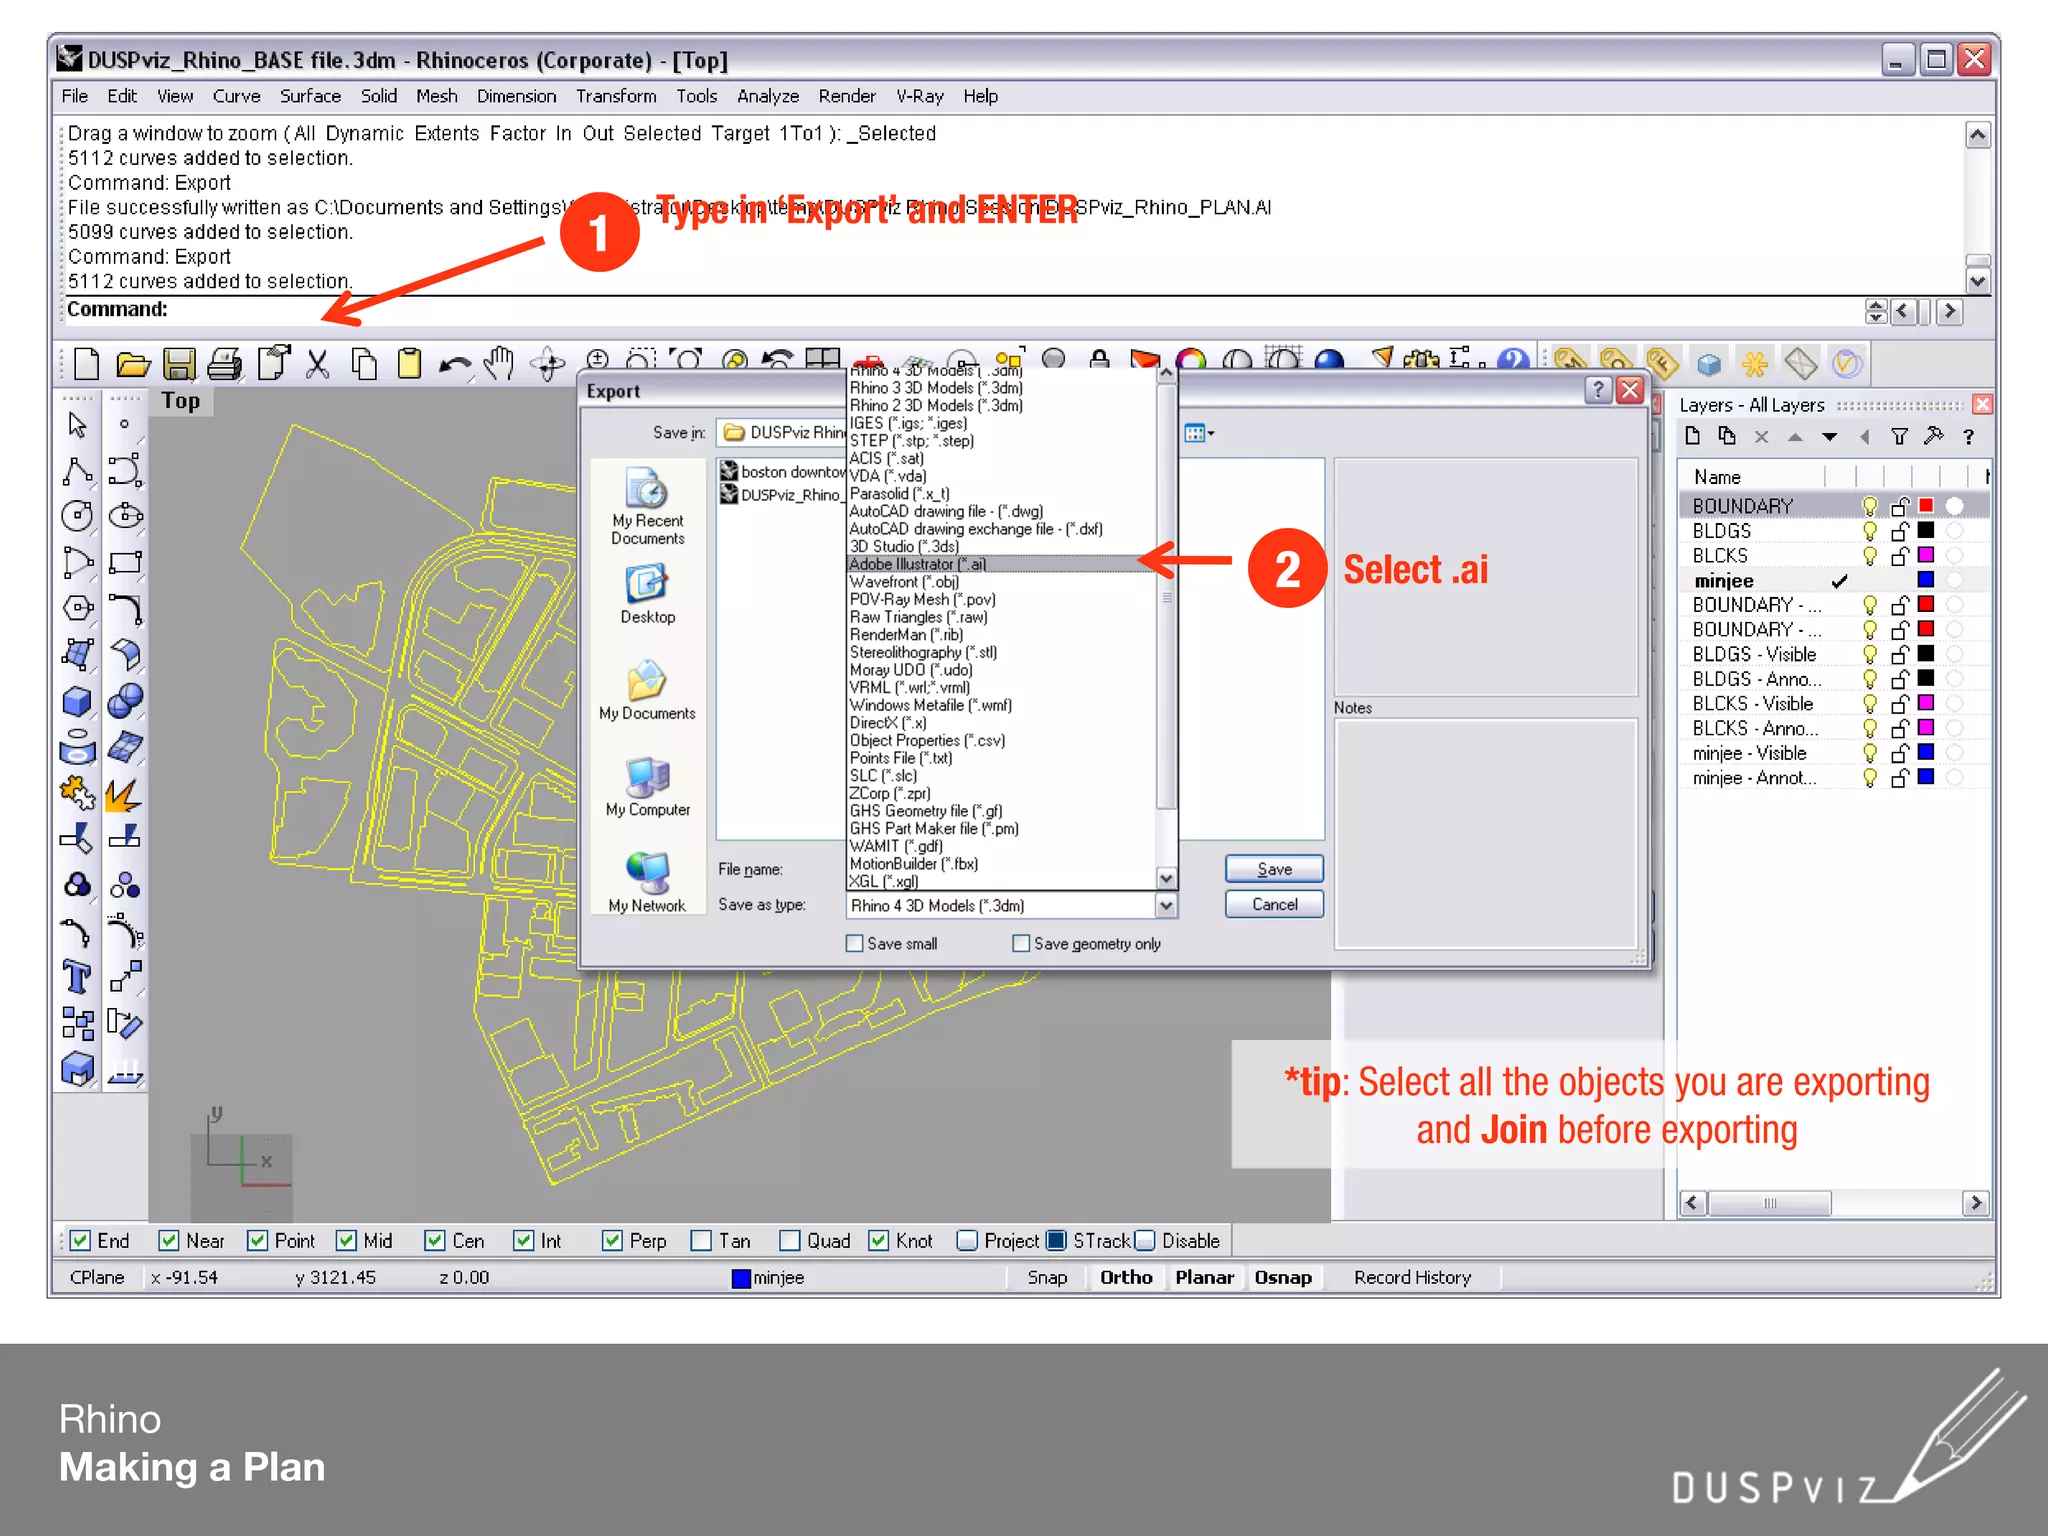
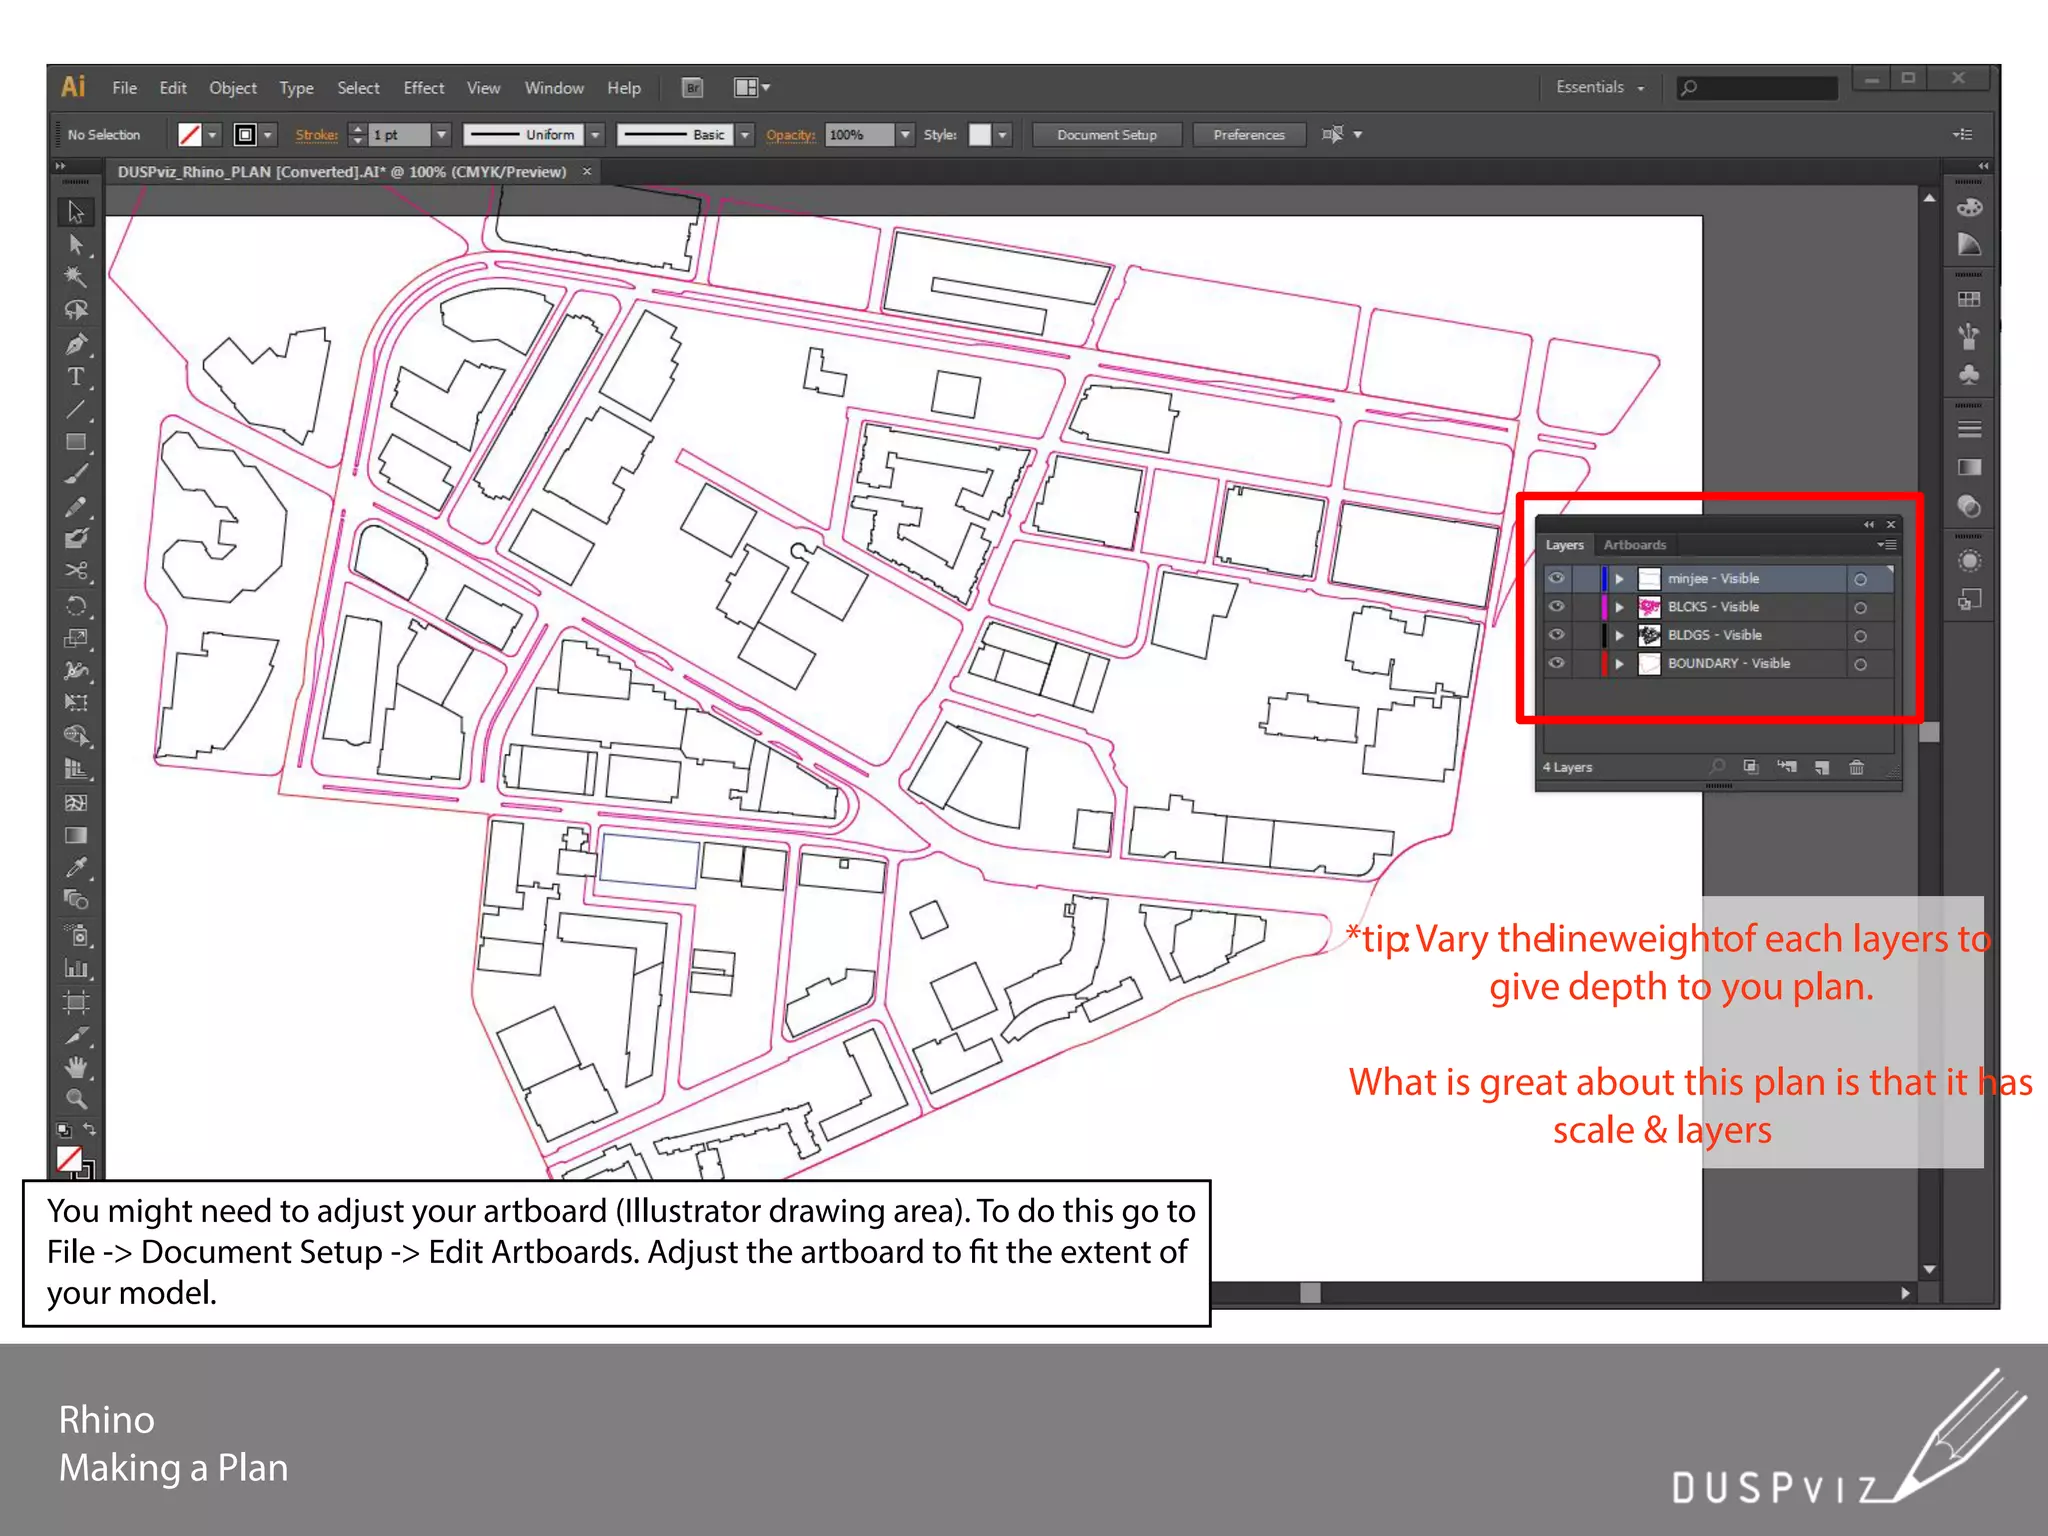
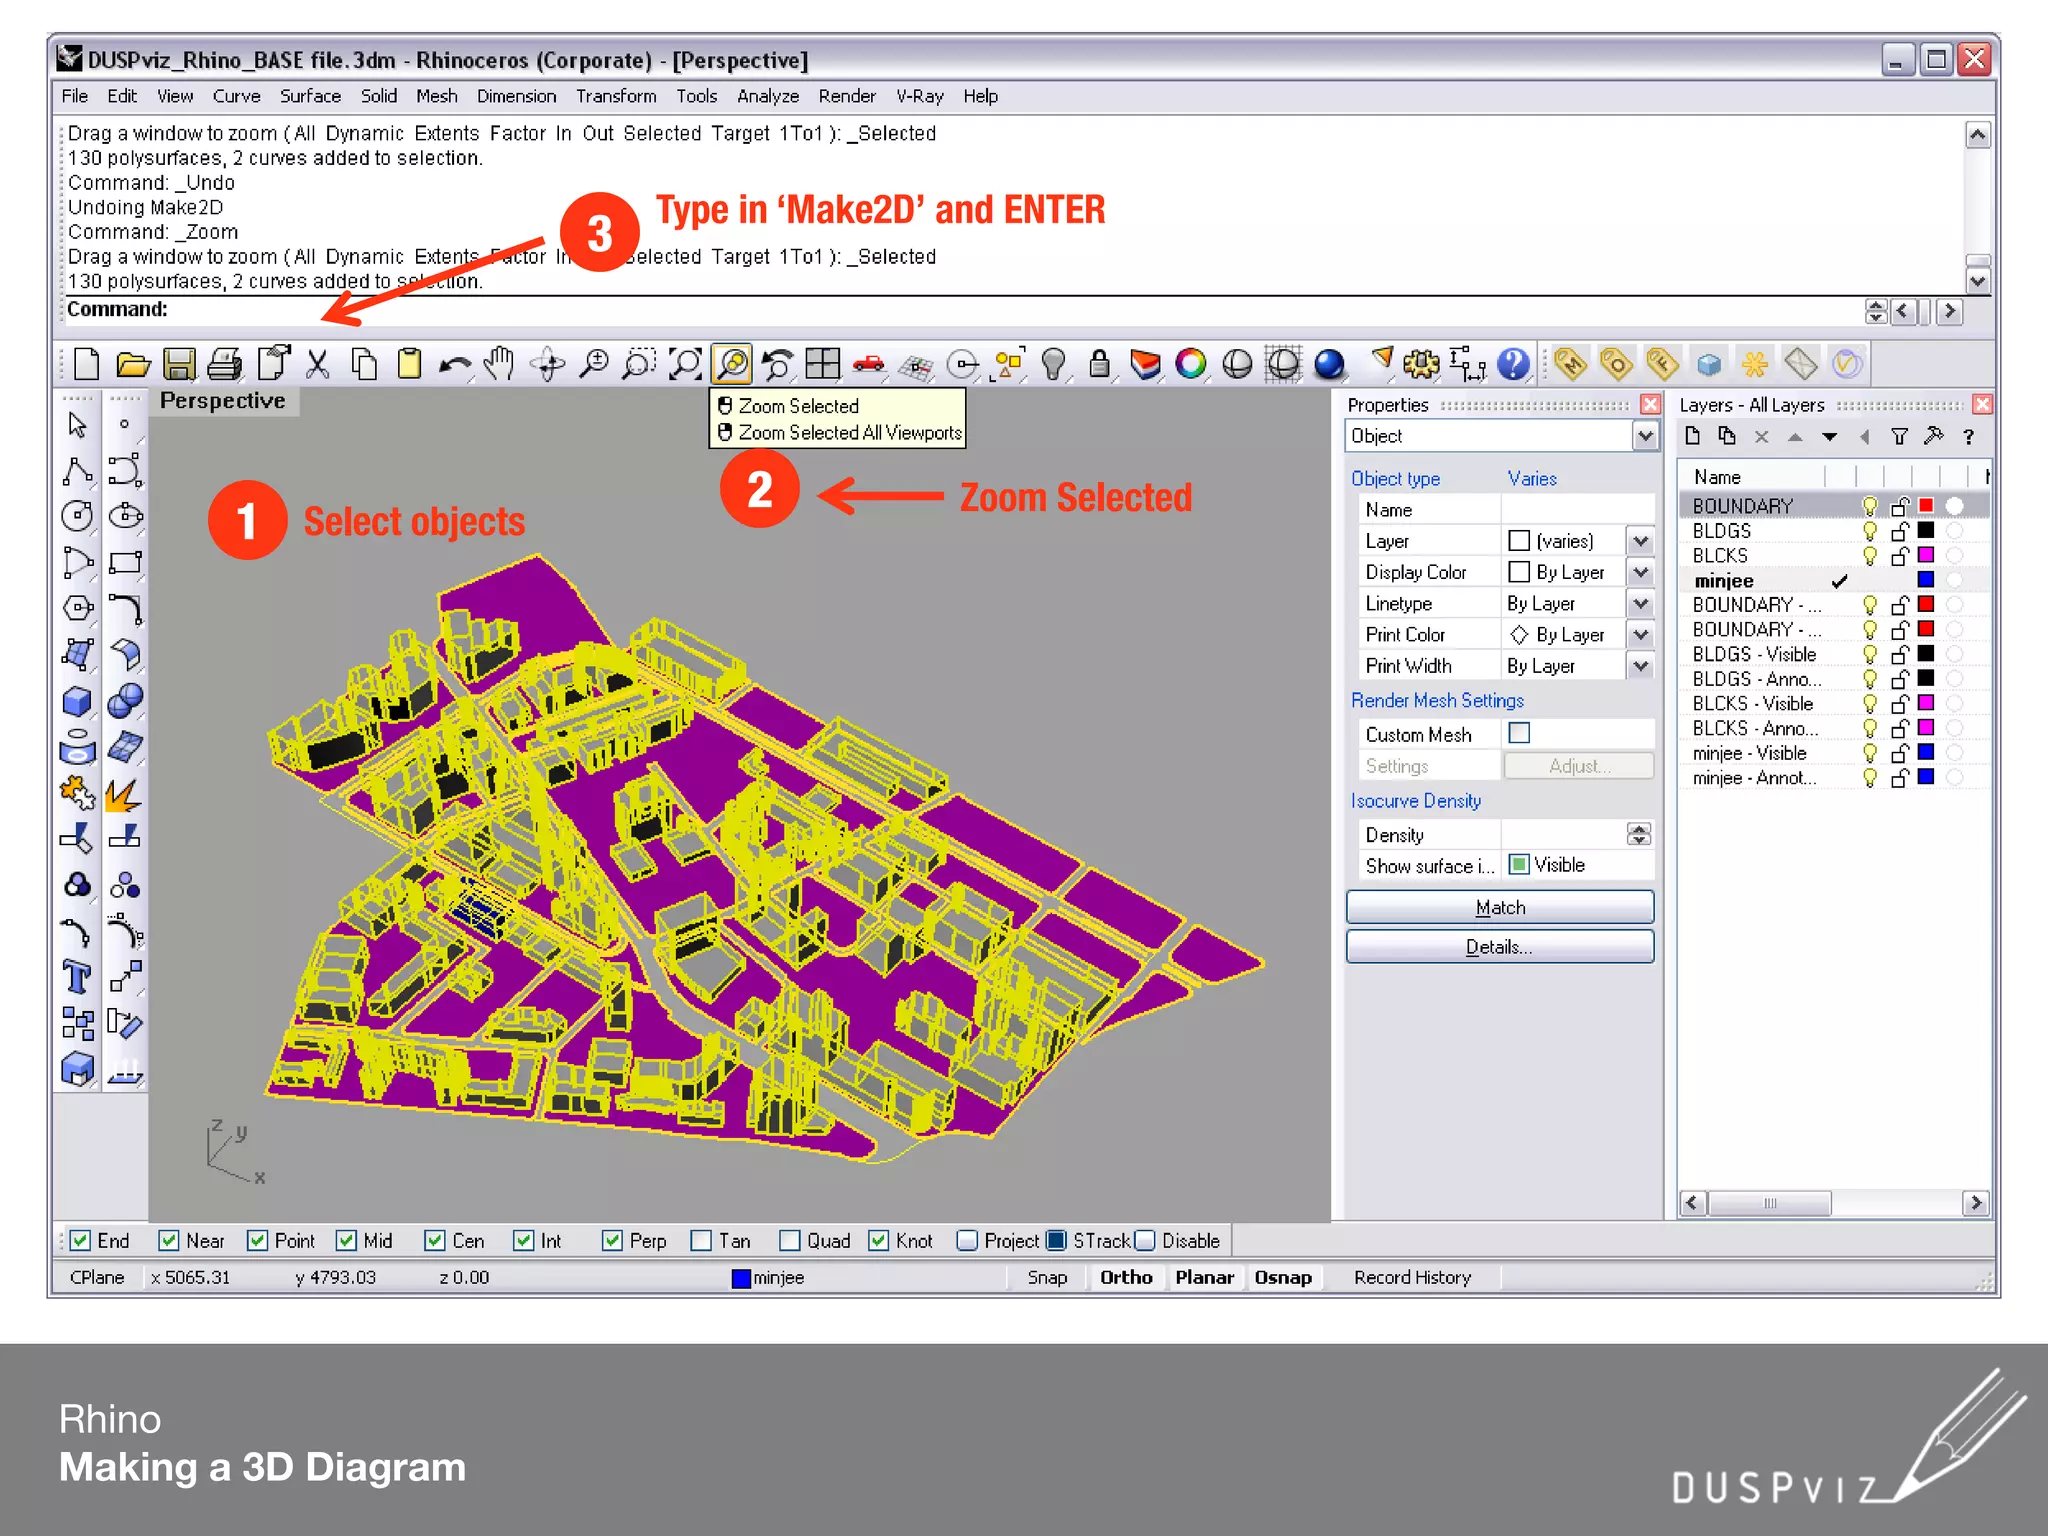
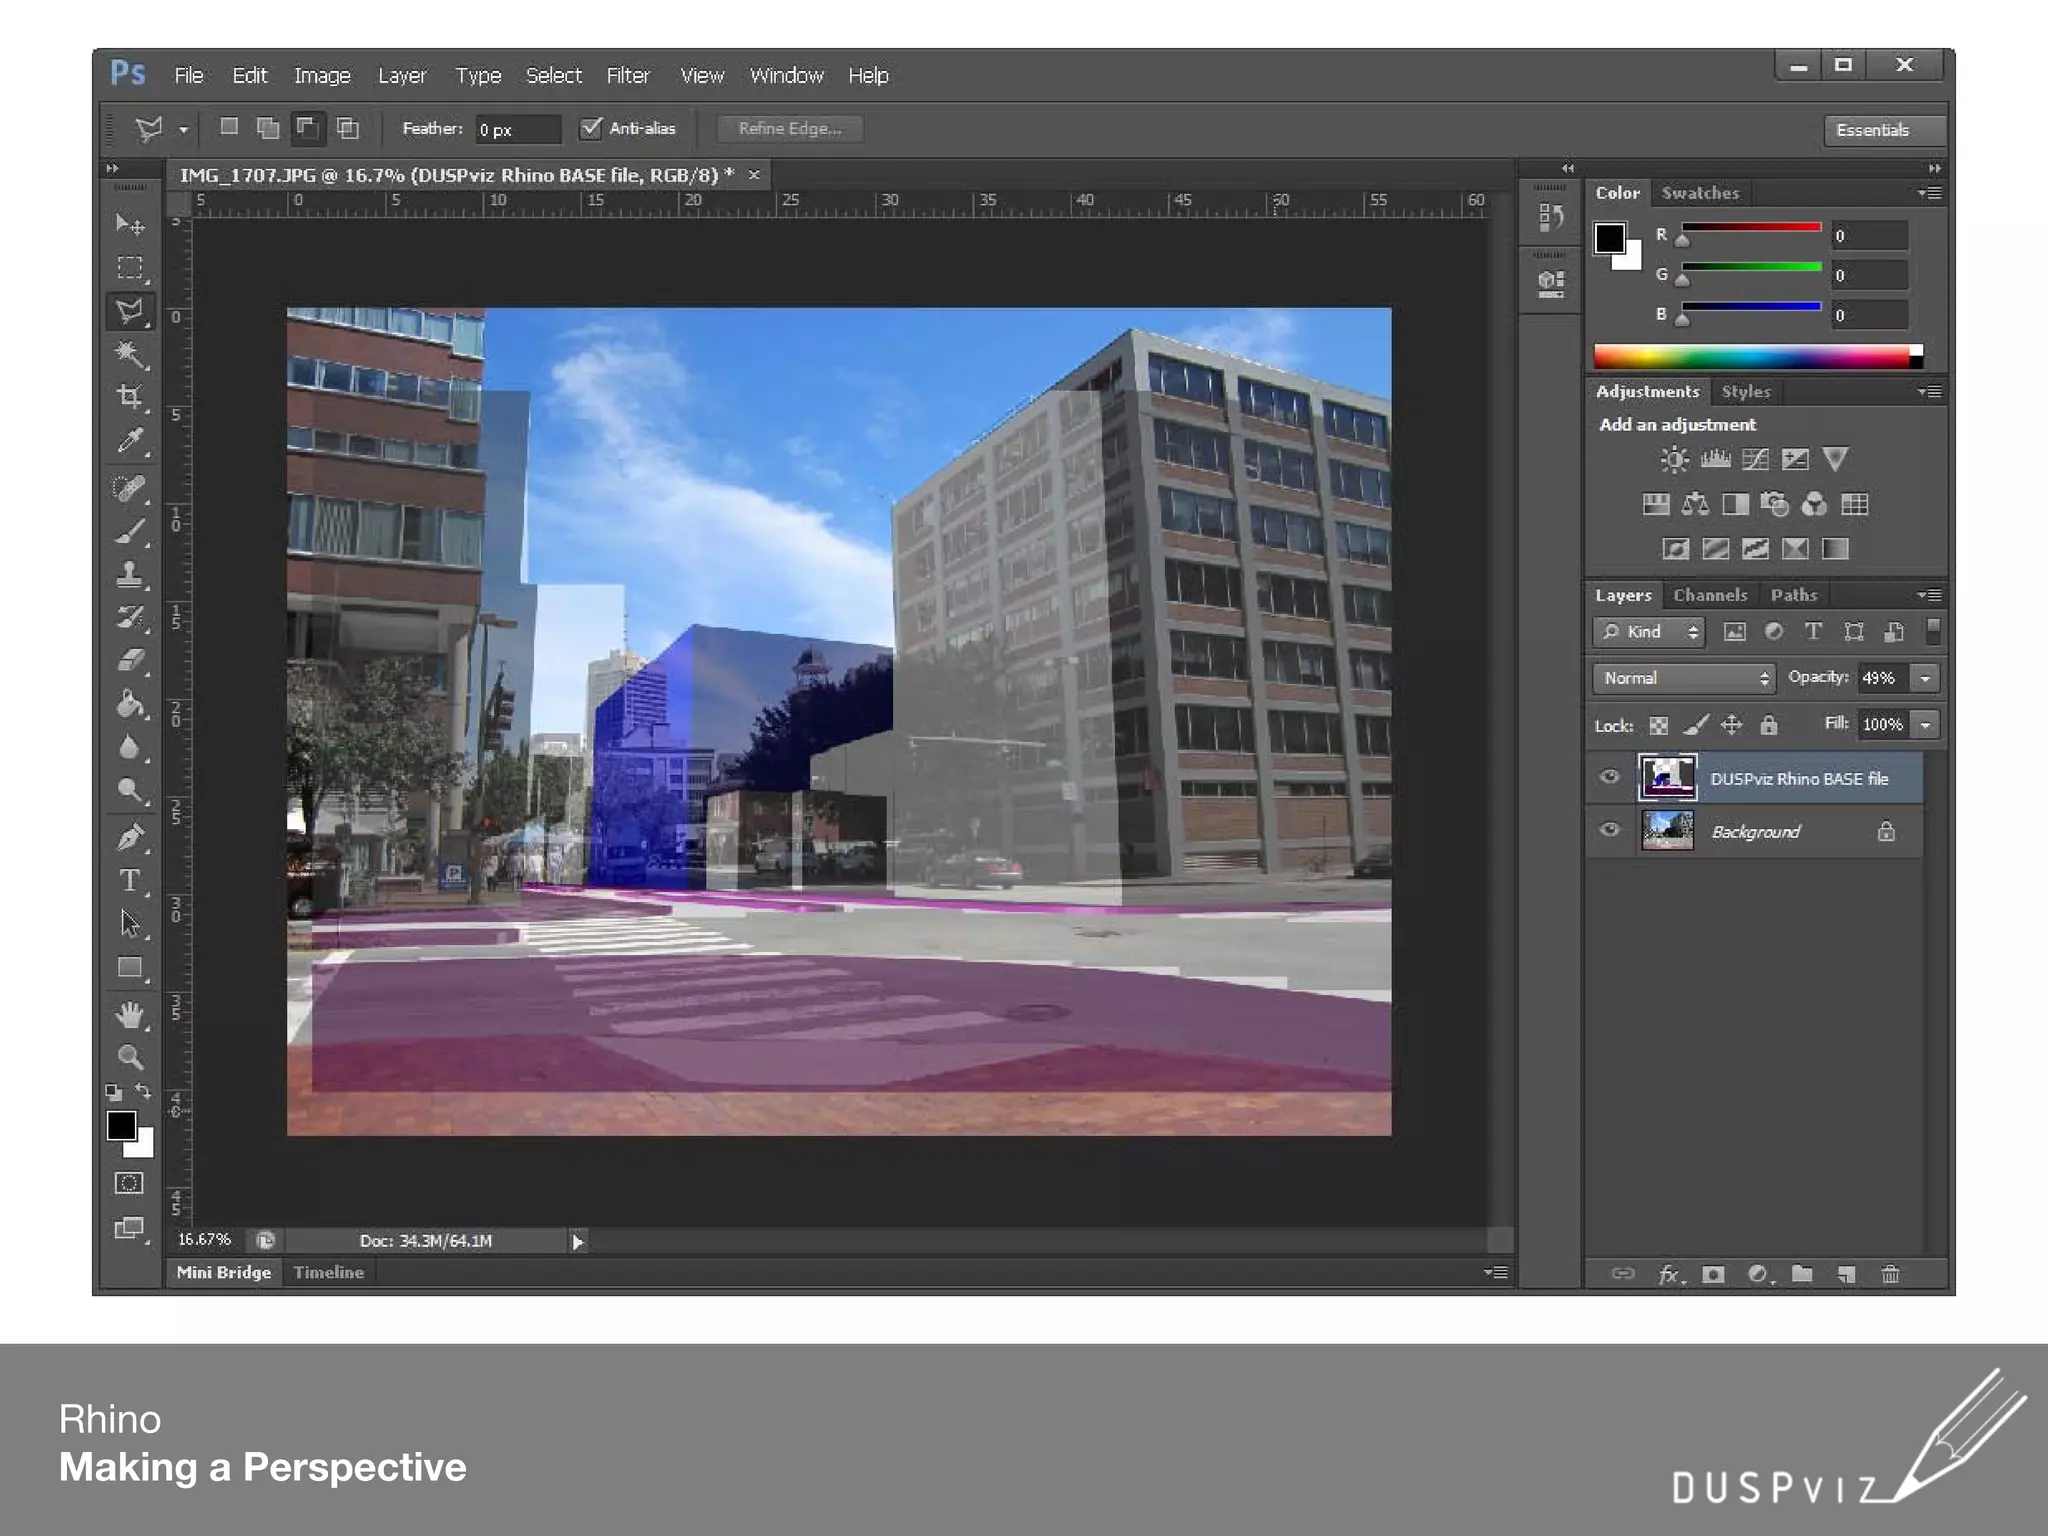
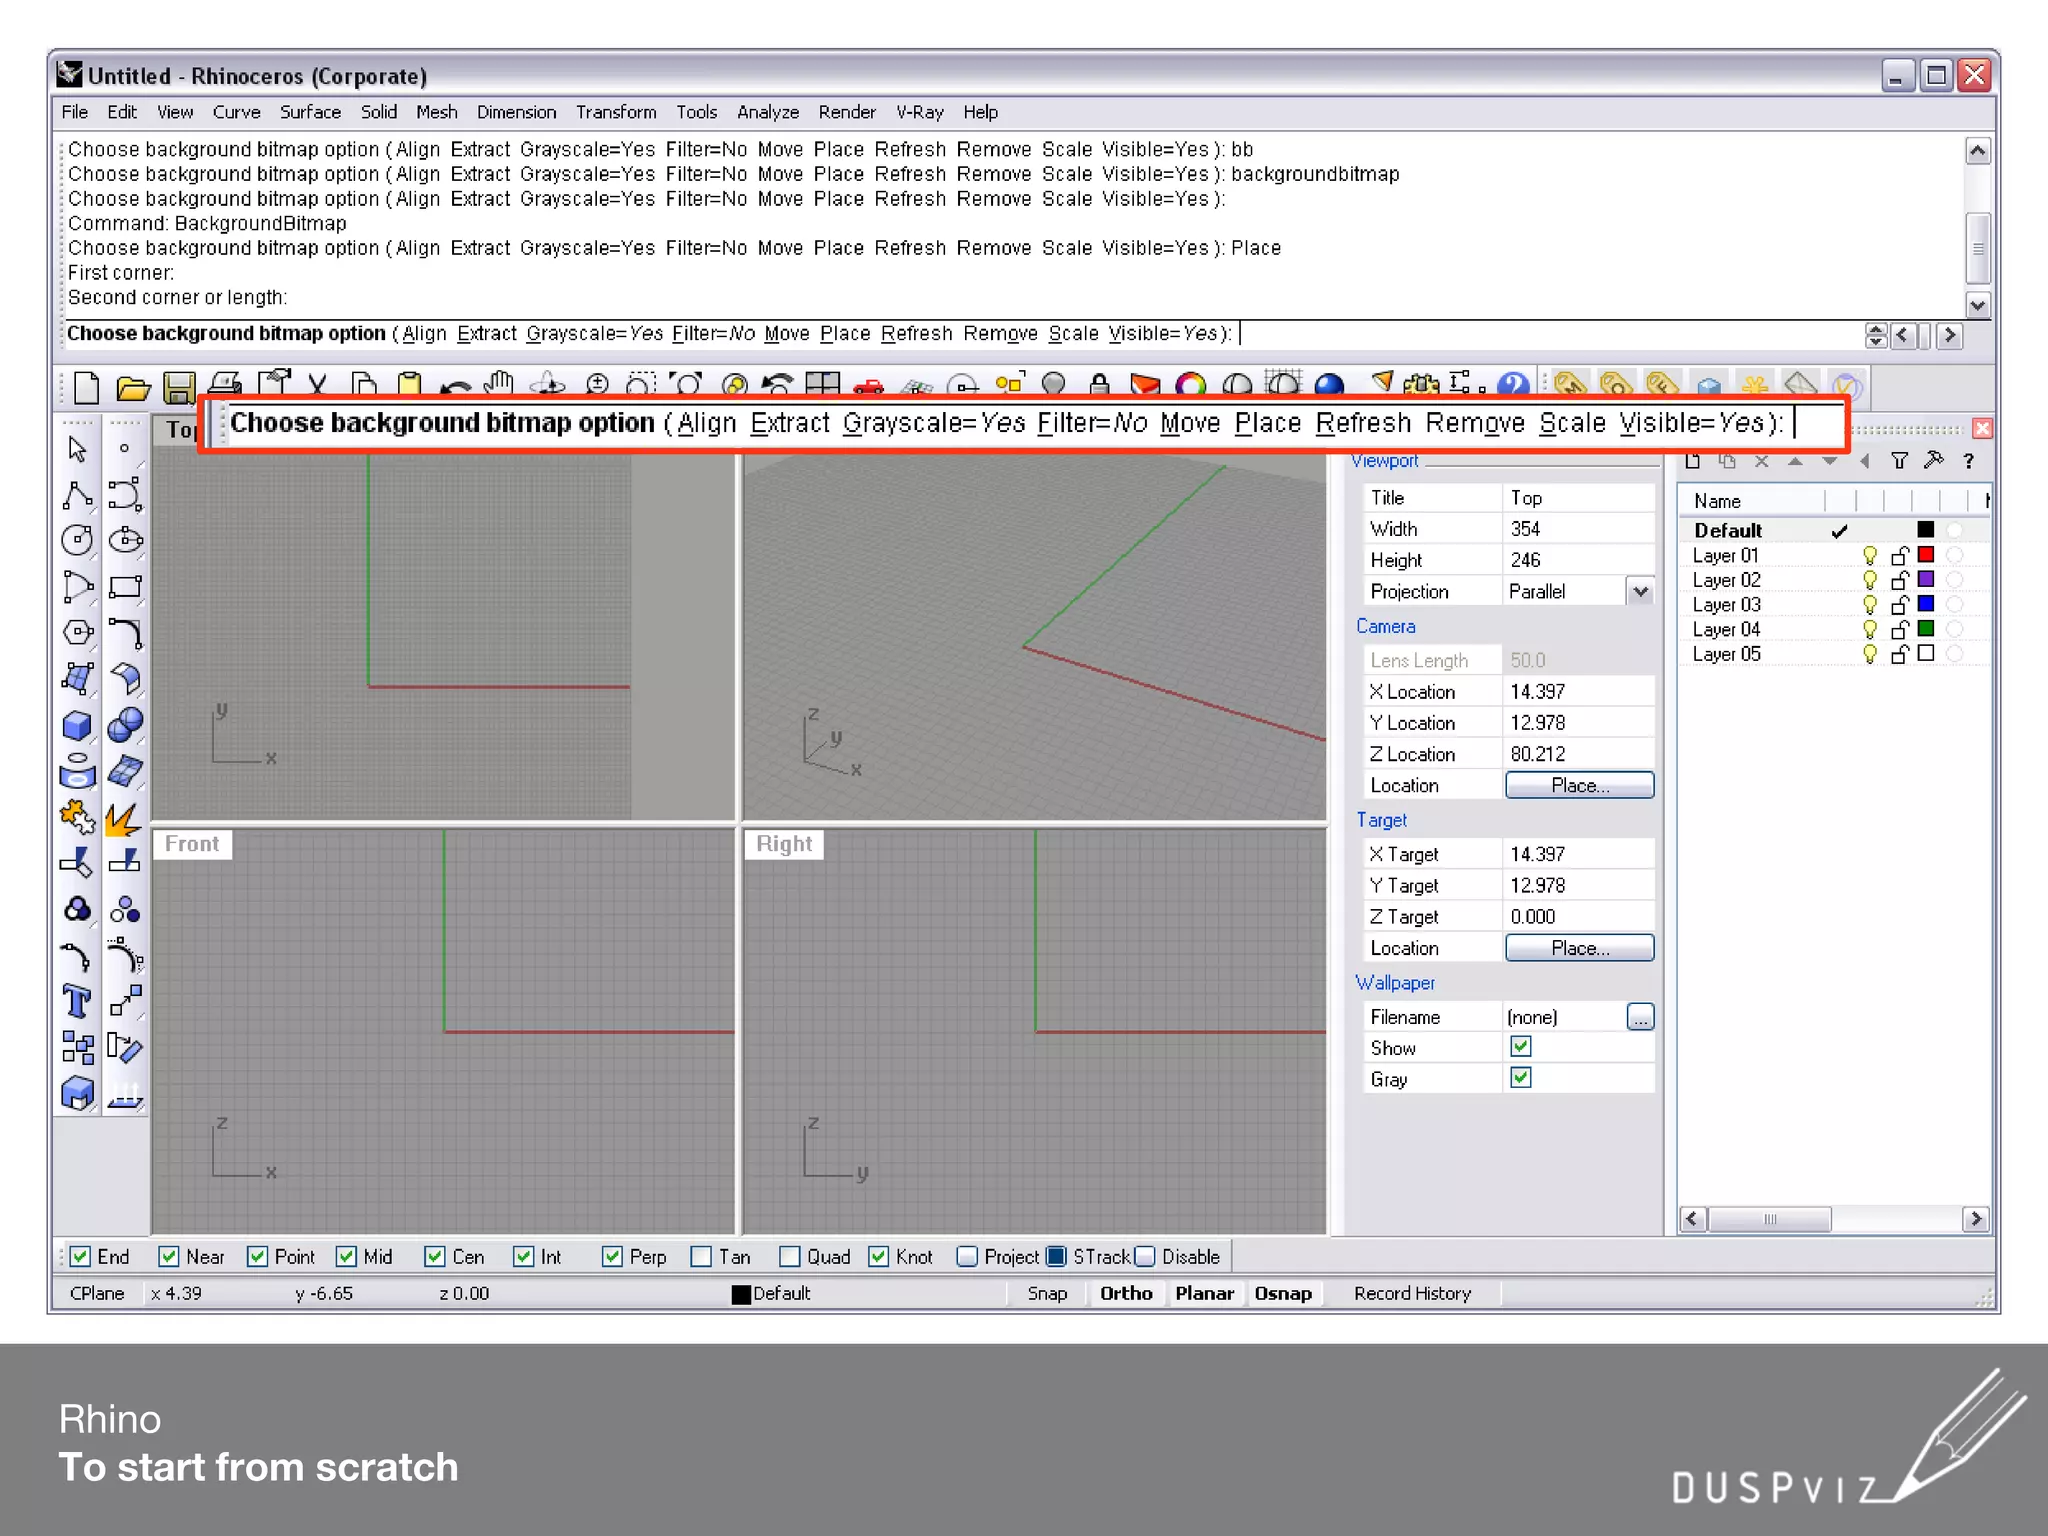
DUSPviz 3D workshop
Session #2: Rhinoceros for Urban Planners
Mesh (polygonal) vs NURBS
Rhino
Purpose
Mesh uses polygons to represent models – Sketchup
NURBS represents surface with mathematical curves - Rhino
Rhino’s primary purpose (for urban planners) is to
build a 3D mock-up scheme of new urban developments
Rhino
Purpose
Rhino can also be used to make
Plans, 2D&3D Diagrams, and Perspectives
Rhino
Purpose
Rhino
Interface
Toolbar1
Drafting Options2
Viewports3
Properties and Layers5
Rhino
Interface
THE COMMAND LINE
Rhino is a script-based program.
Understanding the nature of the script language is important!
Pay attention to the follow-up sentences and options in the command line.
To Zoom In & Out To Pan To Rotate View
in the PERSPECTIVE view
roll mouse wheel
CTRL+ Move
Mouse
Right click & drag
(in the TOP, FRONT RIGHT view )
Right click & Rotate
SHIFT + Right click & drag
(in the PERSPECTIVE view )
Rhino
Navigating
*tip: Always start drawing in the TOP
viewport, with PROJECT option checked
Rhino
Drawing Objects
Set as Ghosted OR Shaded mode1
Project ON2
*tip: Type in horizontal length and then
vertical length for exact dimensions
Rhino
Drawing Objects
Draw a rectangle using
‘Rectangle’ tool
1
*tip: Always use ‘Polyline’
instead of ‘Line’
Rhino
Drawing Objects
Draw a rectangle using
‘Polyline’ tool
1
Ortho ON2
Explore different Snap options3
Rhino
Object Selection
vs
Selecting from right to left selects every
object that is touching the selection box
Selecting from left to right selects every
object that is within the selection box
Rhino
Manipulating Objects – 2D
Copy Rotate set Scale Split Join
Select an object
ENTERto con rm
Specify a point to
copyfrom
Specify a point to
copyto
HitESC to
terminate
Select an object
ENTERto con rm
Specify a point of
the center of
rotation
Type in an angle /
Specify the rst
reference point
Specify the
secondreference
point
Select an object
Typein a
distance to o set
Click inside or
outside of box
Select an object
ENTERto con rm
Specify a point of
the center of
rotation
Type in an angle /
Specify the rst
reference point
Specify the
secondreference
point
Select an object
ENTERto con rm
Type in ‘P’ to split
byPoints
Specify points to
split curve
ENTERto con rm
Select objects to
join
ENTERto con rm
The KEY Commands- 2D
ENTERto con rm
Rhino
Manipulating Objects – 3D
The KEY Command– ExtrudeCRV
to make buildings
Extrude Box is different than Extrude Rectangle.
Use Extrude Box to get all faces of the element.
Rhino
Manipulating Objects – 3D
The KEY Command – Scale1D
to alter the height/width of a building
Rhino
Manipulating Objects – 3D
The KEY Command – Boolean Series
to make elaborate building shapes
Boolean command series is probably the only command that you’d need to
make diverse building shapes.
Think about the Venn Diagram you learned in school.
The principle is exactly the same.
Rhino
Before you start…
Always check your drafting options
Project ON
Rhino
Layers
This indicates the layer you are
currently working on
Create a new layer1
Lock layers other than your
newly created one2
Rhino
Exercise
Your task : create a building right next to the Kendall Hotel.
Rhino
Saving views
1
2
In this step, we are setting up bookmark
of our view so we can refer to it later.
Rhino
Making a Plan
Unlock all the layers 1
Select all objects2
Type in ‘Make2D’ and ENTER
3
Check4
In this step, we are creating a top-down
2D view of our 3D model.
Rhino
Making a Plan
Type in ‘Export’ and ENTER
1
Select .ai2
*tip: Select all the objects you are exporting
and Join before exporting
Rhino
Making a Plan
Rhino
Making a Plan
*tip:Vary thelineweightof each layers to
give depth to you plan.
What is great about this plan is that it has
scale & layers
You might need to adjust your artboard (Illustrator drawing area). To do this go to
File -> Document Setup -> Edit Artboards. Adjust the artboard to fit the extent of
your model.
Rhino
Making a 3D Diagram
2
Select objects1
Type in ‘Make2D’ and ENTER
3
Zoom Selected
Rhino
Making a 3D Diagram
*tip: Select all the objects you are exporting
and Join before exporting
Type in ‘Export’ and ENTER
1
Rhino
Making a Perspective
1
2
Rhino
Making a Perspective
Rhino
Making a Perspective
Rhino
Making a Perspective
Type in ‘Print’ and ENTER
1
Rhino
Making a Perspective
Rhino
Making a Perspective
Rhino
Rendering
Rhino
To start from scratch

DUSPviz Rhino 3D Workshop

  • 1.
    DUSPviz 3D workshop Session#2: Rhinoceros for Urban Planners
  • 2.
    Mesh (polygonal) vsNURBS Rhino Purpose Mesh uses polygons to represent models – Sketchup NURBS represents surface with mathematical curves - Rhino
  • 3.
    Rhino’s primary purpose(for urban planners) is to build a 3D mock-up scheme of new urban developments Rhino Purpose
  • 4.
    Rhino can alsobe used to make Plans, 2D&3D Diagrams, and Perspectives Rhino Purpose
  • 5.
  • 6.
    Rhino Interface THE COMMAND LINE Rhinois a script-based program. Understanding the nature of the script language is important! Pay attention to the follow-up sentences and options in the command line.
  • 7.
    To Zoom In& Out To Pan To Rotate View in the PERSPECTIVE view roll mouse wheel CTRL+ Move Mouse Right click & drag (in the TOP, FRONT RIGHT view ) Right click & Rotate SHIFT + Right click & drag (in the PERSPECTIVE view ) Rhino Navigating
  • 8.
    *tip: Always startdrawing in the TOP viewport, with PROJECT option checked Rhino Drawing Objects Set as Ghosted OR Shaded mode1 Project ON2
  • 9.
    *tip: Type inhorizontal length and then vertical length for exact dimensions Rhino Drawing Objects Draw a rectangle using ‘Rectangle’ tool 1
  • 10.
    *tip: Always use‘Polyline’ instead of ‘Line’ Rhino Drawing Objects Draw a rectangle using ‘Polyline’ tool 1 Ortho ON2 Explore different Snap options3
  • 11.
    Rhino Object Selection vs Selecting fromright to left selects every object that is touching the selection box Selecting from left to right selects every object that is within the selection box
  • 12.
    Rhino Manipulating Objects –2D Copy Rotate set Scale Split Join Select an object ENTERto con rm Specify a point to copyfrom Specify a point to copyto HitESC to terminate Select an object ENTERto con rm Specify a point of the center of rotation Type in an angle / Specify the rst reference point Specify the secondreference point Select an object Typein a distance to o set Click inside or outside of box Select an object ENTERto con rm Specify a point of the center of rotation Type in an angle / Specify the rst reference point Specify the secondreference point Select an object ENTERto con rm Type in ‘P’ to split byPoints Specify points to split curve ENTERto con rm Select objects to join ENTERto con rm The KEY Commands- 2D ENTERto con rm
  • 13.
    Rhino Manipulating Objects –3D The KEY Command– ExtrudeCRV to make buildings Extrude Box is different than Extrude Rectangle. Use Extrude Box to get all faces of the element.
  • 14.
    Rhino Manipulating Objects –3D The KEY Command – Scale1D to alter the height/width of a building
  • 15.
    Rhino Manipulating Objects –3D The KEY Command – Boolean Series to make elaborate building shapes Boolean command series is probably the only command that you’d need to make diverse building shapes. Think about the Venn Diagram you learned in school. The principle is exactly the same.
  • 16.
    Rhino Before you start… Alwayscheck your drafting options Project ON
  • 17.
    Rhino Layers This indicates thelayer you are currently working on Create a new layer1 Lock layers other than your newly created one2
  • 18.
    Rhino Exercise Your task :create a building right next to the Kendall Hotel.
  • 19.
    Rhino Saving views 1 2 In thisstep, we are setting up bookmark of our view so we can refer to it later.
  • 20.
    Rhino Making a Plan Unlockall the layers 1 Select all objects2 Type in ‘Make2D’ and ENTER 3 Check4 In this step, we are creating a top-down 2D view of our 3D model.
  • 21.
    Rhino Making a Plan Typein ‘Export’ and ENTER 1 Select .ai2 *tip: Select all the objects you are exporting and Join before exporting
  • 22.
  • 23.
    Rhino Making a Plan *tip:Varythelineweightof each layers to give depth to you plan. What is great about this plan is that it has scale & layers You might need to adjust your artboard (Illustrator drawing area). To do this go to File -> Document Setup -> Edit Artboards. Adjust the artboard to fit the extent of your model.
  • 24.
    Rhino Making a 3DDiagram 2 Select objects1 Type in ‘Make2D’ and ENTER 3 Zoom Selected
  • 25.
    Rhino Making a 3DDiagram *tip: Select all the objects you are exporting and Join before exporting Type in ‘Export’ and ENTER 1
  • 26.
  • 27.
  • 28.
  • 29.
    Rhino Making a Perspective Typein ‘Print’ and ENTER 1
  • 30.
  • 31.
  • 32.
  • 33.