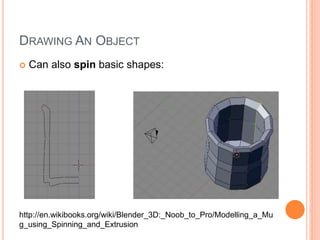
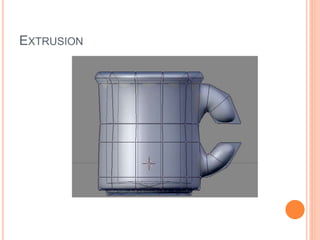
CREATING A 3D IMAGE
Michael Heron
INTRODUCTION
 In this lecture we are going to look at the process
we go through in order to build a 3D image.
 At least in theory.
 Will need to wait until the lab before we do it For Reals.
 Two main techniques for doing this.
 Line Mode
 Box Mode
TERMINOLOGY
 Face
 A simple shape used to make up a more complex
shape.
 Also known as a polygon
 Vertex
 A corner point of a polygon
 Edge
 A line represented by two connected vertexes
CREATING A 3D OBJECT
 We need to do several things.
 Define the geometry of the shape.
 Apply transforms to set
 Location
 Scale
 Rotation
 Define surface details.
 Textures
 We do this for each object in a scene.
 We’ll talk about only one.
DEFINE THE GEOMETRY
 How do we define the geometry?
 We choose between two main ways.
 Or a hybrid of the two.
 First way is to draw each point in the shape.
 For large, complex shapes – extremely difficult.
 The more polygons we have, the more difficult this
becomes.
 This is the line mode of drawing shapes.
 There be dragons.
DEFINE THE GEOMETRY
 How do you sculpt an elephant?
 You take a block of marble, and chip away all the bits
that don’t look like an elephant.
 This is the Box Mode of drawing shapes.
 Start with an approximate shape.
 Usually one of the standard geometric principles.
 Manipulate it until it fits your needs.
 Or at least, closely approximates your needs.
 Recommended approach.
DEFINE THE GEOMETRY
 A third way is to make use of a representation of a
real object.
 Requires the use of specialised hard-ware
 Which you don’t have.
 The method you choose depends on
 The nature of the object
 Requirements of the model.
 A hybrid approach is usually the best
 Start with a rough shape, draw extensions to handle fine
detail work.
3D REPRESENTATIONAL FORMS
 Several ways to represent 3D Geometry:
 Polygonal.
 Objects approximated by nets of polygons
 A polymesh
 Bicubic
 Objects represented by nets of curved patches.
 Constructive Solid Geometry
 Constructed from sets of basic geometric shapes
 Space subdivision
 Ray-tracing
 We focus primarily on polygonal today.
 Talk about the rest in the next lecture, or thereabouts.
SIMPLE POLYMESH
(x1,y1,z1) (x2,y2,z2)
(x3,y3,z3)
(x4,y4,z4)
(x5,y5,z5) (x6,y6,z6)
(x7,y7,z7)(x8,y8,z8)
SIMPLE POLYMESH – LOCAL CO-ORDINATES
(0,0,0) (50,0,0)
(50,0,50)(0,0,50)
(0,50,0) (50,50,0)
(50,50,50)
SIMPLE POLYMESH - REPRESENTATION
object surfaces polygons vertices
SIMPLE POLYMESH - REPRESENTATION
 Represented by a face-vertex mesh
 A list of faces represented by vertexes
 A list of the vertexes and what faces they are part of
 Co-ordinate space of each vertex.
 This provides a mathematical, context independent
representation of an object in its own local space.
FACE-VERTEX MESH
POLYMESH NOTES
 Shape is only an approximation for complex images.
 Can’t represent a circle.
 Can represent something that is almost a circle
 Level of approximation dictated by polygon count.
 Shading and other detailing approaches can help to hide
shape approximations.
 Ubiquitous representation.
 Graphics cards usually include specialised hardware for
rendering large numbers of polygons.
DRAWING AN OBJECT
 Begin with simple starting shape.
 Want to draw a head? Start with a sphere.
 Can add a sphere as a base shape in Blender
 Consider necessary transforms.
 Can do vertex, edge, and face manipulation on
polymesh shapes.
 Can apply basic transforms to part of a shape.
 Can also extrude.
 Used to extend a part of a shape.
DRAWING AN OBJECT
 Can also spin basic shapes:
http://en.wikibooks.org/wiki/Blender_3D:_Noob_to_Pro/Modelling_a_Mu
g_using_Spinning_and_Extrusion
DRAWING A SHAPE
 Blender provides many different modifiers to
change the basic structure of how you interact with
a shape.
 Mirror allows you to mirror modifications across a
shape.
 Subsurf makes a rough image much smoother and
more organic.
 Lots of these modifiers
 Experimentation is the key
MODIFIER - SUBSURF
MOLDING A SHAPE
 Back to the elephant.
 How do we turn a simple shape into what we actually want?
 Begin with a sphere
 Elephant body
 Select appropriate faces on that sphere.
 Extrude into legs
 Add another sphere
 The head
 Extrude a trunk
 Extrude a tail
 The rough work is handled using these kind of processes.
EXTRUSION
 Extrusion is one of the most powerful tools you
have available in blender.
 Pick a face, and extend it outwards or inwards.
 Used to raise and lower surfaces.
 Can be used to create entirely new surfaces.
 Used to create shapes where shapes did not
previously exist.
 For example, in the coffee cup.
EXTRUSION
TEXTURING
 Once you have a basic shape you want to make
use of, you can apply various textures to it.
 This changes the colour, and how it interacts with light
sources.
 A base blender scene has three elements.
 A light source (by default, the sun)
 A camera
 A shape
TEXTURING
 The texturing system in Blender is extremely rich.
 You can set how your object interacts with light
 You can set the specific kind of rendering to be done
 You can choose transparency and type of textures.
 Most of these will not be visible except in preview
until a scene is rendered.
TEXTURES
 Importantly, we can also make use of predefined
bitmaps for a texture.
 We can make use of our own images which get layered onto
the shapes we provide.
 We’ll see more of this later lectures and labs.
 It’s not a simple concept and easier to understand when
shown rather than simply described.
 Experimentation very important.
 Can’t even begin to cover what Blender makes available!
SUMMARY
 Polymeshes are the graphical representation must
used.
 We’ll talk about the rest later.
 3D Object created by:
 Representing geometry
 Applying transforms
 Applying textures
 Rendering

GRPHICS02 - Creating 3D Graphics

  • 1.
    CREATING A 3DIMAGE Michael Heron
  • 2.
    INTRODUCTION  In thislecture we are going to look at the process we go through in order to build a 3D image.  At least in theory.  Will need to wait until the lab before we do it For Reals.  Two main techniques for doing this.  Line Mode  Box Mode
  • 3.
    TERMINOLOGY  Face  Asimple shape used to make up a more complex shape.  Also known as a polygon  Vertex  A corner point of a polygon  Edge  A line represented by two connected vertexes
  • 4.
    CREATING A 3DOBJECT  We need to do several things.  Define the geometry of the shape.  Apply transforms to set  Location  Scale  Rotation  Define surface details.  Textures  We do this for each object in a scene.  We’ll talk about only one.
  • 5.
    DEFINE THE GEOMETRY How do we define the geometry?  We choose between two main ways.  Or a hybrid of the two.  First way is to draw each point in the shape.  For large, complex shapes – extremely difficult.  The more polygons we have, the more difficult this becomes.  This is the line mode of drawing shapes.  There be dragons.
  • 6.
    DEFINE THE GEOMETRY How do you sculpt an elephant?  You take a block of marble, and chip away all the bits that don’t look like an elephant.  This is the Box Mode of drawing shapes.  Start with an approximate shape.  Usually one of the standard geometric principles.  Manipulate it until it fits your needs.  Or at least, closely approximates your needs.  Recommended approach.
  • 7.
    DEFINE THE GEOMETRY A third way is to make use of a representation of a real object.  Requires the use of specialised hard-ware  Which you don’t have.  The method you choose depends on  The nature of the object  Requirements of the model.  A hybrid approach is usually the best  Start with a rough shape, draw extensions to handle fine detail work.
  • 8.
    3D REPRESENTATIONAL FORMS Several ways to represent 3D Geometry:  Polygonal.  Objects approximated by nets of polygons  A polymesh  Bicubic  Objects represented by nets of curved patches.  Constructive Solid Geometry  Constructed from sets of basic geometric shapes  Space subdivision  Ray-tracing  We focus primarily on polygonal today.  Talk about the rest in the next lecture, or thereabouts.
  • 9.
  • 10.
    SIMPLE POLYMESH –LOCAL CO-ORDINATES (0,0,0) (50,0,0) (50,0,50)(0,0,50) (0,50,0) (50,50,0) (50,50,50)
  • 11.
    SIMPLE POLYMESH -REPRESENTATION object surfaces polygons vertices
  • 12.
    SIMPLE POLYMESH -REPRESENTATION  Represented by a face-vertex mesh  A list of faces represented by vertexes  A list of the vertexes and what faces they are part of  Co-ordinate space of each vertex.  This provides a mathematical, context independent representation of an object in its own local space.
  • 13.
  • 14.
    POLYMESH NOTES  Shapeis only an approximation for complex images.  Can’t represent a circle.  Can represent something that is almost a circle  Level of approximation dictated by polygon count.  Shading and other detailing approaches can help to hide shape approximations.  Ubiquitous representation.  Graphics cards usually include specialised hardware for rendering large numbers of polygons.
  • 15.
    DRAWING AN OBJECT Begin with simple starting shape.  Want to draw a head? Start with a sphere.  Can add a sphere as a base shape in Blender  Consider necessary transforms.  Can do vertex, edge, and face manipulation on polymesh shapes.  Can apply basic transforms to part of a shape.  Can also extrude.  Used to extend a part of a shape.
  • 16.
    DRAWING AN OBJECT Can also spin basic shapes: http://en.wikibooks.org/wiki/Blender_3D:_Noob_to_Pro/Modelling_a_Mu g_using_Spinning_and_Extrusion
  • 17.
    DRAWING A SHAPE Blender provides many different modifiers to change the basic structure of how you interact with a shape.  Mirror allows you to mirror modifications across a shape.  Subsurf makes a rough image much smoother and more organic.  Lots of these modifiers  Experimentation is the key
  • 18.
  • 19.
    MOLDING A SHAPE Back to the elephant.  How do we turn a simple shape into what we actually want?  Begin with a sphere  Elephant body  Select appropriate faces on that sphere.  Extrude into legs  Add another sphere  The head  Extrude a trunk  Extrude a tail  The rough work is handled using these kind of processes.
  • 20.
    EXTRUSION  Extrusion isone of the most powerful tools you have available in blender.  Pick a face, and extend it outwards or inwards.  Used to raise and lower surfaces.  Can be used to create entirely new surfaces.  Used to create shapes where shapes did not previously exist.  For example, in the coffee cup.
  • 21.
  • 22.
    TEXTURING  Once youhave a basic shape you want to make use of, you can apply various textures to it.  This changes the colour, and how it interacts with light sources.  A base blender scene has three elements.  A light source (by default, the sun)  A camera  A shape
  • 23.
    TEXTURING  The texturingsystem in Blender is extremely rich.  You can set how your object interacts with light  You can set the specific kind of rendering to be done  You can choose transparency and type of textures.  Most of these will not be visible except in preview until a scene is rendered.
  • 24.
    TEXTURES  Importantly, wecan also make use of predefined bitmaps for a texture.  We can make use of our own images which get layered onto the shapes we provide.  We’ll see more of this later lectures and labs.  It’s not a simple concept and easier to understand when shown rather than simply described.  Experimentation very important.  Can’t even begin to cover what Blender makes available!
  • 25.
    SUMMARY  Polymeshes arethe graphical representation must used.  We’ll talk about the rest later.  3D Object created by:  Representing geometry  Applying transforms  Applying textures  Rendering