The document summarizes three photo editing experiments conducted by the author:
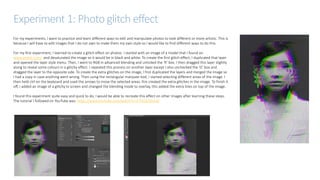
1. A glitch effect was created on a black and white model photo by desaturating, duplicating layers, adjusting RGB, and moving selected areas to produce glitches.
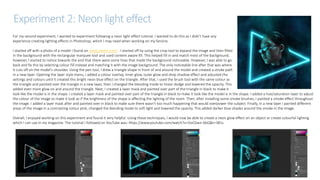
2. A neon light effect was added to a model photo by drawing a triangle shape, adding glow effects, painting glow, and adding smoke to create bright lighting.
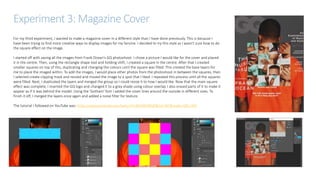
3. A magazine cover was designed using Frank Ocean photos arranged in overlapping squares, adding logos and text to mimic a magazine layout.
The Art Pastor's Guide to Sabbath | Steve ThomasonSteve Thomason
What is the purpose of the Sabbath Law in the Torah. It is interesting to compare how the context of the law shifts from Exodus to Deuteronomy. Who gets to rest, and why?
Instructions for Submissions thorugh G- Classroom.pptxJheel Barad
This presentation provides a briefing on how to upload submissions and documents in Google Classroom. It was prepared as part of an orientation for new Sainik School in-service teacher trainees. As a training officer, my goal is to ensure that you are comfortable and proficient with this essential tool for managing assignments and fostering student engagement.
The Indian economy is classified into different sectors to simplify the analysis and understanding of economic activities. For Class 10, it's essential to grasp the sectors of the Indian economy, understand their characteristics, and recognize their importance. This guide will provide detailed notes on the Sectors of the Indian Economy Class 10, using specific long-tail keywords to enhance comprehension.
For more information, visit-www.vavaclasses.com
Palestine last event orientationfvgnh .pptxRaedMohamed3
An EFL lesson about the current events in Palestine. It is intended to be for intermediate students who wish to increase their listening skills through a short lesson in power point.
The Roman Empire A Historical Colossus.pdfkaushalkr1407
The Roman Empire, a vast and enduring power, stands as one of history's most remarkable civilizations, leaving an indelible imprint on the world. It emerged from the Roman Republic, transitioning into an imperial powerhouse under the leadership of Augustus Caesar in 27 BCE. This transformation marked the beginning of an era defined by unprecedented territorial expansion, architectural marvels, and profound cultural influence.
The empire's roots lie in the city of Rome, founded, according to legend, by Romulus in 753 BCE. Over centuries, Rome evolved from a small settlement to a formidable republic, characterized by a complex political system with elected officials and checks on power. However, internal strife, class conflicts, and military ambitions paved the way for the end of the Republic. Julius Caesar’s dictatorship and subsequent assassination in 44 BCE created a power vacuum, leading to a civil war. Octavian, later Augustus, emerged victorious, heralding the Roman Empire’s birth.
Under Augustus, the empire experienced the Pax Romana, a 200-year period of relative peace and stability. Augustus reformed the military, established efficient administrative systems, and initiated grand construction projects. The empire's borders expanded, encompassing territories from Britain to Egypt and from Spain to the Euphrates. Roman legions, renowned for their discipline and engineering prowess, secured and maintained these vast territories, building roads, fortifications, and cities that facilitated control and integration.
The Roman Empire’s society was hierarchical, with a rigid class system. At the top were the patricians, wealthy elites who held significant political power. Below them were the plebeians, free citizens with limited political influence, and the vast numbers of slaves who formed the backbone of the economy. The family unit was central, governed by the paterfamilias, the male head who held absolute authority.
Culturally, the Romans were eclectic, absorbing and adapting elements from the civilizations they encountered, particularly the Greeks. Roman art, literature, and philosophy reflected this synthesis, creating a rich cultural tapestry. Latin, the Roman language, became the lingua franca of the Western world, influencing numerous modern languages.
Roman architecture and engineering achievements were monumental. They perfected the arch, vault, and dome, constructing enduring structures like the Colosseum, Pantheon, and aqueducts. These engineering marvels not only showcased Roman ingenuity but also served practical purposes, from public entertainment to water supply.
Unit 8 - Information and Communication Technology (Paper I).pdfThiyagu K
This slides describes the basic concepts of ICT, basics of Email, Emerging Technology and Digital Initiatives in Education. This presentations aligns with the UGC Paper I syllabus.
This is a presentation by Dada Robert in a Your Skill Boost masterclass organised by the Excellence Foundation for South Sudan (EFSS) on Saturday, the 25th and Sunday, the 26th of May 2024.
He discussed the concept of quality improvement, emphasizing its applicability to various aspects of life, including personal, project, and program improvements. He defined quality as doing the right thing at the right time in the right way to achieve the best possible results and discussed the concept of the "gap" between what we know and what we do, and how this gap represents the areas we need to improve. He explained the scientific approach to quality improvement, which involves systematic performance analysis, testing and learning, and implementing change ideas. He also highlighted the importance of client focus and a team approach to quality improvement.
The French Revolution, which began in 1789, was a period of radical social and political upheaval in France. It marked the decline of absolute monarchies, the rise of secular and democratic republics, and the eventual rise of Napoleon Bonaparte. This revolutionary period is crucial in understanding the transition from feudalism to modernity in Europe.
For more information, visit-www.vavaclasses.com
Welcome to TechSoup New Member Orientation and Q&A (May 2024).pdfTechSoup
In this webinar you will learn how your organization can access TechSoup's wide variety of product discount and donation programs. From hardware to software, we'll give you a tour of the tools available to help your nonprofit with productivity, collaboration, financial management, donor tracking, security, and more.
How to Make a Field invisible in Odoo 17Celine George
It is possible to hide or invisible some fields in odoo. Commonly using “invisible” attribute in the field definition to invisible the fields. This slide will show how to make a field invisible in odoo 17.
2. Experiment 1: Photo glitch effect
For my experiments, I want to practice and learn different ways to edit and manipulate photos to look different or more artistic. This is
because I will have to edit images that I do not own to make them my own style so I would like to find different ways to do this.
For my first experiment, I learned to create a glitch effect on photos. I started with an image of a model that I found on
www.pexels.com/ and desaturated the image so it would be in black and white. To create the first glitch effect, I duplicated that layer
and opened the layer style menu. Then, I went to RGB in advanced blending and unticked the ‘R’ box. I then dragged this layer slightly
along to reveal some colours in a glitchy effect. I repeated this process on another layer except I also unchecked the ‘G’ box and
dragged the layer to the opposite side. To create the extra glitches on the image, I first duplicated the layers and merged the image so
I had a copy in case anything went wrong. Then using the rectangular marquee tool, I started selecting different areas of the image. I
then held ctrl on the keyboard and used the arrows to move the selected areas, this created the extra glitches in the image. To finish it
off, I added an image of a glitchy tv screen and changed the blending mode to overlay, this added the extra lines on top of the image.
I found this experiment quite easy and quick to do, I would be able to recreate this effect on other images after learning these steps.
The tutorial I followed on YouTube was: https://www.youtube.com/watch?v=57GQ1rS0yU0
3. Experiment 2: Neon light effect
For my second experiment, I wanted to experiment following a neon light effect tutorial. I wanted to do this as I didn’t have any
experience creating lighting effects in Photoshop, which I may need when working on my fanzine.
I started off with a photo of a model I found on www.pexels.com/ . I started off by using the crop tool to expand the image and then filled
in the background with the rectangular marquee tool and used content aware fill. This helped fill in and match most of the background,
however, I started to notice towards the end that there were some lines that made the background noticeable. However, I was able to go
back and fix this by selecting colour fill instead and matching it with the image background. The only noticeable line after that was where
it cuts off on the model's shoulder. Using the pen tool, I drew a triangle shape in front of and around the model and created a stroke path
in a new layer. Opening the layer style menu, I added a colour overlay, inner glow, outer glow and drop shadow effect and adjusted the
settings and colours until it created this bright neon blue effect on the triangle. After that, I used the brush tool with the same colour as
the triangle and painted over the triangle in a new layer, then I changed the blending mode to linear dodge and lowered the opacity. This
added even more glow on and around the triangle. Next, I created a layer mask and painted over part of the triangle in black to make it
look like the model is in the shape. I created a layer mask and painted over part of the triangle in black to make it look like the model is in the shape. I added a hue/saturation layer to adjust
the colour of the image to make it look as if the brightness of the shape is affecting the lighting of the room. Then, after installing some smoke brushes, I painted a smoke effect throughout
the image. I added a layer mask after and painted over in black to make sure there wasn’t too much happening that would overpower the subject. Finally, in a new layer I painted different
areas of the image in a contrasting colour pink, changed the blending mode to soft light and lowered the opacity. This added darker blue shades around the smoke in the image.
Overall, I enjoyed working on this experiment and found it very helpful. Using these techniques, I would now be able to create a neon glow effect on an object or create colourful lighting
which I can use in my magazine. The tutorial I followed on YouTube was: https://www.youtube.com/watch?v=3JxCbwn-6bQ&t=381s
4. Experiment 3: Magazine Cover
For my third experiment, I wanted to make a magazine cover in a different style than I have done previously. This is because I
have been trying to find more creative ways to display images for my fanzine. I decided to try this style as I wasn't sure how to do
the square effect on the image.
I started off with saving all the images from Frank Ocean's GQ photoshoot. I chose a picture I would like for the cover and placed
it in the centre. Then, using the rectangle shape tool and holding shift, I created a square in the centre. After that I created
smaller squares on top of this, duplicating and changing the colours until the square was filled. This created the base layers for
me to place the imaged within. To add the images, I would place other photos from the photoshoot in between the squares, then
I selected create clipping mask and resized and moved the image to a spot that I liked. I repeated this process until all the squares
were filled. Next, I duplicated the layers and merged the group so I could resize it to how I would like. Now that the main square
effect was complete, I inserted the GQ logo and changed it to a grey shade using colour overlay. I also erased parts of it to make it
appear as if it was behind the model. Using the 'Gotham' font I added the cover lines around the outside in different sizes. To
finish it off, I merged the layers once again and added a noise filter for texture.
The tutorial I followed on YouTube was: https://www.youtube.com/watch?v=BIvN6iiRRaE&list=WL&index=5&t=69s