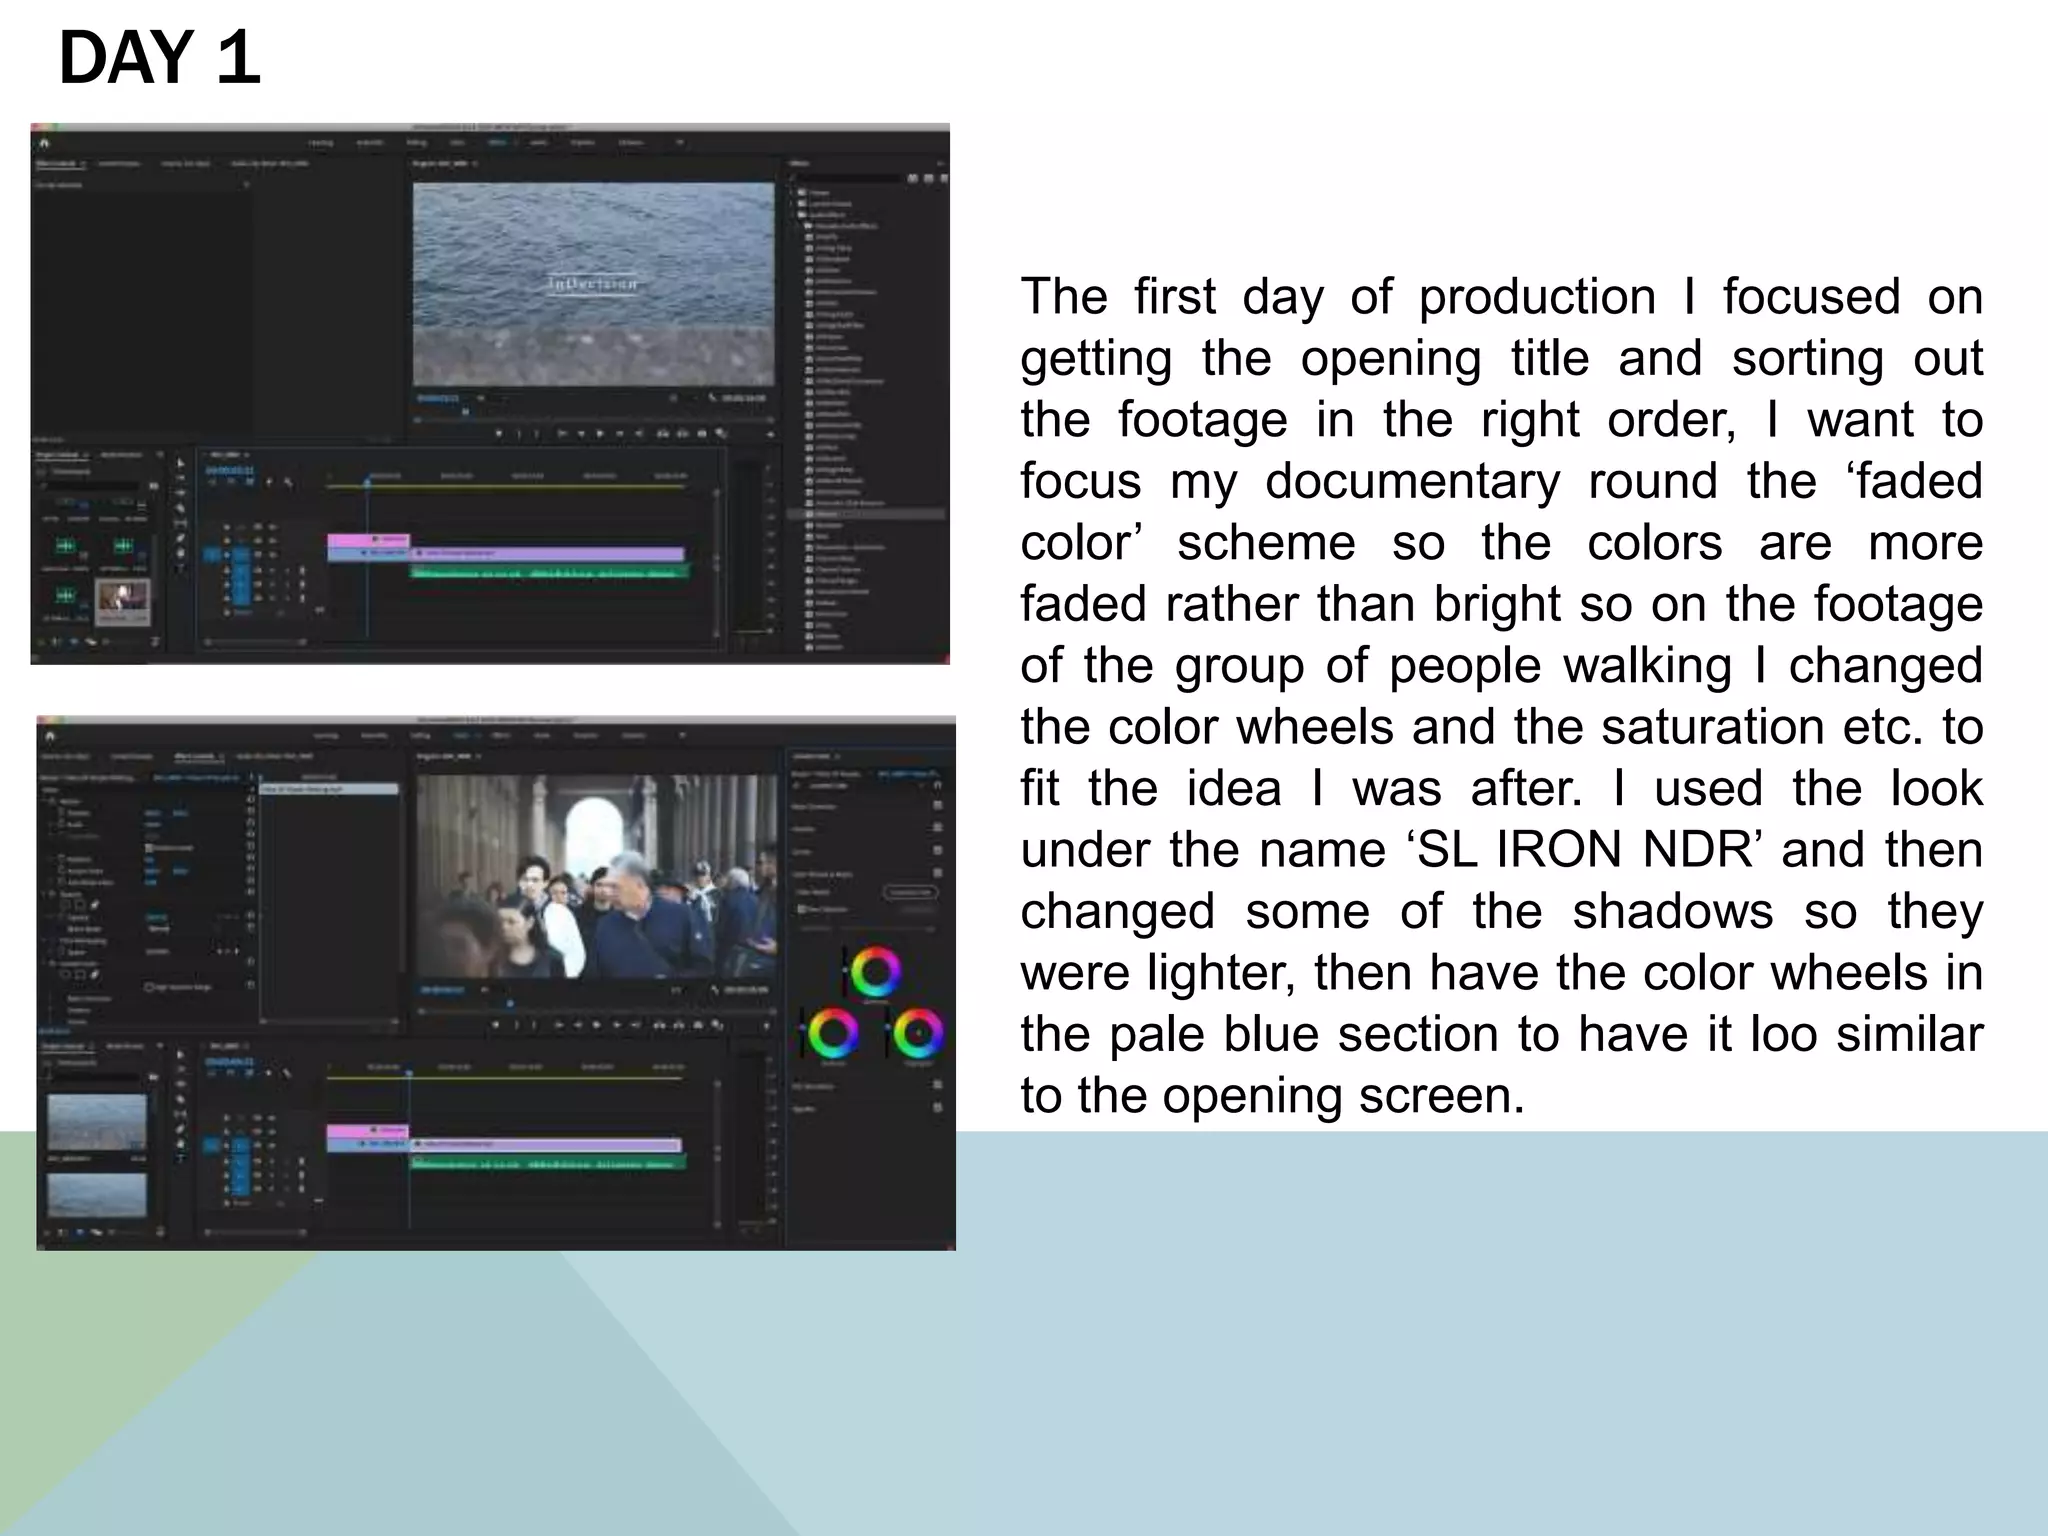
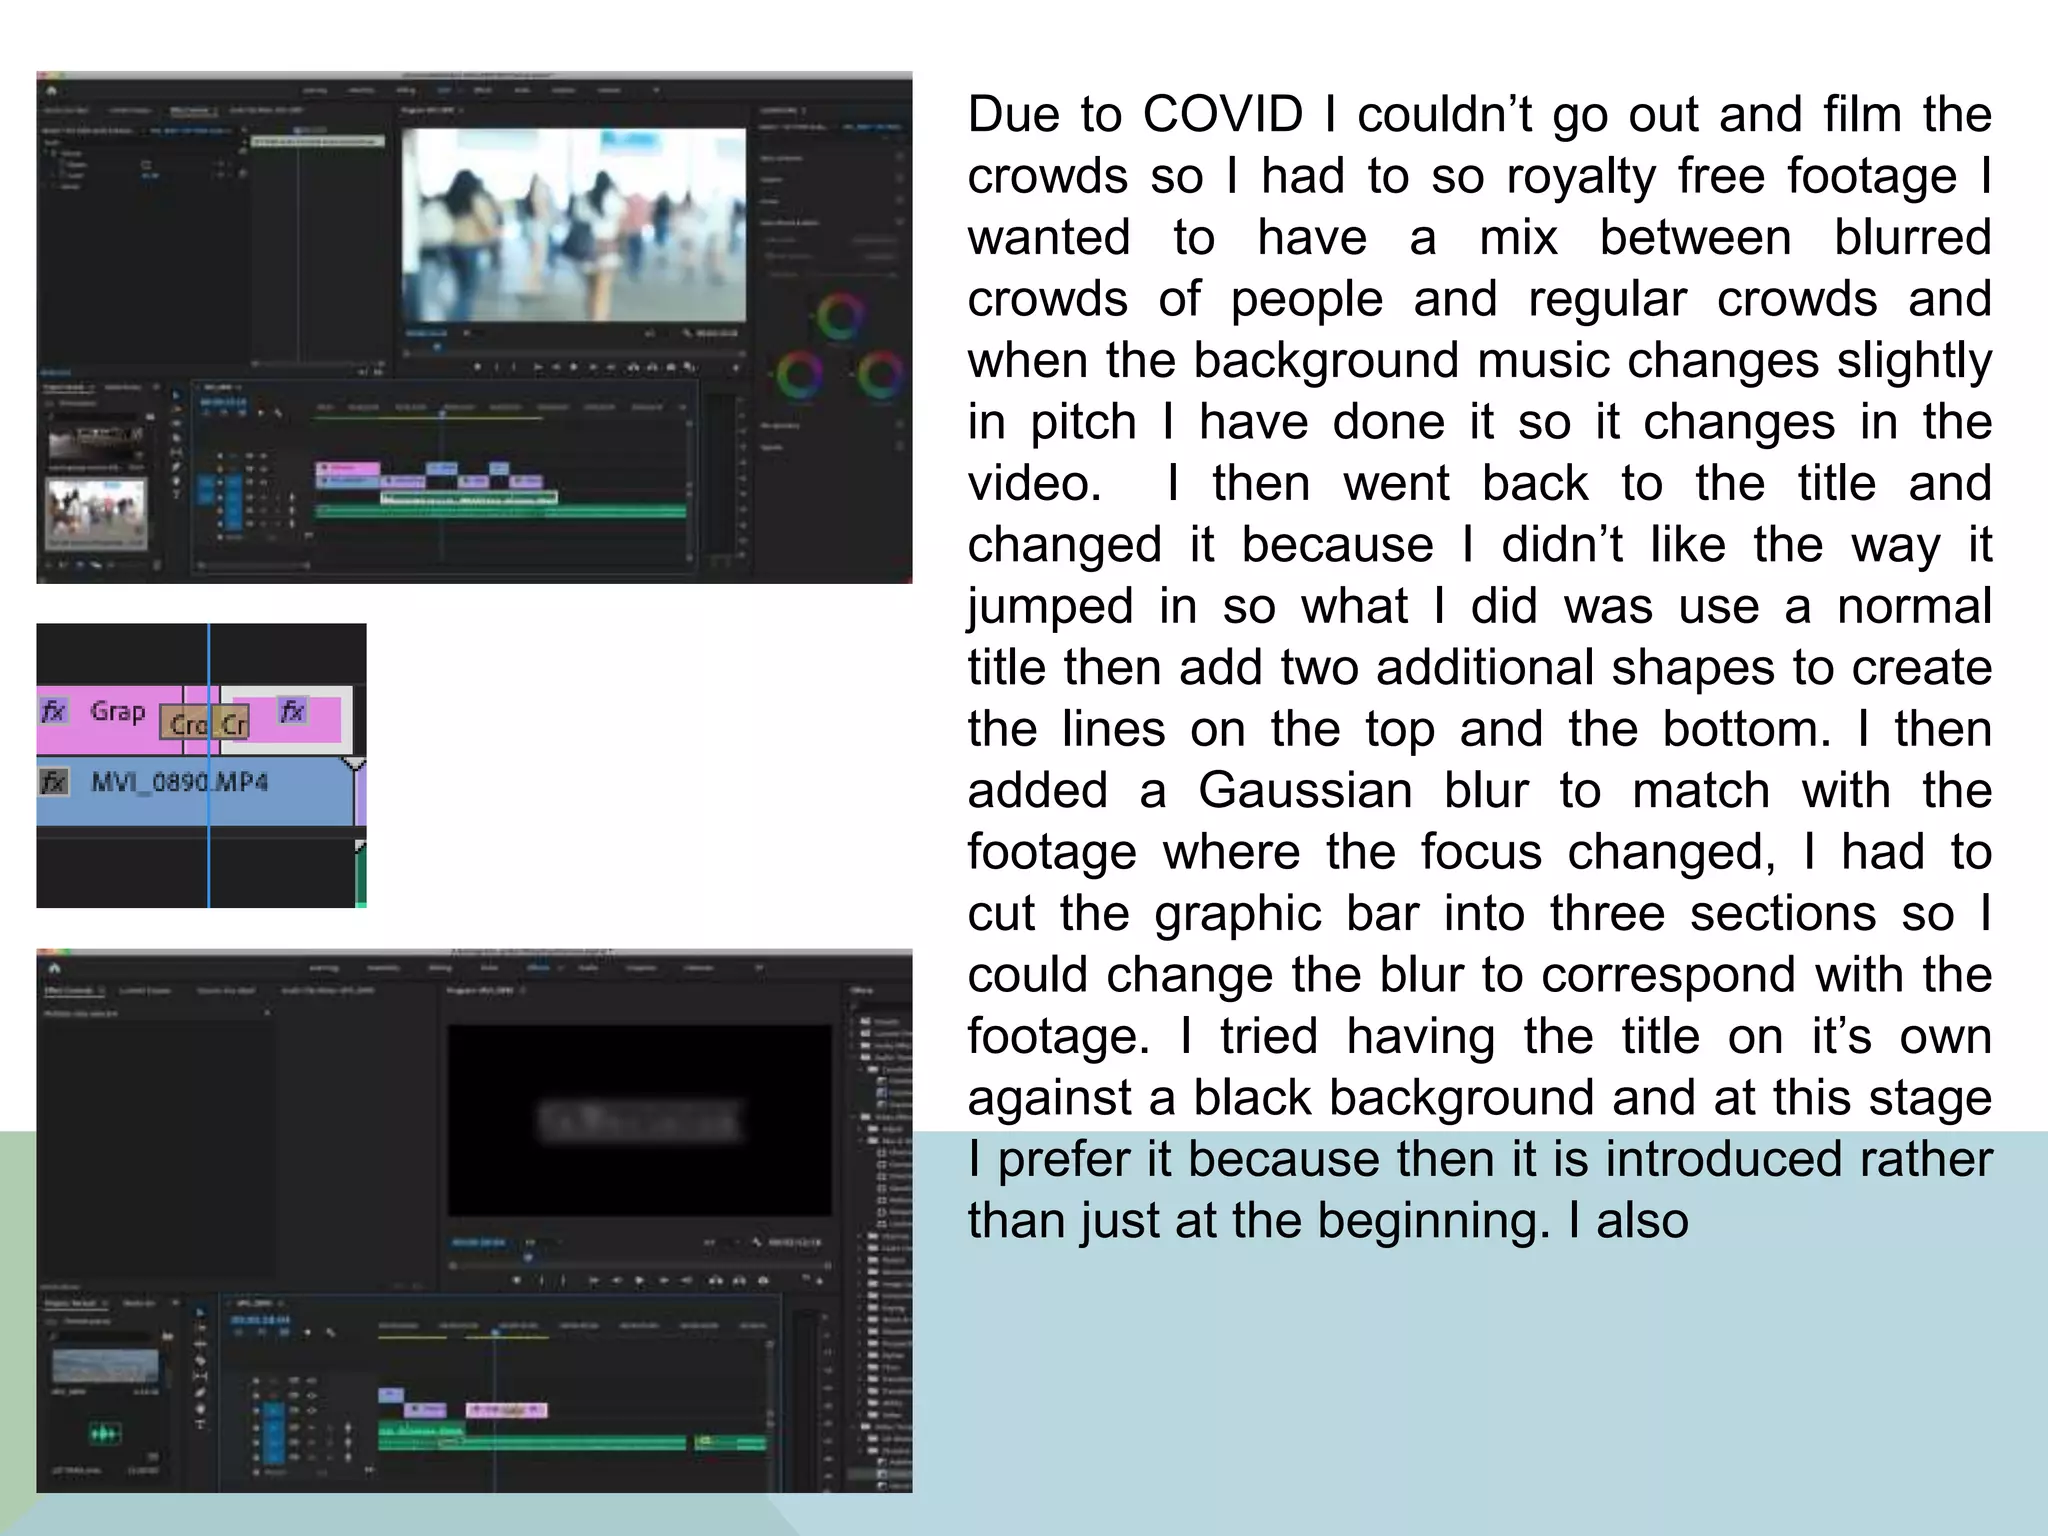
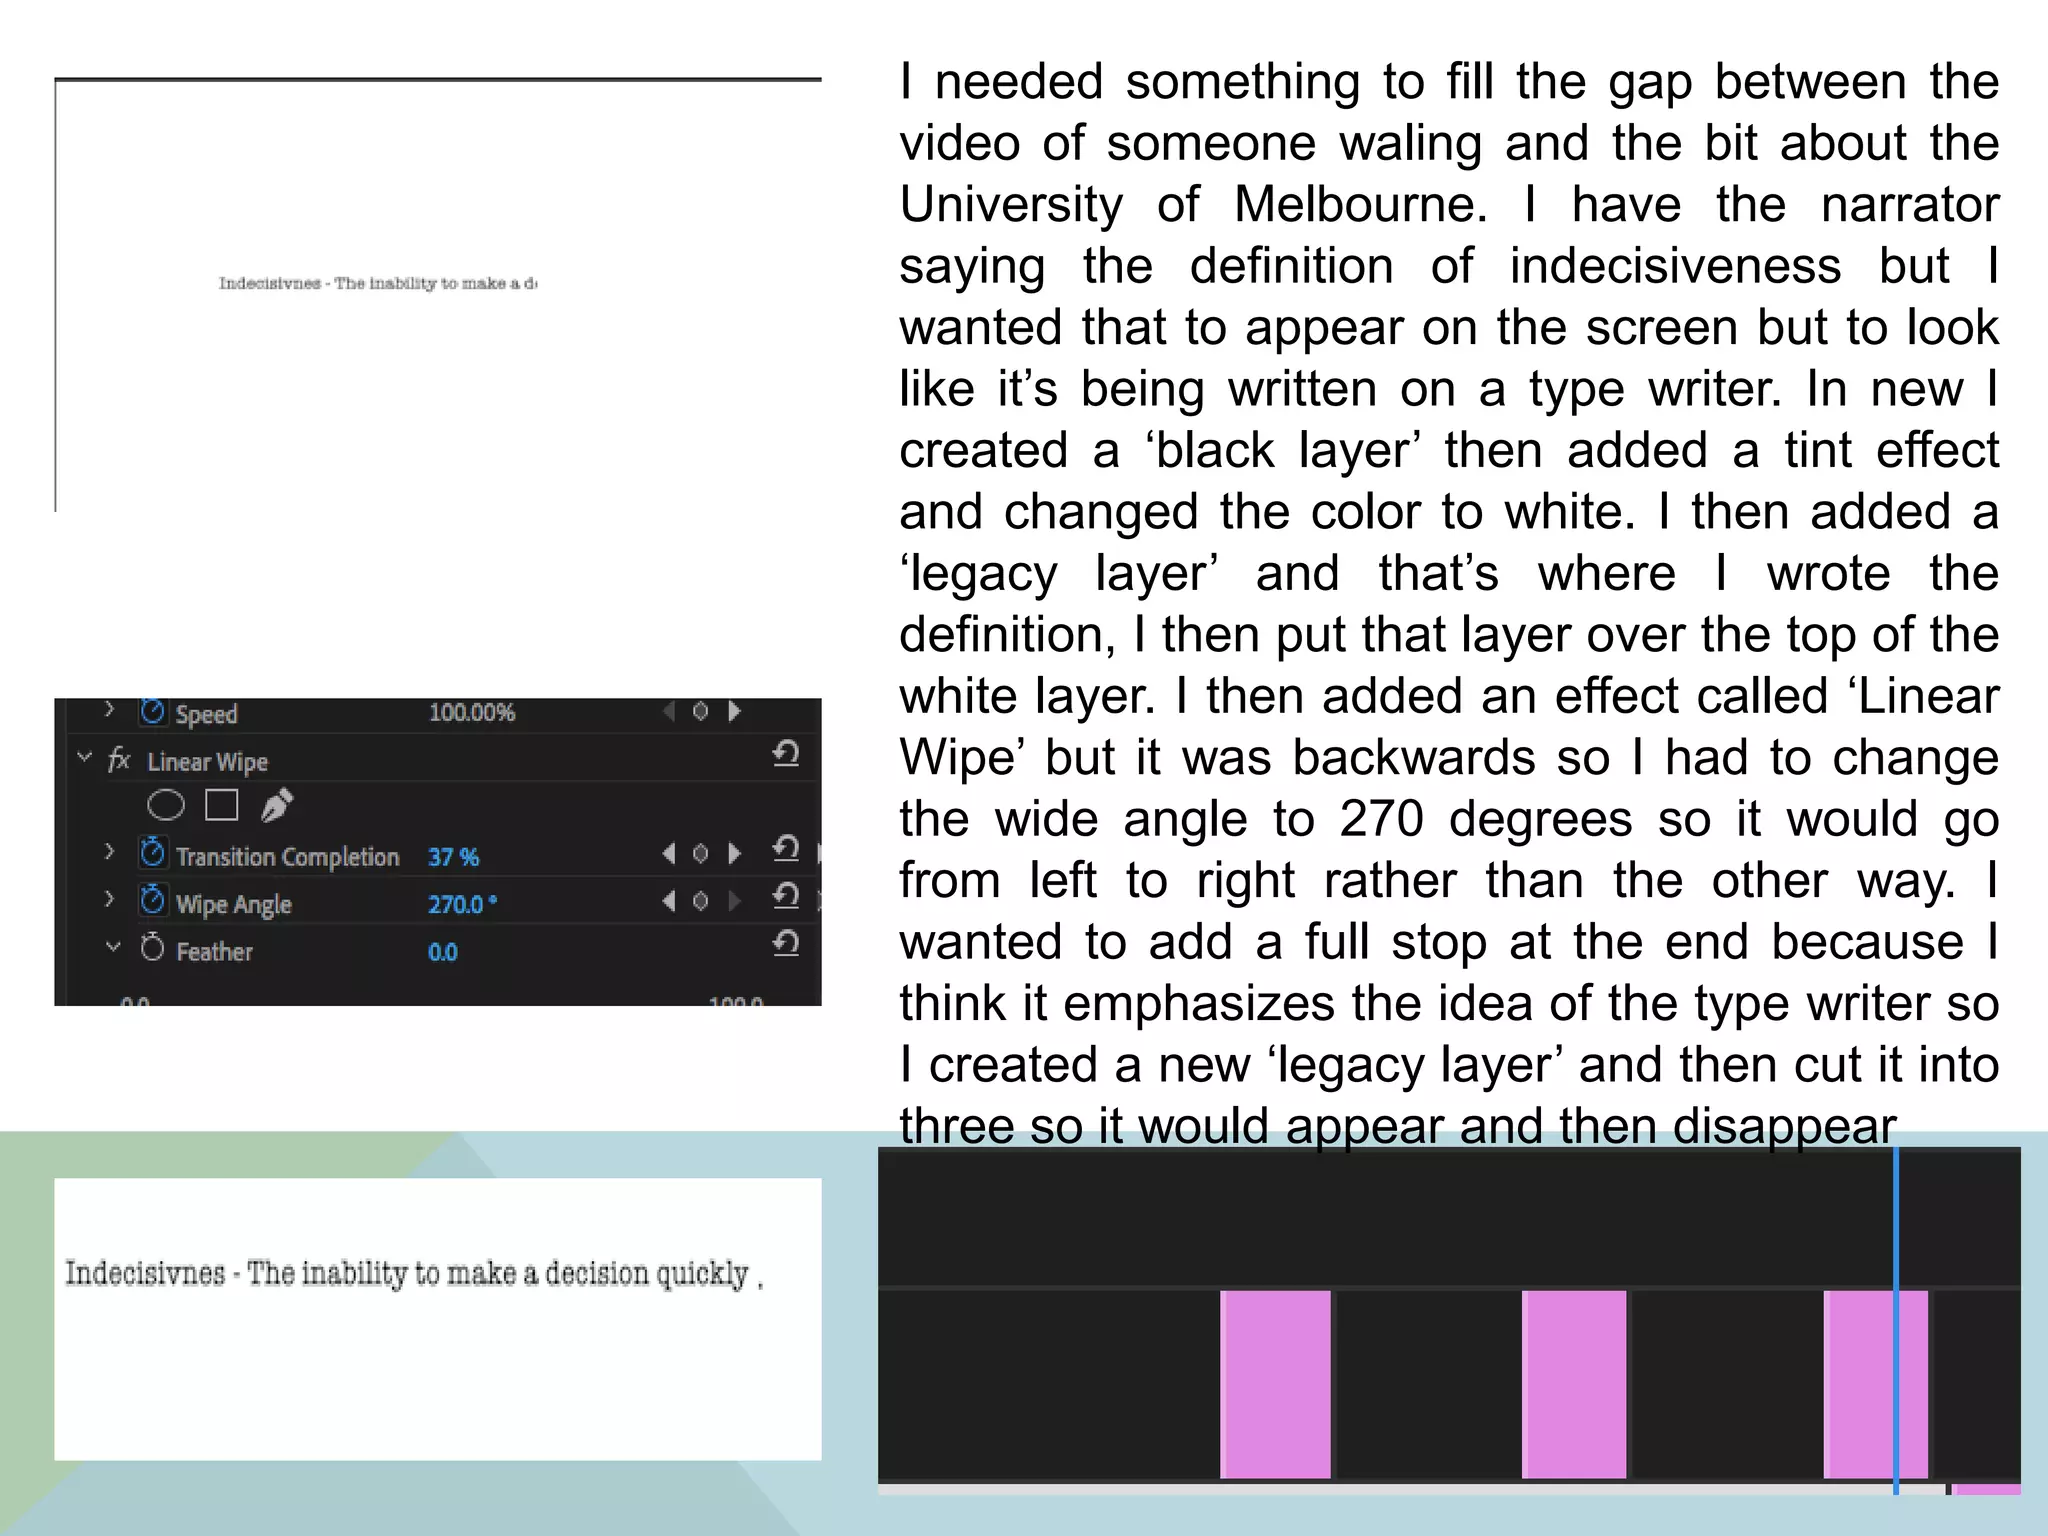
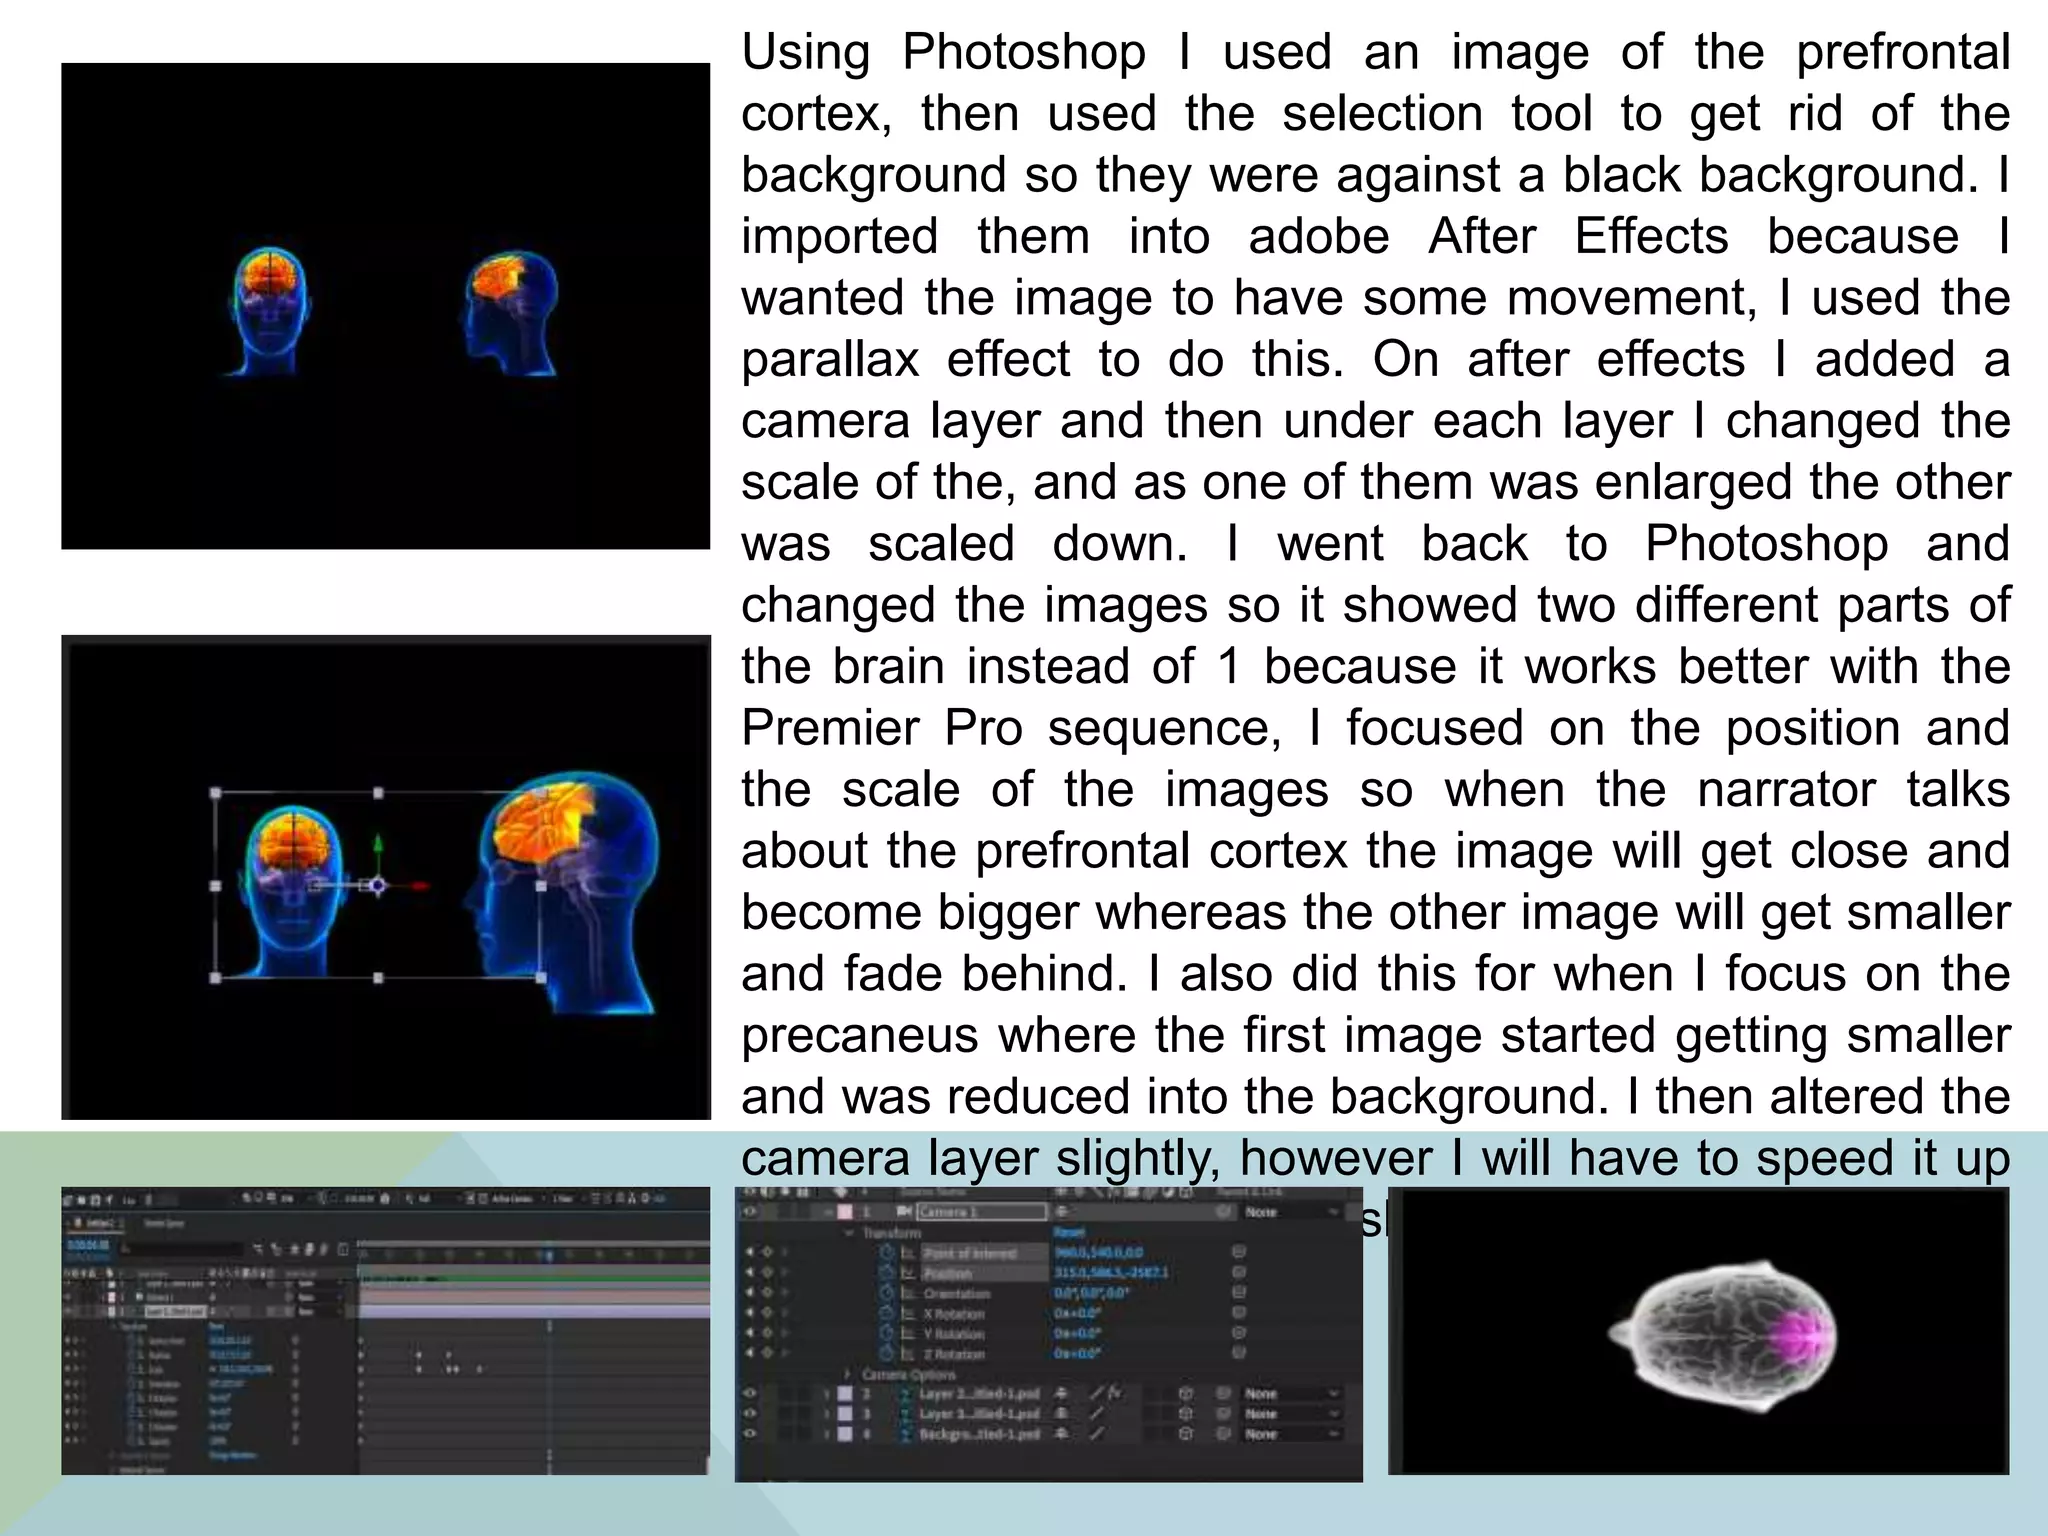
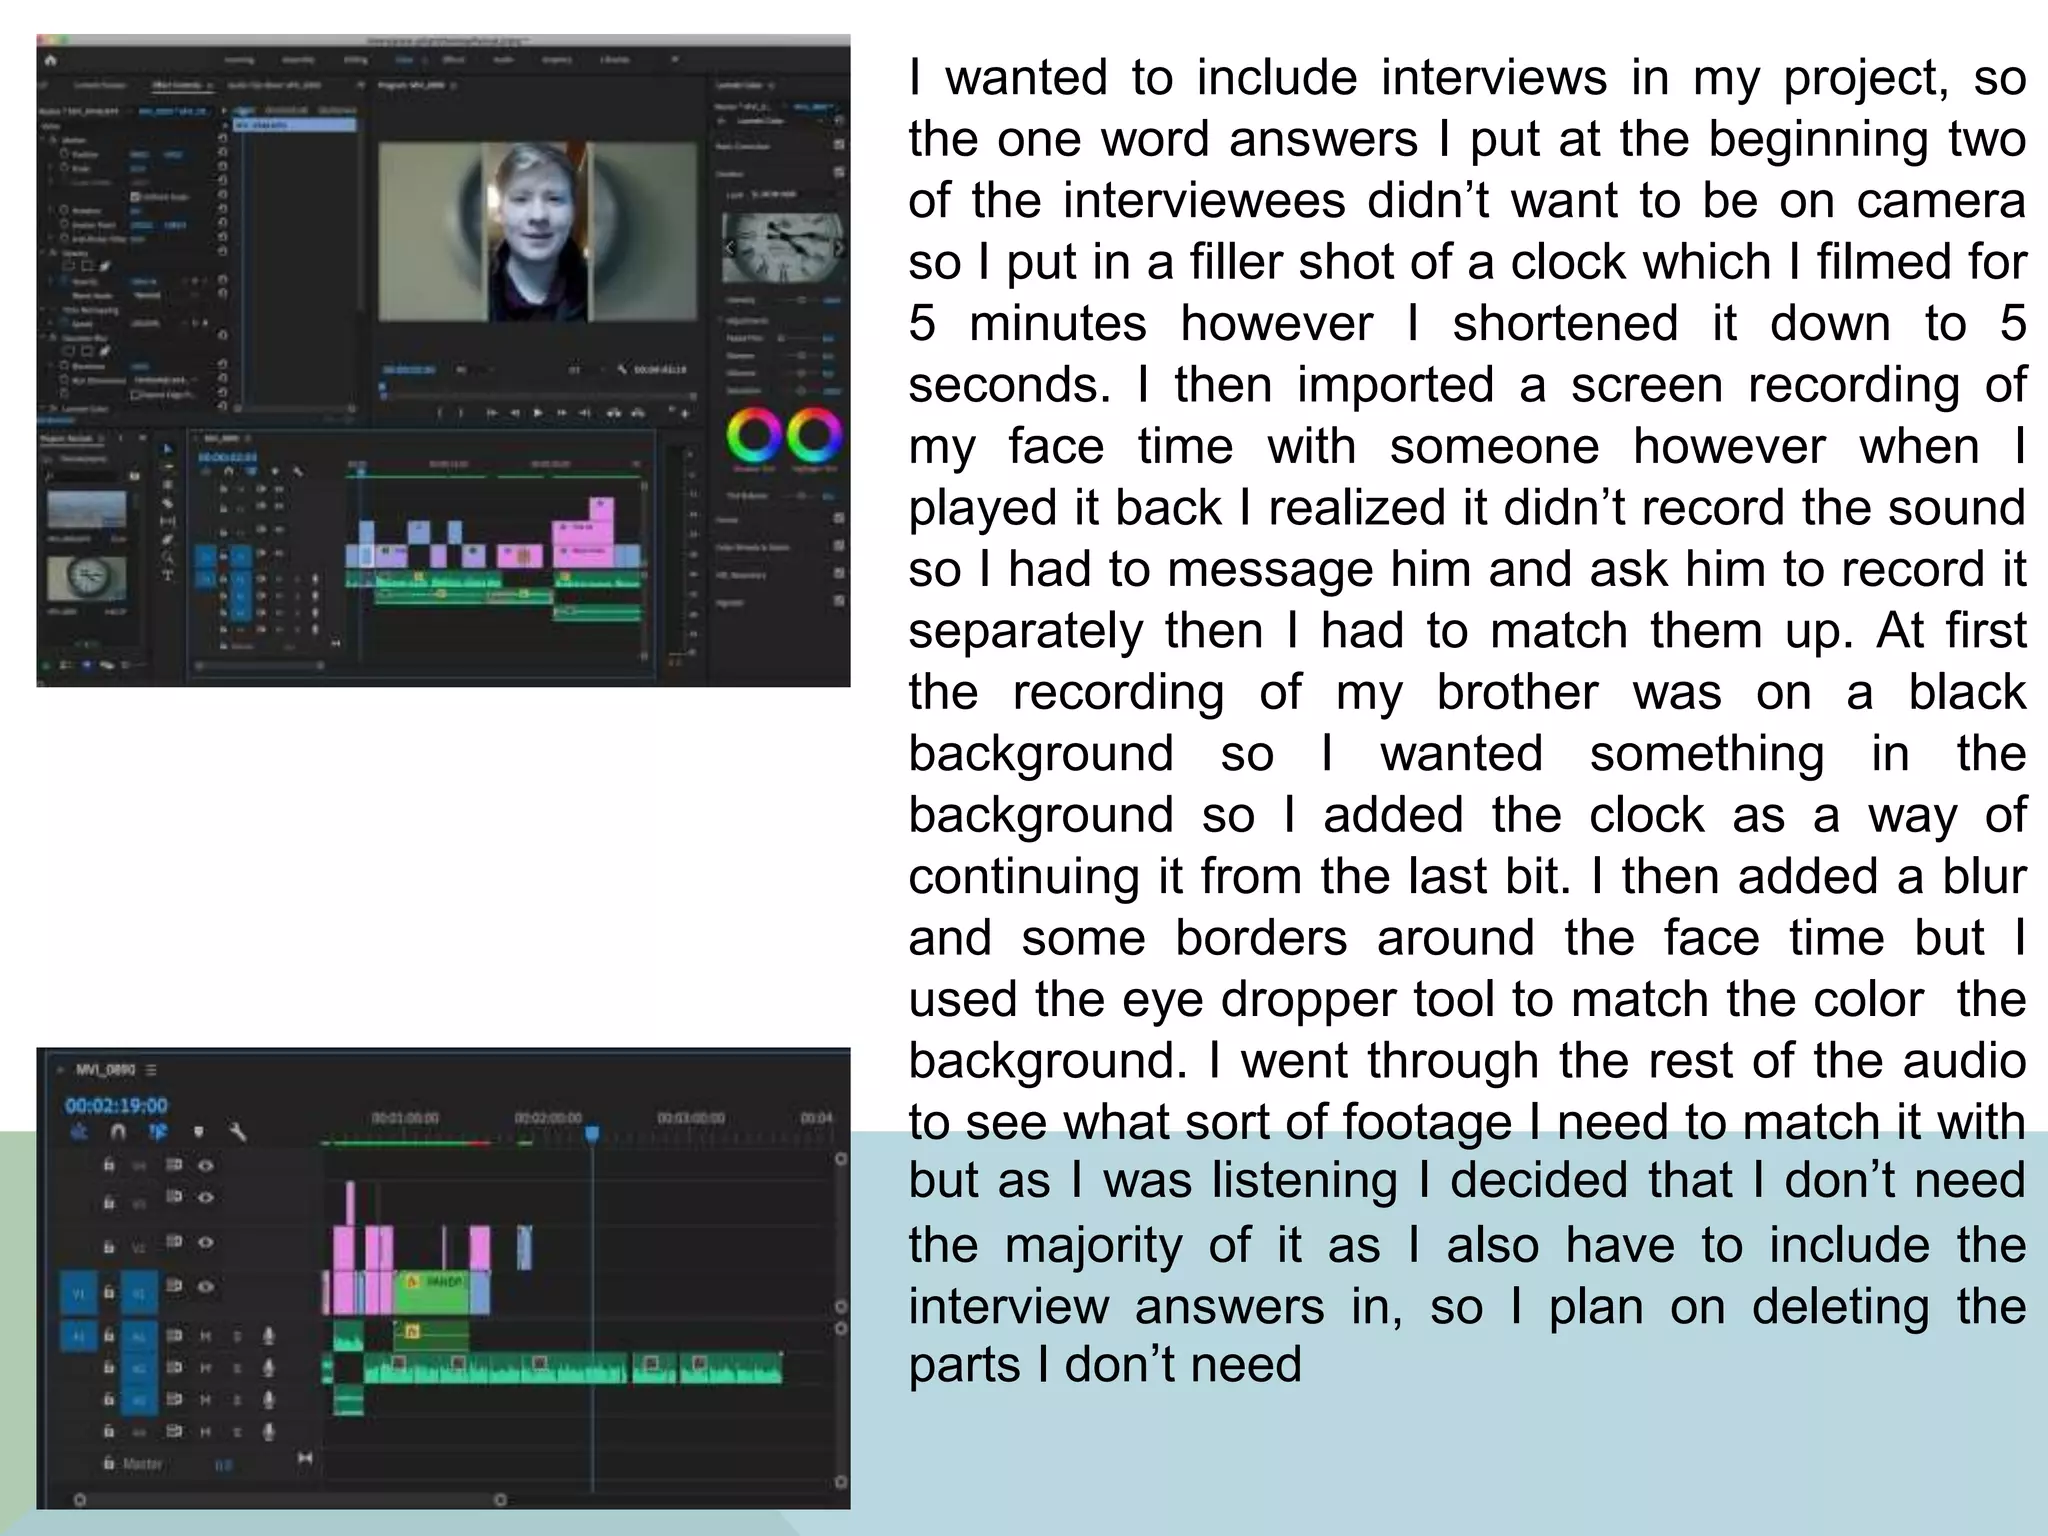
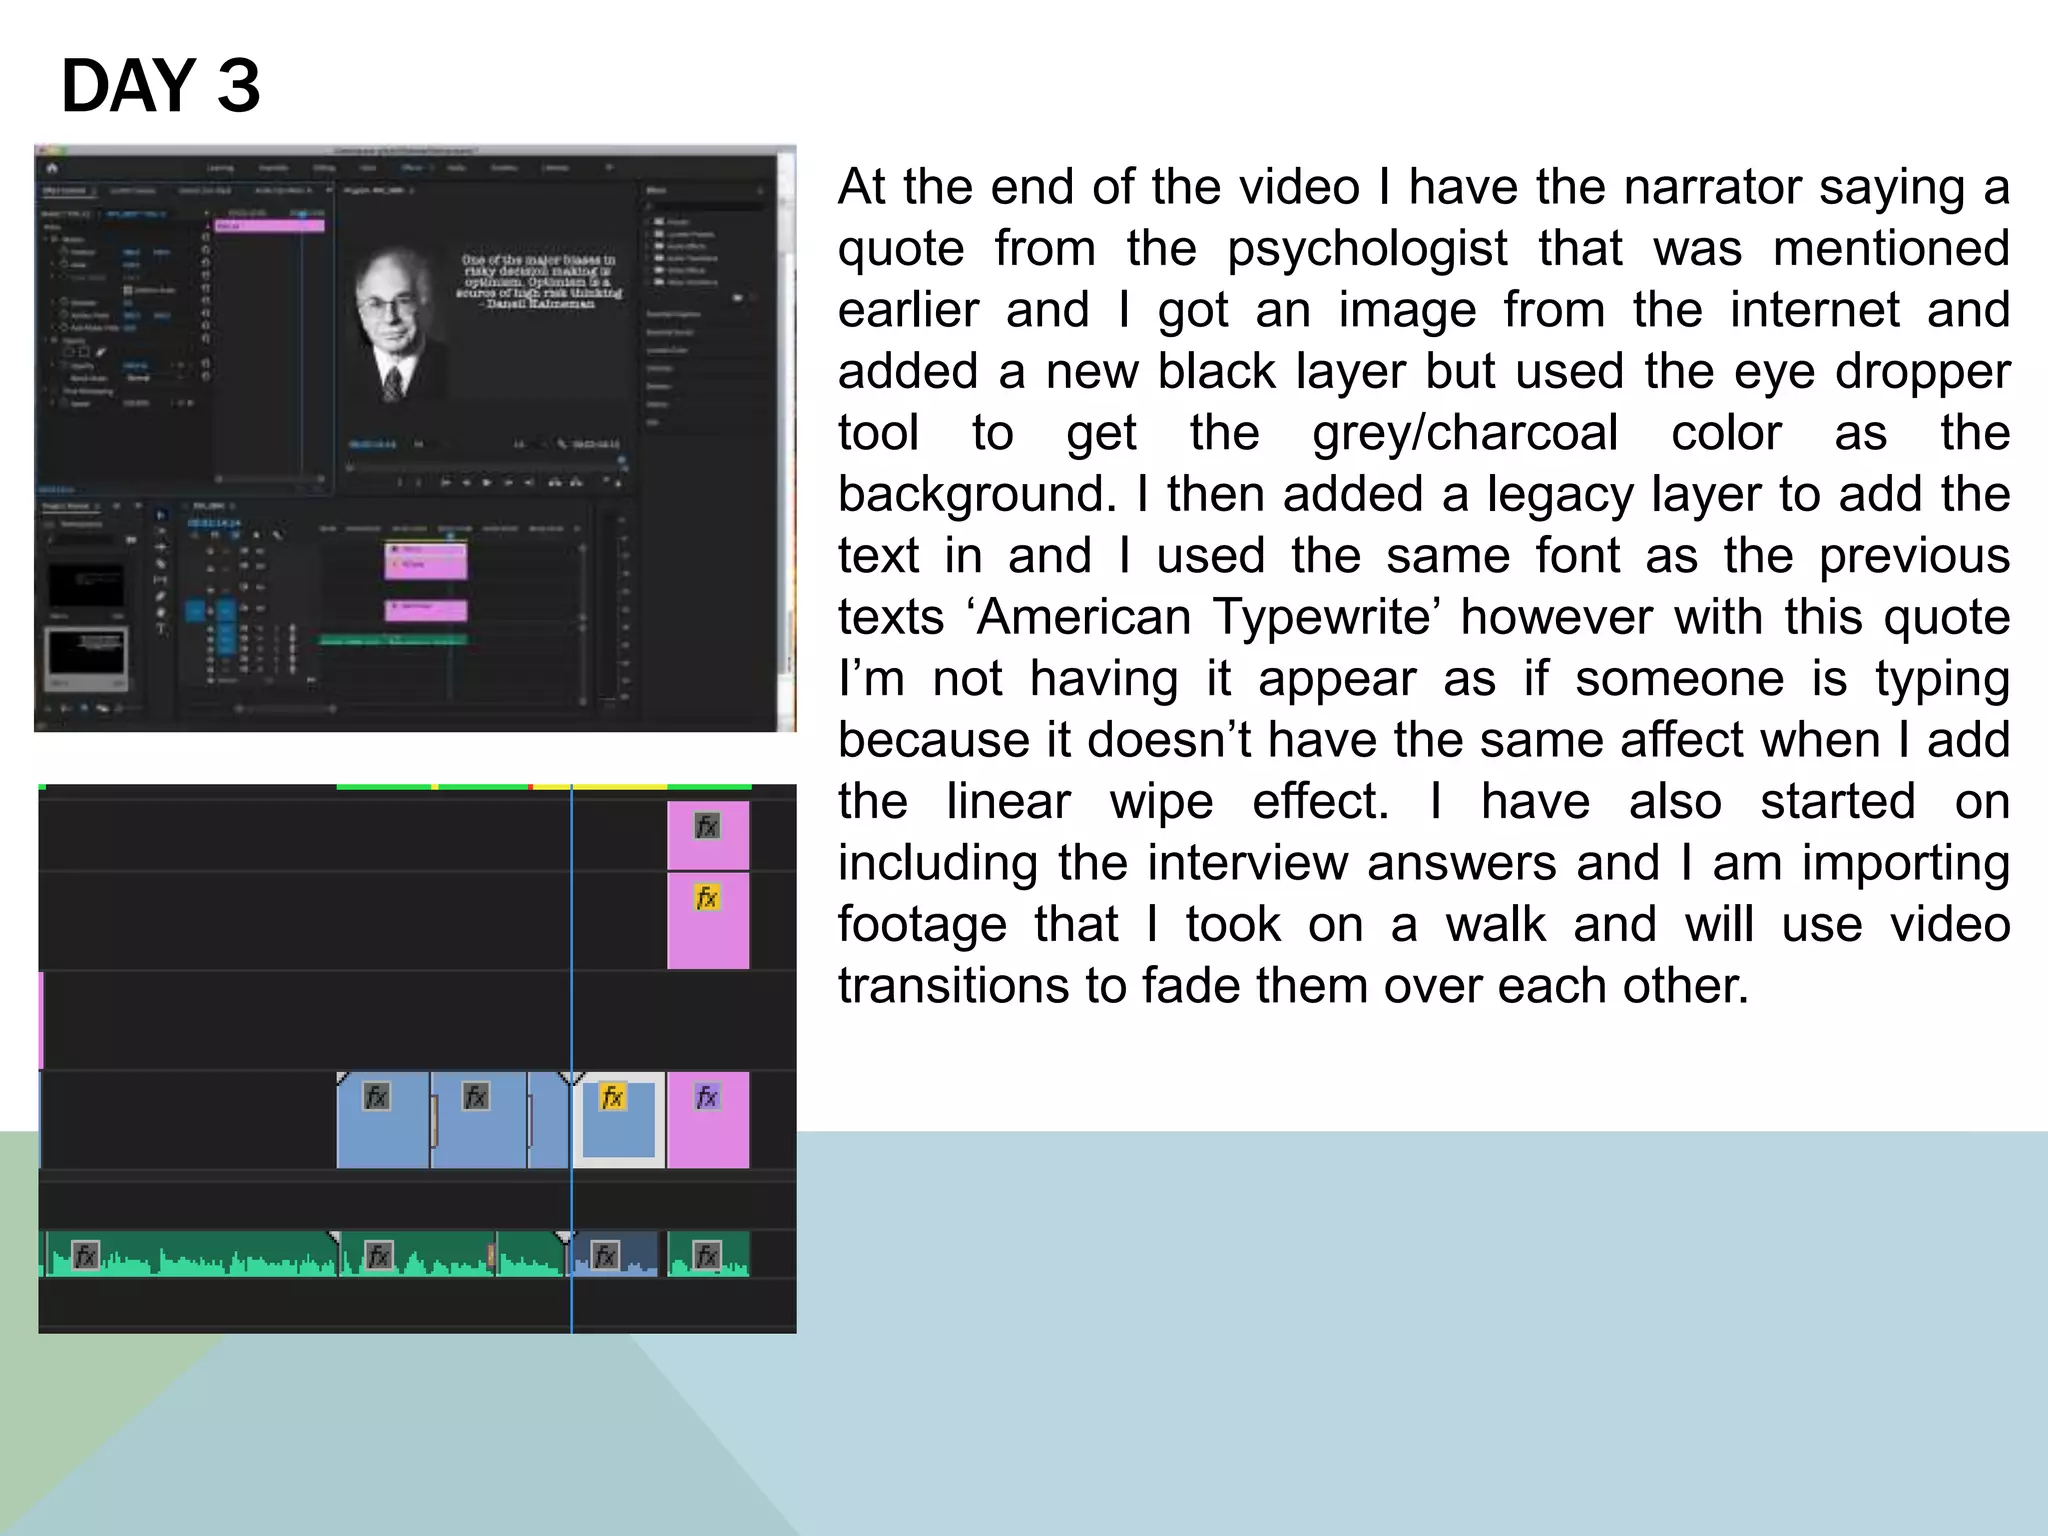
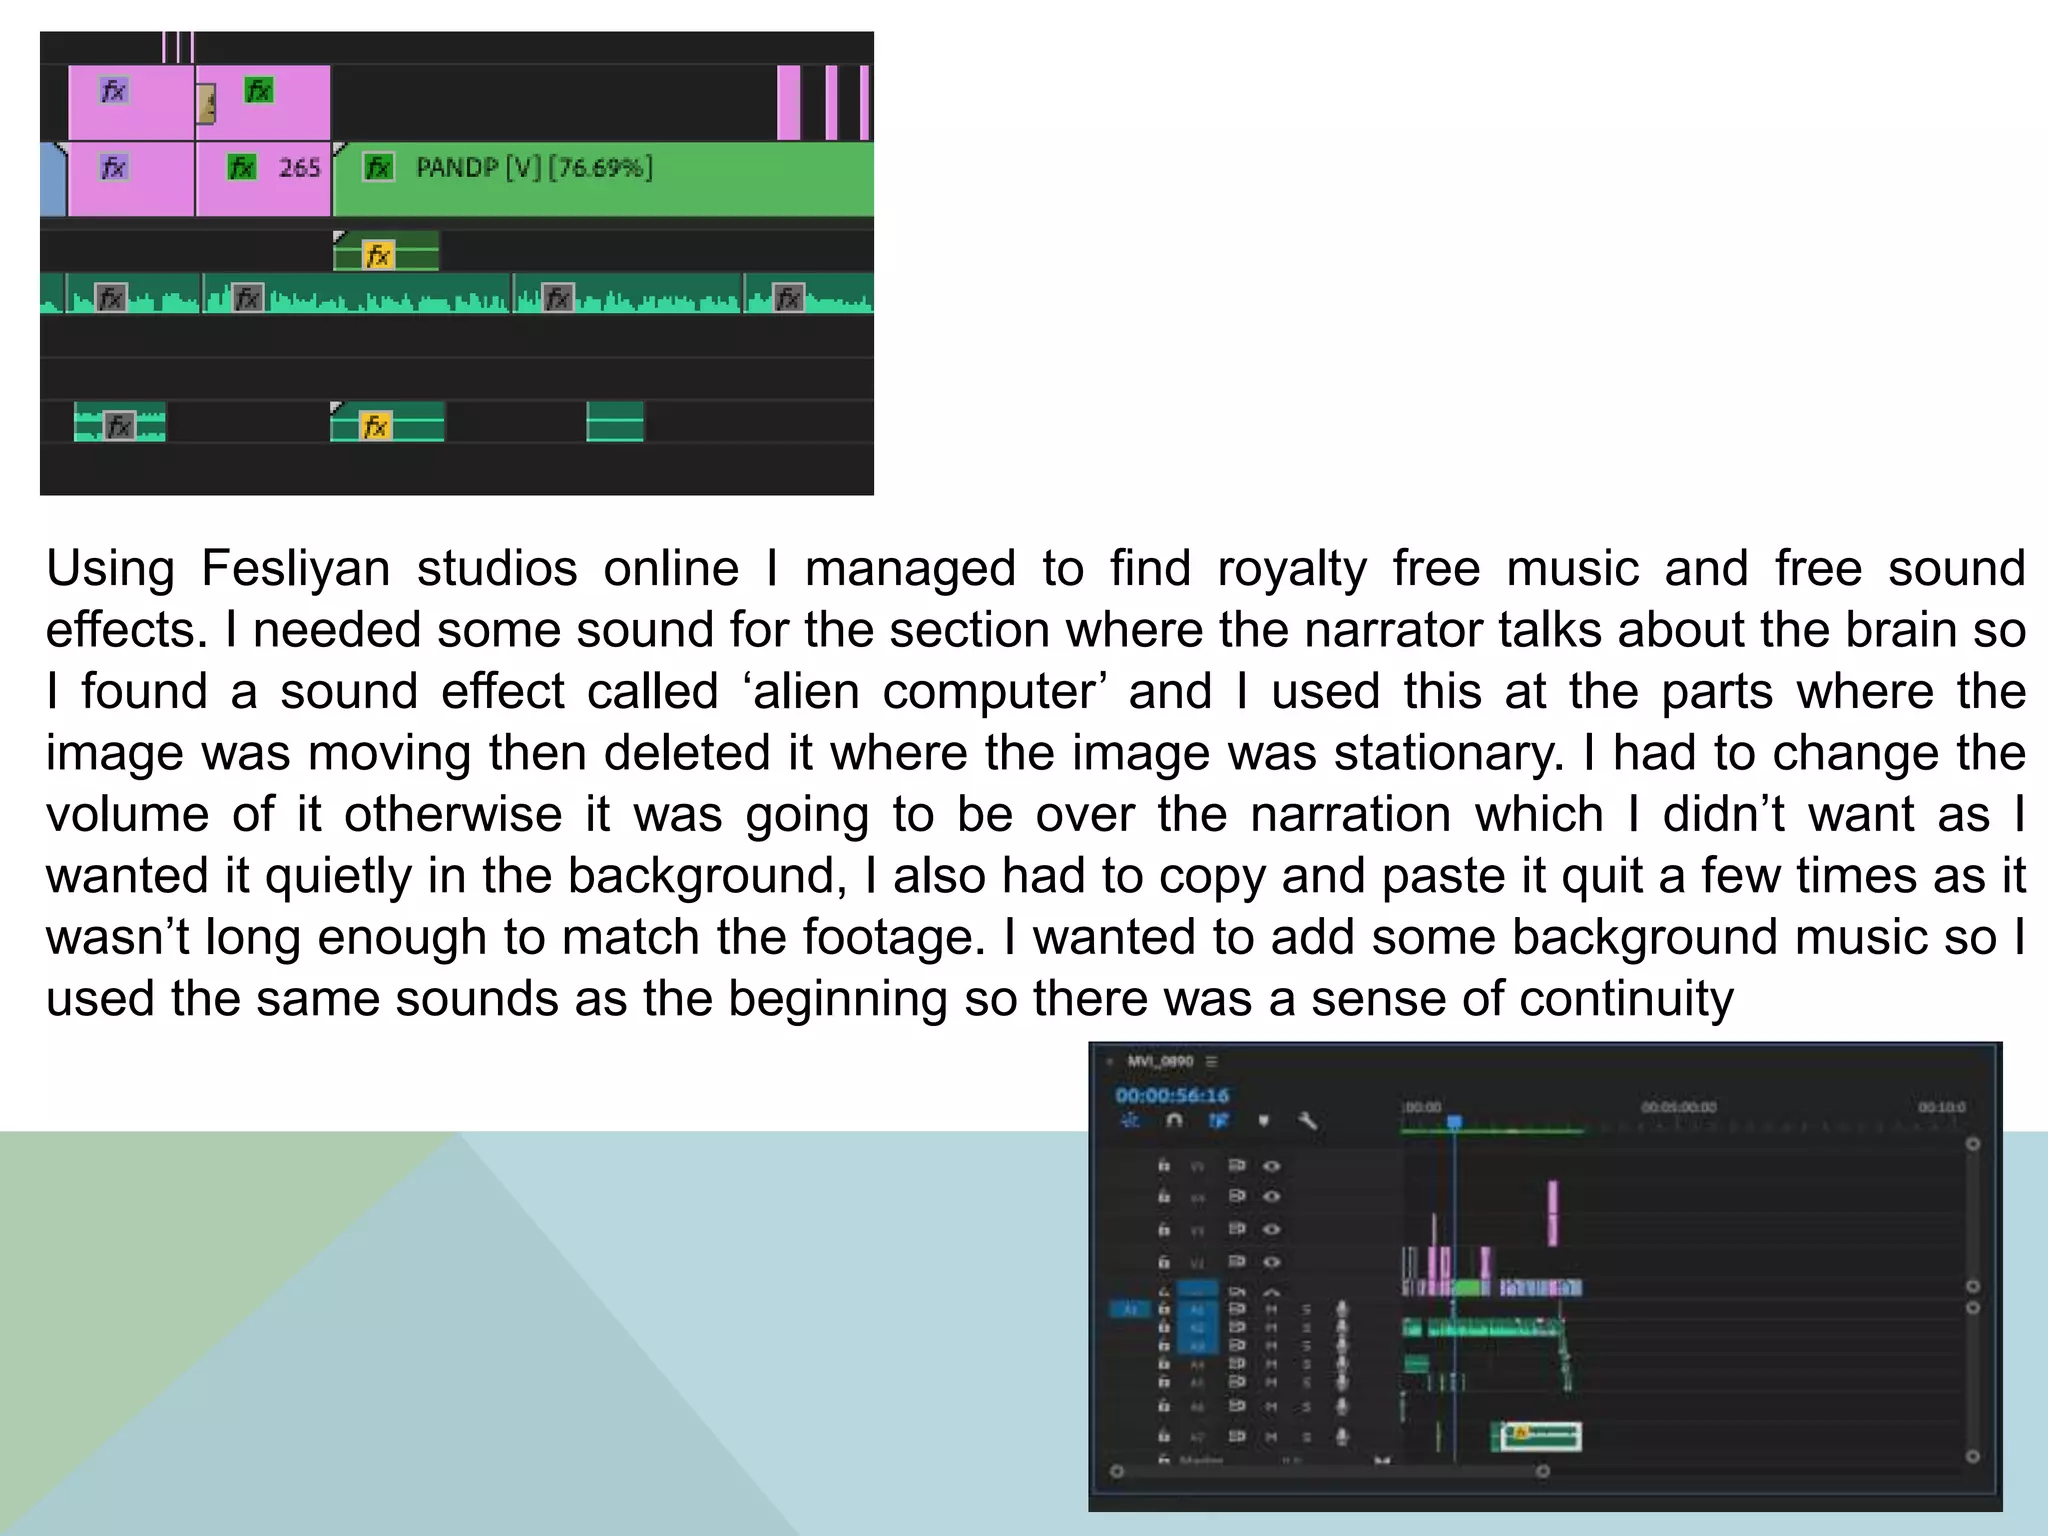
DAY 1
The first day of production I focused on
getting the opening title and sorting out
the footage in the right order, I want to
focus my documentary round the ‘faded
color’ scheme so the colors are more
faded rather than bright so on the footage
of the group of people walking I changed
the color wheels and the saturation etc. to
fit the idea I was after. I used the look
under the name ‘SL IRON NDR’ and then
changed some of the shadows so they
were lighter, then have the color wheels in
the pale blue section to have it loo similar
to the opening screen.
Due to COVID I couldn’t go out and film the
crowds so I had to so royalty free footage I
wanted to have a mix between blurred
crowds of people and regular crowds and
when the background music changes slightly
in pitch I have done it so it changes in the
video. I then went back to the title and
changed it because I didn’t like the way it
jumped in so what I did was use a normal
title then add two additional shapes to create
the lines on the top and the bottom. I then
added a Gaussian blur to match with the
footage where the focus changed, I had to
cut the graphic bar into three sections so I
could change the blur to correspond with the
footage. I tried having the title on it’s own
against a black background and at this stage
I prefer it because then it is introduced rather
than just at the beginning. I also
I managed to add all the narration
on which is the majority of the
audio done however I still have to
put in the interview answers, and
the audio is already past the time
limit so I might have to change it a
bit.
DAY 2
I started off by importing a picture of the
University of Melbourne and I wanted it to
be more interesting to watch than rather
just a picture on the screen so I made it
appear as if it was a slide show. On the
bottom layer I added a Gaussian blur then
imported the same image and put it on top
of the other image but this time it didn’t
have any effects on it, I scaled the image
down so it fit on top of the blurred image, I
then added a slide affect so it has some
movement. I then used the ‘Shadow effect’
to create a border around the image and
changed the color to white.
I needed something to fill the gap between the
video of someone waling and the bit about the
University of Melbourne. I have the narrator
saying the definition of indecisiveness but I
wanted that to appear on the screen but to look
like it’s being written on a type writer. In new I
created a ‘black layer’ then added a tint effect
and changed the color to white. I then added a
‘legacy layer’ and that’s where I wrote the
definition, I then put that layer over the top of the
white layer. I then added an effect called ‘Linear
Wipe’ but it was backwards so I had to change
the wide angle to 270 degrees so it would go
from left to right rather than the other way. I
wanted to add a full stop at the end because I
think it emphasizes the idea of the type writer so
I created a new ‘legacy layer’ and then cut it into
three so it would appear and then disappear
Using Photoshop I used an image of the prefrontal
cortex, then used the selection tool to get rid of the
background so they were against a black background. I
imported them into adobe After Effects because I
wanted the image to have some movement, I used the
parallax effect to do this. On after effects I added a
camera layer and then under each layer I changed the
scale of the, and as one of them was enlarged the other
was scaled down. I went back to Photoshop and
changed the images so it showed two different parts of
the brain instead of 1 because it works better with the
Premier Pro sequence, I focused on the position and
the scale of the images so when the narrator talks
about the prefrontal cortex the image will get close and
become bigger whereas the other image will get smaller
and fade behind. I also did this for when I focus on the
precaneus where the first image started getting smaller
and was reduced into the background. I then altered the
camera layer slightly, however I will have to speed it up
in Premier because it’s too slow in after effects
During the part where the narrator mentions parts
of the brain lighting up I wanted there to be
something in the video rather than it being the
stationary. So I went back onto Photoshop and
created a new folder and the copied and pasted
the brain image however this time I de-saturated
the image so it was black and white. I exported it
out as a PNG image then brought it into Premier
Pro where I cut it into sections and alternated
between the colored and the black and white to
make it appear as if it was lighting up which
corresponded with what the narrator mentioned.
I wanted to include interviews in my project, so
the one word answers I put at the beginning two
of the interviewees didn’t want to be on camera
so I put in a filler shot of a clock which I filmed for
5 minutes however I shortened it down to 5
seconds. I then imported a screen recording of
my face time with someone however when I
played it back I realized it didn’t record the sound
so I had to message him and ask him to record it
separately then I had to match them up. At first
the recording of my brother was on a black
background so I wanted something in the
background so I added the clock as a way of
continuing it from the last bit. I then added a blur
and some borders around the face time but I
used the eye dropper tool to match the color the
background. I went through the rest of the audio
to see what sort of footage I need to match it with
but as I was listening I decided that I don’t need
the majority of it as I also have to include the
interview answers in, so I plan on deleting the
parts I don’t need
DAY 3
At the end of the video I have the narrator saying a
quote from the psychologist that was mentioned
earlier and I got an image from the internet and
added a new black layer but used the eye dropper
tool to get the grey/charcoal color as the
background. I then added a legacy layer to add the
text in and I used the same font as the previous
texts ‘American Typewrite’ however with this quote
I’m not having it appear as if someone is typing
because it doesn’t have the same affect when I add
the linear wipe effect. I have also started on
including the interview answers and I am importing
footage that I took on a walk and will use video
transitions to fade them over each other.
I have around 40 seconds of audio and didn’t
know what footage to fill it in with so I decided to
do the ‘PowerPoint’ effect ad I rotated the image
and as it would get bigger the image would rotate.
I want to include different interviews that he has
done and cut them into small little shots so they
switch between them. I went onto Photoshop and
set up some circles with key words that are
spoken inside to then make them move around
whilst they are being spoken about, I did this in
Adobe After Effects and used the scale and the
position key frames in particular to do this effect
I did the same as the previous slide but changed
the colors slightly, The reason ‘Abstract
Information’ is moving on it’s own unlike the rest
is because I wanted it to correspond with the
meaning of ‘abstract’ and therefore I made it
different to the others. I imported the final bit of
the audio and layered it on top of each other with
an exponential fade to make it run smoothly. All I
have to do now is find some background music.
DAY 4
I only had a few things left to do in terms of
production, so I went back and altered the
moving writing, this time I used squares so then
it would differ from the previous one. I changed it
because didn’t like how the ‘abstract
information’ moved differently to the rest of the
writing . I prefer it this way because it links better
to the previous one that is showed apart from
the shape. After working through the video I
decided to try a different animation for the logic
section and I put together a jigsaw and cut out
all the pieces individually then colored them
individually. I then added the writing in and I then
put it into Adobe After Effects and tried putting it
together however it didn’t work out because al
the pieces were overlapping so I decided to try
the timeline way of making it a video however it
wasn’t as animated as much as I wanted it to be
so I decided to stick with the original.
Using Fesliyan studios online I managed to find royalty free music and free sound
effects. I needed some sound for the section where the narrator talks about the brain so
I found a sound effect called ‘alien computer’ and I used this at the parts where the
image was moving then deleted it where the image was stationary. I had to change the
volume of it otherwise it was going to be over the narration which I didn’t want as I
wanted it quietly in the background, I also had to copy and paste it quit a few times as it
wasn’t long enough to match the footage. I wanted to add some background music so I
used the same sounds as the beginning so there was a sense of continuity
DAY 5
I have finished on the audio, I added a few sound effects for example when there
is a moving image I used a sound effect of a camera lens zooming in then the
shutter sound clicking. I also rearranged some of the video footage and the
audio at the end when they overlap, I did try using some effects on the video
such as lens flare/distortion but I don’t think it worked with the footage however it
has given me an insight into some of the effects I can use on future projects. I
also went through some of the audio and changed the audio gain due to some of
it being too quiet because of the music so I changed this slightly which was
effective as the narrator’s voice was the sound that primarily heard. One part of
the video that was the main focus for change was the section where there were
fast paced shots of Daniel Kahneman’s interviews but it didn’t work because the
music was quieter so there was quite a contrast between the two. So I deleted
some of the shots and made the rest longer to fit with the pace of the music and I
think this worked better as it worked more effectively together.
DAY 6 After receiving some feedback I have further
edited some of the effects, for example I added
an intro where it counts down to the start and
then a section at the end where it says ‘the end’.
This way it makes it clearer to the audience that
its beginning and ending rather than ending
abruptly. I also added some text at the beginning
of each interview with the question I asked them
because otherwise it wasn’t clear what they were
answering. I also found some footage of Daniel
Kahneman discussing decision making and
intuition which allows there to be a break
between the narrator. I wanted to try and find
Daniel Kahneman saying the quote that I had on
the screen however I couldn’t find it due to it
being in a book so I found another quote he says
about intuition and I thought it was fitting for
some of the topics that were discussed earlier. I
added this onto the end and deleted the
narrator’s voice then added in Kahneman’s voice
and I think this works well because it allows
there to be a break from the narrator’s voice.
I have changed the ending slightly to get rid
of the mixed audio of people saying their
decisions because it ended abruptly so I
extended the quote from Kahneman where
he talks about intuition and I think it works
better because it allows the video to come
to a close nicely which looks better, I have
also extended the fading effect on each
layer such as the picture and the text
because this way it fades away slowly
which matches they way the audio fades
out which makes the ending neater than
before

Produciton log

  • 2.
    DAY 1 The firstday of production I focused on getting the opening title and sorting out the footage in the right order, I want to focus my documentary round the ‘faded color’ scheme so the colors are more faded rather than bright so on the footage of the group of people walking I changed the color wheels and the saturation etc. to fit the idea I was after. I used the look under the name ‘SL IRON NDR’ and then changed some of the shadows so they were lighter, then have the color wheels in the pale blue section to have it loo similar to the opening screen.
  • 3.
    Due to COVIDI couldn’t go out and film the crowds so I had to so royalty free footage I wanted to have a mix between blurred crowds of people and regular crowds and when the background music changes slightly in pitch I have done it so it changes in the video. I then went back to the title and changed it because I didn’t like the way it jumped in so what I did was use a normal title then add two additional shapes to create the lines on the top and the bottom. I then added a Gaussian blur to match with the footage where the focus changed, I had to cut the graphic bar into three sections so I could change the blur to correspond with the footage. I tried having the title on it’s own against a black background and at this stage I prefer it because then it is introduced rather than just at the beginning. I also
  • 4.
    I managed toadd all the narration on which is the majority of the audio done however I still have to put in the interview answers, and the audio is already past the time limit so I might have to change it a bit. DAY 2 I started off by importing a picture of the University of Melbourne and I wanted it to be more interesting to watch than rather just a picture on the screen so I made it appear as if it was a slide show. On the bottom layer I added a Gaussian blur then imported the same image and put it on top of the other image but this time it didn’t have any effects on it, I scaled the image down so it fit on top of the blurred image, I then added a slide affect so it has some movement. I then used the ‘Shadow effect’ to create a border around the image and changed the color to white.
  • 5.
    I needed somethingto fill the gap between the video of someone waling and the bit about the University of Melbourne. I have the narrator saying the definition of indecisiveness but I wanted that to appear on the screen but to look like it’s being written on a type writer. In new I created a ‘black layer’ then added a tint effect and changed the color to white. I then added a ‘legacy layer’ and that’s where I wrote the definition, I then put that layer over the top of the white layer. I then added an effect called ‘Linear Wipe’ but it was backwards so I had to change the wide angle to 270 degrees so it would go from left to right rather than the other way. I wanted to add a full stop at the end because I think it emphasizes the idea of the type writer so I created a new ‘legacy layer’ and then cut it into three so it would appear and then disappear
  • 6.
    Using Photoshop Iused an image of the prefrontal cortex, then used the selection tool to get rid of the background so they were against a black background. I imported them into adobe After Effects because I wanted the image to have some movement, I used the parallax effect to do this. On after effects I added a camera layer and then under each layer I changed the scale of the, and as one of them was enlarged the other was scaled down. I went back to Photoshop and changed the images so it showed two different parts of the brain instead of 1 because it works better with the Premier Pro sequence, I focused on the position and the scale of the images so when the narrator talks about the prefrontal cortex the image will get close and become bigger whereas the other image will get smaller and fade behind. I also did this for when I focus on the precaneus where the first image started getting smaller and was reduced into the background. I then altered the camera layer slightly, however I will have to speed it up in Premier because it’s too slow in after effects
  • 7.
    During the partwhere the narrator mentions parts of the brain lighting up I wanted there to be something in the video rather than it being the stationary. So I went back onto Photoshop and created a new folder and the copied and pasted the brain image however this time I de-saturated the image so it was black and white. I exported it out as a PNG image then brought it into Premier Pro where I cut it into sections and alternated between the colored and the black and white to make it appear as if it was lighting up which corresponded with what the narrator mentioned.
  • 8.
    I wanted toinclude interviews in my project, so the one word answers I put at the beginning two of the interviewees didn’t want to be on camera so I put in a filler shot of a clock which I filmed for 5 minutes however I shortened it down to 5 seconds. I then imported a screen recording of my face time with someone however when I played it back I realized it didn’t record the sound so I had to message him and ask him to record it separately then I had to match them up. At first the recording of my brother was on a black background so I wanted something in the background so I added the clock as a way of continuing it from the last bit. I then added a blur and some borders around the face time but I used the eye dropper tool to match the color the background. I went through the rest of the audio to see what sort of footage I need to match it with but as I was listening I decided that I don’t need the majority of it as I also have to include the interview answers in, so I plan on deleting the parts I don’t need
  • 9.
    DAY 3 At theend of the video I have the narrator saying a quote from the psychologist that was mentioned earlier and I got an image from the internet and added a new black layer but used the eye dropper tool to get the grey/charcoal color as the background. I then added a legacy layer to add the text in and I used the same font as the previous texts ‘American Typewrite’ however with this quote I’m not having it appear as if someone is typing because it doesn’t have the same affect when I add the linear wipe effect. I have also started on including the interview answers and I am importing footage that I took on a walk and will use video transitions to fade them over each other.
  • 10.
    I have around40 seconds of audio and didn’t know what footage to fill it in with so I decided to do the ‘PowerPoint’ effect ad I rotated the image and as it would get bigger the image would rotate. I want to include different interviews that he has done and cut them into small little shots so they switch between them. I went onto Photoshop and set up some circles with key words that are spoken inside to then make them move around whilst they are being spoken about, I did this in Adobe After Effects and used the scale and the position key frames in particular to do this effect
  • 11.
    I did thesame as the previous slide but changed the colors slightly, The reason ‘Abstract Information’ is moving on it’s own unlike the rest is because I wanted it to correspond with the meaning of ‘abstract’ and therefore I made it different to the others. I imported the final bit of the audio and layered it on top of each other with an exponential fade to make it run smoothly. All I have to do now is find some background music.
  • 12.
    DAY 4 I onlyhad a few things left to do in terms of production, so I went back and altered the moving writing, this time I used squares so then it would differ from the previous one. I changed it because didn’t like how the ‘abstract information’ moved differently to the rest of the writing . I prefer it this way because it links better to the previous one that is showed apart from the shape. After working through the video I decided to try a different animation for the logic section and I put together a jigsaw and cut out all the pieces individually then colored them individually. I then added the writing in and I then put it into Adobe After Effects and tried putting it together however it didn’t work out because al the pieces were overlapping so I decided to try the timeline way of making it a video however it wasn’t as animated as much as I wanted it to be so I decided to stick with the original.
  • 13.
    Using Fesliyan studiosonline I managed to find royalty free music and free sound effects. I needed some sound for the section where the narrator talks about the brain so I found a sound effect called ‘alien computer’ and I used this at the parts where the image was moving then deleted it where the image was stationary. I had to change the volume of it otherwise it was going to be over the narration which I didn’t want as I wanted it quietly in the background, I also had to copy and paste it quit a few times as it wasn’t long enough to match the footage. I wanted to add some background music so I used the same sounds as the beginning so there was a sense of continuity
  • 14.
    DAY 5 I havefinished on the audio, I added a few sound effects for example when there is a moving image I used a sound effect of a camera lens zooming in then the shutter sound clicking. I also rearranged some of the video footage and the audio at the end when they overlap, I did try using some effects on the video such as lens flare/distortion but I don’t think it worked with the footage however it has given me an insight into some of the effects I can use on future projects. I also went through some of the audio and changed the audio gain due to some of it being too quiet because of the music so I changed this slightly which was effective as the narrator’s voice was the sound that primarily heard. One part of the video that was the main focus for change was the section where there were fast paced shots of Daniel Kahneman’s interviews but it didn’t work because the music was quieter so there was quite a contrast between the two. So I deleted some of the shots and made the rest longer to fit with the pace of the music and I think this worked better as it worked more effectively together.
  • 15.
    DAY 6 Afterreceiving some feedback I have further edited some of the effects, for example I added an intro where it counts down to the start and then a section at the end where it says ‘the end’. This way it makes it clearer to the audience that its beginning and ending rather than ending abruptly. I also added some text at the beginning of each interview with the question I asked them because otherwise it wasn’t clear what they were answering. I also found some footage of Daniel Kahneman discussing decision making and intuition which allows there to be a break between the narrator. I wanted to try and find Daniel Kahneman saying the quote that I had on the screen however I couldn’t find it due to it being in a book so I found another quote he says about intuition and I thought it was fitting for some of the topics that were discussed earlier. I added this onto the end and deleted the narrator’s voice then added in Kahneman’s voice and I think this works well because it allows there to be a break from the narrator’s voice.
  • 16.
    I have changedthe ending slightly to get rid of the mixed audio of people saying their decisions because it ended abruptly so I extended the quote from Kahneman where he talks about intuition and I think it works better because it allows the video to come to a close nicely which looks better, I have also extended the fading effect on each layer such as the picture and the text because this way it fades away slowly which matches they way the audio fades out which makes the ending neater than before