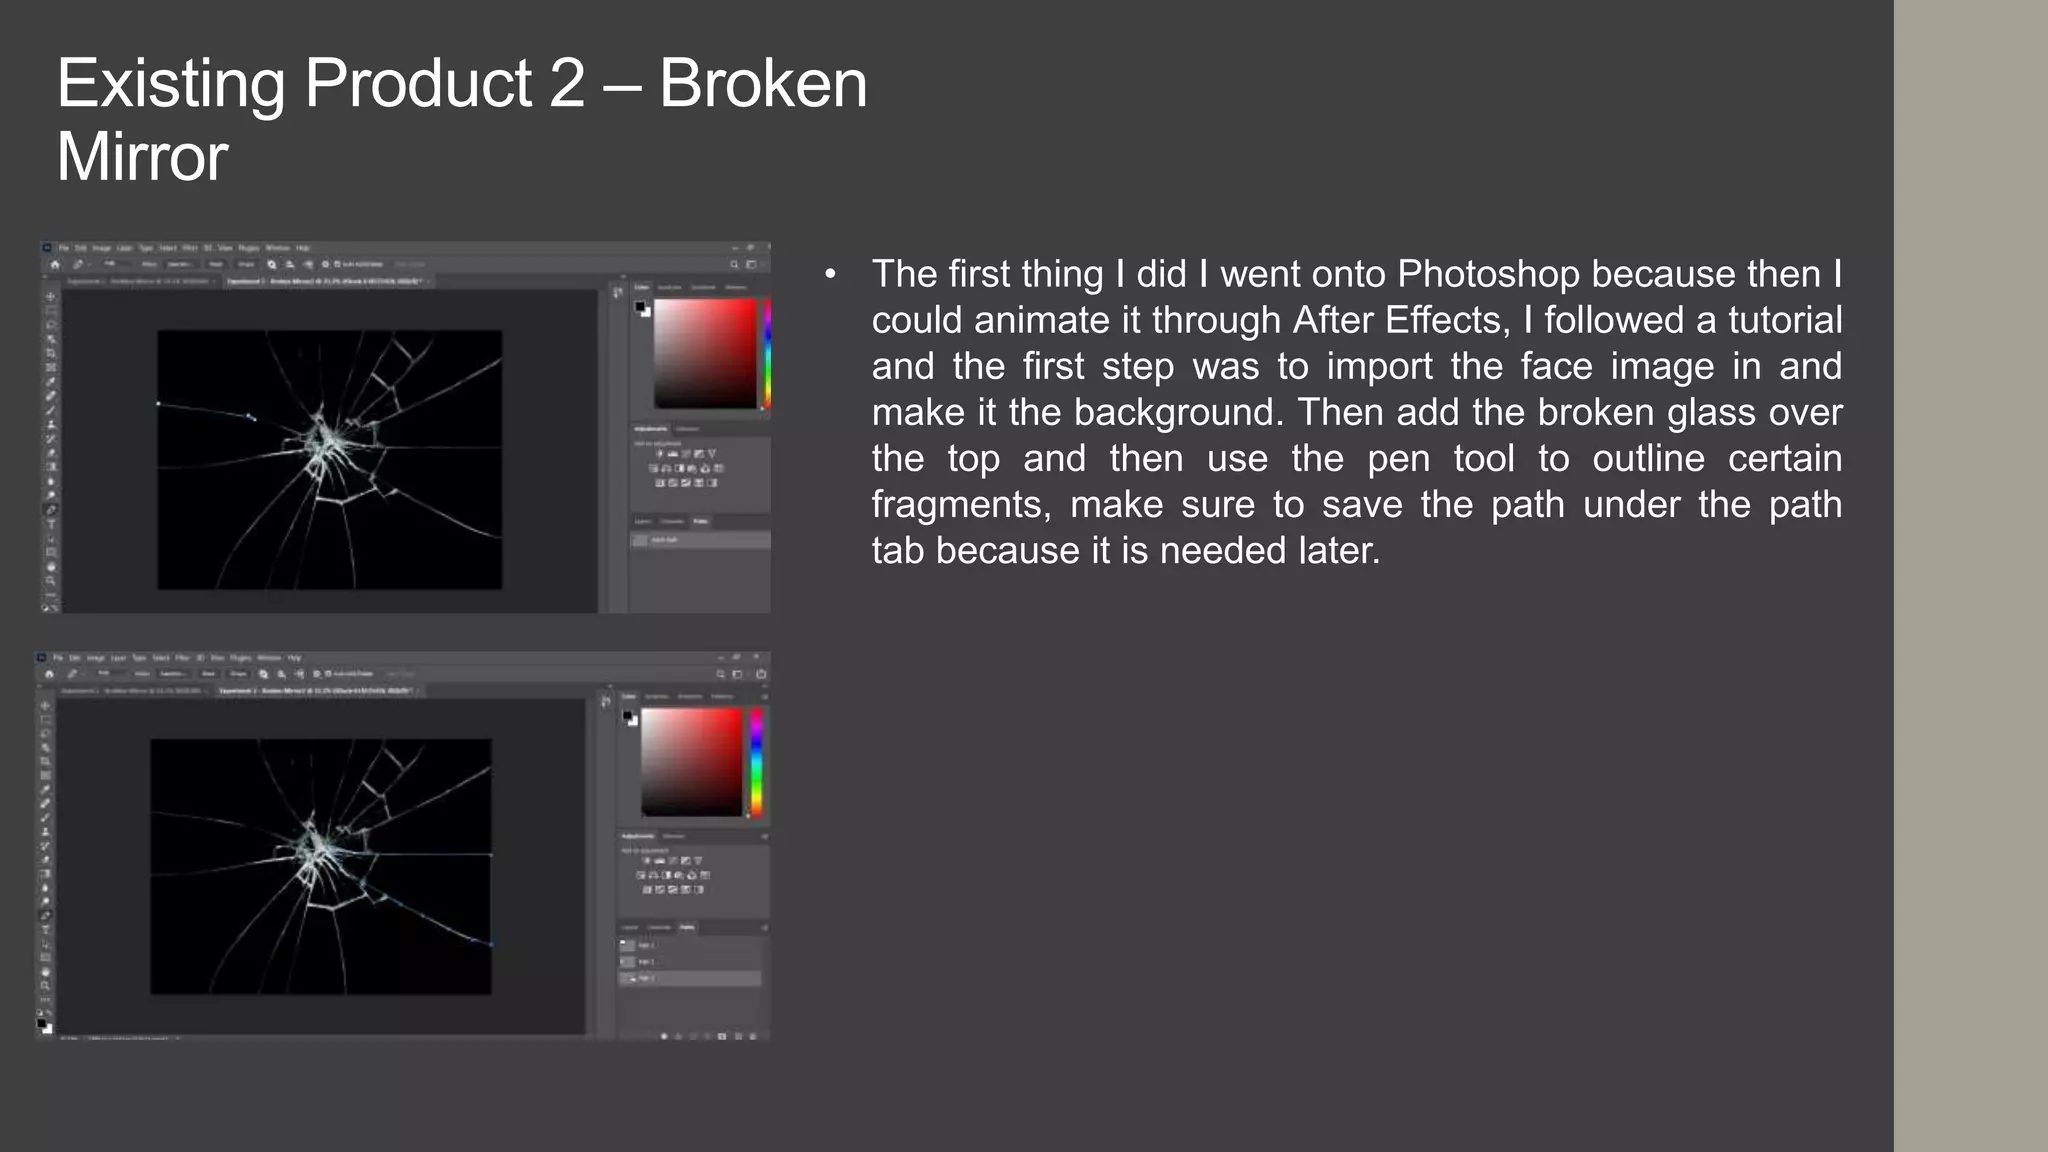
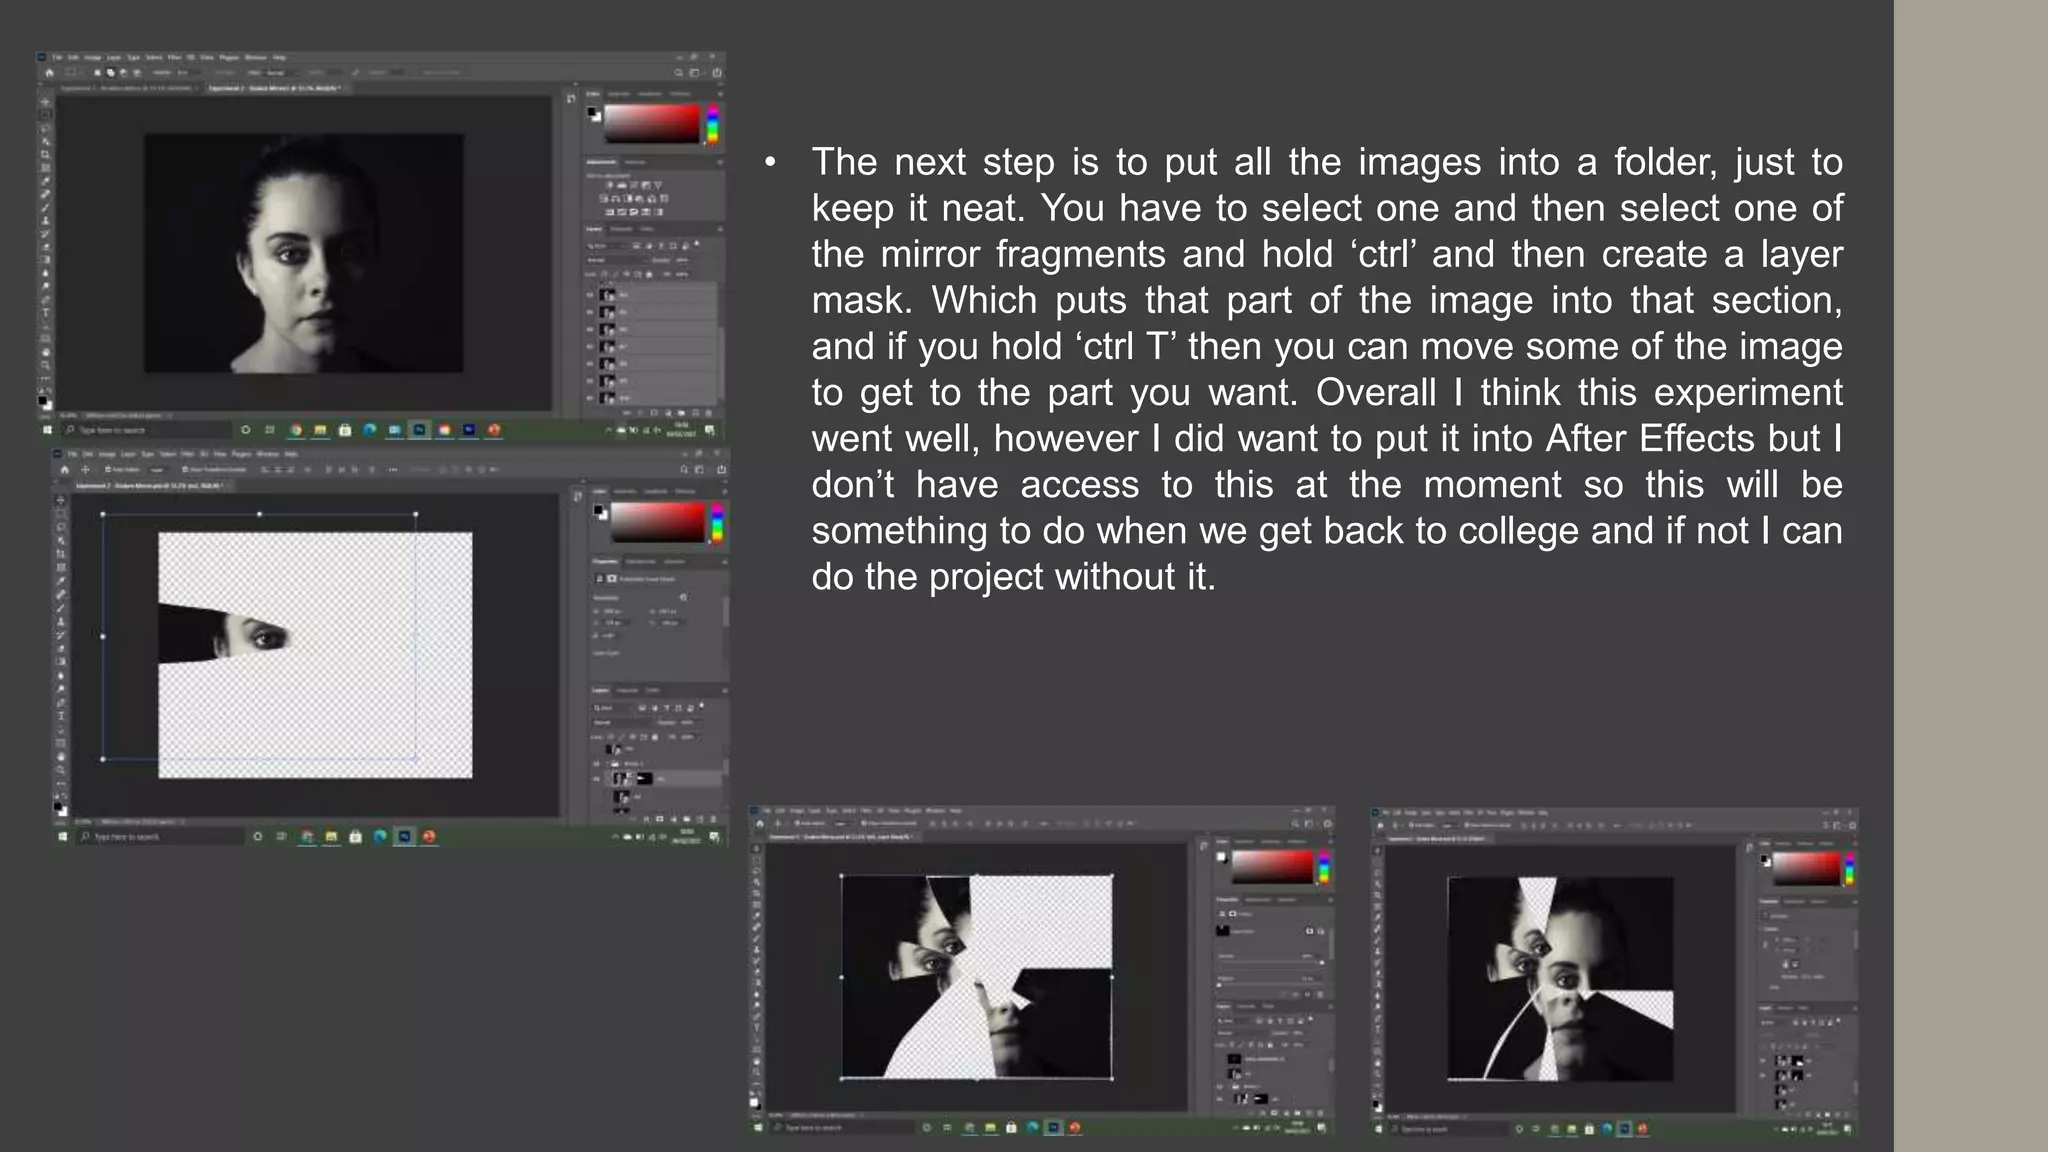
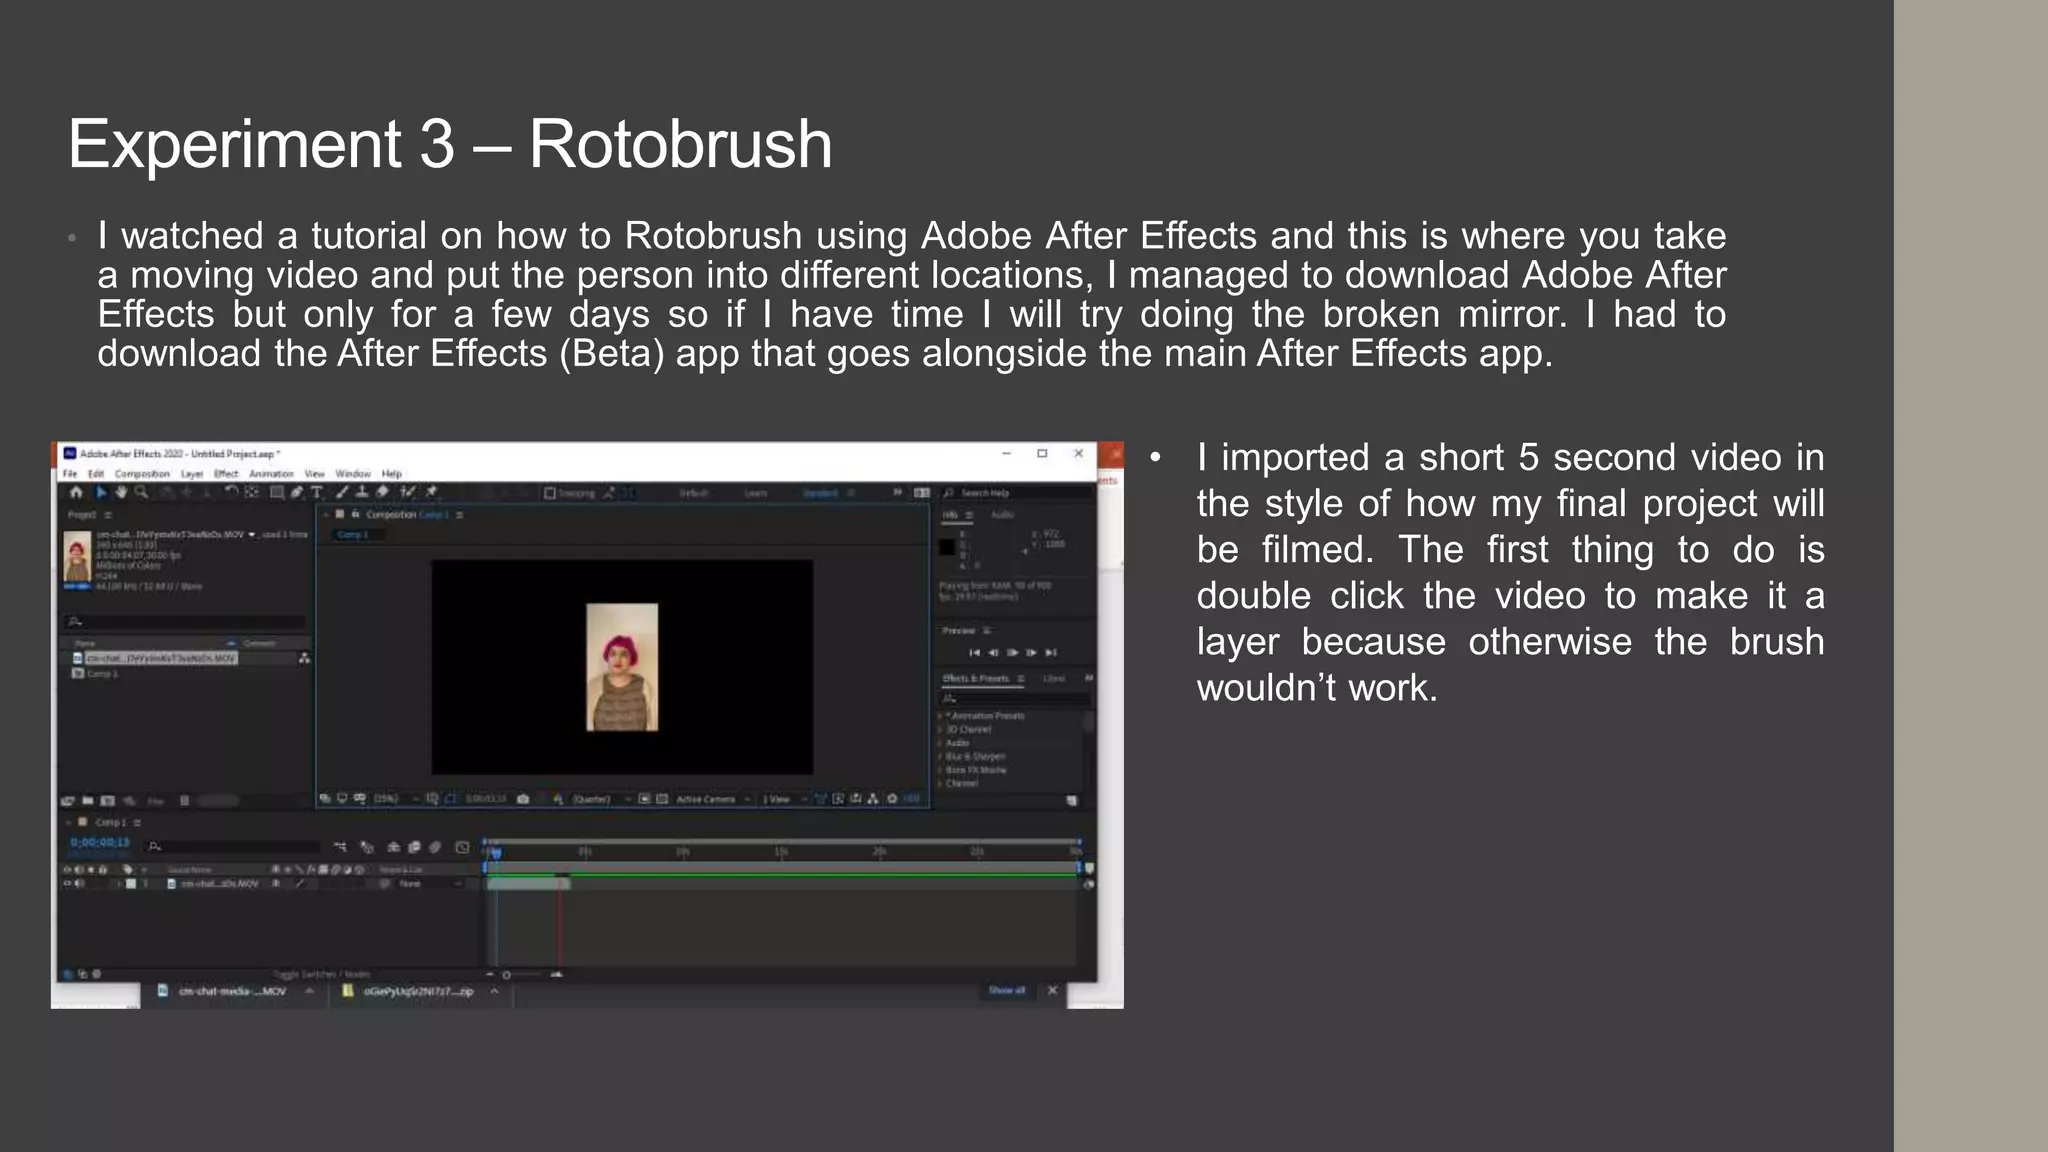
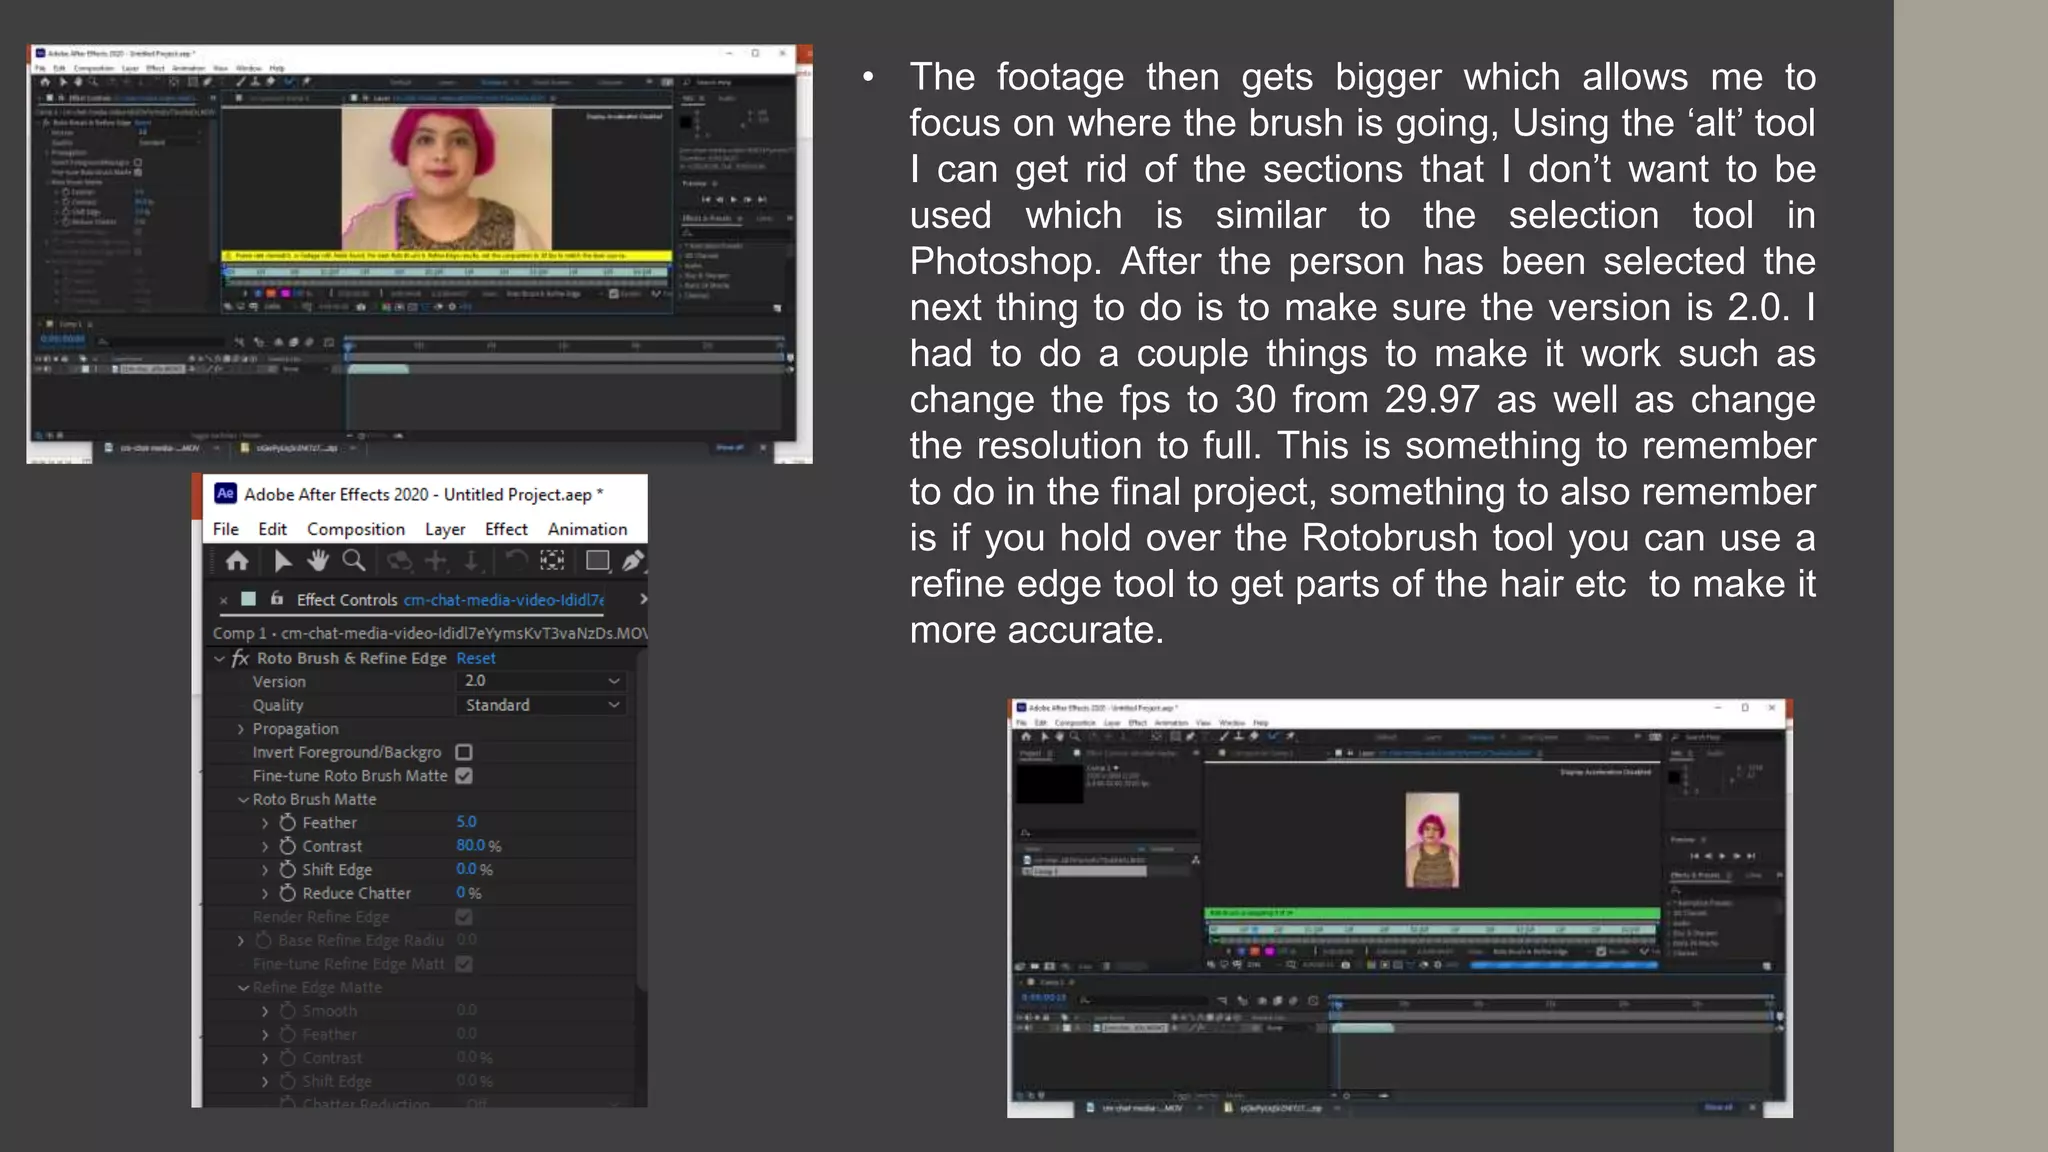
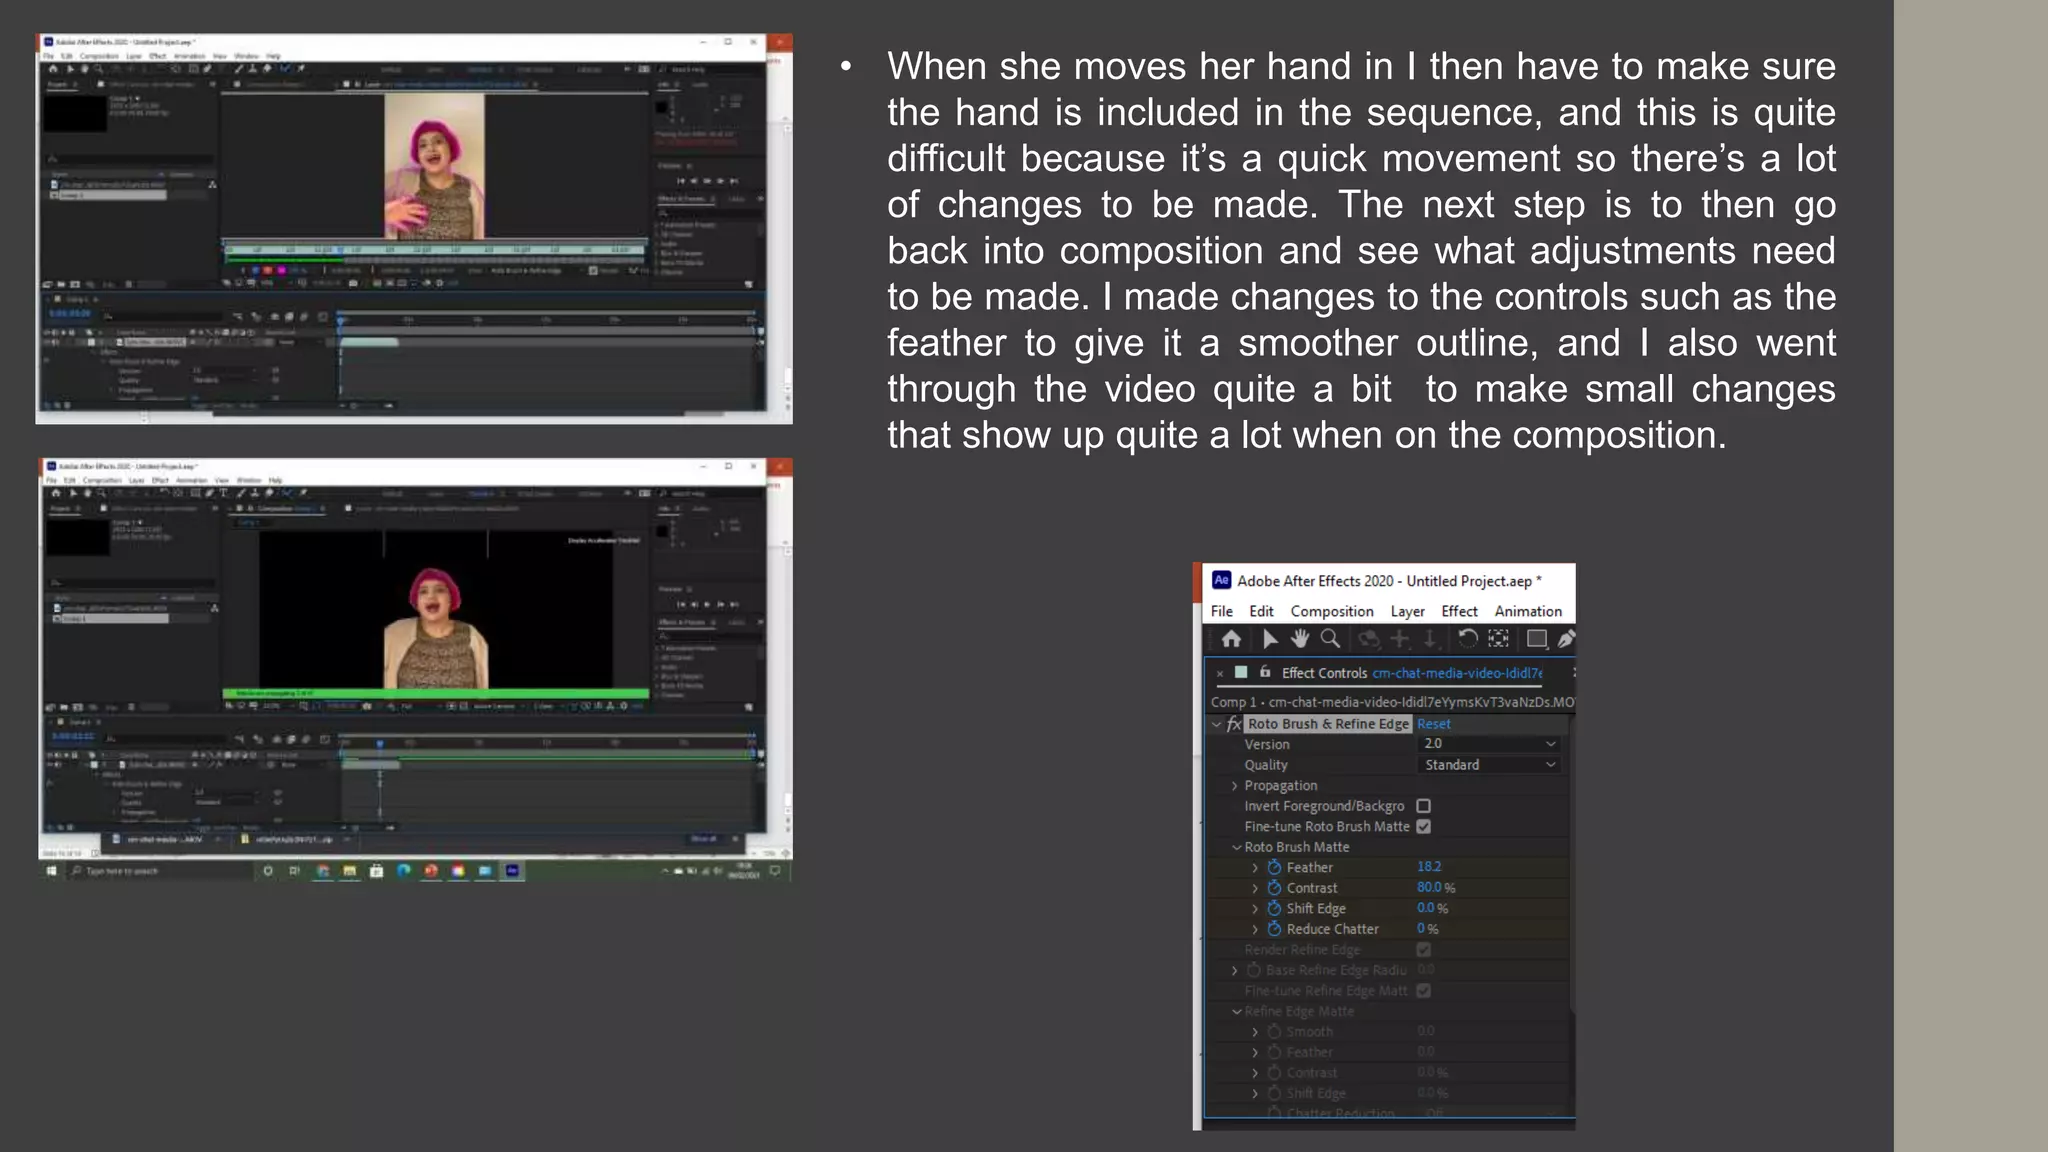
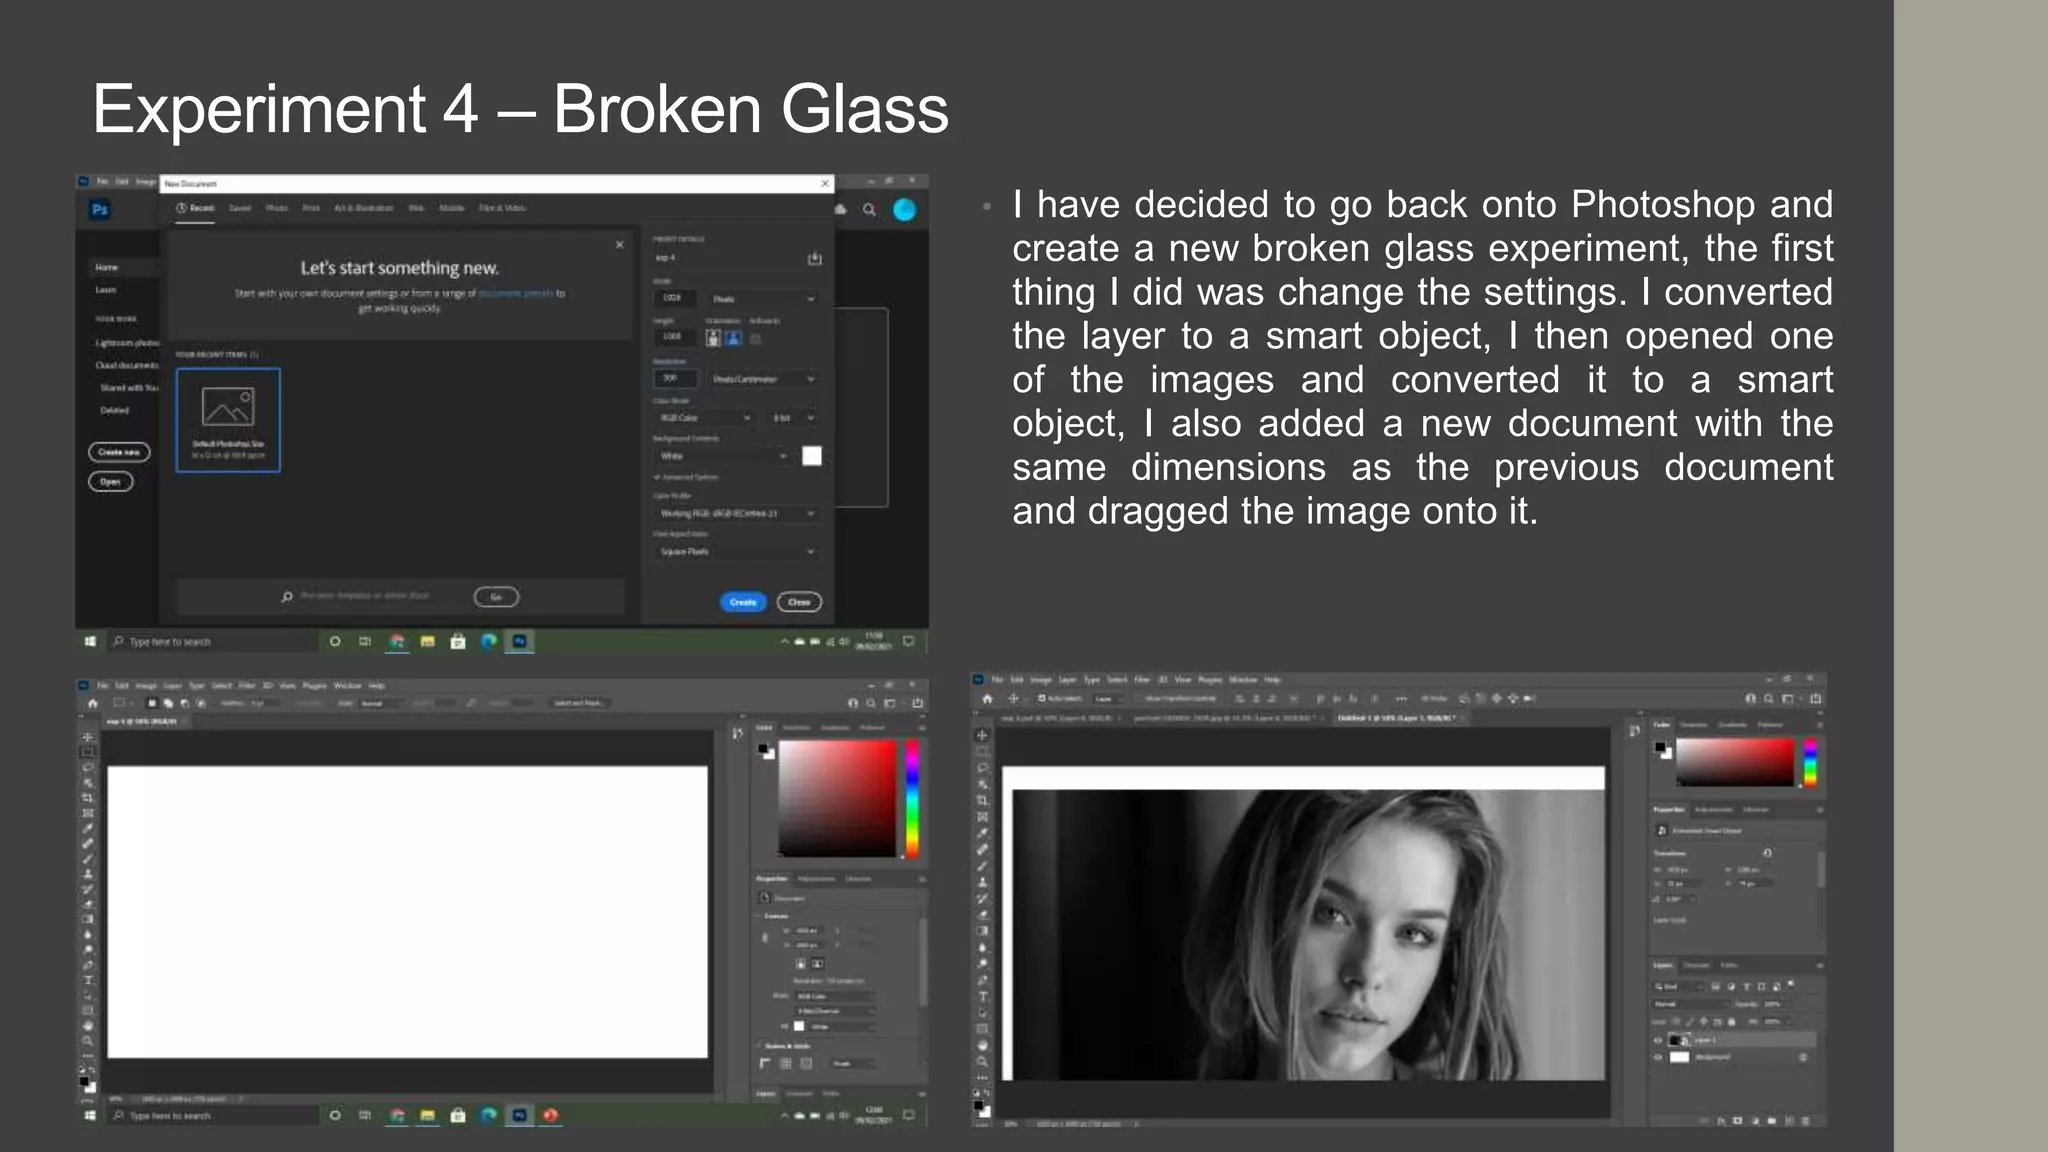
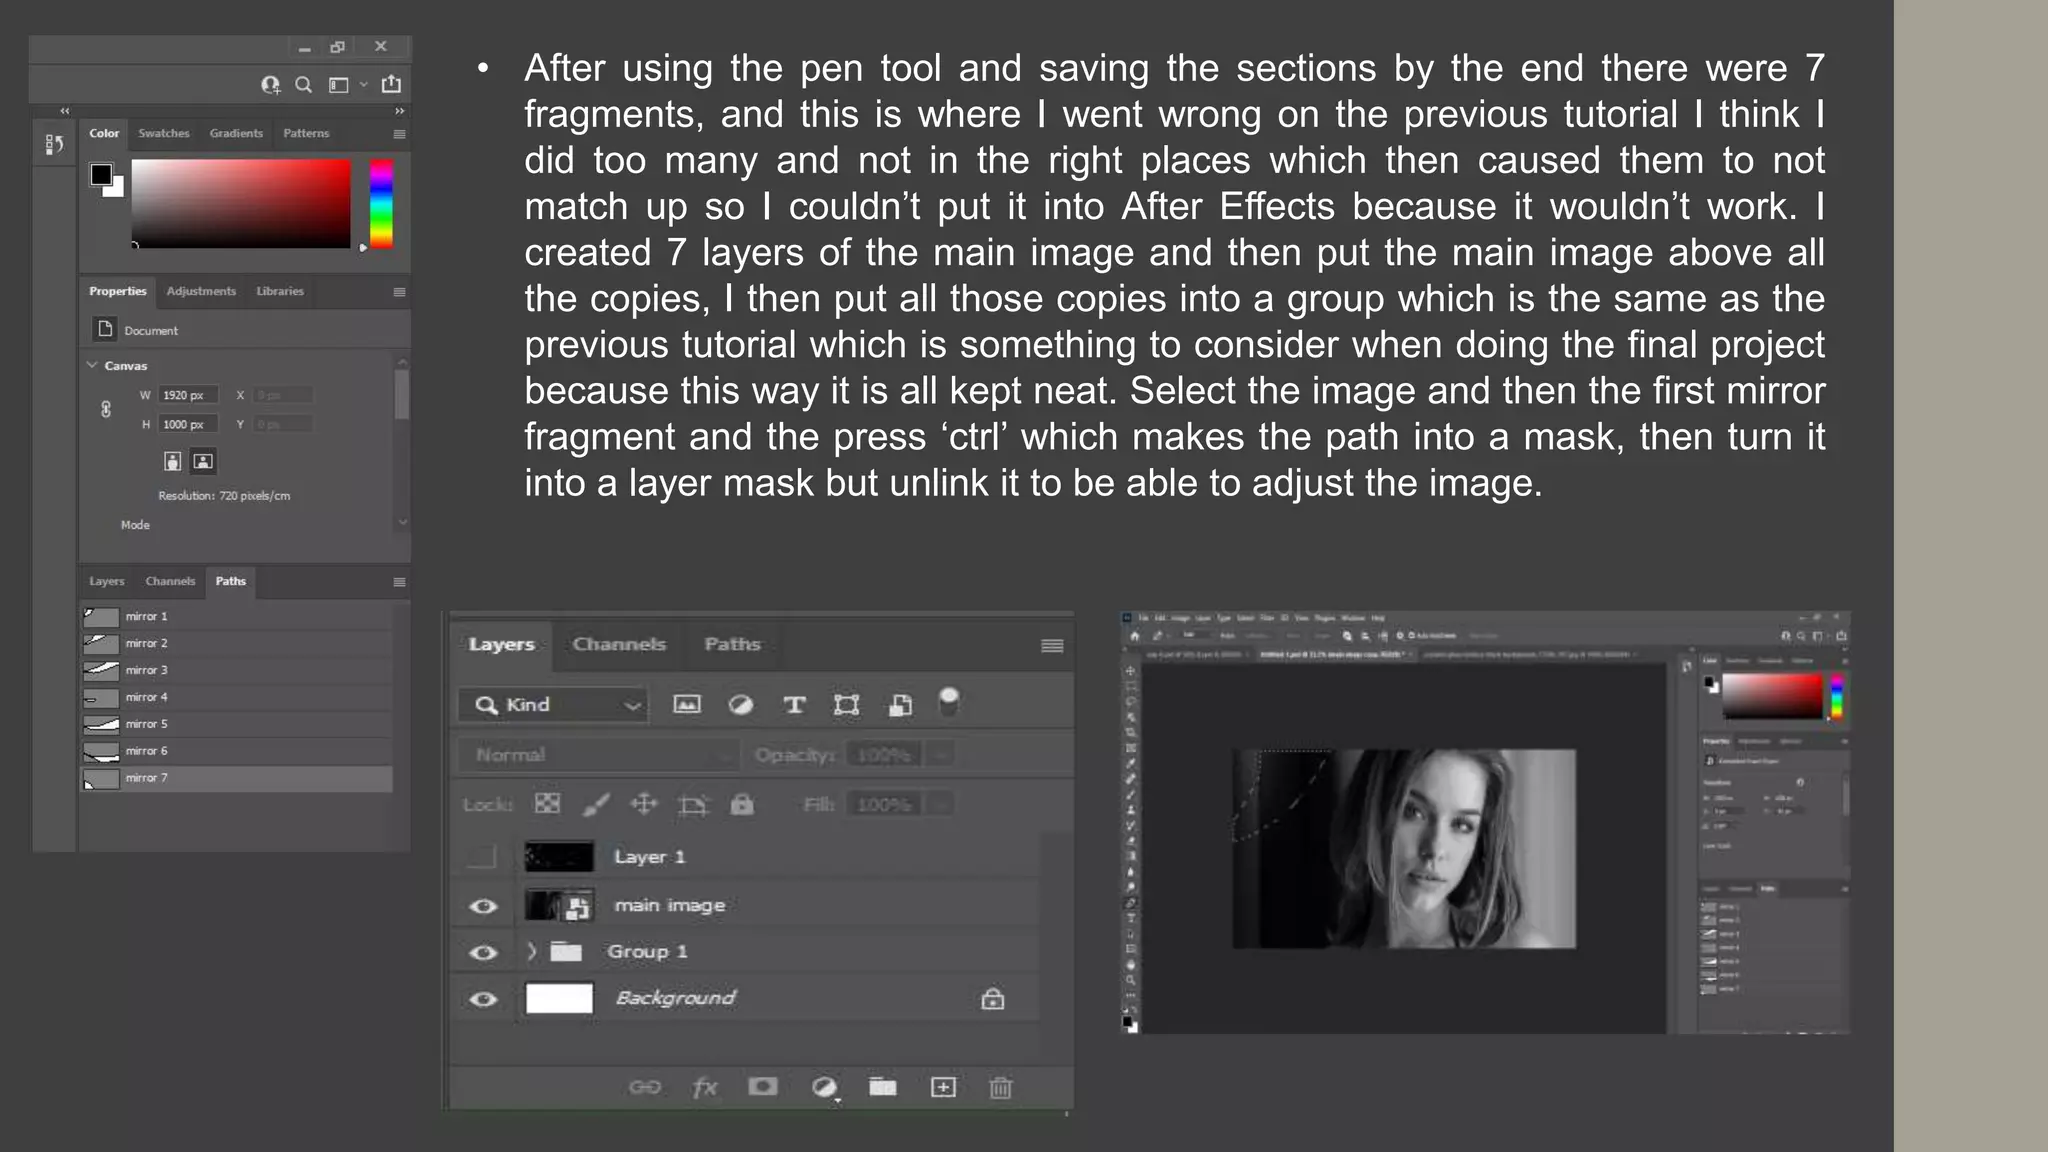
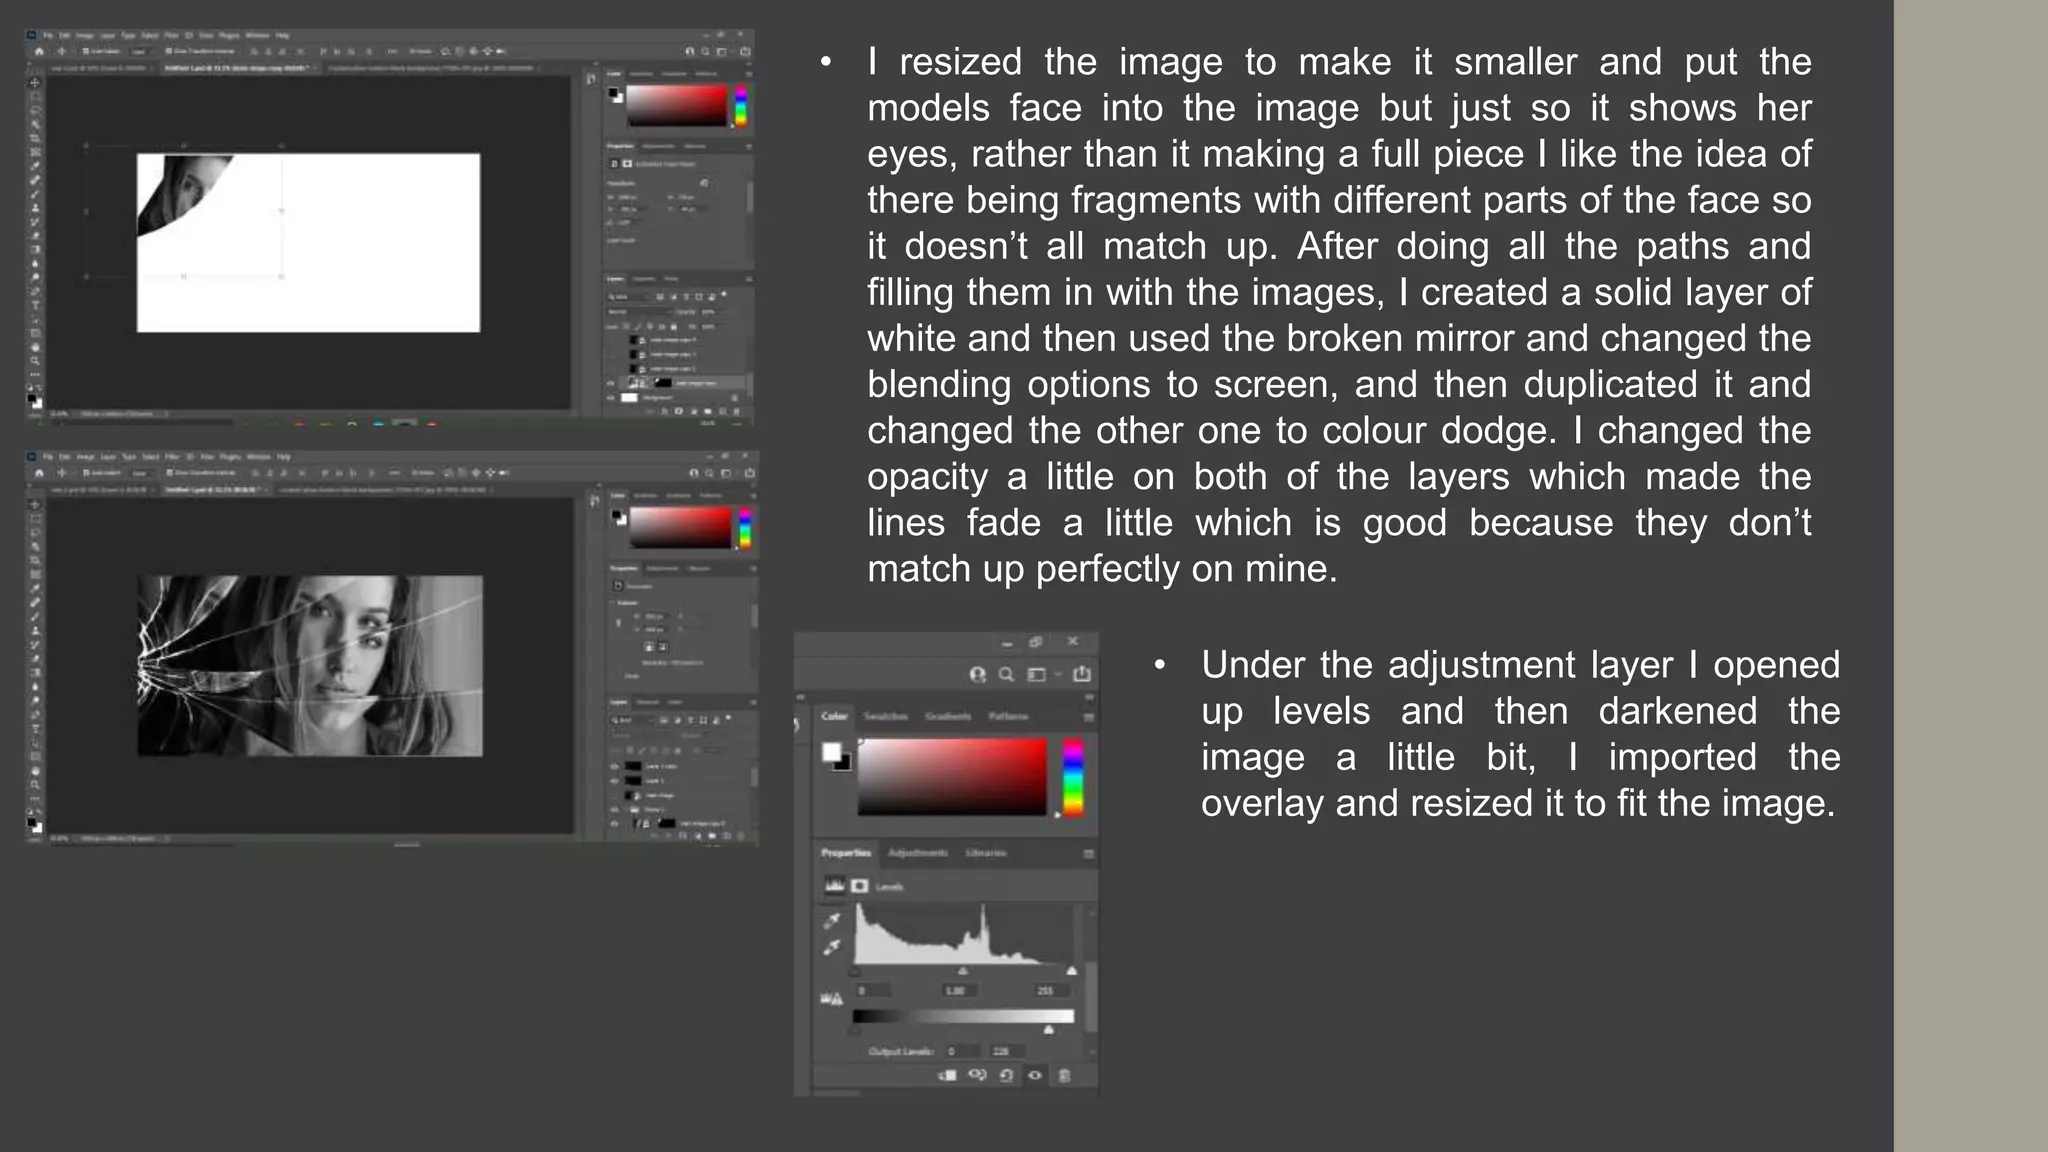
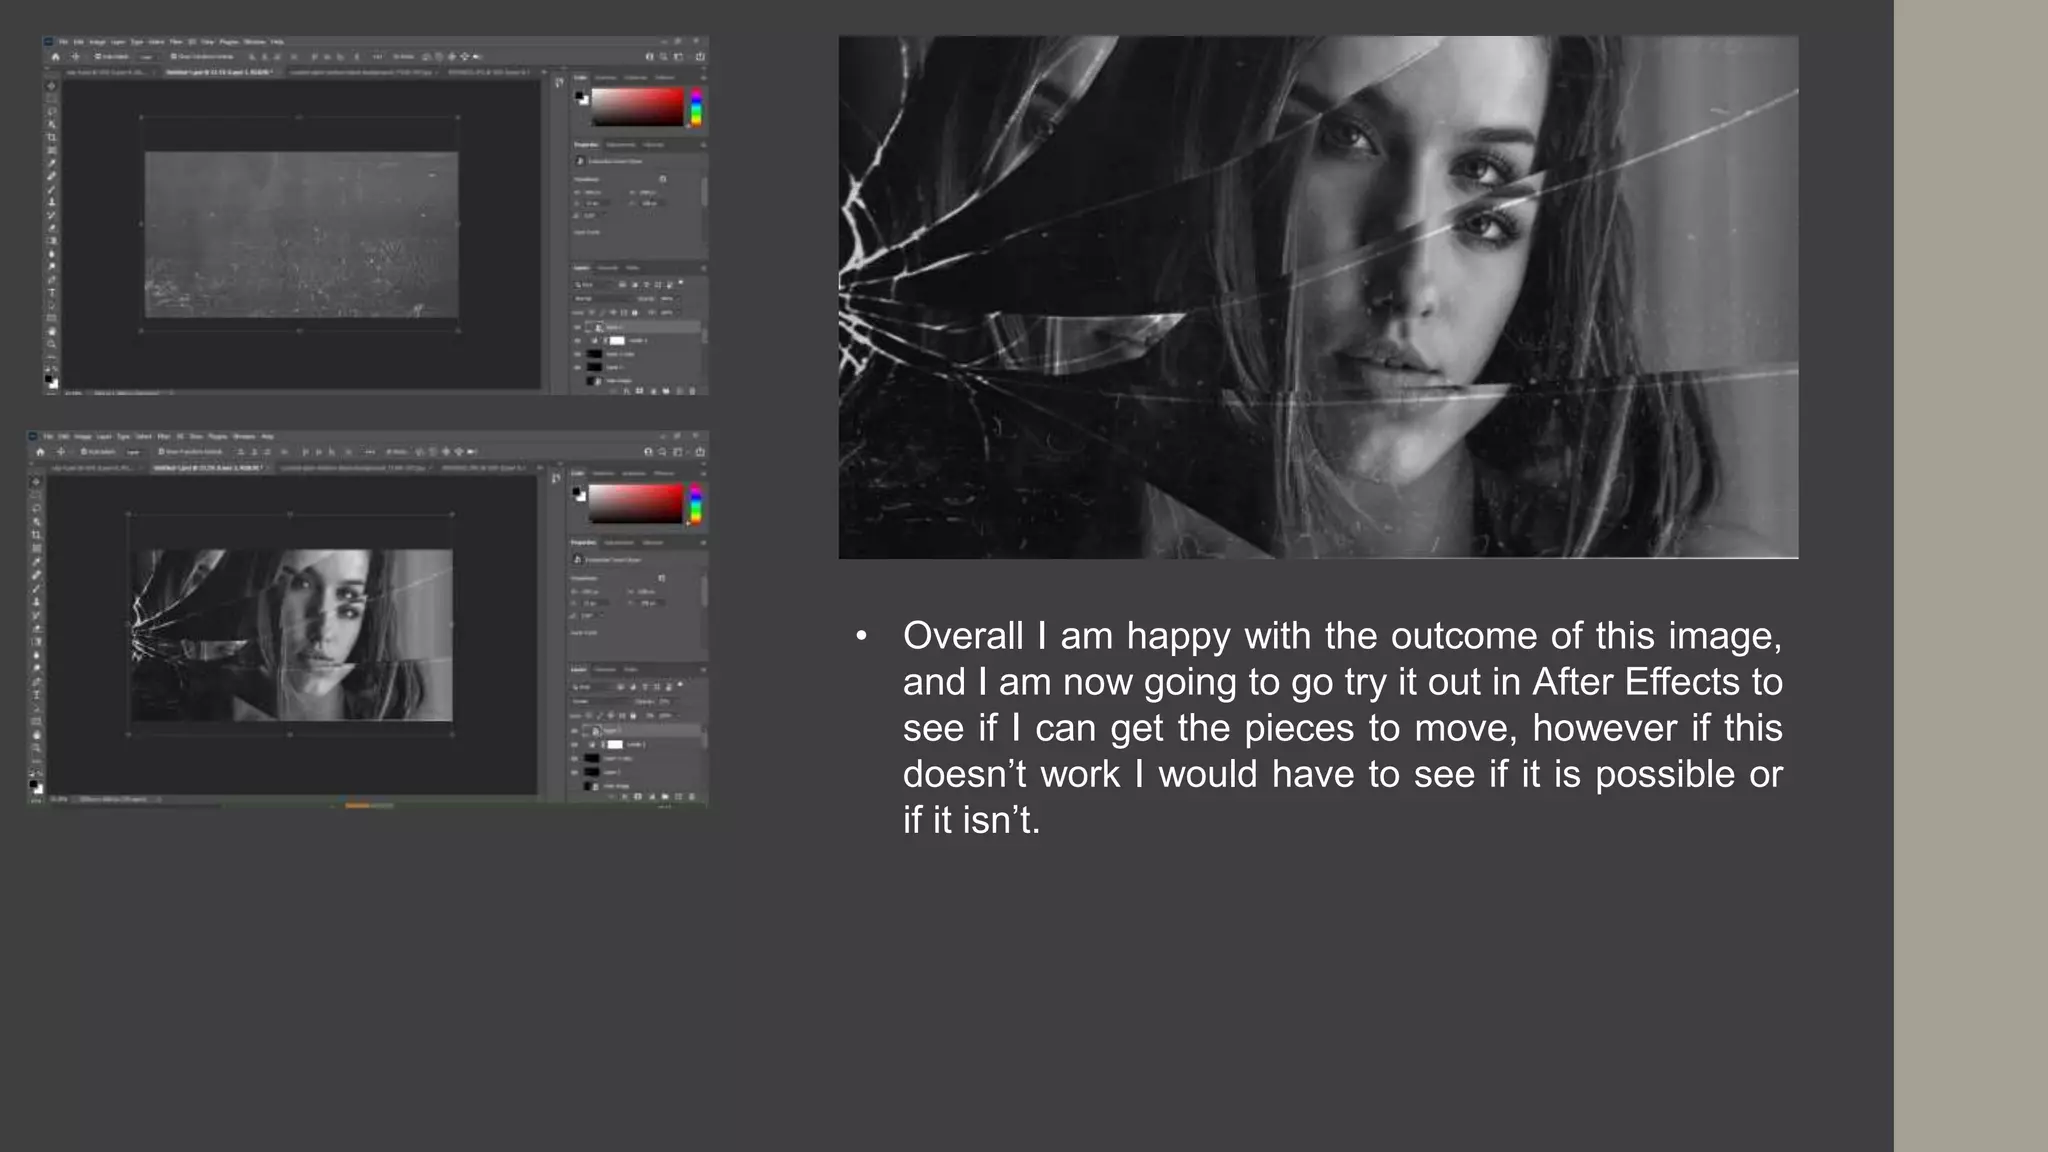
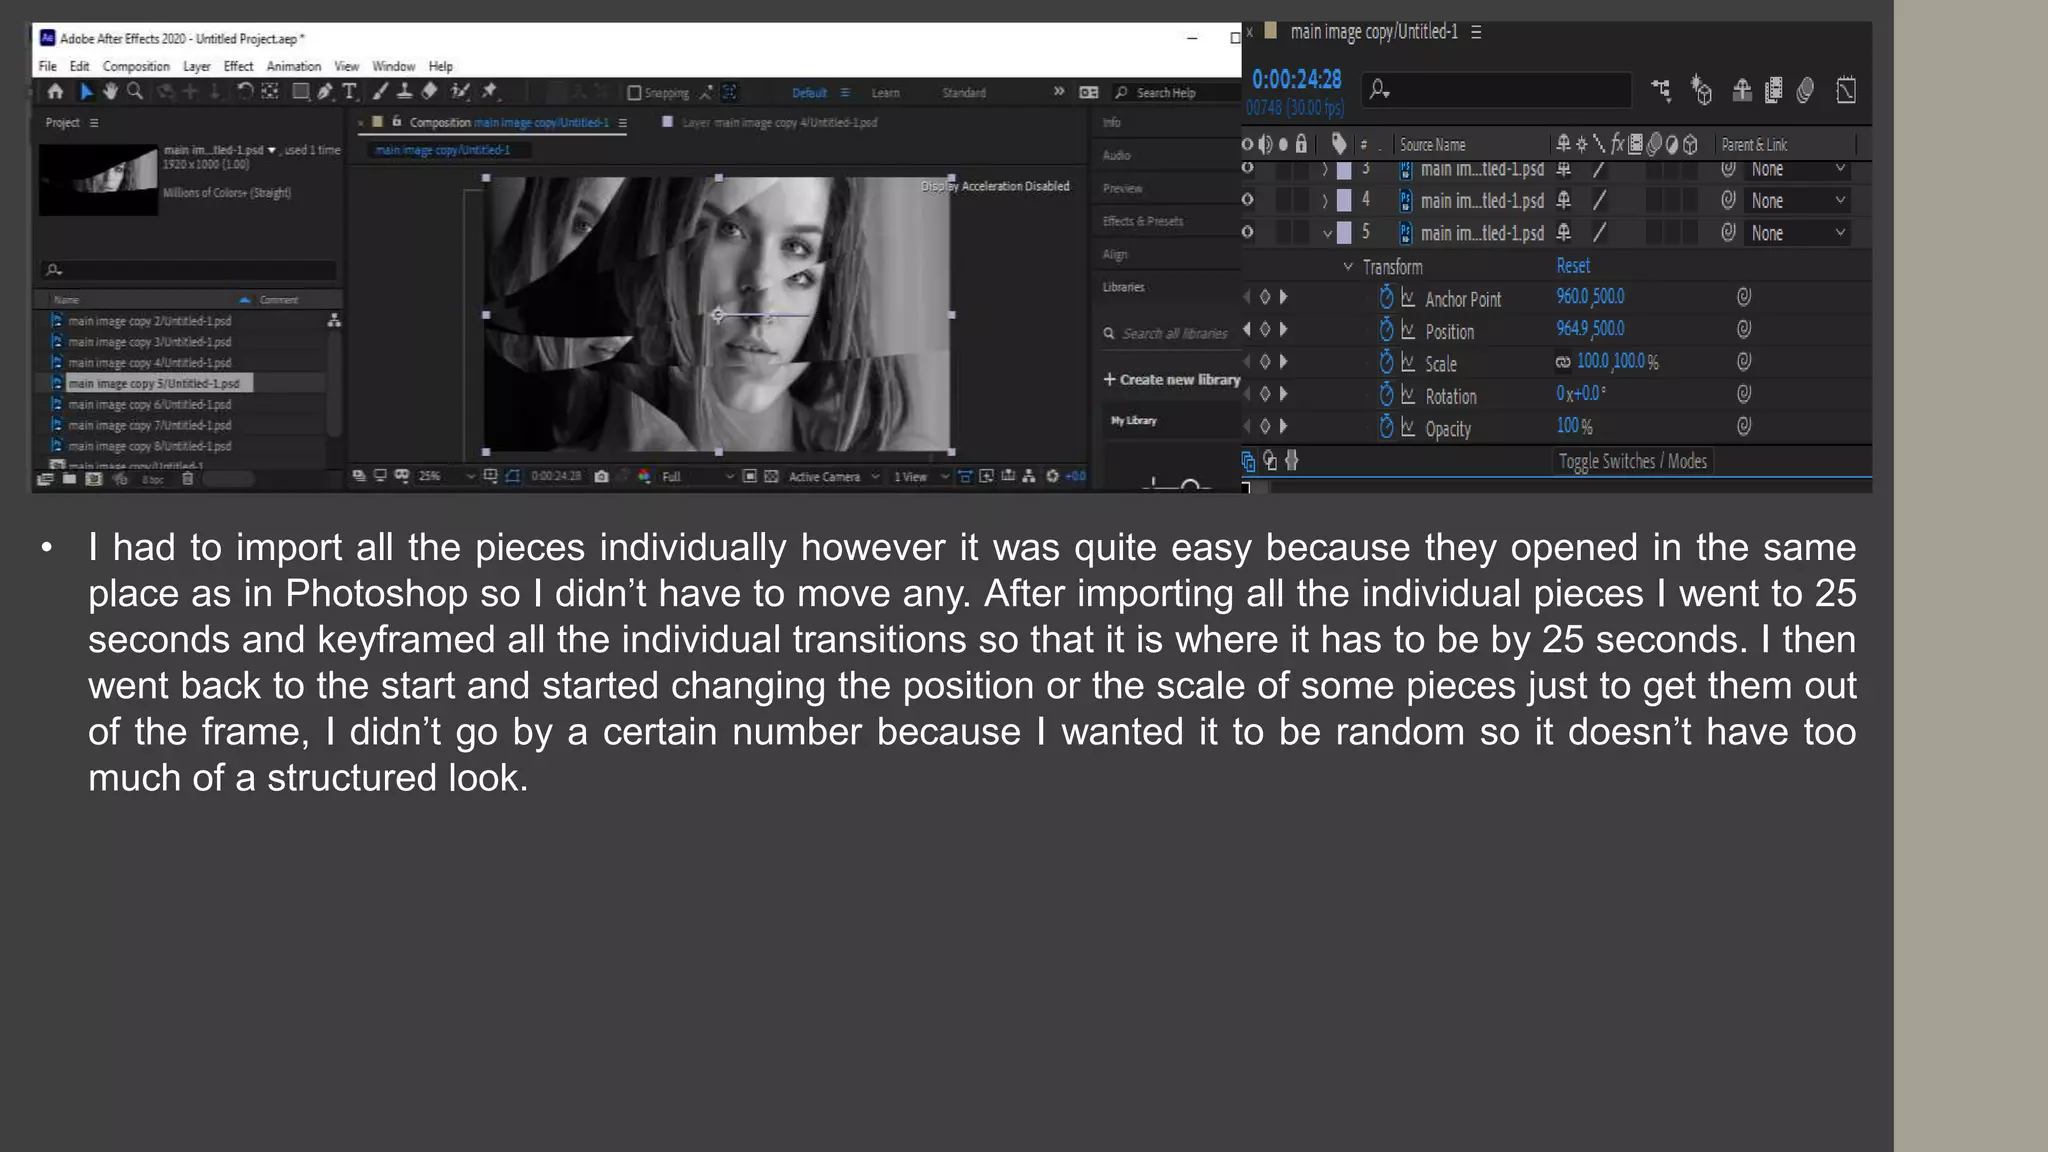
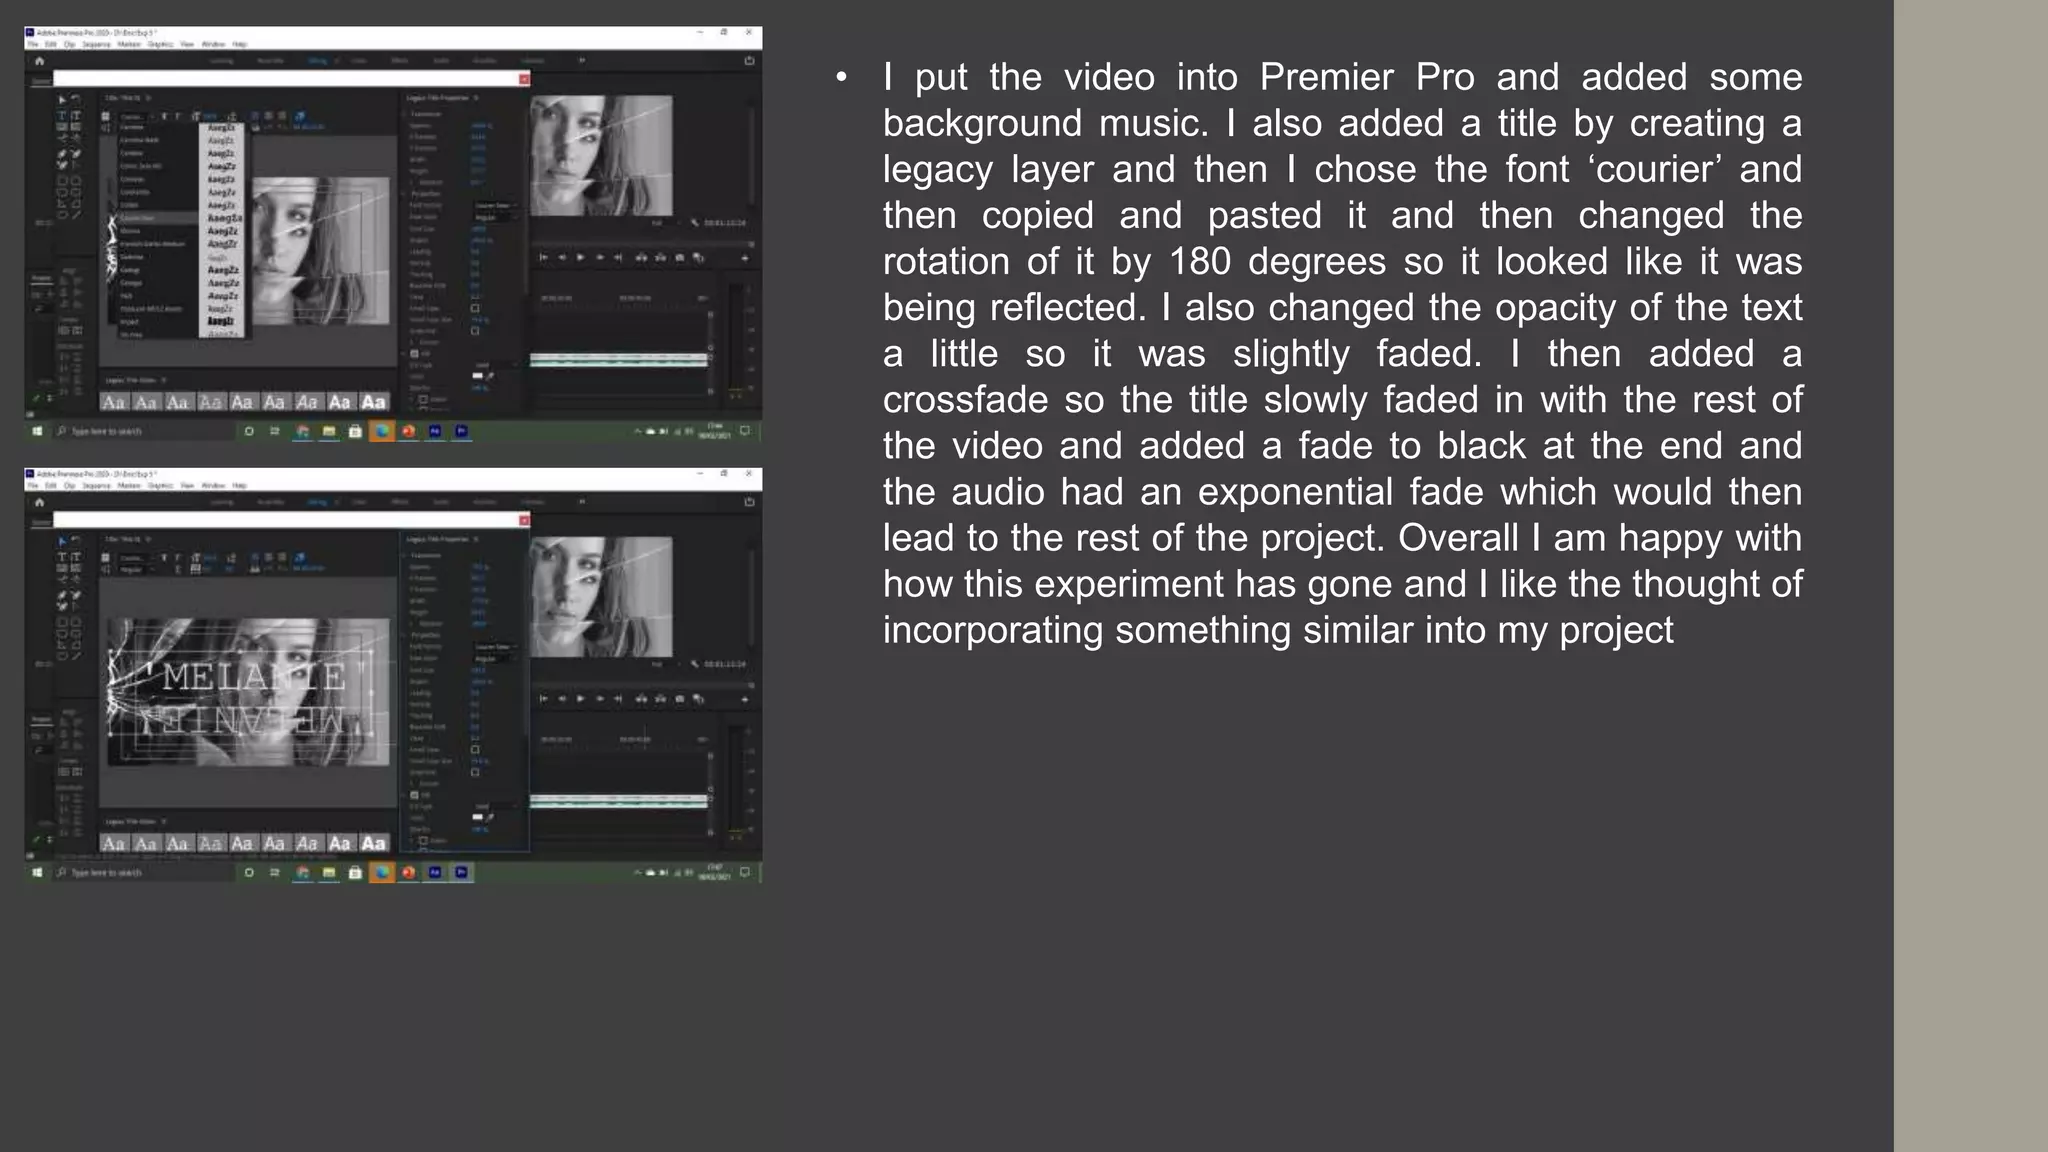
Problem Solving
Grace Gilbert
Practical/Technical
1. Internet/Power
• The first problem that I might face is the internet or power going out, and due to
COVID I am doing the majority of my work at home. If the internet goes off it
isn’t too much of a big problem at the moment because I can continue working
on the PowerPoints, however if this happened in the production stage there
would be a bigger impact on my work because you can’t use any of the software
without internet, so in this case I would work on the reflective vlogs which I can
edit on my phone without internet and then this way I am still doing something
that contributes to the project. If the power went out there is a good chance I
would lose all my work so the first thing to make sure is that I regularly save my
work so if I do lose something it won’t be too much, what I can do is turn on auto
save on PowerPoint and what it does is save everything automatically to my one
drive which I can access anywhere so this is something I will do to ensure I
don’t lose any work. Another thing the power going out would affect is the entire
project because I use a computer for everything so if the power did go out I
could work on the storyboards in preparation for production.
3. Storage/Corrupt Save
• These two tie in together, because to avoid the corrupt saved files in which case I would have to delete
the files, I have to save the work to different places and then that affects the storage. I have found that
in past projects I have lost work and haven't been able to get it back due to corrupt saving where I
wasn’t able to open the file and as a result I had to rush the work lost to keep on track with the rest of
the work, taking this into account I have quite a few places I can save my work because I have two
memory sticks which both have a lot of space left so I can save my work to these areas. I also can save
it directly to my computer as well as my one drive so in case any files become corrupt or I run out of
storage I have other copies of the files as well as a lot of space to save it.
• Due to COVID we have to work from home and this creates multiple issues that I could come across.
One of my main issues is time management as being at home there is a lot of distractions and I don’t
want to fall behind on work, however we have to check in on teams which gives me a little structure to
the day which mirrors the times I would be in class. This allows me to do the work as I have set aside the
times I will be working and I put aside my phone and any other distractions so I can focus on the work.
Apart from the time management there isn’t too much of an issue at this stage although as it gets closer
to production I think the pandemic could make a few things more difficult. In terms of past projects the
only project to be affected by the pandemic was the first year FMP, and I found that timing was
something that I struggled with but I found that writing a ‘to do list’ helped me organise the stuff I had to
work on and I found that I managed to keep organised and didn’t fall behind so this is something to
consider when moving forward with production.
2. Pandemic
4. Equipment
• In previous projects I have struggled with the equipment especially during the pandemic because we
weren't able to get back into college to collect anything. In the first year FMP I found that I could only
film on my phone but due to the circumstances I didn’t end up making anything, and learning from this I
did buy some equipment such as a camera and a tripod for if we had to make the second year project
at home. At the moment due to the pandemic there is a chance that we wont get back to college I time
for production which then affects the equipment, however I have my own DSLR camera and a tripod so
I can use these which I was going to do anyway. The only thing I will miss out on if we don’t get back to
college is a microphone which will record clearer dialogue as well as other foley sounds. I can use the
voice recorder on my phone and go to a quiet place to record the dialogue and I can find sounds online
that I can use.
5. Ability
• I have found that in previous projects I used tutorials and experiments to learn how to do techniques I
wanted to include and this is the same for this project as anything I want to do I can test out in
experiments. I have chosen a project that is quite simple, as I don’t need to use any really advanced
editing techniques and things such as colour grading I have already looked at tutorials so I know what
I am doing with it. Overall I have the ability to make this project and I know the techniques I want to
include so I will work on these in the experiments so I will be able to use them confidently and
therefore doesn’t take up too much time because I wont have to search them up etc.
Theoretical/Creative
1. Pandemic
• I have previously discussed the problems that the pandemic might affect, but in terms of production
there could be a bigger impact. In the first year I found that I didn’t have the software to make
anything and this was sorted by the college, however this isn't the case for this project so I do have a
good understanding on the type of software to use if we cant et back into college. I have planned my
production around COVID because I want to conduct interviews but due to social distancing etc I
have decided to do them over video so I will ask people to answer a couple questions and give them
a set of instructions when it comes to filming so all of the clips look as close to each other as
possible. Due to working at home I have limited access to software and as we don’t know when we
are going back into college I have decided to download a few pieces of software that I can use in
case we don’t get back to college when I start my post production stage, however my computer runs
very slowly with the software I have downloaded so I am going to have to make sure I have enough
time to get my production done but if needed I can use another laptop in the house which runs a little
quicker and I will download the software on this as well as my computer so I can use either one.
2. Time
• Timing could be an important issue to address as the main part of the project relies on me waiting
for people to send their interviews back, because if they are going to be delayed then the entire
project is going to be delayed. I want to use filler shots in this project so this shouldn’t take too long
to film and in the case that the interview videos are delayed I can focus on getting the other shots in
the right position and sorting out the audio for that. A solution to making sure I get the interviews
back on time I can send out a time frame when I send out the instructions and as long as I send it
with plenty of notice there shouldn’t be too much of an issue. Production itself shouldn’t be too much
of an issue because I have the tutorials written up so I don’t have to find them online which will save
me some time because I also won’t have to watch them, overall to make sure I have enough time to
get everything done I will make a schedule of what I should do first and then try to stick to it to
ensure everything gets done.
3. Cast
• I plan on interviewing as many people as possible because this project will work best on a
bigger scale, however due to the restrictions etc. some people might not have the time to
take part because they have to work from home. I have found that in the most recent project
which is the factual project that people ended up backing out last minute and I didn’t know
what to do with the project because I didn’t plan for this so I had to make it up during the
production stage. I don’t want this to happen with this project so if this was the case I could
make the entire documentary about women through the ages but I don’t necessarily want to
do this. I have tried to make the process more comfortable to people who have said yes to
being interviewed because I wont be there with a camera etc and they can do it on their
phones so hopefully this makes the whole process feel a little more comfortable and
therefore reduces the risk of people backing out.
Experiment 1 – Colour
Grading
• The first experiment I am doing is colour
grading, I used already found footage on a
website called Pexels. Like the tutorial the
first thing I corrected was the white balance
which changed the readings on the waveform
scope so they are all a similar height at
around 80. However I still thought it was too
bright so I changed it down to 60 and then
this altered the vector scope so there wasn’t
as much white in the yellow section.
• The tip from the tutorial suggests that the
‘blacks’ should sit at 0 on the scale so I had to
change it and get it as close to 0 as possible.
Then you have to get the ‘whites’ between 90
and 100 and this has given the video a more
solid look whereas before it looked slightly
‘cloudy’.
• I only made a few slight changes however I now
have a better understanding of what is going on
so a further experiment will be to film my own
footage and do it on that footage as well.
Existing Product 2 – Broken
Mirror
• The first thing I did I went onto Photoshop because then I
could animate it through After Effects, I followed a tutorial
and the first step was to import the face image in and
make it the background. Then add the broken glass over
the top and then use the pen tool to outline certain
fragments, make sure to save the path under the path
tab because it is needed later.
• The next step is to put all the images into a folder, just to
keep it neat. You have to select one and then select one of
the mirror fragments and hold ‘ctrl’ and then create a layer
mask. Which puts that part of the image into that section,
and if you hold ‘ctrl T’ then you can move some of the image
to get to the part you want. Overall I think this experiment
went well, however I did want to put it into After Effects but I
don’t have access to this at the moment so this will be
something to do when we get back to college and if not I can
do the project without it.
Experiment 3 – Rotobrush
• I watched a tutorial on how to Rotobrush using Adobe After Effects and this is where you take
a moving video and put the person into different locations, I managed to download Adobe After
Effects but only for a few days so if I have time I will try doing the broken mirror. I had to
download the After Effects (Beta) app that goes alongside the main After Effects app.
• I imported a short 5 second video in
the style of how my final project will
be filmed. The first thing to do is
double click the video to make it a
layer because otherwise the brush
wouldn’t work.
• The footage then gets bigger which allows me to
focus on where the brush is going, Using the ‘alt’ tool
I can get rid of the sections that I don’t want to be
used which is similar to the selection tool in
Photoshop. After the person has been selected the
next thing to do is to make sure the version is 2.0. I
had to do a couple things to make it work such as
change the fps to 30 from 29.97 as well as change
the resolution to full. This is something to remember
to do in the final project, something to also remember
is if you hold over the Rotobrush tool you can use a
refine edge tool to get parts of the hair etc to make it
more accurate.
• When she moves her hand in I then have to make sure
the hand is included in the sequence, and this is quite
difficult because it’s a quick movement so there’s a lot
of changes to be made. The next step is to then go
back into composition and see what adjustments need
to be made. I made changes to the controls such as the
feather to give it a smoother outline, and I also went
through the video quite a bit to make small changes
that show up quite a lot when on the composition.
https://www.cinecom.net/after-effects-tutorials/new-rotobrush-
tool/
• On the video they put the two shots of the man dancing together and by using the Rotobrush
tool it makes the transition smoother. They also used the puppet position tool to make slight
changes to the person to make it look like he jumped into that scene rather than it being a
completely different video. What this experiment has taught me is that I can use the Rotobrush
tool to make smooth transitions between two videos, I like the idea of having someone wave but
when they put their arm down it changes to a different person putting their arm down etc
because this way it makes a connection between the people. I could also do something similar
to how they did it in the video by having different people walk and make a sequence of it and
using the Rotobrush and the pin point tool I can make it more precise. There are a lot of things I
can do with this tool and now I know the basics to be able to create a good looking video and I
can also use it in future projects. Something to note with the Rotobrush tool is it ties in with the
rotoscoping stuff which is used for animation.
Experiment 4 – Broken Glass
• I have decided to go back onto Photoshop and
create a new broken glass experiment, the first
thing I did was change the settings. I converted
the layer to a smart object, I then opened one
of the images and converted it to a smart
object, I also added a new document with the
same dimensions as the previous document
and dragged the image onto it.
• I resized the image to make it fit within the
workspace, I chose to focus on the face because
this is where the broken glass is going to be. I
imported the broken glass layer but wanted it to be
the other way so I rotated it and then enlarged it to
fit the frame. Much like the previous glass tutorial I
go onto the path section and use the pen tool to get
the outlines I want.
• After using the pen tool and saving the sections by the end there were 7
fragments, and this is where I went wrong on the previous tutorial I think I
did too many and not in the right places which then caused them to not
match up so I couldn’t put it into After Effects because it wouldn’t work. I
created 7 layers of the main image and then put the main image above all
the copies, I then put all those copies into a group which is the same as the
previous tutorial which is something to consider when doing the final project
because this way it is all kept neat. Select the image and then the first mirror
fragment and the press ‘ctrl’ which makes the path into a mask, then turn it
into a layer mask but unlink it to be able to adjust the image.
• I resized the image to make it smaller and put the
models face into the image but just so it shows her
eyes, rather than it making a full piece I like the idea of
there being fragments with different parts of the face so
it doesn’t all match up. After doing all the paths and
filling them in with the images, I created a solid layer of
white and then used the broken mirror and changed the
blending options to screen, and then duplicated it and
changed the other one to colour dodge. I changed the
opacity a little on both of the layers which made the
lines fade a little which is good because they don’t
match up perfectly on mine.
• Under the adjustment layer I opened
up levels and then darkened the
image a little bit, I imported the
overlay and resized it to fit the image.
• Overall I am happy with the outcome of this image,
and I am now going to go try it out in After Effects to
see if I can get the pieces to move, however if this
doesn’t work I would have to see if it is possible or
if it isn’t.
• I had to import all the pieces individually however it was quite easy because they opened in the same
place as in Photoshop so I didn’t have to move any. After importing all the individual pieces I went to 25
seconds and keyframed all the individual transitions so that it is where it has to be by 25 seconds. I then
went back to the start and started changing the position or the scale of some pieces just to get them out
of the frame, I didn’t go by a certain number because I wanted it to be random so it doesn’t have too
much of a structured look.
• I put the video into Premier Pro and added some
background music. I also added a title by creating a
legacy layer and then I chose the font ‘courier’ and
then copied and pasted it and then changed the
rotation of it by 180 degrees so it looked like it was
being reflected. I also changed the opacity of the text
a little so it was slightly faded. I then added a
crossfade so the title slowly faded in with the rest of
the video and added a fade to black at the end and
the audio had an exponential fade which would then
lead to the rest of the project. Overall I am happy with
how this experiment has gone and I like the thought of
incorporating something similar into my project
Summary
• Overall this problem solving stage has helped me highlight some of the common issues that could
come up and to summarize what I want to do, is due to the COVID restrictions I am not able to go and
interview people so as a solution I am going to be sending a list of filming instructions alongside the
questions and this will enable people to film the video to how I want it without me being there. Any
extra footage that I need to film I am able to go out and film it without breaking any of the restrictions
because I can go out on my own and film stuff without needing the help of others. The only thing that
could be an issue is I want to film different people doing different tasks as filler shots but due to the
restrictions I might not be able to do this so I can just film people from my family if needed. In terms of
shooting methods there isn't much I wont be able to do because as long as I send a brief over to
people with the questions, instructions and the consent form then that’s the majority of the project
done.

5. problem solving

  • 1.
  • 2.
  • 3.
    1. Internet/Power • Thefirst problem that I might face is the internet or power going out, and due to COVID I am doing the majority of my work at home. If the internet goes off it isn’t too much of a big problem at the moment because I can continue working on the PowerPoints, however if this happened in the production stage there would be a bigger impact on my work because you can’t use any of the software without internet, so in this case I would work on the reflective vlogs which I can edit on my phone without internet and then this way I am still doing something that contributes to the project. If the power went out there is a good chance I would lose all my work so the first thing to make sure is that I regularly save my work so if I do lose something it won’t be too much, what I can do is turn on auto save on PowerPoint and what it does is save everything automatically to my one drive which I can access anywhere so this is something I will do to ensure I don’t lose any work. Another thing the power going out would affect is the entire project because I use a computer for everything so if the power did go out I could work on the storyboards in preparation for production.
  • 4.
    3. Storage/Corrupt Save •These two tie in together, because to avoid the corrupt saved files in which case I would have to delete the files, I have to save the work to different places and then that affects the storage. I have found that in past projects I have lost work and haven't been able to get it back due to corrupt saving where I wasn’t able to open the file and as a result I had to rush the work lost to keep on track with the rest of the work, taking this into account I have quite a few places I can save my work because I have two memory sticks which both have a lot of space left so I can save my work to these areas. I also can save it directly to my computer as well as my one drive so in case any files become corrupt or I run out of storage I have other copies of the files as well as a lot of space to save it. • Due to COVID we have to work from home and this creates multiple issues that I could come across. One of my main issues is time management as being at home there is a lot of distractions and I don’t want to fall behind on work, however we have to check in on teams which gives me a little structure to the day which mirrors the times I would be in class. This allows me to do the work as I have set aside the times I will be working and I put aside my phone and any other distractions so I can focus on the work. Apart from the time management there isn’t too much of an issue at this stage although as it gets closer to production I think the pandemic could make a few things more difficult. In terms of past projects the only project to be affected by the pandemic was the first year FMP, and I found that timing was something that I struggled with but I found that writing a ‘to do list’ helped me organise the stuff I had to work on and I found that I managed to keep organised and didn’t fall behind so this is something to consider when moving forward with production. 2. Pandemic
  • 5.
    4. Equipment • Inprevious projects I have struggled with the equipment especially during the pandemic because we weren't able to get back into college to collect anything. In the first year FMP I found that I could only film on my phone but due to the circumstances I didn’t end up making anything, and learning from this I did buy some equipment such as a camera and a tripod for if we had to make the second year project at home. At the moment due to the pandemic there is a chance that we wont get back to college I time for production which then affects the equipment, however I have my own DSLR camera and a tripod so I can use these which I was going to do anyway. The only thing I will miss out on if we don’t get back to college is a microphone which will record clearer dialogue as well as other foley sounds. I can use the voice recorder on my phone and go to a quiet place to record the dialogue and I can find sounds online that I can use. 5. Ability • I have found that in previous projects I used tutorials and experiments to learn how to do techniques I wanted to include and this is the same for this project as anything I want to do I can test out in experiments. I have chosen a project that is quite simple, as I don’t need to use any really advanced editing techniques and things such as colour grading I have already looked at tutorials so I know what I am doing with it. Overall I have the ability to make this project and I know the techniques I want to include so I will work on these in the experiments so I will be able to use them confidently and therefore doesn’t take up too much time because I wont have to search them up etc.
  • 6.
  • 7.
    1. Pandemic • Ihave previously discussed the problems that the pandemic might affect, but in terms of production there could be a bigger impact. In the first year I found that I didn’t have the software to make anything and this was sorted by the college, however this isn't the case for this project so I do have a good understanding on the type of software to use if we cant et back into college. I have planned my production around COVID because I want to conduct interviews but due to social distancing etc I have decided to do them over video so I will ask people to answer a couple questions and give them a set of instructions when it comes to filming so all of the clips look as close to each other as possible. Due to working at home I have limited access to software and as we don’t know when we are going back into college I have decided to download a few pieces of software that I can use in case we don’t get back to college when I start my post production stage, however my computer runs very slowly with the software I have downloaded so I am going to have to make sure I have enough time to get my production done but if needed I can use another laptop in the house which runs a little quicker and I will download the software on this as well as my computer so I can use either one.
  • 8.
    2. Time • Timingcould be an important issue to address as the main part of the project relies on me waiting for people to send their interviews back, because if they are going to be delayed then the entire project is going to be delayed. I want to use filler shots in this project so this shouldn’t take too long to film and in the case that the interview videos are delayed I can focus on getting the other shots in the right position and sorting out the audio for that. A solution to making sure I get the interviews back on time I can send out a time frame when I send out the instructions and as long as I send it with plenty of notice there shouldn’t be too much of an issue. Production itself shouldn’t be too much of an issue because I have the tutorials written up so I don’t have to find them online which will save me some time because I also won’t have to watch them, overall to make sure I have enough time to get everything done I will make a schedule of what I should do first and then try to stick to it to ensure everything gets done.
  • 9.
    3. Cast • Iplan on interviewing as many people as possible because this project will work best on a bigger scale, however due to the restrictions etc. some people might not have the time to take part because they have to work from home. I have found that in the most recent project which is the factual project that people ended up backing out last minute and I didn’t know what to do with the project because I didn’t plan for this so I had to make it up during the production stage. I don’t want this to happen with this project so if this was the case I could make the entire documentary about women through the ages but I don’t necessarily want to do this. I have tried to make the process more comfortable to people who have said yes to being interviewed because I wont be there with a camera etc and they can do it on their phones so hopefully this makes the whole process feel a little more comfortable and therefore reduces the risk of people backing out.
  • 10.
    Experiment 1 –Colour Grading • The first experiment I am doing is colour grading, I used already found footage on a website called Pexels. Like the tutorial the first thing I corrected was the white balance which changed the readings on the waveform scope so they are all a similar height at around 80. However I still thought it was too bright so I changed it down to 60 and then this altered the vector scope so there wasn’t as much white in the yellow section.
  • 11.
    • The tipfrom the tutorial suggests that the ‘blacks’ should sit at 0 on the scale so I had to change it and get it as close to 0 as possible. Then you have to get the ‘whites’ between 90 and 100 and this has given the video a more solid look whereas before it looked slightly ‘cloudy’. • I only made a few slight changes however I now have a better understanding of what is going on so a further experiment will be to film my own footage and do it on that footage as well.
  • 12.
    Existing Product 2– Broken Mirror • The first thing I did I went onto Photoshop because then I could animate it through After Effects, I followed a tutorial and the first step was to import the face image in and make it the background. Then add the broken glass over the top and then use the pen tool to outline certain fragments, make sure to save the path under the path tab because it is needed later.
  • 13.
    • The nextstep is to put all the images into a folder, just to keep it neat. You have to select one and then select one of the mirror fragments and hold ‘ctrl’ and then create a layer mask. Which puts that part of the image into that section, and if you hold ‘ctrl T’ then you can move some of the image to get to the part you want. Overall I think this experiment went well, however I did want to put it into After Effects but I don’t have access to this at the moment so this will be something to do when we get back to college and if not I can do the project without it.
  • 14.
    Experiment 3 –Rotobrush • I watched a tutorial on how to Rotobrush using Adobe After Effects and this is where you take a moving video and put the person into different locations, I managed to download Adobe After Effects but only for a few days so if I have time I will try doing the broken mirror. I had to download the After Effects (Beta) app that goes alongside the main After Effects app. • I imported a short 5 second video in the style of how my final project will be filmed. The first thing to do is double click the video to make it a layer because otherwise the brush wouldn’t work.
  • 15.
    • The footagethen gets bigger which allows me to focus on where the brush is going, Using the ‘alt’ tool I can get rid of the sections that I don’t want to be used which is similar to the selection tool in Photoshop. After the person has been selected the next thing to do is to make sure the version is 2.0. I had to do a couple things to make it work such as change the fps to 30 from 29.97 as well as change the resolution to full. This is something to remember to do in the final project, something to also remember is if you hold over the Rotobrush tool you can use a refine edge tool to get parts of the hair etc to make it more accurate.
  • 16.
    • When shemoves her hand in I then have to make sure the hand is included in the sequence, and this is quite difficult because it’s a quick movement so there’s a lot of changes to be made. The next step is to then go back into composition and see what adjustments need to be made. I made changes to the controls such as the feather to give it a smoother outline, and I also went through the video quite a bit to make small changes that show up quite a lot when on the composition.
  • 17.
    https://www.cinecom.net/after-effects-tutorials/new-rotobrush- tool/ • On thevideo they put the two shots of the man dancing together and by using the Rotobrush tool it makes the transition smoother. They also used the puppet position tool to make slight changes to the person to make it look like he jumped into that scene rather than it being a completely different video. What this experiment has taught me is that I can use the Rotobrush tool to make smooth transitions between two videos, I like the idea of having someone wave but when they put their arm down it changes to a different person putting their arm down etc because this way it makes a connection between the people. I could also do something similar to how they did it in the video by having different people walk and make a sequence of it and using the Rotobrush and the pin point tool I can make it more precise. There are a lot of things I can do with this tool and now I know the basics to be able to create a good looking video and I can also use it in future projects. Something to note with the Rotobrush tool is it ties in with the rotoscoping stuff which is used for animation.
  • 18.
    Experiment 4 –Broken Glass • I have decided to go back onto Photoshop and create a new broken glass experiment, the first thing I did was change the settings. I converted the layer to a smart object, I then opened one of the images and converted it to a smart object, I also added a new document with the same dimensions as the previous document and dragged the image onto it.
  • 19.
    • I resizedthe image to make it fit within the workspace, I chose to focus on the face because this is where the broken glass is going to be. I imported the broken glass layer but wanted it to be the other way so I rotated it and then enlarged it to fit the frame. Much like the previous glass tutorial I go onto the path section and use the pen tool to get the outlines I want.
  • 20.
    • After usingthe pen tool and saving the sections by the end there were 7 fragments, and this is where I went wrong on the previous tutorial I think I did too many and not in the right places which then caused them to not match up so I couldn’t put it into After Effects because it wouldn’t work. I created 7 layers of the main image and then put the main image above all the copies, I then put all those copies into a group which is the same as the previous tutorial which is something to consider when doing the final project because this way it is all kept neat. Select the image and then the first mirror fragment and the press ‘ctrl’ which makes the path into a mask, then turn it into a layer mask but unlink it to be able to adjust the image.
  • 21.
    • I resizedthe image to make it smaller and put the models face into the image but just so it shows her eyes, rather than it making a full piece I like the idea of there being fragments with different parts of the face so it doesn’t all match up. After doing all the paths and filling them in with the images, I created a solid layer of white and then used the broken mirror and changed the blending options to screen, and then duplicated it and changed the other one to colour dodge. I changed the opacity a little on both of the layers which made the lines fade a little which is good because they don’t match up perfectly on mine. • Under the adjustment layer I opened up levels and then darkened the image a little bit, I imported the overlay and resized it to fit the image.
  • 22.
    • Overall Iam happy with the outcome of this image, and I am now going to go try it out in After Effects to see if I can get the pieces to move, however if this doesn’t work I would have to see if it is possible or if it isn’t.
  • 23.
    • I hadto import all the pieces individually however it was quite easy because they opened in the same place as in Photoshop so I didn’t have to move any. After importing all the individual pieces I went to 25 seconds and keyframed all the individual transitions so that it is where it has to be by 25 seconds. I then went back to the start and started changing the position or the scale of some pieces just to get them out of the frame, I didn’t go by a certain number because I wanted it to be random so it doesn’t have too much of a structured look.
  • 24.
    • I putthe video into Premier Pro and added some background music. I also added a title by creating a legacy layer and then I chose the font ‘courier’ and then copied and pasted it and then changed the rotation of it by 180 degrees so it looked like it was being reflected. I also changed the opacity of the text a little so it was slightly faded. I then added a crossfade so the title slowly faded in with the rest of the video and added a fade to black at the end and the audio had an exponential fade which would then lead to the rest of the project. Overall I am happy with how this experiment has gone and I like the thought of incorporating something similar into my project
  • 25.
    Summary • Overall thisproblem solving stage has helped me highlight some of the common issues that could come up and to summarize what I want to do, is due to the COVID restrictions I am not able to go and interview people so as a solution I am going to be sending a list of filming instructions alongside the questions and this will enable people to film the video to how I want it without me being there. Any extra footage that I need to film I am able to go out and film it without breaking any of the restrictions because I can go out on my own and film stuff without needing the help of others. The only thing that could be an issue is I want to film different people doing different tasks as filler shots but due to the restrictions I might not be able to do this so I can just film people from my family if needed. In terms of shooting methods there isn't much I wont be able to do because as long as I send a brief over to people with the questions, instructions and the consent form then that’s the majority of the project done.