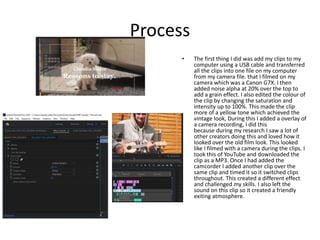
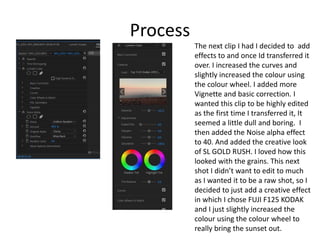
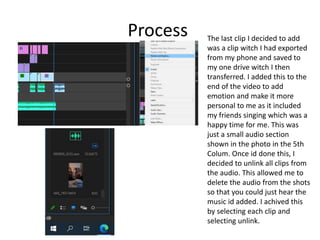
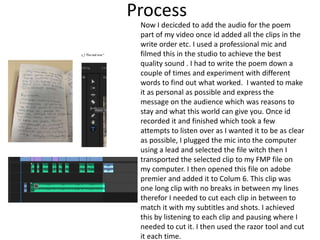
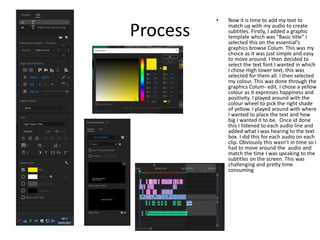
Production
Reflection
Claudia slater
Process
• The first thing I did was add my clips to my
computer using a USB cable and transferred
all the clips into one file on my computer
from my camera file. that I filmed on my
camera which was a Canon G7X. I then
added noise alpha at 20% over the top to
add a grain effect. I also edited the colour of
the clip by changing the saturation and
intensity up to 100%. This made the clip
more of a yellow tone which achieved the
vintage look, During this I added a overlay of
a camera recording, I did this
because during my research I saw a lot of
other creators doing this and loved how it
looked over the old film look. This looked
like I filmed with a camera during the clips. I
took this of YouTube and downloaded the
clip as a MP3. Once I had added the
camcorder I added another clip over the
same clip and timed it so it switched clips
throughout. This created a different effect
and challenged my skills. I also left the
sound on this clip so it created a friendly
exiting atmosphere.
Process
• Here I added the audio which was on a
mp3 Filmed on garage band created by
my friend. This was helpful as then I
avoided copyright etc. I added this to a
underneath Colum. I then added the
next clip along with the audio and edited
this clip by adding saturation and
intensity to 100%, I also added a creative
film effect over the top this slightly
changed the tone to be a bit darker.
Witch created the emotion I was trying to
express on the audience. I decided to use
FIJI F125. I then moved onto adding the
next clip in witch I enhanced the bright
colours in by adding higher saturation
and vibrance as well as intensity. This
really made the sunset stand out. I added
the creative effect SL BIG LDR. I loved
how this turned out.
Process
• This next clip I didn’t go into to much
editing with as it was already quite a
bright shot ,As it was shot above on a
drone. I just decided to add a creative
effect called FUJI 125 KODAK. This
enhanced the colours a little more. I then
decided I wanted this clip to be slowed
down so I changed the speed to be 70.
This created a effective look, and made
the shot last longer and I really thought
with the subtitles it expressed the audio
and the message And really made the clip
better as the birds flew slowly witch
worked with the audio. This next clip I
added the effect noise alpha again at 40
and used the creative effect FUJI REALA.
This made the clip grainy. I then added the
same camera recorder overlay over this
clip. I did this by dragging it onto the
above Colum.
Process
This next clip I decided to make it
slower so I selected speed and
duration and changed the speed
to 40. I then added a effect to
this clip witch was FUJI F125 this
seemed to be common effect I
used during my project as I think
all together it achieved the
vintage retro look I was trying to
express. I then again transferred
the camera effect clip over this
clip. After that I added my next
clip and I decided I wanted to
change the colours a little so I
opted for B&W. The effect I used
to create this was Monochrome
kodak and I decided to slow this
clip down to the speed of 40.
Process
The next clip I had I decided to add
effects to and once Id transferred it
over. I increased the curves and
slightly increased the colour using
the colour wheel. I added more
Vignette and basic correction. I
wanted this clip to be highly edited
as the first time I transferred it, It
seemed a little dull and boring. I
then added the Noise alpha effect
to 40. And added the creative look
of SL GOLD RUSH. I loved how this
looked with the grains. This next
shot I didn’t want to edit to much
as I wanted it to be a raw shot, so I
decided to just add a creative effect
in which I chose FUJI F125 KODAK
and I just slightly increased the
colour using the colour wheel to
really bring the sunset out.
Process The last clip I decided to add
was a clip witch I had exported
from my phone and saved to
my one drive witch I then
transferred. I added this to the
end of the video to add
emotion and make it more
personal to me as it included
my friends singing which was a
happy time for me. This was
just a small audio section
shown in the photo in the 5th
Colum. Once id done this, I
decided to unlink all clips from
the audio. This allowed me to
delete the audio from the shots
so that you could just hear the
music id added. I achived this
by selecting each clip and
selecting unlink.
Process
Now I decicded to add the audio for the poem
part of my video once id added all the clips in the
write order etc. I used a professional mic and
filmed this in the studio to achieve the best
quality sound . I had to write the poem down a
couple of times and experiment with different
words to find out what worked. I wanted to make
it as personal as possible and express the
message on the audience which was reasons to
stay and what this world can give you. Once id
recorded it and finished which took a few
attempts to listen over as I wanted it to be as clear
as possible, I plugged the mic into the computer
using a lead and selected the file witch then I
transported the selected clip to my FMP file on
my computer. I then opened this file on adobe
premier and added it to Colum 6. This clip was
one long clip with no breaks in between my lines
therefor I needed to cut each clip in between to
match it with my subtitles and shots. I achieved
this by listening to each clip and pausing where I
needed to cut it. I then used the razor tool and cut
it each time.
Process
• Now it is time to add my text to
match up with my audio to create
subtitles. Firstly, I added a graphic
template which was "Basic title" I
selected this on the essential's
graphics browse Colum. This was my
choice as it was just simple and easy
to move around. I then decided to
select the text font I wanted in which
I chose High tower text, this was
selected for them all. I then selected
my colour. This was done through the
graphics Colum- edit. I chose a yellow
colour as it expresses happiness and
positivity. I played around with the
colour wheel to pick the right shade
of yellow. I played around with where
I wanted to place the text and how
big I wanted it to be. Once id done
this I listened to each audio line and
added what I was hearing to the text
box. I did this for each audio on each
clip. Obviously this wasn’t in time so I
had to move around the audio and
match the time I was speaking to the
subtitles on the screen. This was
challenging and pretty time
consuming
Process
• Lastly I added a title to the
beginning of my video witch
I selected on the graphics
Colum in which I chose the
font Georgia. I liked how
bold this was as well as this
I added a bold text effect to
my font too. This
emphasised the text and
made it larger. I then
enlarged it. After this I
decided to render my video
to create the smoothest
best video I could. I did this
by selecting sequence and
render effects in and out. I
then exported the video
and saved it as a YouTube
clip.

6. production reflection (fmp)

  • 1.
  • 2.
    Process • The firstthing I did was add my clips to my computer using a USB cable and transferred all the clips into one file on my computer from my camera file. that I filmed on my camera which was a Canon G7X. I then added noise alpha at 20% over the top to add a grain effect. I also edited the colour of the clip by changing the saturation and intensity up to 100%. This made the clip more of a yellow tone which achieved the vintage look, During this I added a overlay of a camera recording, I did this because during my research I saw a lot of other creators doing this and loved how it looked over the old film look. This looked like I filmed with a camera during the clips. I took this of YouTube and downloaded the clip as a MP3. Once I had added the camcorder I added another clip over the same clip and timed it so it switched clips throughout. This created a different effect and challenged my skills. I also left the sound on this clip so it created a friendly exiting atmosphere.
  • 3.
    Process • Here Iadded the audio which was on a mp3 Filmed on garage band created by my friend. This was helpful as then I avoided copyright etc. I added this to a underneath Colum. I then added the next clip along with the audio and edited this clip by adding saturation and intensity to 100%, I also added a creative film effect over the top this slightly changed the tone to be a bit darker. Witch created the emotion I was trying to express on the audience. I decided to use FIJI F125. I then moved onto adding the next clip in witch I enhanced the bright colours in by adding higher saturation and vibrance as well as intensity. This really made the sunset stand out. I added the creative effect SL BIG LDR. I loved how this turned out.
  • 4.
    Process • This nextclip I didn’t go into to much editing with as it was already quite a bright shot ,As it was shot above on a drone. I just decided to add a creative effect called FUJI 125 KODAK. This enhanced the colours a little more. I then decided I wanted this clip to be slowed down so I changed the speed to be 70. This created a effective look, and made the shot last longer and I really thought with the subtitles it expressed the audio and the message And really made the clip better as the birds flew slowly witch worked with the audio. This next clip I added the effect noise alpha again at 40 and used the creative effect FUJI REALA. This made the clip grainy. I then added the same camera recorder overlay over this clip. I did this by dragging it onto the above Colum.
  • 5.
    Process This next clipI decided to make it slower so I selected speed and duration and changed the speed to 40. I then added a effect to this clip witch was FUJI F125 this seemed to be common effect I used during my project as I think all together it achieved the vintage retro look I was trying to express. I then again transferred the camera effect clip over this clip. After that I added my next clip and I decided I wanted to change the colours a little so I opted for B&W. The effect I used to create this was Monochrome kodak and I decided to slow this clip down to the speed of 40.
  • 6.
    Process The next clipI had I decided to add effects to and once Id transferred it over. I increased the curves and slightly increased the colour using the colour wheel. I added more Vignette and basic correction. I wanted this clip to be highly edited as the first time I transferred it, It seemed a little dull and boring. I then added the Noise alpha effect to 40. And added the creative look of SL GOLD RUSH. I loved how this looked with the grains. This next shot I didn’t want to edit to much as I wanted it to be a raw shot, so I decided to just add a creative effect in which I chose FUJI F125 KODAK and I just slightly increased the colour using the colour wheel to really bring the sunset out.
  • 7.
    Process The lastclip I decided to add was a clip witch I had exported from my phone and saved to my one drive witch I then transferred. I added this to the end of the video to add emotion and make it more personal to me as it included my friends singing which was a happy time for me. This was just a small audio section shown in the photo in the 5th Colum. Once id done this, I decided to unlink all clips from the audio. This allowed me to delete the audio from the shots so that you could just hear the music id added. I achived this by selecting each clip and selecting unlink.
  • 8.
    Process Now I decicdedto add the audio for the poem part of my video once id added all the clips in the write order etc. I used a professional mic and filmed this in the studio to achieve the best quality sound . I had to write the poem down a couple of times and experiment with different words to find out what worked. I wanted to make it as personal as possible and express the message on the audience which was reasons to stay and what this world can give you. Once id recorded it and finished which took a few attempts to listen over as I wanted it to be as clear as possible, I plugged the mic into the computer using a lead and selected the file witch then I transported the selected clip to my FMP file on my computer. I then opened this file on adobe premier and added it to Colum 6. This clip was one long clip with no breaks in between my lines therefor I needed to cut each clip in between to match it with my subtitles and shots. I achieved this by listening to each clip and pausing where I needed to cut it. I then used the razor tool and cut it each time.
  • 9.
    Process • Now itis time to add my text to match up with my audio to create subtitles. Firstly, I added a graphic template which was "Basic title" I selected this on the essential's graphics browse Colum. This was my choice as it was just simple and easy to move around. I then decided to select the text font I wanted in which I chose High tower text, this was selected for them all. I then selected my colour. This was done through the graphics Colum- edit. I chose a yellow colour as it expresses happiness and positivity. I played around with the colour wheel to pick the right shade of yellow. I played around with where I wanted to place the text and how big I wanted it to be. Once id done this I listened to each audio line and added what I was hearing to the text box. I did this for each audio on each clip. Obviously this wasn’t in time so I had to move around the audio and match the time I was speaking to the subtitles on the screen. This was challenging and pretty time consuming
  • 10.
    Process • Lastly Iadded a title to the beginning of my video witch I selected on the graphics Colum in which I chose the font Georgia. I liked how bold this was as well as this I added a bold text effect to my font too. This emphasised the text and made it larger. I then enlarged it. After this I decided to render my video to create the smoothest best video I could. I did this by selecting sequence and render effects in and out. I then exported the video and saved it as a YouTube clip.

Editor's Notes

  • #3 Discuss the tools and processes used in your production. Log your thoughts and feelings about your work.
  • #4 Discuss the tools and processes used in your production. Log your thoughts and feelings about your work.
  • #5 Discuss the tools and processes used in your production. Log your thoughts and feelings about your work.
  • #6 Discuss the tools and processes used in your production. Log your thoughts and feelings about your work.
  • #7 Discuss the tools and processes used in your production. Log your thoughts and feelings about your work.