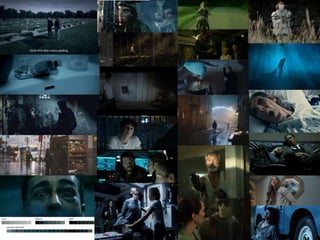
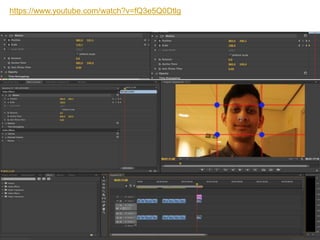
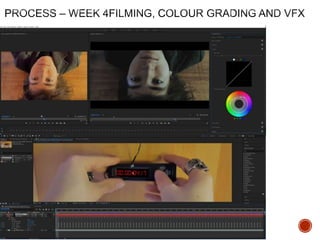
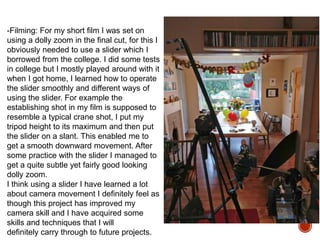
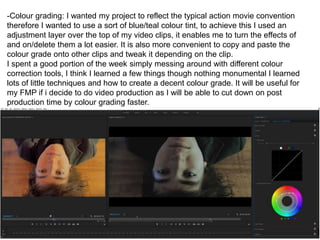
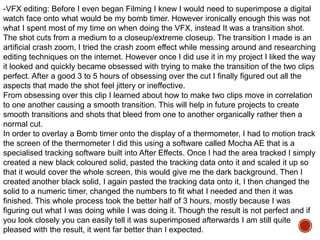
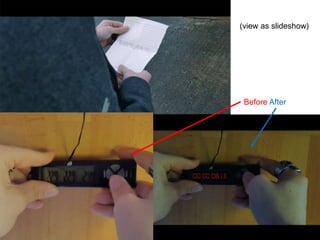
STAGE 5
PRODUCTION
REFLECTIONS
Samuel Schoettner
 This proforma is to record how you worked on your production
 You should complete this each week during production
 Consider all relevant areas that you covered that week
 Think about what worked/what didn’t work/how you can improve
and actions for the following sessions/weeks
This week were given a movie clip from Shaun of the dead however all the audio had been removed from
the clip. The task was to recreate all the Foley sounds by ourselves. We made a list of all the sounds we
needed and then we went out to record them. Most of the sounds were quite easy to recreate. Simple
sounds such as walking and ambient sound were as easy to record as just going outside to record the
general ambiance, and then recorded some footsteps. All we then had to do was layer the two over the top
of each other and we would have a convincing sound of someone walking outside. What i found most
fascinating is the level of detail that is required to make the audio seem realistic, for example when I did the
music, I had to cut out the mid and base frequencies and pan the audio towards the left as he walked up to
the shop to make it sound like the music was coming from inside the shop, then as he entered I made the
audio swap to the right side and i faded in the mid tones and some of the base frequencies also turning up
the volume a little. I found this gave the sound a quality as if you had just changed atmosphere from one to
another, also little details like making the music sound a bit more tinny and hollow as you wouldn't expect a
superb sound system in a corner shop, rather you'd expect an old stereo with bad speakers. other details
like adding sounds of him touching his tie at the beginning of the scene just after he trips over the curb, help
convey a surrealism that you have learned to expect from movies, little details like that often go completely
unnoticed and only subconsciously rendered which is exactly what they are supposed to be. I very much
enjoyed the making of this clip as I had never recorded Foley before, at least not to the level of detail as this
and never for a completely silent clip where I had to invent my own sounds. It was very enjoyable to go
through everything and add each layer of sound to the clip slowly figuring out what was missing, what was
too loud, what needs to be louder, figuring out what doesn't seem like an organic normal sound. I feel like I
learned quite a lot about how sound is and should be applied in films and some of the ways you can use
panning or equalization in order to make a specific sound fit into its environment by cutting out its base
resonance or its high frequencies. I am already looking forward to doing the sound design for my short film
as i thoroughly enjoyed it and i learned quite a bit.
https://www.youtube.com/watch?v=zuDCSSNrG6s
This week I finished off the initial plans and began the research. Due to the fact that we had 2 days off, of
college on-top of our usual study day, we only had one half day and a 3/4 day of college during the whole week.
Though I intended to do work at home I lacked initiative to do any work. So I spent a lot of the time at home
doing very little work, this obviously means that I am a bit behind, I spent most of Thursday catching up on the
work and I am now more or less back on track. I do still have some work to do at home over the weekend to
fully catch up and be on-top of everything. While in college I was mostly focused and did work, however I
definitely need to make sure that I stay on-top of my college work and if I am lacking behind I need to focus up,
and do it at home. With most of the projects I have found doing the research quite challenging as I am rarely
interested in doing the research (this depends on what the research is) For example researching viewing
figures, Psychographics and demographics I found very uninteresting. However I do appreciate the importance
of this research, I just find it hard to do it.
When doing the initial plans we had to create some ideas and make mood boards. This was an exercise I
enjoyed a lot, specifically the creating of the mood boards. It helped me realise the mood and feel for my film.
Looking at all the different pictures and colour schemes on Google, helped me to find different ways of
colouring, different ways of lighting, and how film-makers change the colour schemes/colour intensity and
vibrancy depending on how harsh the lighting is how soft it is etc.
The short film I am planning on making will use two different colour schemes; the first colour scheme I will use
is going to be a teal/blue tint, this is to give the traditional agent spy serious aspect to the shot. I'm hoping this
will make the shots look serious and will add a touch of realism. Once the plot and climax of the short film is
revealed the colour scheme will change to a more soft and homely orange/yellow tint, this will make the scene
softer and more comfortable too look at. I have also been researching different forms of post production work
as I would like to give my short film an almost hyper realistic feel. Two techniques I would like to implement are
Dolly zooms and a form of motion tracking where the tracked object always stays in the center of the frame.
(example image) I would like to include these shots to give the short film an extra level of detail and so that I
can learn some new tricks and techniques. I would very much like to learn how to operate a steady-cam/glide-
cam properly, as it would be a very useful asset for future film production.
This week we mainly did course work in the form of power point and word, I finished of my research power point
and began doing the pre-production power point. Also due to missing a day at the start of the rotation where I
missed the filming and editing production experiments, I did them today (Friday 26/01/2018) I used a slider to
created a dolly zoom I was surprised at how easy it was operate, though it was not perfectly done by myself, I
think I got a pretty decent result using a Tutorial I had found earlier during the research. This worked quite well
for me, I simply used a grid to scale and position to footage, so that Tahmids face would be roughly in the same
position and the same scale at the start and end of the video clip.
This created a fairly good looking dolly zoom, though for when I do it in the future I must motion track the subject
so it stays in the same position and then, instead of only having two key-frames (one at the start one at the end) I
will use multiple key-frames to match the velocity of the slider. My first attempt, the video above, only used 2 key-
frames which is why there are points where it seems like the video is zooming in/out for no reason.
This specific tool can come in very useful in the future when doing other projects as I will know how to use/apply
a dolly zoom and I will also know when and why they are used in a film.
Doing the writing and research for the project is as expected not the most fun but it has to be done, though last
week was going quite slowly I think I managed to pick up the slack this week and move on a bit, I have nearly
finished everything in order to begin filming, which is very good as I am hoping to be done with filming by mid
next week at the latest. This will give me plenty of time to edit colour grade and add in VFX that might be needed
and re-shoot anything if necessary. It will also give me plenty of time to record the Foley and ambient sounds of
the short film. At the moment I think I will use a very calm soundtrack with very little music and a lot of Diegetic
sound.
Over the course of the last two weeks I have realised how important it is to stay on-top of my work, especially my
planning and written work, it is very easy to fall behind on the written work, but often harder to catch up as more
written work piles up.
Over the weekend I hope to finish all my planning and begin some filming, then i can utilize next week with the
recording of audio and editing/post production work.
https://www.youtube.com/watch?v=fQ3e5Q0Dtlg
-Filming: For my short film I was set on
using a dolly zoom in the final cut, for this I
obviously needed to use a slider which I
borrowed from the college. I did some tests
in college but I mostly played around with it
when I got home, I learned how to operate
the slider smoothly and different ways of
using the slider. For example the
establishing shot in my film is supposed to
resemble a typical crane shot, I put my
tripod height to its maximum and then put
the slider on a slant. This enabled me to
get a smooth downward movement. After
some practice with the slider I managed to
get a quite subtle yet fairly good looking
dolly zoom.
I think using a slider I have learned a lot
about camera movement I definitely feel as
though this project has improved my
camera skill and I have acquired some
skills and techniques that I will
definitely carry through to future projects.
-Colour grading: I wanted my project to reflect the typical action movie convention
therefore I wanted to use a sort of blue/teal colour tint, to achieve this I used an
adjustment layer over the top of my video clips, it enables me to turn the effects of
and on/delete them a lot easier. It is also more convenient to copy and paste the
colour grade onto other clips and tweak it depending on the clip.
I spent a good portion of the week simply messing around with different colour
correction tools, I think I learned a few things though nothing monumental I learned
lots of little techniques and how to create a decent colour grade. It will be useful for
my FMP if i decide to do video production as I will be able to cut down on post
production time by colour grading faster.
-VFX editing: Before I even began Filming I knew I would need to superimpose a digital
watch face onto what would be my bomb timer. However ironically enough this was not
what I spent most of my time on when doing the VFX, instead It was a transition shot.
The shot cuts from a medium to a closeup/extreme closeup. The transition I made is an
artificial crash zoom, I tried the crash zoom effect while messing around and researching
editing techniques on the internet. However once I did use it in my project I liked the way
it looked and quickly became obsessed with trying to make the transition of the two clips
perfect. After a good 3 to 5 hours of obsessing over the cut I finally figured out all the
aspects that made the shot feel jittery or ineffective.
From obsessing over this clip I learned about how to make two clips move in correlation
to one another causing a smooth transition. This will help in future projects to create
smooth transitions and shots that bleed from one to another organically rather then a
normal cut.
In order to overlay a Bomb timer onto the display of a thermometer, I had to motion track
the screen of the thermometer I did this using a software called Mocha AE that is a
specialised tracking software built into After Effects. Once I had the area tracked I simply
created a new black coloured solid, pasted the tracking data onto it and scaled it up so
that it would cover the whole screen, this would give me the dark background. Then I
created another black solid, I again pasted the tracking data onto it, I then changed the
solid to a numeric timer, changed the numbers to fit what I needed and then it was
finished. This whole process took the better half of 3 hours, mostly because I was
figuring out what I was doing while I was doing it. Though the result is not perfect and if
you look closely you can easily tell it was superimposed afterwards I am still quite
pleased with the result, it went far better than I expected.
(view as slideshow)
Before After
During this week I recorded the sound for my short film, some of the sound effects I recorded using
a shotgun microphone outside, for example the ambient sounds and the footsteps. I recorded other
more detailed sounds inside using a condenser microphone. For example the fluttering paper
sound of the confetti, the unfolding of a paper note and the artificial bang of the confetti cannons.
I used adobe audition to record and master the audio and then imported the clips into premier pro
where I did the last adjustments to match the sound to the scene.
I used the mastering tool in premier pro to edit the audio.
Most of the SFX worked quite well and were relatively quick to record. There were however a few
that took a while to complete. The best example is the suitcase, I recorded that sound effect a good
10 times until it finally sounded somewhat believable, I had to re enact the scene until the sound
finally sounded organic enough to be used. The other sounds were either too harsh or too soft etc.
Though it was annoying it definitely helped me understand what a huge and enormous difference
sound effects can make if they do not fit/ when they fit perfectly and I will allocate more time to the
sound process next time I am doing a project that requires sound/Foley recording of any kind.
Another process that turned out to be more difficult than expected was simply adjusting the levels
of the audio so that nothing was inconsistently loud or quite and so that no sounds were loud/quite
without there being a reason for it. Though these things may seem obvious and simple, I was quite
astonished as to how much impact change the volume of one score or sound effect can have on a
project. It can change the entire dynamic, what was before a bit louder and seemed action heavy, if
you turn the volume down a little bit all of a sudden it can become nothing more than tension
building music. I think I did learn something about Foley recording and more importantly the vast
impact it has on a piece of film. Let me give you an example, in the entirety of my short film you
cannot really see a key being put under or being picked up from under the plant pot. But by simply
adding the sound effect of a key being put down/ picked up, we instantly know there is a key
without seeing it. Again it seems self explanatory but its little sound effects like that, which make
films what they are.
5. production reflection sf 2017

5. production reflection sf 2017

  • 1.
  • 2.
     This proformais to record how you worked on your production  You should complete this each week during production  Consider all relevant areas that you covered that week  Think about what worked/what didn’t work/how you can improve and actions for the following sessions/weeks
  • 3.
    This week weregiven a movie clip from Shaun of the dead however all the audio had been removed from the clip. The task was to recreate all the Foley sounds by ourselves. We made a list of all the sounds we needed and then we went out to record them. Most of the sounds were quite easy to recreate. Simple sounds such as walking and ambient sound were as easy to record as just going outside to record the general ambiance, and then recorded some footsteps. All we then had to do was layer the two over the top of each other and we would have a convincing sound of someone walking outside. What i found most fascinating is the level of detail that is required to make the audio seem realistic, for example when I did the music, I had to cut out the mid and base frequencies and pan the audio towards the left as he walked up to the shop to make it sound like the music was coming from inside the shop, then as he entered I made the audio swap to the right side and i faded in the mid tones and some of the base frequencies also turning up the volume a little. I found this gave the sound a quality as if you had just changed atmosphere from one to another, also little details like making the music sound a bit more tinny and hollow as you wouldn't expect a superb sound system in a corner shop, rather you'd expect an old stereo with bad speakers. other details like adding sounds of him touching his tie at the beginning of the scene just after he trips over the curb, help convey a surrealism that you have learned to expect from movies, little details like that often go completely unnoticed and only subconsciously rendered which is exactly what they are supposed to be. I very much enjoyed the making of this clip as I had never recorded Foley before, at least not to the level of detail as this and never for a completely silent clip where I had to invent my own sounds. It was very enjoyable to go through everything and add each layer of sound to the clip slowly figuring out what was missing, what was too loud, what needs to be louder, figuring out what doesn't seem like an organic normal sound. I feel like I learned quite a lot about how sound is and should be applied in films and some of the ways you can use panning or equalization in order to make a specific sound fit into its environment by cutting out its base resonance or its high frequencies. I am already looking forward to doing the sound design for my short film as i thoroughly enjoyed it and i learned quite a bit.
  • 4.
  • 5.
    This week Ifinished off the initial plans and began the research. Due to the fact that we had 2 days off, of college on-top of our usual study day, we only had one half day and a 3/4 day of college during the whole week. Though I intended to do work at home I lacked initiative to do any work. So I spent a lot of the time at home doing very little work, this obviously means that I am a bit behind, I spent most of Thursday catching up on the work and I am now more or less back on track. I do still have some work to do at home over the weekend to fully catch up and be on-top of everything. While in college I was mostly focused and did work, however I definitely need to make sure that I stay on-top of my college work and if I am lacking behind I need to focus up, and do it at home. With most of the projects I have found doing the research quite challenging as I am rarely interested in doing the research (this depends on what the research is) For example researching viewing figures, Psychographics and demographics I found very uninteresting. However I do appreciate the importance of this research, I just find it hard to do it. When doing the initial plans we had to create some ideas and make mood boards. This was an exercise I enjoyed a lot, specifically the creating of the mood boards. It helped me realise the mood and feel for my film. Looking at all the different pictures and colour schemes on Google, helped me to find different ways of colouring, different ways of lighting, and how film-makers change the colour schemes/colour intensity and vibrancy depending on how harsh the lighting is how soft it is etc. The short film I am planning on making will use two different colour schemes; the first colour scheme I will use is going to be a teal/blue tint, this is to give the traditional agent spy serious aspect to the shot. I'm hoping this will make the shots look serious and will add a touch of realism. Once the plot and climax of the short film is revealed the colour scheme will change to a more soft and homely orange/yellow tint, this will make the scene softer and more comfortable too look at. I have also been researching different forms of post production work as I would like to give my short film an almost hyper realistic feel. Two techniques I would like to implement are Dolly zooms and a form of motion tracking where the tracked object always stays in the center of the frame. (example image) I would like to include these shots to give the short film an extra level of detail and so that I can learn some new tricks and techniques. I would very much like to learn how to operate a steady-cam/glide- cam properly, as it would be a very useful asset for future film production.
  • 8.
    This week wemainly did course work in the form of power point and word, I finished of my research power point and began doing the pre-production power point. Also due to missing a day at the start of the rotation where I missed the filming and editing production experiments, I did them today (Friday 26/01/2018) I used a slider to created a dolly zoom I was surprised at how easy it was operate, though it was not perfectly done by myself, I think I got a pretty decent result using a Tutorial I had found earlier during the research. This worked quite well for me, I simply used a grid to scale and position to footage, so that Tahmids face would be roughly in the same position and the same scale at the start and end of the video clip. This created a fairly good looking dolly zoom, though for when I do it in the future I must motion track the subject so it stays in the same position and then, instead of only having two key-frames (one at the start one at the end) I will use multiple key-frames to match the velocity of the slider. My first attempt, the video above, only used 2 key- frames which is why there are points where it seems like the video is zooming in/out for no reason. This specific tool can come in very useful in the future when doing other projects as I will know how to use/apply a dolly zoom and I will also know when and why they are used in a film. Doing the writing and research for the project is as expected not the most fun but it has to be done, though last week was going quite slowly I think I managed to pick up the slack this week and move on a bit, I have nearly finished everything in order to begin filming, which is very good as I am hoping to be done with filming by mid next week at the latest. This will give me plenty of time to edit colour grade and add in VFX that might be needed and re-shoot anything if necessary. It will also give me plenty of time to record the Foley and ambient sounds of the short film. At the moment I think I will use a very calm soundtrack with very little music and a lot of Diegetic sound. Over the course of the last two weeks I have realised how important it is to stay on-top of my work, especially my planning and written work, it is very easy to fall behind on the written work, but often harder to catch up as more written work piles up. Over the weekend I hope to finish all my planning and begin some filming, then i can utilize next week with the recording of audio and editing/post production work.
  • 9.
  • 11.
    -Filming: For myshort film I was set on using a dolly zoom in the final cut, for this I obviously needed to use a slider which I borrowed from the college. I did some tests in college but I mostly played around with it when I got home, I learned how to operate the slider smoothly and different ways of using the slider. For example the establishing shot in my film is supposed to resemble a typical crane shot, I put my tripod height to its maximum and then put the slider on a slant. This enabled me to get a smooth downward movement. After some practice with the slider I managed to get a quite subtle yet fairly good looking dolly zoom. I think using a slider I have learned a lot about camera movement I definitely feel as though this project has improved my camera skill and I have acquired some skills and techniques that I will definitely carry through to future projects.
  • 12.
    -Colour grading: Iwanted my project to reflect the typical action movie convention therefore I wanted to use a sort of blue/teal colour tint, to achieve this I used an adjustment layer over the top of my video clips, it enables me to turn the effects of and on/delete them a lot easier. It is also more convenient to copy and paste the colour grade onto other clips and tweak it depending on the clip. I spent a good portion of the week simply messing around with different colour correction tools, I think I learned a few things though nothing monumental I learned lots of little techniques and how to create a decent colour grade. It will be useful for my FMP if i decide to do video production as I will be able to cut down on post production time by colour grading faster.
  • 13.
    -VFX editing: BeforeI even began Filming I knew I would need to superimpose a digital watch face onto what would be my bomb timer. However ironically enough this was not what I spent most of my time on when doing the VFX, instead It was a transition shot. The shot cuts from a medium to a closeup/extreme closeup. The transition I made is an artificial crash zoom, I tried the crash zoom effect while messing around and researching editing techniques on the internet. However once I did use it in my project I liked the way it looked and quickly became obsessed with trying to make the transition of the two clips perfect. After a good 3 to 5 hours of obsessing over the cut I finally figured out all the aspects that made the shot feel jittery or ineffective. From obsessing over this clip I learned about how to make two clips move in correlation to one another causing a smooth transition. This will help in future projects to create smooth transitions and shots that bleed from one to another organically rather then a normal cut. In order to overlay a Bomb timer onto the display of a thermometer, I had to motion track the screen of the thermometer I did this using a software called Mocha AE that is a specialised tracking software built into After Effects. Once I had the area tracked I simply created a new black coloured solid, pasted the tracking data onto it and scaled it up so that it would cover the whole screen, this would give me the dark background. Then I created another black solid, I again pasted the tracking data onto it, I then changed the solid to a numeric timer, changed the numbers to fit what I needed and then it was finished. This whole process took the better half of 3 hours, mostly because I was figuring out what I was doing while I was doing it. Though the result is not perfect and if you look closely you can easily tell it was superimposed afterwards I am still quite pleased with the result, it went far better than I expected.
  • 14.
  • 16.
    During this weekI recorded the sound for my short film, some of the sound effects I recorded using a shotgun microphone outside, for example the ambient sounds and the footsteps. I recorded other more detailed sounds inside using a condenser microphone. For example the fluttering paper sound of the confetti, the unfolding of a paper note and the artificial bang of the confetti cannons. I used adobe audition to record and master the audio and then imported the clips into premier pro where I did the last adjustments to match the sound to the scene. I used the mastering tool in premier pro to edit the audio. Most of the SFX worked quite well and were relatively quick to record. There were however a few that took a while to complete. The best example is the suitcase, I recorded that sound effect a good 10 times until it finally sounded somewhat believable, I had to re enact the scene until the sound finally sounded organic enough to be used. The other sounds were either too harsh or too soft etc. Though it was annoying it definitely helped me understand what a huge and enormous difference sound effects can make if they do not fit/ when they fit perfectly and I will allocate more time to the sound process next time I am doing a project that requires sound/Foley recording of any kind. Another process that turned out to be more difficult than expected was simply adjusting the levels of the audio so that nothing was inconsistently loud or quite and so that no sounds were loud/quite without there being a reason for it. Though these things may seem obvious and simple, I was quite astonished as to how much impact change the volume of one score or sound effect can have on a project. It can change the entire dynamic, what was before a bit louder and seemed action heavy, if you turn the volume down a little bit all of a sudden it can become nothing more than tension building music. I think I did learn something about Foley recording and more importantly the vast impact it has on a piece of film. Let me give you an example, in the entirety of my short film you cannot really see a key being put under or being picked up from under the plant pot. But by simply adding the sound effect of a key being put down/ picked up, we instantly know there is a key without seeing it. Again it seems self explanatory but its little sound effects like that, which make films what they are.

Editor's Notes

  • #4 Discuss the tools and processes used in your production. Log your thoughts and feelings about your work.
  • #6 Discuss the tools and processes used in your production. Log your thoughts and feelings about your work.
  • #8 Collection of images related to your product/inspirational/visually interesting At least 15 needed
  • #9 Discuss the tools and processes used in your production. Log your thoughts and feelings about your work.
  • #11 Discuss the tools and processes used in your production. Log your thoughts and feelings about your work.
  • #16 Discuss the tools and processes used in your production. Log your thoughts and feelings about your work.