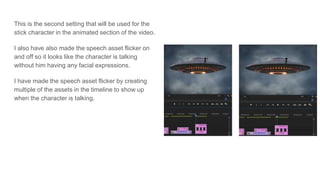
Production Reflection
Laurence Archer
To begin my production, I started by gathering all
sources of audio and video I needed but did not
have to record myself. Once I did this I then placed
all the files into my Adobe Premiere Pro document
which I will be creating my final production on.
I did this because it will help me be more efficient
and faster when I need to edit together the rest of
my documentary, after I have gathered my filmed
footage.
For my title card, I wanted to make it look and sound like I was typing the title as the video was playing. I
did this by adding another letter every few frames, the keyframes used to create this effect are shown in
the left image above.
I also used a stock sound effect of a sound of typing on a keyboard to make the typing aspect of my title
card seem much more realistic.
For my title card for the animation section of the
documentary, I created many different clips of the
same piece of text but at different rotated angles so
it feels like it had been drawn over and over, whilst
also looking nice visually.
I had to segment the text in the timeline so you can
not see the text rotate, as I wanted it to move
instantly instead of rotating over time.
These are some of the video transition effects that
are used in my production. Video transition effects
are used to make moving from each scene look
much nicer.
If these were not added to the end of each scene,
the video would just cut instantly to the next part of
the video which can be quite jarring to the eyes and
visually unappealing. Which makes having these
effects very good to use in my production.
For the foley title card, I used footage from a
YouTube video talking about foley, I will later add
sound effects that sound like someone walking in
snow, as an example of foley.
I also created my own text title card, which is slowly
fades in and out during the shot, so the viewers
know which section of the video they are on.
The text has a ‘crossfade’ transition effect to fade in
and out during the video, whilst the footage has a
‘dip to black’ effect so the shot fades in and out to a
black screen.
This is the music I will use for the majority of my
production. This song was taken from a royalty free
website so I can use it without paying for rights to
the song.
This will be used as background music during the
video so it isn’t just silence while someone is talking
during the documentary.
The song can also be cut quite easy to be used in
seperate parts of the video without anyone noticing
it’s been cut.
The video shown on the image to the right is a
video example of foley being used in videos.
This footage can be used during the foley section of
my video and can also be kept for uses of a
contingency plan.
The footage will be used to demonstrate foley to the
viewers of my documentary and the importance of it
when filming.
These images are going to be used as backgrounds
for the animated section of my video. These two
backgrounds are used to demonstrate a good and
bad example of a normal setting for characters to
be in.
I will start by using the top image and will use the
bottom one for one scene when I talk about
unnecessary backgrounds.
This is one of the character models that will be
used during the animated section of my video, I
have created a stick figure to show that the
character is far away.
I also created a separate asset for the character
which are some speech marks to show when the
character is talking.
This will only be used for a scene with a spaceship
setting and is used to show the distance between
the character and the camera.
This is the second setting that will be used for the
stick character in the animated section of the video.
I also have also made the speech asset flicker on
and off so it looks like the character is talking
without him having any facial expressions.
I have made the speech asset flicker by creating
multiple of the assets in the timeline to show up
when the character is talking.
I have also got cinematic shots off YouTube for a
more appealing aesthetic for the documentary.
These shots will also help with transitioning
between each scene and other shots. I will also cut
out some of the shots that are less appealing and
also so I do not have too many shots.
I have removed any audio from these shots as I
would like to have people talk over these shots.
Finally, I moved all the film footage and animation into my timeline on Premiere Pro. And exported it so it
could be uploaded on YouTube.
Before I did this, I cut out any unnecessary footage that wasn’t needed for the final product. I did this so I
did not go over the three minute time limit while also making the documentary more enjoyable by not
having any unnecessary filler footage.

Production reflection

  • 1.
  • 2.
    To begin myproduction, I started by gathering all sources of audio and video I needed but did not have to record myself. Once I did this I then placed all the files into my Adobe Premiere Pro document which I will be creating my final production on. I did this because it will help me be more efficient and faster when I need to edit together the rest of my documentary, after I have gathered my filmed footage.
  • 3.
    For my titlecard, I wanted to make it look and sound like I was typing the title as the video was playing. I did this by adding another letter every few frames, the keyframes used to create this effect are shown in the left image above. I also used a stock sound effect of a sound of typing on a keyboard to make the typing aspect of my title card seem much more realistic.
  • 4.
    For my titlecard for the animation section of the documentary, I created many different clips of the same piece of text but at different rotated angles so it feels like it had been drawn over and over, whilst also looking nice visually. I had to segment the text in the timeline so you can not see the text rotate, as I wanted it to move instantly instead of rotating over time.
  • 5.
    These are someof the video transition effects that are used in my production. Video transition effects are used to make moving from each scene look much nicer. If these were not added to the end of each scene, the video would just cut instantly to the next part of the video which can be quite jarring to the eyes and visually unappealing. Which makes having these effects very good to use in my production.
  • 6.
    For the foleytitle card, I used footage from a YouTube video talking about foley, I will later add sound effects that sound like someone walking in snow, as an example of foley. I also created my own text title card, which is slowly fades in and out during the shot, so the viewers know which section of the video they are on. The text has a ‘crossfade’ transition effect to fade in and out during the video, whilst the footage has a ‘dip to black’ effect so the shot fades in and out to a black screen.
  • 7.
    This is themusic I will use for the majority of my production. This song was taken from a royalty free website so I can use it without paying for rights to the song. This will be used as background music during the video so it isn’t just silence while someone is talking during the documentary. The song can also be cut quite easy to be used in seperate parts of the video without anyone noticing it’s been cut.
  • 8.
    The video shownon the image to the right is a video example of foley being used in videos. This footage can be used during the foley section of my video and can also be kept for uses of a contingency plan. The footage will be used to demonstrate foley to the viewers of my documentary and the importance of it when filming.
  • 9.
    These images aregoing to be used as backgrounds for the animated section of my video. These two backgrounds are used to demonstrate a good and bad example of a normal setting for characters to be in. I will start by using the top image and will use the bottom one for one scene when I talk about unnecessary backgrounds.
  • 10.
    This is oneof the character models that will be used during the animated section of my video, I have created a stick figure to show that the character is far away. I also created a separate asset for the character which are some speech marks to show when the character is talking. This will only be used for a scene with a spaceship setting and is used to show the distance between the character and the camera.
  • 11.
    This is thesecond setting that will be used for the stick character in the animated section of the video. I also have also made the speech asset flicker on and off so it looks like the character is talking without him having any facial expressions. I have made the speech asset flicker by creating multiple of the assets in the timeline to show up when the character is talking.
  • 12.
    I have alsogot cinematic shots off YouTube for a more appealing aesthetic for the documentary. These shots will also help with transitioning between each scene and other shots. I will also cut out some of the shots that are less appealing and also so I do not have too many shots. I have removed any audio from these shots as I would like to have people talk over these shots.
  • 13.
    Finally, I movedall the film footage and animation into my timeline on Premiere Pro. And exported it so it could be uploaded on YouTube. Before I did this, I cut out any unnecessary footage that wasn’t needed for the final product. I did this so I did not go over the three minute time limit while also making the documentary more enjoyable by not having any unnecessary filler footage.