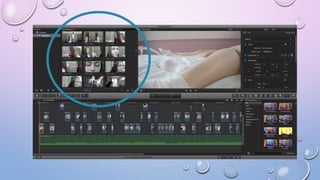
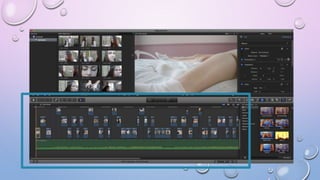
SlideShare a Scribd company logo
1 of 20
FINAL CUT PRO
After importing my video clips, they appeared in this
box. As I moved the mouse over the clip it would give
a preview of the clip. This was useful for viewing clips
when there are multiple shots as you can then see
which one you want to add out of the takes. For
example DSC_0081 is a blooper whereas clip
DSC_0082 is the clip I wanted to use, by running
over it I could see which one was the blooper
therefore didn’t waste any time in adding the wrong
clip to my timeline. The process of adding videos to
my timeline was very simple, I could select the whole
clip and add it or if it was just a specific part I could
select that part and just add that.
In final cut there is a options bar which has different choices for the editor
to choose to use. These are the transitions which I could choose from
however I decided to not use any transitions because I like how my
narrative developed with the straight cut editing. On a whole I decided to
lightly edit my video because I didn’t want the editing to distract from the
main narrative. There was also an option to add text, however I didn’t
choose to add text to my video. Sometimes music videos add text to
highlight certain words the lyrics are singing sometimes in Rap or Pop
videos. Other music videos may add a title to their video to introduce the
video and song, however I chose not to do this because I didn’t want to
pull attention from the clip. This bar also offers a filter tab where there is a
selection of filters which can be quickly and easily applied to individual
clips, I didn’t use many of these as I felt many of them was too garish and I
preferred the original look of the video however I did use one of them in my
video.
This is the timeline of the editing software, where the video clips can be ordered and cut. In
the green bar is the song I had added. Each clip can be arranged here and I found the
timeline very simple to use
This is the effects area, this is where the editing can become detailed
and very precise. For the type of editing I wanted to do I clicked under
Color, and on Correction 1. This then took me to the editing panel, which
I could change the saturation, color and exposure. Here I edited the
exposure, the sliders included a global option, which changes everything
overall. The shadow’s slider changes the darker parts of the shot, (where
there is most shadows). The midtones changes effect the areas which
are between shadows and highlights. Finally the highlights are the
lightest points of the image. By dragging the exposure circles down it
creates a darker shot whereas pulling them up makes the exposure
brighter.
Here I changed the shadows to
10% which lightened the corners
of the image. I also made the
midtones to 11% which
brightened everything in-between
however dropped the highlights
to 1% as the ‘glare’ by the high
percentage of midtones meant
the image was too washed out
therefore I made the highlights
slightly darker.
This is a before and after
shot. I prefer the after
shot as I think it’s a much
softer look, whereas the
first clip looks more harsh.
Here is another example of where I lightened
the image, giving it a more luminous look rather
than the darker original image. I found it easy to
use Final Cut Pro to do this therefore in the
future would use the same programme if I was
to edit darker clips. Sometimes in other editing
programmes such as Movie Maker when editing
aspects like the brightness, by making clips
lighter, quality of the video is lost or it looks
unnaturally bright. However the exposure wheel
and percentage system Final Cut has means
you can make changes to the exposure subtly
instead of having it too much.
This is an example of the same clip edited in
Movie Maker. The brightness has only been
altered a little bit however the shot is over-
exposed and looks unprofessional. When in full
screen quality of the video was also lost. The
brightness also is really harsh whereas I wanted
a softer look, it also looks like it is obviously
edited whereas I went for a more subtle look.
Movie Maker
Final Cut Pro
Original
Exposure
Changed
Original
Brightness
Slightly
Changed
This is the blade tool I used in Final Cut Pro. This tool allowed me to cut clips at a
precise point. The timer at the top of the image below shows the exact time of
where the video Is currently at. When using the blade tool as the mouse runs over a
clip it gives the precise time, therefore this was really useful at editing clips in detail
because I could pin point the part which I wanted the clip to split.
Here is a clip which I used the blade tool to split.
After splitting the clip it allowed me to individually
edit each one. Therefore if I wanted to add an effect
halfway through a clip by using the blade tool to
separate the clip I could add an effect to the part I
wanted and the flow of the video play back would
not be effected and seamlessly transition. I used
this to edit a lot of my clips with because I found it
very user friendly and precise. It particularly helped
when editing to the beat as I could listen to the song
and when hearing the ‘beat’ I wanted to cut a clip at
I could use the blade tool to cut a clip and then
delete the unwanted part. Therefore I really liked
this tool as it had multi-uses.
After using the blade tool to separate this
clip I selected it and clicked on ‘Adjust
Speed’ There are pre-set speed changes I
could pick like ‘50%’ ‘25%’ and ‘75%’
However there was also an option to
adjust the speed to a custom setting. This
was extremely useful when the pre-set
options were too slow or too fast. It
allowed me to adjust the speed precisely
so it was exactly what I wanted.
Another tool I used was the trim tool which allowed
me to edit the duration of a clip. This could extend
or shorten a clip. To do this I had to select the
segment I wanted to edit then drag the yellow bar at
the desired side until I was happy with where it
ended. I used this tool along with the blade tool to
edit the duration of clips in order to get my lip-
syncing precise and in time with the music.
This is the movie maker
version of the trimming
tool. I found it very
unfriendly and awkward
to use. Having to set
certain start and end
points, unlike the
simplistic drag, adjust,
trimmed style the Final
Cut Pro was.
To edit the
colourings of
the video I went
to the same
menu to get to
the exposure.
Color,
Correction 1.
The colour wheel was simple to use. Again
it had a global option which made the
overall clip a certain colour, the shadows
made the darker parts of the clip change
colour, midtones the parts inbetween and
the highlights made the lightest parts. I
added a blue tone to the clip to give it a
more ‘depressed’ look rather than the
yellow undertones the original clip had.
Adjusted
Colour
Original
Here is another example
of where I changed the
colour to give the clip a
more dismal look rather
than the brighter more
warmer toned video clip
below.
To the right is a
comparison to the colour
options I had on Movie
Maker. This is the closest
option to make the video
‘blue’. I think this looks
more unprofessional and
isn’t a very subtle editing
filter which is what I was
aiming for. Therefore
Final Cut provided the
tools to be able to do
this.
More examples where I changed the colouring to be more ‘pink’ which gave a more
romantic, rosy look to the video.
Changed colour
Original
I looked at the filters however mostly found they wasn’t appropriate for my
video. A lot of them were too severe and gave the appearance of a heavily
edited video which I didn’t want. This is because I wanted to draw
attention to the narrative instead.
However for this part of the video it is
separate to the chorus, bridge and verse
scenes and therefore I wanted to use the
editing to separate it from the rest of the
video therefore felt a filter may be
appropriate. I picked the black and white
filter as I still felt it upheld the ‘soft’ look I was
going for throughout my video and the lack
of colouring means the audiences attention
is directly drawn to what is going on in the
close-up. In this shot her eyes are the main
attention. In the coloured image there are
five main colours in the image meaning our
eyes may be drawn to the orange in the
background or elsewhere.
By changing this to black and white the
darkest part of the image is her eyelashes. As they are in condensed bold
black lines in the centre of the shot
the eyes are more likely to fall here
than the coloured image where
there is more distraction.

More Related Content

What's hot

How did you use media technologies in the
How did you use media technologies in theHow did you use media technologies in the
How did you use media technologies in theReiss Langdon
 
Media evaluation task 6
Media evaluation task 6Media evaluation task 6
Media evaluation task 6jakeleat
 
Changes
ChangesChanges
ChangesXPHD
 
Media Evaluation Question 4 - Technology 2
Media Evaluation Question 4 - Technology 2Media Evaluation Question 4 - Technology 2
Media Evaluation Question 4 - Technology 2smarshall96
 
6. fmp production reflection
6. fmp production reflection6. fmp production reflection
6. fmp production reflectionFraser Hardwick
 
Presentation1
Presentation1Presentation1
Presentation1anjvars
 
3.production experiments
3.production experiments3.production experiments
3.production experimentsJordannekay99
 
5. production reflection
5. production reflection 5. production reflection
5. production reflection JackAbsFab20
 
4. production experiments(1) (2) (1)
4. production experiments(1) (2) (1)4. production experiments(1) (2) (1)
4. production experiments(1) (2) (1)kieran Beal
 
How did you use new media technologies in the construction and research, plan...
How did you use new media technologies in the construction and research, plan...How did you use new media technologies in the construction and research, plan...
How did you use new media technologies in the construction and research, plan...guested647b
 
Evaluation question 4
Evaluation question 4Evaluation question 4
Evaluation question 4Rossraymondo
 
4. production experiments(1) (2) (1)
4. production experiments(1) (2) (1)4. production experiments(1) (2) (1)
4. production experiments(1) (2) (1)kieran Beal
 

What's hot (19)

How did you use media technologies in the
How did you use media technologies in theHow did you use media technologies in the
How did you use media technologies in the
 
Media evaluation task 6
Media evaluation task 6Media evaluation task 6
Media evaluation task 6
 
Changes
ChangesChanges
Changes
 
Question 4 NEW
Question 4 NEWQuestion 4 NEW
Question 4 NEW
 
Media Evaluation Question 4 - Technology 2
Media Evaluation Question 4 - Technology 2Media Evaluation Question 4 - Technology 2
Media Evaluation Question 4 - Technology 2
 
6. fmp production reflection
6. fmp production reflection6. fmp production reflection
6. fmp production reflection
 
Question 4
Question 4Question 4
Question 4
 
The internet
The internetThe internet
The internet
 
Trailer production
Trailer production Trailer production
Trailer production
 
Presentation1
Presentation1Presentation1
Presentation1
 
production log
production log production log
production log
 
Evaluation question 4
Evaluation question 4Evaluation question 4
Evaluation question 4
 
3.production experiments
3.production experiments3.production experiments
3.production experiments
 
5. production reflection
5. production reflection 5. production reflection
5. production reflection
 
4. production experiments(1) (2) (1)
4. production experiments(1) (2) (1)4. production experiments(1) (2) (1)
4. production experiments(1) (2) (1)
 
Evaluation question 4
Evaluation question 4Evaluation question 4
Evaluation question 4
 
How did you use new media technologies in the construction and research, plan...
How did you use new media technologies in the construction and research, plan...How did you use new media technologies in the construction and research, plan...
How did you use new media technologies in the construction and research, plan...
 
Evaluation question 4
Evaluation question 4Evaluation question 4
Evaluation question 4
 
4. production experiments(1) (2) (1)
4. production experiments(1) (2) (1)4. production experiments(1) (2) (1)
4. production experiments(1) (2) (1)
 

Viewers also liked

Kajals powerpoint evaluation - Q1.
Kajals powerpoint evaluation - Q1.Kajals powerpoint evaluation - Q1.
Kajals powerpoint evaluation - Q1.Kajal Vadgama
 
Video Editing with Final Cut Pro X
Video Editing with Final Cut Pro XVideo Editing with Final Cut Pro X
Video Editing with Final Cut Pro XHafizur Rohman
 
Pai ca cérvix
Pai ca cérvixPai ca cérvix
Pai ca cérvixrodonfilos
 
Matemàtiques a l'entorn
Matemàtiques a l'entornMatemàtiques a l'entorn
Matemàtiques a l'entornEscola Mogent
 
Ldc arittapatti project
Ldc arittapatti projectLdc arittapatti project
Ldc arittapatti projectdevadhakshan
 
Final Cut Pro Tips
Final Cut Pro TipsFinal Cut Pro Tips
Final Cut Pro TipsChris New
 
Final cut pro ppt
Final cut pro pptFinal cut pro ppt
Final cut pro pptsparkly
 
Introduction to FINAL CUT PRO X Editing tips and techniques
Introduction to FINAL CUT PRO X Editing tips and techniquesIntroduction to FINAL CUT PRO X Editing tips and techniques
Introduction to FINAL CUT PRO X Editing tips and techniquesMR Murray
 

Viewers also liked (15)

Kajals powerpoint evaluation - Q1.
Kajals powerpoint evaluation - Q1.Kajals powerpoint evaluation - Q1.
Kajals powerpoint evaluation - Q1.
 
Final Cut Pro
Final Cut ProFinal Cut Pro
Final Cut Pro
 
Video Editing with Final Cut Pro X
Video Editing with Final Cut Pro XVideo Editing with Final Cut Pro X
Video Editing with Final Cut Pro X
 
Pai ca cérvix
Pai ca cérvixPai ca cérvix
Pai ca cérvix
 
Sin título 6
Sin título 6Sin título 6
Sin título 6
 
Puerta mecánica
Puerta mecánicaPuerta mecánica
Puerta mecánica
 
Matemàtiques a l'entorn
Matemàtiques a l'entornMatemàtiques a l'entorn
Matemàtiques a l'entorn
 
5η ομαδα
5η ομαδα5η ομαδα
5η ομαδα
 
Scratch guessing game
Scratch guessing gameScratch guessing game
Scratch guessing game
 
Ldc arittapatti project
Ldc arittapatti projectLdc arittapatti project
Ldc arittapatti project
 
Folleto luesia + entrevista
Folleto luesia + entrevistaFolleto luesia + entrevista
Folleto luesia + entrevista
 
Final Cut Pro Tips
Final Cut Pro TipsFinal Cut Pro Tips
Final Cut Pro Tips
 
Final cut pro ppt
Final cut pro pptFinal cut pro ppt
Final cut pro ppt
 
Introduction to FINAL CUT PRO X Editing tips and techniques
Introduction to FINAL CUT PRO X Editing tips and techniquesIntroduction to FINAL CUT PRO X Editing tips and techniques
Introduction to FINAL CUT PRO X Editing tips and techniques
 
Lubricación Industrial
Lubricación  IndustrialLubricación  Industrial
Lubricación Industrial
 

Similar to FINAL CUT PRO TIPS FOR COLOR GRADING AND PRECISE EDITING

Production diary
Production diaryProduction diary
Production diaryLewisGray
 
Evaluation, Question 4
Evaluation, Question 4Evaluation, Question 4
Evaluation, Question 4kait-gc
 
Alterations
AlterationsAlterations
Alterationsgeetag
 
Premiere pro
Premiere proPremiere pro
Premiere proLucy Bell
 
Music Video Constuction
Music Video ConstuctionMusic Video Constuction
Music Video ConstuctionFazBegum
 
Music Video Printscreens
Music Video PrintscreensMusic Video Printscreens
Music Video PrintscreensFazBegum
 
Question 4
Question 4Question 4
Question 4Grace
 
Question 4
Question 4Question 4
Question 4Grace
 
Production / Edit Log
Production / Edit LogProduction / Edit Log
Production / Edit LogNatalie-Lynch
 
MV Process log form 2019
MV Process log form 2019MV Process log form 2019
MV Process log form 2019georgewetton1
 
3. fmp production experiments
3. fmp production experiments3. fmp production experiments
3. fmp production experimentsjack-morton
 
Unit 10 Learning Aim C
Unit 10 Learning Aim CUnit 10 Learning Aim C
Unit 10 Learning Aim CBethPotter4
 

Similar to FINAL CUT PRO TIPS FOR COLOR GRADING AND PRECISE EDITING (20)

Production diary
Production diaryProduction diary
Production diary
 
Production diary
Production diaryProduction diary
Production diary
 
Production diary
Production diaryProduction diary
Production diary
 
Production diary
Production diaryProduction diary
Production diary
 
Production diary
Production diaryProduction diary
Production diary
 
Post production diary
Post production diaryPost production diary
Post production diary
 
Editing processes
Editing processesEditing processes
Editing processes
 
Evaluation, Question 4
Evaluation, Question 4Evaluation, Question 4
Evaluation, Question 4
 
Editing
EditingEditing
Editing
 
Alterations
AlterationsAlterations
Alterations
 
Premiere pro
Premiere proPremiere pro
Premiere pro
 
Music Video Constuction
Music Video ConstuctionMusic Video Constuction
Music Video Constuction
 
Music Video Printscreens
Music Video PrintscreensMusic Video Printscreens
Music Video Printscreens
 
Question 4
Question 4Question 4
Question 4
 
Question 4
Question 4Question 4
Question 4
 
Production / Edit Log
Production / Edit LogProduction / Edit Log
Production / Edit Log
 
MV Process log form 2019
MV Process log form 2019MV Process log form 2019
MV Process log form 2019
 
3. fmp production experiments
3. fmp production experiments3. fmp production experiments
3. fmp production experiments
 
Unit 10 Learning Aim C
Unit 10 Learning Aim CUnit 10 Learning Aim C
Unit 10 Learning Aim C
 
Editing
EditingEditing
Editing
 

More from Georgina Fenton

More from Georgina Fenton (12)

Survey: Audience Research
Survey: Audience ResearchSurvey: Audience Research
Survey: Audience Research
 
Album Research
Album ResearchAlbum Research
Album Research
 
Q4 PhotoShop Process
Q4 PhotoShop ProcessQ4 PhotoShop Process
Q4 PhotoShop Process
 
Poster Research
Poster ResearchPoster Research
Poster Research
 
Q1 Convention and Theory Analysis
Q1 Convention and Theory AnalysisQ1 Convention and Theory Analysis
Q1 Convention and Theory Analysis
 
Existing Products
Existing ProductsExisting Products
Existing Products
 
Storyboard
StoryboardStoryboard
Storyboard
 
Uses And Gratification Theory
Uses And Gratification TheoryUses And Gratification Theory
Uses And Gratification Theory
 
Stuart Hall: Sacrilege
Stuart Hall: SacrilegeStuart Hall: Sacrilege
Stuart Hall: Sacrilege
 
Stuart Hall: Smack My Bitch Up
Stuart Hall: Smack My Bitch UpStuart Hall: Smack My Bitch Up
Stuart Hall: Smack My Bitch Up
 
Richard Dyer: Yeah Yeah Yeahs
Richard Dyer: Yeah Yeah Yeahs Richard Dyer: Yeah Yeah Yeahs
Richard Dyer: Yeah Yeah Yeahs
 
Sven Carlson
Sven CarlsonSven Carlson
Sven Carlson
 

Recently uploaded

Introduction to ArtificiaI Intelligence in Higher Education
Introduction to ArtificiaI Intelligence in Higher EducationIntroduction to ArtificiaI Intelligence in Higher Education
Introduction to ArtificiaI Intelligence in Higher Educationpboyjonauth
 
The basics of sentences session 2pptx copy.pptx
The basics of sentences session 2pptx copy.pptxThe basics of sentences session 2pptx copy.pptx
The basics of sentences session 2pptx copy.pptxheathfieldcps1
 
SOCIAL AND HISTORICAL CONTEXT - LFTVD.pptx
SOCIAL AND HISTORICAL CONTEXT - LFTVD.pptxSOCIAL AND HISTORICAL CONTEXT - LFTVD.pptx
SOCIAL AND HISTORICAL CONTEXT - LFTVD.pptxiammrhaywood
 
Incoming and Outgoing Shipments in 1 STEP Using Odoo 17
Incoming and Outgoing Shipments in 1 STEP Using Odoo 17Incoming and Outgoing Shipments in 1 STEP Using Odoo 17
Incoming and Outgoing Shipments in 1 STEP Using Odoo 17Celine George
 
Measures of Central Tendency: Mean, Median and Mode
Measures of Central Tendency: Mean, Median and ModeMeasures of Central Tendency: Mean, Median and Mode
Measures of Central Tendency: Mean, Median and ModeThiyagu K
 
Kisan Call Centre - To harness potential of ICT in Agriculture by answer farm...
Kisan Call Centre - To harness potential of ICT in Agriculture by answer farm...Kisan Call Centre - To harness potential of ICT in Agriculture by answer farm...
Kisan Call Centre - To harness potential of ICT in Agriculture by answer farm...Krashi Coaching
 
Mastering the Unannounced Regulatory Inspection
Mastering the Unannounced Regulatory InspectionMastering the Unannounced Regulatory Inspection
Mastering the Unannounced Regulatory InspectionSafetyChain Software
 
Call Girls in Dwarka Mor Delhi Contact Us 9654467111
Call Girls in Dwarka Mor Delhi Contact Us 9654467111Call Girls in Dwarka Mor Delhi Contact Us 9654467111
Call Girls in Dwarka Mor Delhi Contact Us 9654467111Sapana Sha
 
Hybridoma Technology ( Production , Purification , and Application )
Hybridoma Technology  ( Production , Purification , and Application  ) Hybridoma Technology  ( Production , Purification , and Application  )
Hybridoma Technology ( Production , Purification , and Application ) Sakshi Ghasle
 
Organic Name Reactions for the students and aspirants of Chemistry12th.pptx
Organic Name Reactions  for the students and aspirants of Chemistry12th.pptxOrganic Name Reactions  for the students and aspirants of Chemistry12th.pptx
Organic Name Reactions for the students and aspirants of Chemistry12th.pptxVS Mahajan Coaching Centre
 
PSYCHIATRIC History collection FORMAT.pptx
PSYCHIATRIC   History collection FORMAT.pptxPSYCHIATRIC   History collection FORMAT.pptx
PSYCHIATRIC History collection FORMAT.pptxPoojaSen20
 
Presiding Officer Training module 2024 lok sabha elections
Presiding Officer Training module 2024 lok sabha electionsPresiding Officer Training module 2024 lok sabha elections
Presiding Officer Training module 2024 lok sabha electionsanshu789521
 
Crayon Activity Handout For the Crayon A
Crayon Activity Handout For the Crayon ACrayon Activity Handout For the Crayon A
Crayon Activity Handout For the Crayon AUnboundStockton
 
The Most Excellent Way | 1 Corinthians 13
The Most Excellent Way | 1 Corinthians 13The Most Excellent Way | 1 Corinthians 13
The Most Excellent Way | 1 Corinthians 13Steve Thomason
 
How to Make a Pirate ship Primary Education.pptx
How to Make a Pirate ship Primary Education.pptxHow to Make a Pirate ship Primary Education.pptx
How to Make a Pirate ship Primary Education.pptxmanuelaromero2013
 
Arihant handbook biology for class 11 .pdf
Arihant handbook biology for class 11 .pdfArihant handbook biology for class 11 .pdf
Arihant handbook biology for class 11 .pdfchloefrazer622
 

Recently uploaded (20)

Introduction to ArtificiaI Intelligence in Higher Education
Introduction to ArtificiaI Intelligence in Higher EducationIntroduction to ArtificiaI Intelligence in Higher Education
Introduction to ArtificiaI Intelligence in Higher Education
 
The basics of sentences session 2pptx copy.pptx
The basics of sentences session 2pptx copy.pptxThe basics of sentences session 2pptx copy.pptx
The basics of sentences session 2pptx copy.pptx
 
Staff of Color (SOC) Retention Efforts DDSD
Staff of Color (SOC) Retention Efforts DDSDStaff of Color (SOC) Retention Efforts DDSD
Staff of Color (SOC) Retention Efforts DDSD
 
Código Creativo y Arte de Software | Unidad 1
Código Creativo y Arte de Software | Unidad 1Código Creativo y Arte de Software | Unidad 1
Código Creativo y Arte de Software | Unidad 1
 
SOCIAL AND HISTORICAL CONTEXT - LFTVD.pptx
SOCIAL AND HISTORICAL CONTEXT - LFTVD.pptxSOCIAL AND HISTORICAL CONTEXT - LFTVD.pptx
SOCIAL AND HISTORICAL CONTEXT - LFTVD.pptx
 
Incoming and Outgoing Shipments in 1 STEP Using Odoo 17
Incoming and Outgoing Shipments in 1 STEP Using Odoo 17Incoming and Outgoing Shipments in 1 STEP Using Odoo 17
Incoming and Outgoing Shipments in 1 STEP Using Odoo 17
 
Measures of Central Tendency: Mean, Median and Mode
Measures of Central Tendency: Mean, Median and ModeMeasures of Central Tendency: Mean, Median and Mode
Measures of Central Tendency: Mean, Median and Mode
 
Kisan Call Centre - To harness potential of ICT in Agriculture by answer farm...
Kisan Call Centre - To harness potential of ICT in Agriculture by answer farm...Kisan Call Centre - To harness potential of ICT in Agriculture by answer farm...
Kisan Call Centre - To harness potential of ICT in Agriculture by answer farm...
 
Mastering the Unannounced Regulatory Inspection
Mastering the Unannounced Regulatory InspectionMastering the Unannounced Regulatory Inspection
Mastering the Unannounced Regulatory Inspection
 
Call Girls in Dwarka Mor Delhi Contact Us 9654467111
Call Girls in Dwarka Mor Delhi Contact Us 9654467111Call Girls in Dwarka Mor Delhi Contact Us 9654467111
Call Girls in Dwarka Mor Delhi Contact Us 9654467111
 
Hybridoma Technology ( Production , Purification , and Application )
Hybridoma Technology  ( Production , Purification , and Application  ) Hybridoma Technology  ( Production , Purification , and Application  )
Hybridoma Technology ( Production , Purification , and Application )
 
TataKelola dan KamSiber Kecerdasan Buatan v022.pdf
TataKelola dan KamSiber Kecerdasan Buatan v022.pdfTataKelola dan KamSiber Kecerdasan Buatan v022.pdf
TataKelola dan KamSiber Kecerdasan Buatan v022.pdf
 
Organic Name Reactions for the students and aspirants of Chemistry12th.pptx
Organic Name Reactions  for the students and aspirants of Chemistry12th.pptxOrganic Name Reactions  for the students and aspirants of Chemistry12th.pptx
Organic Name Reactions for the students and aspirants of Chemistry12th.pptx
 
PSYCHIATRIC History collection FORMAT.pptx
PSYCHIATRIC   History collection FORMAT.pptxPSYCHIATRIC   History collection FORMAT.pptx
PSYCHIATRIC History collection FORMAT.pptx
 
Presiding Officer Training module 2024 lok sabha elections
Presiding Officer Training module 2024 lok sabha electionsPresiding Officer Training module 2024 lok sabha elections
Presiding Officer Training module 2024 lok sabha elections
 
Model Call Girl in Bikash Puri Delhi reach out to us at 🔝9953056974🔝
Model Call Girl in Bikash Puri  Delhi reach out to us at 🔝9953056974🔝Model Call Girl in Bikash Puri  Delhi reach out to us at 🔝9953056974🔝
Model Call Girl in Bikash Puri Delhi reach out to us at 🔝9953056974🔝
 
Crayon Activity Handout For the Crayon A
Crayon Activity Handout For the Crayon ACrayon Activity Handout For the Crayon A
Crayon Activity Handout For the Crayon A
 
The Most Excellent Way | 1 Corinthians 13
The Most Excellent Way | 1 Corinthians 13The Most Excellent Way | 1 Corinthians 13
The Most Excellent Way | 1 Corinthians 13
 
How to Make a Pirate ship Primary Education.pptx
How to Make a Pirate ship Primary Education.pptxHow to Make a Pirate ship Primary Education.pptx
How to Make a Pirate ship Primary Education.pptx
 
Arihant handbook biology for class 11 .pdf
Arihant handbook biology for class 11 .pdfArihant handbook biology for class 11 .pdf
Arihant handbook biology for class 11 .pdf
 

FINAL CUT PRO TIPS FOR COLOR GRADING AND PRECISE EDITING

  • 2.
  • 3. After importing my video clips, they appeared in this box. As I moved the mouse over the clip it would give a preview of the clip. This was useful for viewing clips when there are multiple shots as you can then see which one you want to add out of the takes. For example DSC_0081 is a blooper whereas clip DSC_0082 is the clip I wanted to use, by running over it I could see which one was the blooper therefore didn’t waste any time in adding the wrong clip to my timeline. The process of adding videos to my timeline was very simple, I could select the whole clip and add it or if it was just a specific part I could select that part and just add that.
  • 4.
  • 5. In final cut there is a options bar which has different choices for the editor to choose to use. These are the transitions which I could choose from however I decided to not use any transitions because I like how my narrative developed with the straight cut editing. On a whole I decided to lightly edit my video because I didn’t want the editing to distract from the main narrative. There was also an option to add text, however I didn’t choose to add text to my video. Sometimes music videos add text to highlight certain words the lyrics are singing sometimes in Rap or Pop videos. Other music videos may add a title to their video to introduce the video and song, however I chose not to do this because I didn’t want to pull attention from the clip. This bar also offers a filter tab where there is a selection of filters which can be quickly and easily applied to individual clips, I didn’t use many of these as I felt many of them was too garish and I preferred the original look of the video however I did use one of them in my video.
  • 6.
  • 7. This is the timeline of the editing software, where the video clips can be ordered and cut. In the green bar is the song I had added. Each clip can be arranged here and I found the timeline very simple to use
  • 8.
  • 9. This is the effects area, this is where the editing can become detailed and very precise. For the type of editing I wanted to do I clicked under Color, and on Correction 1. This then took me to the editing panel, which I could change the saturation, color and exposure. Here I edited the exposure, the sliders included a global option, which changes everything overall. The shadow’s slider changes the darker parts of the shot, (where there is most shadows). The midtones changes effect the areas which are between shadows and highlights. Finally the highlights are the lightest points of the image. By dragging the exposure circles down it creates a darker shot whereas pulling them up makes the exposure brighter.
  • 10. Here I changed the shadows to 10% which lightened the corners of the image. I also made the midtones to 11% which brightened everything in-between however dropped the highlights to 1% as the ‘glare’ by the high percentage of midtones meant the image was too washed out therefore I made the highlights slightly darker. This is a before and after shot. I prefer the after shot as I think it’s a much softer look, whereas the first clip looks more harsh.
  • 11. Here is another example of where I lightened the image, giving it a more luminous look rather than the darker original image. I found it easy to use Final Cut Pro to do this therefore in the future would use the same programme if I was to edit darker clips. Sometimes in other editing programmes such as Movie Maker when editing aspects like the brightness, by making clips lighter, quality of the video is lost or it looks unnaturally bright. However the exposure wheel and percentage system Final Cut has means you can make changes to the exposure subtly instead of having it too much.
  • 12. This is an example of the same clip edited in Movie Maker. The brightness has only been altered a little bit however the shot is over- exposed and looks unprofessional. When in full screen quality of the video was also lost. The brightness also is really harsh whereas I wanted a softer look, it also looks like it is obviously edited whereas I went for a more subtle look.
  • 13. Movie Maker Final Cut Pro Original Exposure Changed Original Brightness Slightly Changed
  • 14. This is the blade tool I used in Final Cut Pro. This tool allowed me to cut clips at a precise point. The timer at the top of the image below shows the exact time of where the video Is currently at. When using the blade tool as the mouse runs over a clip it gives the precise time, therefore this was really useful at editing clips in detail because I could pin point the part which I wanted the clip to split. Here is a clip which I used the blade tool to split. After splitting the clip it allowed me to individually edit each one. Therefore if I wanted to add an effect halfway through a clip by using the blade tool to separate the clip I could add an effect to the part I wanted and the flow of the video play back would not be effected and seamlessly transition. I used this to edit a lot of my clips with because I found it very user friendly and precise. It particularly helped when editing to the beat as I could listen to the song and when hearing the ‘beat’ I wanted to cut a clip at I could use the blade tool to cut a clip and then delete the unwanted part. Therefore I really liked this tool as it had multi-uses.
  • 15. After using the blade tool to separate this clip I selected it and clicked on ‘Adjust Speed’ There are pre-set speed changes I could pick like ‘50%’ ‘25%’ and ‘75%’ However there was also an option to adjust the speed to a custom setting. This was extremely useful when the pre-set options were too slow or too fast. It allowed me to adjust the speed precisely so it was exactly what I wanted.
  • 16. Another tool I used was the trim tool which allowed me to edit the duration of a clip. This could extend or shorten a clip. To do this I had to select the segment I wanted to edit then drag the yellow bar at the desired side until I was happy with where it ended. I used this tool along with the blade tool to edit the duration of clips in order to get my lip- syncing precise and in time with the music. This is the movie maker version of the trimming tool. I found it very unfriendly and awkward to use. Having to set certain start and end points, unlike the simplistic drag, adjust, trimmed style the Final Cut Pro was.
  • 17. To edit the colourings of the video I went to the same menu to get to the exposure. Color, Correction 1. The colour wheel was simple to use. Again it had a global option which made the overall clip a certain colour, the shadows made the darker parts of the clip change colour, midtones the parts inbetween and the highlights made the lightest parts. I added a blue tone to the clip to give it a more ‘depressed’ look rather than the yellow undertones the original clip had.
  • 18. Adjusted Colour Original Here is another example of where I changed the colour to give the clip a more dismal look rather than the brighter more warmer toned video clip below. To the right is a comparison to the colour options I had on Movie Maker. This is the closest option to make the video ‘blue’. I think this looks more unprofessional and isn’t a very subtle editing filter which is what I was aiming for. Therefore Final Cut provided the tools to be able to do this.
  • 19. More examples where I changed the colouring to be more ‘pink’ which gave a more romantic, rosy look to the video. Changed colour Original
  • 20. I looked at the filters however mostly found they wasn’t appropriate for my video. A lot of them were too severe and gave the appearance of a heavily edited video which I didn’t want. This is because I wanted to draw attention to the narrative instead. However for this part of the video it is separate to the chorus, bridge and verse scenes and therefore I wanted to use the editing to separate it from the rest of the video therefore felt a filter may be appropriate. I picked the black and white filter as I still felt it upheld the ‘soft’ look I was going for throughout my video and the lack of colouring means the audiences attention is directly drawn to what is going on in the close-up. In this shot her eyes are the main attention. In the coloured image there are five main colours in the image meaning our eyes may be drawn to the orange in the background or elsewhere. By changing this to black and white the darkest part of the image is her eyelashes. As they are in condensed bold black lines in the centre of the shot the eyes are more likely to fall here than the coloured image where there is more distraction.