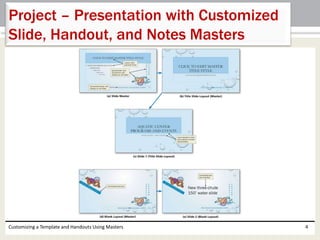
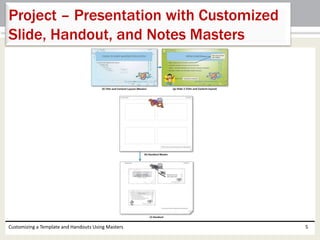
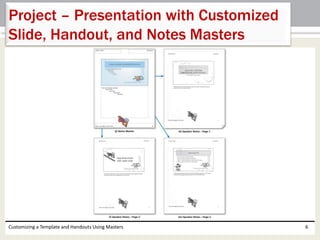
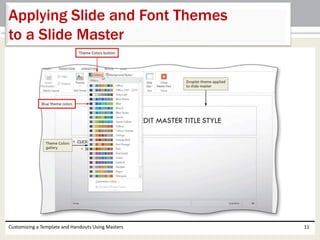
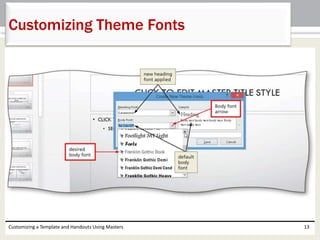
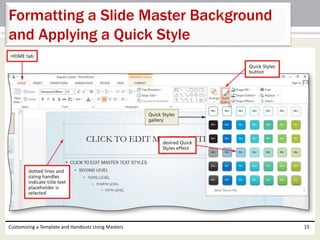
Chapter 8
Customizing a Template
and Handouts Using
Masters
Microsoft
PowerPoint 2013
• Apply slide and font themes to a slide master
• Change a slide master background
• Add a background style and graphic to a slide
master
• Insert a placeholder into a slide layout
• Apply a Quick Style to a placeholder
• Change text direction and character spacing
Customizing a Template and Handouts Using Masters 2
Objectives
• Hide background graphics on individual slides
• Apply a fill to a text box and change transparency
• Rename a slide master
• Save a slide master as a template
• Create handouts using the handout master
• Create speaker notes using the notes master
Customizing a Template and Handouts Using Masters 3
Objectives
Customizing a Template and Handouts Using Masters 4
Project – Presentation with Customized
Slide, Handout, and Notes Masters
Customizing a Template and Handouts Using Masters 5
Project – Presentation with Customized
Slide, Handout, and Notes Masters
Customizing a Template and Handouts Using Masters 6
Project – Presentation with Customized
Slide, Handout, and Notes Masters
• Customize slide masters by changing the theme
fonts and background
• Format and arrange slide master footers
• Insert and format graphics and text boxes
• Rename and delete slide layouts
• Customize handout and notes masters
• Use a custom template to create a new
presentation
Customizing a Template and Handouts Using Masters 7
Roadmap
• Tap or click the Slide Master button (VIEW tab |
Master Views group) to display the SLIDE MASTER
tab and the slide thumbnails in the Overview
pane
• Tap or click the Office Theme Slide Master layout
Customizing a Template and Handouts Using Masters 8
Displaying a Slide Master
Customizing a Template and Handouts Using Masters 9
Displaying a Slide Master
• With the slide master displaying, tap or click the
Themes button (SLIDE MASTER tab | Edit Theme
group) to display the Themes gallery
• Scroll down to display the desired theme
• Tap or click the desired theme to apply it to the slide
master
• Tap or click the Theme Colors button (SLIDE MASTER
tab | Background group) to display the Theme Colors
gallery
• Tap or click the desired color scheme in the gallery to
change the slide master colors
Customizing a Template and Handouts Using Masters 10
Applying Slide and Font Themes
to a Slide Master
Customizing a Template and Handouts Using Masters 11
Applying Slide and Font Themes
to a Slide Master
• Tap or click the Theme Fonts button (SLIDE MASTER tab |
Background group) to display the Theme Fonts gallery
• Tap or click Customize Fonts in the Theme Fonts gallery to
display the Create New Theme Fonts dialog box
• Tap or click the Heading font arrow and then tap or click the
desired font for the heading text font
• Tap or click the Body font arrow and then tap or click the
desired font for the body text font
• Select the words, Custom 1, in the Name box and then type
the desired font set name
• Tap or click the Save button to save the new font set
Customizing a Template and Handouts Using Masters 12
Customizing Theme Fonts
Customizing a Template and Handouts Using Masters 13
Customizing Theme Fonts
• Tap or click the Background Styles button (SLIDE
MASTER tab | Background group) to display the
Background Styles gallery
• Tap or click the desired background style to apply the
background to the slide master
• Tap or click the slide master title text placeholder to
select it
• Display the HOME tab and then tap or click the Quick
Styles button (HOME tab | Drawing group) to display
the Quick Styles gallery
• Tap or click the desired Quick Style
Customizing a Template and Handouts Using Masters 14
Formatting a Slide Master Background
and Applying a Quick Style
Customizing a Template and Handouts Using Masters 15
Formatting a Slide Master Background
and Applying a Quick Style
• With the slide master displaying, tap or click the border of the
placeholder in the footer to delete
• Press the DELETE key to delete the selected placeholder
• Tap or click the footer placeholder to move, and then drag it to
the desired location
• Display the INSERT tab, tap or click the Header & Footer button
(INSERT tab | Text group), and then place a check mark in the
Slide number check box
• Place a check mark in the Footer check box and then type the
desired footer text
• Place a check mark in the ‘Don’t show on title slide’ check box
• Tap or click the ‘Apply to All’ button to add the slide number and
footer text to the slide master
Customizing a Template and Handouts Using Masters 16
Deleting, Moving, and Adding Text
to a Slide Master Footer
Customizing a Template and Handouts Using Masters 17
Deleting, Moving, and Adding Text
to a Slide Master Footer
• Select the content footer text and then tap or click
the Font arrow to display the Font gallery
• Tap or click the desired font in the Font gallery to
change the footer font
• Change the font size as desired
• Change the font color as desired
• Click the desired alignment button to align the
selected footer text
• Use the Format Painter to apply the content footer
placeholder formatting to other placeholders
Customizing a Template and Handouts Using Masters 18
Formatting Slide Master Footer Text
Customizing a Template and Handouts Using Masters 19
Formatting Slide Master Footer Text
• With the slide master and INSERT tab displaying,
tap or click the Pictures button (INSERT tab |
Images group) to display the Insert Picture dialog
box
• Navigate to the location of the picture to insert,
and then tap or click the picture to select the file
name
• Tap or click the Insert button to insert the picture
into the slide aster
• Drag the picture to the desired location
Customizing a Template and Handouts Using Masters 20
Inserting a Background Graphic
into a Slide Master
Customizing a Template and Handouts Using Masters 21
Inserting a Background Graphic
into a Slide Master
• In the Overview pane, scroll down and then tap or
click the Blank Layout to display this layout
• With the SLIDE MASTER tab displaying, click the
Insert Placeholder arrow (SLIDE MASTER tab | Master
Layout group) to display the Insert Placeholder
gallery
• Tap or click Text in the gallery to change the pointer
to a crosshair
• Position the pointer at the desired location for the
placeholder
• Tap or click to insert the new placeholder into the
Blank Layout
Customizing a Template and Handouts Using Masters 22
Inserting a Placeholder
into a Blank Layout
Customizing a Template and Handouts Using Masters 23
Inserting a Placeholder
into a Blank Layout
• Tap or click inside the new placeholder and then
select all the text in the placeholder
• Press the DELETE key to delete all the selected text in
the placeholder
• Tap or click the Bullets button (HOME tab | Paragraph
group) to remove the bullet from the placeholder
• Type the desired text in the placeholder
• Tap or click the Text Direction button (HOME tab |
Paragraph group) to open the Text Direction gallery
• Tap or click the desired text direction in the Text
Direction gallery
Customizing a Template and Handouts Using Masters 24
Adding and Formatting Placeholder Text
• Tap or click the Align Text button (HOME tab |
Paragraph group) to display the Align Text gallery
• Tap or click the desired alignment option to align
the placeholder text
• Press and hold or right-click the text in the
placeholder to display the mini toolbar and
shortcut menu, tap or click the Font arrow on the
mini toolbar, and then select the desired font
• If desired, change the font size and the font color
Customizing a Template and Handouts Using Masters 25
Adding and Formatting Placeholder Text
Customizing a Template and Handouts Using Masters 26
Adding and Formatting Placeholder Text
• With the HOME tab displaying, tap or click the new
placeholder border and then tap or click the Cut
button (HOME tab | Clipboard group) to delete the
placeholder from the layout and copy it to the
Clipboard
• Tap or click the desired Slide Master thumbnail in the
Overview pane
• Tap or click the Paste button (HOME tab | Clipboard
group) to copy the placeholder from the Clipboard to
the slide master
• Drag the placeholder to the desired location
Customizing a Template and Handouts Using Masters 27
Cutting a Placeholder and Pasting
It into a Slide Master
Customizing a Template and Handouts Using Masters 28
Cutting a Placeholder and Pasting
It into a Slide Master
• With the text in the text box selected, tap or click
the Character Spacing button (HOME tab | Font
group) to display the Character Spacing gallery
• Tap or click the desired character spacing option
Customizing a Template and Handouts Using Masters 29
Changing Character Spacing
• Tap or click to select the desired text box
• Tap or click the Shape Fill arrow (HOME tab |
Drawing group) to display the Shape Fill gallery
• Tap or click the desired fill color
• Tap or click the Drawing Dialog Box Launcher
(HOME tab | Drawing group) to display the
Format Shape pane
• Tap or click the Transparency slider in the Fill
section and drag it to the desired setting
Customizing a Template and Handouts Using Masters 30
Applying a Fill to a Text Box
and Increasing Transparency
Customizing a Template and Handouts Using Masters 31
Applying a Fill to a Text Box
and Increasing Transparency
• Tap or click the ‘Size & Properties’ Shape Option
• Tap or click TEXT BOX to display the TEXT BOX
section
• Tap or click the up and down arrows to change
the Left, Right, Top, and Bottom margins
• Tap or click the Close button
Customizing a Template and Handouts Using Masters 32
Changing a Text Box Internal Margin
Customizing a Template and Handouts Using Masters 33
Changing a Text Box Internal Margin
• Tap or click the picture or text box to rotate, and
then position the pointer over the rotation handle
so that it changes to a Free Rotate pointer
• Drag the rotation handle clockwise or
counterclockwise to rotate the object
Customizing a Template and Handouts Using Masters 34
Rotating a Picture and a Text Box
Customizing a Template and Handouts Using Masters 35
Rotating a Picture and a Text Box
• Tap or click the Hide Background Graphics check
box (SLIDE MASTER tab | Background group) to
remove the check mark in it
Customizing a Template and Handouts Using Masters 36
Hiding and Unhiding Background
Graphics
• Display the slide master to rename, and then tap
or click the Rename button (SLIDE MASTER tab |
Edit Master group) to display the Rename Layout
dialog box
• Delete the text in the Layout name text box and
then type the desired name in the text box
• Tap or click the Rename button to give the layout
the new name
Customizing a Template and Handouts Using Masters 37
Renaming a Slide Master
and a Slide Layout
Customizing a Template and Handouts Using Masters 38
Renaming a Slide Master
and a Slide Layout
• Tap or click the desired layout(s) in the Overview
pane to delete
• Press the DELETE key to delete the selected
layout(s)
Customizing a Template and Handouts Using Masters 39
Deleting a Slide Layout
• Tap or click the Handout Master button (VIEW tab | Master
Views group) to display the HANDOUT MASTER tab
• Tap or click the ‘Slides Per Page’ button (HANDOUT MASTER
tab | Page Setup group) to display the Slides Per Page
gallery
• Tap or click the desired number of slides per page in the
gallery
• Tap or click the Handout Orientation button (HANDOUT
MASTER tab | Page Setup group) to display the Handout
Orientation gallery
• Tap or click the desired orientation
• Tap or click the Header placeholder and then type the
desired header text
Customizing a Template and Handouts Using Masters 40
Customizing a Handout
Using a Handout Master
• Tap or click the Footer placeholder and then type the
desired footer text
• Drag the placeholders to the desired locations
• Tap or click the Theme Fonts button (HANDOUT
MASTER tab | Background group) to display the
Theme Fonts gallery
• Tap or click the desired font
• Display the INSERT tab, tap or click the Pictures
button (INSERT tab | Images group), and then insert
the desired picture
Customizing a Template and Handouts Using Masters 41
Customizing a Handout
Using a Handout Master
• Rotate the picture as desired
• Display the INSERT tab, tap or click the ‘Header &
Footer’ button (INSERT tab | Text group), and then
place a check mark in the ‘Date and time’ check box
• Place a check mark in the Header check box
• Place a check mark in the Footer check box
• Tap or click the ‘Apply to All’ button to add the
header and footer text and date to the handout
master
Customizing a Template and Handouts Using Masters 42
Customizing a Handout
Using a Handout Master
Customizing a Template and Handouts Using Masters 43
Customizing a Handout
Using a Handout Master
• Tap or click the Notes Master button (VIEW tab |
Master Views group) to display the NOTES MASTER
tab
• Tap or click the Footer placeholder, delete the text,
and then type the desired footer text
• Tap or click the Theme Fonts button to display the
Theme Fonts gallery
• Tap or click the desired font
• Tap or click the ‘Notes Page Orientation’ button
(NOTES MASTER tab | Page Setup group) to display
the ‘Notes Page Orientation’ gallery
Customizing a Template and Handouts Using Masters 44
Customizing a Notes Page
Using a Notes Master
• Tap or click the desired orientation
• Display the INSERT tab, tap or click the Pictures
button, and then insert the desired picture
• Resize the picture as desired
• Move the picture to the desired location
Customizing a Template and Handouts Using Masters 45
Customizing a Notes Page
Using a Notes Master
Customizing a Template and Handouts Using Masters 46
Customizing a Notes Page
Using a Notes Master
• Tap or click the ‘Close Master View’ button
(NOTES MASTER tab | Close group) to exit Master
view and return to Normal view
Customizing a Template and Handouts Using Masters 47
Closing Master View
• Open the Backstage view, display the Save As tab, and
then tap or click the Browse button to display the
Save As dialog box
• Tap or click the ‘Save as type’ arrow to display the
‘Save as type’ list
• Tap or click ‘PowerPoint Template’ in the ‘Save as
type’ list to change the save as type
• Type the desired file name
• Tap or click the Save button to save the presentation
as a template
• Close the file
Customizing a Template and Handouts Using Masters 48
Saving a Master as a Template
Customizing a Template and Handouts Using Masters 49
Saving a Master as a Template
• Open the desired template
• Open the Backstage view, display the Save As tab, and
then navigate to the location where your files are
saved
• Tap or click the ‘Save as type’ arrow to display the
‘Save as type’ list and then tap or click PowerPoint
Presentation in the ‘Save as type’ list
• Tap or click the desired file in the Save As dialog box
• Tap or click the Save button to display the Confirm
Save As dialog box
• Tap or click the Yes button to replace the file
Customizing a Template and Handouts Using Masters 50
Opening a Template
and Saving a Presentation
Customizing a Template and Handouts Using Masters 51
Opening a Template
and Saving a Presentation
• Press and hold or right-click anywhere on the slide
background to display the shortcut menu
• Tap or click Format Background on the shortcut
menu to display the Format Background pane
• With the FILL section displaying, select the
desired fill color
• Tap or click the Transparency slider and drag it to
the desired location
Customizing a Template and Handouts Using Masters 52
Applying a Fill Color to a Slide
Customizing a Template and Handouts Using Masters 53
Applying a Fill Color to a Slide
• With the Format Background pane displaying, tap
or click Pattern fill to display the Pattern gallery
• Tap or click the desired pattern to apply the
pattern to the background
• Tap or click the Close button to close the Format
Background task pane
Customizing a Template and Handouts Using Masters 54
Applying a Pattern to a Slide
Customizing a Template and Handouts Using Masters 55
Applying a Pattern to a Slide
• Tap or click FILE on the ribbon to open the
Backstage view
• Tap or click the Print tab in the Backstage view to
display the Print gallery
• Verify that the printer listed on the Printer Status
button will print a hard copy
• Tap or click the Print button in the Print gallery to
print the presentation to the currently selected
printer
Customizing a Template and Handouts Using Masters 56
Printing a Presentation
• Open the Backstage view and then display the Print
gallery
• Tap or click the ‘Full Page Slides’ button in the
Settings area to display the gallery
• Tap or click the desired layout option in the Handouts
area
• Tap or click the Portrait Orientation button in the
Settings area to display the Orientation gallery
• Tap or click to select the desired orientation
• Tap or click the Print button in the Print gallery to
print the handout
Customizing a Template and Handouts Using Masters 57
Printing a Handout
Using the Handout Master
Customizing a Template and Handouts Using Masters 58
Printing a Handout
Using the Handout Master
• With the Backstage view open, change the layout
to Notes Pages in the Print Layout area
• If desired, change the orientation
• Tap or click the Previous Page and Next Page
buttons to display previews of the other pages
• Tap or click the Print button in the Print gallery to
print the notes
Customizing a Template and Handouts Using Masters 59
Printing Speaker Notes
Using the Notes Master
Customizing a Template and Handouts Using Masters 60
Printing Speaker Notes
Using the Notes Master
• Apply slide and font themes to a slide master
• Change a slide master background
• Add a background style and graphic to a slide
master
• Insert a placeholder into a slide layout
• Apply a Quick Style to a placeholder
• Change text direction and character spacing
Customizing a Template and Handouts Using Masters 61
Chapter Summary
• Hide background graphics on individual slides
• Apply a fill to a text box and change transparency
• Rename a slide master
• Save a slide master as a template
• Create handouts using the handout master
• Create speaker notes using the notes master
Customizing a Template and Handouts Using Masters 62
Chapter Summary
Chapter 8 Complete
Microsoft
PowerPoint 2013

Ppt2013 ch08

  • 1.
    Chapter 8 Customizing aTemplate and Handouts Using Masters Microsoft PowerPoint 2013
  • 2.
    • Apply slideand font themes to a slide master • Change a slide master background • Add a background style and graphic to a slide master • Insert a placeholder into a slide layout • Apply a Quick Style to a placeholder • Change text direction and character spacing Customizing a Template and Handouts Using Masters 2 Objectives
  • 3.
    • Hide backgroundgraphics on individual slides • Apply a fill to a text box and change transparency • Rename a slide master • Save a slide master as a template • Create handouts using the handout master • Create speaker notes using the notes master Customizing a Template and Handouts Using Masters 3 Objectives
  • 4.
    Customizing a Templateand Handouts Using Masters 4 Project – Presentation with Customized Slide, Handout, and Notes Masters
  • 5.
    Customizing a Templateand Handouts Using Masters 5 Project – Presentation with Customized Slide, Handout, and Notes Masters
  • 6.
    Customizing a Templateand Handouts Using Masters 6 Project – Presentation with Customized Slide, Handout, and Notes Masters
  • 7.
    • Customize slidemasters by changing the theme fonts and background • Format and arrange slide master footers • Insert and format graphics and text boxes • Rename and delete slide layouts • Customize handout and notes masters • Use a custom template to create a new presentation Customizing a Template and Handouts Using Masters 7 Roadmap
  • 8.
    • Tap orclick the Slide Master button (VIEW tab | Master Views group) to display the SLIDE MASTER tab and the slide thumbnails in the Overview pane • Tap or click the Office Theme Slide Master layout Customizing a Template and Handouts Using Masters 8 Displaying a Slide Master
  • 9.
    Customizing a Templateand Handouts Using Masters 9 Displaying a Slide Master
  • 10.
    • With theslide master displaying, tap or click the Themes button (SLIDE MASTER tab | Edit Theme group) to display the Themes gallery • Scroll down to display the desired theme • Tap or click the desired theme to apply it to the slide master • Tap or click the Theme Colors button (SLIDE MASTER tab | Background group) to display the Theme Colors gallery • Tap or click the desired color scheme in the gallery to change the slide master colors Customizing a Template and Handouts Using Masters 10 Applying Slide and Font Themes to a Slide Master
  • 11.
    Customizing a Templateand Handouts Using Masters 11 Applying Slide and Font Themes to a Slide Master
  • 12.
    • Tap orclick the Theme Fonts button (SLIDE MASTER tab | Background group) to display the Theme Fonts gallery • Tap or click Customize Fonts in the Theme Fonts gallery to display the Create New Theme Fonts dialog box • Tap or click the Heading font arrow and then tap or click the desired font for the heading text font • Tap or click the Body font arrow and then tap or click the desired font for the body text font • Select the words, Custom 1, in the Name box and then type the desired font set name • Tap or click the Save button to save the new font set Customizing a Template and Handouts Using Masters 12 Customizing Theme Fonts
  • 13.
    Customizing a Templateand Handouts Using Masters 13 Customizing Theme Fonts
  • 14.
    • Tap orclick the Background Styles button (SLIDE MASTER tab | Background group) to display the Background Styles gallery • Tap or click the desired background style to apply the background to the slide master • Tap or click the slide master title text placeholder to select it • Display the HOME tab and then tap or click the Quick Styles button (HOME tab | Drawing group) to display the Quick Styles gallery • Tap or click the desired Quick Style Customizing a Template and Handouts Using Masters 14 Formatting a Slide Master Background and Applying a Quick Style
  • 15.
    Customizing a Templateand Handouts Using Masters 15 Formatting a Slide Master Background and Applying a Quick Style
  • 16.
    • With theslide master displaying, tap or click the border of the placeholder in the footer to delete • Press the DELETE key to delete the selected placeholder • Tap or click the footer placeholder to move, and then drag it to the desired location • Display the INSERT tab, tap or click the Header & Footer button (INSERT tab | Text group), and then place a check mark in the Slide number check box • Place a check mark in the Footer check box and then type the desired footer text • Place a check mark in the ‘Don’t show on title slide’ check box • Tap or click the ‘Apply to All’ button to add the slide number and footer text to the slide master Customizing a Template and Handouts Using Masters 16 Deleting, Moving, and Adding Text to a Slide Master Footer
  • 17.
    Customizing a Templateand Handouts Using Masters 17 Deleting, Moving, and Adding Text to a Slide Master Footer
  • 18.
    • Select thecontent footer text and then tap or click the Font arrow to display the Font gallery • Tap or click the desired font in the Font gallery to change the footer font • Change the font size as desired • Change the font color as desired • Click the desired alignment button to align the selected footer text • Use the Format Painter to apply the content footer placeholder formatting to other placeholders Customizing a Template and Handouts Using Masters 18 Formatting Slide Master Footer Text
  • 19.
    Customizing a Templateand Handouts Using Masters 19 Formatting Slide Master Footer Text
  • 20.
    • With theslide master and INSERT tab displaying, tap or click the Pictures button (INSERT tab | Images group) to display the Insert Picture dialog box • Navigate to the location of the picture to insert, and then tap or click the picture to select the file name • Tap or click the Insert button to insert the picture into the slide aster • Drag the picture to the desired location Customizing a Template and Handouts Using Masters 20 Inserting a Background Graphic into a Slide Master
  • 21.
    Customizing a Templateand Handouts Using Masters 21 Inserting a Background Graphic into a Slide Master
  • 22.
    • In theOverview pane, scroll down and then tap or click the Blank Layout to display this layout • With the SLIDE MASTER tab displaying, click the Insert Placeholder arrow (SLIDE MASTER tab | Master Layout group) to display the Insert Placeholder gallery • Tap or click Text in the gallery to change the pointer to a crosshair • Position the pointer at the desired location for the placeholder • Tap or click to insert the new placeholder into the Blank Layout Customizing a Template and Handouts Using Masters 22 Inserting a Placeholder into a Blank Layout
  • 23.
    Customizing a Templateand Handouts Using Masters 23 Inserting a Placeholder into a Blank Layout
  • 24.
    • Tap orclick inside the new placeholder and then select all the text in the placeholder • Press the DELETE key to delete all the selected text in the placeholder • Tap or click the Bullets button (HOME tab | Paragraph group) to remove the bullet from the placeholder • Type the desired text in the placeholder • Tap or click the Text Direction button (HOME tab | Paragraph group) to open the Text Direction gallery • Tap or click the desired text direction in the Text Direction gallery Customizing a Template and Handouts Using Masters 24 Adding and Formatting Placeholder Text
  • 25.
    • Tap orclick the Align Text button (HOME tab | Paragraph group) to display the Align Text gallery • Tap or click the desired alignment option to align the placeholder text • Press and hold or right-click the text in the placeholder to display the mini toolbar and shortcut menu, tap or click the Font arrow on the mini toolbar, and then select the desired font • If desired, change the font size and the font color Customizing a Template and Handouts Using Masters 25 Adding and Formatting Placeholder Text
  • 26.
    Customizing a Templateand Handouts Using Masters 26 Adding and Formatting Placeholder Text
  • 27.
    • With theHOME tab displaying, tap or click the new placeholder border and then tap or click the Cut button (HOME tab | Clipboard group) to delete the placeholder from the layout and copy it to the Clipboard • Tap or click the desired Slide Master thumbnail in the Overview pane • Tap or click the Paste button (HOME tab | Clipboard group) to copy the placeholder from the Clipboard to the slide master • Drag the placeholder to the desired location Customizing a Template and Handouts Using Masters 27 Cutting a Placeholder and Pasting It into a Slide Master
  • 28.
    Customizing a Templateand Handouts Using Masters 28 Cutting a Placeholder and Pasting It into a Slide Master
  • 29.
    • With thetext in the text box selected, tap or click the Character Spacing button (HOME tab | Font group) to display the Character Spacing gallery • Tap or click the desired character spacing option Customizing a Template and Handouts Using Masters 29 Changing Character Spacing
  • 30.
    • Tap orclick to select the desired text box • Tap or click the Shape Fill arrow (HOME tab | Drawing group) to display the Shape Fill gallery • Tap or click the desired fill color • Tap or click the Drawing Dialog Box Launcher (HOME tab | Drawing group) to display the Format Shape pane • Tap or click the Transparency slider in the Fill section and drag it to the desired setting Customizing a Template and Handouts Using Masters 30 Applying a Fill to a Text Box and Increasing Transparency
  • 31.
    Customizing a Templateand Handouts Using Masters 31 Applying a Fill to a Text Box and Increasing Transparency
  • 32.
    • Tap orclick the ‘Size & Properties’ Shape Option • Tap or click TEXT BOX to display the TEXT BOX section • Tap or click the up and down arrows to change the Left, Right, Top, and Bottom margins • Tap or click the Close button Customizing a Template and Handouts Using Masters 32 Changing a Text Box Internal Margin
  • 33.
    Customizing a Templateand Handouts Using Masters 33 Changing a Text Box Internal Margin
  • 34.
    • Tap orclick the picture or text box to rotate, and then position the pointer over the rotation handle so that it changes to a Free Rotate pointer • Drag the rotation handle clockwise or counterclockwise to rotate the object Customizing a Template and Handouts Using Masters 34 Rotating a Picture and a Text Box
  • 35.
    Customizing a Templateand Handouts Using Masters 35 Rotating a Picture and a Text Box
  • 36.
    • Tap orclick the Hide Background Graphics check box (SLIDE MASTER tab | Background group) to remove the check mark in it Customizing a Template and Handouts Using Masters 36 Hiding and Unhiding Background Graphics
  • 37.
    • Display theslide master to rename, and then tap or click the Rename button (SLIDE MASTER tab | Edit Master group) to display the Rename Layout dialog box • Delete the text in the Layout name text box and then type the desired name in the text box • Tap or click the Rename button to give the layout the new name Customizing a Template and Handouts Using Masters 37 Renaming a Slide Master and a Slide Layout
  • 38.
    Customizing a Templateand Handouts Using Masters 38 Renaming a Slide Master and a Slide Layout
  • 39.
    • Tap orclick the desired layout(s) in the Overview pane to delete • Press the DELETE key to delete the selected layout(s) Customizing a Template and Handouts Using Masters 39 Deleting a Slide Layout
  • 40.
    • Tap orclick the Handout Master button (VIEW tab | Master Views group) to display the HANDOUT MASTER tab • Tap or click the ‘Slides Per Page’ button (HANDOUT MASTER tab | Page Setup group) to display the Slides Per Page gallery • Tap or click the desired number of slides per page in the gallery • Tap or click the Handout Orientation button (HANDOUT MASTER tab | Page Setup group) to display the Handout Orientation gallery • Tap or click the desired orientation • Tap or click the Header placeholder and then type the desired header text Customizing a Template and Handouts Using Masters 40 Customizing a Handout Using a Handout Master
  • 41.
    • Tap orclick the Footer placeholder and then type the desired footer text • Drag the placeholders to the desired locations • Tap or click the Theme Fonts button (HANDOUT MASTER tab | Background group) to display the Theme Fonts gallery • Tap or click the desired font • Display the INSERT tab, tap or click the Pictures button (INSERT tab | Images group), and then insert the desired picture Customizing a Template and Handouts Using Masters 41 Customizing a Handout Using a Handout Master
  • 42.
    • Rotate thepicture as desired • Display the INSERT tab, tap or click the ‘Header & Footer’ button (INSERT tab | Text group), and then place a check mark in the ‘Date and time’ check box • Place a check mark in the Header check box • Place a check mark in the Footer check box • Tap or click the ‘Apply to All’ button to add the header and footer text and date to the handout master Customizing a Template and Handouts Using Masters 42 Customizing a Handout Using a Handout Master
  • 43.
    Customizing a Templateand Handouts Using Masters 43 Customizing a Handout Using a Handout Master
  • 44.
    • Tap orclick the Notes Master button (VIEW tab | Master Views group) to display the NOTES MASTER tab • Tap or click the Footer placeholder, delete the text, and then type the desired footer text • Tap or click the Theme Fonts button to display the Theme Fonts gallery • Tap or click the desired font • Tap or click the ‘Notes Page Orientation’ button (NOTES MASTER tab | Page Setup group) to display the ‘Notes Page Orientation’ gallery Customizing a Template and Handouts Using Masters 44 Customizing a Notes Page Using a Notes Master
  • 45.
    • Tap orclick the desired orientation • Display the INSERT tab, tap or click the Pictures button, and then insert the desired picture • Resize the picture as desired • Move the picture to the desired location Customizing a Template and Handouts Using Masters 45 Customizing a Notes Page Using a Notes Master
  • 46.
    Customizing a Templateand Handouts Using Masters 46 Customizing a Notes Page Using a Notes Master
  • 47.
    • Tap orclick the ‘Close Master View’ button (NOTES MASTER tab | Close group) to exit Master view and return to Normal view Customizing a Template and Handouts Using Masters 47 Closing Master View
  • 48.
    • Open theBackstage view, display the Save As tab, and then tap or click the Browse button to display the Save As dialog box • Tap or click the ‘Save as type’ arrow to display the ‘Save as type’ list • Tap or click ‘PowerPoint Template’ in the ‘Save as type’ list to change the save as type • Type the desired file name • Tap or click the Save button to save the presentation as a template • Close the file Customizing a Template and Handouts Using Masters 48 Saving a Master as a Template
  • 49.
    Customizing a Templateand Handouts Using Masters 49 Saving a Master as a Template
  • 50.
    • Open thedesired template • Open the Backstage view, display the Save As tab, and then navigate to the location where your files are saved • Tap or click the ‘Save as type’ arrow to display the ‘Save as type’ list and then tap or click PowerPoint Presentation in the ‘Save as type’ list • Tap or click the desired file in the Save As dialog box • Tap or click the Save button to display the Confirm Save As dialog box • Tap or click the Yes button to replace the file Customizing a Template and Handouts Using Masters 50 Opening a Template and Saving a Presentation
  • 51.
    Customizing a Templateand Handouts Using Masters 51 Opening a Template and Saving a Presentation
  • 52.
    • Press andhold or right-click anywhere on the slide background to display the shortcut menu • Tap or click Format Background on the shortcut menu to display the Format Background pane • With the FILL section displaying, select the desired fill color • Tap or click the Transparency slider and drag it to the desired location Customizing a Template and Handouts Using Masters 52 Applying a Fill Color to a Slide
  • 53.
    Customizing a Templateand Handouts Using Masters 53 Applying a Fill Color to a Slide
  • 54.
    • With theFormat Background pane displaying, tap or click Pattern fill to display the Pattern gallery • Tap or click the desired pattern to apply the pattern to the background • Tap or click the Close button to close the Format Background task pane Customizing a Template and Handouts Using Masters 54 Applying a Pattern to a Slide
  • 55.
    Customizing a Templateand Handouts Using Masters 55 Applying a Pattern to a Slide
  • 56.
    • Tap orclick FILE on the ribbon to open the Backstage view • Tap or click the Print tab in the Backstage view to display the Print gallery • Verify that the printer listed on the Printer Status button will print a hard copy • Tap or click the Print button in the Print gallery to print the presentation to the currently selected printer Customizing a Template and Handouts Using Masters 56 Printing a Presentation
  • 57.
    • Open theBackstage view and then display the Print gallery • Tap or click the ‘Full Page Slides’ button in the Settings area to display the gallery • Tap or click the desired layout option in the Handouts area • Tap or click the Portrait Orientation button in the Settings area to display the Orientation gallery • Tap or click to select the desired orientation • Tap or click the Print button in the Print gallery to print the handout Customizing a Template and Handouts Using Masters 57 Printing a Handout Using the Handout Master
  • 58.
    Customizing a Templateand Handouts Using Masters 58 Printing a Handout Using the Handout Master
  • 59.
    • With theBackstage view open, change the layout to Notes Pages in the Print Layout area • If desired, change the orientation • Tap or click the Previous Page and Next Page buttons to display previews of the other pages • Tap or click the Print button in the Print gallery to print the notes Customizing a Template and Handouts Using Masters 59 Printing Speaker Notes Using the Notes Master
  • 60.
    Customizing a Templateand Handouts Using Masters 60 Printing Speaker Notes Using the Notes Master
  • 61.
    • Apply slideand font themes to a slide master • Change a slide master background • Add a background style and graphic to a slide master • Insert a placeholder into a slide layout • Apply a Quick Style to a placeholder • Change text direction and character spacing Customizing a Template and Handouts Using Masters 61 Chapter Summary
  • 62.
    • Hide backgroundgraphics on individual slides • Apply a fill to a text box and change transparency • Rename a slide master • Save a slide master as a template • Create handouts using the handout master • Create speaker notes using the notes master Customizing a Template and Handouts Using Masters 62 Chapter Summary
  • 63.