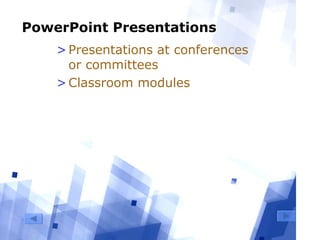
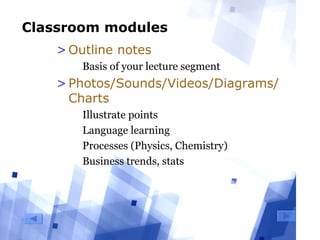
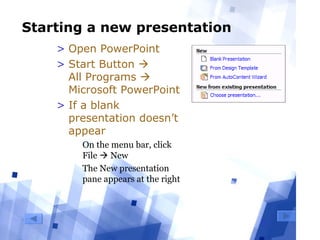
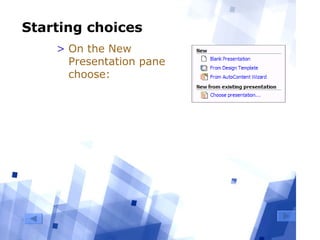
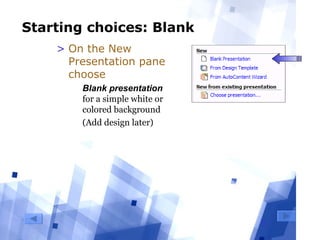
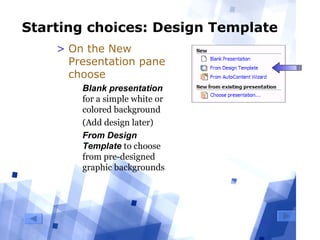
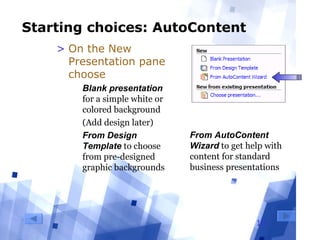
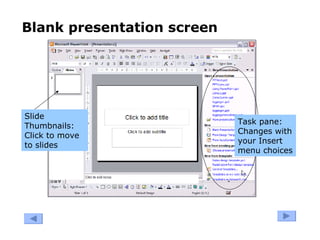
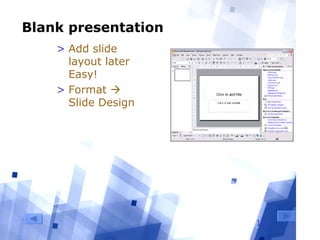
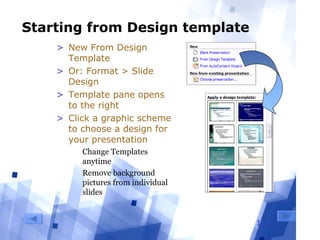
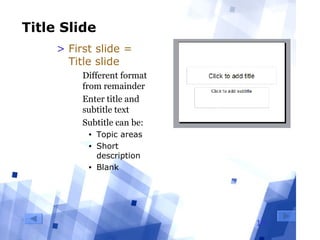
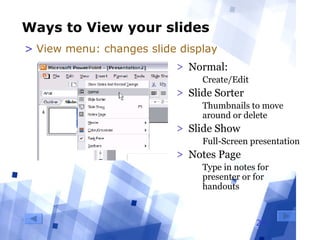
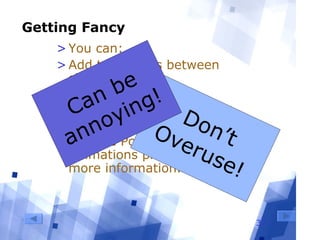
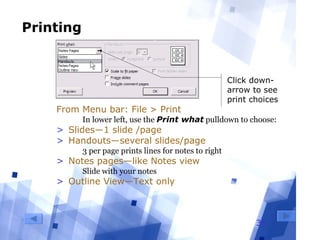
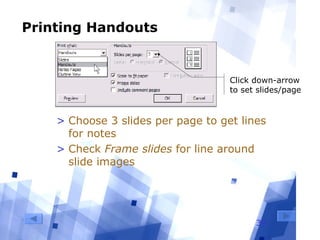
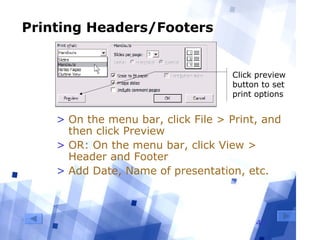
PowerPoint Presentations
Text and Graphics
Techniques
Tips
2
What we’ll look at….
>Uses for PowerPoint
>Starting out
  Blank or design
>Choosing slide layouts
>Inserting & Formatting Text
>Inserting Graphics
>Viewing and arranging slides
>Creating/Printing notes and handouts
3
PowerPoint Presentations
>Presentations at conferences
or committees
>Classroom modules
4
Presentations
>Text and illustrations
  Pictures
  Graphs
  Cartoons for color and variety
>Presentation + space for
notes =
Ready-made handouts
5
Classroom modules
>Outline notes
  Basis of your lecture segment
>Photos/Sounds/Videos/Diagrams/
Charts
  Illustrate points
  Language learning
  Processes (Physics, Chemistry)
  Business trends, stats
6
Starting a new presentation
> Open PowerPoint
> Start Button 
All Programs 
Microsoft PowerPoint
> If a blank
presentation doesn’t
appear
  On the menu bar, click 
File  New
  The New presentation 
pane appears at the right
7
Starting choices
> On the New
Presentation pane
choose:
8
Starting choices: Blank
> On the New
Presentation pane
choose
  Blank presentation 
for a simple white or 
colored background
  (Add design later)
9
Starting choices: Design Template
> On the New
Presentation pane
choose
  Blank presentation 
for a simple white or 
colored background
  (Add design later)
  From Design
Template to choose 
from pre-designed 
graphic backgrounds
10
Starting choices: AutoContent
> On the New
Presentation pane
choose
  Blank presentation 
for a simple white or 
colored background
  (Add design later)
  From Design
Template to choose 
from pre-designed 
graphic backgrounds
From AutoContent
Wizard to get help with 
content for standard 
business presentations
Blank presentation screen
Slide
Thumbnails:
Click to move
to slides
Task pane:
Changes with
your Insert
menu choices
12
Blank presentation
> Add slide
layout later
Easy!
> Format 
Slide Design
13
Starting from Design template
> New From Design
Template
> Or: Format > Slide
Design
> Template pane opens
to the right
> Click a graphic scheme
to choose a design for
your presentation
  Change Templates 
anytime
  Remove background 
pictures from individual 
slides
14
Title Slide
> First slide =
Title slide
  Different format 
from remainder
  Enter title and 
subtitle text
  Subtitle can be:
• Topic areas
• Short
description
• Blank
15
Adding more slides
> On the menu
bar, click
Insert  New
Slide
> OR: Click the
New Slide icon
> Or: Press
Control-M
16
Choosing a slide layout
When you add a new slide:
> Apply slide layout pane
appears at right
> Click to apply your choice
  Text = Bullets
  Graphics: Easily add clip art or 
images saved on your computer
  Combinations: Text and 
Graphics frames
> Always add a title
> Everything easily
changed!
17
Frames
> Selecting a layout
inserts movable
containers (frames)
to hold text or
graphics
  Graphics don’t have to be 
in a graphics box
> Frames are movable
and resizable
Text and
graphics
layouts
18
Text frames
>Text normally in levels of bullets
(Here’s level 1 in this Slide Design)
  Level two
• Level three
To get rid of a bullet, backspace at
the beginning of a line
>Bullet and text styles are set in the
Slide Design
  You can change the Master slide 
(View > Master > Slide Master)
19
Adding Text
> Type text in a text frame
> To go down to the next level of bullet:
  Press Tab at the beginning of a line or
  Click the Increase Indent icon on Formatting toolbar
> To go back to a higher level bullet:
  Press Shift-Tab at the beginning of a line or
  Click  the Decrease Indent icon on Formatting toolbar
20
Text: Other formatting
> Highlight text to format
> Use toolbar button to format
> Use sparingly!
Bold Italic
Underline Shadow
Align: Left Center
Right
Make text
Bigger/Smaller
Add or take away
numbering or bullets
Change Text Color:
Click down arrow to
see more choices
21
Techniques: Text
> Clear Titles
> Nothing below 18/20 pt
> Short bullets
  Explicate as you present
  Not full text
> San Serif Fonts
  Arial, Helvetica, Verdana, Tahoma
> Best Serif font: Georgia
  This text: Verdana (Sans Serif top and 
brown) and Georgia (smaller black)
22
Tips: Text and graphics
>Appropriate graphic style
  Serious and subdued
  Playful and cartoony
  Illustrative photos
>Consistent style, colors
  Drawings with similar look
>Not too busy
  Not even 1 graphic per page unless 
illustrating a point
23
Tips: Consistency
>Text as well as Graphics styles
set in the Slide Design you
choose
>Styles include:
  Type Face sizes and colors
  Bullet styles and colors
  Background graphics
24
Ways to View your slides
> Normal: 
  Create/Edit
> Slide Sorter
  Thumbnails to move 
around or delete 
> Slide Show
  Full-Screen presentation
> Notes Page
  Type in notes for 
presenter or for 
handouts
> View menu: changes slide display
25
Slide Sorter View
> Open from
  View menu
  View icons (lower left)
> Click slide to select
  Drag to move
  Press Delete to remove
26
Notes View
> Open from
  View menu
> Bottom section for
text
  Notes to print for 
presenter or for 
distribution
Type your
notes here
27
Master slides
> Presentation
designs set by
Master slides
> To view and
change
  View > Slide 
Master
> Changing an aspect of the master
changes your whole presentation -
consistently
28
Graphic frames
> Select a layout that includes a graphics
frame
> Click an icon to insert a graphic type
Or insert graphics from the menu:
Insert  Picture
  Pictures don’t have to be in a graphics frame
29
Pictures
> Before PowerPoint:
  Assemble your pix from camera/scan/Web
> Web: Search with Google―Image
tab
1. Click thumbnail of picture
2. Then click See full-sized image
3. Right-click (Control-click on Mac) 
4. Click Save Picture as: to download
  Remember where you saved the picture!
30
Choosing Pictures
> Choose Pictures like shoes
1. Are they the right fit?
  Size: Dimensions and File Size
  Can resize (some) in PowerPoint
2. Do they go with your
presentation?
  Relevance
3. Do they go with each
other?
  Consistency, style
31
Techniques: Inserting pictures
> Insert  Picture
> Clip art
  for supplied art
> From File
  for your pictures on disk
32
Techniques: Tweaking pictures
>Use the Picture toolbar
  View Toolbars, Picture
  Quickly add lines, change brightness, 
contrast, even color (sometimes)
>Size, position, tilt graphic
  Don’t make it (much) larger
33
The picture toolbar
Change to
shades of grey
Change
brightness
Change
contrast
Crop (get rid of
part of picture)
Flip
Add
lines
Compress
Re-color
(sometimes)
Reset to
original
Open Format
picture window
Choose
transparent
color
>Click to select picture before
you choose an option
To show toolbar: Click a picture
If the toolbar doesn’t appear:
Right-click picture and choose “Show Picture toolbar”
34
Manipulating Pictures
> Don’t make pictures
larger
  Bigger = Fuzzier
> Control in
PowerPoint:
  Placement
  Size
  Rotation
Drag
corner
bubble to
resize
Drag to
rotate
Click and drag
to move
35
Getting Fancy
>You can:
>Add transitions between
slides
>Animate text
>Make graphics appear and
disappear
>See the PowerPoint
Animations presentation for
more information.
36
Getting Fancy
>You can:
>Add transitions between
slides
>Animate text
>Make graphics appear and
disappear
>See the PowerPoint
Animations presentation for
more information.
Don’tOveruse!
37
Getting Fancy
>You can:
>Add transitions between
slides
>Animate text
>Make graphics appear and
disappear
>See the PowerPoint
Animations presentation for
more information.
Don’tOveruse!
Can be
annoying!
38
Printing
From Menu bar: File > Print
  In lower left, use the Print what pulldown to choose:
> Slides―1 slide /page
> Handouts―several slides/page
  3 per page prints lines for notes to right
> Notes pages―like Notes view
  Slide with your notes
> Outline View―Text only
Click down-
arrow to see
print choices
39
Printing Handouts
> Choose 3 slides per page to get lines
for notes
> Check Frame slides for line around
slide images
Click down-arrow
to set slides/page
40
Printing Headers/Footers
> On the menu bar, click File > Print, and
then click Preview
> OR: On the menu bar, click View >
Header and Footer
> Add Date, Name of presentation, etc.
Click preview
button to set
print options
Summary
>Use PowerPoint for
  Conferences
  Meetings
  Classroom modules
>Start from blank or design template
  Add or change design template at will
>Add text
  Bullet form primarily: Promote and demote bullets
>Insert pictures
  Insert saved pictures or clip art
>Print Handouts, Notes pages or text
outline

Power point text graphics

  • 1.
    PowerPoint Presentations Text andGraphics Techniques Tips
  • 2.
    2 What we’ll lookat…. >Uses for PowerPoint >Starting out   Blank or design >Choosing slide layouts >Inserting & Formatting Text >Inserting Graphics >Viewing and arranging slides >Creating/Printing notes and handouts
  • 3.
    3 PowerPoint Presentations >Presentations atconferences or committees >Classroom modules
  • 4.
    4 Presentations >Text and illustrations  Pictures   Graphs   Cartoons for color and variety >Presentation + space for notes = Ready-made handouts
  • 5.
    5 Classroom modules >Outline notes  Basis of your lecture segment >Photos/Sounds/Videos/Diagrams/ Charts   Illustrate points   Language learning   Processes (Physics, Chemistry)   Business trends, stats
  • 6.
    6 Starting a newpresentation > Open PowerPoint > Start Button  All Programs  Microsoft PowerPoint > If a blank presentation doesn’t appear   On the menu bar, click  File  New   The New presentation  pane appears at the right
  • 7.
    7 Starting choices > Onthe New Presentation pane choose:
  • 8.
    8 Starting choices: Blank >On the New Presentation pane choose   Blank presentation  for a simple white or  colored background   (Add design later)
  • 9.
    9 Starting choices: DesignTemplate > On the New Presentation pane choose   Blank presentation  for a simple white or  colored background   (Add design later)   From Design Template to choose  from pre-designed  graphic backgrounds
  • 10.
    10 Starting choices: AutoContent >On the New Presentation pane choose   Blank presentation  for a simple white or  colored background   (Add design later)   From Design Template to choose  from pre-designed  graphic backgrounds From AutoContent Wizard to get help with  content for standard  business presentations
  • 11.
    Blank presentation screen Slide Thumbnails: Clickto move to slides Task pane: Changes with your Insert menu choices
  • 12.
    12 Blank presentation > Addslide layout later Easy! > Format  Slide Design
  • 13.
    13 Starting from Designtemplate > New From Design Template > Or: Format > Slide Design > Template pane opens to the right > Click a graphic scheme to choose a design for your presentation   Change Templates  anytime   Remove background  pictures from individual  slides
  • 14.
    14 Title Slide > Firstslide = Title slide   Different format  from remainder   Enter title and  subtitle text   Subtitle can be: • Topic areas • Short description • Blank
  • 15.
    15 Adding more slides >On the menu bar, click Insert  New Slide > OR: Click the New Slide icon > Or: Press Control-M
  • 16.
    16 Choosing a slidelayout When you add a new slide: > Apply slide layout pane appears at right > Click to apply your choice   Text = Bullets   Graphics: Easily add clip art or  images saved on your computer   Combinations: Text and  Graphics frames > Always add a title > Everything easily changed!
  • 17.
    17 Frames > Selecting alayout inserts movable containers (frames) to hold text or graphics   Graphics don’t have to be  in a graphics box > Frames are movable and resizable Text and graphics layouts
  • 18.
    18 Text frames >Text normallyin levels of bullets (Here’s level 1 in this Slide Design)   Level two • Level three To get rid of a bullet, backspace at the beginning of a line >Bullet and text styles are set in the Slide Design   You can change the Master slide  (View > Master > Slide Master)
  • 19.
    19 Adding Text > Typetext in a text frame > To go down to the next level of bullet:   Press Tab at the beginning of a line or   Click the Increase Indent icon on Formatting toolbar > To go back to a higher level bullet:   Press Shift-Tab at the beginning of a line or   Click  the Decrease Indent icon on Formatting toolbar
  • 20.
    20 Text: Other formatting >Highlight text to format > Use toolbar button to format > Use sparingly! Bold Italic Underline Shadow Align: Left Center Right Make text Bigger/Smaller Add or take away numbering or bullets Change Text Color: Click down arrow to see more choices
  • 21.
    21 Techniques: Text > ClearTitles > Nothing below 18/20 pt > Short bullets   Explicate as you present   Not full text > San Serif Fonts   Arial, Helvetica, Verdana, Tahoma > Best Serif font: Georgia   This text: Verdana (Sans Serif top and  brown) and Georgia (smaller black)
  • 22.
    22 Tips: Text andgraphics >Appropriate graphic style   Serious and subdued   Playful and cartoony   Illustrative photos >Consistent style, colors   Drawings with similar look >Not too busy   Not even 1 graphic per page unless  illustrating a point
  • 23.
    23 Tips: Consistency >Text aswell as Graphics styles set in the Slide Design you choose >Styles include:   Type Face sizes and colors   Bullet styles and colors   Background graphics
  • 24.
    24 Ways to Viewyour slides > Normal:    Create/Edit > Slide Sorter   Thumbnails to move  around or delete  > Slide Show   Full-Screen presentation > Notes Page   Type in notes for  presenter or for  handouts > View menu: changes slide display
  • 25.
    25 Slide Sorter View >Open from   View menu   View icons (lower left) > Click slide to select   Drag to move   Press Delete to remove
  • 26.
    26 Notes View > Openfrom   View menu > Bottom section for text   Notes to print for  presenter or for  distribution Type your notes here
  • 27.
    27 Master slides > Presentation designsset by Master slides > To view and change   View > Slide  Master > Changing an aspect of the master changes your whole presentation - consistently
  • 28.
    28 Graphic frames > Selecta layout that includes a graphics frame > Click an icon to insert a graphic type Or insert graphics from the menu: Insert  Picture   Pictures don’t have to be in a graphics frame
  • 29.
    29 Pictures > Before PowerPoint:  Assemble your pix from camera/scan/Web > Web: Search with Google―Image tab 1. Click thumbnail of picture 2. Then click See full-sized image 3. Right-click (Control-click on Mac)  4. Click Save Picture as: to download   Remember where you saved the picture!
  • 30.
    30 Choosing Pictures > ChoosePictures like shoes 1. Are they the right fit?   Size: Dimensions and File Size   Can resize (some) in PowerPoint 2. Do they go with your presentation?   Relevance 3. Do they go with each other?   Consistency, style
  • 31.
    31 Techniques: Inserting pictures >Insert  Picture > Clip art   for supplied art > From File   for your pictures on disk
  • 32.
    32 Techniques: Tweaking pictures >Usethe Picture toolbar   View Toolbars, Picture   Quickly add lines, change brightness,  contrast, even color (sometimes) >Size, position, tilt graphic   Don’t make it (much) larger
  • 33.
    33 The picture toolbar Changeto shades of grey Change brightness Change contrast Crop (get rid of part of picture) Flip Add lines Compress Re-color (sometimes) Reset to original Open Format picture window Choose transparent color >Click to select picture before you choose an option To show toolbar: Click a picture If the toolbar doesn’t appear: Right-click picture and choose “Show Picture toolbar”
  • 34.
    34 Manipulating Pictures > Don’tmake pictures larger   Bigger = Fuzzier > Control in PowerPoint:   Placement   Size   Rotation Drag corner bubble to resize Drag to rotate Click and drag to move
  • 35.
    35 Getting Fancy >You can: >Addtransitions between slides >Animate text >Make graphics appear and disappear >See the PowerPoint Animations presentation for more information.
  • 36.
    36 Getting Fancy >You can: >Addtransitions between slides >Animate text >Make graphics appear and disappear >See the PowerPoint Animations presentation for more information. Don’tOveruse!
  • 37.
    37 Getting Fancy >You can: >Addtransitions between slides >Animate text >Make graphics appear and disappear >See the PowerPoint Animations presentation for more information. Don’tOveruse! Can be annoying!
  • 38.
    38 Printing From Menu bar:File > Print   In lower left, use the Print what pulldown to choose: > Slides―1 slide /page > Handouts―several slides/page   3 per page prints lines for notes to right > Notes pages―like Notes view   Slide with your notes > Outline View―Text only Click down- arrow to see print choices
  • 39.
    39 Printing Handouts > Choose3 slides per page to get lines for notes > Check Frame slides for line around slide images Click down-arrow to set slides/page
  • 40.
    40 Printing Headers/Footers > Onthe menu bar, click File > Print, and then click Preview > OR: On the menu bar, click View > Header and Footer > Add Date, Name of presentation, etc. Click preview button to set print options
  • 41.
    Summary >Use PowerPoint for  Conferences   Meetings   Classroom modules >Start from blank or design template   Add or change design template at will >Add text   Bullet form primarily: Promote and demote bullets >Insert pictures   Insert saved pictures or clip art >Print Handouts, Notes pages or text outline