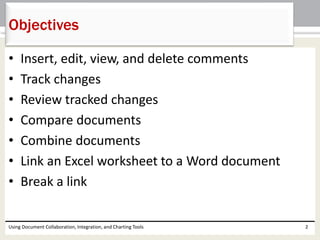
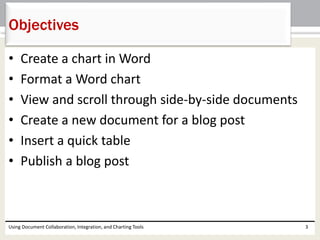
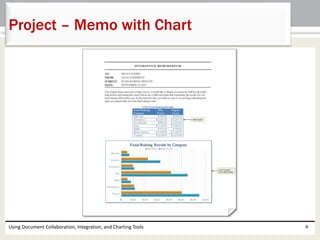
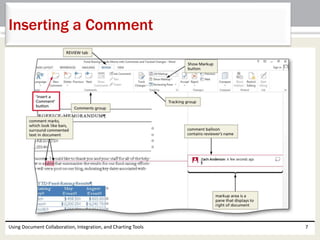
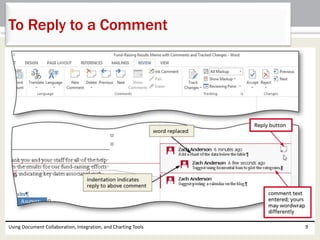
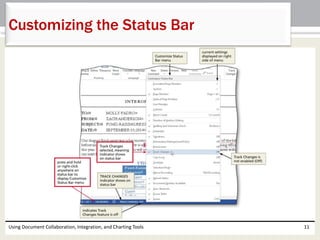
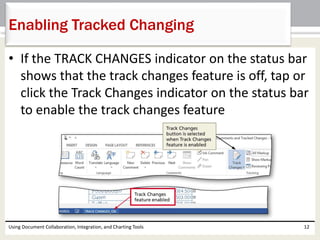
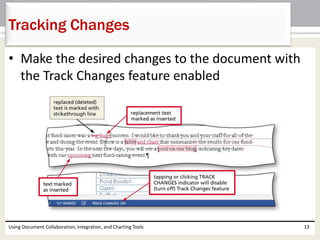
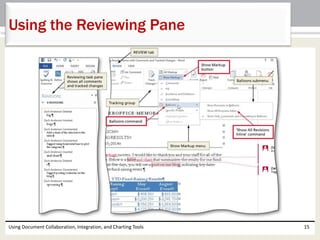
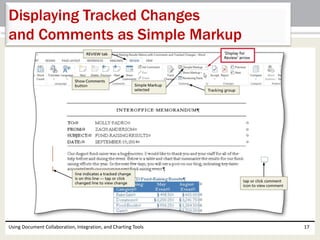
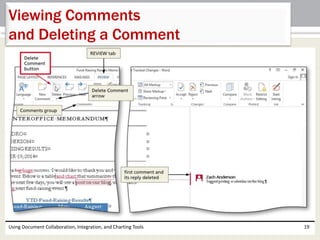
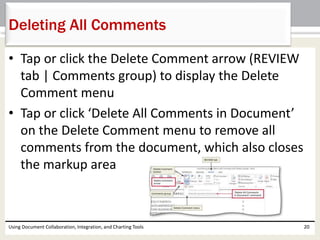
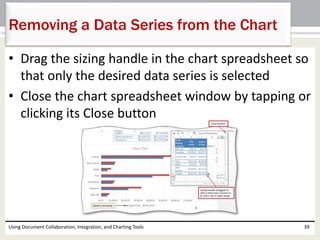
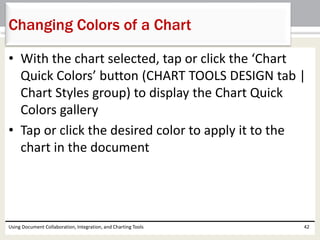
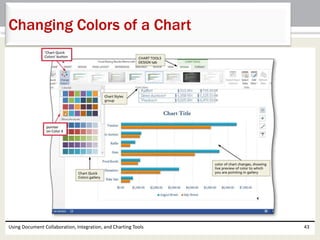
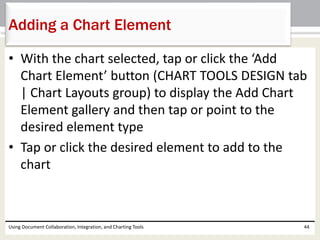
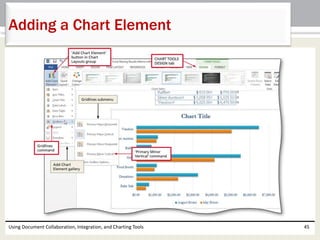
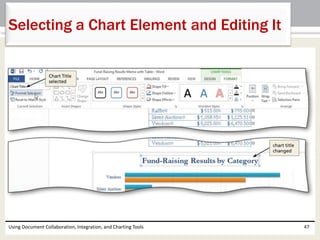
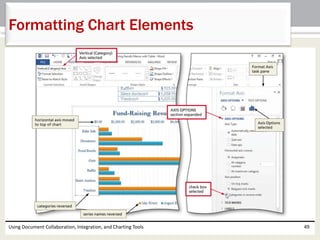
Microsoft 
Word 2013 
Chapter 8 
Using Document 
Collaboration, Integration, 
and Charting Tools
Objectives 
• Insert, edit, view, and delete comments 
• Track changes 
• Review tracked changes 
• Compare documents 
• Combine documents 
• Link an Excel worksheet to a Word document 
• Break a link 
Using Document Collaboration, Integration, and Charting Tools 2
Objectives 
• Create a chart in Word 
• Format a Word chart 
• View and scroll through side-by-side documents 
• Create a new document for a blog post 
• Insert a quick table 
• Publish a blog post 
Using Document Collaboration, Integration, and Charting Tools 3
Project – Memo with Chart 
Using Document Collaboration, Integration, and Charting Tools 4
Roadmap 
• Insert comments and track changes in the memo 
with the table 
• Review the comments and tracked changes 
• Link an Excel worksheet to a word document 
• Chart a Word table using Word’s CHART TOOLS 
tab 
• Create and publish a blog post 
Using Document Collaboration, Integration, and Charting Tools 5
Inserting a Comment 
• Position the insertion point at the location where the comment 
should be located 
• If the ‘Display for Review’ box (REVIEW tab | Tracking group) 
does not show All Markup, tap or click the ‘Display for Review’ 
arrow (REVIEW tab | Tracking group) and then tap or click All 
Markup on the Display for Review menu to instruct Word to 
display the document with all proposed edits shown as markup 
• Tap or click the ‘Insert a Comment’ button (REVIEW tab | 
Comments group) to display a comment balloon in the markup 
area in the document window and place comment marks 
around the commented text in the document 
• Window 
• Type the desired comment in the comment balloon 
Using Document Collaboration, Integration, and Charting Tools 6
Inserting a Comment 
Using Document Collaboration, Integration, and Charting Tools 7
To Reply to a Comment 
• If necessary, tap or click the comment to which 
you wish to reply so that the comment is selected 
• Tap or click the Reply button in the selected 
comment to display a reply comment for the 
selected comment 
• Type the desired text in the new indented 
comment 
Using Document Collaboration, Integration, and Charting Tools 8
To Reply to a Comment 
Using Document Collaboration, Integration, and Charting Tools 9
Customizing the Status Bar 
• If the status bar does not show a desired item, press 
and hold or right-click anywhere on the status bar to 
display the Customize Status Bar menu 
• Tap or click the item on the Customize Status Bar 
menu that you want to show to place a check mark 
beside the item, which also immediately may show as 
an indicator on the status bar 
• Tap or click anywhere outside of the Customize Status 
Bar menu or press the ESC key to remove the menu 
from the screen 
Using Document Collaboration, Integration, and Charting Tools 10
Customizing the Status Bar 
Using Document Collaboration, Integration, and Charting Tools 11
Enabling Tracked Changing 
• If the TRACK CHANGES indicator on the status bar 
shows that the track changes feature is off, tap or 
click the Track Changes indicator on the status bar 
to enable the track changes feature 
Using Document Collaboration, Integration, and Charting Tools 12
Tracking Changes 
• Make the desired changes to the document with 
the Track Changes feature enabled 
Using Document Collaboration, Integration, and Charting Tools 13
Using the Reviewing Pane 
• Tap or click the Reviewing Pane arrow (REVIEW tab | 
Tracking group) to display the Reviewing Pane menu 
• Tap or click ‘Reviewing Pane Vertical’ on the 
Reviewing Pane menu to display the Reviewing task 
pane on the left side of the Word window 
• Tap or click the Show Markup button (REVIEW tab | 
Tracking group) to display the Show Markup menu 
• Tap or point to Balloons on the Show Markup menu 
to display the Balloons submenu 
• Tap or click ‘Show All Revisions Inline’ on the Balloons 
submenu to remove the markup area from the Word 
window and place all markups inline 
Using Document Collaboration, Integration, and Charting Tools 14
Using the Reviewing Pane 
Using Document Collaboration, Integration, and Charting Tools 15
Displaying Tracked Changes 
and Comments as Simple Markup 
• Tap or click the ‘Display for Review’ arrow 
(REVIEW tab | Tracking group) to display the 
Display for Review menu 
• Tap or click Simple Markup on the Display for 
Review menu to show a simple markup instead of 
all markups in the document window 
Using Document Collaboration, Integration, and Charting Tools 16
Displaying Tracked Changes 
and Comments as Simple Markup 
Using Document Collaboration, Integration, and Charting Tools 17
Viewing Comments 
and Deleting a Comment 
• Position the insertion point at the beginning of 
the document, so that Word begins searching for 
comments from the top of the document 
• Tap or click the Next Comment button (Review tab 
| Comments group), which causes Word to locate 
and select the first comment in the document 
• Tap or click the Delete Comment button (REVIEW 
tab | Comments group) to remove the comment 
balloon from the markup area 
Using Document Collaboration, Integration, and Charting Tools 18
Viewing Comments 
and Deleting a Comment 
Using Document Collaboration, Integration, and Charting Tools 19
Deleting All Comments 
• Tap or click the Delete Comment arrow (REVIEW 
tab | Comments group) to display the Delete 
Comment menu 
• Tap or click ‘Delete All Comments in Document’ 
on the Delete Comment menu to remove all 
comments from the document, which also closes 
the markup area 
Using Document Collaboration, Integration, and Charting Tools 20
Reviewing Tracked Changes 
• Position the insertion point at the beginning of the 
document, so that Word begins the review of tracked 
changes from the top of the document 
• Tap or click the Next Change button (REVIEW tab | 
Changes group), which causes Word to locate and 
select the first markup in the document 
• Tap or click the desired button on the ribbon 
corresponding to how you wish to handle the change 
• Repeat the previous two steps for each change in the 
document 
Using Document Collaboration, Integration, and Charting Tools 21
Reviewing Tracked Changes 
Using Document Collaboration, Integration, and Charting Tools 22
Changing Tracking Options 
Using Document Collaboration, Integration, and Charting Tools 23
Comparing Documents 
• Tap or click the Compare button (REVIEW tab | 
Compare group) to display the Compare menu 
• Tap or click Compare on the Compare menu to 
display the Compare Documents dialog box 
• Tap or click the Original document arrow and then 
tap or click the first file to compare 
• Tap or click the Revised document arrow and then 
tap or click the second file to compare 
Using Document Collaboration, Integration, and Charting Tools 24
Comparing Documents 
• If a More button appears in the dialog box, tap or 
click it to expand the dialog box, which changes 
the More button to a Less button 
• If necessary, in the Show changes in area, tap or 
click New document so that tracked changes are 
marked in a new document 
• Tap or click the OK button to open a new 
document window and display the differences 
between the two documents as tracked changes 
in a new document window 
Using Document Collaboration, Integration, and Charting Tools 25
Comparing Documents 
Using Document Collaboration, Integration, and Charting Tools 26
Combining Revisions 
from Multiple Authors 
• Tap or click the Compare button (REVIEW tab | 
Compare group) to display the Compare menu 
• Tap or click Combine on the Compare menu to 
display the Combine Documents dialog box 
• Tap or click the Original document arrow and then 
click the first file to combine 
• Tap or click the Revised document arrow and then 
click the second file to combine 
Using Document Collaboration, Integration, and Charting Tools 27
Combining Revisions 
from Multiple Authors 
• If a More button appears in the dialog box, tap or 
click it to expand the dialog box, which changes 
the More button to a Less button 
• In the Show changes in area, if necessary, tap or 
click Original document so that tracked changes 
are marked in the original document 
• Tap or click the OK button to combine the 
documents and display the differences between 
the two documents as tracked changes in the 
original document 
Using Document Collaboration, Integration, and Charting Tools 28
Combining Revisions 
from Multiple Authors 
Using Document Collaboration, Integration, and Charting Tools 29
Showing Tracked Changes and 
Comments by a Single Reviewer 
• Tap or click the Show Markup button (REVIEW tab 
| Tracking group) to display the Show Markup 
menu and then tap or point to Specific People on 
the Show Markup menu to display the Specific 
People submenu 
• Tap or click the name of the reviewer on the 
Reviewers submenu to hide the selected 
reviewer’s markups and leave other markups on 
the screen 
Using Document Collaboration, Integration, and Charting Tools 30
Showing Tracked Changes and 
Comments by a Single Reviewer 
Using Document Collaboration, Integration, and Charting Tools 31
Linking an Excel Worksheet 
in a Word Document 
• Drag through the cells in the Excel worksheet to copy 
• In the Excel window, if you are using a touch screen, tap the 
Copy button (HOME tab | Clipboard group) and then tap 
Copy on the Copy menu; if you are using a mouse, click the 
Copy button (HOME tab | Clipboard group) to copy the 
selected cells to the Clipboard 
• Position the insertion point in the Word document where 
you wish to insert the cells 
• In Word, tap or click the Paste arrow (HOME tab | Clipboard 
group) to display the Paste gallery 
• If you are using a mouse, point to the ‘Link & Keep Source 
Formatting’ button in the Paste gallery to display a live 
preview of that paste option 
Using Document Collaboration, Integration, and Charting Tools 32
Linking an Excel Worksheet 
in a Word Document 
• Tap or click the ‘Link & Keep Source Formatting’ 
button in the Paste gallery to paste and link the 
object at the location of the insertion point in the 
document 
Using Document Collaboration, Integration, and Charting Tools 33
Breaking a Link 
• If you are using a touch screen, press and hold the linked object and then 
tap the ‘Show Context Menu’ button on the mini toolbar; if you are using 
a mouse, right-click the linked object (the linked Excel worksheet, in this 
case) to display a shortcut menu 
• Tap or point to ‘Linked Worksheet Object’ on the shortcut menu to 
display the Linked Worksheet Object submenu 
• Tap or click Links on the Linked Worksheet Object submenu to display the 
Links dialog box 
• If necessary, tap or click the source file listed in the dialog box to select it 
• Tap or click the Break Link button, which displays a dialog box asking if 
you are sure you want to break the selected links 
• Tap or click the Yes button in the dialog box to remove the source file 
from the list 
Using Document Collaboration, Integration, and Charting Tools 34
Breaking a Link 
Using Document Collaboration, Integration, and Charting Tools 35
Charting a Table 
• Tap or click the ‘Add a Chart’ button (INSERT tab | 
Illustrations group) to display the Insert Chart dialog 
box 
• Tap or click the desired category in the left pane 
• Tap or click the desired chart type in the right pane 
• Tap or click the OK button so that Word creates a 
default chart at the location of the insertion point 
• In the Word document, select the table to be charted 
• Tap or click the Copy button (HOME tab | Clipboard 
group) to copy the selected table to the Clipboard 
Using Document Collaboration, Integration, and Charting Tools 36
Charting a Table 
• In the chart spreadsheet window, tap or click the Select All 
button (upper-left corner of worksheet) to select the entire 
worksheet 
• Press and hold or right-click the selected worksheet to 
display a mini toolbar or shortcut menu 
• In the chart spreadsheet window, tap the Paste button or 
click the ‘Keep Source Formatting’ button to paste the 
contents of the Clipboard starting in the upper-left corner 
of the worksheet 
• When Word displays a dialog box indicating that the pasted 
contents are a different size from the selection, tap or click 
the OK button 
• If necessary, resize the chart as necessary 
Using Document Collaboration, Integration, and Charting Tools 37
Charting a Table 
Using Document Collaboration, Integration, and Charting Tools 38
Removing a Data Series from the Chart 
• Drag the sizing handle in the chart spreadsheet so 
that only the desired data series is selected 
• Close the chart spreadsheet window by tapping or 
clicking its Close button 
Using Document Collaboration, Integration, and Charting Tools 39
Applying a Chart Style 
• Tap or click the chart to select it 
• Tap or click the desired style in the Chart Styles 
gallery (CHART TOOLS DESIGN tab | Chart Styles 
group) 
Using Document Collaboration, Integration, and Charting Tools 40
Applying a Chart Style 
Using Document Collaboration, Integration, and Charting Tools 41
Changing Colors of a Chart 
• With the chart selected, tap or click the ‘Chart 
Quick Colors’ button (CHART TOOLS DESIGN tab | 
Chart Styles group) to display the Chart Quick 
Colors gallery 
• Tap or click the desired color to apply it to the 
chart in the document 
Using Document Collaboration, Integration, and Charting Tools 42
Changing Colors of a Chart 
Using Document Collaboration, Integration, and Charting Tools 43
Adding a Chart Element 
• With the chart selected, tap or click the ‘Add 
Chart Element’ button (CHART TOOLS DESIGN tab 
| Chart Layouts group) to display the Add Chart 
Element gallery and then tap or point to the 
desired element type 
• Tap or click the desired element to add to the 
chart 
Using Document Collaboration, Integration, and Charting Tools 44
Adding a Chart Element 
Using Document Collaboration, Integration, and Charting Tools 45
Selecting a Chart Element and Editing It 
• With the chart selected, tap or click the Chart 
Elements arrow (CHART TOOLS FORMAT tab | 
Current Selection group) to display the Chart 
Elements list 
• Tap or click the desired element to edit 
• Type the desired text 
Using Document Collaboration, Integration, and Charting Tools 46
Selecting a Chart Element and Editing It 
Using Document Collaboration, Integration, and Charting Tools 47
Formatting Chart Elements 
• With the chart selected, tap or click the Chart 
Elements arrow (CHART TOOLS FORMAT tab | 
Current Selection group) to display the Chart 
Elements list and then tap or click the element to 
format 
• Make the necessary changes in the task pane 
Using Document Collaboration, Integration, and Charting Tools 48
Formatting Chart Elements 
Using Document Collaboration, Integration, and Charting Tools 49
Changing a Chart Type 
• Tap or click the ‘Change Chart Type’ button 
(CHART TOOLS DESIGN tab | Type group) to 
display the Change Chart Type dialog box 
• Tap or click the desired chart category and chart 
type 
• Tap or click the OK button to change the chart 
type 
Using Document Collaboration, Integration, and Charting Tools 50
Changing a Chart Type 
Using Document Collaboration, Integration, and Charting Tools 51
Viewing and Scrolling through 
Documents Side by Side 
• Open the documents to view side by side 
• Tap or click the ‘View Side by Side’ button (VIEW tab 
| Window group) to display each open window side 
by side 
• Scroll to the bottom of one of the windows and 
notice how both windows (documents) scroll 
together 
• In either window, tap or click the ‘View Side by Side’ 
button (VIEW tab | Window group) to turn off side-by- 
side viewing and display each window in the full 
screen 
Using Document Collaboration, Integration, and Charting Tools 52
Viewing and Scrolling through 
Documents Side by Side 
Using Document Collaboration, Integration, and Charting Tools 53
Creating a Blank Document 
for a Blog Post 
• Open the Backstage view 
• Tap or click the New tab in the Backstage view to 
display the New gallery 
• Tap or click the Blog post thumbnail to select the 
template and display it in a preview window 
• Tap or click the Create button in the preview 
window to create a new blank document for a 
blog post 
Using Document Collaboration, Integration, and Charting Tools 54
Creating a Blank Document 
for a Blog Post 
Using Document Collaboration, Integration, and Charting Tools 55
Inserting a Quick Table 
• With the insertion point positioned where you 
wish to insert the Quick Table, tap or click the 
‘Add a Table’ button (INSERT tab | Tables group) 
to display the Add a Table gallery 
• Tap or point to Quick Tables in the Add a Table 
gallery to display the Quick Tables gallery 
• Tap or click the desired Quick Table to insert the 
selected Quick Table in the document at the 
location of the insertion point 
Using Document Collaboration, Integration, and Charting Tools 56
Inserting a Quick Table 
Using Document Collaboration, Integration, and Charting Tools 57
Publishing a Blog Post 
• Tap or click the Publish button (BLOG POST tab | 
Blog group), which causes Word to display a brief 
message that it is contacting the blog provider 
and then display a message on the screen that the 
post was published 
Using Document Collaboration, Integration, and Charting Tools 58
Publishing a Blog Post 
Using Document Collaboration, Integration, and Charting Tools 59
Displaying a Blog Webpage 
in a Browser Window 
• Tap or click the Home Page button (BLOG POST 
tab | Blog group), which runs the default browser 
and displays the webpage associated with the 
registered blog account in the browser window. 
You may need to tap or click the Refresh button in 
your browser window to display the most current 
webpage contents 
Using Document Collaboration, Integration, and Charting Tools 60
Displaying a Blog Webpage 
in a Browser Window 
Using Document Collaboration, Integration, and Charting Tools 61
Chapter Summary 
• Insert, edit, view, and delete comments 
• Track changes 
• Review tracked changes 
• Compare documents 
• Combine documents 
• Link an Excel worksheet to a Word document 
• Break a link 
Using Document Collaboration, Integration, and Charting Tools 62
Chapter Summary 
• Create a chart in Word 
• Format a Word chart 
• View and scroll through side-by-side documents 
• Create a new document for a blog post 
• Insert a quick table 
• Publish a blog post 
Using Document Collaboration, Integration, and Charting Tools 63
Microsoft 
Word 2013 
Chapter 8 Complete

Word ch08

  • 1.
    Microsoft Word 2013 Chapter 8 Using Document Collaboration, Integration, and Charting Tools
  • 2.
    Objectives • Insert,edit, view, and delete comments • Track changes • Review tracked changes • Compare documents • Combine documents • Link an Excel worksheet to a Word document • Break a link Using Document Collaboration, Integration, and Charting Tools 2
  • 3.
    Objectives • Createa chart in Word • Format a Word chart • View and scroll through side-by-side documents • Create a new document for a blog post • Insert a quick table • Publish a blog post Using Document Collaboration, Integration, and Charting Tools 3
  • 4.
    Project – Memowith Chart Using Document Collaboration, Integration, and Charting Tools 4
  • 5.
    Roadmap • Insertcomments and track changes in the memo with the table • Review the comments and tracked changes • Link an Excel worksheet to a word document • Chart a Word table using Word’s CHART TOOLS tab • Create and publish a blog post Using Document Collaboration, Integration, and Charting Tools 5
  • 6.
    Inserting a Comment • Position the insertion point at the location where the comment should be located • If the ‘Display for Review’ box (REVIEW tab | Tracking group) does not show All Markup, tap or click the ‘Display for Review’ arrow (REVIEW tab | Tracking group) and then tap or click All Markup on the Display for Review menu to instruct Word to display the document with all proposed edits shown as markup • Tap or click the ‘Insert a Comment’ button (REVIEW tab | Comments group) to display a comment balloon in the markup area in the document window and place comment marks around the commented text in the document • Window • Type the desired comment in the comment balloon Using Document Collaboration, Integration, and Charting Tools 6
  • 7.
    Inserting a Comment Using Document Collaboration, Integration, and Charting Tools 7
  • 8.
    To Reply toa Comment • If necessary, tap or click the comment to which you wish to reply so that the comment is selected • Tap or click the Reply button in the selected comment to display a reply comment for the selected comment • Type the desired text in the new indented comment Using Document Collaboration, Integration, and Charting Tools 8
  • 9.
    To Reply toa Comment Using Document Collaboration, Integration, and Charting Tools 9
  • 10.
    Customizing the StatusBar • If the status bar does not show a desired item, press and hold or right-click anywhere on the status bar to display the Customize Status Bar menu • Tap or click the item on the Customize Status Bar menu that you want to show to place a check mark beside the item, which also immediately may show as an indicator on the status bar • Tap or click anywhere outside of the Customize Status Bar menu or press the ESC key to remove the menu from the screen Using Document Collaboration, Integration, and Charting Tools 10
  • 11.
    Customizing the StatusBar Using Document Collaboration, Integration, and Charting Tools 11
  • 12.
    Enabling Tracked Changing • If the TRACK CHANGES indicator on the status bar shows that the track changes feature is off, tap or click the Track Changes indicator on the status bar to enable the track changes feature Using Document Collaboration, Integration, and Charting Tools 12
  • 13.
    Tracking Changes •Make the desired changes to the document with the Track Changes feature enabled Using Document Collaboration, Integration, and Charting Tools 13
  • 14.
    Using the ReviewingPane • Tap or click the Reviewing Pane arrow (REVIEW tab | Tracking group) to display the Reviewing Pane menu • Tap or click ‘Reviewing Pane Vertical’ on the Reviewing Pane menu to display the Reviewing task pane on the left side of the Word window • Tap or click the Show Markup button (REVIEW tab | Tracking group) to display the Show Markup menu • Tap or point to Balloons on the Show Markup menu to display the Balloons submenu • Tap or click ‘Show All Revisions Inline’ on the Balloons submenu to remove the markup area from the Word window and place all markups inline Using Document Collaboration, Integration, and Charting Tools 14
  • 15.
    Using the ReviewingPane Using Document Collaboration, Integration, and Charting Tools 15
  • 16.
    Displaying Tracked Changes and Comments as Simple Markup • Tap or click the ‘Display for Review’ arrow (REVIEW tab | Tracking group) to display the Display for Review menu • Tap or click Simple Markup on the Display for Review menu to show a simple markup instead of all markups in the document window Using Document Collaboration, Integration, and Charting Tools 16
  • 17.
    Displaying Tracked Changes and Comments as Simple Markup Using Document Collaboration, Integration, and Charting Tools 17
  • 18.
    Viewing Comments andDeleting a Comment • Position the insertion point at the beginning of the document, so that Word begins searching for comments from the top of the document • Tap or click the Next Comment button (Review tab | Comments group), which causes Word to locate and select the first comment in the document • Tap or click the Delete Comment button (REVIEW tab | Comments group) to remove the comment balloon from the markup area Using Document Collaboration, Integration, and Charting Tools 18
  • 19.
    Viewing Comments andDeleting a Comment Using Document Collaboration, Integration, and Charting Tools 19
  • 20.
    Deleting All Comments • Tap or click the Delete Comment arrow (REVIEW tab | Comments group) to display the Delete Comment menu • Tap or click ‘Delete All Comments in Document’ on the Delete Comment menu to remove all comments from the document, which also closes the markup area Using Document Collaboration, Integration, and Charting Tools 20
  • 21.
    Reviewing Tracked Changes • Position the insertion point at the beginning of the document, so that Word begins the review of tracked changes from the top of the document • Tap or click the Next Change button (REVIEW tab | Changes group), which causes Word to locate and select the first markup in the document • Tap or click the desired button on the ribbon corresponding to how you wish to handle the change • Repeat the previous two steps for each change in the document Using Document Collaboration, Integration, and Charting Tools 21
  • 22.
    Reviewing Tracked Changes Using Document Collaboration, Integration, and Charting Tools 22
  • 23.
    Changing Tracking Options Using Document Collaboration, Integration, and Charting Tools 23
  • 24.
    Comparing Documents •Tap or click the Compare button (REVIEW tab | Compare group) to display the Compare menu • Tap or click Compare on the Compare menu to display the Compare Documents dialog box • Tap or click the Original document arrow and then tap or click the first file to compare • Tap or click the Revised document arrow and then tap or click the second file to compare Using Document Collaboration, Integration, and Charting Tools 24
  • 25.
    Comparing Documents •If a More button appears in the dialog box, tap or click it to expand the dialog box, which changes the More button to a Less button • If necessary, in the Show changes in area, tap or click New document so that tracked changes are marked in a new document • Tap or click the OK button to open a new document window and display the differences between the two documents as tracked changes in a new document window Using Document Collaboration, Integration, and Charting Tools 25
  • 26.
    Comparing Documents UsingDocument Collaboration, Integration, and Charting Tools 26
  • 27.
    Combining Revisions fromMultiple Authors • Tap or click the Compare button (REVIEW tab | Compare group) to display the Compare menu • Tap or click Combine on the Compare menu to display the Combine Documents dialog box • Tap or click the Original document arrow and then click the first file to combine • Tap or click the Revised document arrow and then click the second file to combine Using Document Collaboration, Integration, and Charting Tools 27
  • 28.
    Combining Revisions fromMultiple Authors • If a More button appears in the dialog box, tap or click it to expand the dialog box, which changes the More button to a Less button • In the Show changes in area, if necessary, tap or click Original document so that tracked changes are marked in the original document • Tap or click the OK button to combine the documents and display the differences between the two documents as tracked changes in the original document Using Document Collaboration, Integration, and Charting Tools 28
  • 29.
    Combining Revisions fromMultiple Authors Using Document Collaboration, Integration, and Charting Tools 29
  • 30.
    Showing Tracked Changesand Comments by a Single Reviewer • Tap or click the Show Markup button (REVIEW tab | Tracking group) to display the Show Markup menu and then tap or point to Specific People on the Show Markup menu to display the Specific People submenu • Tap or click the name of the reviewer on the Reviewers submenu to hide the selected reviewer’s markups and leave other markups on the screen Using Document Collaboration, Integration, and Charting Tools 30
  • 31.
    Showing Tracked Changesand Comments by a Single Reviewer Using Document Collaboration, Integration, and Charting Tools 31
  • 32.
    Linking an ExcelWorksheet in a Word Document • Drag through the cells in the Excel worksheet to copy • In the Excel window, if you are using a touch screen, tap the Copy button (HOME tab | Clipboard group) and then tap Copy on the Copy menu; if you are using a mouse, click the Copy button (HOME tab | Clipboard group) to copy the selected cells to the Clipboard • Position the insertion point in the Word document where you wish to insert the cells • In Word, tap or click the Paste arrow (HOME tab | Clipboard group) to display the Paste gallery • If you are using a mouse, point to the ‘Link & Keep Source Formatting’ button in the Paste gallery to display a live preview of that paste option Using Document Collaboration, Integration, and Charting Tools 32
  • 33.
    Linking an ExcelWorksheet in a Word Document • Tap or click the ‘Link & Keep Source Formatting’ button in the Paste gallery to paste and link the object at the location of the insertion point in the document Using Document Collaboration, Integration, and Charting Tools 33
  • 34.
    Breaking a Link • If you are using a touch screen, press and hold the linked object and then tap the ‘Show Context Menu’ button on the mini toolbar; if you are using a mouse, right-click the linked object (the linked Excel worksheet, in this case) to display a shortcut menu • Tap or point to ‘Linked Worksheet Object’ on the shortcut menu to display the Linked Worksheet Object submenu • Tap or click Links on the Linked Worksheet Object submenu to display the Links dialog box • If necessary, tap or click the source file listed in the dialog box to select it • Tap or click the Break Link button, which displays a dialog box asking if you are sure you want to break the selected links • Tap or click the Yes button in the dialog box to remove the source file from the list Using Document Collaboration, Integration, and Charting Tools 34
  • 35.
    Breaking a Link Using Document Collaboration, Integration, and Charting Tools 35
  • 36.
    Charting a Table • Tap or click the ‘Add a Chart’ button (INSERT tab | Illustrations group) to display the Insert Chart dialog box • Tap or click the desired category in the left pane • Tap or click the desired chart type in the right pane • Tap or click the OK button so that Word creates a default chart at the location of the insertion point • In the Word document, select the table to be charted • Tap or click the Copy button (HOME tab | Clipboard group) to copy the selected table to the Clipboard Using Document Collaboration, Integration, and Charting Tools 36
  • 37.
    Charting a Table • In the chart spreadsheet window, tap or click the Select All button (upper-left corner of worksheet) to select the entire worksheet • Press and hold or right-click the selected worksheet to display a mini toolbar or shortcut menu • In the chart spreadsheet window, tap the Paste button or click the ‘Keep Source Formatting’ button to paste the contents of the Clipboard starting in the upper-left corner of the worksheet • When Word displays a dialog box indicating that the pasted contents are a different size from the selection, tap or click the OK button • If necessary, resize the chart as necessary Using Document Collaboration, Integration, and Charting Tools 37
  • 38.
    Charting a Table Using Document Collaboration, Integration, and Charting Tools 38
  • 39.
    Removing a DataSeries from the Chart • Drag the sizing handle in the chart spreadsheet so that only the desired data series is selected • Close the chart spreadsheet window by tapping or clicking its Close button Using Document Collaboration, Integration, and Charting Tools 39
  • 40.
    Applying a ChartStyle • Tap or click the chart to select it • Tap or click the desired style in the Chart Styles gallery (CHART TOOLS DESIGN tab | Chart Styles group) Using Document Collaboration, Integration, and Charting Tools 40
  • 41.
    Applying a ChartStyle Using Document Collaboration, Integration, and Charting Tools 41
  • 42.
    Changing Colors ofa Chart • With the chart selected, tap or click the ‘Chart Quick Colors’ button (CHART TOOLS DESIGN tab | Chart Styles group) to display the Chart Quick Colors gallery • Tap or click the desired color to apply it to the chart in the document Using Document Collaboration, Integration, and Charting Tools 42
  • 43.
    Changing Colors ofa Chart Using Document Collaboration, Integration, and Charting Tools 43
  • 44.
    Adding a ChartElement • With the chart selected, tap or click the ‘Add Chart Element’ button (CHART TOOLS DESIGN tab | Chart Layouts group) to display the Add Chart Element gallery and then tap or point to the desired element type • Tap or click the desired element to add to the chart Using Document Collaboration, Integration, and Charting Tools 44
  • 45.
    Adding a ChartElement Using Document Collaboration, Integration, and Charting Tools 45
  • 46.
    Selecting a ChartElement and Editing It • With the chart selected, tap or click the Chart Elements arrow (CHART TOOLS FORMAT tab | Current Selection group) to display the Chart Elements list • Tap or click the desired element to edit • Type the desired text Using Document Collaboration, Integration, and Charting Tools 46
  • 47.
    Selecting a ChartElement and Editing It Using Document Collaboration, Integration, and Charting Tools 47
  • 48.
    Formatting Chart Elements • With the chart selected, tap or click the Chart Elements arrow (CHART TOOLS FORMAT tab | Current Selection group) to display the Chart Elements list and then tap or click the element to format • Make the necessary changes in the task pane Using Document Collaboration, Integration, and Charting Tools 48
  • 49.
    Formatting Chart Elements Using Document Collaboration, Integration, and Charting Tools 49
  • 50.
    Changing a ChartType • Tap or click the ‘Change Chart Type’ button (CHART TOOLS DESIGN tab | Type group) to display the Change Chart Type dialog box • Tap or click the desired chart category and chart type • Tap or click the OK button to change the chart type Using Document Collaboration, Integration, and Charting Tools 50
  • 51.
    Changing a ChartType Using Document Collaboration, Integration, and Charting Tools 51
  • 52.
    Viewing and Scrollingthrough Documents Side by Side • Open the documents to view side by side • Tap or click the ‘View Side by Side’ button (VIEW tab | Window group) to display each open window side by side • Scroll to the bottom of one of the windows and notice how both windows (documents) scroll together • In either window, tap or click the ‘View Side by Side’ button (VIEW tab | Window group) to turn off side-by- side viewing and display each window in the full screen Using Document Collaboration, Integration, and Charting Tools 52
  • 53.
    Viewing and Scrollingthrough Documents Side by Side Using Document Collaboration, Integration, and Charting Tools 53
  • 54.
    Creating a BlankDocument for a Blog Post • Open the Backstage view • Tap or click the New tab in the Backstage view to display the New gallery • Tap or click the Blog post thumbnail to select the template and display it in a preview window • Tap or click the Create button in the preview window to create a new blank document for a blog post Using Document Collaboration, Integration, and Charting Tools 54
  • 55.
    Creating a BlankDocument for a Blog Post Using Document Collaboration, Integration, and Charting Tools 55
  • 56.
    Inserting a QuickTable • With the insertion point positioned where you wish to insert the Quick Table, tap or click the ‘Add a Table’ button (INSERT tab | Tables group) to display the Add a Table gallery • Tap or point to Quick Tables in the Add a Table gallery to display the Quick Tables gallery • Tap or click the desired Quick Table to insert the selected Quick Table in the document at the location of the insertion point Using Document Collaboration, Integration, and Charting Tools 56
  • 57.
    Inserting a QuickTable Using Document Collaboration, Integration, and Charting Tools 57
  • 58.
    Publishing a BlogPost • Tap or click the Publish button (BLOG POST tab | Blog group), which causes Word to display a brief message that it is contacting the blog provider and then display a message on the screen that the post was published Using Document Collaboration, Integration, and Charting Tools 58
  • 59.
    Publishing a BlogPost Using Document Collaboration, Integration, and Charting Tools 59
  • 60.
    Displaying a BlogWebpage in a Browser Window • Tap or click the Home Page button (BLOG POST tab | Blog group), which runs the default browser and displays the webpage associated with the registered blog account in the browser window. You may need to tap or click the Refresh button in your browser window to display the most current webpage contents Using Document Collaboration, Integration, and Charting Tools 60
  • 61.
    Displaying a BlogWebpage in a Browser Window Using Document Collaboration, Integration, and Charting Tools 61
  • 62.
    Chapter Summary •Insert, edit, view, and delete comments • Track changes • Review tracked changes • Compare documents • Combine documents • Link an Excel worksheet to a Word document • Break a link Using Document Collaboration, Integration, and Charting Tools 62
  • 63.
    Chapter Summary •Create a chart in Word • Format a Word chart • View and scroll through side-by-side documents • Create a new document for a blog post • Insert a quick table • Publish a blog post Using Document Collaboration, Integration, and Charting Tools 63
  • 64.
    Microsoft Word 2013 Chapter 8 Complete