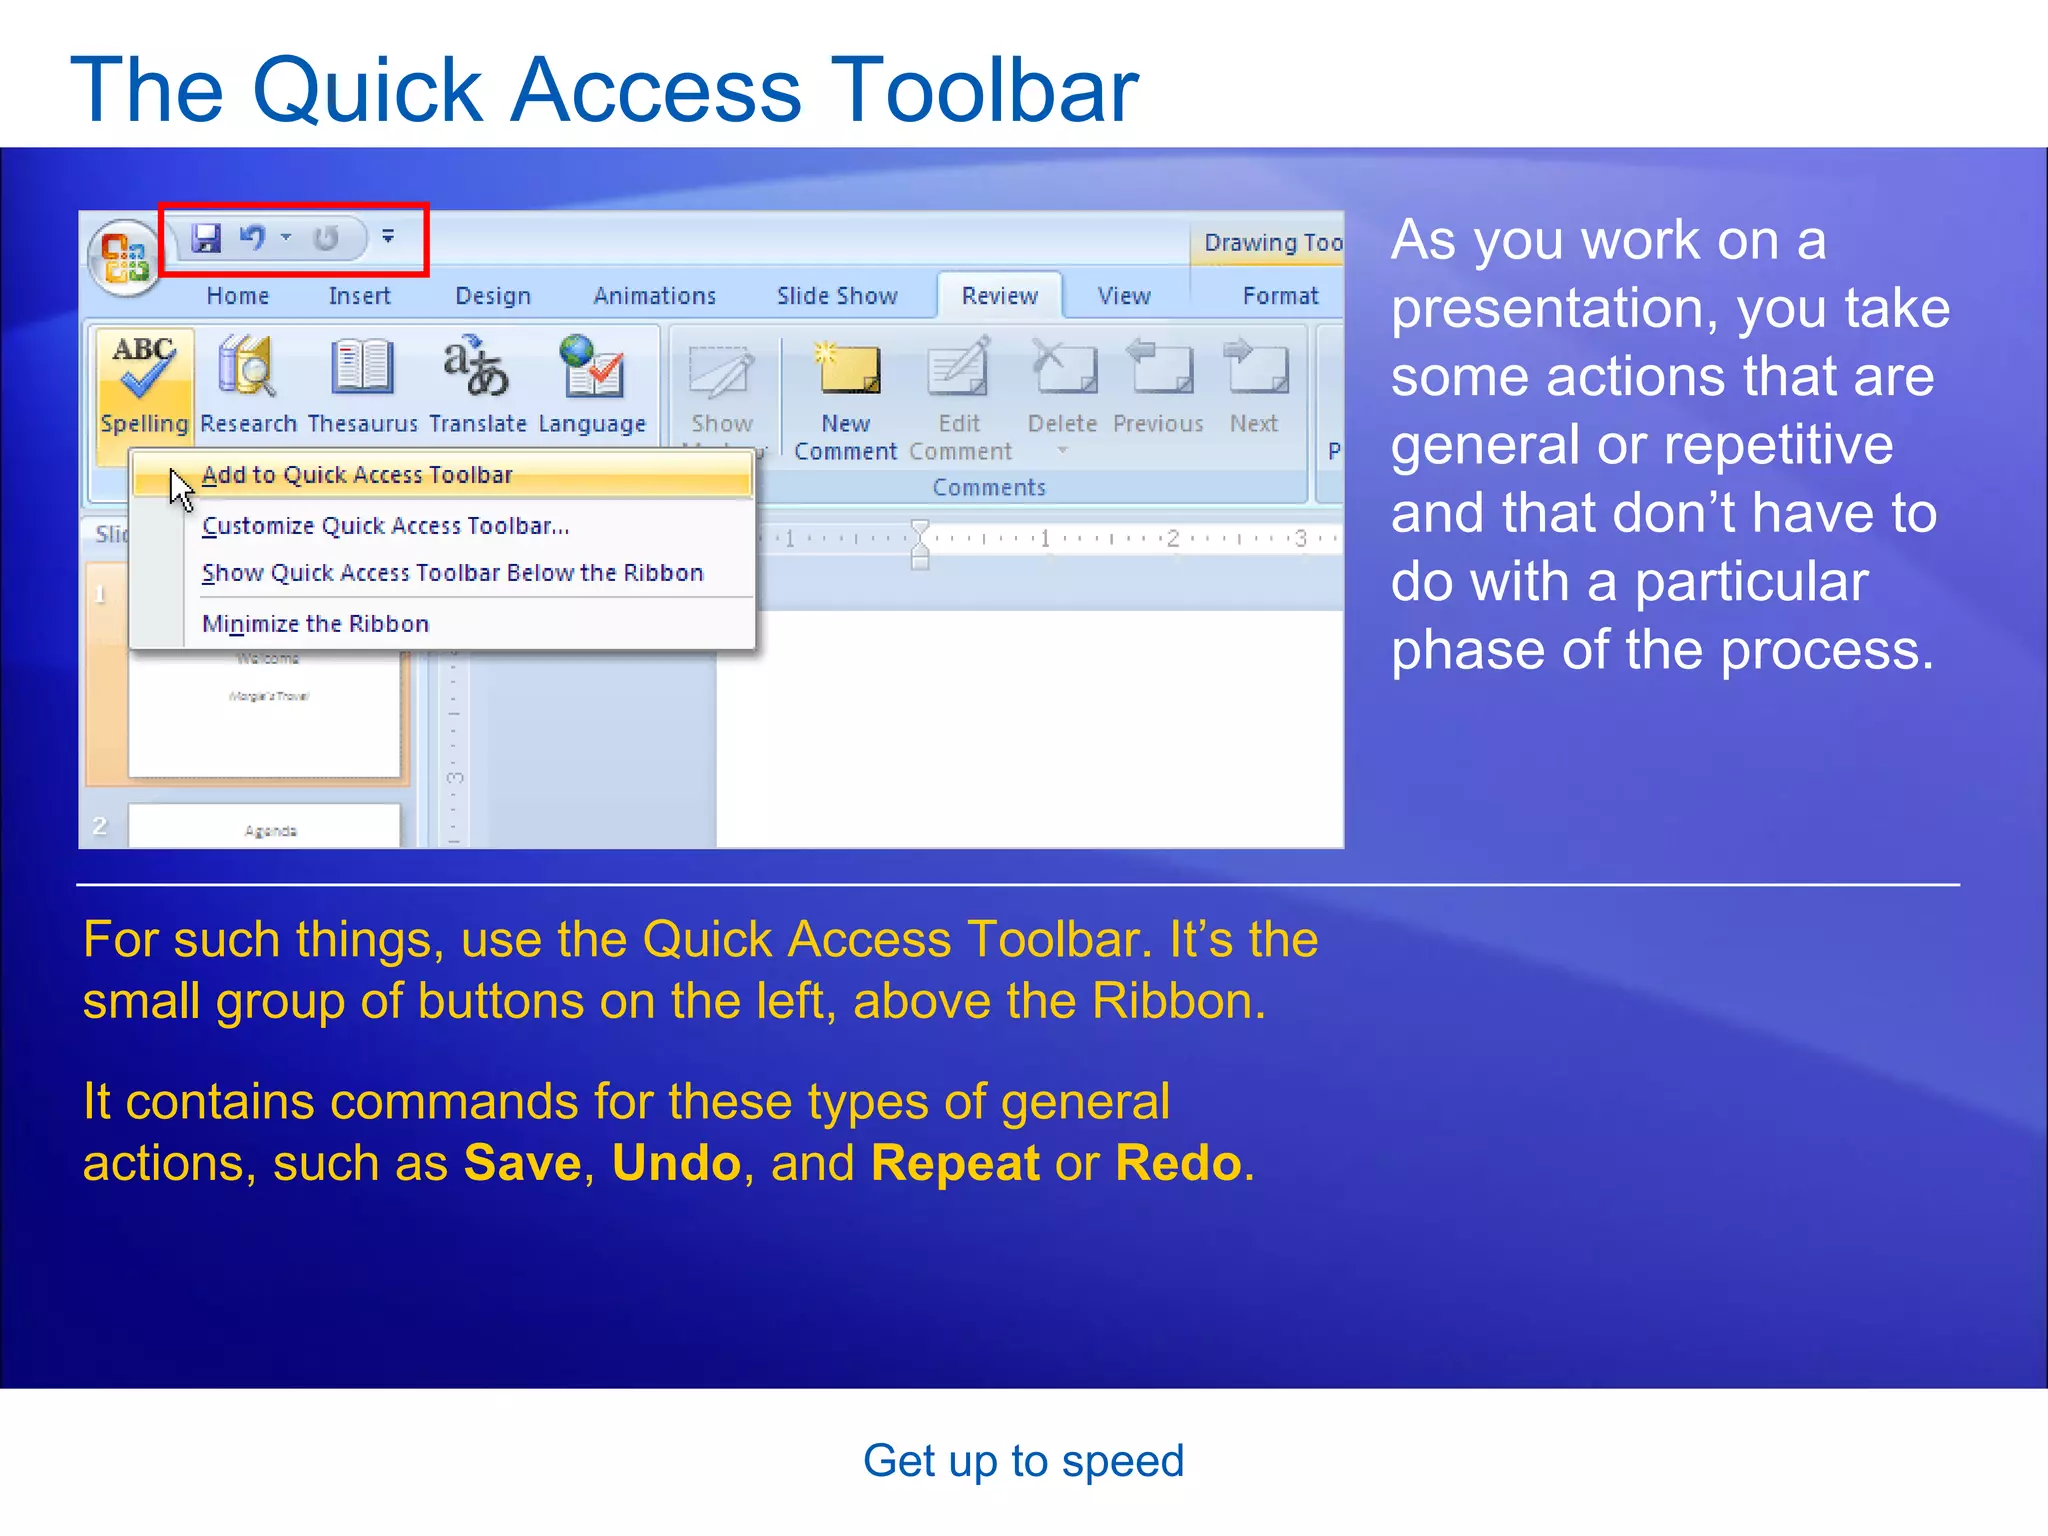
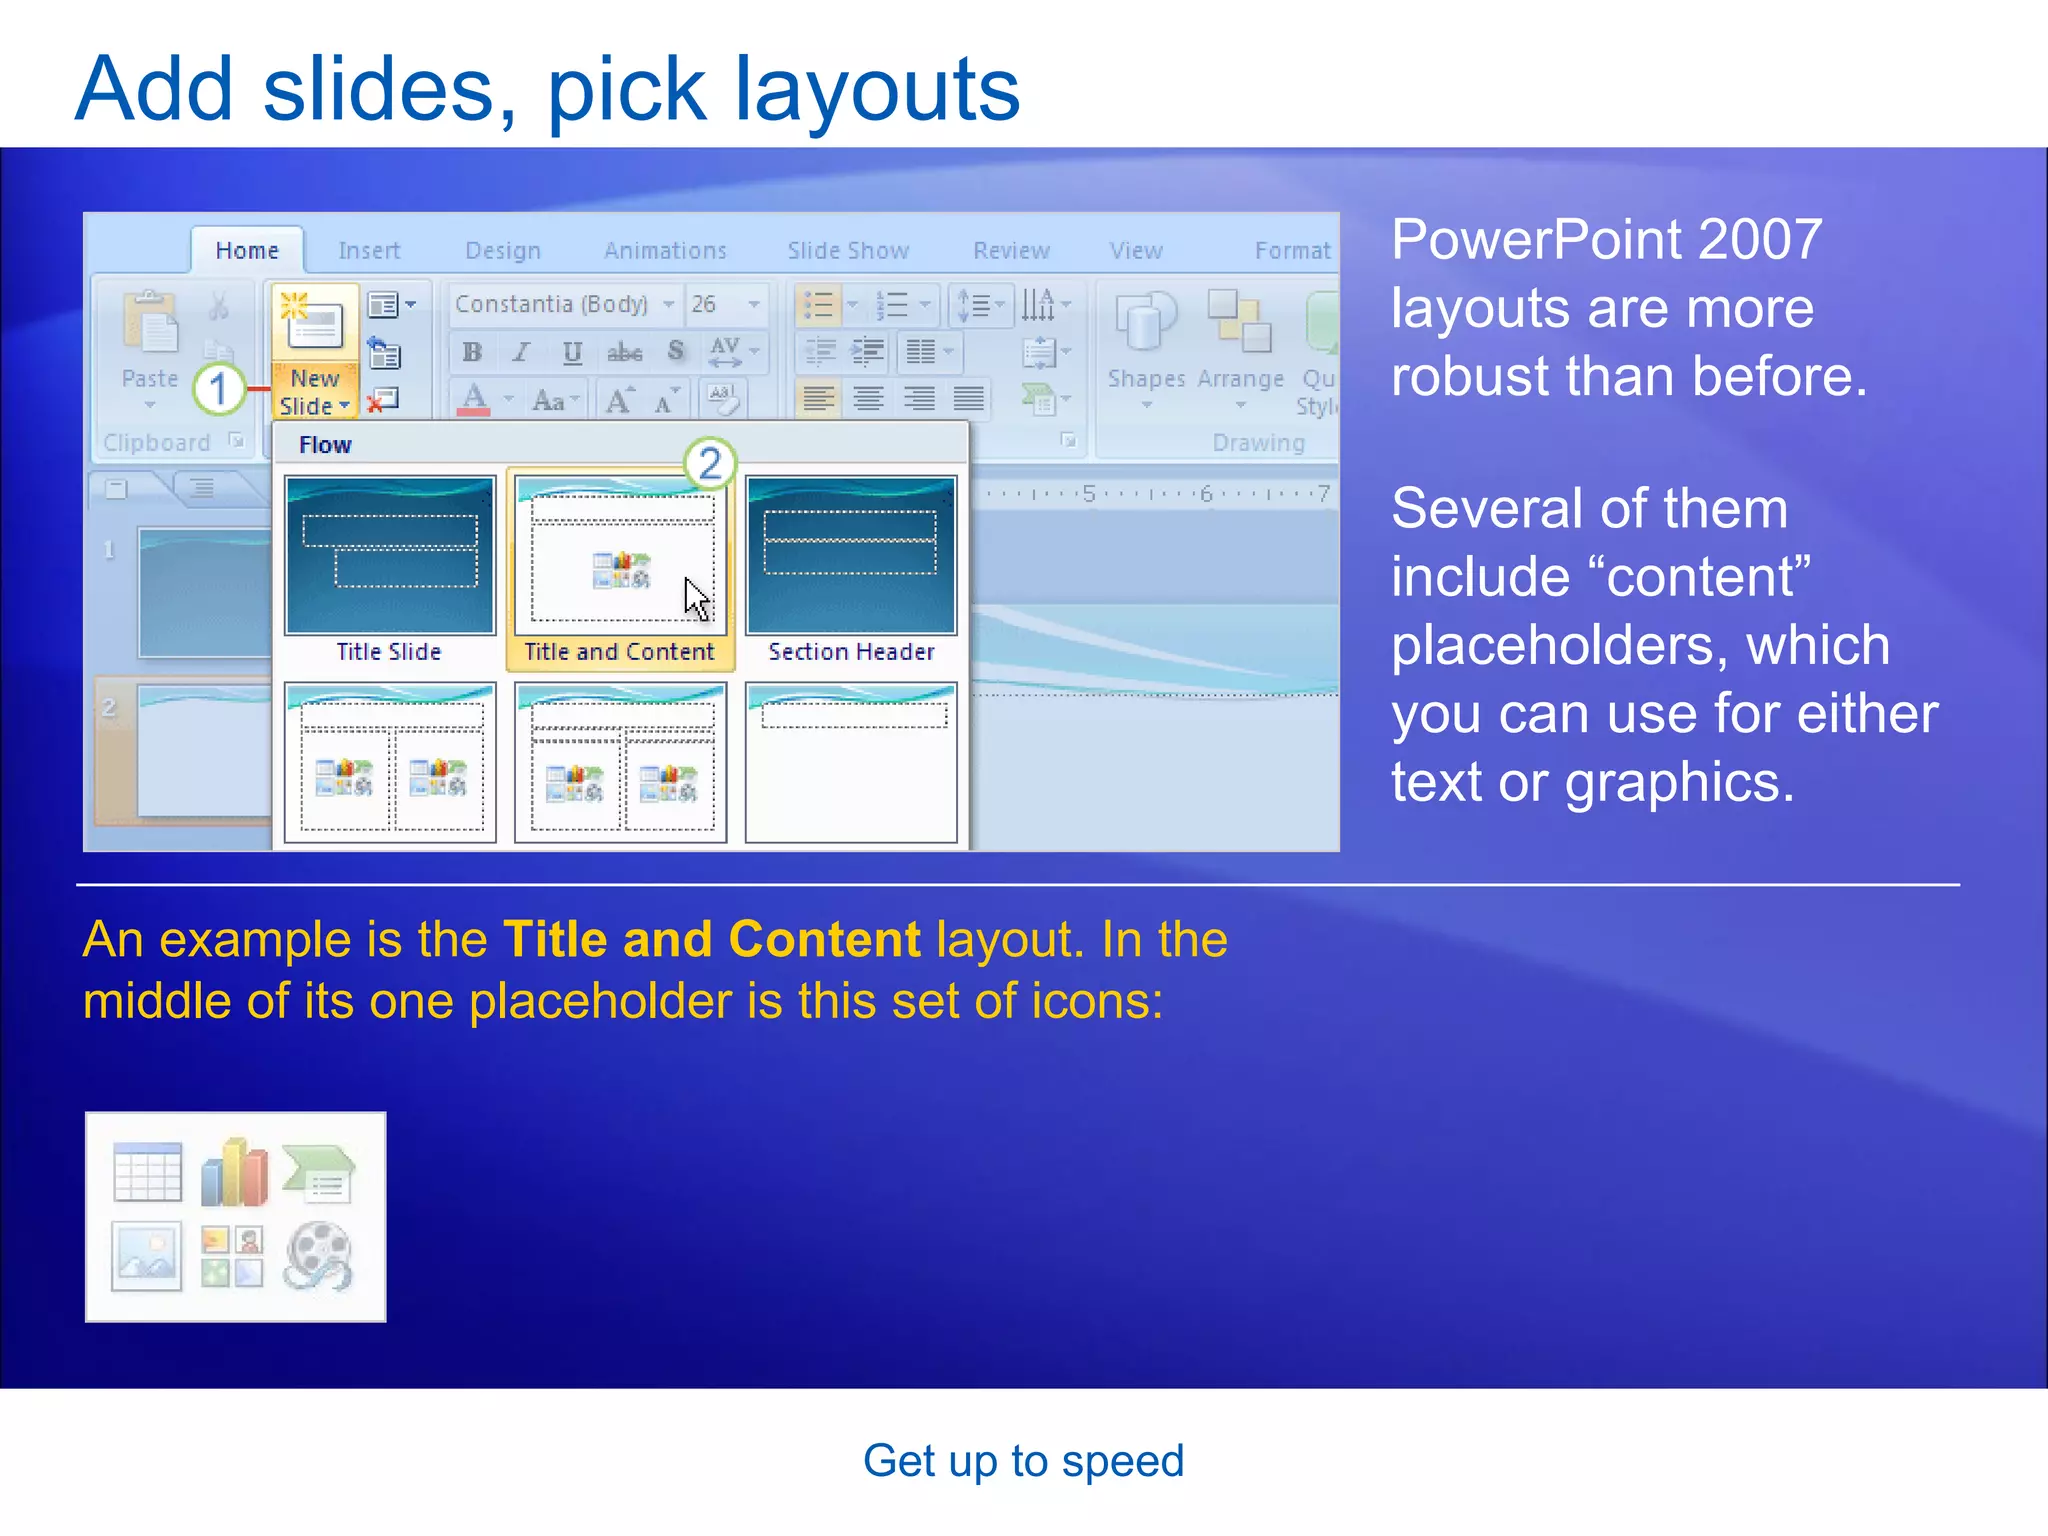
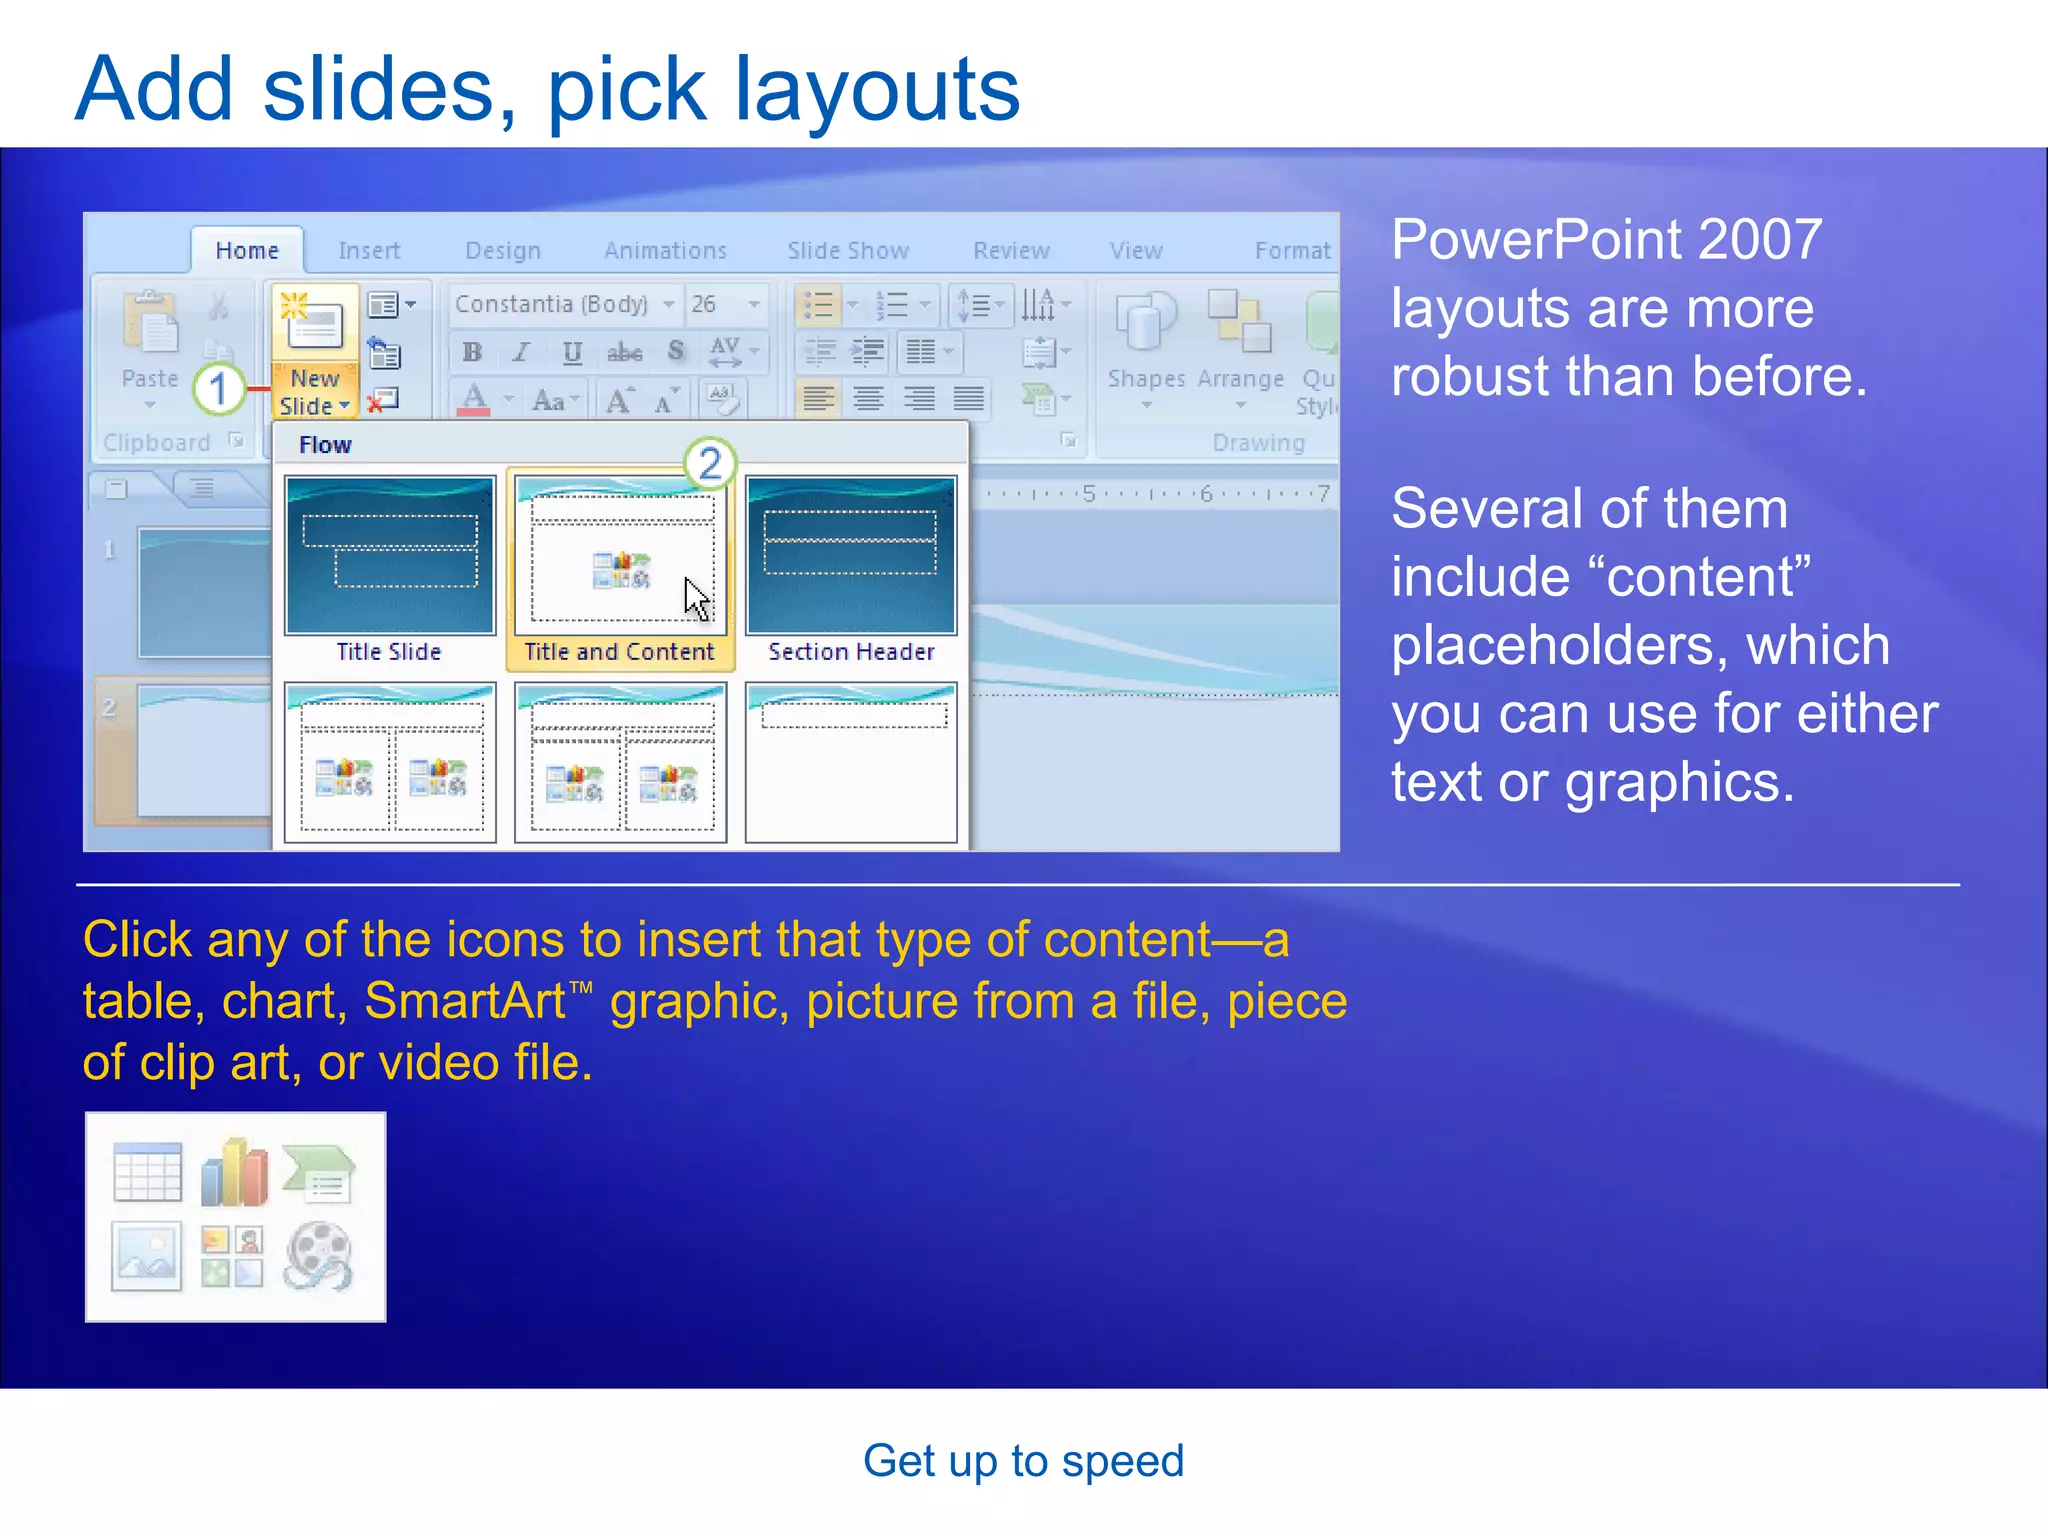
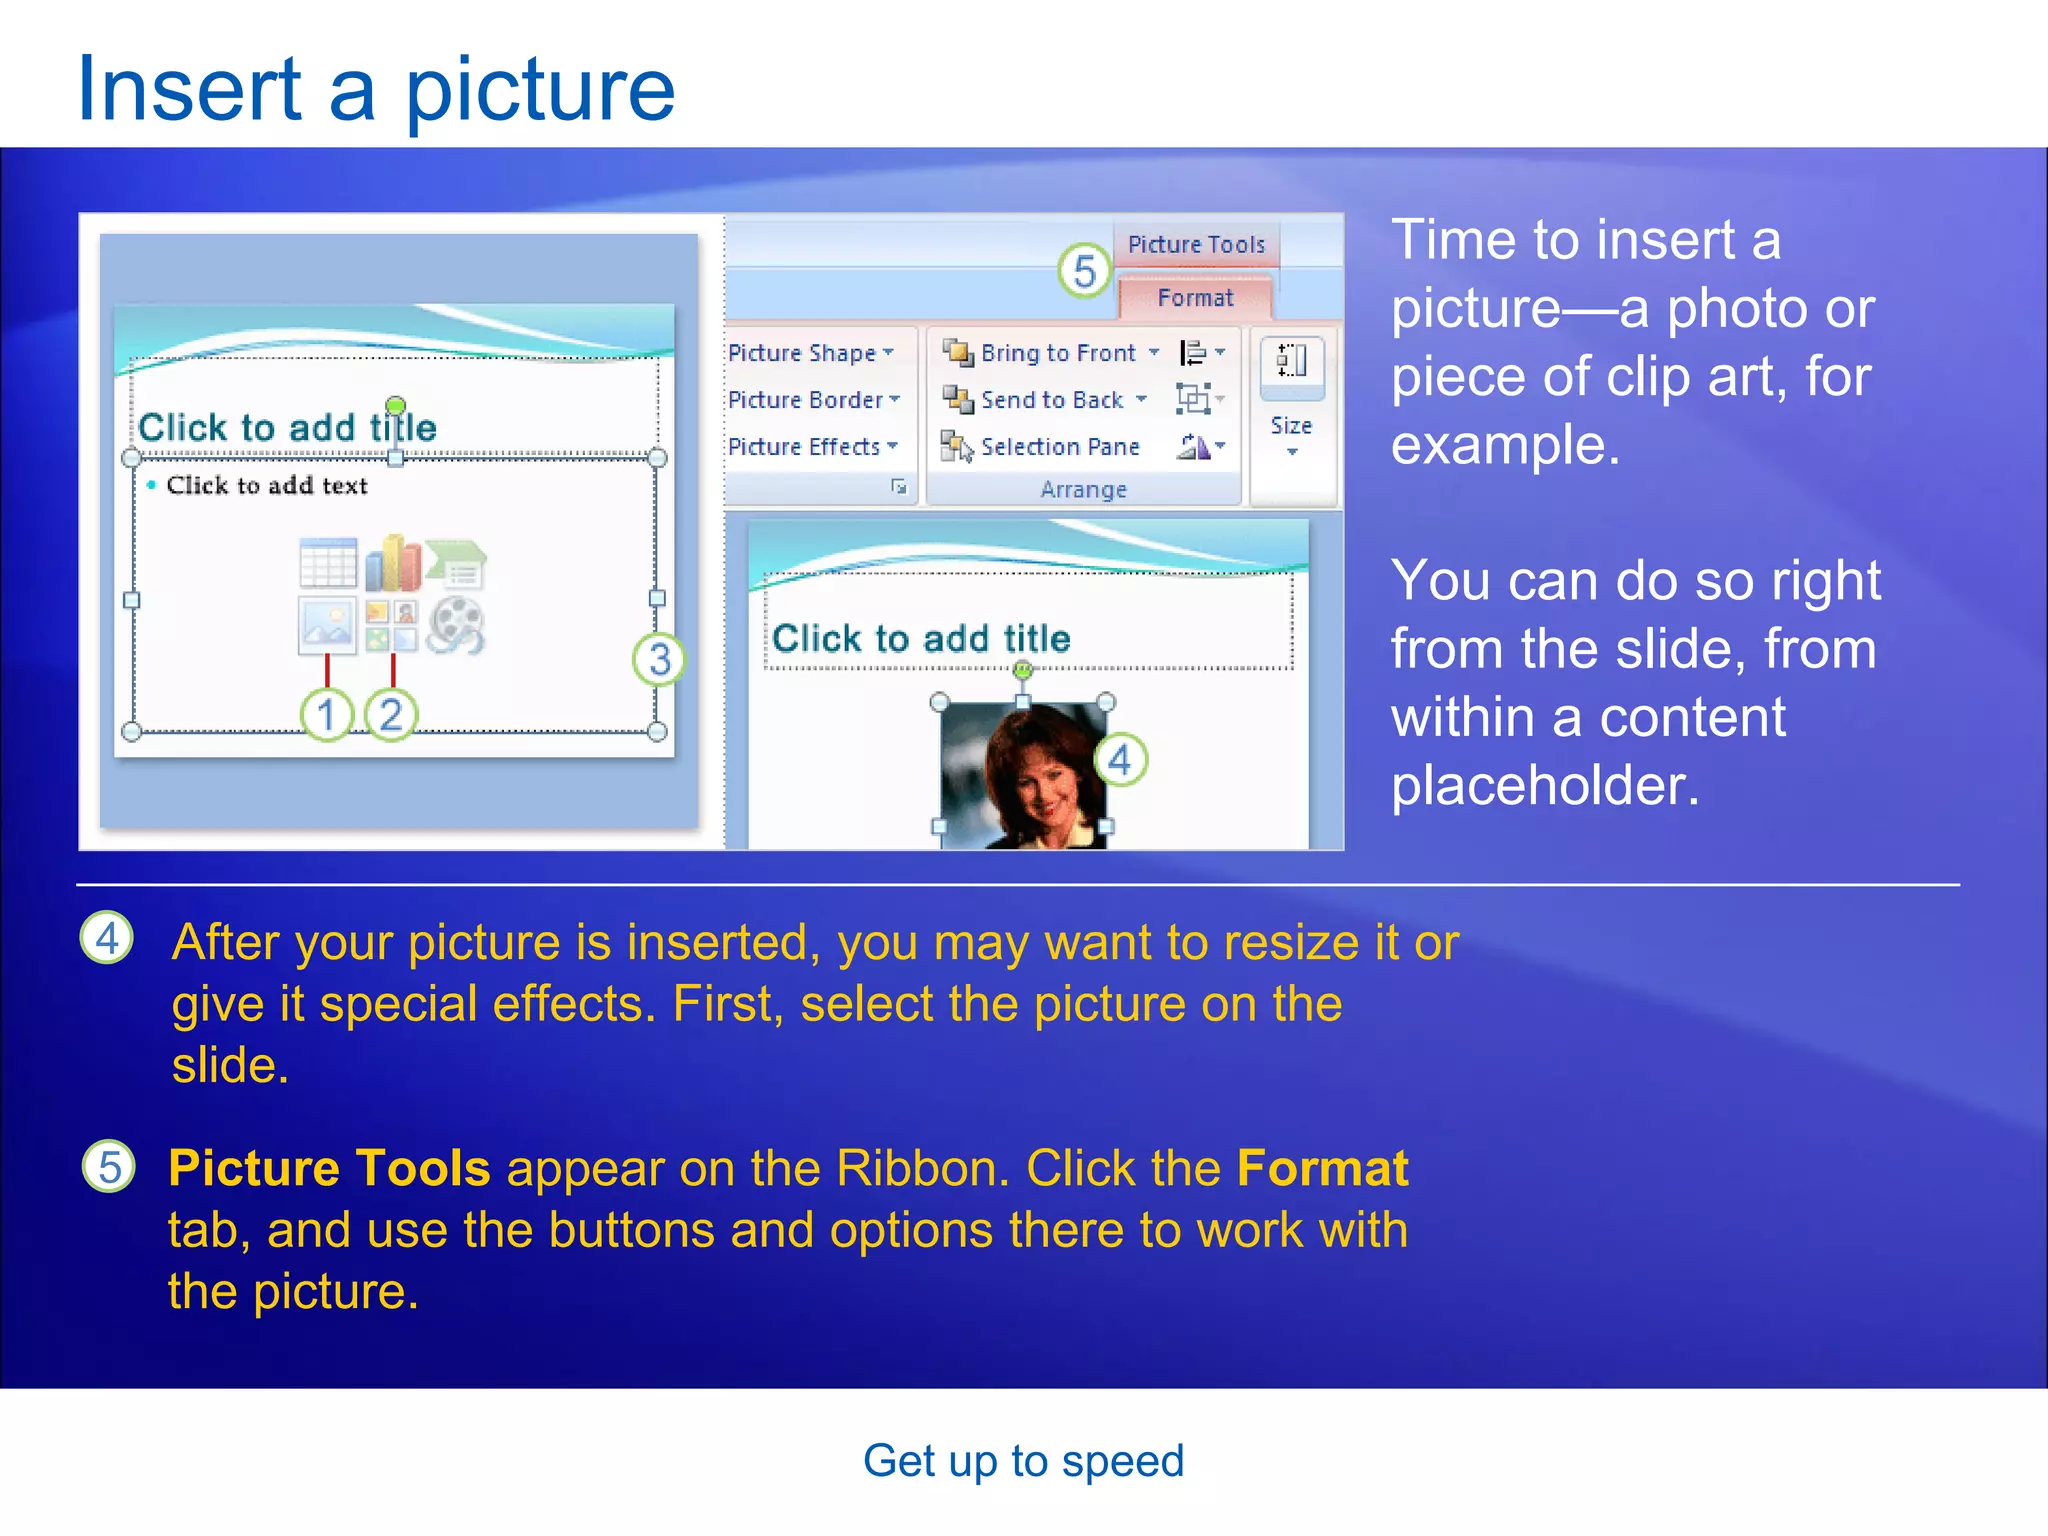
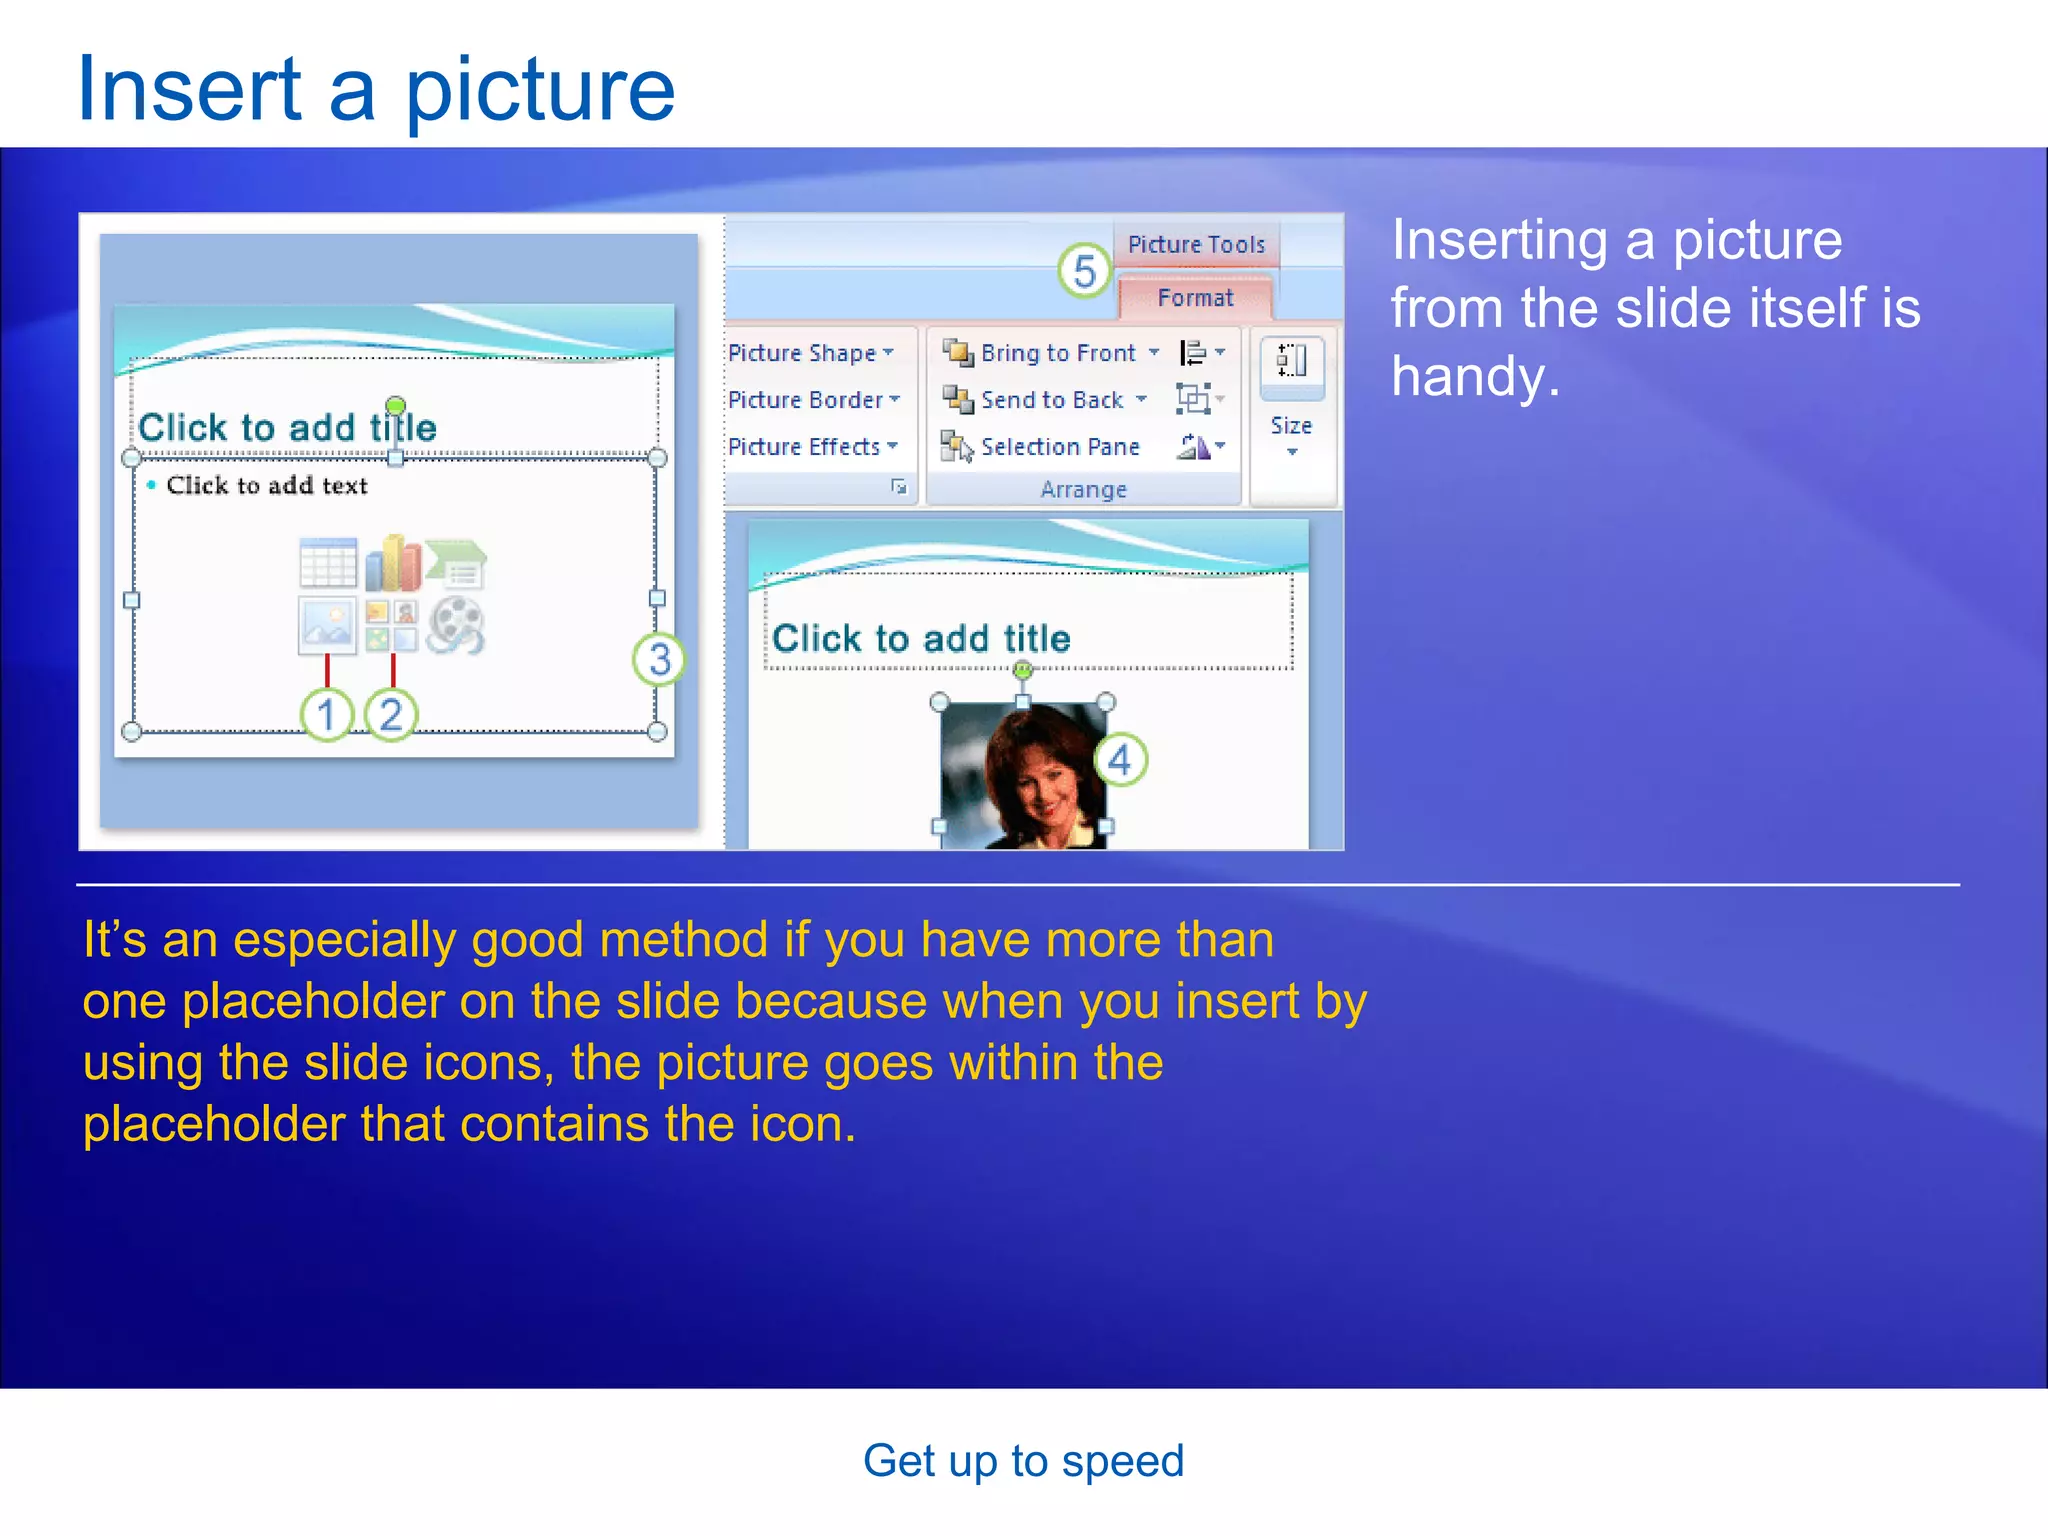
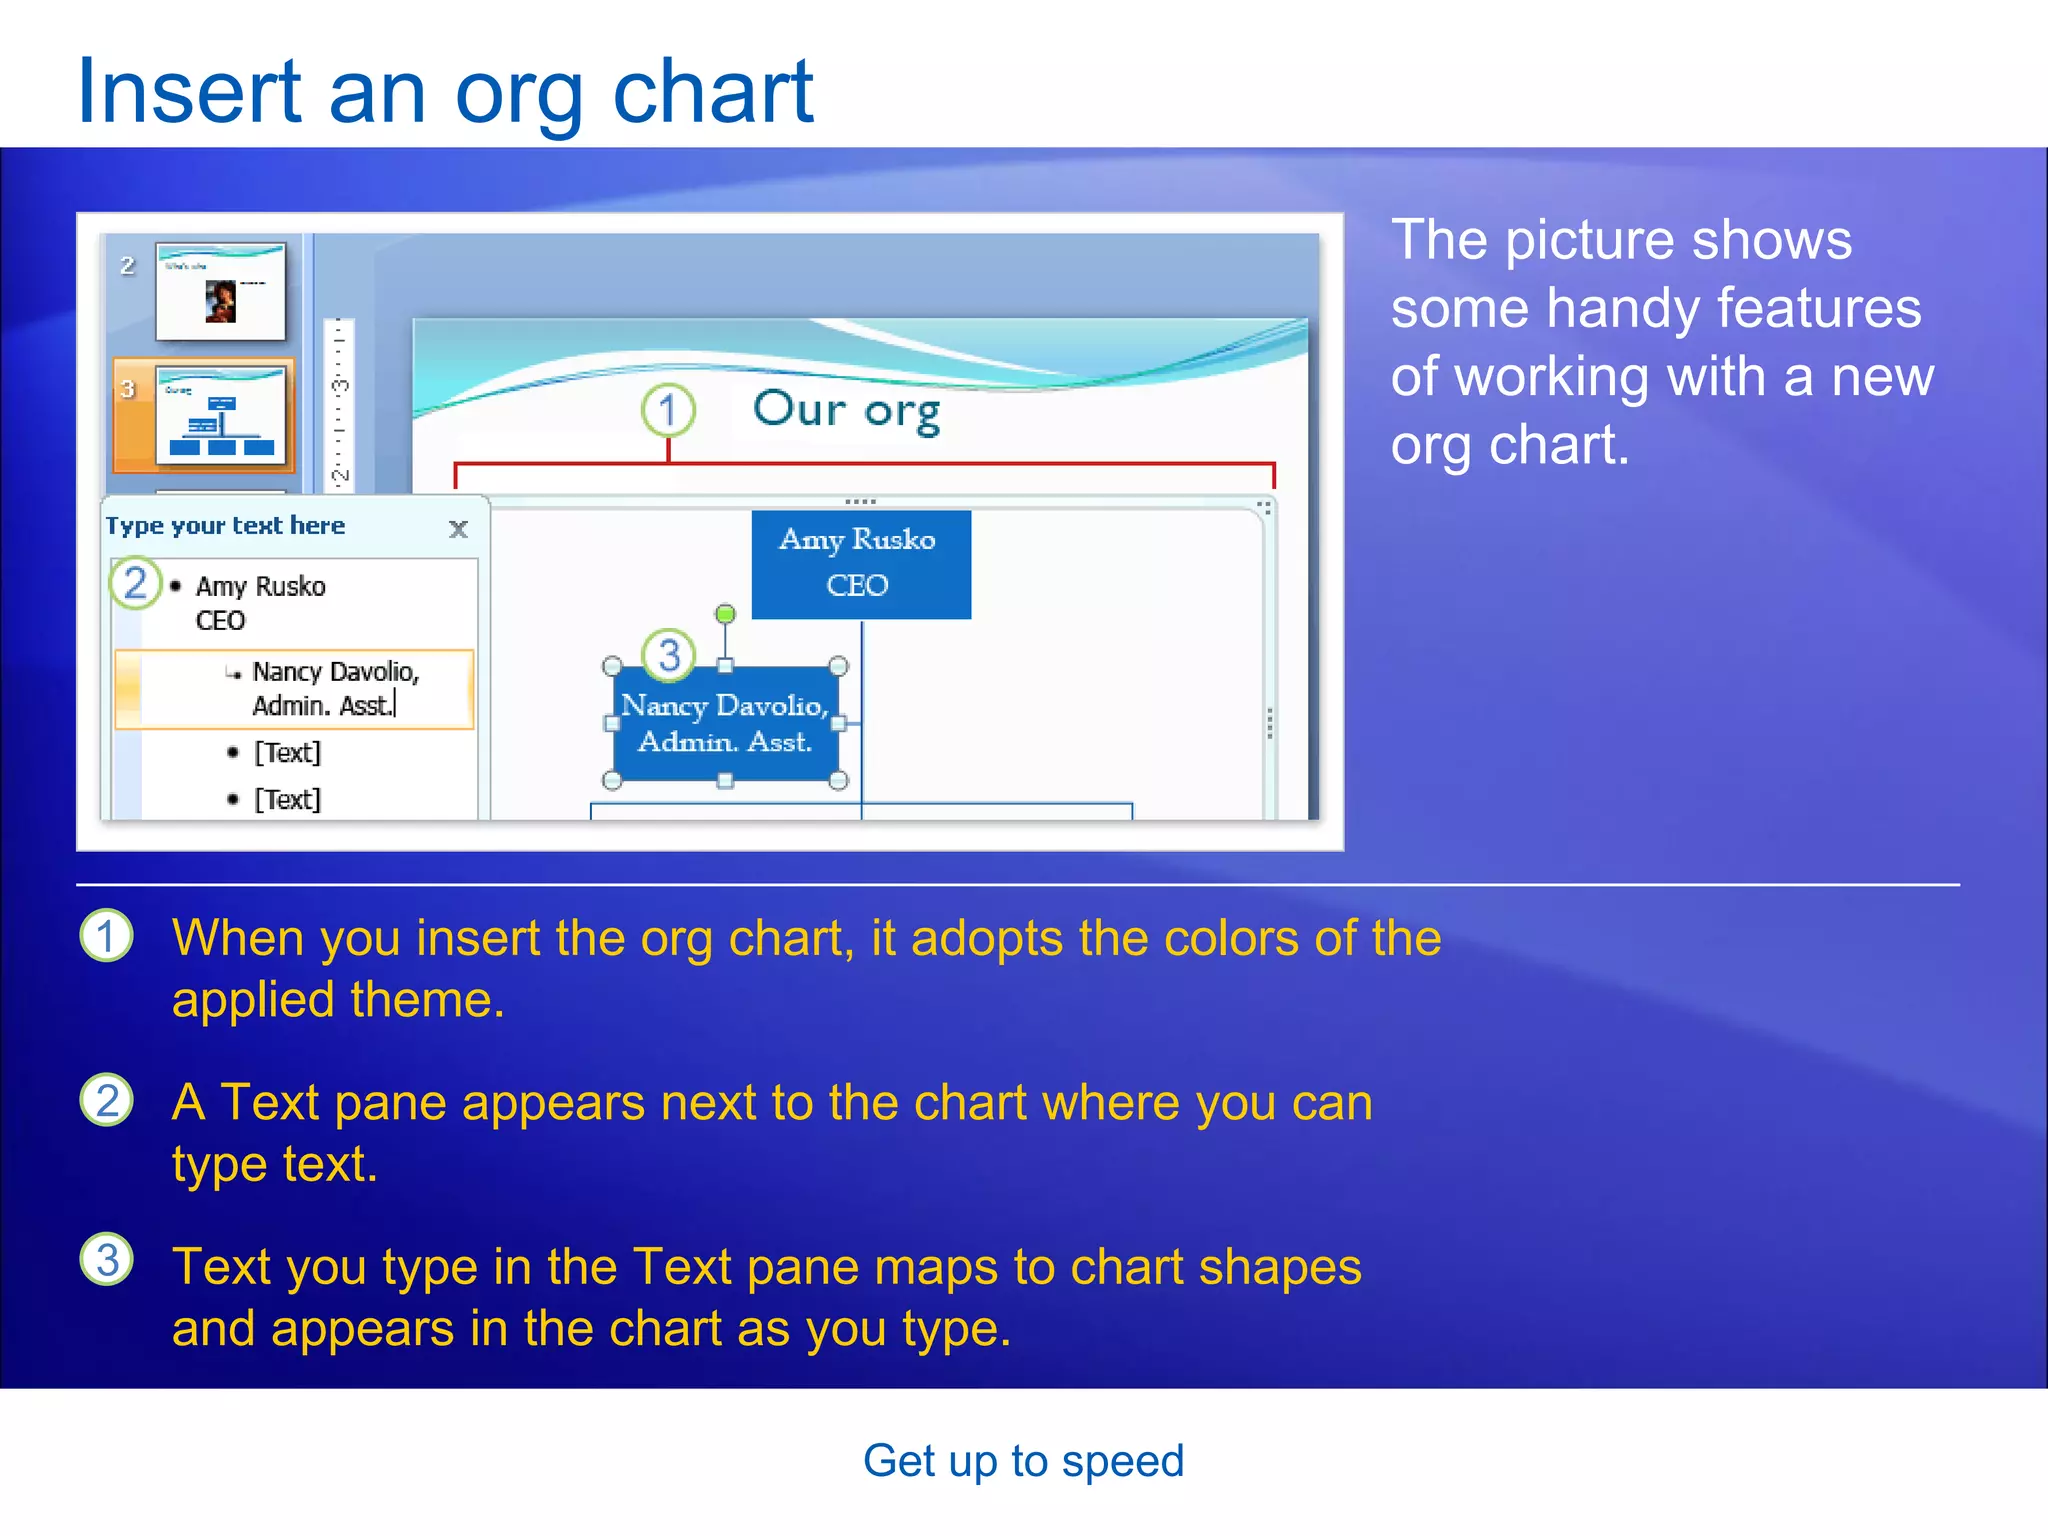
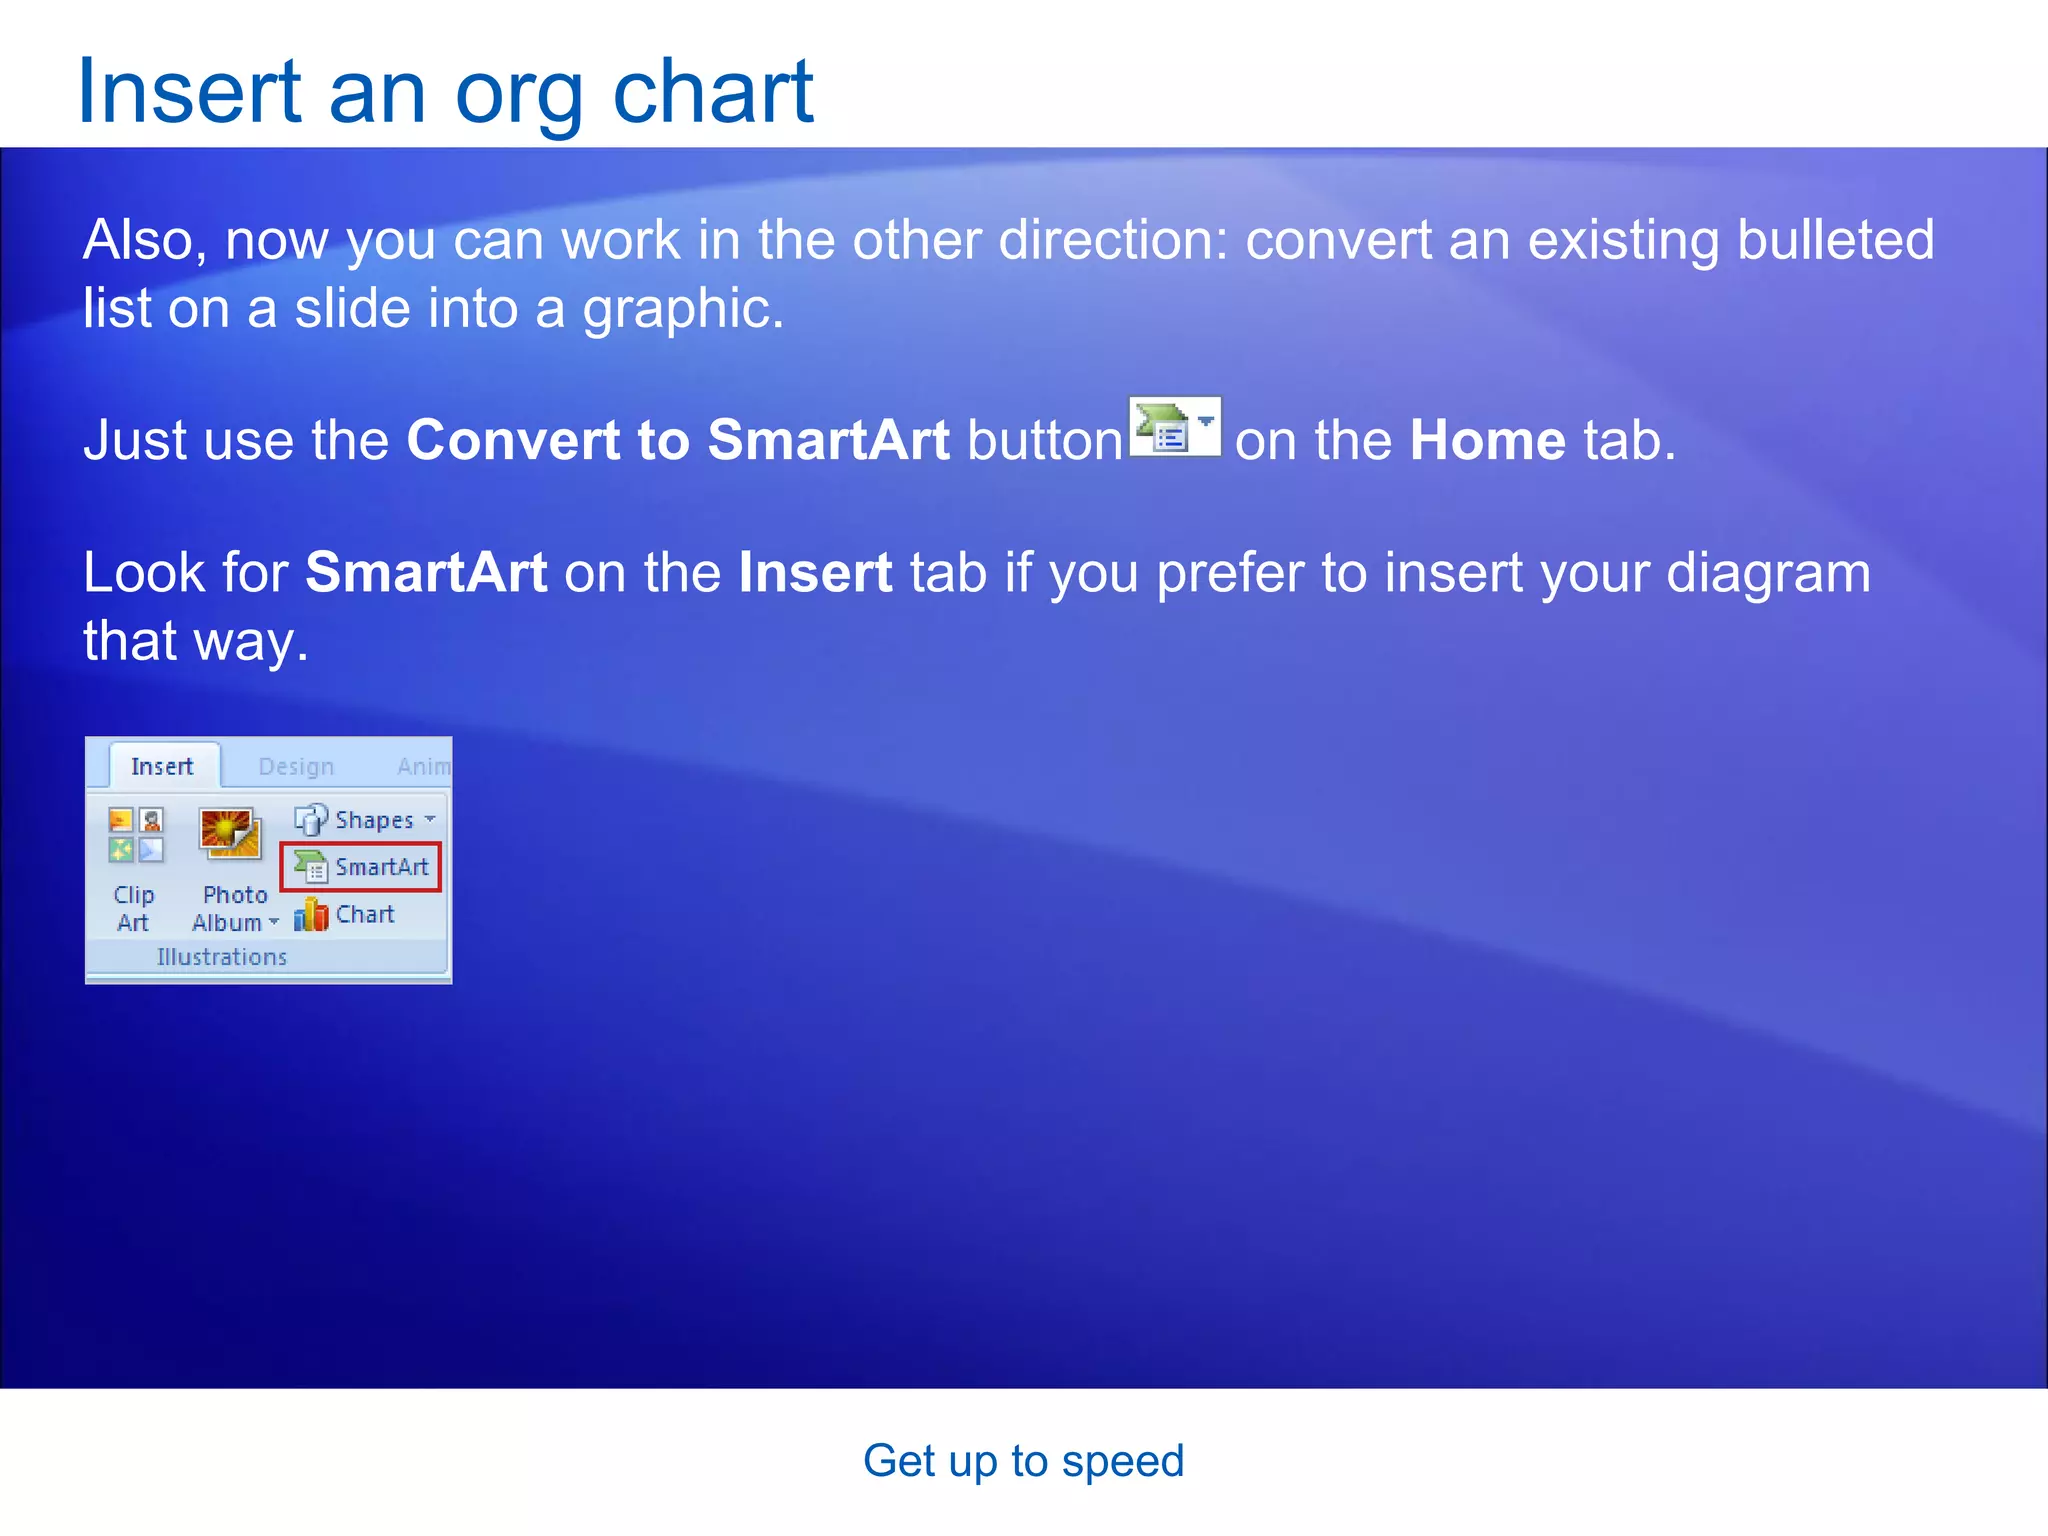
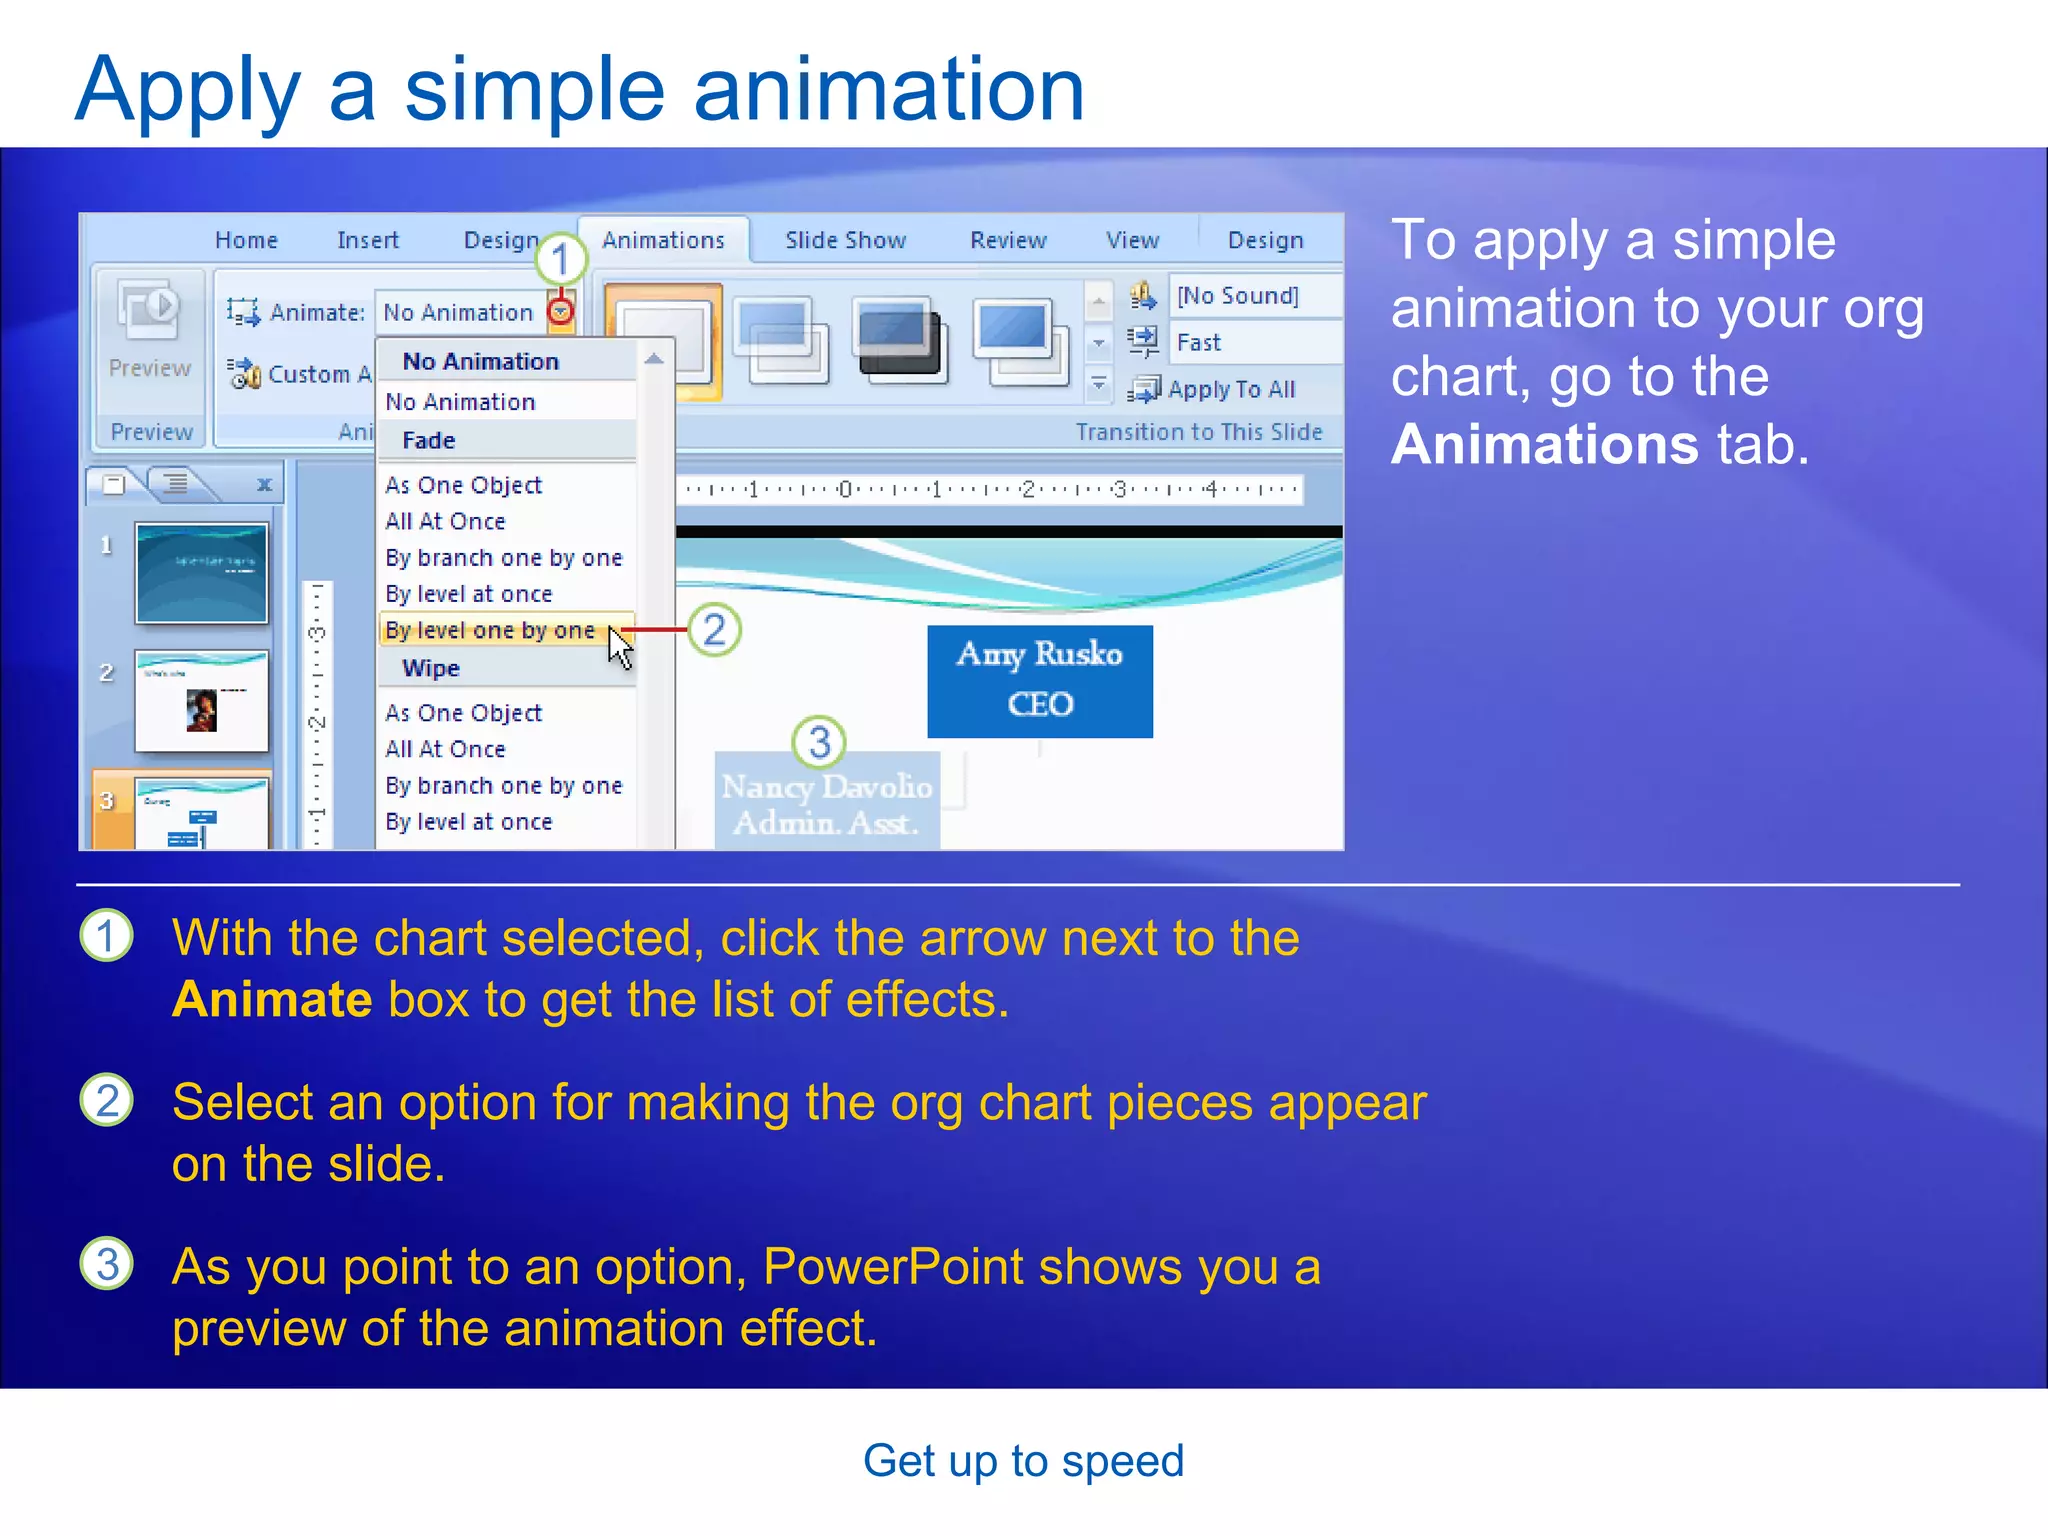
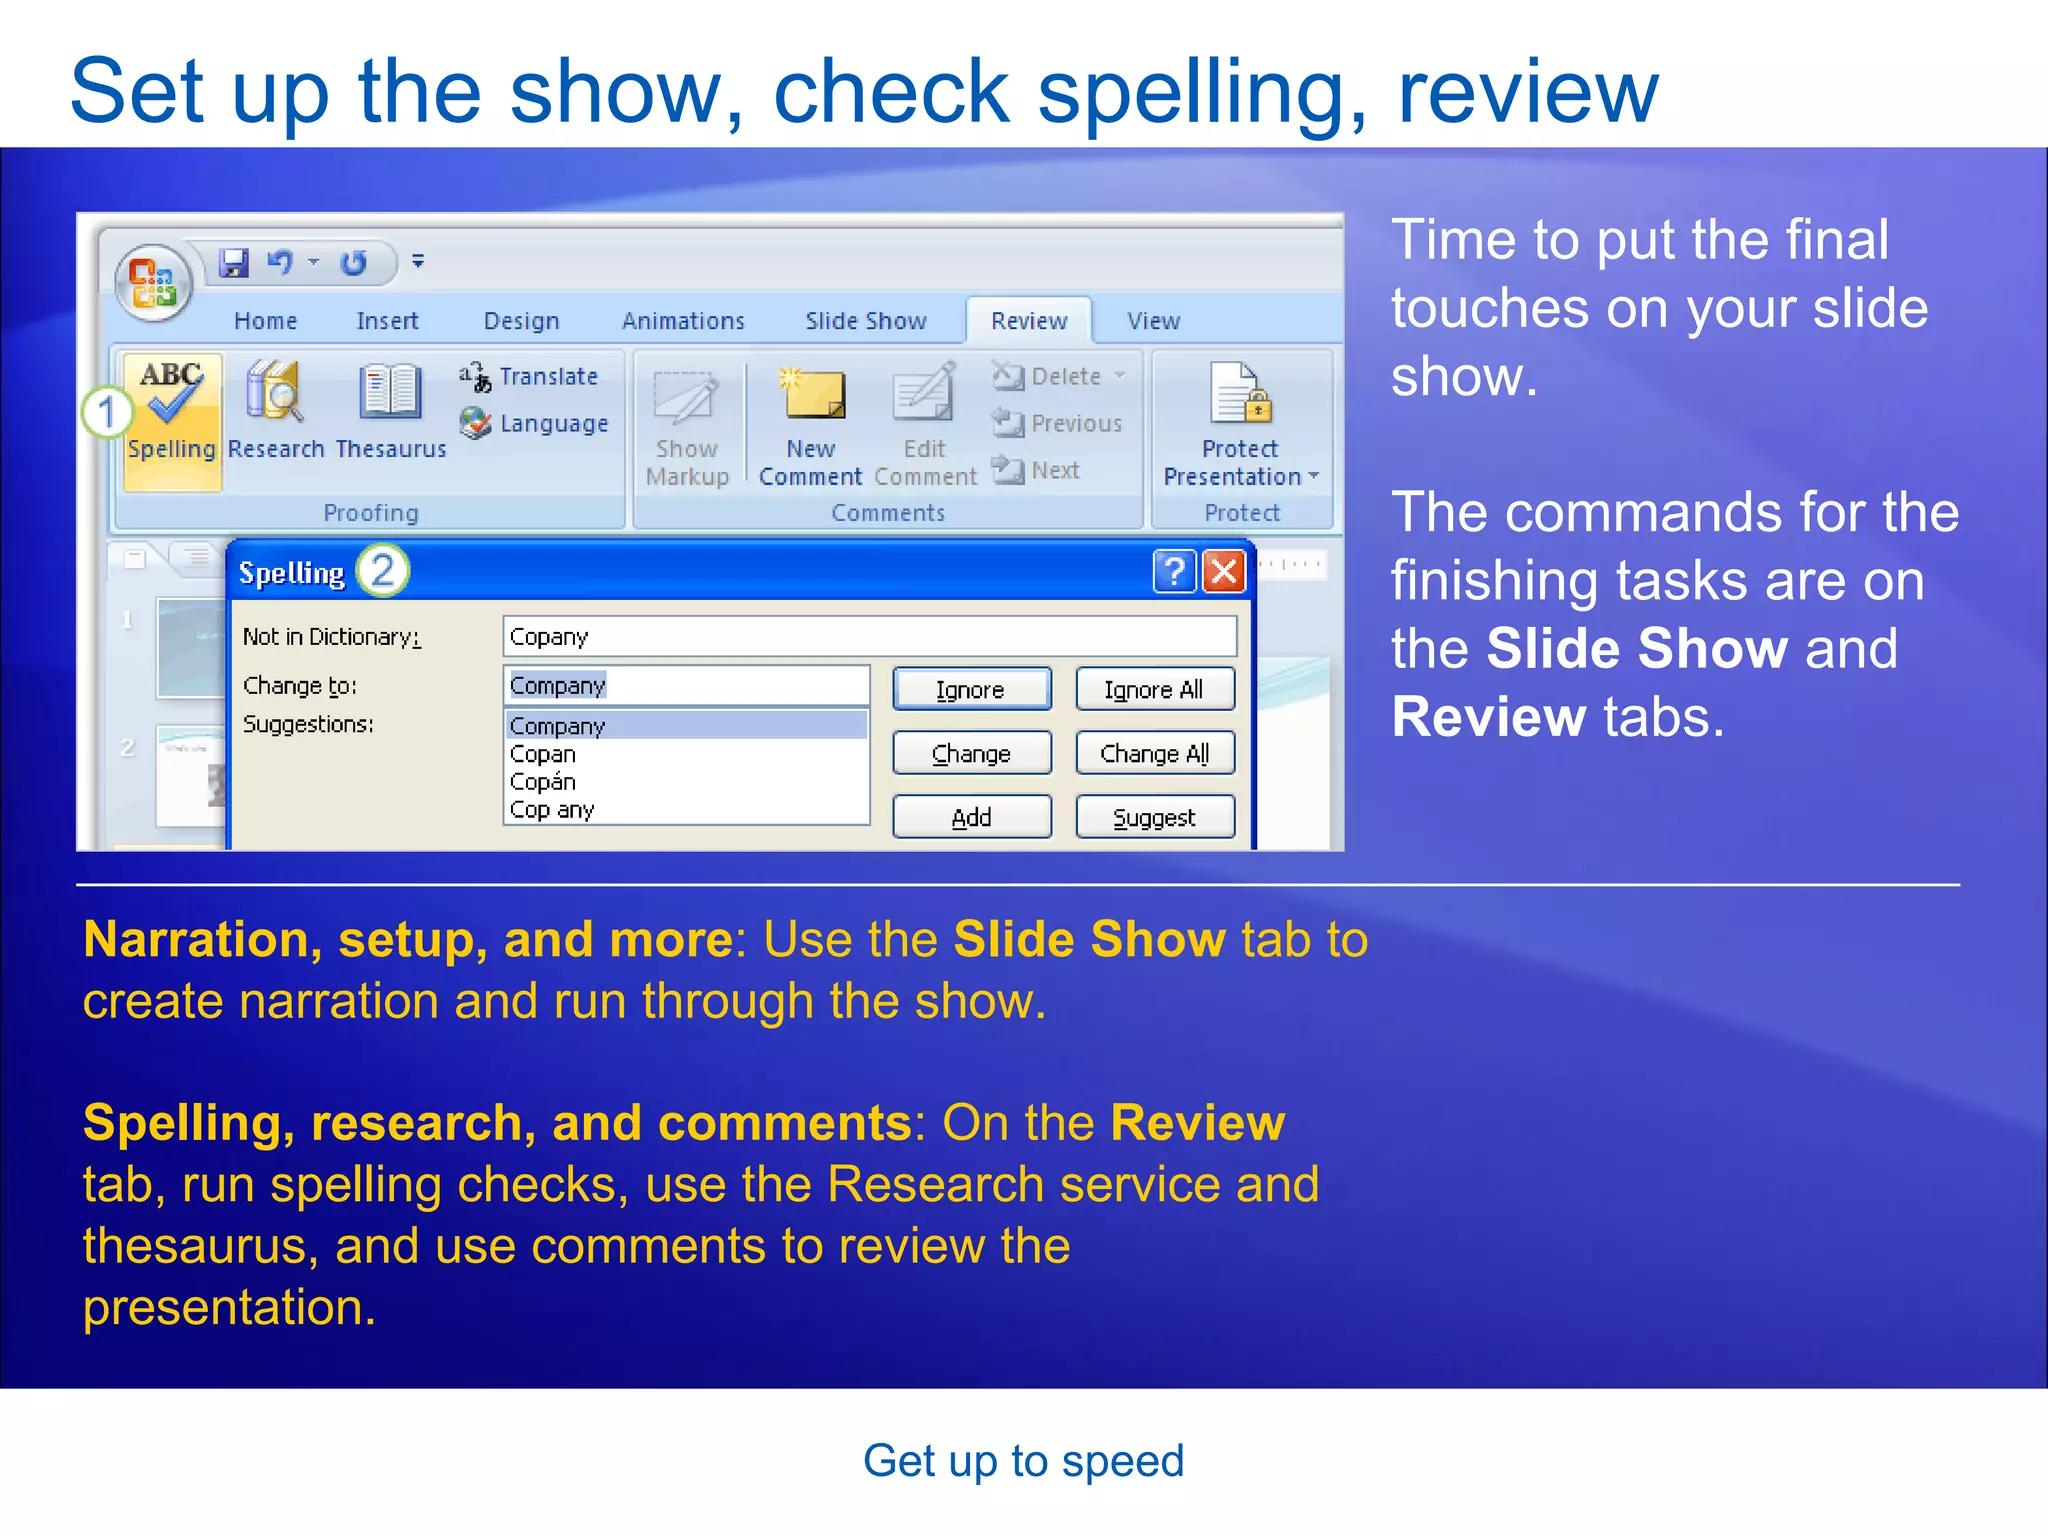
This document provides an overview of the training course for Microsoft PowerPoint 2007. It discusses the new Ribbon interface and how to navigate and use its tabs and groups. It also covers how to perform common tasks like adding slides, choosing layouts and themes, inserting pictures and diagrams, and applying basic animations and formatting. The training is meant to help users get up to speed with the updated user interface and complete tasks they are accustomed to in PowerPoint.
This is a guide to PowerPoint 2007 that I created for staff INSET. It covers lots of things from the very basics to the more complex features of the developer tab. I spent a while on this so I thought I would share in case anyone else would find this use
Ms Word 2010 Training In Ambala ! Batra Computer Centrejatin batra
Batra Computer Centre is An ISO certified 9001:2008 training Centre in Ambala.
We Provide Best Ms Word 2010 Training in Ambala. BATRA COMPUTER CENTRE provides best training in C, C++, S.E.O, Web Designing, Web Development and So many other courses are available.
Photoshop: Leading digital image editing application for internet, print, and other new media disciplines
Developed and published by Adobe Systems
Photoshop was created in 1988 by Thomas and John Knoll
Became the de facto industry standard in raster graphics editing
Photoshop: Leading digital image editing application for internet, print, and other new media disciplines
Developed and published by Adobe Systems
Photoshop was created in 1988 by Thomas and John Knoll
Became the de facto industry standard in raster graphics editing
C:\users\y8467qyt\desktop\death by power pointWencke
The presentation was designed based on Garr Reynolds' 2010 Presentation Zen Design book and Alexei Kapterev's presentation with the same name. It served to compile simple rules for frequent PowerPoint users and a little guide on how to use PPT effectively with minimal effort. Creating this presentation also supported my social learning through first observing, then imitating what others have done and hopefully I will now be able to apply my new knowledge to other projects. Thanks to the inspiration, Garr and Alexei.
This document will provide you with step-by-step instructions on how to use some of the new tools and how to find some of the old tools that you grew to know. This document is by no means an all inclusive step-by-step guide to PowerPoint 2007; it was designed for the novice.
An introduction to microsoft office 2007 lectureSukh Sandhu
Microsoft Office applications include Outlook, Word, Excel, PowerPoint, and Access. If you are new to this software or are upgrading from a previous version of Microsoft Office study this lecture to learn how to use them. Any questions, send those to me@sukh.co
FellowBuddy.com is an innovative platform that brings students together to share notes, exam papers, study guides, project reports and presentation for upcoming exams.
We connect Students who have an understanding of course material with Students who need help.
Benefits:-
# Students can catch up on notes they missed because of an absence.
# Underachievers can find peer developed notes that break down lecture and study material in a way that they can understand
# Students can earn better grades, save time and study effectively
Our Vision & Mission – Simplifying Students Life
Our Belief – “The great breakthrough in your life comes when you realize it, that you can learn anything you need to learn; to accomplish any goal that you have set for yourself. This means there are no limits on what you can be, have or do.”
Like Us - https://www.facebook.com/FellowBuddycom
2024.06.01 Introducing a competency framework for languag learning materials ...Sandy Millin
http://sandymillin.wordpress.com/iateflwebinar2024
Published classroom materials form the basis of syllabuses, drive teacher professional development, and have a potentially huge influence on learners, teachers and education systems. All teachers also create their own materials, whether a few sentences on a blackboard, a highly-structured fully-realised online course, or anything in between. Despite this, the knowledge and skills needed to create effective language learning materials are rarely part of teacher training, and are mostly learnt by trial and error.
Knowledge and skills frameworks, generally called competency frameworks, for ELT teachers, trainers and managers have existed for a few years now. However, until I created one for my MA dissertation, there wasn’t one drawing together what we need to know and do to be able to effectively produce language learning materials.
This webinar will introduce you to my framework, highlighting the key competencies I identified from my research. It will also show how anybody involved in language teaching (any language, not just English!), teacher training, managing schools or developing language learning materials can benefit from using the framework.
The Indian economy is classified into different sectors to simplify the analysis and understanding of economic activities. For Class 10, it's essential to grasp the sectors of the Indian economy, understand their characteristics, and recognize their importance. This guide will provide detailed notes on the Sectors of the Indian Economy Class 10, using specific long-tail keywords to enhance comprehension.
For more information, visit-www.vavaclasses.com
Unit 8 - Information and Communication Technology (Paper I).pdfThiyagu K
This slides describes the basic concepts of ICT, basics of Email, Emerging Technology and Digital Initiatives in Education. This presentations aligns with the UGC Paper I syllabus.
The French Revolution, which began in 1789, was a period of radical social and political upheaval in France. It marked the decline of absolute monarchies, the rise of secular and democratic republics, and the eventual rise of Napoleon Bonaparte. This revolutionary period is crucial in understanding the transition from feudalism to modernity in Europe.
For more information, visit-www.vavaclasses.com
How to Split Bills in the Odoo 17 POS ModuleCeline George
Bills have a main role in point of sale procedure. It will help to track sales, handling payments and giving receipts to customers. Bill splitting also has an important role in POS. For example, If some friends come together for dinner and if they want to divide the bill then it is possible by POS bill splitting. This slide will show how to split bills in odoo 17 POS.
Students, digital devices and success - Andreas Schleicher - 27 May 2024..pptxEduSkills OECD
Andreas Schleicher presents at the OECD webinar ‘Digital devices in schools: detrimental distraction or secret to success?’ on 27 May 2024. The presentation was based on findings from PISA 2022 results and the webinar helped launch the PISA in Focus ‘Managing screen time: How to protect and equip students against distraction’ https://www.oecd-ilibrary.org/education/managing-screen-time_7c225af4-en and the OECD Education Policy Perspective ‘Students, digital devices and success’ can be found here - https://oe.cd/il/5yV
Digital Tools and AI for Teaching Learning and Research
Power Point 2007 Get Up To Speed
1. Microsoft ® Office PowerPoint ® 2007 Training Get up to speed Jim Taliaferro Community Mental Health Center
2.
3. Overview: A hands-on introduction Get up to speed When you first open PowerPoint 2007, you’ll see that the user interface has changed. A new structure is in place for PowerPoint commands. This new design will help you more easily find and use the features you need and create great presentations. This course will give you a head start with what’s changed and why. After learning what’s new, you won’t want to turn back.
4.
5. Lesson 1 Get your bearings—what’s changed and why
6. Get your bearings—what’s changed and why Get up to speed The most noticeable change in PowerPoint 2007 is at the top of the window. Instead of menus and toolbars, there’s a tall band across the screen. This band is called the Ribbon, and it contains many, very visual commands arranged into groups. The Ribbon is now your control center for creating a presentation.
7. The Ribbon Get up to speed Why revamp the old command system? Because the new system better supports how you work in PowerPoint. Research shows that people favor certain commands and tend to use them over and over. So now those commands are the most prominent and visible—you don’t have to hunt for them on menus or toolbars that aren’t displayed. Animation: Right-click, and click Play .
8. The Ribbon Get up to speed Why revamp the old command system? Because the new system better supports how you work in PowerPoint. Research shows that people favor certain commands and tend to use them over and over. So now those commands are the most prominent and visible—you don’t have to hunt for them on menus or toolbars that aren’t displayed.
9. The tabs: Devoted to the main tasks Get up to speed The Ribbon is made up of several tabs —the Home tab and others. Other tabs include Insert , Design , Animations , Slide Show , Review , and View . The animation introduces them. Animation: Right-click, and click Play .
10. The tabs: Devoted to the main tasks Get up to speed The Ribbon is made up of several tabs —the Home tab and others. Other tabs include Insert , Design , Animations , Slide Show , Review , and View . The picture shows you the contents of three of them: Insert , Design , and Animations .
11. Display the galleries Get up to speed PowerPoint often offers many choices for something, such as styles for a shape, or types of WordArt or animation effects. A few types of transition effects show on the Ribbon. To see the full gallery of choices, click the More arrow. For example, say you wanted to add transition effects to a slide. In that case:
12. Display the galleries Get up to speed PowerPoint often offers many choices for something, such as styles for a shape, or types of WordArt or animation effects. Point to any effect in the gallery to see it previewed on the slide. Then click to apply it. For example, say you wanted to add transition effects to a slide. In that case:
13. Use advanced options Get up to speed Clearly, there are more commands and options than will fit into a group. Only the most commonly used commands show up. Click the diagonal arrow, called the Dialog Box Launcher , that appears in the lower corner. A dialog box opens with more options to choose from. When you don’t see an option that you want in a group, such as the Font group shown here:
14. Use advanced options Get up to speed The arrow appears in the group when you’re doing work on the slide that might call for commands in that group. For instance, when you click within a text placeholder on the slide, the arrow appears in every group of the Home tab that has commands related to working with text. Tip: You can gain screen real estate by temporarily hiding Ribbon commands. Just double-click the name of the displayed tab.
15.
16. The Quick Access Toolbar Get up to speed As you work on a presentation, you take some actions that are general or repetitive and that don’t have to do with a particular phase of the process. For such things, use the Quick Access Toolbar. It’s the small group of buttons on the left, above the Ribbon. It contains commands for these types of general actions, such as Save , Undo , and Repeat or Redo .
17. Changing views Get up to speed You need to change your view often in PowerPoint, and you’ve always done it easily by using buttons. That hasn’t changed. The buttons for Normal, Slide Sorter, and Slide Show views are still there. But now they’re part of a new toolbar that includes a zoom slider and a button that refits the slide to the window after you’ve zoomed in or out.
18. Changing views Get up to speed You need to change your view often in PowerPoint, and you’ve always done it easily by using buttons. That hasn’t changed. View buttons are the same but have moved from the lower left of the window to the lower right. You drag the zoom slider to enlarge or shrink your view of the slide. Or click the minus (-) and plus (+) buttons. The picture shows the changes:
19. Changing views Get up to speed You need to change your view often in PowerPoint, and you’ve always done it easily by using buttons. That hasn’t changed. Click this button to refit the slide to the window after zooming. The picture shows the changes:
20.
21. Keyboard shortcuts Get up to speed If you rely on the keyboard more than the mouse when you work in PowerPoint, you’ll want to know that the Ribbon design comes with new shortcuts that have a new name: Key Tips . Here’s how you use the new keyboard shortcuts: Start by pressing ALT. Key Tips appear in little white squares on various parts of the Ribbon. Press one of the keys to get to more commands and buttons.
22. Keyboard shortcuts Get up to speed If you rely on the keyboard more than the mouse when you work in PowerPoint, you’ll want to know that the Ribbon design comes with new shortcuts that have a new name: Key Tips . Here’s how you use the new keyboard shortcuts: Press one of the Key Tips in a group to complete the sequence.
32. Get to work in PowerPoint Get up to speed Ready to get to work? Here’s a primer for doing what you’re used to doing when you create a presentation. You’ll find out how to start a new presentation in PowerPoint 2007 and how to give your slides a background and set of colors. You’ll also learn how to use the Ribbon tabs and tools to insert elements into the slides, style them as you want, and then set up the show and get ready to print.
33. Start a new presentation Get up to speed New presentations begin with the Microsoft Office Button , located at the upper left of the window. Here’s how to start. Click the Microsoft Office Button . Click New on the menu that opens. Choose an option in the New Presentation window. You can start with a blank slide or base the presentation on a template or existing presentation.
34. Choose a theme Get up to speed A theme supplies the look and feel of the presentation design. Choose a theme for the presentation right at the start, so you can see how all your content will look. The Design tab is the place to go for themes. A gallery appears there under Themes . Each theme has a name, which shows in the ScreenTip.
35. Choose a theme Get up to speed You can see a preview of how your theme will look, before you apply it. Rest the pointer over a theme thumbnail (the one shown is called Flow ). The temporary preview appears on the slide. You can click the More arrow to the right of the Themes group to get more choices and information. Seeing the effect before you apply it saves you the step of undoing it if you don’t like it.
36. Tailor the theme Get up to speed The theme you choose is a complete design. But where’s the fun if you can’t do some tweaking? The Design tab has other galleries in case you want to modify the theme. Each provides a preview on the slide as you rest the mouse pointer over gallery choices.
37. Tailor the theme Get up to speed Here’s how to tweak the theme. Use the Colors , Fonts , and Effects galleries, all on the Design tab. Look at other Background Styles . The choices use the theme colors.
38. Tailor the theme Get up to speed Here’s how to tweak the theme. Point to a thumbnail to get a preview of the alternative background. To apply your own background, such as a photograph, click Format Background .
39. Add slides, pick layouts Get up to speed When you insert a slide, you can insert one that automatically applies a layout. You can also choose a layout before you insert the slide. On the Home tab, click New Slide (below the slide icon). This displays the layout choices. Click a layout to insert a slide with that layout. To choose a layout before you insert a slide:
40. Add slides, pick layouts Get up to speed PowerPoint 2007 layouts are more robust than before. An example is the Title and Content layout. In the middle of its one placeholder is this set of icons: Several of them include “content” placeholders, which you can use for either text or graphics.
41. Add slides, pick layouts Get up to speed PowerPoint 2007 layouts are more robust than before. Click any of the icons to insert that type of content—a table, chart, SmartArt ™ graphic, picture from a file, piece of clip art, or video file. Several of them include “content” placeholders, which you can use for either text or graphics.
42. Insert a picture Get up to speed Time to insert a picture—a photo or piece of clip art, for example. You can do so right from the slide, from within a content placeholder. To insert a picture of your own, click the Insert Picture from File icon. To insert a piece of clip art, click the Clip Art icon. The picture will be positioned within the placeholder border.
43. Insert a picture Get up to speed Time to insert a picture—a photo or piece of clip art, for example. You can do so right from the slide, from within a content placeholder. After your picture is inserted, you may want to resize it or give it special effects. First, select the picture on the slide. Picture Tools appear on the Ribbon. Click the Format tab, and use the buttons and options there to work with the picture.
44. Insert a picture Get up to speed Inserting a picture from the slide itself is handy. It’s an especially good method if you have more than one placeholder on the slide because when you insert by using the slide icons, the picture goes within the placeholder that contains the icon.
45. Insert a picture Get up to speed Finally, don’t forget the Insert tab. You can use the Insert tab to insert a picture, too—as well as many other slide elements. The only difference in using this method is that sometimes PowerPoint has to guess which placeholder you want the picture to go in.
46. Insert a text box caption Get up to speed For your picture’s caption, insert a text box. You’ll find this on the Insert tab. Click the Format tab. Display the shapes gallery and point to any style. A preview of the style appears on the slide, applied to the text box. When you insert the text box, Drawing Tools appear.
47. Insert an org chart Get up to speed As you saw earlier, you can insert a picture and other graphics by using icons in the Title and Content layout. These include an icon for SmartArt graphics. SmartArt graphics offer org chart layouts as well as all other layouts for diagrams in PowerPoint 2007.
48. Insert an org chart Get up to speed As you saw earlier, you can insert a picture and other graphics by using icons in the Title and Content layout. When you click the SmartArt graphic icon… … you get a full gallery of the graphical layouts available.
49. Insert an org chart Get up to speed The picture shows some handy features of working with a new org chart. When you insert the org chart, it adopts the colors of the applied theme. A Text pane appears next to the chart where you can type text. Text you type in the Text pane maps to chart shapes and appears in the chart as you type.
50. Insert an org chart Get up to speed Also, now you can work in the other direction: convert an existing bulleted list on a slide into a graphic. Just use the Convert to SmartArt button on the Home tab. Look for SmartArt on the Insert tab if you prefer to insert your diagram that way.
51. Apply a simple animation Get up to speed To apply a simple animation to your org chart, go to the Animations tab. With the chart selected, click the arrow next to the Animate box to get the list of effects. Select an option for making the org chart pieces appear on the slide. As you point to an option, PowerPoint shows you a preview of the animation effect.
52. Set up the show, check spelling, review Get up to speed Time to put the final touches on your slide show. The commands for the finishing tasks are on the Slide Show and Review tabs. Narration, setup, and more : Use the Slide Show tab to create narration and run through the show. Spelling, research, and comments : On the Review tab, run spelling checks, use the Research service and thesaurus, and use comments to review the presentation.
53. Set up the show, check spelling, review Get up to speed How do you check your spelling? On the Review tab, click Spelling . Select from the options you’re used to. The same way you always have.
54. Print, distribute, and set program options Get up to speed Now it’s time to set options for previewing, printing, and distributing your presentation. Point to Print to open Print Preview . Click PowerPoint Options to change program-wide settings such as your default view or whether to turn spelling checker on or off. Then: Start by clicking the Microsoft Office Button .
63. A new file format Get up to speed One of the big changes in PowerPoint 2007 is its new file format. What does this mean to you? The new format has several benefits, including a reduced file size and greater information security for your presentations. In this lesson, you’ll learn about those benefits and find out how the file format affects presentation sharing between PowerPoint 2007 and older versions.
64.
65. What the new format looks like Get up to speed PowerPoint will automatically save a new presentation in the new format. You can see what format your file is being saved in by opening the Save As dialog box. Look in the Save as type box: For new presentations, the new file format is there by default. It’s called PowerPoint Presentation . (In earlier versions, it was called Presentation .)
66. Opening a presentation in an earlier version Get up to speed You’ve just saved a presentation in the new format. But your colleague, who needs to work on it, is using an earlier version of PowerPoint. Can she open the PowerPoint 2007 file? Yes. Say your colleague is working in PowerPoint 2000. When she opens the presentation, she will be asked if she wants to download a converter that will let her open your presentation.
67. Opening a presentation in an earlier version Get up to speed You’ve just saved a presentation in the new format. But your colleague, who needs to work on it, is using an earlier version of PowerPoint. The presentation she sees may not look exactly like the one you created if it contains features from PowerPoint 2007 that she doesn’t have. But she can open, edit, and save it in the format for PowerPoint 2007.
68.
69. Opening and saving existing presentations Get up to speed What about all the presentations you created in earlier versions of PowerPoint? There’s no problem opening and editing an older presentation in PowerPoint 2007. What you’ll need to decide is whether to keep the presentation in its original format or save it in the new format. PowerPoint 2007 helps you make the decision.
70. Opening and saving existing presentations Get up to speed Checking for compatibility As you work, PowerPoint takes note of things you add to the file that may not work the same in the old format. Then when you click Save , PowerPoint displays the Compatibility Checker dialog box. It details what will happen to those elements if you save the file in its original format, PowerPoint 97-2003 (.ppt) . When you open the presentation, PowerPoint 2007 recognizes it as being in the old format.
71. Saving in the old format Get up to speed Why would you save in the old format? If someone needed to work in the file who didn’t have PowerPoint 2007 or the Compatibility Pack. As the Compatibility Checker on the previous slide indicated, saving in the old format would mean some differences for the person opening the file in PowerPoint 2003. A new SmartArt graphic, for example, would become one object, like a picture, and therefore uneditable.
72. Saving in the old format Get up to speed The picture here illustrates the differences in how a SmartArt graphic is treated in PowerPoint 2007 and when the file is saved to an earlier version. PowerPoint 2007: It offers full editing capability, so you can select and change individual shapes and use all the SmartArt tools. PowerPoint 2003: You can only select the whole graphic and do things like add a backfill color or resize it.
73. Saving in the old format Get up to speed “ Roundtripping” If the graphic is basically untouched by the person working in an older PowerPoint version, it will retain all its PowerPoint 2007 properties. This means that when it’s opened again in PowerPoint 2007, it will be fully editable. If the graphic did get some change when in the older version, such as a picture washout, it becomes one object, and is thus uneditable when opened again in PowerPoint 2007.
74. Automatic upgrades in older presentations Get up to speed You might have had this seemingly odd experience. You open an older presentation in PowerPoint 2007, you add no PowerPoint 2007 features to it, and when you save, it the Compatibility Checker appears saying that a PowerPoint 2007 feature won’t be editable if you save in the old format. Huh?
75. Automatic upgrades in older presentations Get up to speed This happens because PowerPoint 2007 automatically upgrades certain types of formatting and elements so they’ll look as good as PowerPoint can make them. An example is WordArt. If the older presentation has WordArt in it, the WordArt is upgraded so that it uses the latest effects, new in PowerPoint 2007.
76. Automatic upgrades in older presentations Get up to speed The picture shows the difference. WordArt logo created in PowerPoint 2003. The same logo when opened in PowerPoint 2007—instant face-lift!
77. The Convert command for quick conversion Get up to speed A way to save an older presentation in the new format is to apply the Convert command in PowerPoint 2007. The effect is that PowerPoint does an “in place” replacement of the old presentation file, converting it to the new format. The file then no longer exists in the old format.
78. The Convert command for quick conversion Get up to speed To use the command, you open the presentation, and then click the Microsoft Office Button . Click Convert to save it in the new file format. A message appears explaining what the Convert command will do. Click OK to complete the command. Then:
79.
80.
81.
82.
83.
84.
Editor's Notes
[ Notes to trainer : For detailed help in customizing this template, see the very last slide. Also, look for additional lesson text in the notes pane of some slides. Adobe Flash animations : This template contains Flash animations. These will play in PowerPoint 2000 and later. However: If you want to save this template in PowerPoint 2007, save it in the earlier PowerPoint file format: PowerPoint 97-2003 Presentation (*.ppt) or PowerPoint 97-2003 Template (*.pot) (you’ll see the file types in the Save As dialog box, next to Save as type) . Warning: If you save it in a PowerPoint 2007 file format, such as PowerPoint Presentation (*.pptx) or PowerPoint Template (*.potx) , the animations won’t be retained in the saved file. Also : Because this presentation contains Flash animations, saving the template may cause a warning message to appear regarding personal information. Unless you add information to the properties of the Flash file itself, this warning does not apply to this presentation. Click OK on the message.]