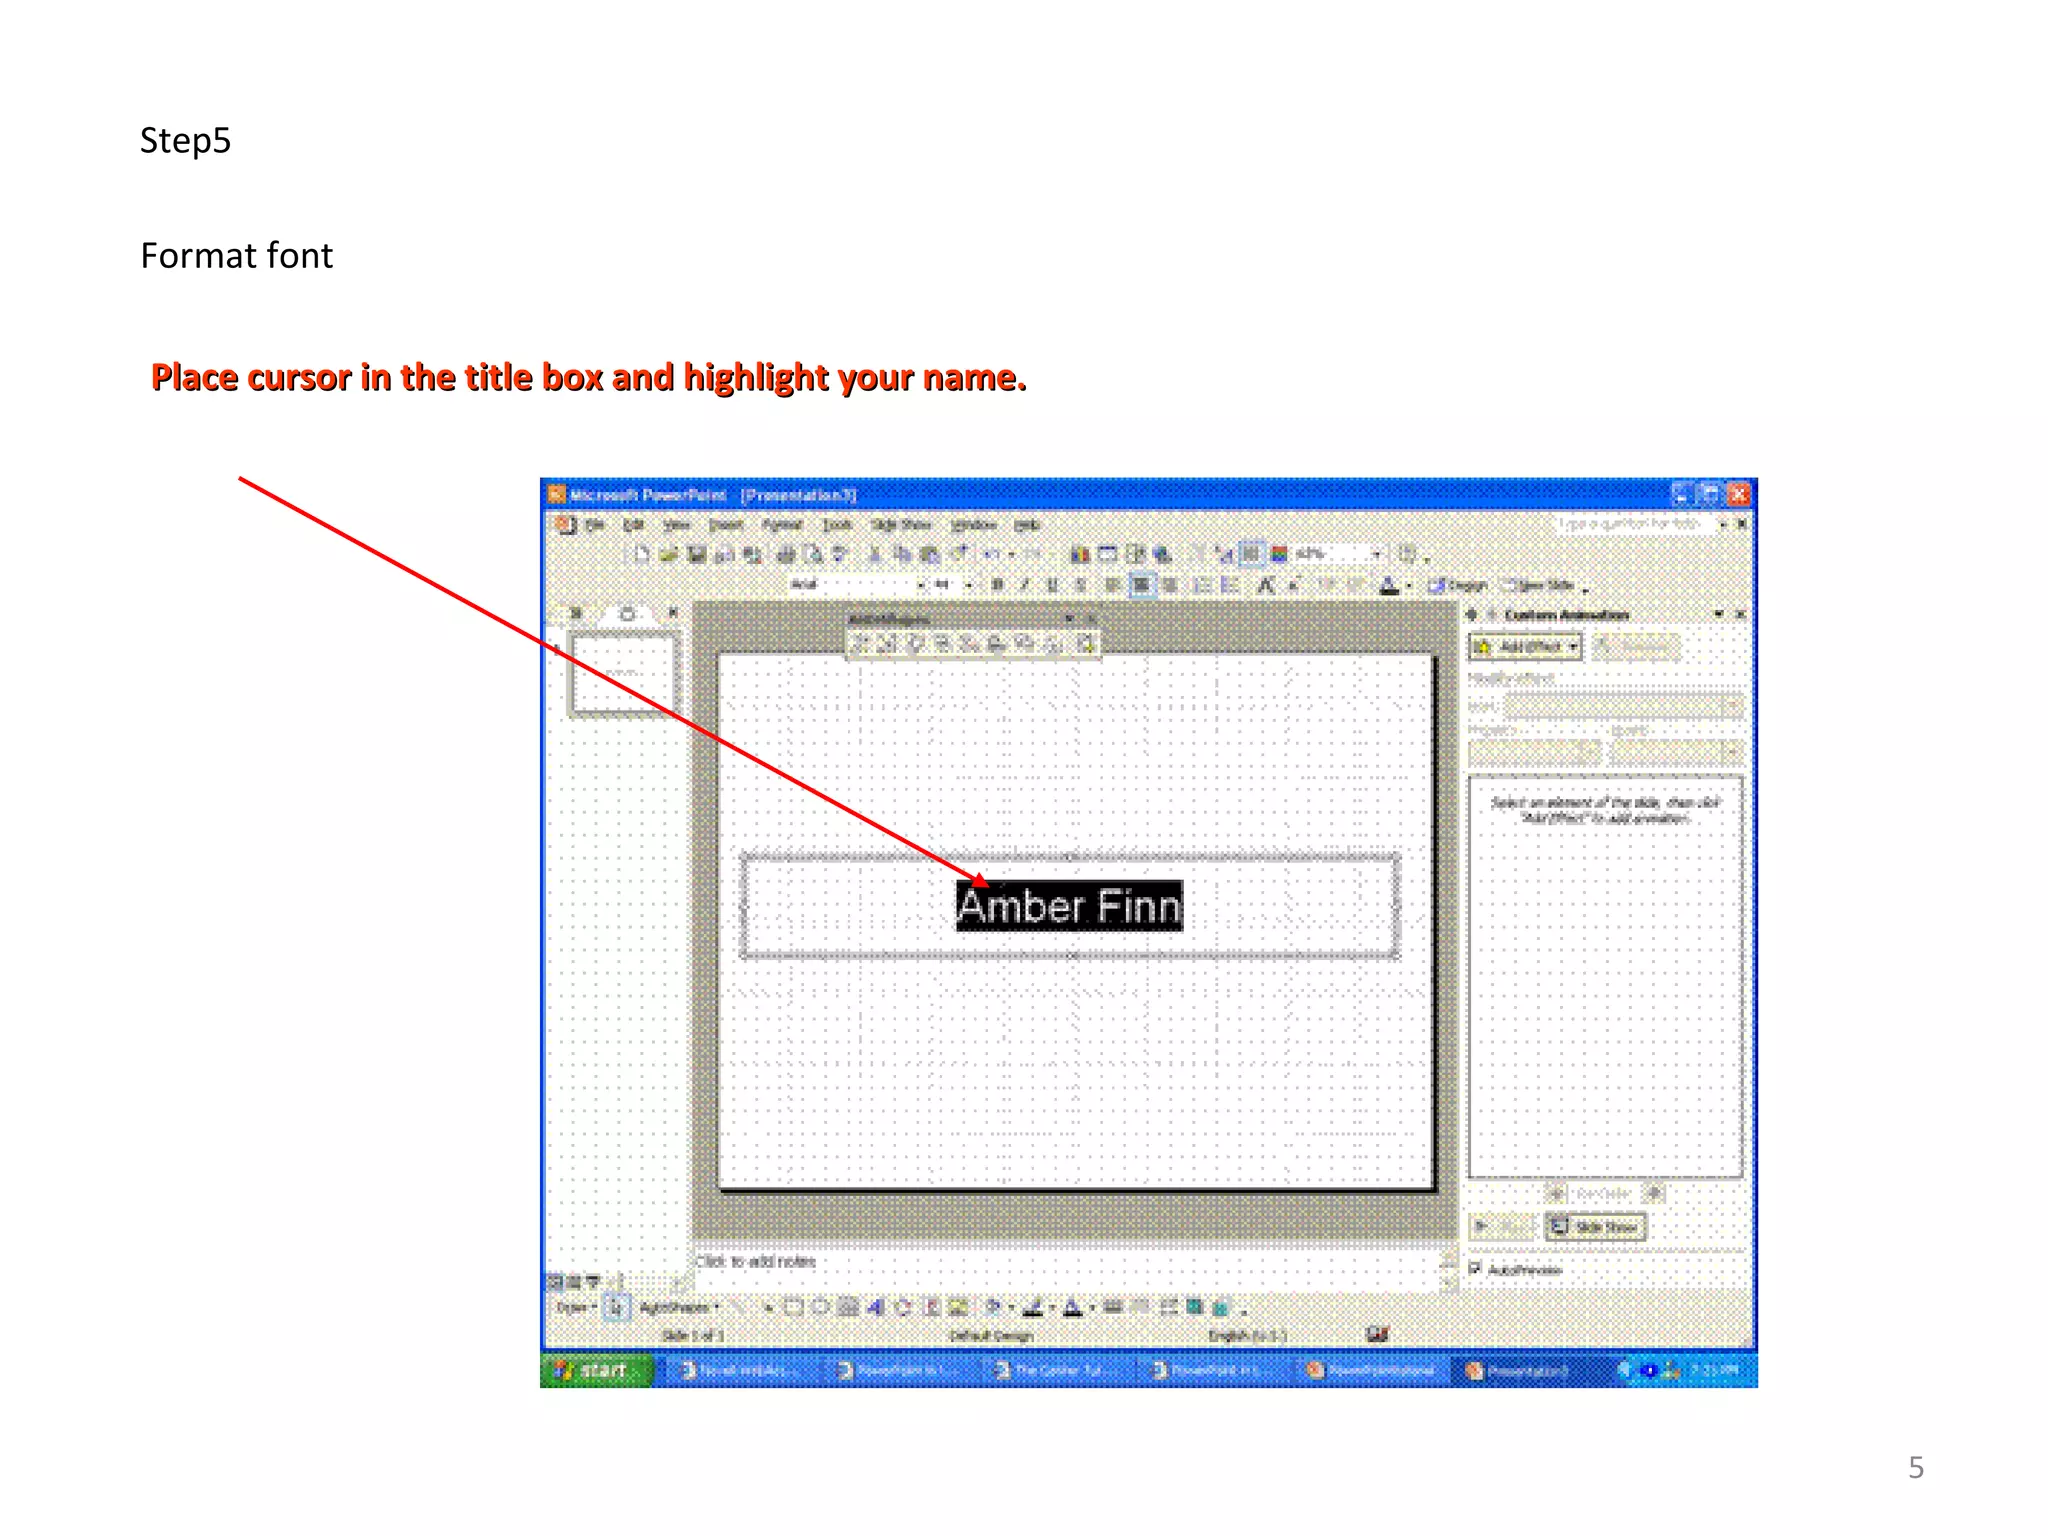
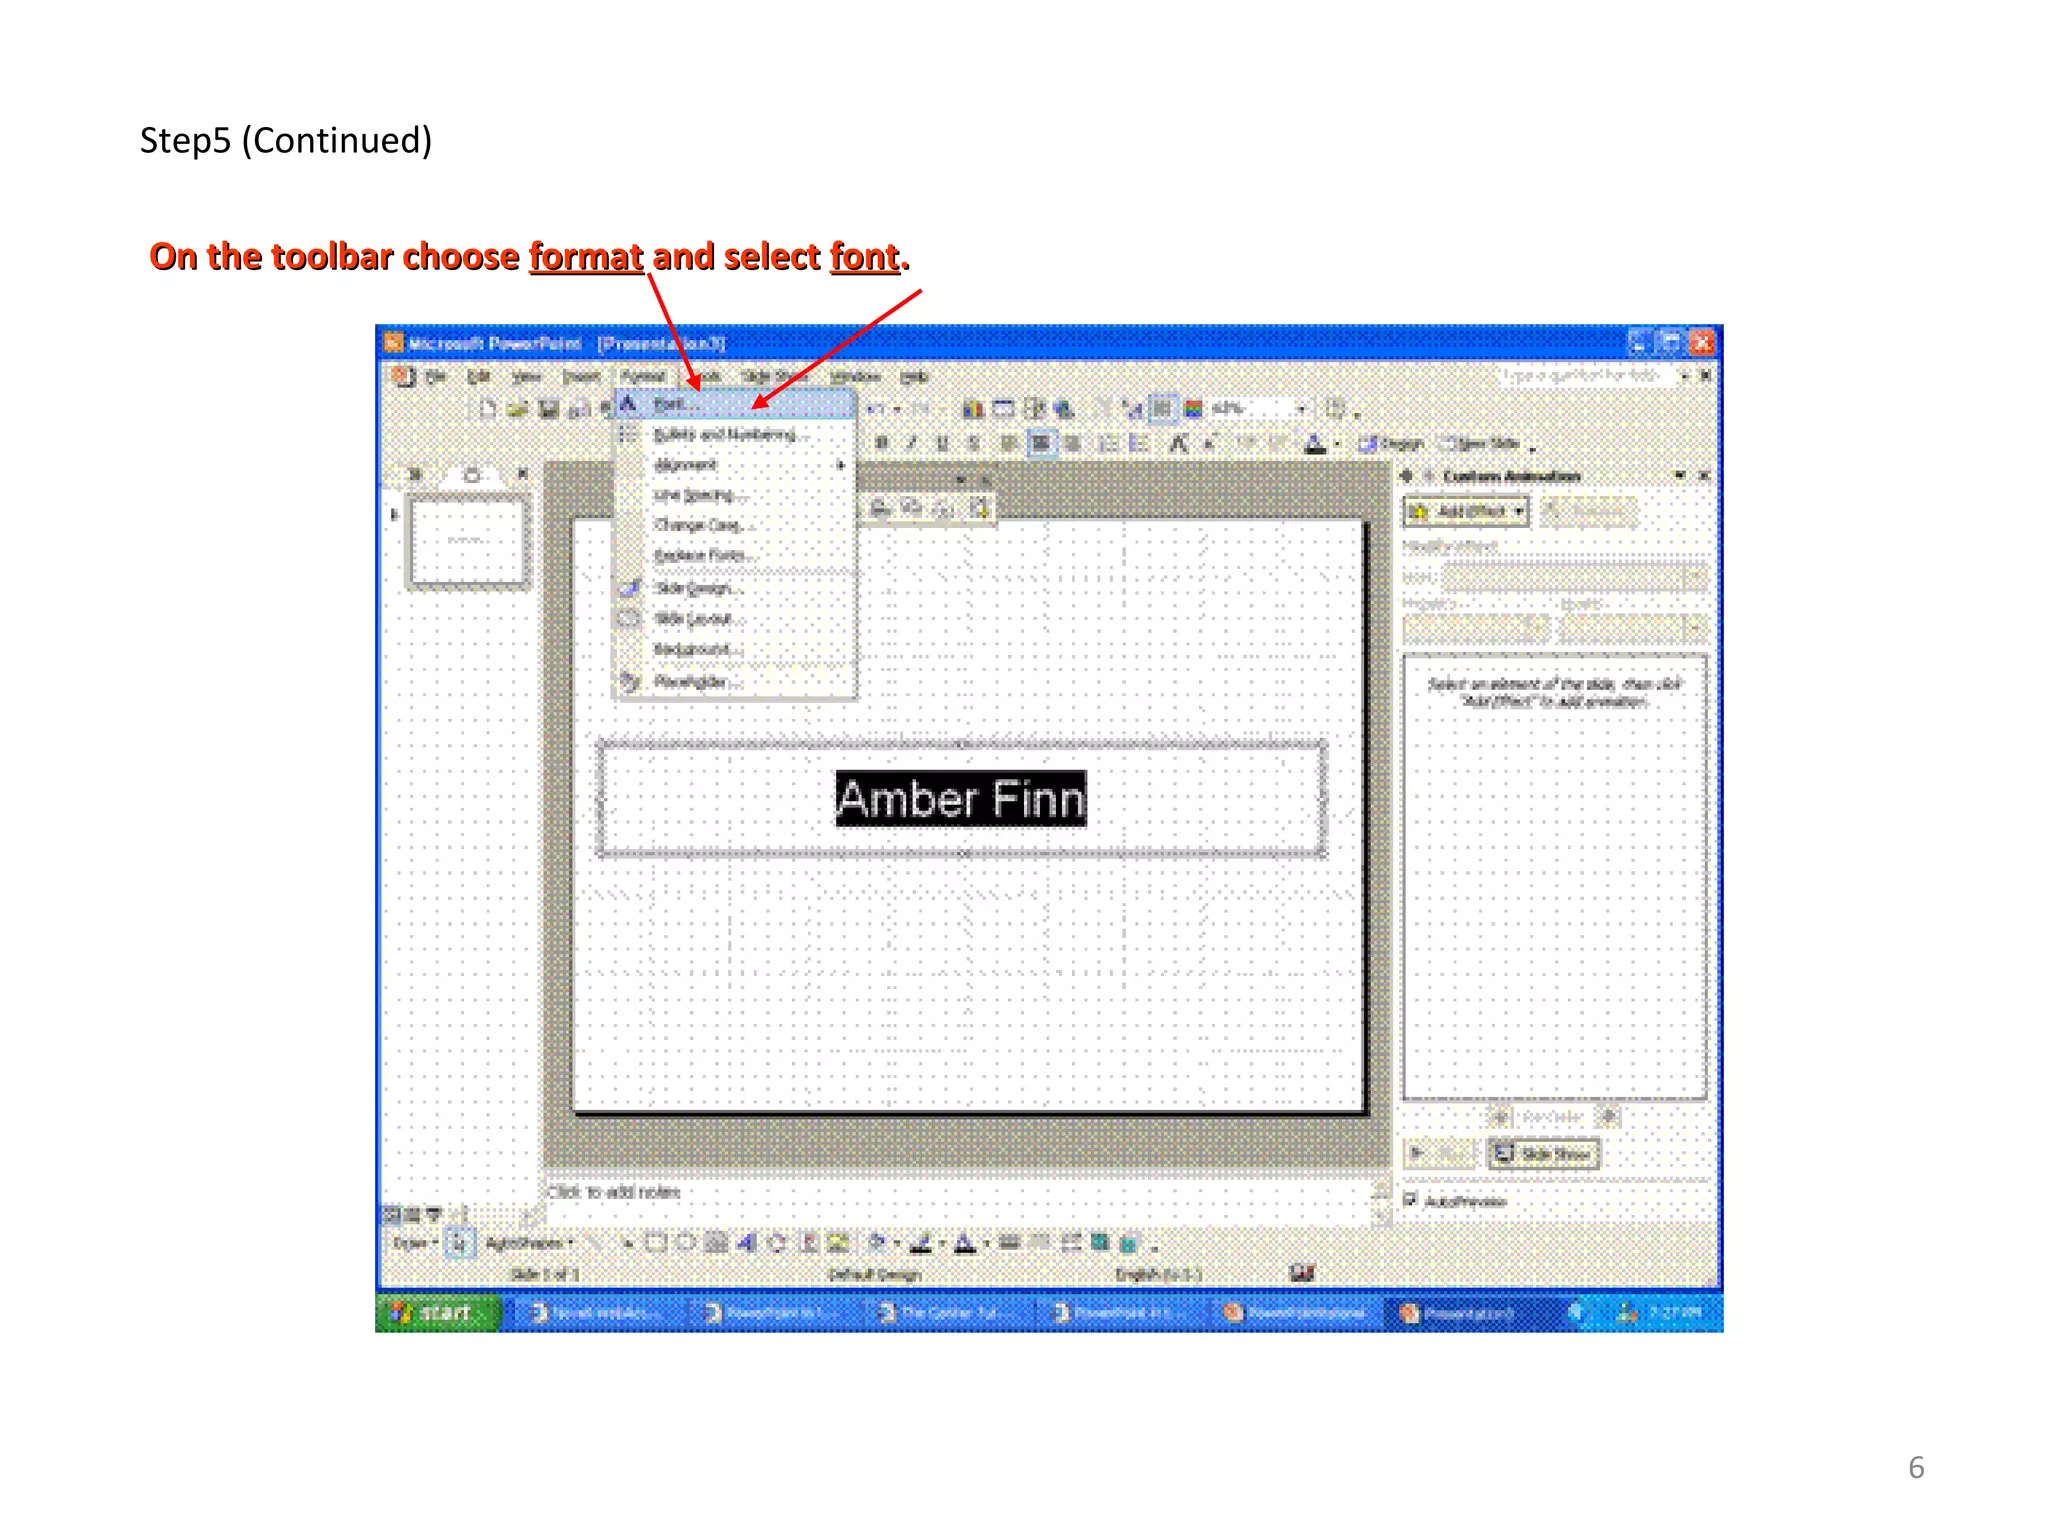
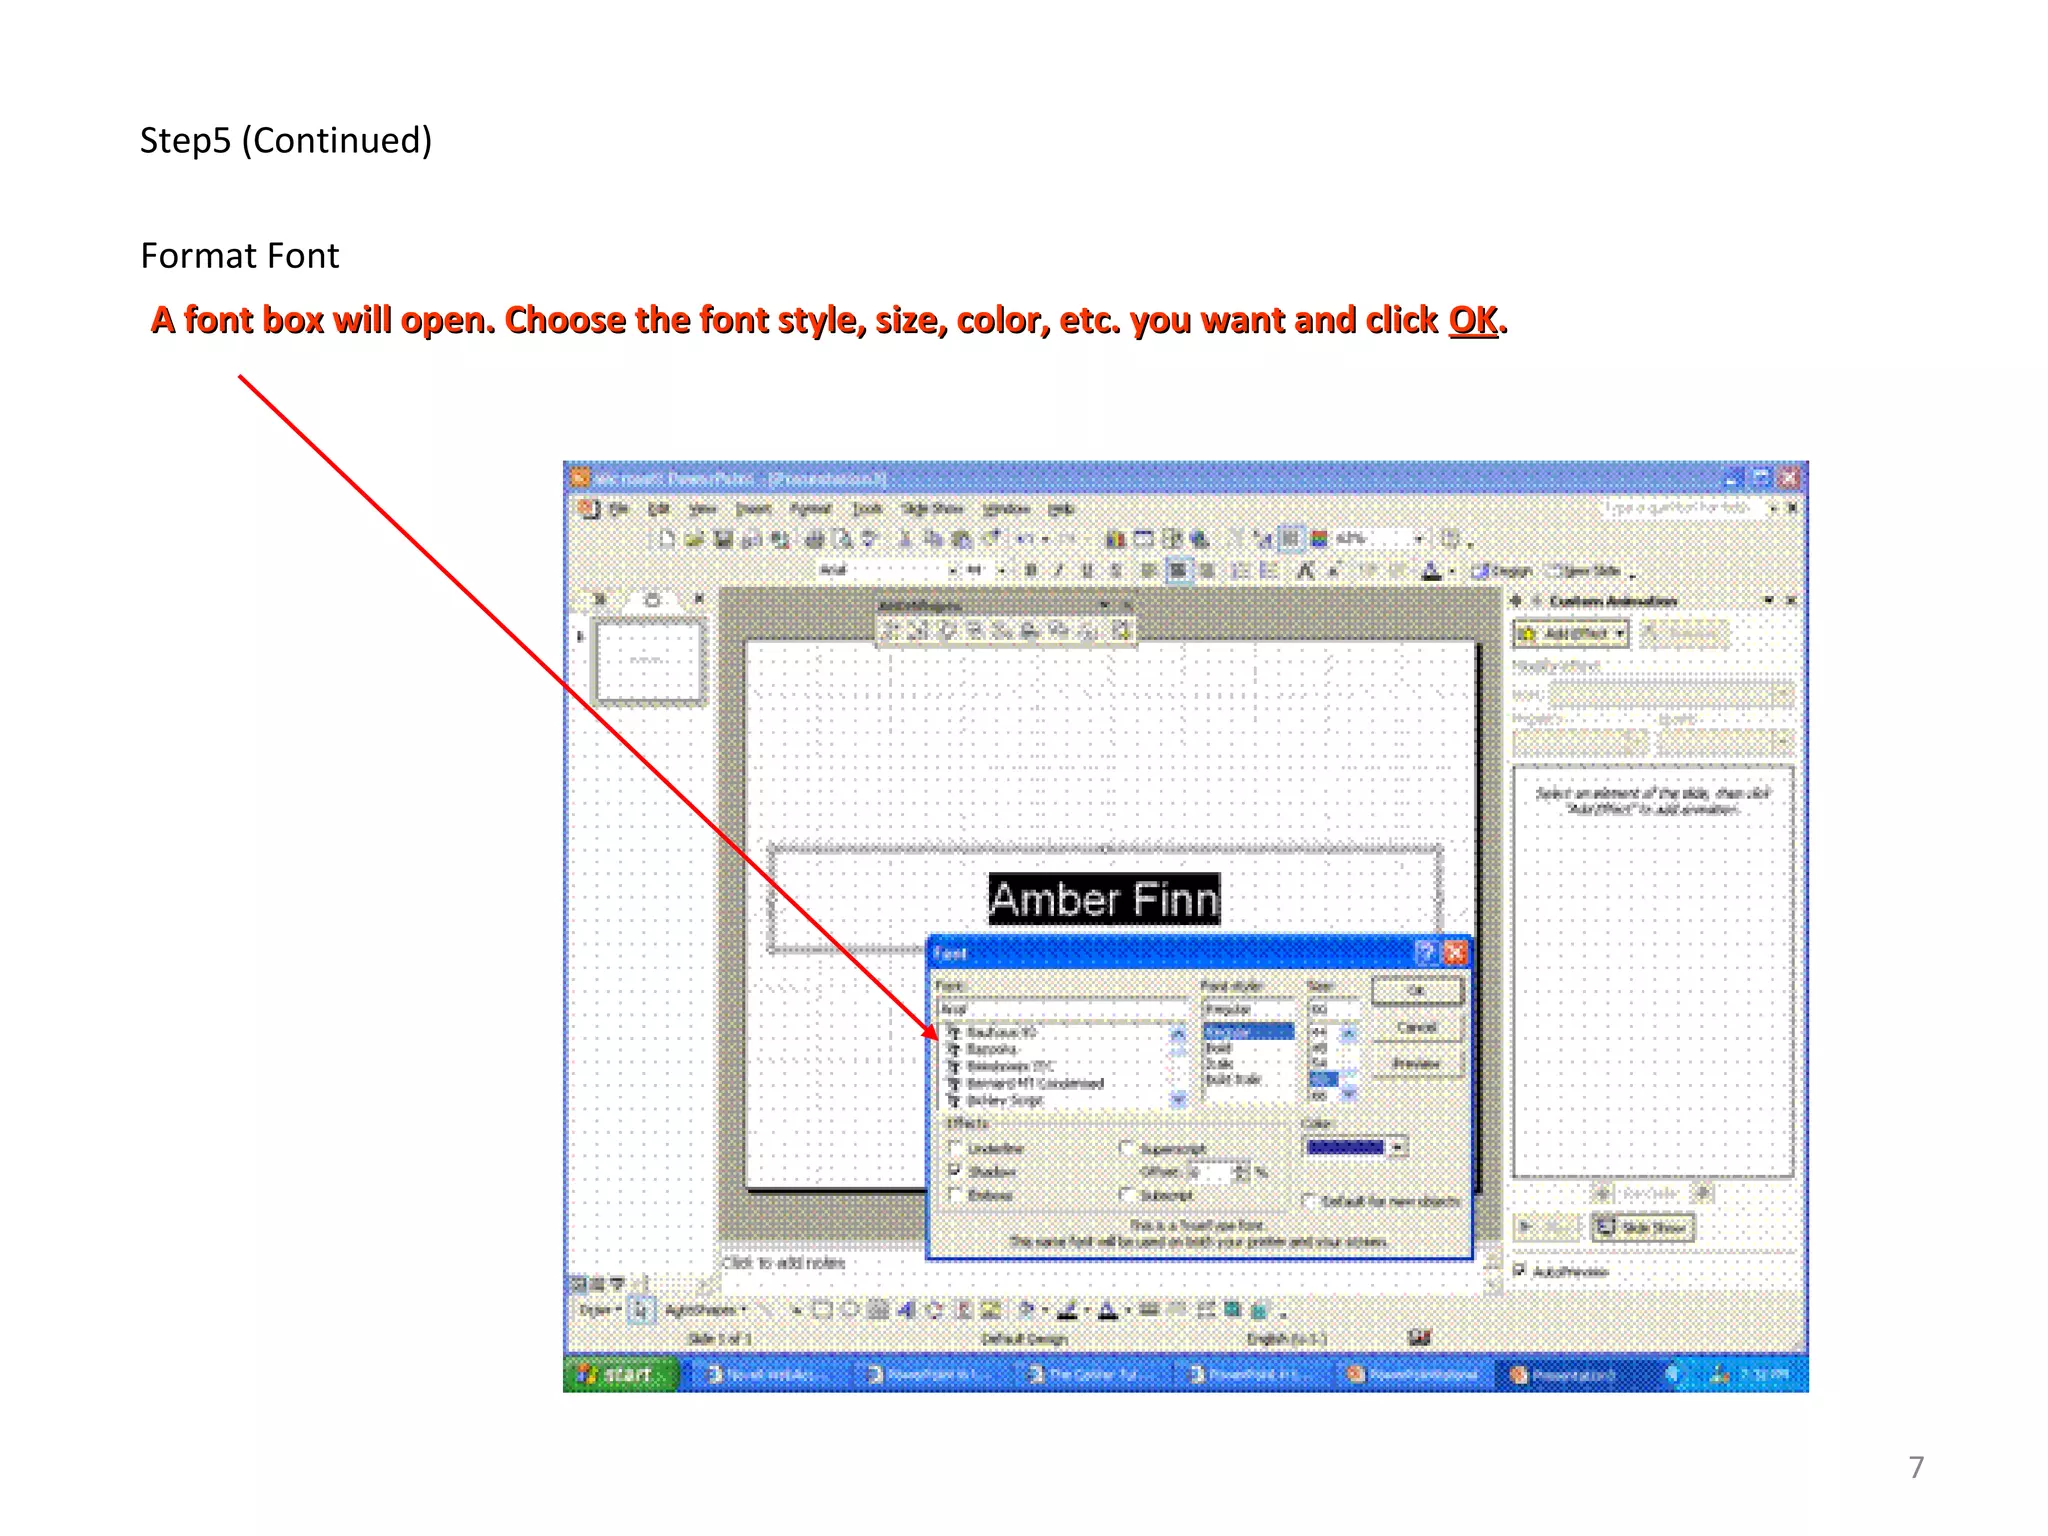
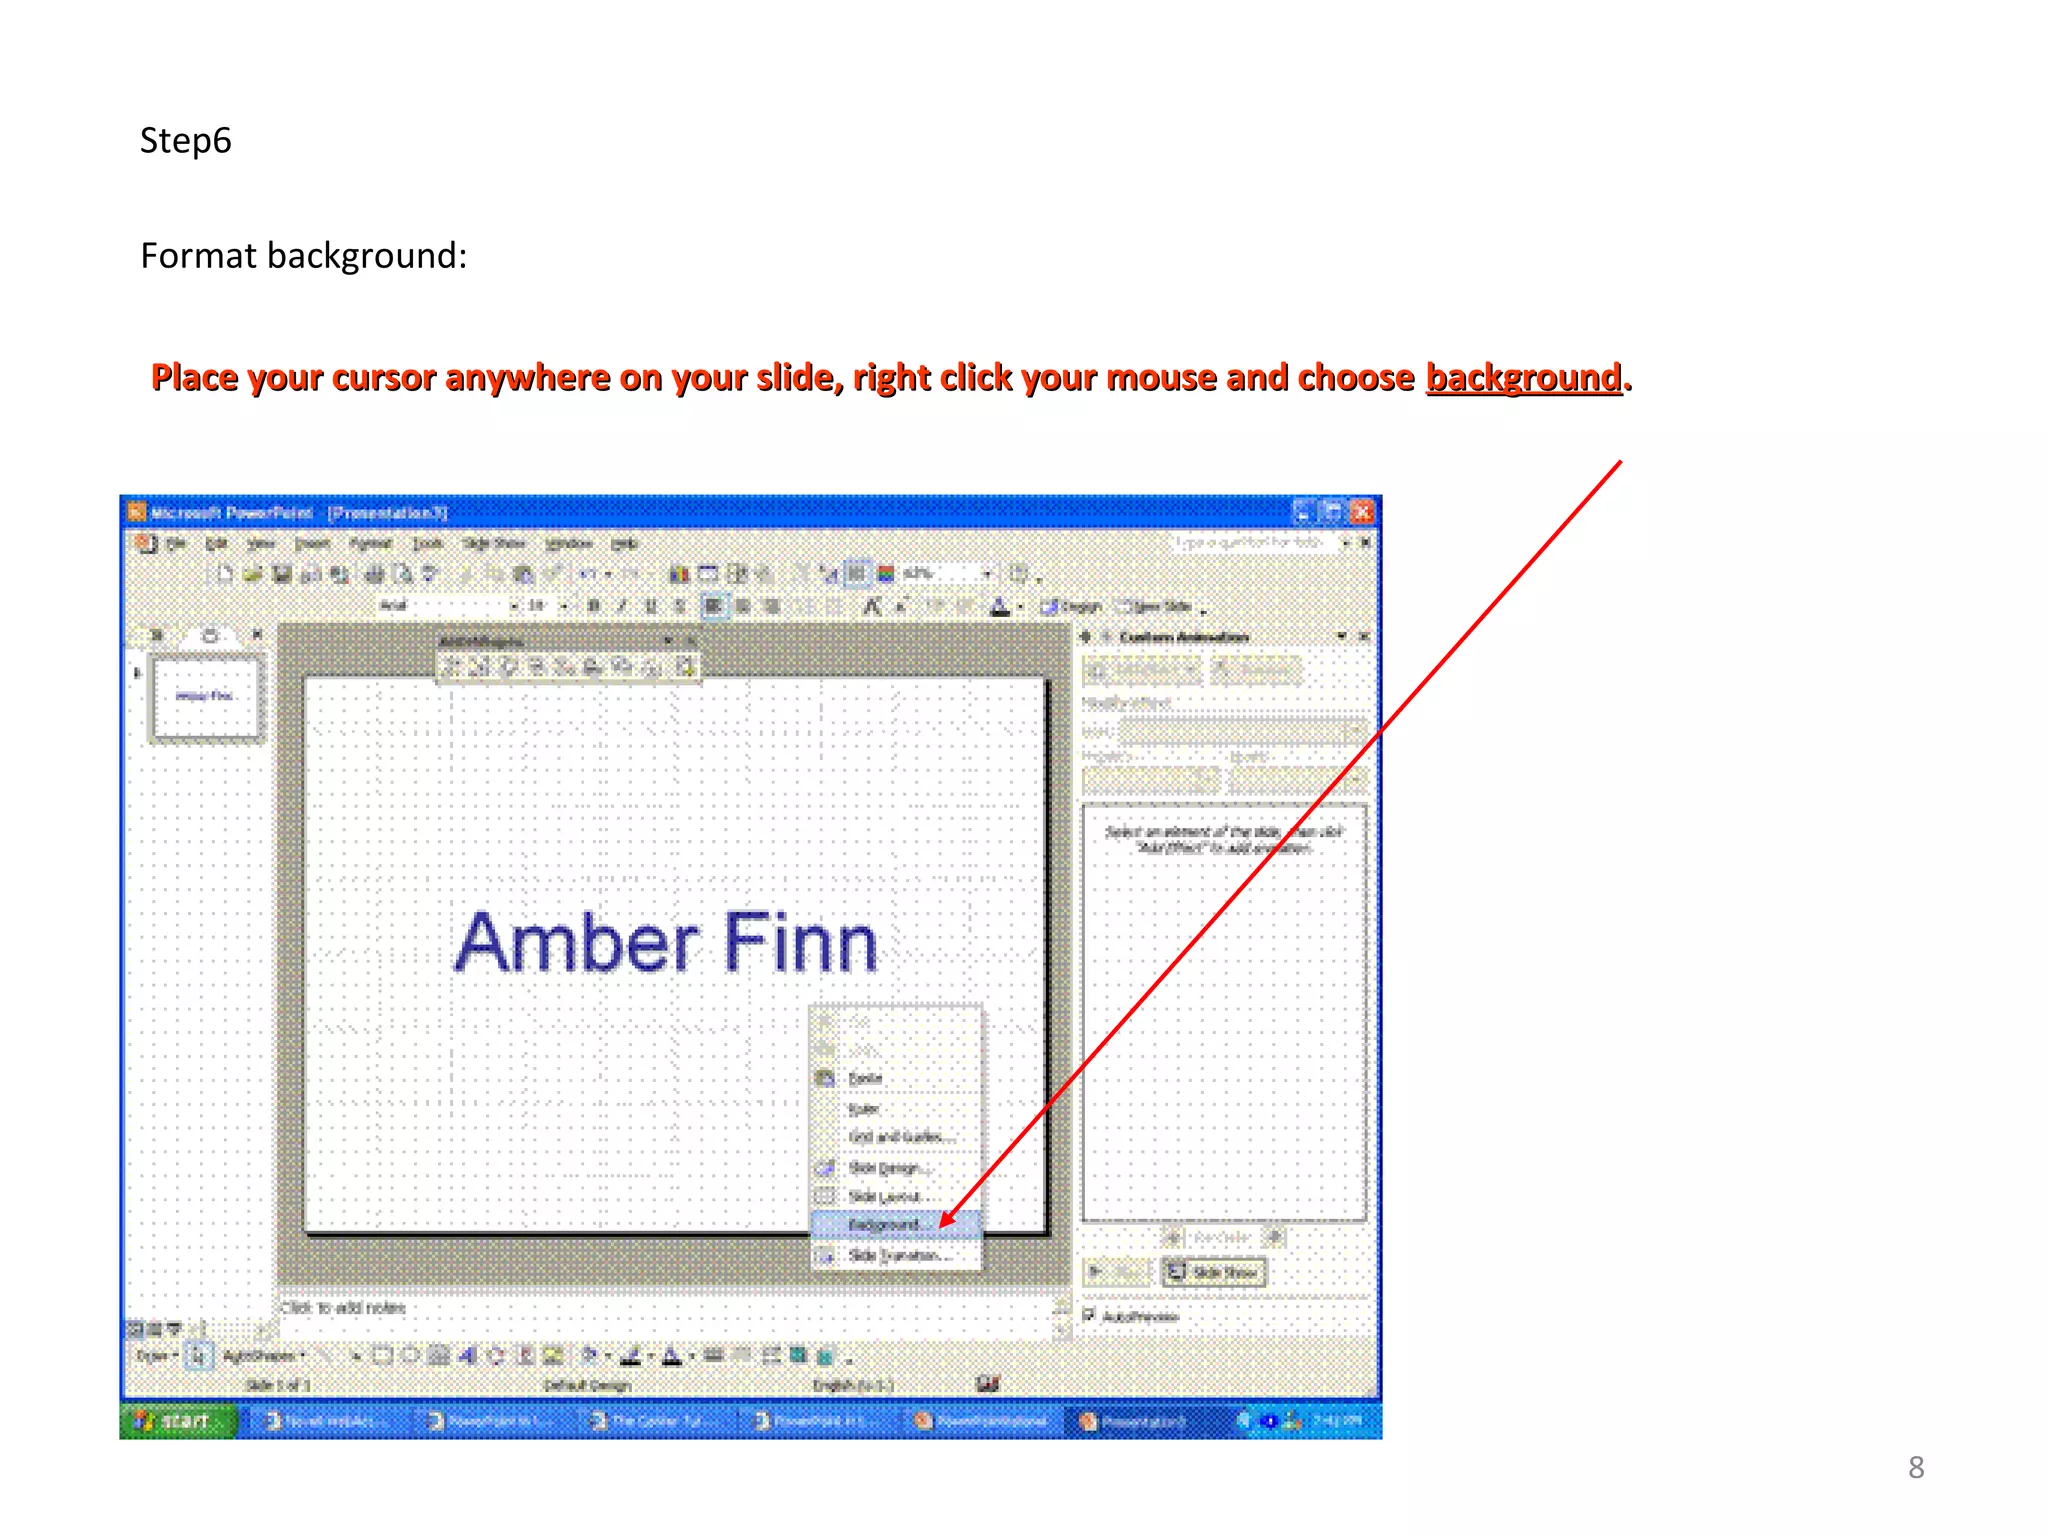
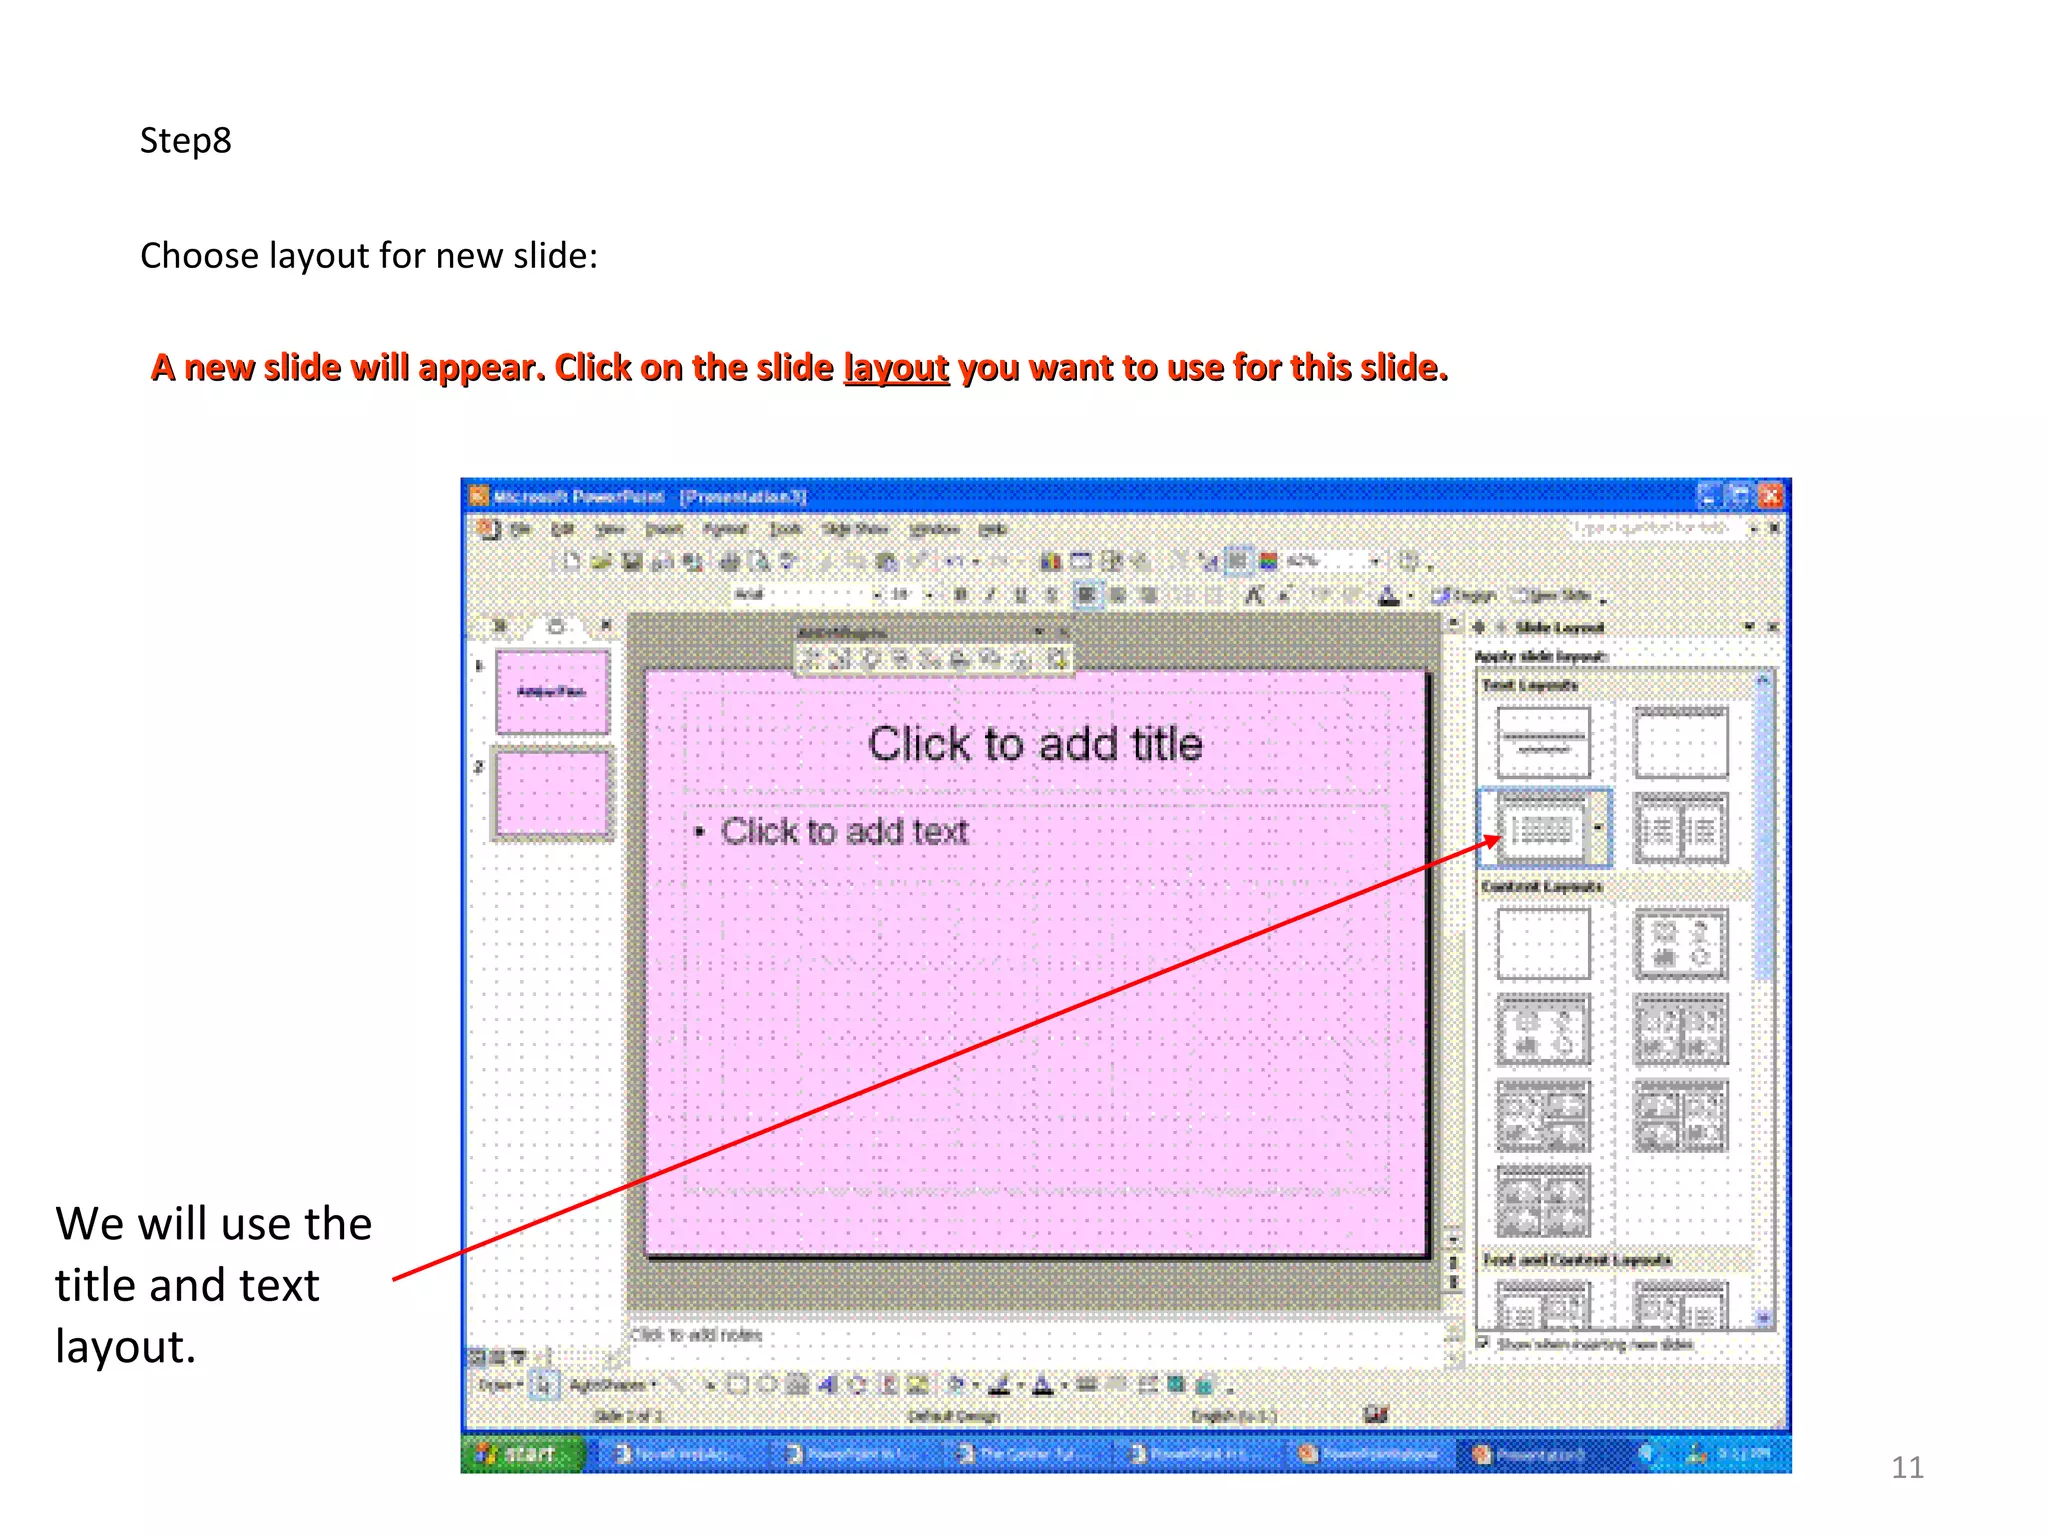
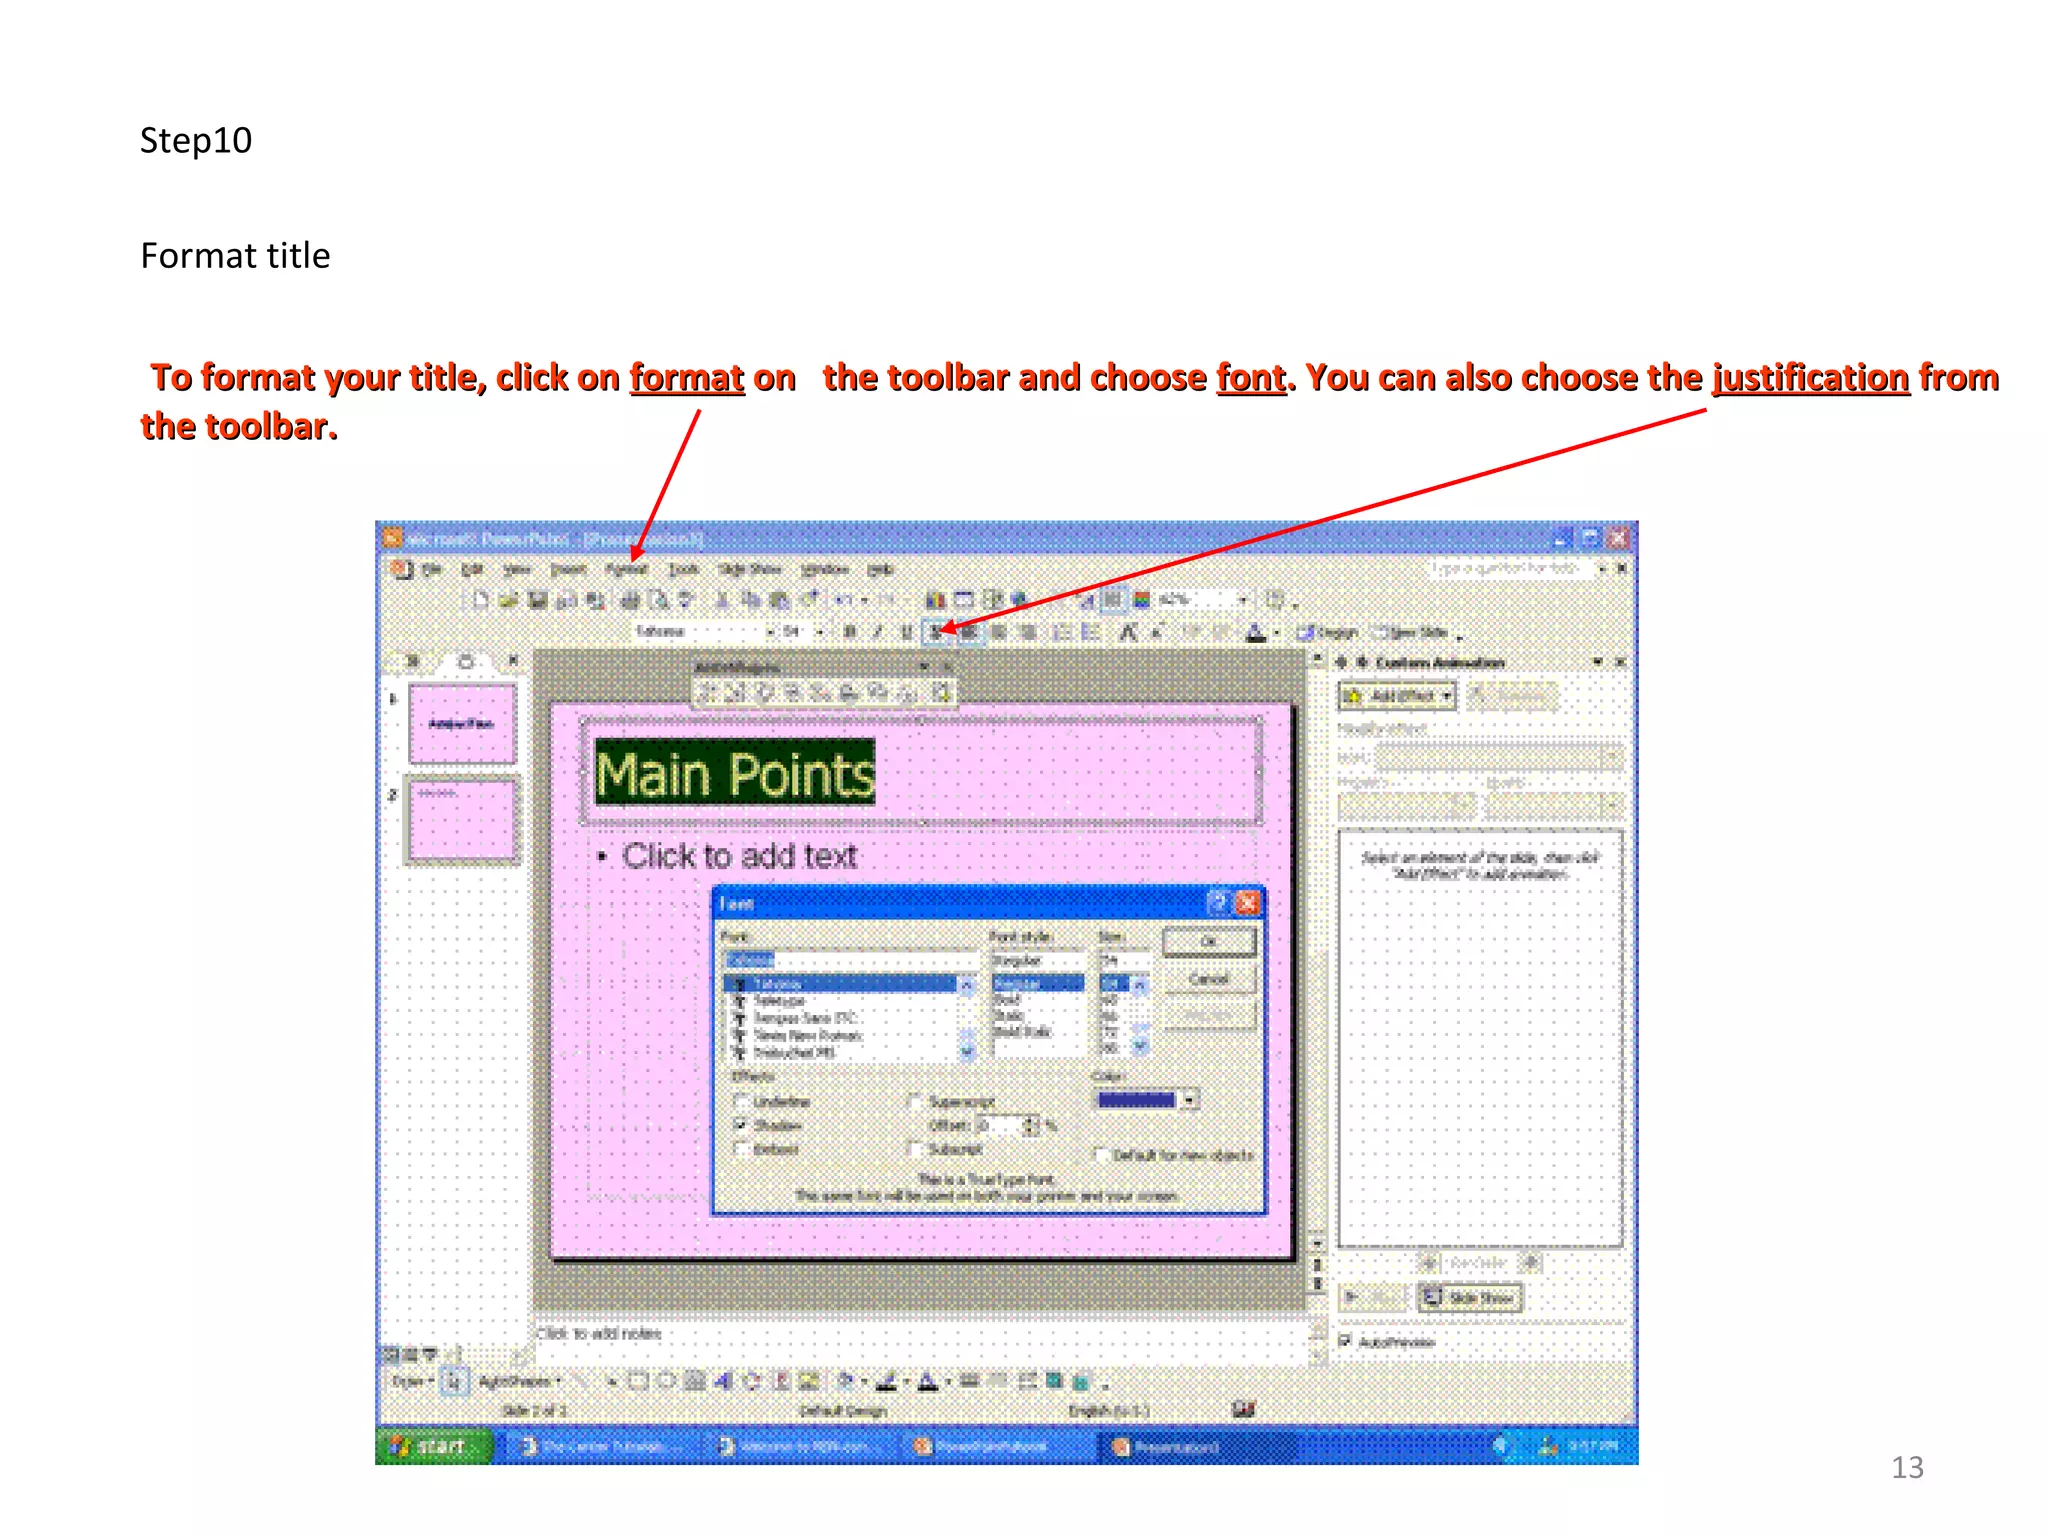
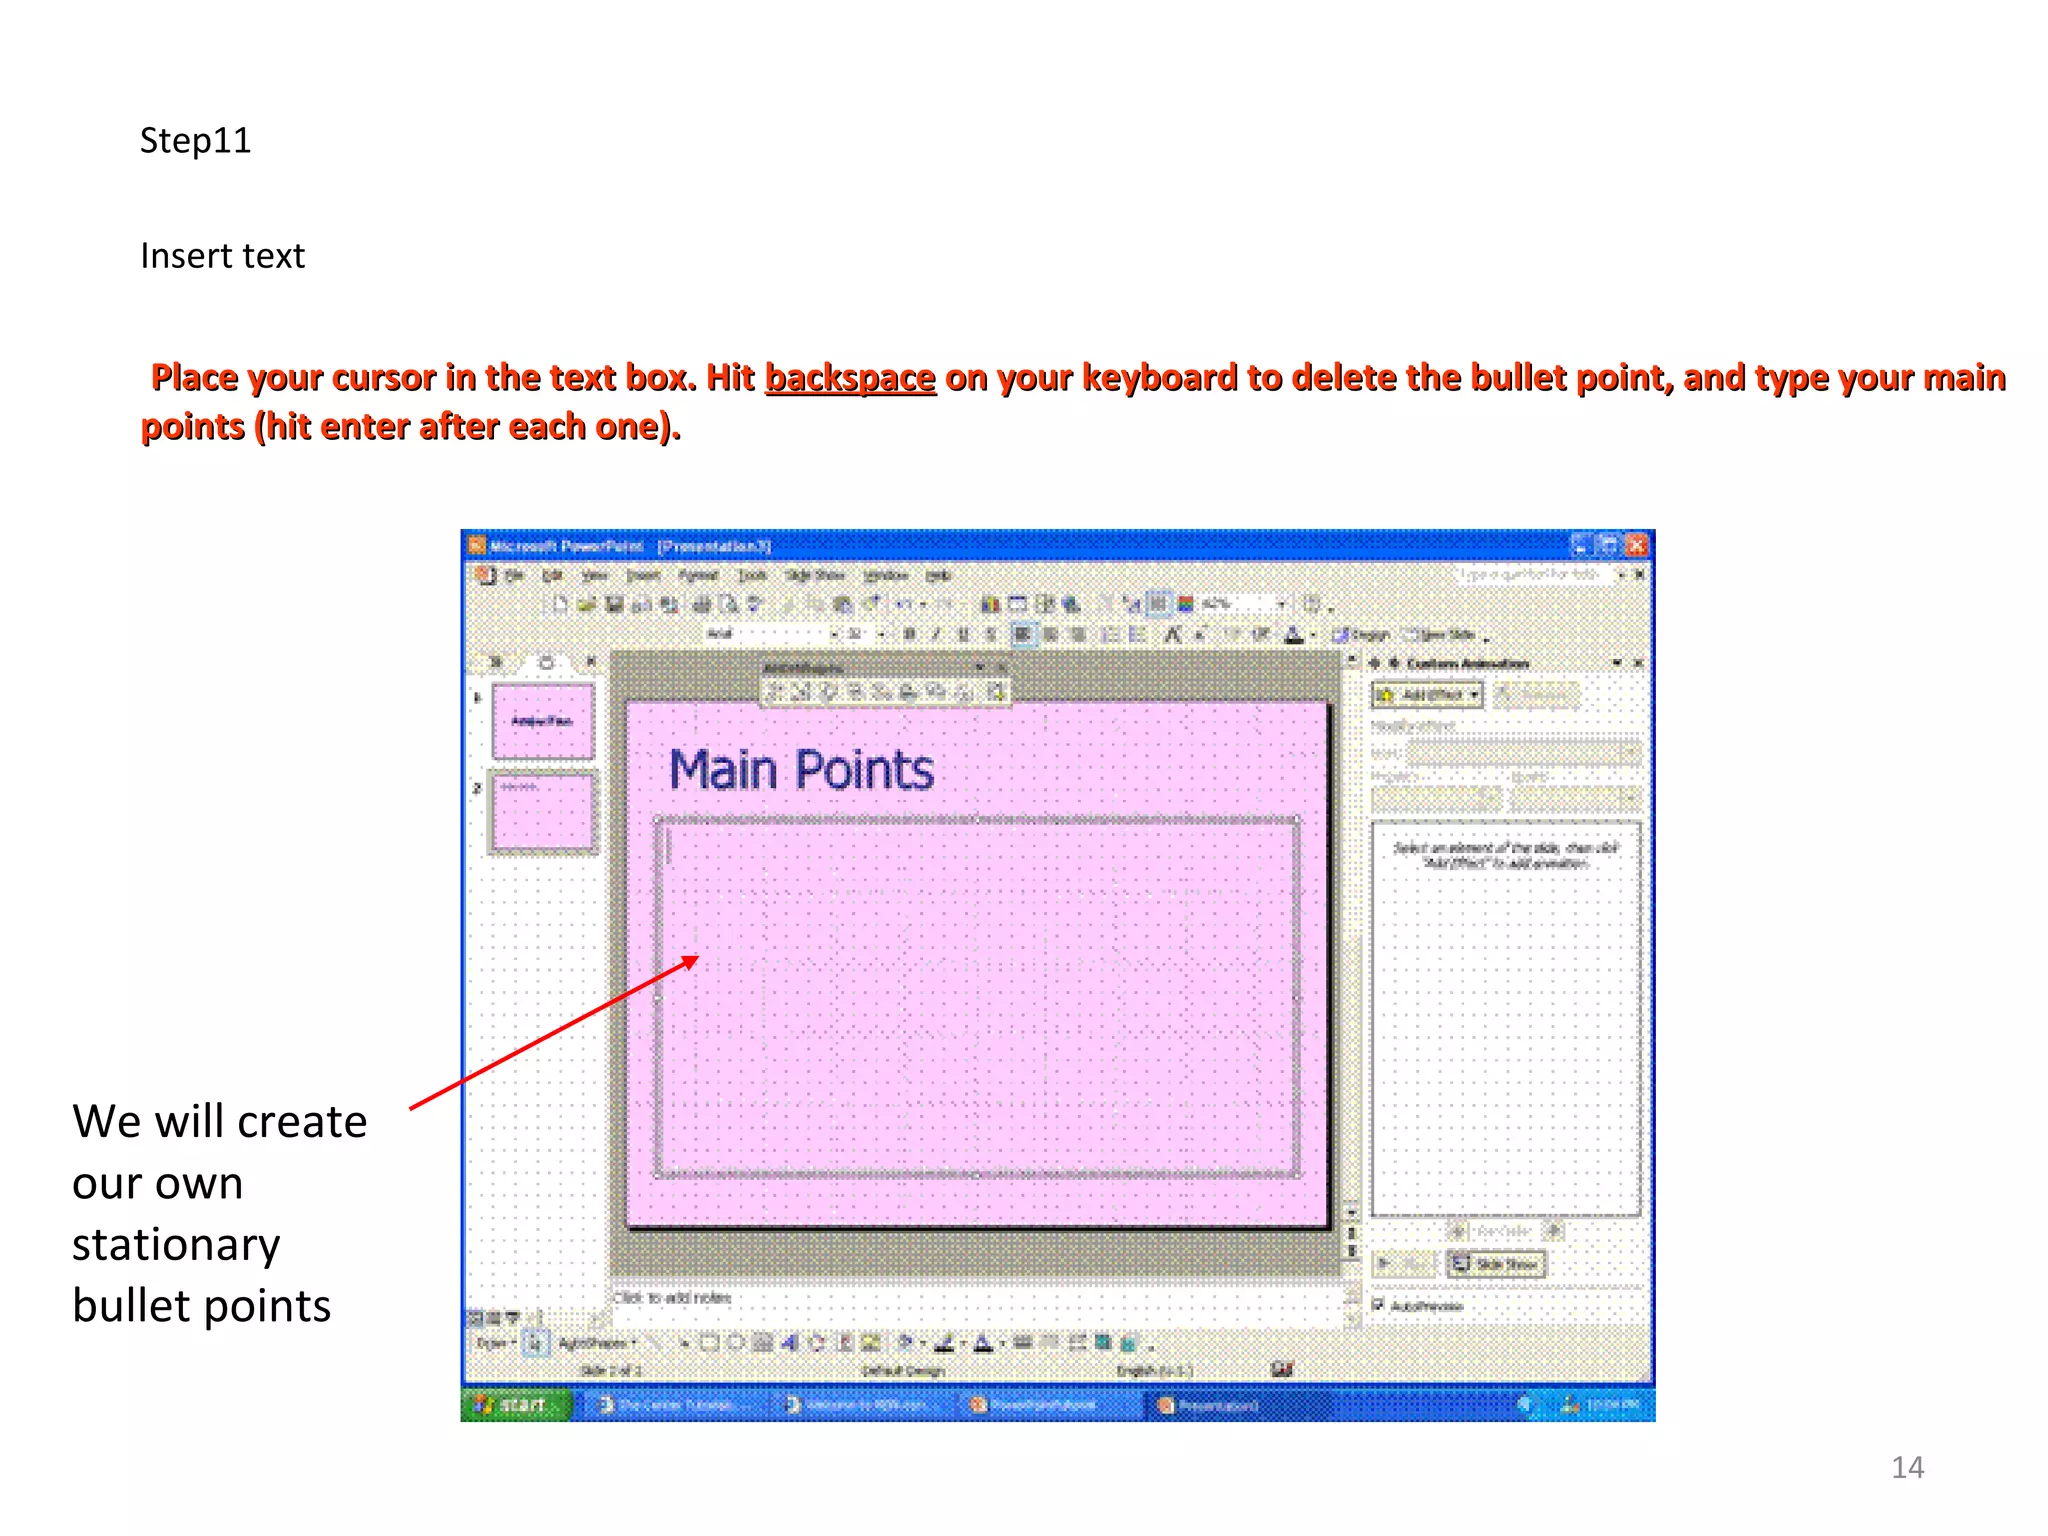
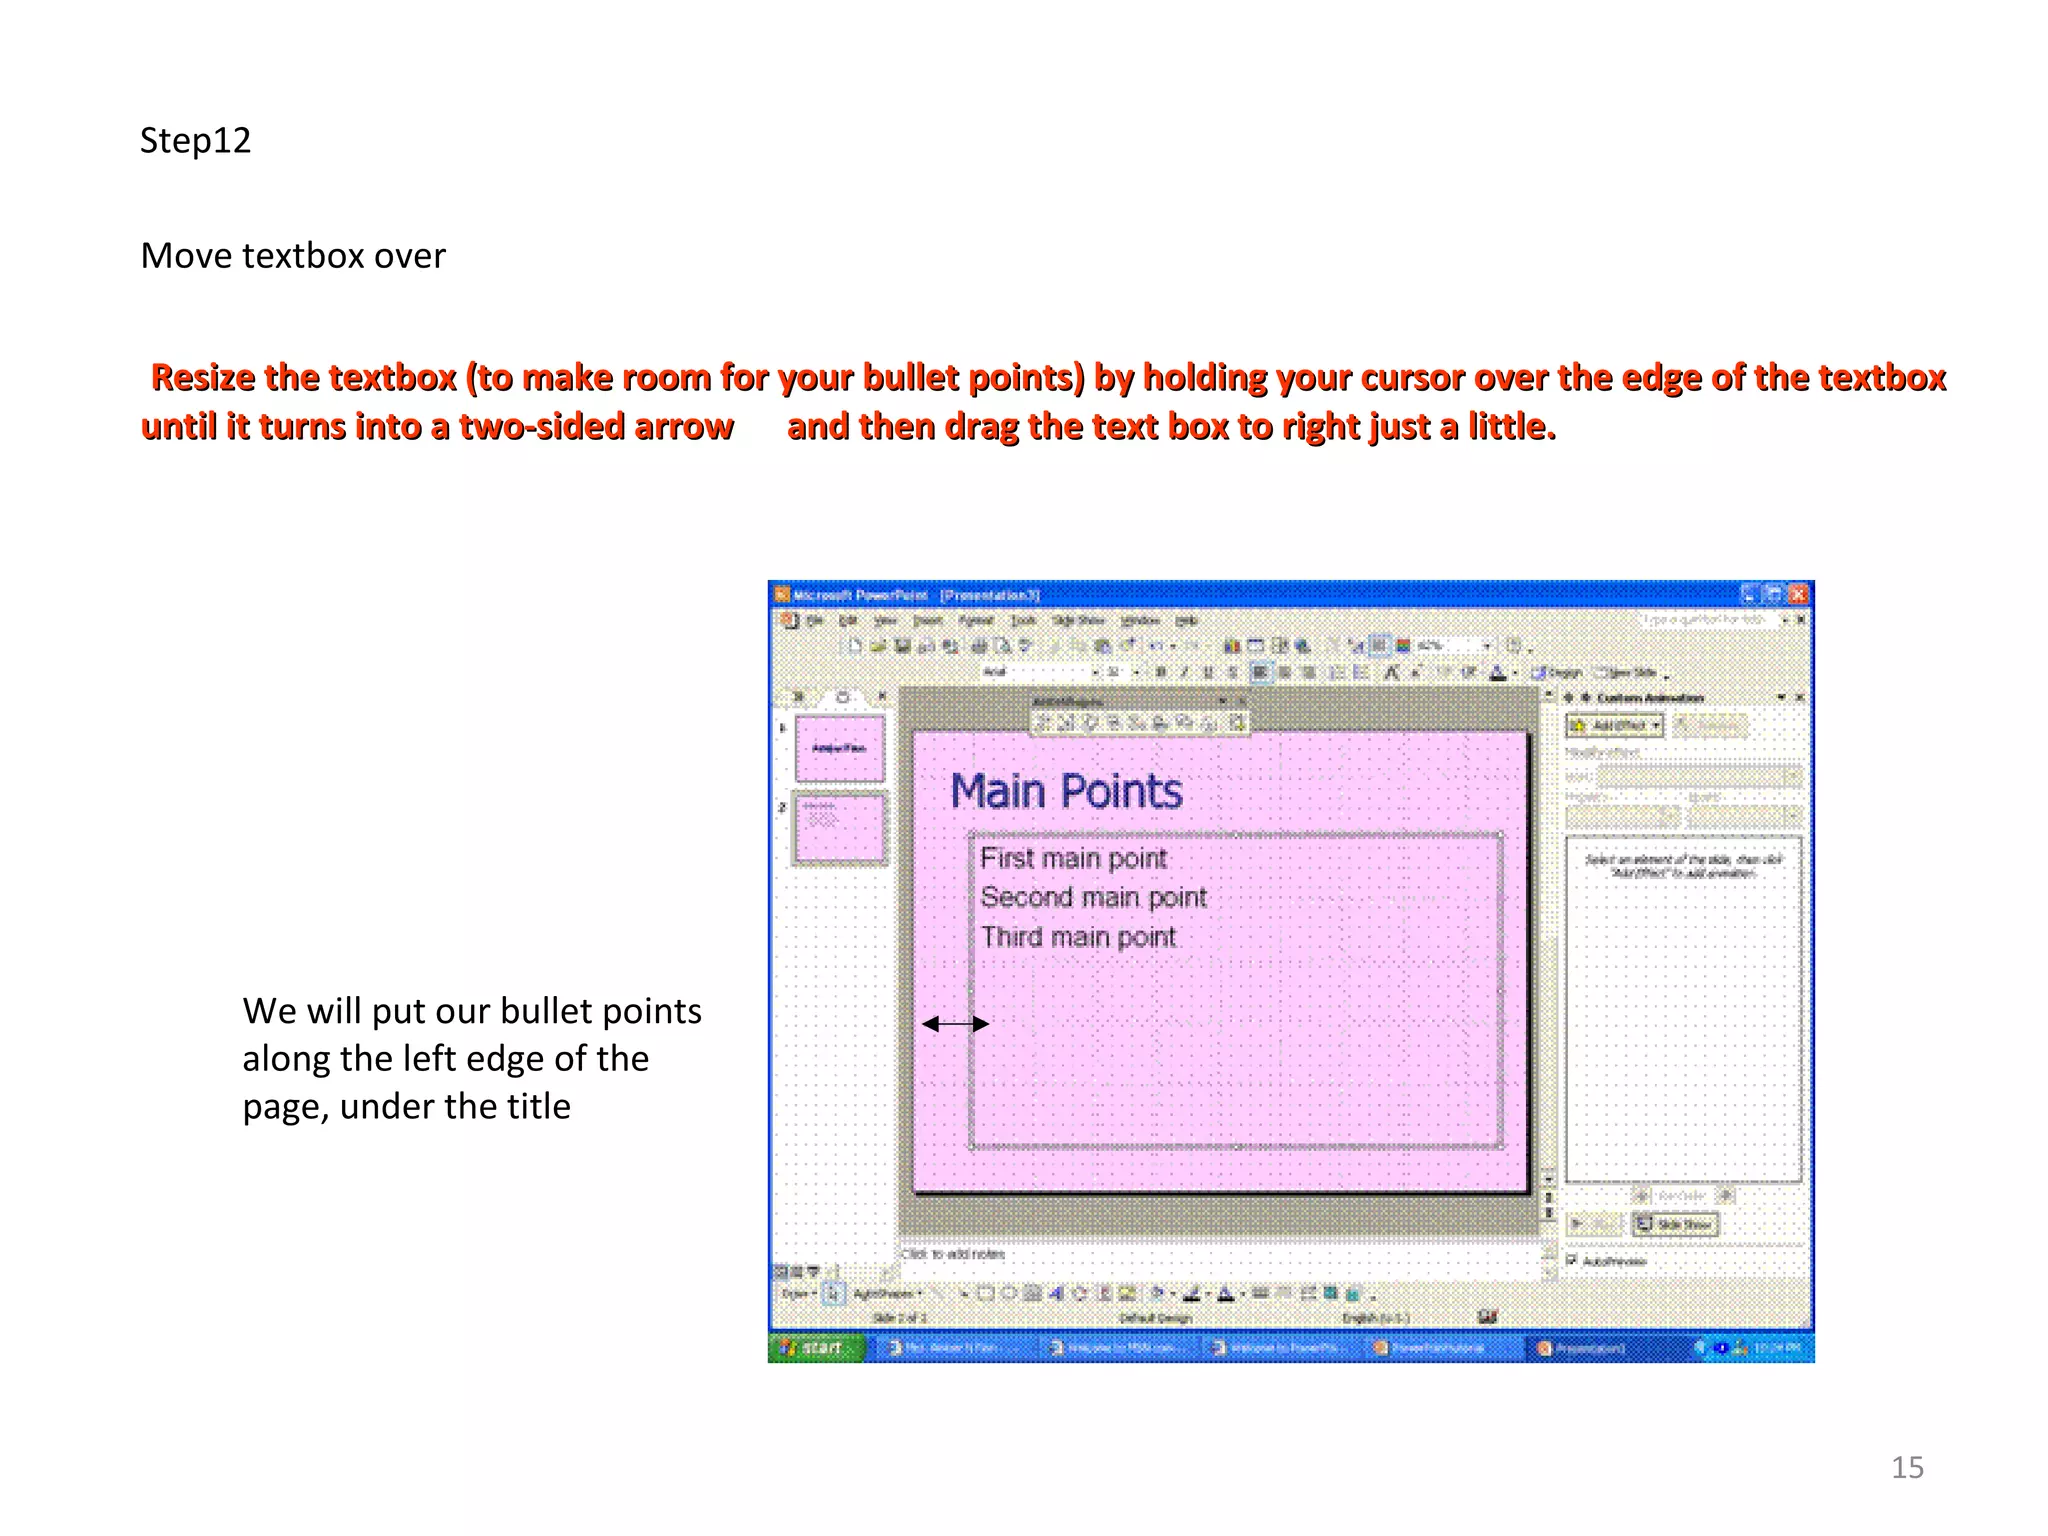
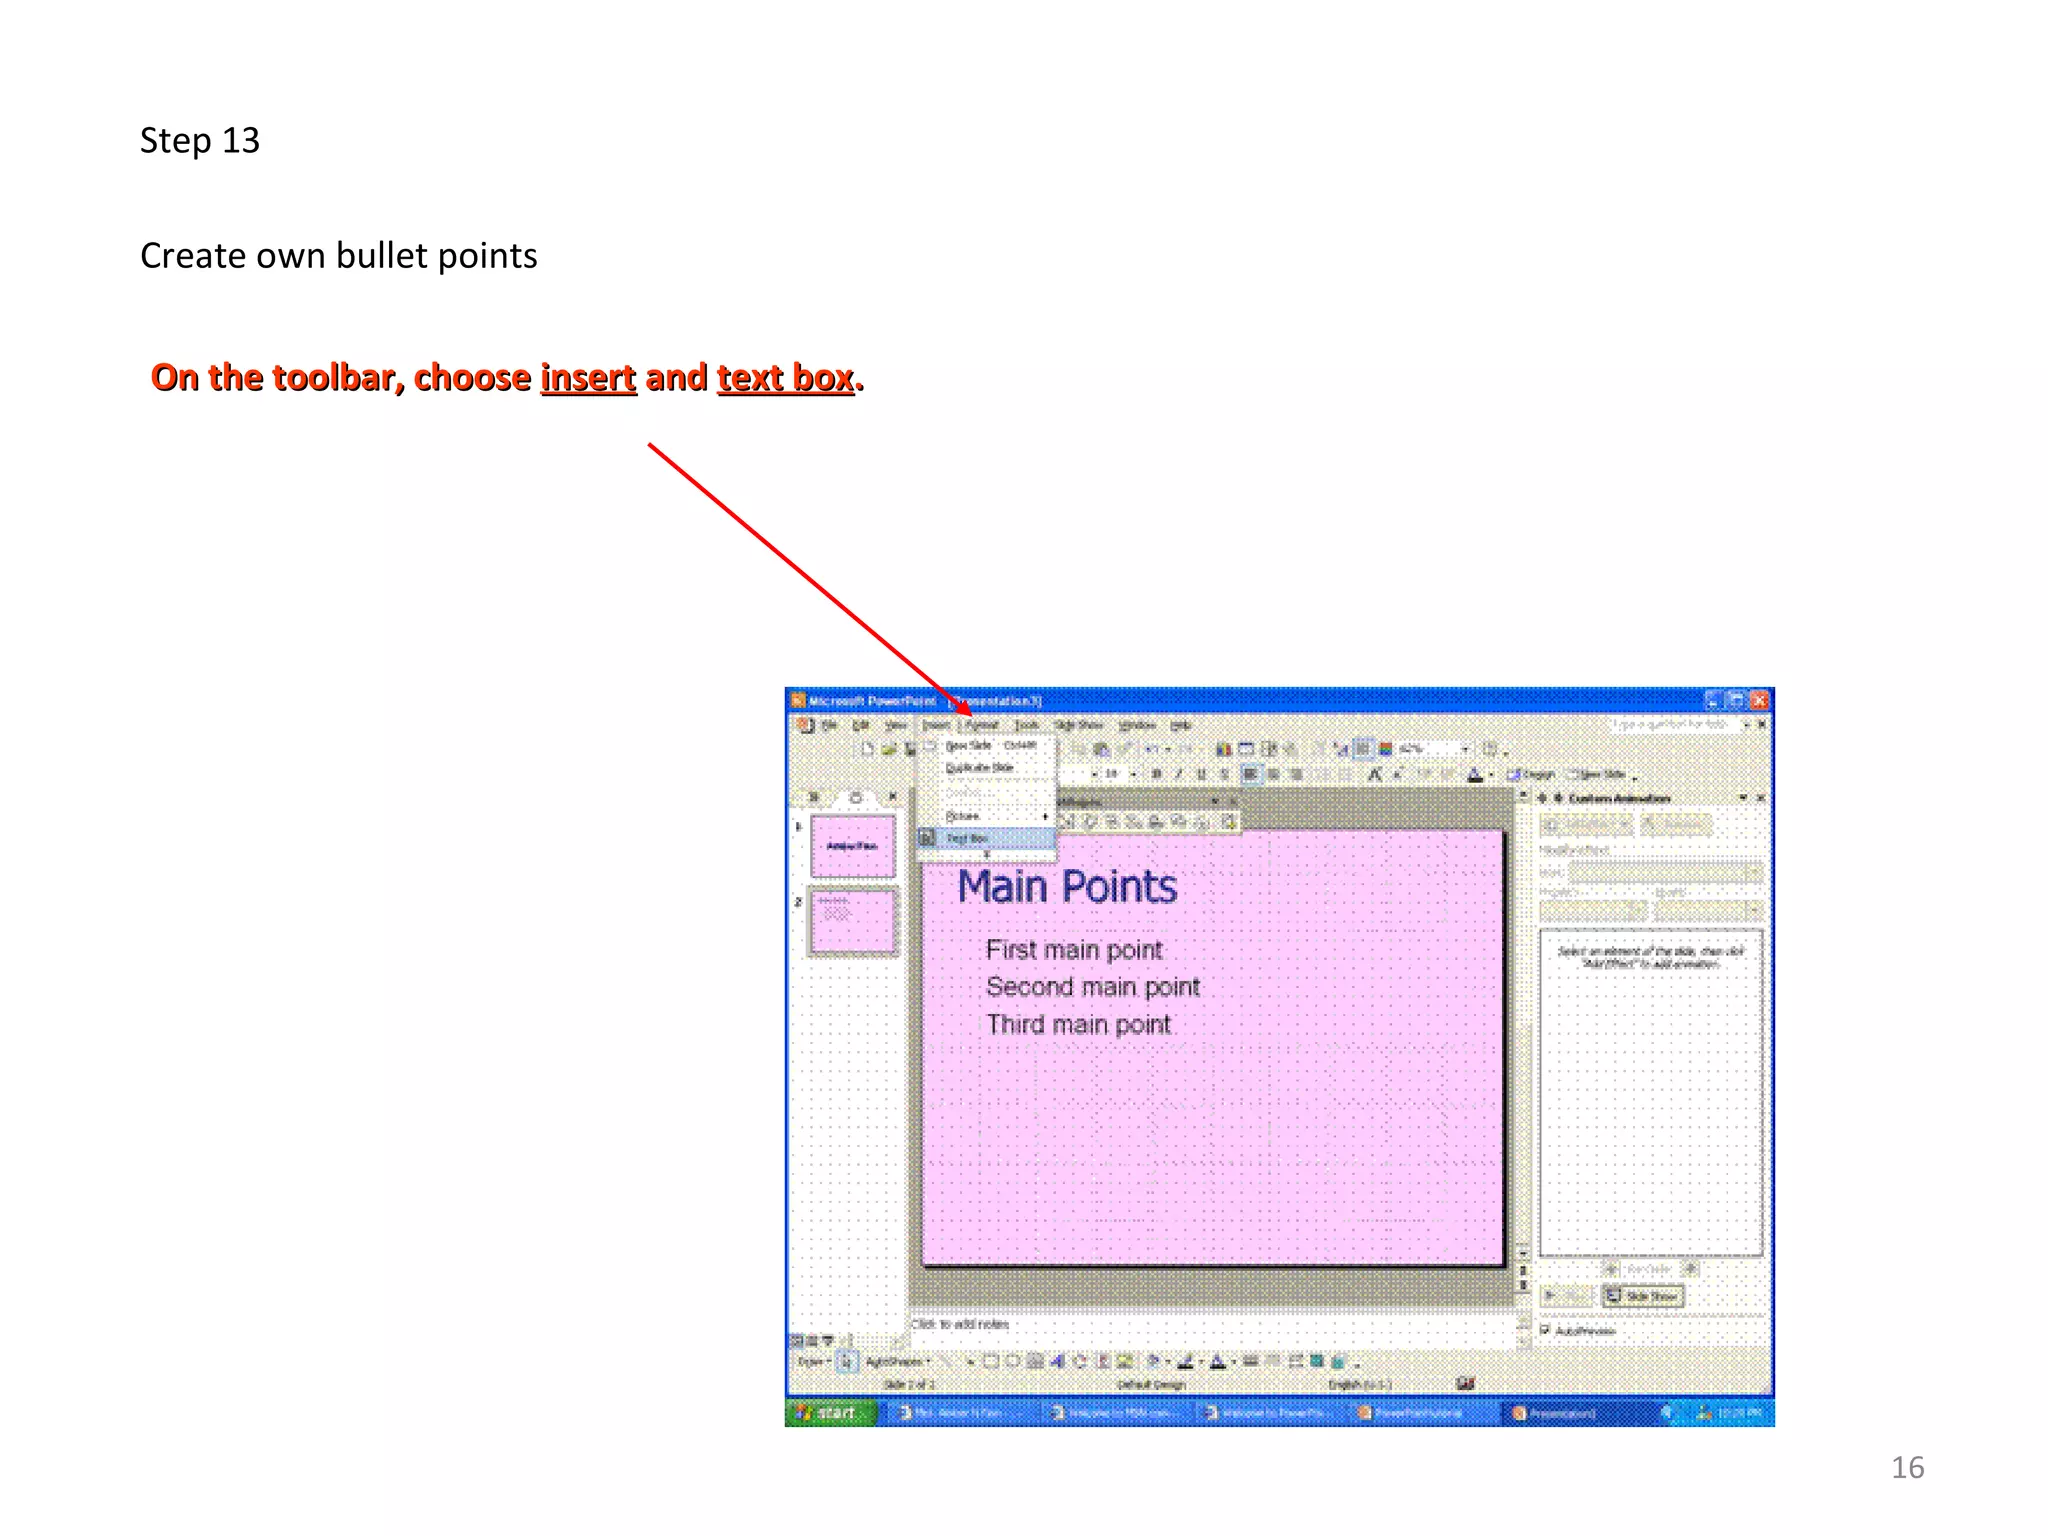
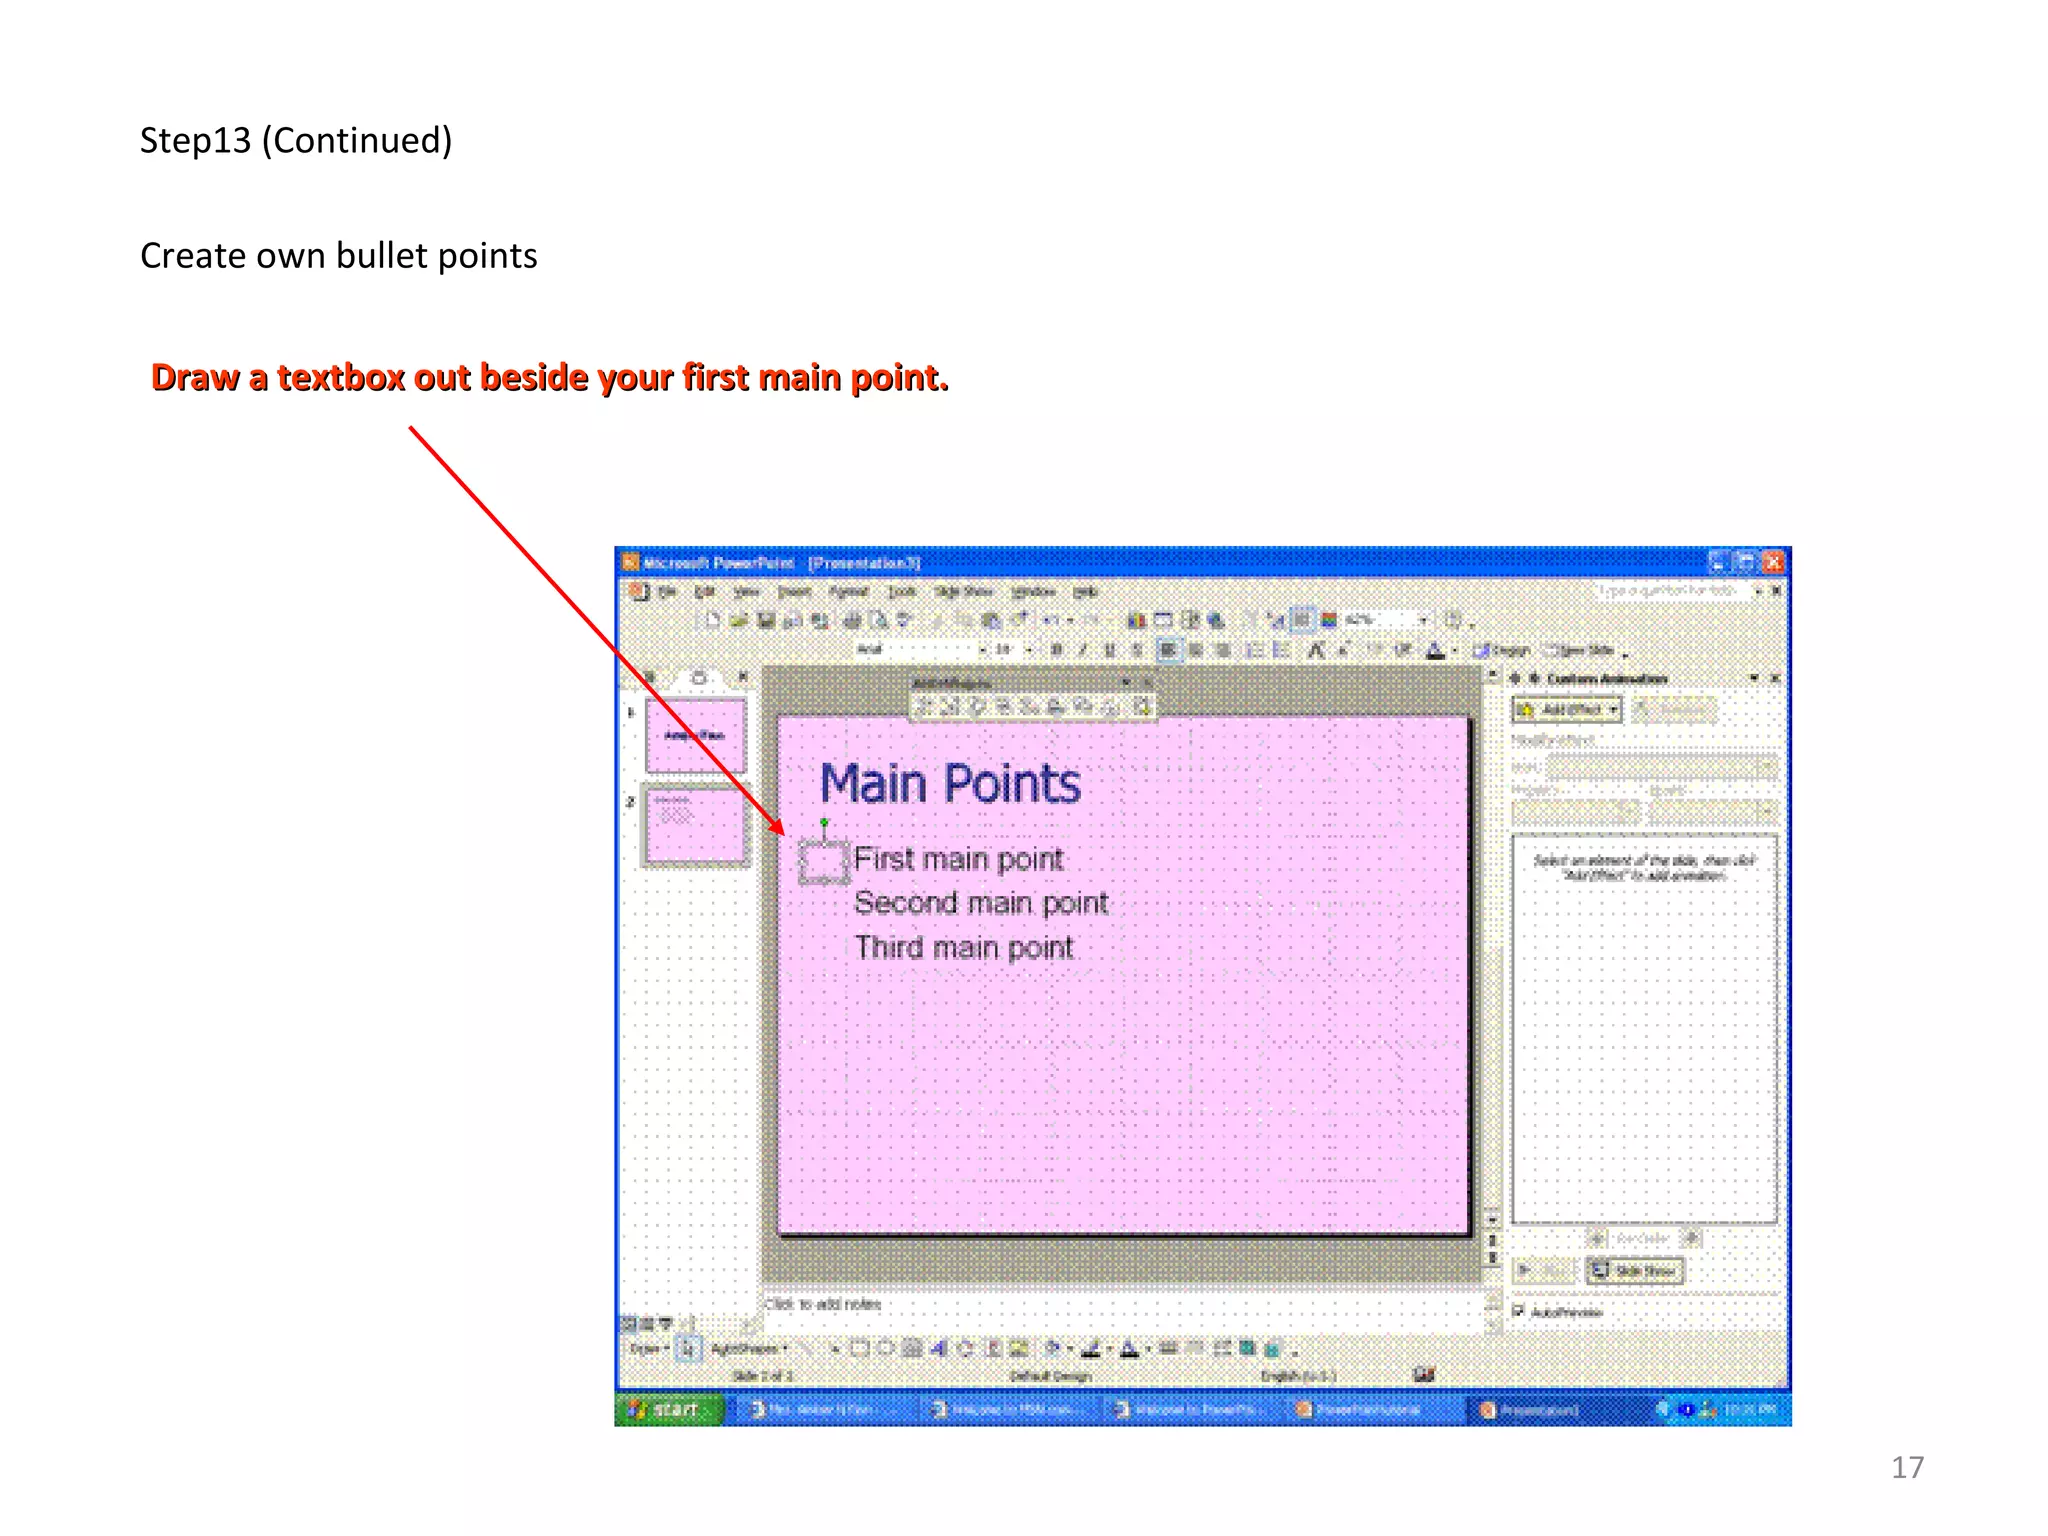
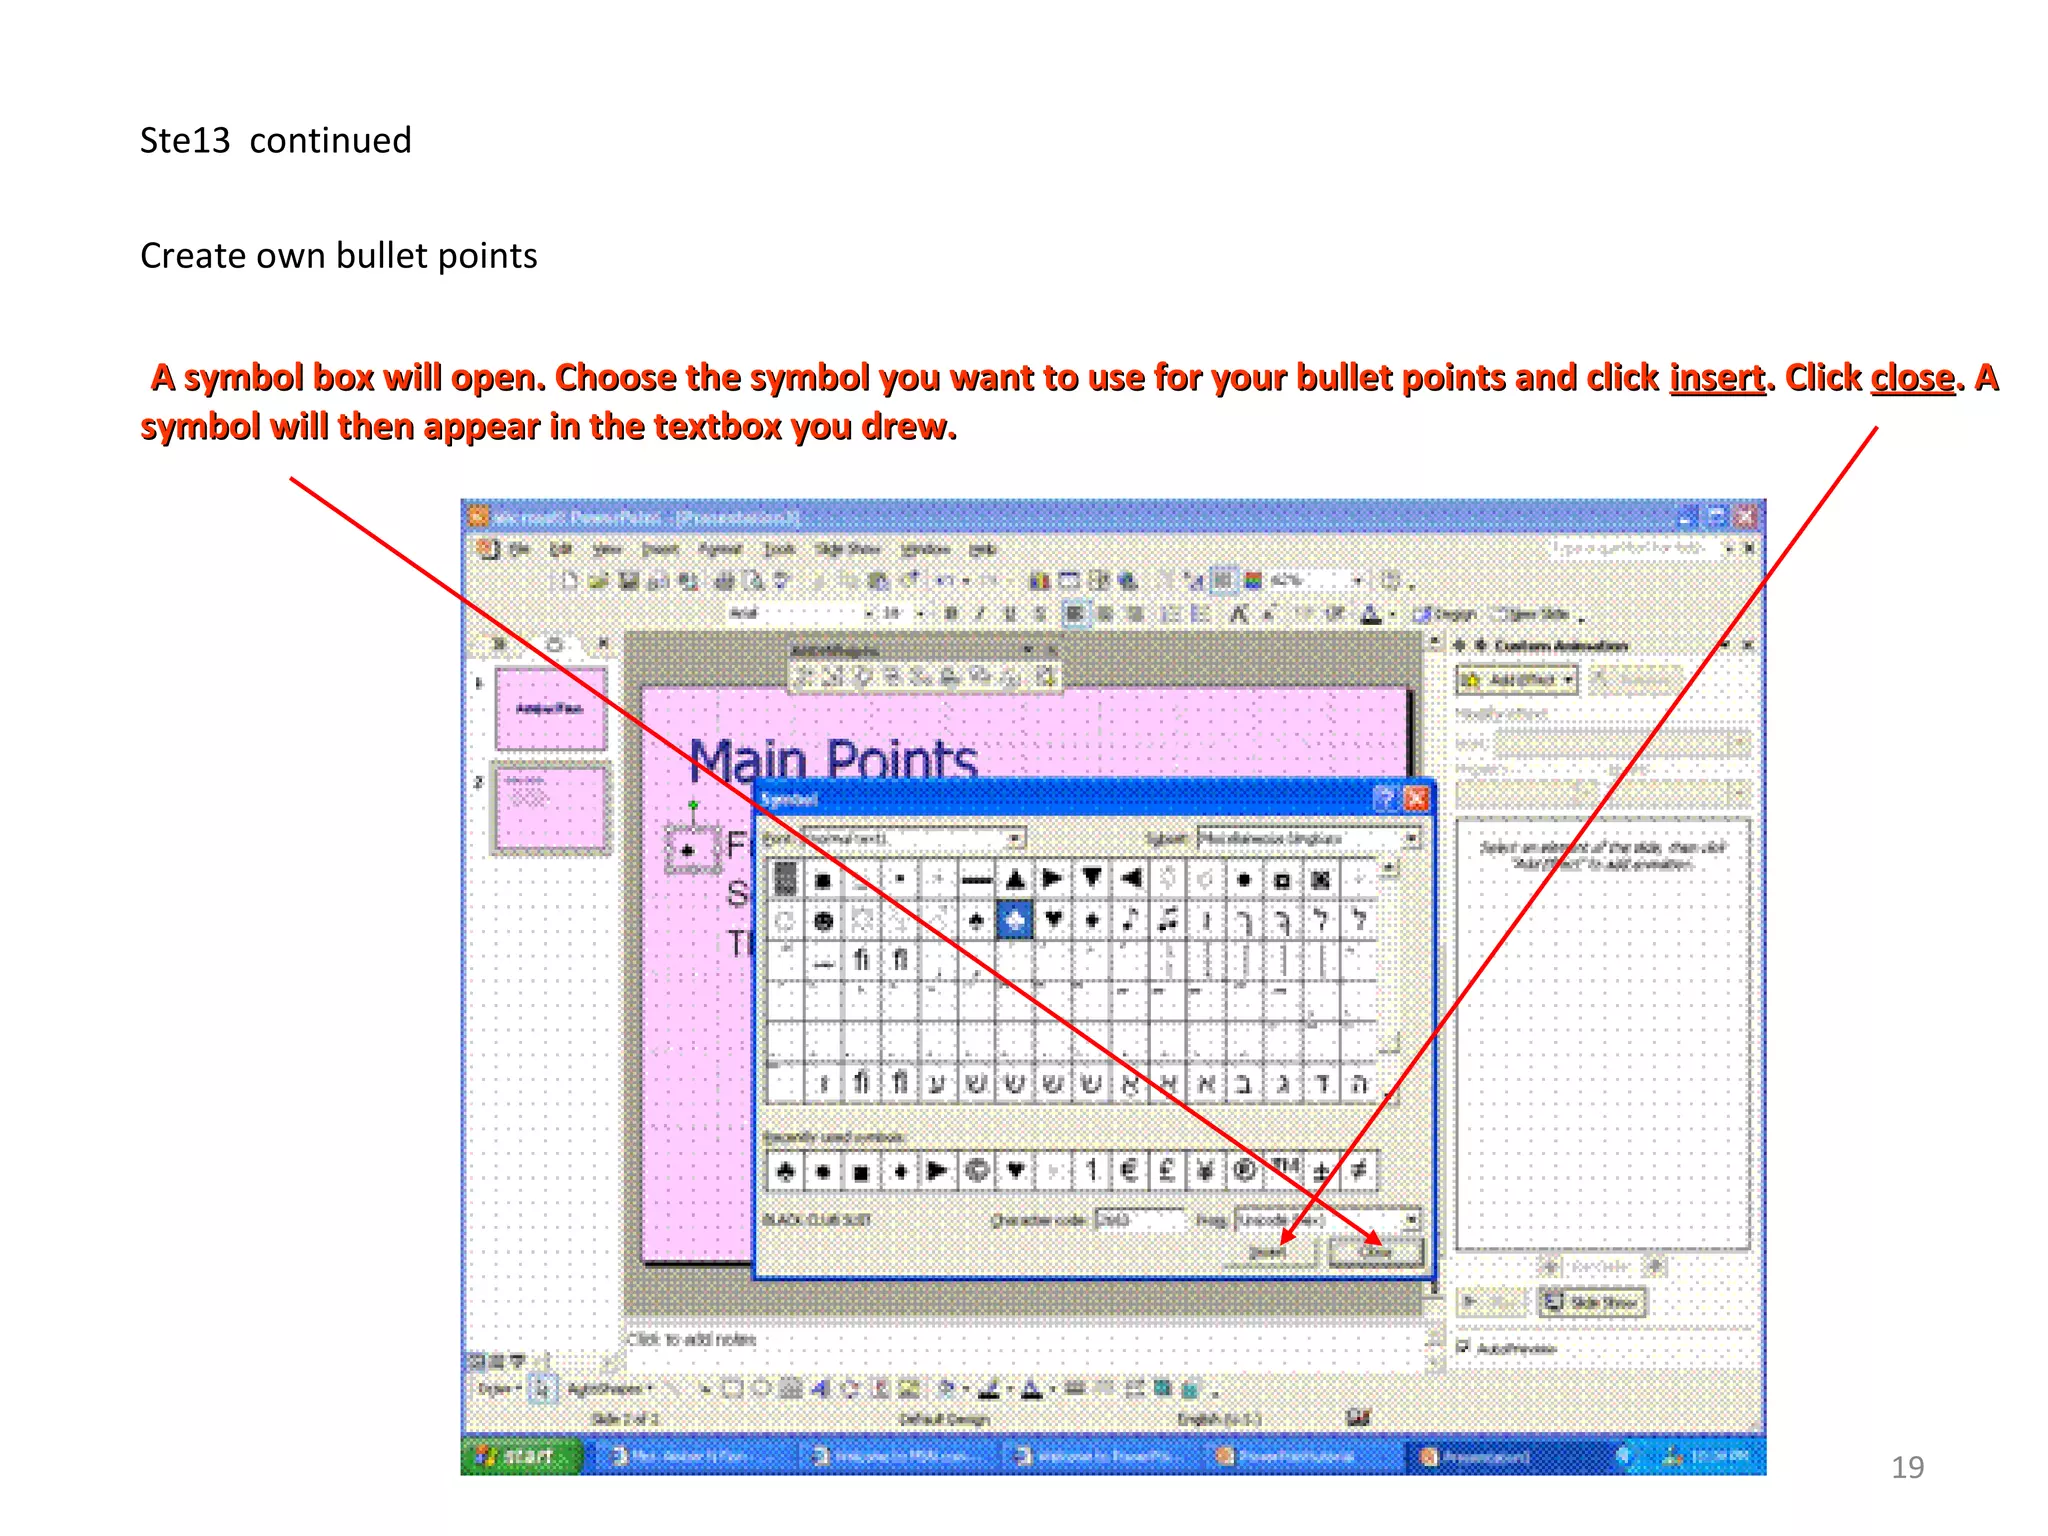
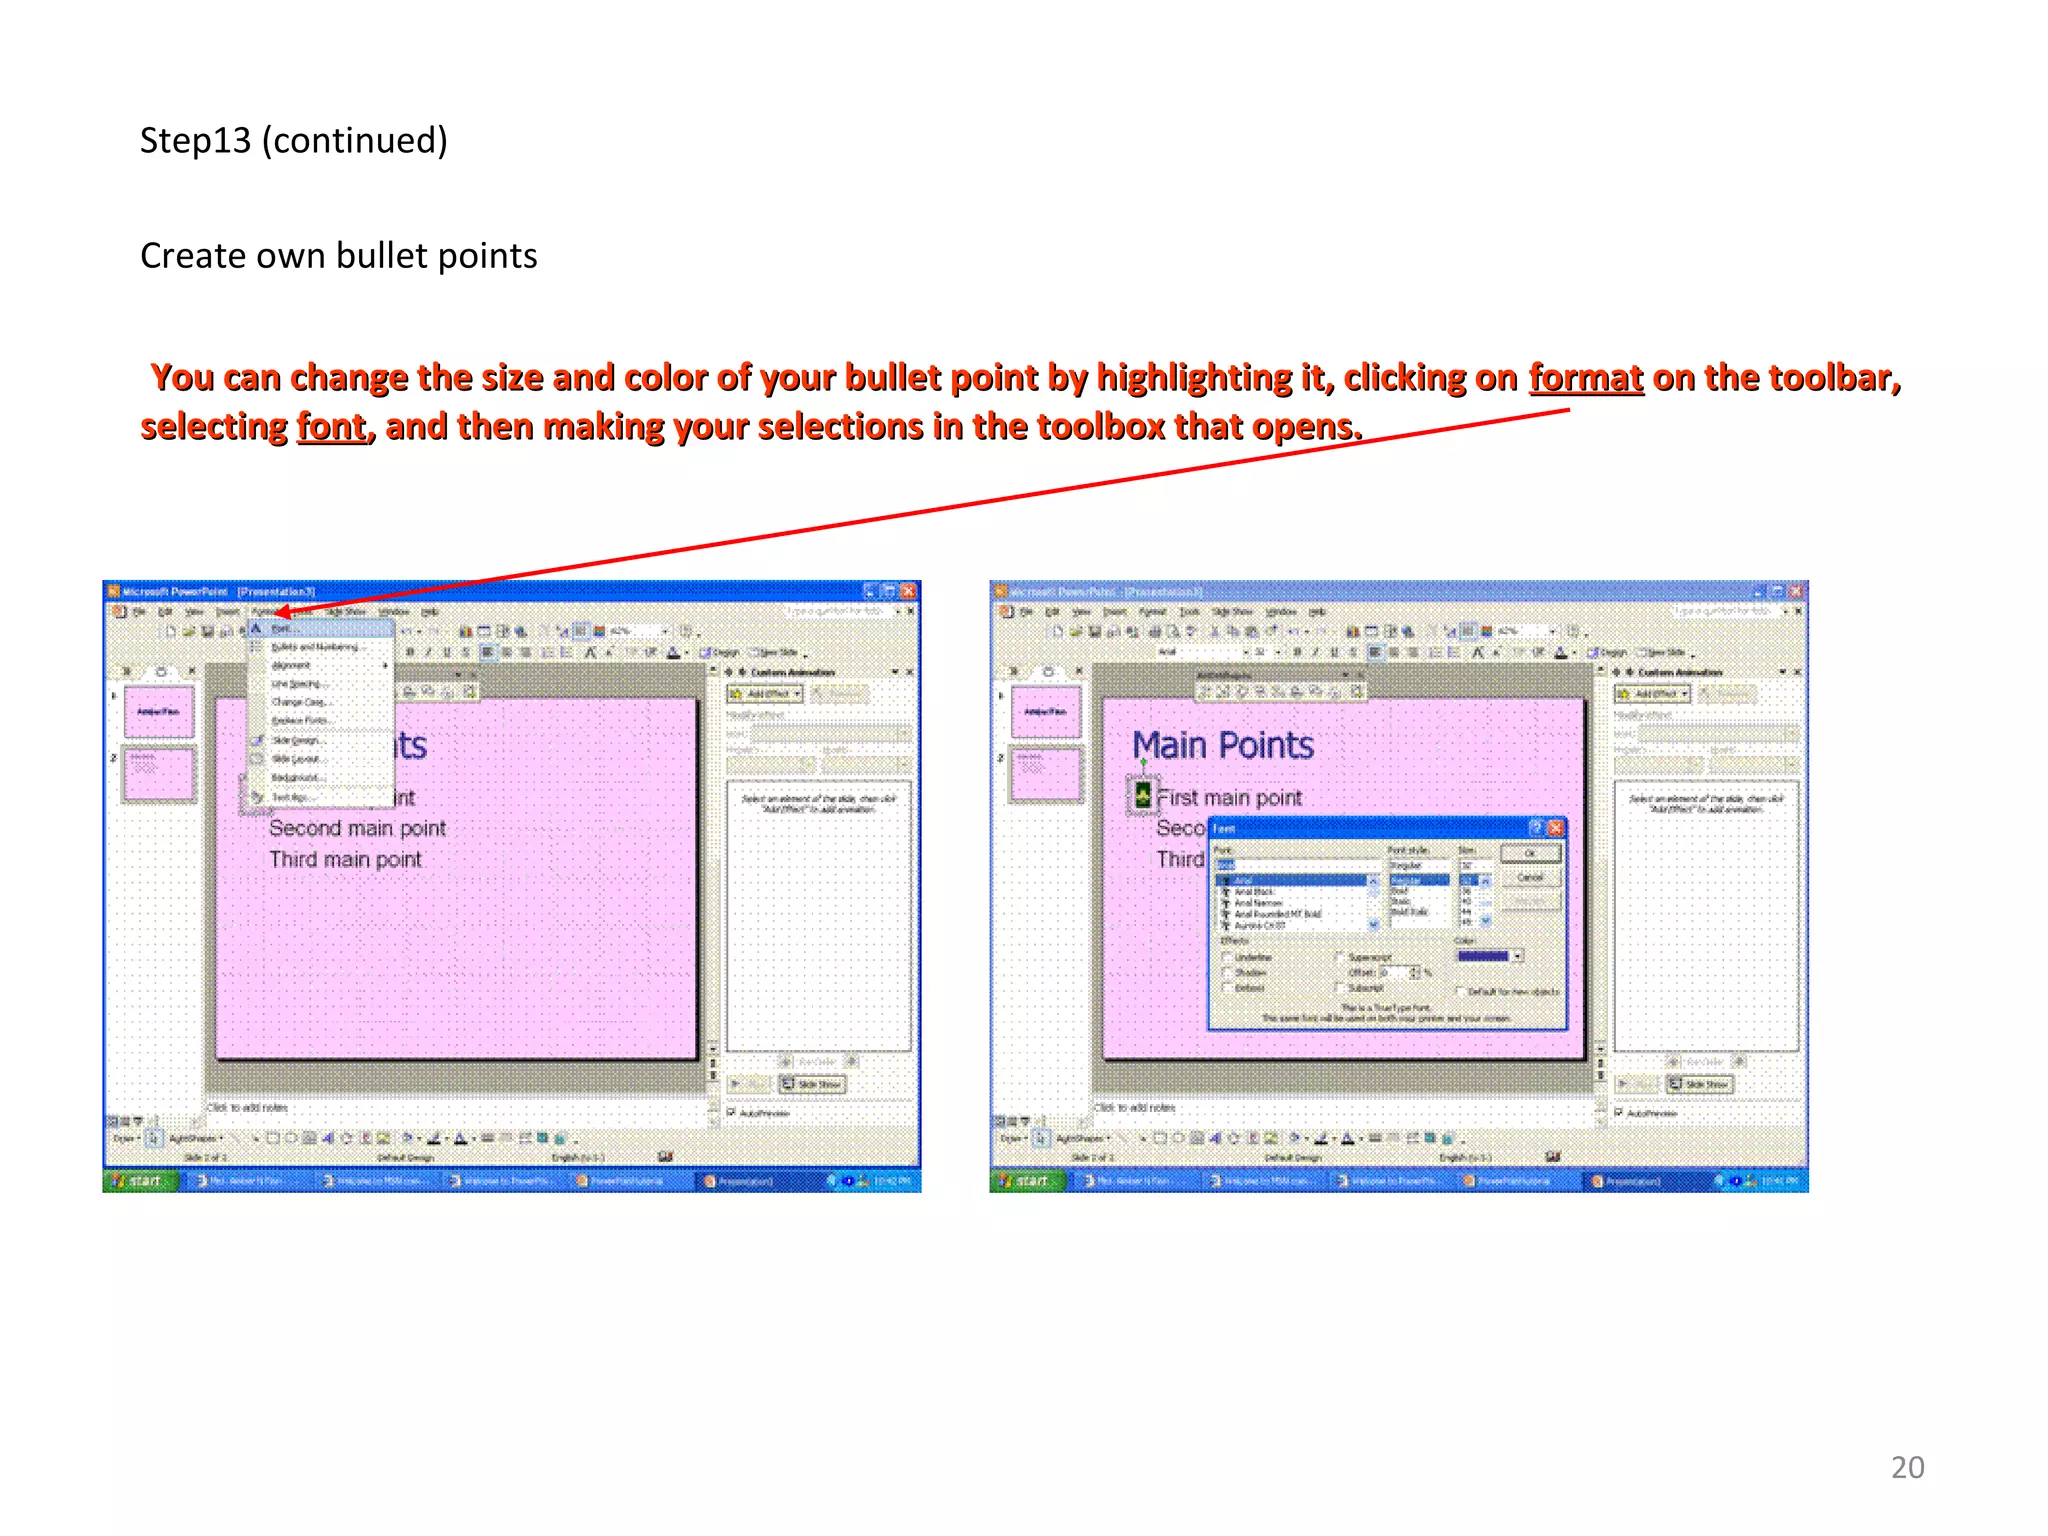
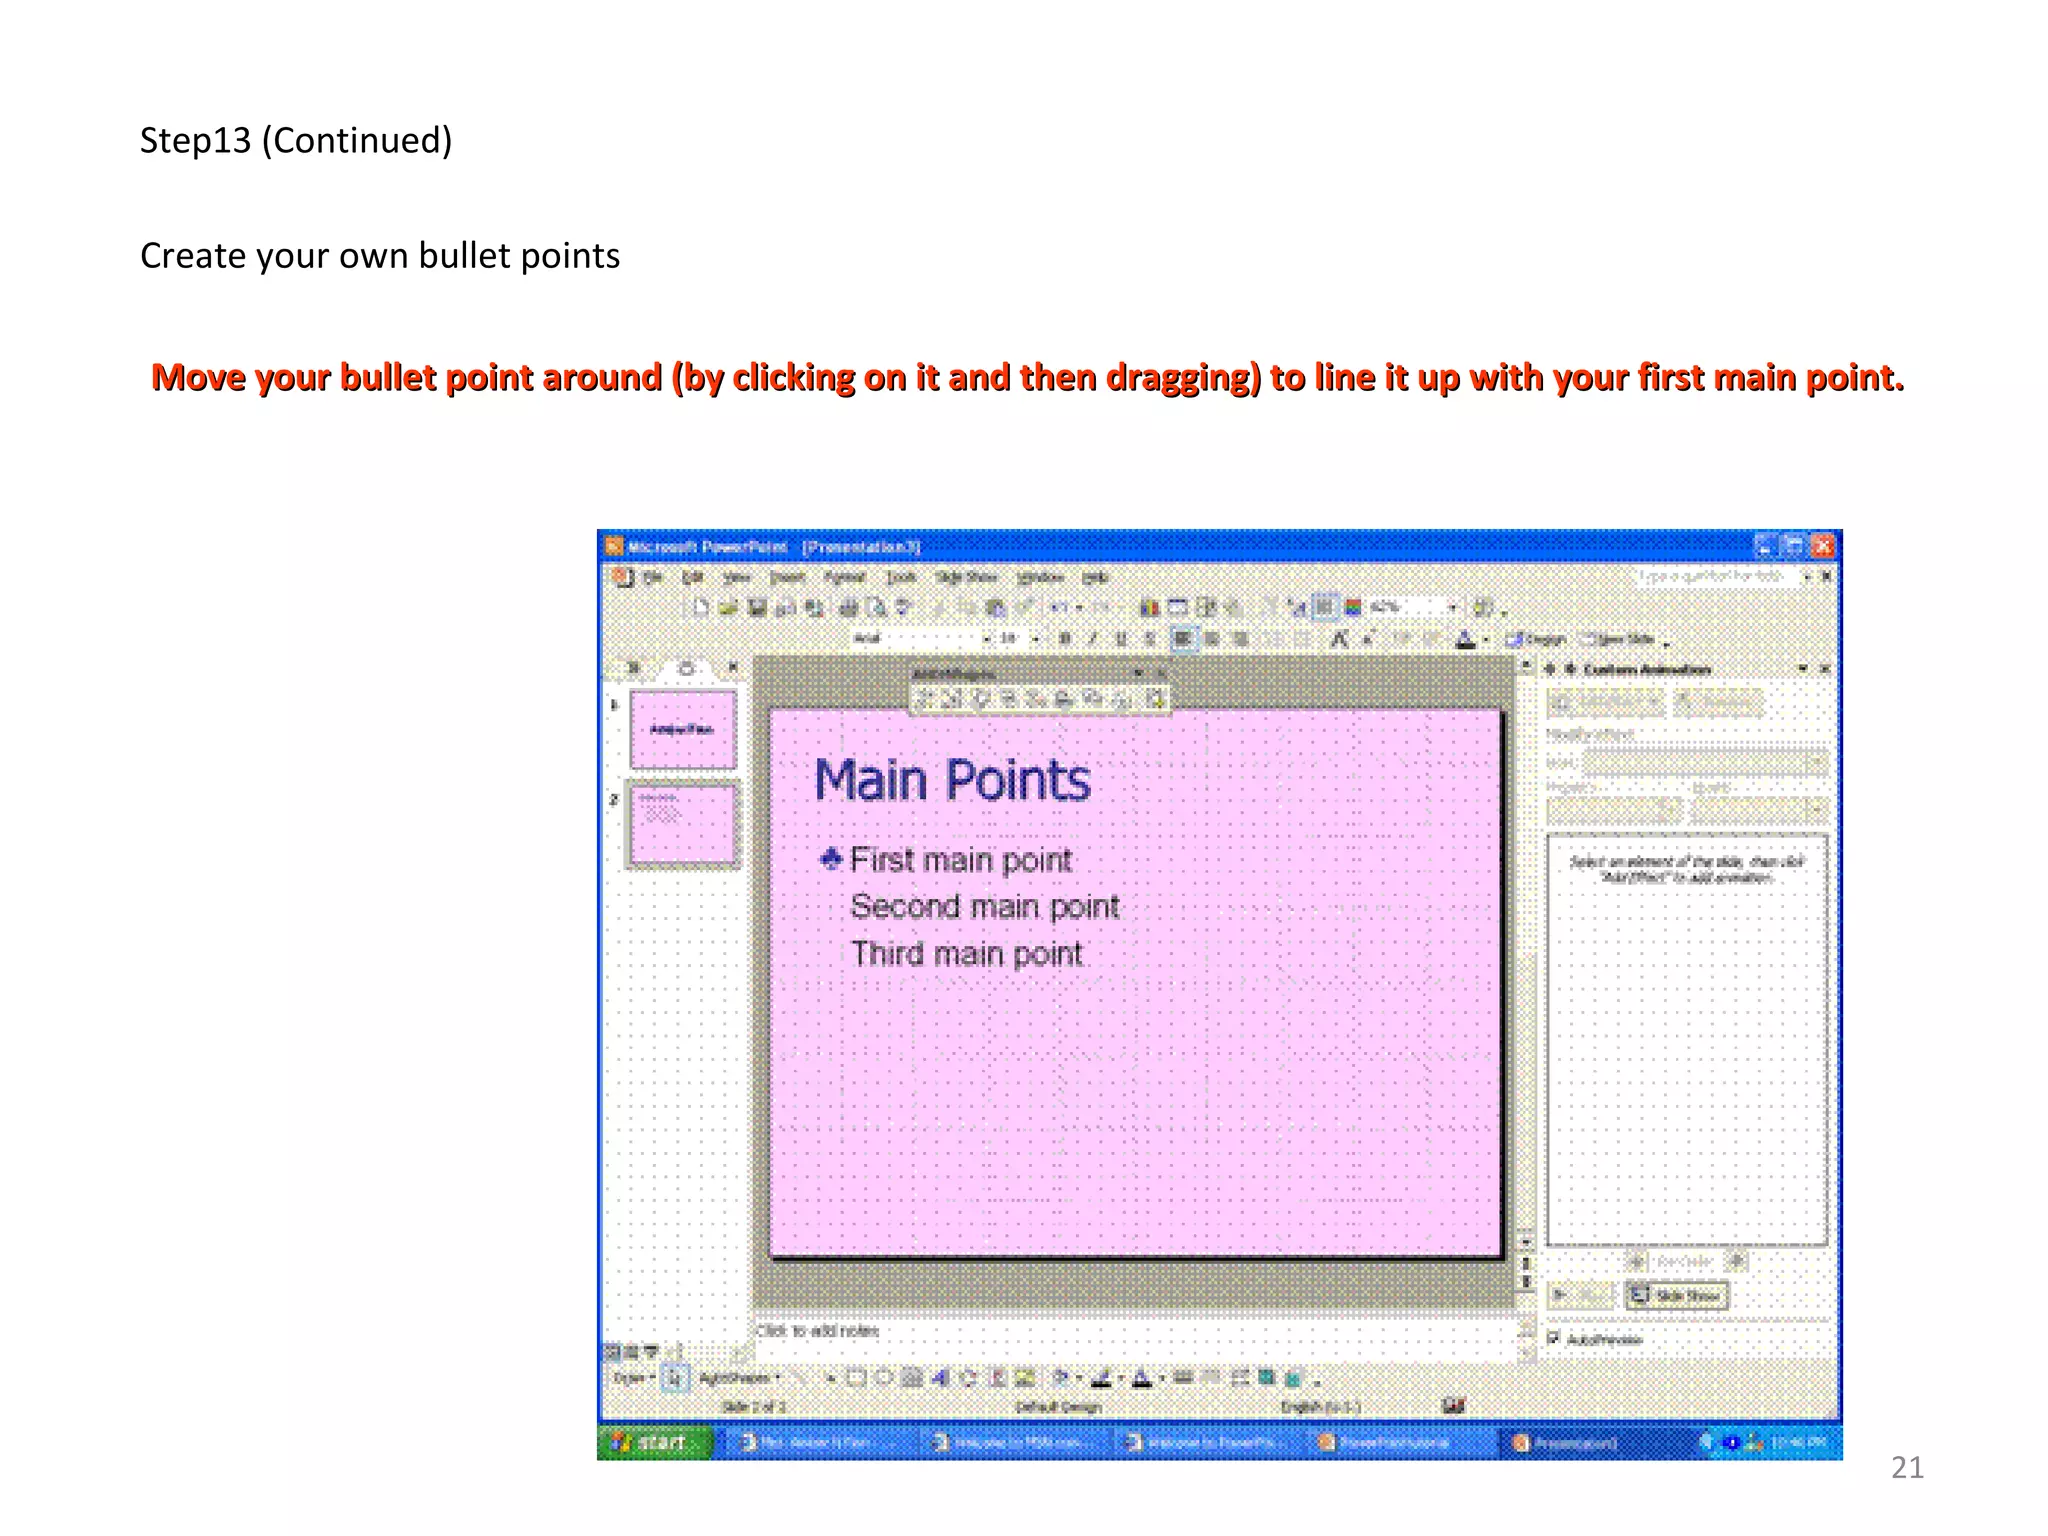
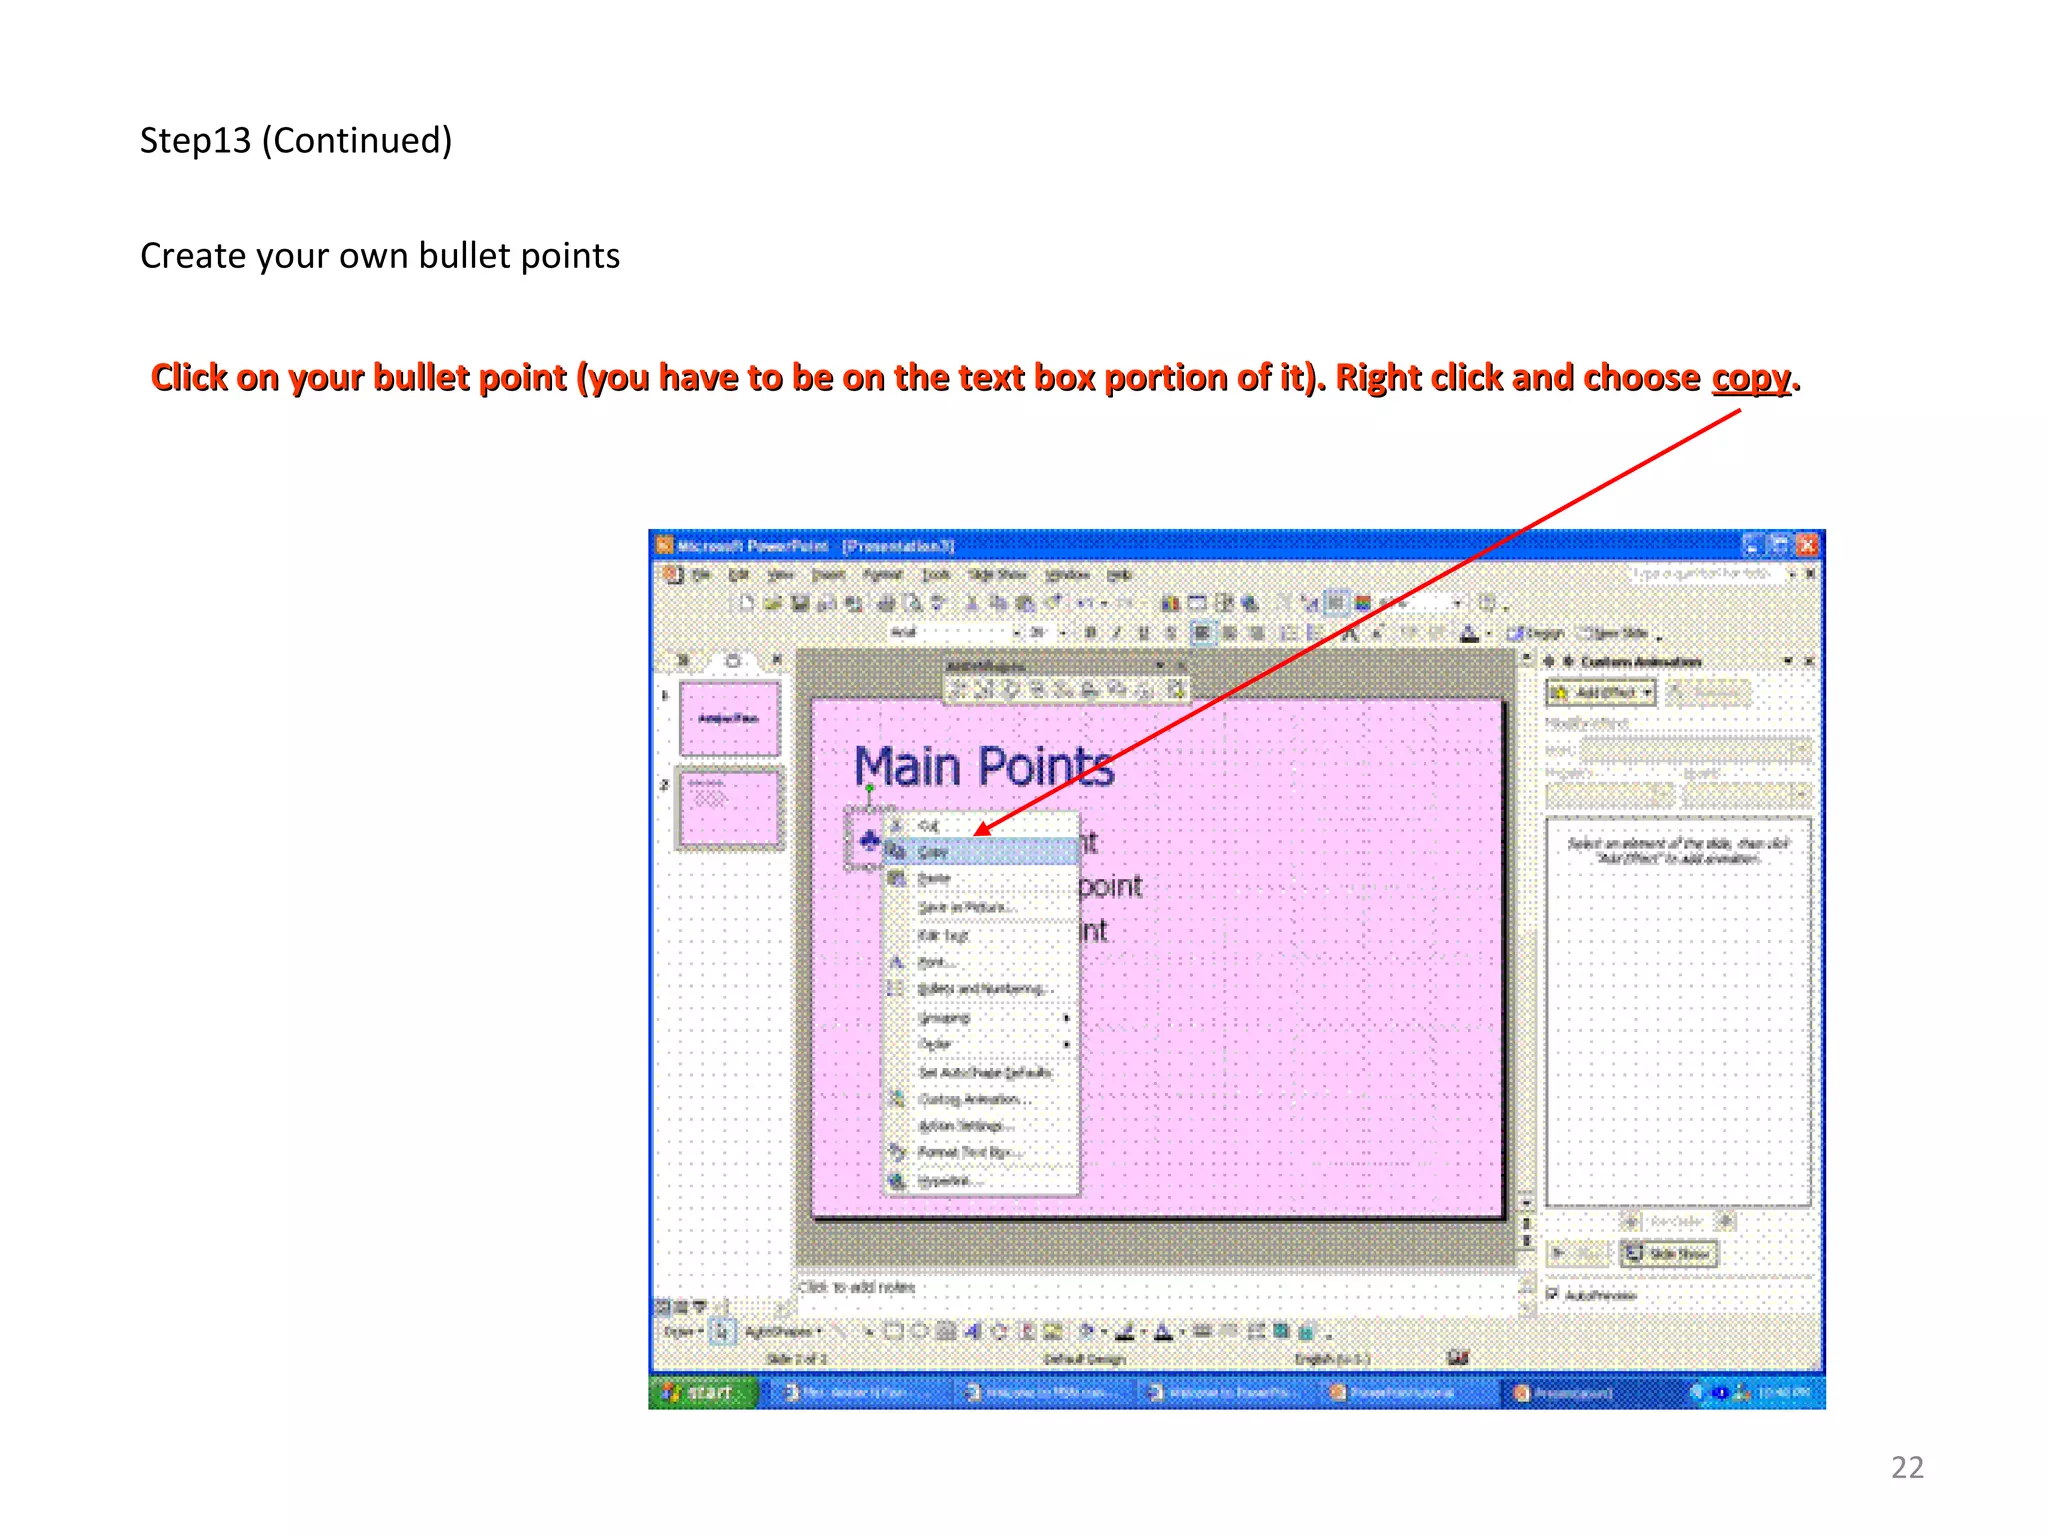
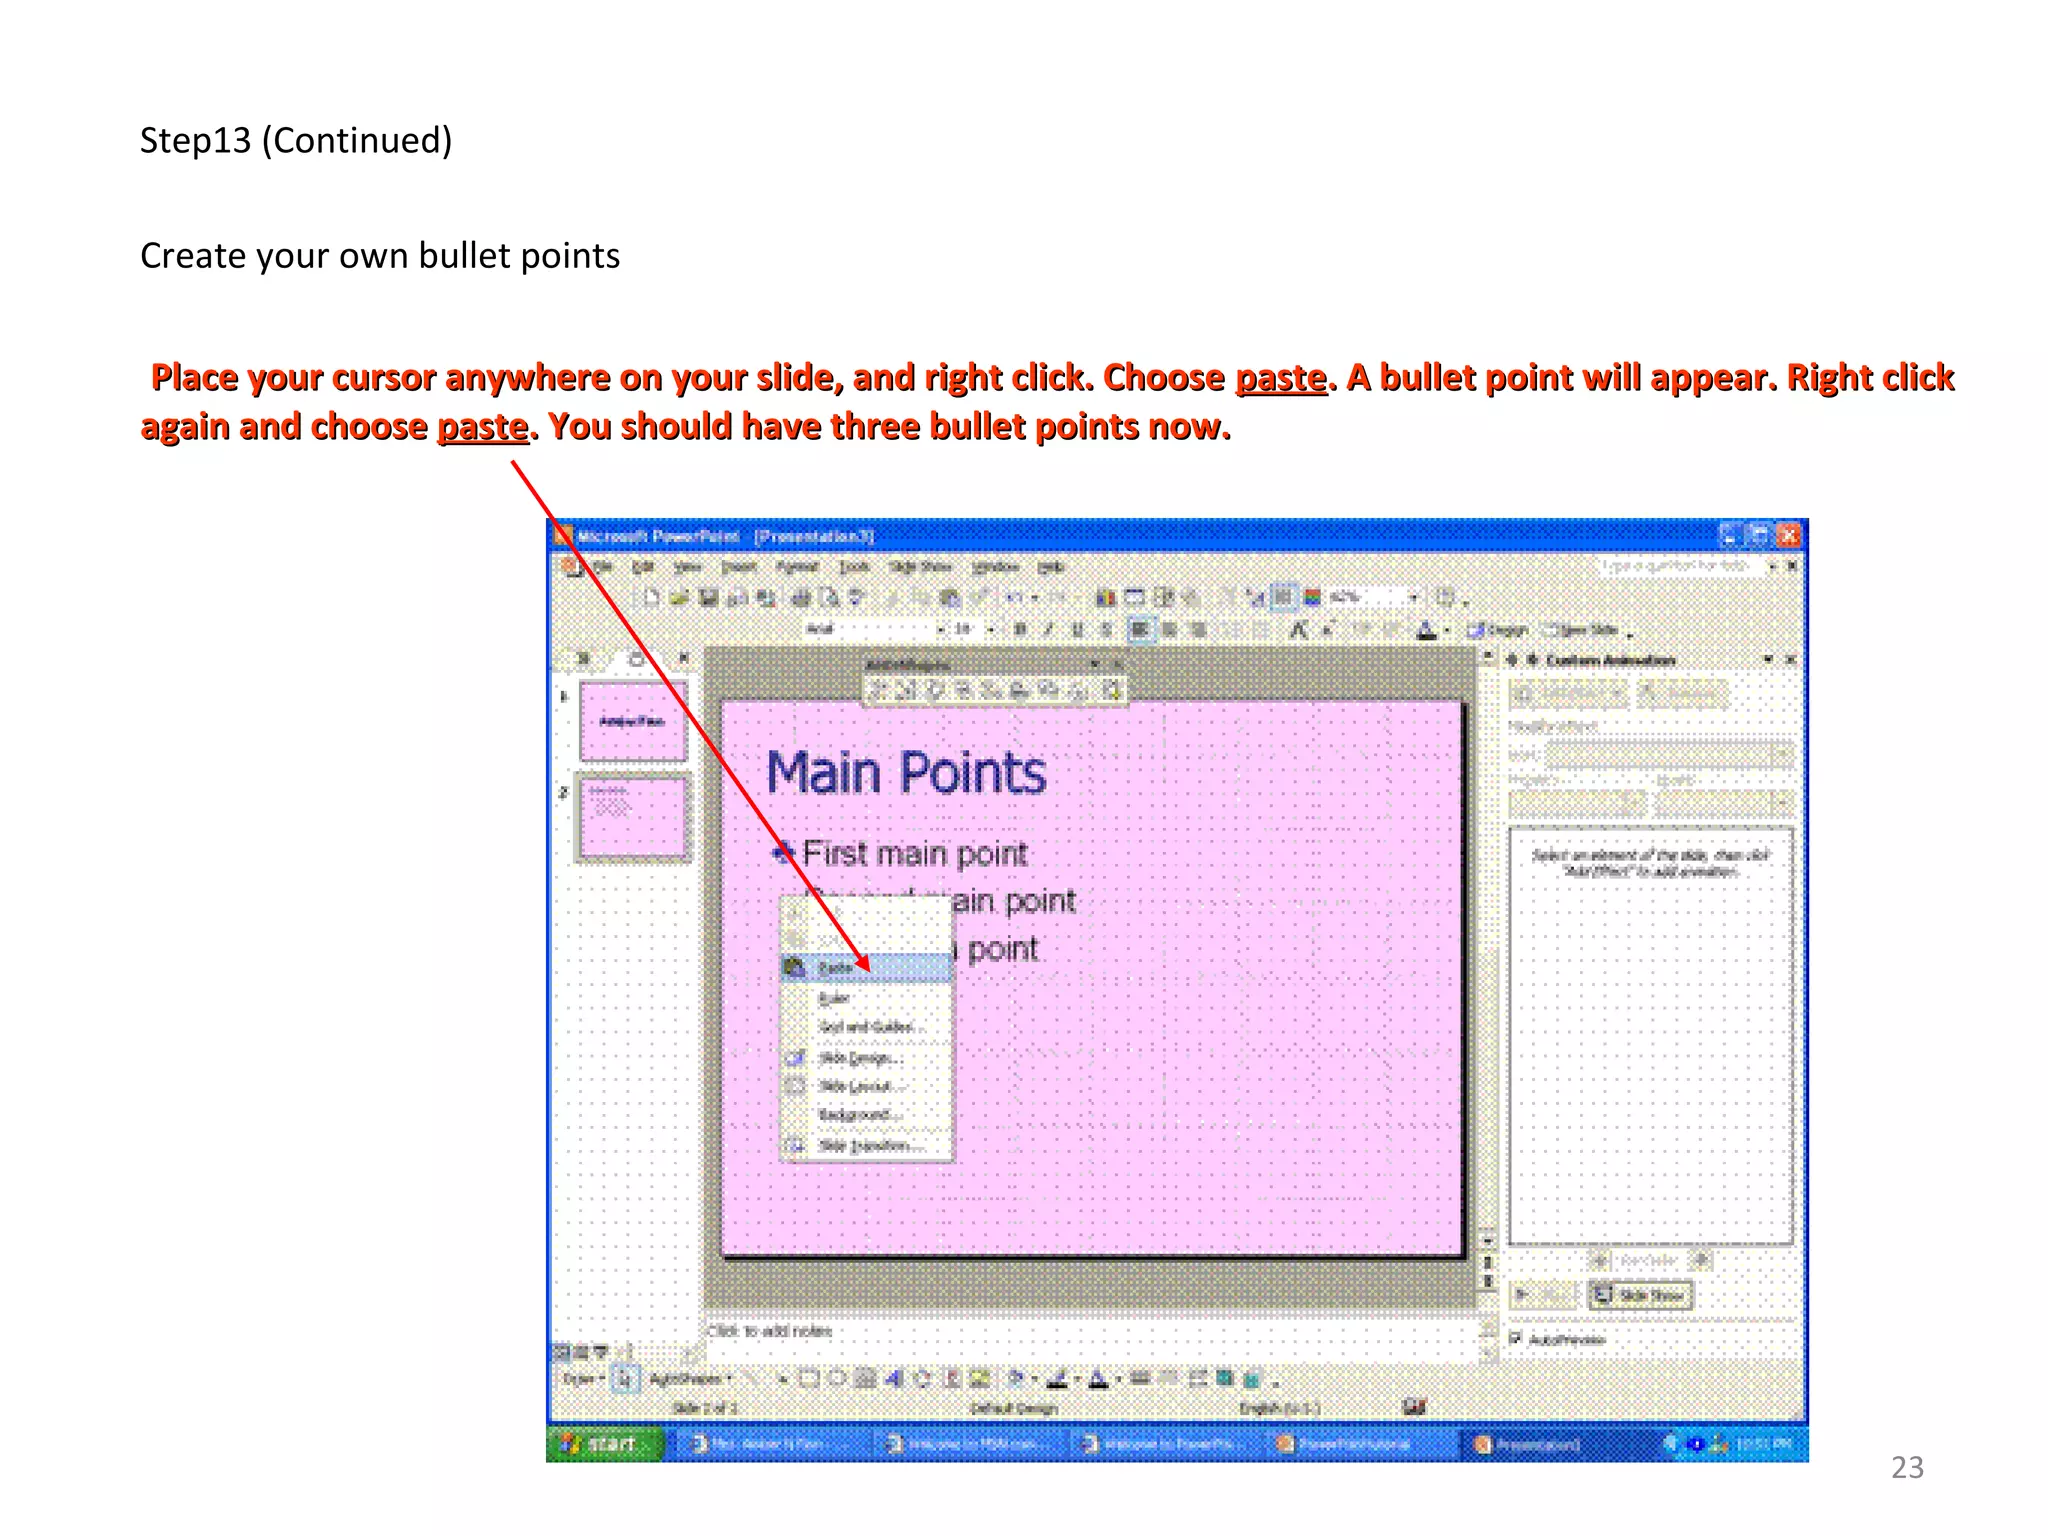
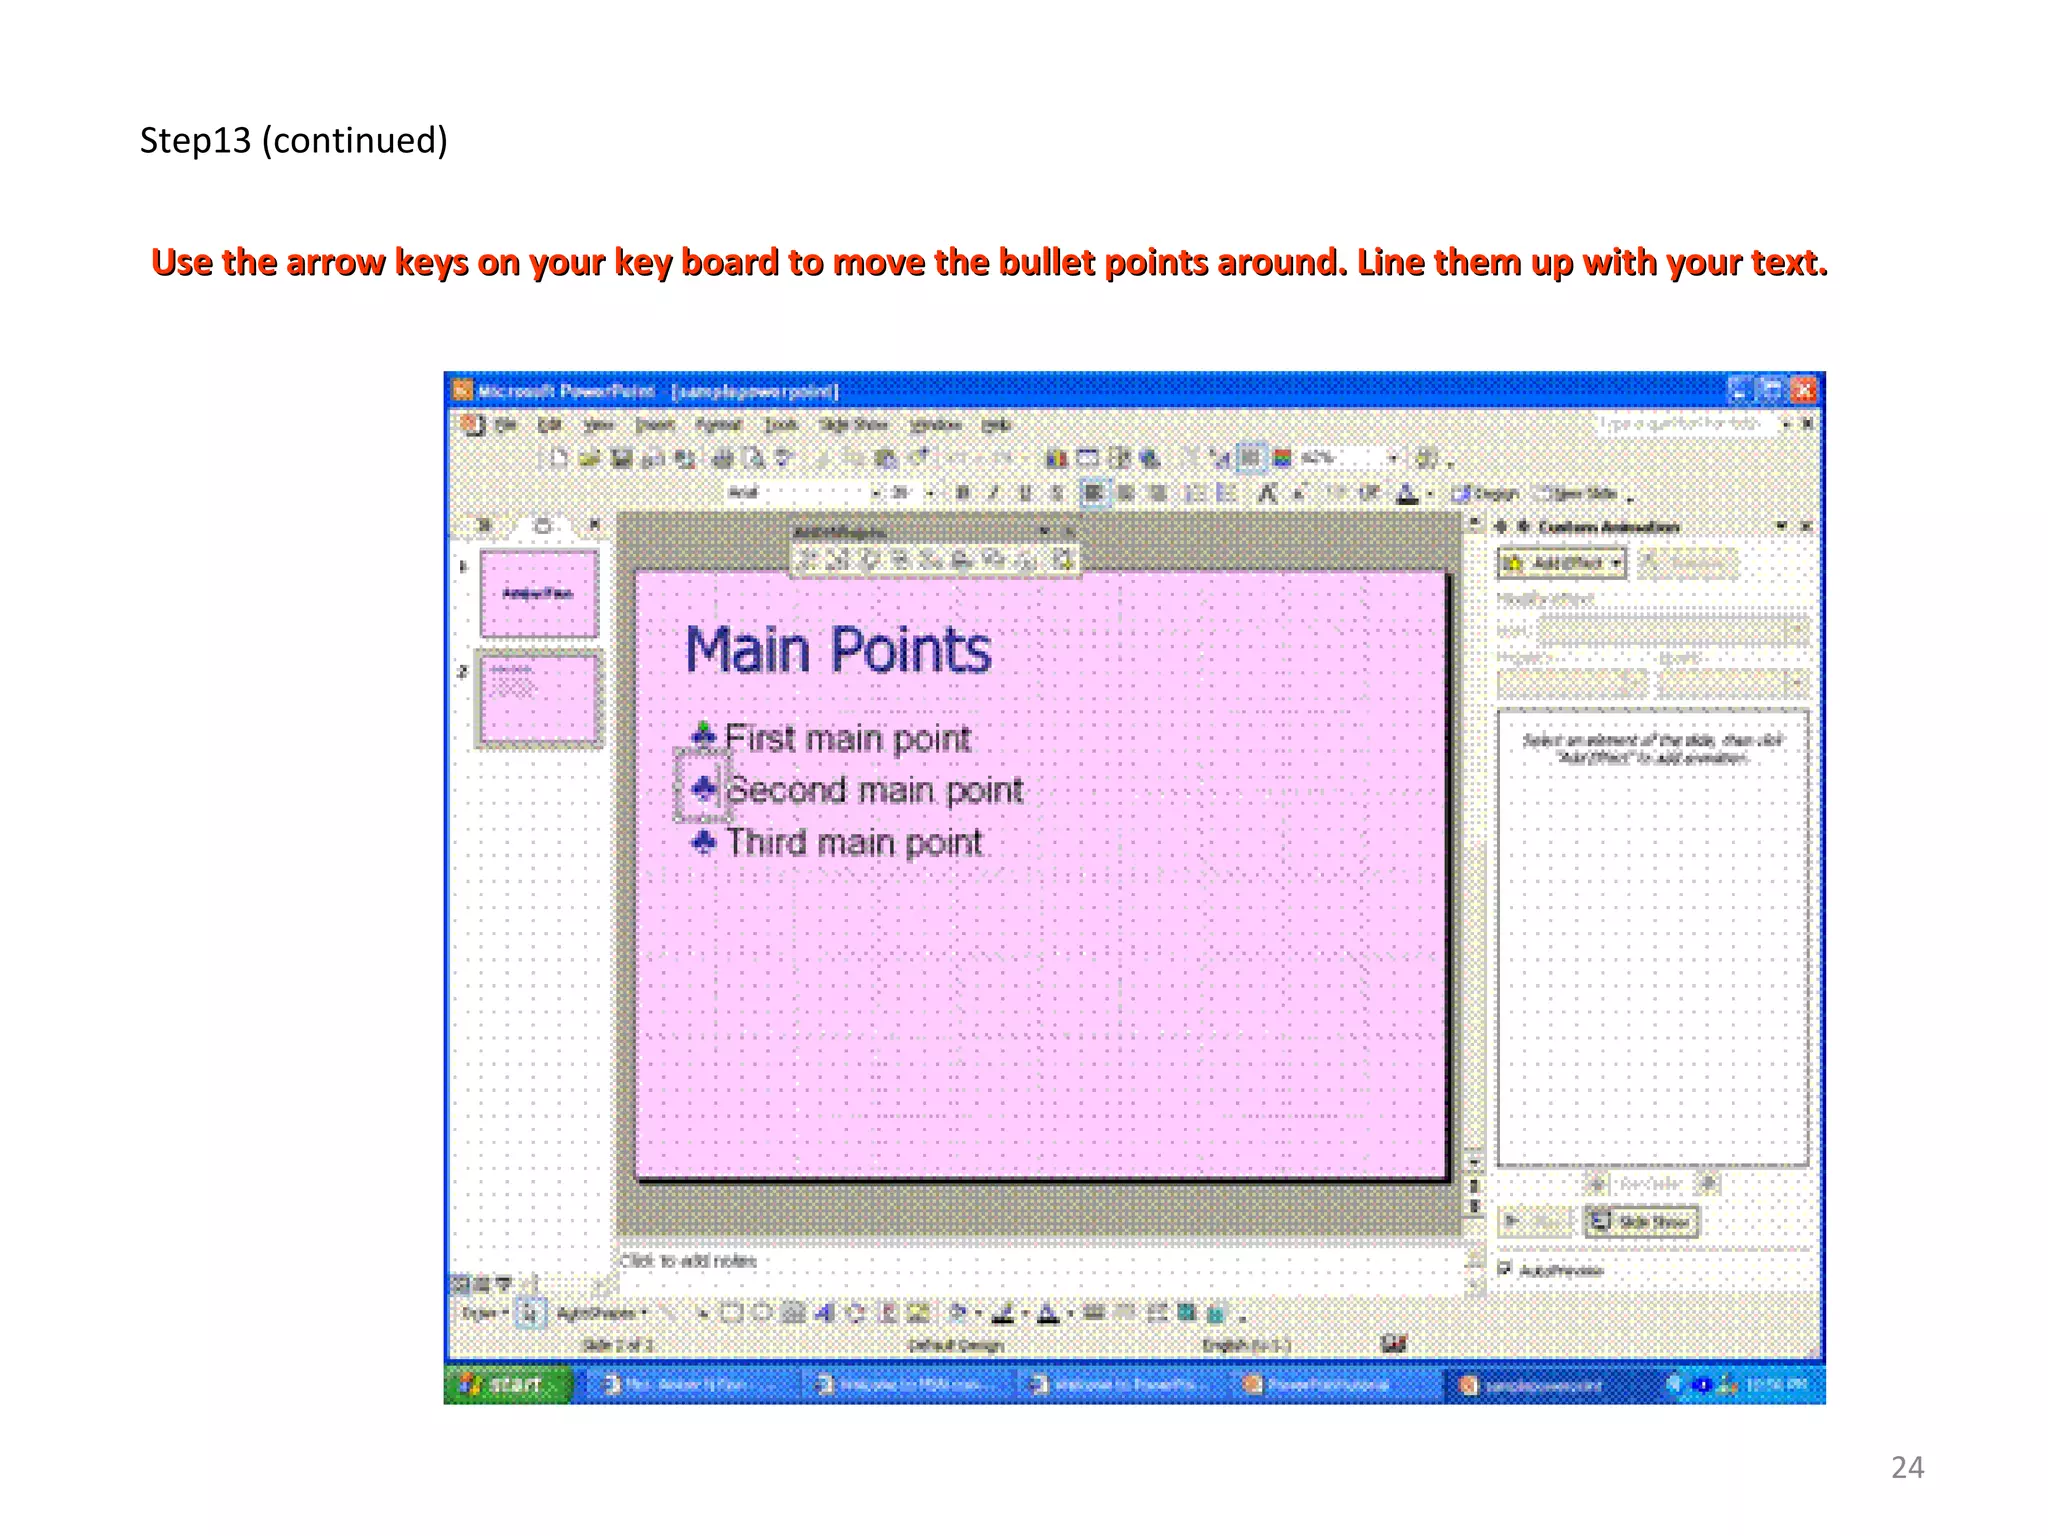
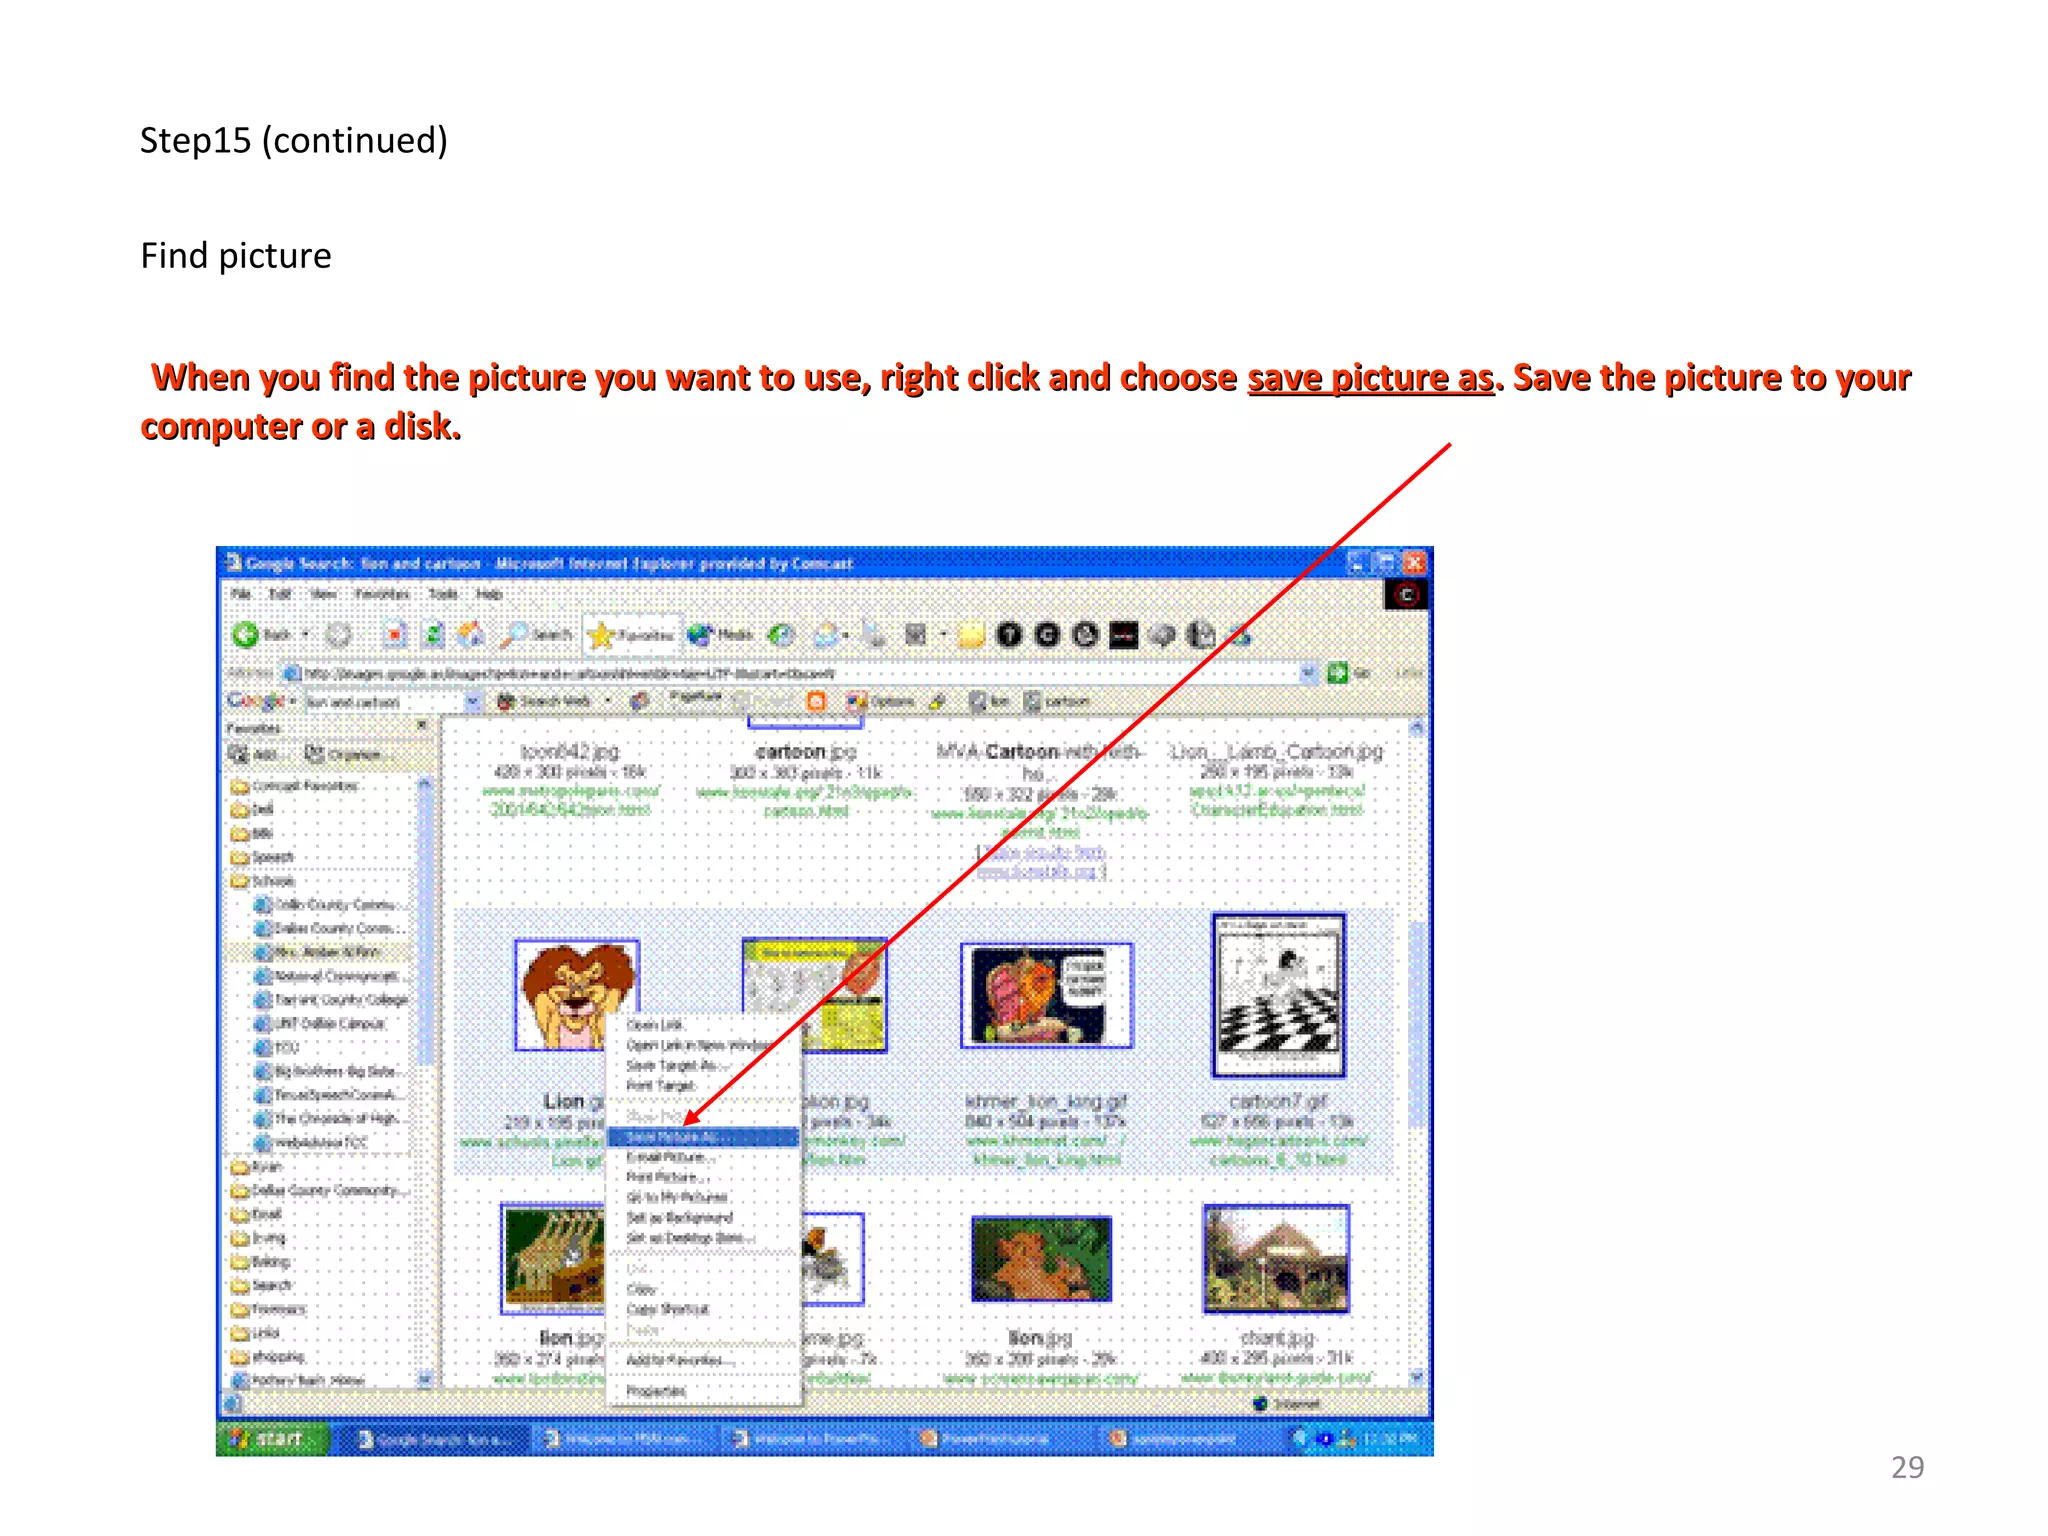
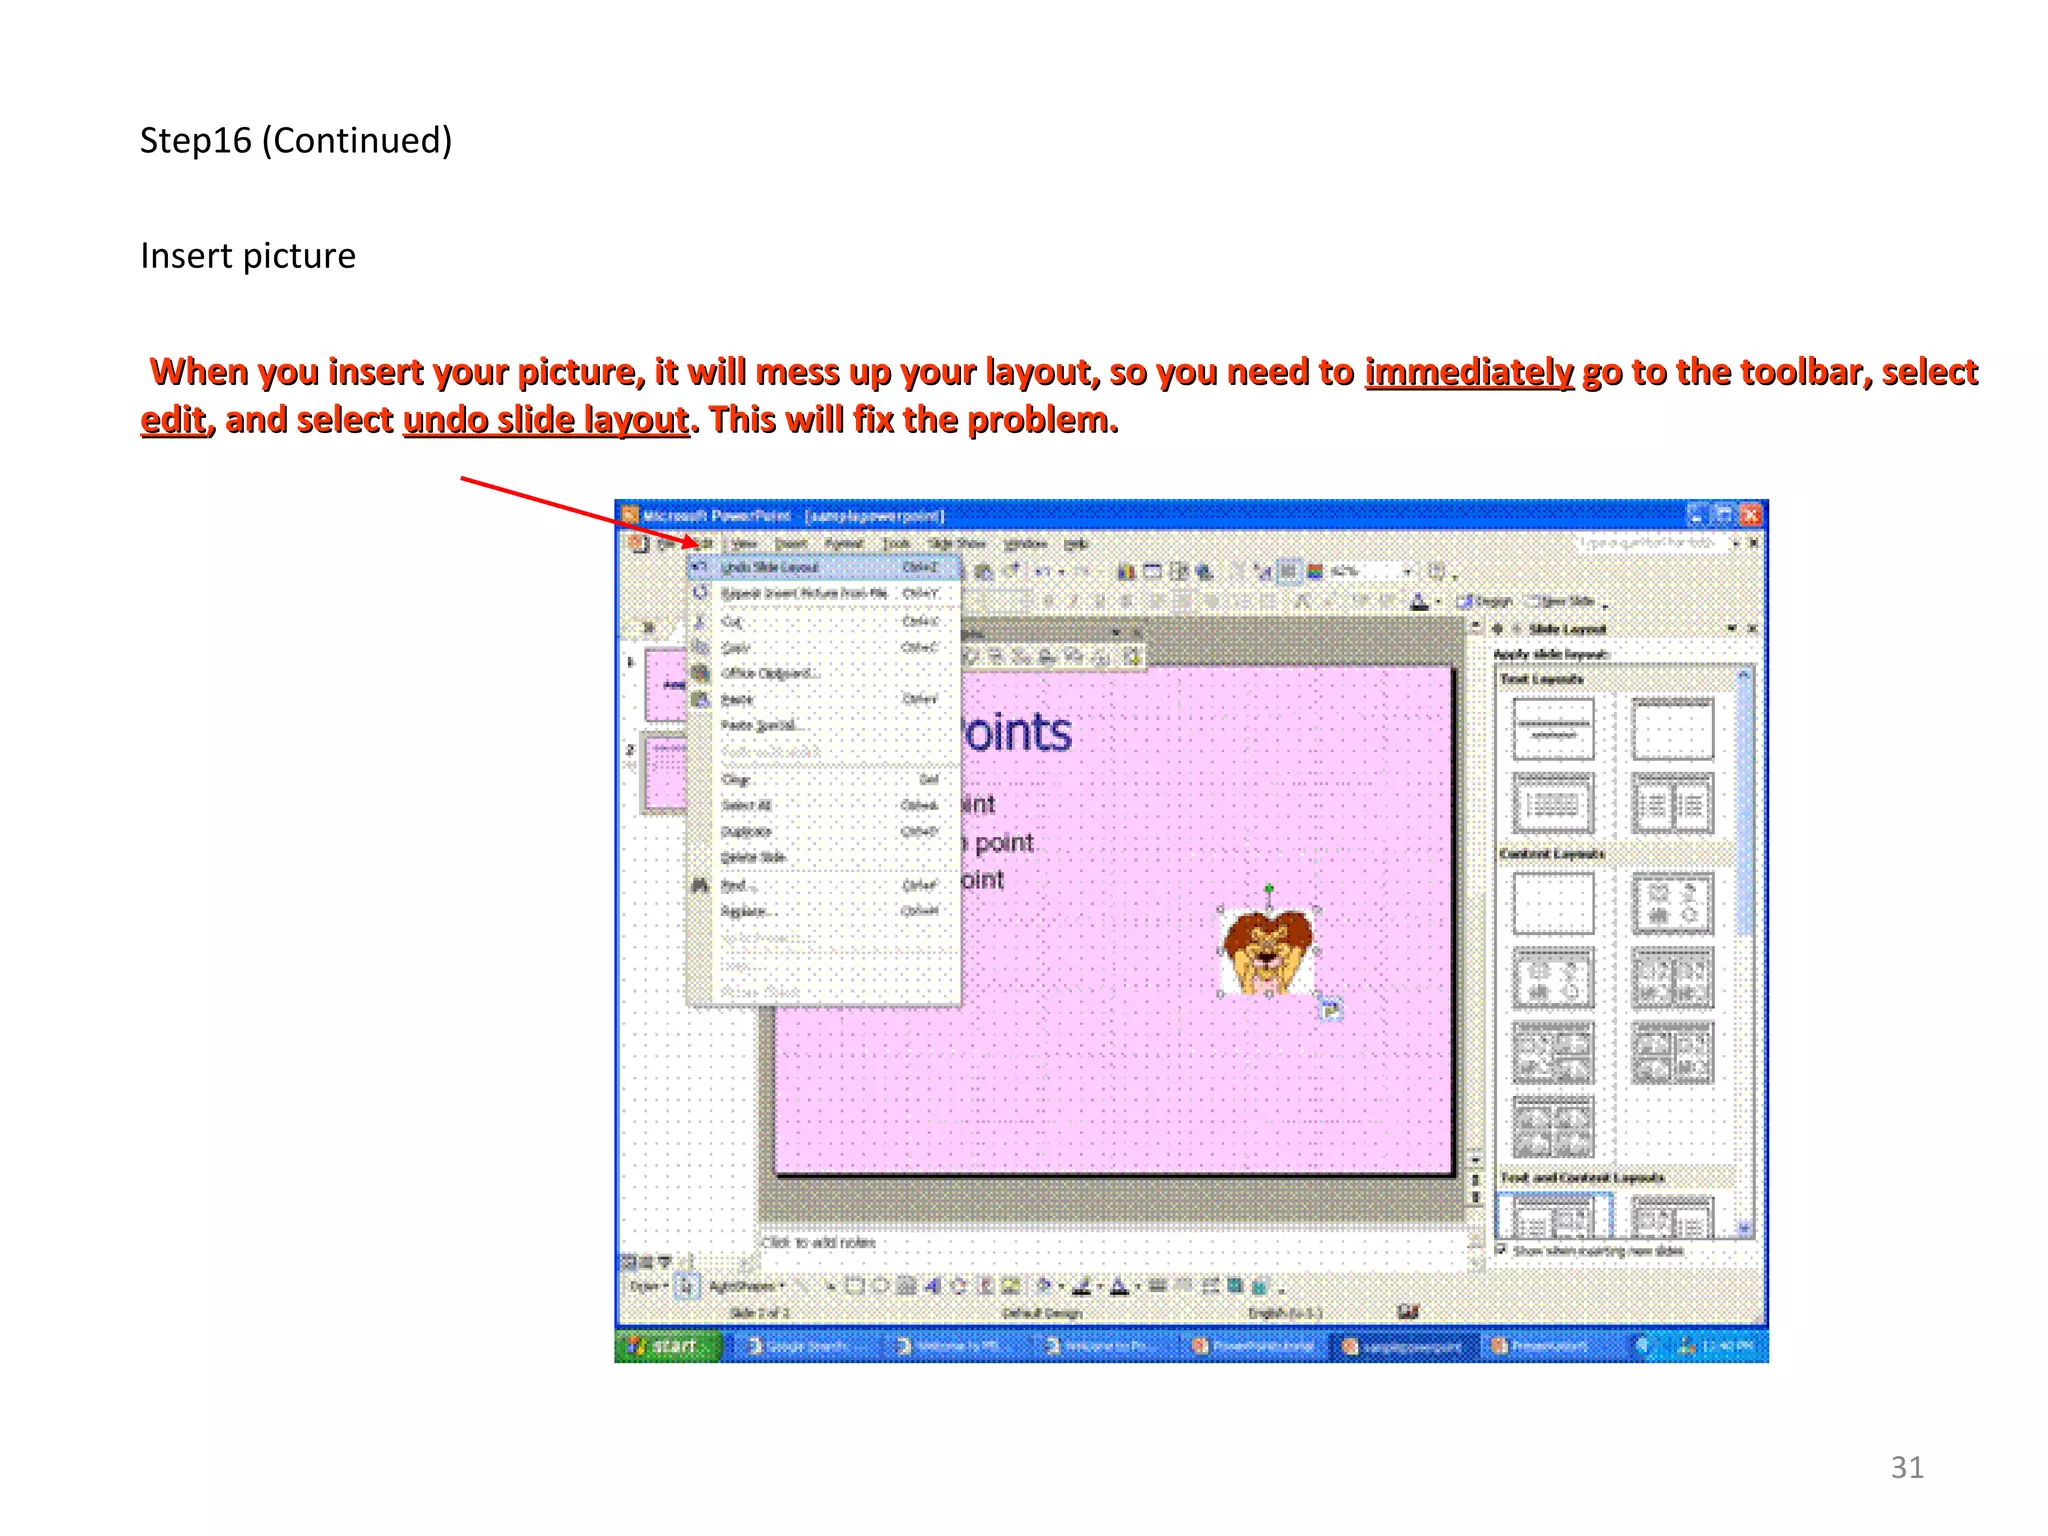
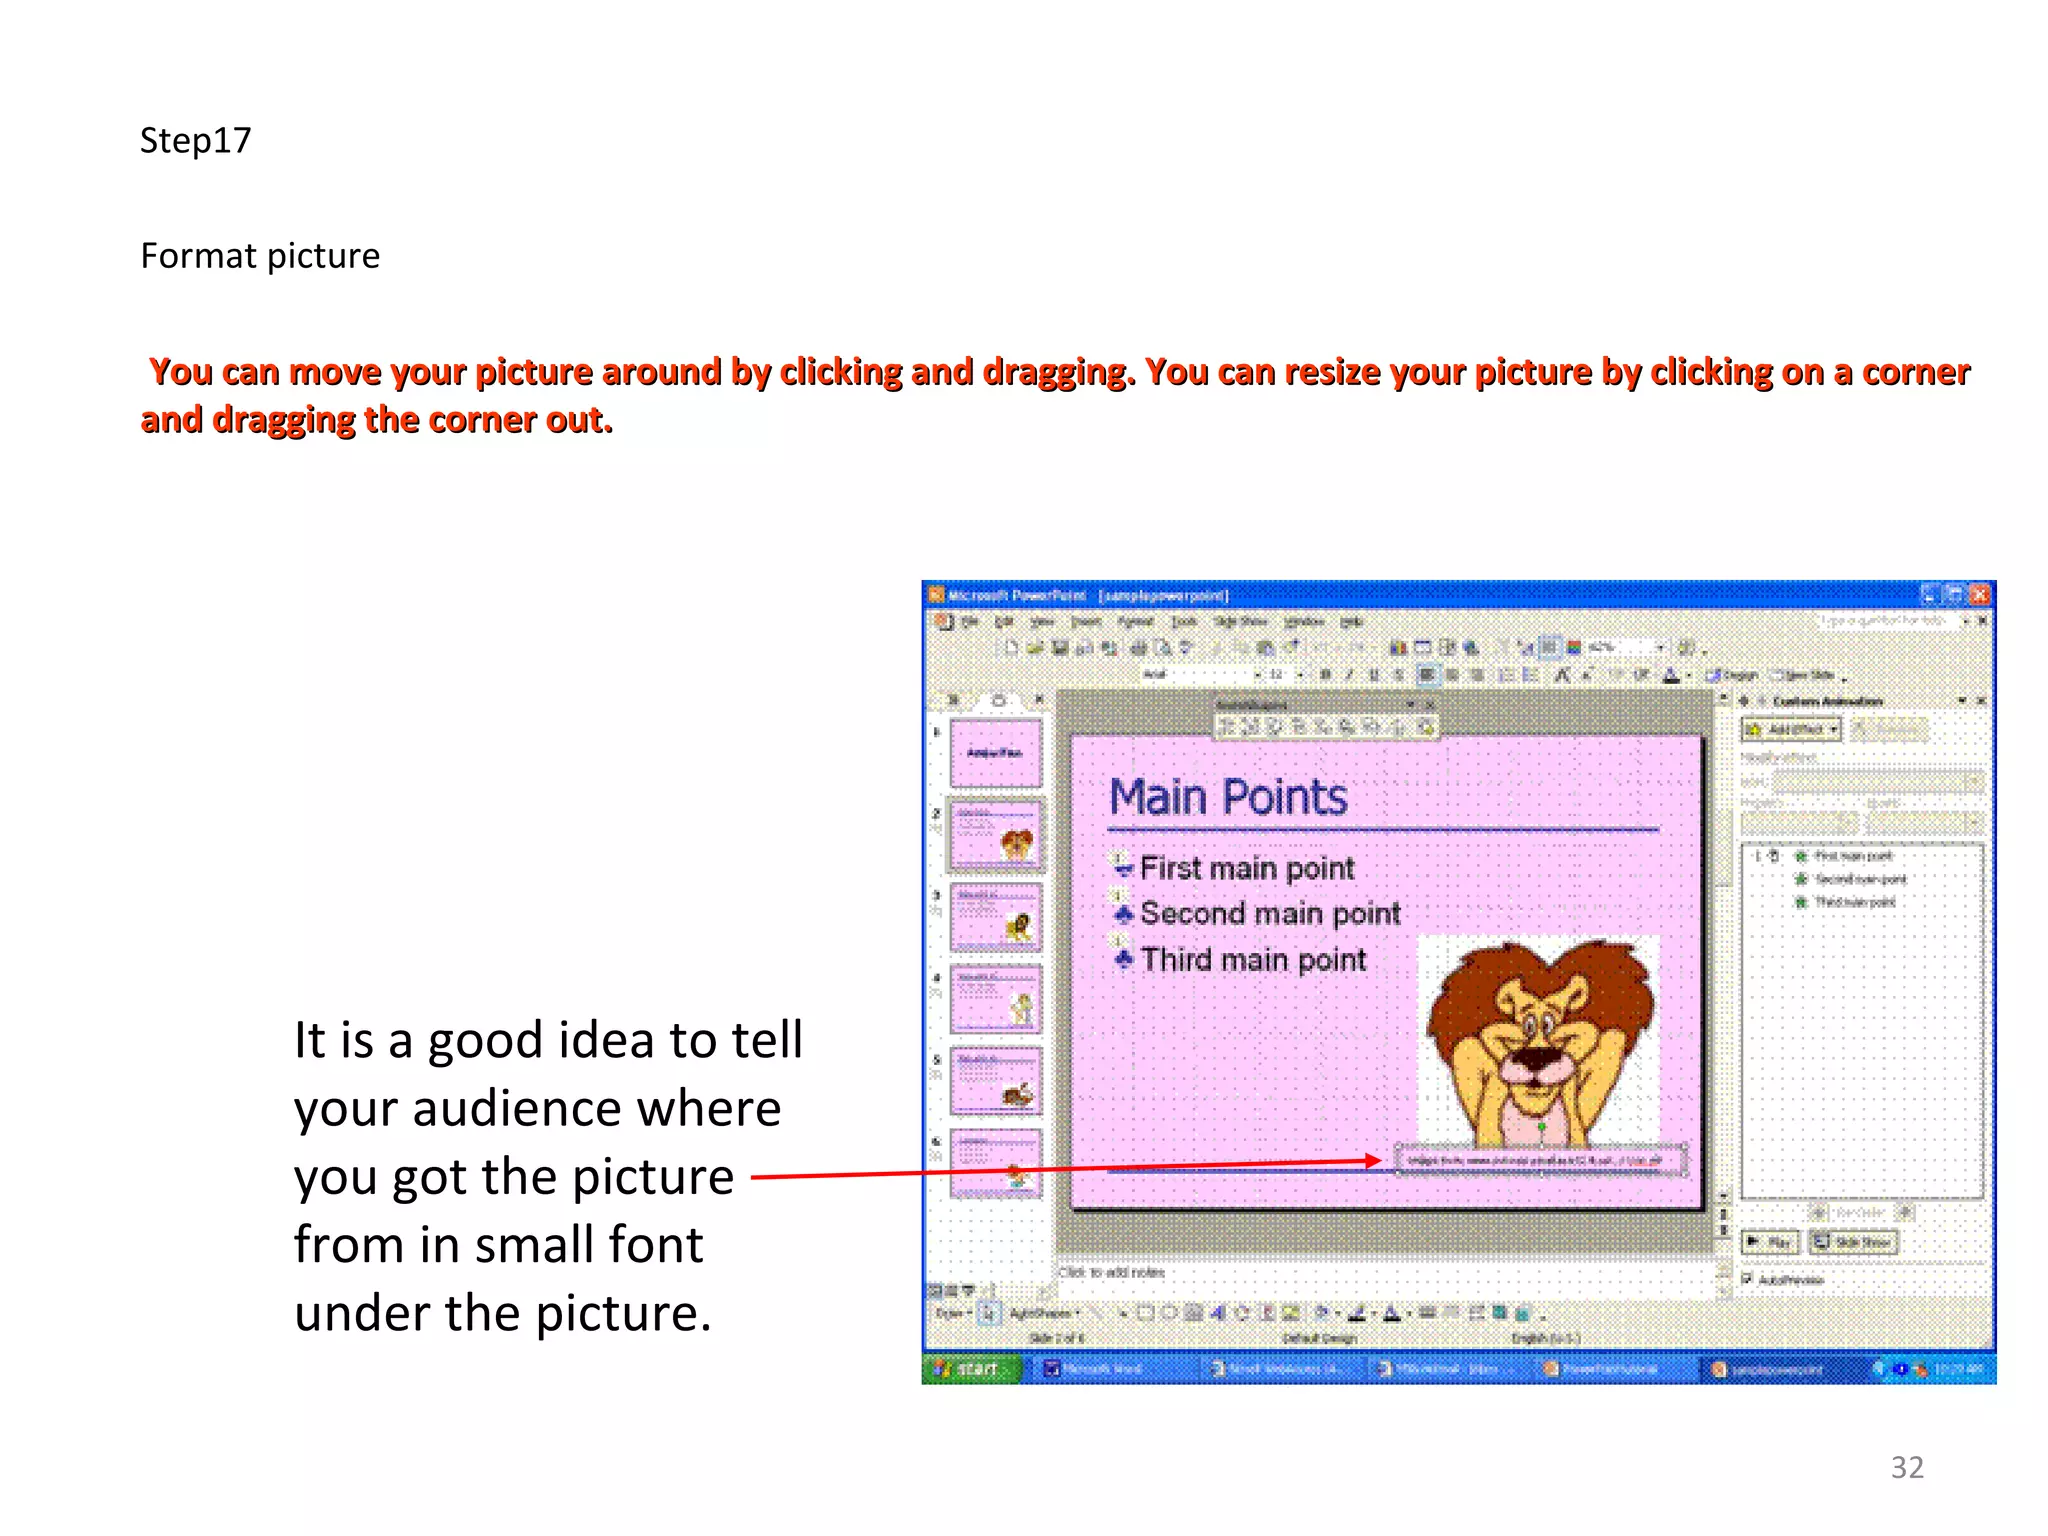
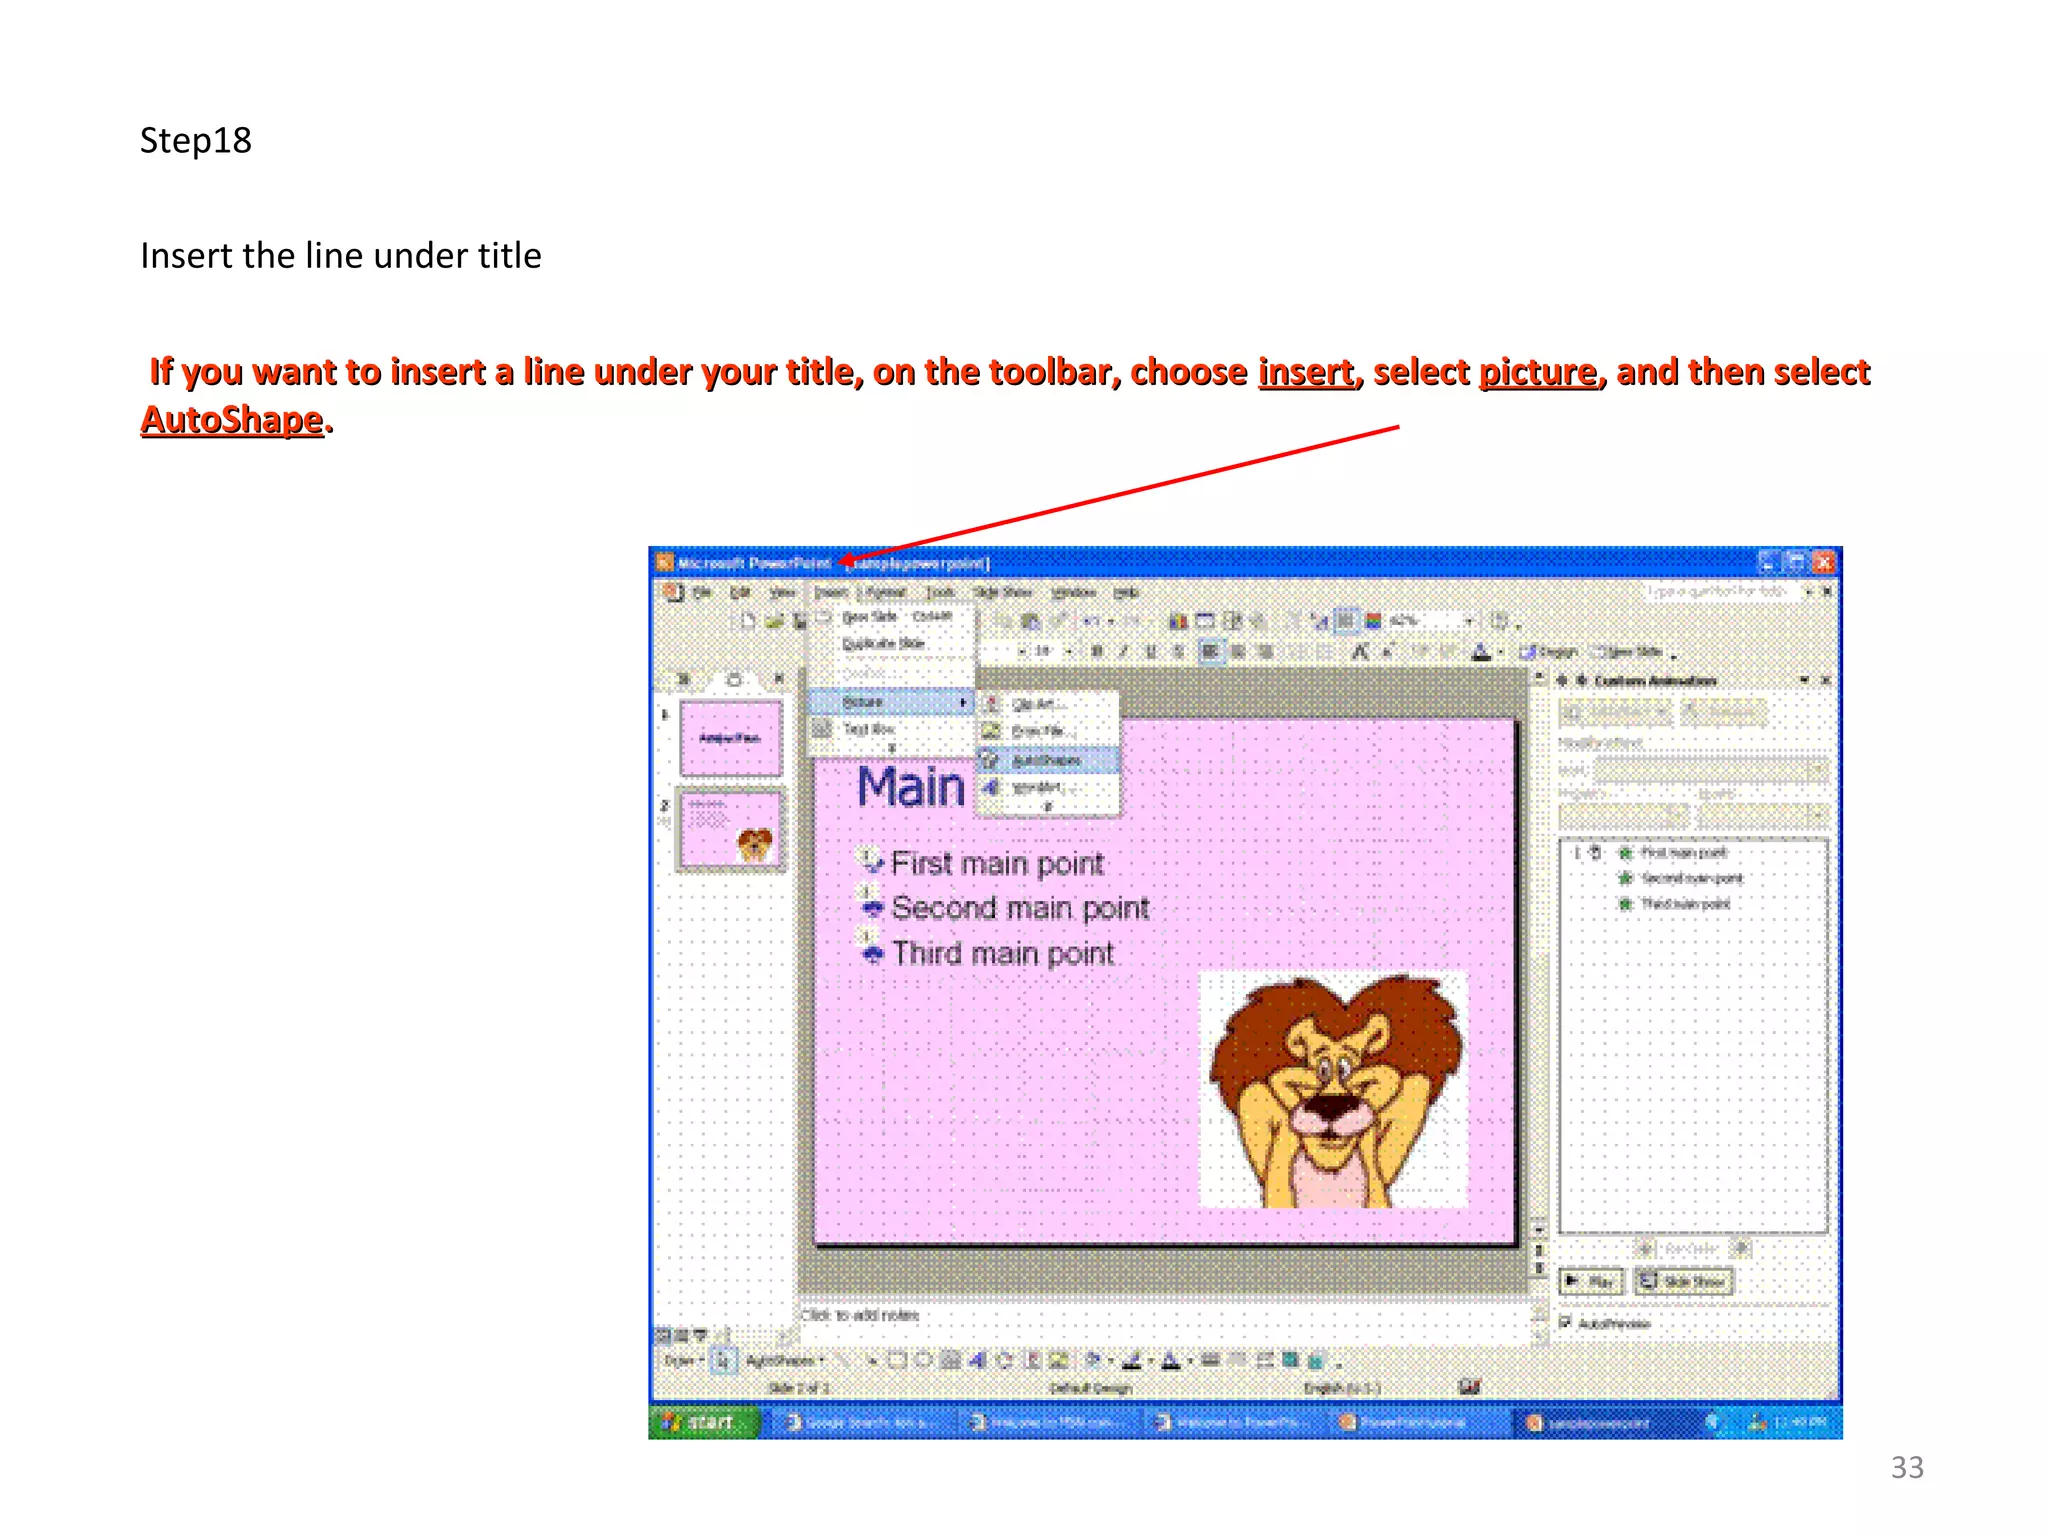
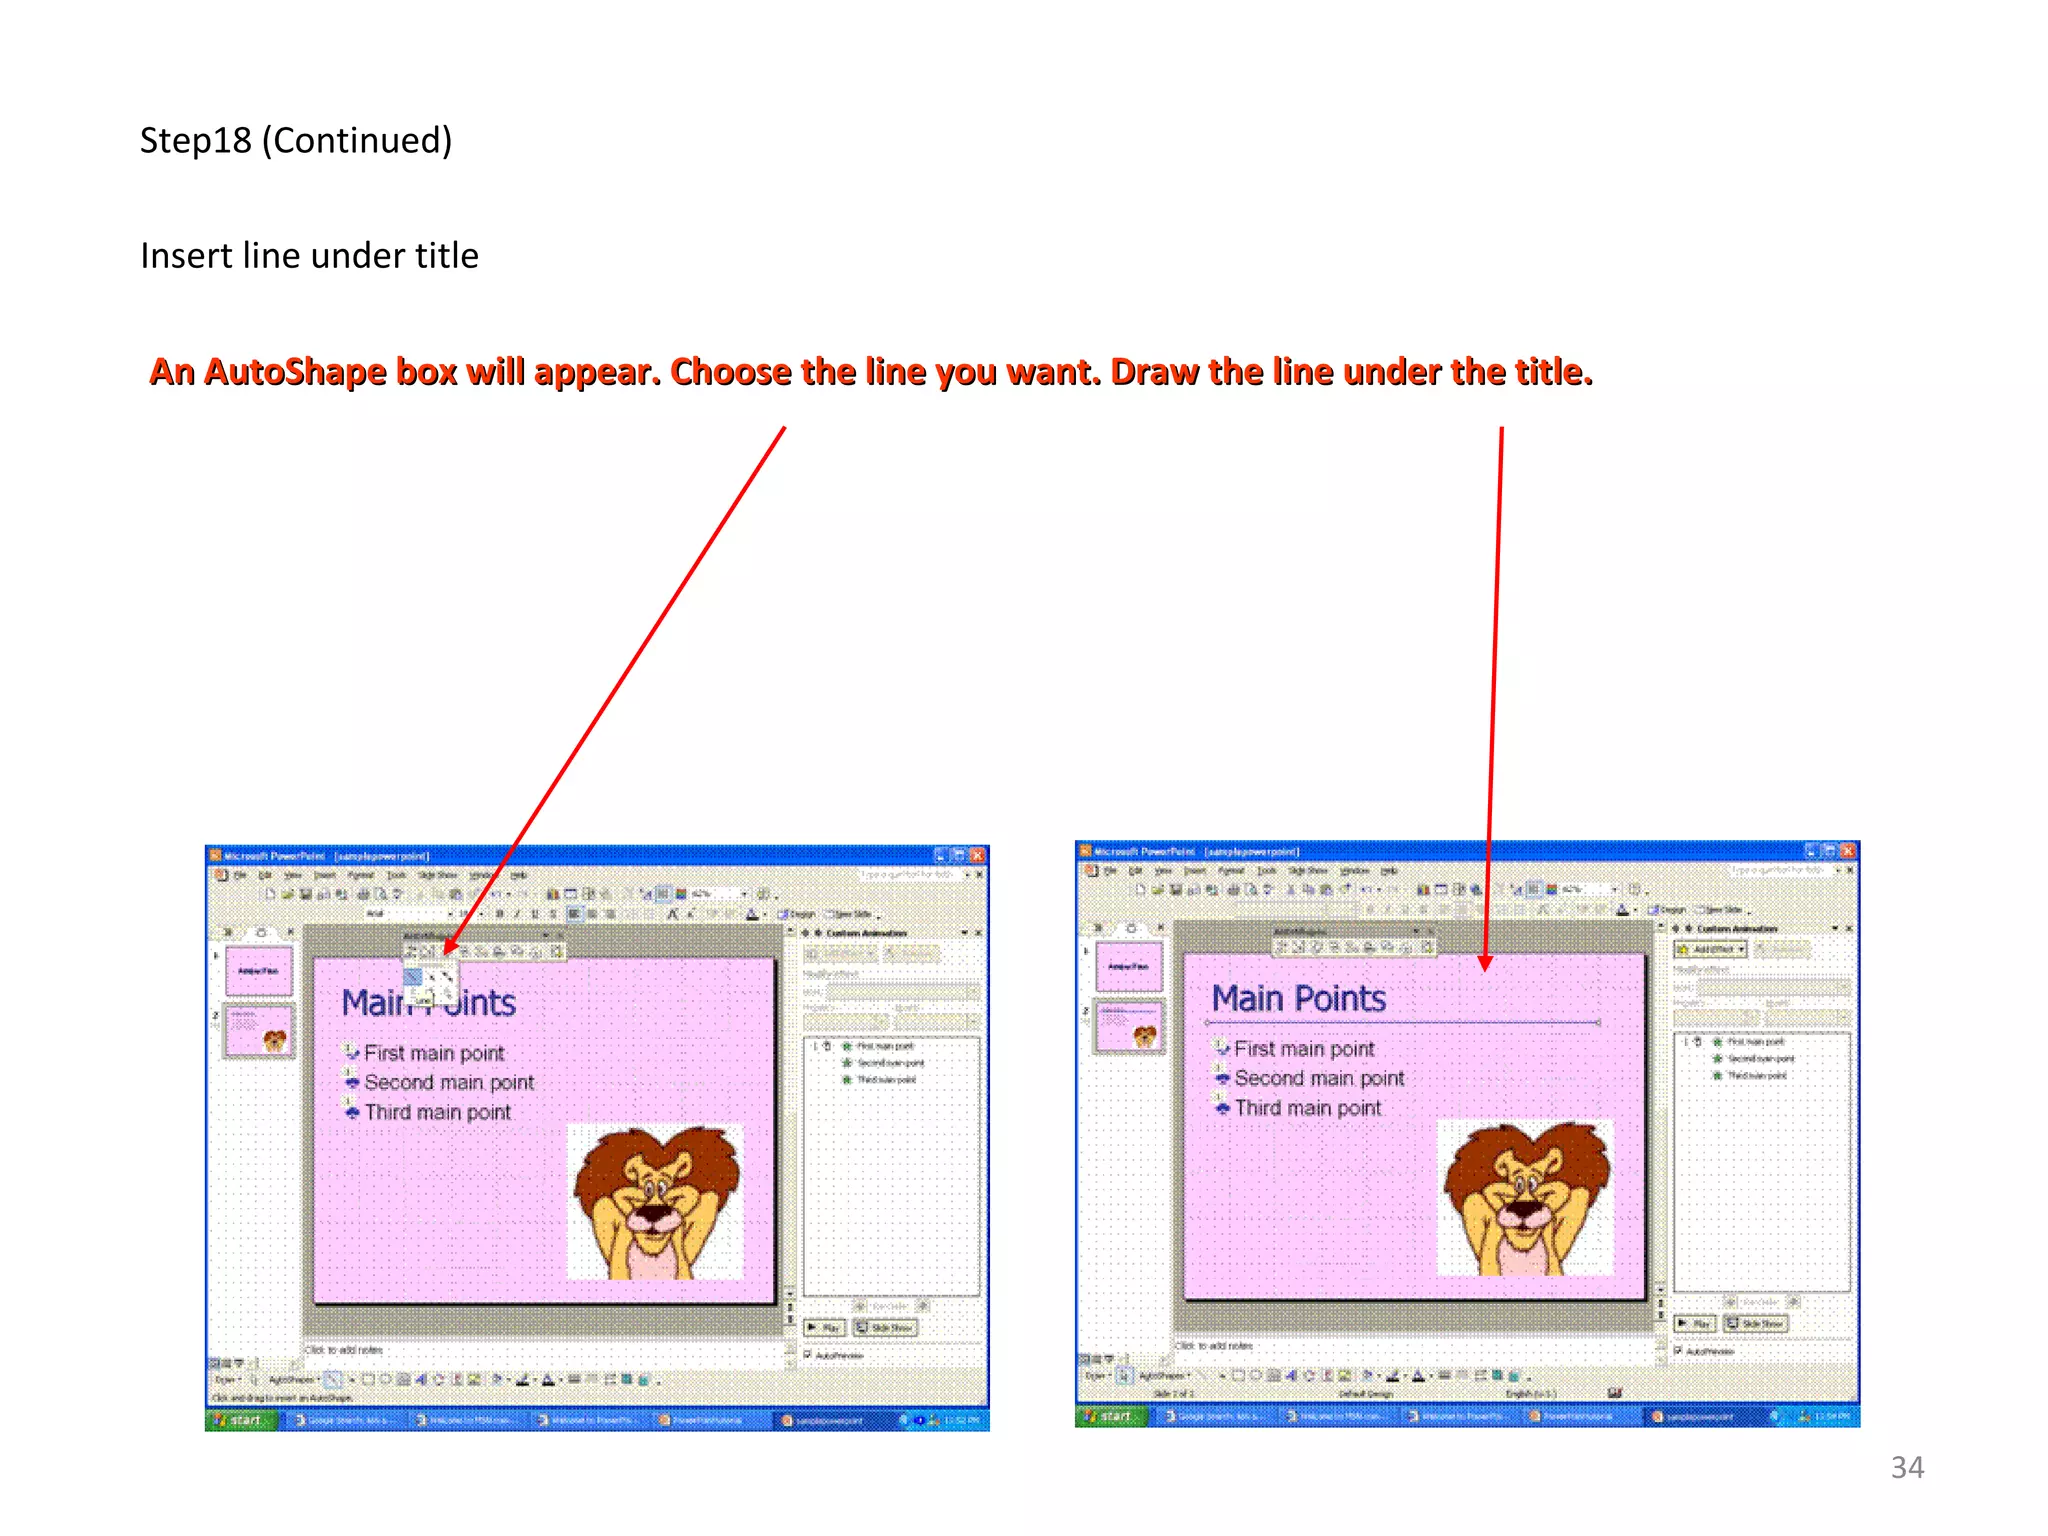
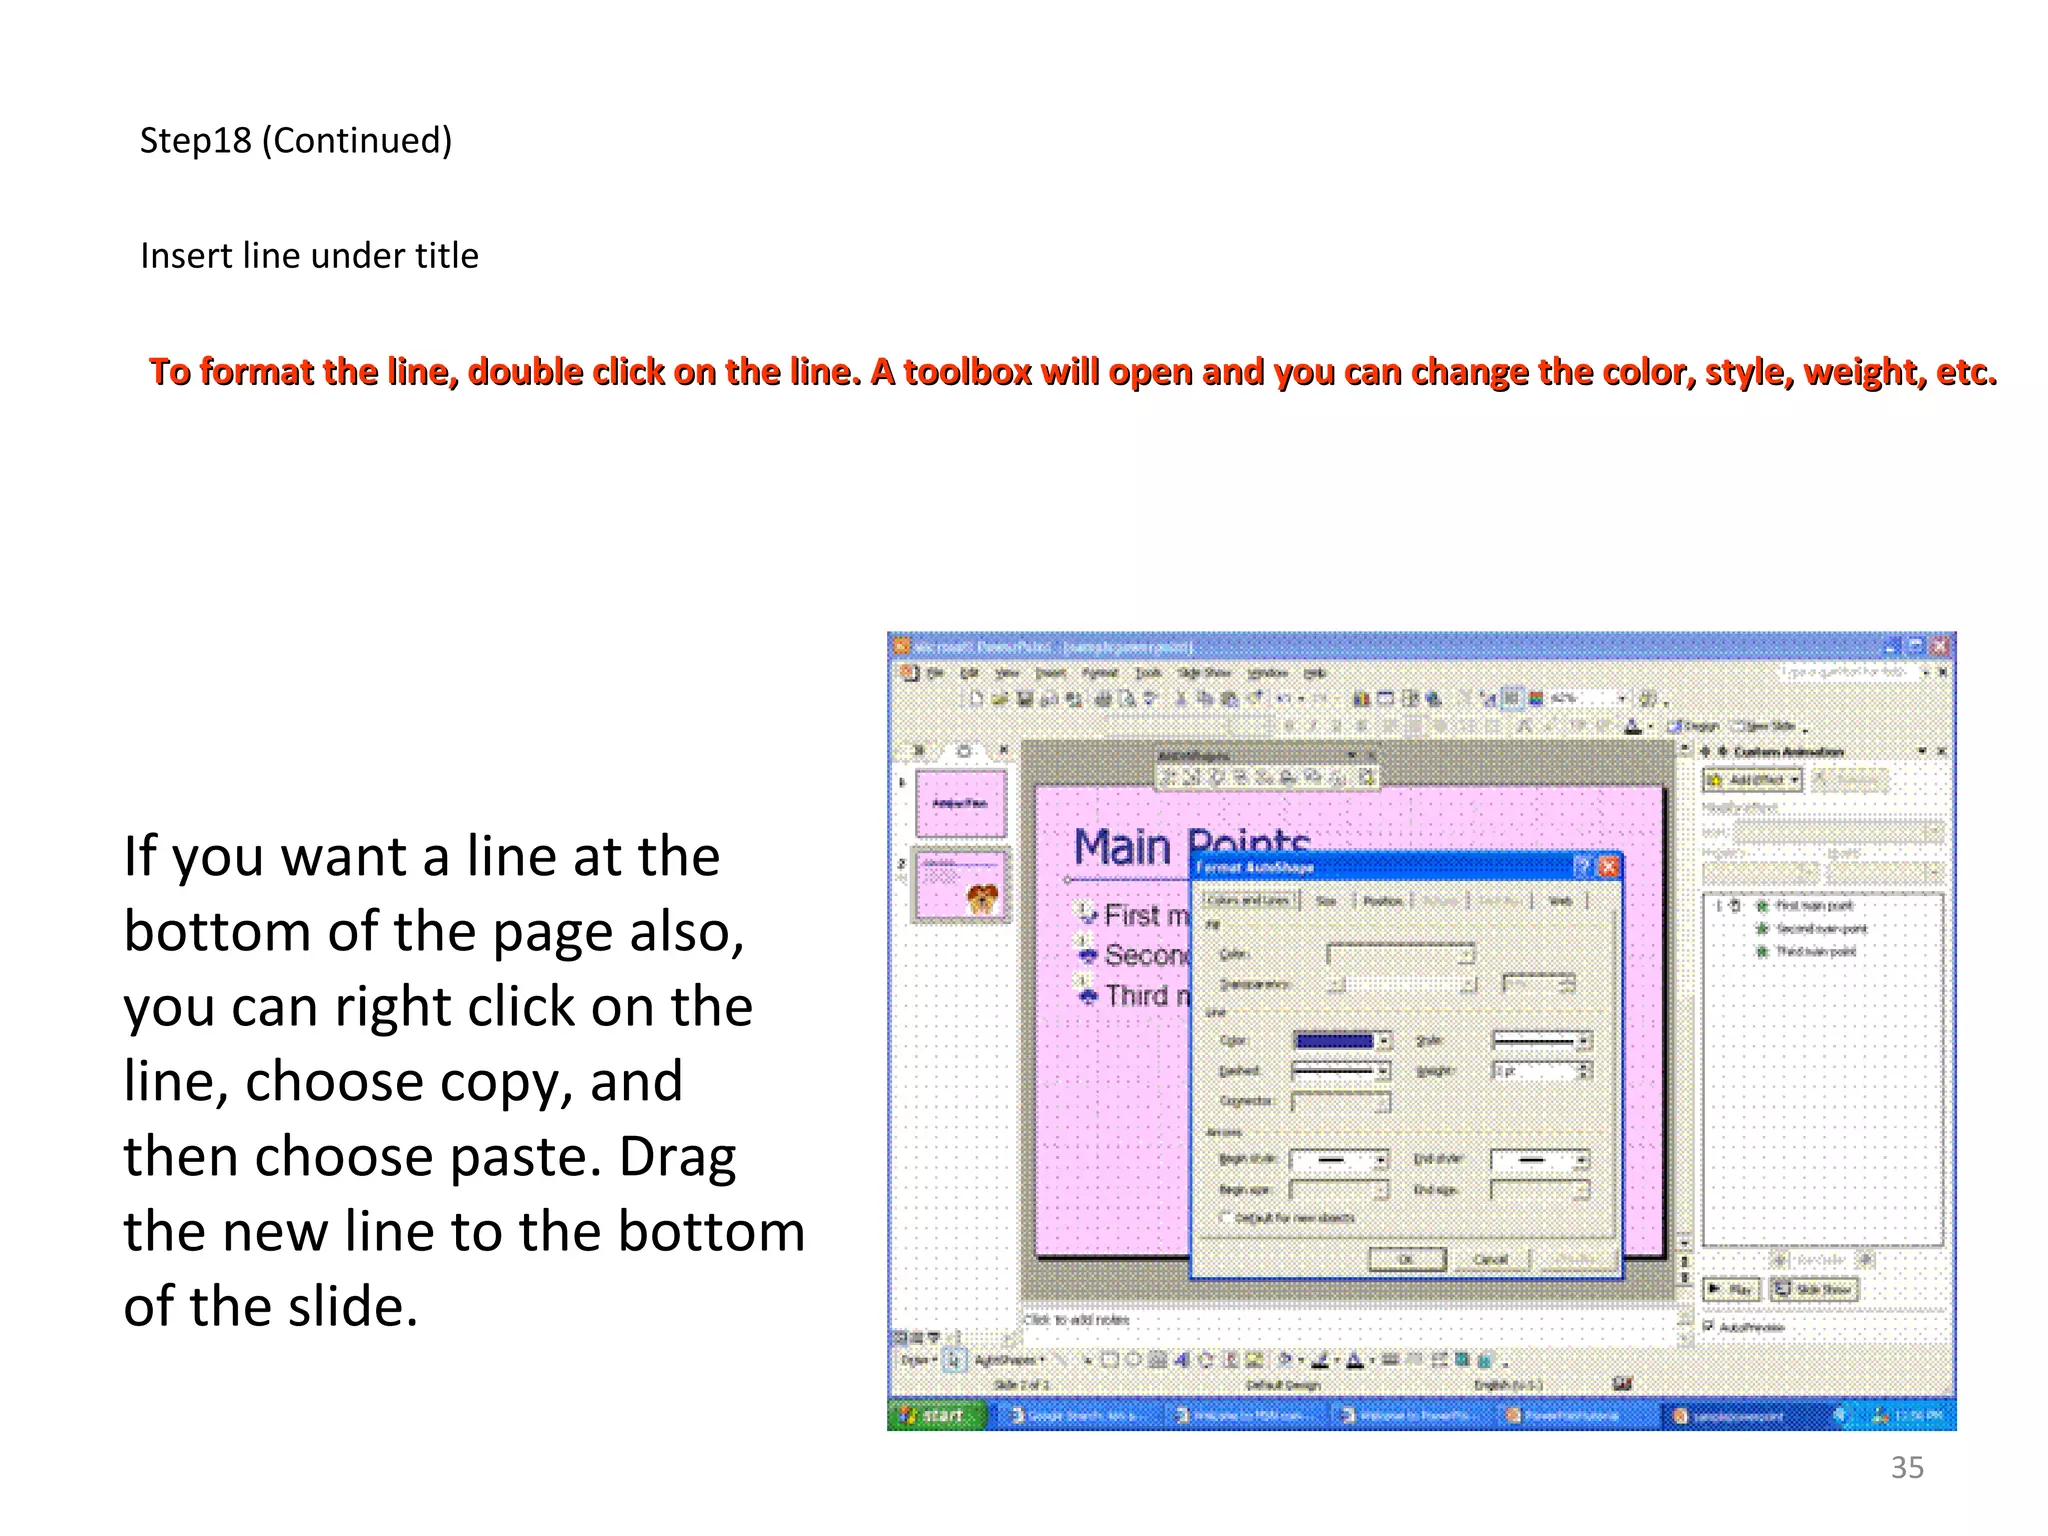
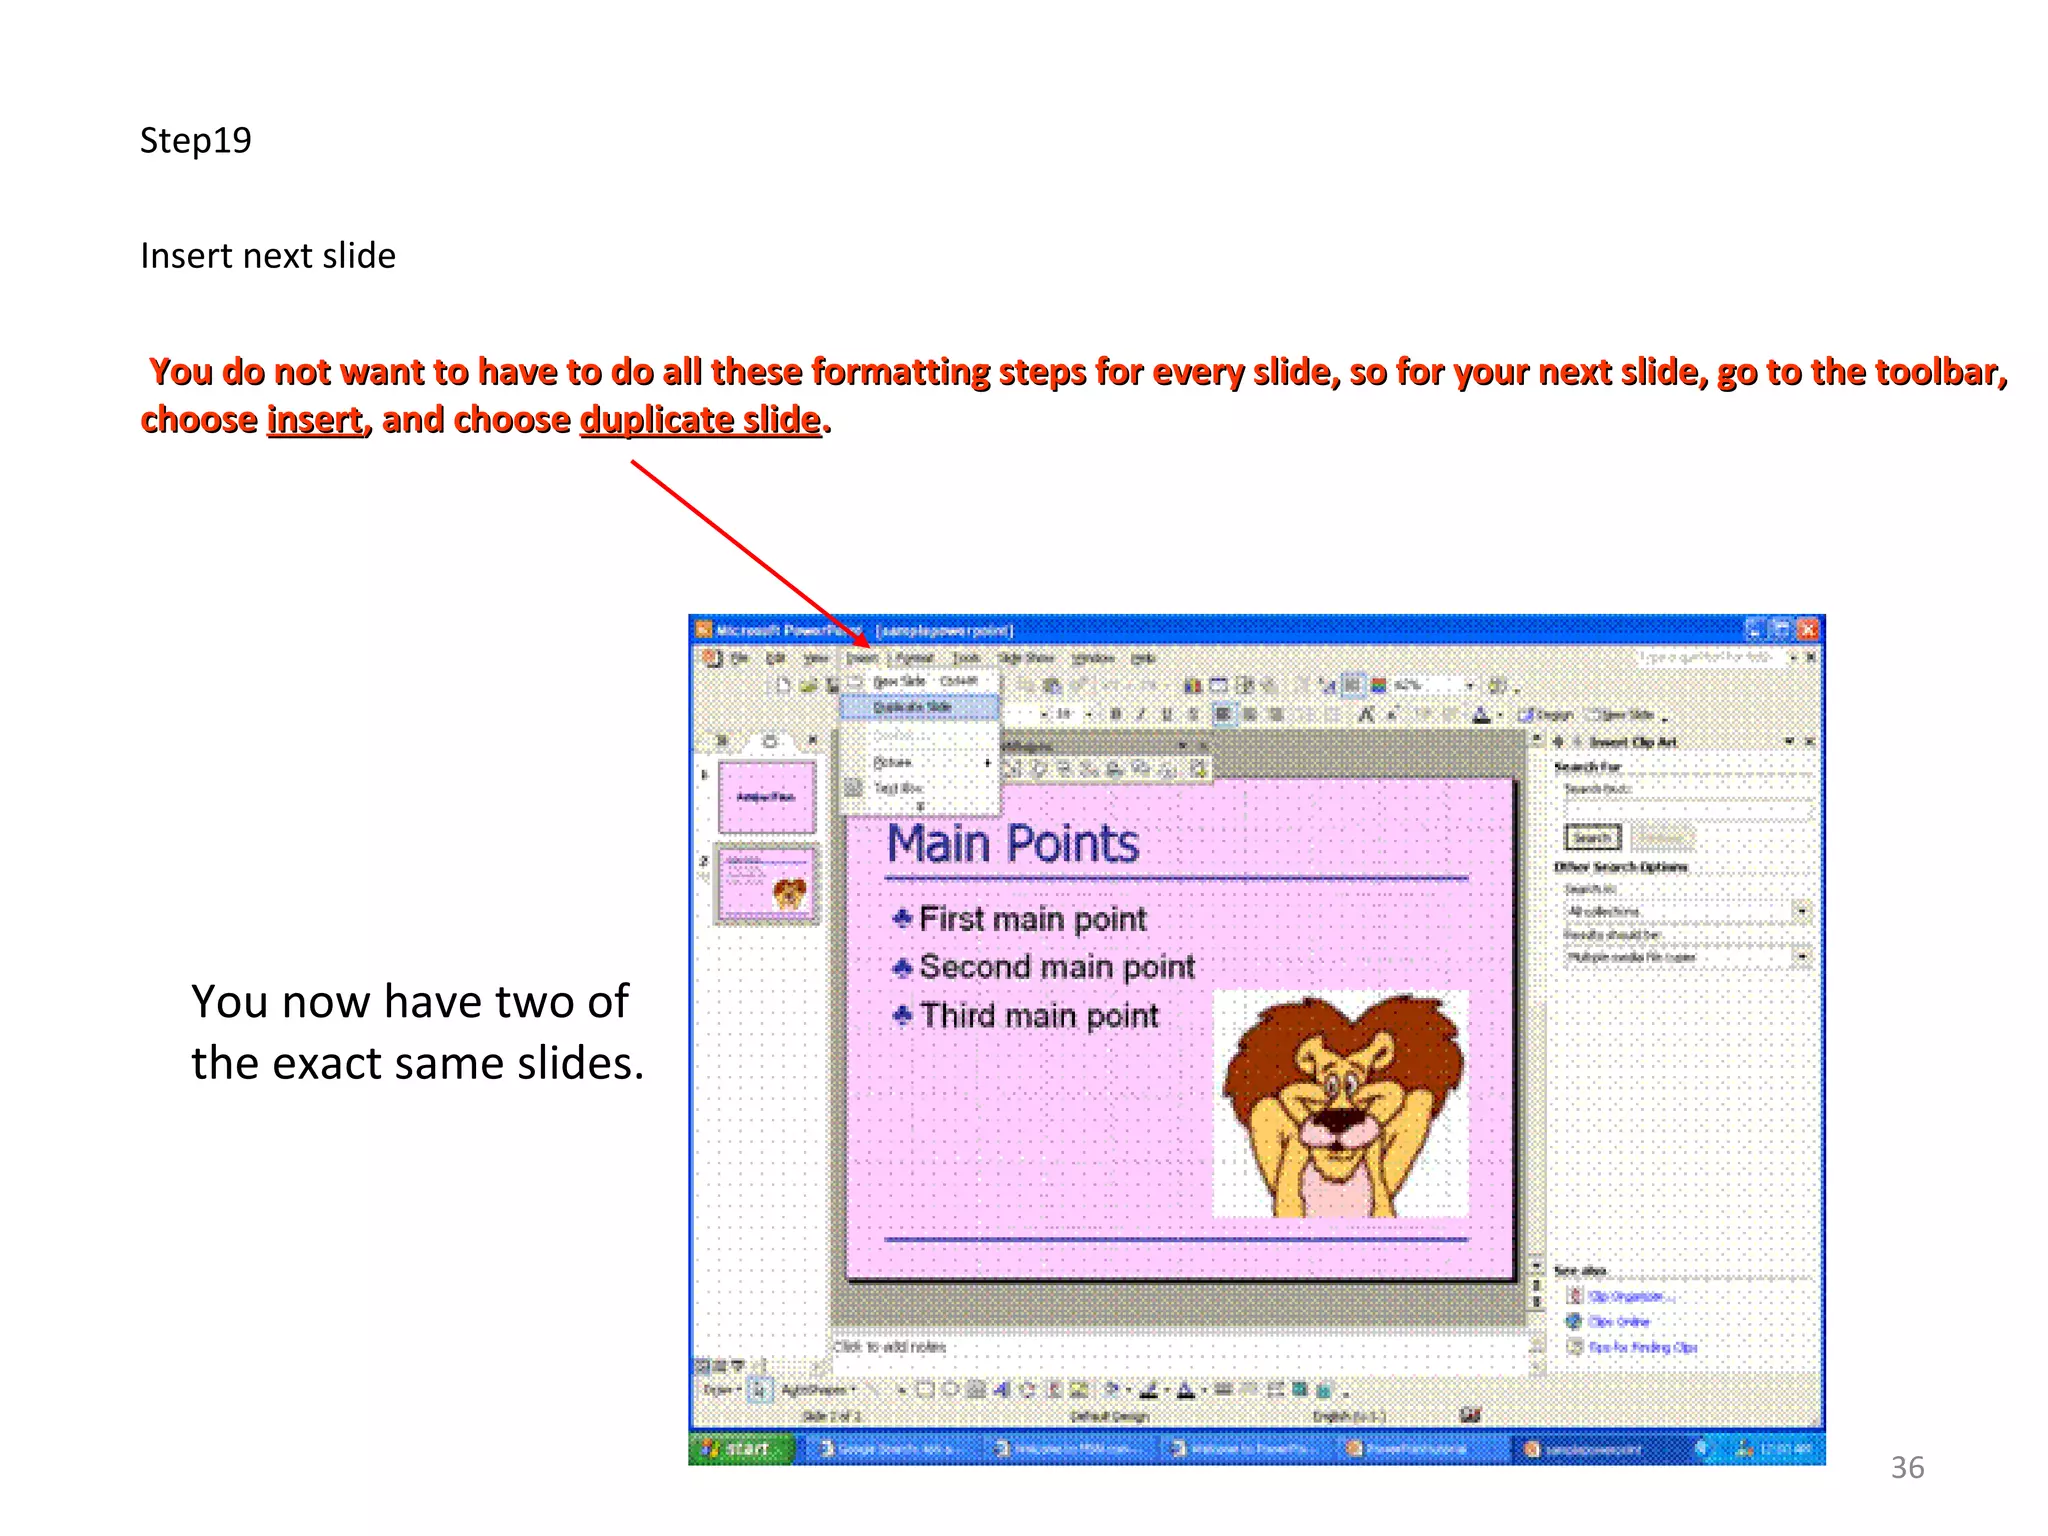
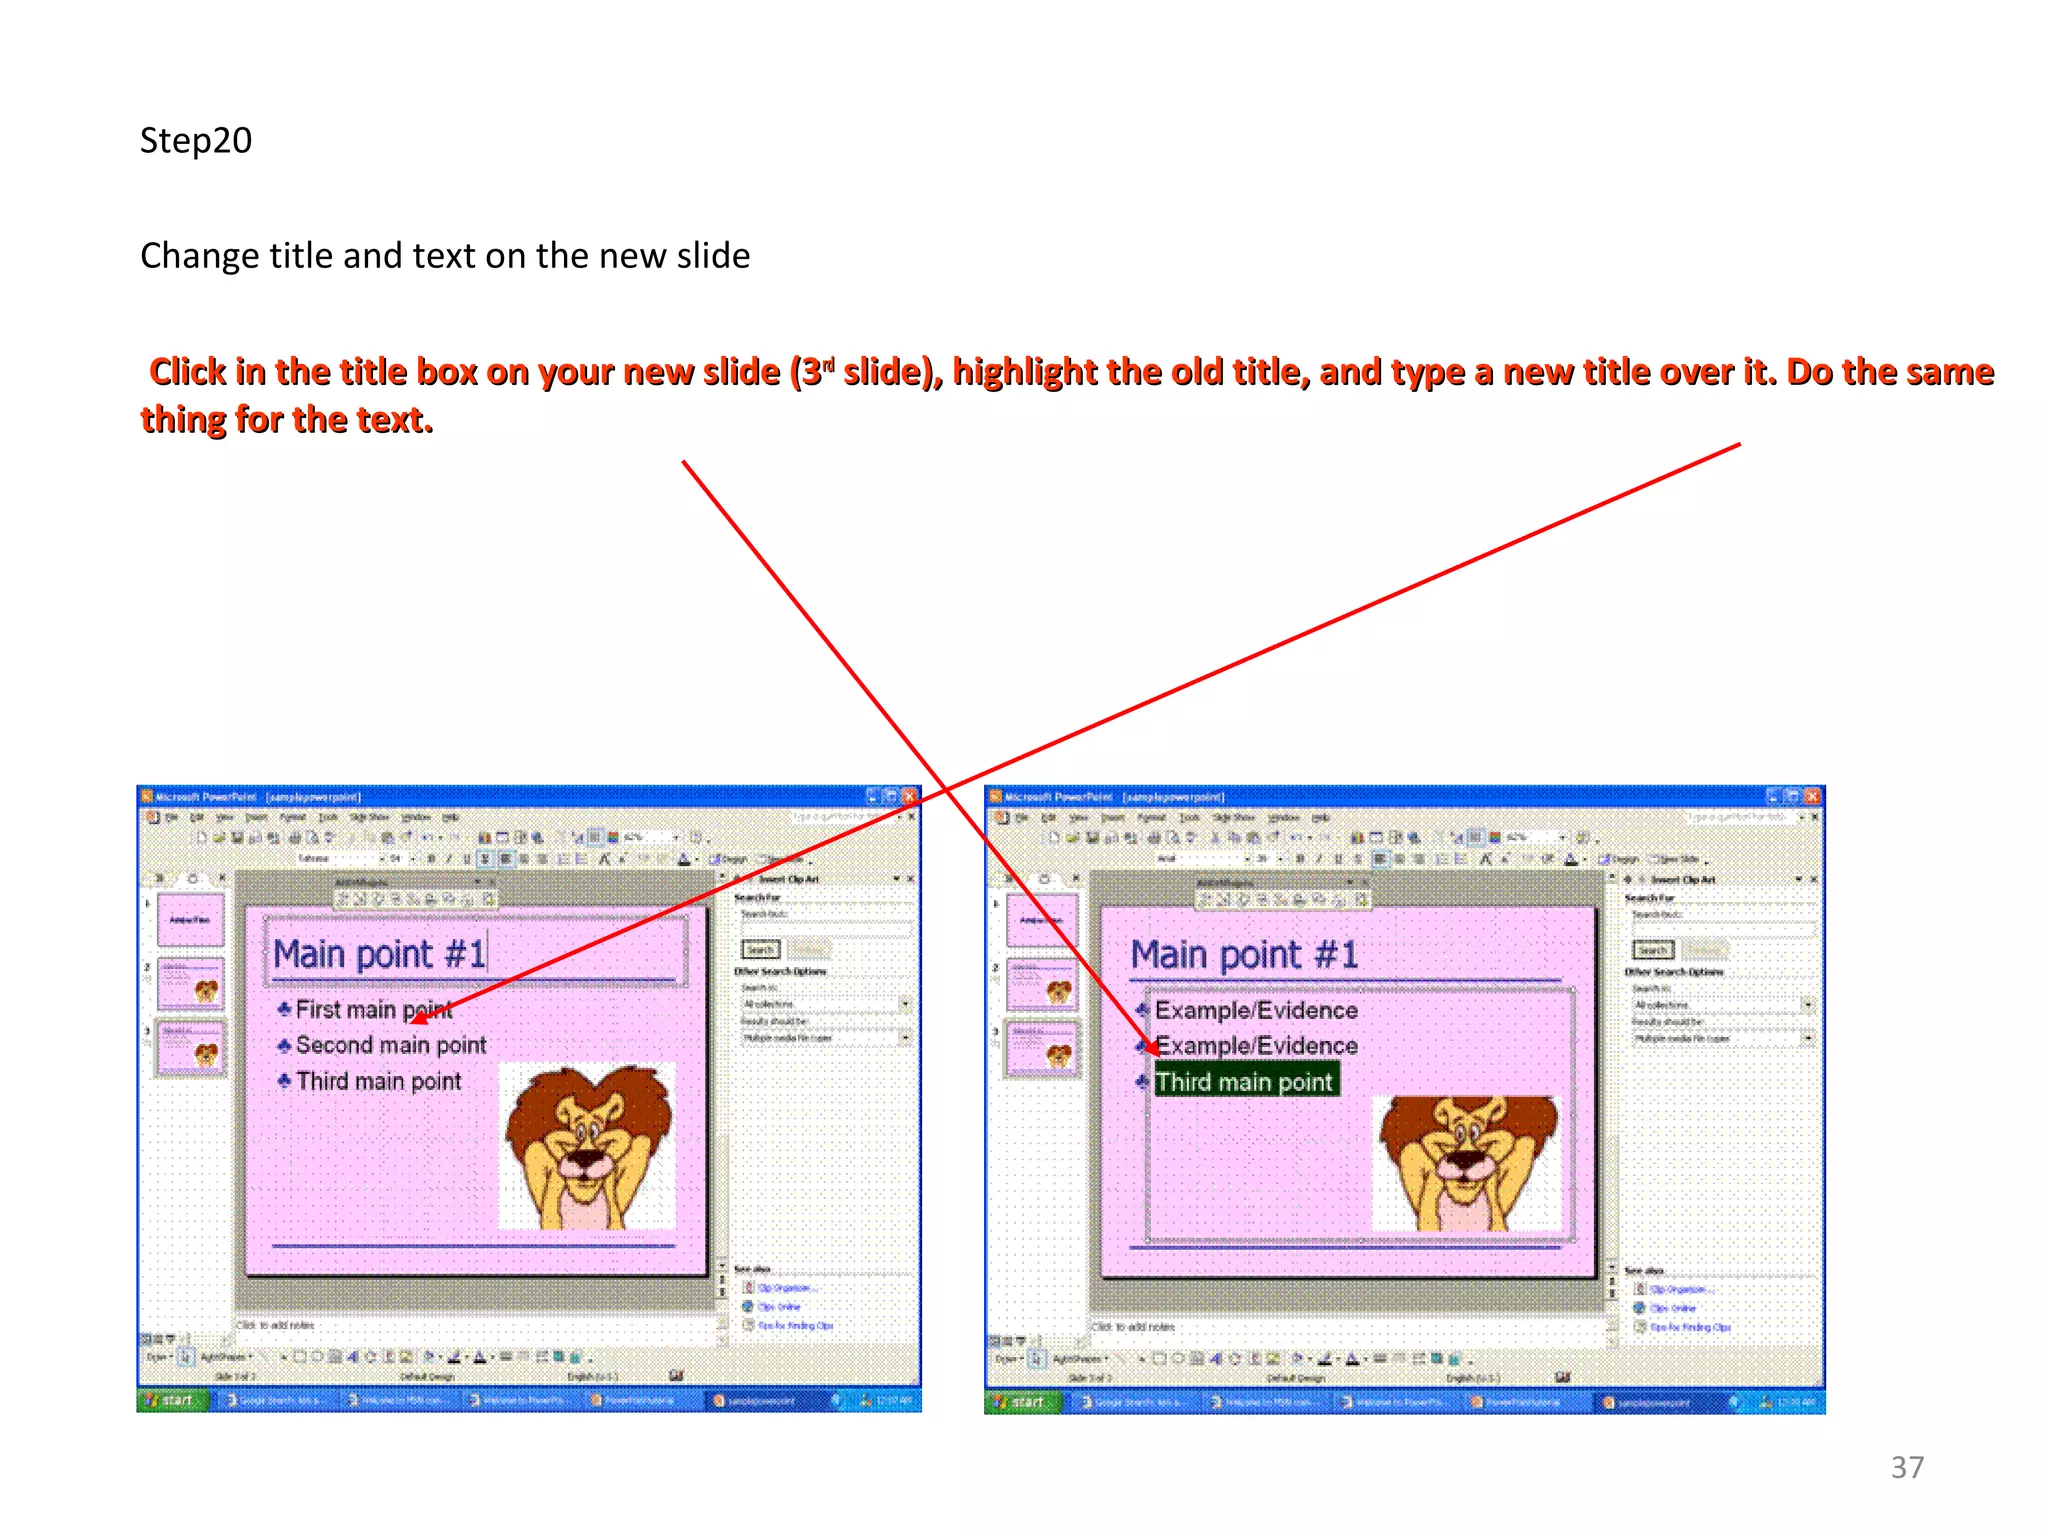
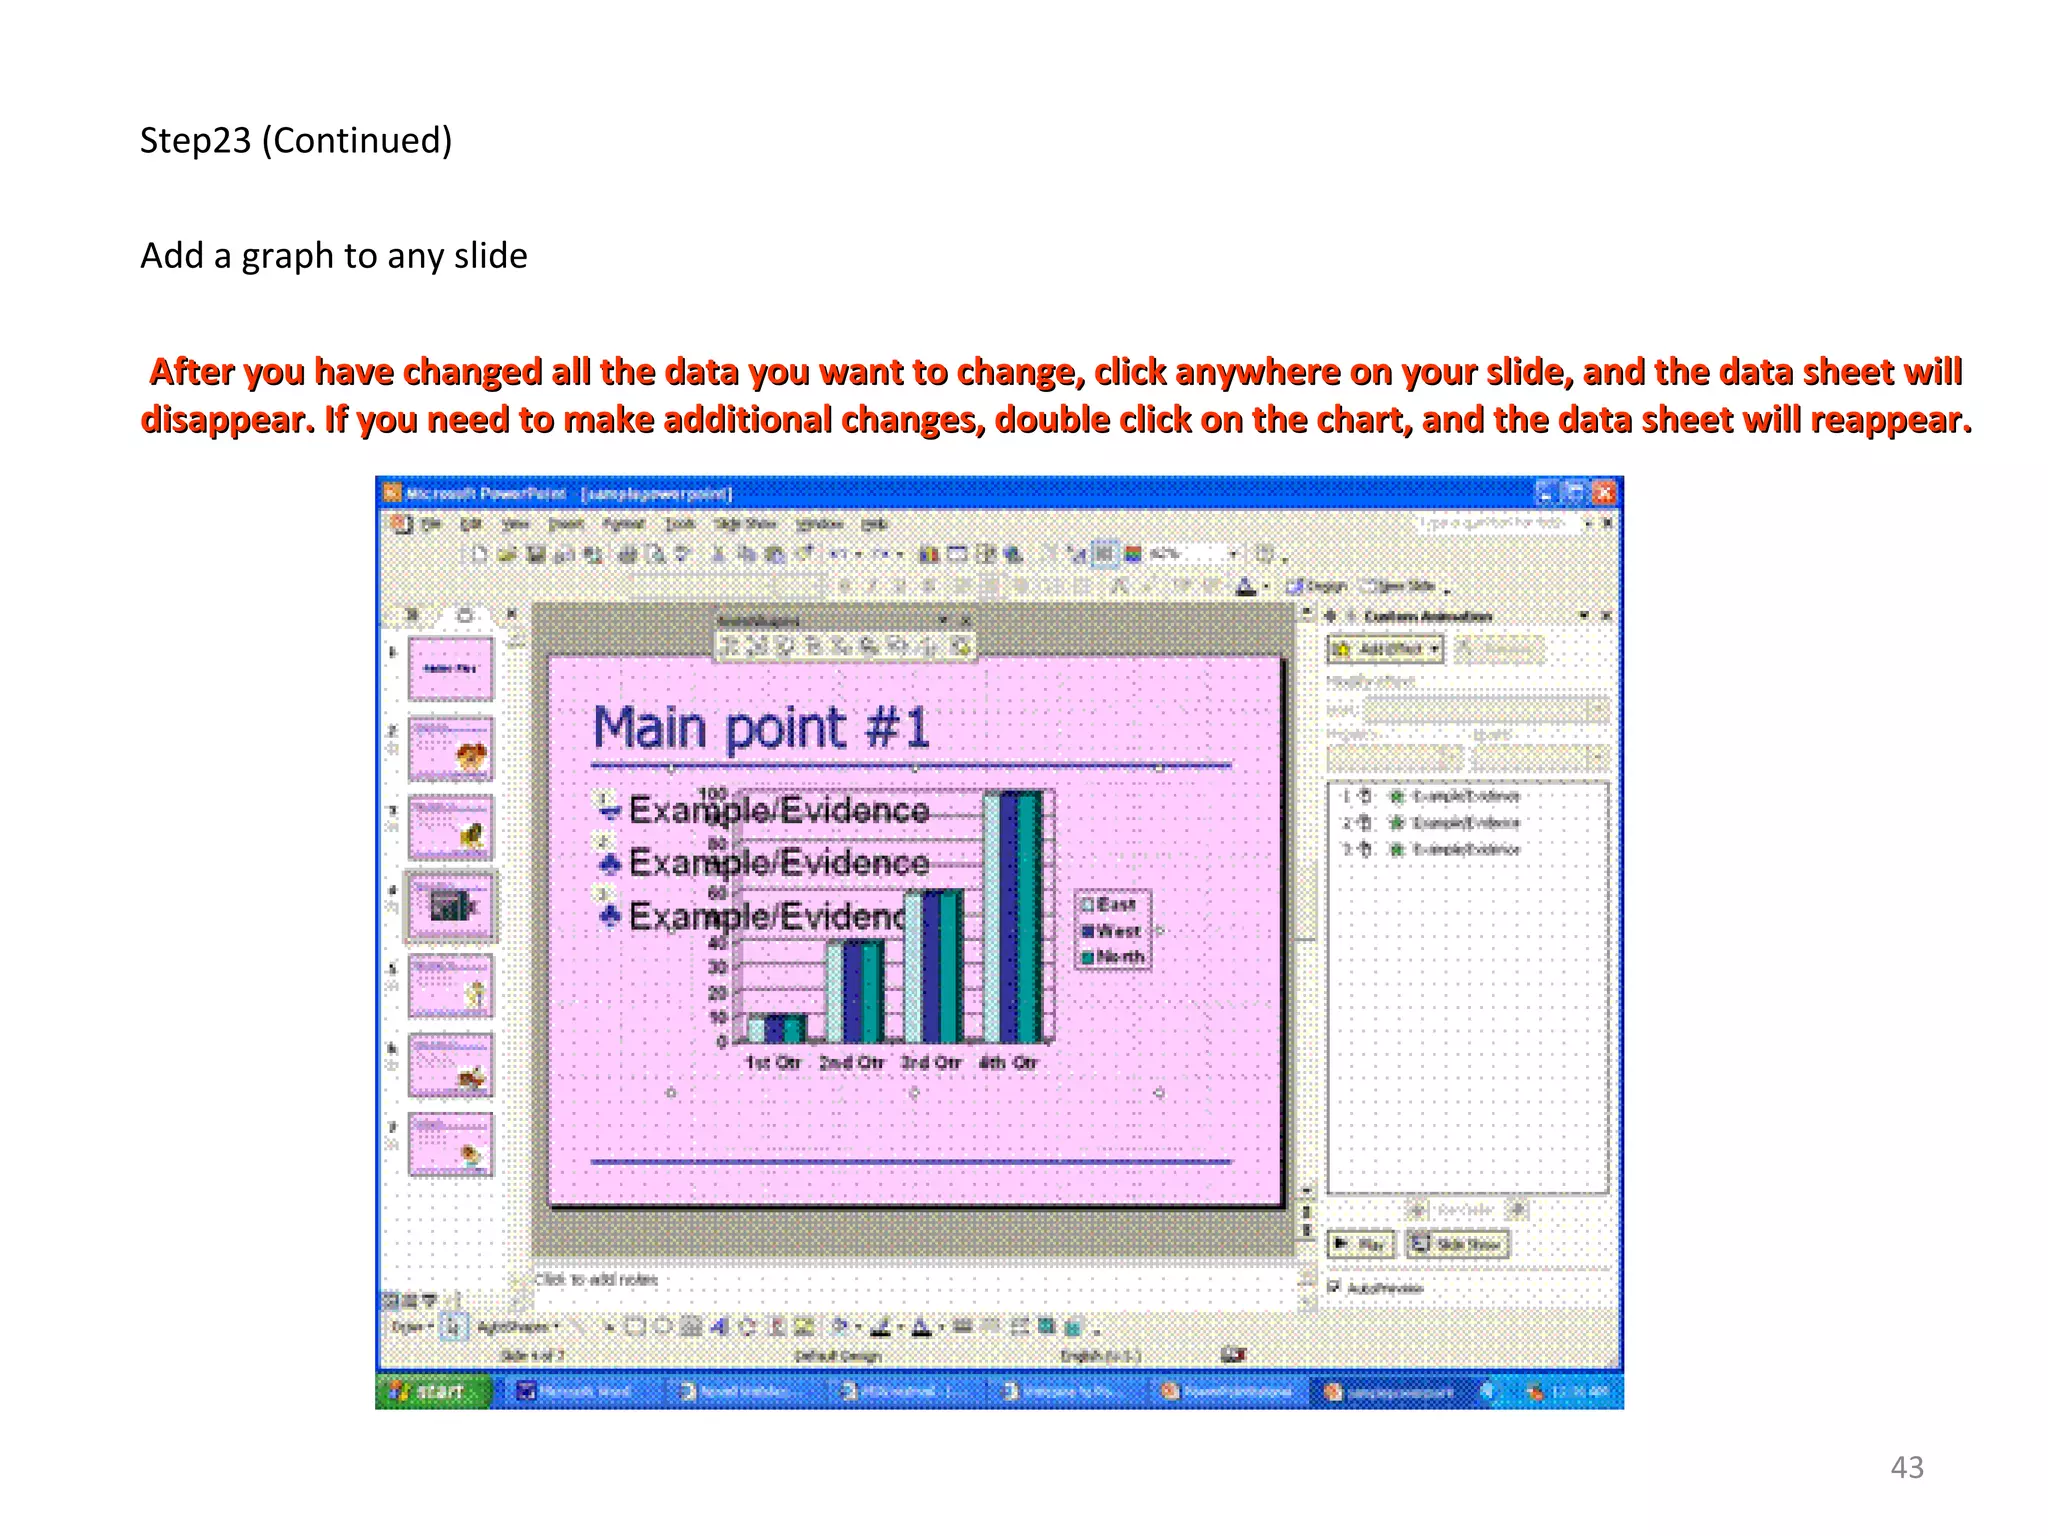
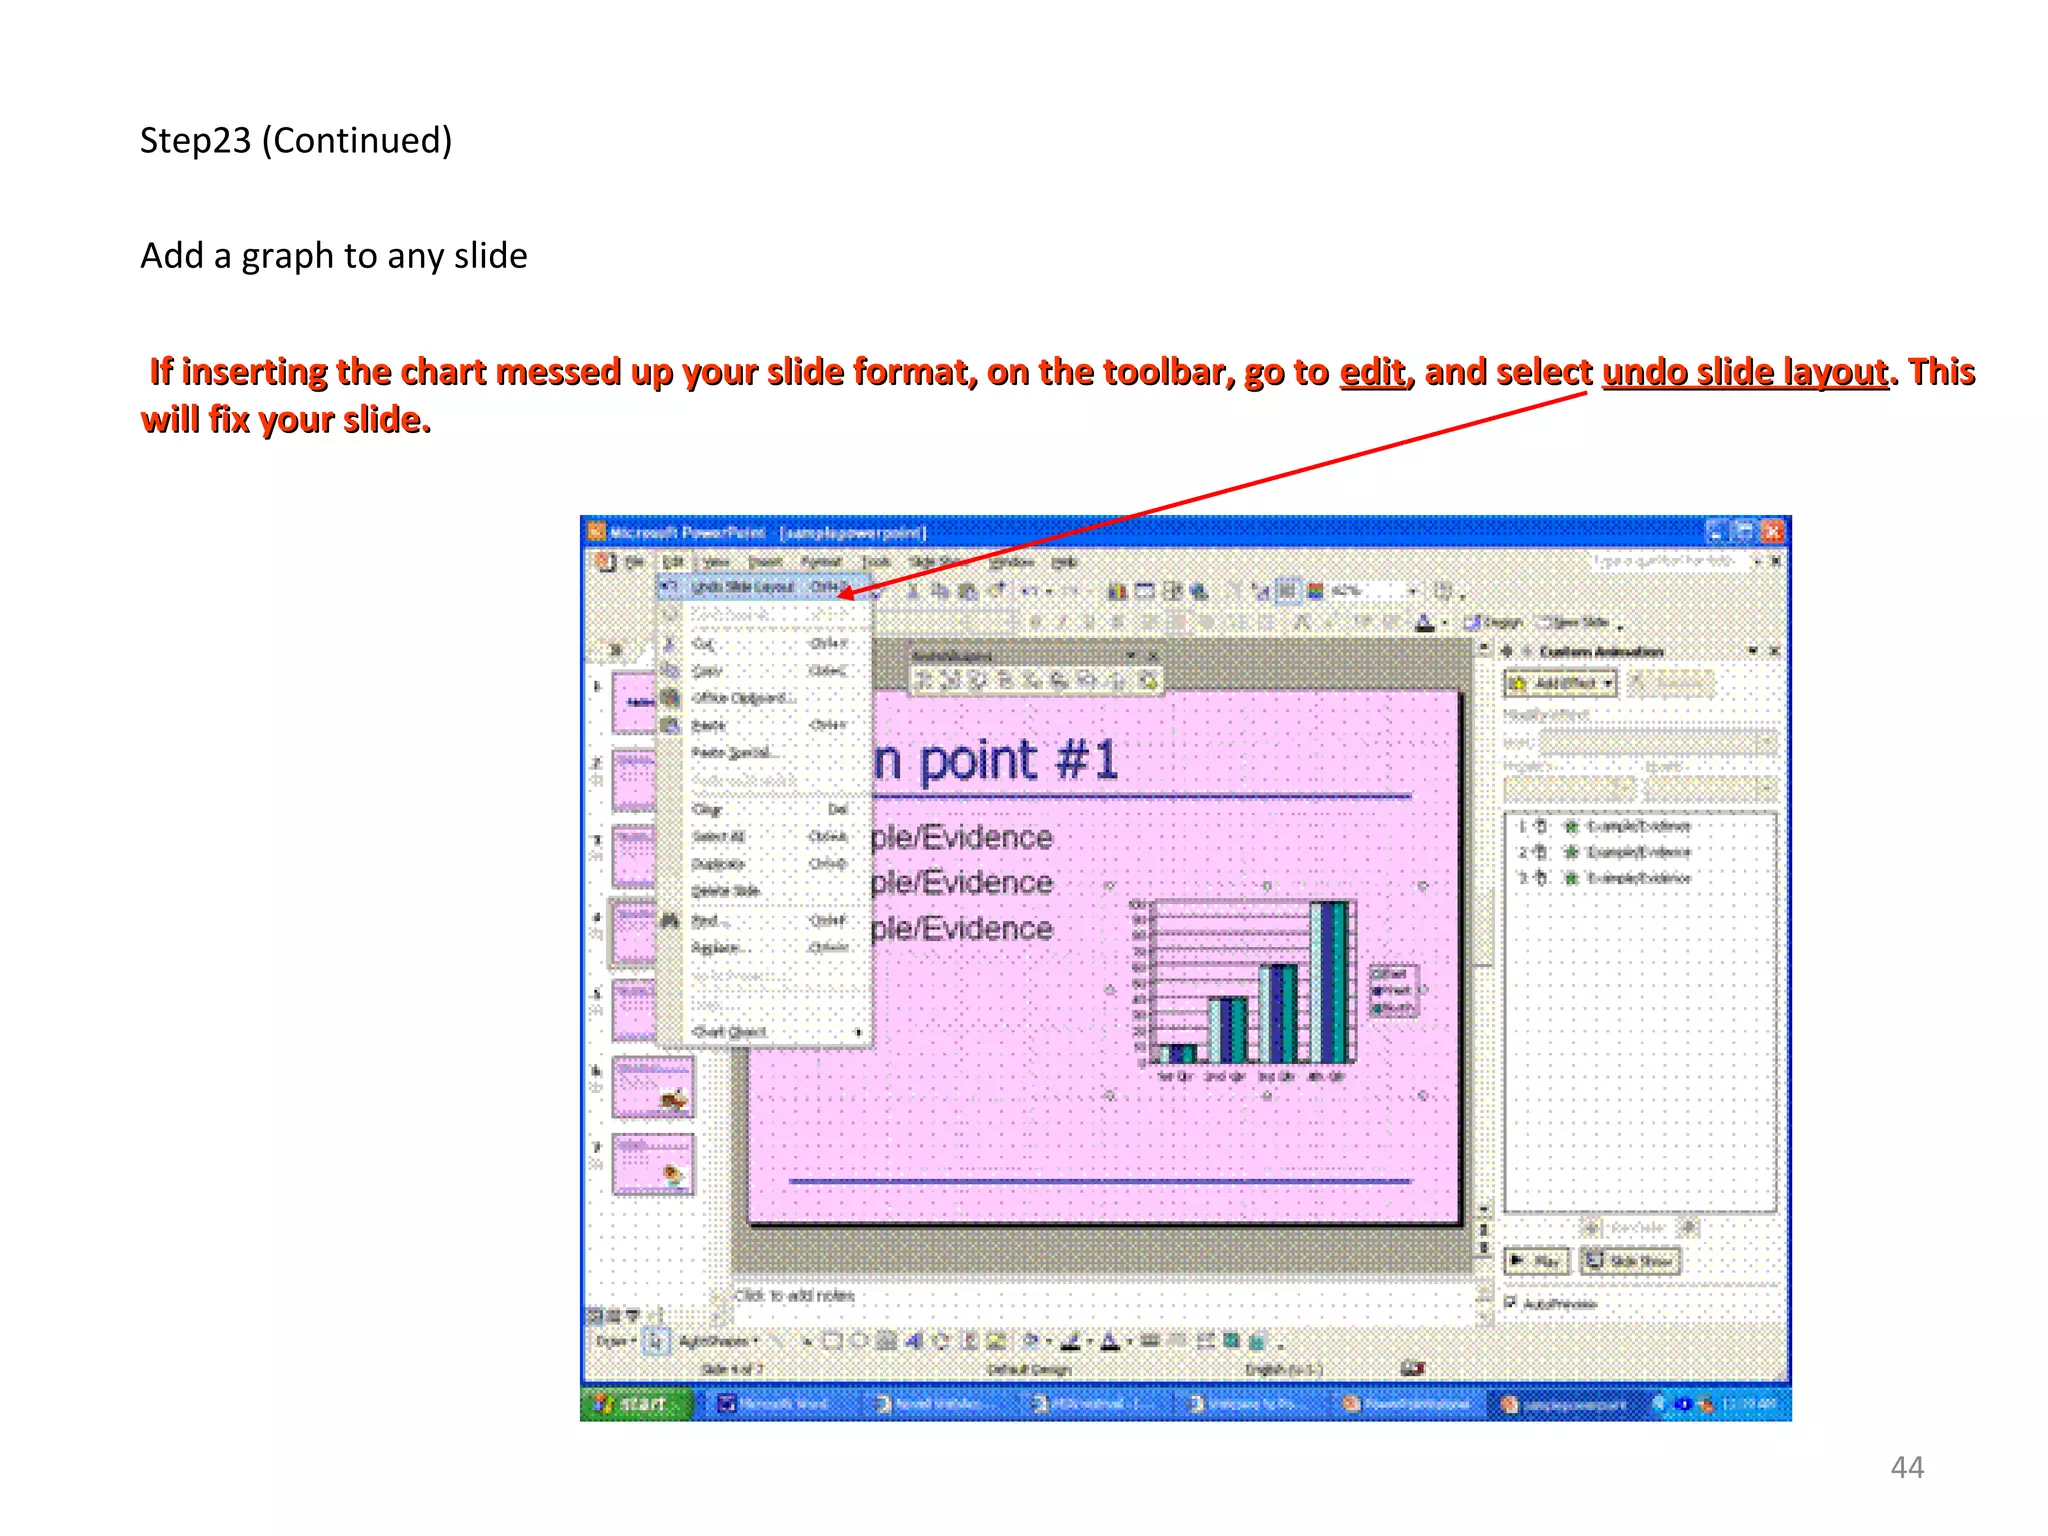
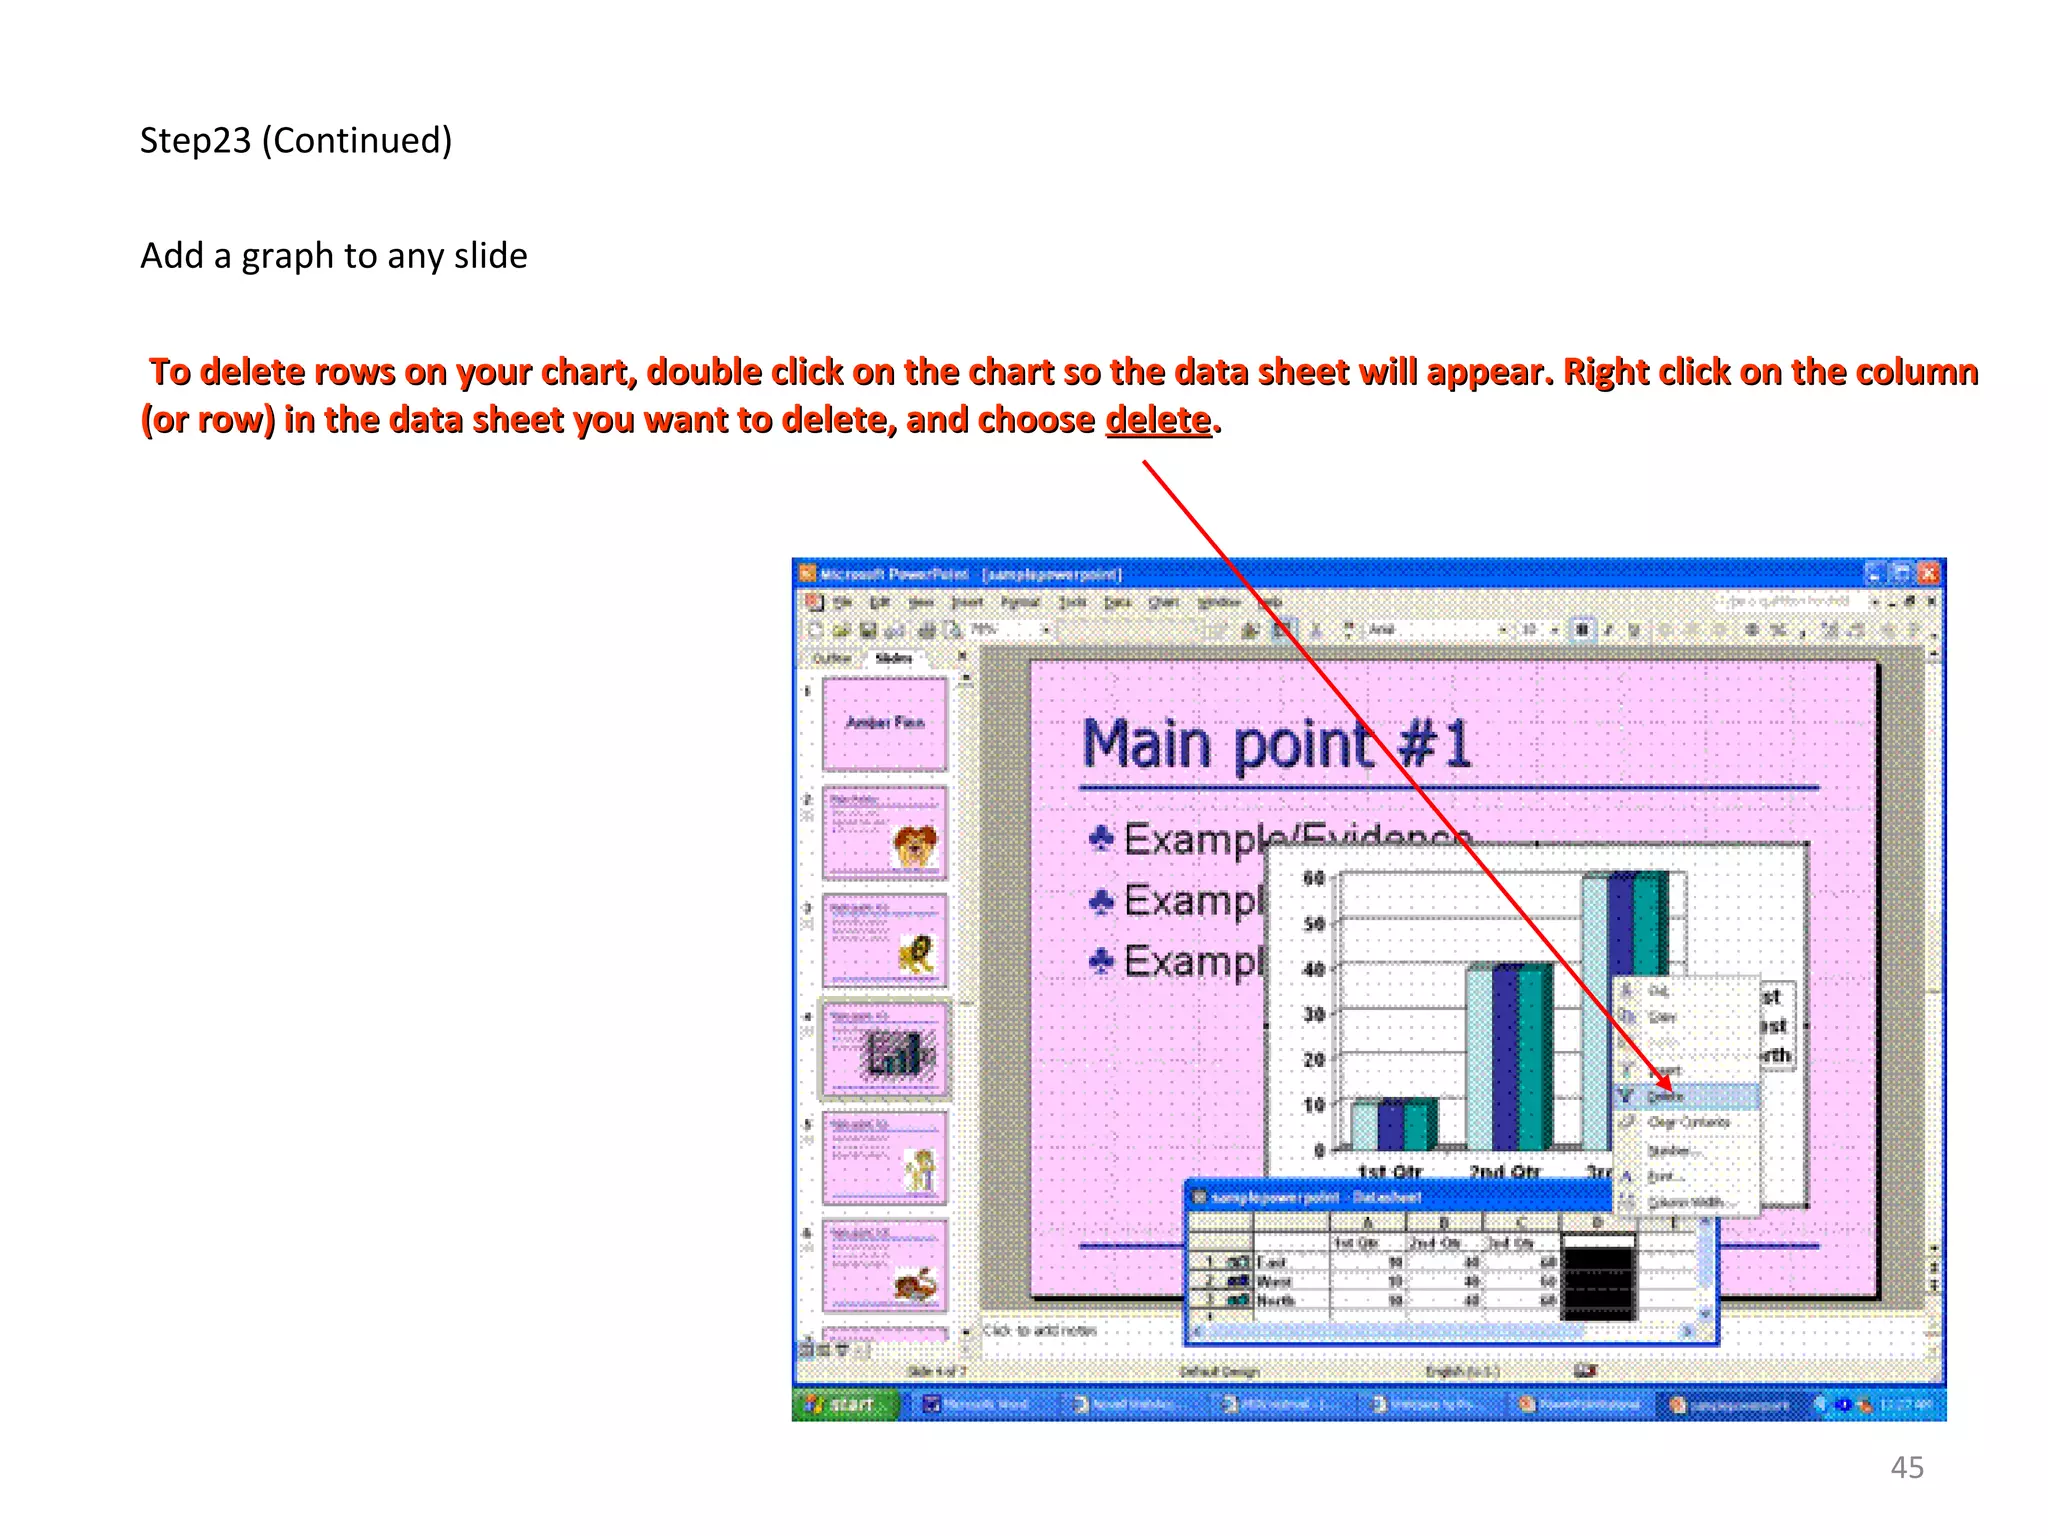
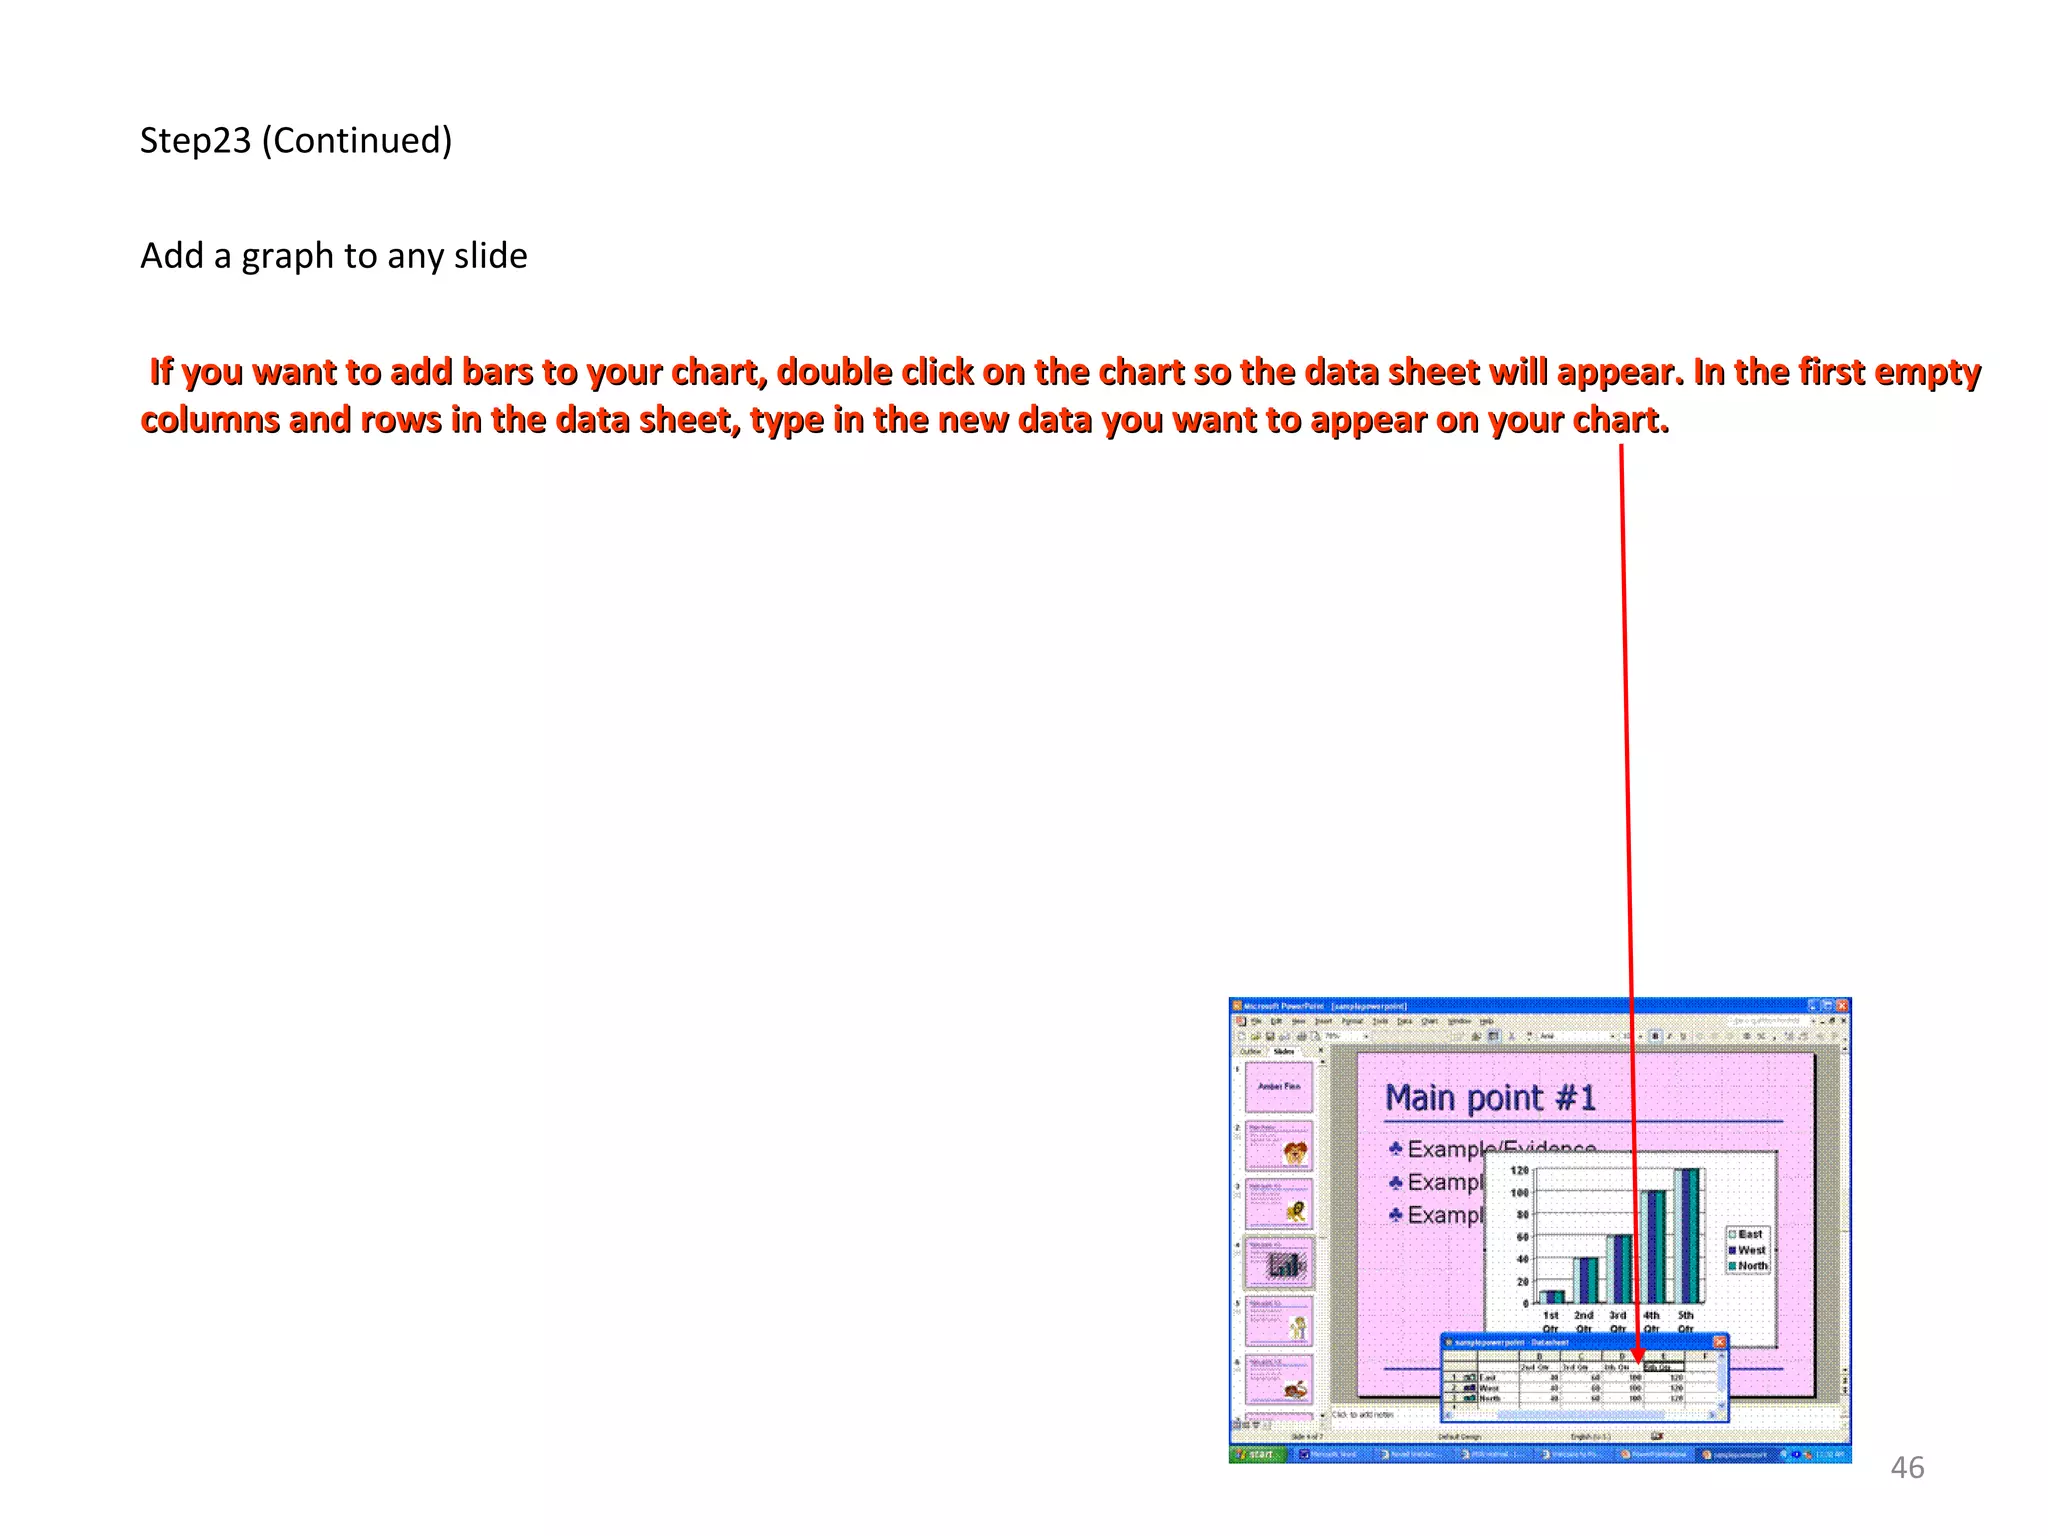
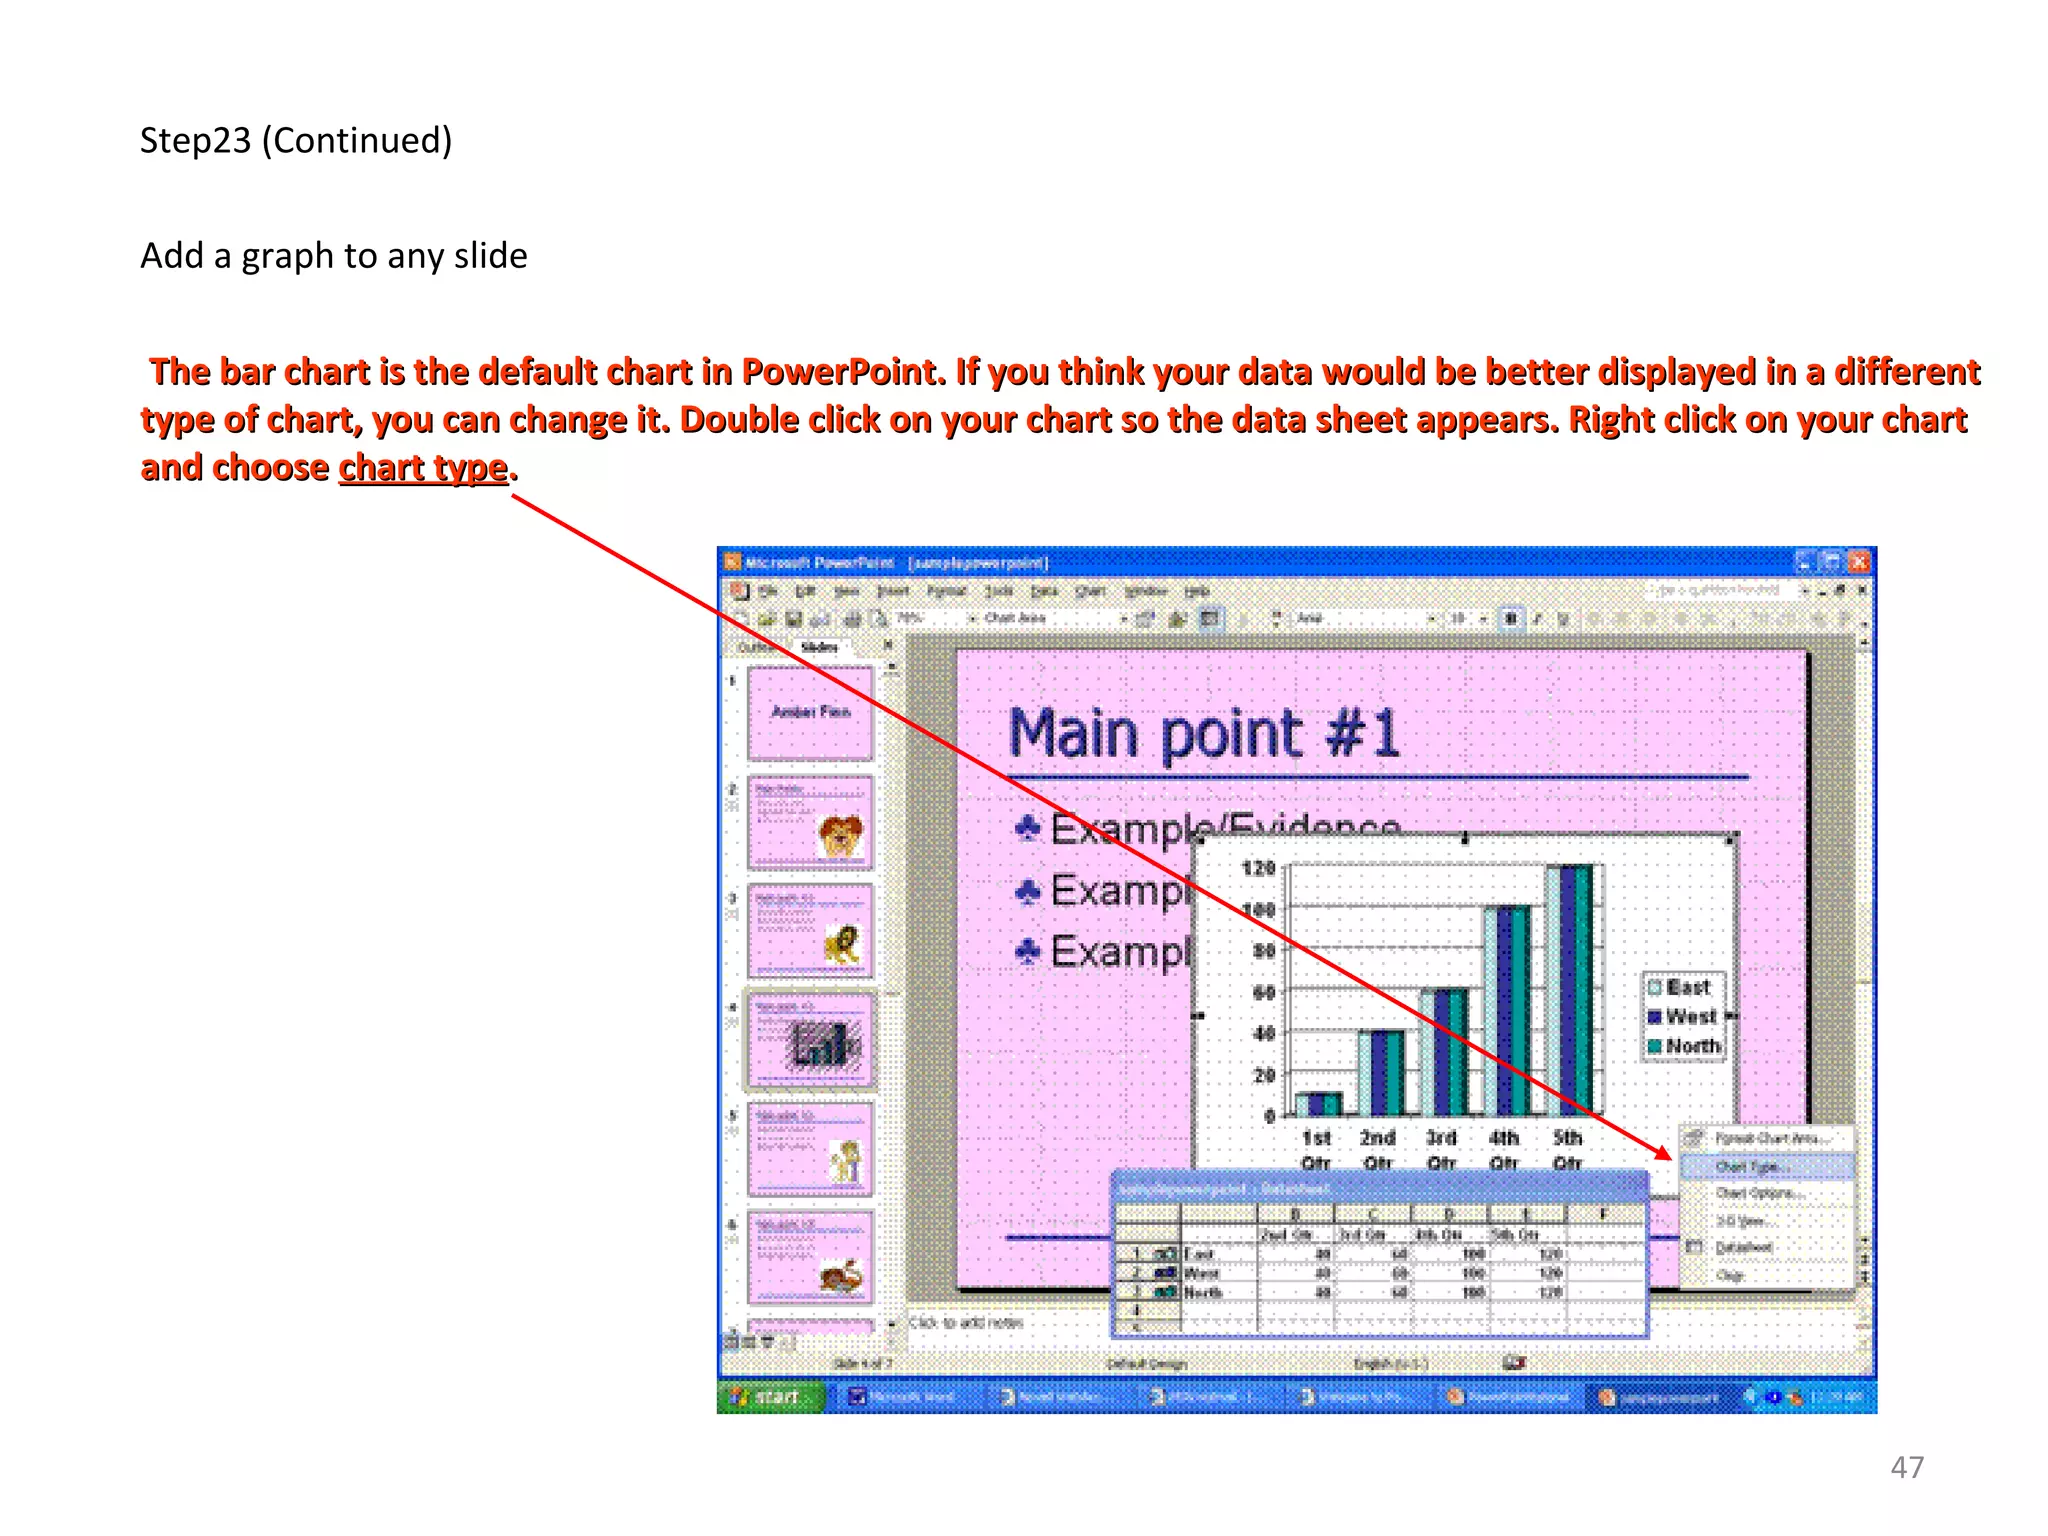
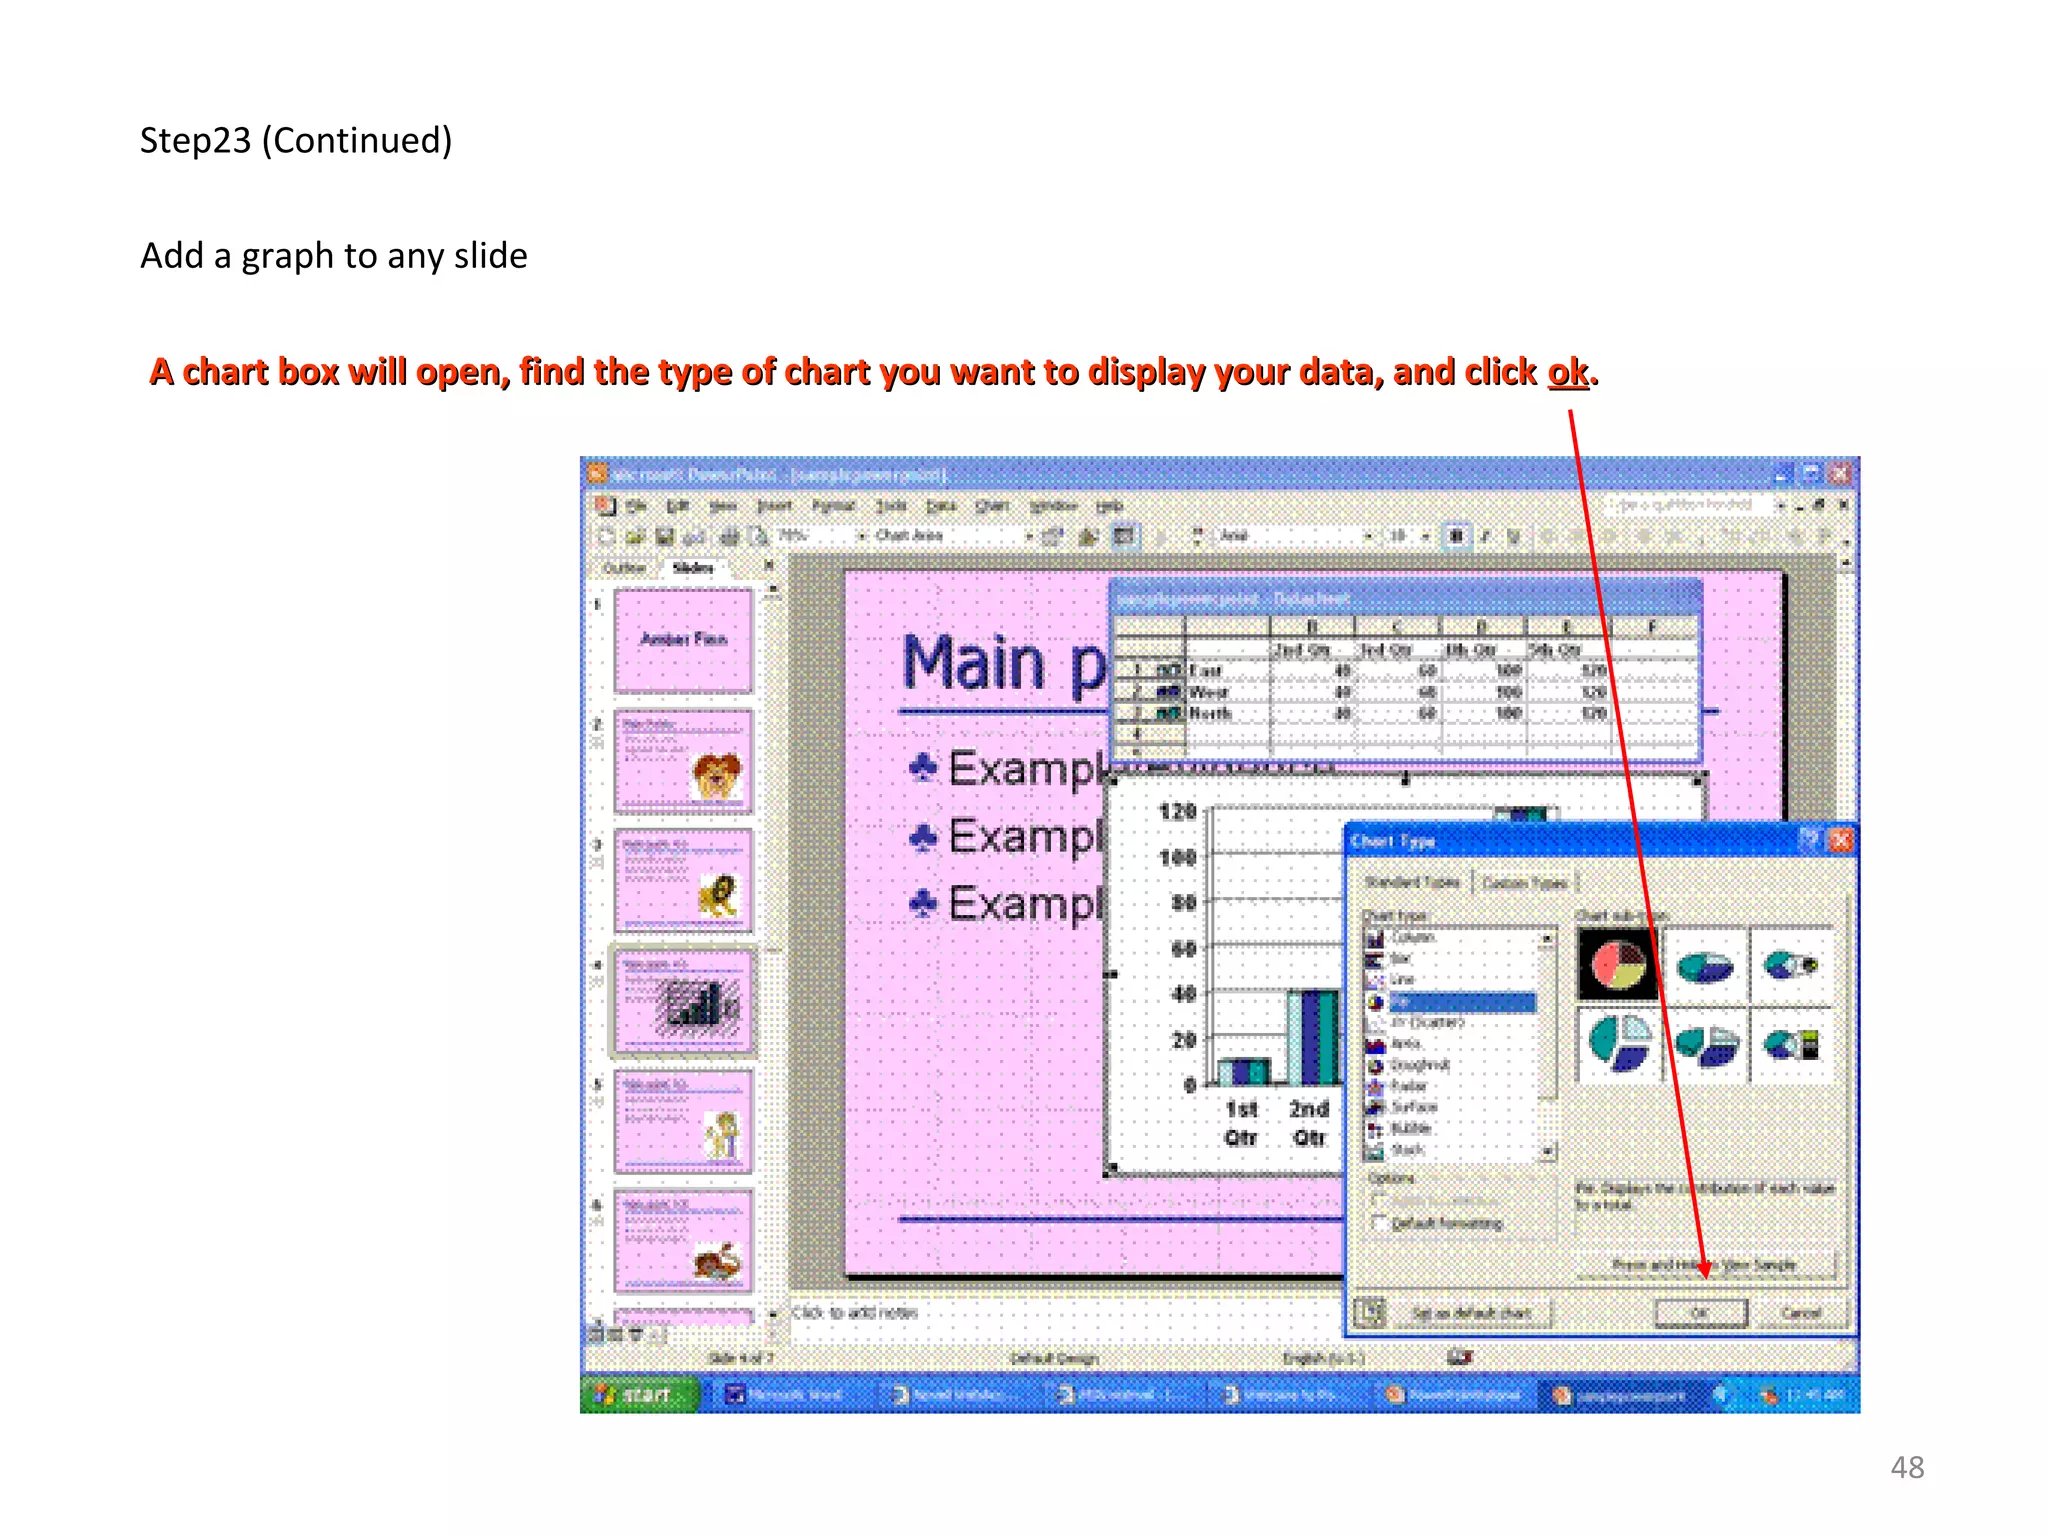
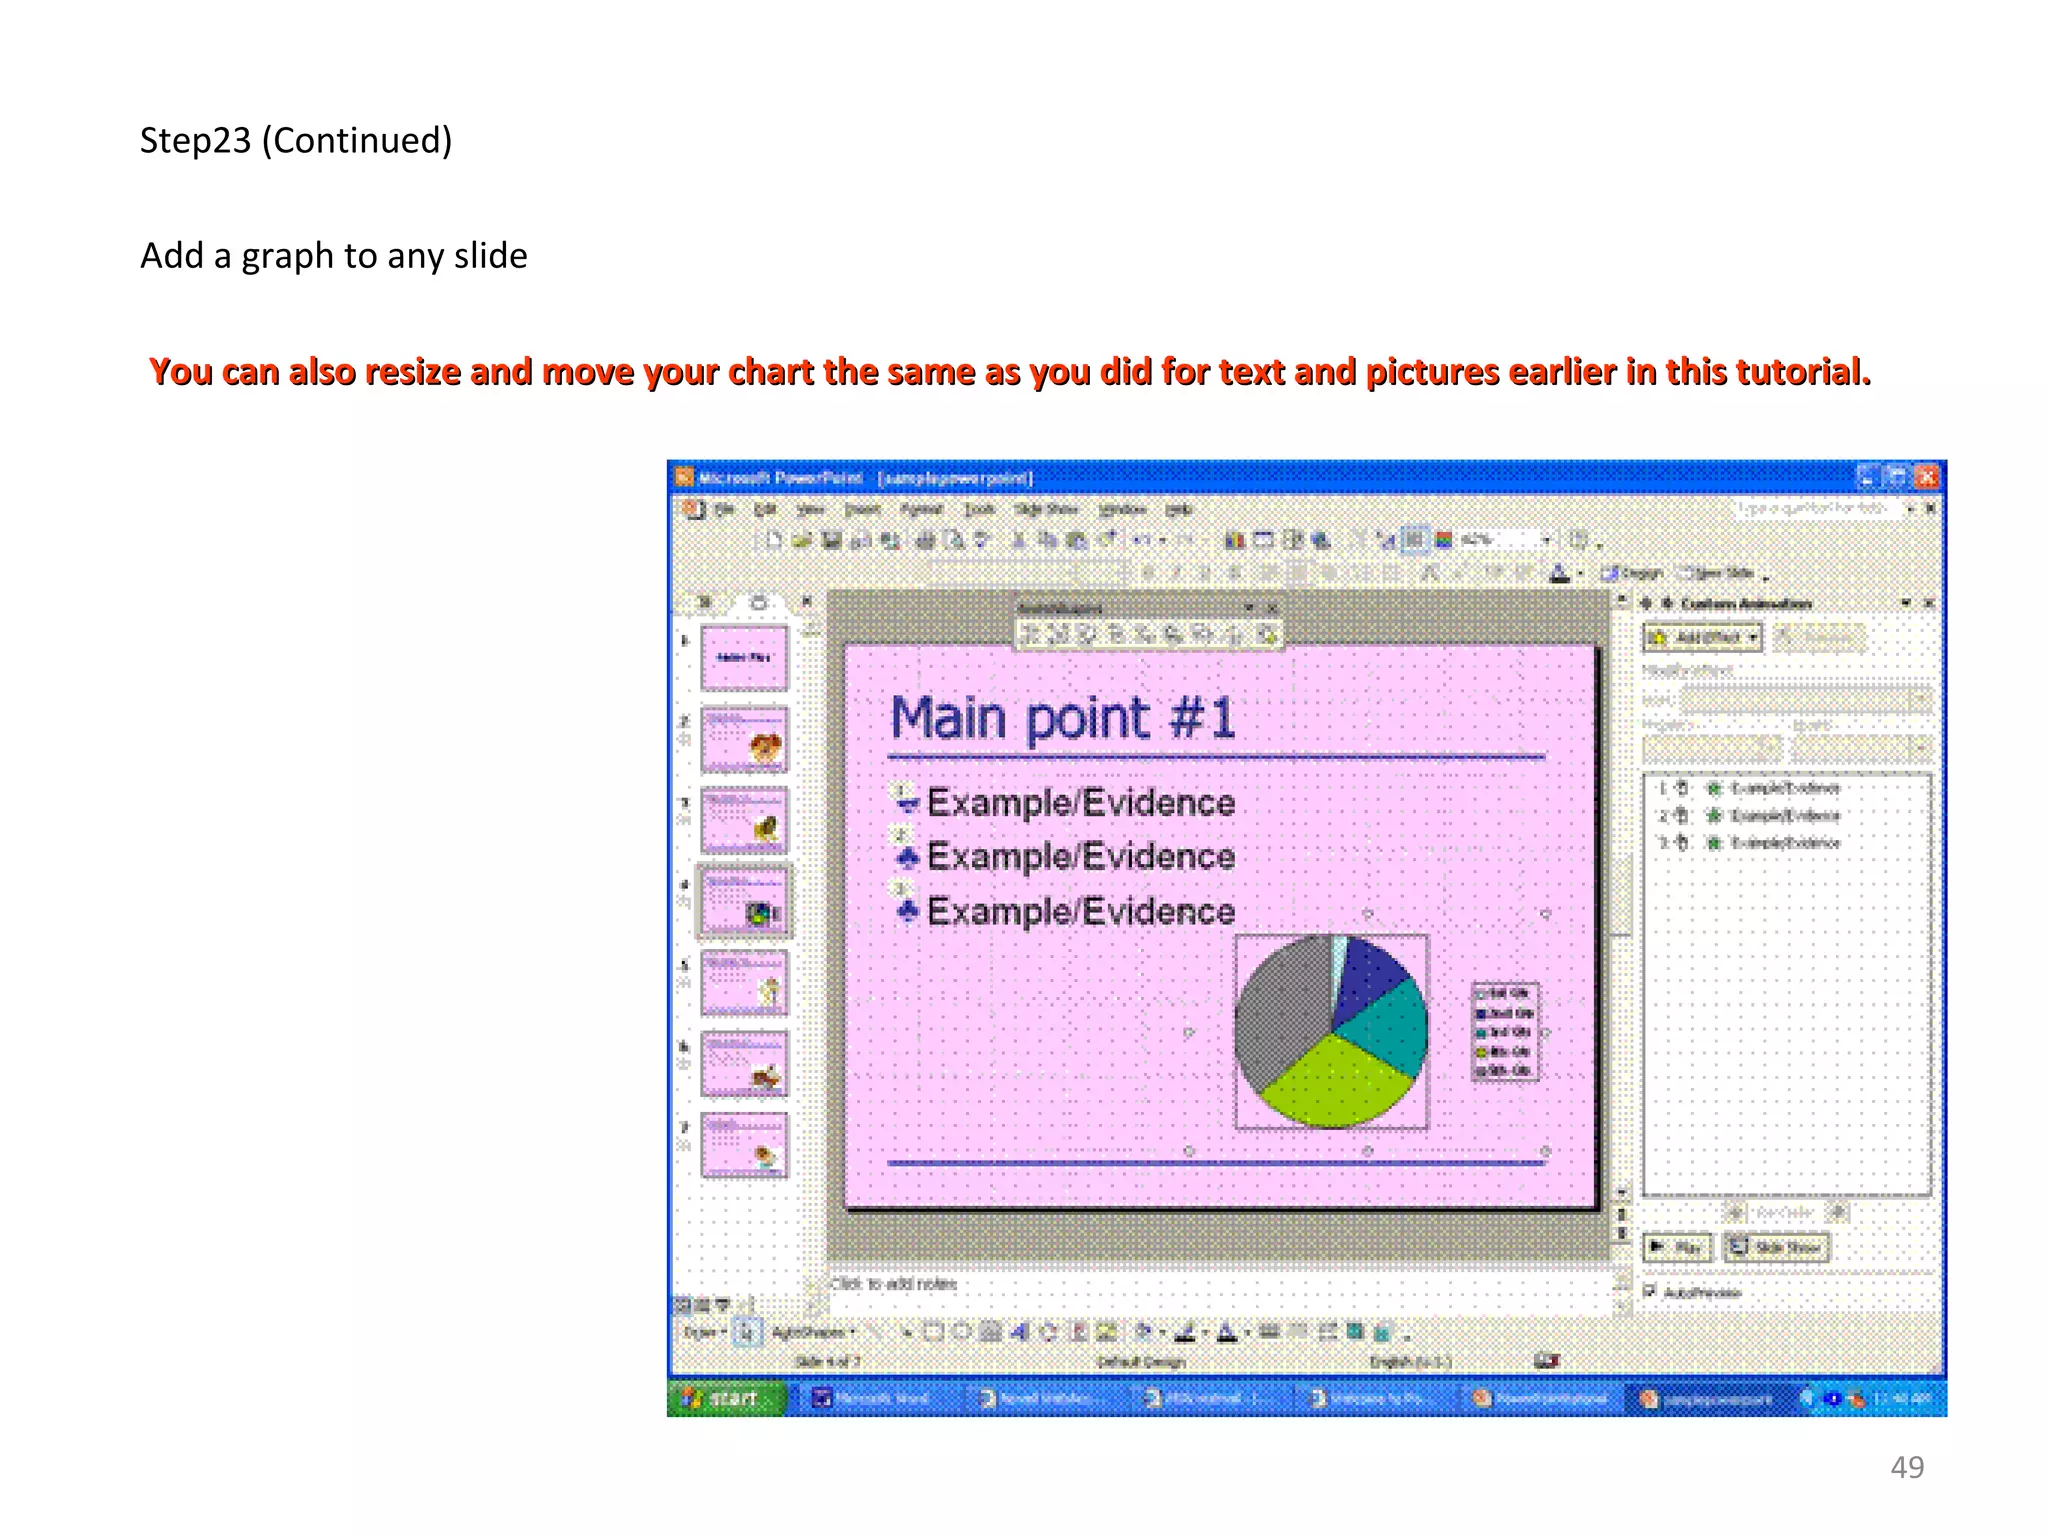
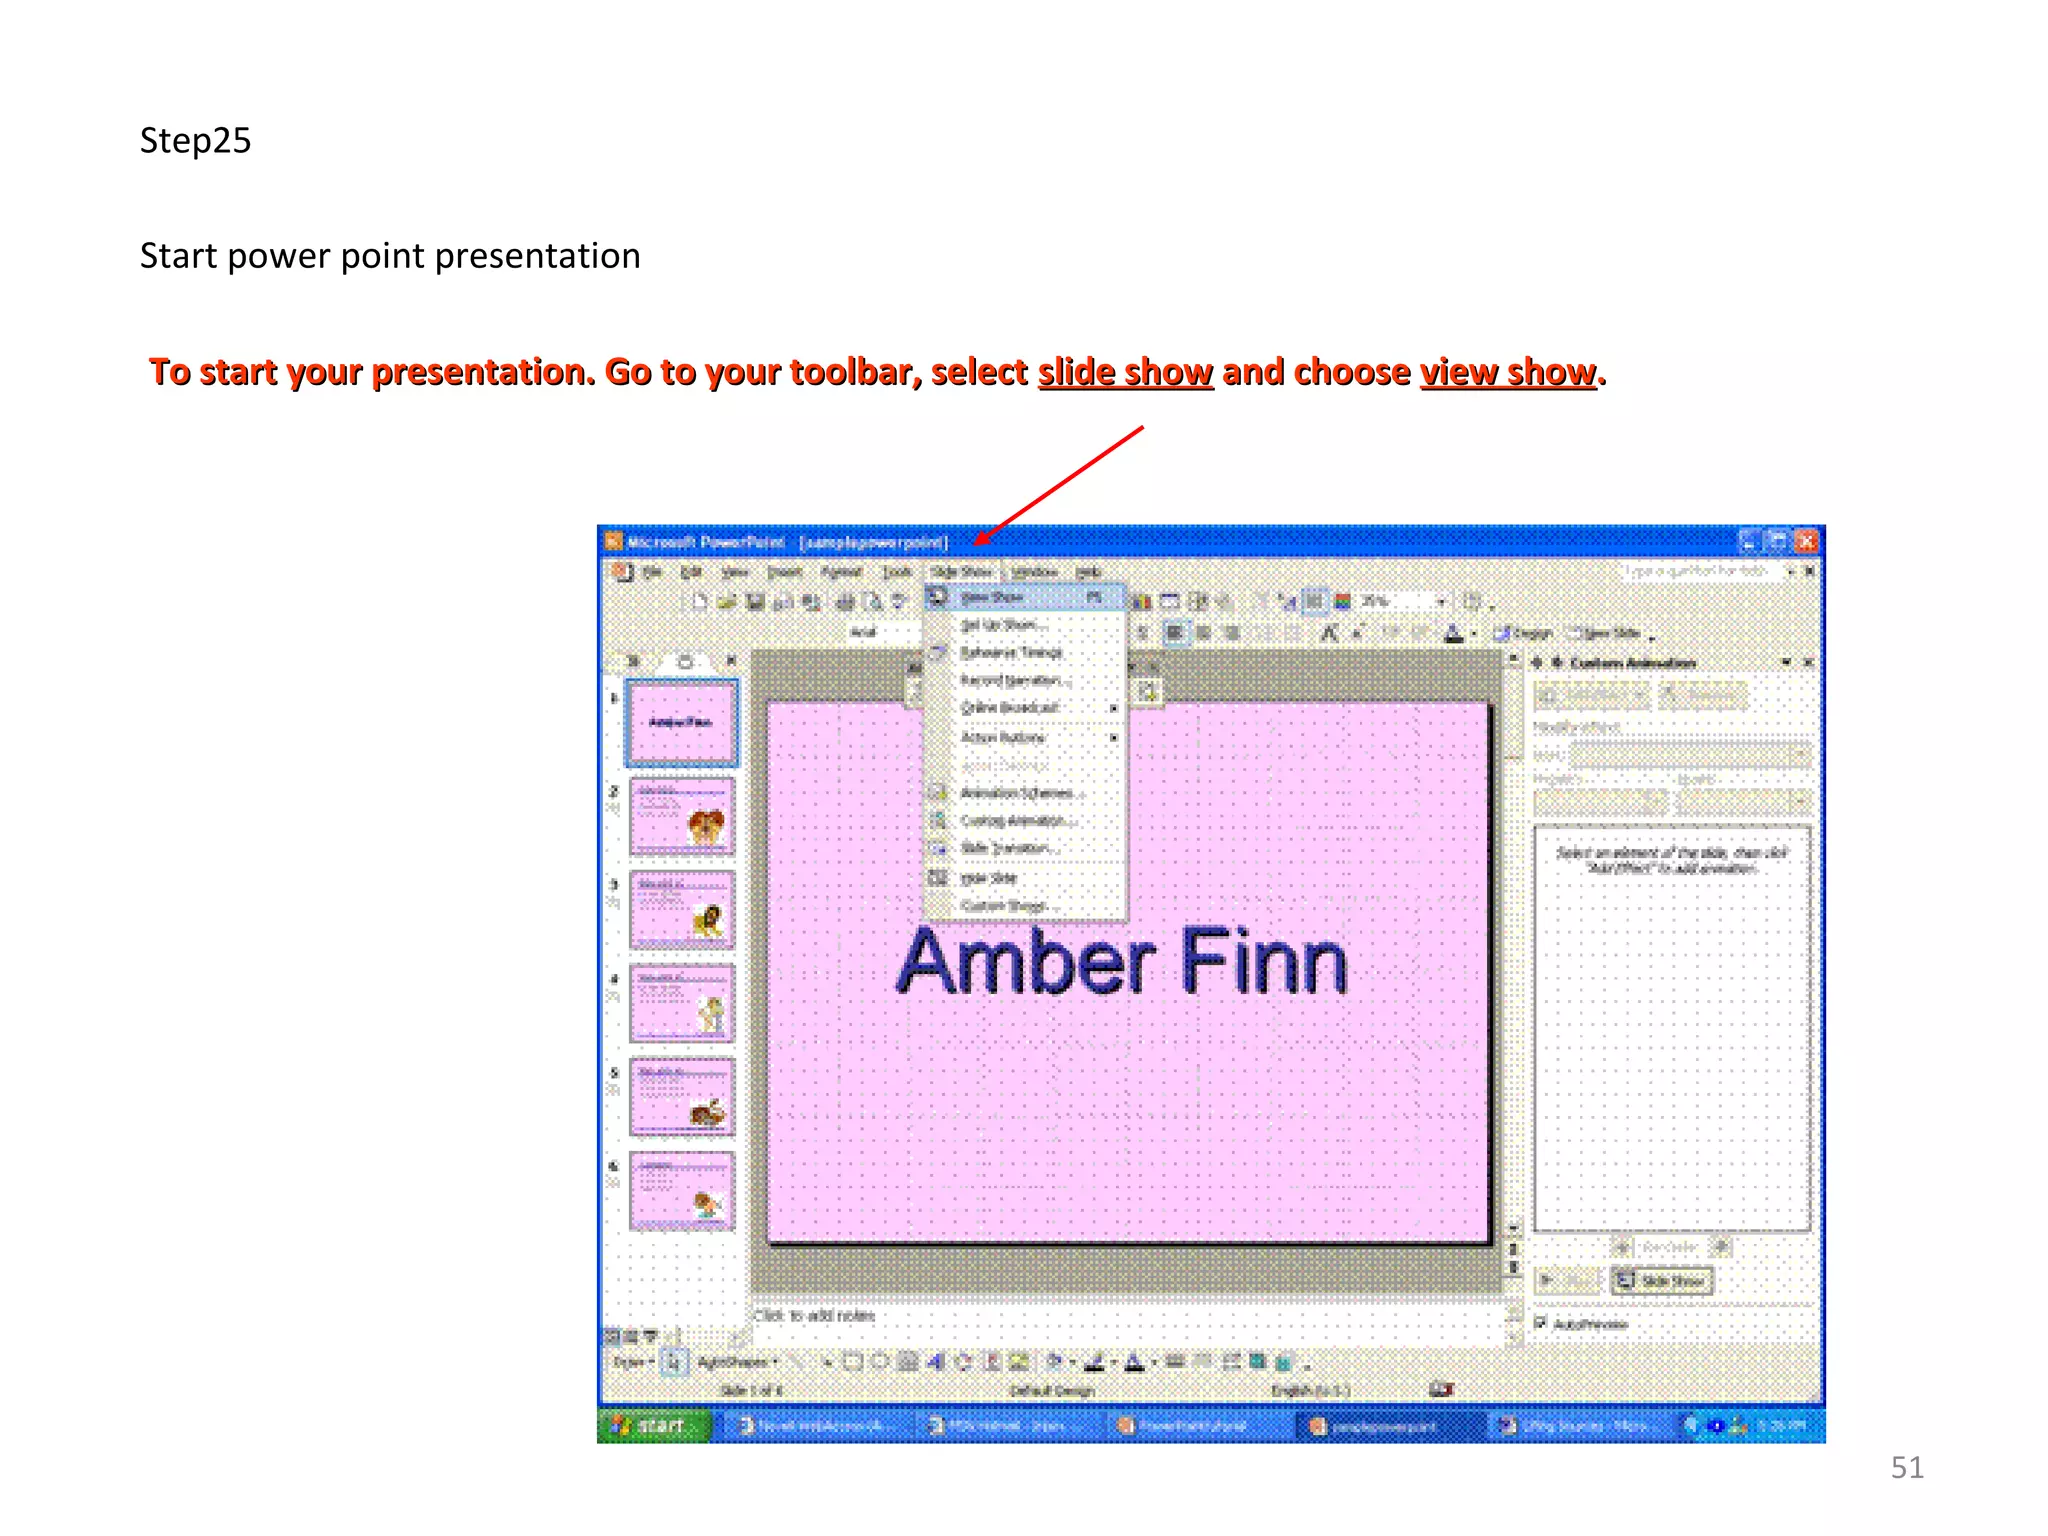
1. 6. Power point
Basic Vocabulary
Slide : A single page in PowerPoint
Presentation : All the slides for a speechAll the slides for a speech
Slide layoutSlide layout : How things are arranged on a slide: How things are arranged on a slide
Design Template : All slides are unified by preselected fonts, colors, graphics, etc.
Step1 :
Getting started
•Open power point
•Select Blank presentation
1
2. Step2 :
Choose layout for the first slide
In the new slide menu, select an Auto layout
We will start our
presentation with a
title slide.
2
3. Step3
Insert Title
• Place cursor in the title box and type your name
For your assignment,
your first slide will
contain your name only.
3
4. Step4
Move Title box
• Place pointer on the edge of the title box, and drag it to the middle of the pagePlace pointer on the edge of the title box, and drag it to the middle of the page
4
5. Step5
Format font
Place cursor in the title box and highlight your name.Place cursor in the title box and highlight your name.
5
6. Step5 (Continued)
On the toolbar chooseOn the toolbar choose formatformat and selectand select fontfont..
6
7. Step5 (Continued)
Format Font
A font box will open. Choose the font style, size, color, etc. you want and clickA font box will open. Choose the font style, size, color, etc. you want and click OKOK..
7
8. Step6
Format background:
Place your cursor anywhere on your slide, right click your mouse and choosePlace your cursor anywhere on your slide, right click your mouse and choose backgroundbackground..
8
9. Step6 (Continued)
Format background:
A toolbox will open, and you can choose the color of your background. ClickA toolbox will open, and you can choose the color of your background. Click apply to allapply to all when finished.when finished.
9
10. Step7
Insert next slide
On toolbar, click onOn toolbar, click on insertinsert. Choose. Choose new slidenew slide..
10
11. Step8
Choose layout for new slide:
A new slide will appear. Click on the slideA new slide will appear. Click on the slide layoutlayout you want to use for this slide.you want to use for this slide.
We will use the
title and text
layout.
11
12. Step9
Insert Title
Place cursor in the title box, and type thePlace cursor in the title box, and type the titletitle for your second slide.for your second slide.
12
13. Step10
Format title
To format your title, click onTo format your title, click on formatformat on the toolbar and chooseon the toolbar and choose fontfont. You can also choose the. You can also choose the justificationjustification fromfrom
the toolbar.the toolbar.
13
14. Step11
Insert text
Place your cursor in the text box. HitPlace your cursor in the text box. Hit backspacebackspace on your keyboard to delete the bullet point, and type your mainon your keyboard to delete the bullet point, and type your main
points (hit enter after each one).points (hit enter after each one).
We will create
our own
stationary
bullet points
14
15. Step12
Move textbox over
Resize the textbox (to make room for your bullet points) by holding your cursor over the edge of the textboxResize the textbox (to make room for your bullet points) by holding your cursor over the edge of the textbox
until it turns into a two-sided arrow and then drag the text box to right just a little.until it turns into a two-sided arrow and then drag the text box to right just a little.
We will put our bullet points
along the left edge of the
page, under the title
15
16. Step 13
Create own bullet points
On the toolbar, chooseOn the toolbar, choose insertinsert andand text boxtext box..
16
17. Step13 (Continued)
Create own bullet points
Draw a textbox out beside your first main point.Draw a textbox out beside your first main point.
17
18. Step 13 (Continued)
Create own bullets
On the toolbar, chooseOn the toolbar, choose insertinsert and selectand select symbolsymbol..
18
19. Ste13 continued
Create own bullet points
A symbol box will open. Choose the symbol you want to use for your bullet points and clickA symbol box will open. Choose the symbol you want to use for your bullet points and click insertinsert. Click. Click closeclose. A. A
symbol will then appear in the textbox you drew.symbol will then appear in the textbox you drew.
19
20. Step13 (continued)
Create own bullet points
You can change the size and color of your bullet point by highlighting it, clicking onYou can change the size and color of your bullet point by highlighting it, clicking on formatformat on the toolbar,on the toolbar,
selectingselecting fontfont, and then making your selections in the toolbox that opens., and then making your selections in the toolbox that opens.
20
21. Step13 (Continued)
Create your own bullet points
Move your bullet point around (by clicking on it and then dragging) to line it up with your first main point.Move your bullet point around (by clicking on it and then dragging) to line it up with your first main point.
21
22. Step13 (Continued)
Create your own bullet points
Click on your bullet point (you have to be on the text box portion of it). Right click and chooseClick on your bullet point (you have to be on the text box portion of it). Right click and choose copycopy..
22
23. Step13 (Continued)
Create your own bullet points
Place your cursor anywhere on your slide, and right click. ChoosePlace your cursor anywhere on your slide, and right click. Choose pastepaste. A bullet point will appear. Right click. A bullet point will appear. Right click
again and chooseagain and choose pastepaste. You should have three bullet points now.. You should have three bullet points now.
23
24. Step13 (continued)
Use the arrow keys on your key board to move the bullet points around. Line them up with your text.Use the arrow keys on your key board to move the bullet points around. Line them up with your text.
24
25. Step14
Animate your main points
If you want your main points to come in one at a time, highlight your text. Right click and chooseIf you want your main points to come in one at a time, highlight your text. Right click and choose customcustom
animationanimation..
25
26. Step14 (continued)
Animate your main points
A custom animation box appears on the right of your screen. Click onA custom animation box appears on the right of your screen. Click on Add EffectAdd Effect and choose how you want yourand choose how you want your
text to come in.text to come in.
26
27. Step14 (continued)
Animate your main points
Make sure in theMake sure in the StartStart drop-down box you have chosendrop-down box you have chosen On ClickOn Click..
27
28. Step15
Find picture
On the internet, go toOn the internet, go to www.google.comwww.google.com. Click on. Click on imagesimages and type in the type of picture that you want to use inand type in the type of picture that you want to use in
your presentation (ex. lions). Click onyour presentation (ex. lions). Click on SearchSearch..
28
29. Step15 (continued)
Find picture
When you find the picture you want to use, right click and chooseWhen you find the picture you want to use, right click and choose save picture assave picture as. Save the picture to your. Save the picture to your
computer or a disk.computer or a disk.
29
30. Step16
Insert picture
Now you want to insert the picture you found into your slide. On the toolbar, chooseNow you want to insert the picture you found into your slide. On the toolbar, choose insertinsert, select, select picturepicture, and, and
fromfrom filefile..
30
31. Step16 (Continued)
Insert picture
When you insert your picture, it will mess up your layout, so you need toWhen you insert your picture, it will mess up your layout, so you need to immediatelyimmediately go to the toolbar, selectgo to the toolbar, select
editedit, and select, and select undo slide layoutundo slide layout. This will fix the problem.. This will fix the problem.
31
32. Step17
Format picture
You can move your picture around by clicking and dragging. You can resize your picture by clicking on a cornerYou can move your picture around by clicking and dragging. You can resize your picture by clicking on a corner
and dragging the corner out.and dragging the corner out.
It is a good idea to tell
your audience where
you got the picture
from in small font
under the picture.
32
33. Step18
Insert the line under title
If you want to insert a line under your title, on the toolbar, chooseIf you want to insert a line under your title, on the toolbar, choose insertinsert, select, select picturepicture, and then select, and then select
AutoShapeAutoShape..
33
34. Step18 (Continued)
Insert line under title
An AutoShape box will appear. Choose the line you want. Draw the line under the title.An AutoShape box will appear. Choose the line you want. Draw the line under the title.
34
35. Step18 (Continued)
Insert line under title
To format the line, double click on the line. A toolbox will open and you can change the color, style, weight, etc.To format the line, double click on the line. A toolbox will open and you can change the color, style, weight, etc.
If you want a line at the
bottom of the page also,
you can right click on the
line, choose copy, and
then choose paste. Drag
the new line to the bottom
of the slide.
35
36. Step19
Insert next slide
You do not want to have to do all these formatting steps for every slide, so for your next slide, go to the toolbar,You do not want to have to do all these formatting steps for every slide, so for your next slide, go to the toolbar,
choosechoose insertinsert, and choose, and choose duplicate slideduplicate slide..
You now have two of
the exact same slides.
36
37. Step20
Change title and text on the new slide
Click in the title box on your new slide (3Click in the title box on your new slide (3rdrd
slide), highlight the old title, and type a new title over it. Do the sameslide), highlight the old title, and type a new title over it. Do the same
thing for the text.thing for the text.
37
38. Step21
Change the picture
Click on the picture, and hit delete on your key board. Insert a new picture (insert, picture, from file). Don’tClick on the picture, and hit delete on your key board. Insert a new picture (insert, picture, from file). Don’t
forget to go toforget to go to insertinsert,, undo slide layoutundo slide layout to fix your slide. You can then move and resize the picture.to fix your slide. You can then move and resize the picture.
38
39. Step22
Additional slides
Insert as many duplicate slides as needed. Follow above steps to change.Insert as many duplicate slides as needed. Follow above steps to change.
39
40. Step23
Add a graph to any slide
You may want to insert a chart to help explain the information in your presentation (especially statistics). To addYou may want to insert a chart to help explain the information in your presentation (especially statistics). To add
a chart: on your toolbar, choosea chart: on your toolbar, choose insertinsert and selectand select chartchart
40
41. Step23 (Continued)
Add a graph to any slide
When you insert a chart, a sample data sheet and corresponding bar chart will appear on your slide. PowerPointWhen you insert a chart, a sample data sheet and corresponding bar chart will appear on your slide. PowerPoint
has included some sample data in the first four columns. The bars in the chart are the graphical representation ofhas included some sample data in the first four columns. The bars in the chart are the graphical representation of
the numbers in the data sheet.the numbers in the data sheet.
41
42. Step23 (Continued)
Add a graph to any slide
To create you own chart, you can replace the data in the sample data sheet with your own data. Click in the rowTo create you own chart, you can replace the data in the sample data sheet with your own data. Click in the row
on the data sheet you want to change, type your number, and hit enter. PowerPoint will automatically changeon the data sheet you want to change, type your number, and hit enter. PowerPoint will automatically change
the chart as well.the chart as well.
You can also change the
chart titles by simply
typing over what
PowerPoint has used as
sample titles.
42
43. Step23 (Continued)
Add a graph to any slide
After you have changed all the data you want to change, click anywhere on your slide, and the data sheet willAfter you have changed all the data you want to change, click anywhere on your slide, and the data sheet will
disappear. If you need to make additional changes, double click on the chart, and the data sheet will reappear.disappear. If you need to make additional changes, double click on the chart, and the data sheet will reappear.
43
44. Step23 (Continued)
Add a graph to any slide
If inserting the chart messed up your slide format, on the toolbar, go toIf inserting the chart messed up your slide format, on the toolbar, go to editedit, and select, and select undo slide layoutundo slide layout. This. This
will fix your slide.will fix your slide.
44
45. Step23 (Continued)
Add a graph to any slide
To delete rows on your chart, double click on the chart so the data sheet will appear. Right click on the columnTo delete rows on your chart, double click on the chart so the data sheet will appear. Right click on the column
(or row) in the data sheet you want to delete, and choose(or row) in the data sheet you want to delete, and choose deletedelete..
45
46. Step23 (Continued)
Add a graph to any slide
If you want to add bars to your chart, double click on the chart so the data sheet will appear. In the first emptyIf you want to add bars to your chart, double click on the chart so the data sheet will appear. In the first empty
columns and rows in the data sheet, type in the new data you want to appear on your chart.columns and rows in the data sheet, type in the new data you want to appear on your chart.
46
47. Step23 (Continued)
Add a graph to any slide
The bar chart is the default chart in PowerPoint. If you think your data would be better displayed in a differentThe bar chart is the default chart in PowerPoint. If you think your data would be better displayed in a different
type of chart, you can change it. Double click on your chart so the data sheet appears. Right click on your charttype of chart, you can change it. Double click on your chart so the data sheet appears. Right click on your chart
and chooseand choose chart typechart type..
47
48. Step23 (Continued)
Add a graph to any slide
A chart box will open, find the type of chart you want to display your data, and clickA chart box will open, find the type of chart you want to display your data, and click okok..
48
49. Step23 (Continued)
Add a graph to any slide
You can also resize and move your chart the same as you did for text and pictures earlier in this tutorial.You can also resize and move your chart the same as you did for text and pictures earlier in this tutorial.
49
50. Step24
Review slides
Review slides for spelling, grammar, etc. errors. Practice using your PowerPoint as you practice yourReview slides for spelling, grammar, etc. errors. Practice using your PowerPoint as you practice your
presentation.presentation.
50
51. Step25
Start power point presentation
To start your presentation. Go to your toolbar, selectTo start your presentation. Go to your toolbar, select slide showslide show and chooseand choose view showview show..
51