Practical Nursing
B
Presented by:Group 4 -
Home About Content Others
A presentation program is a type of software
used visual and multimedia presentations. It allow
users to design slides that can include text,
images ,videos , animations and other interactive
elements to effectively convey information to an
audience .
3.
Home About ContentOthers
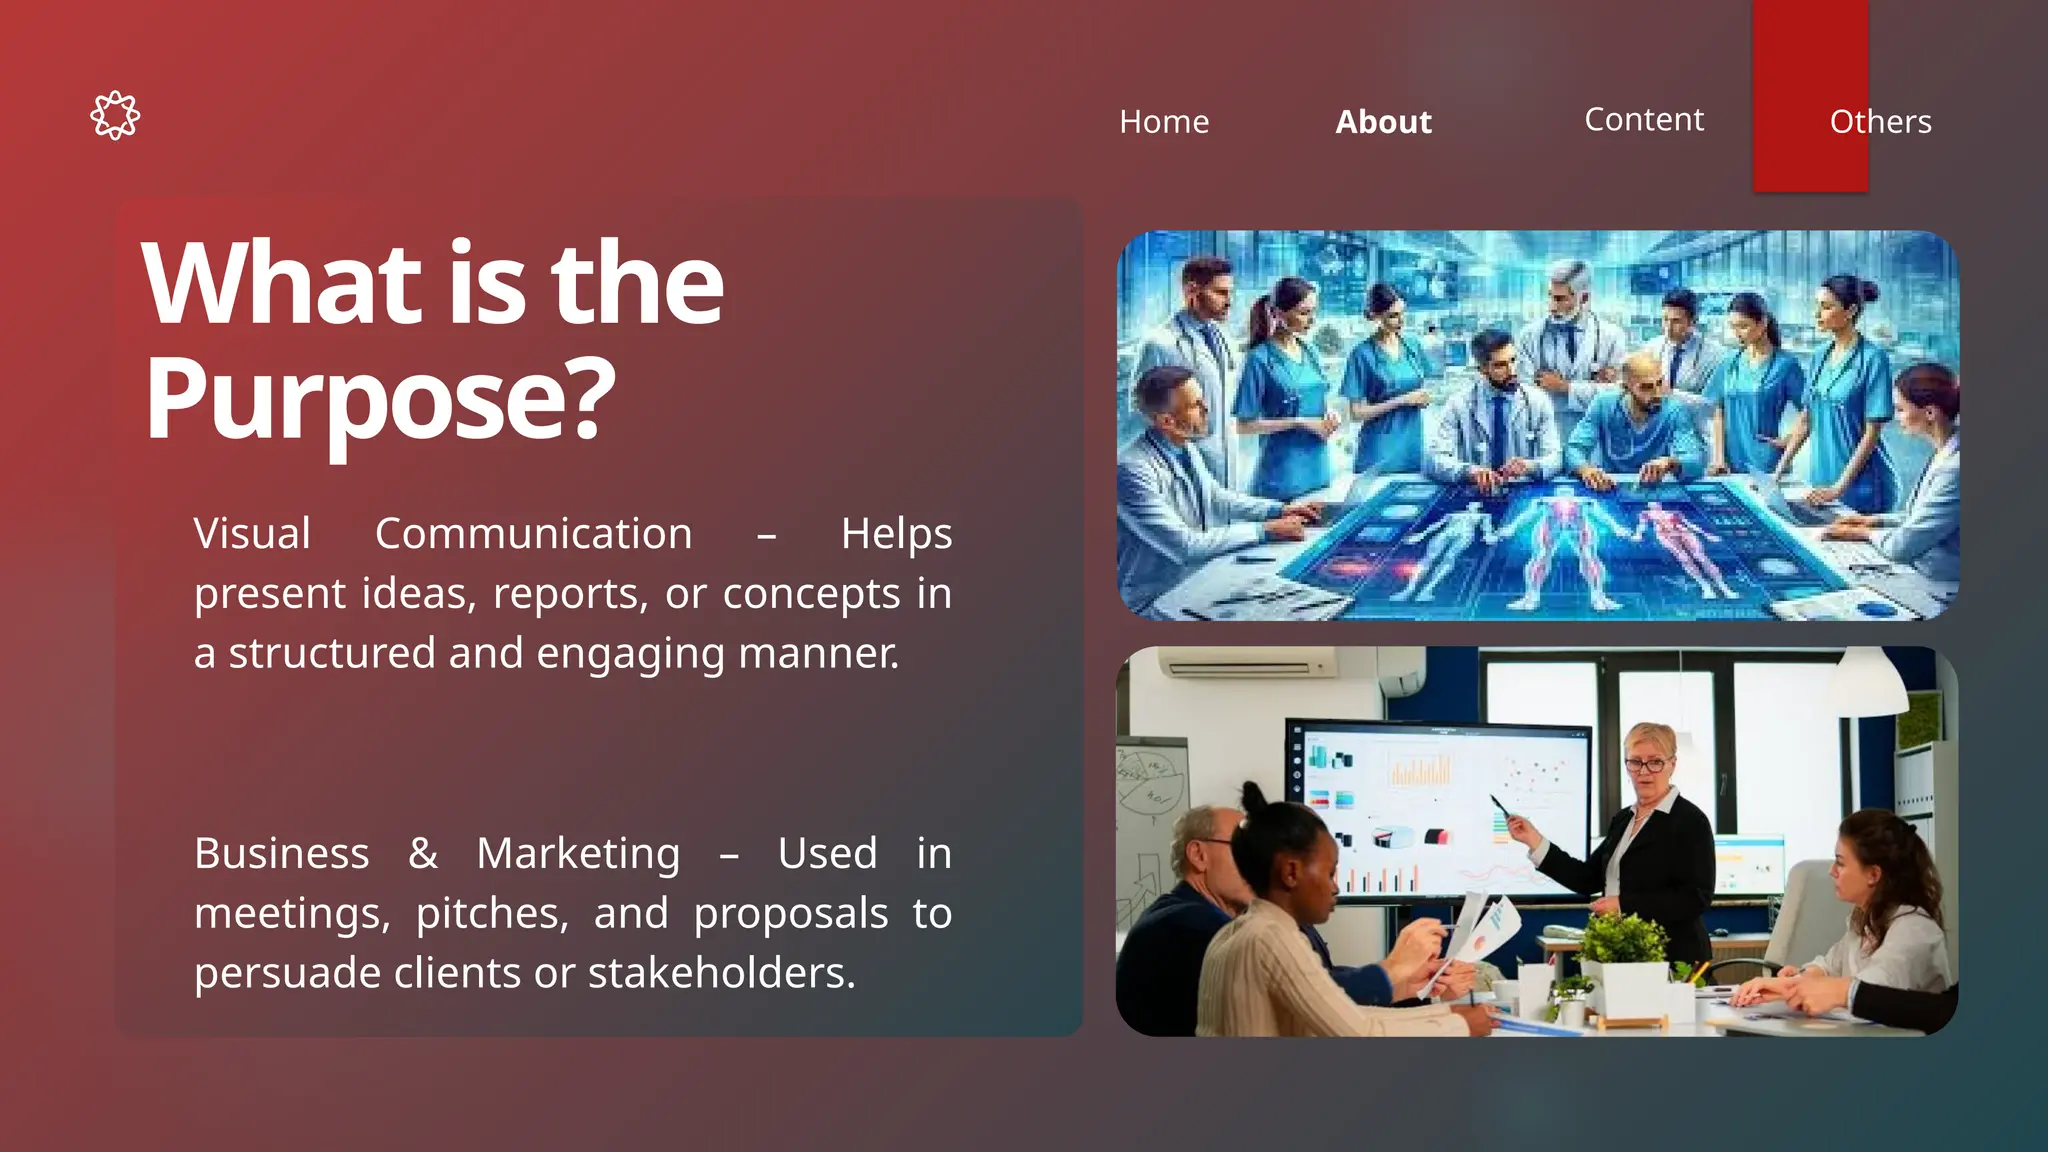
Visual Communication – Helps
present ideas, reports, or concepts in
a structured and engaging manner.
What is the
Purpose?
Business & Marketing – Used in
meetings, pitches, and proposals to
persuade clients or stakeholders.
4.
Home About ContentOthers
Education & Training – Assists
teachers, trainers, and students in
delivering lessons or reports.
Conferences & Public Speaking –
Supports speakers with visual aids to
enhance understanding.
Project & Performance Reports –
Simplifies data presentation with
charts and infographics.
5.
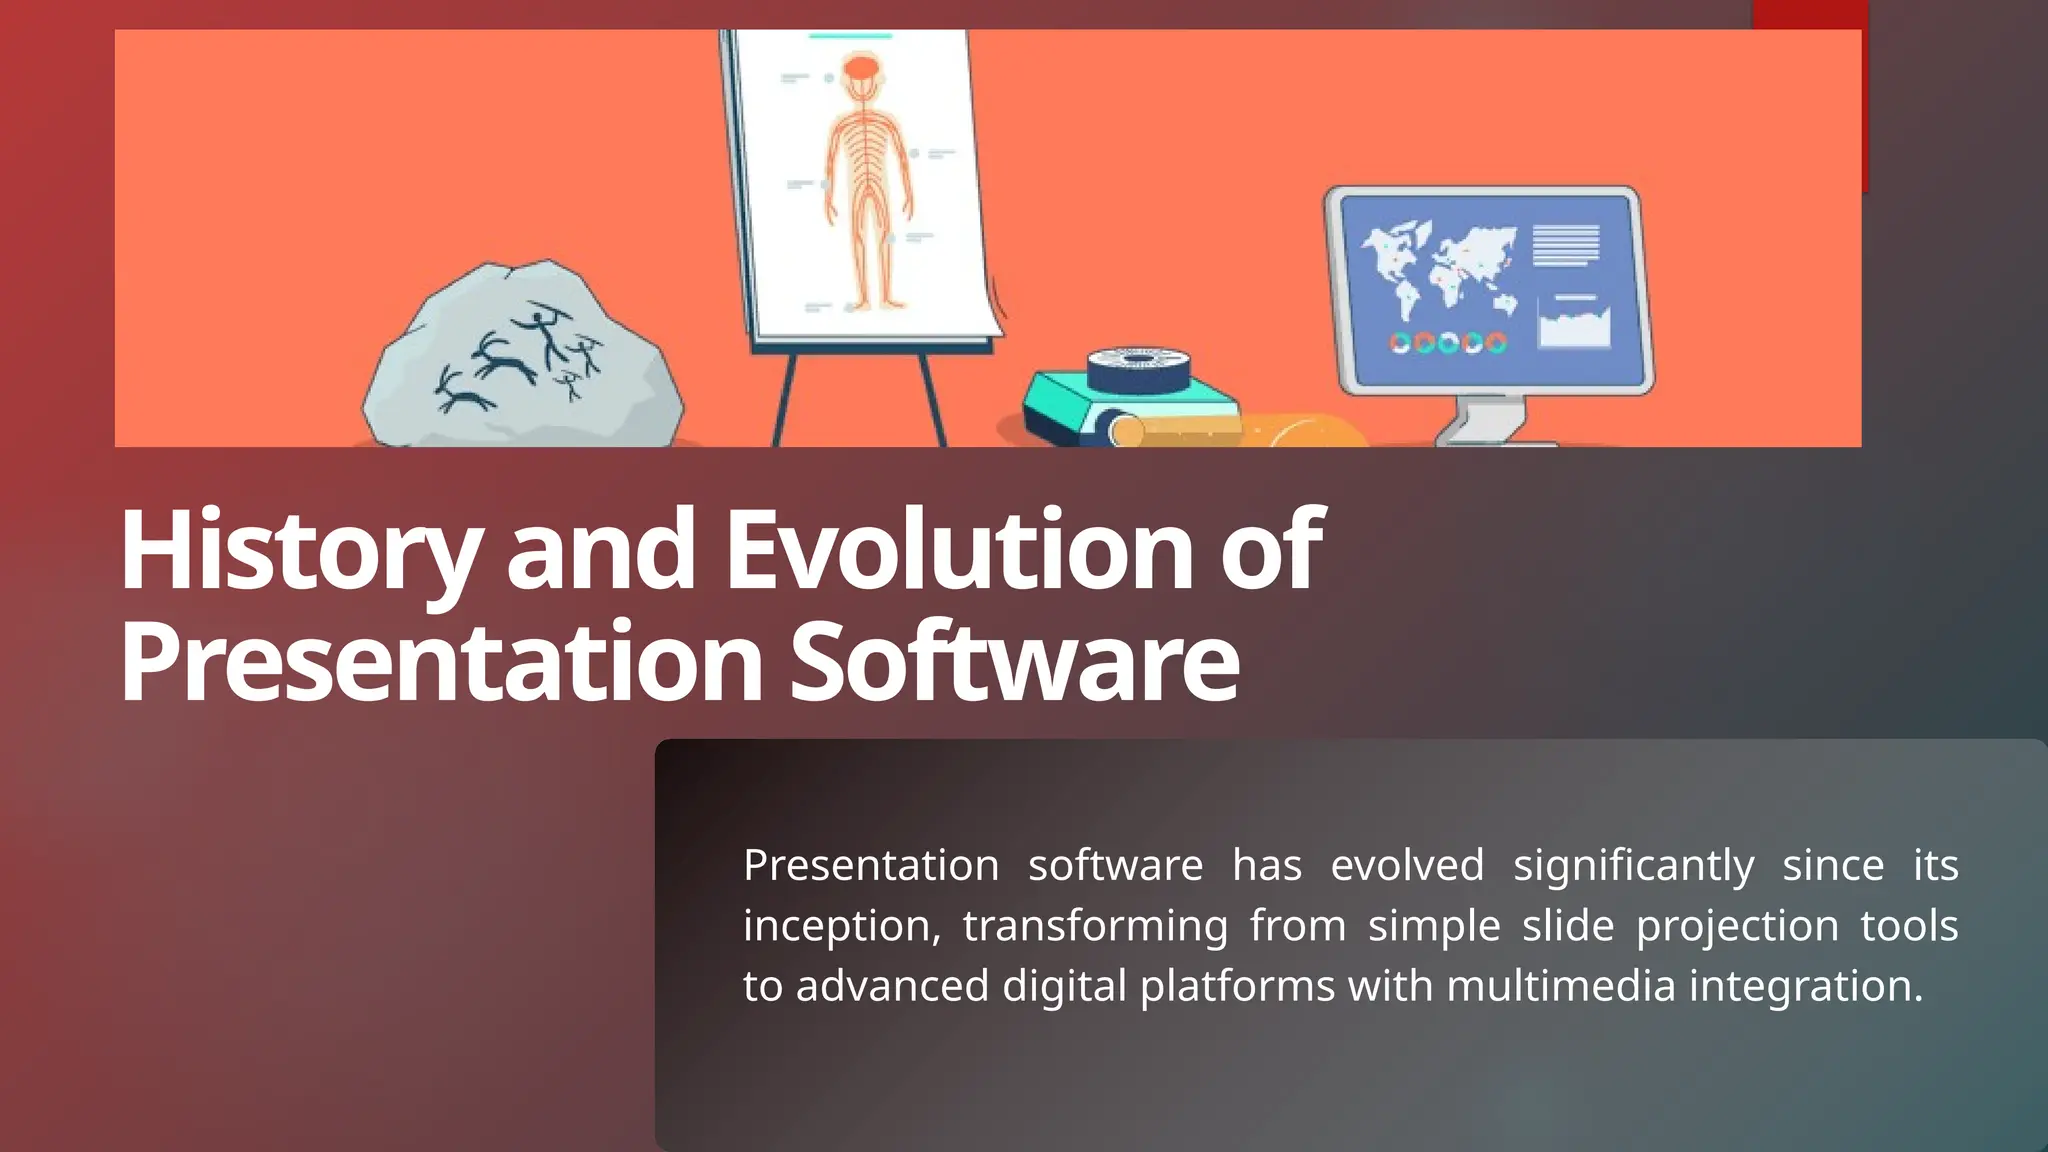
Presentation software hasevolved significantly since its
inception, transforming from simple slide projection tools
to advanced digital platforms with multimedia integration.
History and Evolution of
Presentation Software
6.
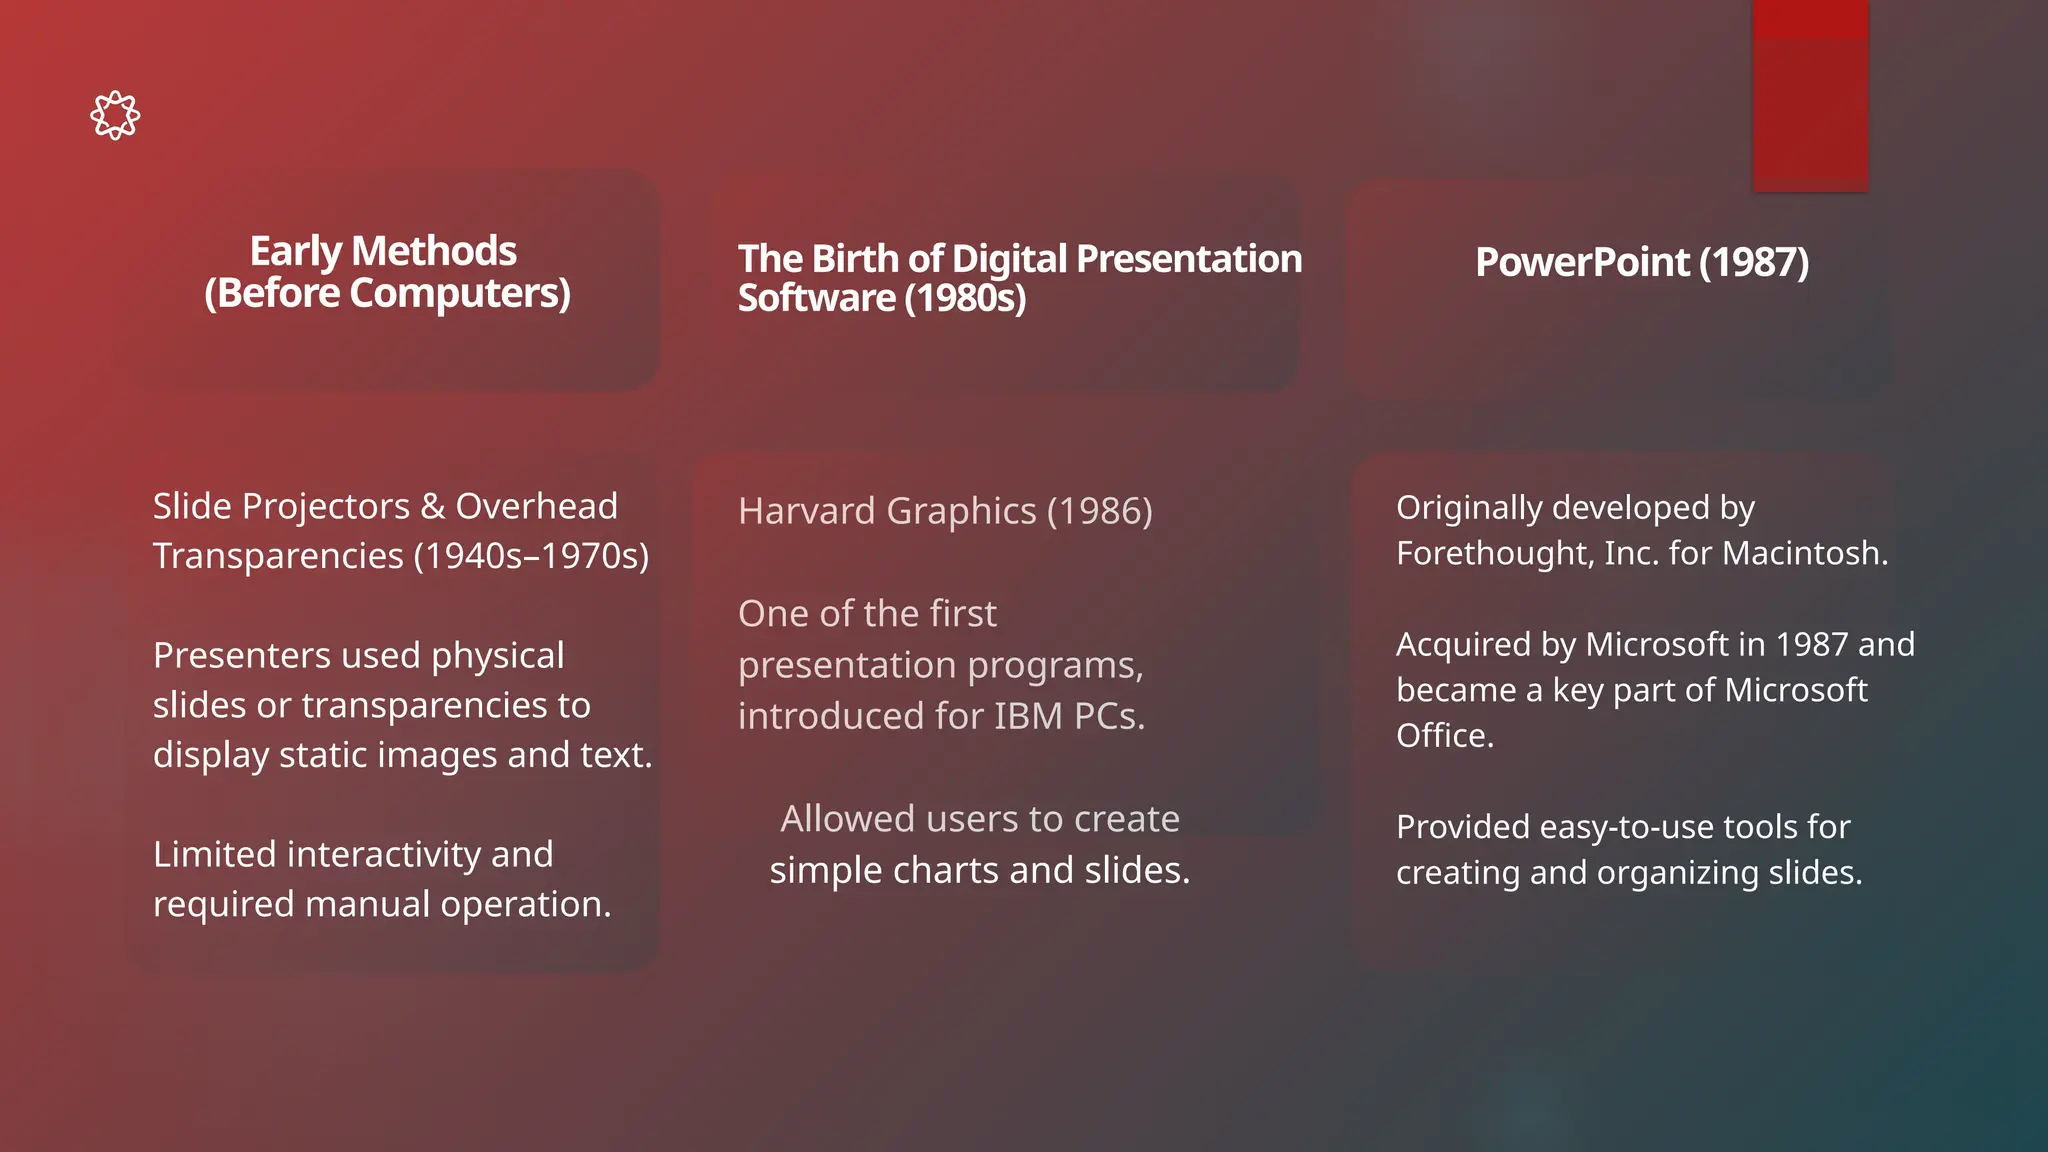
Slide Projectors &Overhead
Transparencies (1940s–1970s)
Presenters used physical
slides or transparencies to
display static images and text.
Limited interactivity and
required manual operation.
Early Methods
(Before Computers)
The Birth of Digital Presentation
Software (1980s)
PowerPoint (1987)
Harvard Graphics (1986)
One of the first
presentation programs,
introduced for IBM PCs.
Allowed users to create
simple charts and slides.
Originally developed by
Forethought, Inc. for Macintosh.
Acquired by Microsoft in 1987 and
became a key part of Microsoft
Office.
Provided easy-to-use tools for
creating and organizing slides.
7.
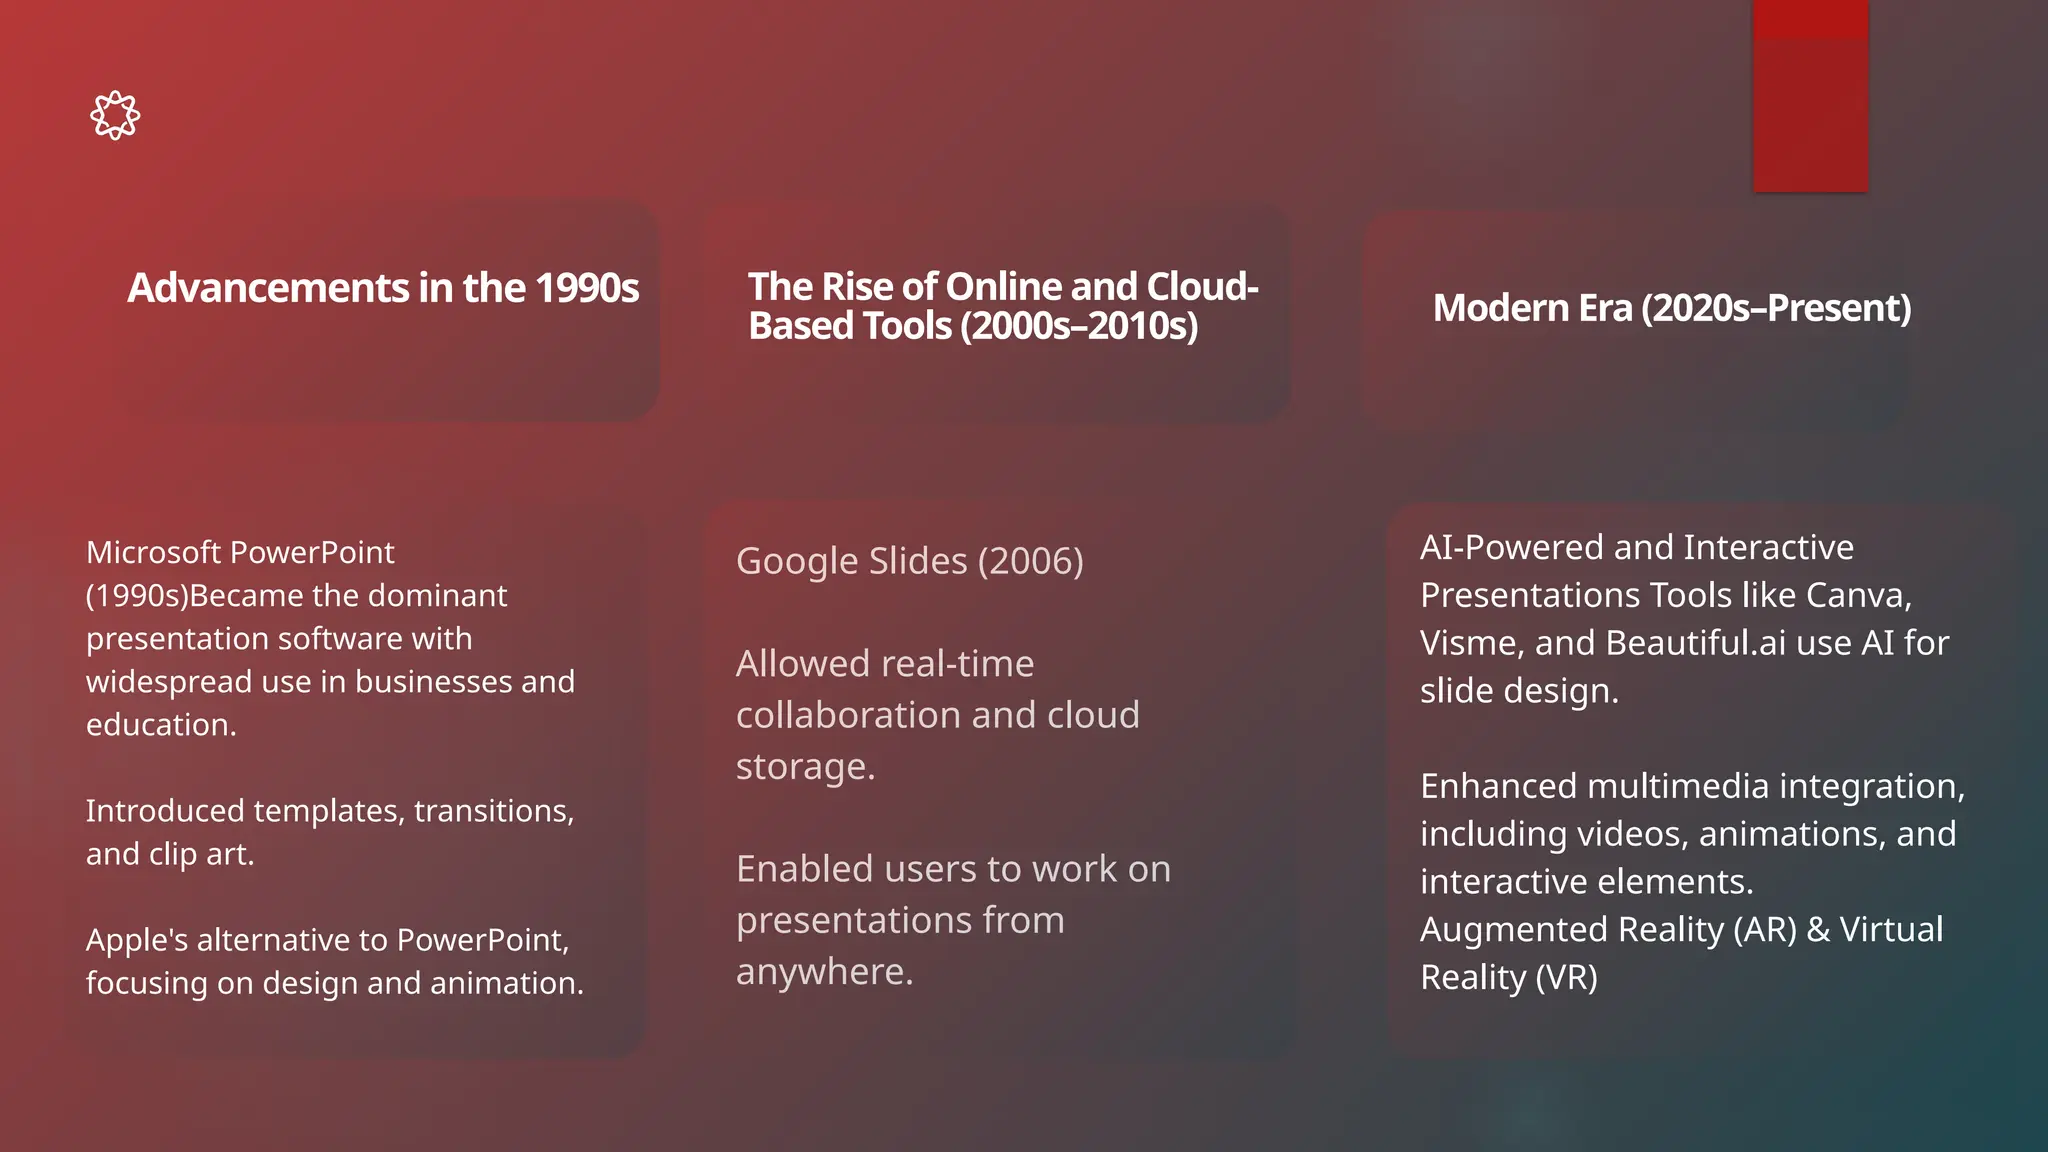
Microsoft PowerPoint
(1990s)Became thedominant
presentation software with
widespread use in businesses and
education.
Introduced templates, transitions,
and clip art.
Apple's alternative to PowerPoint,
focusing on design and animation.
Advancements in the 1990s The Rise of Online and Cloud-
Based Tools (2000s–2010s) Modern Era (2020s–Present)
Google Slides (2006)
Allowed real-time
collaboration and cloud
storage.
Enabled users to work on
presentations from
anywhere.
AI-Powered and Interactive
Presentations Tools like Canva,
Visme, and Beautiful.ai use AI for
slide design.
Enhanced multimedia integration,
including videos, animations, and
interactive elements.
Augmented Reality (AR) & Virtual
Reality (VR)
8.
Home About ContentOthers
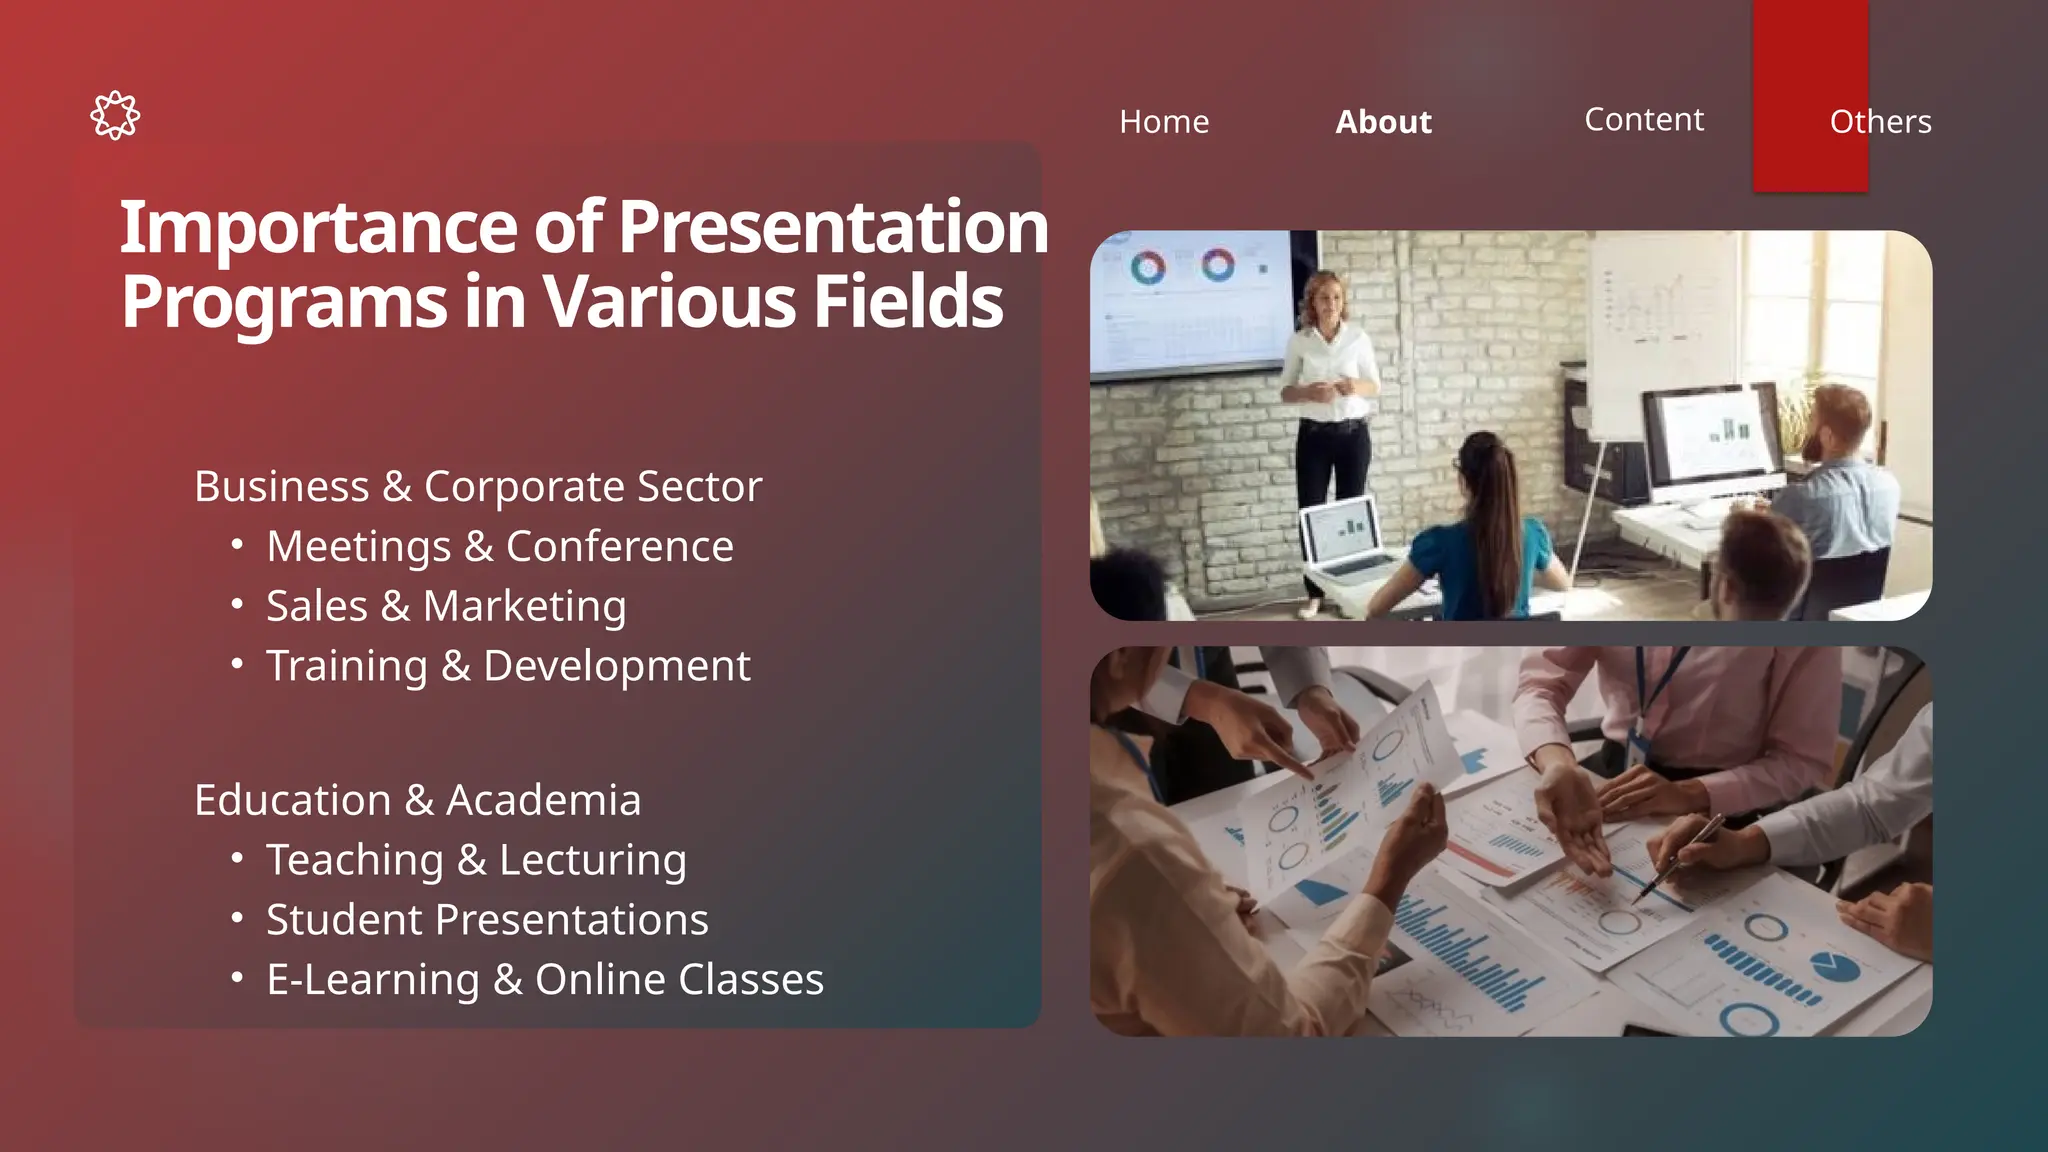
Business & Corporate Sector
• Meetings & Conference
• Sales & Marketing
• Training & Development
Importance of Presentation
Programs in Various Fields
Education & Academia
• Teaching & Lecturing
• Student Presentations
• E-Learning & Online Classes
9.
Home About ContentOthers
Science & Research
• Academic Conferences
• Data Visualization
Government & Public Services
• Policy Presentations
• CommunityAwareness Programs
Healthcare & Medical Field
• Medical Seminars & Conferences
• Patient Education
• Hospital Training
10.
Home About ContentOthers
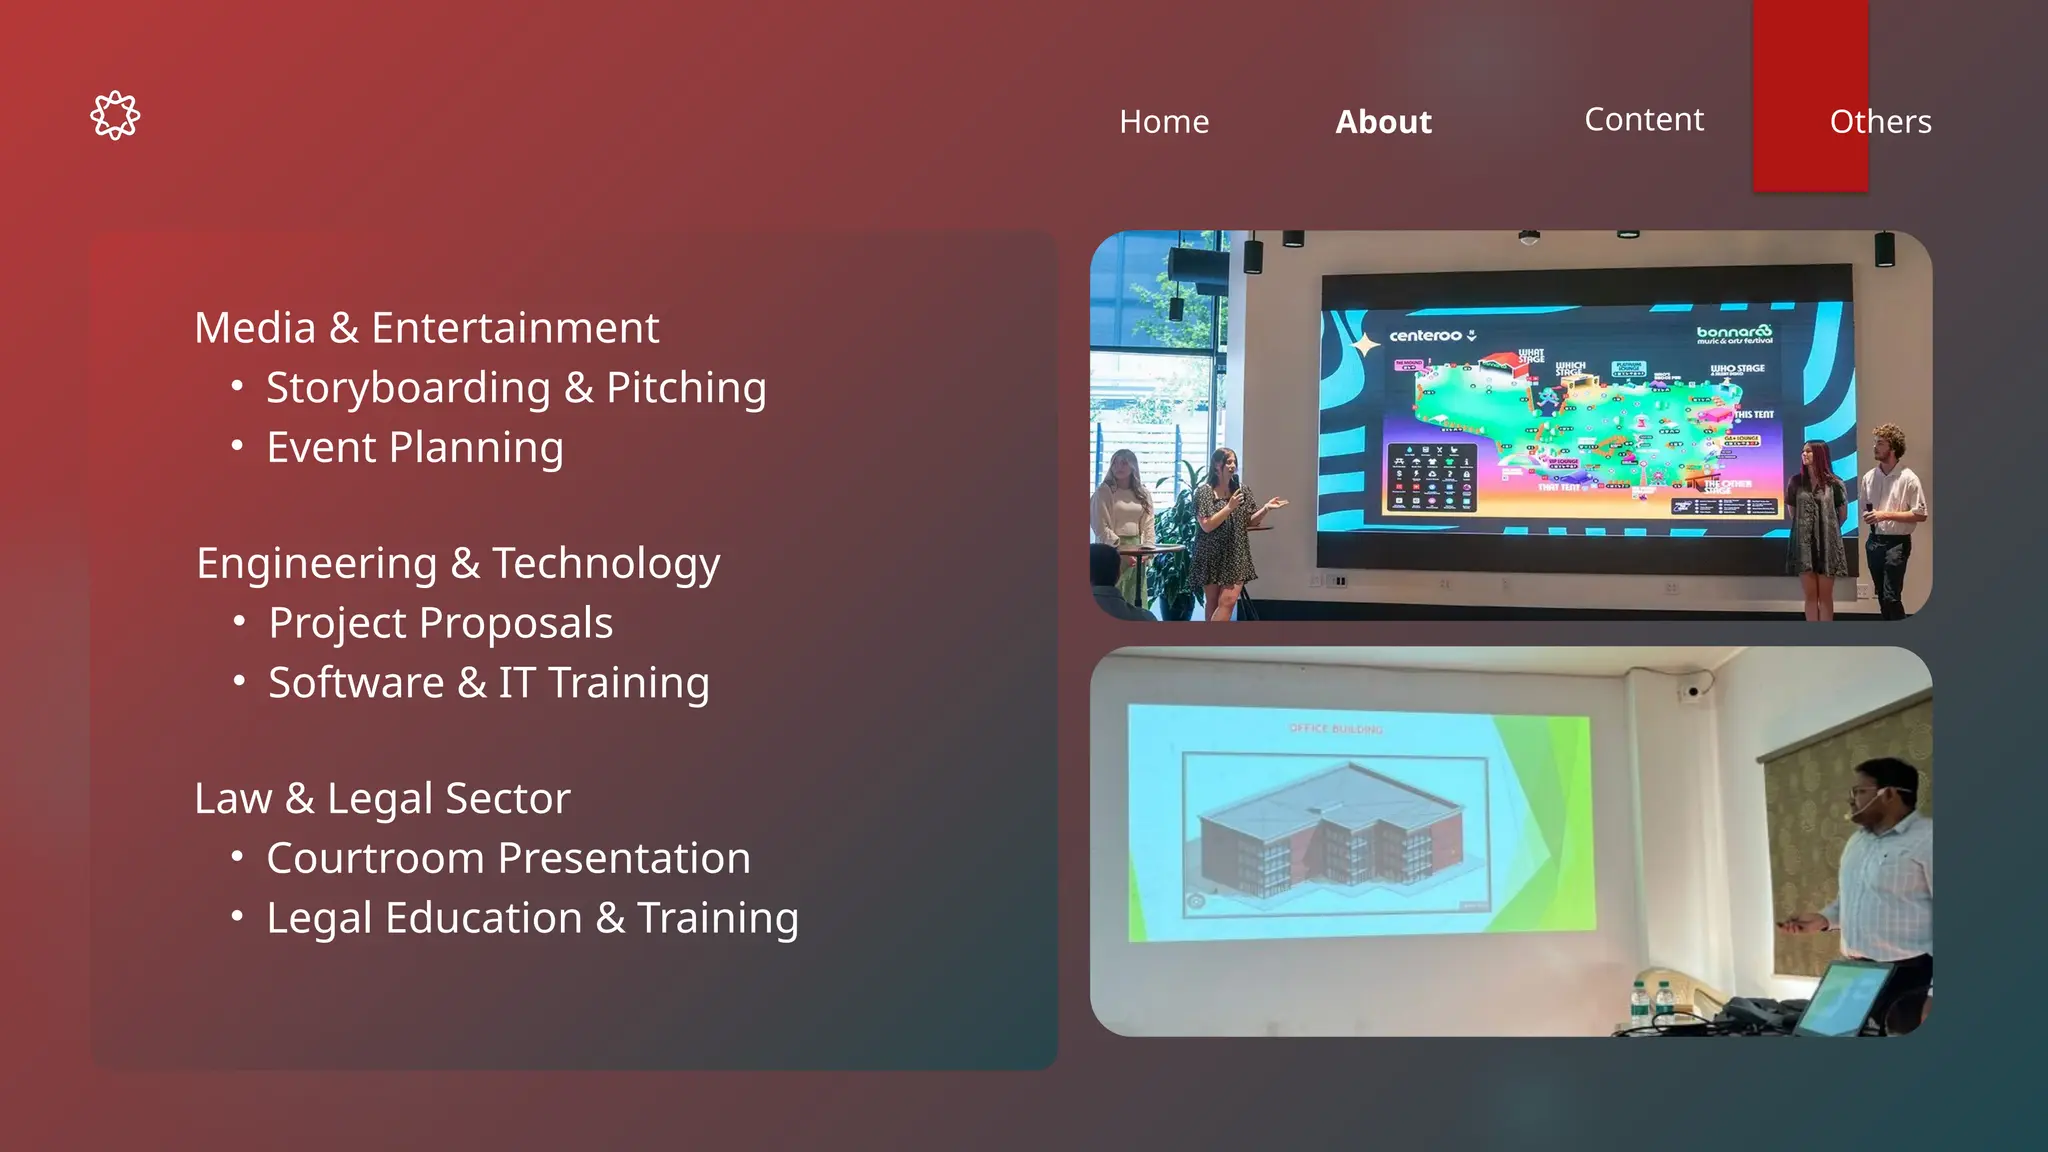
Engineering & Technology
• Project Proposals
• Software & IT Training
Law & Legal Sector
• Courtroom Presentation
• Legal Education & Training
Media & Entertainment
• Storyboarding & Pitching
• Event Planning
11.
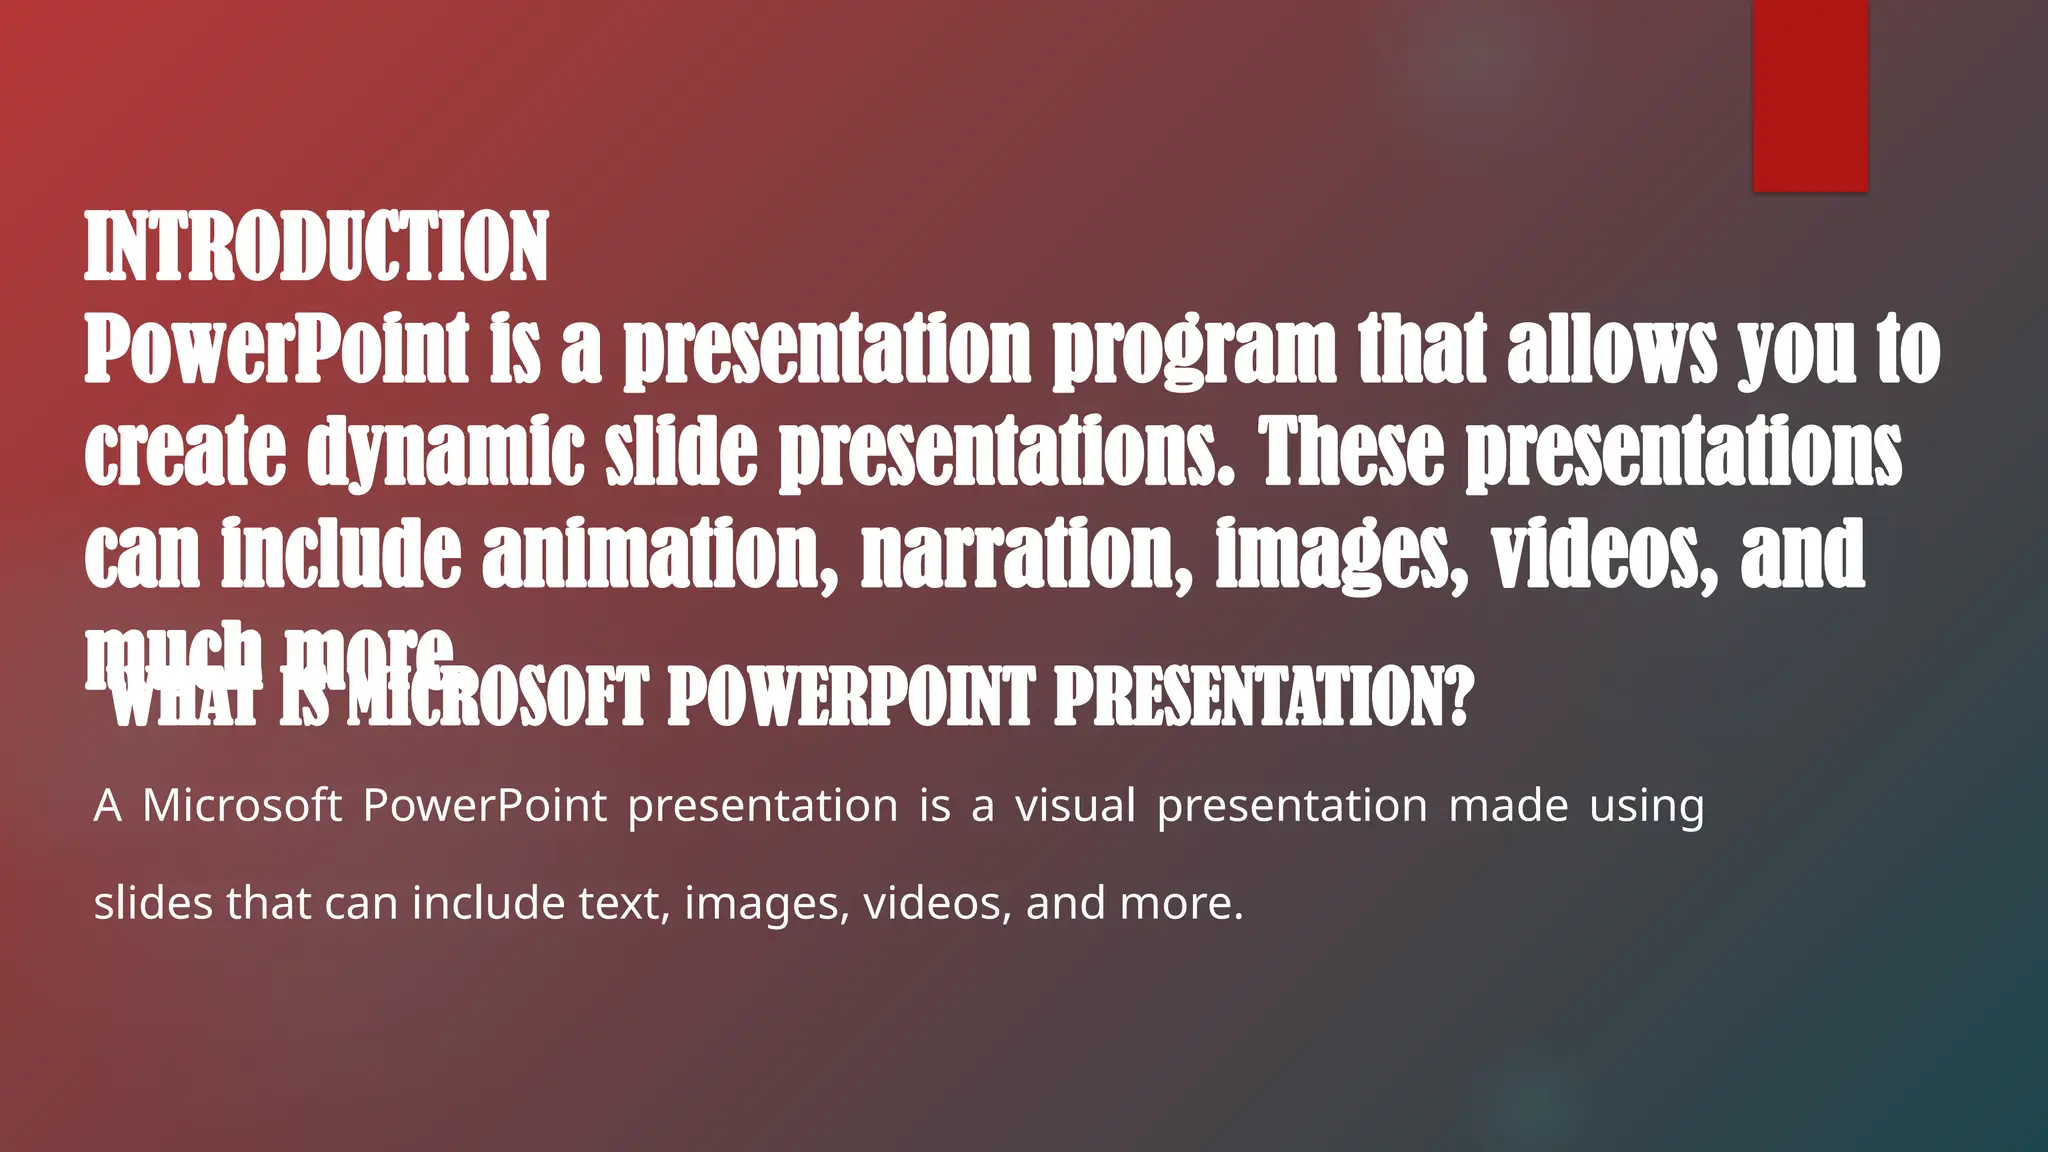
WHAT IS MICROSOFTPOWERPOINT PRESENTATION?
A Microsoft PowerPoint presentation is a visual presentation made using
slides that can include text, images, videos, and more.
INTRODUCTION
PowerPoint is a presentation program that allows you to
create dynamic slide presentations. These presentations
can include animation, narration, images, videos, and
much more.
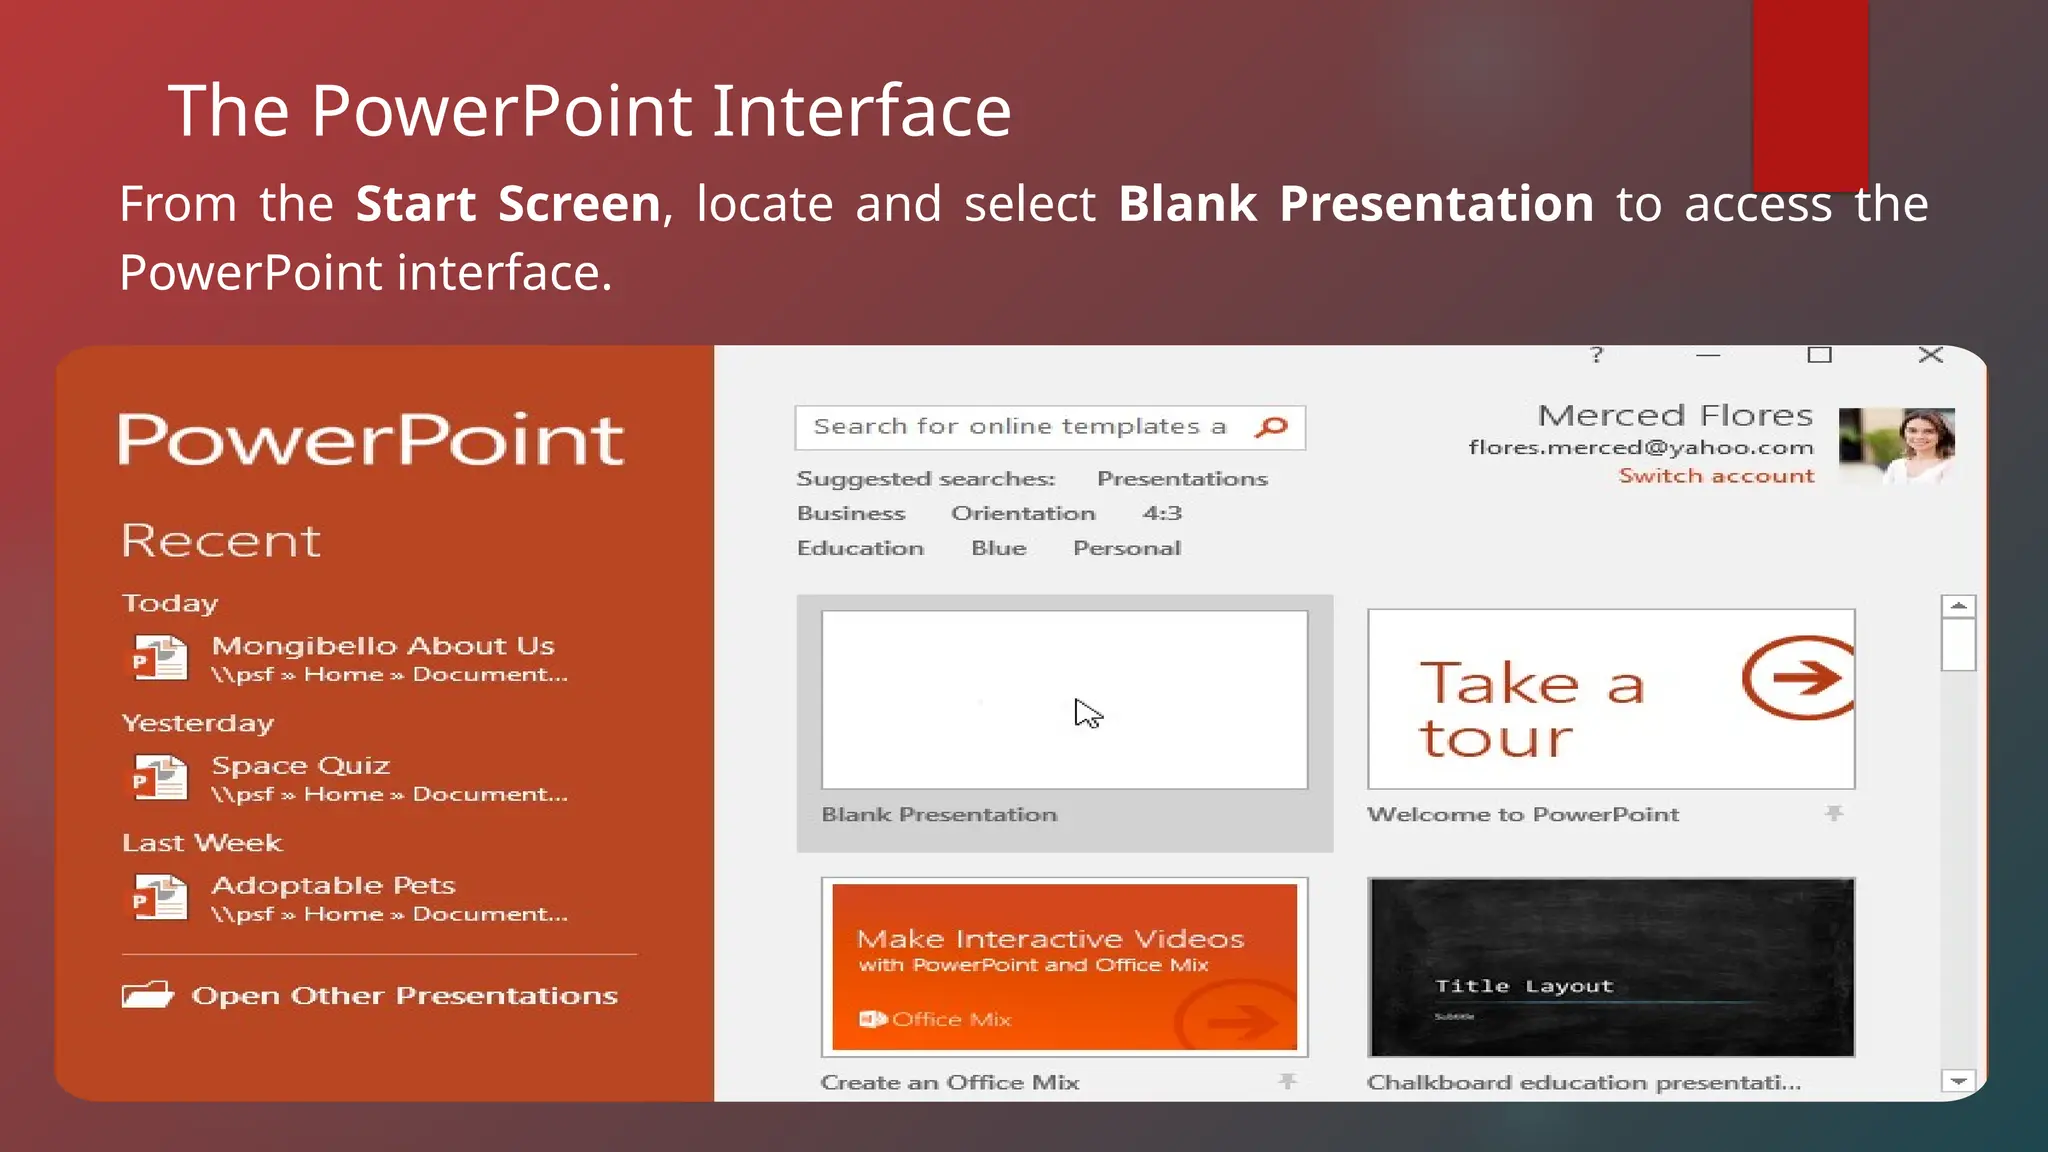
From the StartScreen, locate and select Blank Presentation to access the
PowerPoint interface.
The PowerPoint Interface
14.
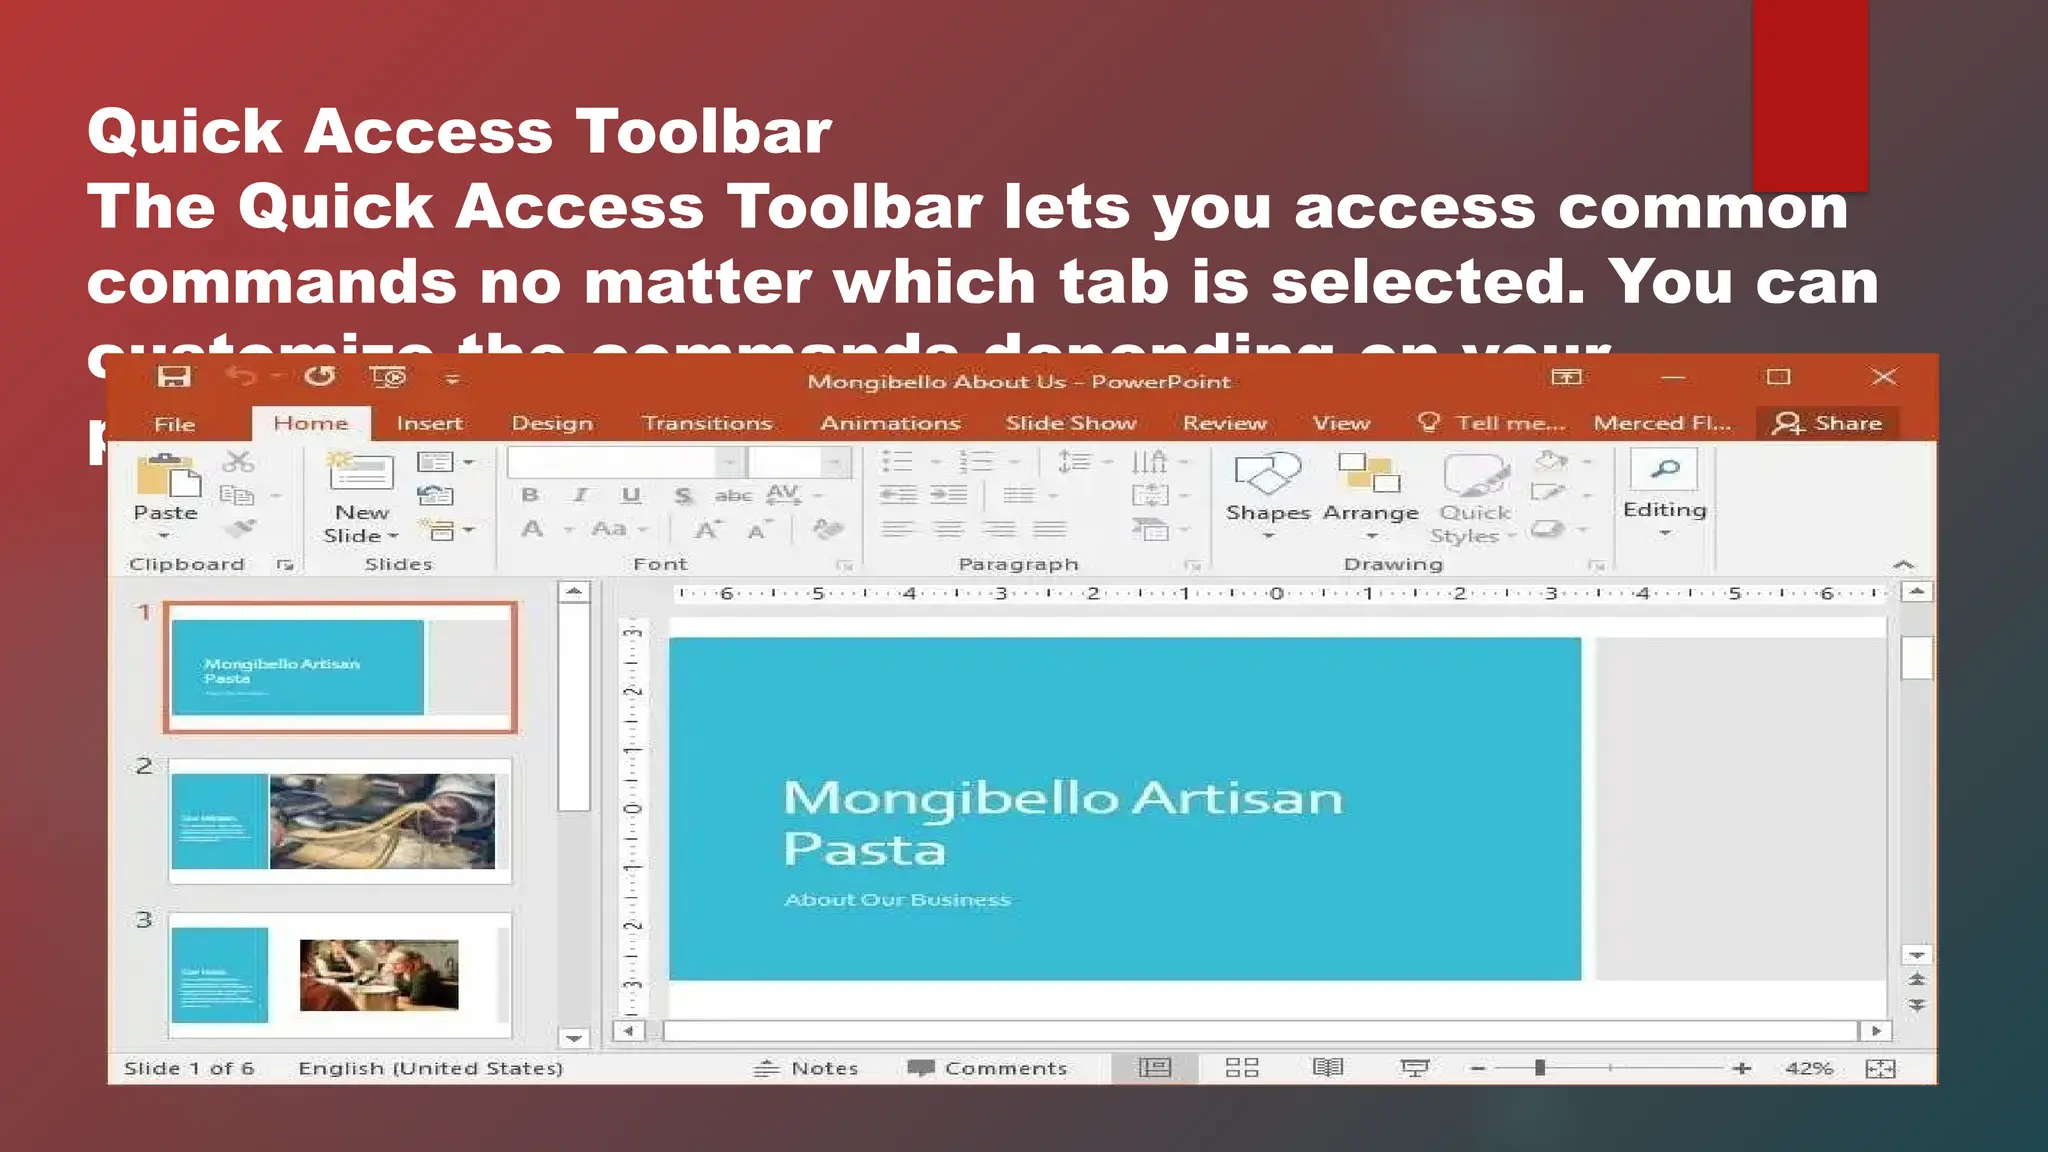
Quick Access Toolbar
TheQuick Access Toolbar lets you access common
commands no matter which tab is selected. You can
customize the commands depending on your
preference.
15.
The Ribbon
The Ribboncontains all of the commands you will need to perform
common tasks in PowerPoint. It has multiple tabs, each with several
groups of commands.
Tell Me
The Tell me box works like a search bar to help you quickly find tools or
commands you want to use.
Microsoft Account
From here, you can access your Microsoft account information, view your
profile, and switch accounts.
Ruler
The Ruler is located at the top and to the left of your current slide. It makes it
easy to align text and objects on your slide.
Slide Pane
16.
Vertical and HorizontalScroll Bars
The scroll bars allow you to scroll up and down or side to side. To do this, click
and drag the vertical or horizontal scroll bar.
Slide Number Indicator
Here, you can quickly see the total number of slides in your presentation, as
well as which slide you are viewing.
Notes
Click Notes to add notes to your current slide. Often called speaker notes, they
can help you deliver or prepare for your presentation.
Comments
Reviewers can leave comments on any slide. C so ick Comments to view
comments for the current slide.
Slide View Options
17.
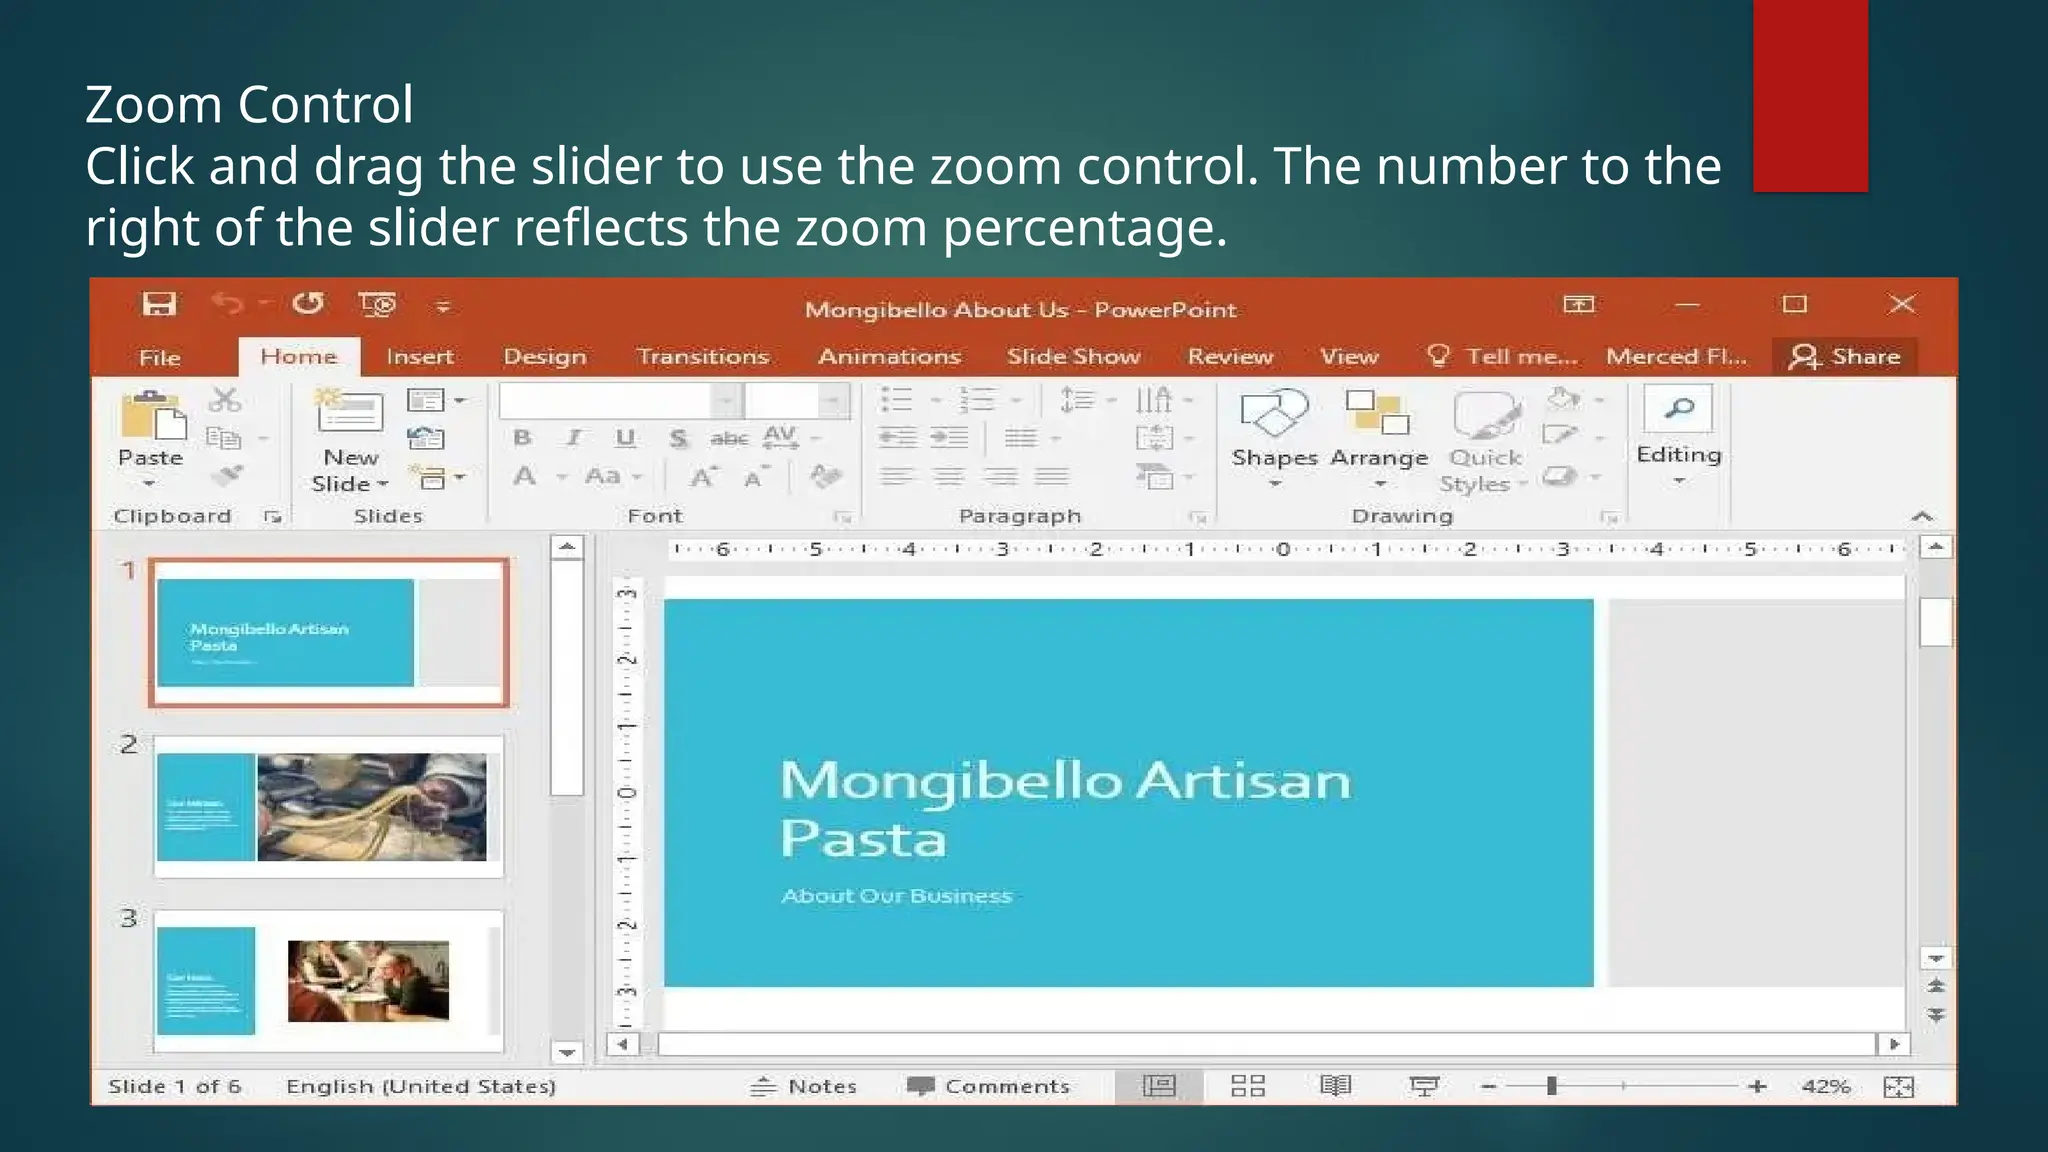
Zoom Control
Click anddrag the slider to use the zoom control. The number to the
right of the slider reflects the zoom percentage.
Working with thePowerPoint
Environment
The Ribbon and Quick Access Toolbar are where you will find the
commands to perform common tasks in PowerPoint. Backstage
view gives you various options for saving, opening a file, printing,
and sharing your document.
20.
The Ribbon
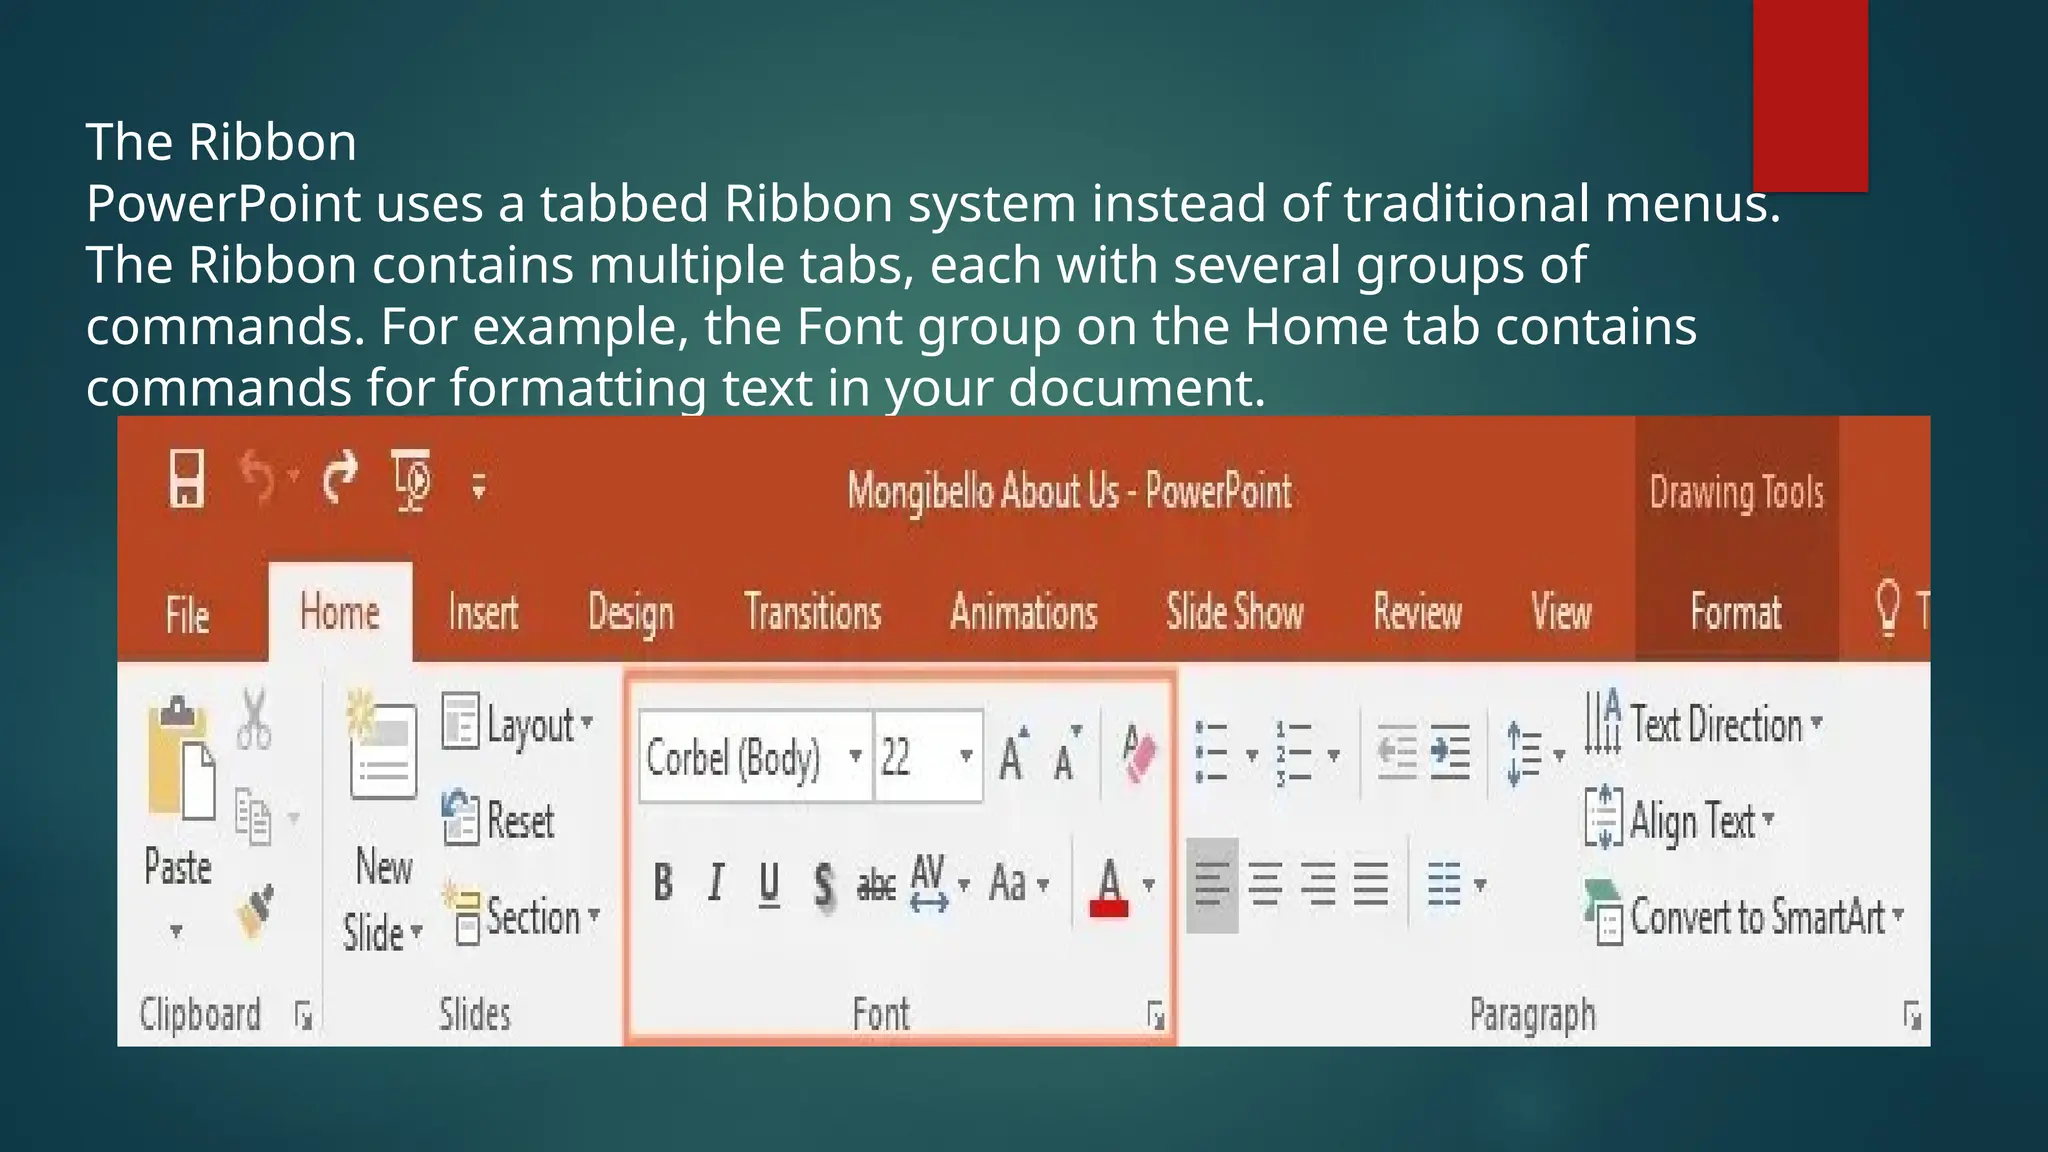
PowerPoint usesa tabbed Ribbon system instead of traditional menus.
The Ribbon contains multiple tabs, each with several groups of
commands. For example, the Font group on the Home tab contains
commands for formatting text in your document.
21.
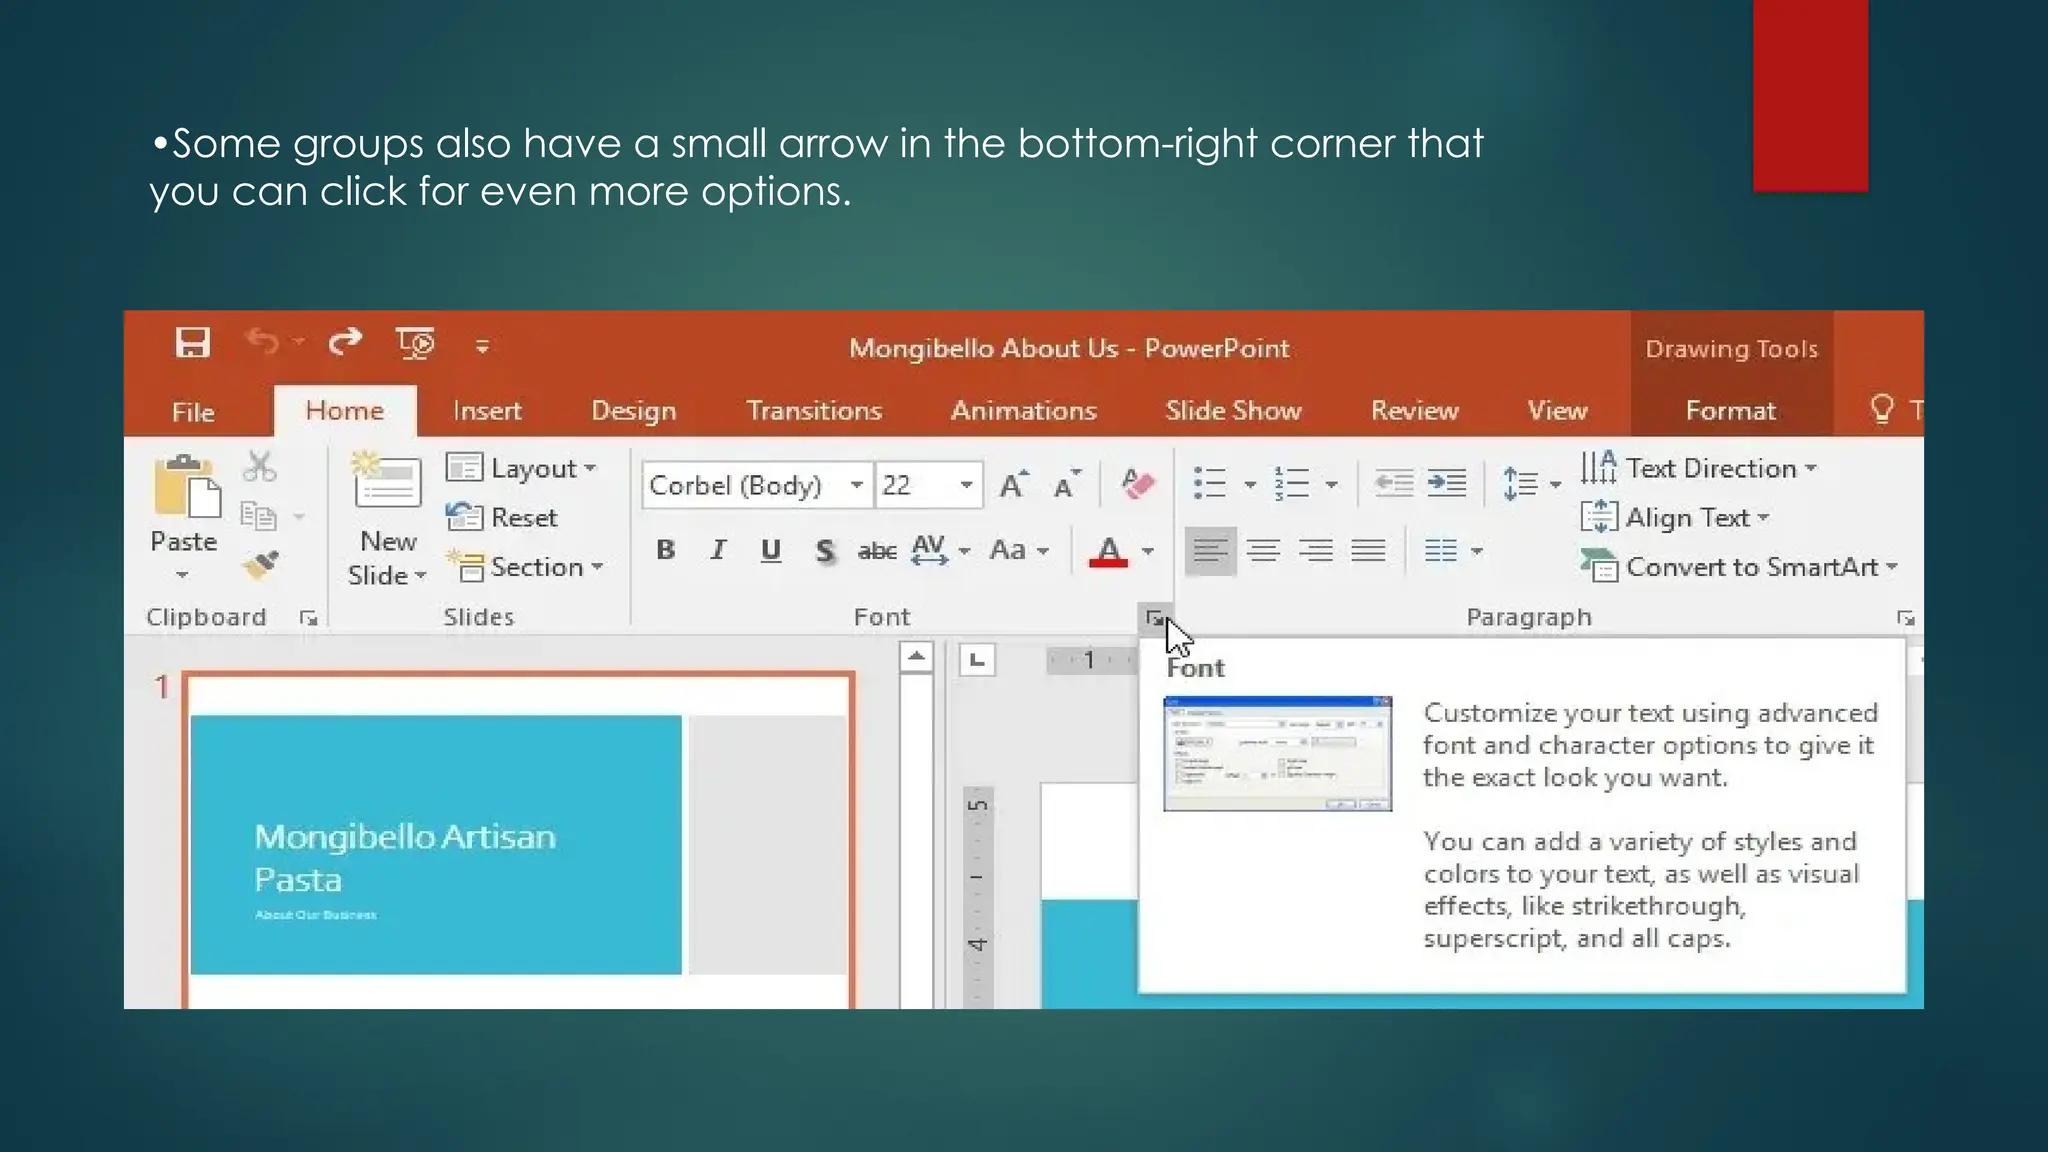
•Some groups alsohave a small arrow in the bottom-right corner that
you can click for even more options.
22.
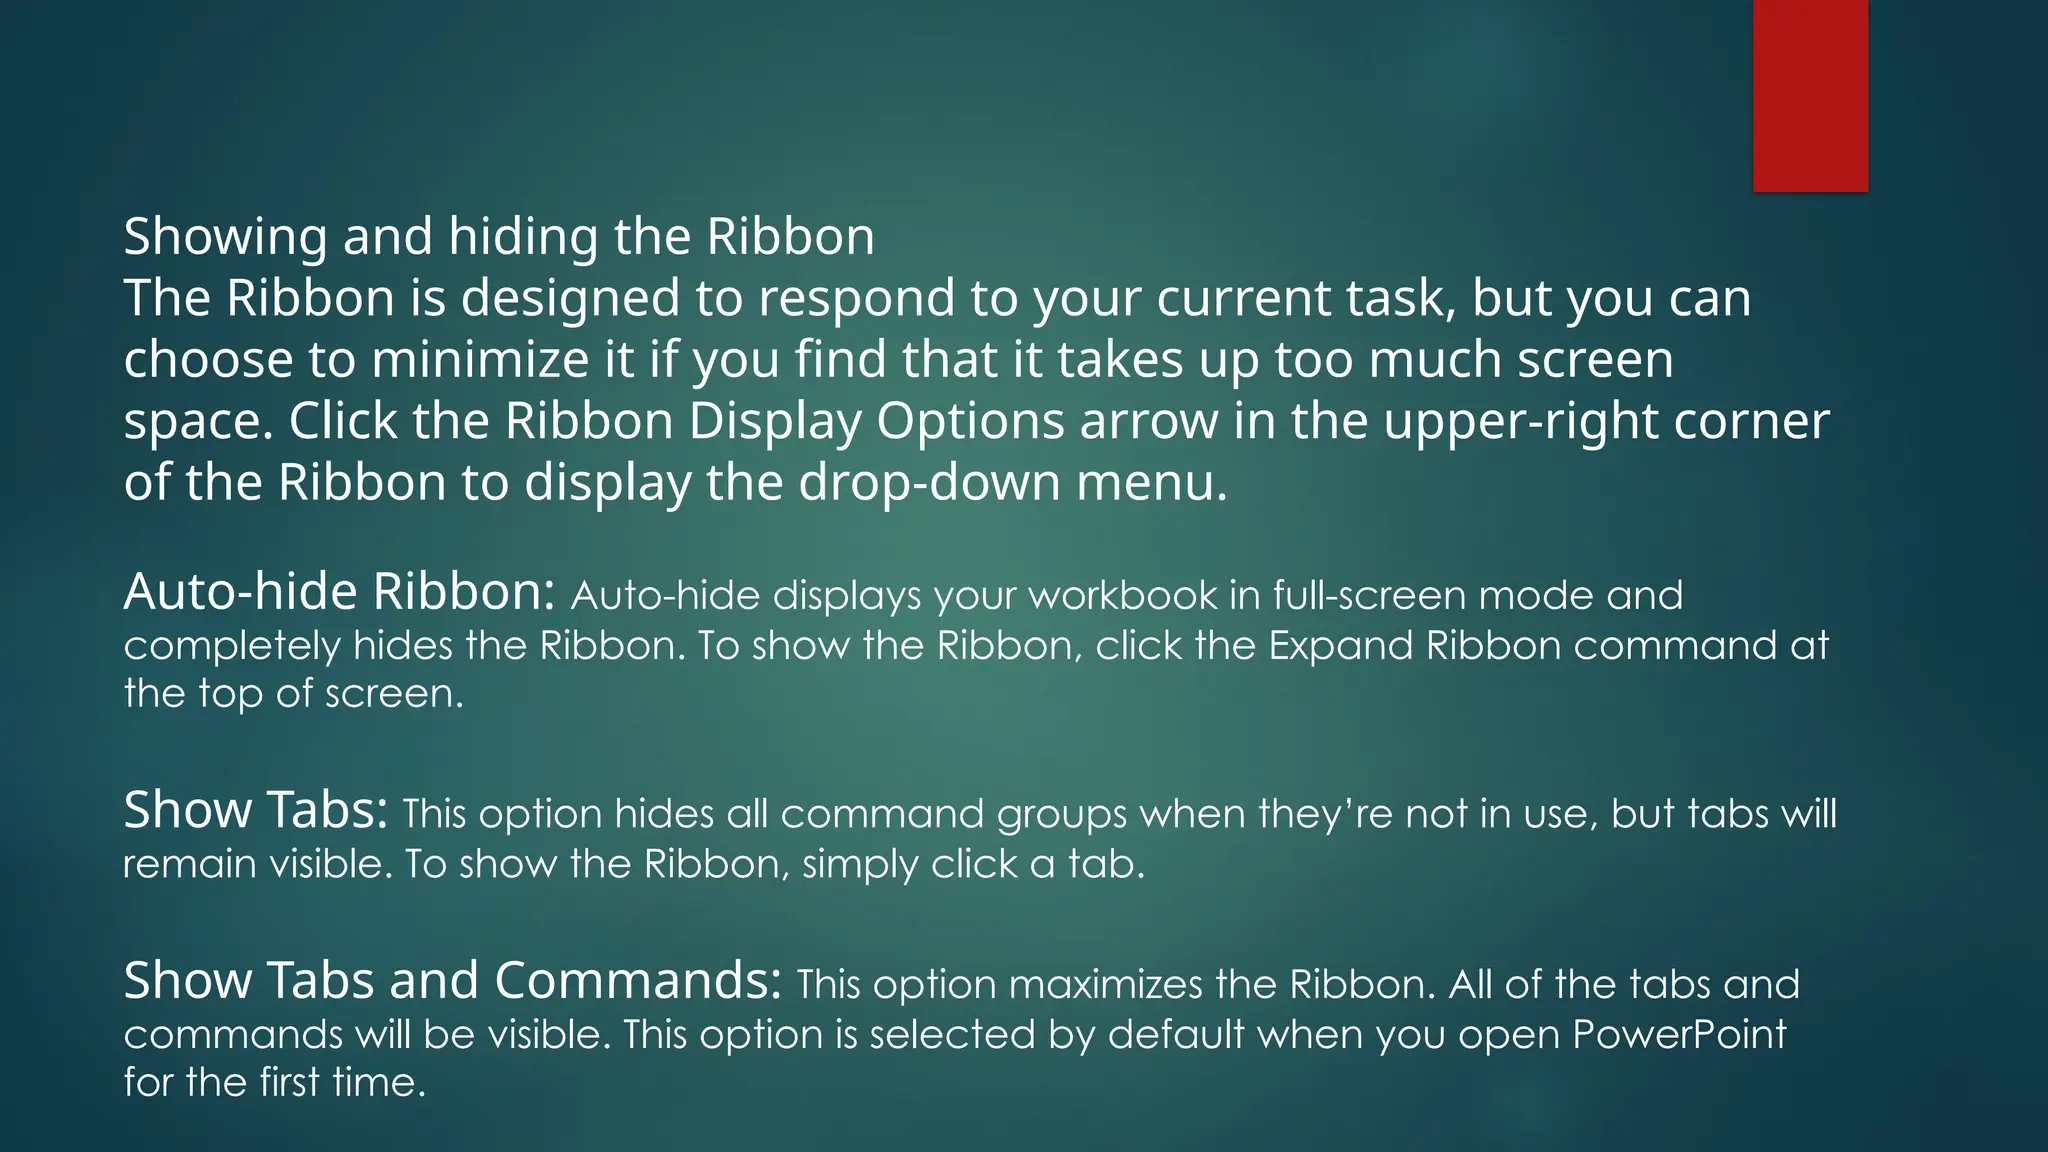
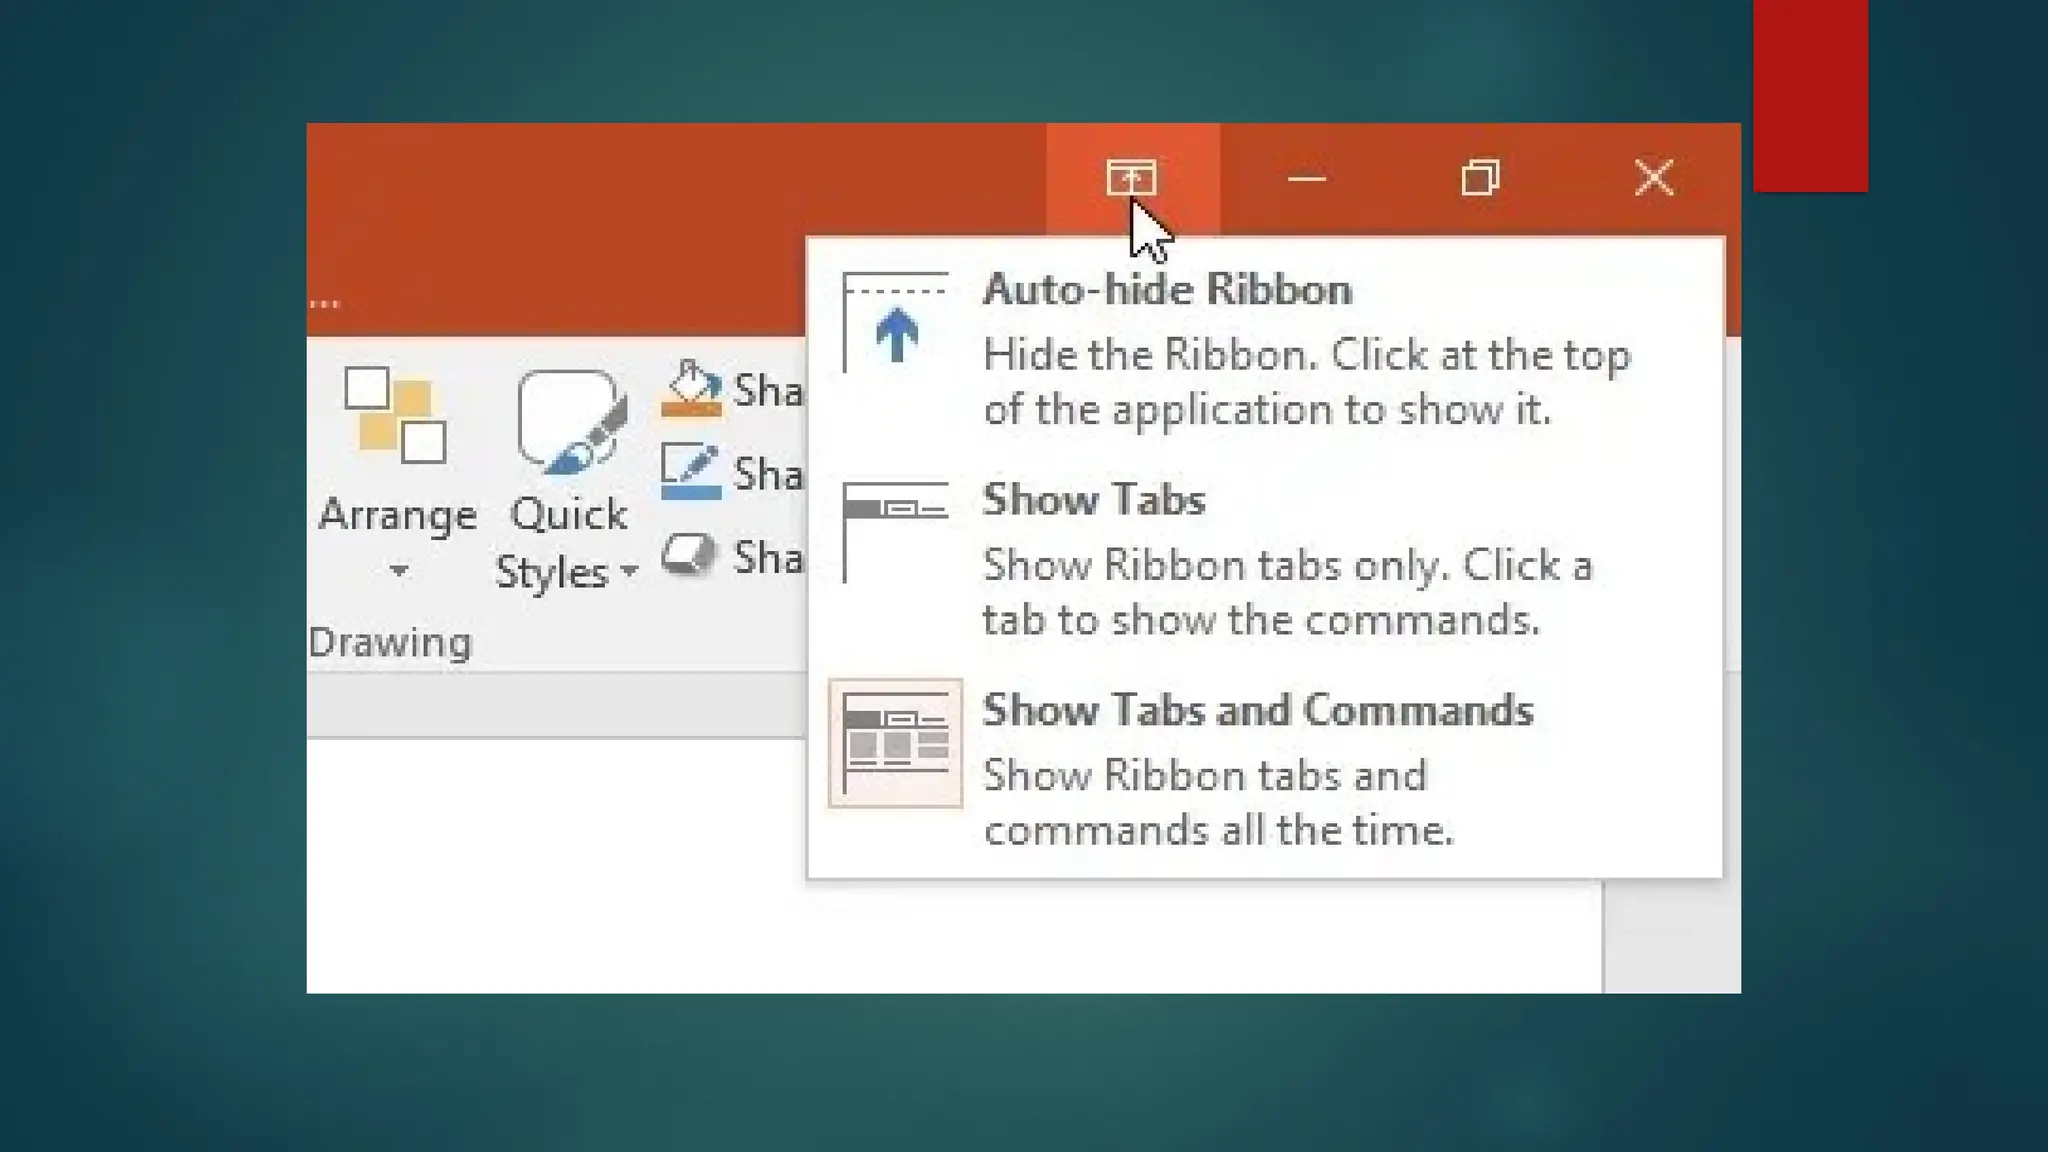
Showing and hidingthe Ribbon
The Ribbon is designed to respond to your current task, but you can
choose to minimize it if you find that it takes up too much screen
space. Click the Ribbon Display Options arrow in the upper-right corner
of the Ribbon to display the drop-down menu.
Auto-hide Ribbon: Auto-hide displays your workbook in full-screen mode and
completely hides the Ribbon. To show the Ribbon, click the Expand Ribbon command at
the top of screen.
Show Tabs: This option hides all command groups when they’re not in use, but tabs will
remain visible. To show the Ribbon, simply click a tab.
Show Tabs and Commands: This option maximizes the Ribbon. All of the tabs and
commands will be visible. This option is selected by default when you open PowerPoint
for the first time.
24.
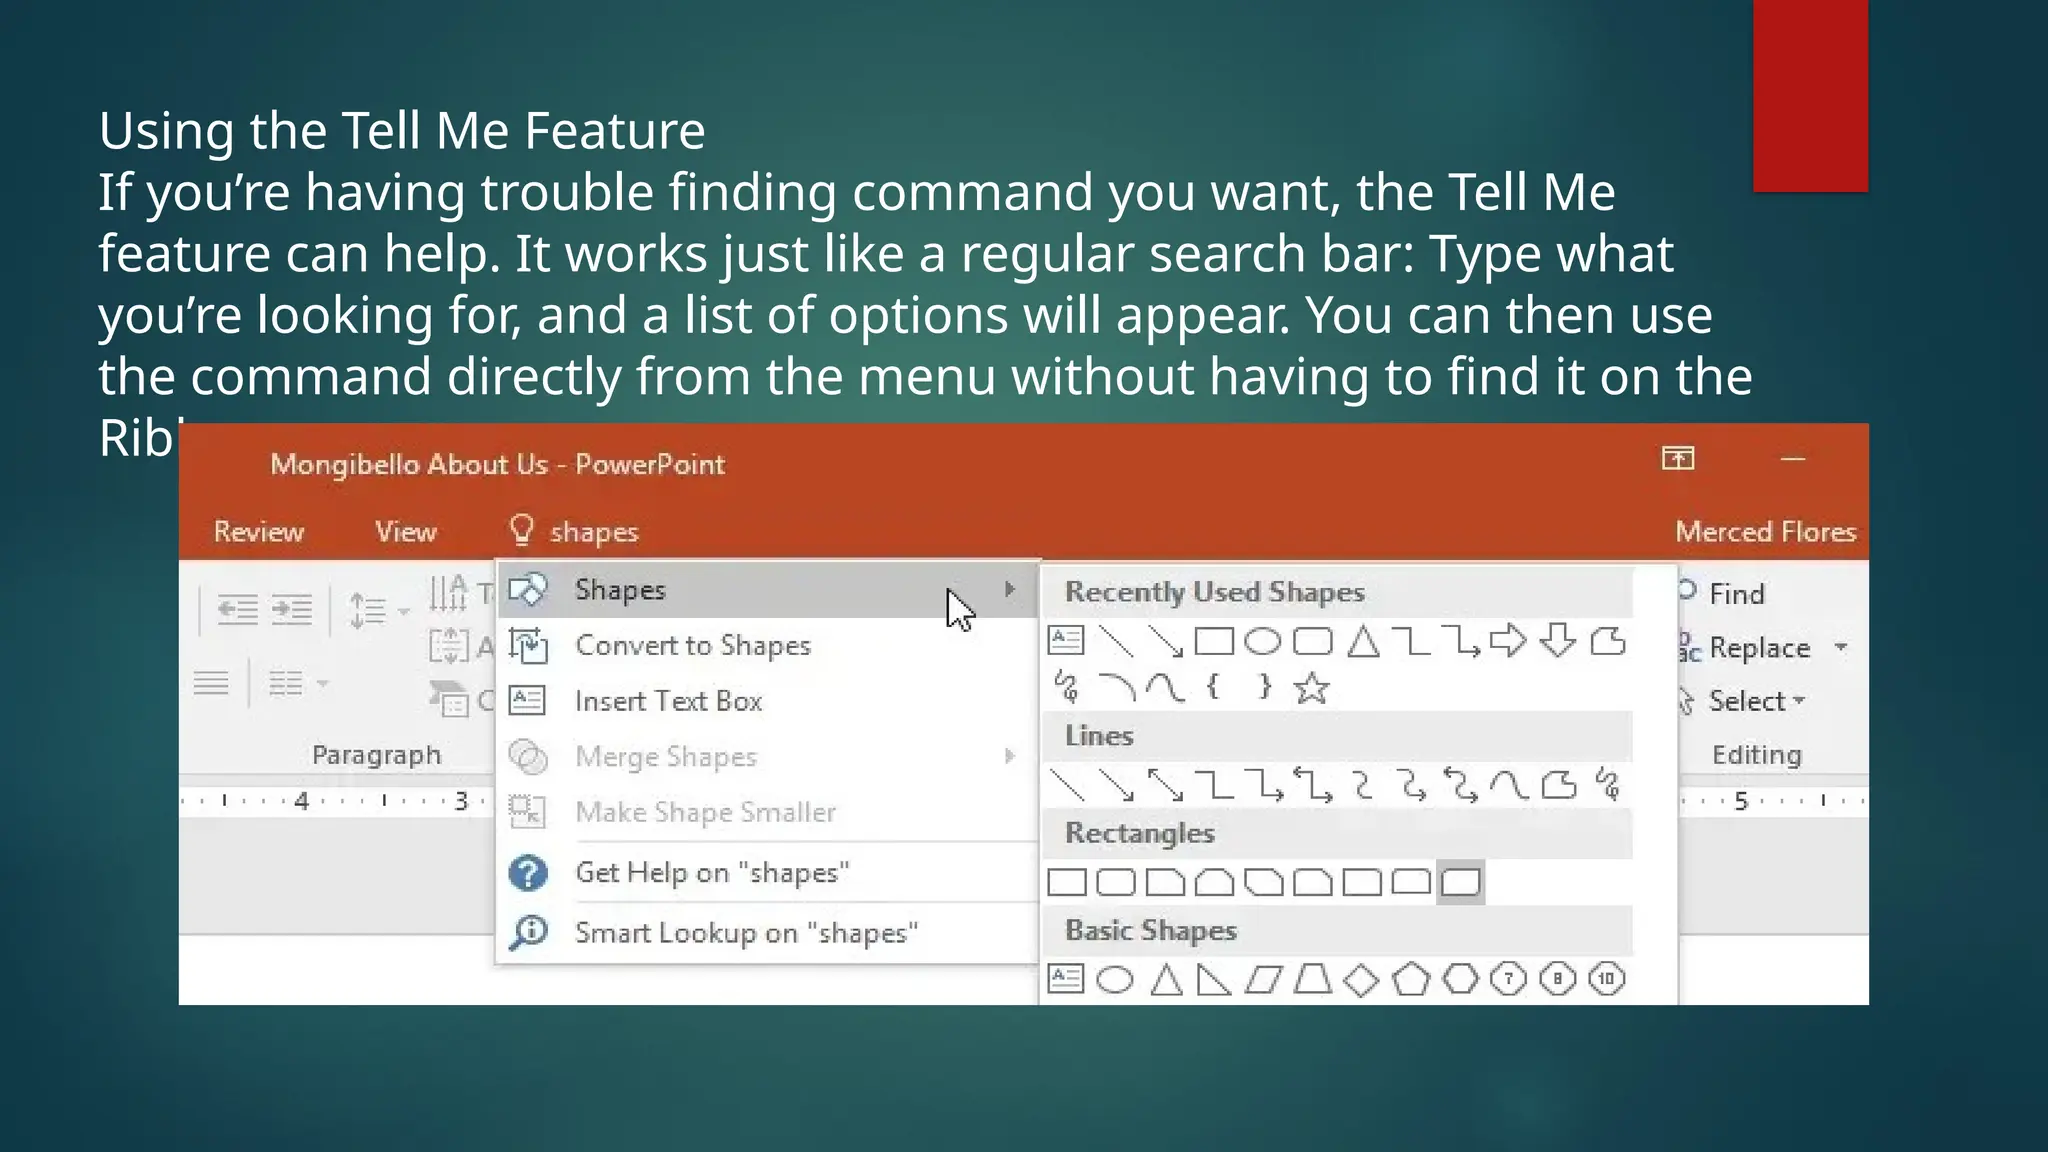
Using the TellMe Feature
If you’re having trouble finding command you want, the Tell Me
feature can help. It works just like a regular search bar: Type what
you’re looking for, and a list of options will appear. You can then use
the command directly from the menu without having to find it on the
Ribbon.
25.
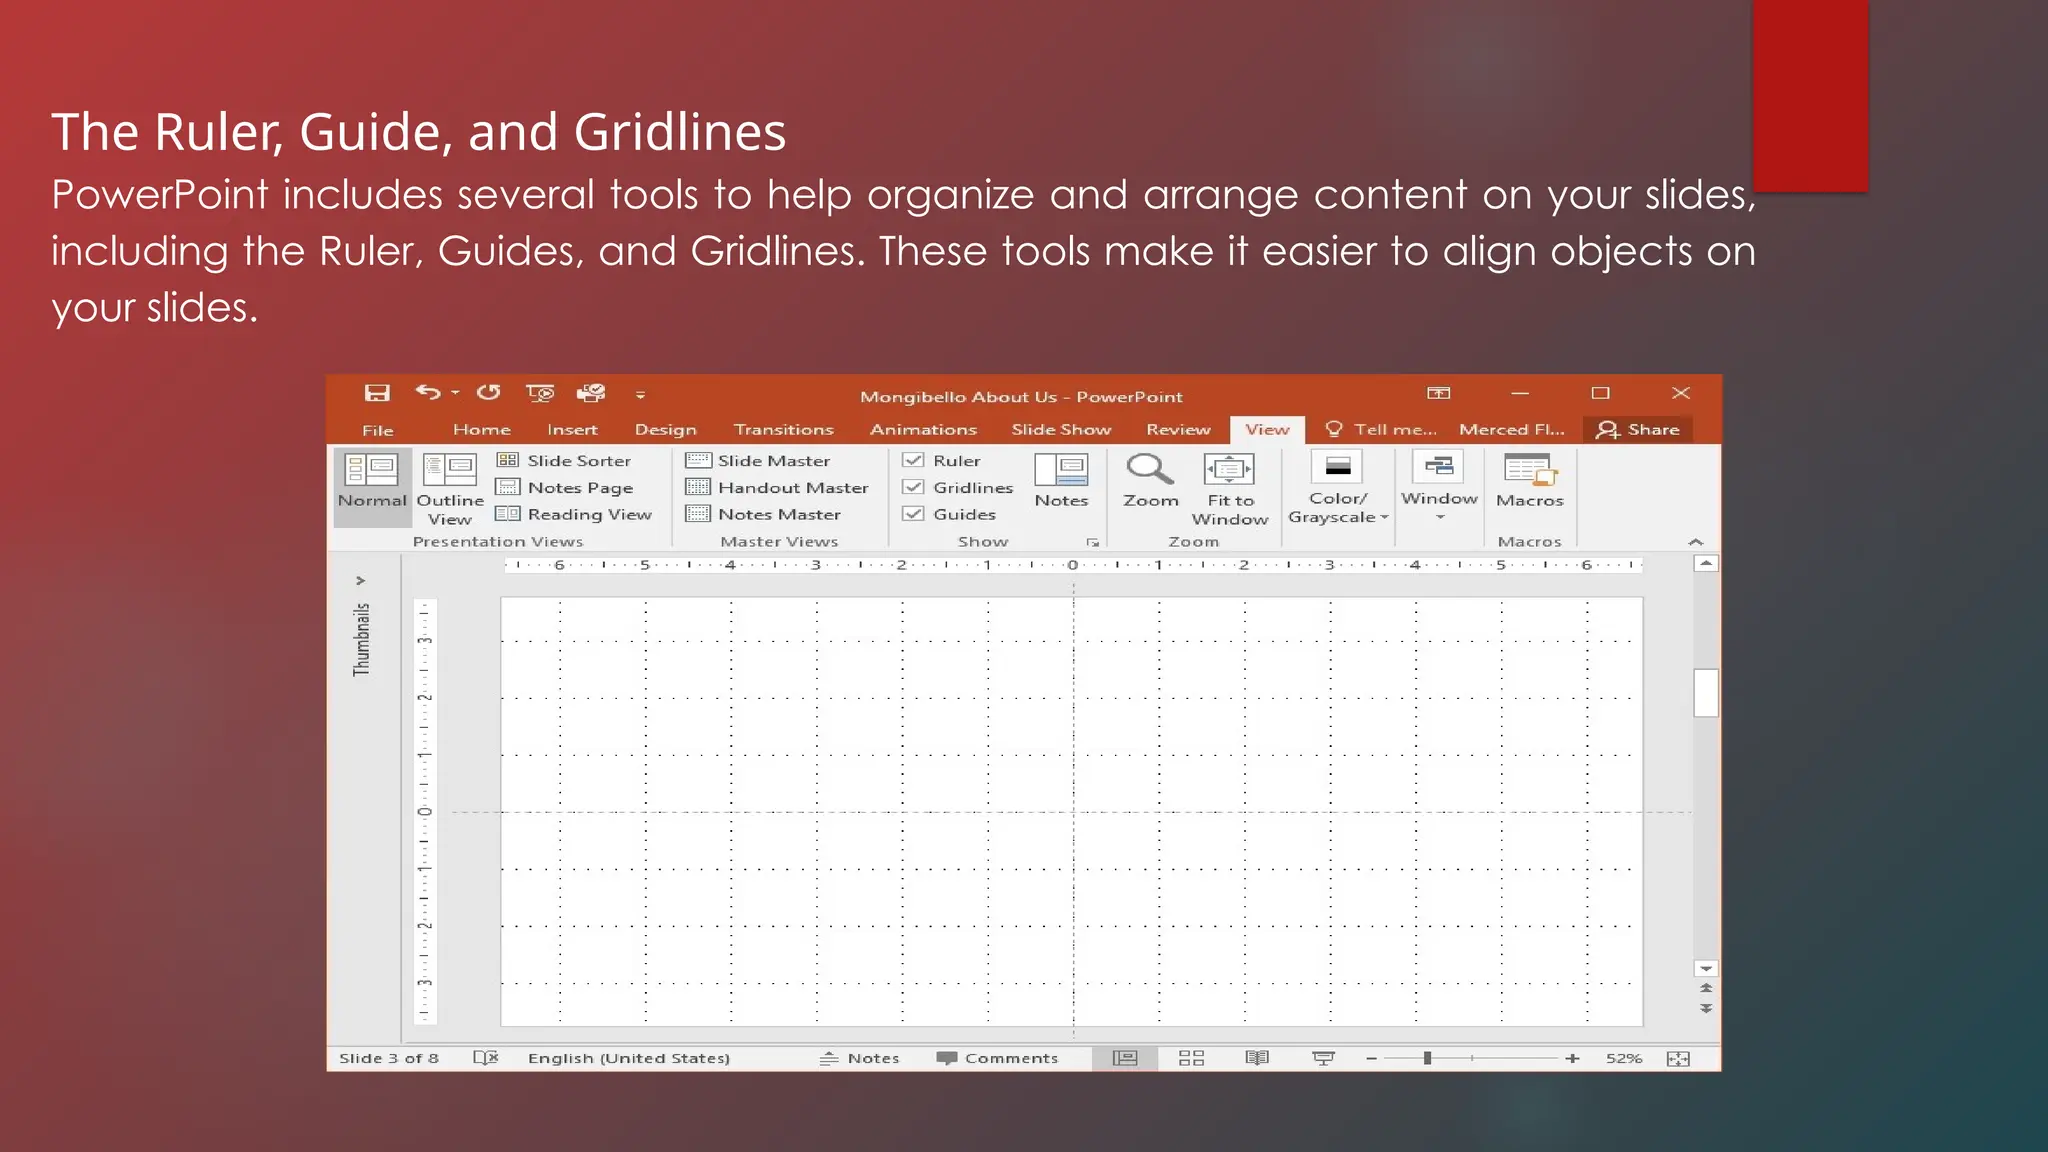
The Ruler, Guide,and Gridlines
PowerPoint includes several tools to help organize and arrange content on your slides,
including the Ruler, Guides, and Gridlines. These tools make it easier to align objects on
your slides.
26.
Zoom and OtherView Options
PowerPoint has a variety of viewing options that change how your
presentation is displayed.
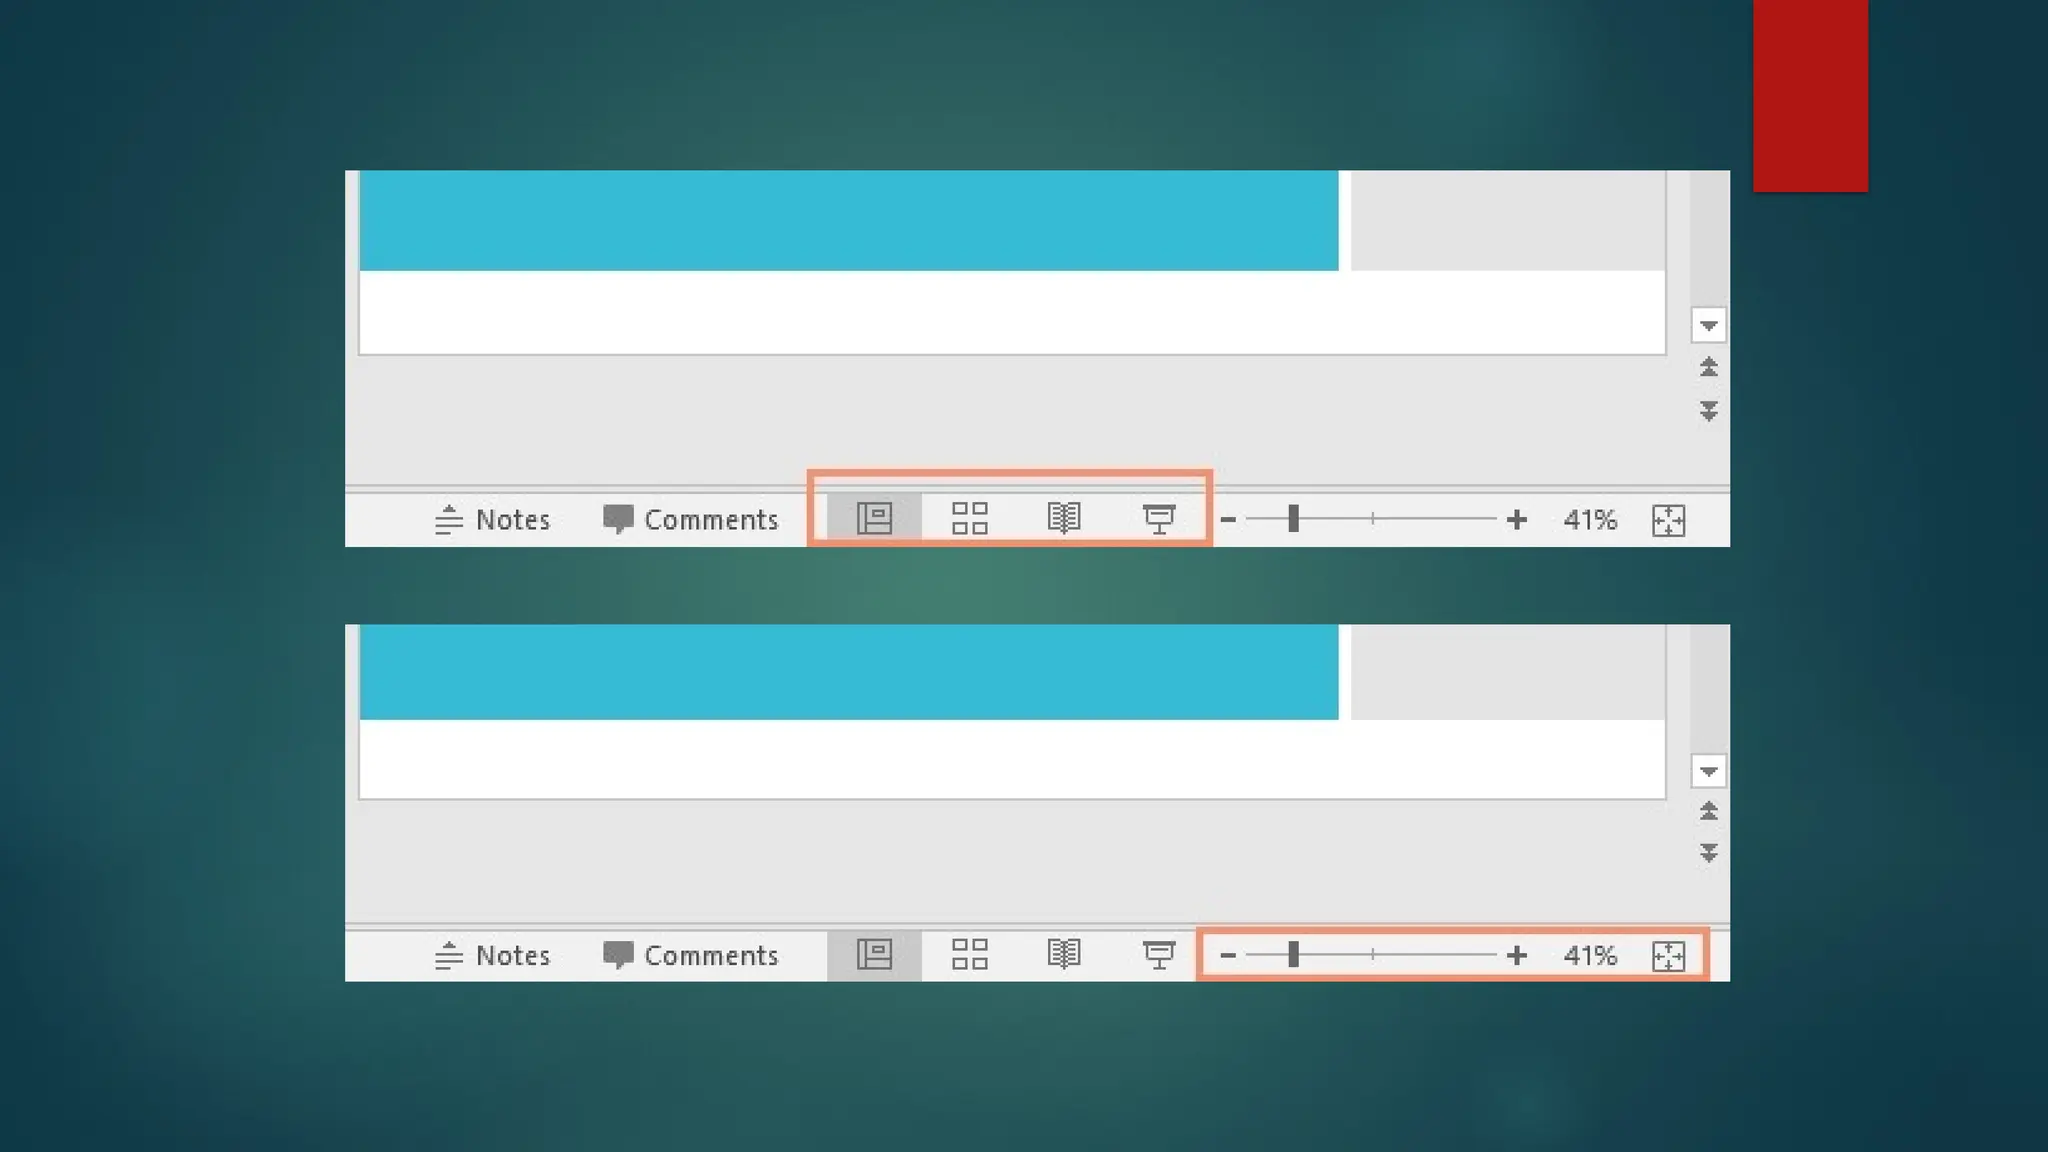
Switching slide views
Switching between different slide views is easy. Just locate and select the
desired slide view command in the bottom-right corner of the PowerPoint
window.
Zooming in and out
To zoom in or out, click and drag the zoom control slider in the bottom-right corner of the
PowerPoint window. You can also select the + or – commands to zoom in or out by smaller
increments. The number next to the slider displays the current zoom percentage, also called
the zoom level.
28.
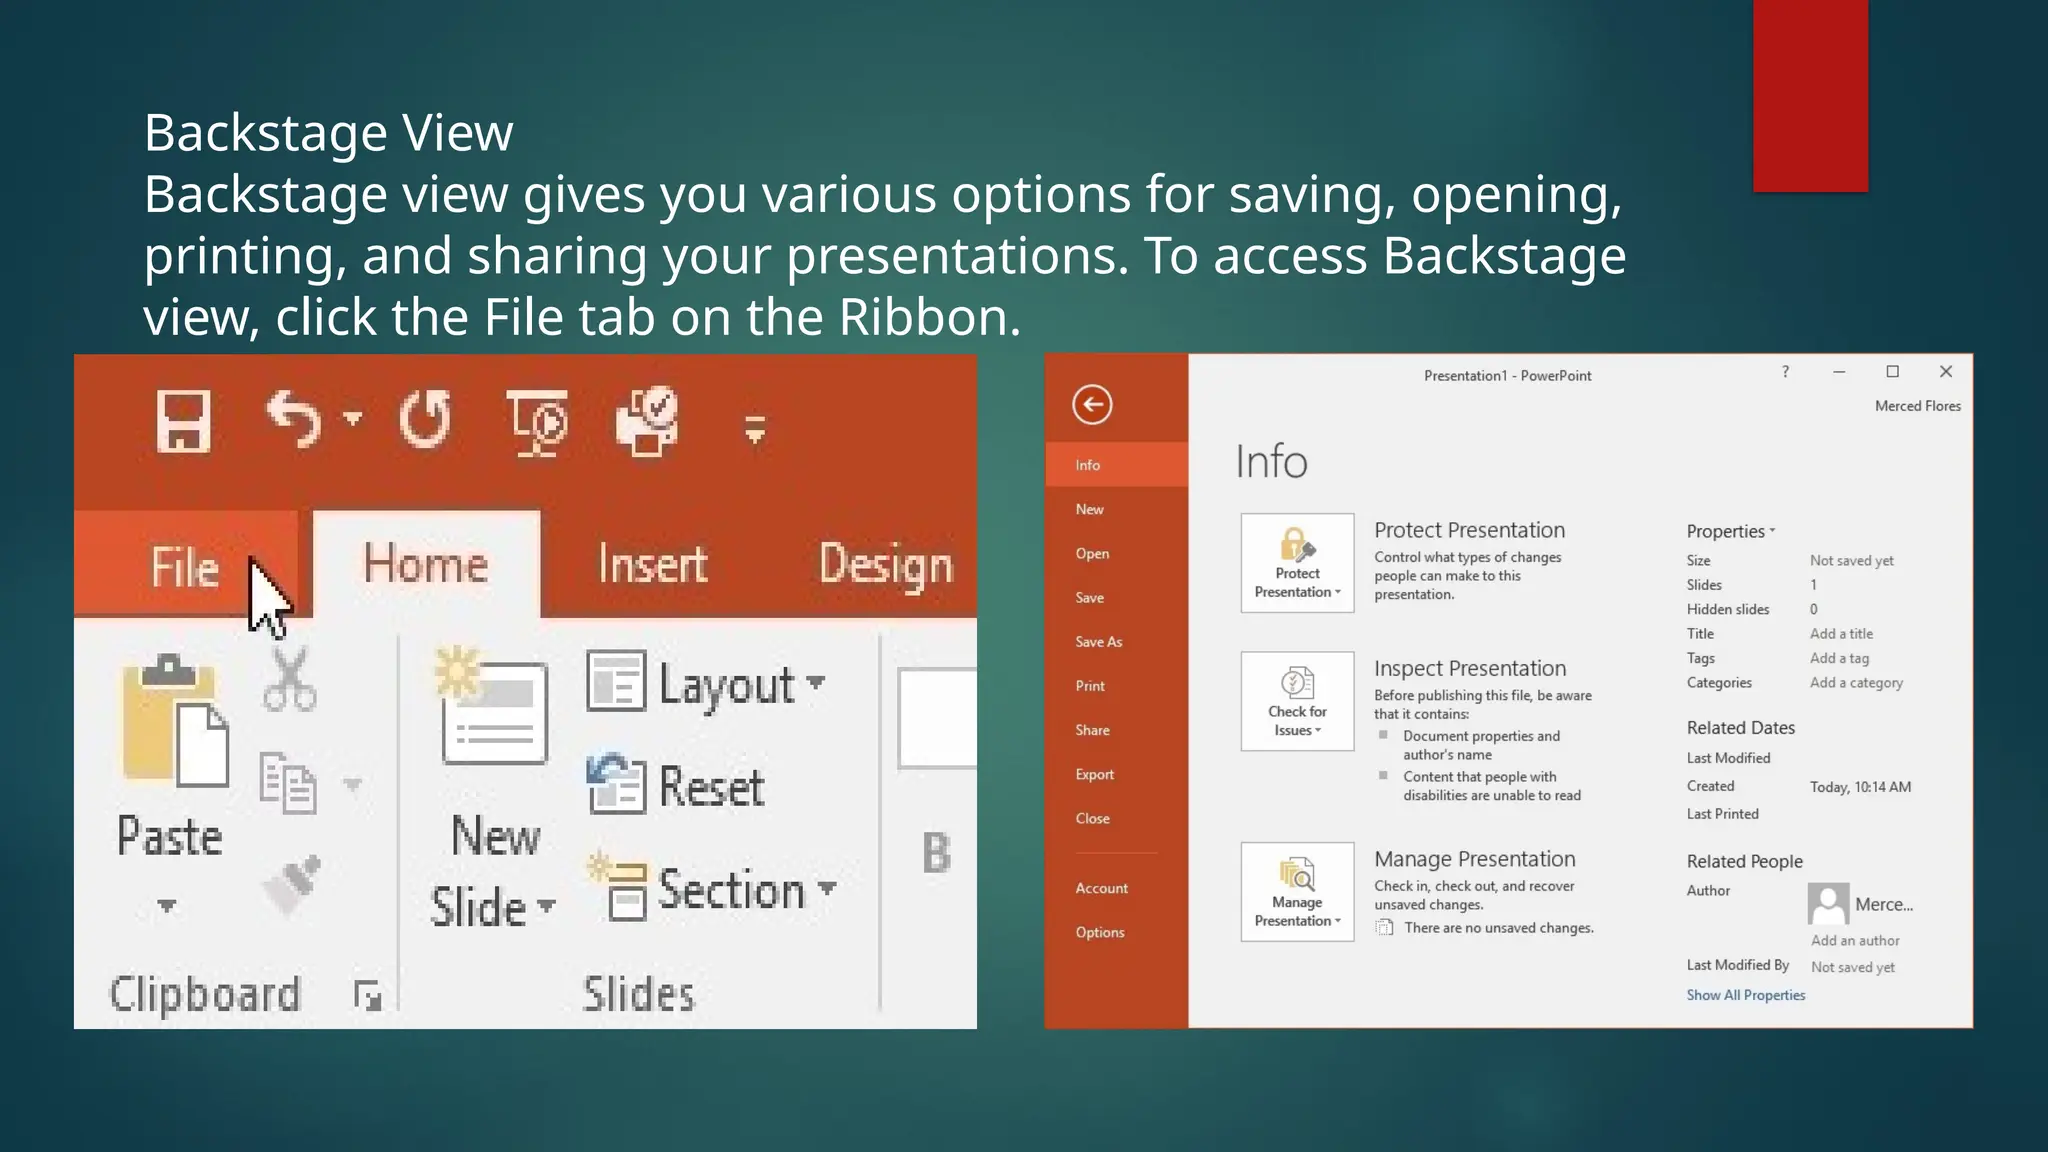
Backstage View
Backstage viewgives you various options for saving, opening,
printing, and sharing your presentations. To access Backstage
view, click the File tab on the Ribbon.
29.
SLIDE AREA
refers tothe central working space on the screen where you add and edit content
directly onto a slide, essentially the main visible part of the slide where you place
text, images, shapes, and other elements; it's the primary area where you design
your presentation slides.
Title Bar
Displays the name of the current file
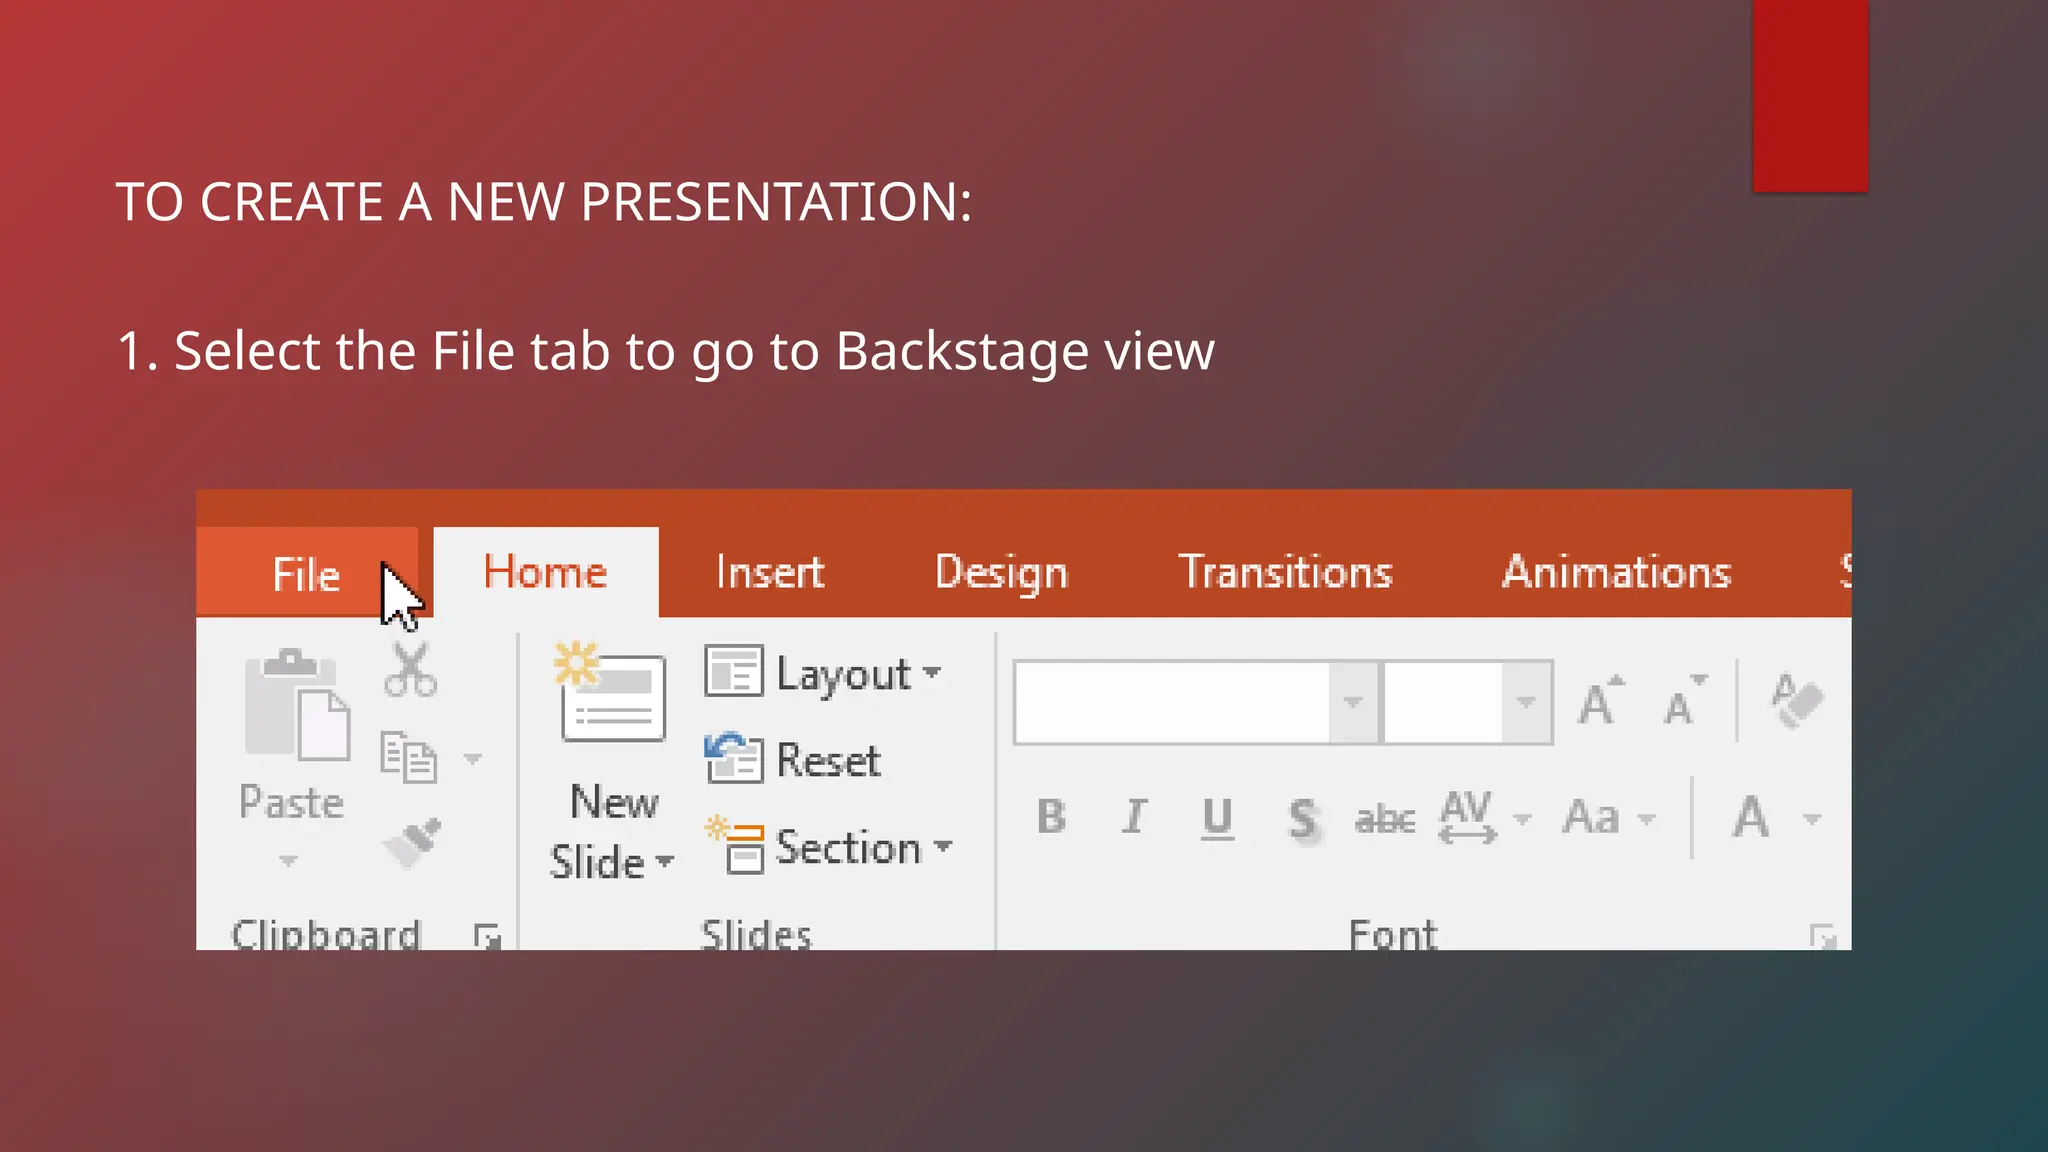
TO CREATE ANEW PRESENTATION:
1. Select the File tab to go to Backstage view
32.
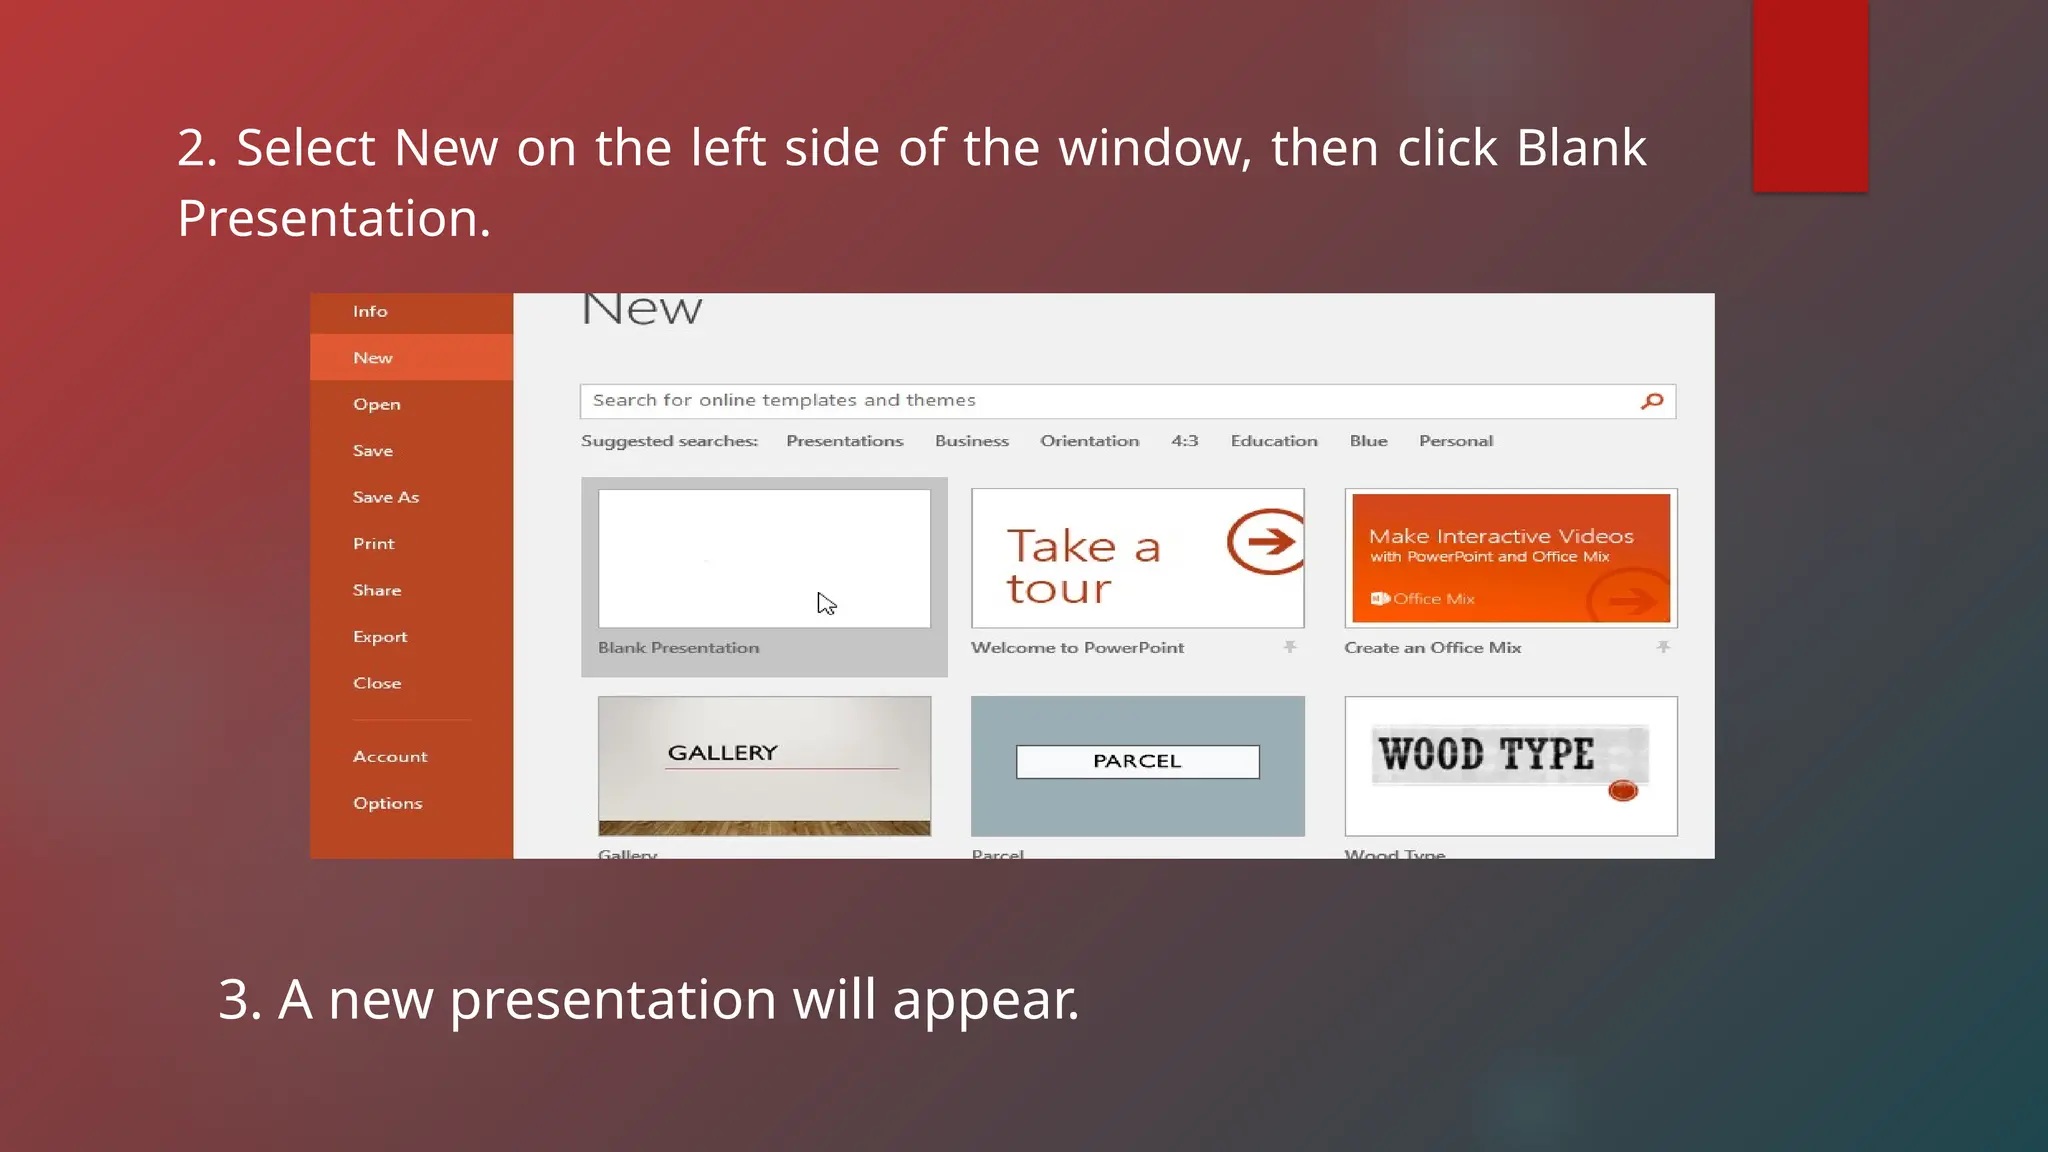
2. Select Newon the left side of the window, then click Blank
Presentation.
3. A new presentation will appear.
33.
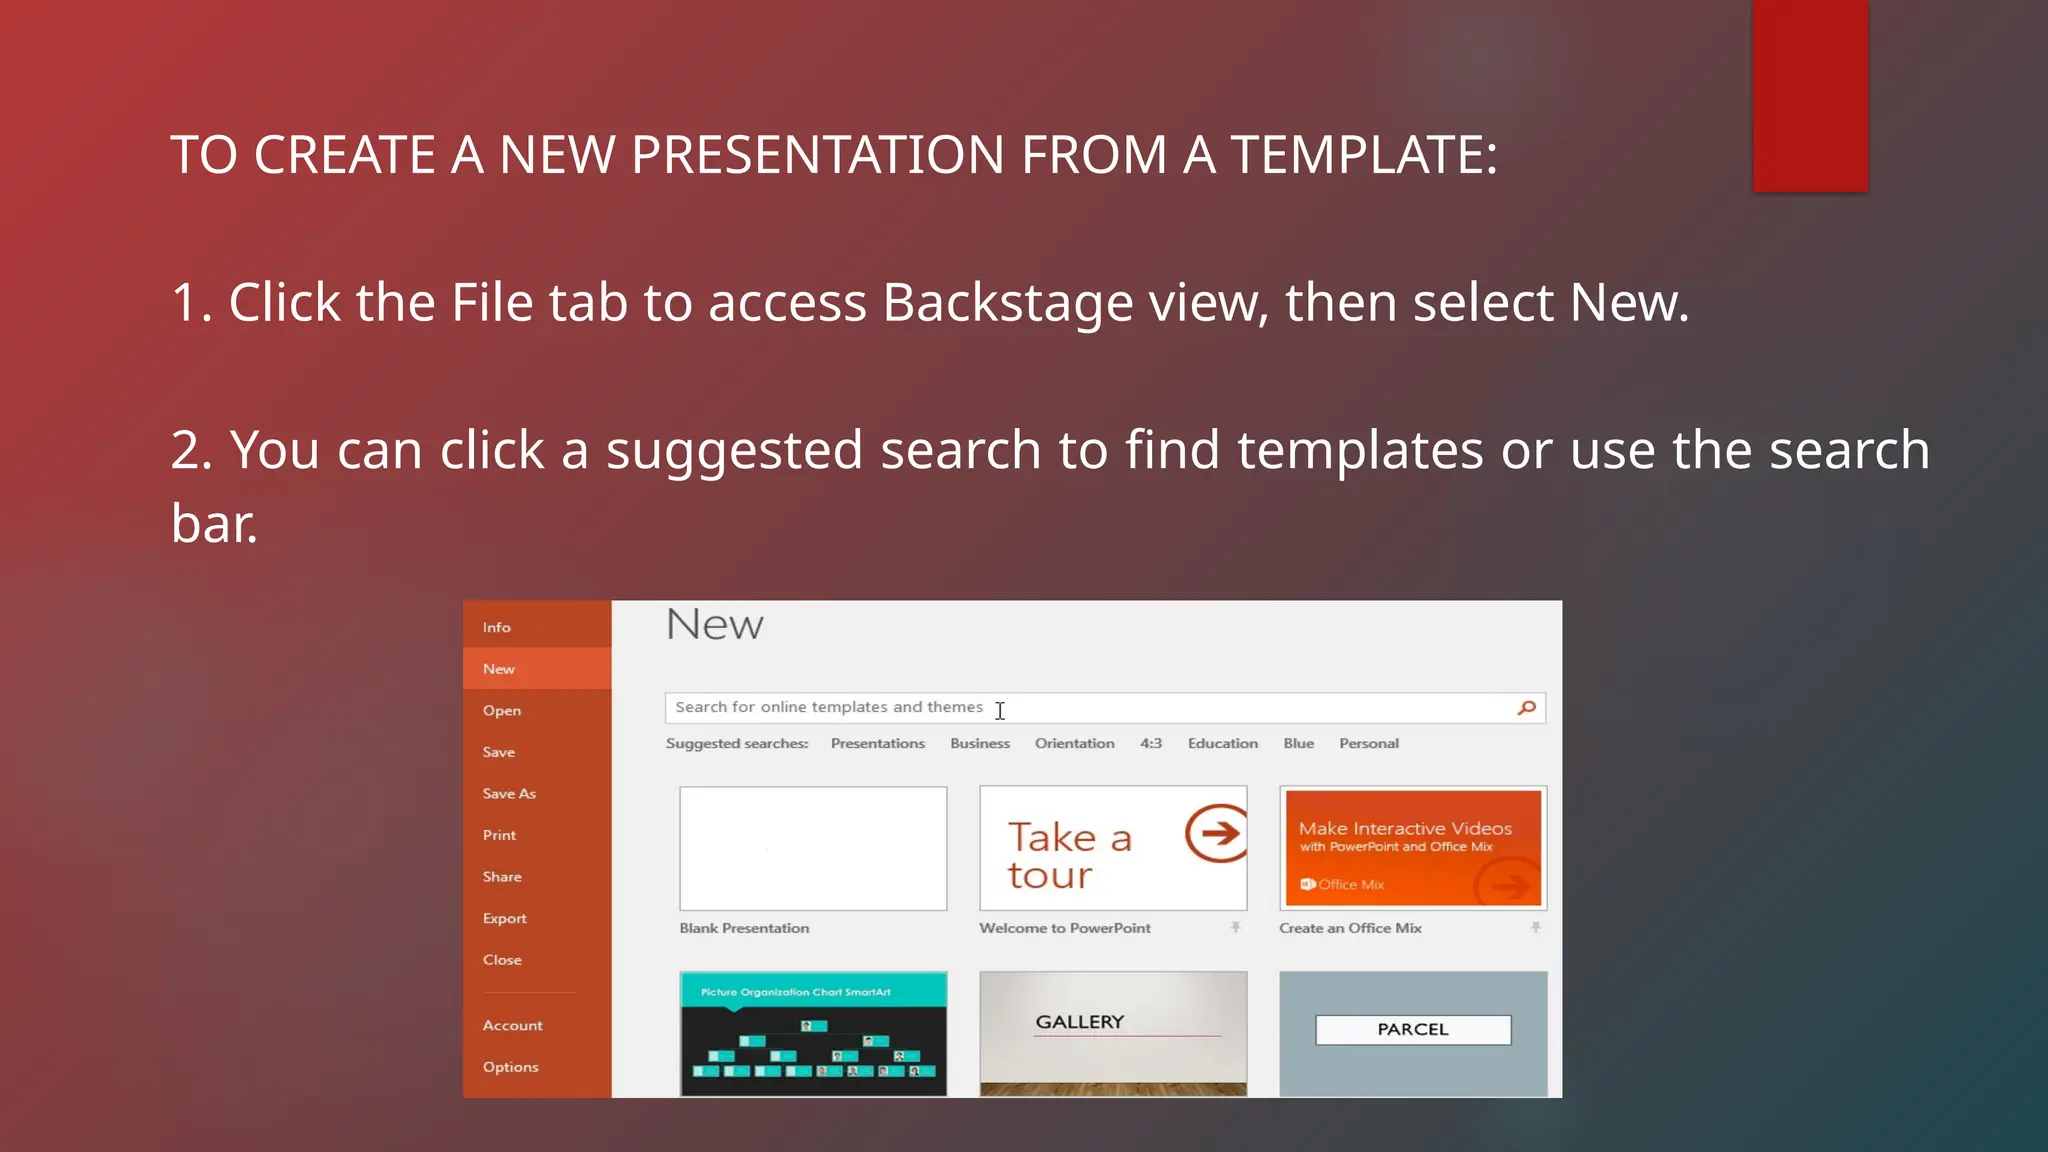
TO CREATE ANEW PRESENTATION FROM A TEMPLATE:
1. Click the File tab to access Backstage view, then select New.
2. You can click a suggested search to find templates or use the search
bar.
34.
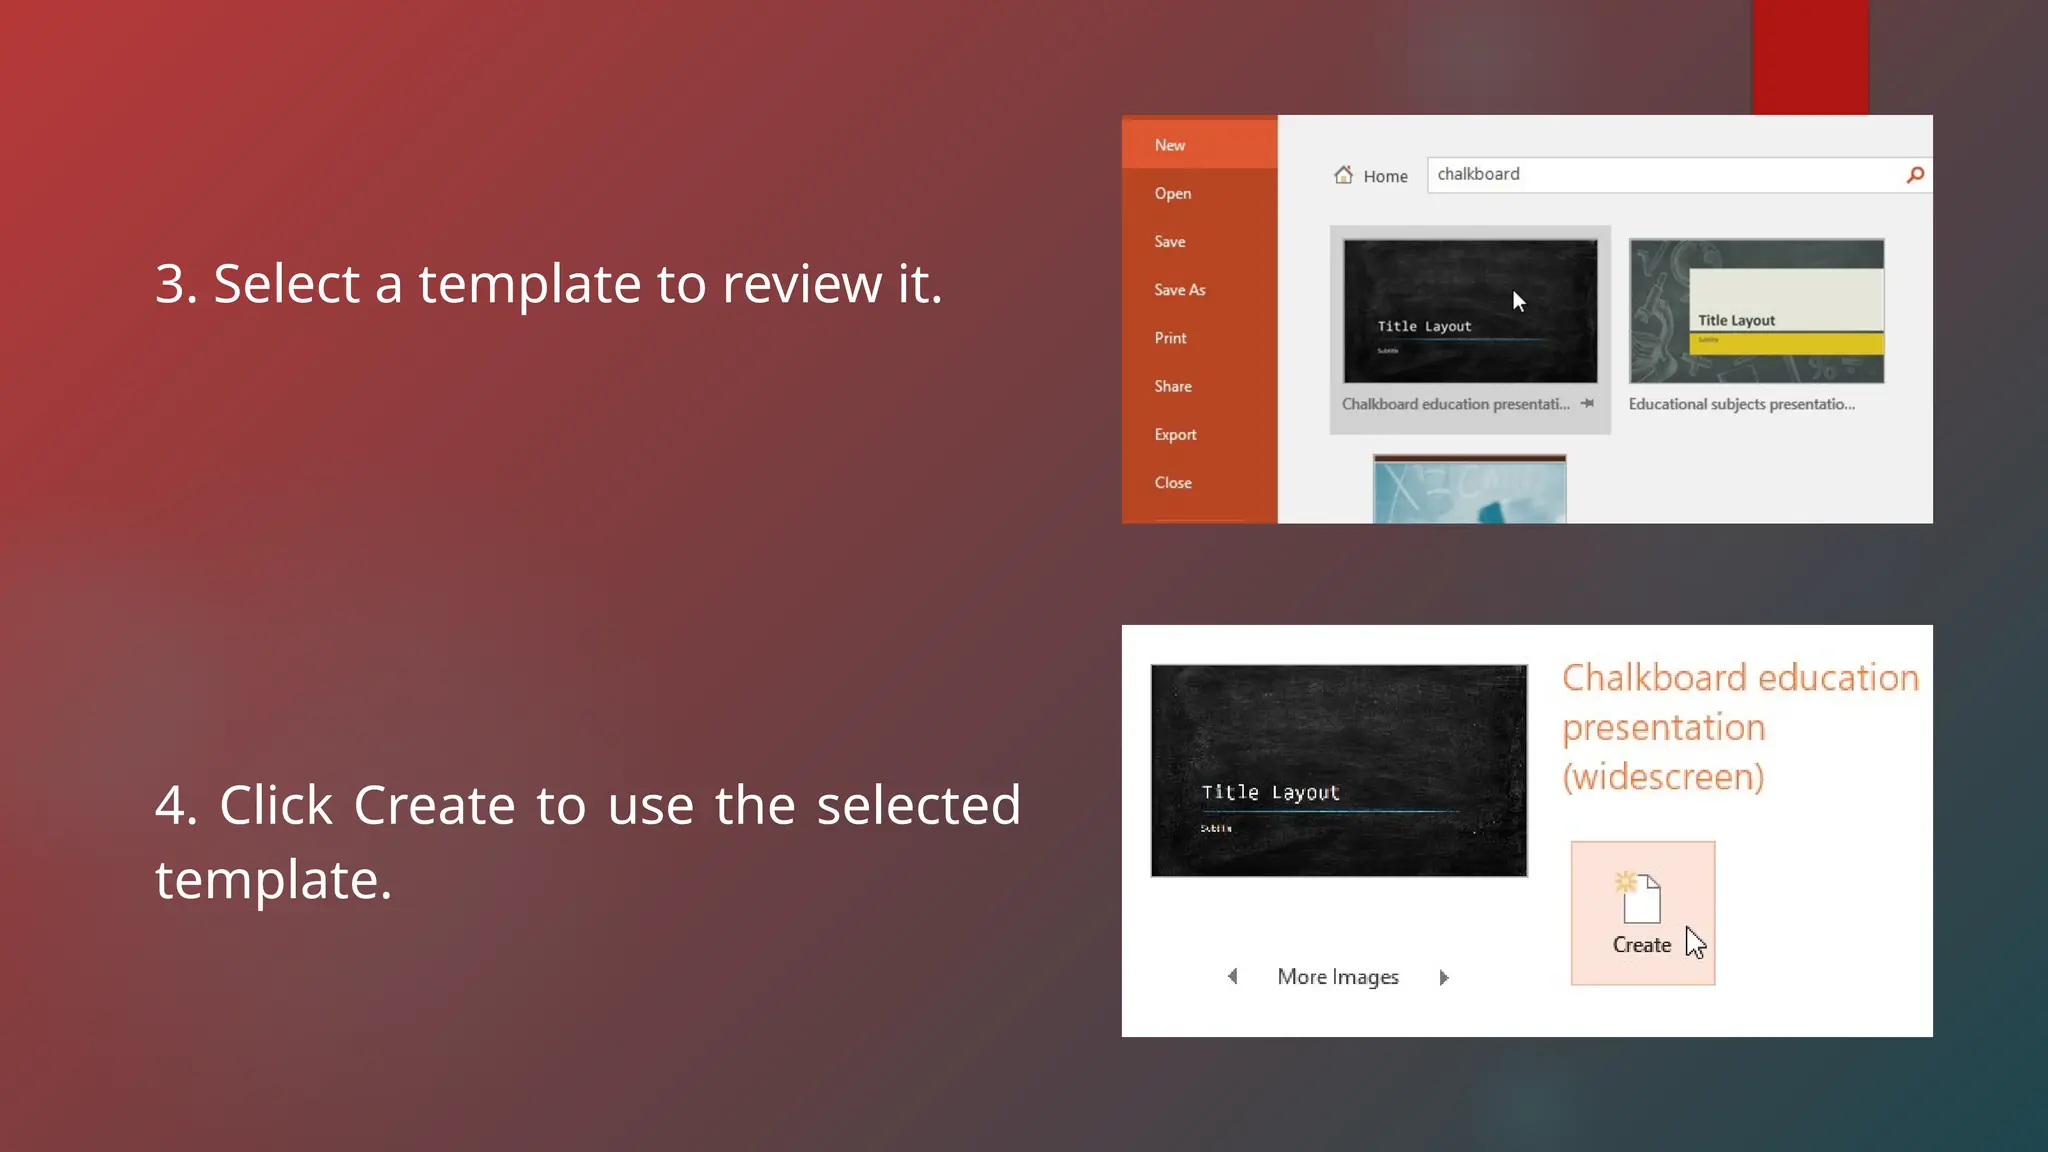
3. Select atemplate to review it.
4. Click Create to use the selected
template.
35.
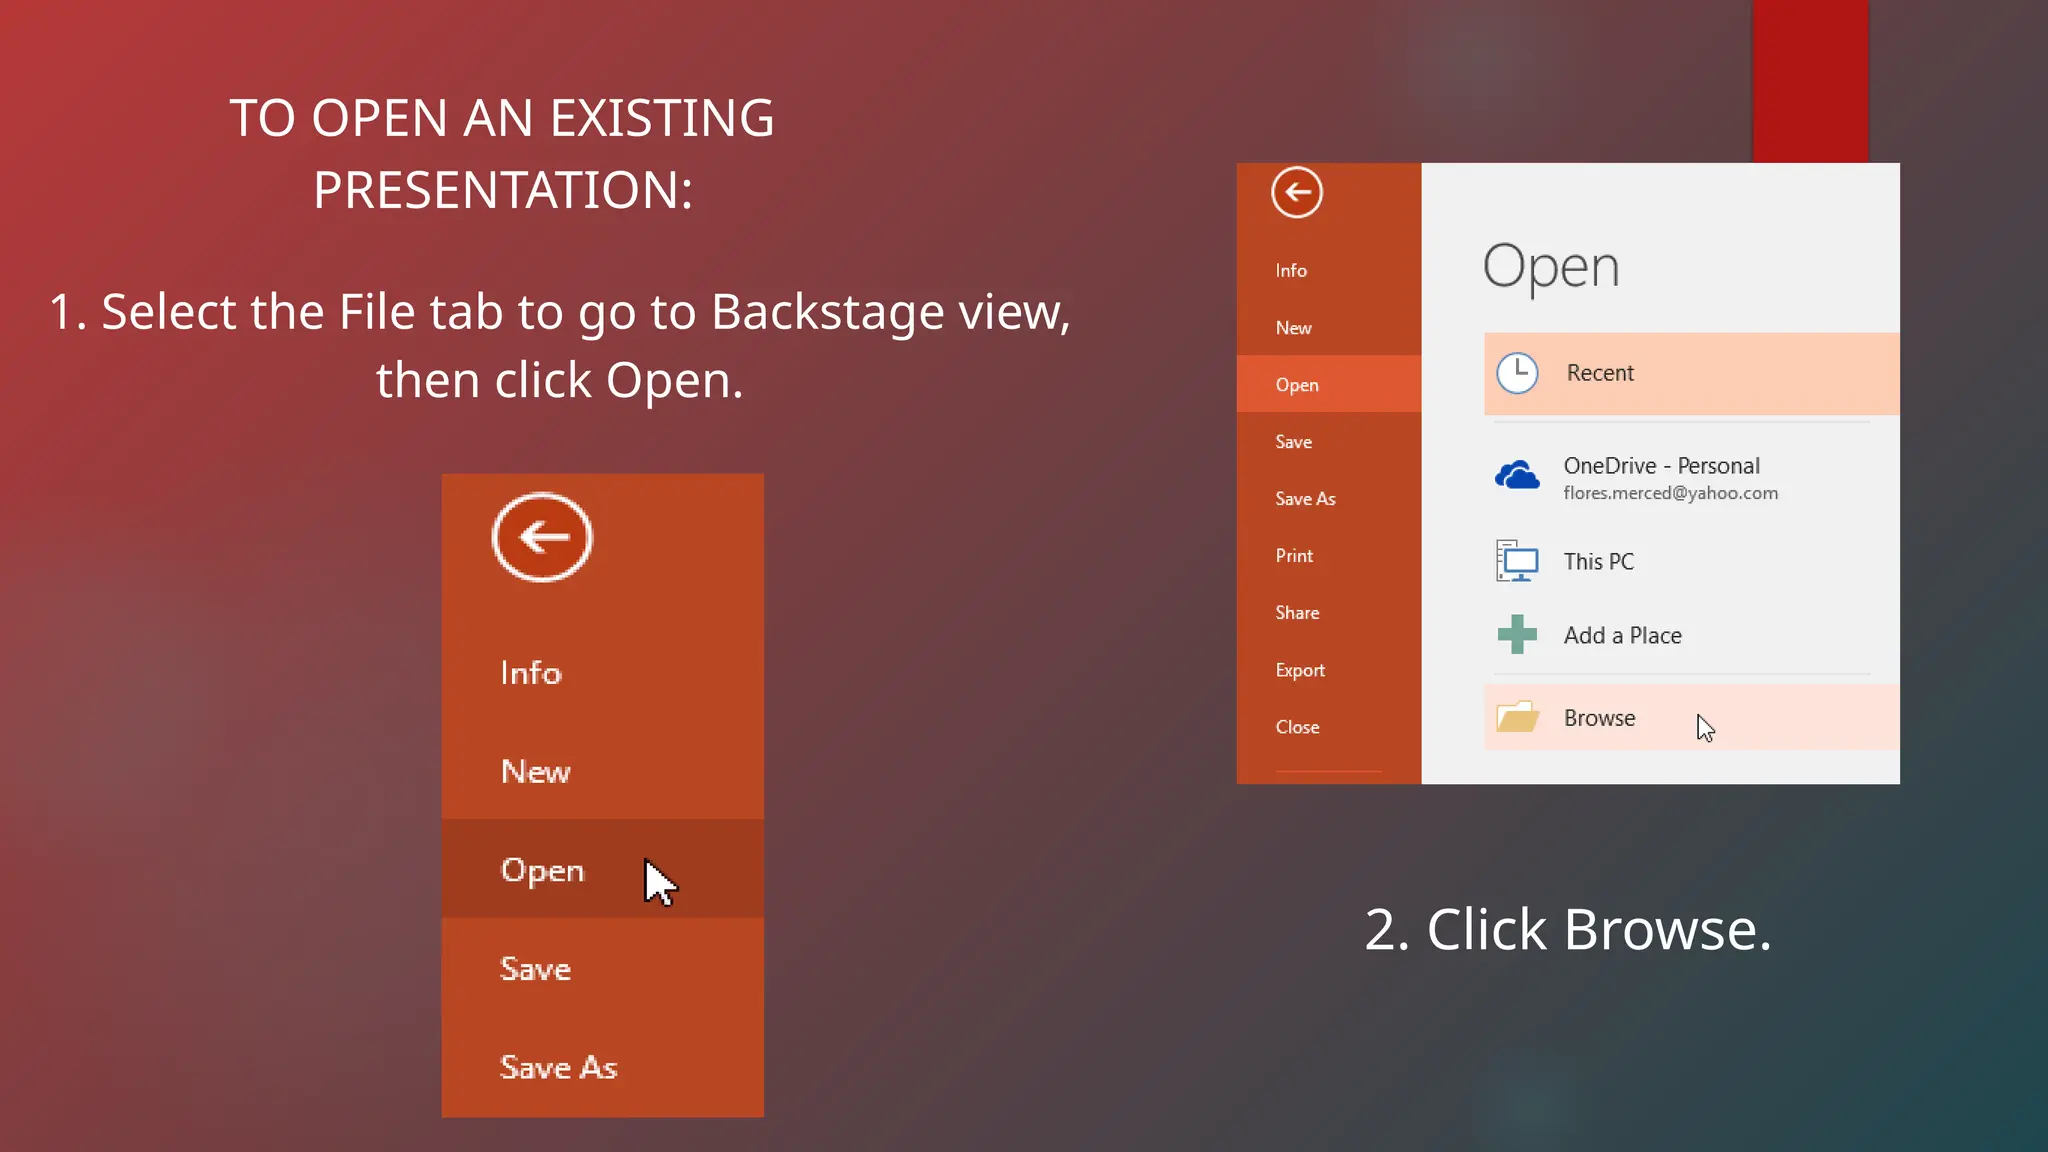
TO OPEN ANEXISTING
PRESENTATION:
1. Select the File tab to go to Backstage view,
then click Open.
2. Click Browse.
36.
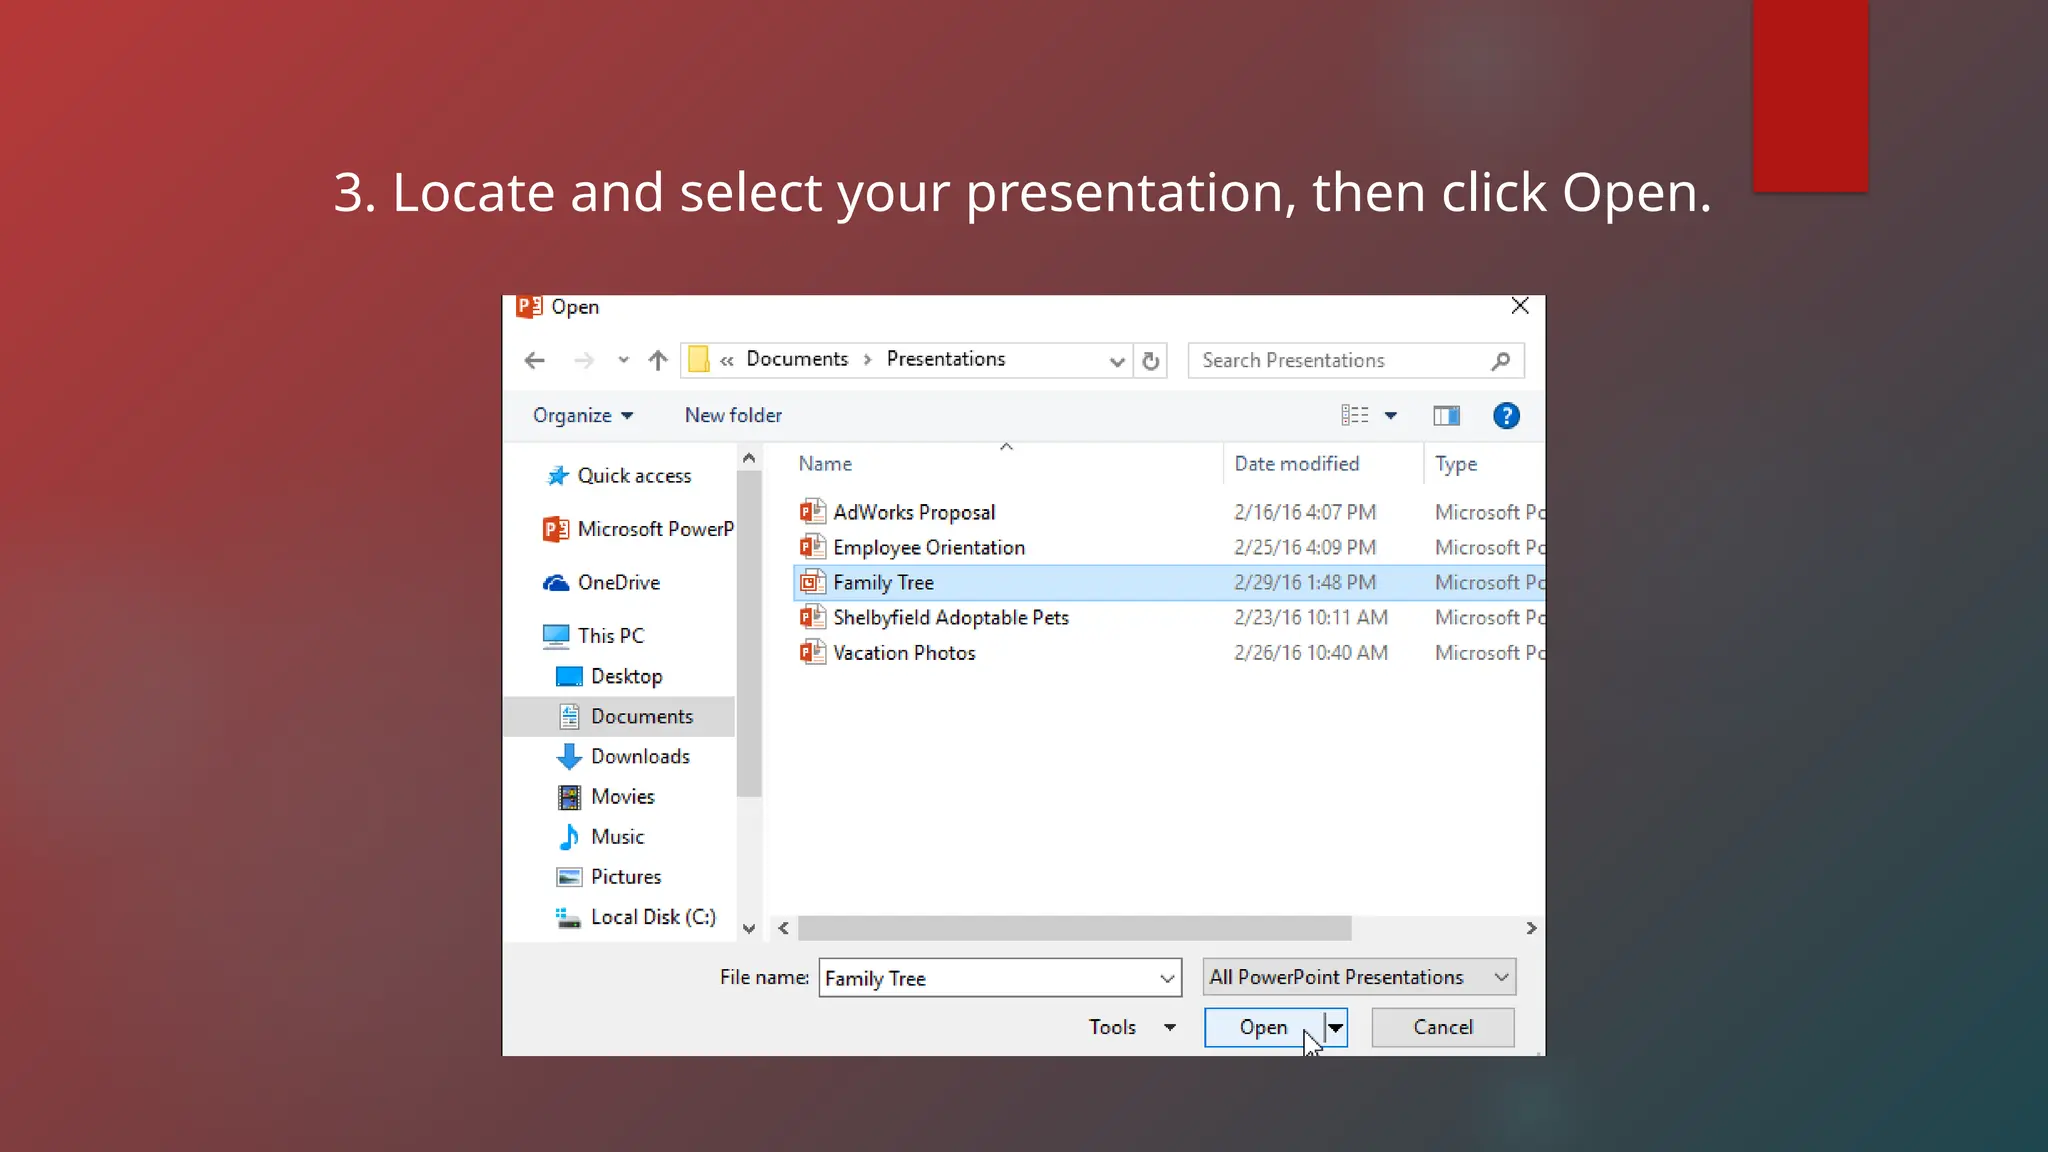
3. Locate andselect your presentation, then click Open.
37.
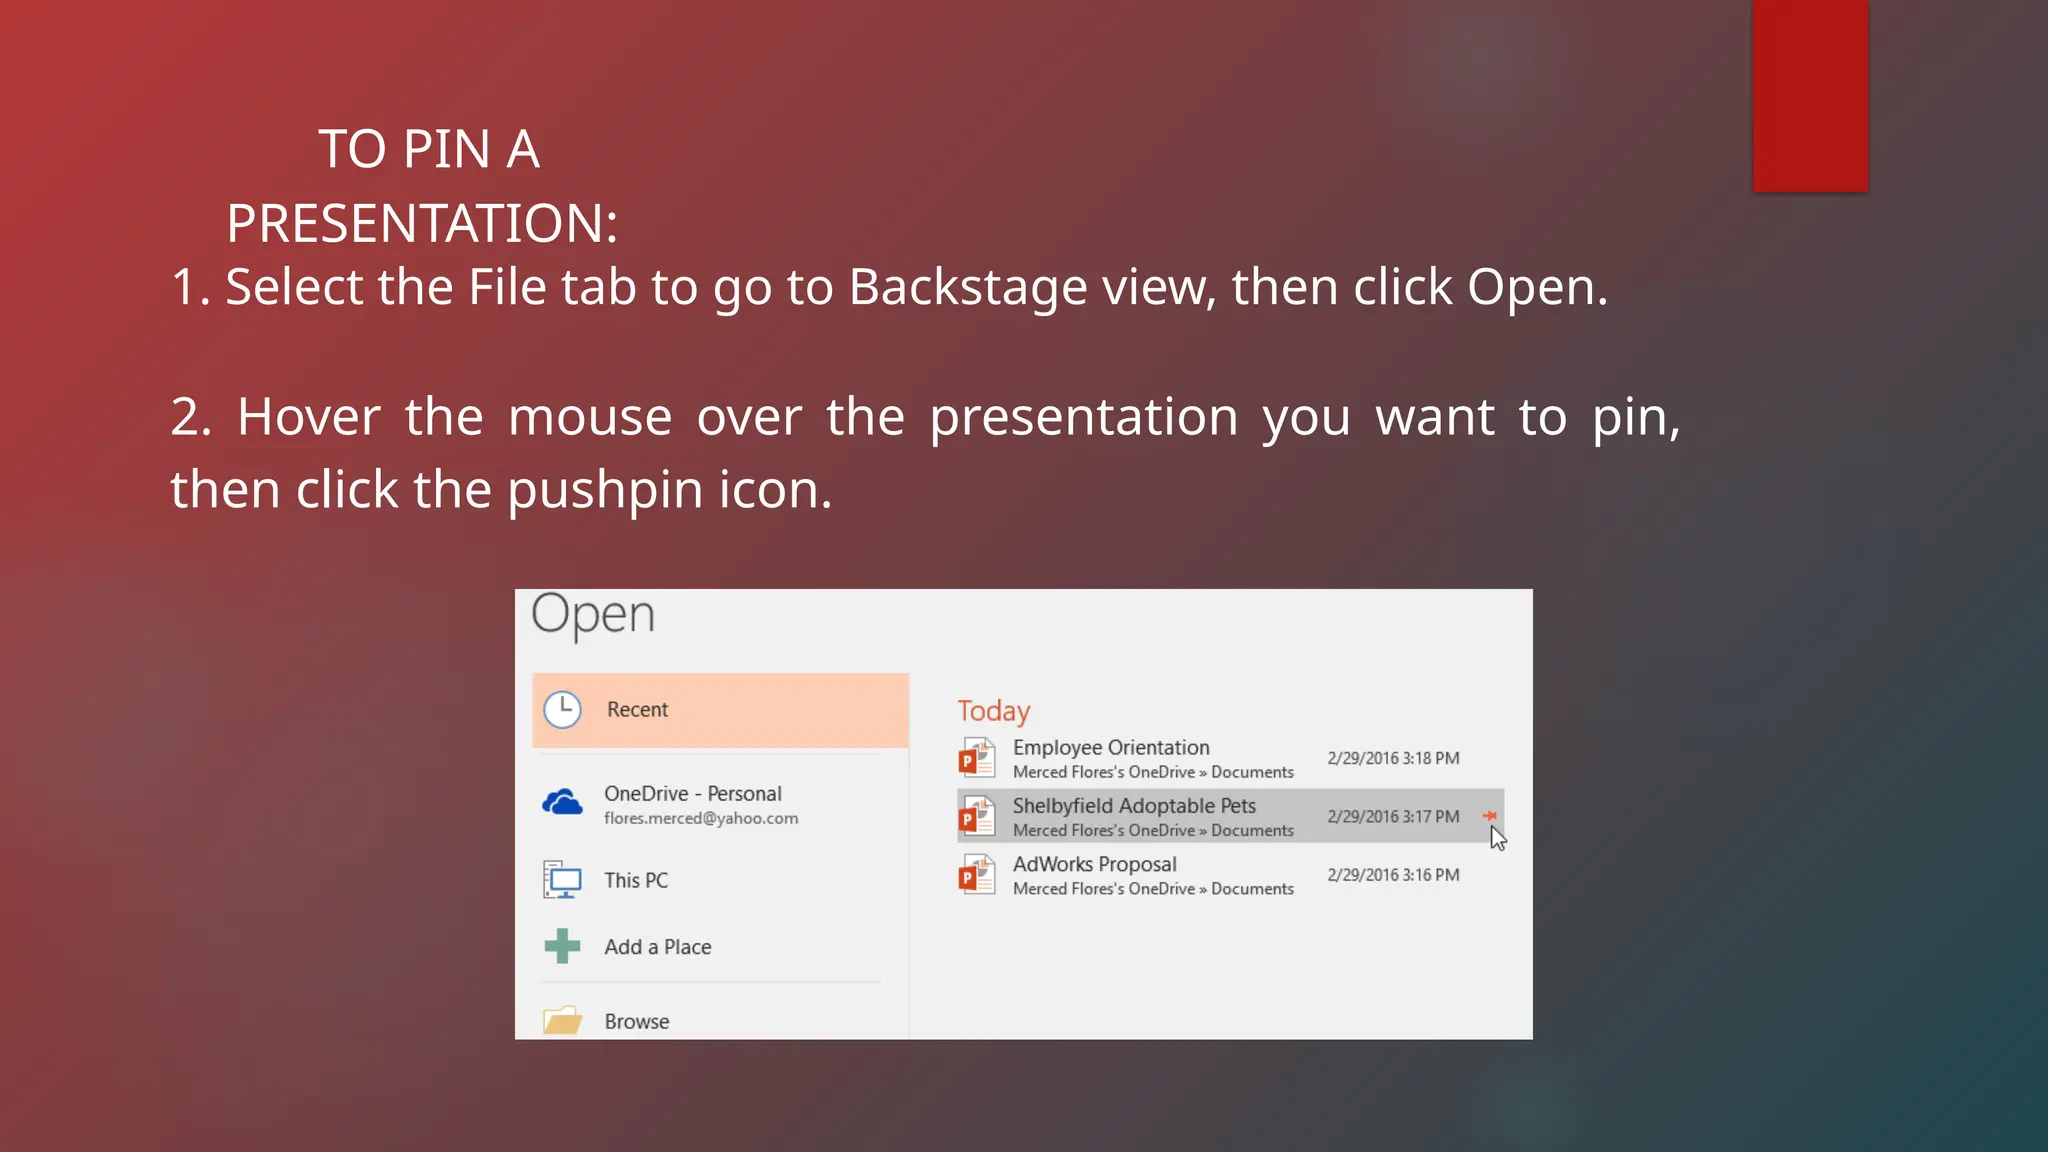
TO PIN A
PRESENTATION:
1.Select the File tab to go to Backstage view, then click Open.
2. Hover the mouse over the presentation you want to pin,
then click the pushpin icon.
38.
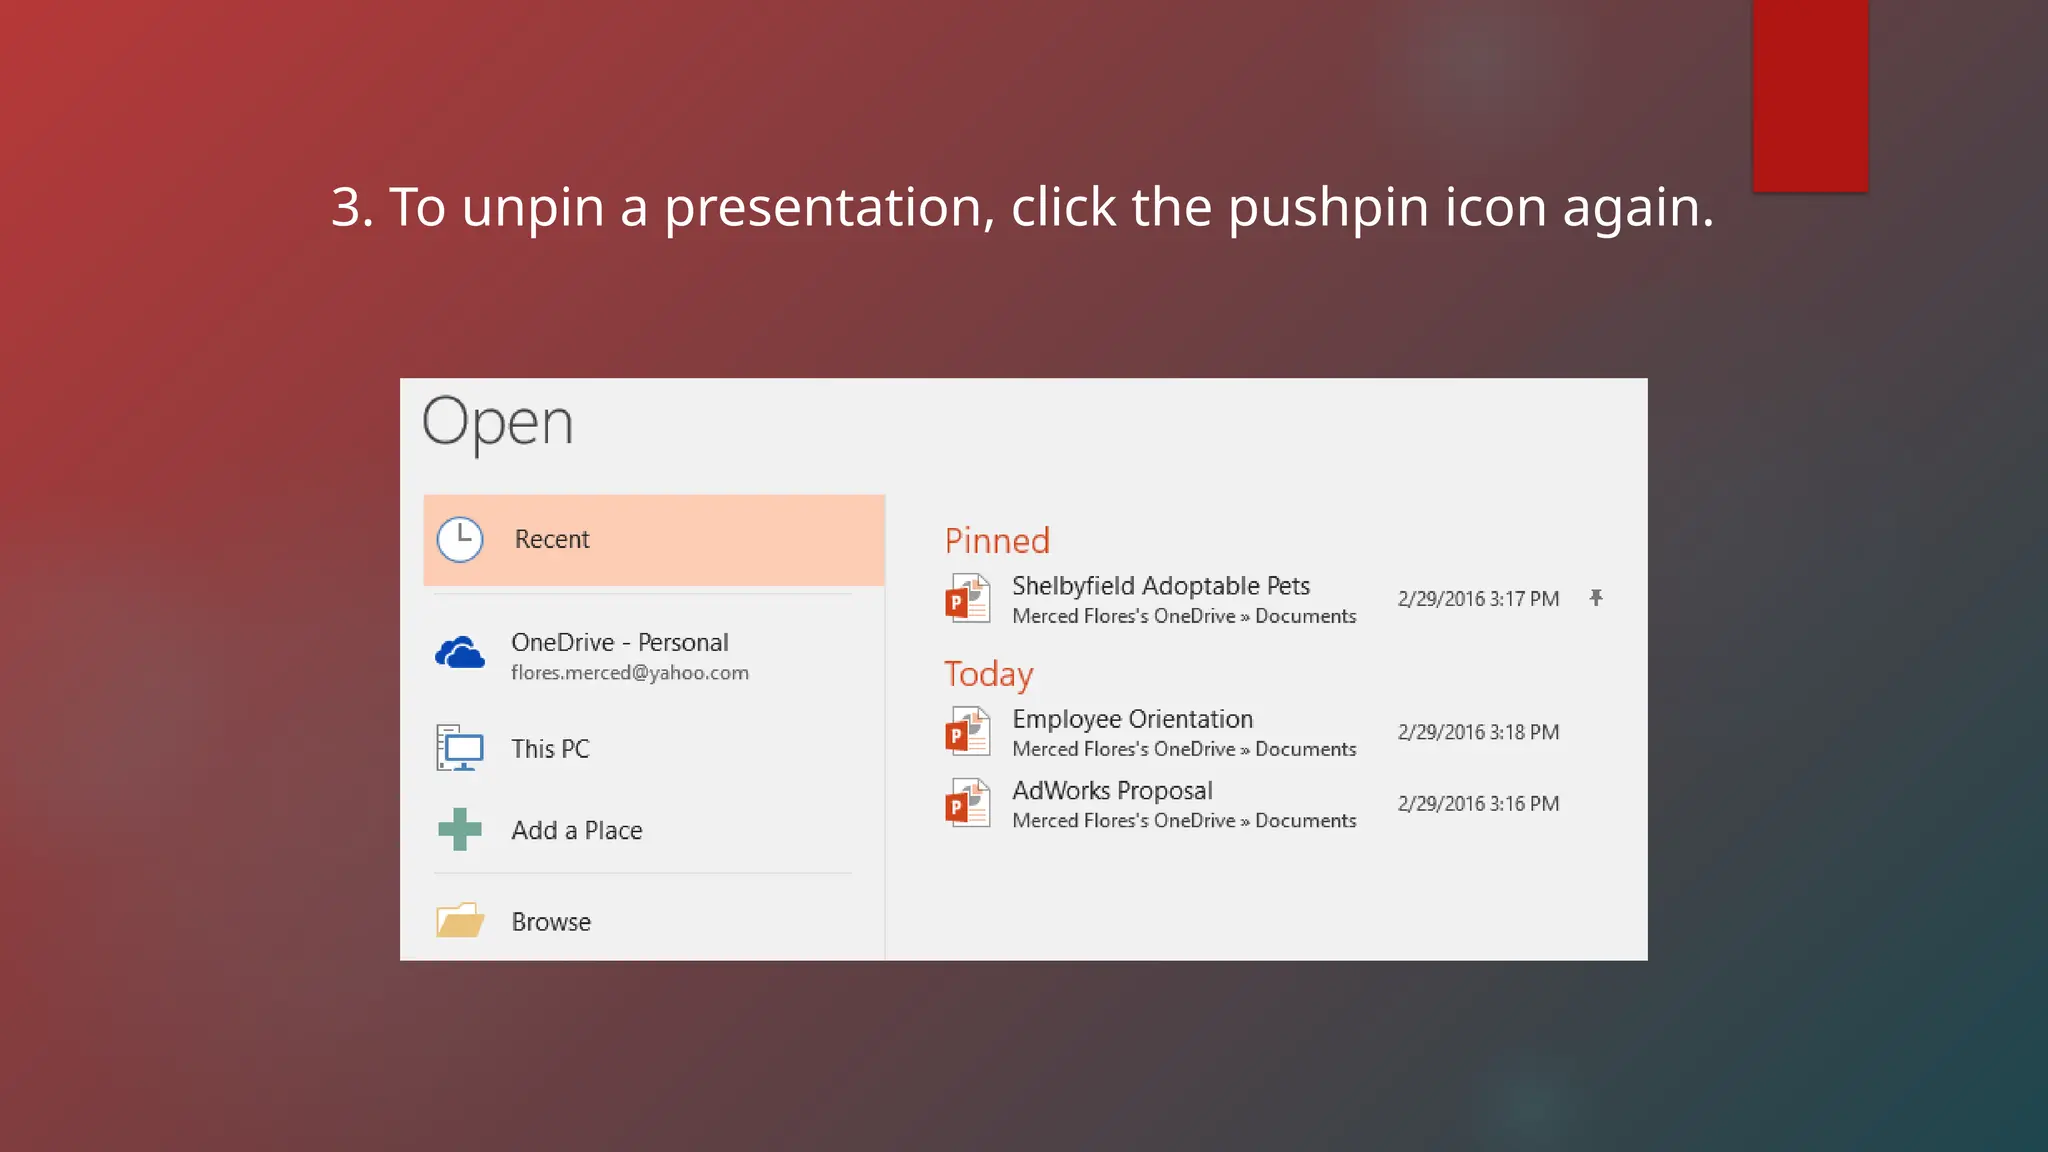
3. To unpina presentation, click the pushpin icon again.
39.
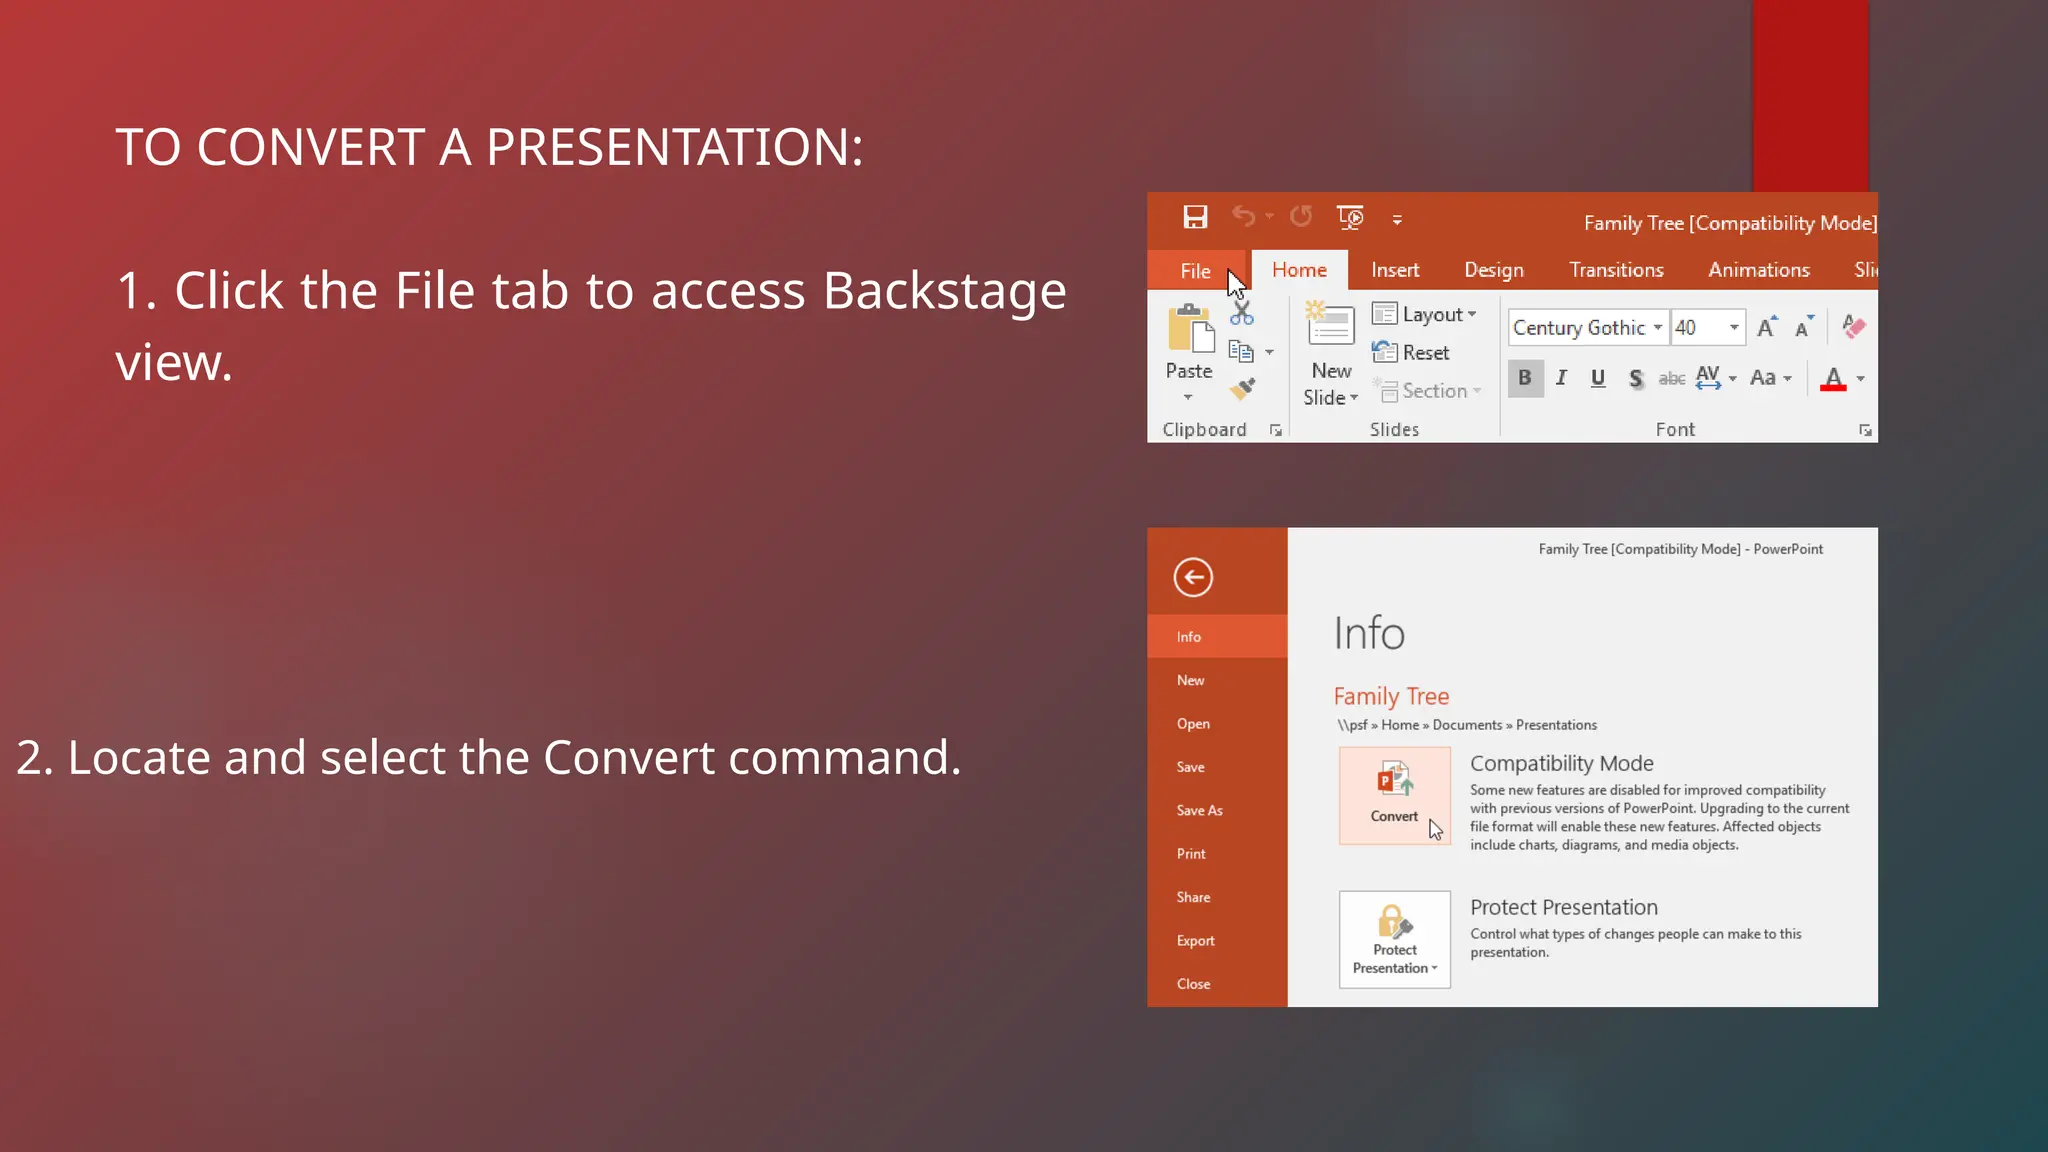
TO CONVERT APRESENTATION:
1. Click the File tab to access Backstage
view.
2. Locate and select the Convert command.
40.
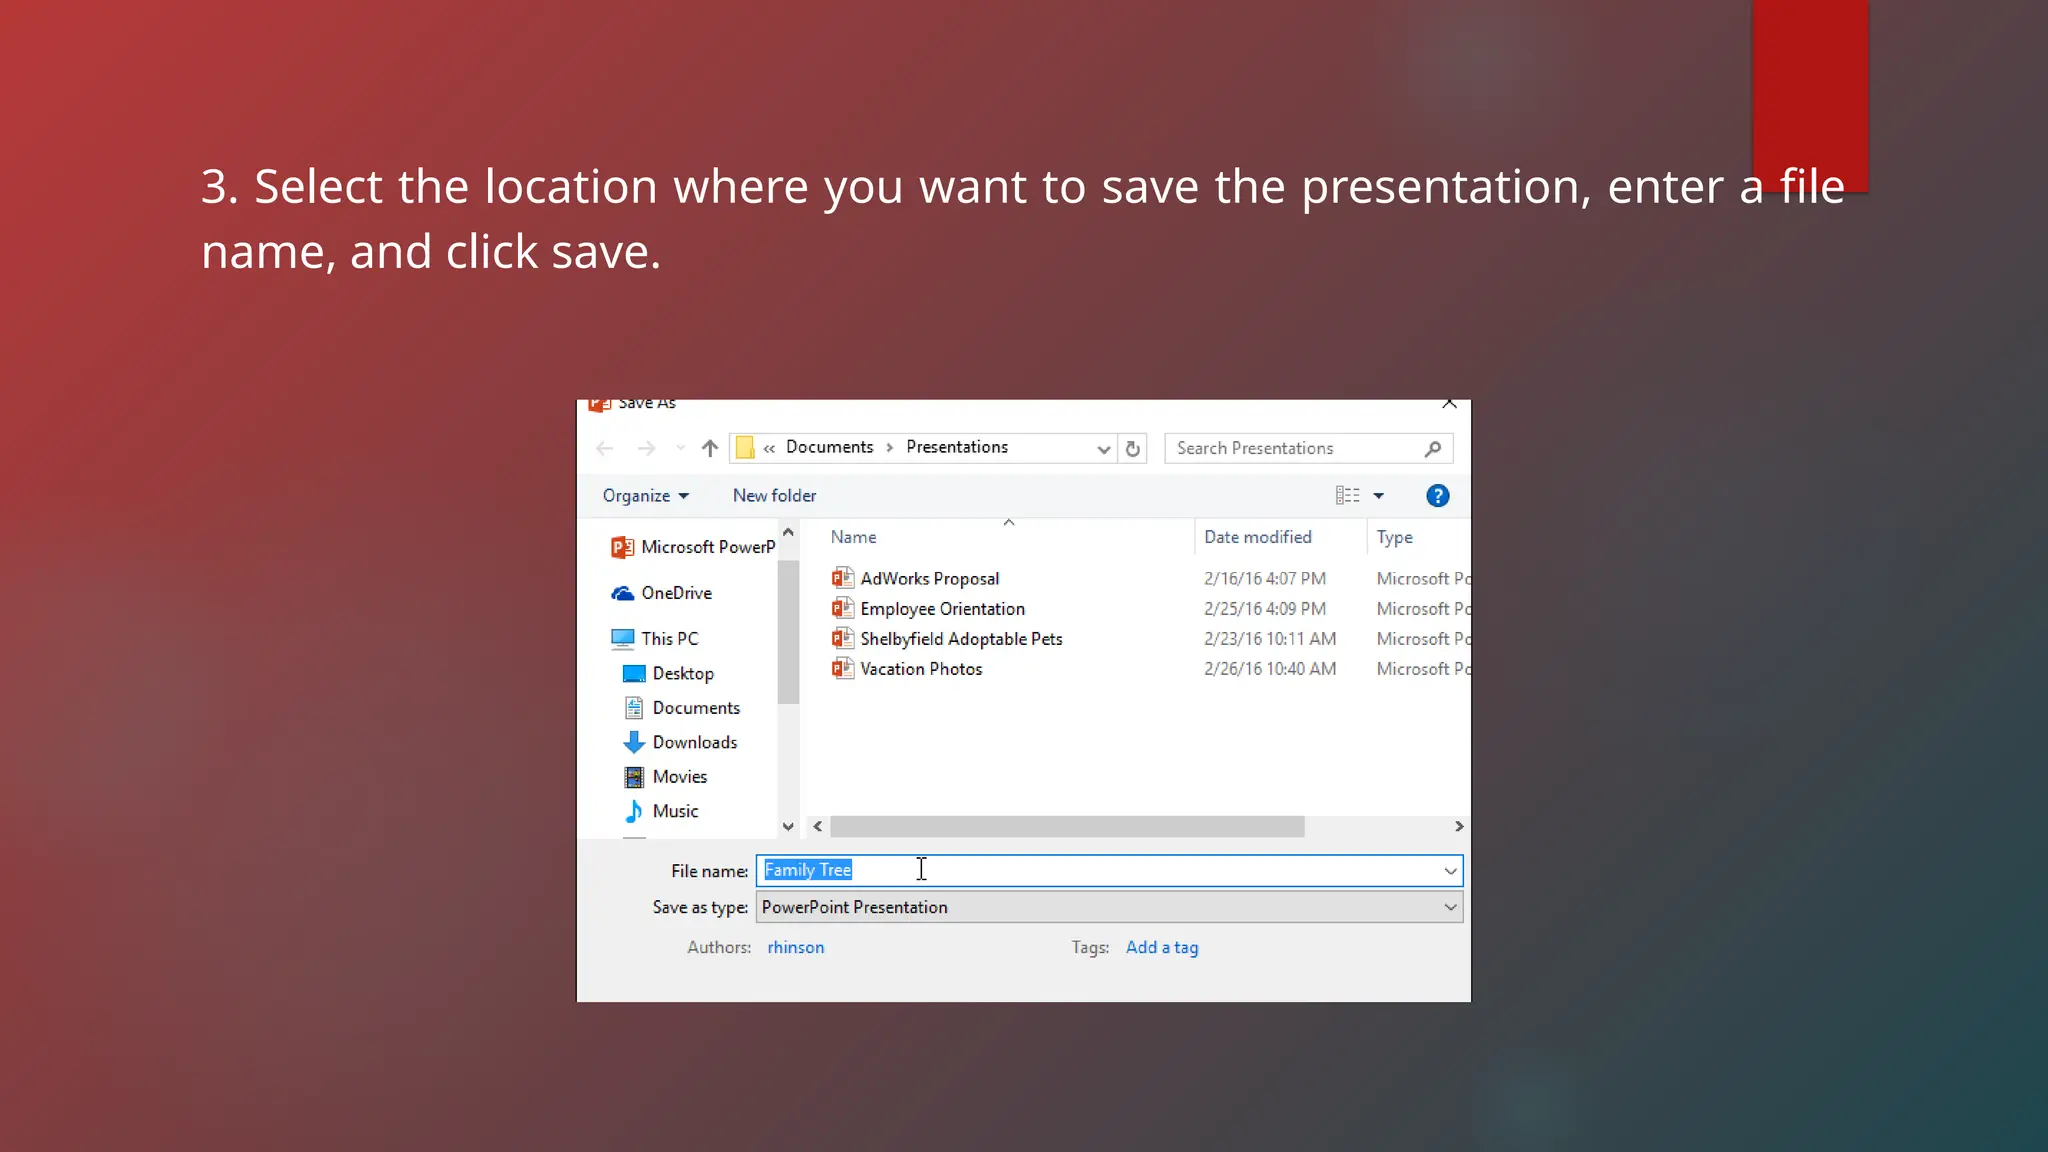
3. Select thelocation where you want to save the presentation, enter a file
name, and click save.
PowerPoint offers twoways to save a file;
1. Save - When you create or edit a presentation.
2. Save As - You’ll use this command to create a copy of a
presentation while keeping the original.
43.
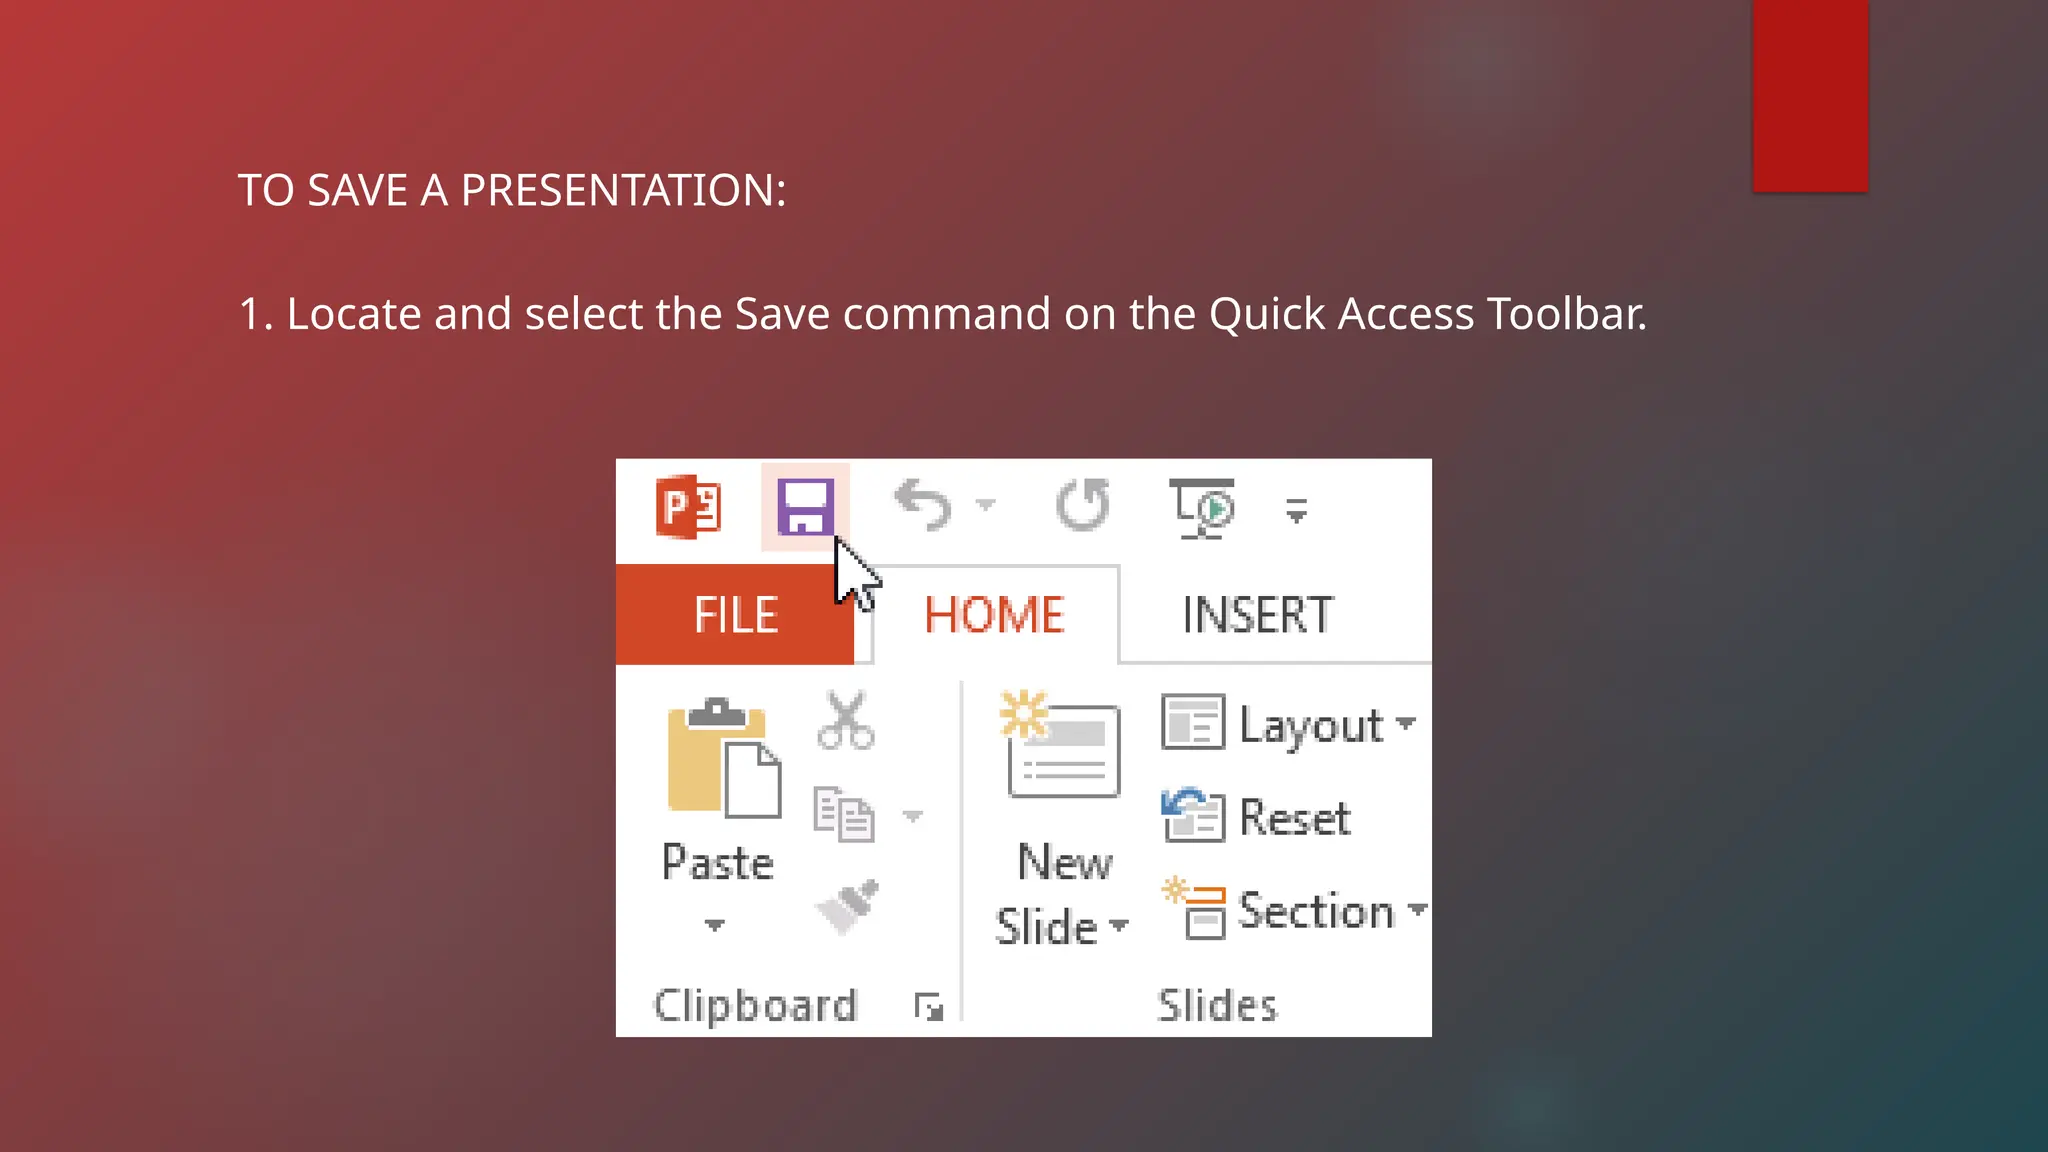
TO SAVE APRESENTATION:
1. Locate and select the Save command on the Quick Access Toolbar.
44.
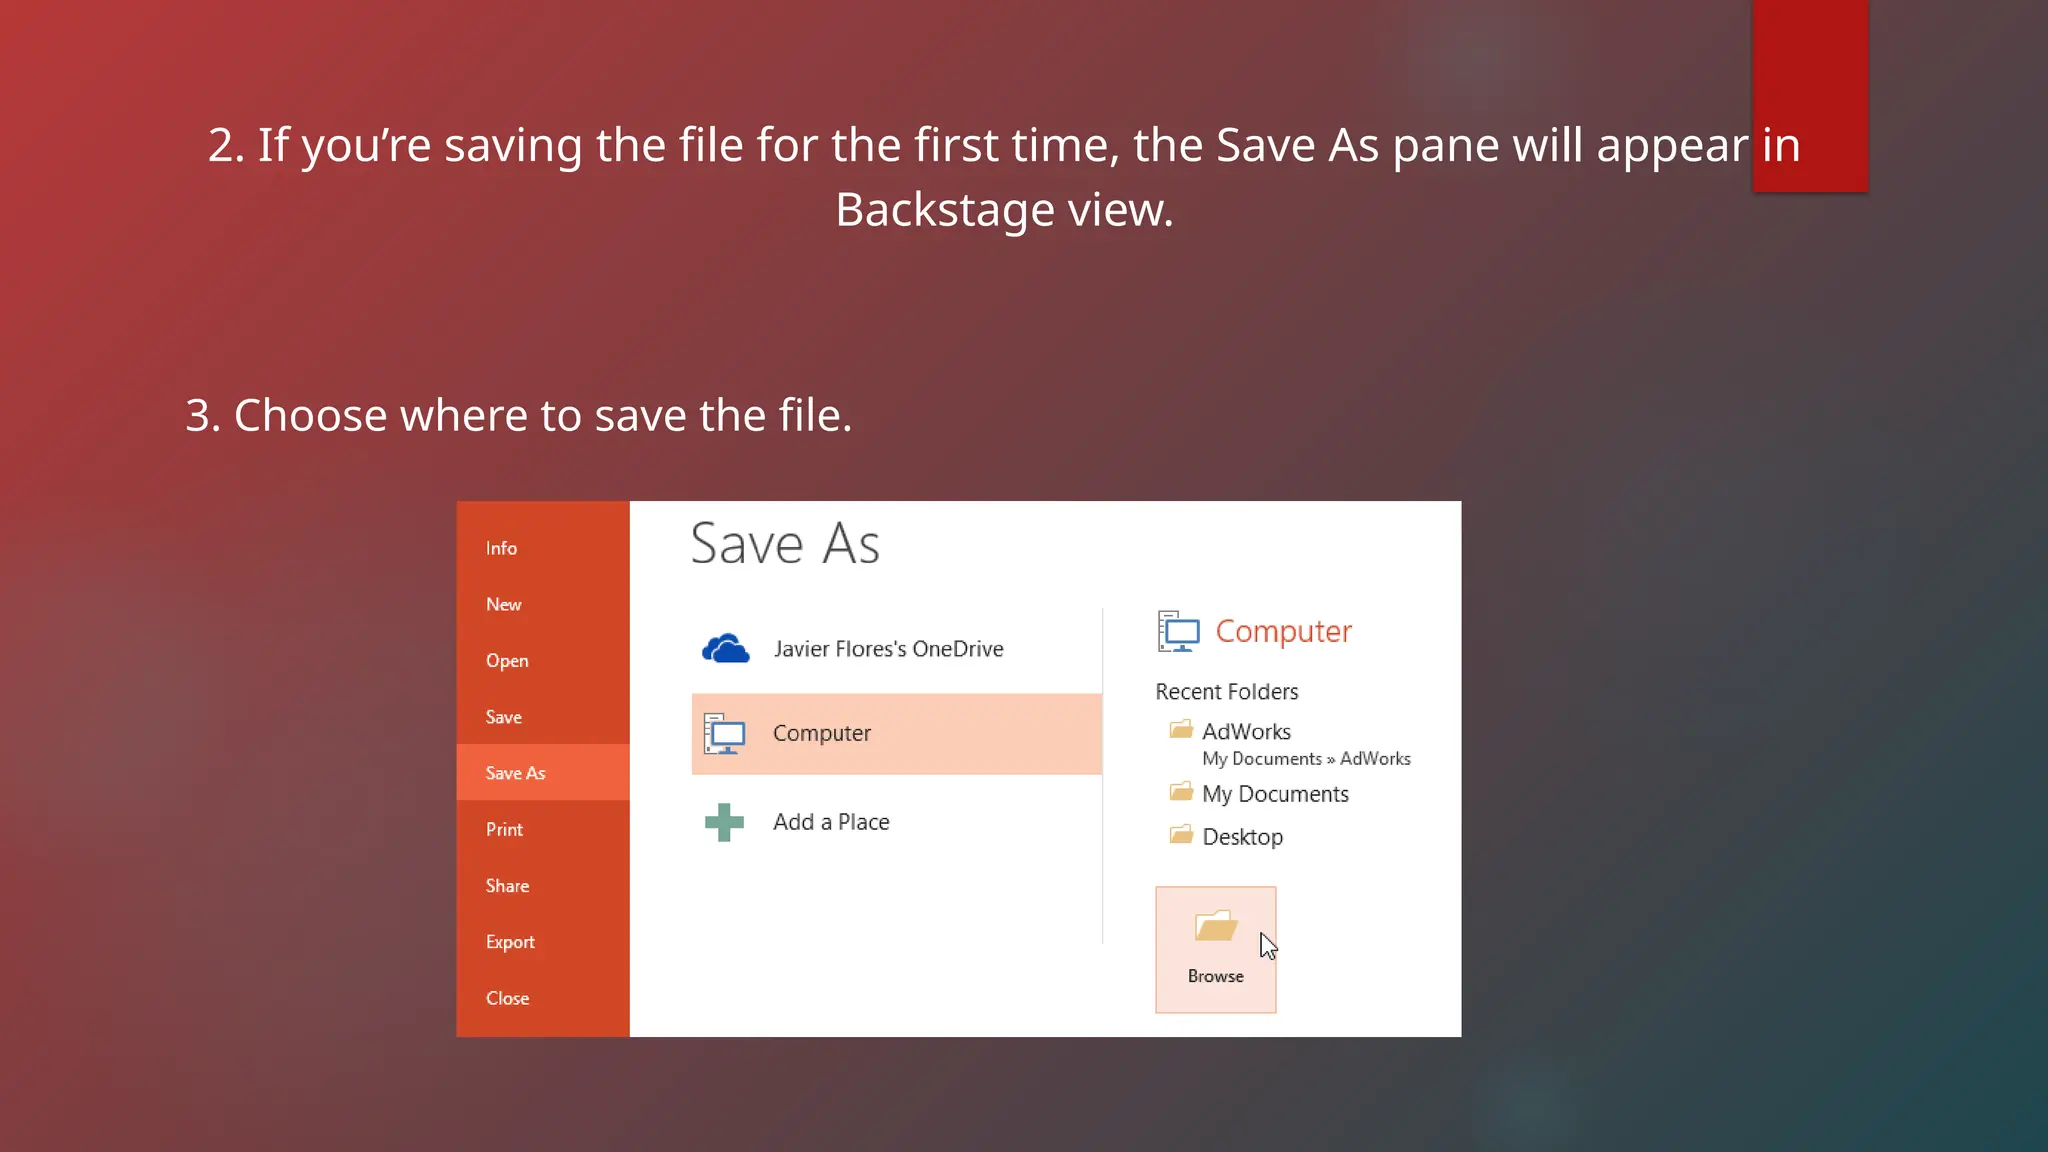
2. If you’resaving the file for the first time, the Save As pane will appear in
Backstage view.
3. Choose where to save the file.
45.
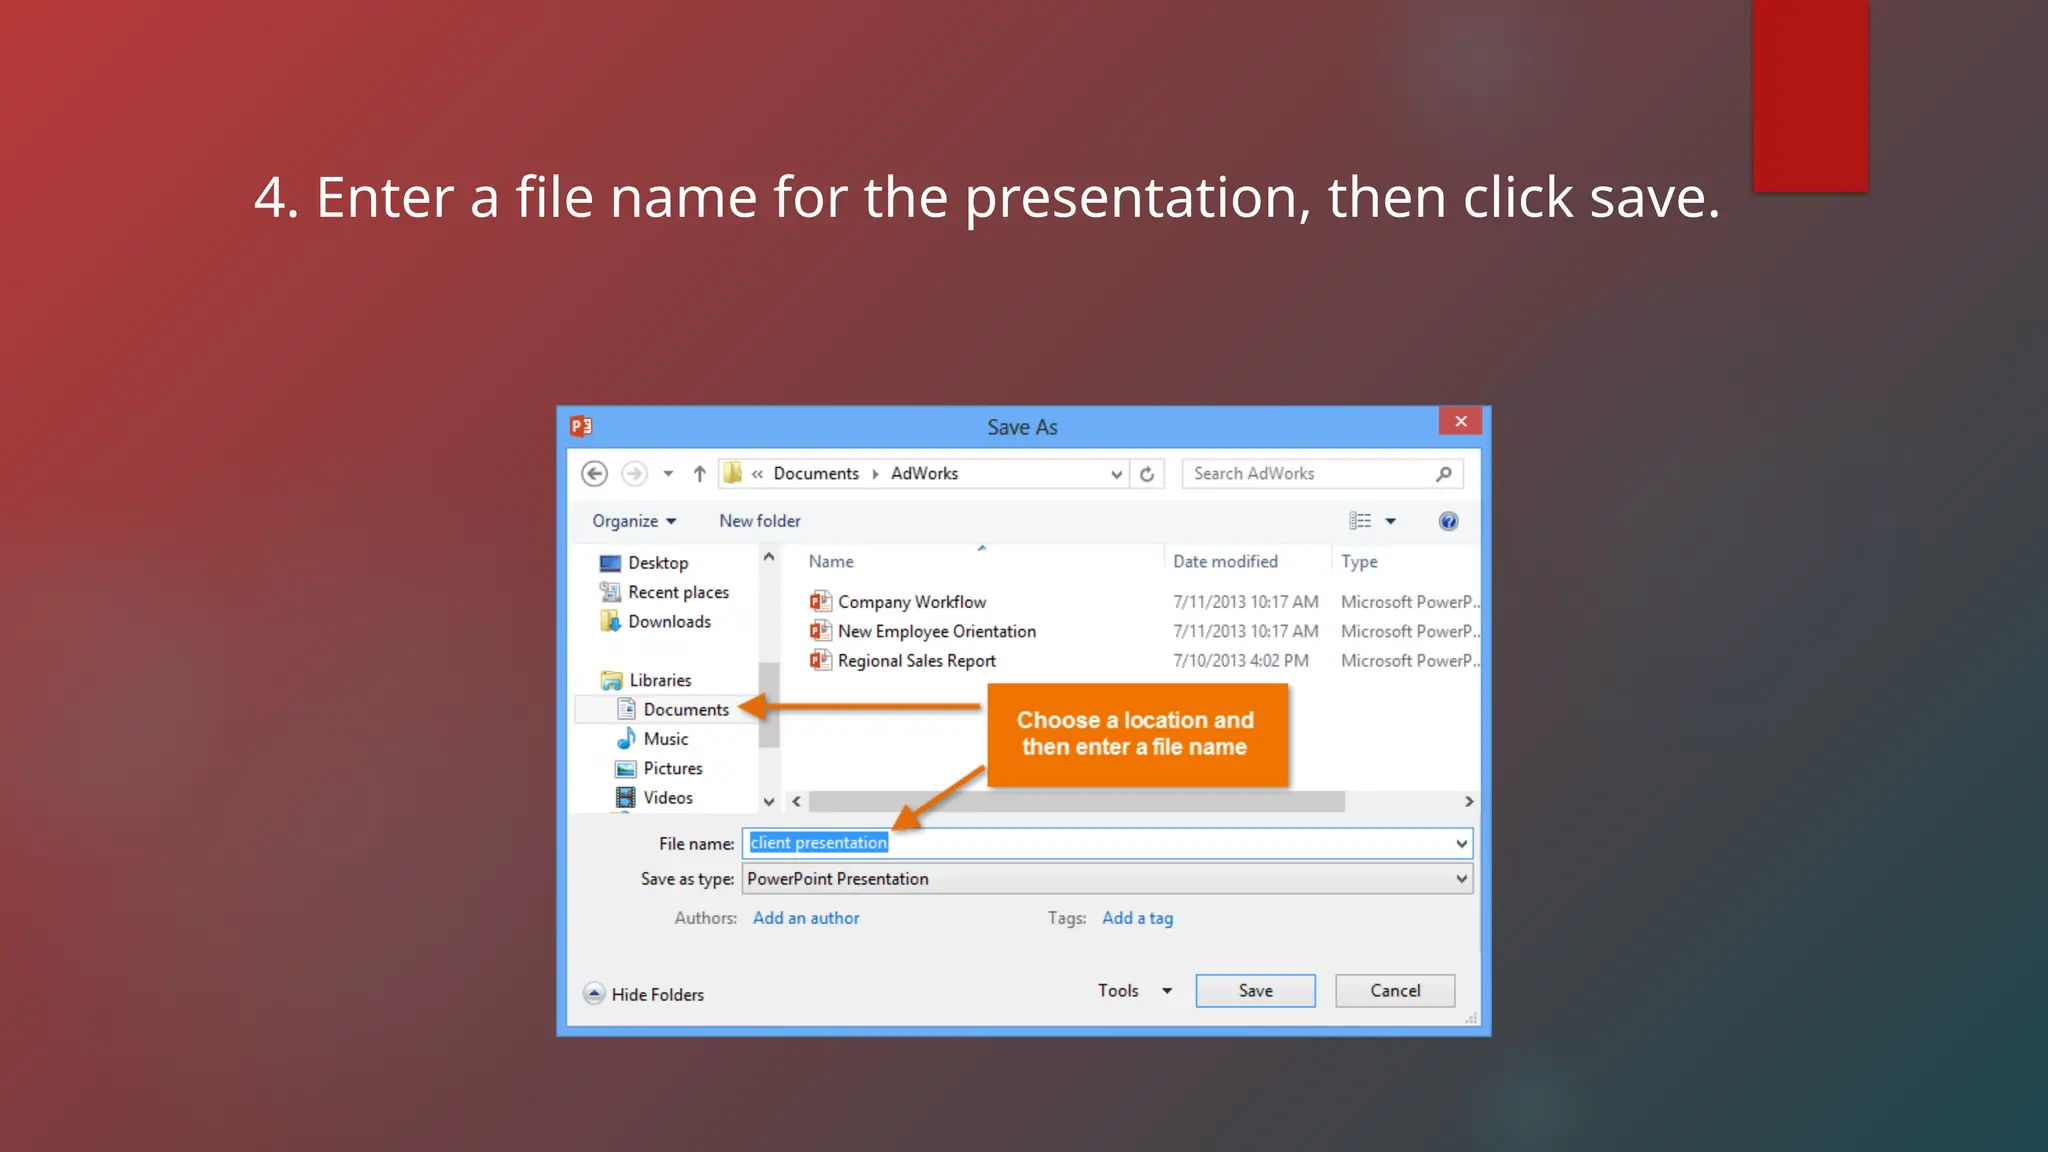
4. Enter afile name for the presentation, then click save.
46.
USING SAVE ASTO MAKE A COPY
1. Click the Save As command in Backstage view.
2. Choose where to save the file and give it a new file name.
47.
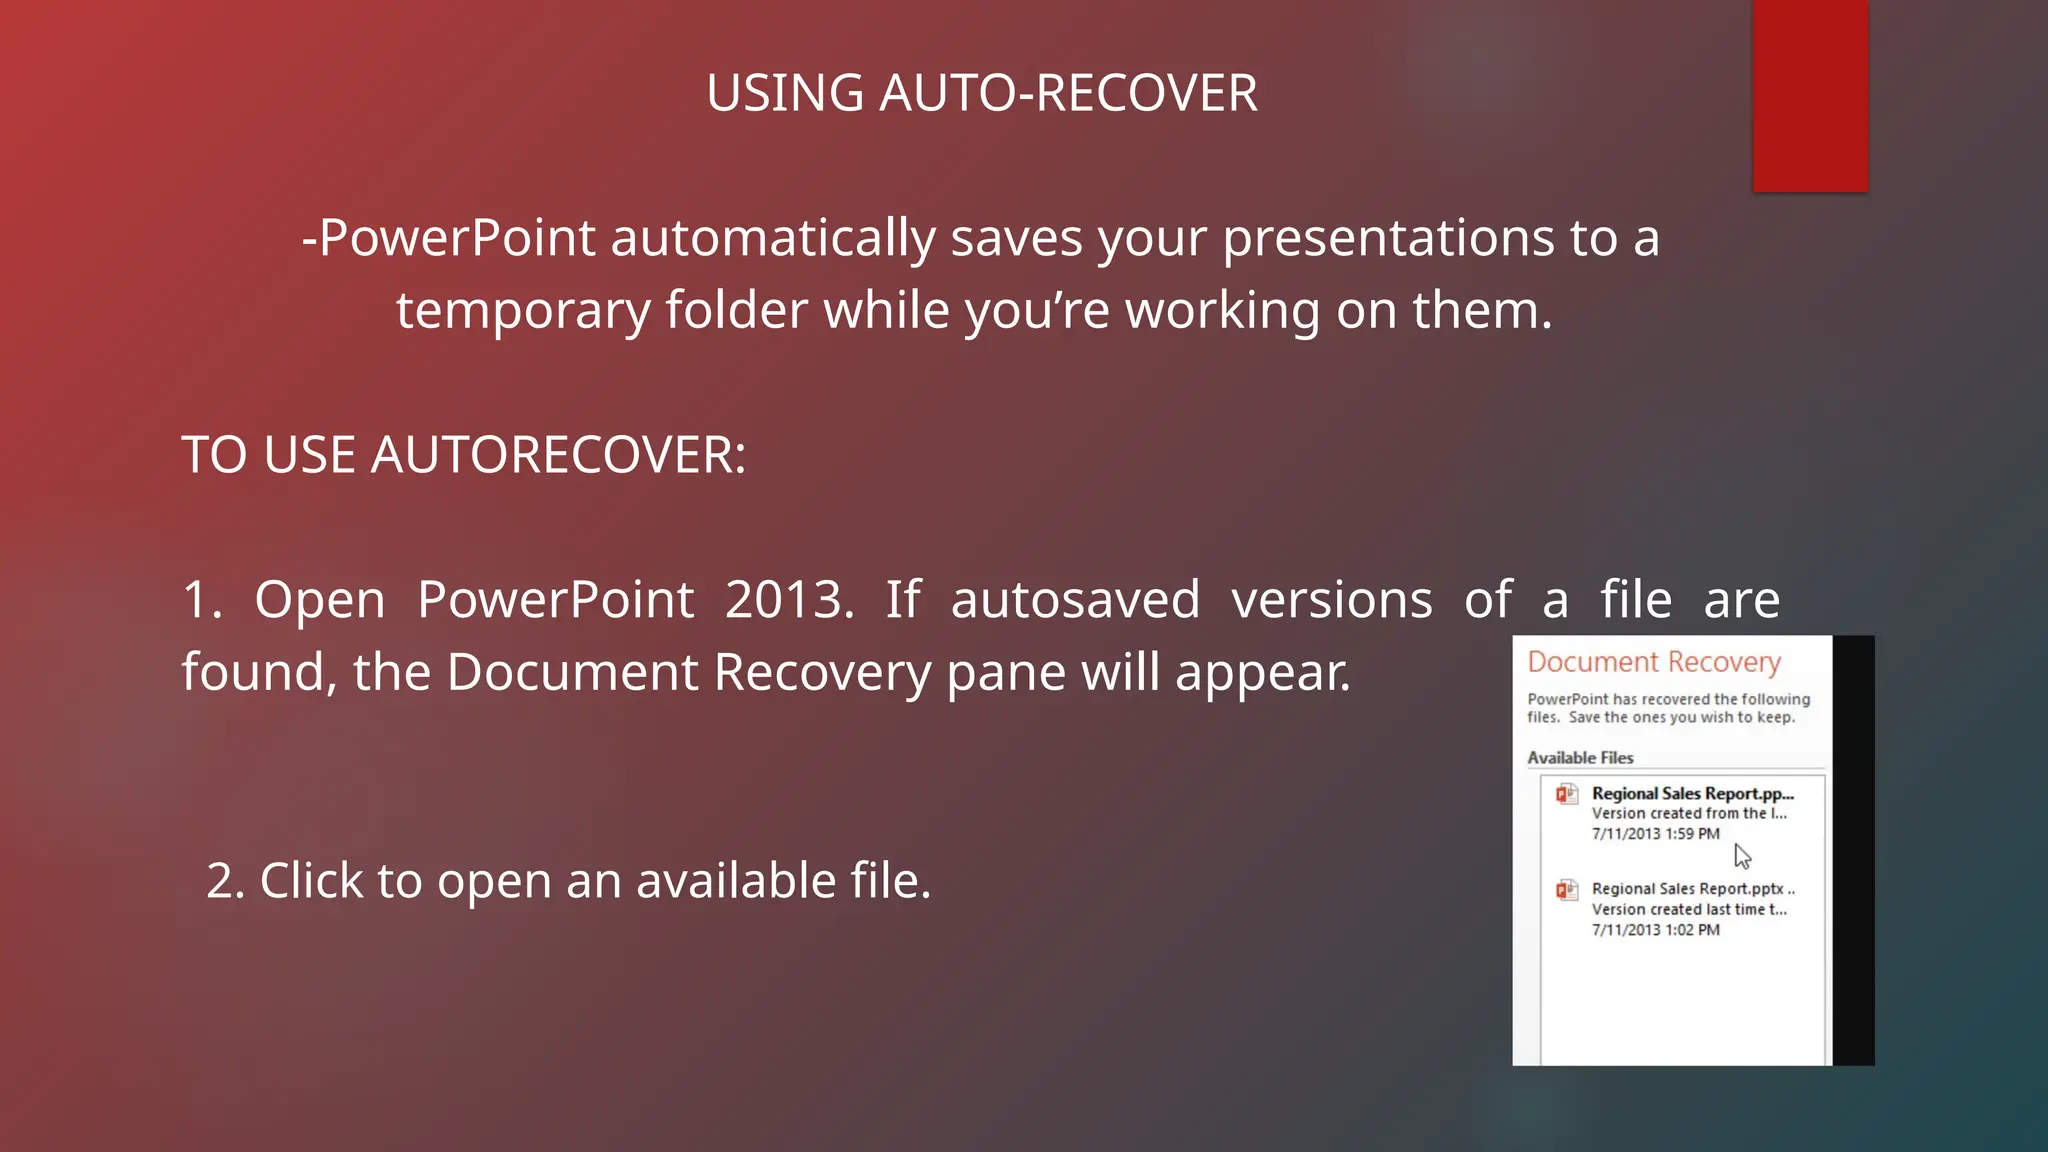
USING AUTO-RECOVER
-PowerPoint automaticallysaves your presentations to a
temporary folder while you’re working on them.
TO USE AUTORECOVER:
1. Open PowerPoint 2013. If autosaved versions of a file are
found, the Document Recovery pane will appear.
2. Click to open an available file.
48.
EXPORTING PRESENTATIONS:
-By default,PowerPoint presentations are saved in the pptx file type. However, there
maybe times when you need to use another file type, such as a PDF or PowerPoint
97-2003 presentations. It’s easy to export your presentation from PowerPoint in a
variety of file types;
1. PDF
2. Video
3. Package for CD – Saves the presentation in a folder along with the Microsoft
PowerPoint Viewer, a special slide show player anyone can download.
4. Handouts – Prints a handout version of your slides.
5. Other file type – Saves in other file types, including PNG and PowerPoint 97-2003
49.
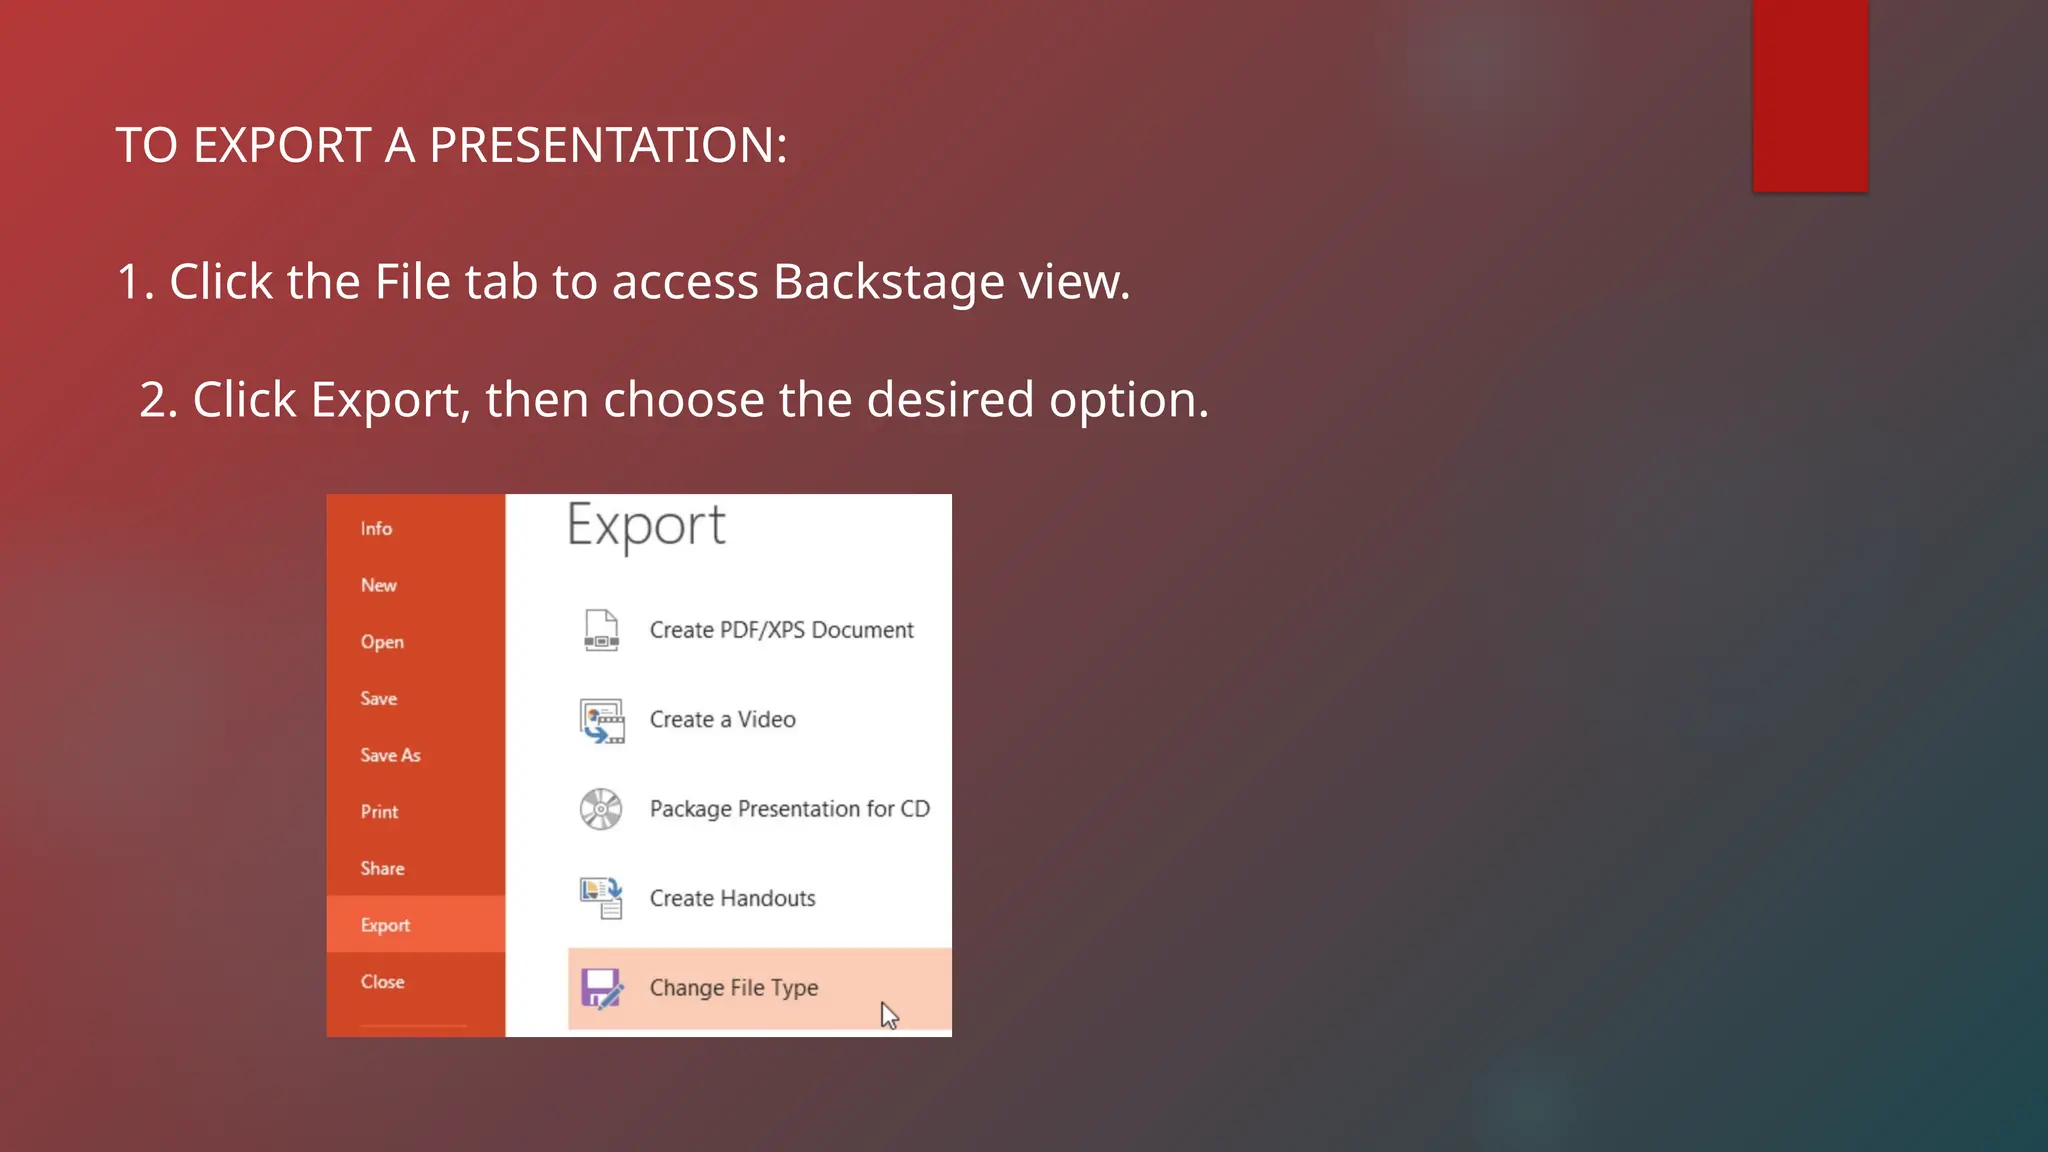
TO EXPORT APRESENTATION:
1. Click the File tab to access Backstage view.
2. Click Export, then choose the desired option.
50.
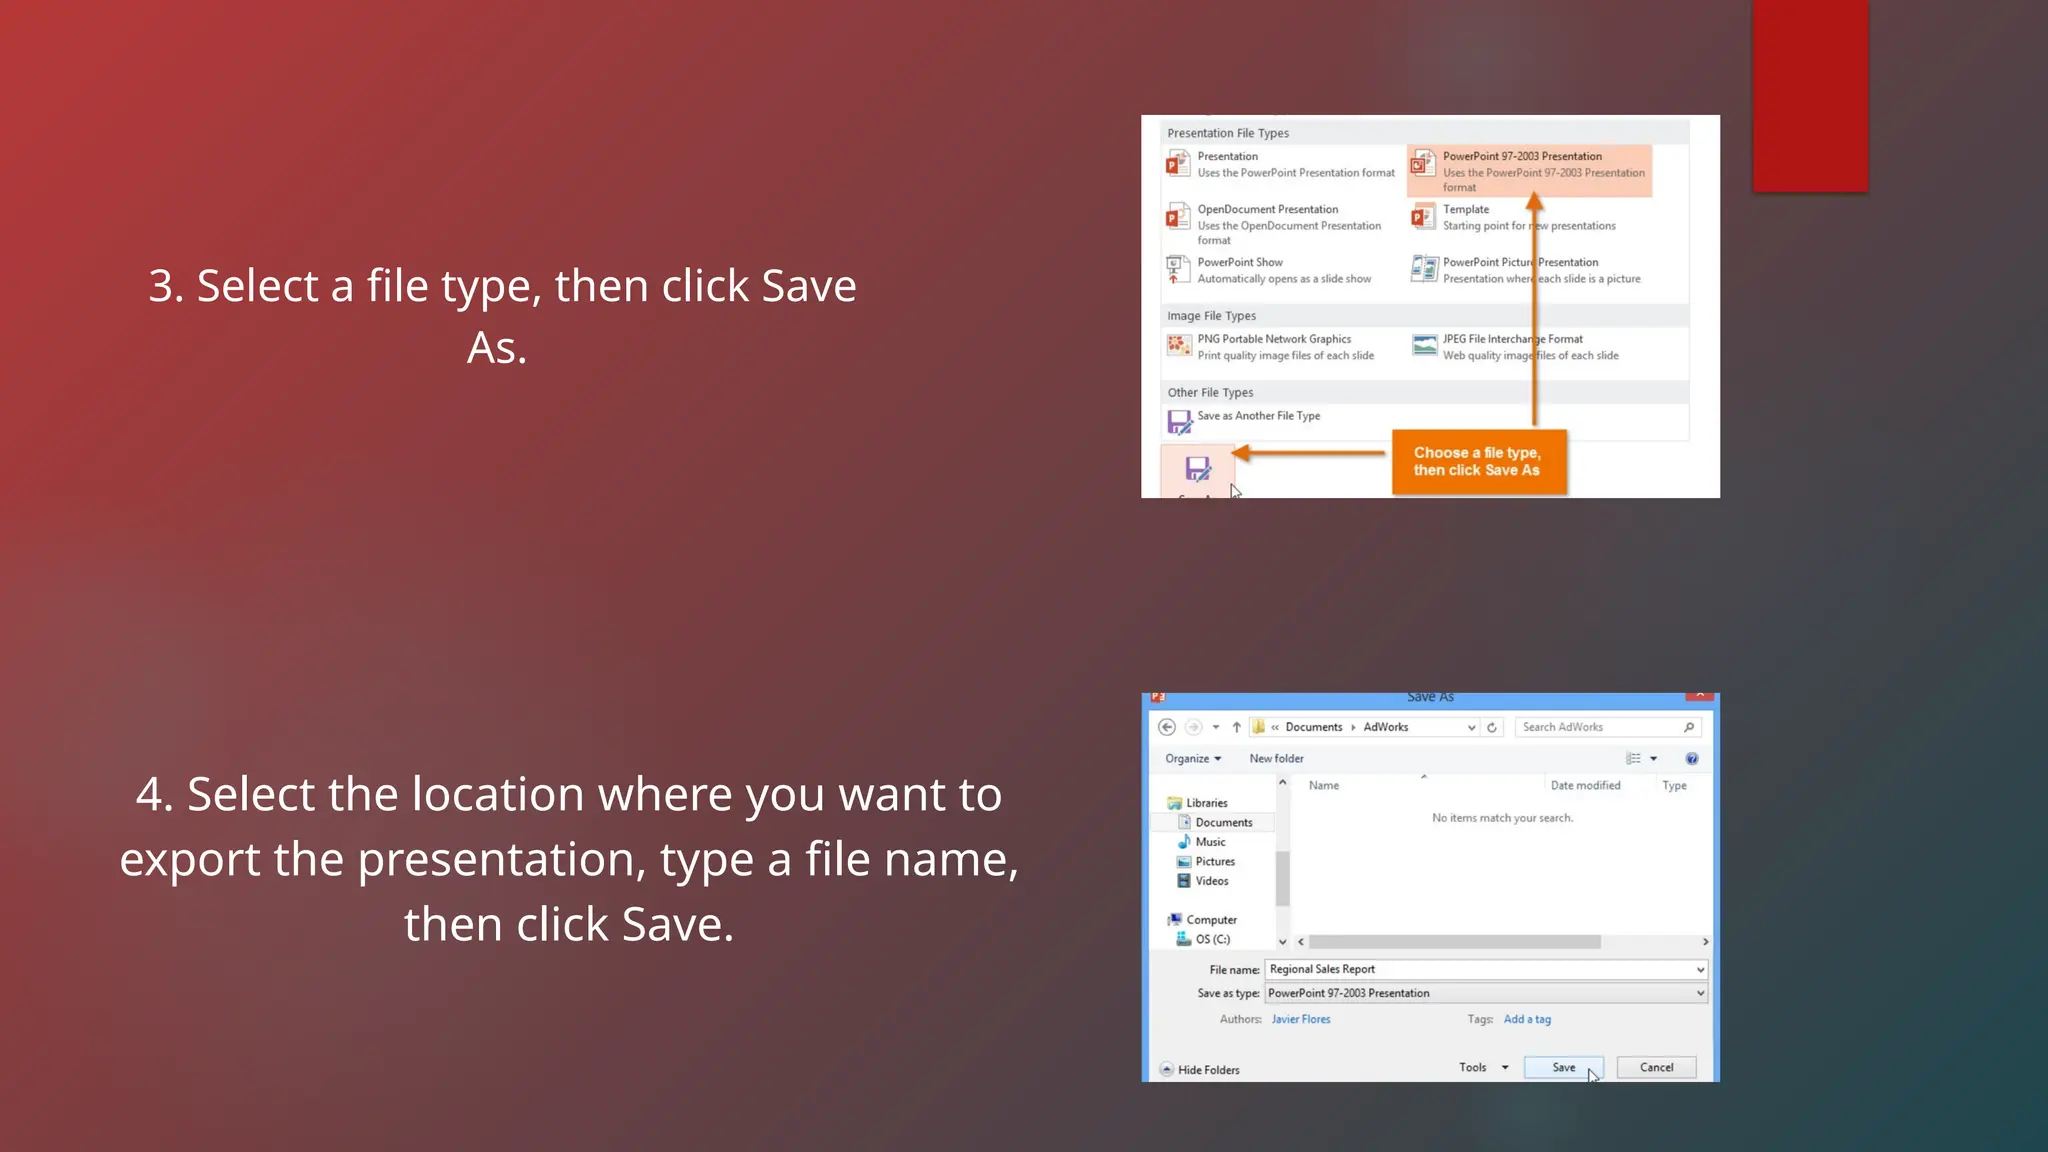
3. Select afile type, then click Save
As.
4. Select the location where you want to
export the presentation, type a file name,
then click Save.
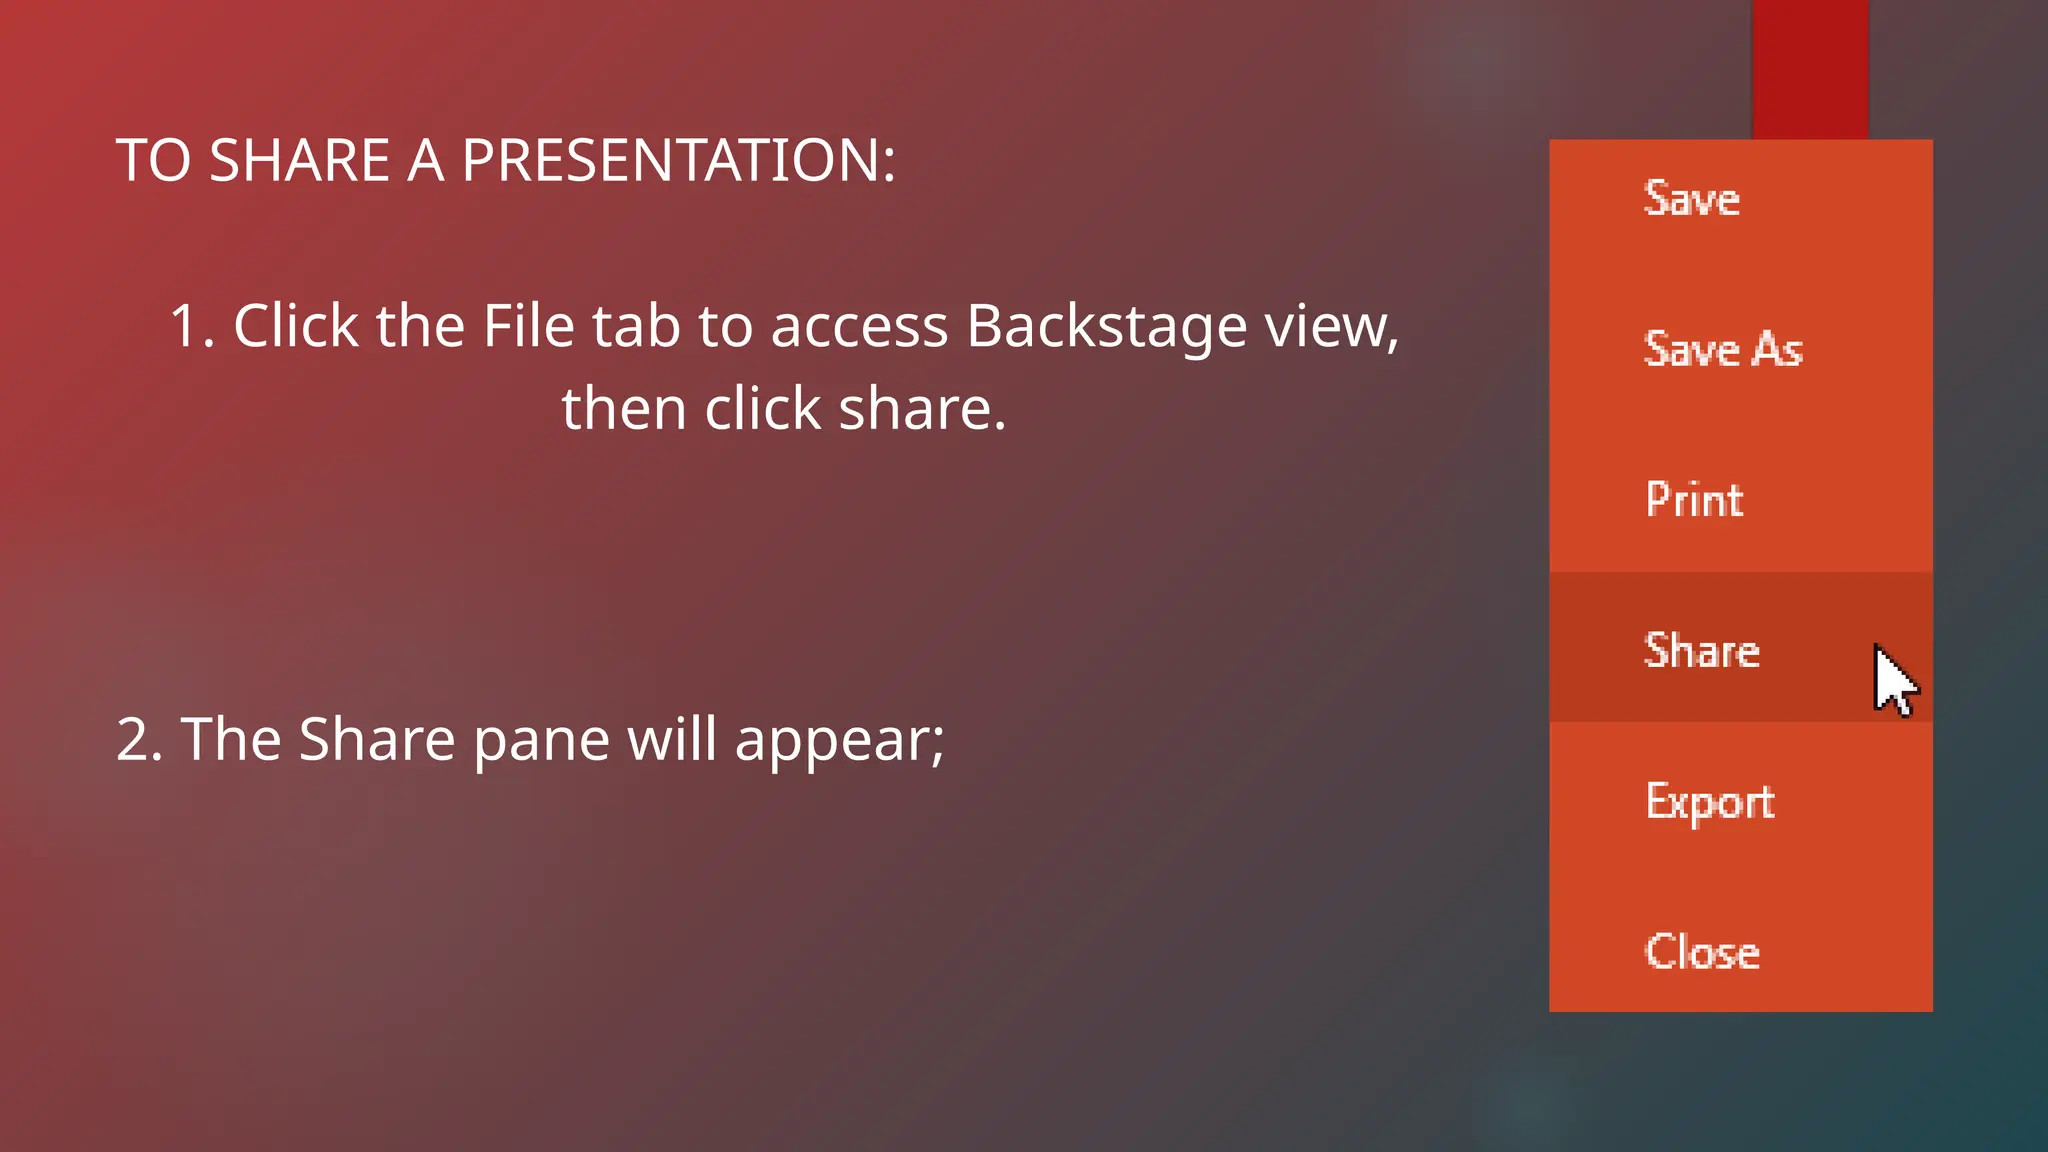
TO SHARE APRESENTATION:
1. Click the File tab to access Backstage view,
then click share.
2. The Share pane will appear;
53.
INVITE PEOPLE
You’ll beable to invite others to view or edit
presentation. This option gives you the greatest
level of control and privacy when sharing a
presentation.
GET A SHARING LINK
You can obtain a link you can use to share your
presentation. You’ll decide if the link allows people
to edit or simply view the presentation.
POST TO SOCIAL NETWORKS
You can post a link to your presentation on any
social network you’ve connected with your
Microsoft account, such as Facebook and LinkedIn.
You’ll also have the option to include a personal
message and set editing permissions.
54.
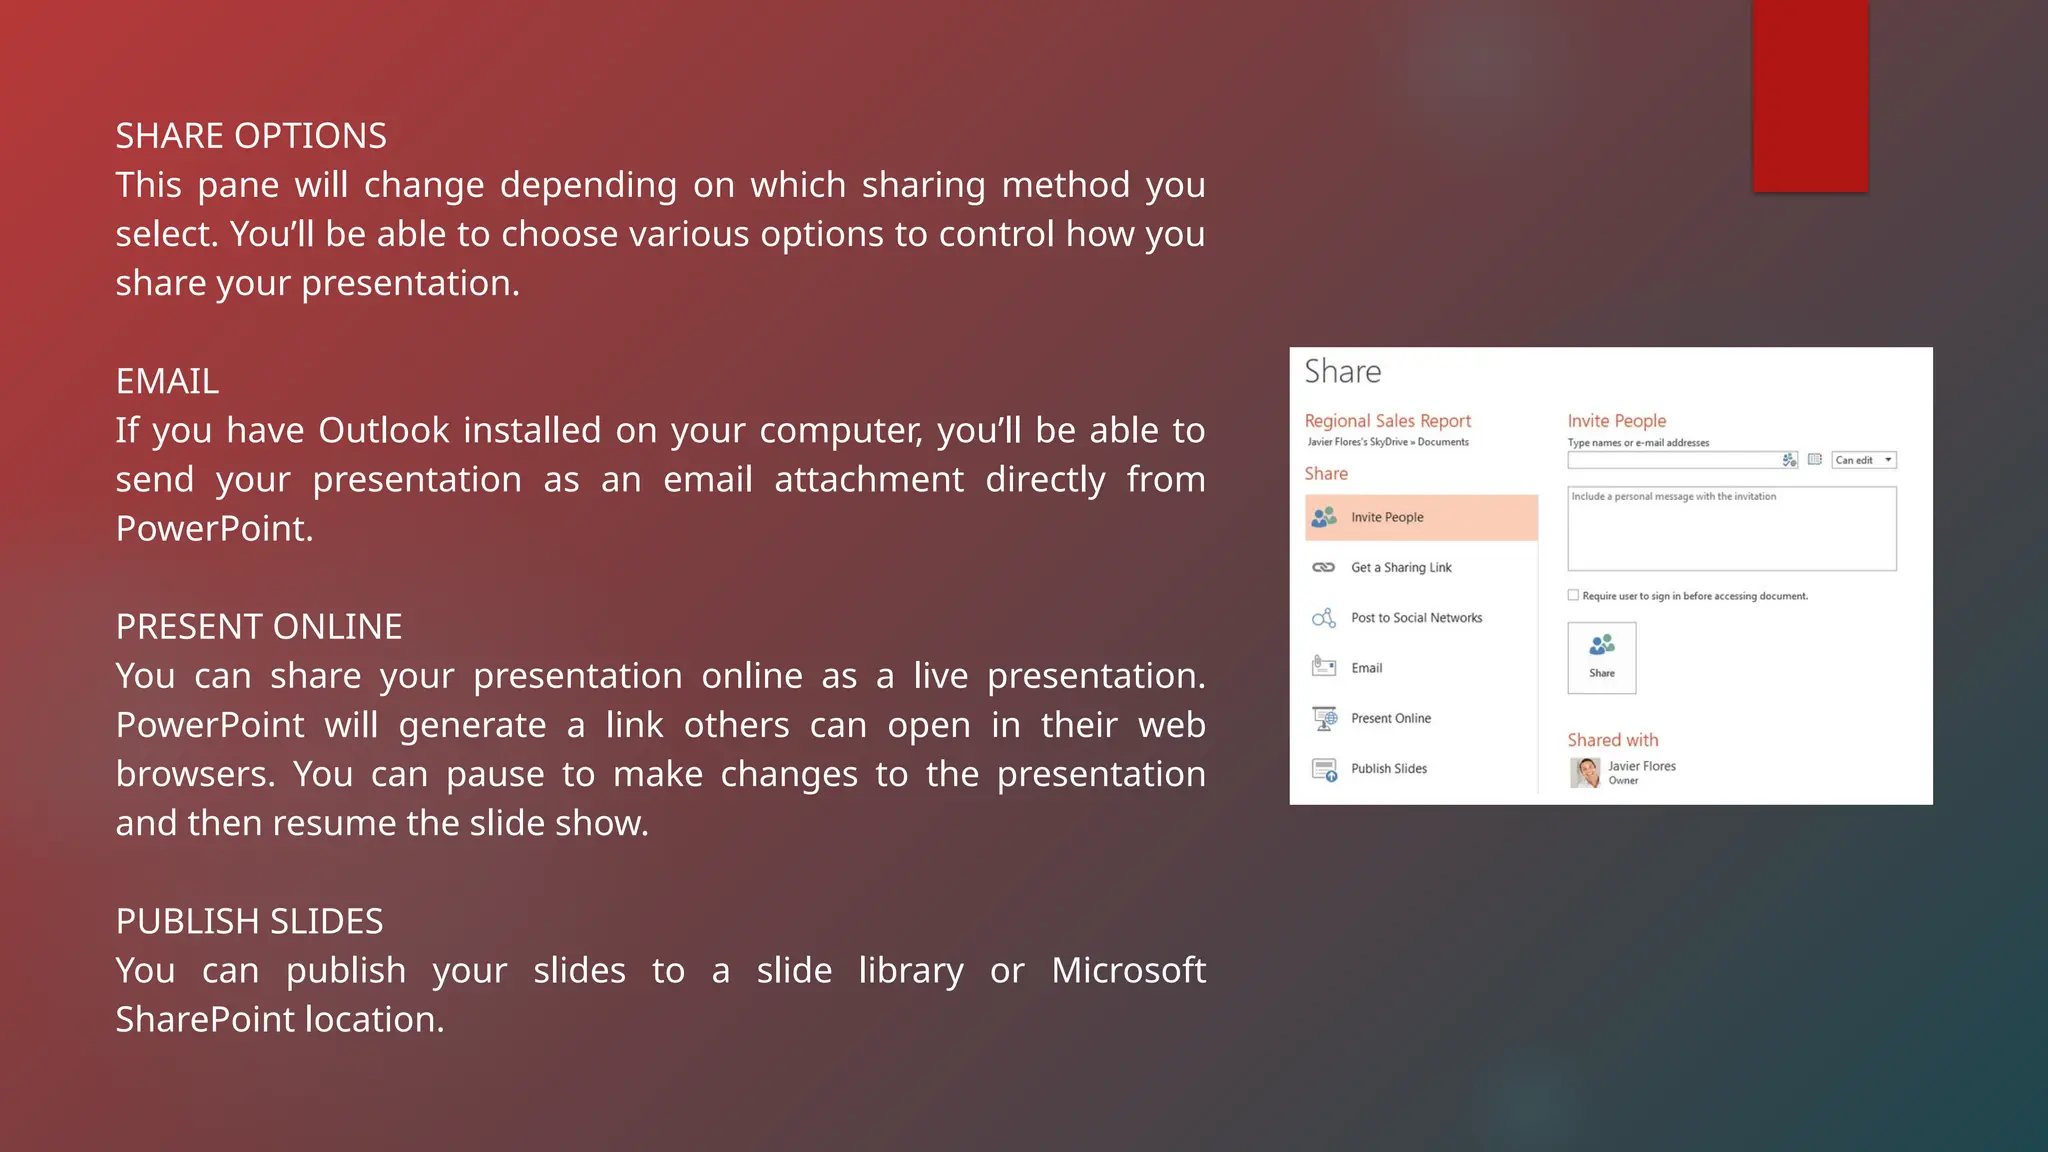
SHARE OPTIONS
This panewill change depending on which sharing method you
select. You’ll be able to choose various options to control how you
share your presentation.
EMAIL
If you have Outlook installed on your computer, you’ll be able to
send your presentation as an email attachment directly from
PowerPoint.
PRESENT ONLINE
You can share your presentation online as a live presentation.
PowerPoint will generate a link others can open in their web
browsers. You can pause to make changes to the presentation
and then resume the slide show.
PUBLISH SLIDES
You can publish your slides to a slide library or Microsoft
SharePoint location.
55.
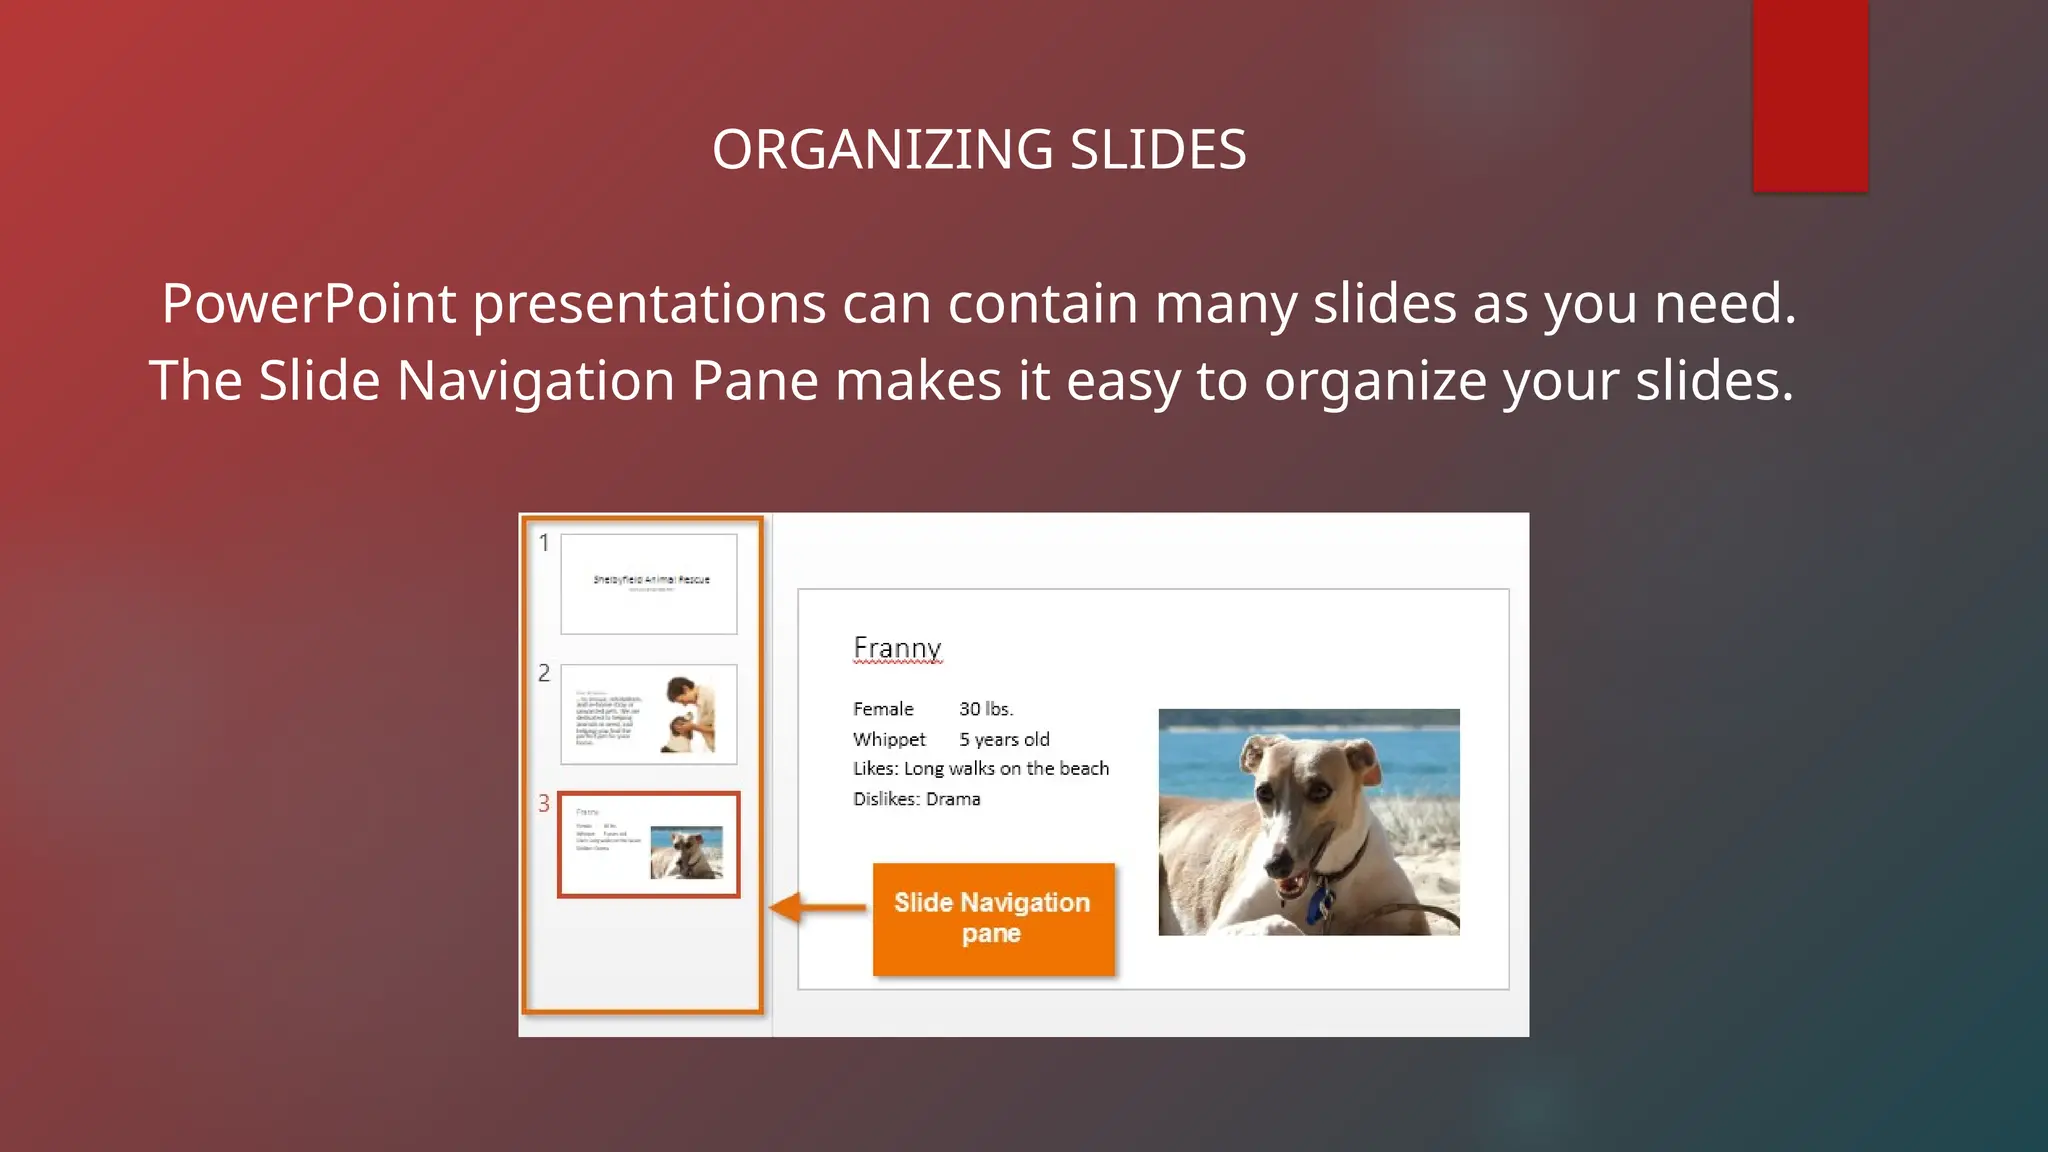
PowerPoint presentations aremade up of a series of slides. Slides contain
the information you will present to your audience. This might include text,
pictures, and charts.
56.
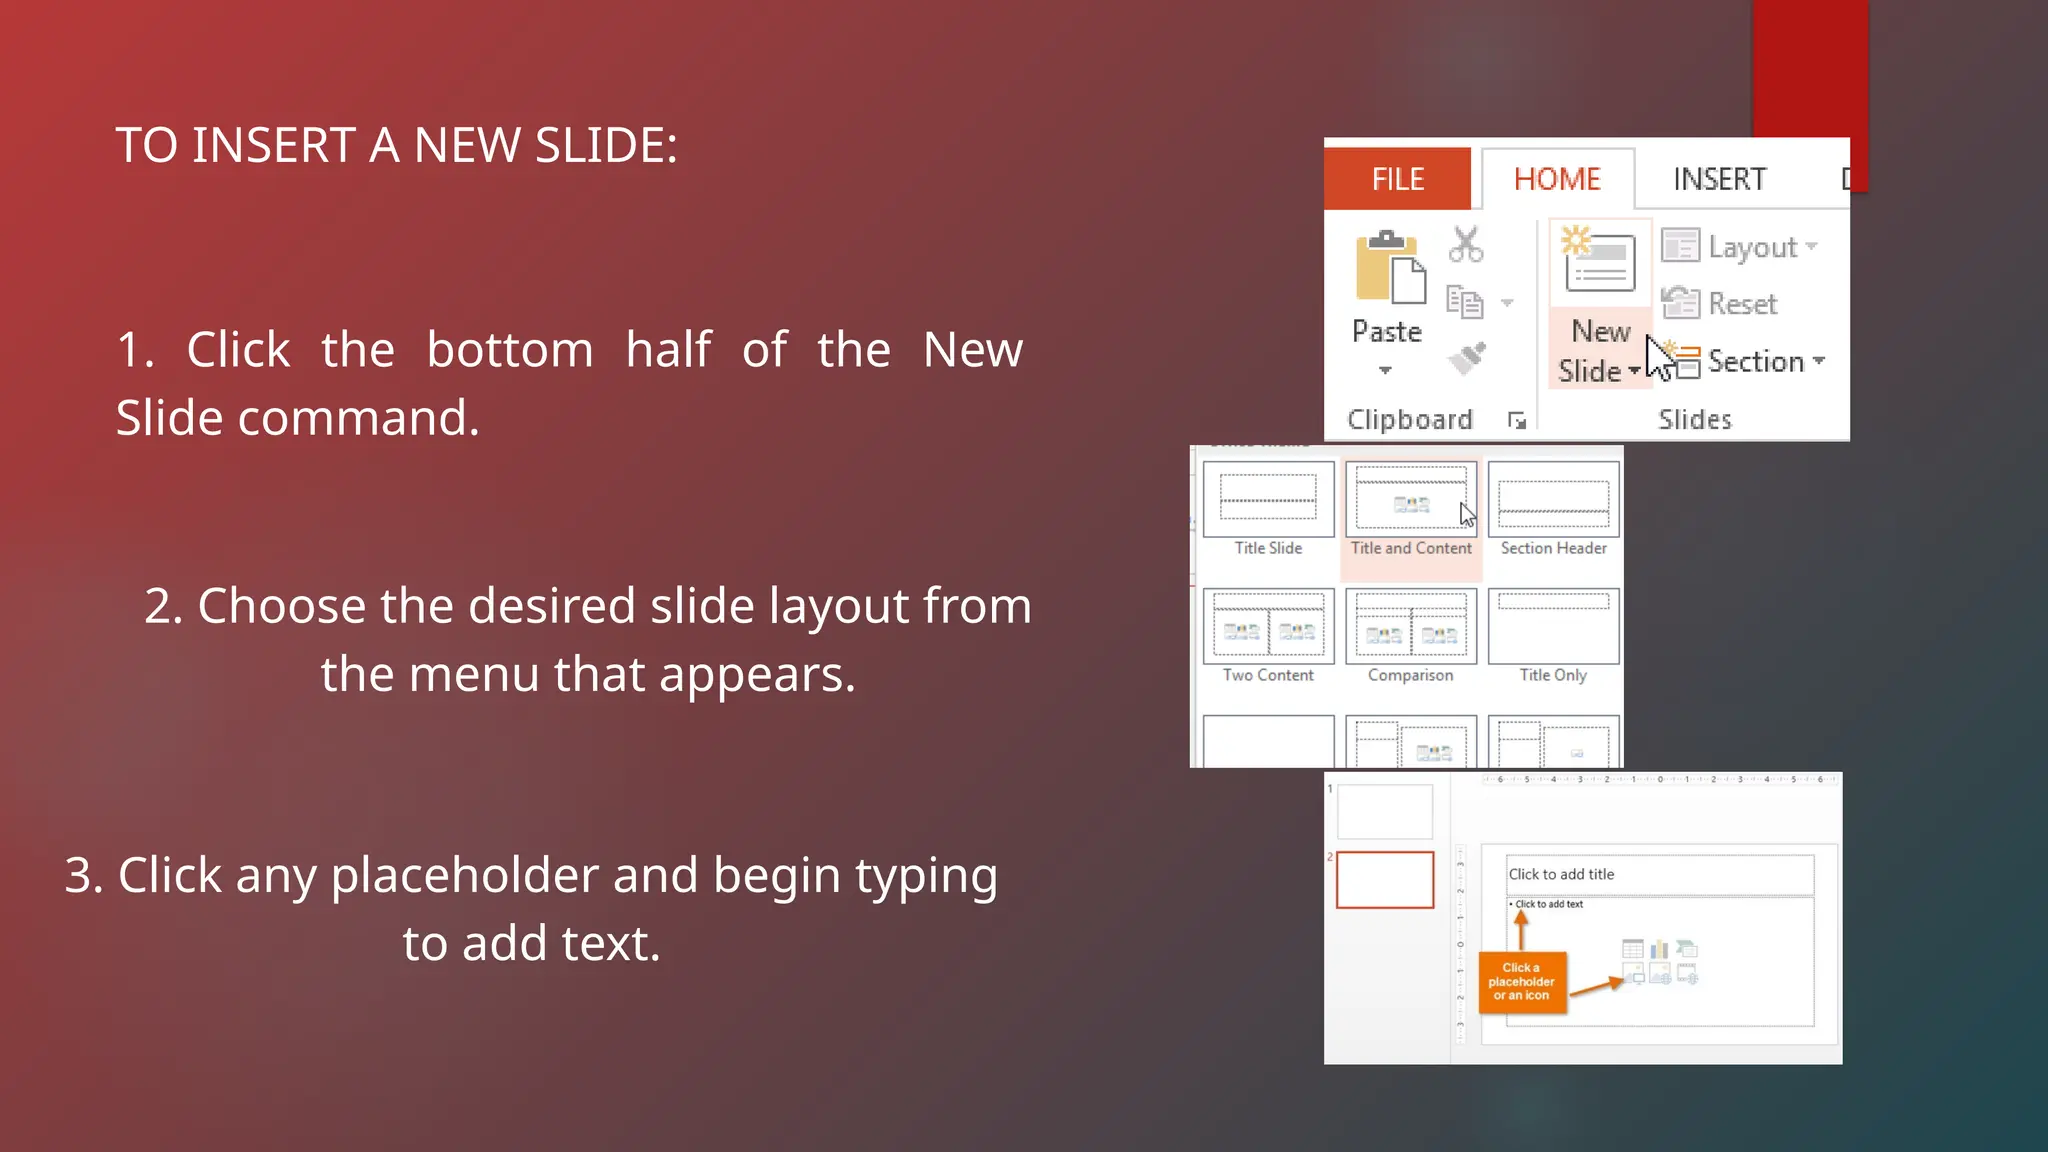
TO INSERT ANEW SLIDE:
1. Click the bottom half of the New
Slide command.
2. Choose the desired slide layout from
the menu that appears.
3. Click any placeholder and begin typing
to add text.
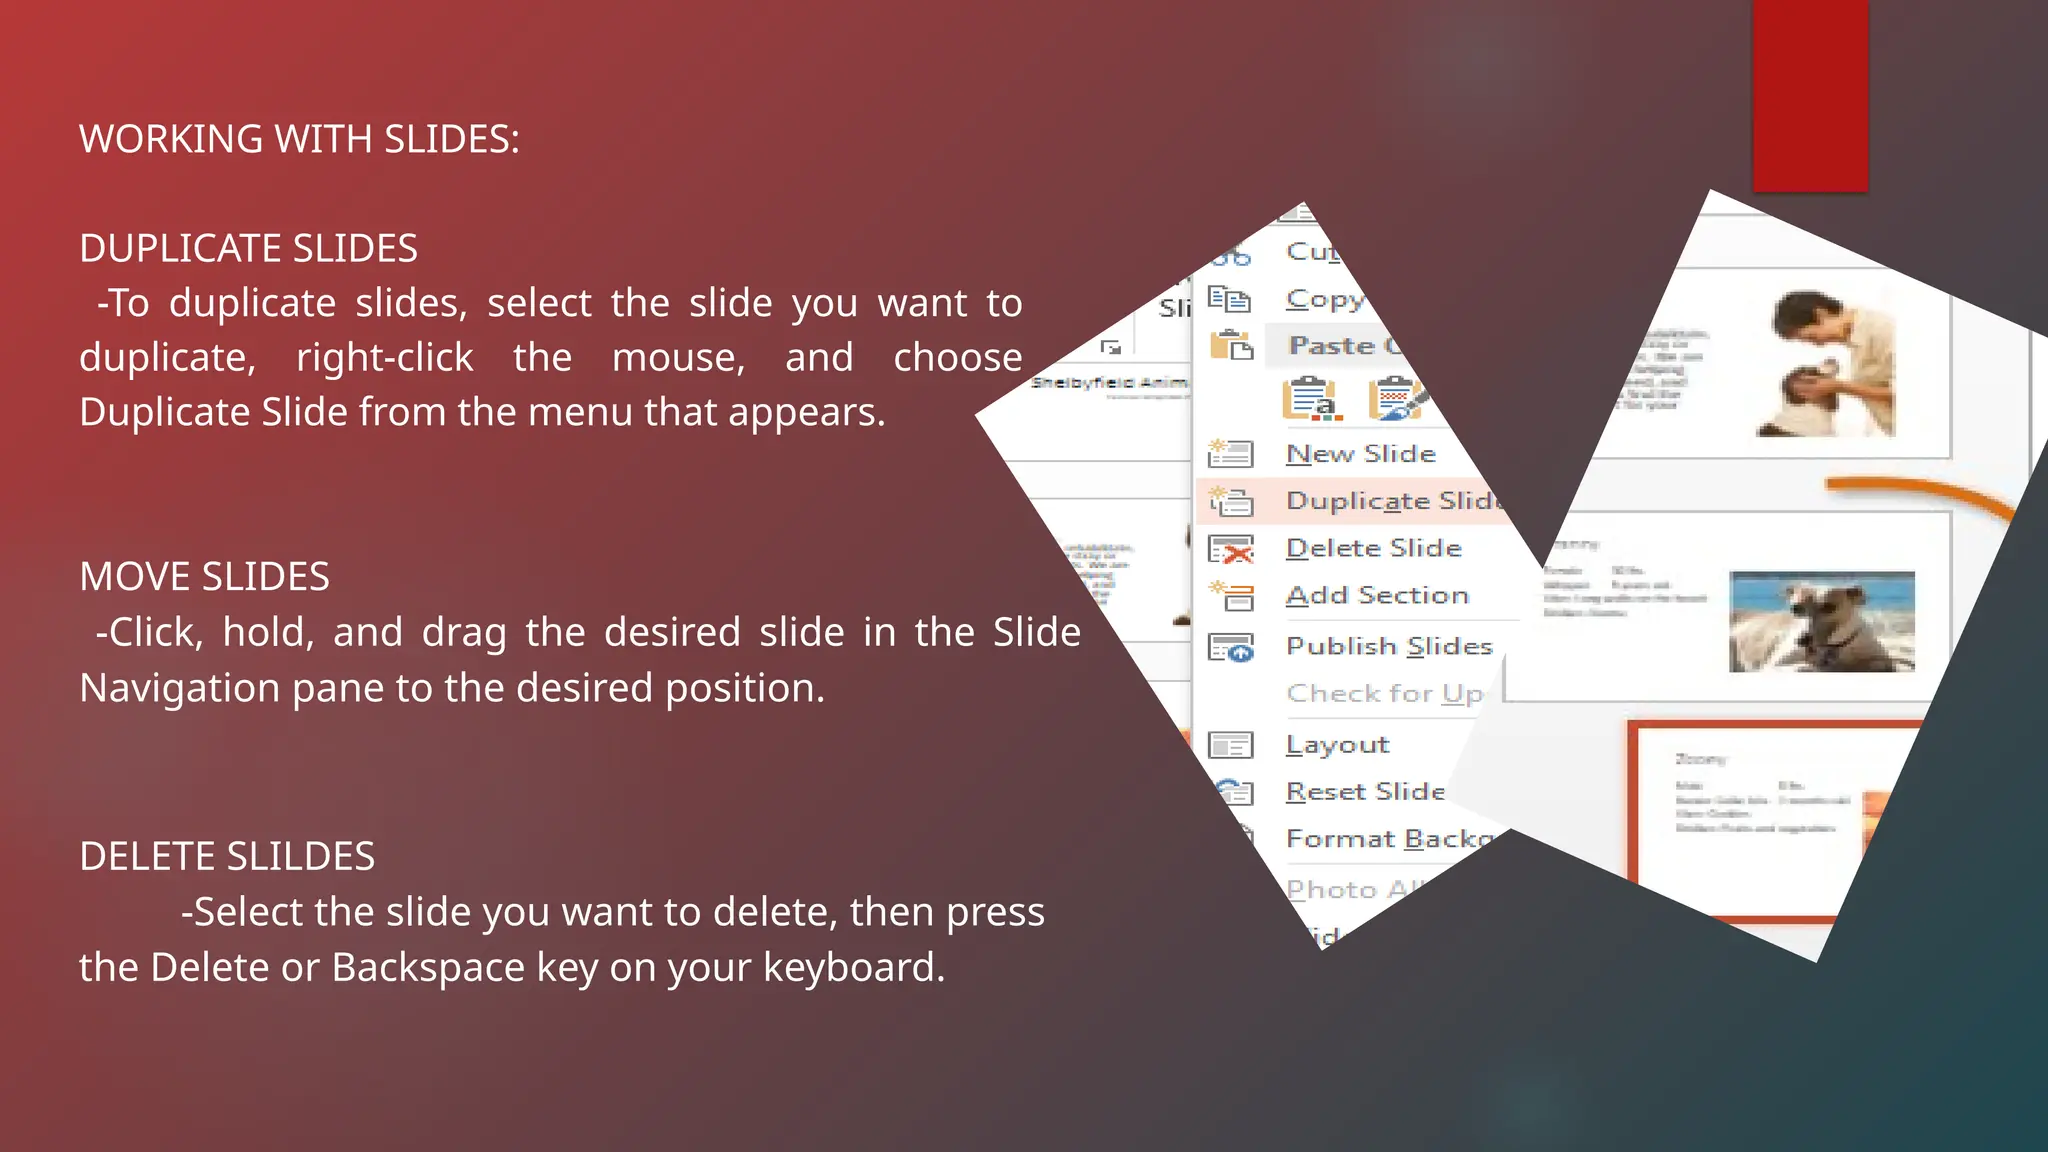
WORKING WITH SLIDES:
DUPLICATESLIDES
-To duplicate slides, select the slide you want to
duplicate, right-click the mouse, and choose
Duplicate Slide from the menu that appears.
MOVE SLIDES
-Click, hold, and drag the desired slide in the Slide
Navigation pane to the desired position.
DELETE SLILDES
-Select the slide you want to delete, then press
the Delete or Backspace key on your keyboard.
59.
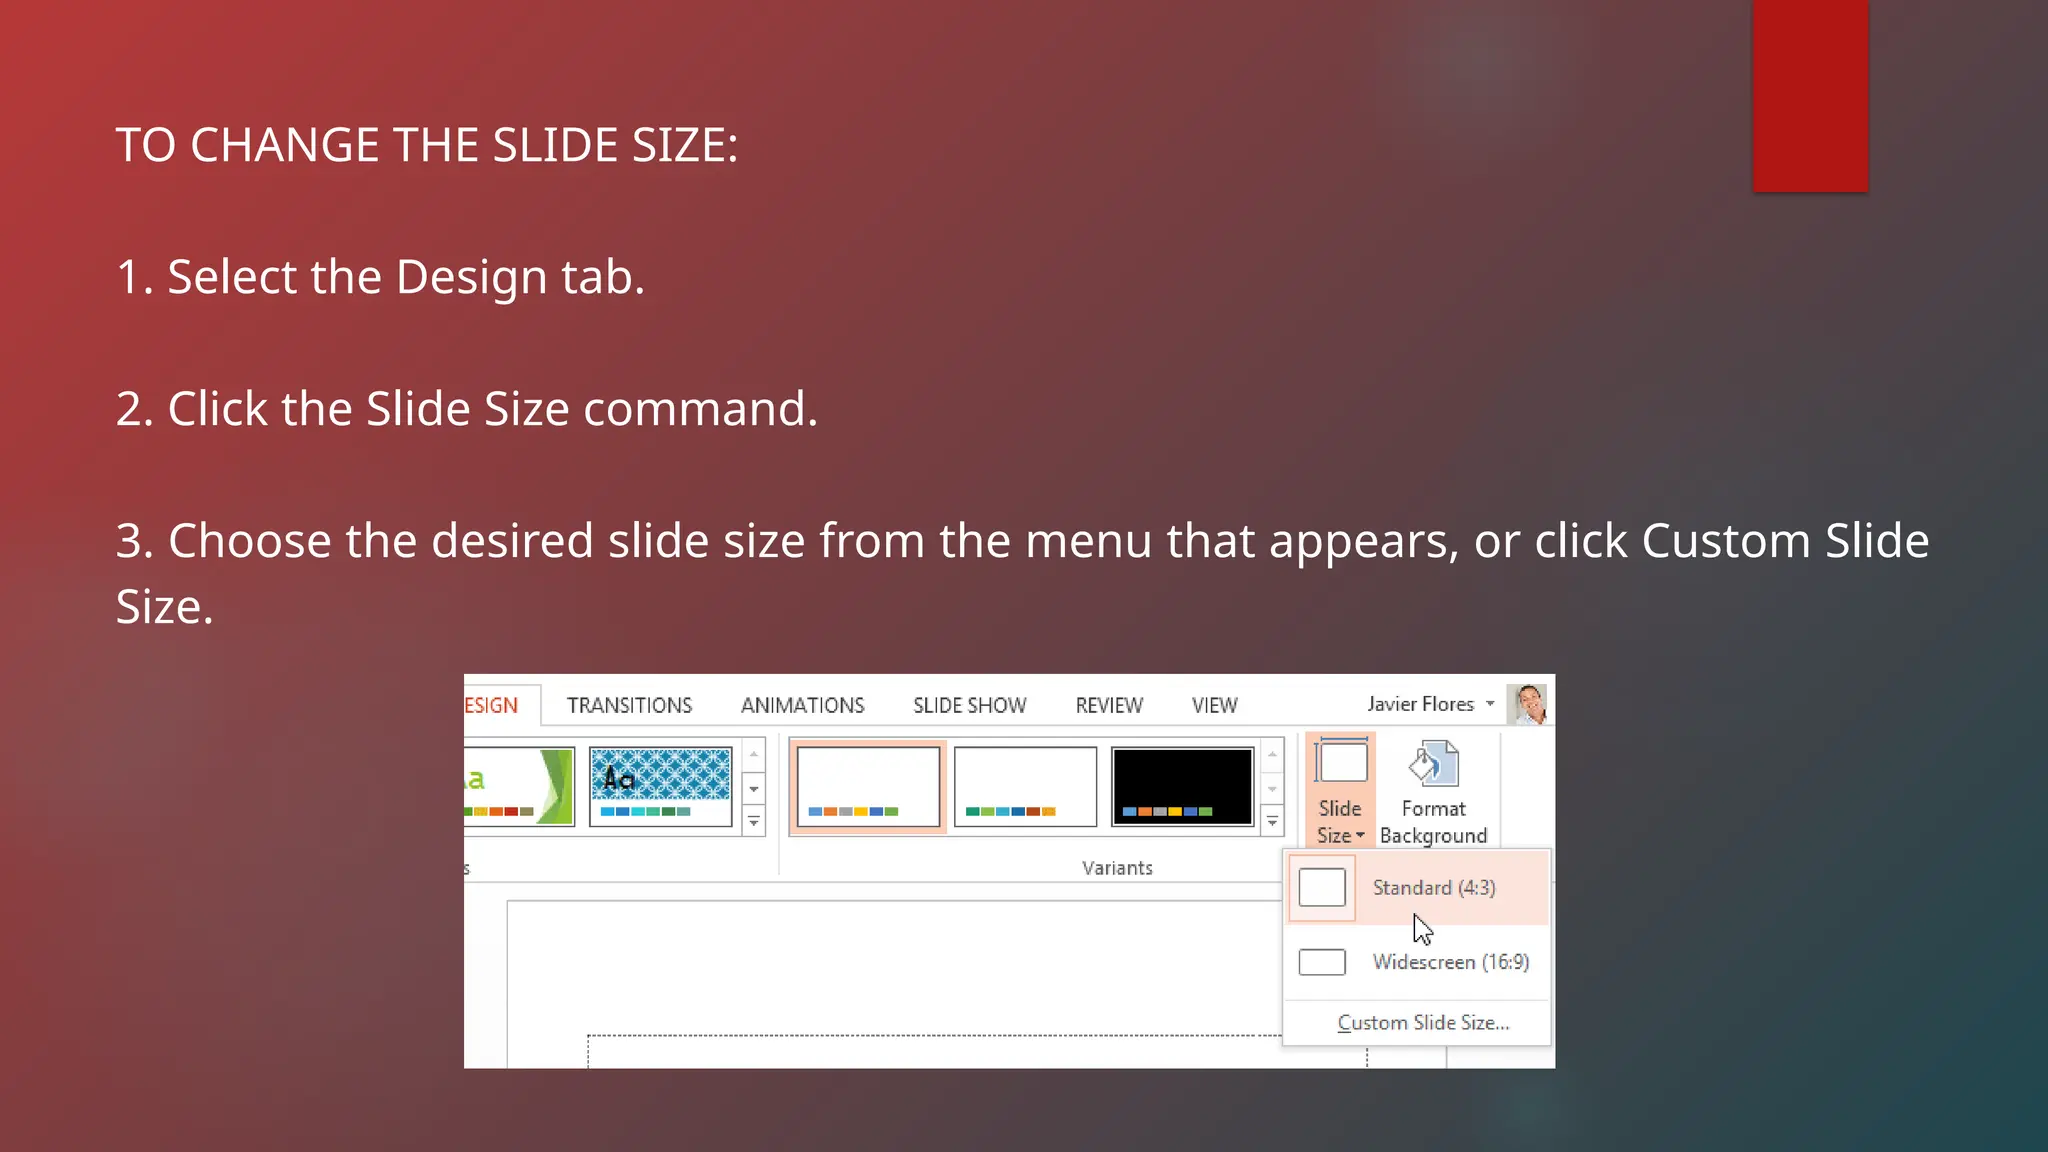
TO CHANGE THESLIDE SIZE:
1. Select the Design tab.
2. Click the Slide Size command.
3. Choose the desired slide size from the menu that appears, or click Custom Slide
Size.
60.
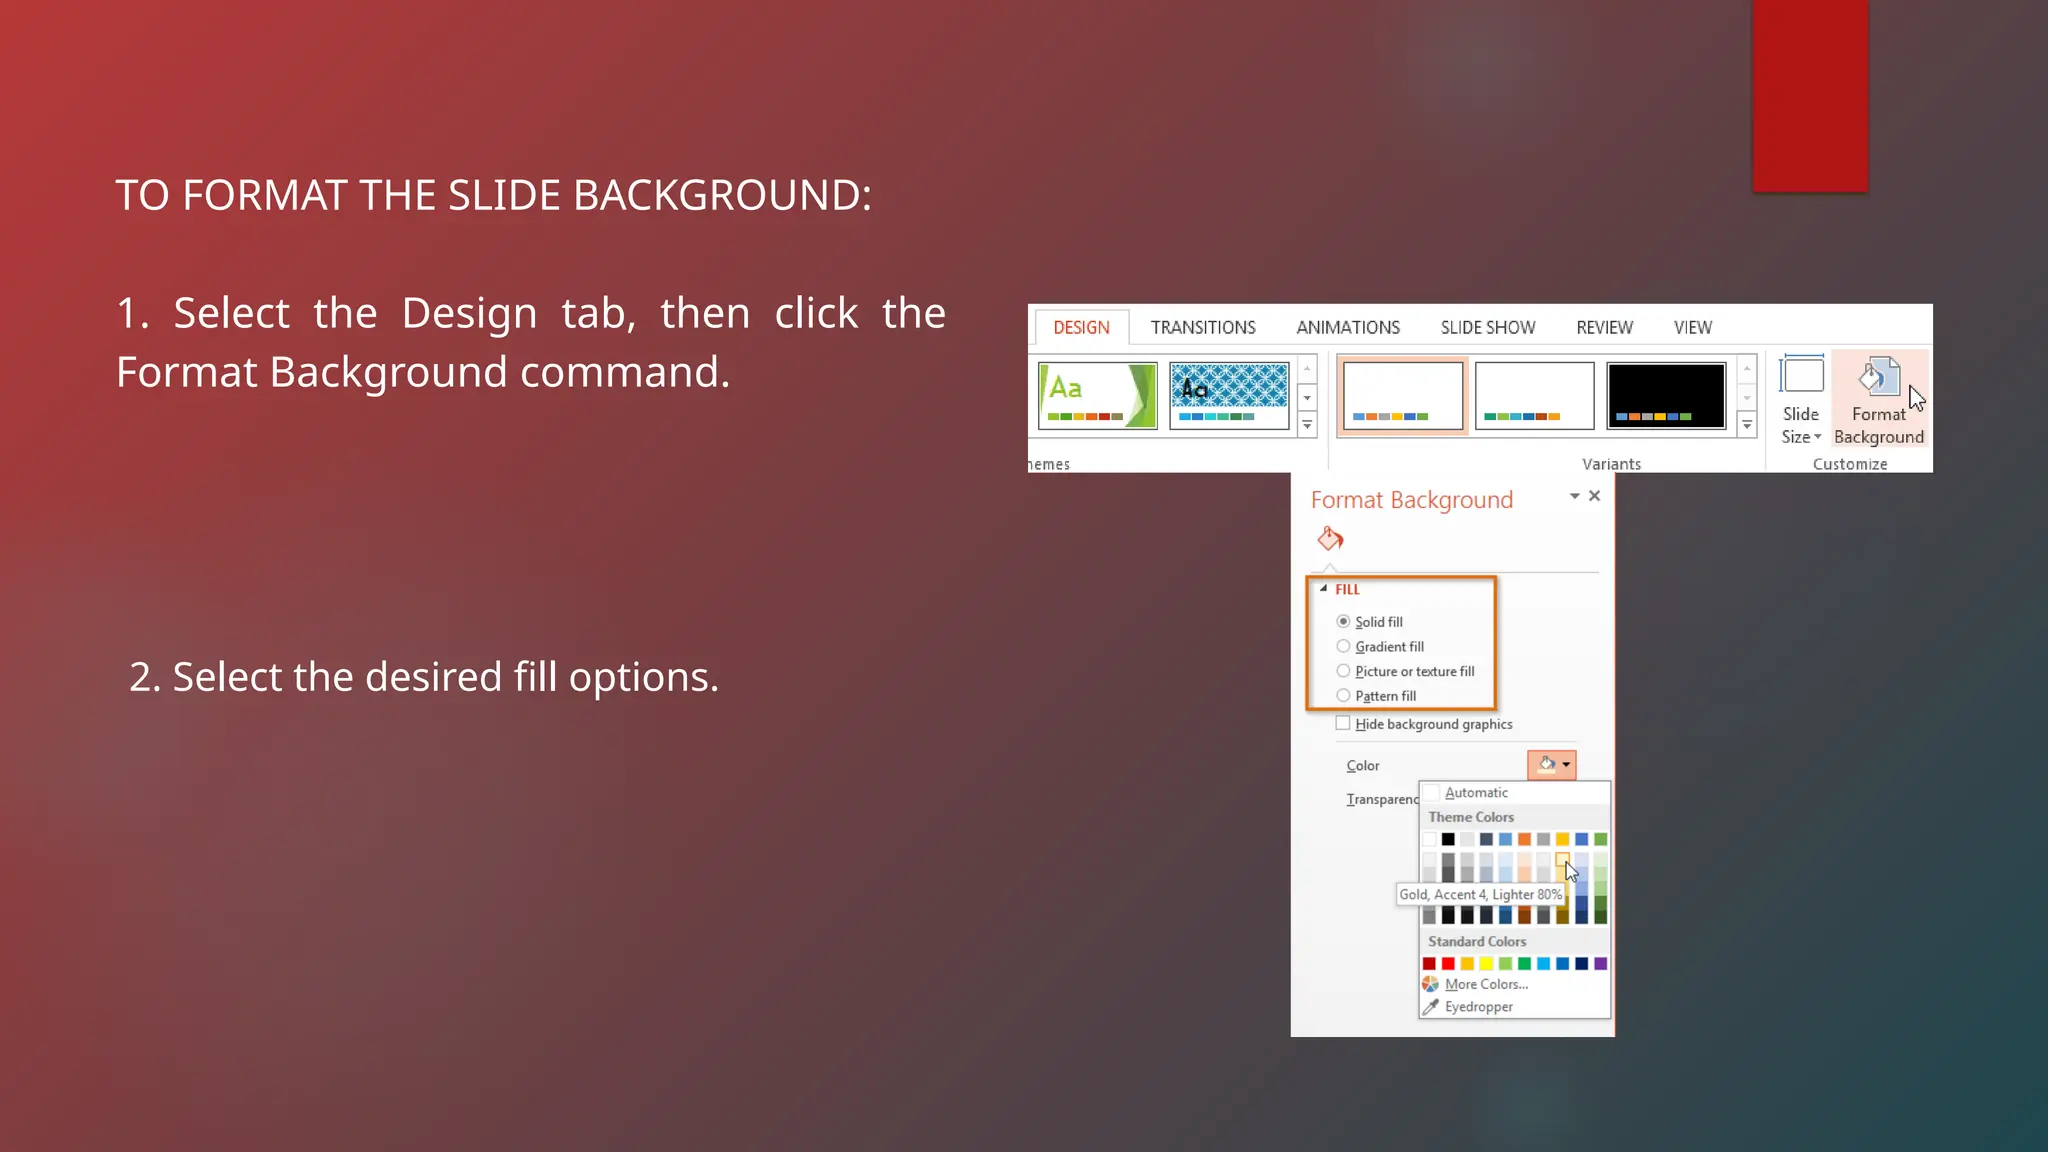
TO FORMAT THESLIDE BACKGROUND:
1. Select the Design tab, then click the
Format Background command.
2. Select the desired fill options.
61.
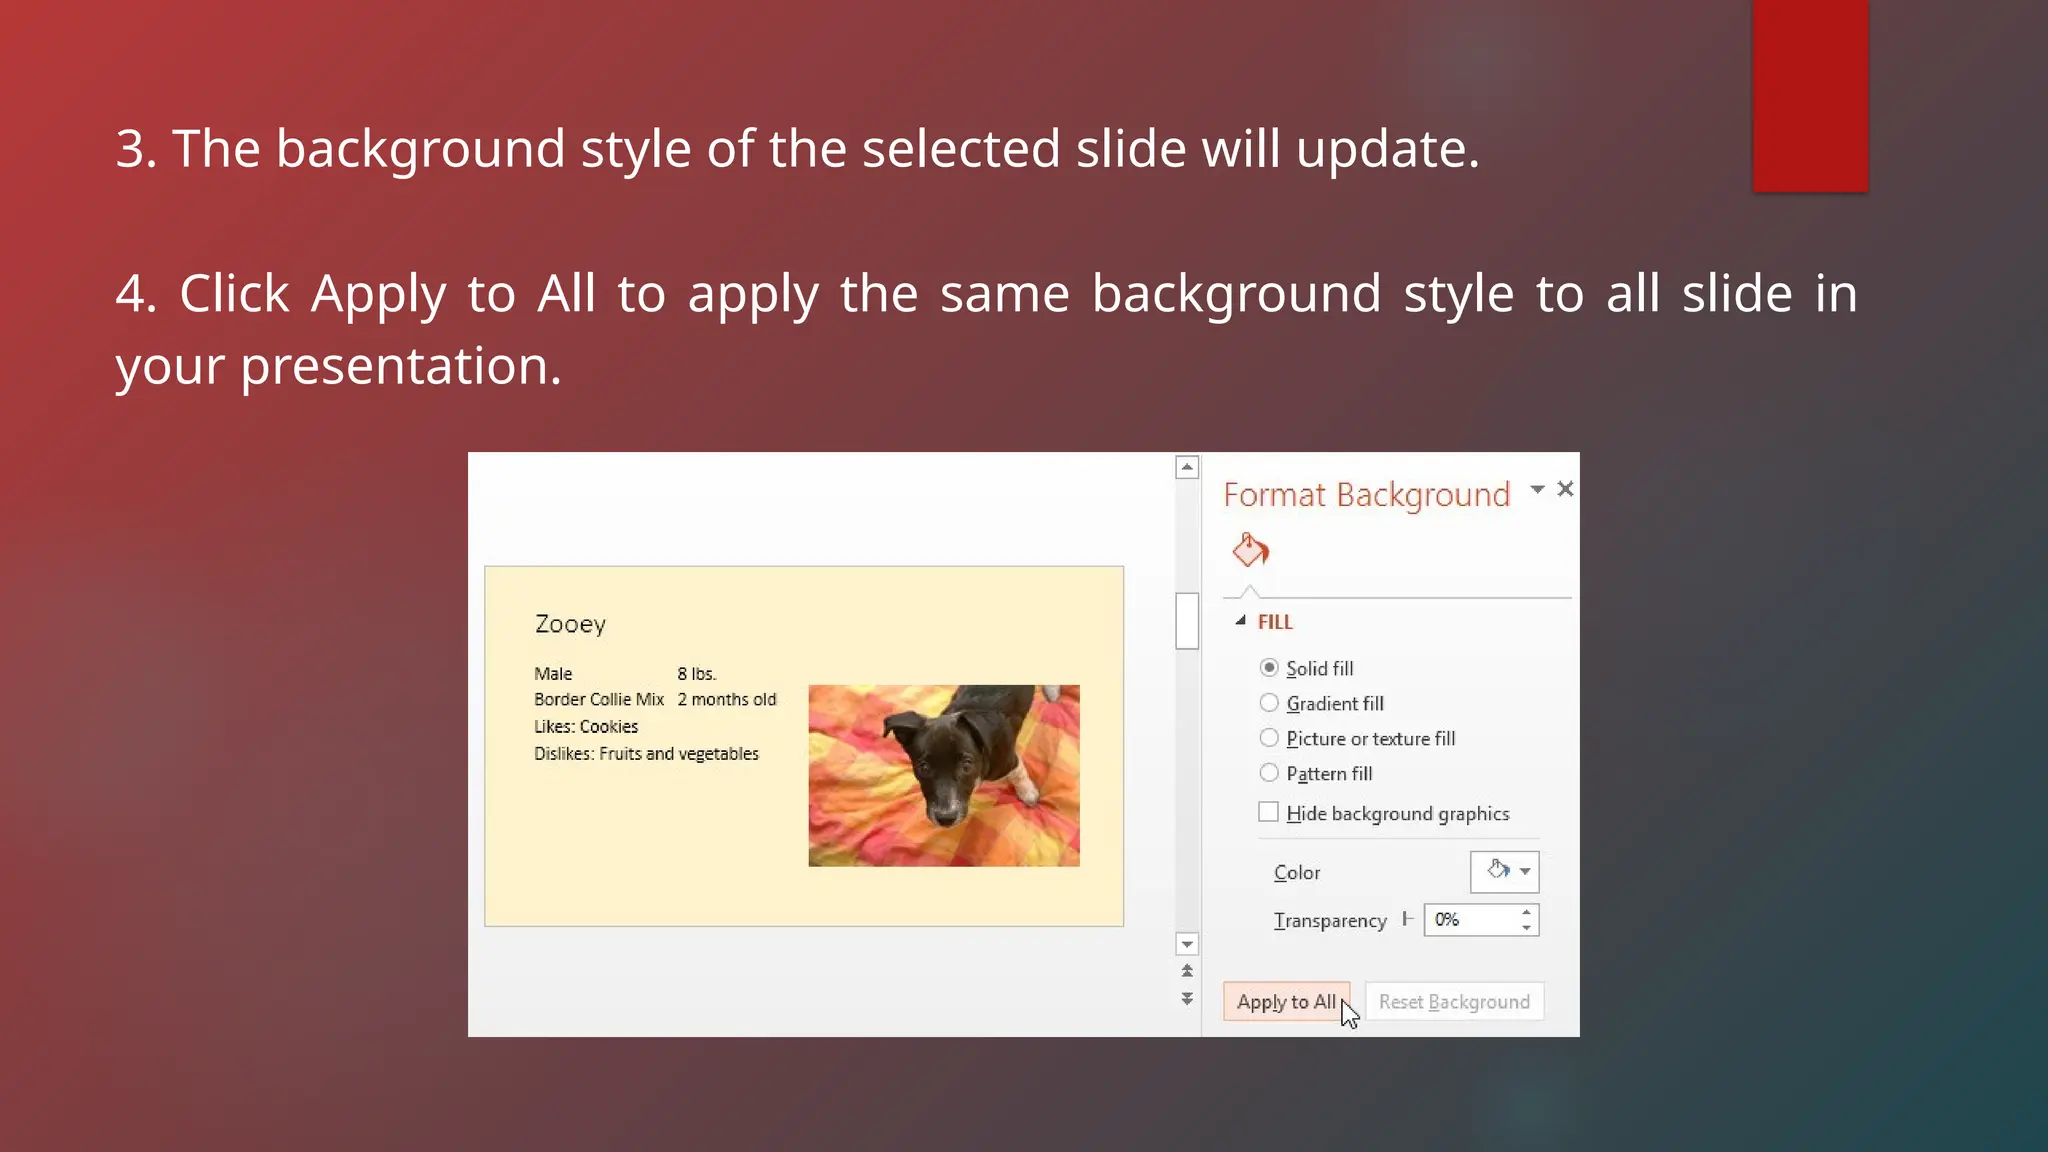
3. The backgroundstyle of the selected slide will update.
4. Click Apply to All to apply the same background style to all slide in
your presentation.
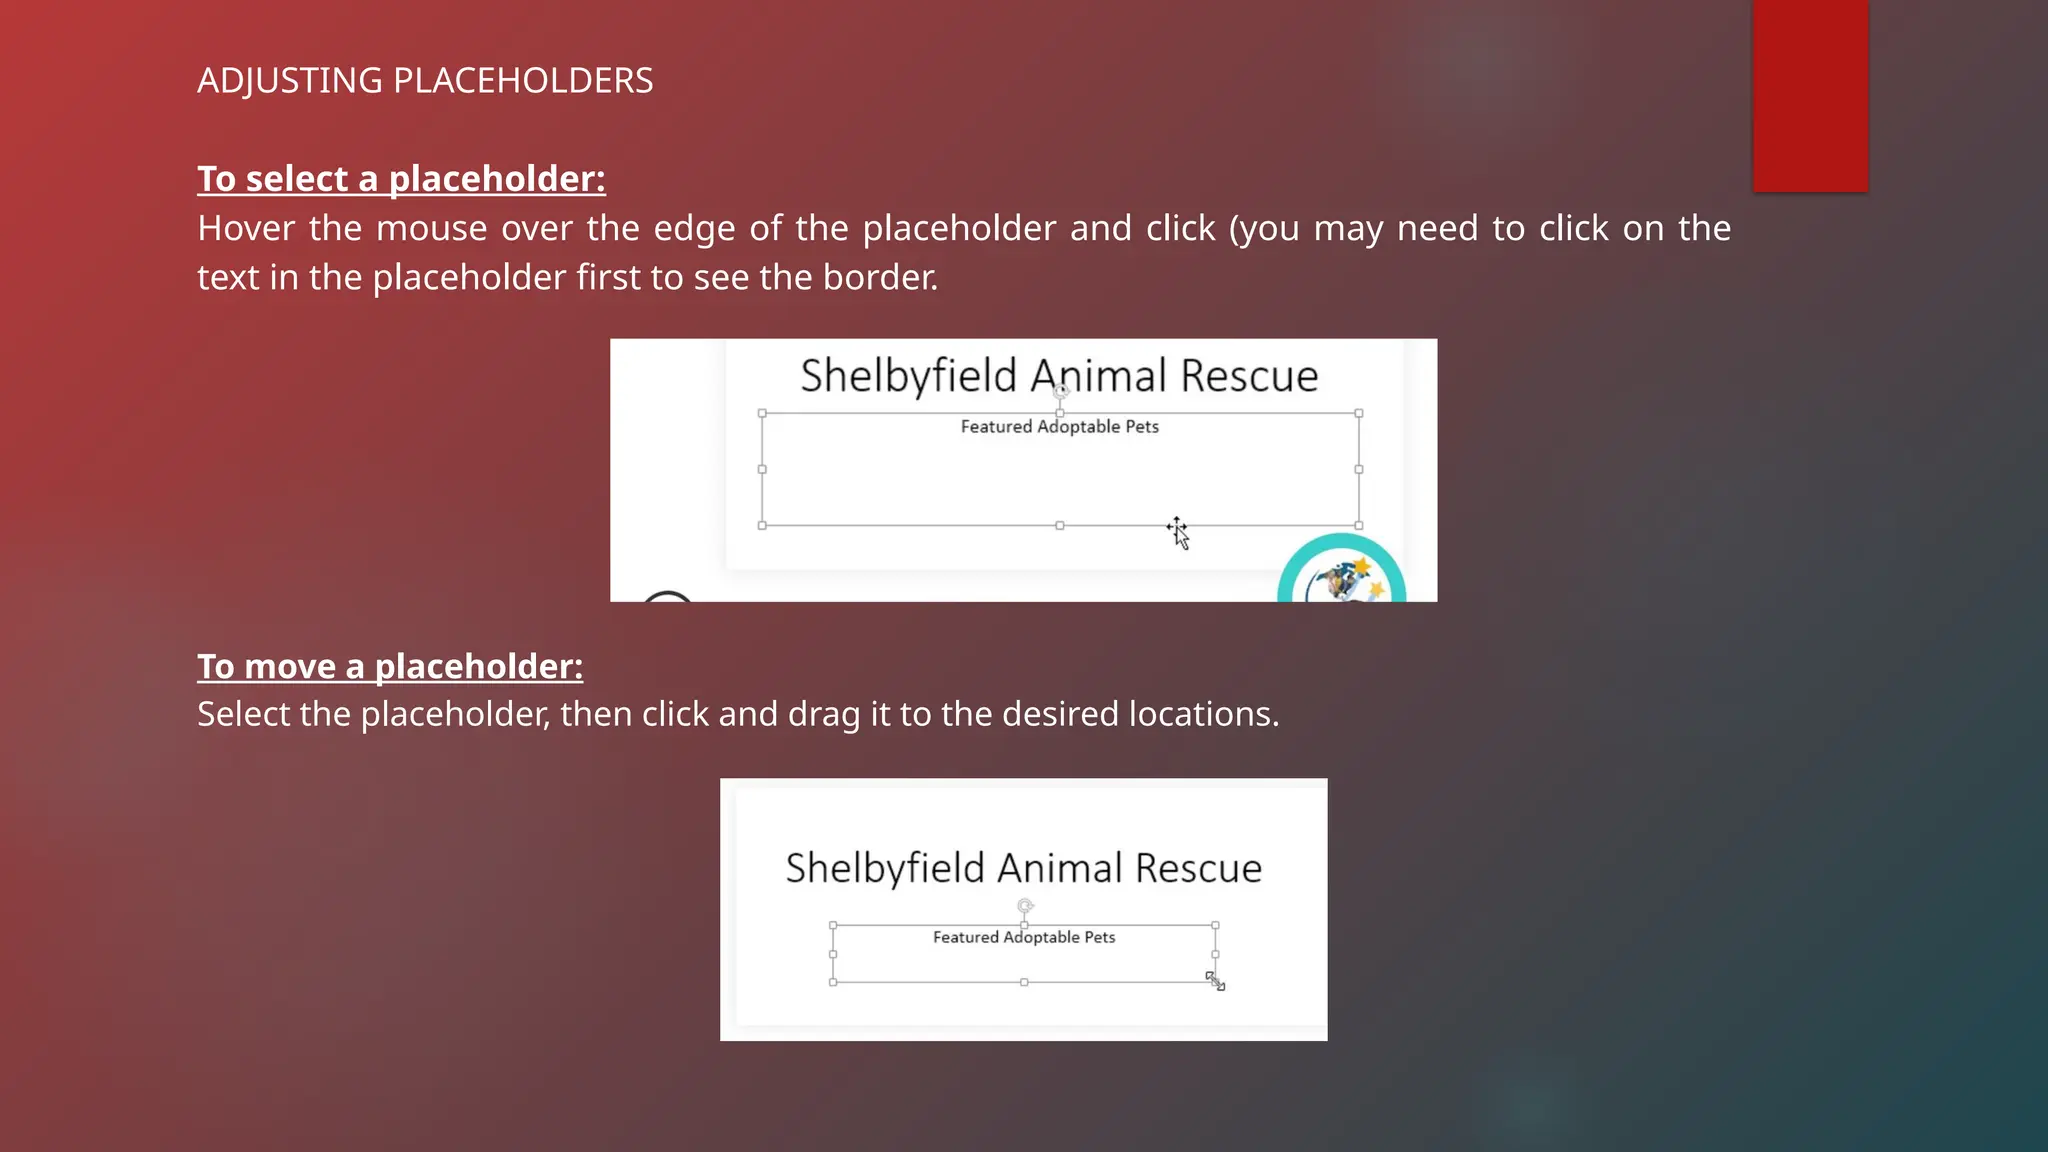
ADJUSTING PLACEHOLDERS
To selecta placeholder:
Hover the mouse over the edge of the placeholder and click (you may need to click on the
text in the placeholder first to see the border.
To move a placeholder:
Select the placeholder, then click and drag it to the desired locations.
64.
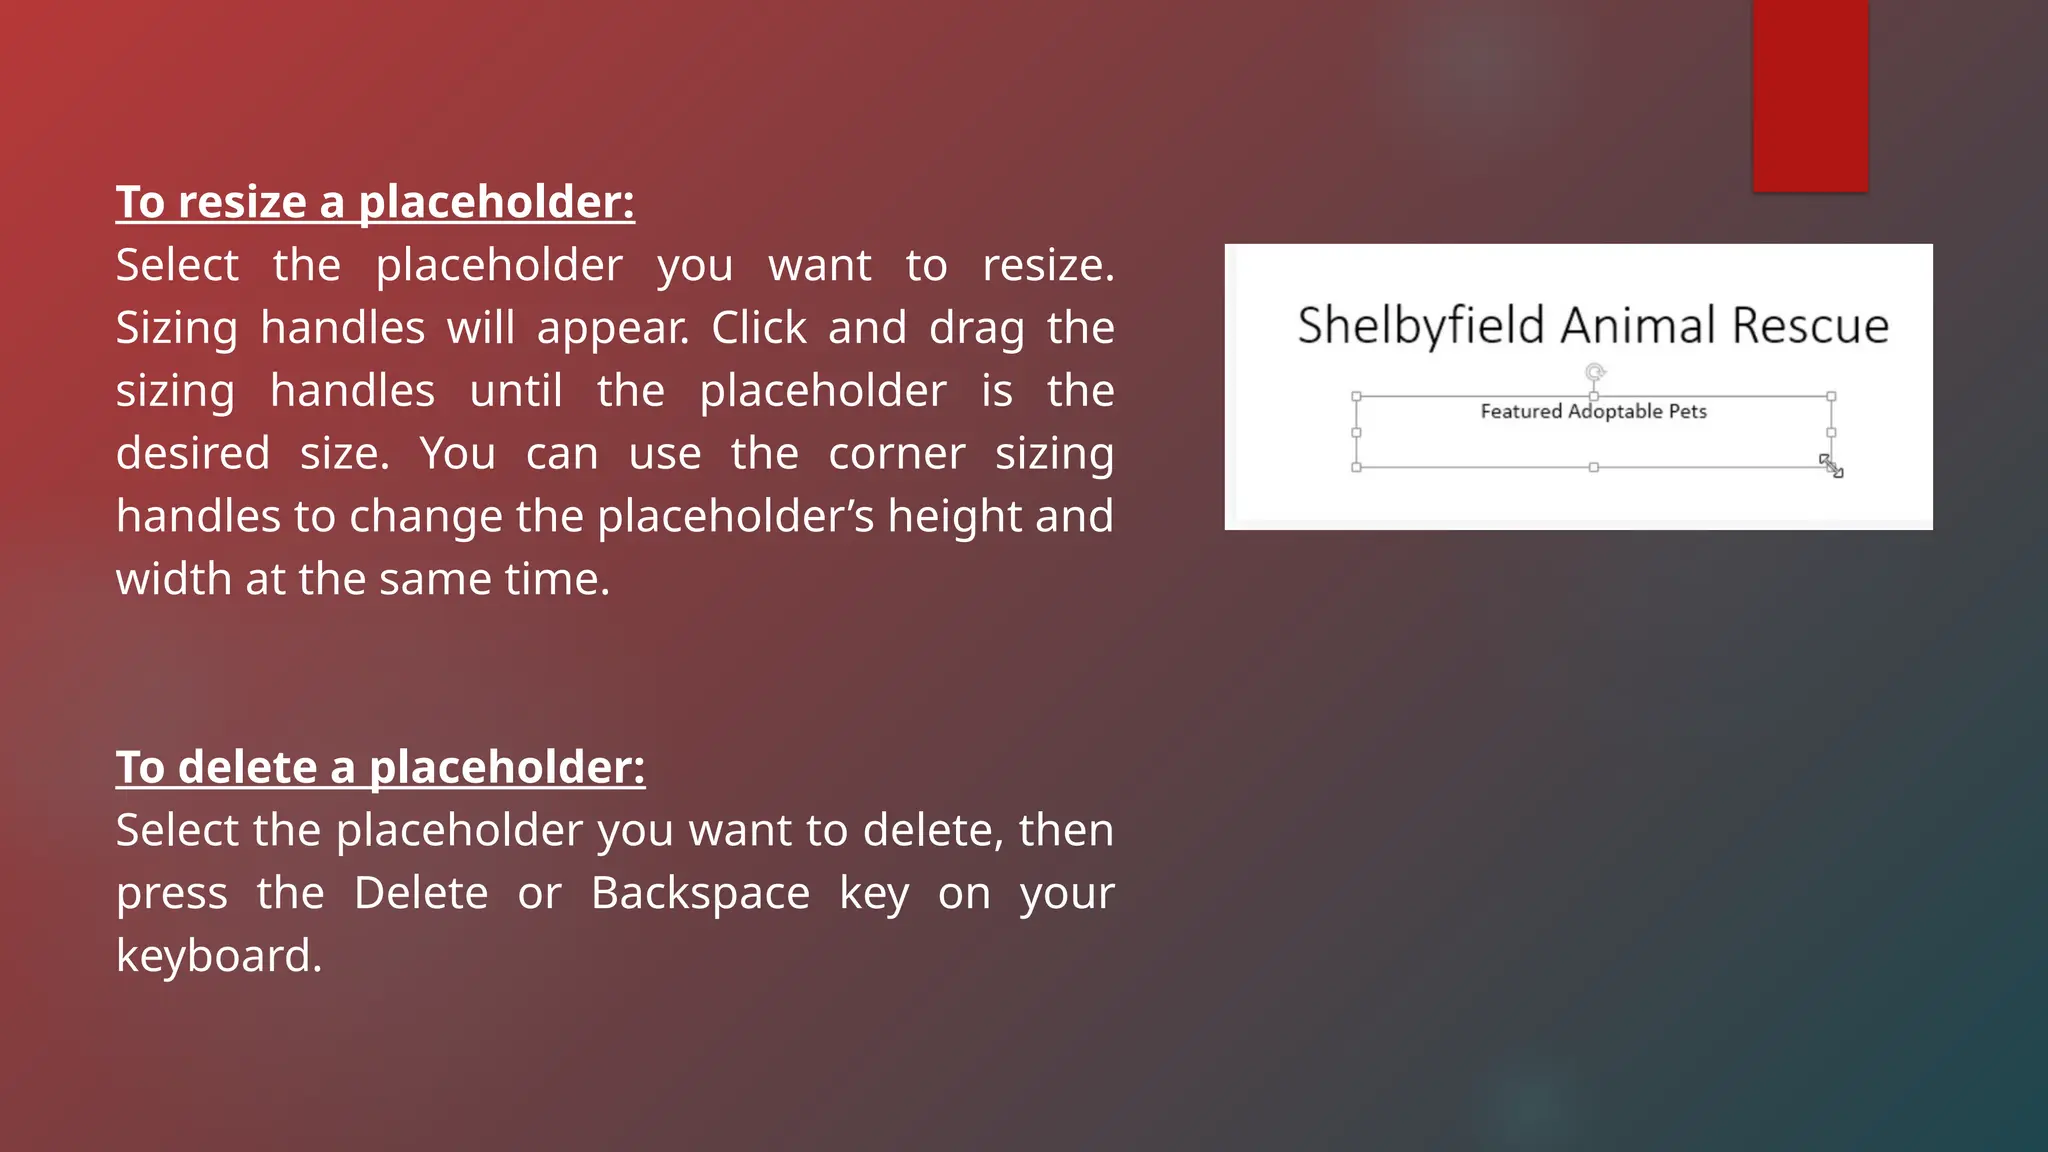
To resize aplaceholder:
Select the placeholder you want to resize.
Sizing handles will appear. Click and drag the
sizing handles until the placeholder is the
desired size. You can use the corner sizing
handles to change the placeholder’s height and
width at the same time.
To delete a placeholder:
Select the placeholder you want to delete, then
press the Delete or Backspace key on your
keyboard.
65.
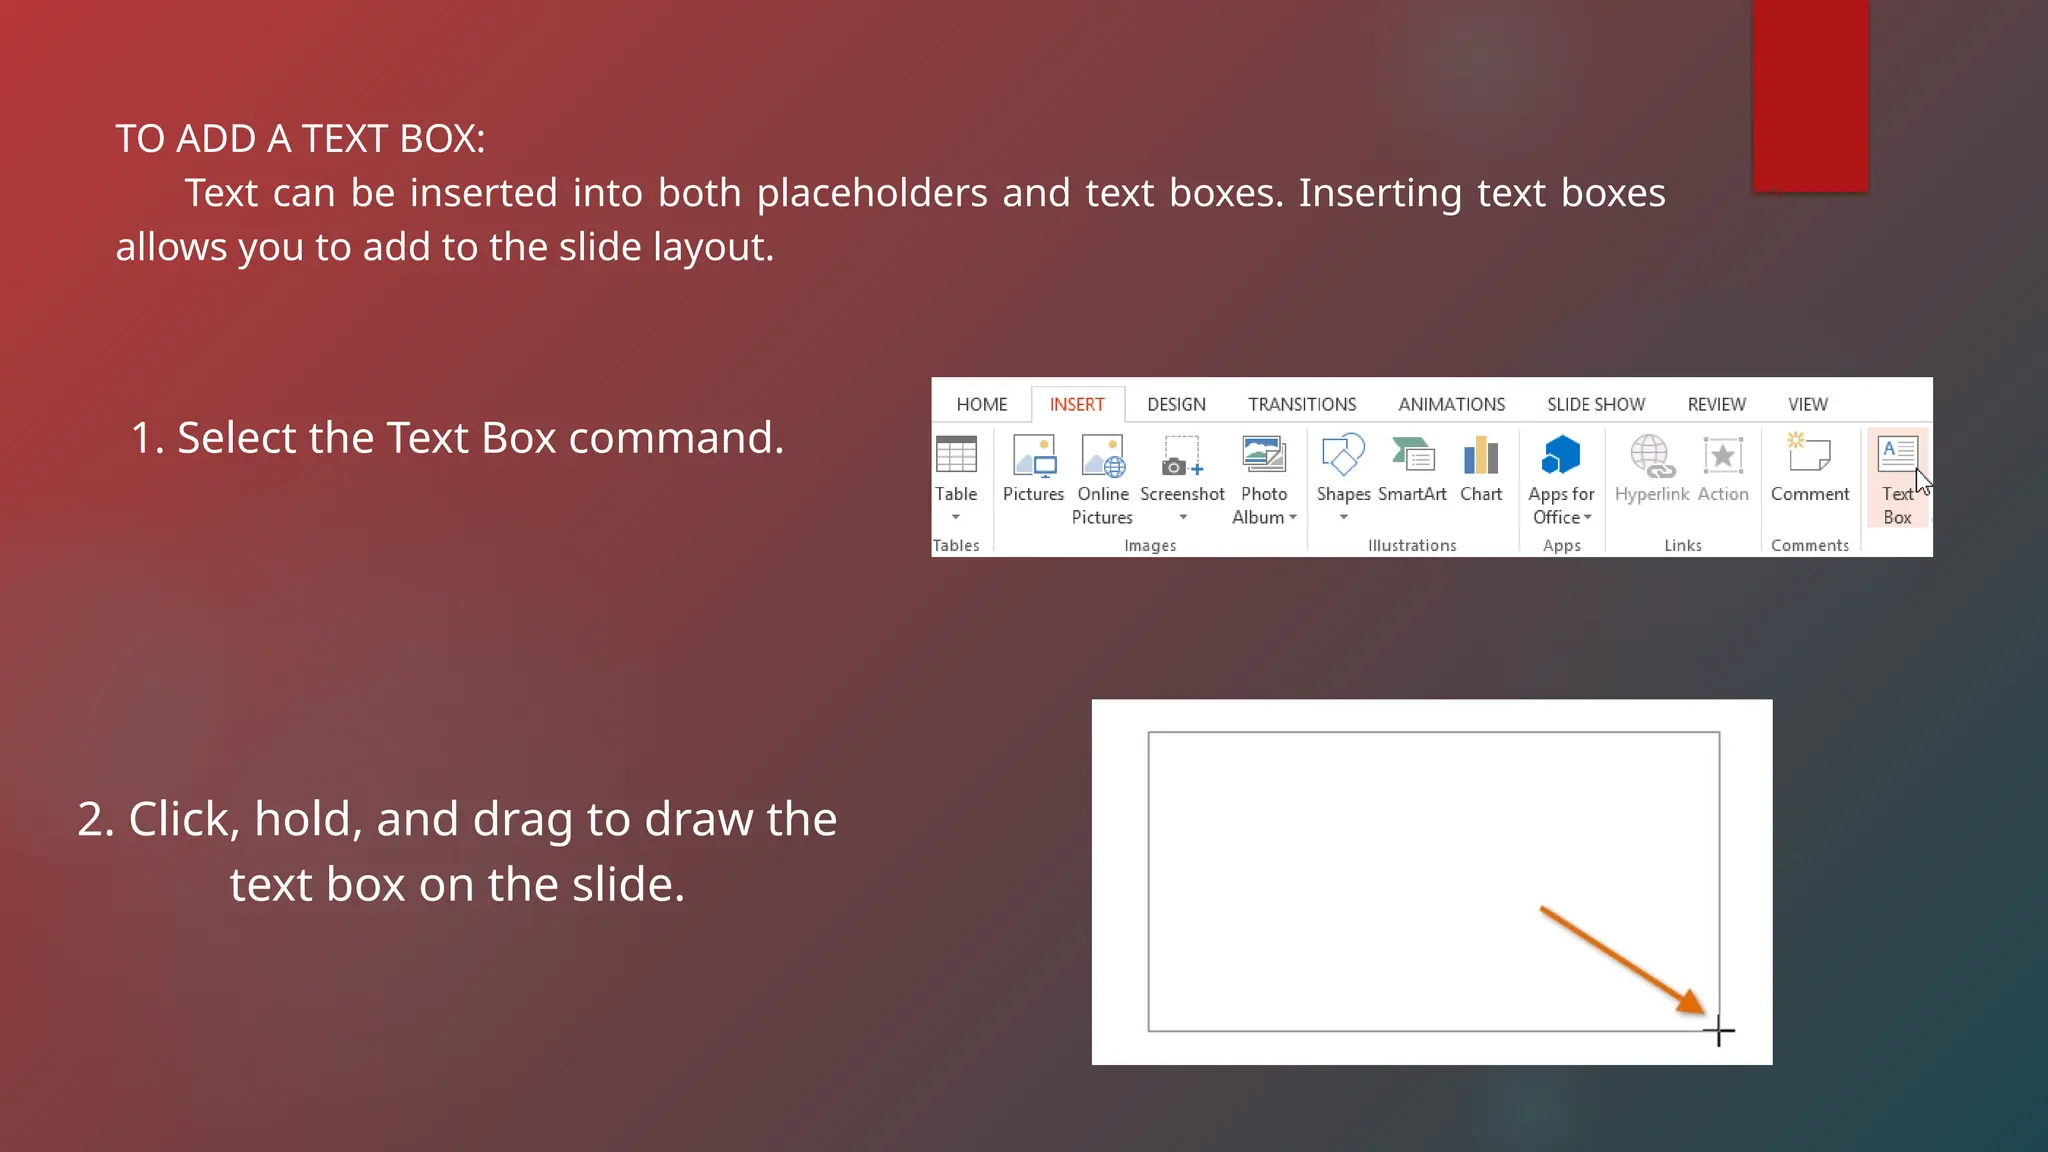
TO ADD ATEXT BOX:
Text can be inserted into both placeholders and text boxes. Inserting text boxes
allows you to add to the slide layout.
1. Select the Text Box command.
2. Click, hold, and drag to draw the
text box on the slide.
66.
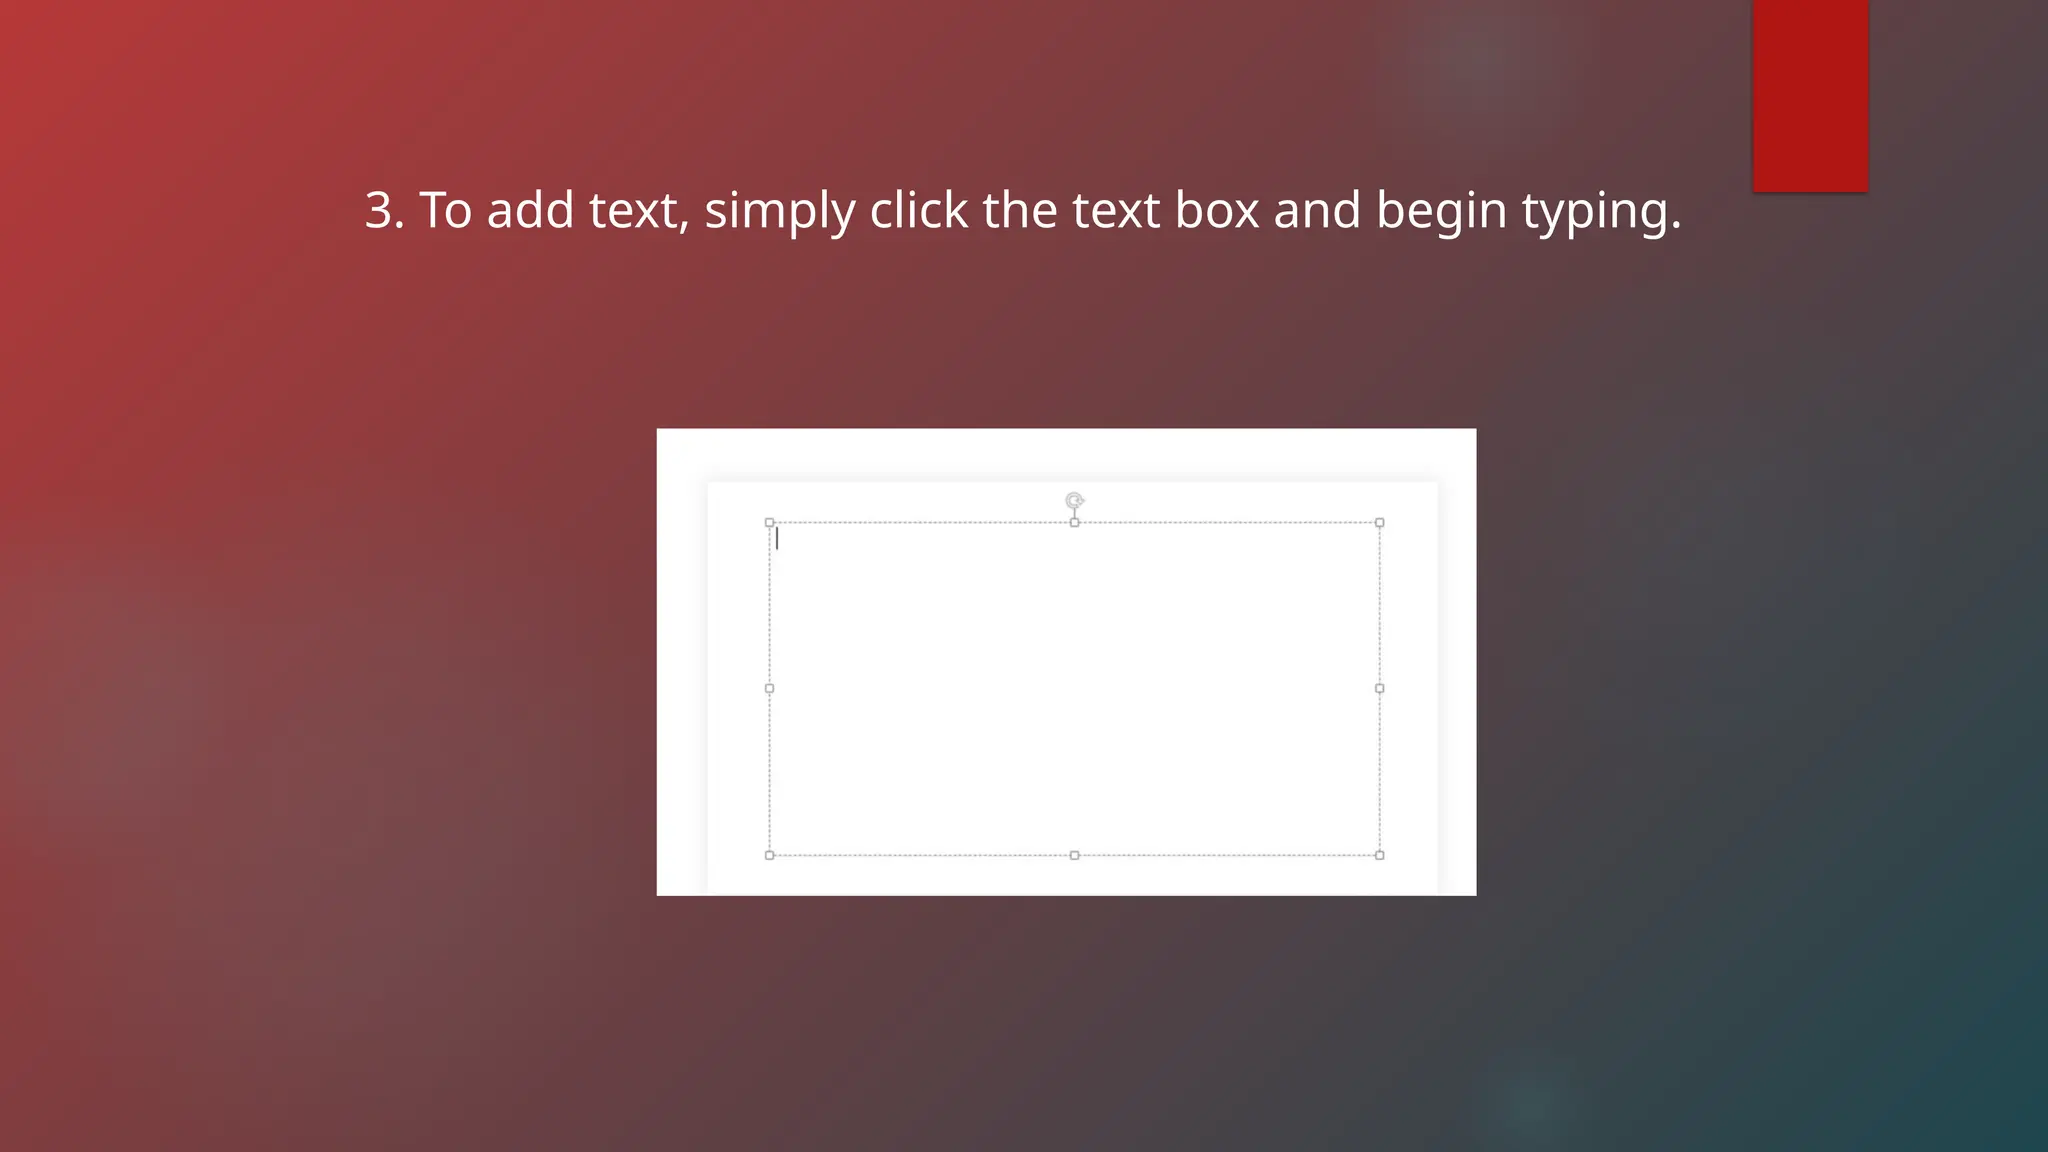
3. To addtext, simply click the text box and begin typing.
67.
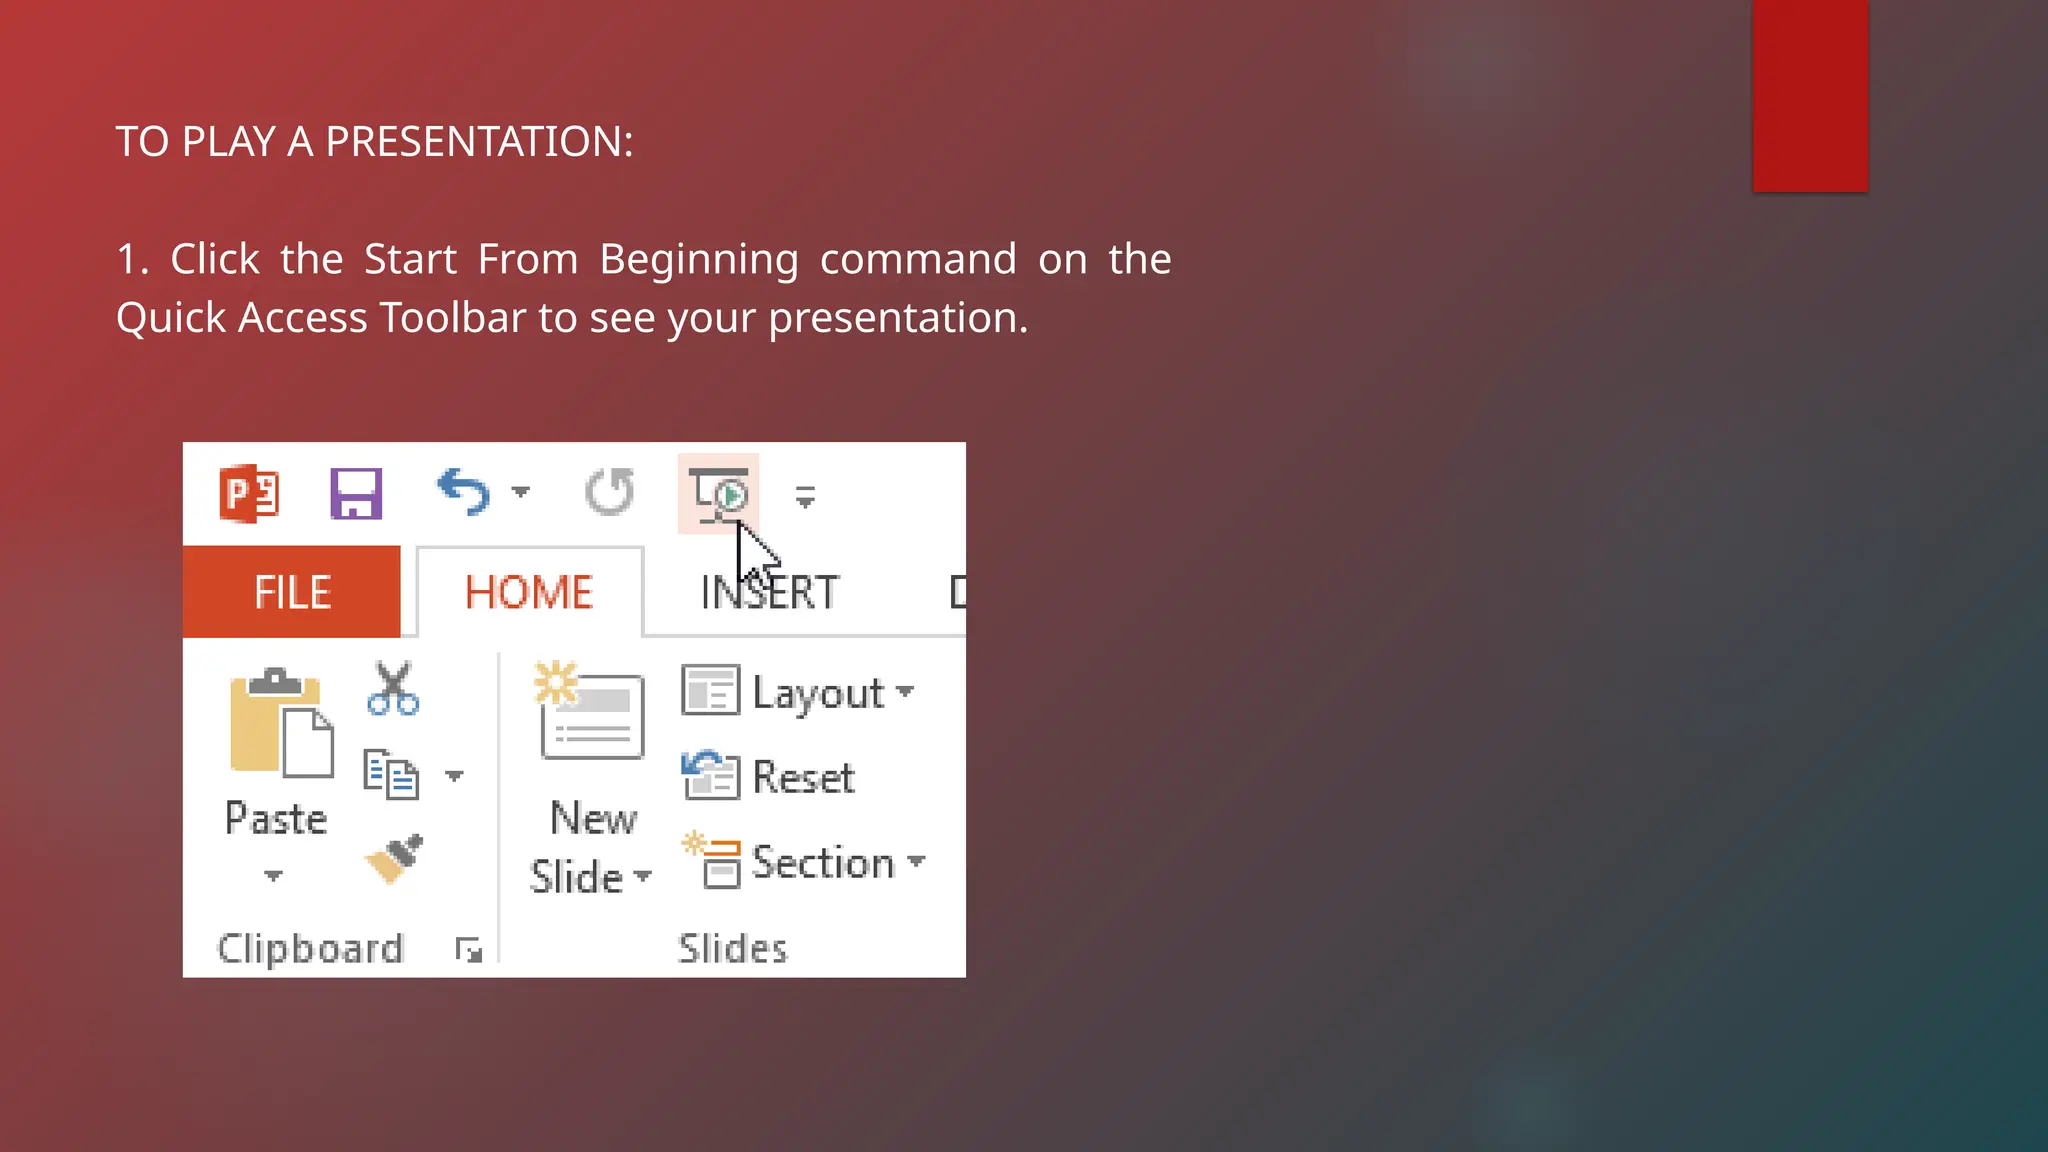
TO PLAY APRESENTATION:
1. Click the Start From Beginning command on the
Quick Access Toolbar to see your presentation.
68.
2. The presentationwill appear in full-screen mode.
3. You can advance to the next slide by clicking your mouse or pressing
the spacebar on your keyboard.
4. Press the Esc key to exit presentation mode.
CO-AUTHORING
As its namesuggests, co-authoring allows you and your
colleagues to work on a PowerPoint presentation collectively.
It comes in handy when you're part of a team and want to
collaborate on a PowerPoint presentation.
71.
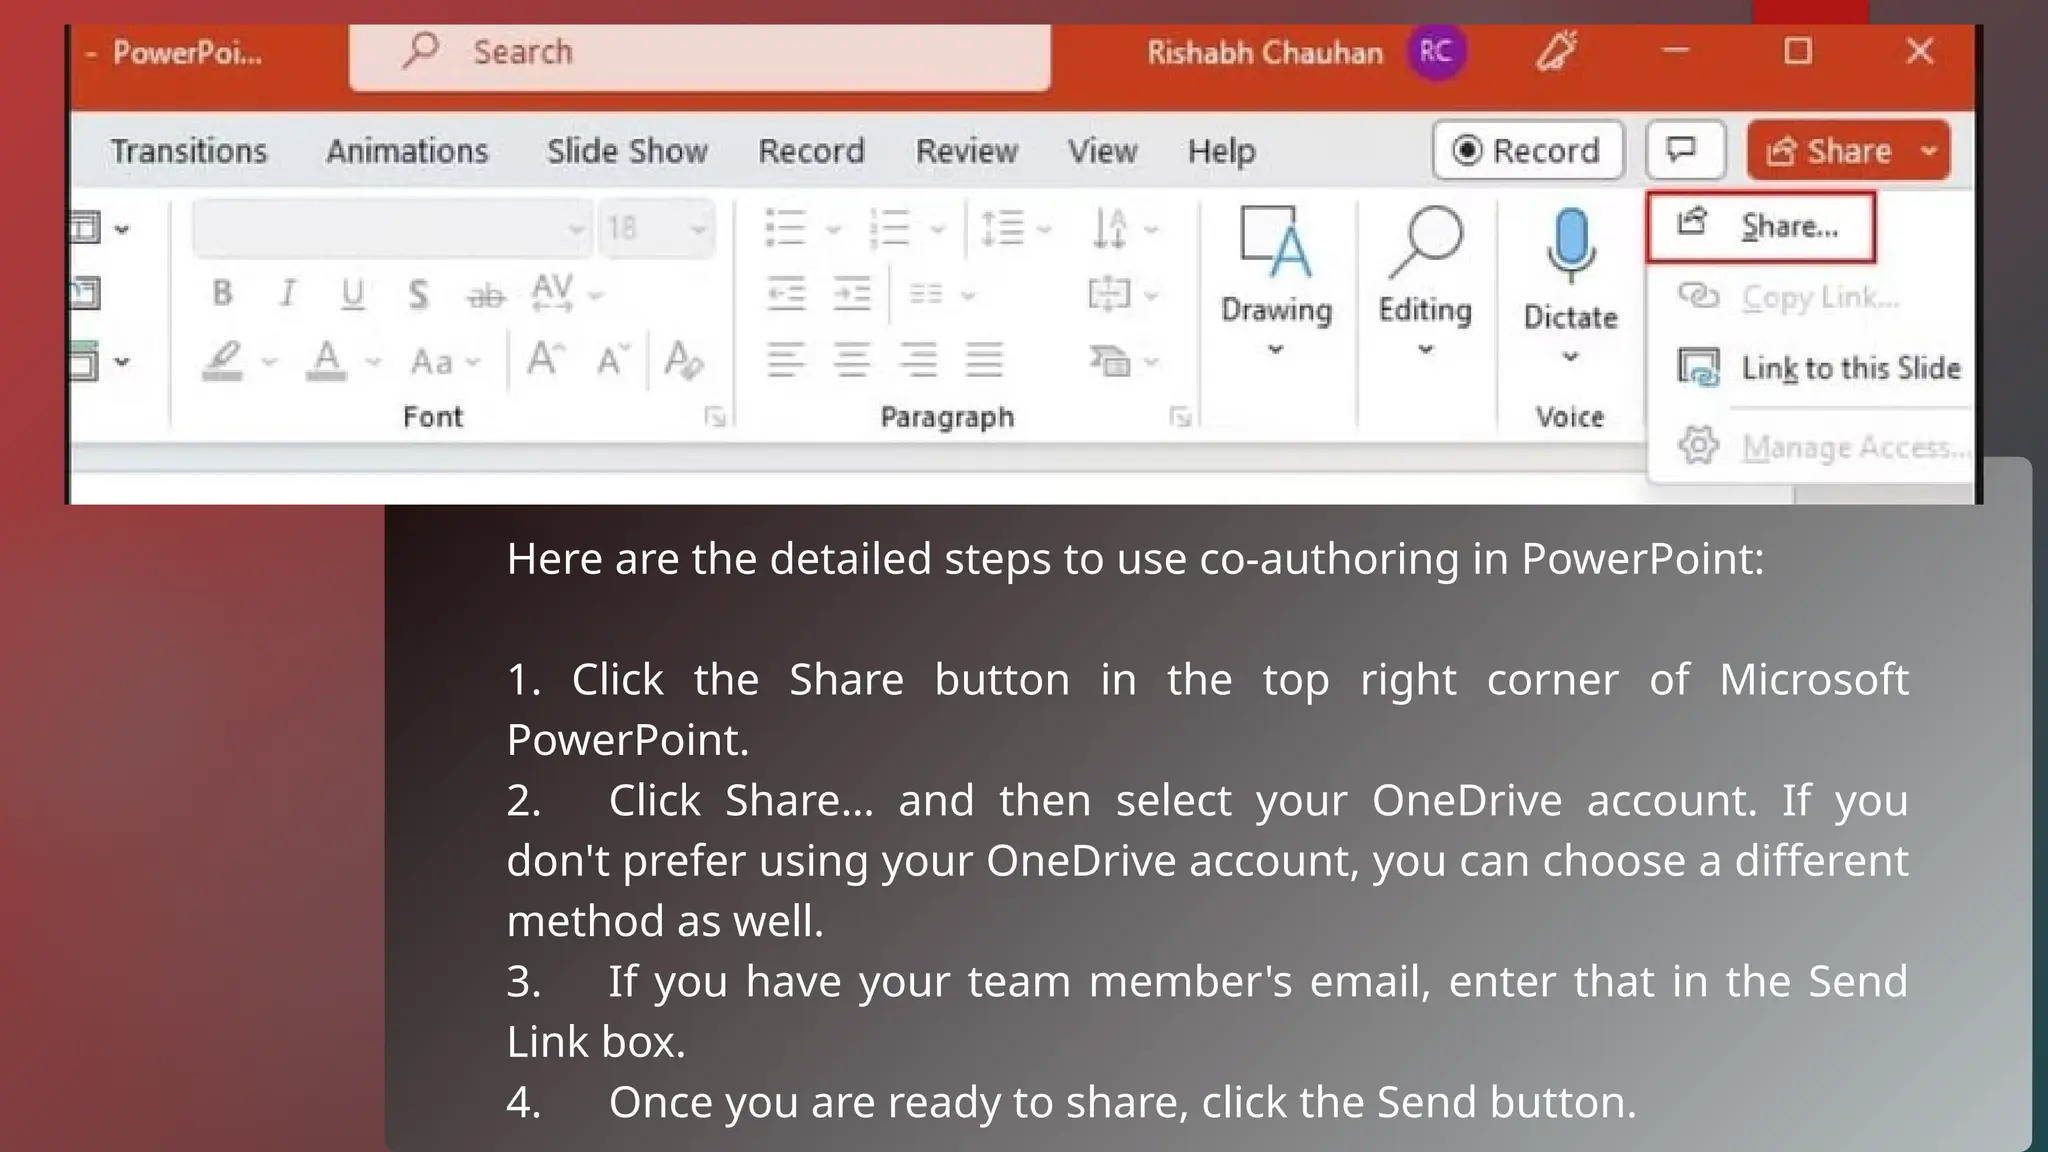
Here are thedetailed steps to use co-authoring in PowerPoint:
1. Click the Share button in the top right corner of Microsoft
PowerPoint.
2. Click Share… and then select your OneDrive account. If you
don't prefer using your OneDrive account, you can choose a different
method as well.
3. If you have your team member's email, enter that in the Send
Link box.
4. Once you are ready to share, click the Send button.
72.
POWERPOINT DESIGNER
PowerPoint Designerhelps you transform your PPT's
appearance. When you add a new slide or change the
content of an existing slide, the Designer analyzes the
content. It then starts suggesting design ideas that match
the content of your PPT. If you often lack design
inspirations, you should learn to use PowerPoint's
Designer feature for help.
73.
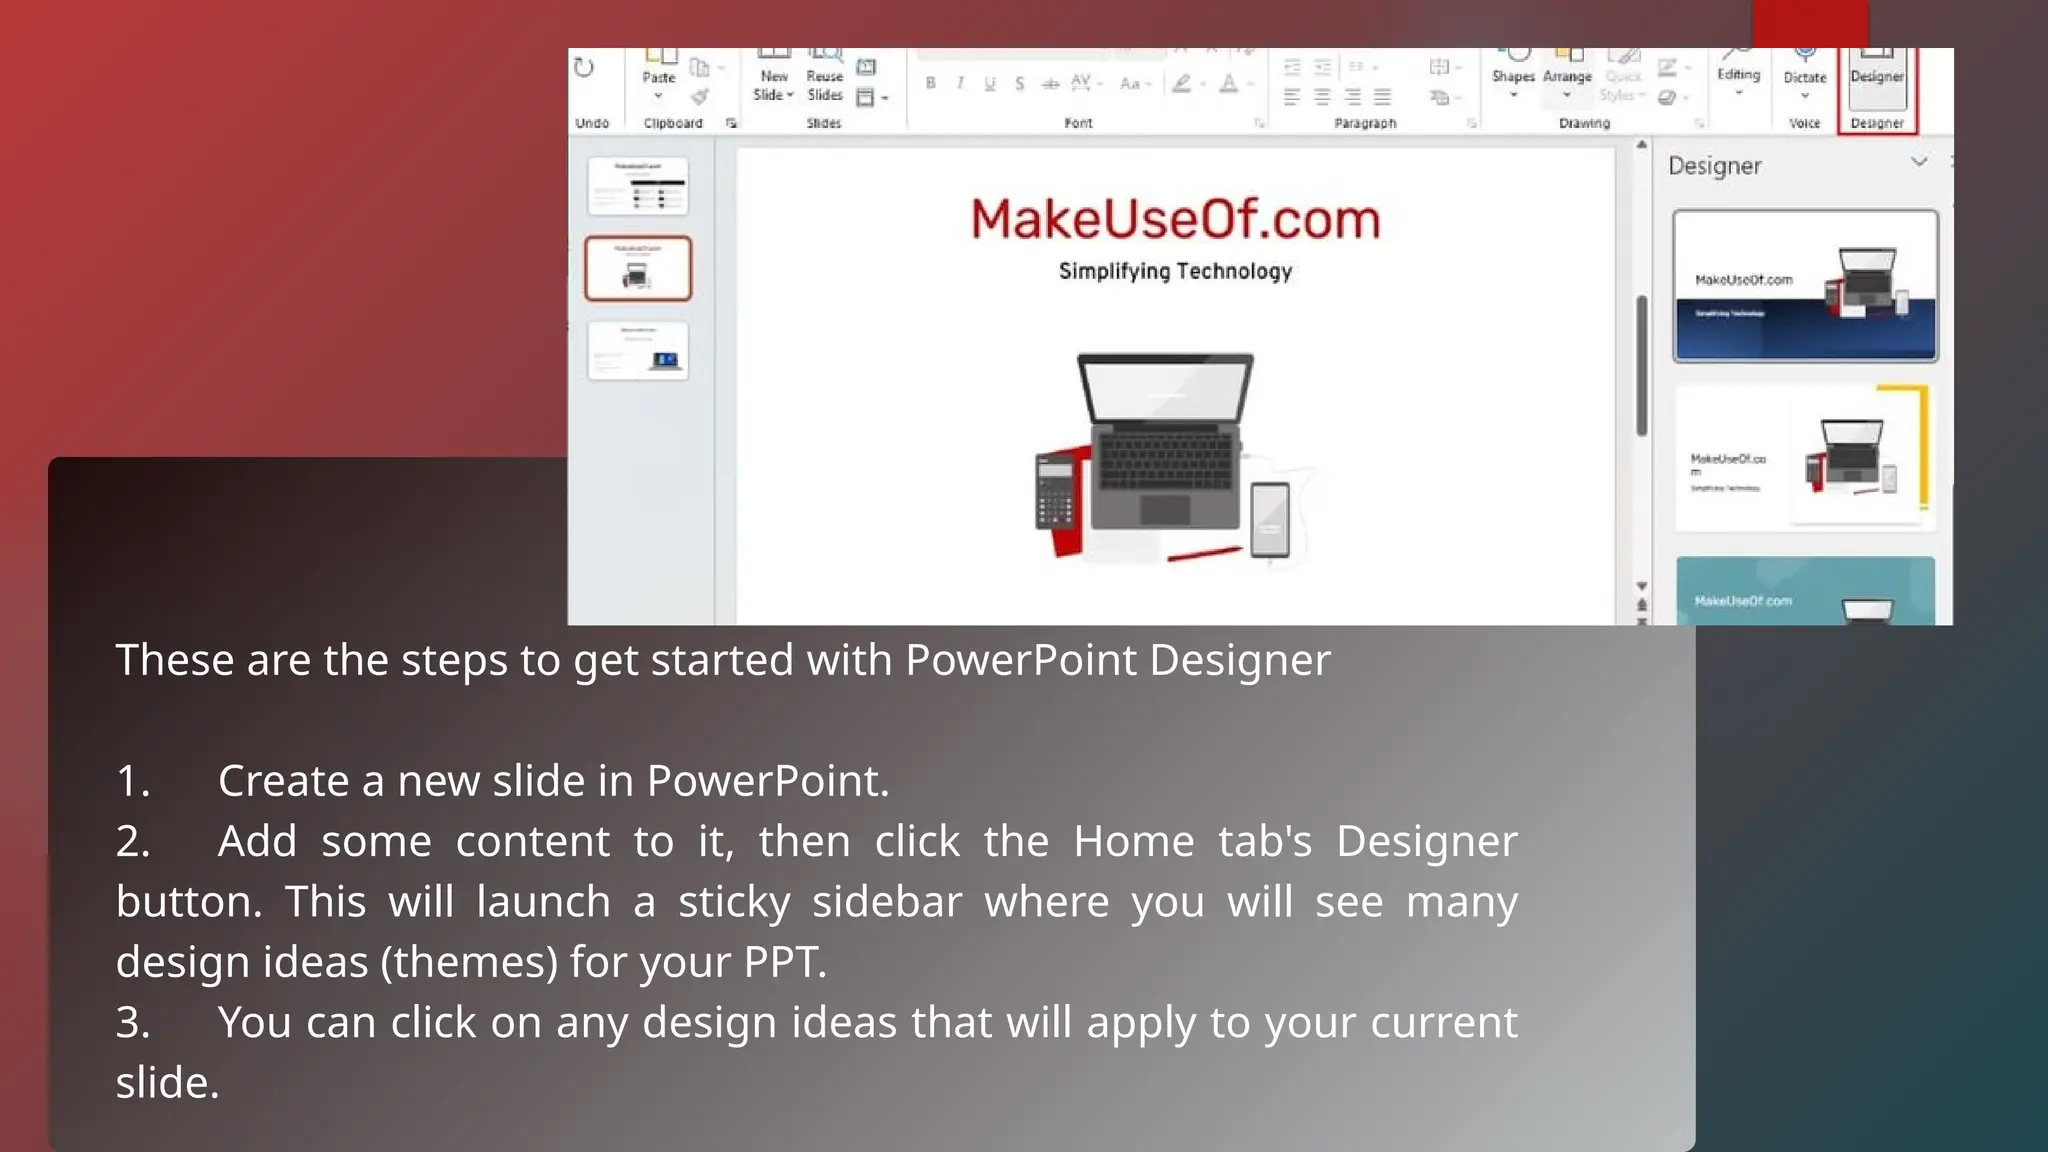
These are thesteps to get started with PowerPoint Designer
1. Create a new slide in PowerPoint.
2. Add some content to it, then click the Home tab's Designer
button. This will launch a sticky sidebar where you will see many
design ideas (themes) for your PPT.
3. You can click on any design ideas that will apply to your current
slide.
74.
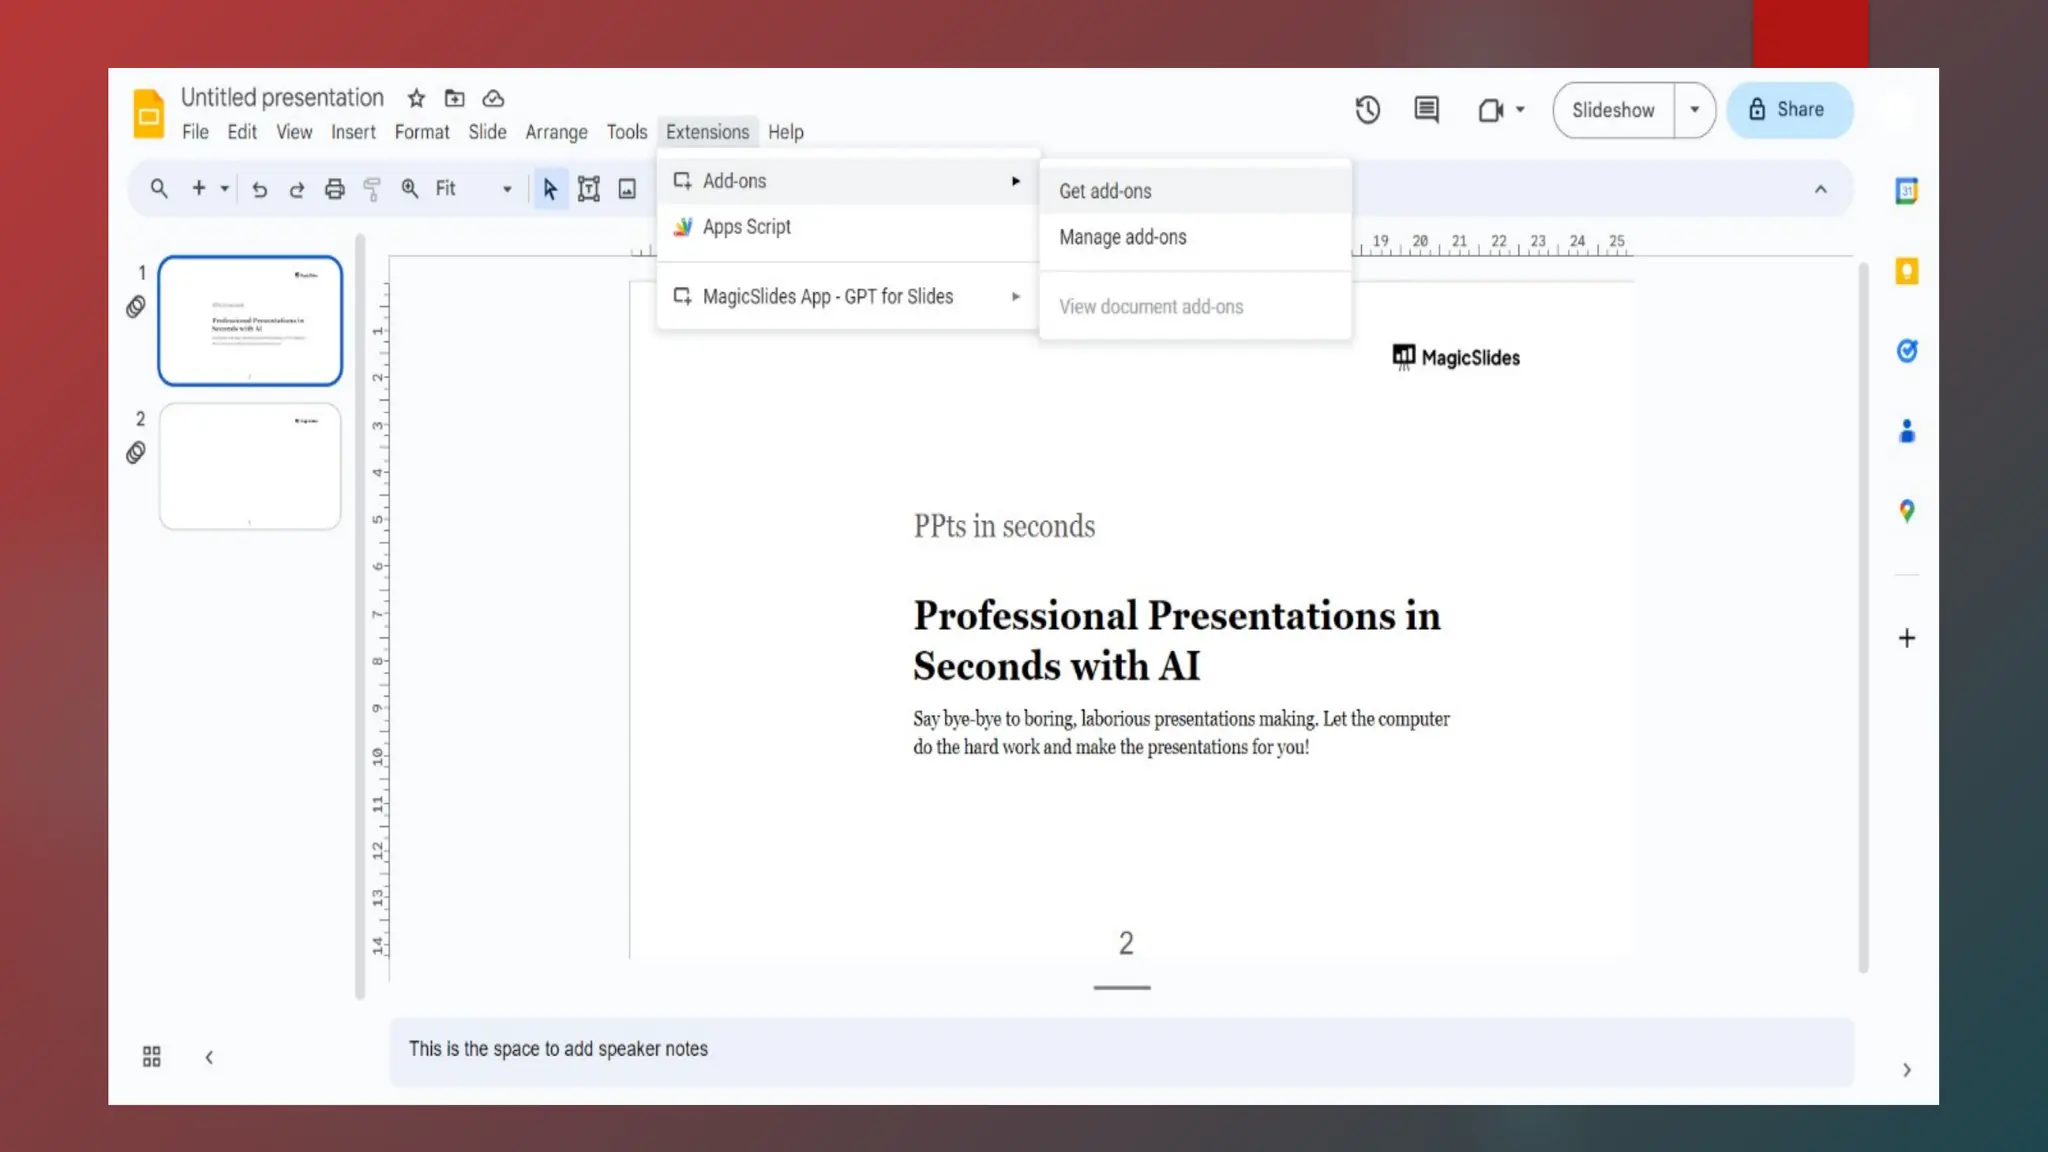
POWERPOINT ADD-INS
PowerPoint allowsyou to install third-party add-ins in one click. There
are many different PowerPoint add-ins to transform your
presentations completely. Once you know which add-ins to install, you
can follow these steps to install them:
75.
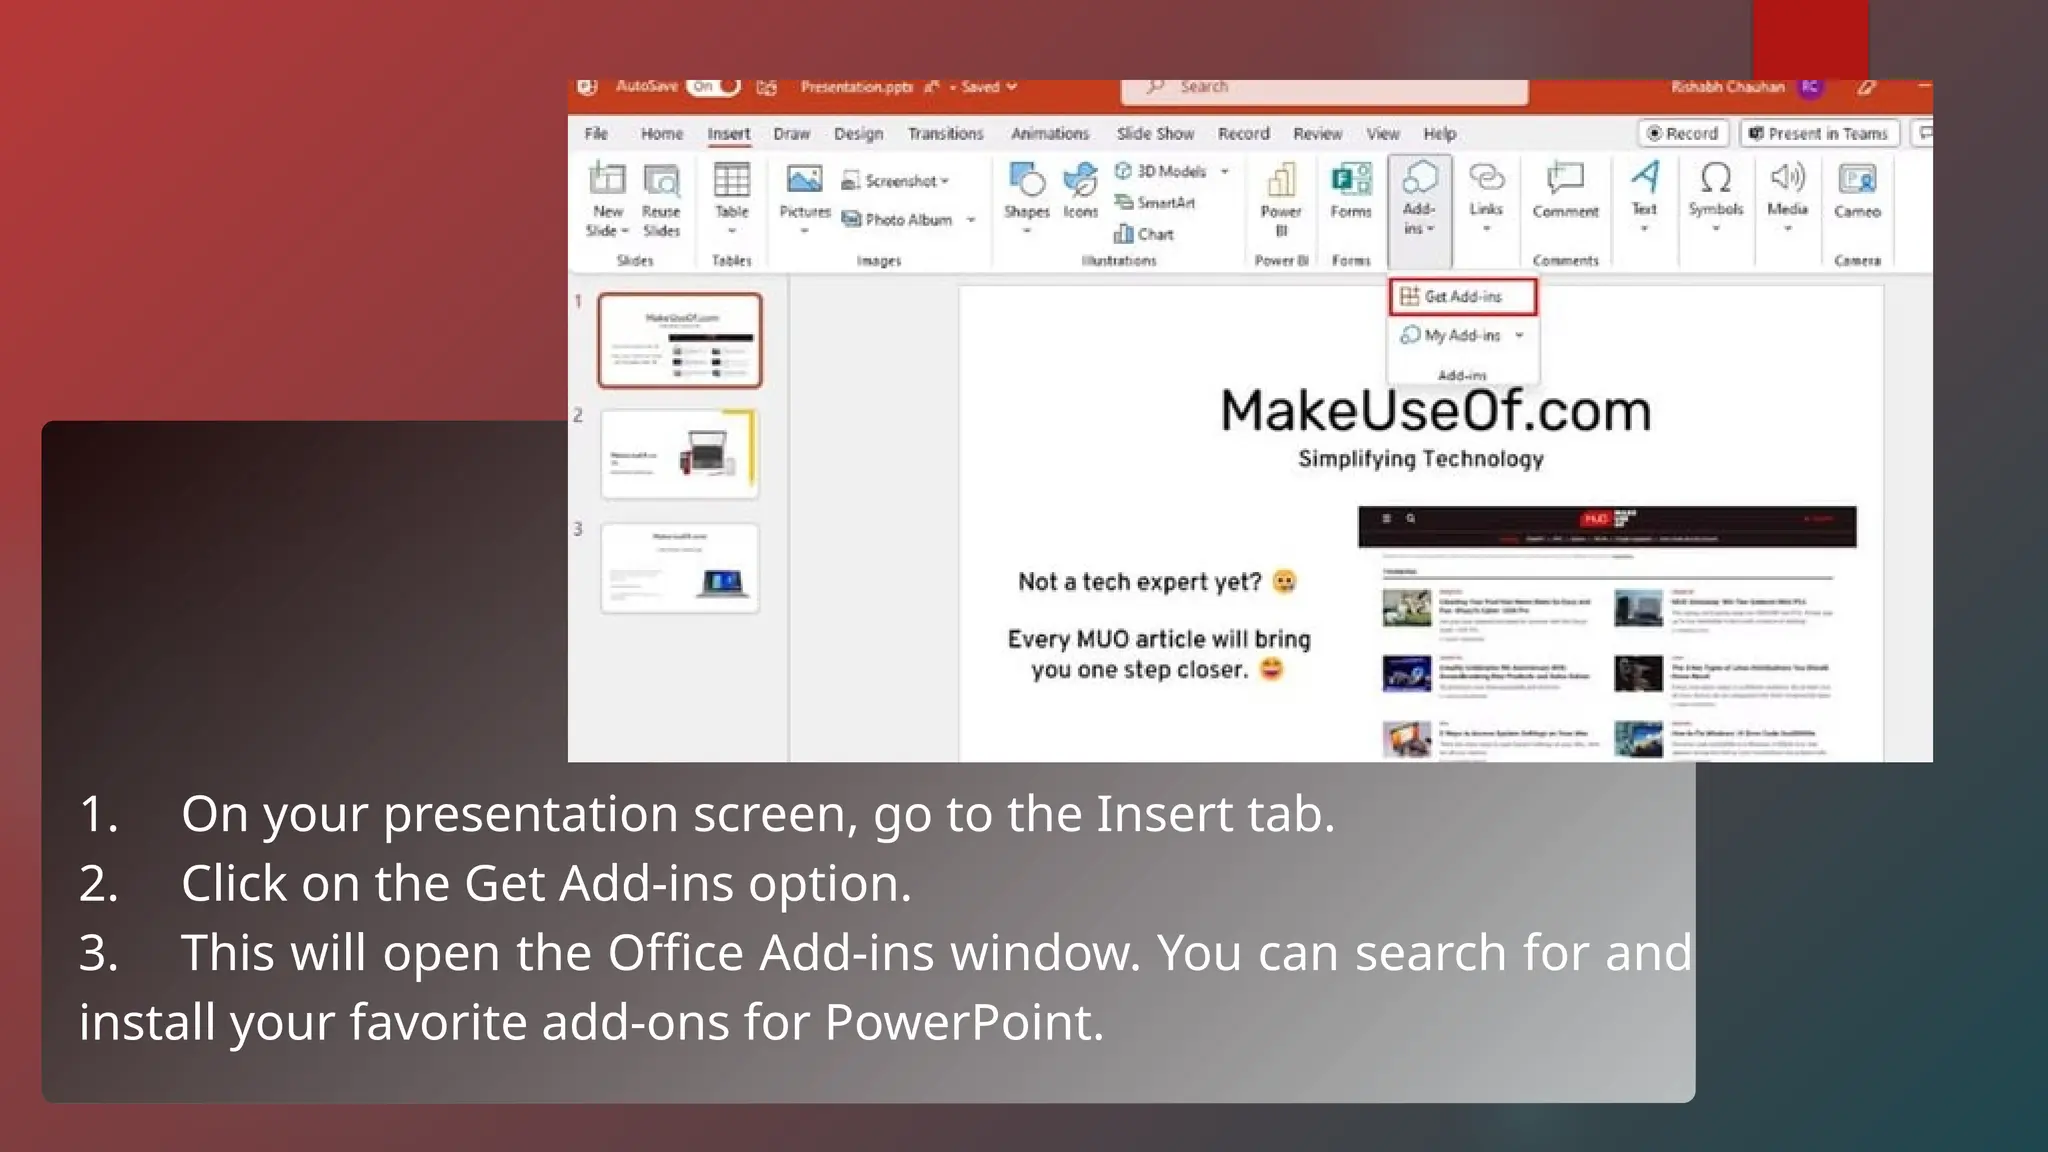
1. On yourpresentation screen, go to the Insert tab.
2. Click on the Get Add-ins option.
3. This will open the Office Add-ins window. You can search for and
install your favorite add-ons for PowerPoint.
76.
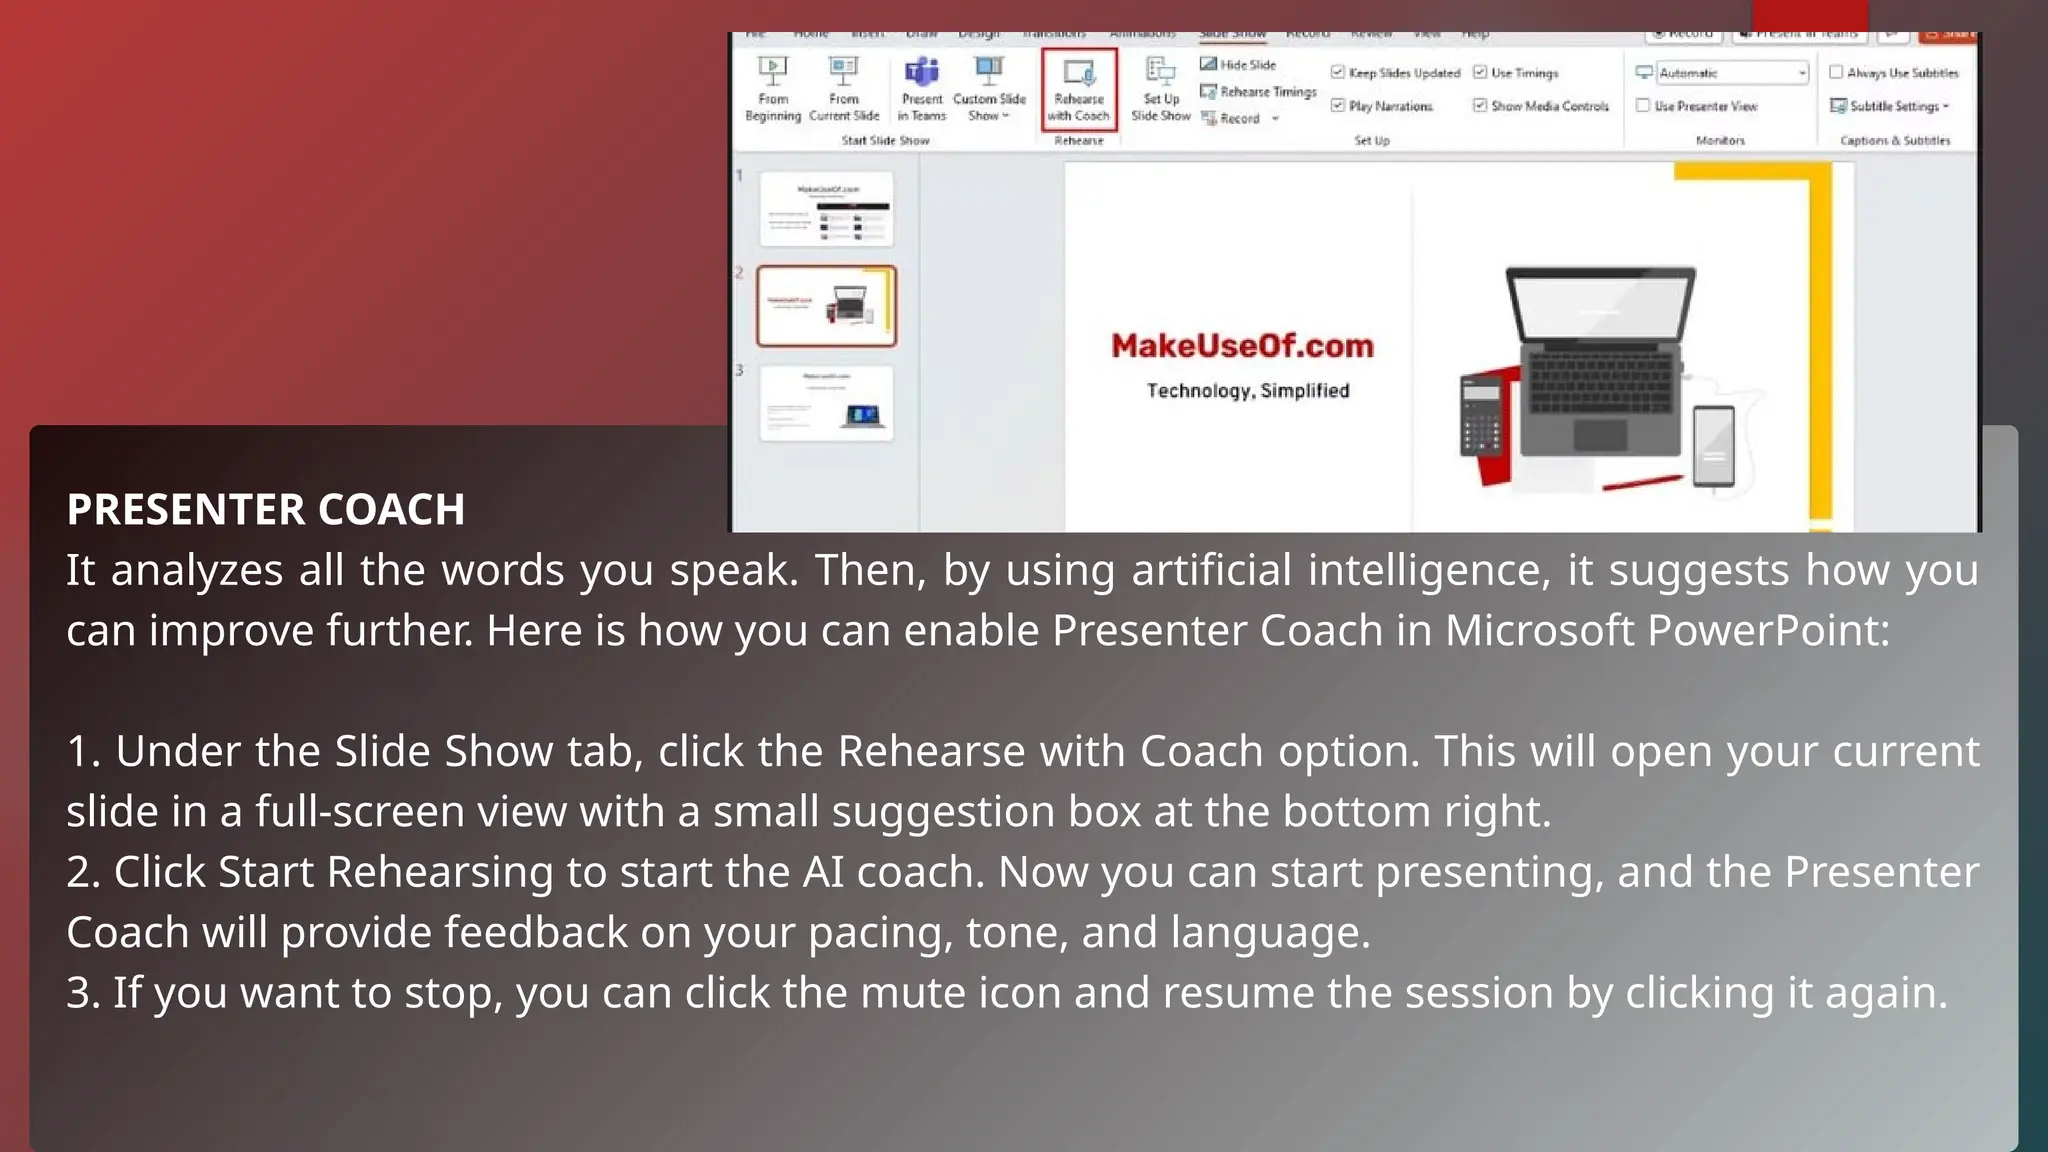
PRESENTER COACH
It analyzesall the words you speak. Then, by using artificial intelligence, it suggests how you
can improve further. Here is how you can enable Presenter Coach in Microsoft PowerPoint:
1. Under the Slide Show tab, click the Rehearse with Coach option. This will open your current
slide in a full-screen view with a small suggestion box at the bottom right.
2. Click Start Rehearsing to start the AI coach. Now you can start presenting, and the Presenter
Coach will provide feedback on your pacing, tone, and language.
3. If you want to stop, you can click the mute icon and resume the session by clicking it again.
77.
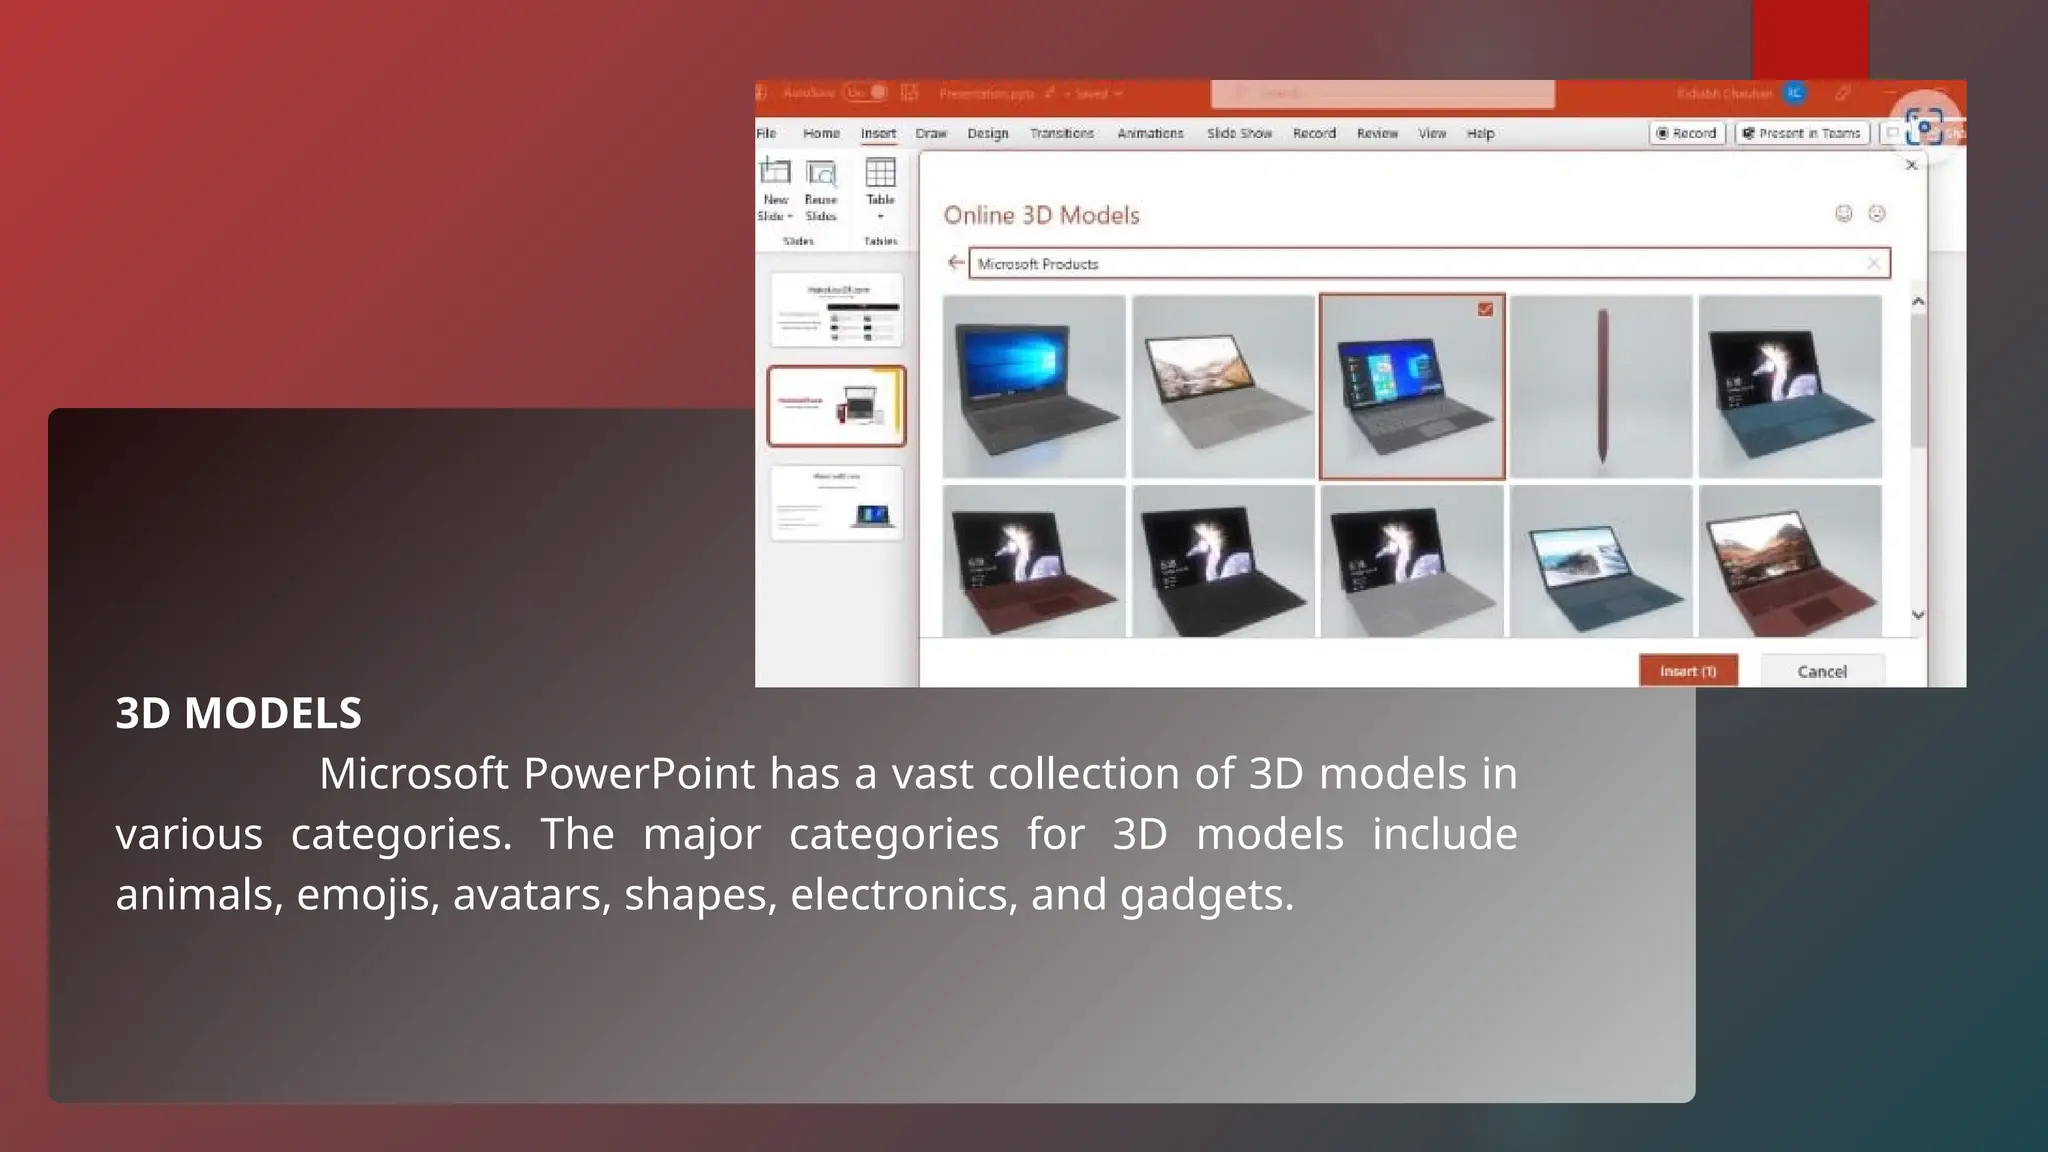
3D MODELS
Microsoft PowerPointhas a vast collection of 3D models in
various categories. The major categories for 3D models include
animals, emojis, avatars, shapes, electronics, and gadgets.
78.
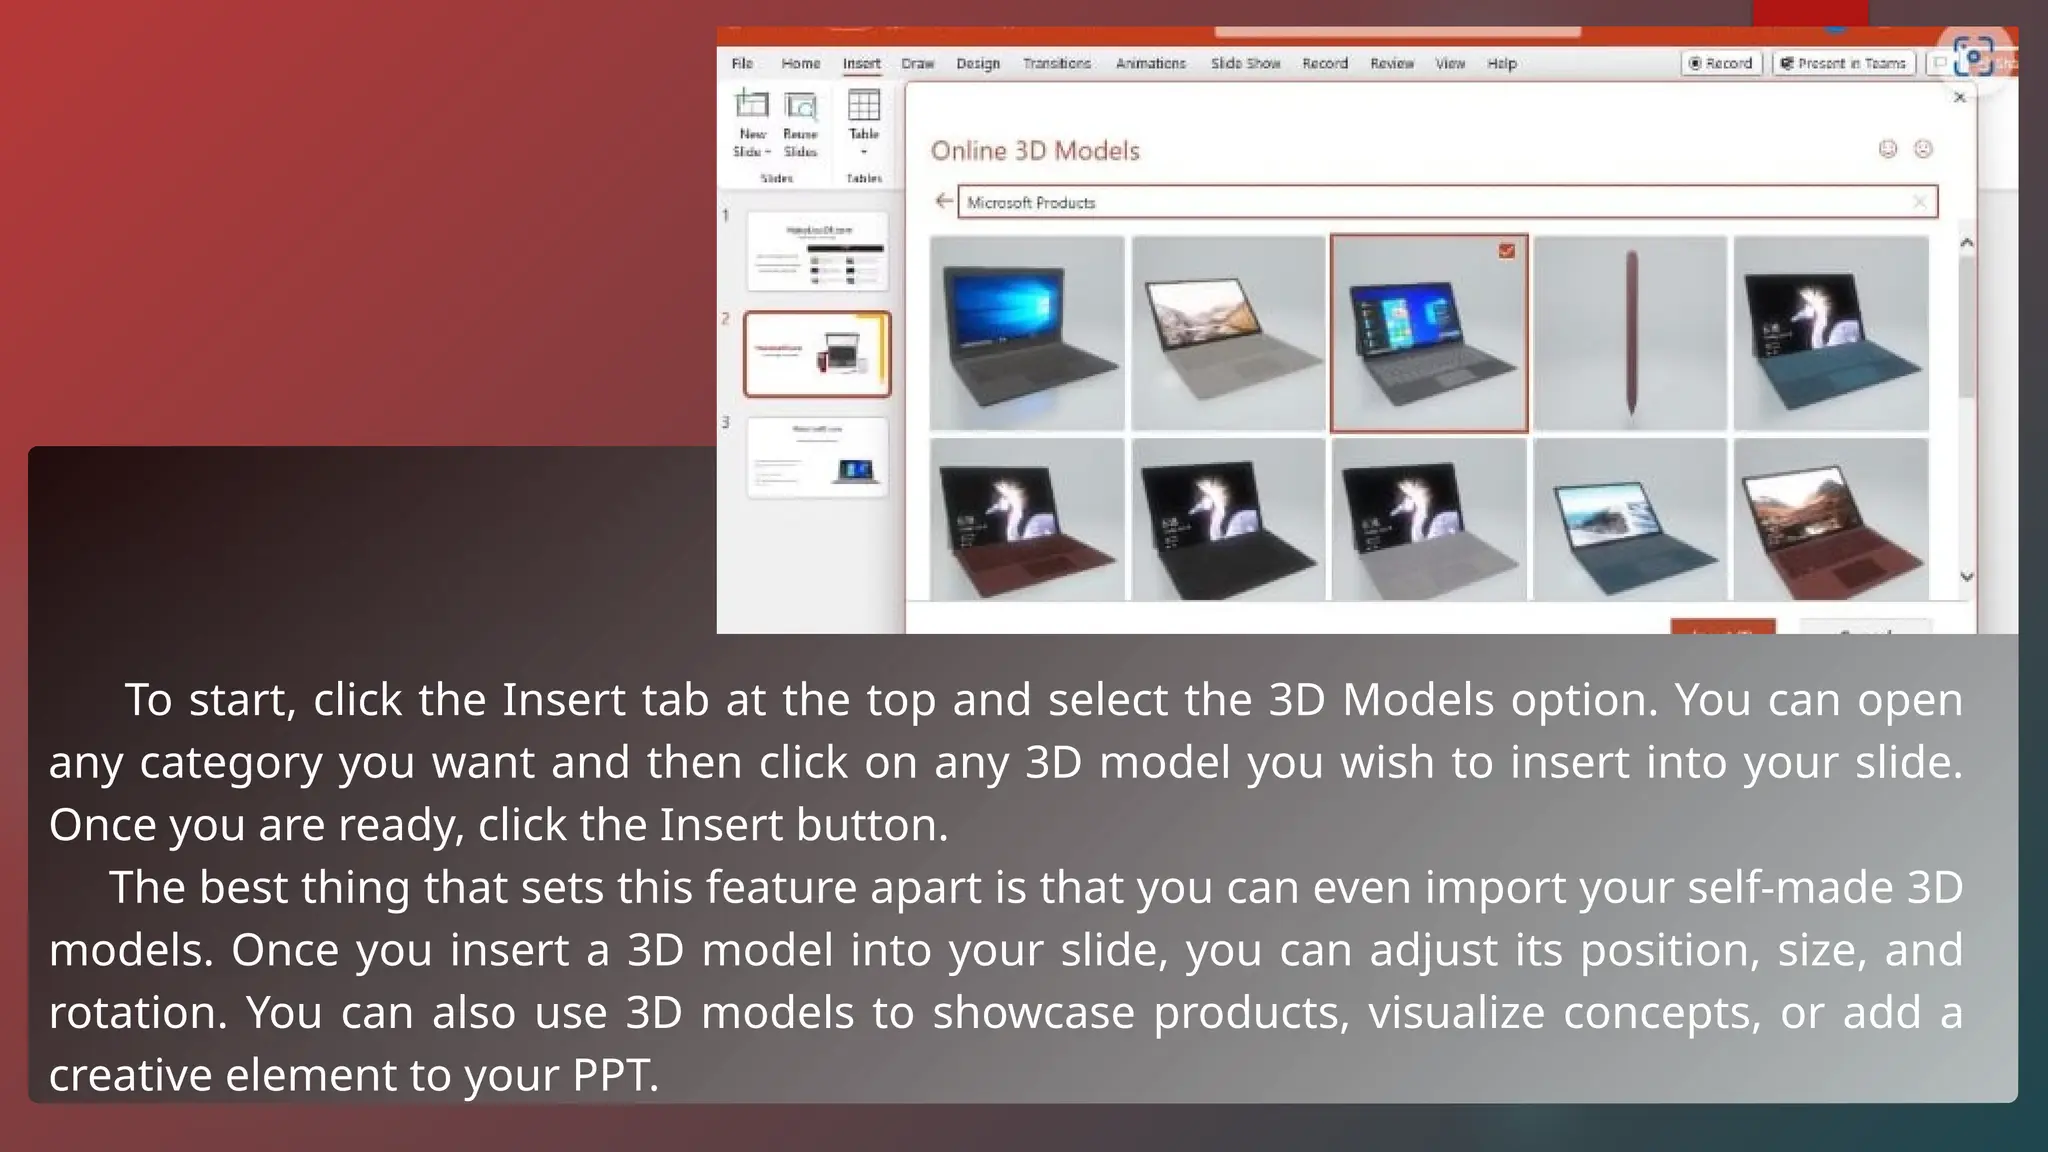
To start, clickthe Insert tab at the top and select the 3D Models option. You can open
any category you want and then click on any 3D model you wish to insert into your slide.
Once you are ready, click the Insert button.
The best thing that sets this feature apart is that you can even import your self-made 3D
models. Once you insert a 3D model into your slide, you can adjust its position, size, and
rotation. You can also use 3D models to showcase products, visualize concepts, or add a
creative element to your PPT.
79.
MORPH TRANSITION
By addingMorph transitions, you can animate different
aspects of your slides. You can animate different objects, slide,
and even texts as you like.
80.
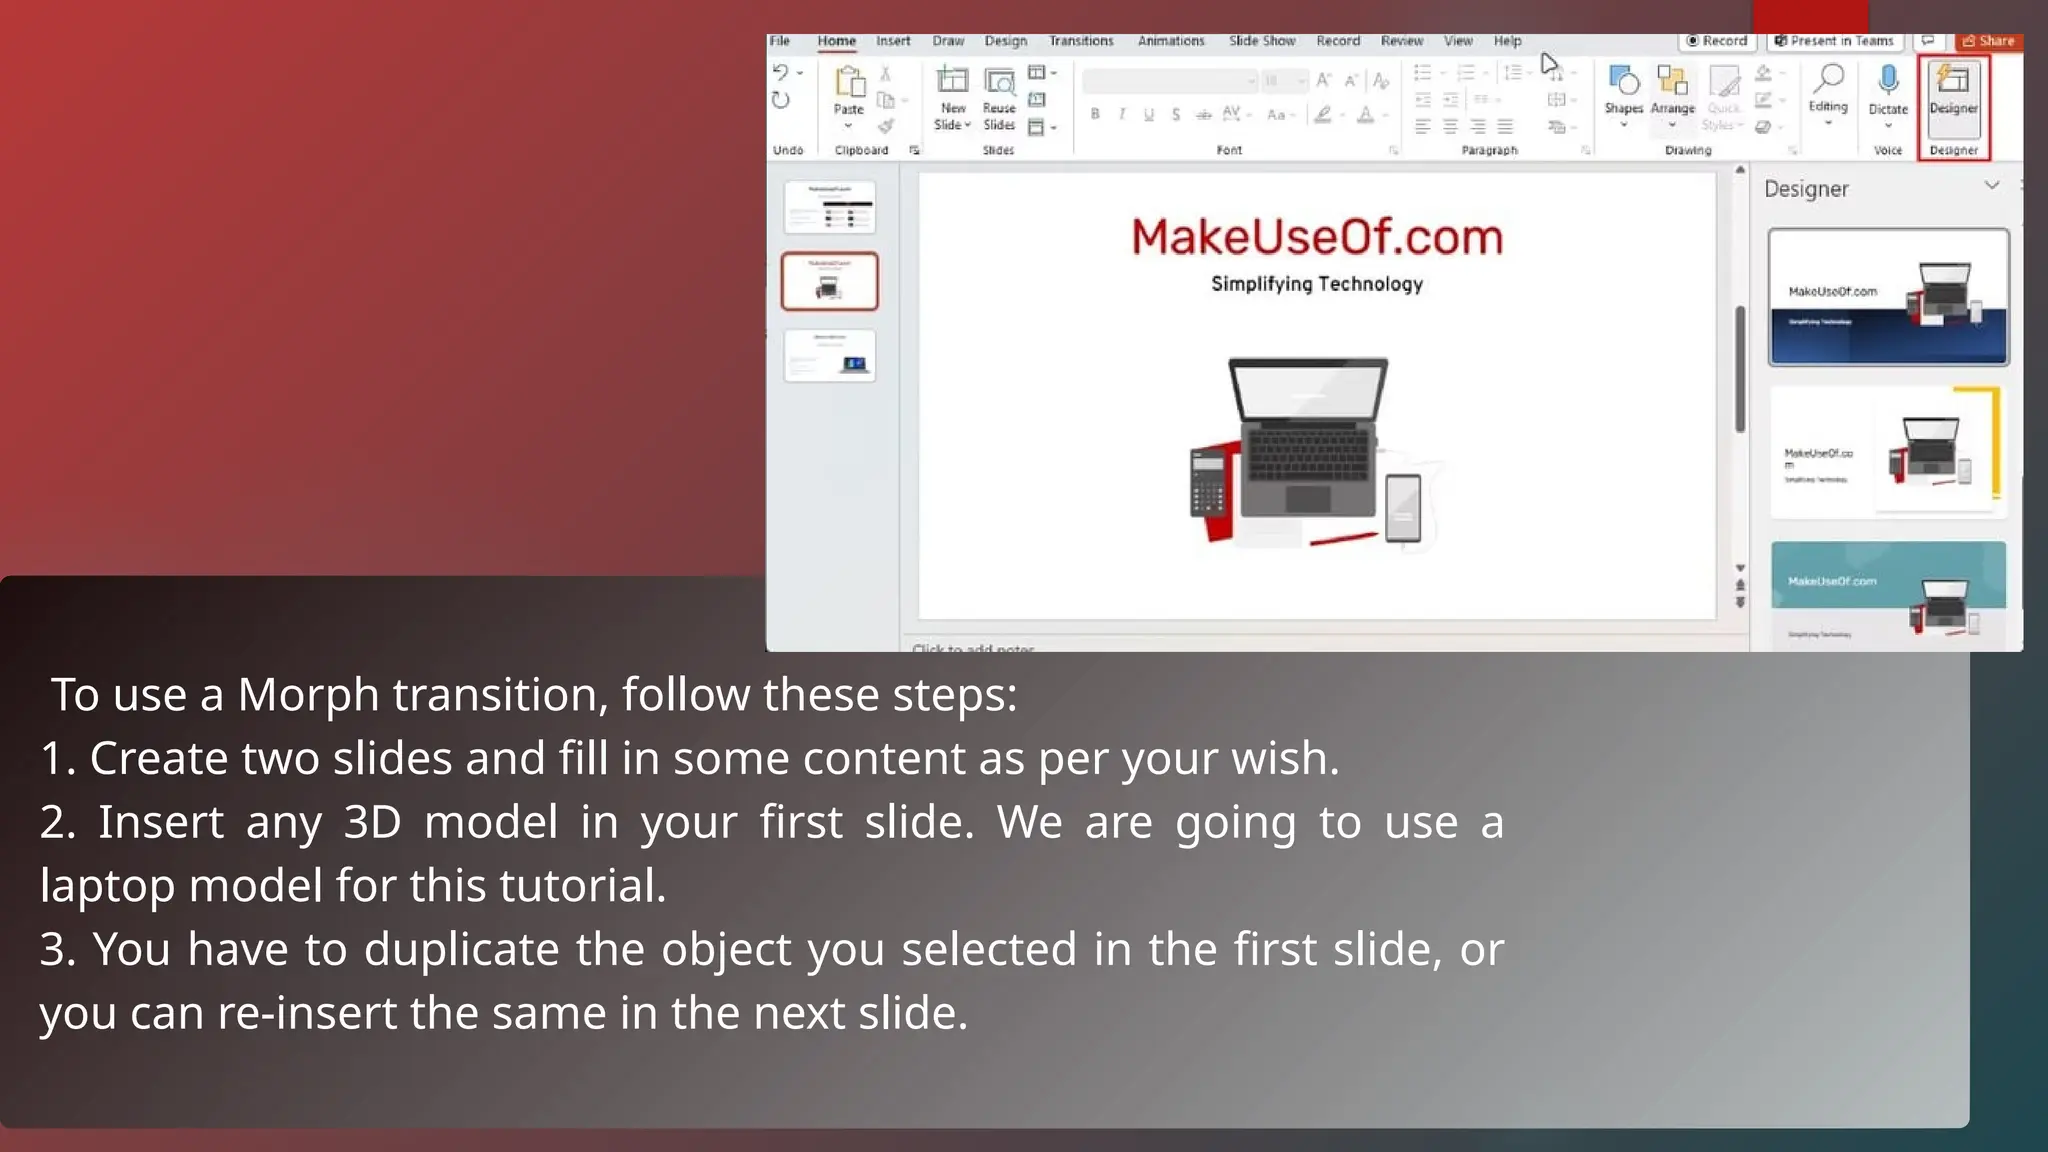
To use aMorph transition, follow these steps:
1. Create two slides and fill in some content as per your wish.
2. Insert any 3D model in your first slide. We are going to use a
laptop model for this tutorial.
3. You have to duplicate the object you selected in the first slide, or
you can re-insert the same in the next slide.
81.
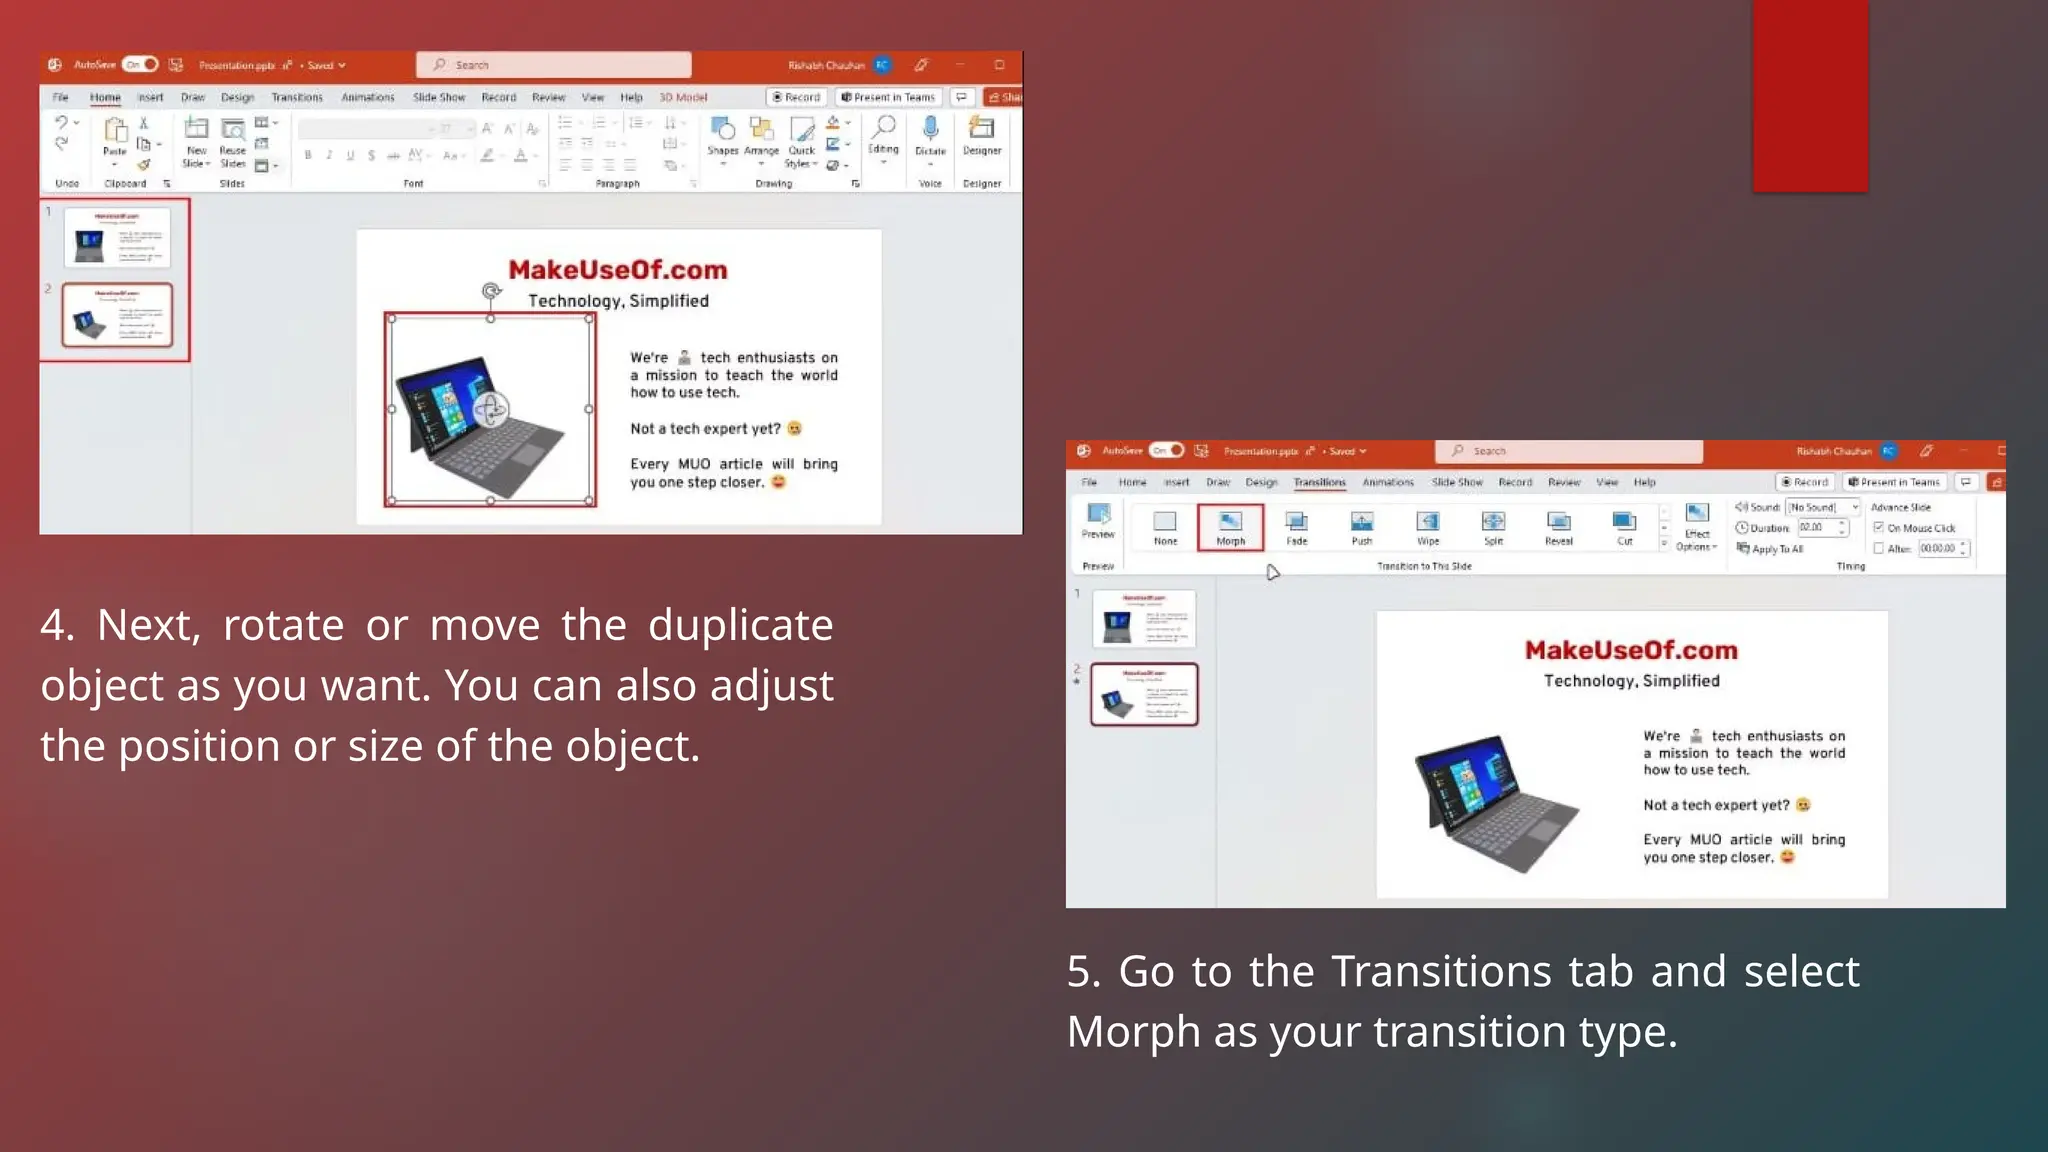
4. Next, rotateor move the duplicate
object as you want. You can also adjust
the position or size of the object.
5. Go to the Transitions tab and select
Morph as your transition type.
82.
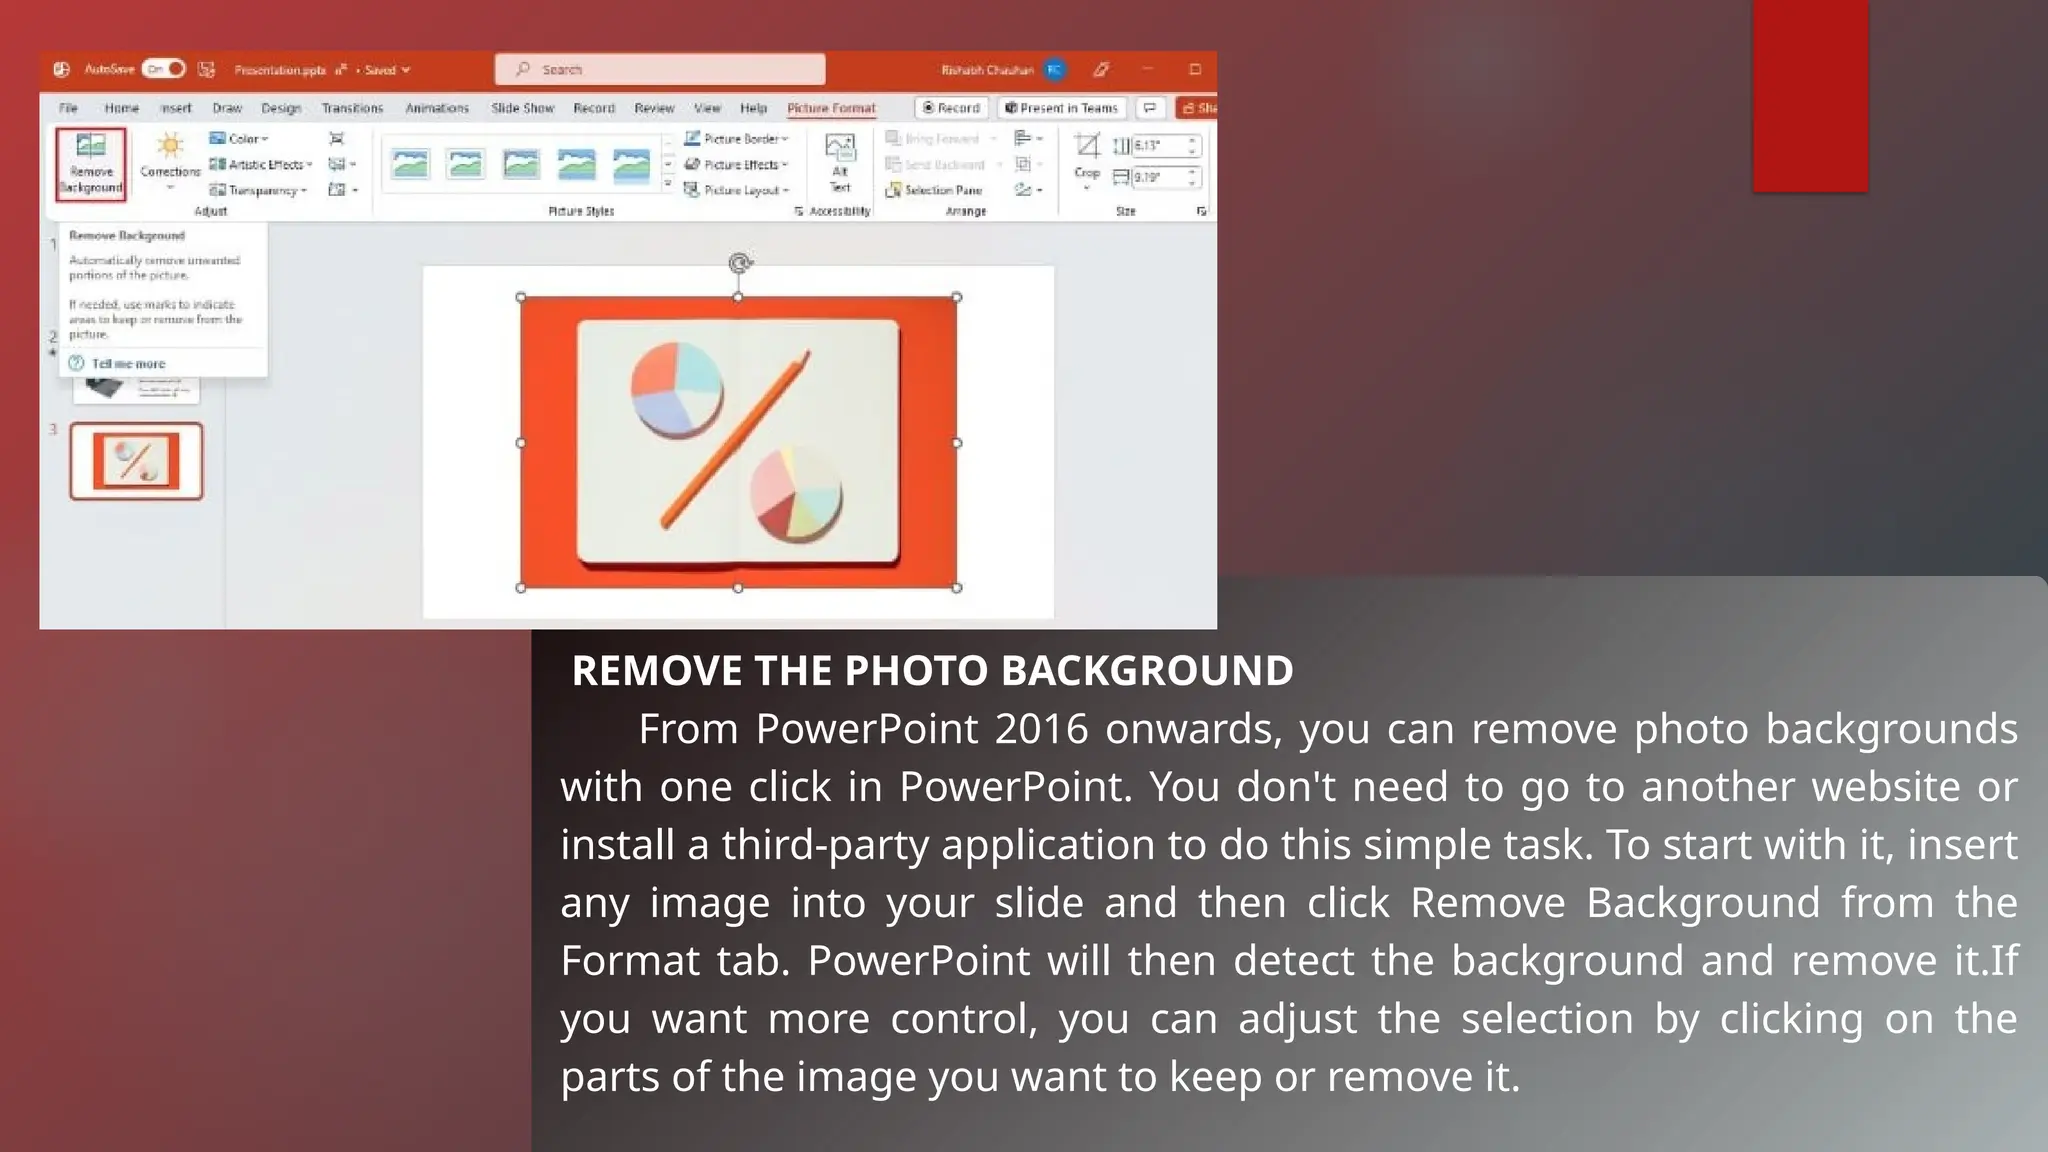
REMOVE THE PHOTOBACKGROUND
From PowerPoint 2016 onwards, you can remove photo backgrounds
with one click in PowerPoint. You don't need to go to another website or
install a third-party application to do this simple task. To start with it, insert
any image into your slide and then click Remove Background from the
Format tab. PowerPoint will then detect the background and remove it.If
you want more control, you can adjust the selection by clicking on the
parts of the image you want to keep or remove it.
83.
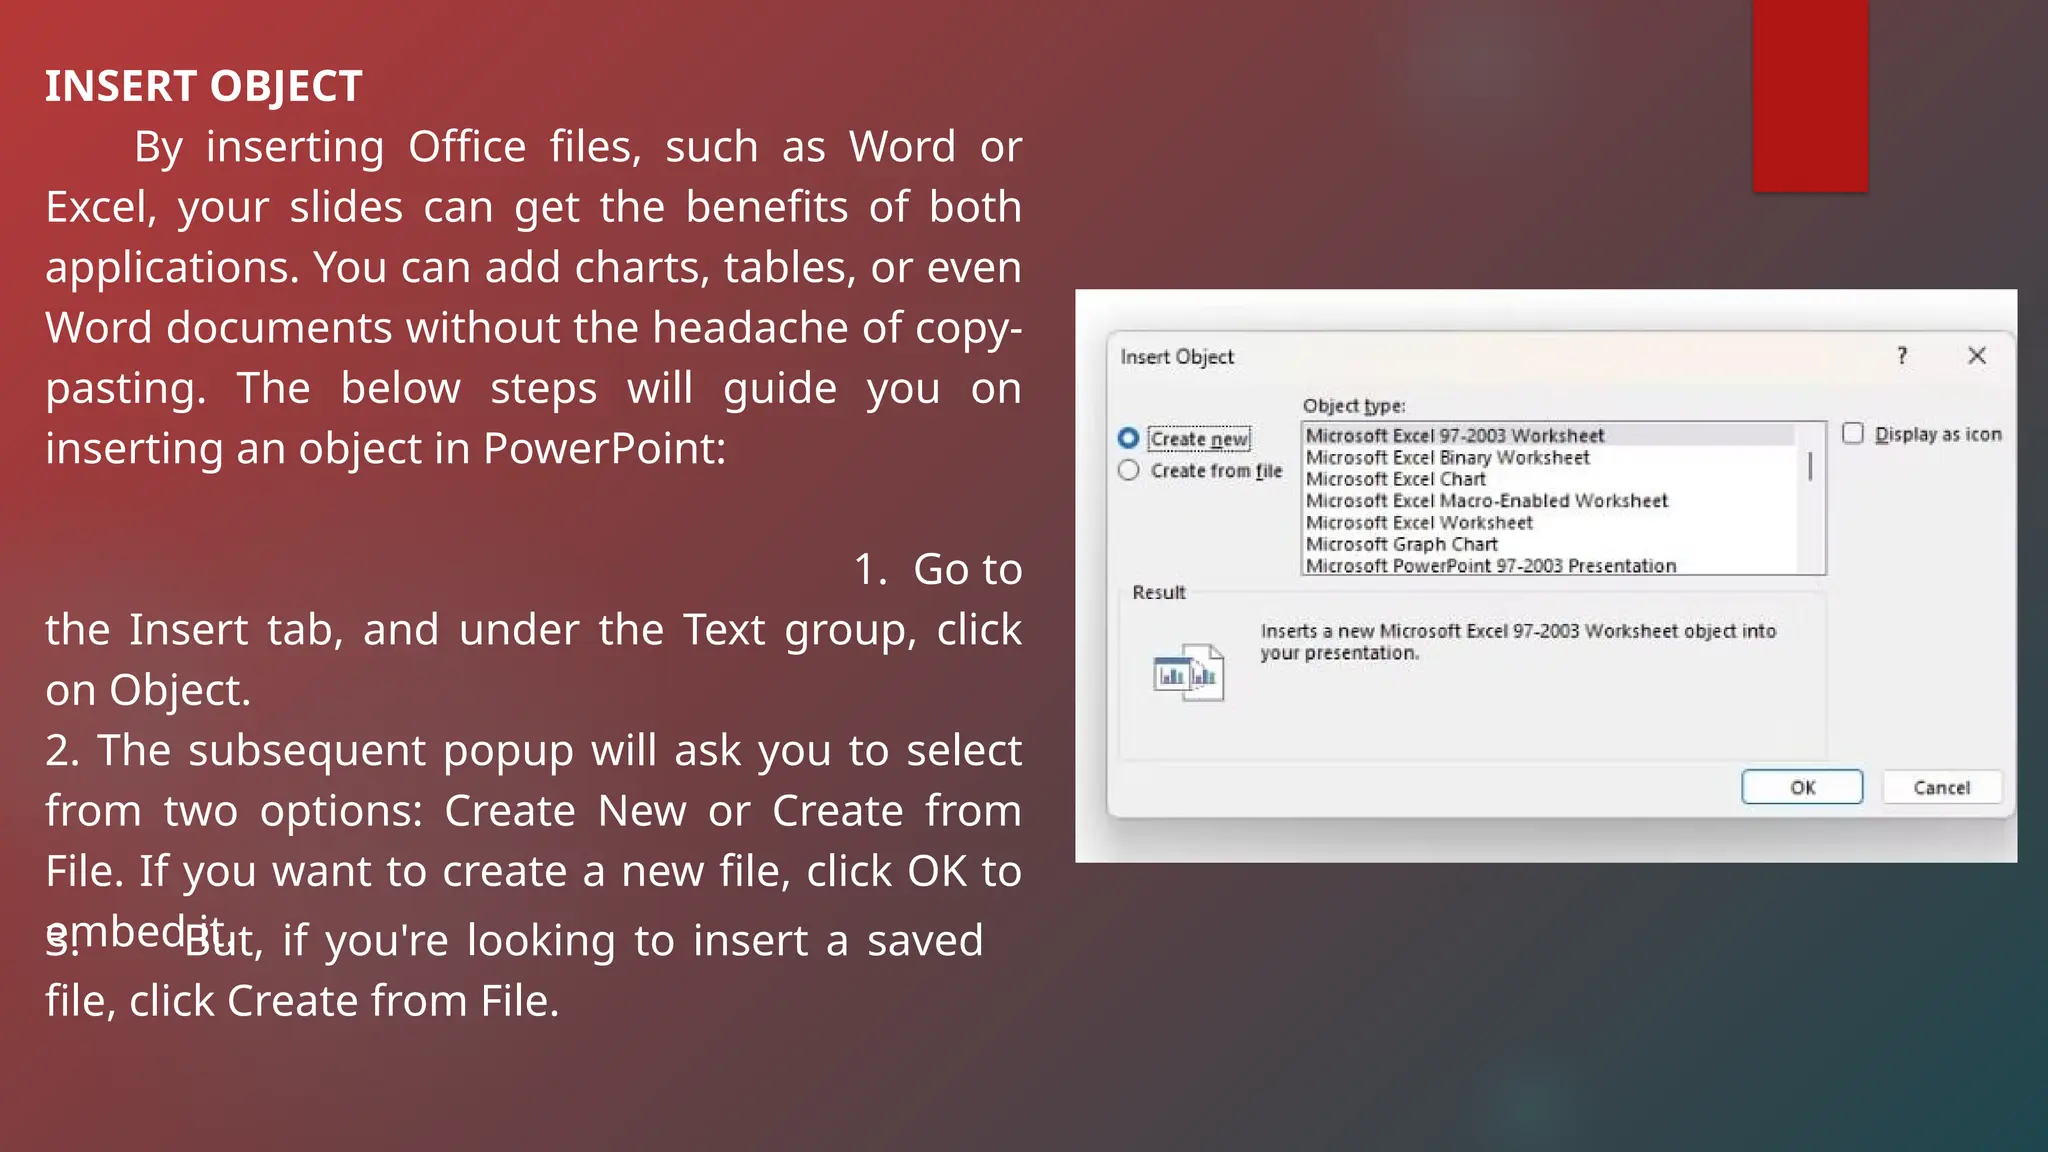
INSERT OBJECT
By insertingOffice files, such as Word or
Excel, your slides can get the benefits of both
applications. You can add charts, tables, or even
Word documents without the headache of copy-
pasting. The below steps will guide you on
inserting an object in PowerPoint:
1. Go to
the Insert tab, and under the Text group, click
on Object.
2. The subsequent popup will ask you to select
from two options: Create New or Create from
File. If you want to create a new file, click OK to
embed it.
3. But, if you're looking to insert a saved
file, click Create from File.
84.
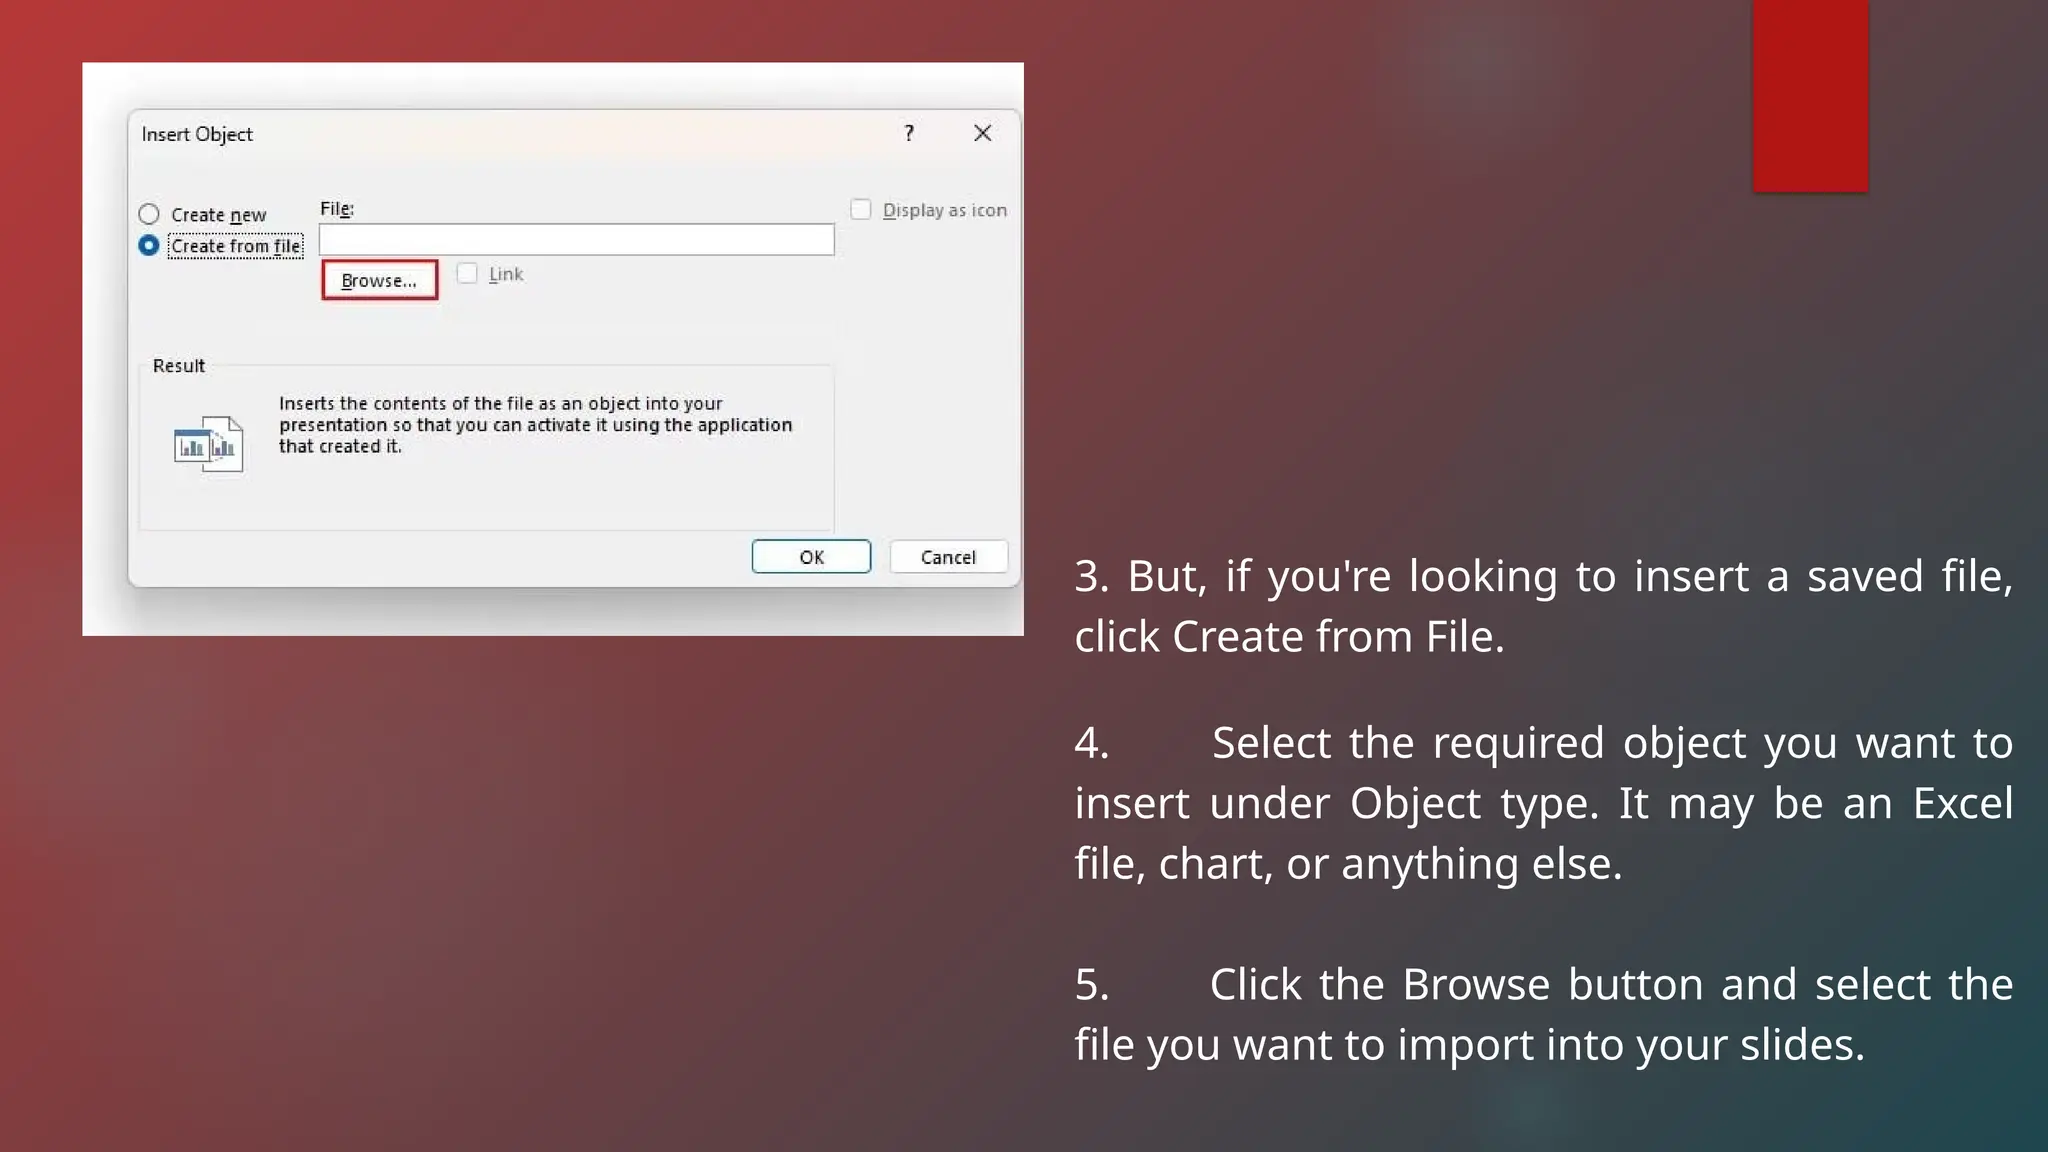
3. But, ifyou're looking to insert a saved file,
click Create from File.
4. Select the required object you want to
insert under Object type. It may be an Excel
file, chart, or anything else.
5. Click the Browse button and select the
file you want to import into your slides.
85.
SLIDEMASTER
Slide Master inPowerPoint lets you create and edit a design
template that applies to all slides at once. This saves time and keeps
your presentation looking consistent.
86.
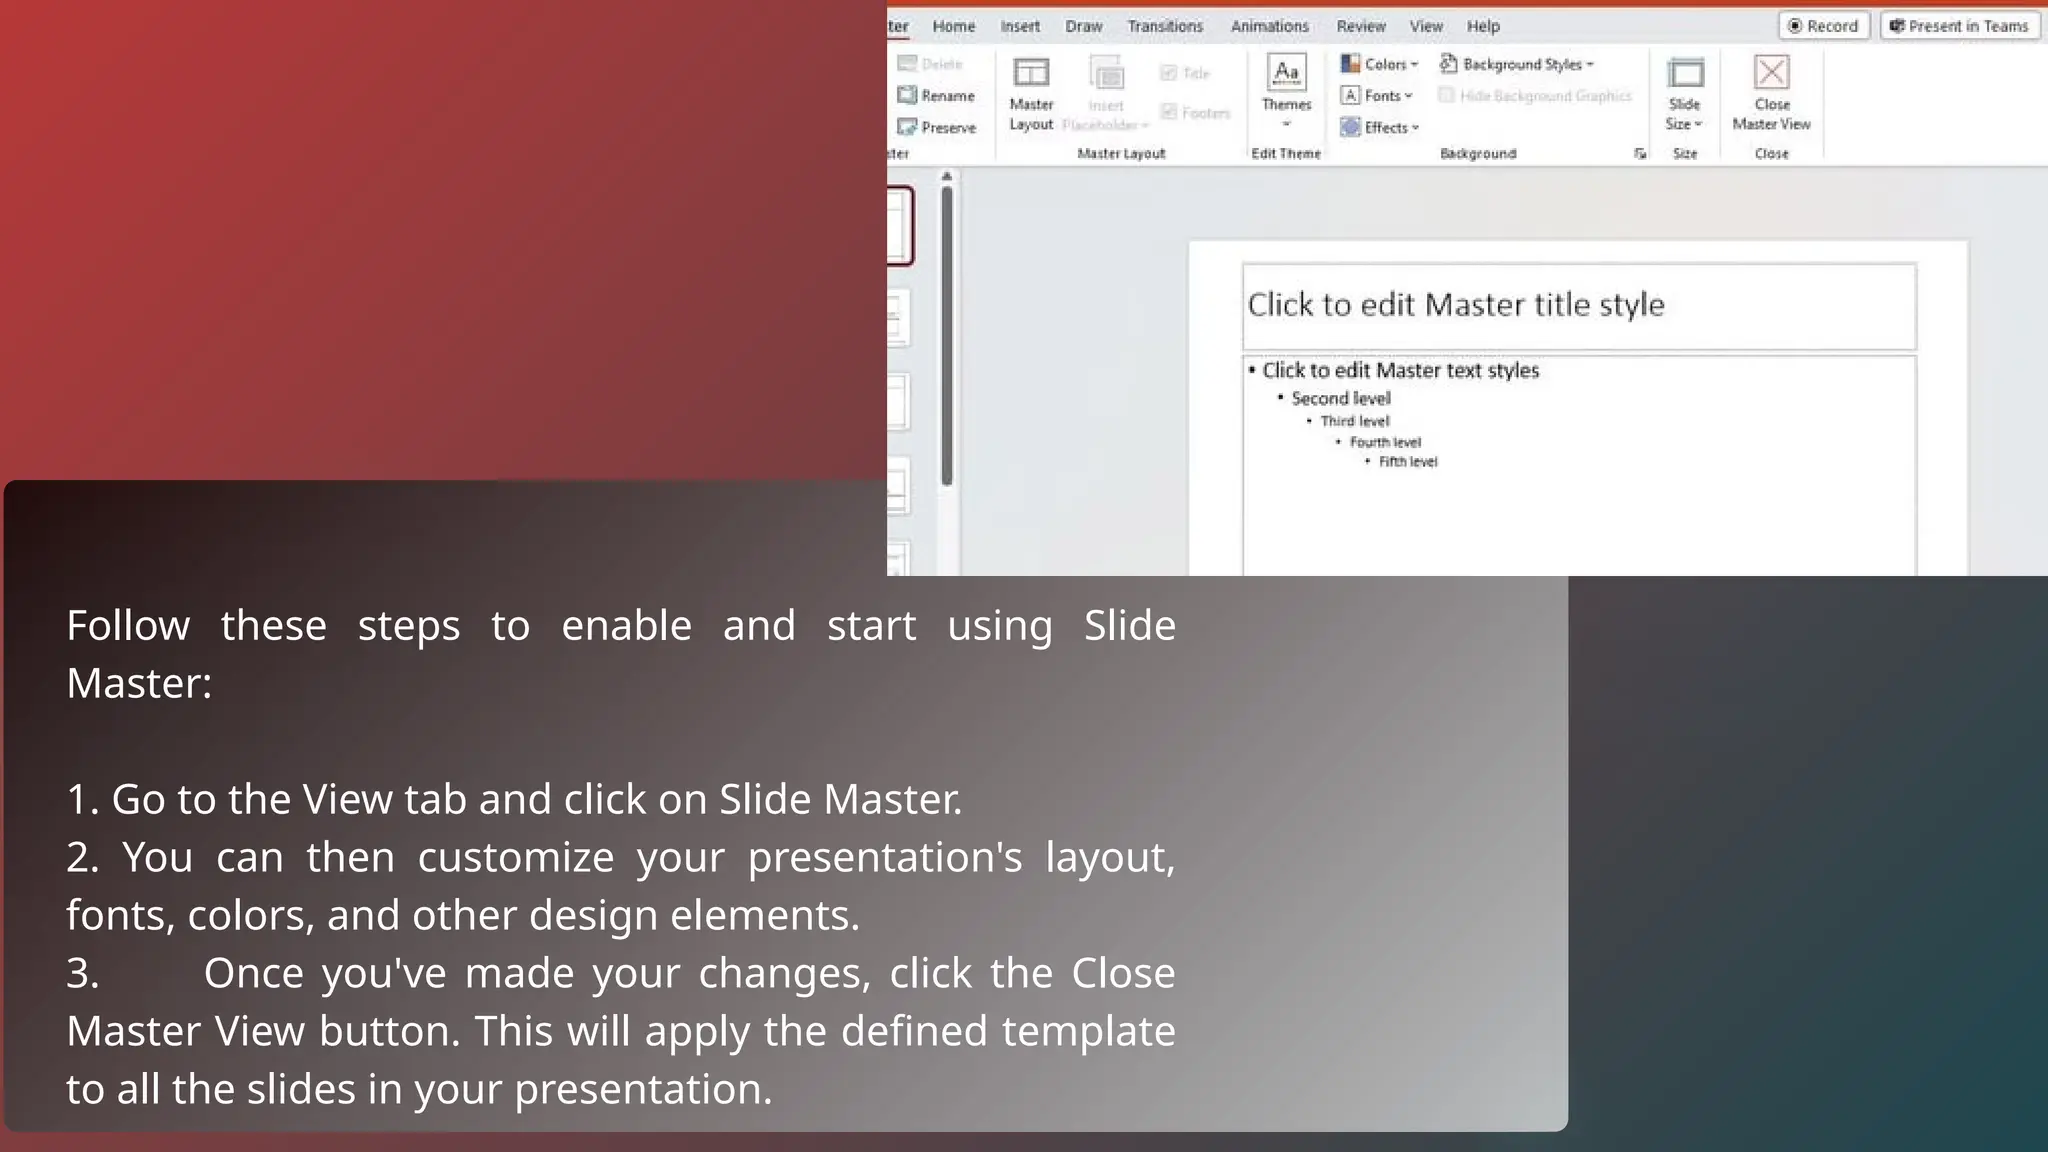
Follow these stepsto enable and start using Slide
Master:
1. Go to the View tab and click on Slide Master.
2. You can then customize your presentation's layout,
fonts, colors, and other design elements.
3. Once you've made your changes, click the Close
Master View button. This will apply the defined template
to all the slides in your presentation.
Google Slides isa platform that assists user in creating and designing
slide deck presentations. It’s a browser-based app, meaning that user can
access it primarily thought that the internet and can access their work from
anywhere they can log in. This makes it easy so that multiple people can work
on a presentation at the same time from different locations. You can convert
your presentation into other formats like PDF, making it a good option for
those who want to send completed projects that can no longer be edited
What is google slide?
89.
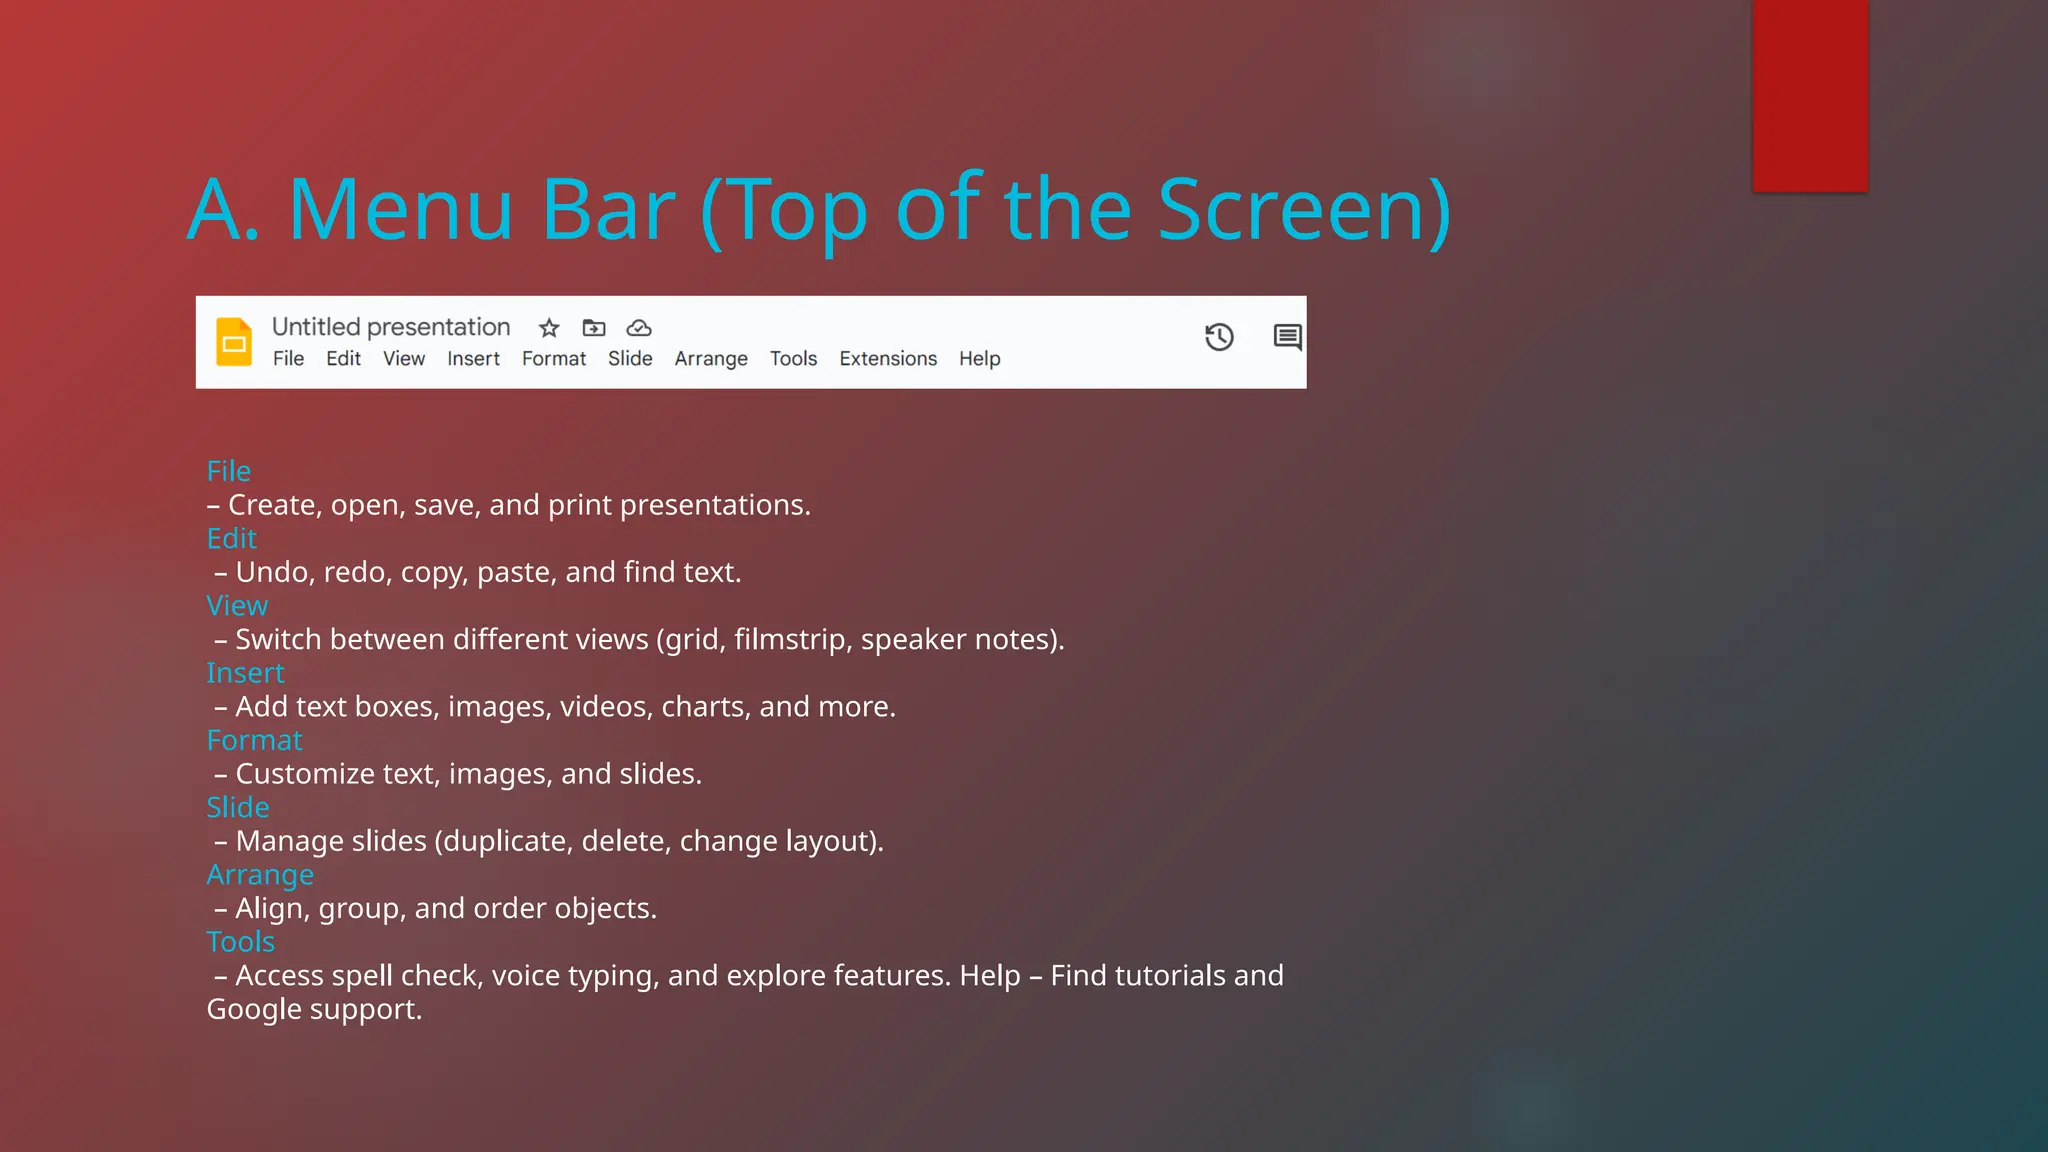
A. Menu Bar(Top of the Screen)
File
– Create, open, save, and print presentations.
Edit
– Undo, redo, copy, paste, and find text.
View
– Switch between different views (grid, filmstrip, speaker notes).
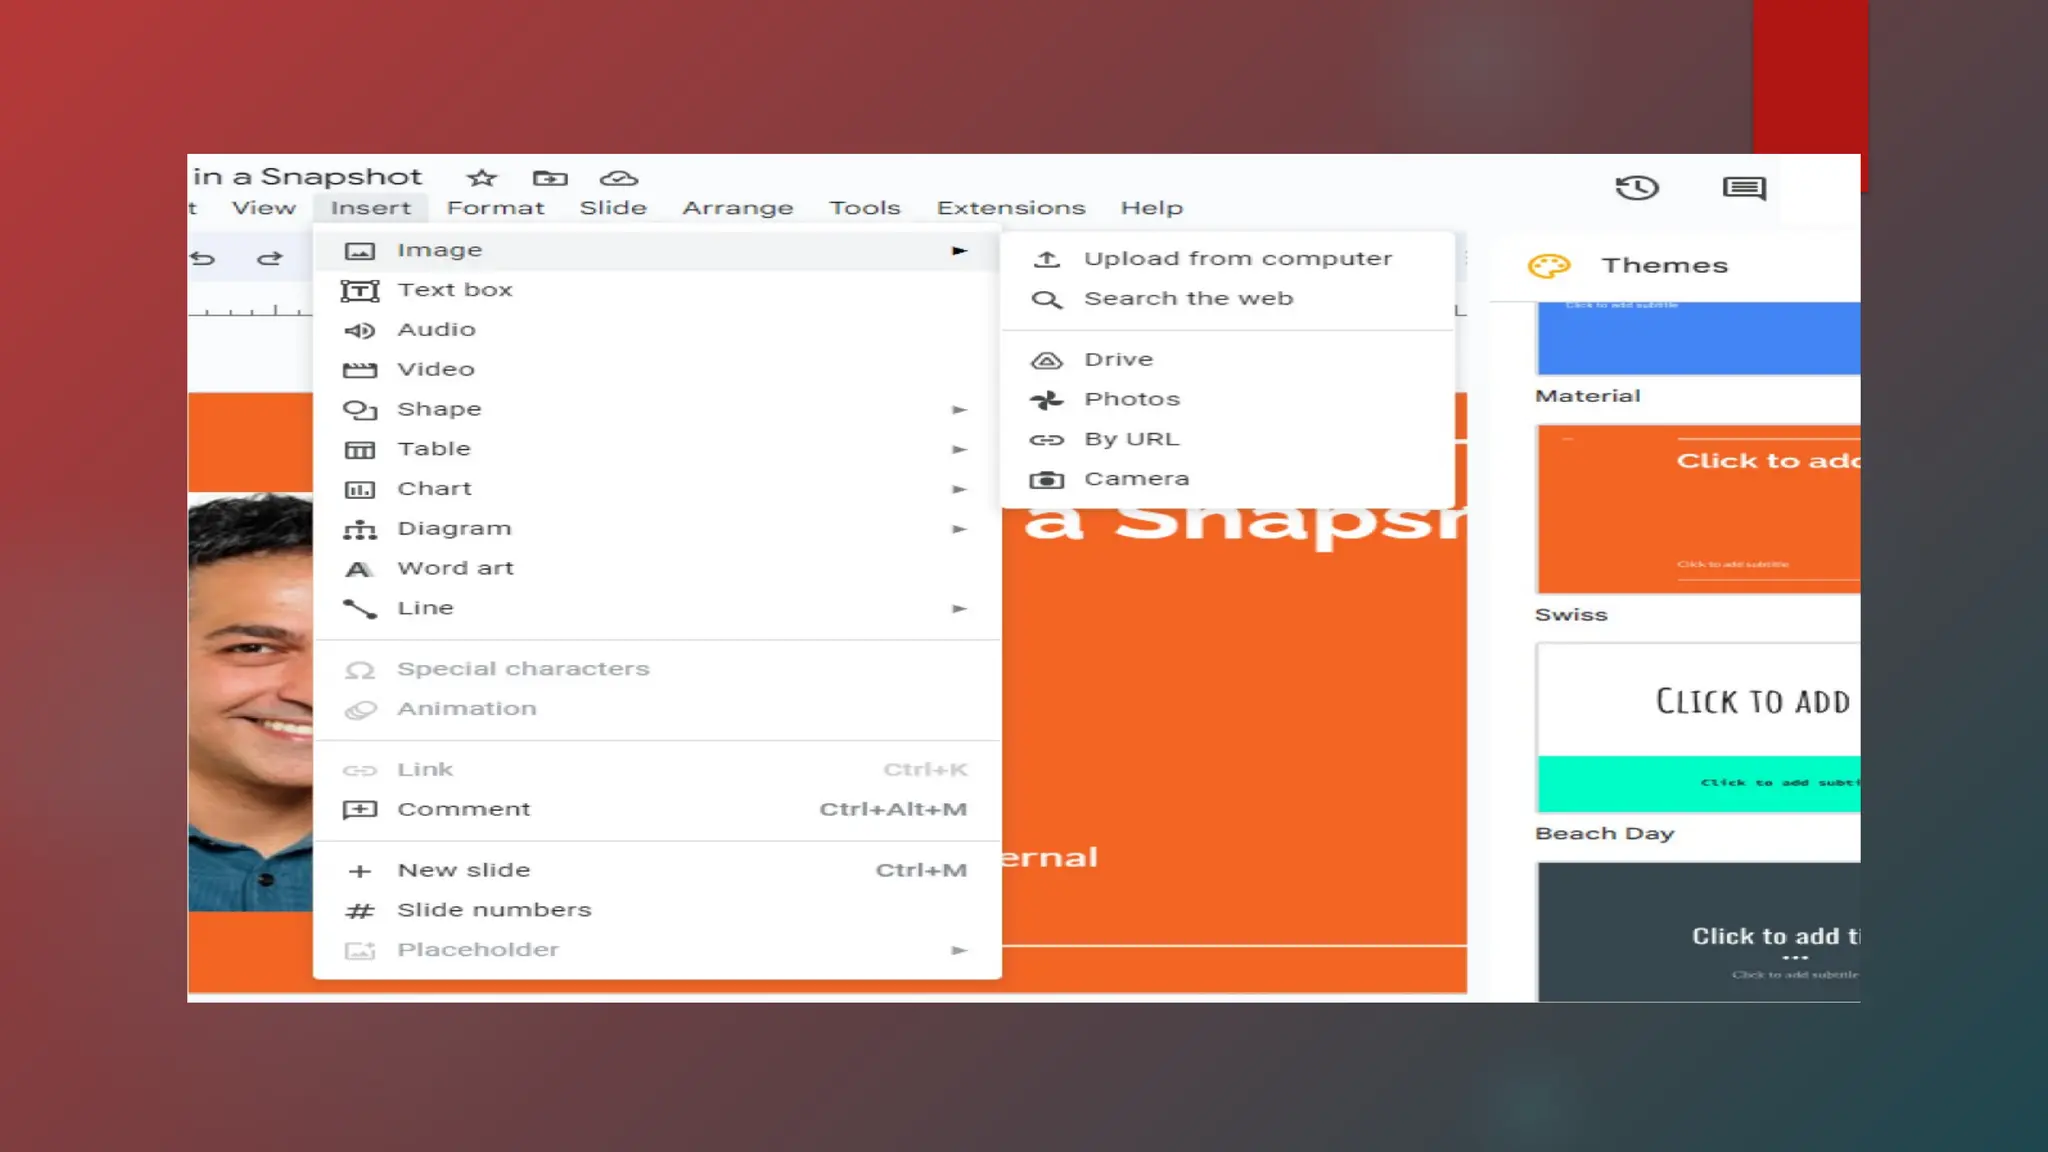
Insert
– Add text boxes, images, videos, charts, and more.
Format
– Customize text, images, and slides.
Slide
– Manage slides (duplicate, delete, change layout).
Arrange
– Align, group, and order objects.
Tools
– Access spell check, voice typing, and explore features. Help – Find tutorials and
Google support.
90.
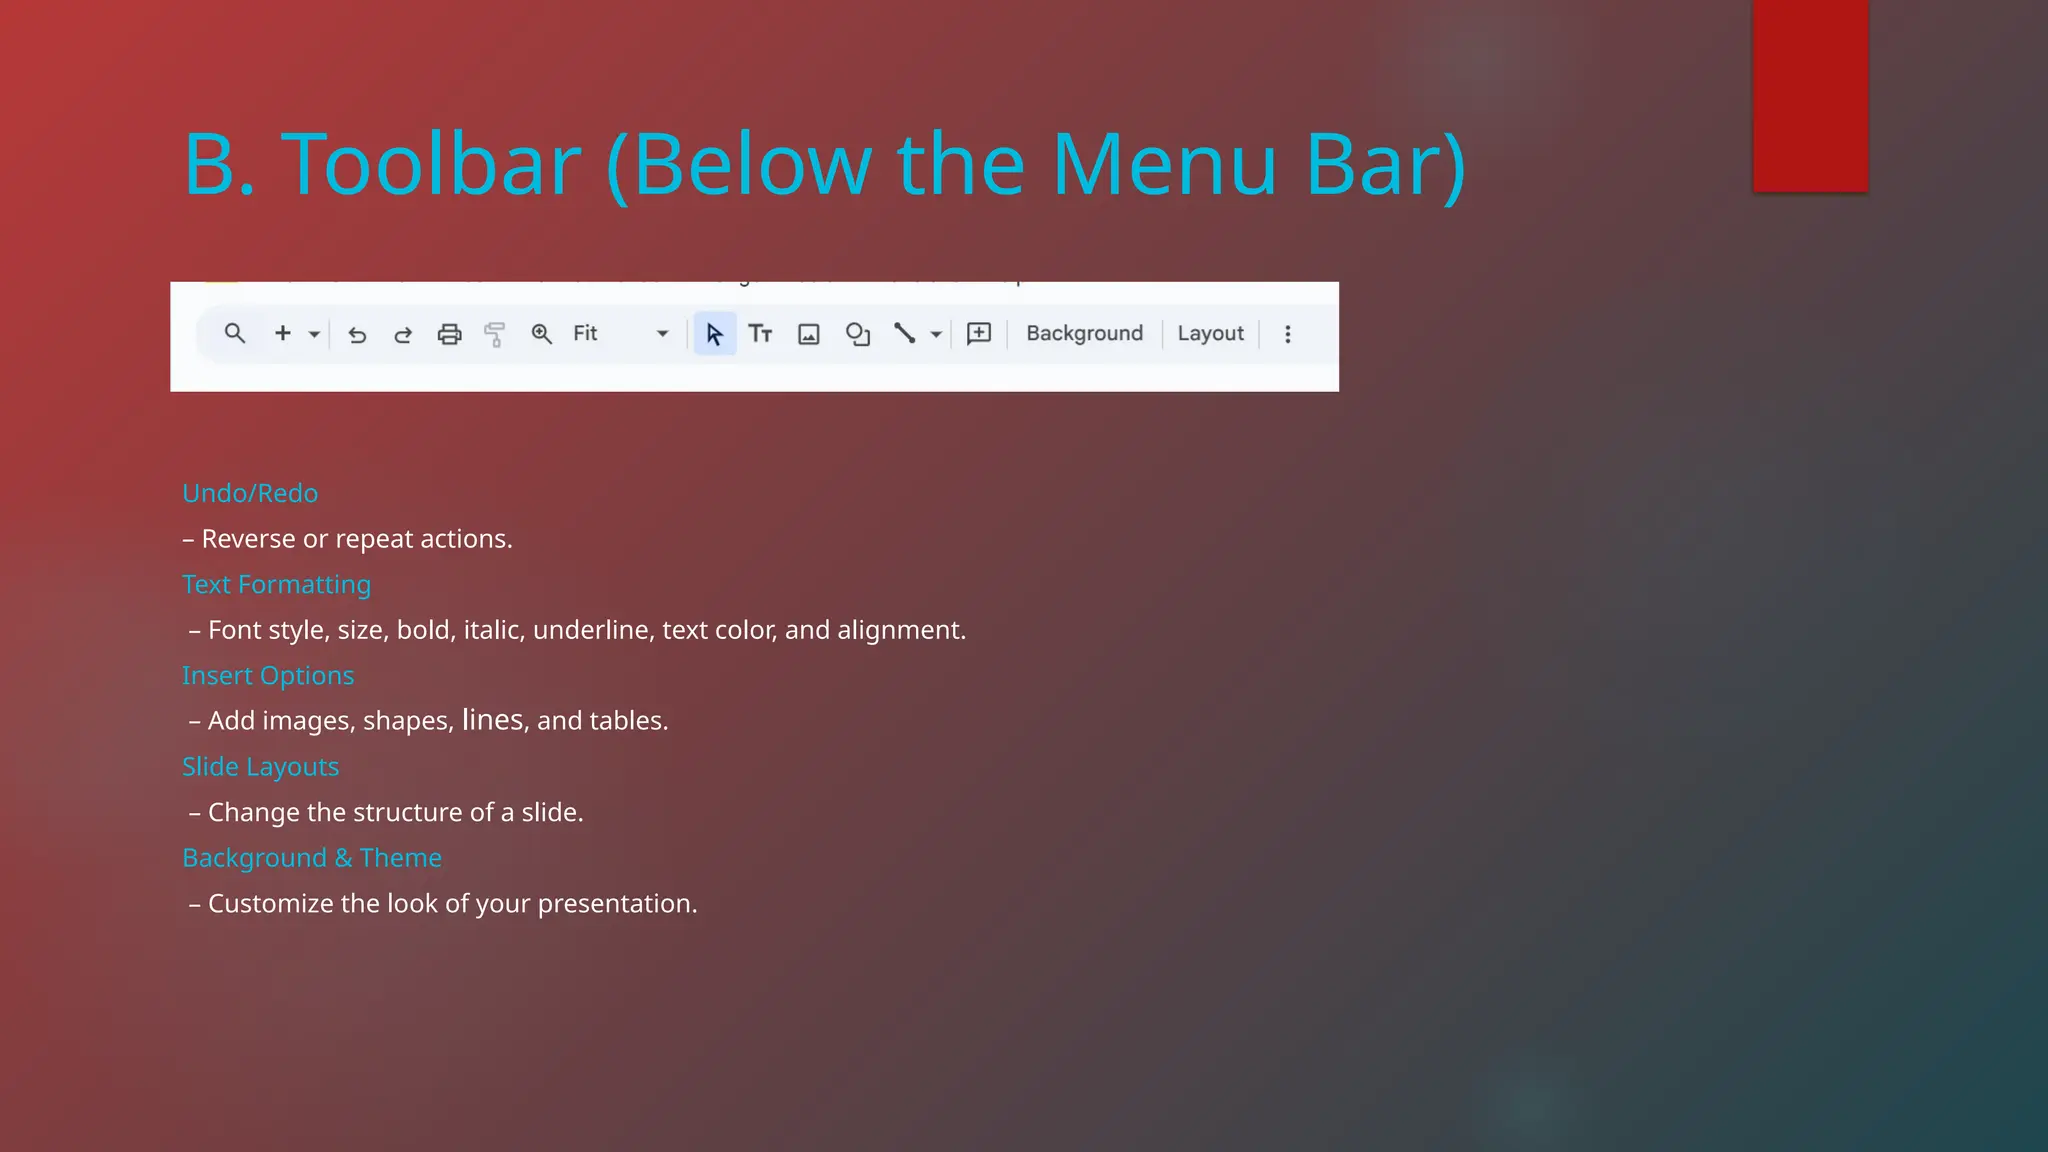
B. Toolbar (Belowthe Menu Bar)
Undo/Redo
– Reverse or repeat actions.
Text Formatting
– Font style, size, bold, italic, underline, text color, and alignment.
Insert Options
– Add images, shapes, lines, and tables.
Slide Layouts
– Change the structure of a slide.
Background & Theme
– Customize the look of your presentation.
91.
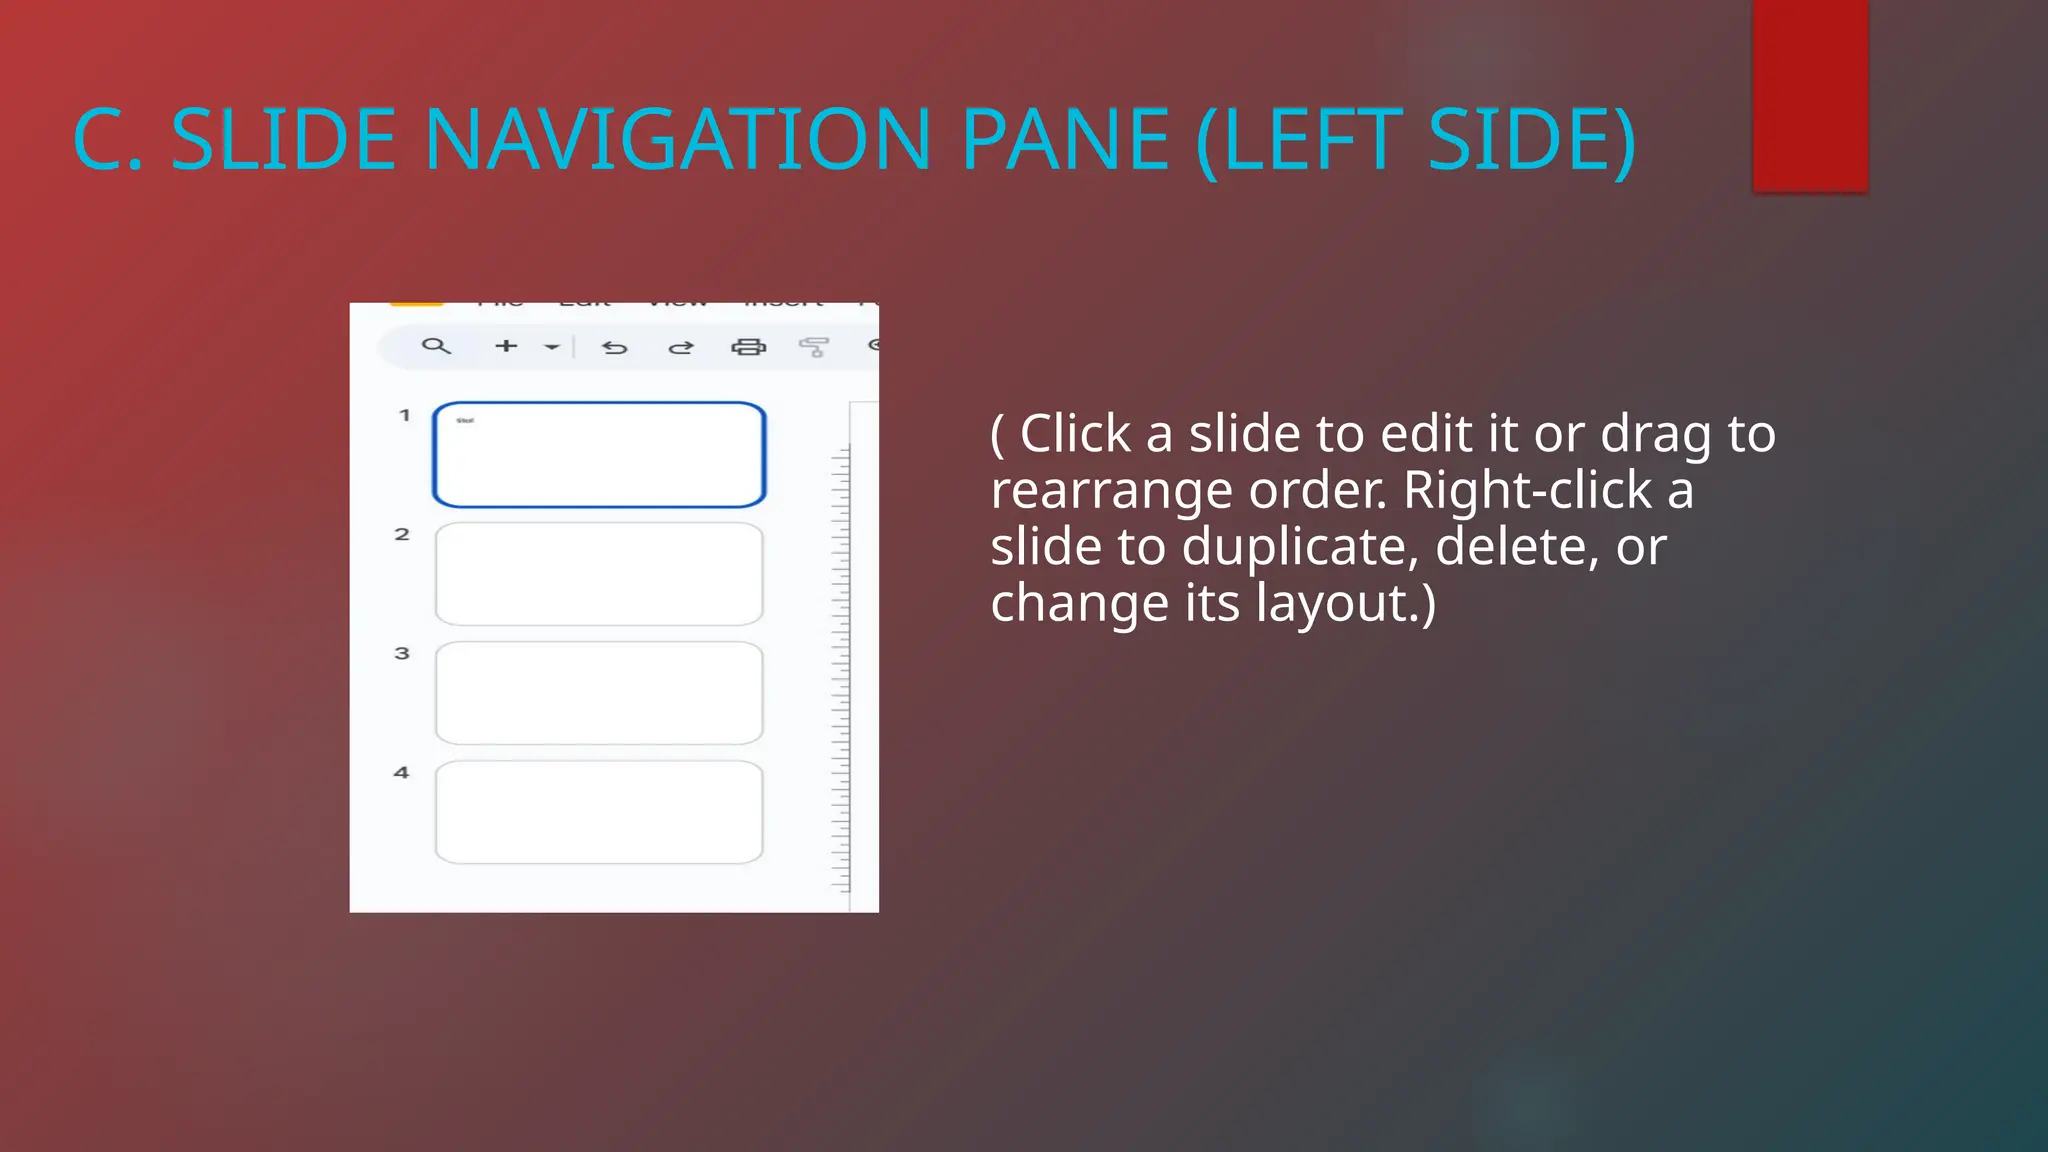
C. SLIDE NAVIGATIONPANE (LEFT SIDE)
( Click a slide to edit it or drag to
rearrange order. Right-click a
slide to duplicate, delete, or
change its layout.)
92.
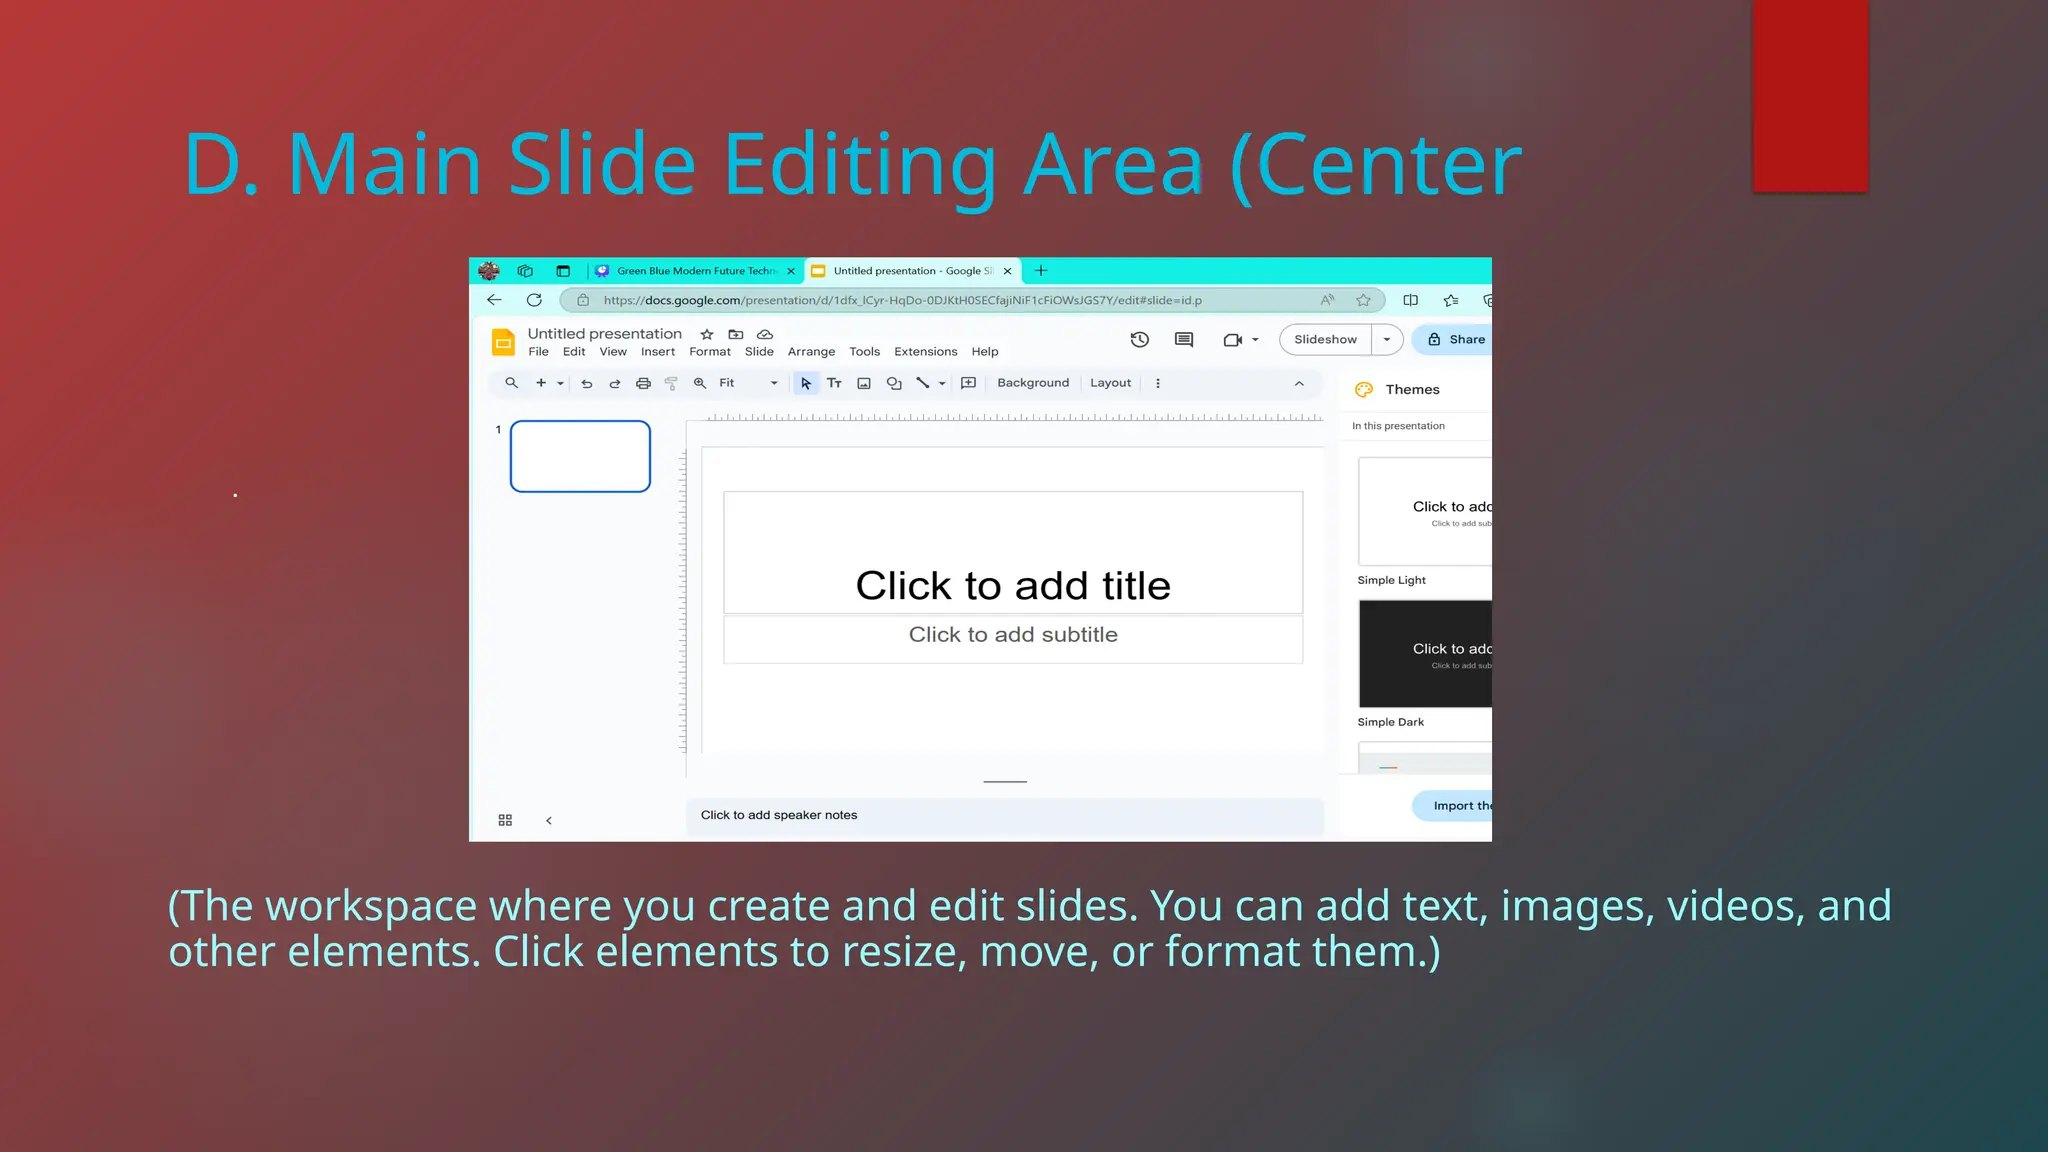
D. Main SlideEditing Area (Center
.
(The workspace where you create and edit slides. You can add text, images, videos, and
other elements. Click elements to resize, move, or format them.)
93.
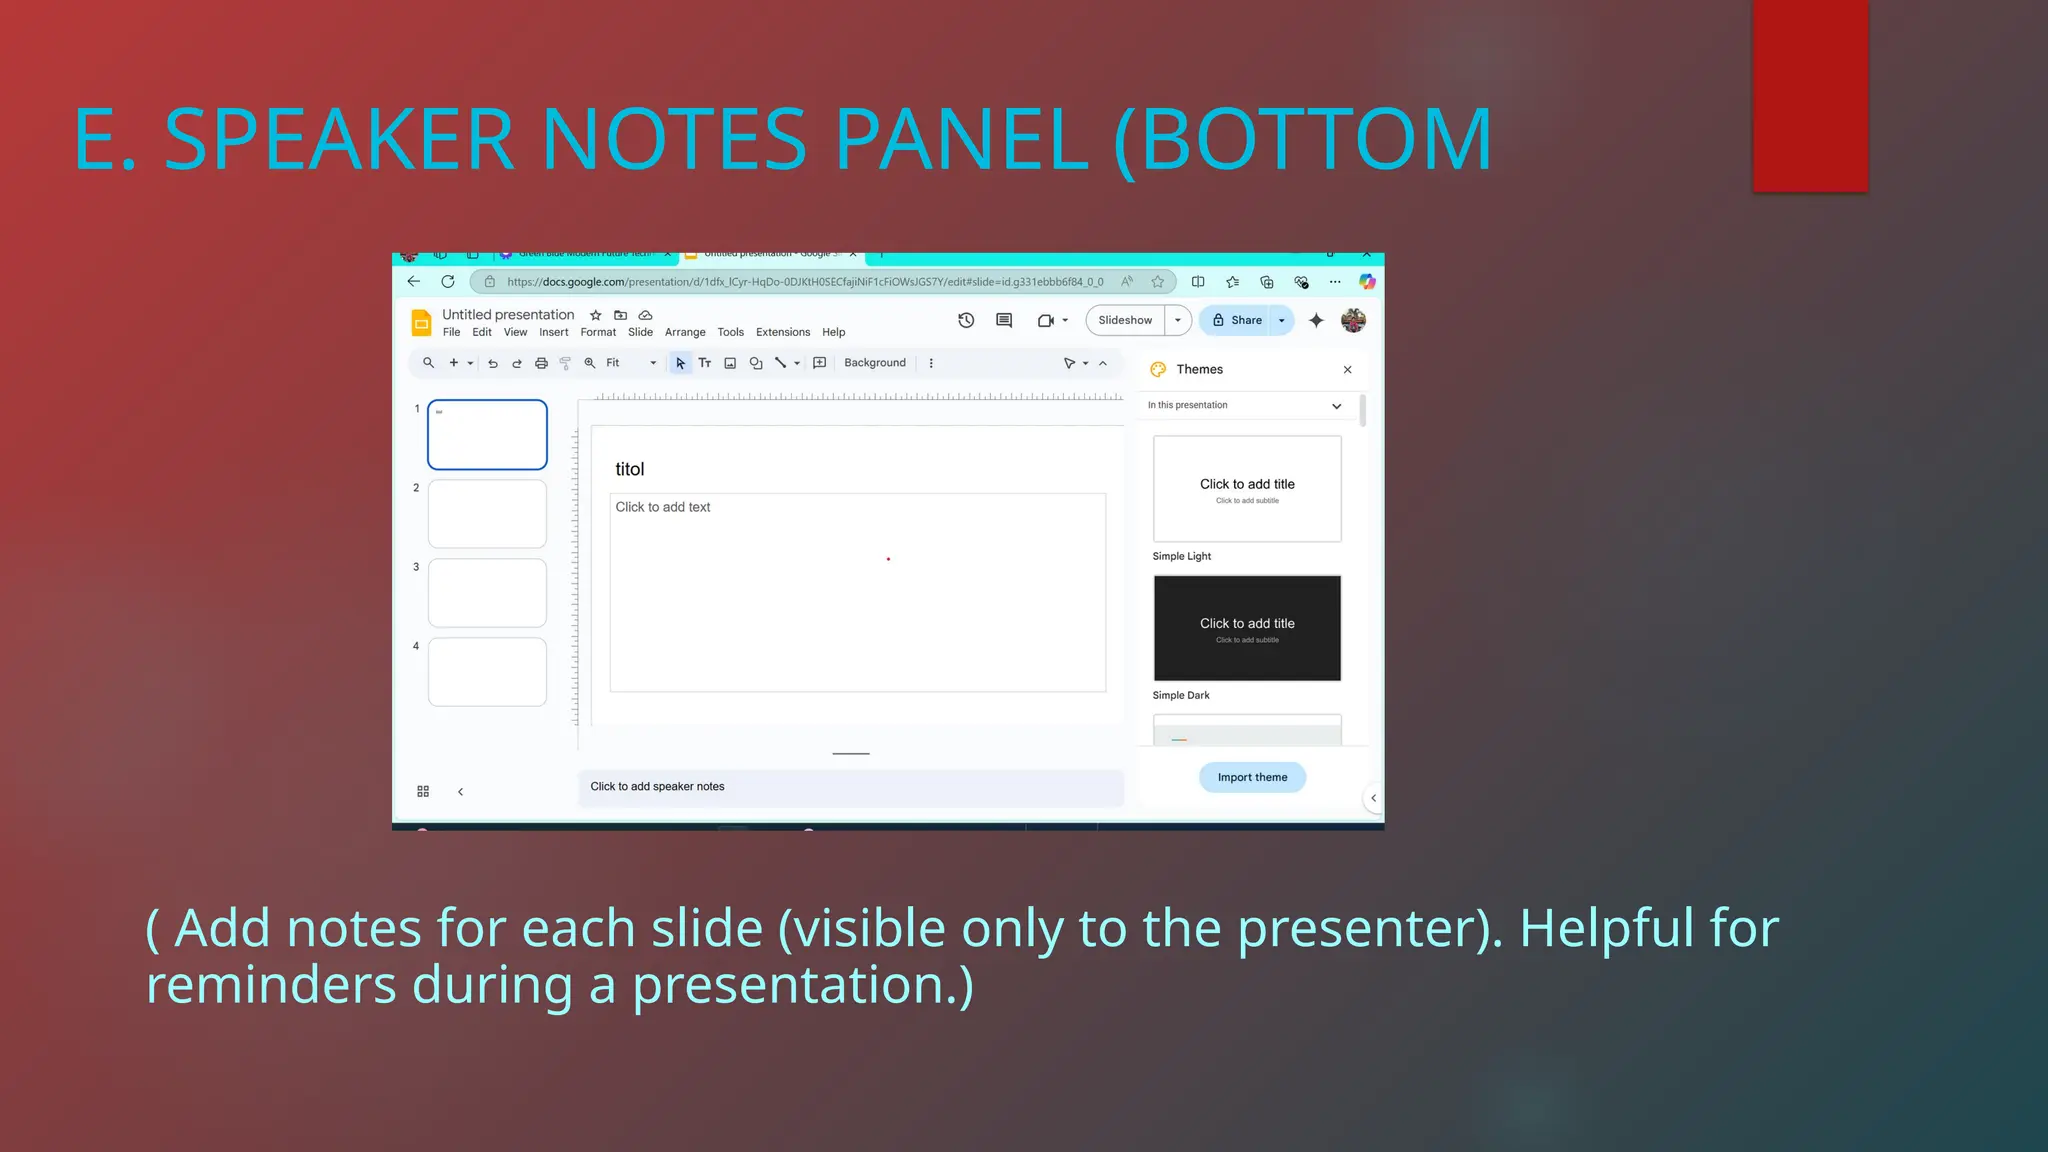
E. SPEAKER NOTESPANEL (BOTTOM
( Add notes for each slide (visible only to the presenter). Helpful for
reminders during a presentation.)
94.
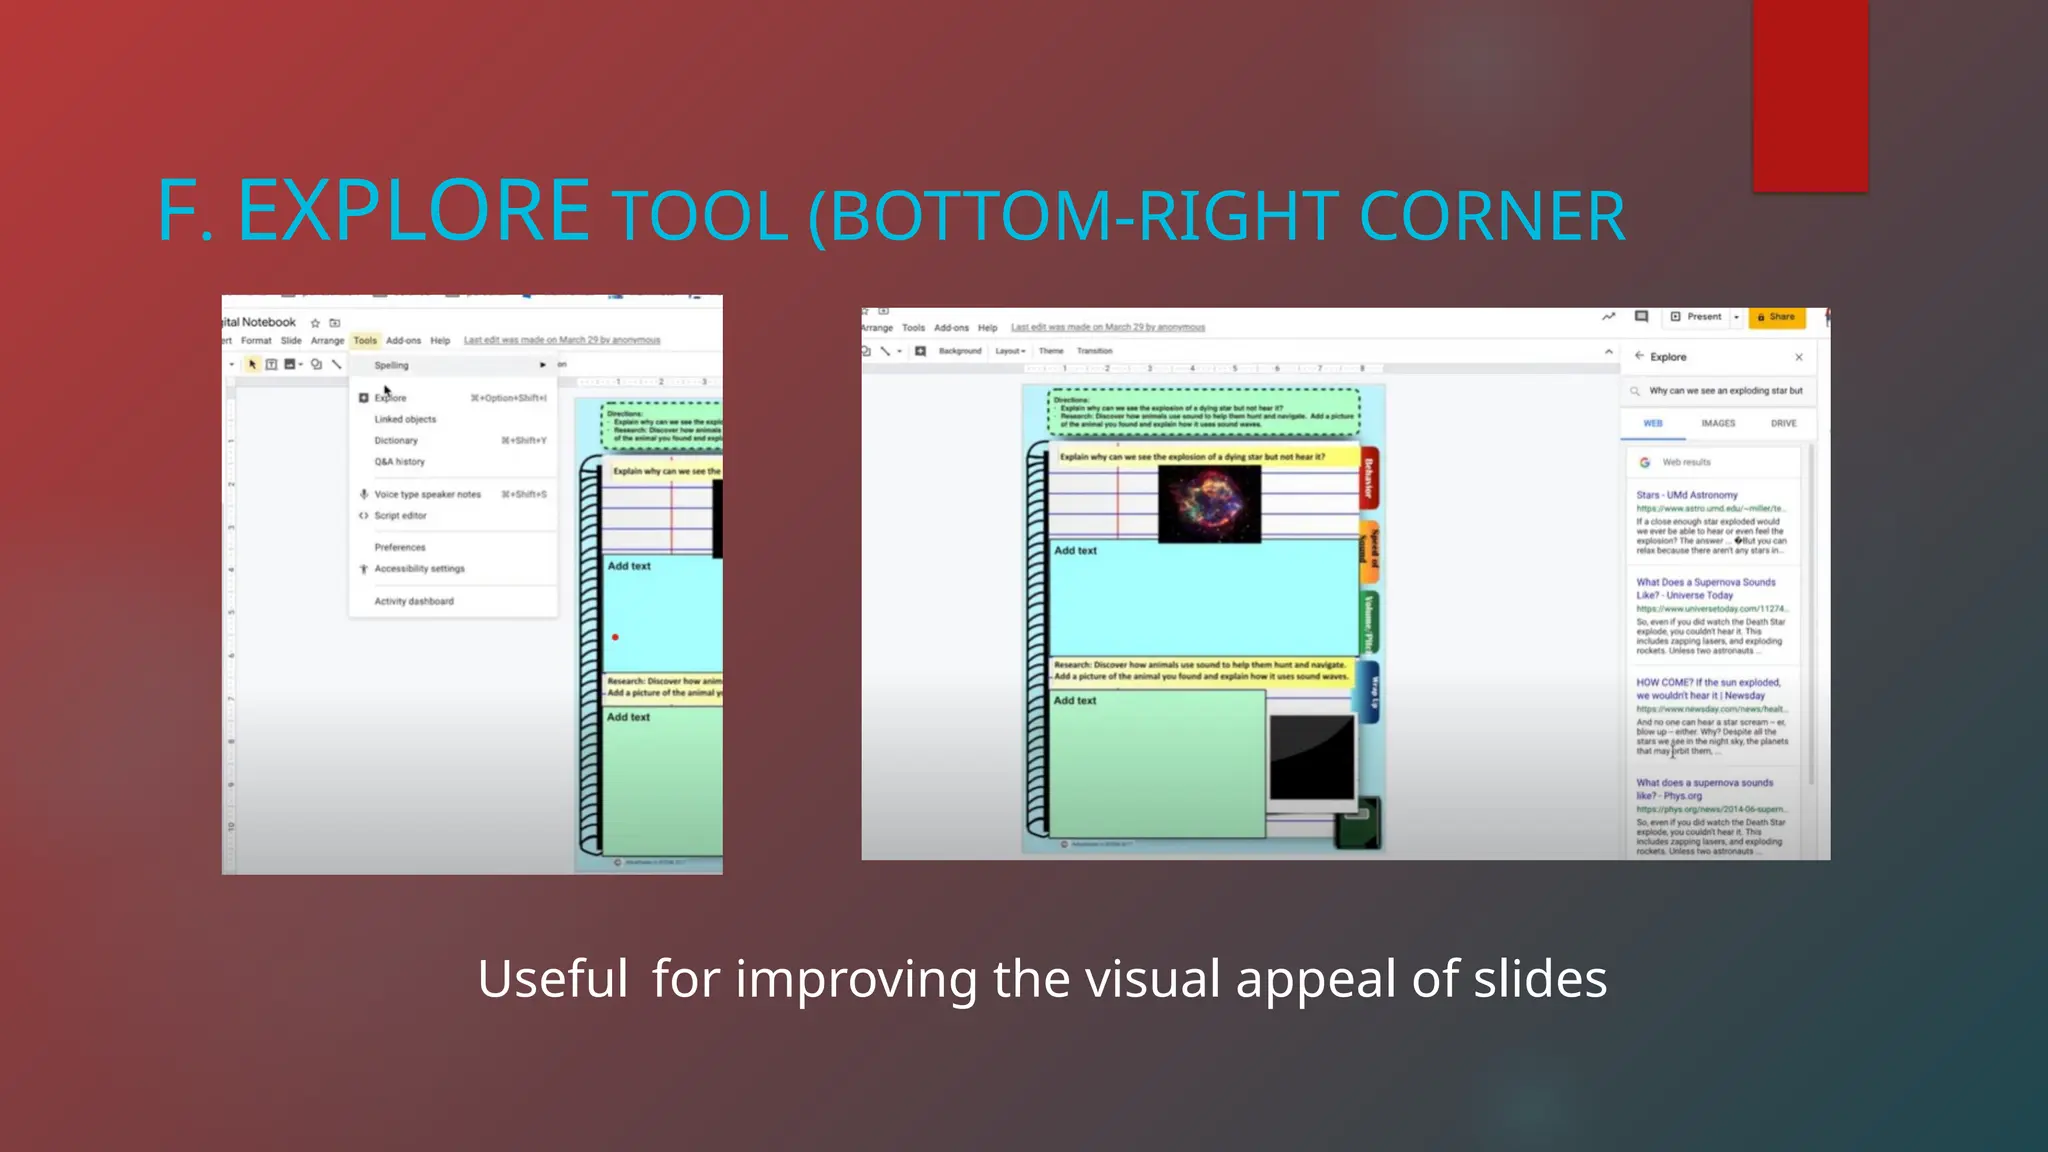
F. EXPLORE TOOL(BOTTOM-RIGHT CORNER
Useful for improving the visual appeal of slides
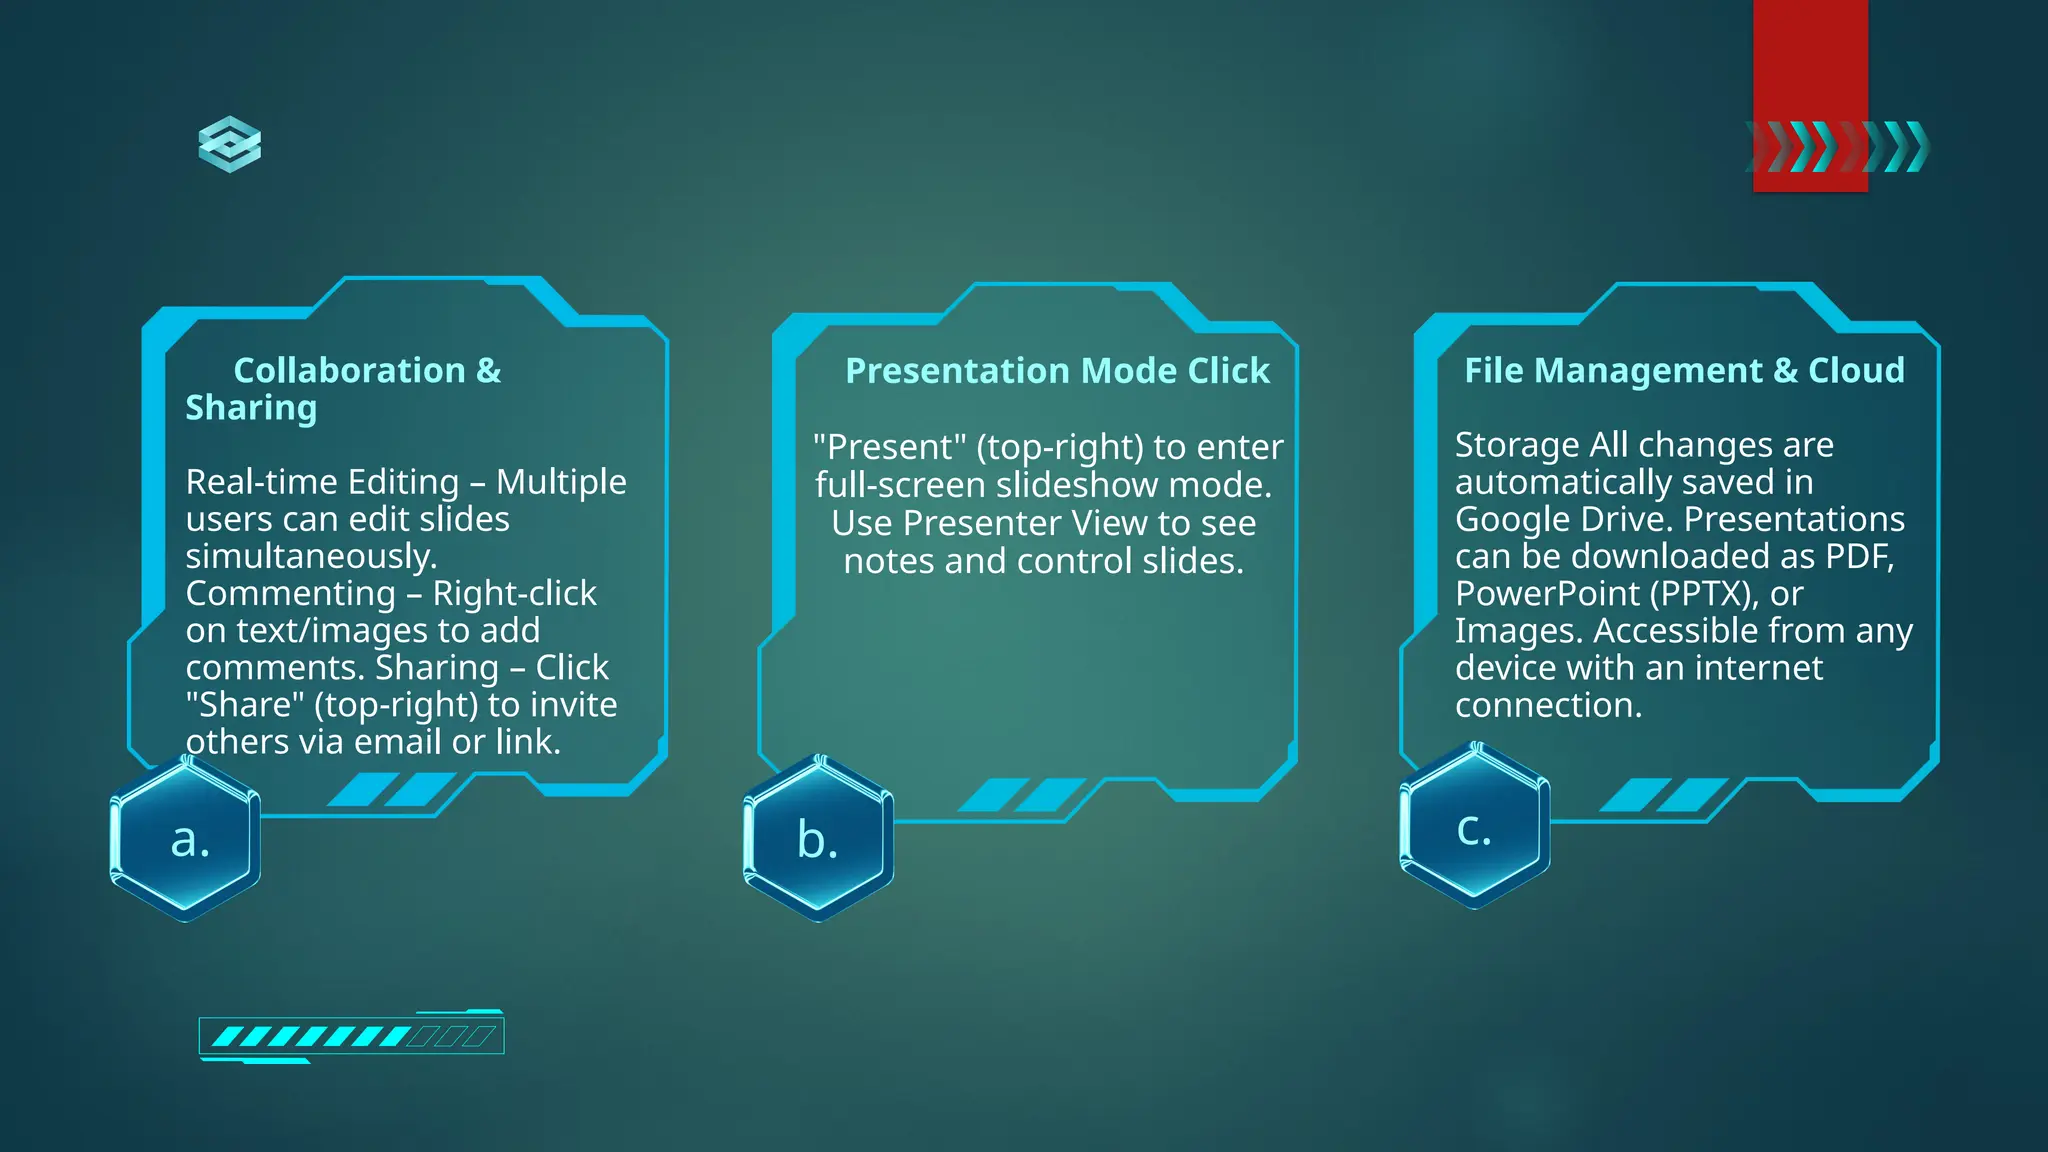
Collaboration &
Sharing
Real-time Editing– Multiple
users can edit slides
simultaneously.
Commenting – Right-click
on text/images to add
comments. Sharing – Click
"Share" (top-right) to invite
others via email or link.
c.
a. b.
Presentation Mode Click
"Present" (top-right) to enter
full-screen slideshow mode.
Use Presenter View to see
notes and control slides.
File Management & Cloud
Storage All changes are
automatically saved in
Google Drive. Presentations
can be downloaded as PDF,
PowerPoint (PPTX), or
Images. Accessible from any
device with an internet
connection.
97.
Features for real-timecollaboration Follow a collaborator:
See what slide a collaborator is on and move to that slide with them Live
pointers:
Make your pointer
How to use these features
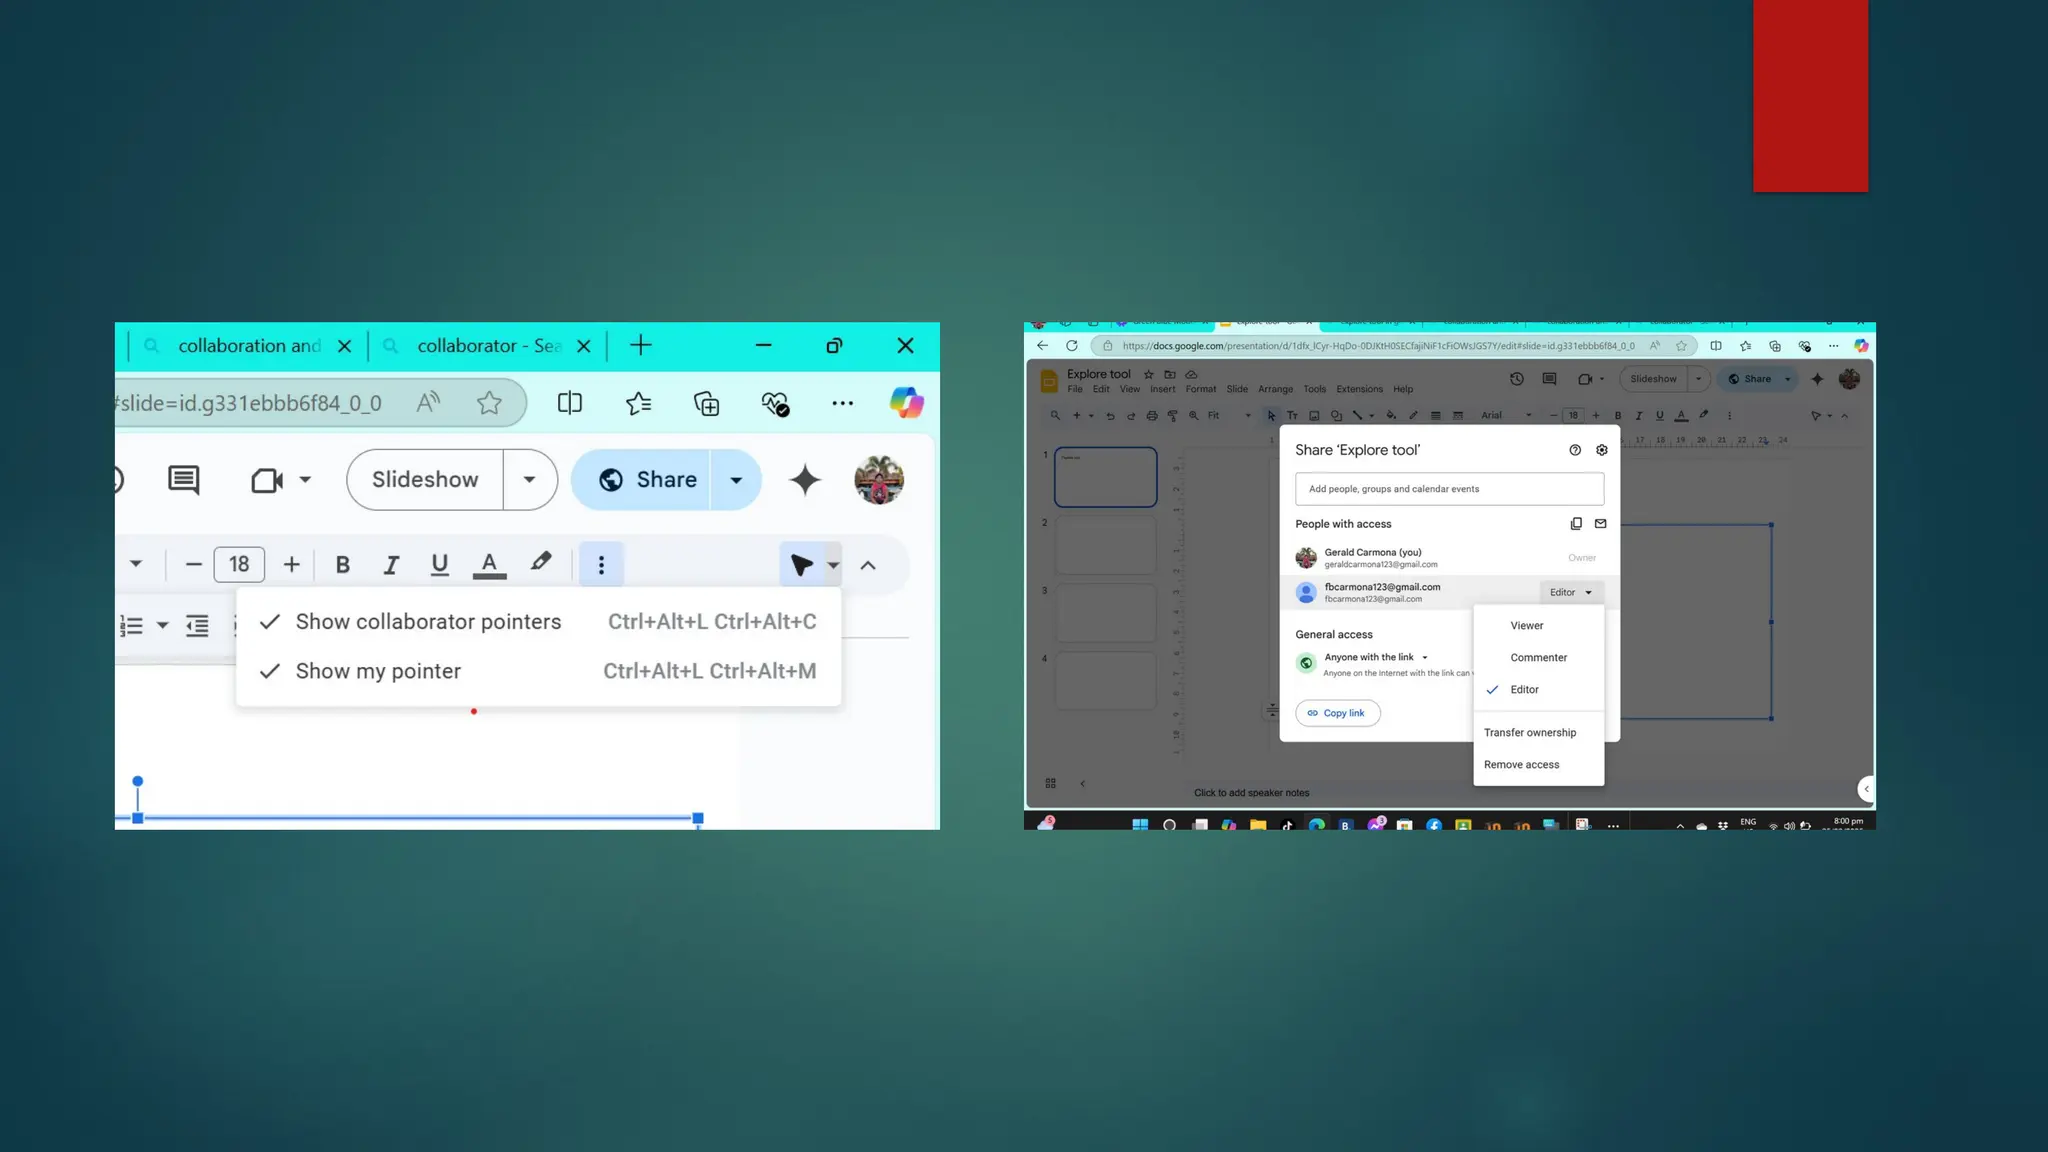
To follow a collaborator, click on their avatar in the Slides toolbar, To use live
pointers,
go to View > Live pointers > show my pointer. You can also turn the live pointer feature
on by using the pointer icon in the toolbar.
Additional collaboration features *Multiple people can edit a cloud-based file at the
same time *Changes are saved instantly and automatically *You can share a file with a
link to any file in your Google Drive
Basic slide formatting in Google Slides involves customizing the appearance and
layout of your slides, including the theme, background, and layout.
Why is formatting important?
Formatting is an important aspect of creating a presentation because it helps your
audience understand your message clearly and accurately.
A layout is the way your text and images are arranged on a slide. On your computer,
open a presentation in Google Slides. Select a slide. At the top, click Layout. Select the
layout you want to use.
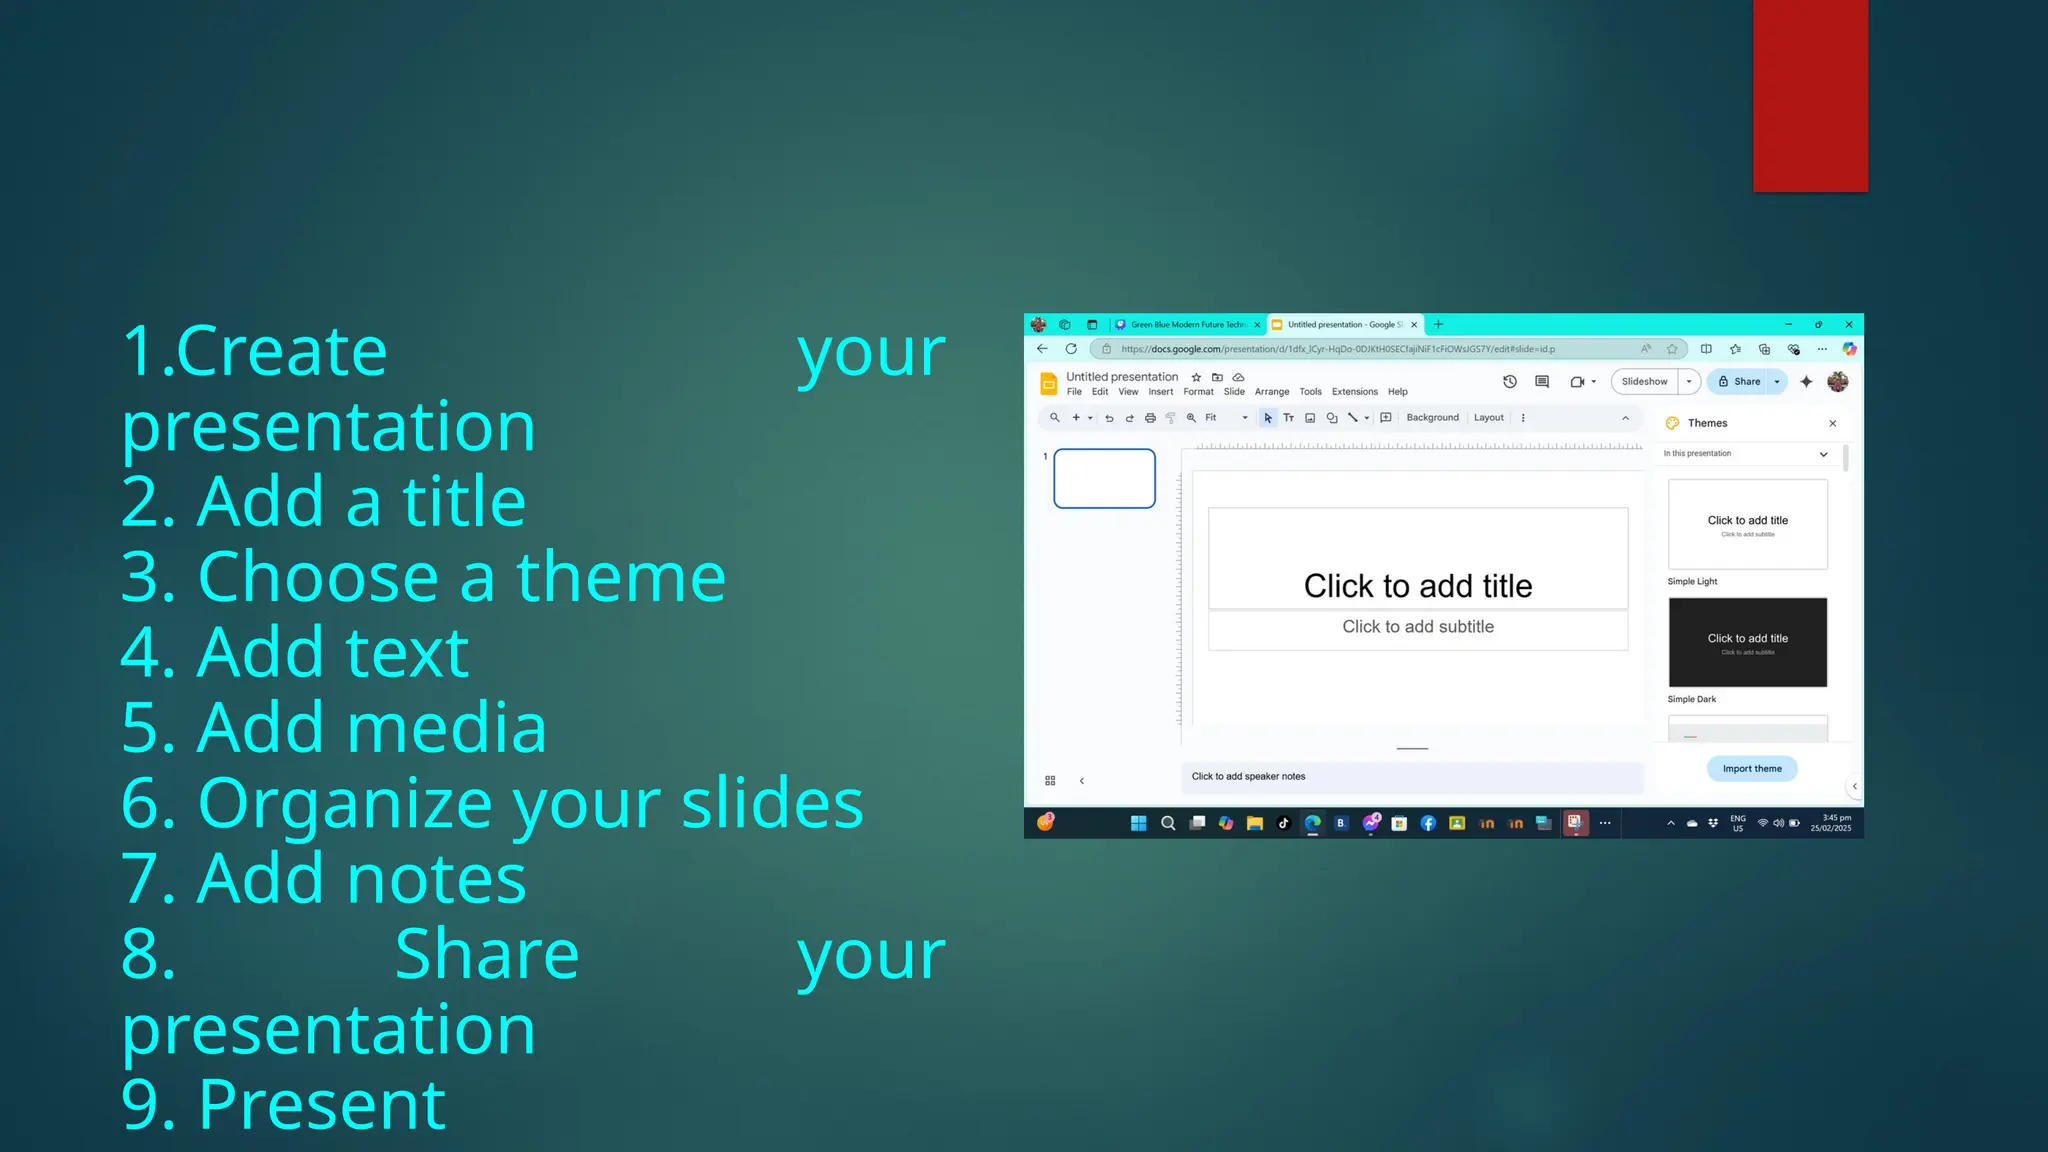
1.Create your
presentation
2. Adda title
3. Choose a theme
4. Add text
5. Add media
6. Organize your slides
7. Add notes
8. Share your
presentation
9. Present
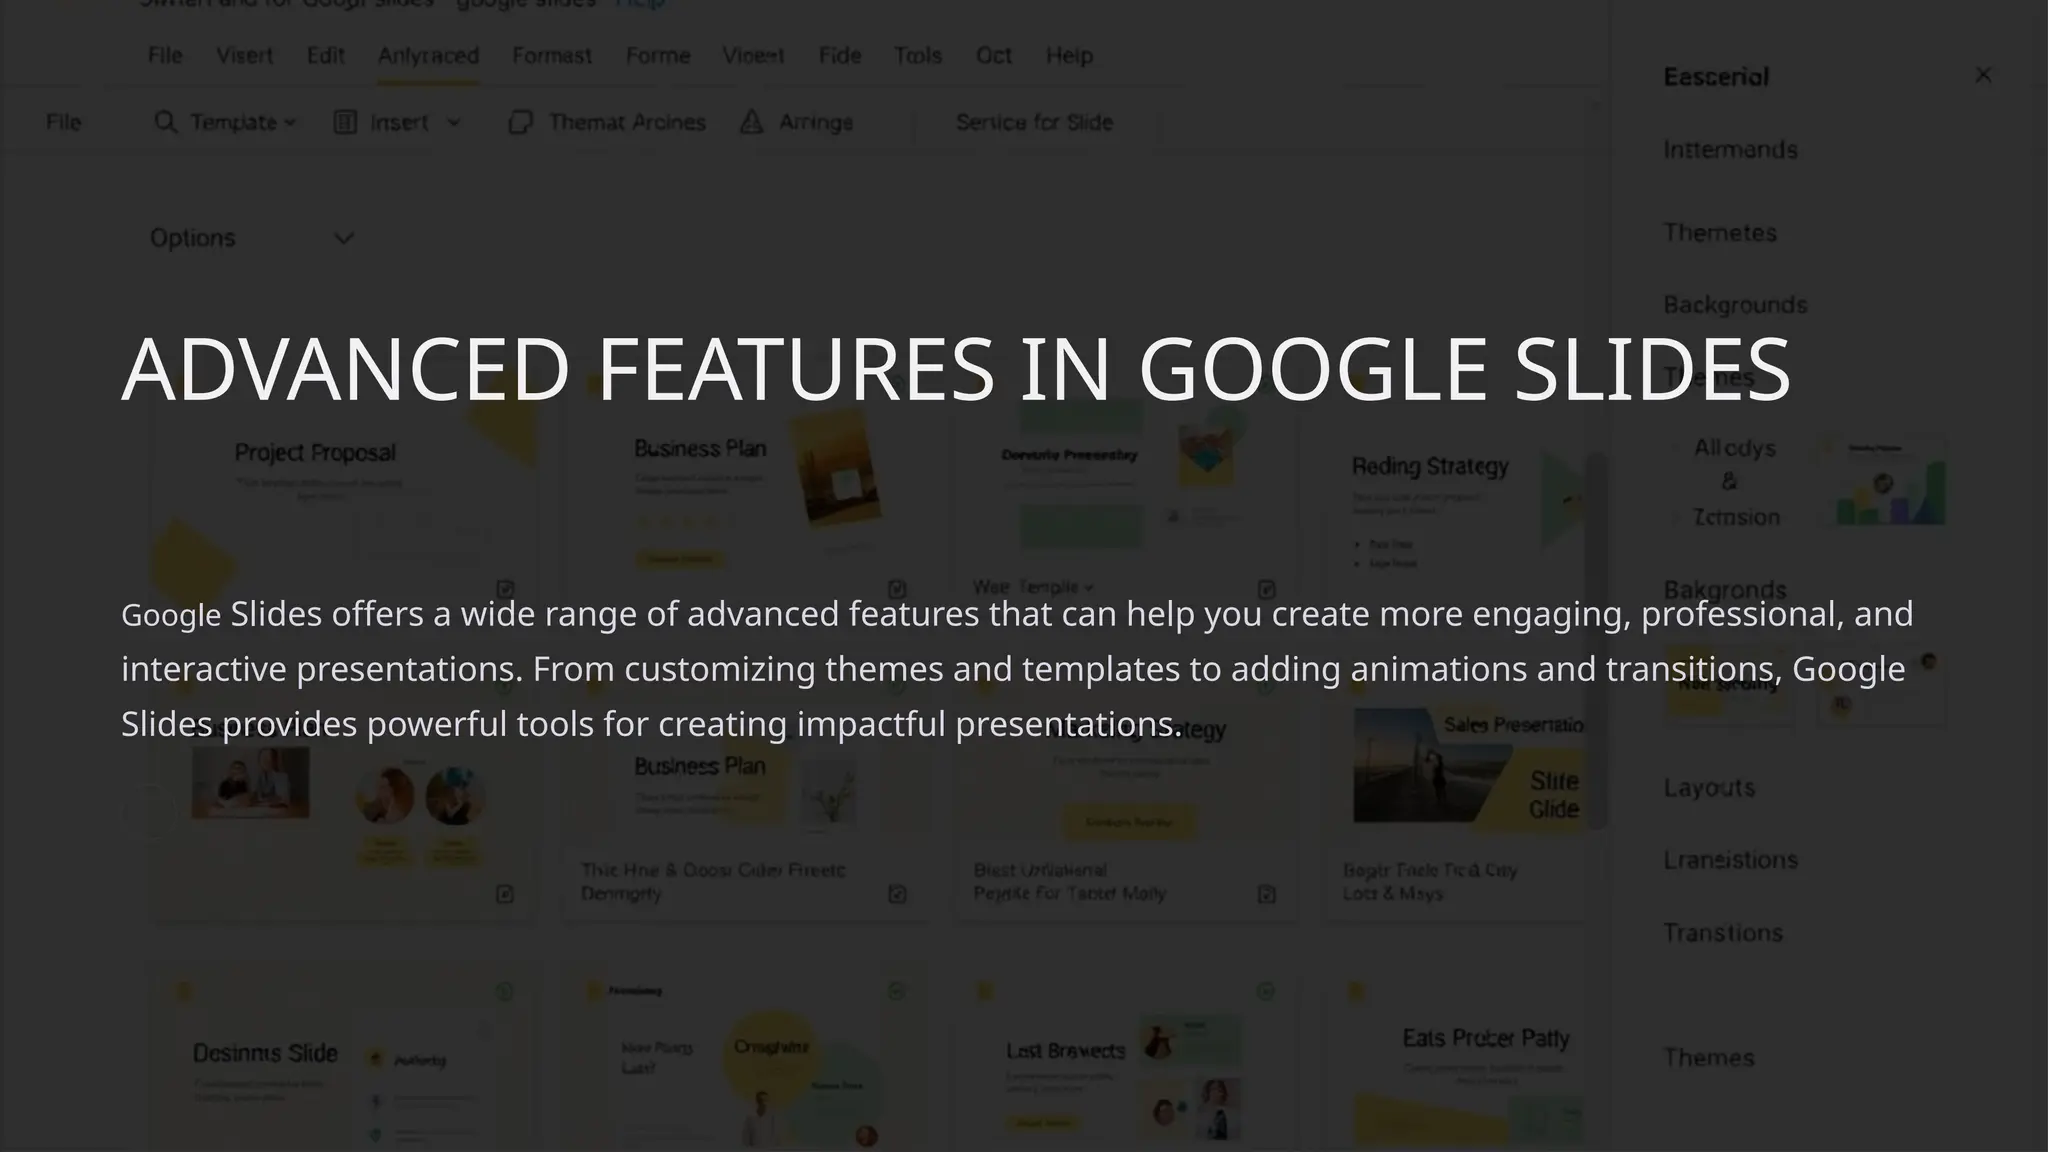
ADVANCED FEATURES INGOOGLE SLIDES
Google Slides offers a wide range of advanced features that can help you create more engaging, professional, and
interactive presentations. From customizing themes and templates to adding animations and transitions, Google
Slides provides powerful tools for creating impactful presentations.
103.
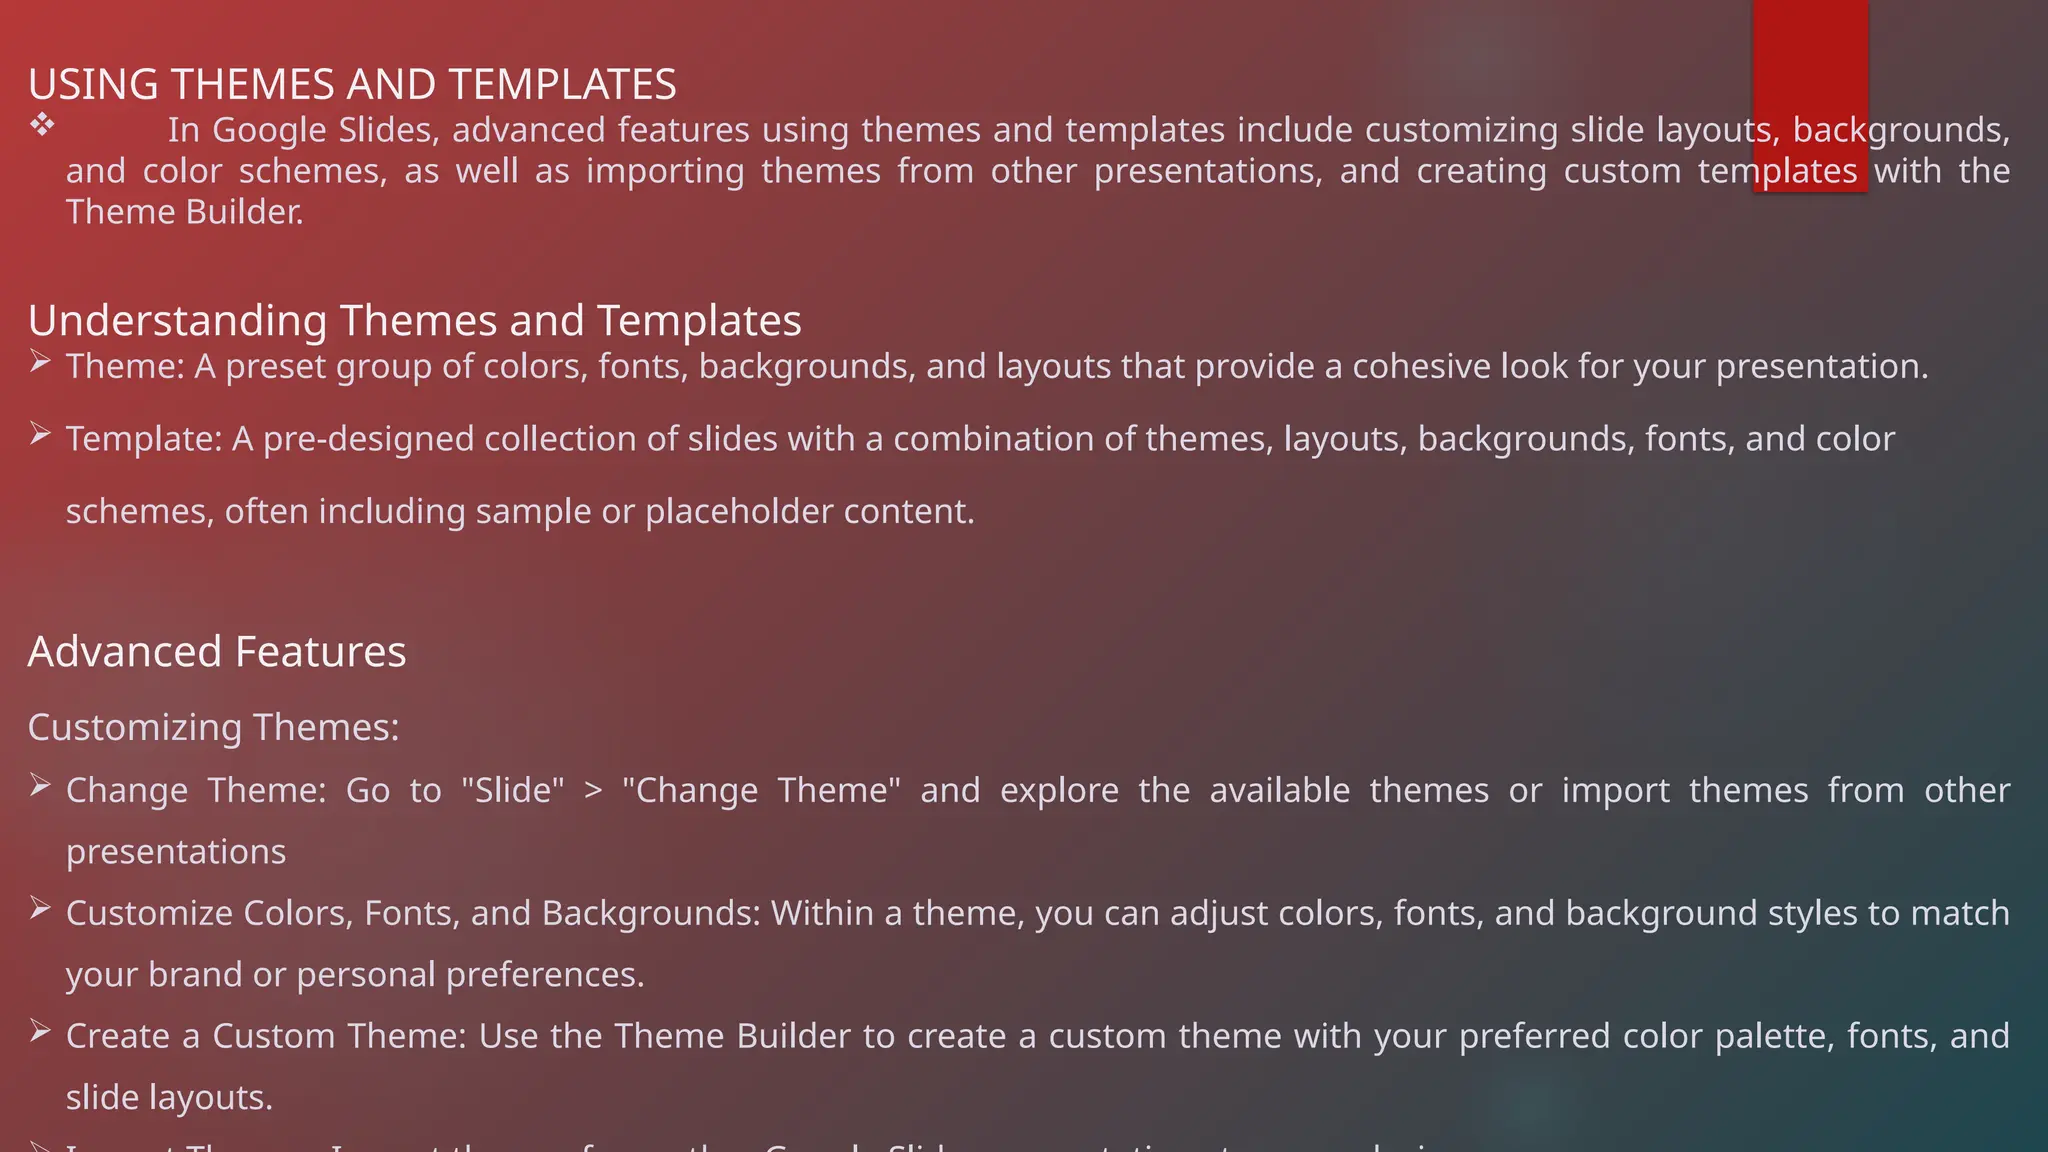
USING THEMES ANDTEMPLATES
In Google Slides, advanced features using themes and templates include customizing slide layouts, backgrounds,
and color schemes, as well as importing themes from other presentations, and creating custom templates with the
Theme Builder.
Understanding Themes and Templates
Theme: A preset group of colors, fonts, backgrounds, and layouts that provide a cohesive look for your presentation.
Template: A pre-designed collection of slides with a combination of themes, layouts, backgrounds, fonts, and color
schemes, often including sample or placeholder content.
Advanced Features
Customizing Themes:
Change Theme: Go to "Slide" > "Change Theme" and explore the available themes or import themes from other
presentations
Customize Colors, Fonts, and Backgrounds: Within a theme, you can adjust colors, fonts, and background styles to match
your brand or personal preferences.
Create a Custom Theme: Use the Theme Builder to create a custom theme with your preferred color palette, fonts, and
slide layouts.
106.
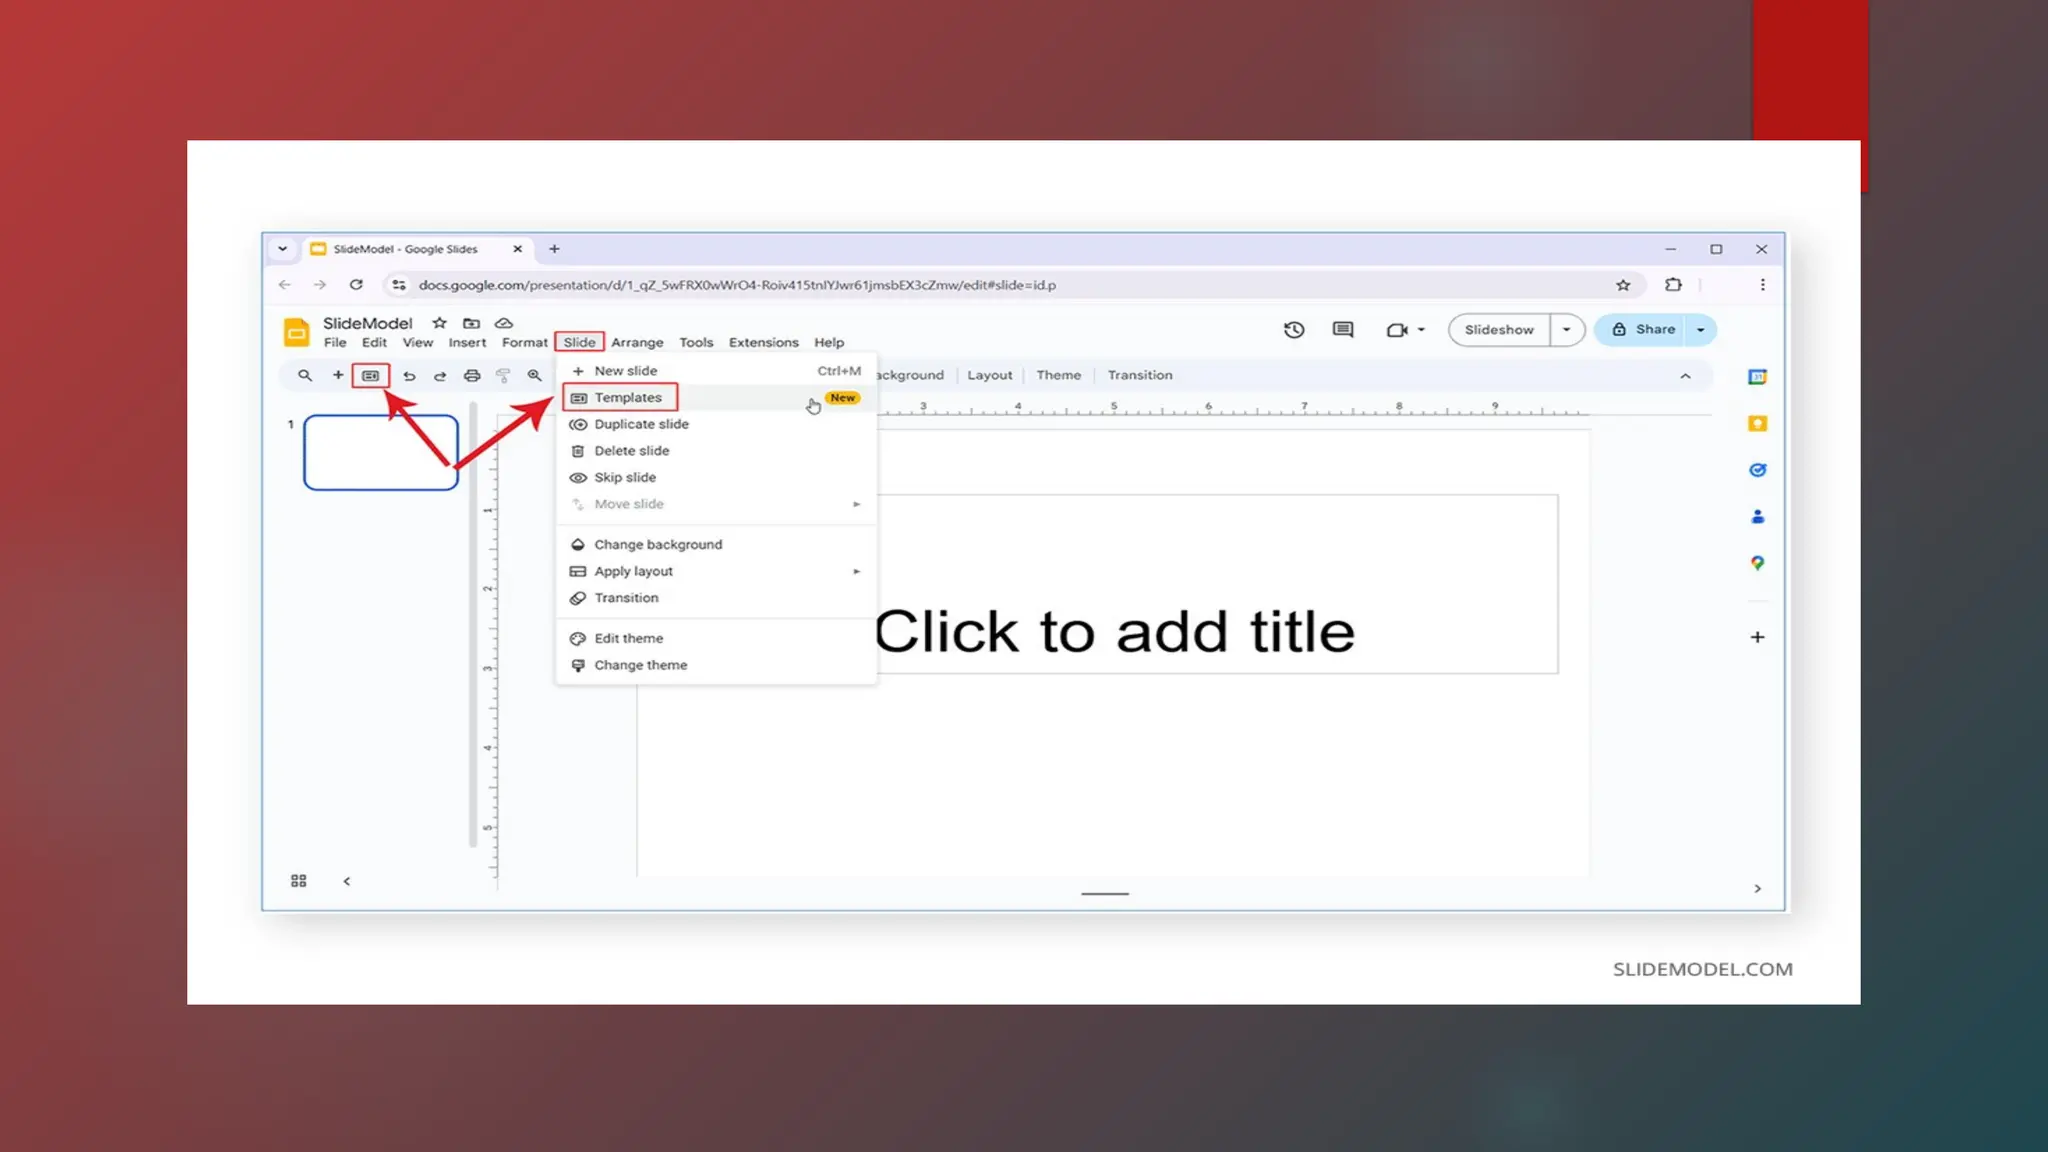
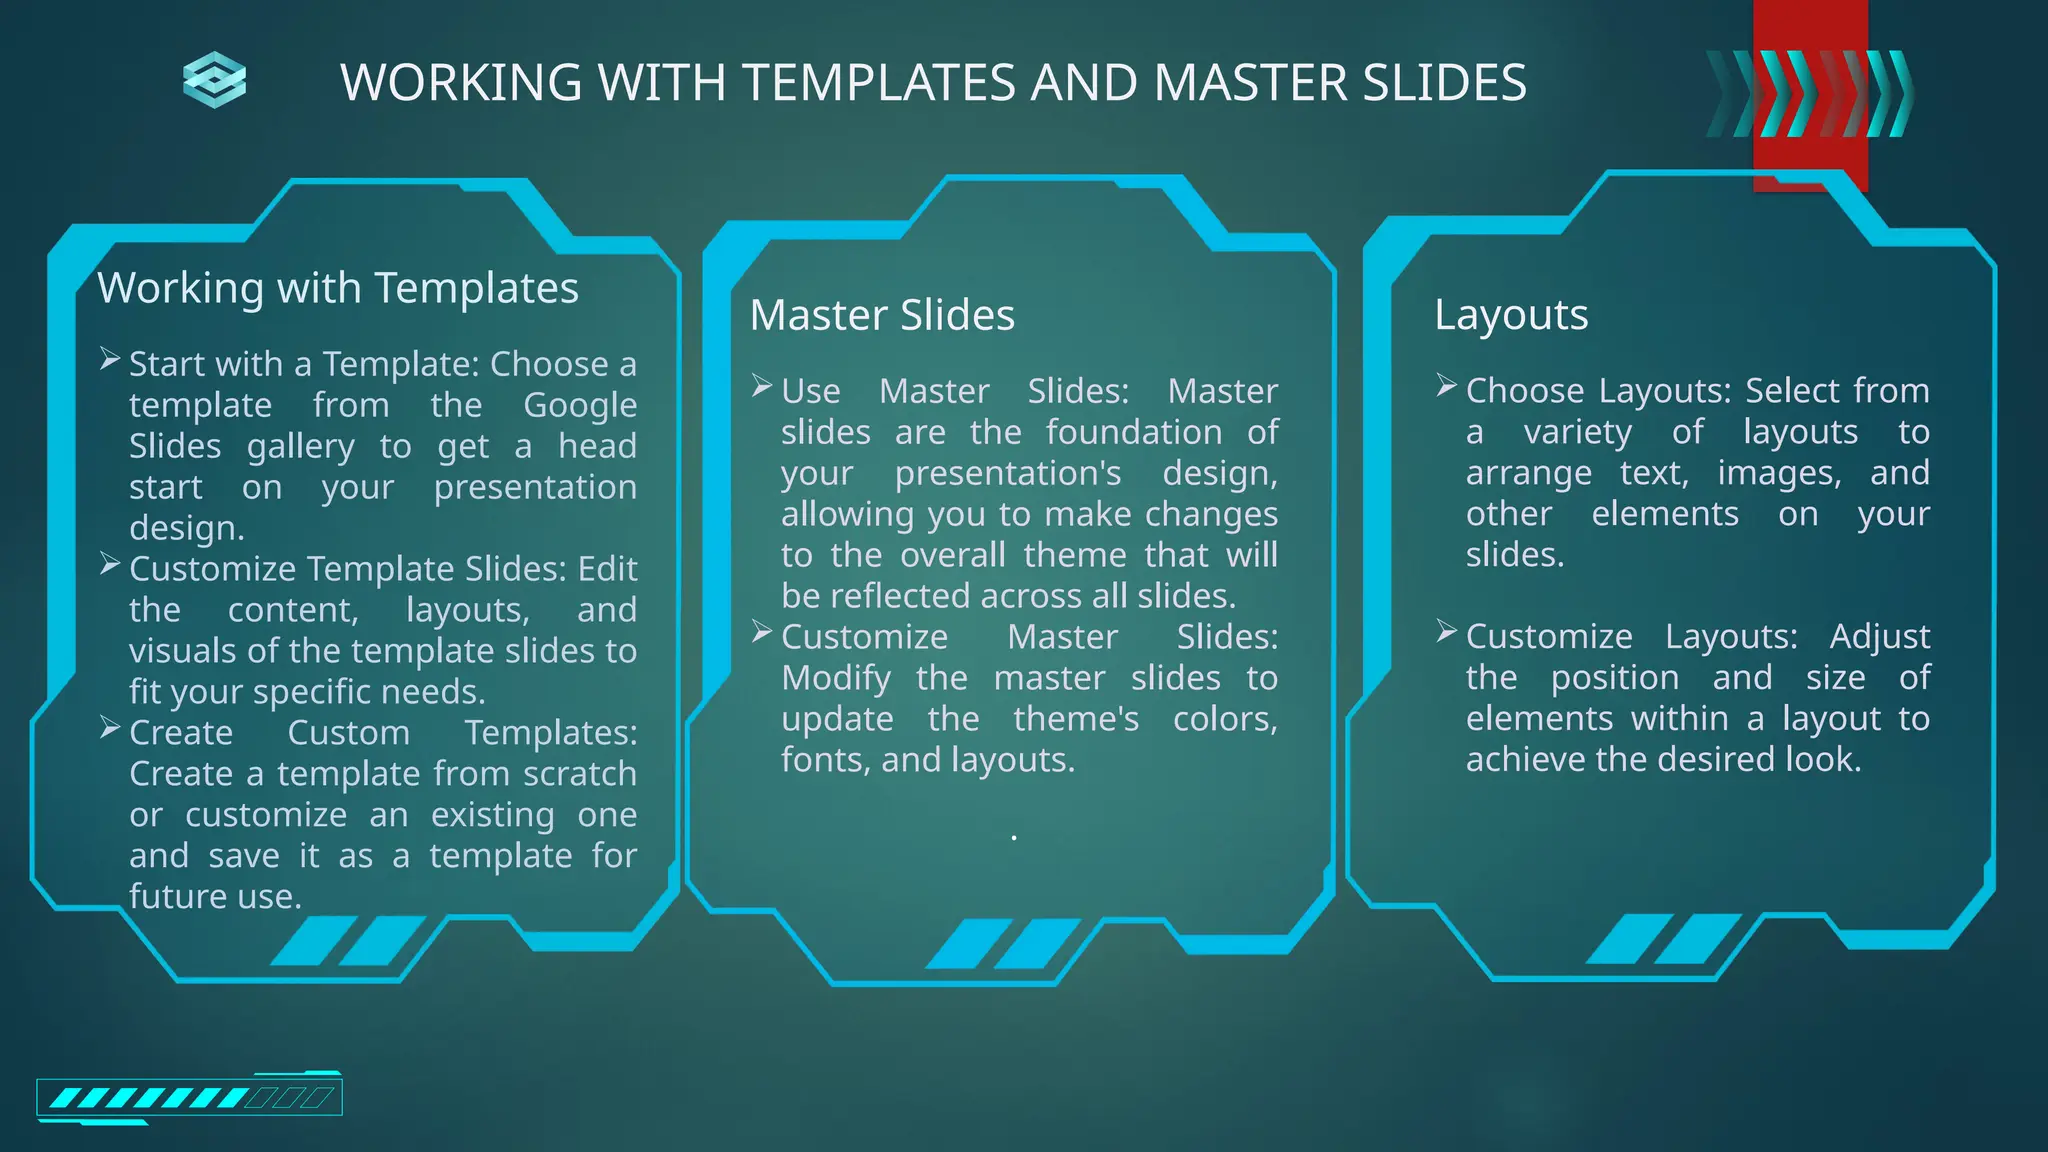
Working with Templates
Startwith a Template: Choose a
template from the Google
Slides gallery to get a head
start on your presentation
design.
Customize Template Slides: Edit
the content, layouts, and
visuals of the template slides to
fit your specific needs.
Create Custom Templates:
Create a template from scratch
or customize an existing one
and save it as a template for
future use.
Master Slides
Use Master Slides: Master
slides are the foundation of
your presentation's design,
allowing you to make changes
to the overall theme that will
be reflected across all slides.
Customize Master Slides:
Modify the master slides to
update the theme's colors,
fonts, and layouts.
.
Layouts
Choose Layouts: Select from
a variety of layouts to
arrange text, images, and
other elements on your
slides.
Customize Layouts: Adjust
the position and size of
elements within a layout to
achieve the desired look.
WORKING WITH TEMPLATES AND MASTER SLIDES
107.
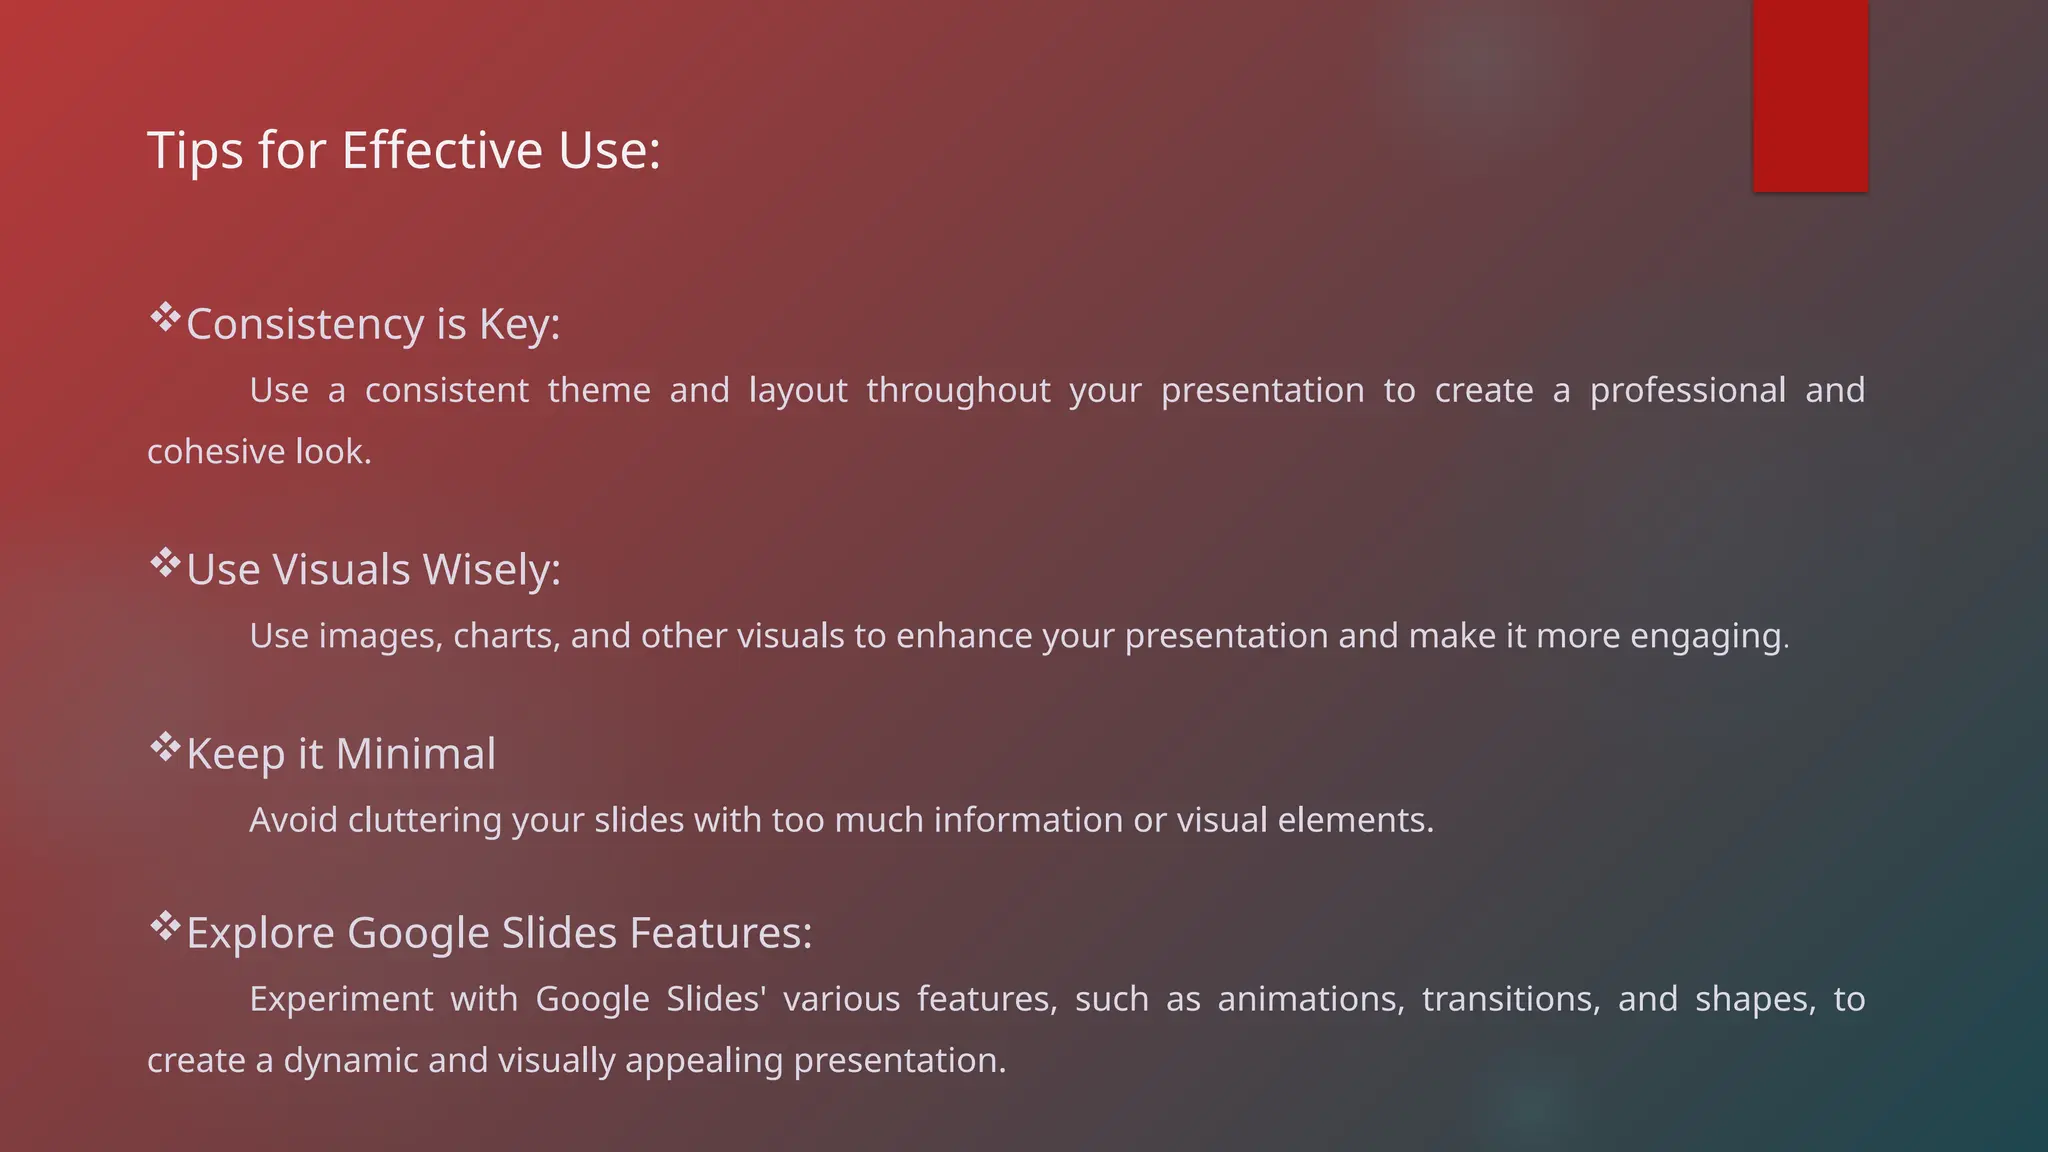
Tips for EffectiveUse:
Consistency is Key:
Use a consistent theme and layout throughout your presentation to create a professional and
cohesive look.
Use Visuals Wisely:
Use images, charts, and other visuals to enhance your presentation and make it more engaging.
Keep it Minimal
Avoid cluttering your slides with too much information or visual elements.
Explore Google Slides Features:
Experiment with Google Slides' various features, such as animations, transitions, and shapes, to
create a dynamic and visually appealing presentation.
108.
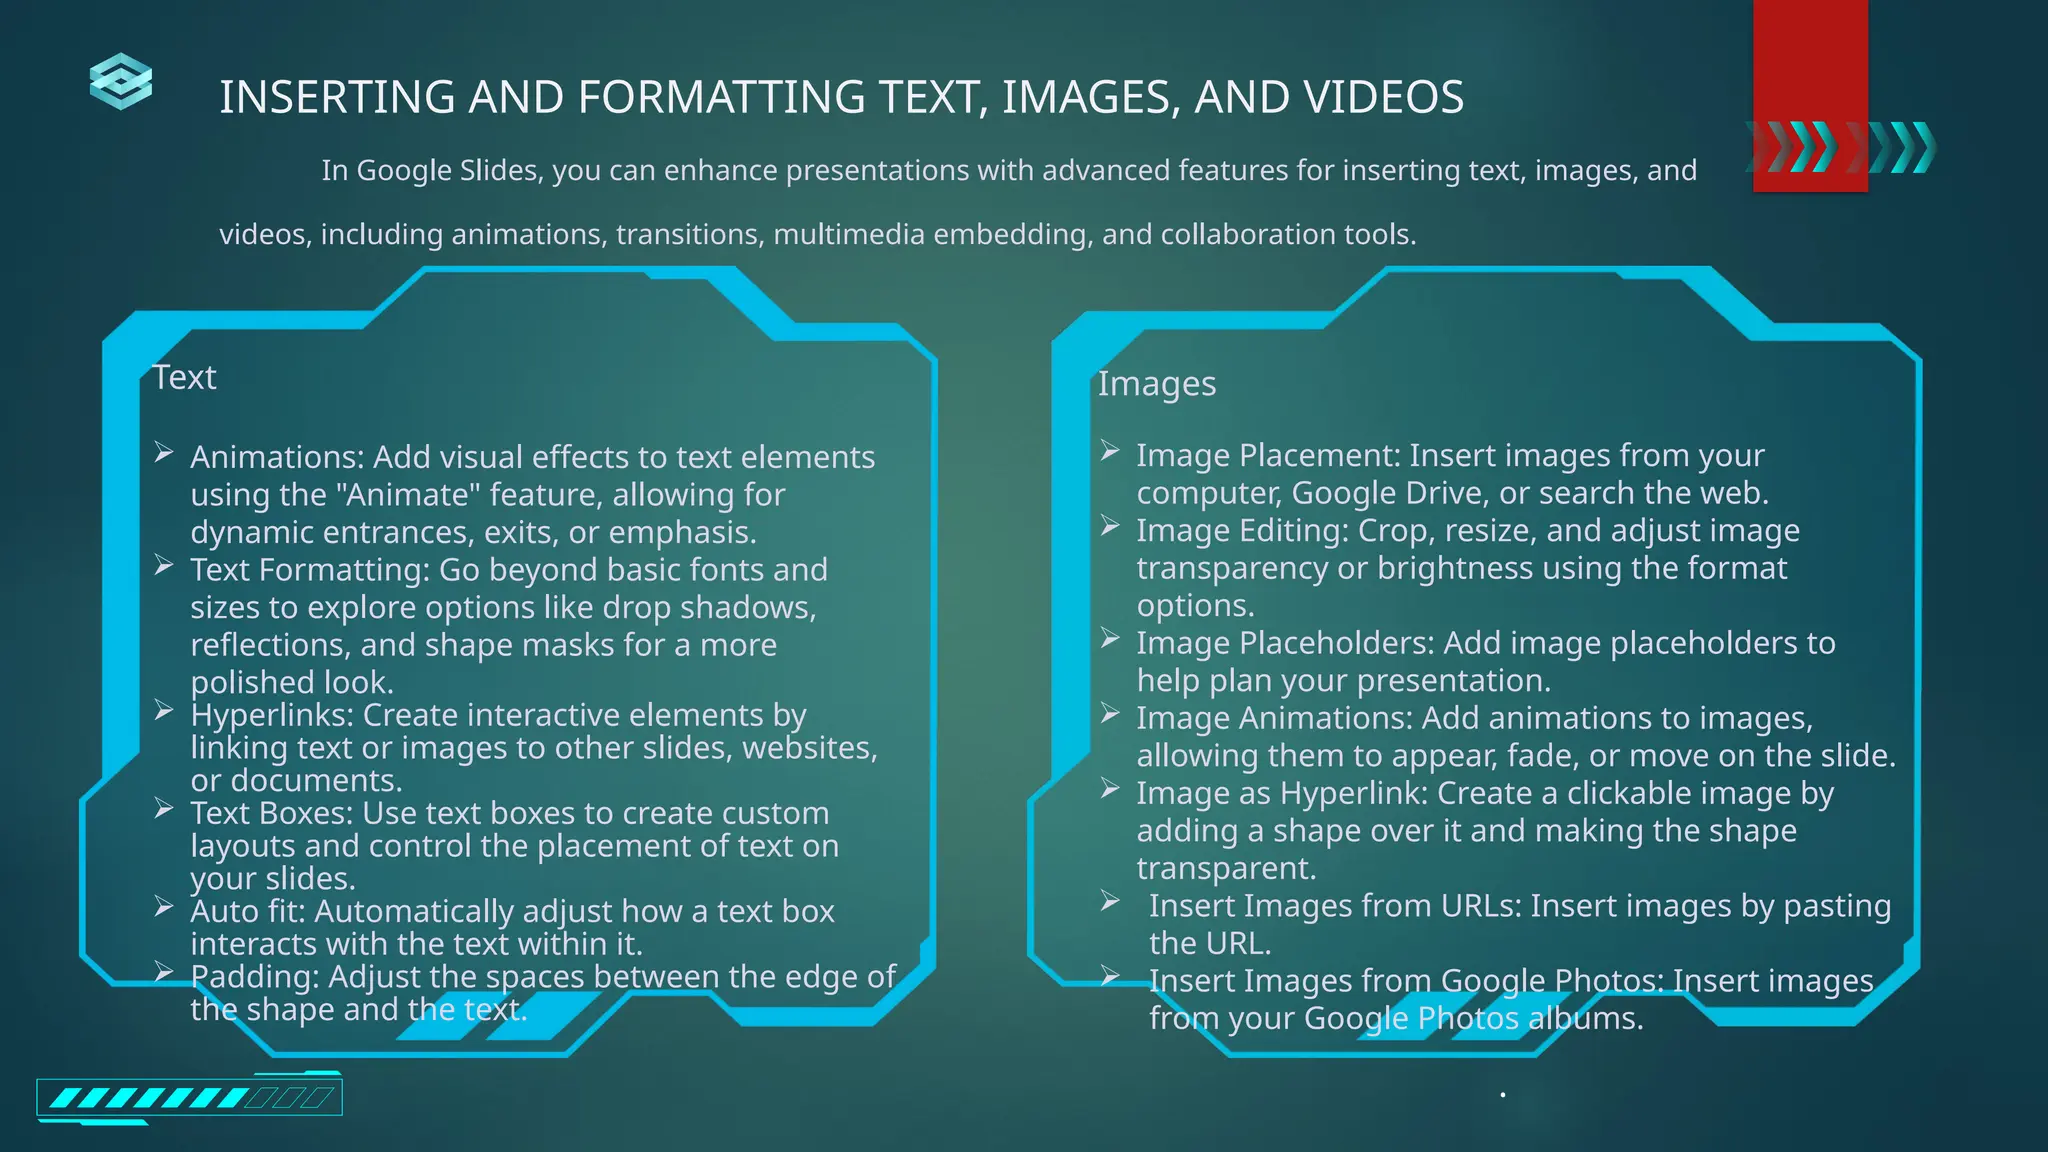
Text
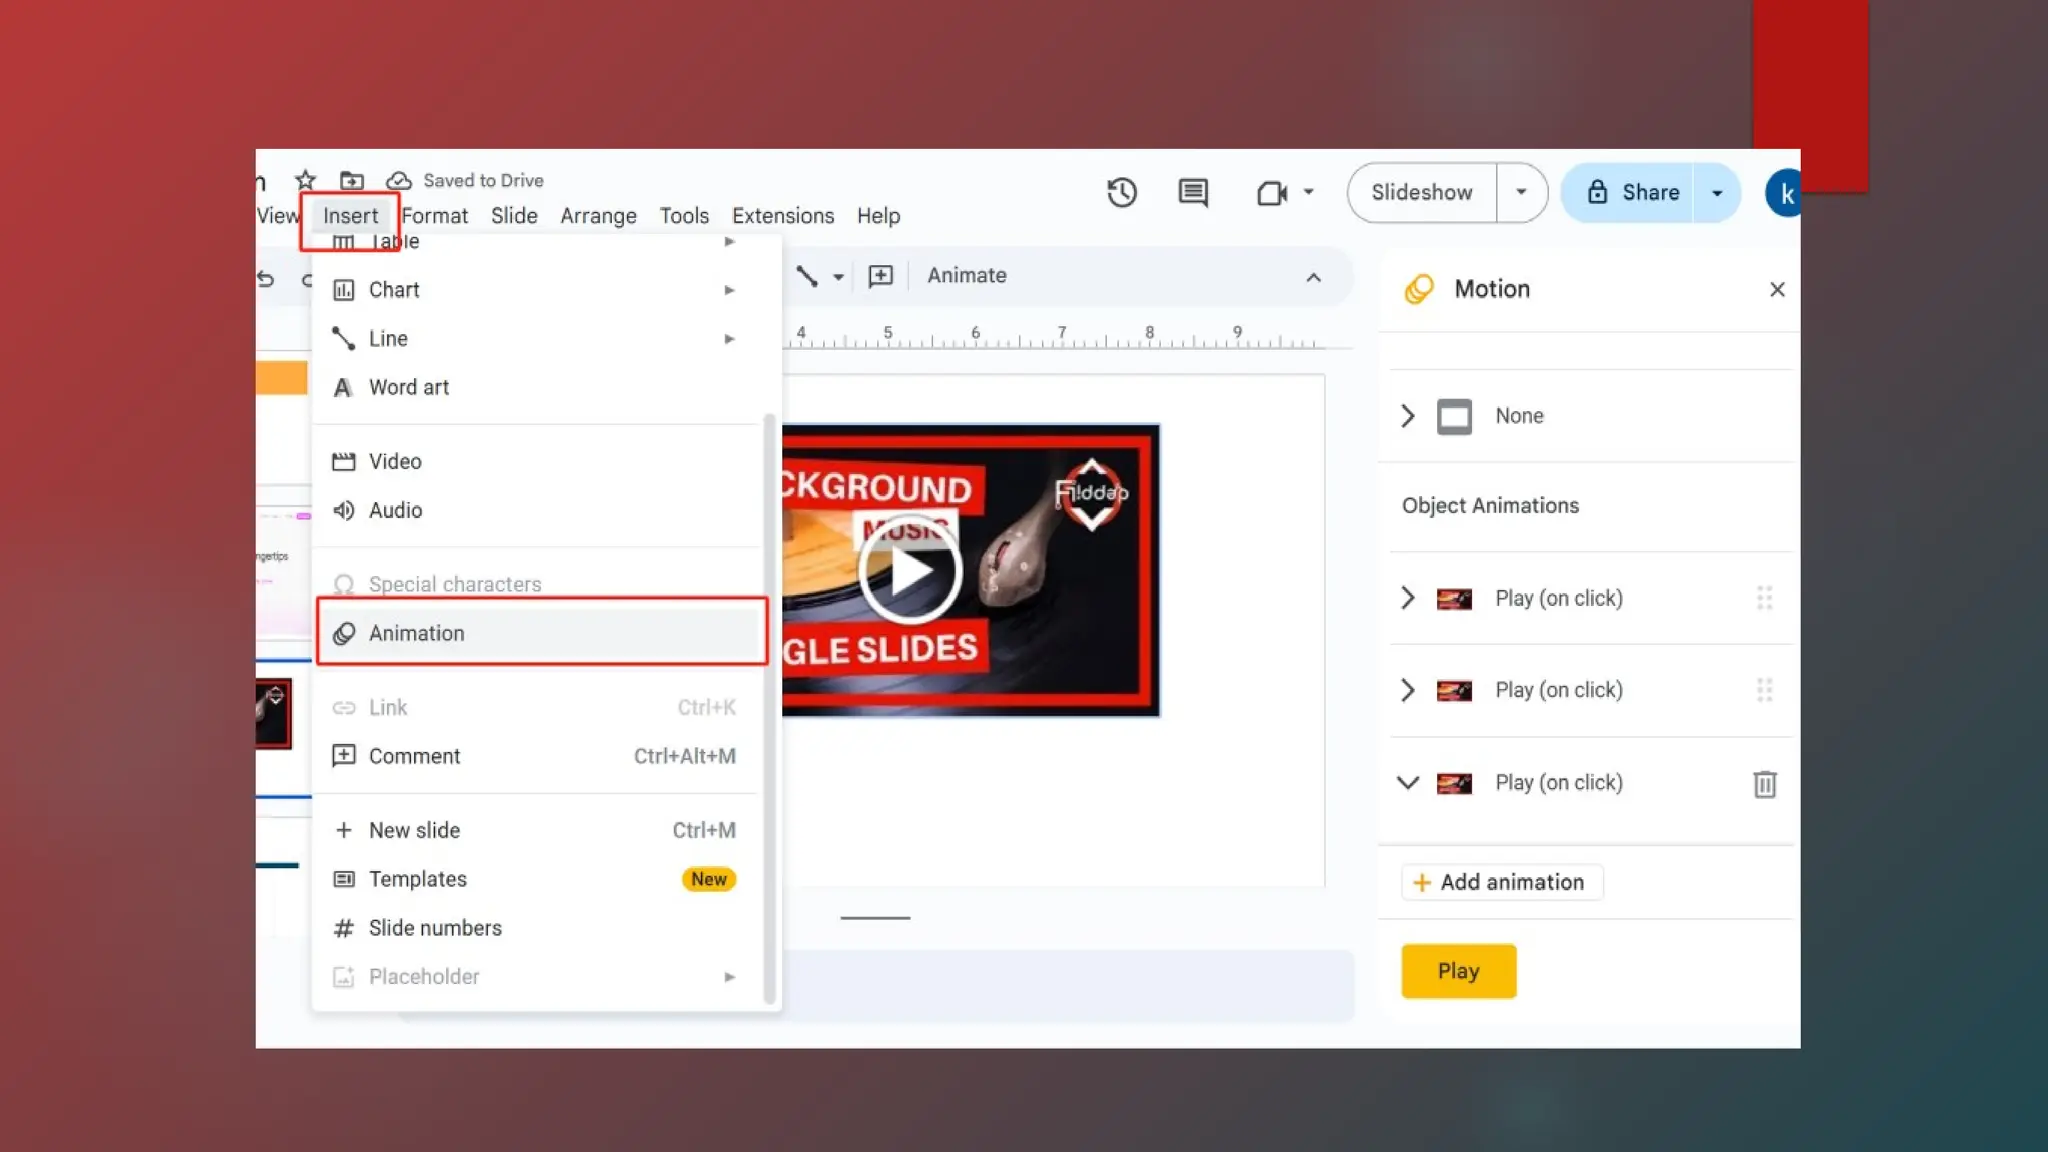
Animations: Addvisual effects to text elements
using the "Animate" feature, allowing for
dynamic entrances, exits, or emphasis.
Text Formatting: Go beyond basic fonts and
sizes to explore options like drop shadows,
reflections, and shape masks for a more
polished look.
Hyperlinks: Create interactive elements by
linking text or images to other slides, websites,
or documents.
Text Boxes: Use text boxes to create custom
layouts and control the placement of text on
your slides.
Auto fit: Automatically adjust how a text box
interacts with the text within it.
Padding: Adjust the spaces between the edge of
the shape and the text.
Images
Image Placement: Insert images from your
computer, Google Drive, or search the web.
Image Editing: Crop, resize, and adjust image
transparency or brightness using the format
options.
Image Placeholders: Add image placeholders to
help plan your presentation.
Image Animations: Add animations to images,
allowing them to appear, fade, or move on the slide.
Image as Hyperlink: Create a clickable image by
adding a shape over it and making the shape
transparent.
Insert Images from URLs: Insert images by pasting
the URL.
Insert Images from Google Photos: Insert images
from your Google Photos albums.
.
INSERTING AND FORMATTING TEXT, IMAGES, AND VIDEOS
In Google Slides, you can enhance presentations with advanced features for inserting text, images, and
videos, including animations, transitions, multimedia embedding, and collaboration tools.
112.
Videos
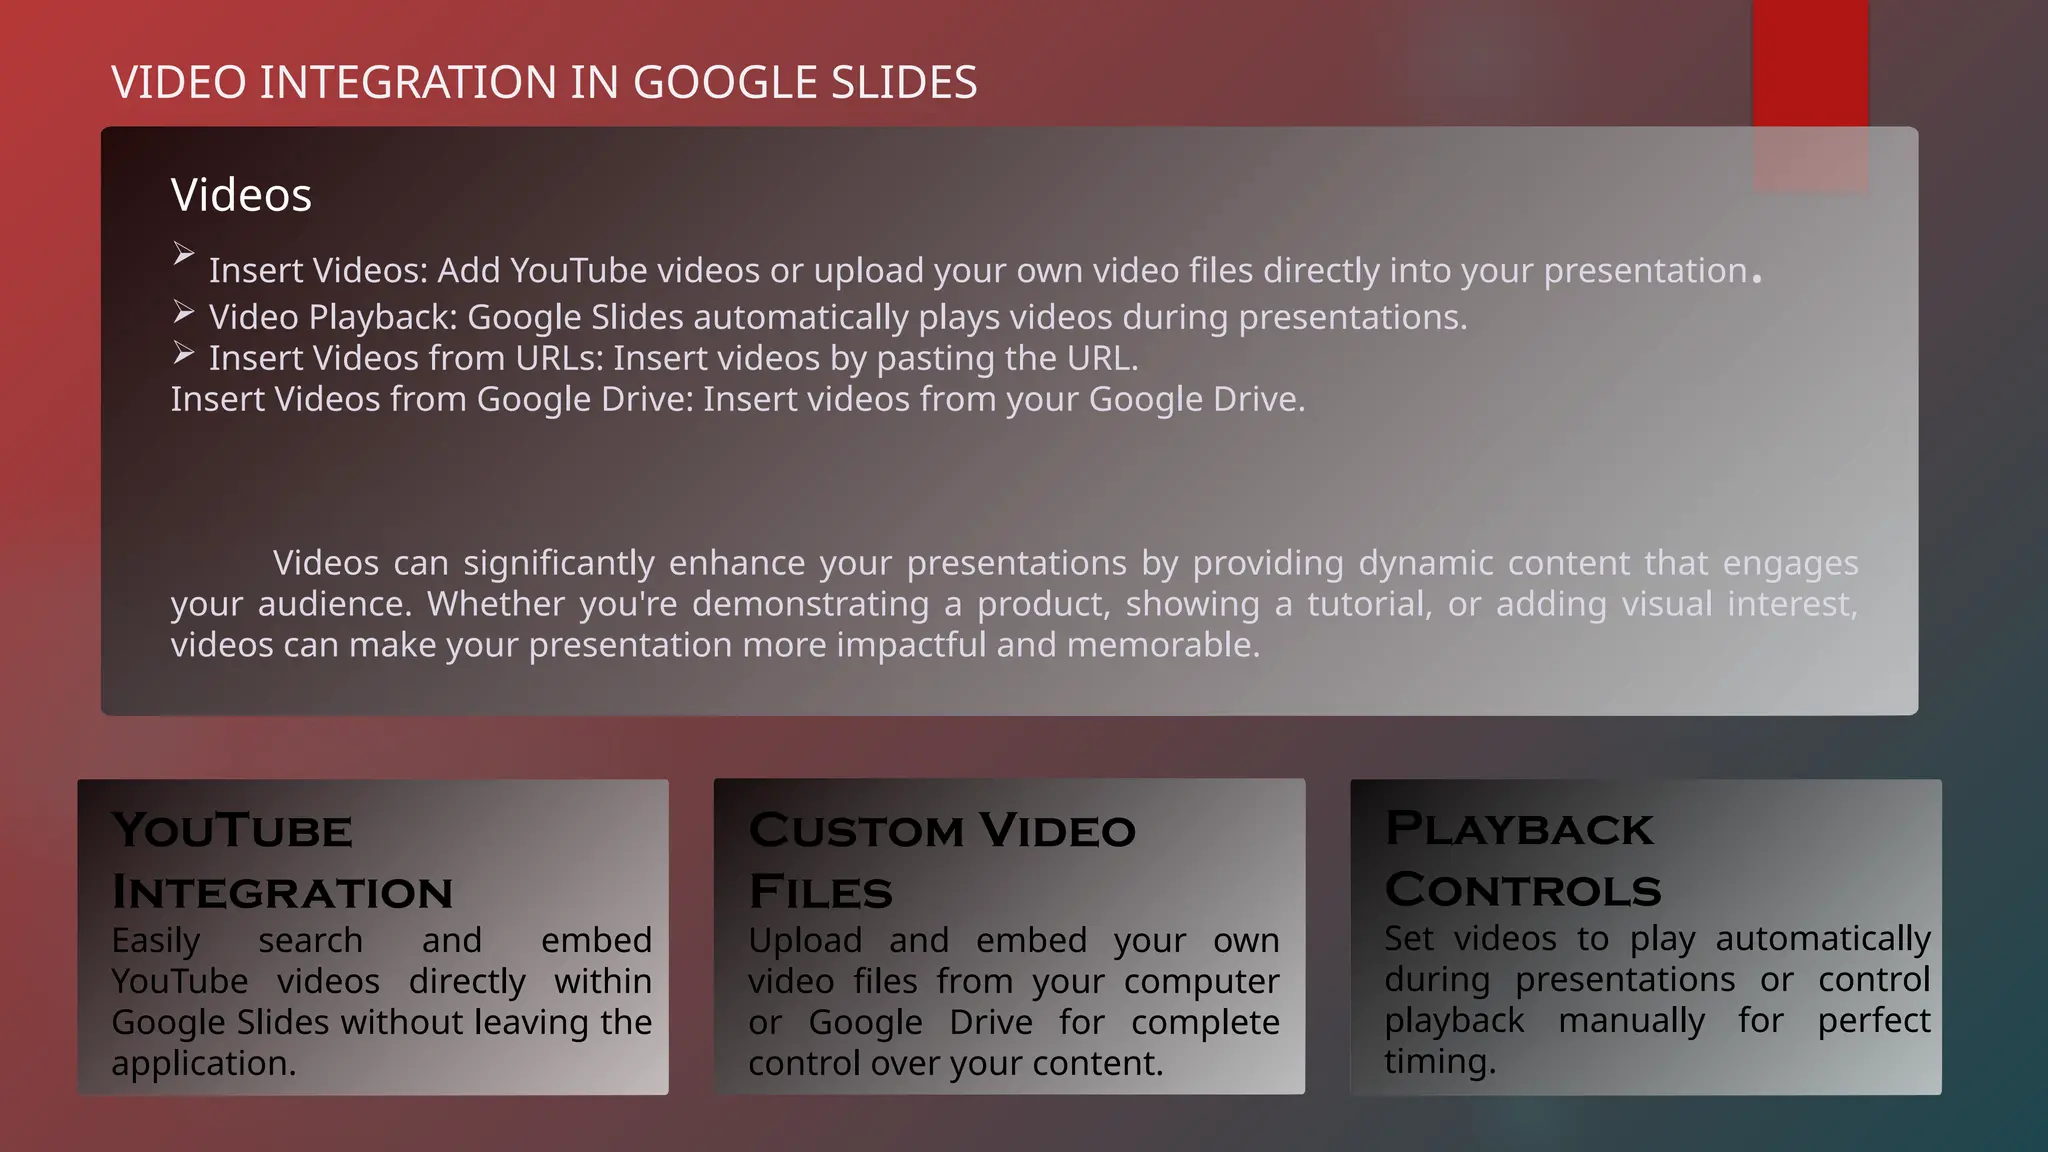
Insert Videos:Add YouTube videos or upload your own video files directly into your presentation.
Video Playback: Google Slides automatically plays videos during presentations.
Insert Videos from URLs: Insert videos by pasting the URL.
Insert Videos from Google Drive: Insert videos from your Google Drive.
Videos can significantly enhance your presentations by providing dynamic content that engages
your audience. Whether you're demonstrating a product, showing a tutorial, or adding visual interest,
videos can make your presentation more impactful and memorable.
VIDEO INTEGRATION IN GOOGLE SLIDES
YouTube
Integration
Easily search and embed
YouTube videos directly within
Google Slides without leaving the
application.
Custom Video
Files
Upload and embed your own
video files from your computer
or Google Drive for complete
control over your content.
Playback
Controls
Set videos to play automatically
during presentations or control
playback manually for perfect
timing.
113.
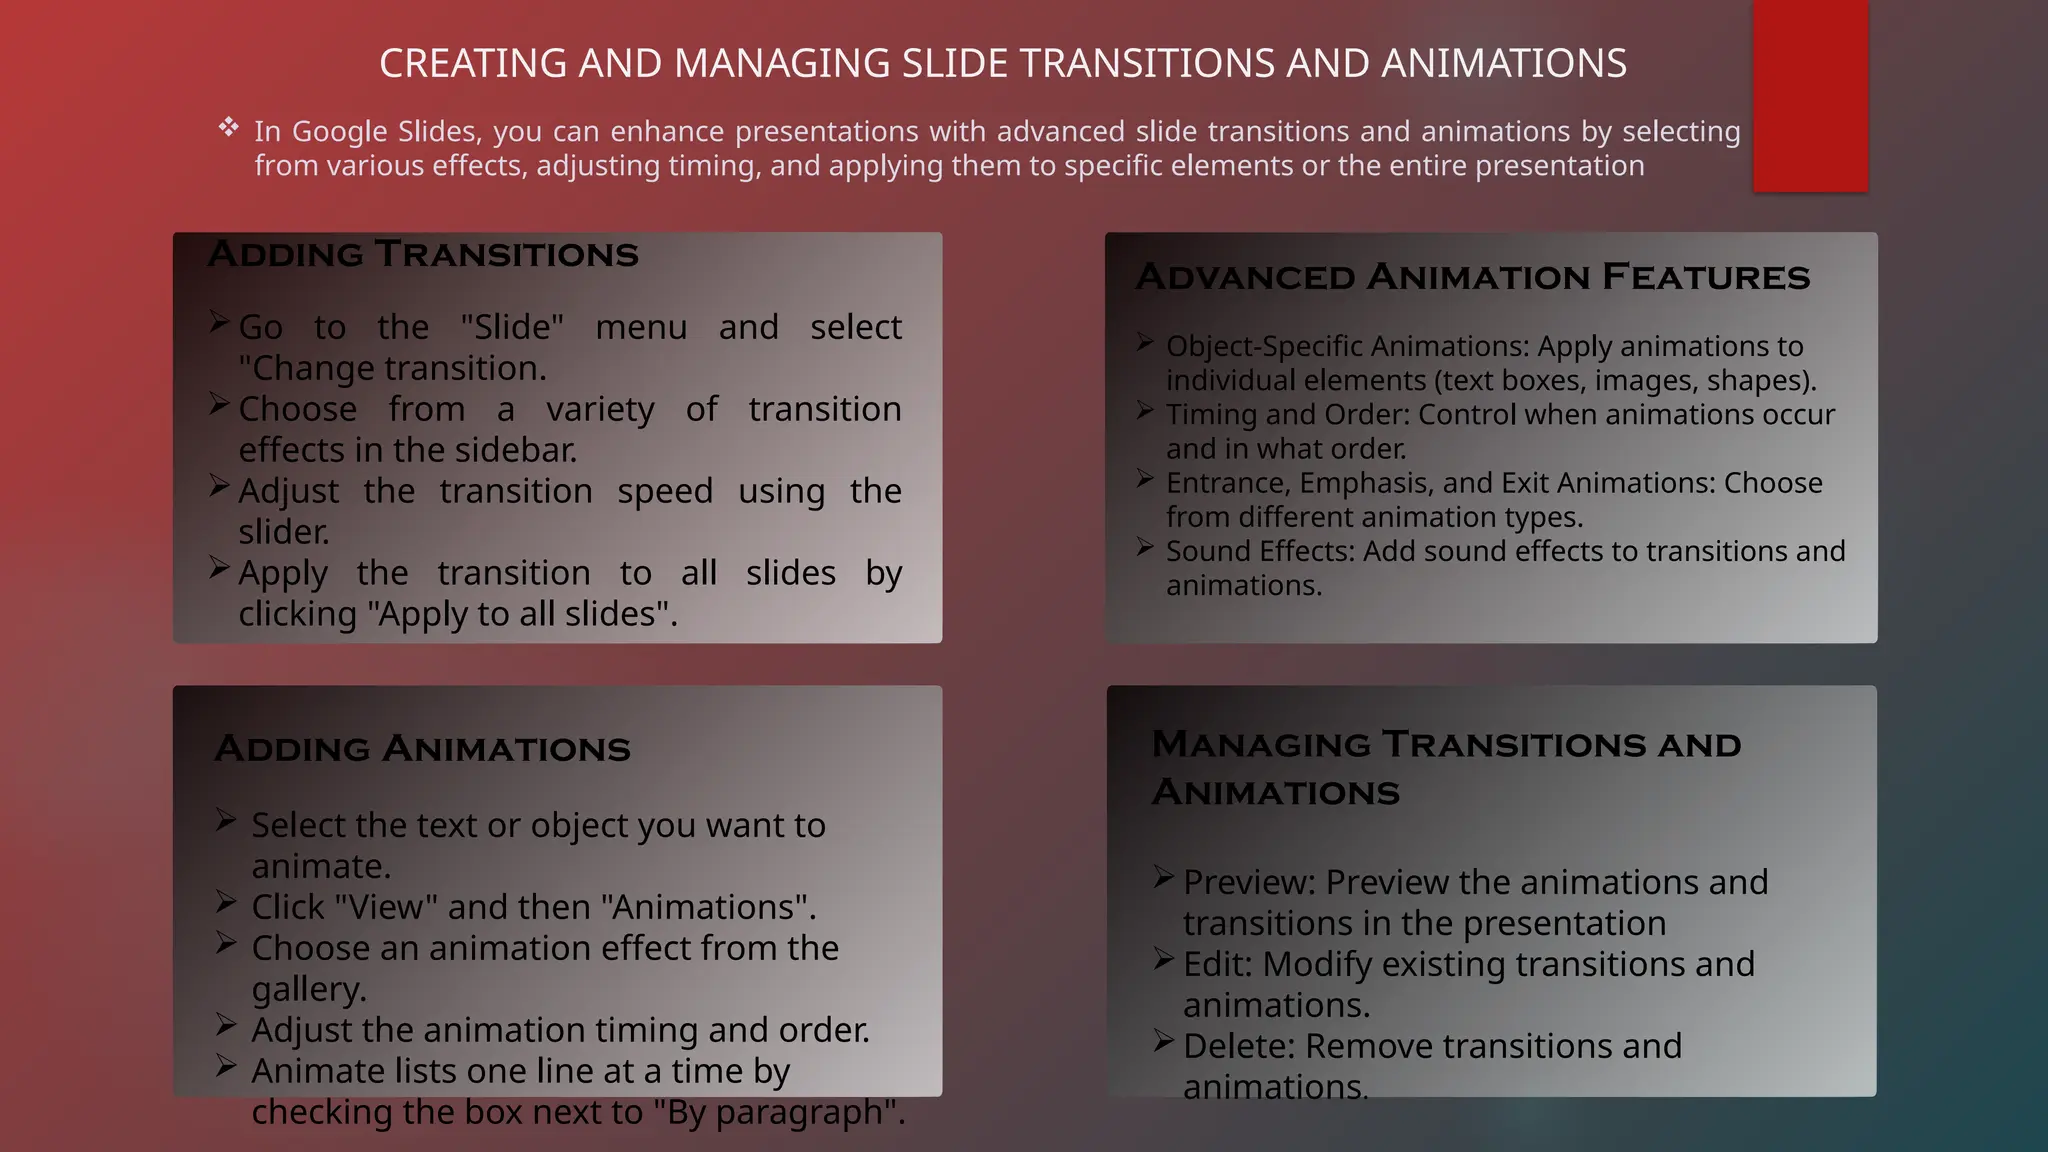
CREATING AND MANAGINGSLIDE TRANSITIONS AND ANIMATIONS
In Google Slides, you can enhance presentations with advanced slide transitions and animations by selecting
from various effects, adjusting timing, and applying them to specific elements or the entire presentation
Adding Transitions
Go to the "Slide" menu and select
"Change transition.
Choose from a variety of transition
effects in the sidebar.
Adjust the transition speed using the
slider.
Apply the transition to all slides by
clicking "Apply to all slides".
Adding Animations
Select the text or object you want to
animate.
Click "View" and then "Animations".
Choose an animation effect from the
gallery.
Adjust the animation timing and order.
Animate lists one line at a time by
checking the box next to "By paragraph".
Advanced Animation Features
Object-Specific Animations: Apply animations to
individual elements (text boxes, images, shapes).
Timing and Order: Control when animations occur
and in what order.
Entrance, Emphasis, and Exit Animations: Choose
from different animation types.
Sound Effects: Add sound effects to transitions and
animations.
Managing Transitions and
Animations
Preview: Preview the animations and
transitions in the presentation
Edit: Modify existing transitions and
animations.
Delete: Remove transitions and
animations.
116.
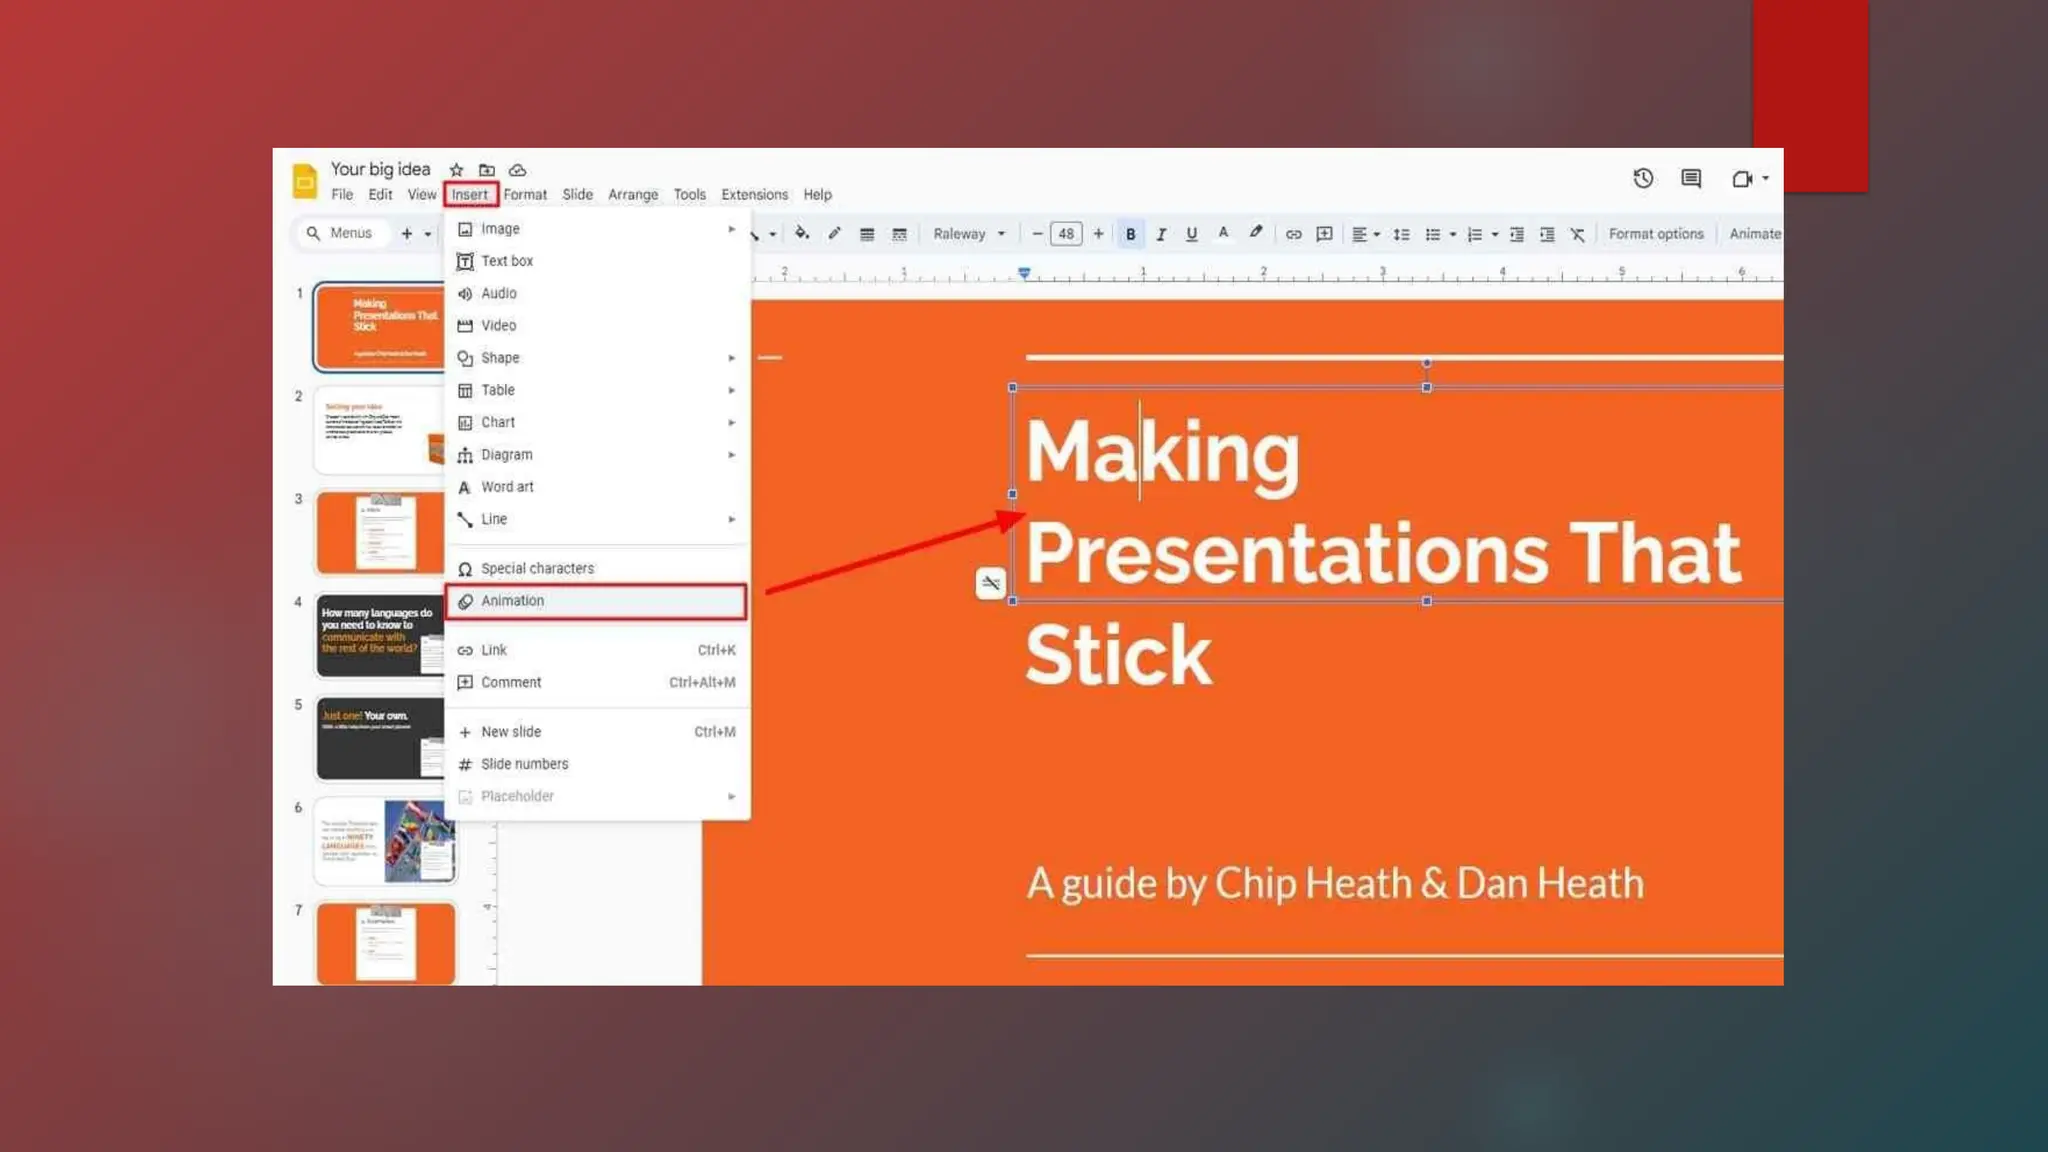
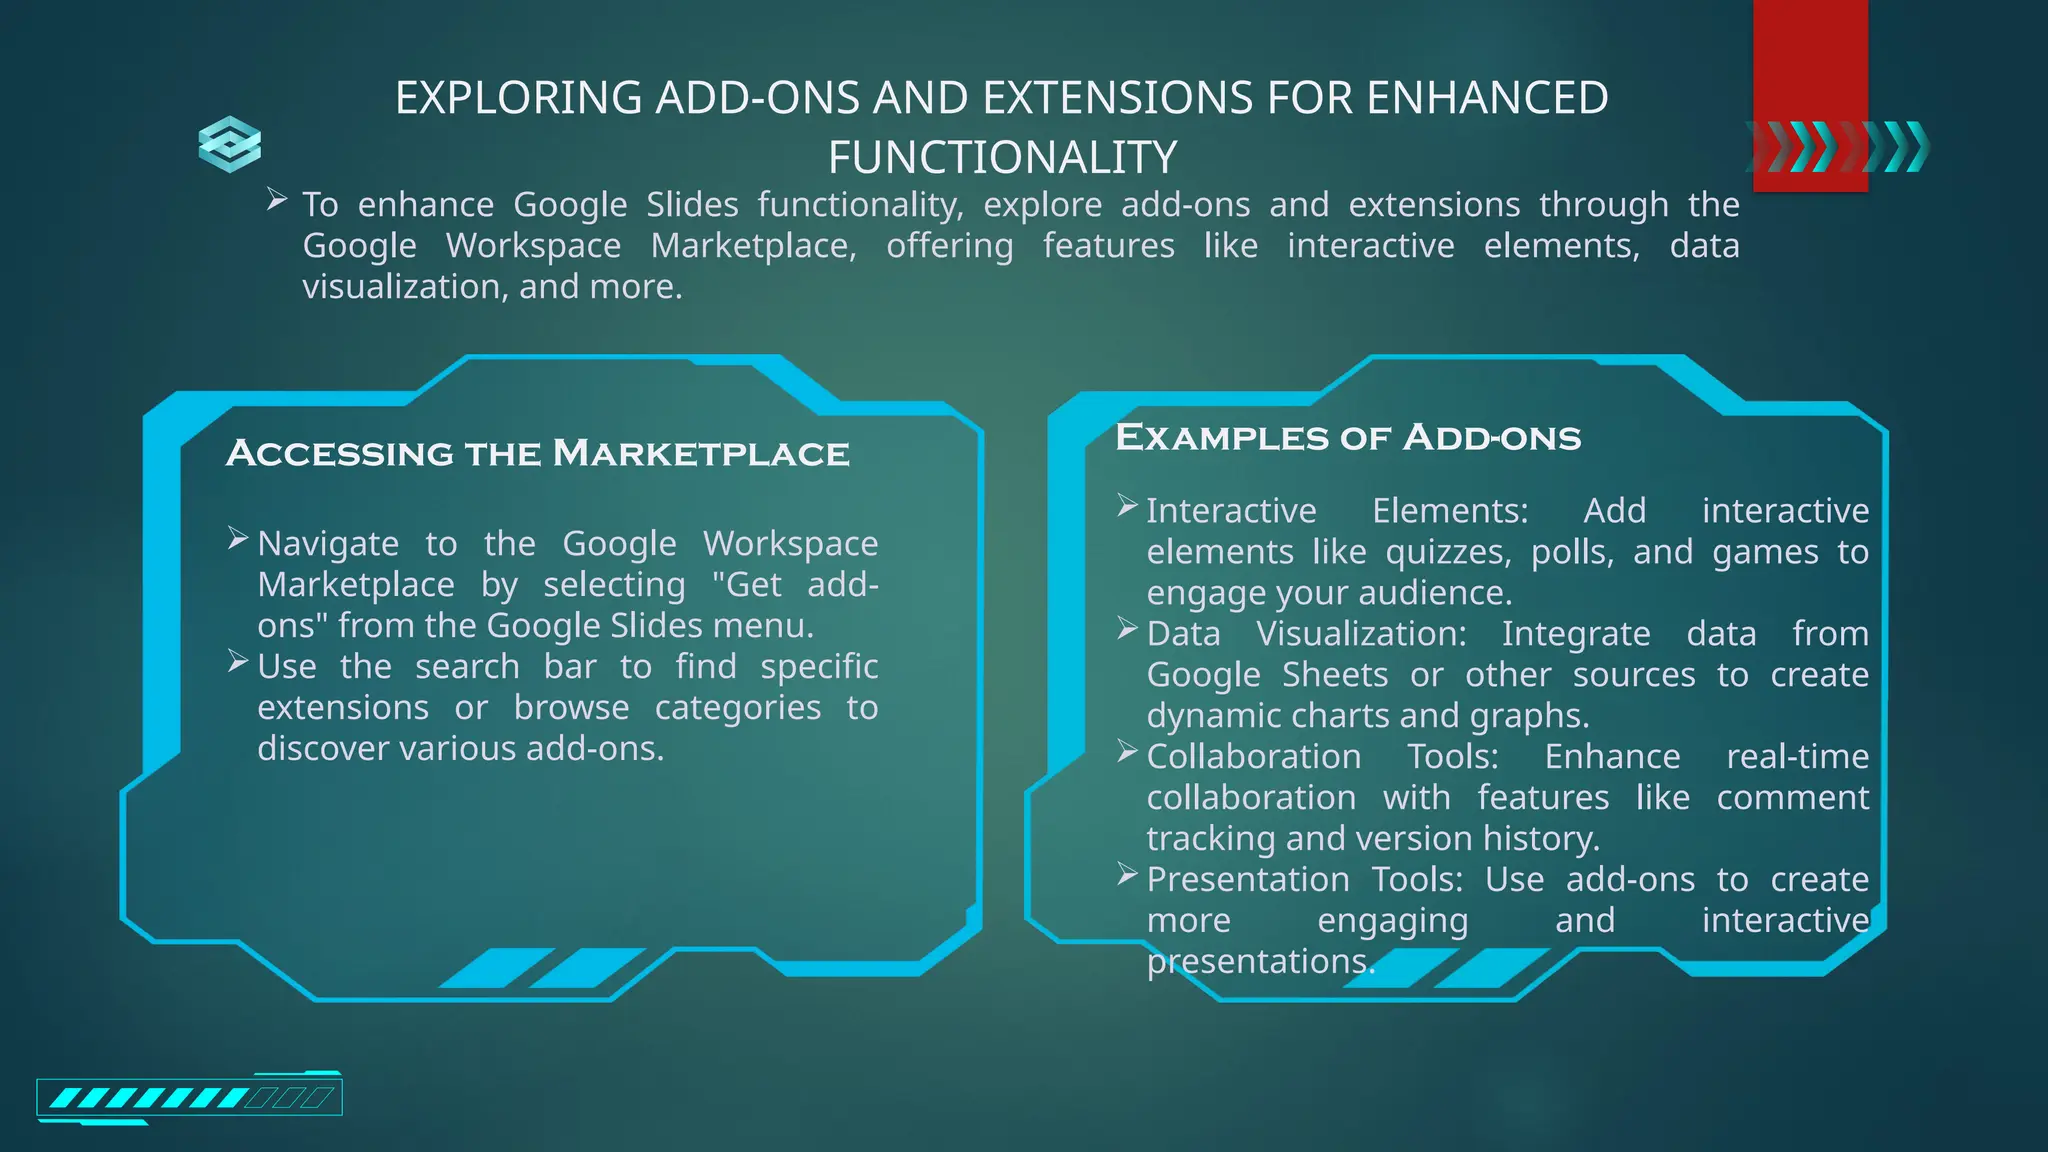
EXPLORING ADD-ONS ANDEXTENSIONS FOR ENHANCED
FUNCTIONALITY
To enhance Google Slides functionality, explore add-ons and extensions through the
Google Workspace Marketplace, offering features like interactive elements, data
visualization, and more.
Examples of Add-ons
Interactive Elements: Add interactive
elements like quizzes, polls, and games to
engage your audience.
Data Visualization: Integrate data from
Google Sheets or other sources to create
dynamic charts and graphs.
Collaboration Tools: Enhance real-time
collaboration with features like comment
tracking and version history.
Presentation Tools: Use add-ons to create
more engaging and interactive
presentations.
Accessing the Marketplace
Navigate to the Google Workspace
Marketplace by selecting "Get add-
ons" from the Google Slides menu.
Use the search bar to find specific
extensions or browse categories to
discover various add-ons.
117.
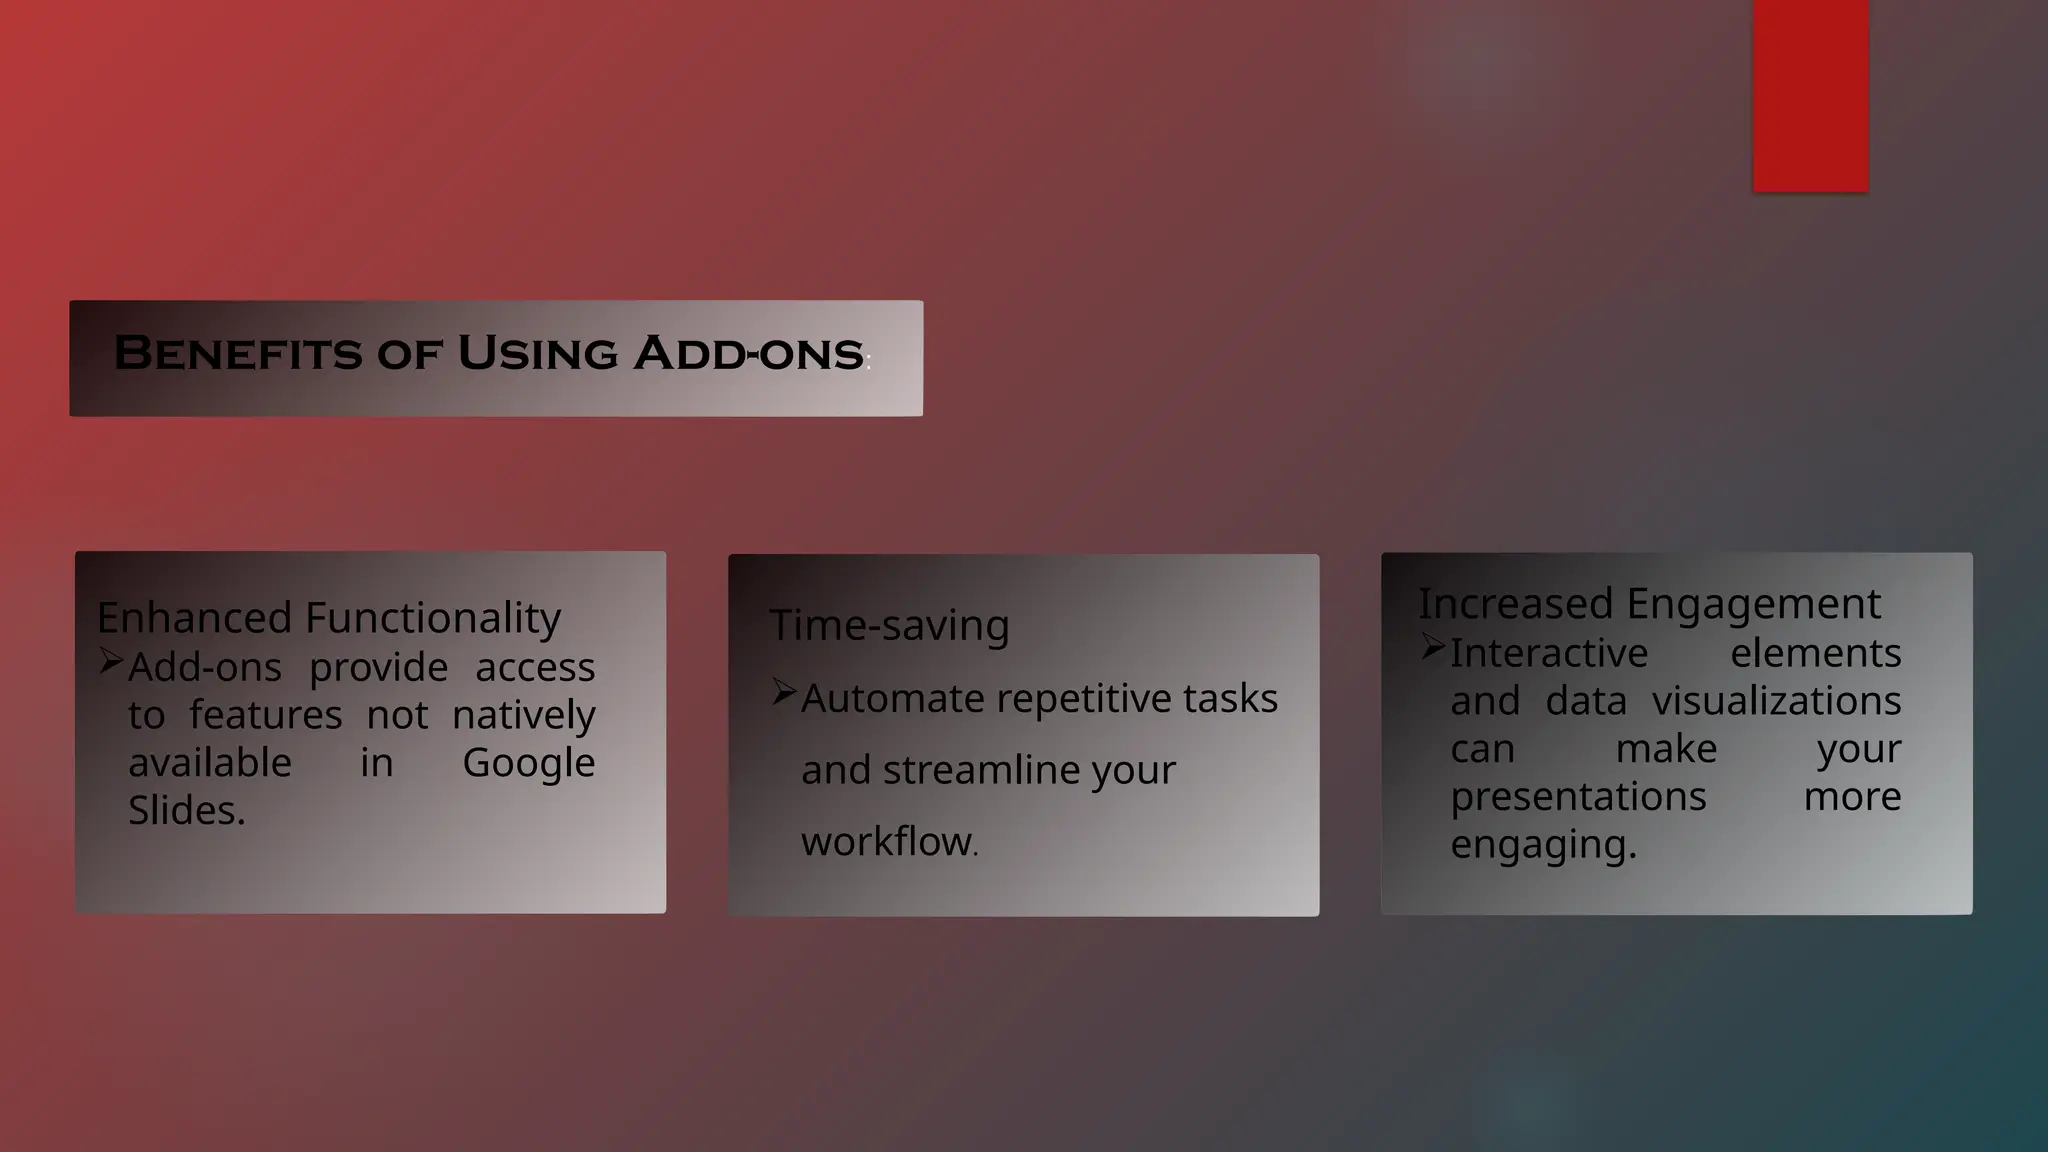
Benefits of UsingAdd-ons:
Enhanced Functionality
Add-ons provide access
to features not natively
available in Google
Slides.
Time-saving
Automate repetitive tasks
and streamline your
workflow.
Increased Engagement
Interactive elements
and data visualizations
can make your
presentations more
engaging.
119.
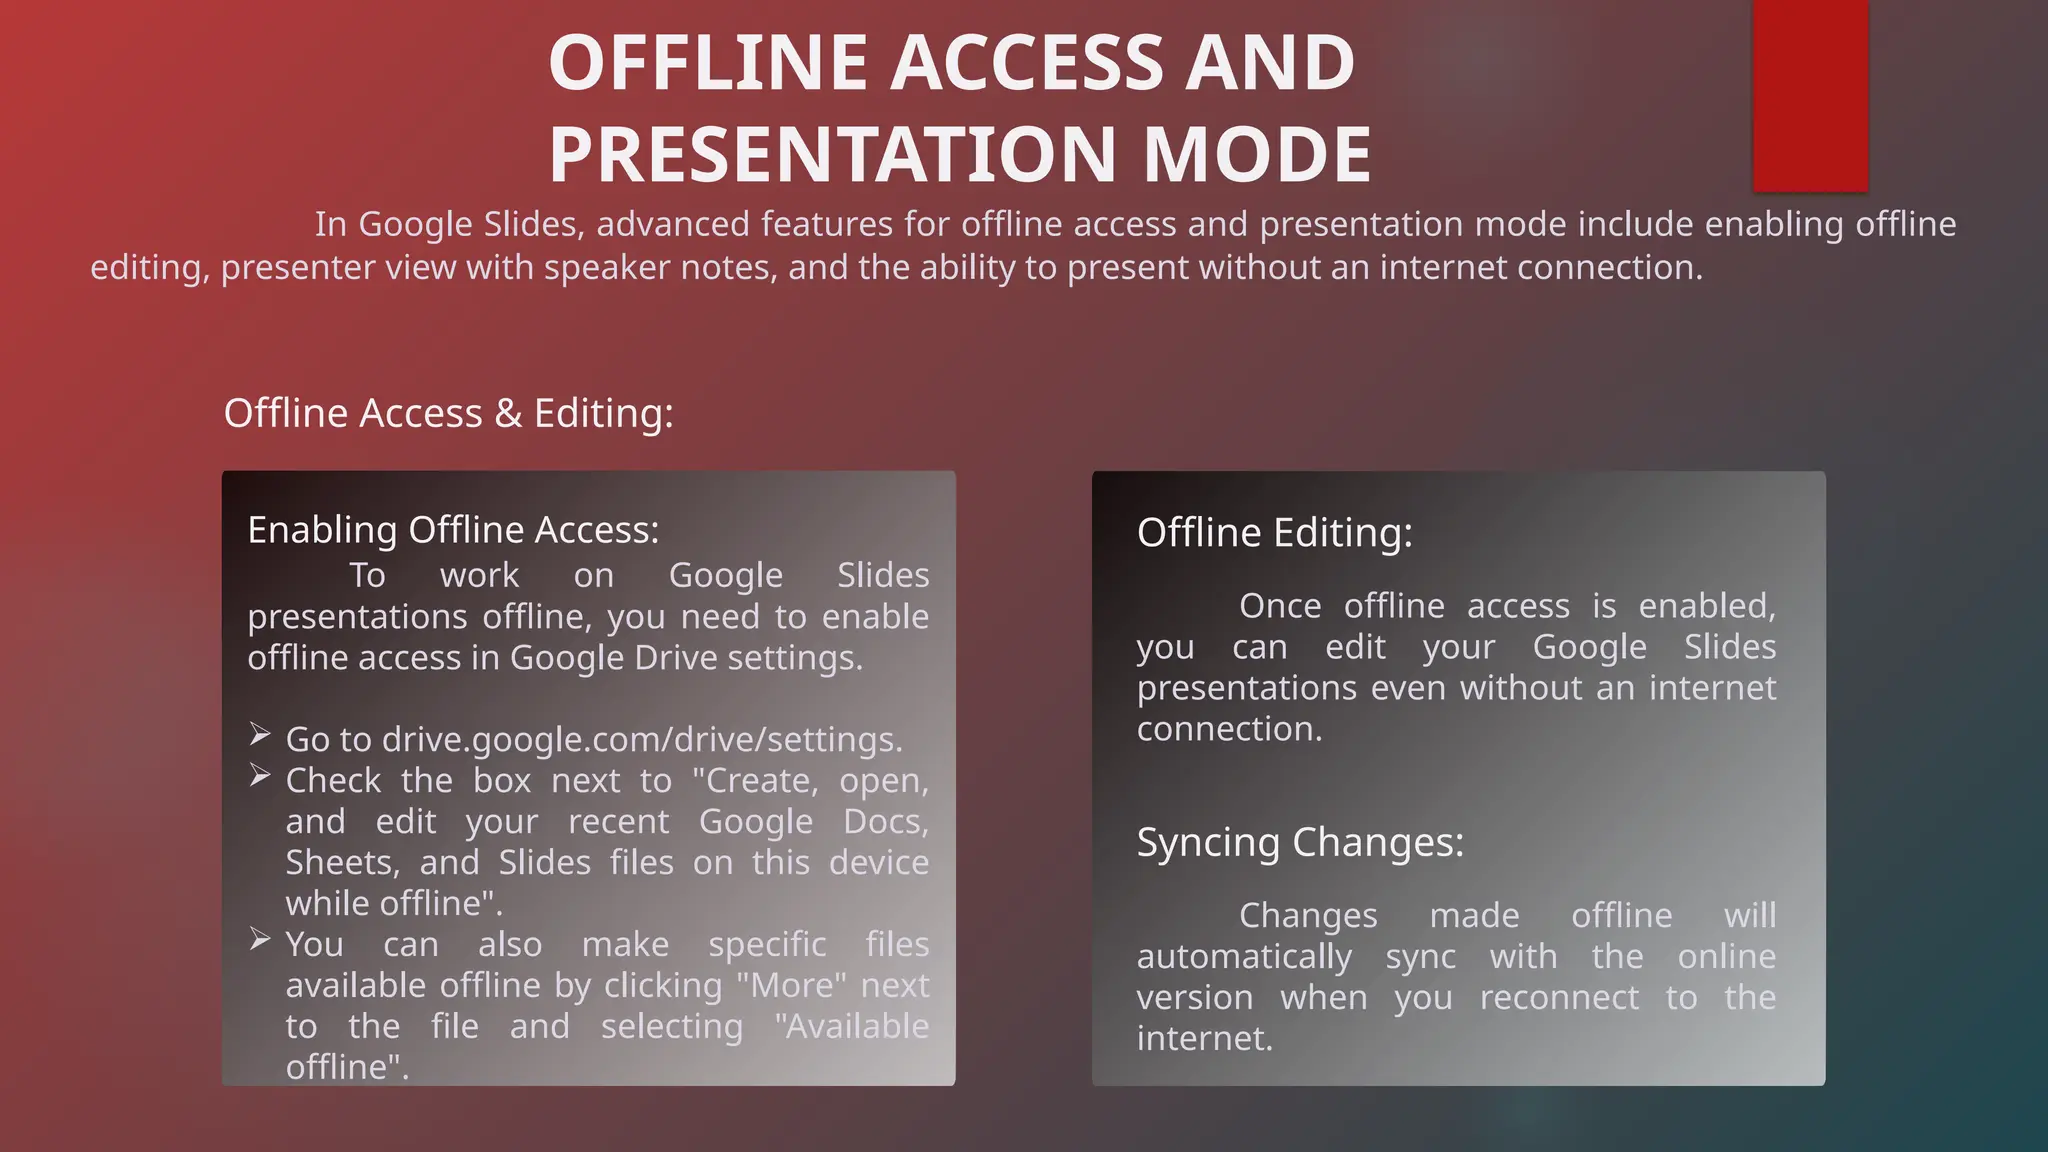
In Google Slides,advanced features for offline access and presentation mode include enabling offline
editing, presenter view with speaker notes, and the ability to present without an internet connection.
OFFLINE ACCESS AND
PRESENTATION MODE
Offline Access & Editing:
Enabling Offline Access:
To work on Google Slides
presentations offline, you need to enable
offline access in Google Drive settings.
Go to drive.google.com/drive/settings.
Check the box next to "Create, open,
and edit your recent Google Docs,
Sheets, and Slides files on this device
while offline".
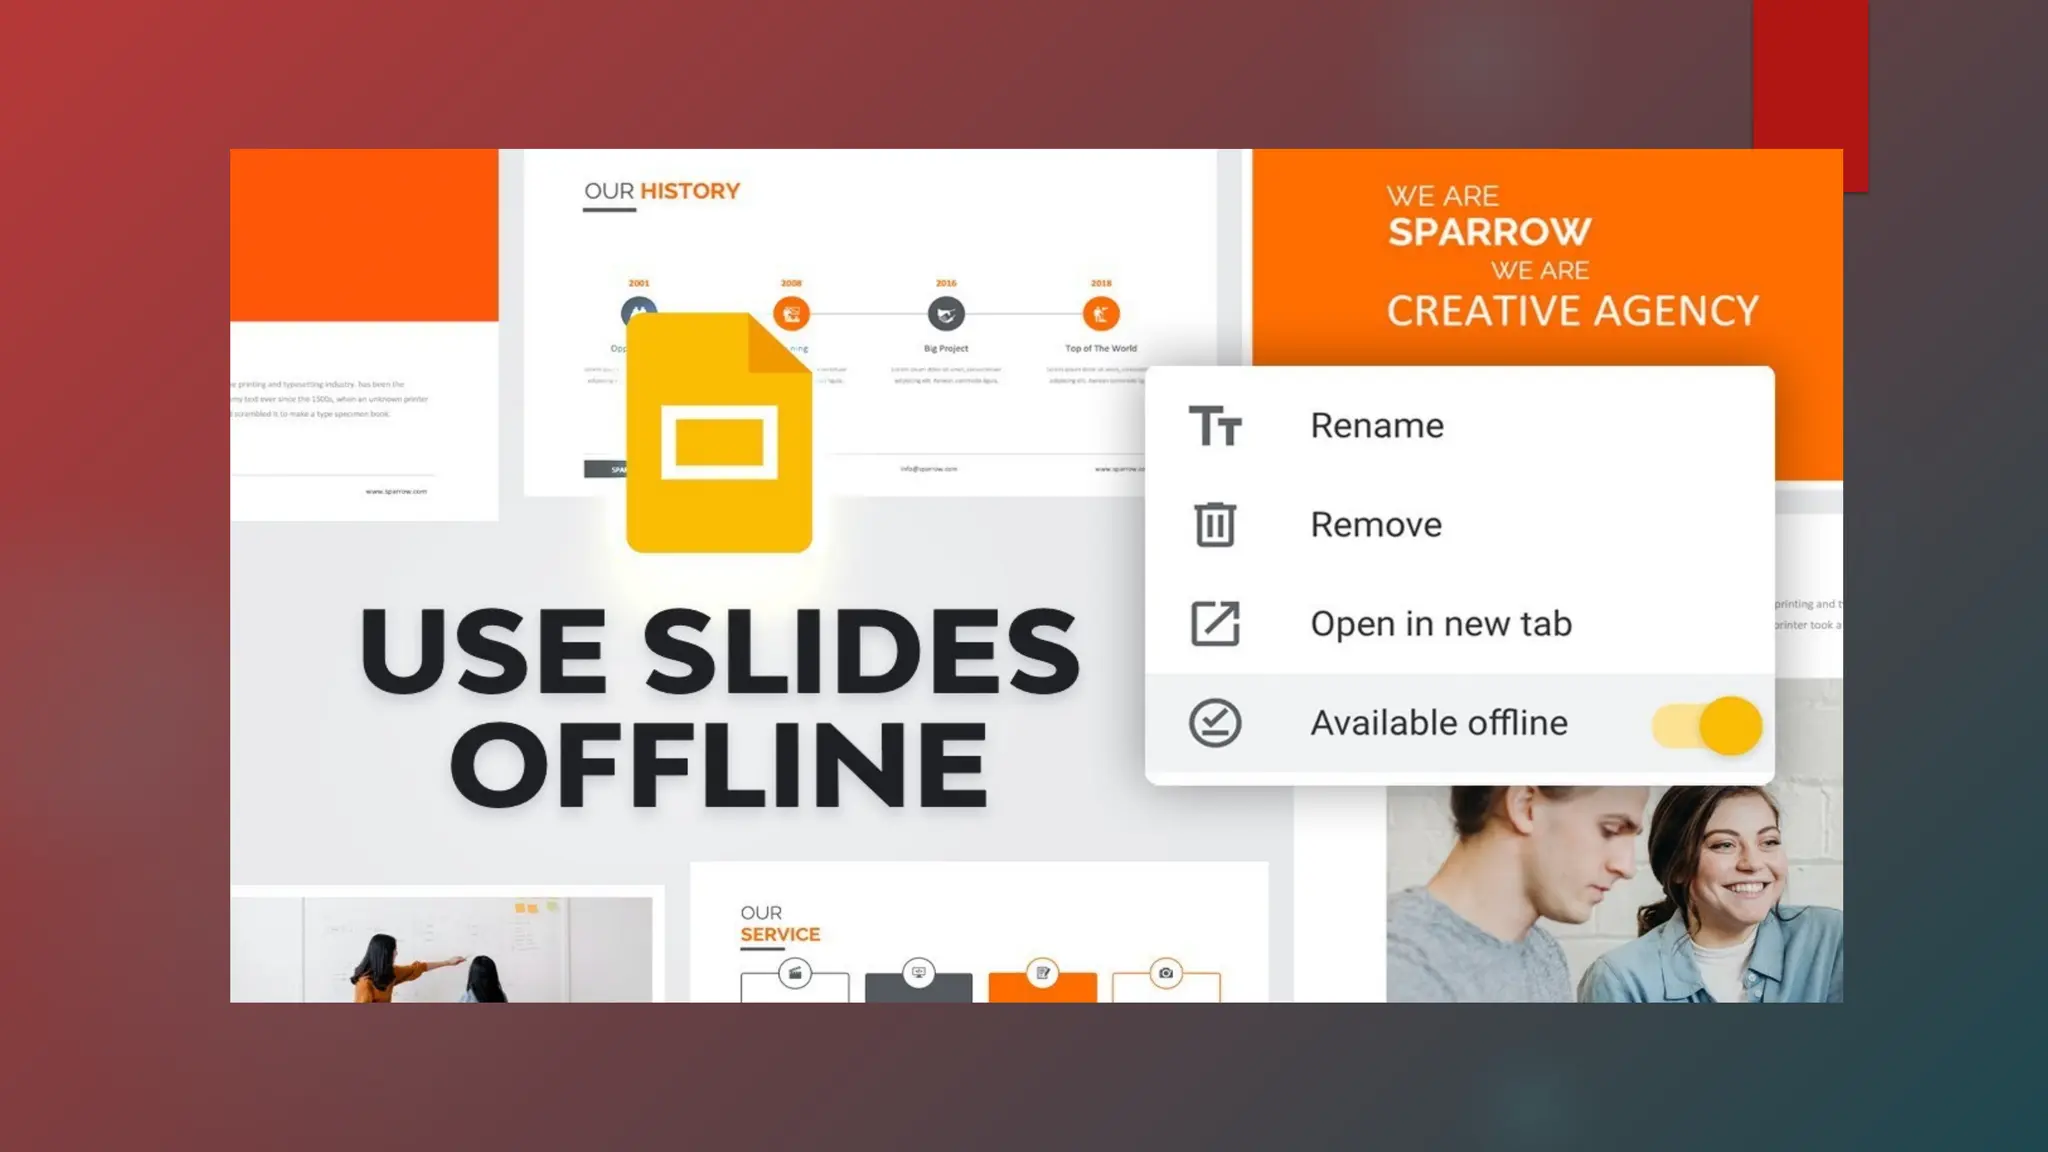
You can also make specific files
available offline by clicking "More" next
to the file and selecting "Available
offline".
Offline Editing:
Once offline access is enabled,
you can edit your Google Slides
presentations even without an internet
connection.
Syncing Changes:
Changes made offline will
automatically sync with the online
version when you reconnect to the
internet.
120.
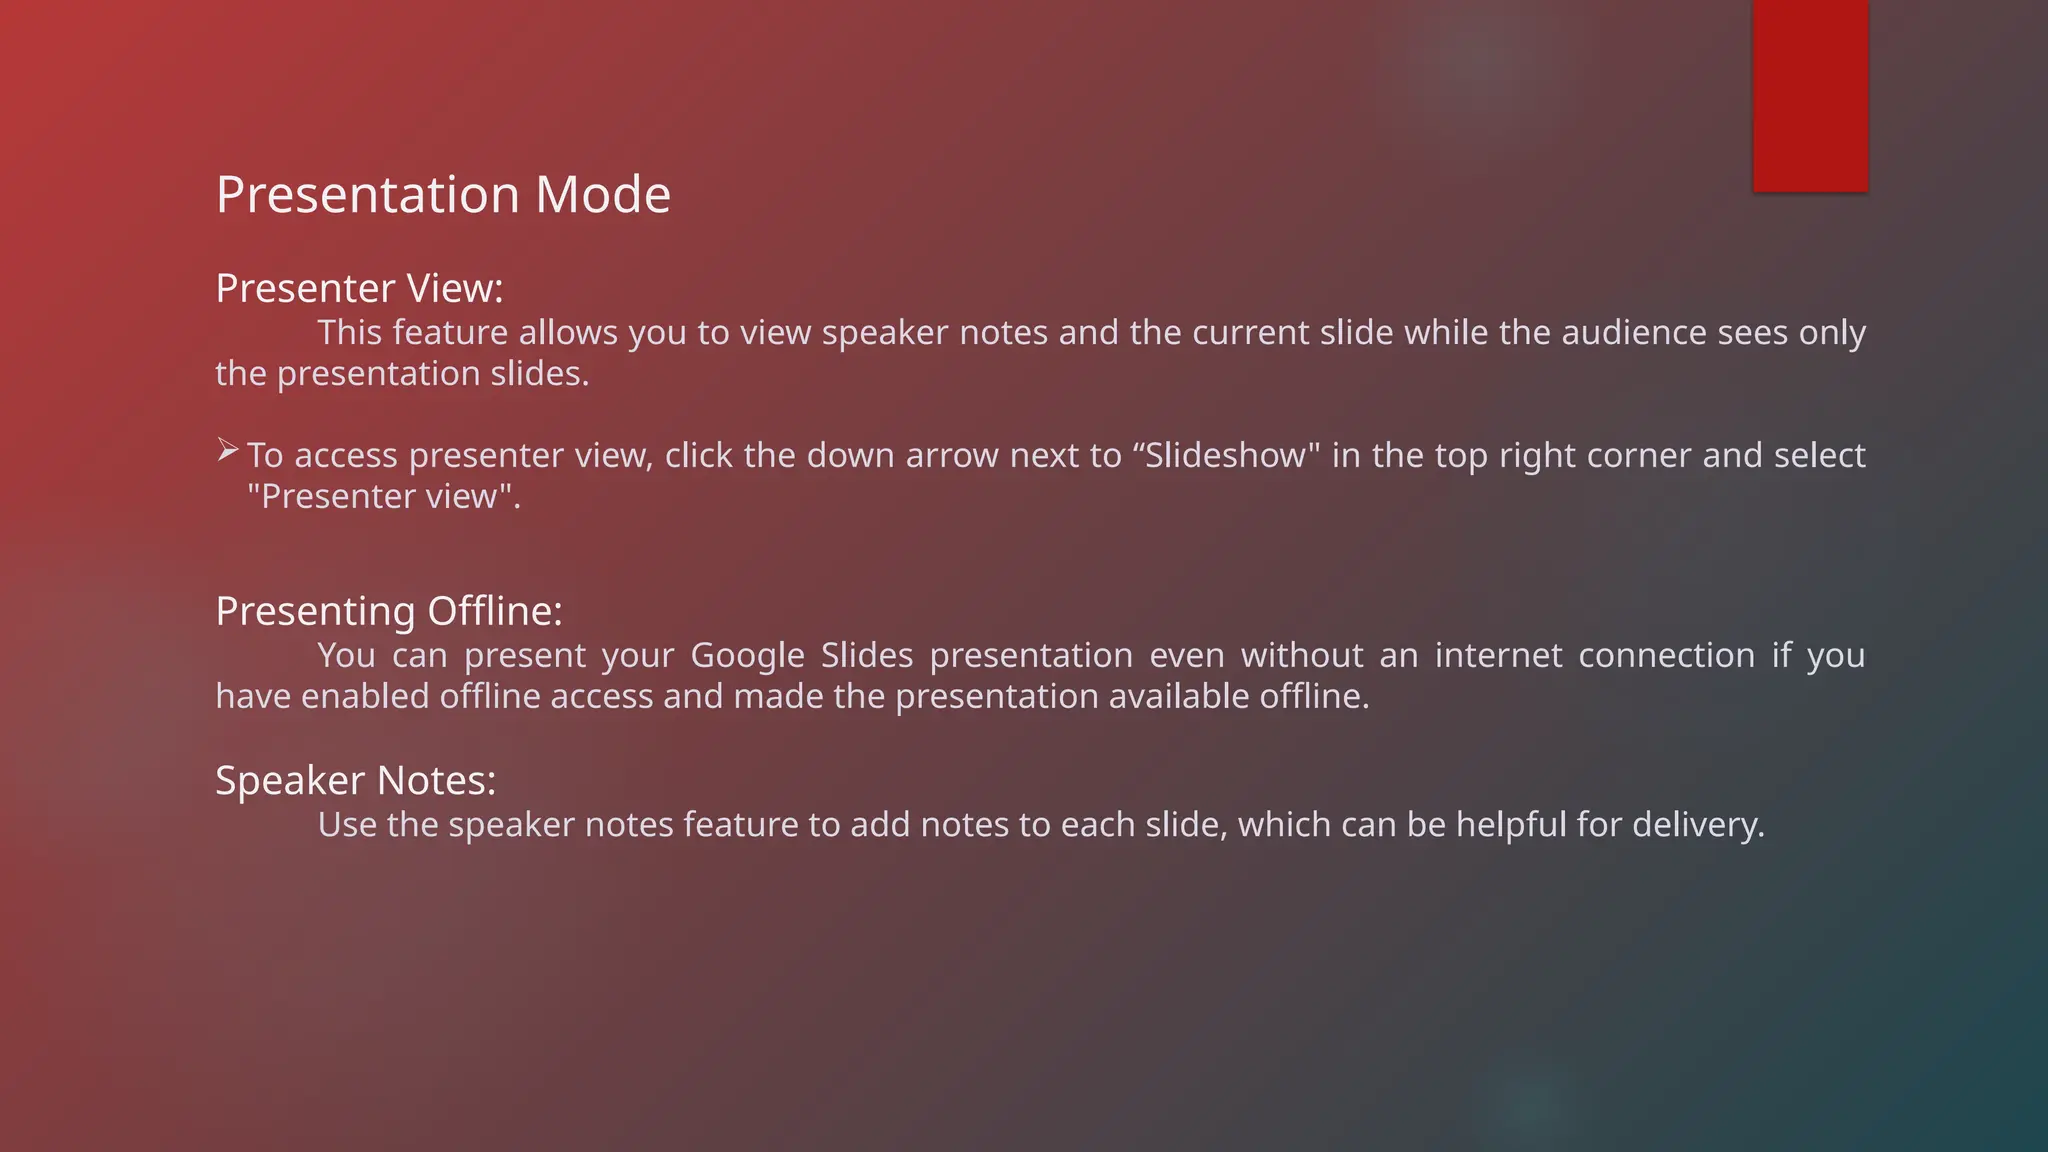
Presentation Mode
Presenter View:
Thisfeature allows you to view speaker notes and the current slide while the audience sees only
the presentation slides.
To access presenter view, click the down arrow next to “Slideshow" in the top right corner and select
"Presenter view".
Presenting Offline:
You can present your Google Slides presentation even without an internet connection if you
have enabled offline access and made the presentation available offline.
Speaker Notes:
Use the speaker notes feature to add notes to each slide, which can be helpful for delivery.


![Coded Agents – with UiPath SDK + LangGraph [Virtual Hands-on Workshop]](https://cdn.slidesharecdn.com/ss_thumbnails/codedagentsdeck-251215155422-5497c599-thumbnail.jpg?width=640&height=640&fit=bounds)


