Procedure of animation in 3 d autodesk maya tools & techniquesijcga
At present time a new technique to approaches for producing computer animation by using software. It is introduced at university level as a text for under graduates and post graduates. It is also useful for those who want to become computer graphics programmers or animation professionals. It is newly introduced techniques in which anyone can create animation for game, education or for entertainment. It addresses the issue of computer-based animation which primarily deals with multiple 2 dimensional planes. This document concentrates on full 3D computer animation by using Autodesk Maya software which is latest for animation and identifies the useful methods and techniques to move objects in interesting ways. In present time many film makers uses it for creating cartoon character for characterize their visualization on screen. A lot of softwares are available in market which helps to create such kind of animation and effect with help of computer graphics.
Packmage CAD is a free corrugated and folding carton box packaging design software, it offers a cost effective solution for carton packaging box template design.
Adobe Photoshop is a raster graphics editor developed and published by Adobe Systems for Windows and OS X.
Photoshop was created in 1988 by Thomas and John Knoll. Since then, it has become the de facto industry standard in raster graphics editing, such that the word "photoshop" has become a verb as in "to Photoshop an image," "photo shopping" and "photoshop contest", though Adobe discourages such use. It can edit and compose raster images in multiple layers and supports masks, alpha compositing and several color models including RGB, CMYK, Lab color space, spot color and duotone. Photoshop has vast support for graphic file formats but also uses its own PSD and PSB file formats which support all the aforementioned features. In addition to raster graphics, it has limited abilities to edit or render text, vector graphics (especially through clipping path), 3D graphics and video. Photoshop's featureset can be expanded by Photoshop plug-ins, programs developed and distributed independently of Photoshop that can run inside it and offer new or enhanced features. so we want to go to reveal some Photoshop secrets which make you more professional designer in your pathway.
Hi, i am Nahid turjo from Bangladesh. i am a professional Photoshop editor. today i share with you 10 secrets of Photoshop. Hopefully its very helpful to all Photoshop users.
Best of Luck.....
32 Killer PhotoShop Tips & Tricks that Make You an Expert.CPZ Media
Check out our top 32 Killer photoshop shortcut tips and tricks that make your photoshop work more easy and comfortable. If you do any mistake then use these tips and tricks in Adobe photoshop and drawback your work again.
Visit our blog site to get more tips.
http://clippingpathzone.com/blog/
Follow us and get all latest slides quickly.
Synthetic Fiber Construction in lab .pptxPavel ( NSTU)
Synthetic fiber production is a fascinating and complex field that blends chemistry, engineering, and environmental science. By understanding these aspects, students can gain a comprehensive view of synthetic fiber production, its impact on society and the environment, and the potential for future innovations. Synthetic fibers play a crucial role in modern society, impacting various aspects of daily life, industry, and the environment. ynthetic fibers are integral to modern life, offering a range of benefits from cost-effectiveness and versatility to innovative applications and performance characteristics. While they pose environmental challenges, ongoing research and development aim to create more sustainable and eco-friendly alternatives. Understanding the importance of synthetic fibers helps in appreciating their role in the economy, industry, and daily life, while also emphasizing the need for sustainable practices and innovation.
The French Revolution, which began in 1789, was a period of radical social and political upheaval in France. It marked the decline of absolute monarchies, the rise of secular and democratic republics, and the eventual rise of Napoleon Bonaparte. This revolutionary period is crucial in understanding the transition from feudalism to modernity in Europe.
For more information, visit-www.vavaclasses.com
How to Make a Field invisible in Odoo 17Celine George
It is possible to hide or invisible some fields in odoo. Commonly using “invisible” attribute in the field definition to invisible the fields. This slide will show how to make a field invisible in odoo 17.
Welcome to TechSoup New Member Orientation and Q&A (May 2024).pdfTechSoup
In this webinar you will learn how your organization can access TechSoup's wide variety of product discount and donation programs. From hardware to software, we'll give you a tour of the tools available to help your nonprofit with productivity, collaboration, financial management, donor tracking, security, and more.
Unit 8 - Information and Communication Technology (Paper I).pdfThiyagu K
This slides describes the basic concepts of ICT, basics of Email, Emerging Technology and Digital Initiatives in Education. This presentations aligns with the UGC Paper I syllabus.
2024.06.01 Introducing a competency framework for languag learning materials ...Sandy Millin
http://sandymillin.wordpress.com/iateflwebinar2024
Published classroom materials form the basis of syllabuses, drive teacher professional development, and have a potentially huge influence on learners, teachers and education systems. All teachers also create their own materials, whether a few sentences on a blackboard, a highly-structured fully-realised online course, or anything in between. Despite this, the knowledge and skills needed to create effective language learning materials are rarely part of teacher training, and are mostly learnt by trial and error.
Knowledge and skills frameworks, generally called competency frameworks, for ELT teachers, trainers and managers have existed for a few years now. However, until I created one for my MA dissertation, there wasn’t one drawing together what we need to know and do to be able to effectively produce language learning materials.
This webinar will introduce you to my framework, highlighting the key competencies I identified from my research. It will also show how anybody involved in language teaching (any language, not just English!), teacher training, managing schools or developing language learning materials can benefit from using the framework.
Instructions for Submissions thorugh G- Classroom.pptxJheel Barad
This presentation provides a briefing on how to upload submissions and documents in Google Classroom. It was prepared as part of an orientation for new Sainik School in-service teacher trainees. As a training officer, my goal is to ensure that you are comfortable and proficient with this essential tool for managing assignments and fostering student engagement.
The Indian economy is classified into different sectors to simplify the analysis and understanding of economic activities. For Class 10, it's essential to grasp the sectors of the Indian economy, understand their characteristics, and recognize their importance. This guide will provide detailed notes on the Sectors of the Indian Economy Class 10, using specific long-tail keywords to enhance comprehension.
For more information, visit-www.vavaclasses.com
Overview on Edible Vaccine: Pros & Cons with Mechanism
Pdf Tutorialb Blender
1. Blender 2.47 QuickStart
4. Managing 3D Objects
1. Blender's Interface 6. Mesh Modelling 9. Rendering
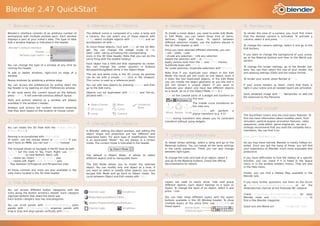
Blender’s interface consists of an arbitrary number of The default scene is composed of a cube, a lamp and To model a mesh object, you need to enter Edit Mode. To render the view of a camera, you must first check
workspaces with multiple window each. Each window a camera, You can select any of these objects with In Edit Mode, you can select three kind of items: that the desired camera is activated. To activate a
displays a part of your scene’s data. The type of data RMB, select multiple objects with Shift·RMB and se- Vertices, Edges and Faces. To switch between camera, select it and press Ctrl-Numpad 0.
that a window displays is indicated in the header. lect/deselect all with A. different selection modes, use the buttons placed in
the 3D View header or with Ctrl·Tab. To change the camera settings, select it and go to the
To move these objects, click with LMB on the 3D Wid-
Blender's default interface Edit buttons.
get. You can change the widget mode to Ro- Once you have selected different elements, you can:
3D window
Header tate/Scale/Grab by activating the corresponding Grab, Rotate, Scale;
If you want to change the background of your scene,
Window type switch icons in the 3D View header. Note that you can do the Extrude any selection; Knife any selection
go to the Material buttons and then to the World sub-
same thing with the bolded hotkeys. Delete the selection with X or Delete;
Buttons window section.
Apply various tools from the W and Ctrl·E menus;
Each object has a little dot that represents its center.
You can change the type of a window at any time by Subdivide loops with Ctrl·R;
You can change the center position in Buttons To change the render settings, go to the Render but-
clicking the header. SeParate selection; Duplicate selections with Shift·D.
Window/Editing/Mesh while in the Object Mode. tons. You can then select the size of your render, the
To add or delete windows, right-click on edge of a Note that if you duplicate your object in the Edit anti-aliasing settings (OSA) and the output format.
The red and white cross is the 3D cursor. Its position
window. Mode, the result will still count as one object, even if
can be set with a simple LMB click in the viewport.
it looks like two duplicated objects. In the Edit Mode To render your scene, press Render or F12.
Resize windows by grabbing a window edge. This cursor is used as a reference point.
you can modify the object geometry as you like and it
You can access the preferences by pulling down the You can add new objects by pressing Space and then will still remain a unique object. If you want to If your scene renders as black, check that there is
top header or by opening an User Preferences window. go to the Add menu. duplicate your object and have two different objects light in your scene and all needed layers are activated.
as a result, do so in the Object Mode. (See §4)
To set (and save) the current layout as the default, Objects can be duplicated with Shift·D and link-du-
Save rendered image with F3. Remember to add the
press Ctrl·U. It will override previous default layout. plicated with Alt·D. LMB on the colored parts of a widget will tranform on
file extension to the filename.
this axis.
Tools and actions relative to a window are always Global
available in the window’s header. The middle circle transforms on
Armature/
Object Center Mesh
the view axis.
10. Final Words
Bone
Hotkeys and actions are context sensitive meaning
3D Cursor Curve
that they work based on the location of mouse cursor. Shift·LMB will perform a
Move Rotate Scale
Lamp Camera planar transform (e.g. X,Y).
The QuickStart covers only the most basic features. To
find out more information about modifier stack, fluid
MMB during transform also allows you to constraint
2. Navigating in the 3D View simulator, particle engine, animation features, video
transform without using widgets.
4. Managing 3D Objects sequencer, node editor, game engine etc. we very
strongly recommend that you read the complete docu-
You can rotate the 3D View with the Middle Mouse
mentation. You can find it on:
Button (MMB). In Blender, editing the object position, and editing the
object shape and properties are two different and
7. Lamps and Materials http://wiki.blender.org.
Panning is accomplished with Shift·MMB. separated tasks. For each type of modification, there
To zoom, use the mouse wheel or Ctrl·MMB. If you is an associated quot;Modequot;. You are always in a certain
As you may have noticed, Blender is mostly hotkey ori-
To tweak lamps settings, select a lamp and go to the
don't have an MMB, you can use Alt·LMB instead mode. The current mode is indicated in the header.
ented. Once you get the hang of these, you will find
Materials buttons. You can tweak all the lamp settings
your experience on Blender much more enjoyable and
in the Lamp subsection. There you can also change
The numpad allows to navigate in the3D View as well: Object Mode
productive.
between light types.
7, 1, 3 set the view to Top, Front, Right; use Ctrl-7,
Ctrl-1, Ctrl-3 to view Bottom, Back, Left The default is Object Mode. It allows to select
If you have difficulties to find the hotkey of a specific
To change the color and look of an object, select it
8, 2 rotate Up, Down; Shift-8, Shift-2 pan different objects and to manipulate them.
function, you can check if it is listed in the Space
and go to the Material buttons. Check the official
4, 6 rotate Left, Right; Shift-4, Shift-6 pan
menu or in the window headers menus. They are also
documentation for details.
5 flips between Orthogonal and Perspective view The Edit Mode allows you to model the selected
in the Help menu.
object. You can modify only one object at a time. If
All those controls and more are also available in the you want to select or modify other objects, you must
Finally, you can find a Hotkey Map available in the
view menu located in the 3D View header. escape Edit Mode and go back to Object mode. You
8. Layers Blender wiki.
cycle between Object and Edit modes with Tab.
Layers are used to easily show, hide and group
3. The Buttons Window If you have further questions, ask them on the forum
different objects. Each object belongs to a layer or at http://www.blenderartists.org, or on the
layers. To change the layer of an object, select it and #blenderchat channel at the freenode IRC network.
You can access different button categories with the press Move.
(Game) Logic Scriptlinks
icons along the Button window's header. Each category
Check http://www.blendernation.com for daily
regroups buttons that share the same use. You can then show different layers with the layers
Materials/Lamp/World Editor Blender news and http://www.blenderart.org to
Each button category also has subcategories. buttons available in the 3D Window header. To show find a free Blender magazine.
Object Properties/Physics/Particles multiple layers at the same time, use Shift·LMB on
You can scroll panels with Shift·Mousewheel, zoom these layers. Good luck and Blend on! -The Blender Team
Active layer
panels with Ctrl·Mousewheel, organise panels with (Game) Logic Scriptlinks
Unactive layer
drag & drop and align panels vertically with RMB.