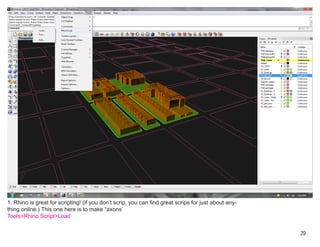
DUSPviz RHINO 4.0 WORKSHOP
         03.02.2012


     prepared by Viktorija Abolina


                                     1
NURBS, Non-Uniform Rational B-Splines, are mathematical represen-
tations of 3-D geometry that can accurately describe any shape from
a simple 2-D line, circle, arc, or curve to the most complex 3-D organic
free-form surface or solid. Because of their flexibility and accuracy,
NURBS models can be used in any process from illustration and ani-
mation to manufacturing.*


* http://www.rhino3d.com/nurbs.htm


                                                                     2
Select model units.
Urban: feet
Architectural: inches


                        3
4
Modify your display:
View - Display Options


                         5
Modify your display:
View - Display Options


                         6
Modify your tools:
Right click on Toolbar and check/un-check the tools you’ll use,


                                                                  7
Modify your tools:
Right click on Toolbar and check/un-check the tools you’ll use,


                                                                  8
Modify your view
Right click on viewport title - Set View - Perspective
Same menu can be used to modify
1. how 3D object are rendered on the screen.
2. camera view angle
                                                         9
3. Vewport Properties, etc.
Import a drawing from GIS/CAD/IL
File - Import


                                   10
Import a drawing from GIS/CAD/IL
1. Choose your file (Supported file formats from GIS: “.dxf” “.dwg”)
2. Open

                                                                       11
Modify object properties in Layer window.


                                            12
Turn off layers you are not working with
in Layer Properties switch off a layer (light bulb icon)


                                                           13
Turn off layers you are not working with
in Layer Properties switch off a layer (light bulb icon)


                                                           14
15
Layer Management: select all objects
right-click on the layer > Select Objects


                                            16
1. Create New Layer in Layer Properties
double click new layer to activate
2. extrude object to 3D select outline and type:
Extrude
                                                   17
Change View:
right-click on viewport and select the view to Ghosted


                                                         18
Make 3D type:
Extrude


                19
1. Create New Layer in Layer Properties this time for curbs
double click new layer to activate
2. extrude object to 3D select outline and type:
Extrude
                                                              20
1. Create New Layer in Layer Properties this time for curbs
double click new layer to activate
2. extrude object to 3D select outline and type:
Extrude
                                                              21
Select all curbes
right-click layer select Object


                                  22
1. Select all curbs
right-click layer Select Object
2. lock so you only have orthogonal movement
press F8 or clock ortho on the bottom
3. to move type
                                               23
Move
1. Make a 2D drawing, type:
Make2D
2. Zoom, type:
Zoom
type S (to zoom to selection)
                                24
1. Export your 2D drawing, got to:
File>Export Selected


                                     25
1. Choose your format and file name


                                      26
1. For a quick basic render choose Material in Layer Properties


                                                                  27
1. For a quick basic render: press render (blue ball) on the menu bar


                                                                        28
1. Rhino is great for scripting! (if you don’t scrip, you can find great scrips for just about any-
thing online.) This one here is to make “axons’
Tools>Rhino Script>Load


                                                                                                      29
1. You can print directly from Rhino at a correct scale
File>Print
1. Select Printer or PDF
2. Select Scale
3. Move Window and select line weights
                                                          30
4. Print
Additional Resources


                       31
32
33
34
35
36
37
38
39
40
41
QUESTIONS


            42

Rhino Crash Course

  • 1.
    DUSPviz RHINO 4.0WORKSHOP 03.02.2012 prepared by Viktorija Abolina 1
  • 2.
    NURBS, Non-Uniform RationalB-Splines, are mathematical represen- tations of 3-D geometry that can accurately describe any shape from a simple 2-D line, circle, arc, or curve to the most complex 3-D organic free-form surface or solid. Because of their flexibility and accuracy, NURBS models can be used in any process from illustration and ani- mation to manufacturing.* * http://www.rhino3d.com/nurbs.htm 2
  • 3.
    Select model units. Urban:feet Architectural: inches 3
  • 4.
  • 5.
    Modify your display: View- Display Options 5
  • 6.
    Modify your display: View- Display Options 6
  • 7.
    Modify your tools: Rightclick on Toolbar and check/un-check the tools you’ll use, 7
  • 8.
    Modify your tools: Rightclick on Toolbar and check/un-check the tools you’ll use, 8
  • 9.
    Modify your view Rightclick on viewport title - Set View - Perspective Same menu can be used to modify 1. how 3D object are rendered on the screen. 2. camera view angle 9 3. Vewport Properties, etc.
  • 10.
    Import a drawingfrom GIS/CAD/IL File - Import 10
  • 11.
    Import a drawingfrom GIS/CAD/IL 1. Choose your file (Supported file formats from GIS: “.dxf” “.dwg”) 2. Open 11
  • 12.
    Modify object propertiesin Layer window. 12
  • 13.
    Turn off layersyou are not working with in Layer Properties switch off a layer (light bulb icon) 13
  • 14.
    Turn off layersyou are not working with in Layer Properties switch off a layer (light bulb icon) 14
  • 15.
  • 16.
    Layer Management: selectall objects right-click on the layer > Select Objects 16
  • 17.
    1. Create NewLayer in Layer Properties double click new layer to activate 2. extrude object to 3D select outline and type: Extrude 17
  • 18.
    Change View: right-click onviewport and select the view to Ghosted 18
  • 19.
  • 20.
    1. Create NewLayer in Layer Properties this time for curbs double click new layer to activate 2. extrude object to 3D select outline and type: Extrude 20
  • 21.
    1. Create NewLayer in Layer Properties this time for curbs double click new layer to activate 2. extrude object to 3D select outline and type: Extrude 21
  • 22.
    Select all curbes right-clicklayer select Object 22
  • 23.
    1. Select allcurbs right-click layer Select Object 2. lock so you only have orthogonal movement press F8 or clock ortho on the bottom 3. to move type 23 Move
  • 24.
    1. Make a2D drawing, type: Make2D 2. Zoom, type: Zoom type S (to zoom to selection) 24
  • 25.
    1. Export your2D drawing, got to: File>Export Selected 25
  • 26.
    1. Choose yourformat and file name 26
  • 27.
    1. For aquick basic render choose Material in Layer Properties 27
  • 28.
    1. For aquick basic render: press render (blue ball) on the menu bar 28
  • 29.
    1. Rhino isgreat for scripting! (if you don’t scrip, you can find great scrips for just about any- thing online.) This one here is to make “axons’ Tools>Rhino Script>Load 29
  • 30.
    1. You canprint directly from Rhino at a correct scale File>Print 1. Select Printer or PDF 2. Select Scale 3. Move Window and select line weights 30 4. Print
  • 31.
  • 32.
  • 33.
  • 34.
  • 35.
  • 36.
  • 37.
  • 38.
  • 39.
  • 40.
  • 41.
  • 42.