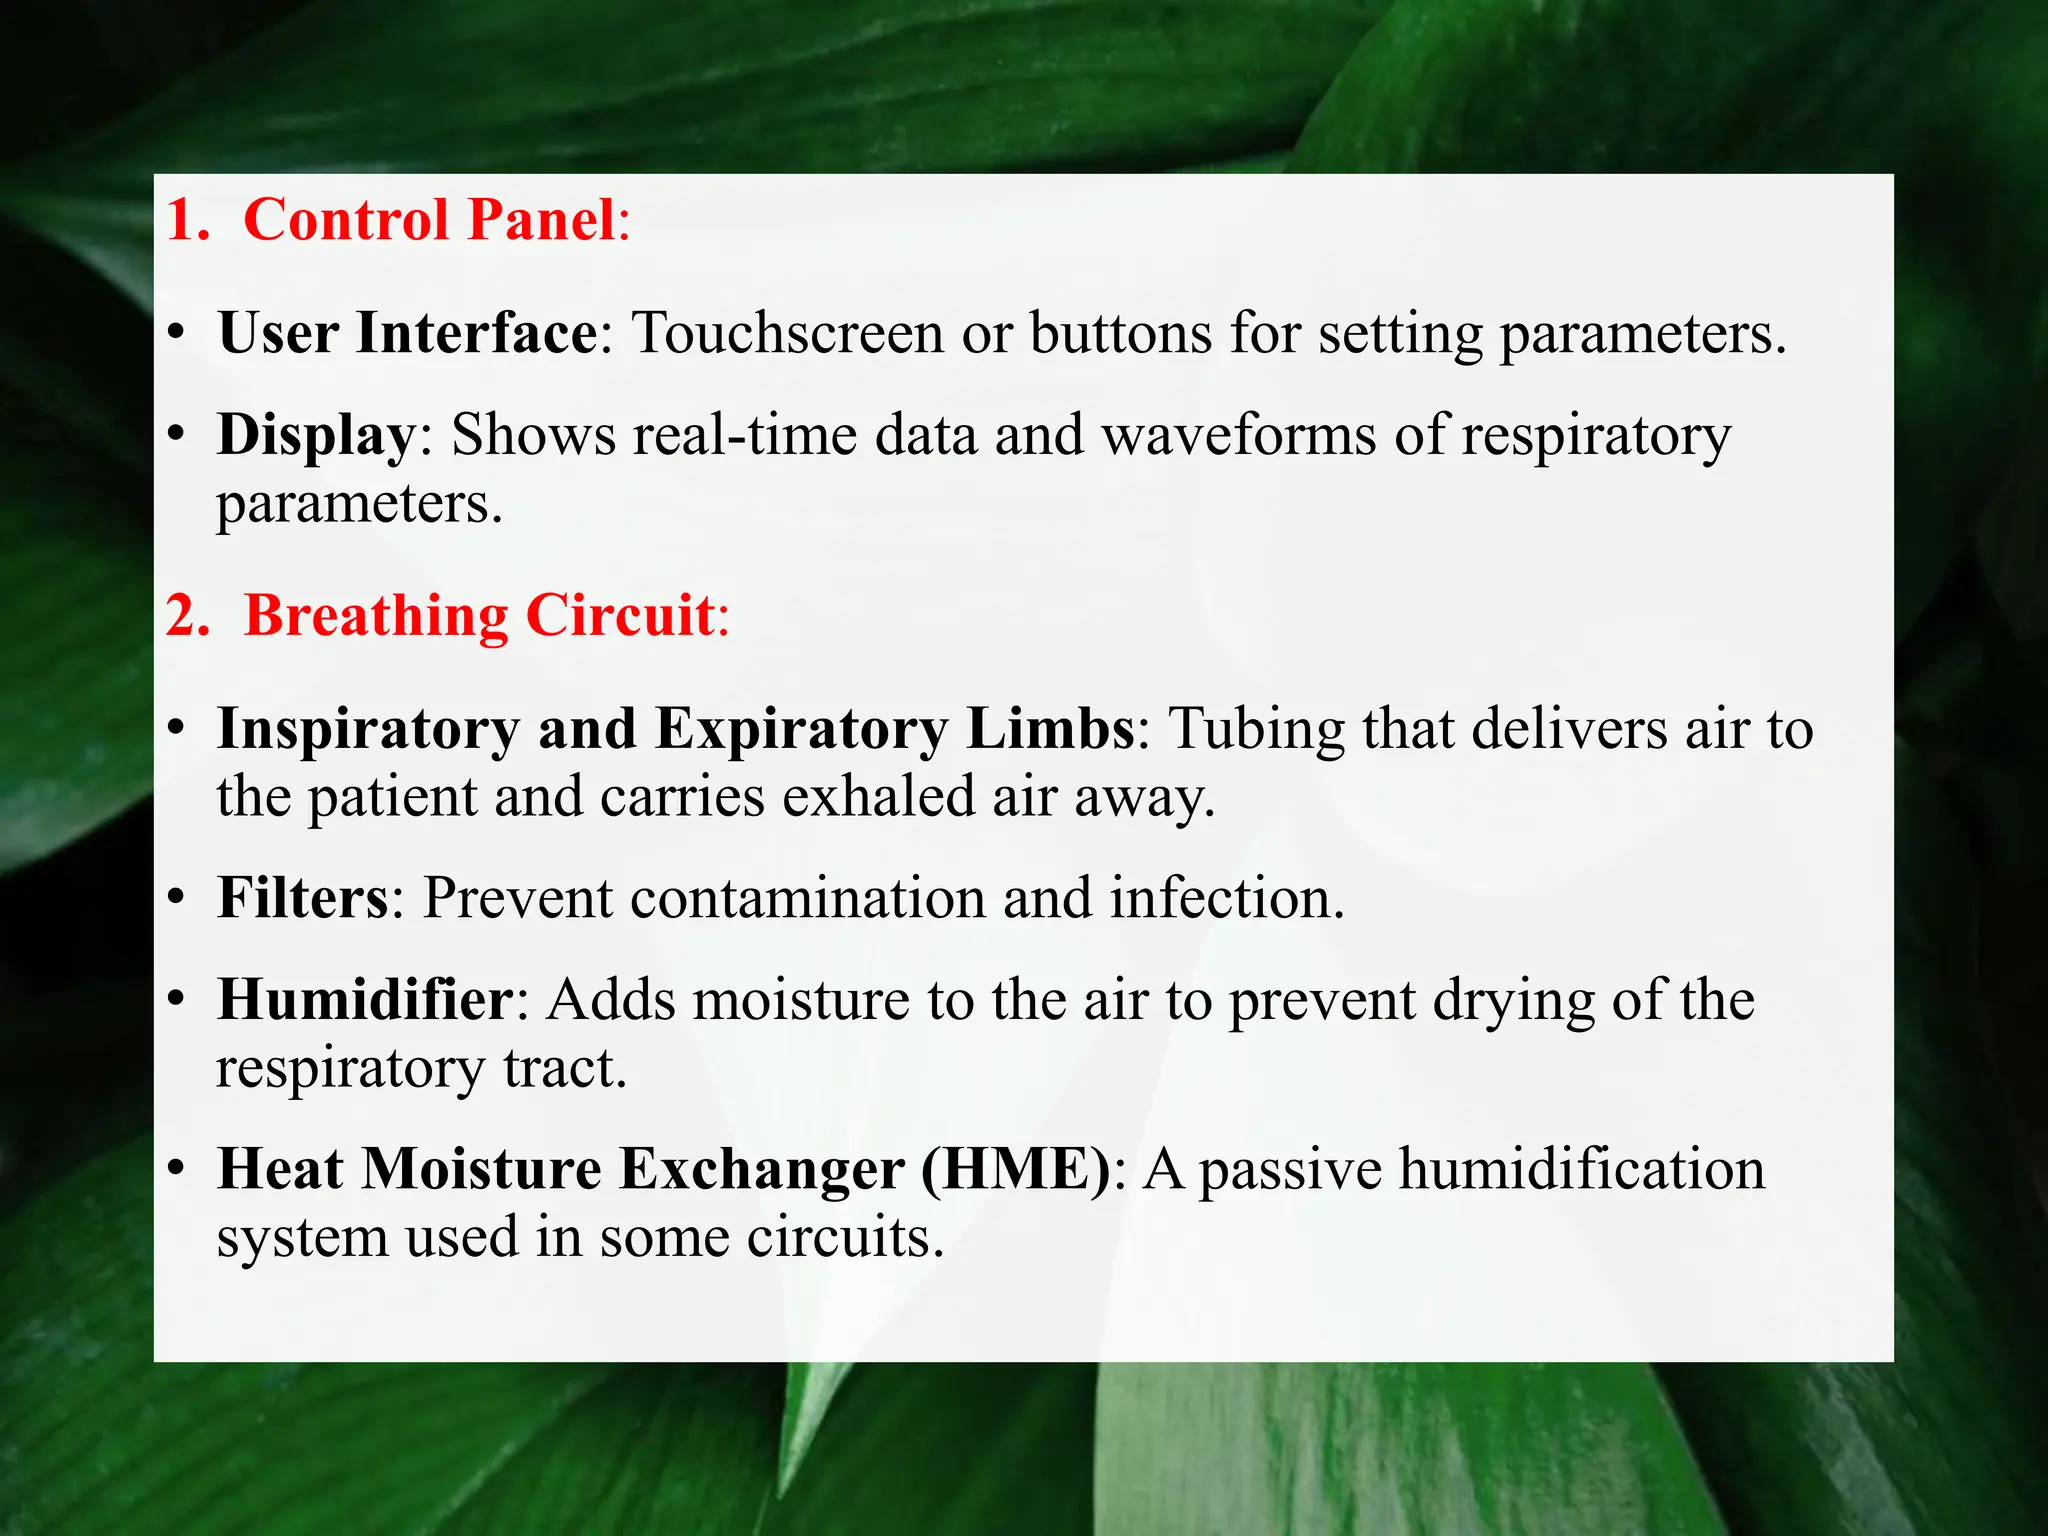
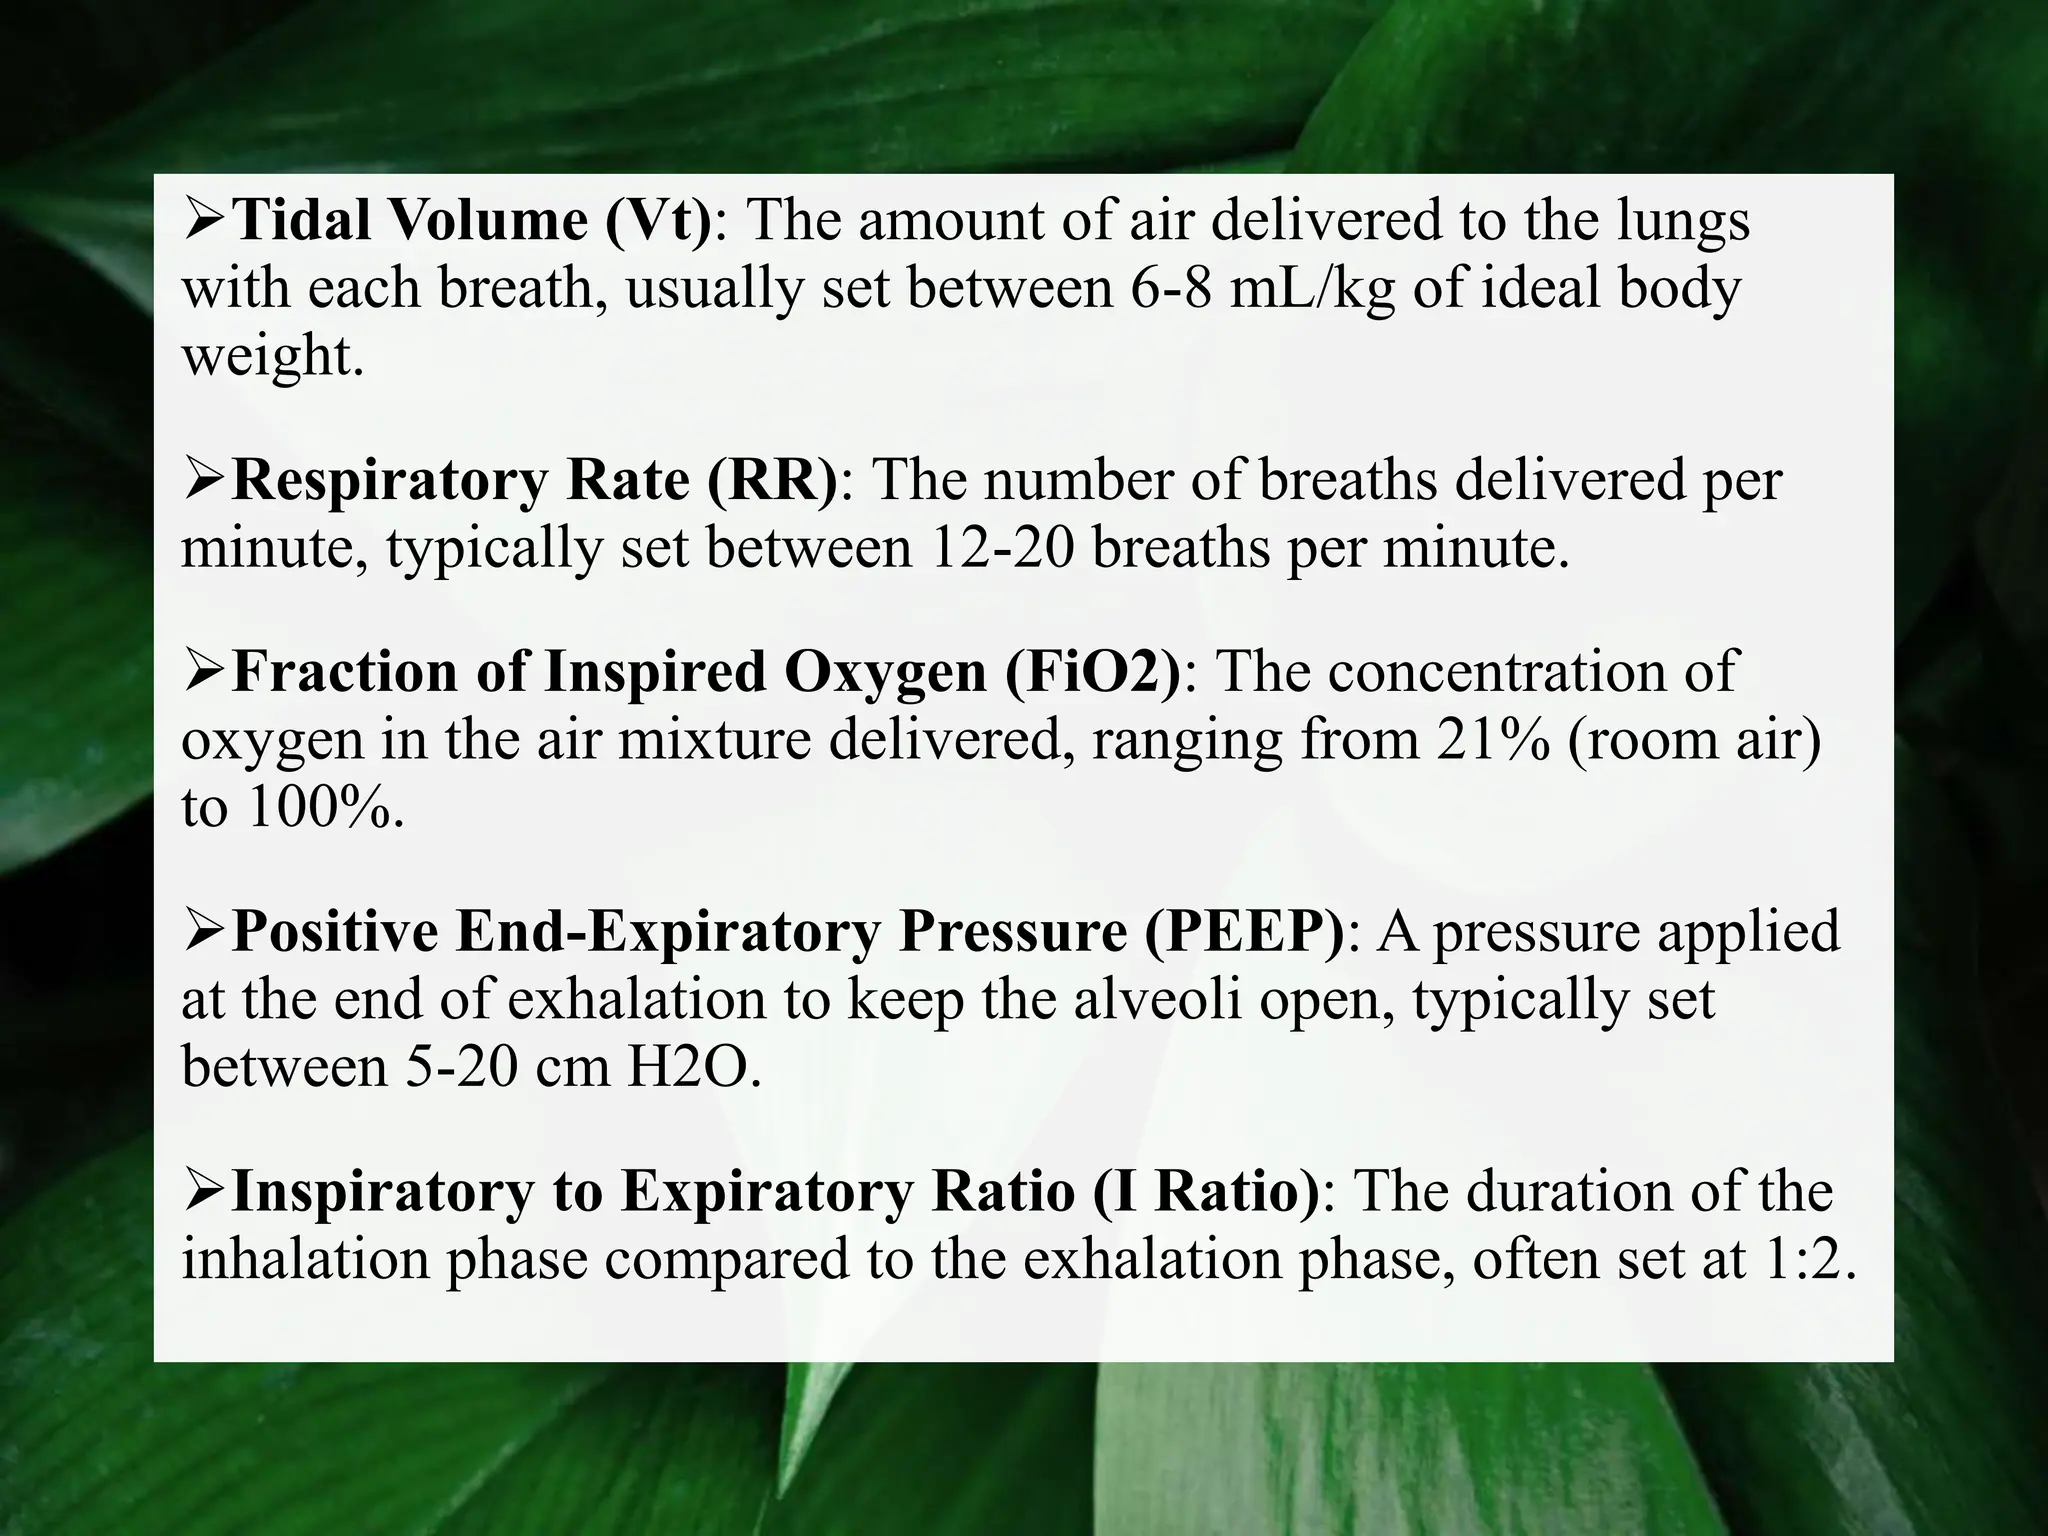
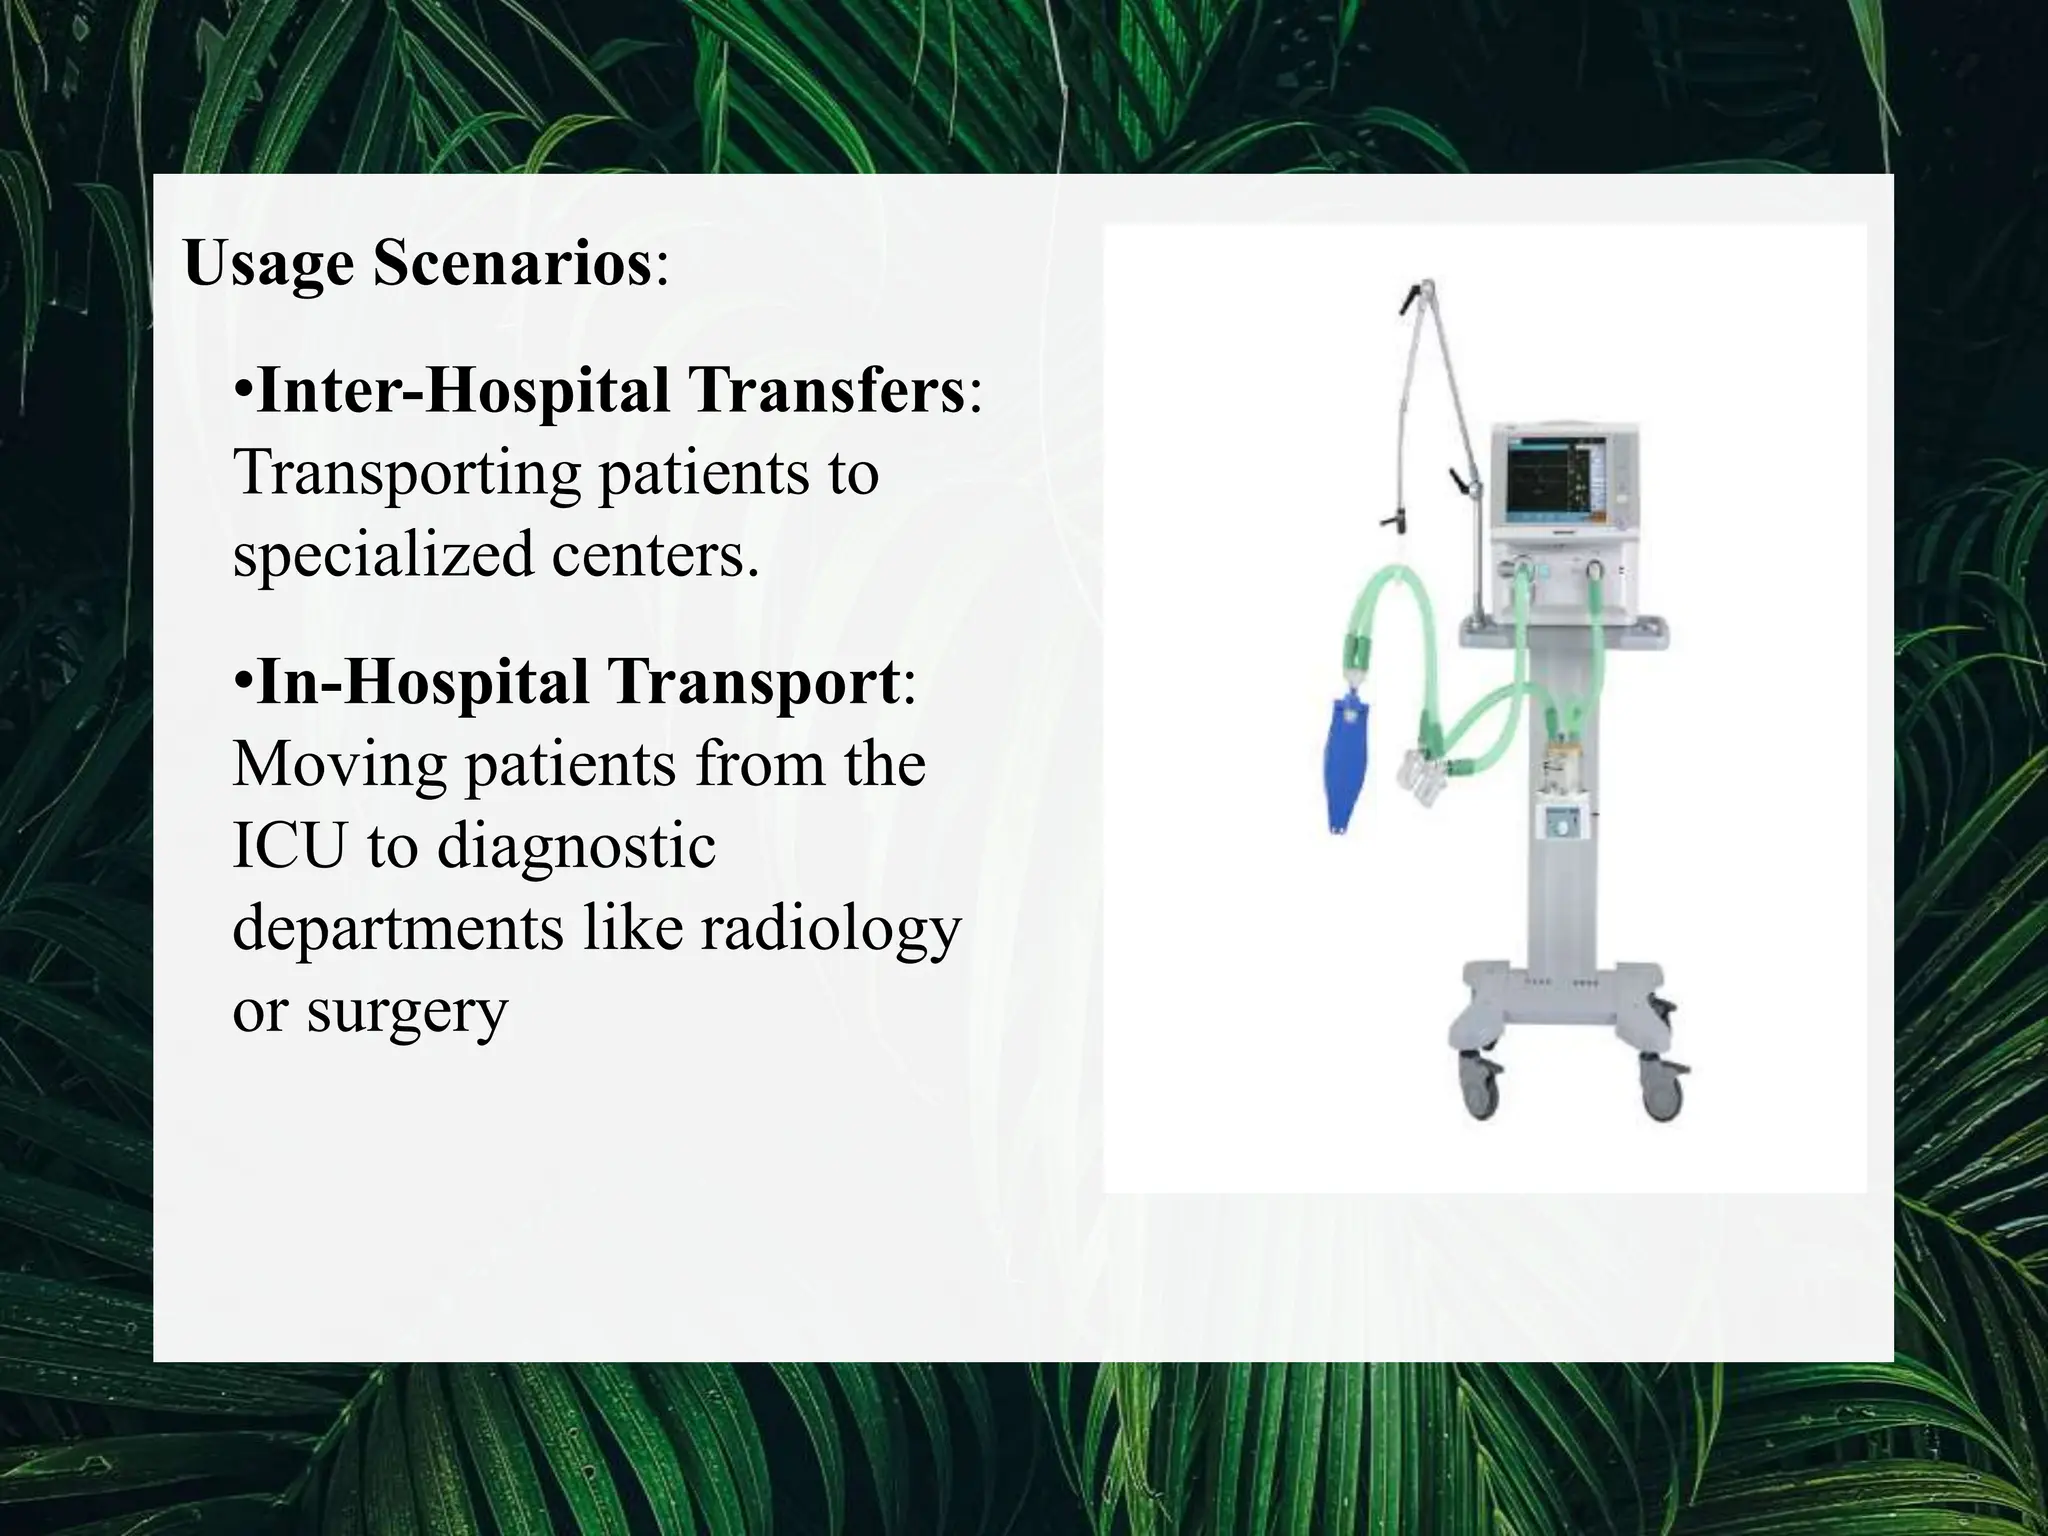
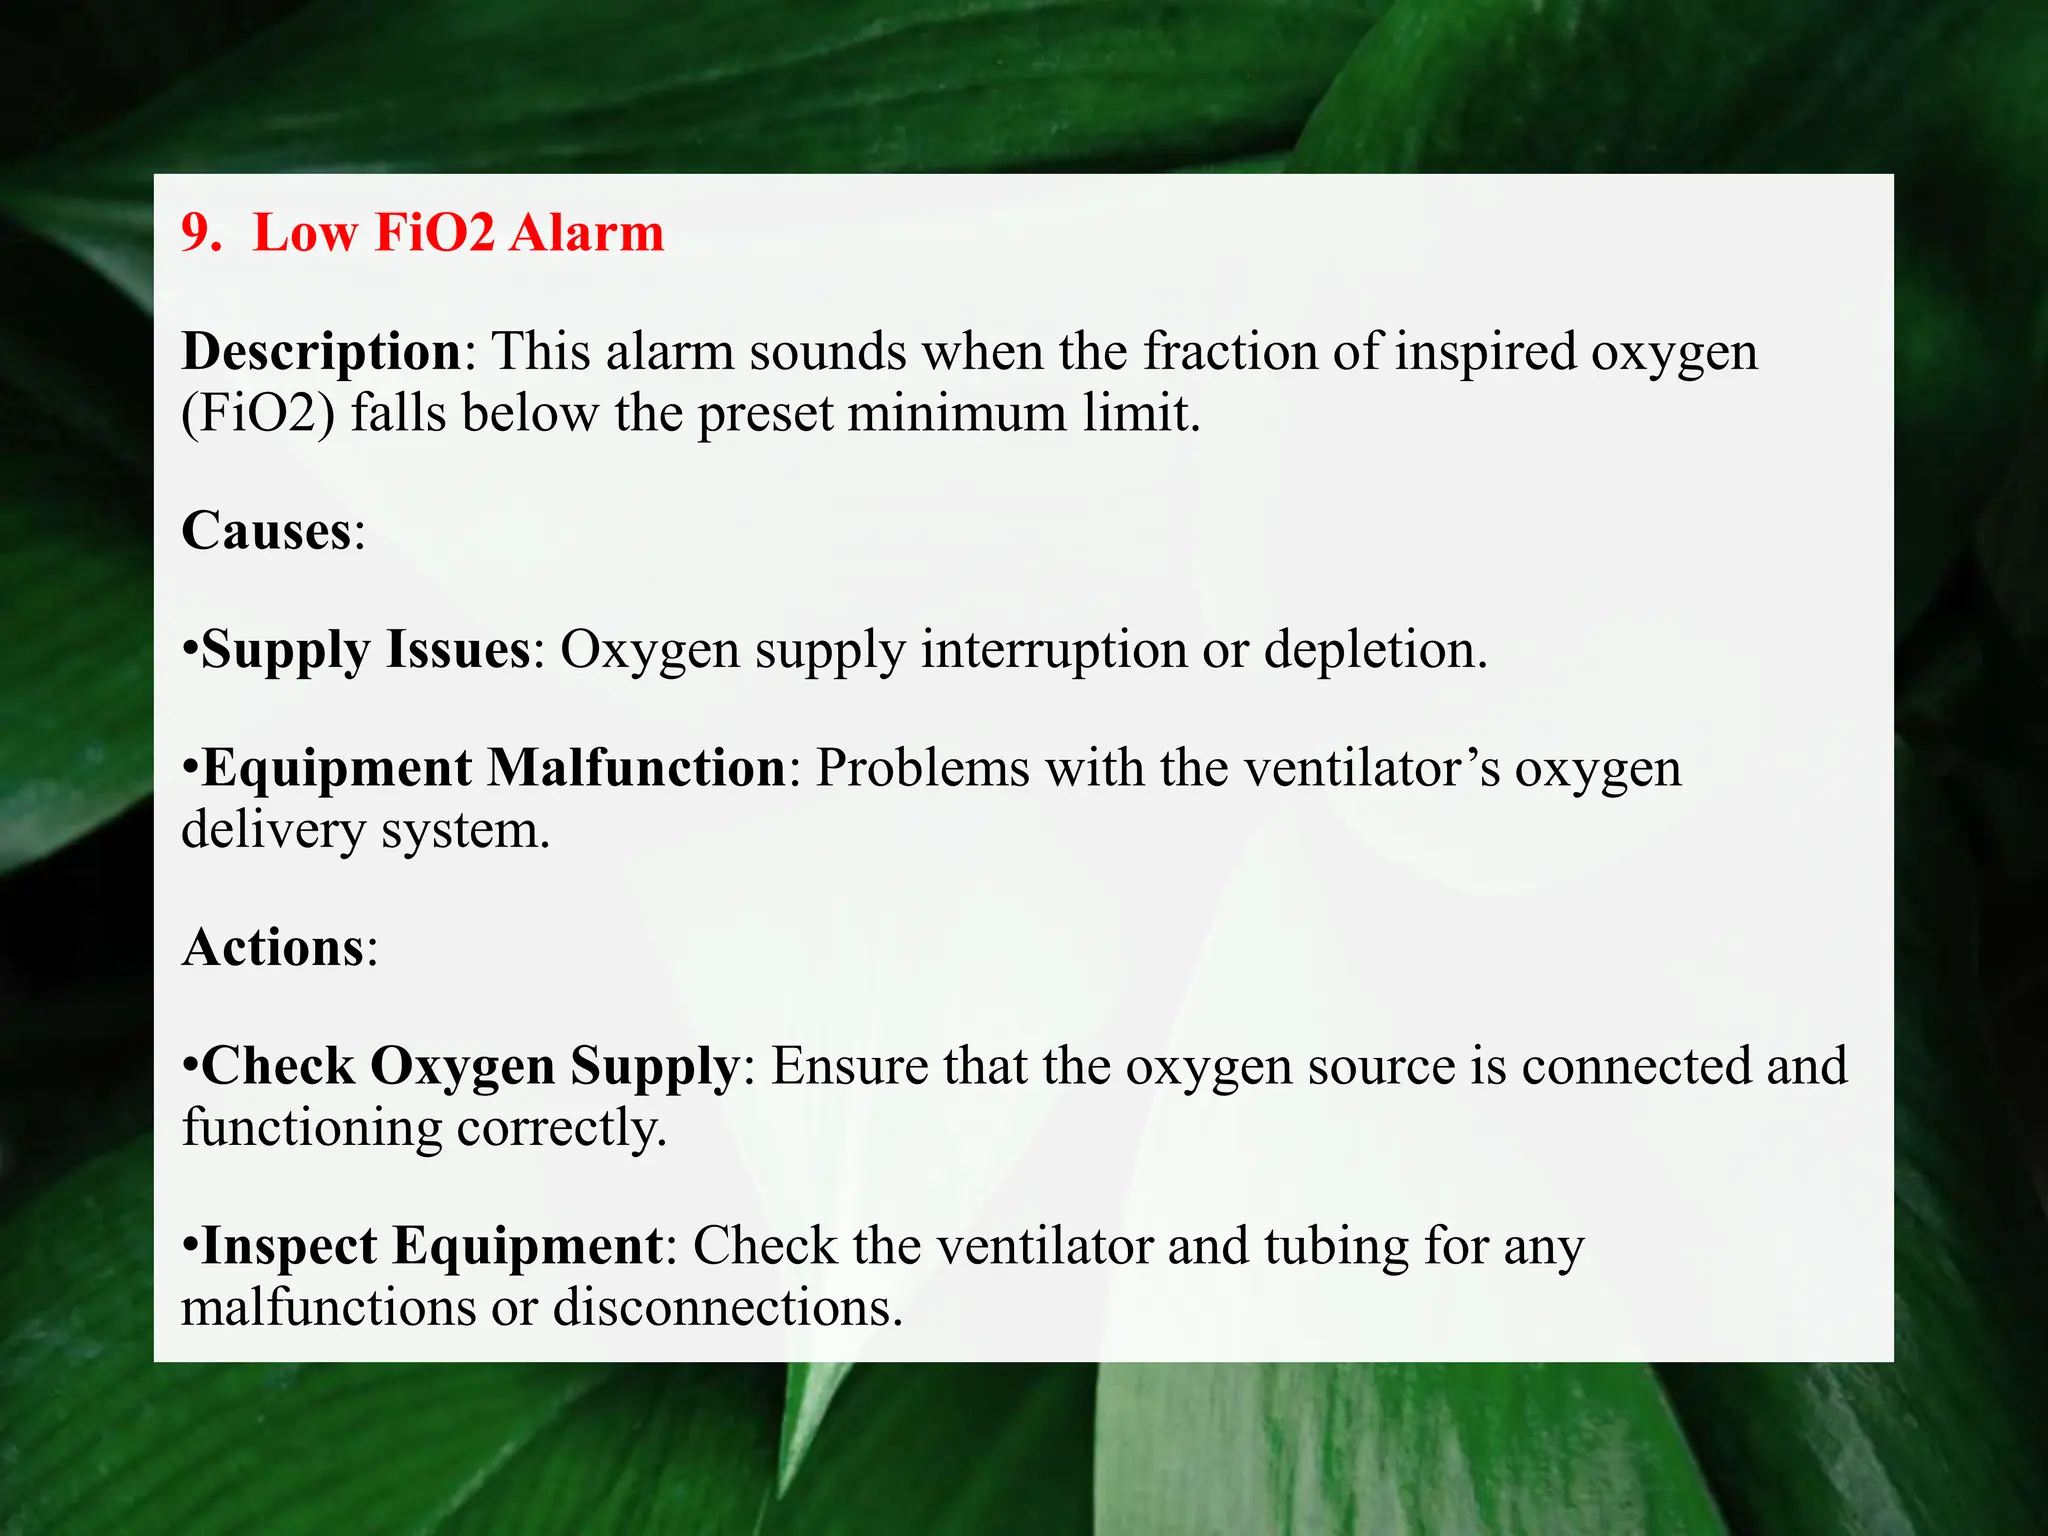
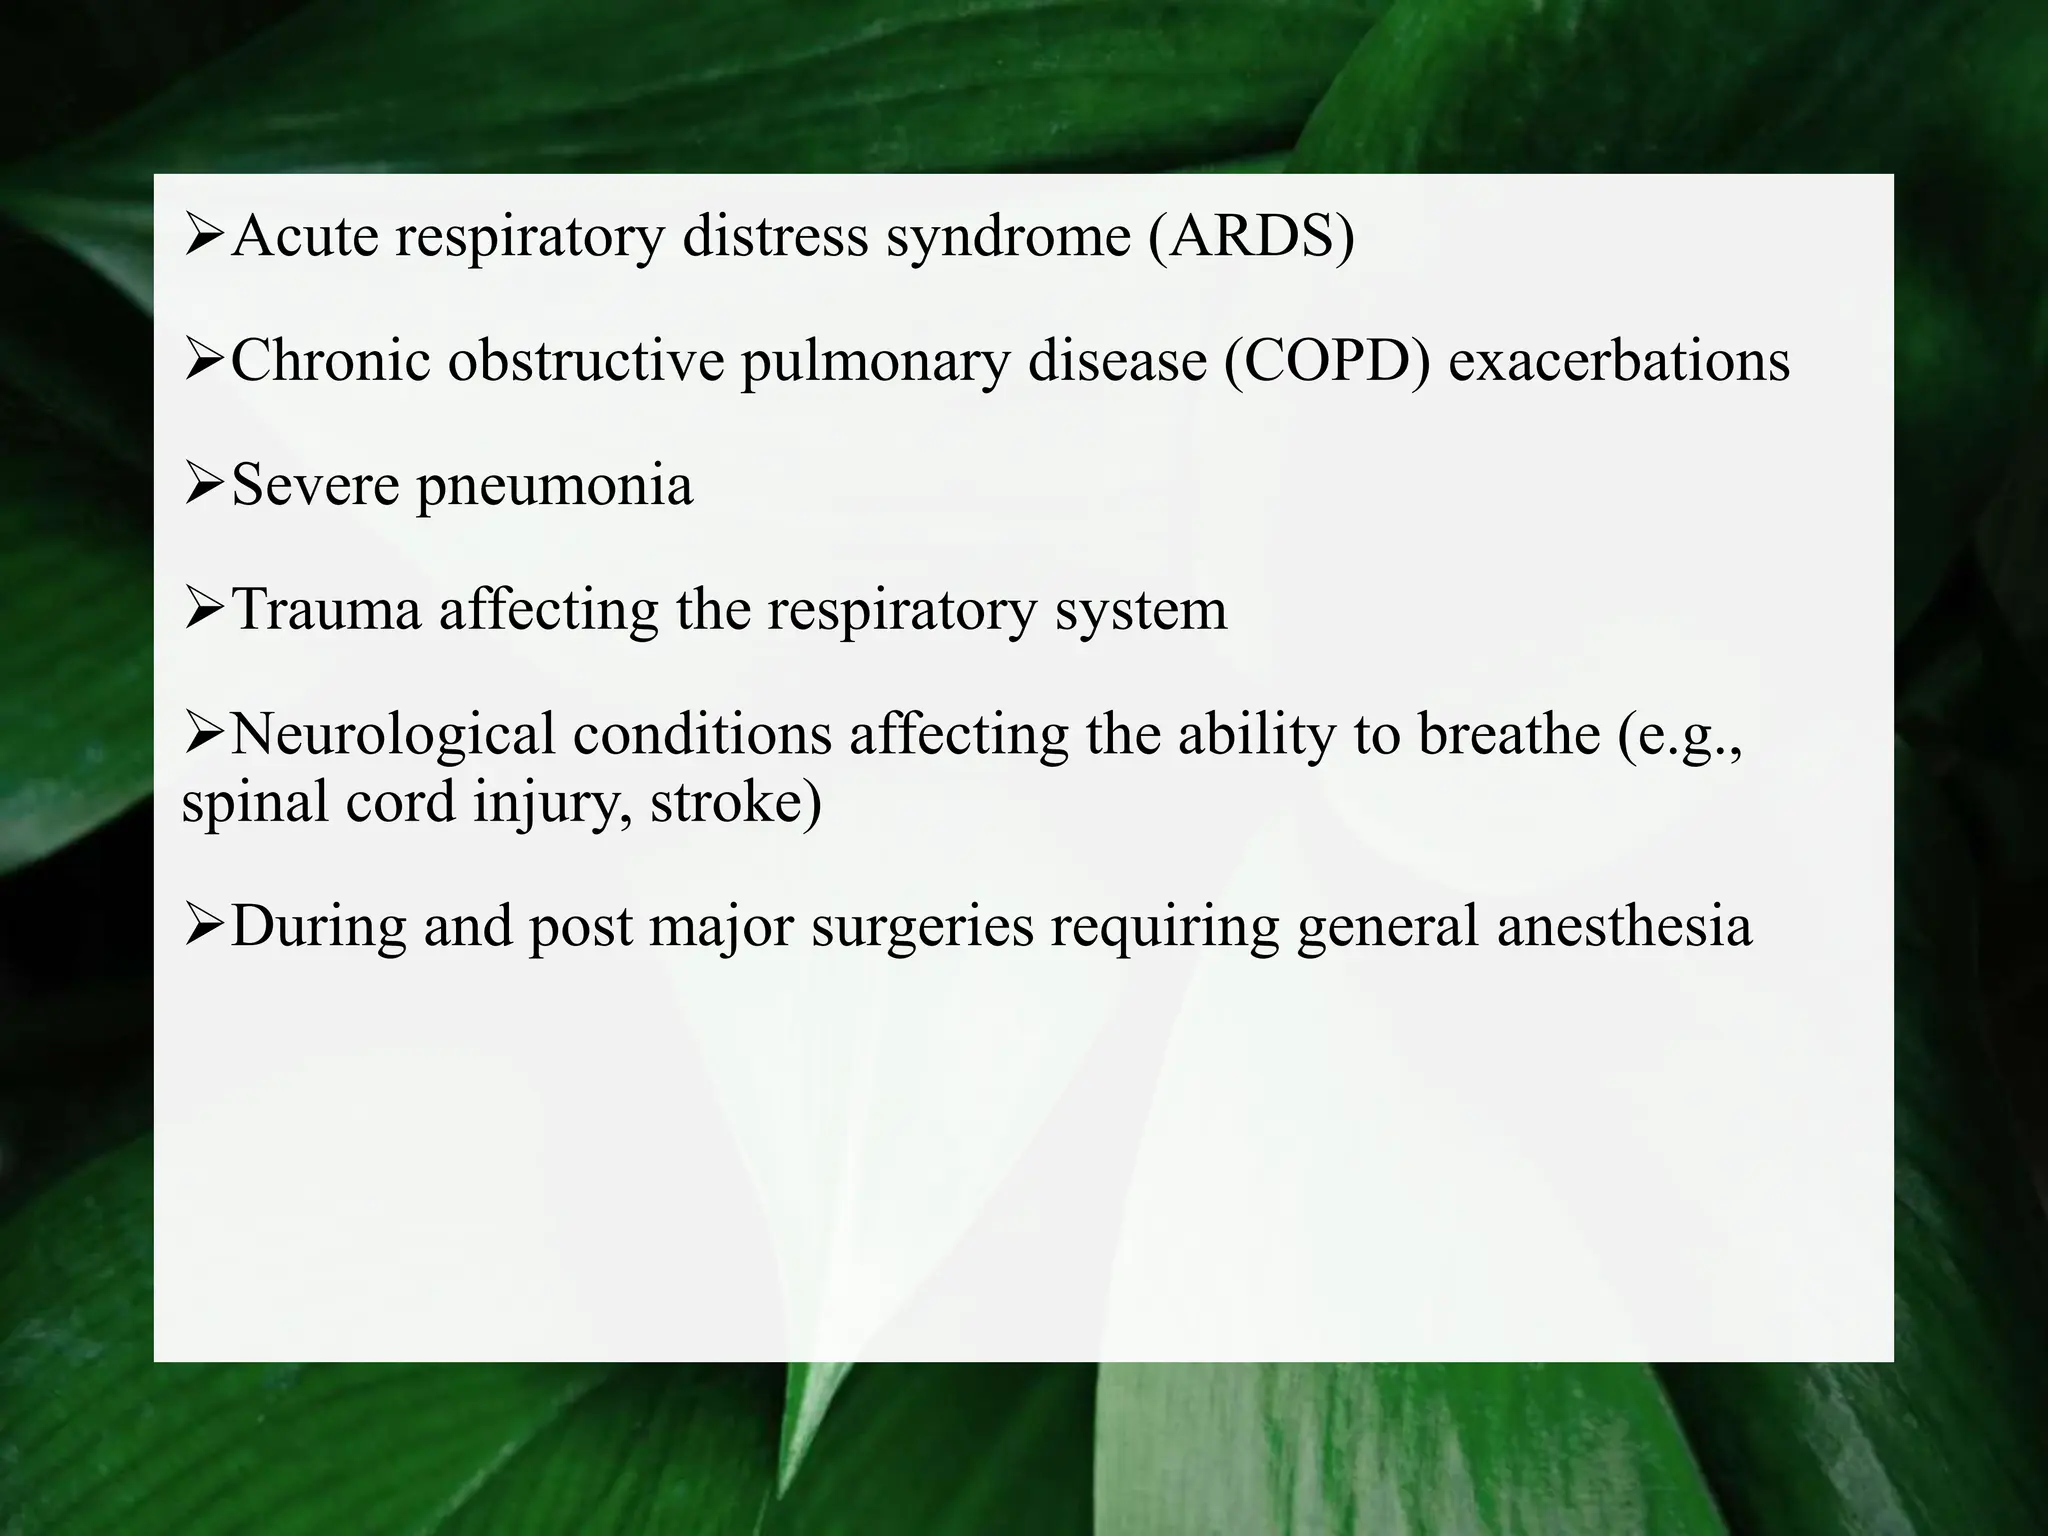
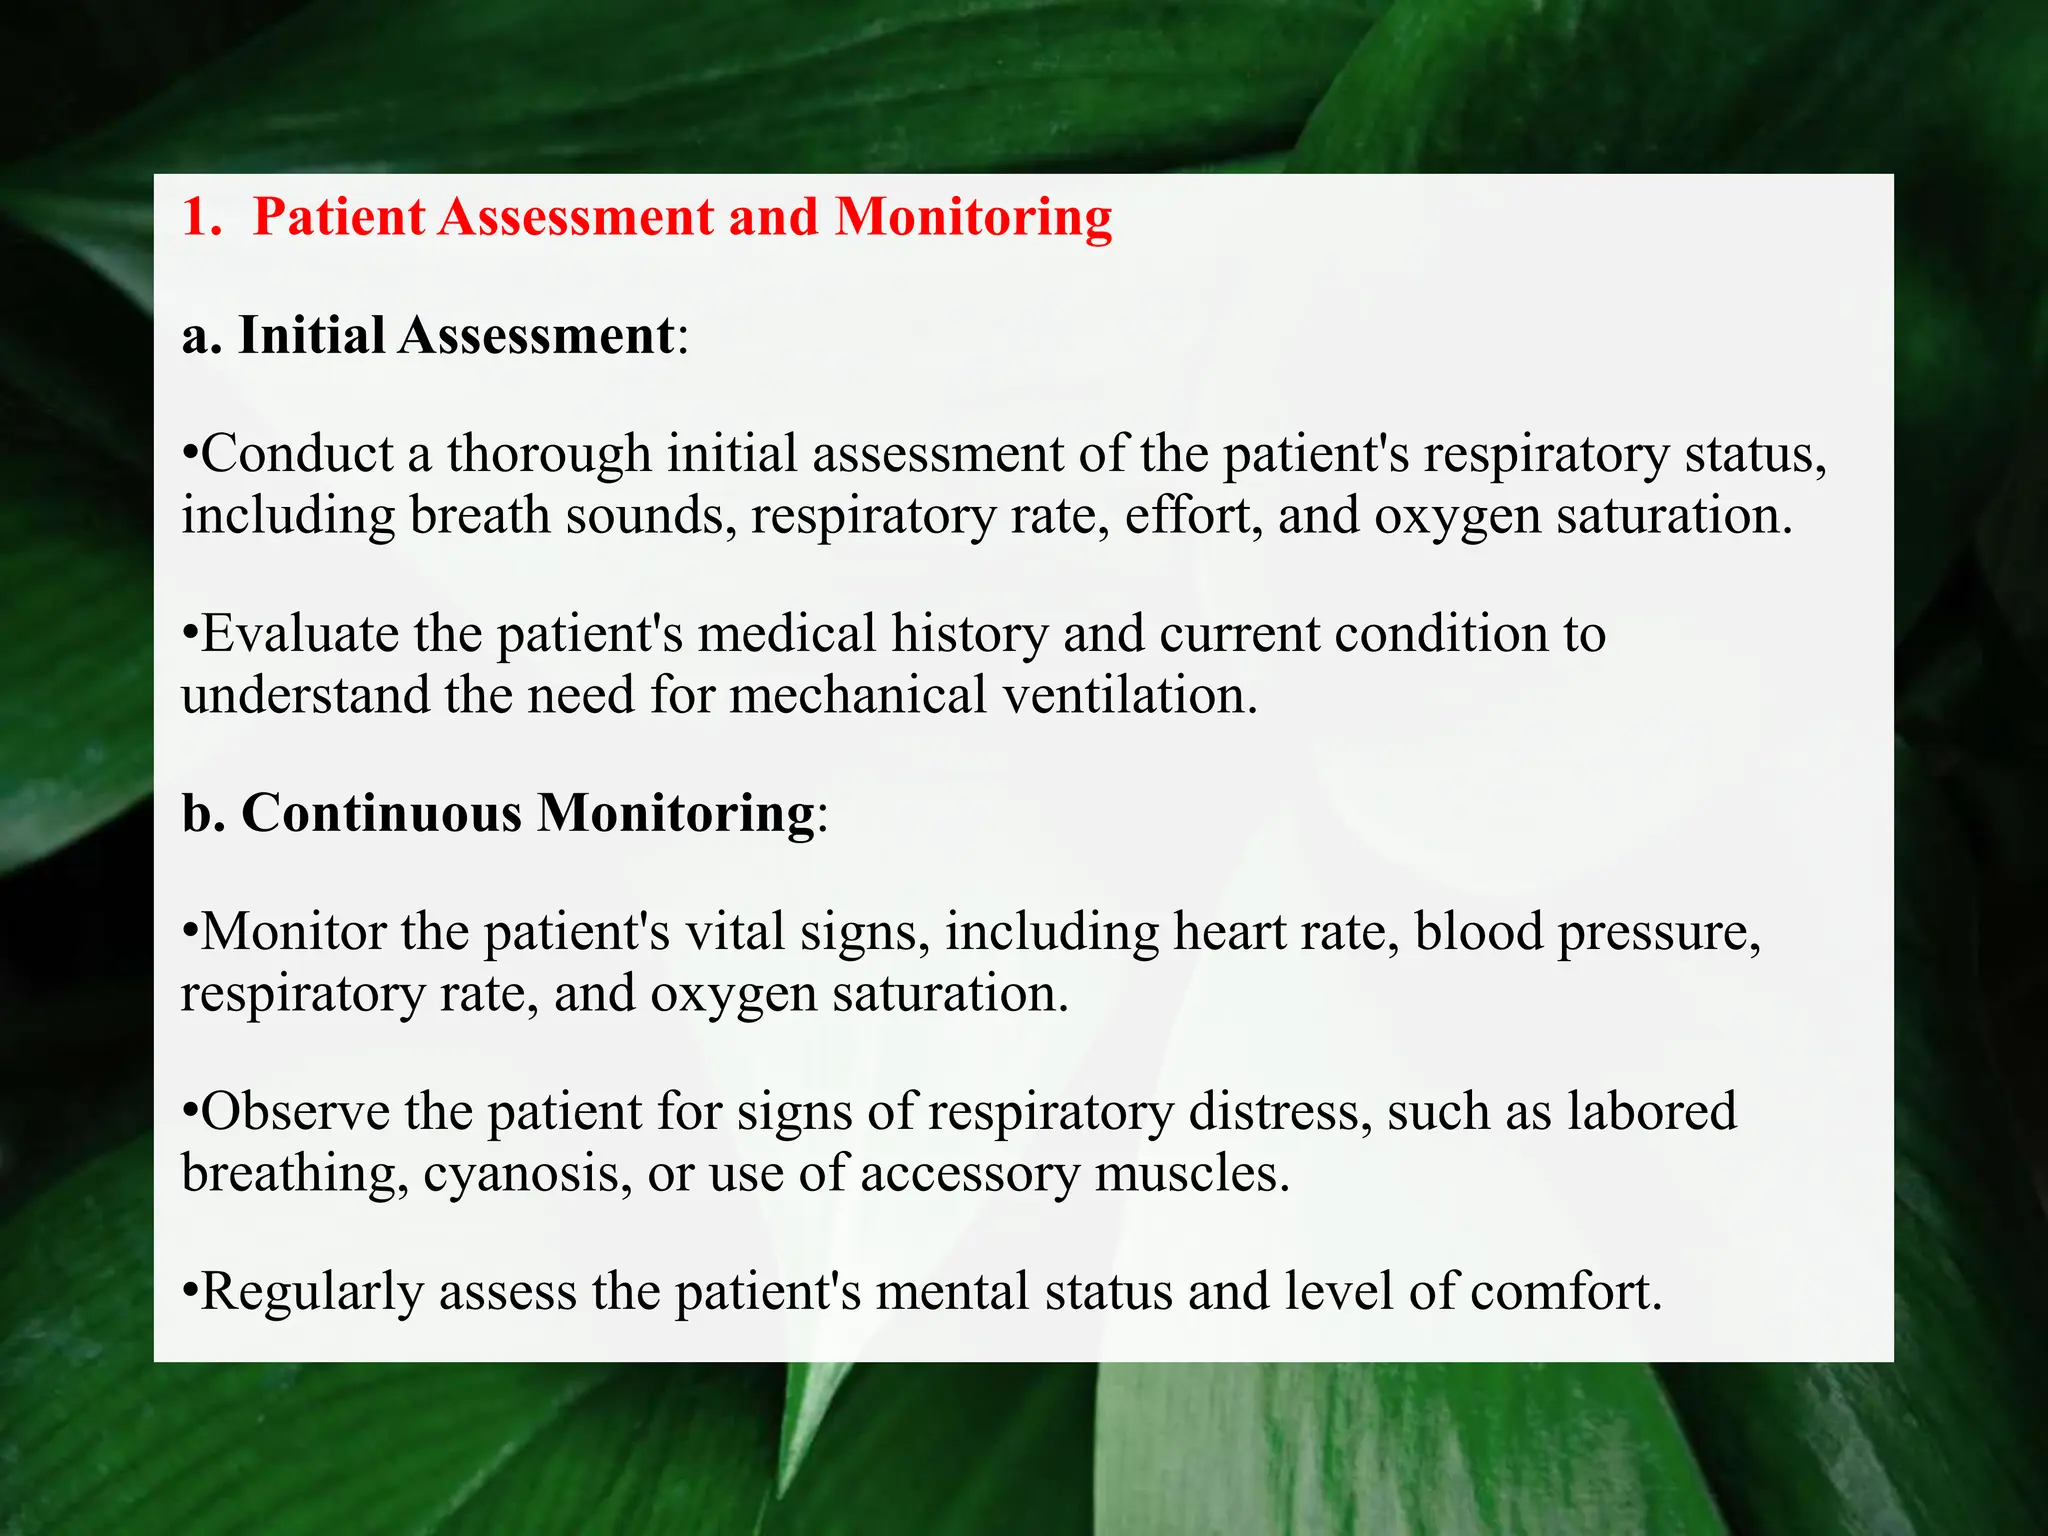
MS. SONAM SHARMA
ASST. PROFESSOR
MECHANICAL
VENTILATOR
A mechanical ventilator, also
known as a respirator, is used in
critical care settings to support
patients with respiratory failure,
severe lung injury, or during
surgery when general anesthesia is
used. It delivers controlled and
regulated amounts of air, often
enriched with oxygen, to the
patient's lungs.
1. Control Panel:
• User Interface: Touchscreen or buttons for setting parameters.
• Display: Shows real-time data and waveforms of respiratory
parameters.
2. Breathing Circuit:
• Inspiratory and Expiratory Limbs: Tubing that delivers air to
the patient and carries exhaled air away.
• Filters: Prevent contamination and infection.
• Humidifier: Adds moisture to the air to prevent drying of the
respiratory tract.
• Heat Moisture Exchanger (HME): A passive humidification
system used in some circuits.
Inspiratory and Expiratory Limbs
Filters
Humidifier
3. Ventilator Modes:
• Volume-Controlled Modes: Deliver a preset volume of air.
• Pressure-Controlled Modes: Deliver air until a preset pressure
is reached.
• Combined Modes: Include elements of both volume and
pressure control.
4. Sensors and Monitors:
• Flow Sensors: Measure the amount of air being delivered.
• Pressure Sensors: Measure the pressure in the airway.
• Oxygen Sensors: Monitor the concentration of oxygen being
delivered.
Sensors and Monitors
5. Alarms and Safety Features:
• High/Low Pressure Alarms: Indicate if the pressure
in the system is outside of the set parameters.
• Apnea Alarm: Alerts if the patient stops breathing.
• Disconnect Alarm: Alerts if there is a break in the
circuit.
SETTING
PARAMETERS
Tidal Volume (Vt): The amount of air delivered to the lungs
with each breath, usually set between 6-8 mL/kg of ideal body
weight.
Respiratory Rate (RR): The number of breaths delivered per
minute, typically set between 12-20 breaths per minute.
Fraction of Inspired Oxygen (FiO2): The concentration of
oxygen in the air mixture delivered, ranging from 21% (room air)
to 100%.
Positive End-Expiratory Pressure (PEEP): A pressure applied
at the end of exhalation to keep the alveoli open, typically set
between 5-20 cm H2O.
Inspiratory to Expiratory Ratio (I Ratio): The duration of the
inhalation phase compared to the exhalation phase, often set at 1:2.
PROCESS OF
MECHANICAL
VENTILATION
1. Initial Assessment and Indication:
• Determine the need for mechanical ventilation based on clinical
assessment, blood gas analysis, and underlying medical
conditions.
Intubation:
• Insert an endotracheal tube (ETT) or tracheostomy tube to secure
the airway and connect it to the ventilator.
Ventilator Setup:
• Select appropriate mode of ventilation based on the patient’s
condition.
• Set initial parameters such as tidal volume, respiratory rate, FiO2
(fraction of inspired oxygen), and PEEP (positive end-expiratory
pressure).
2. Ongoing Monitoring and Adjustment:
• Continuously monitor the patient’s vital signs, blood gases, and
ventilator waveforms.
• Adjust settings as needed to optimize ventilation and
oxygenation while minimizing the risk of lung injury.
Weaning:
• Gradually reduce ventilator support as the patient’s condition
improves.
• Conduct spontaneous breathing trials to assess readiness for
extubation.
Extubation:
• Remove the endotracheal tube once the patient can maintain
adequate breathing on their own.
TYPES OF
MECHANICAL
VENTILATORS
1. Acute Care Ventilators
These ventilators are used in intensive care units (ICUs) and are
designed for critically ill patients. They offer advanced features,
various ventilation modes, and extensive monitoring capabilities.
Features:
• Multiple Ventilation Modes: Acute care ventilators support
various modes such as Volume-Controlled Ventilation (VCV),
Pressure-Controlled Ventilation (PCV), and combined modes.
• Monitoring: Continuous monitoring of vital parameters such as
tidal volume, respiratory rate, and airway pressures.
• Alarms: Safety alarms for high/low pressure, disconnection,
and apnea.
Usage Scenarios:
•Acute Respiratory Distress
Syndrome (ARDS): These
ventilators are essential for
managing severe lung injury.
•Post-Surgery: Patients
recovering from major surgeries
may need these ventilators for
respiratory support.
•Chronic Conditions: Patients
with chronic respiratory diseases
like COPD during acute
exacerbations.
2. Transport Ventilators
These portable ventilators are used during the transport of
critically ill patients within the hospital or between different
healthcare facilities.
Features:
• Portability: Lightweight and battery-operated for mobility.
• Simplicity: Often simpler interface and fewer modes than ICU
ventilators, but still capable of providing essential respiratory
support.
• Durability: Built to withstand the rigors of transport and varying
environmental conditions.
Usage Scenarios:
•Inter-Hospital Transfers:
Transporting patients to
specialized centers.
•In-Hospital Transport:
Moving patients from the
ICU to diagnostic
departments like radiology
or surgery
3. Home Ventilators
These ventilators are designed for long-term use at home, providing support for
patients with chronic respiratory failure.
Features:
• User-Friendly Interface: Simplified controls for easy use by non-professional
caregivers.
• Safety Features: Built-in alarms and monitoring to ensure safe operation.
• Portability: Compact and lightweight for home use.
Usage Scenarios:
• Chronic Respiratory Conditions: Patients with conditions like muscular
dystrophy.
• Weaning: Patients transitioning from hospital care to home care.
INVASIVE
VENTILATORS
Invasive mechanical ventilation (IMV) is a critical life-support
technique used to assist or replace spontaneous breathing in
patients with severe respiratory failure or other conditions
affecting their ability to breathe independently. This method
involves the insertion of a tube into the patient's airway, through
which a mechanical ventilator delivers controlled breaths. IMV is
commonly used in intensive care units (ICUs), during major
surgeries, and in emergency settings.
Indications for Invasive Mechanical Ventilation
•Acute Respiratory Failure: Conditions such as ARDS, pneumonia, and severe
asthma exacerbations.
•Chronic Respiratory Failure: Advanced COPD, neuromuscular diseases, or
end-stage lung diseases.
•During Surgery: To maintain adequate ventilation and oxygenation during
procedures requiring general anesthesia.
•Severe Hypoxemia: When non-invasive methods are insufficient to maintain
adequate oxygen levels.
•Severe Hypercapnia: Elevated levels of carbon dioxide that cannot be
managed by non-invasive means.
•Airway Protection: For patients with compromised airway reflexes due to
coma, drug overdose, or severe trauma.
Components of an Invasive Mechanical
Ventilation System
•Endotracheal Tube (ETT) or Tracheostomy Tube: A tube
placed into the trachea through the mouth (endotracheal) or
through a surgical opening in the neck (tracheostomy) to provide a
direct airway.
•Mechanical Ventilator: A machine that delivers controlled
breaths to the patient through the ETT or tracheostomy tube.
•Ventilator Circuit: Tubing that connects the ventilator to the
patient's airway.
Modes of Invasive Mechanical Ventilation
1. Volume-Controlled Ventilation (VCV)
• Description: Delivers a preset tidal volume with each breath,
ensuring a consistent volume of air.
• Advantages: Provides reliable minute ventilation.
• Disadvantages: Can cause barotrauma if the airway pressures become
too high.
2. Bilevel Positive Airway Pressure (BiPAP)
•Description: Delivers two levels of pressure: higher during inhalation
(IPAP) and lower during exhalation (EPAP).
•Advantages: Supports both inspiration and expiration, useful in
chronic respiratory conditions.
•Disadvantages: Typically used non-invasively but can be adapted for
invasive use.
3. Pressure-Controlled Ventilation (PCV)
•Description: Delivers breaths until a preset pressure is reached, with the
tidal volume varying based on lung compliance.
•Advantages: Lower risk of barotrauma.
•Disadvantages: Variable tidal volumes can affect minute ventilation.
4. Assist-Control Ventilation (ACV)
•Description: The ventilator delivers a preset number of breaths at a set
tidal volume or pressure but also allows the patient to initiate additional
breaths at the same settings.
•Advantages: Provides full support while allowing patient-initiated
breaths.
•Disadvantages: Risk of hyperventilation if the patient breathes
excessively.
5. Synchronized Intermittent Mandatory Ventilation (SIMV)
•Description: Combines mandatory breaths with patient-initiated breaths,
synchronizing the ventilator with the patient's efforts.
•Advantages: Useful for weaning patients off the ventilator.
•Disadvantages: Can be less comfortable if synchronization is not optimal.
6. Pressure Support Ventilation (PSV)
•Description: Provides a preset level of pressure support during
spontaneous breaths initiated by the patient.
•Advantages: Reduces the work of breathing and is often used in weaning.
•Disadvantages: Requires the patient to have sufficient spontaneous
breathing effort.
NON-INVASIVE
VENTILATORS
(NIV)
Non-invasive positive pressure ventilators (NIPPV) provide
ventilatory support without the need for endotracheal
intubation or tracheostomy. They deliver pressurized air
through a mask or similar interface, facilitating breathing by
increasing airway pressure and thus assisting or completely
supporting the patient’s respiratory efforts. NIPPV is widely
used in various clinical settings, from emergency care to
chronic management, due to its effectiveness and reduced risk
of complications compared to invasive ventilation.
Types of Non-Invasive Positive Pressure
Ventilators
1. Continuous Positive Airway Pressure (CPAP)
• Description: CPAP devices deliver a constant level of positive airway
pressure throughout the entire respiratory cycle. This continuous
pressure keeps the airways open, improving oxygenation and reducing
the work of breathing.
• Applications: Primarily used for obstructive sleep apnea (OSA), and
also beneficial in acute cardiogenic pulmonary edema and other
conditions causing hypoxemia.
• Advantages: Simple to use, effective in preventing airway collapse,
and improves oxygenation.
• Disadvantages: Can be uncomfortable for some patients, does not
provide ventilatory support (only supports airway patency).
2. Bi-Level Positive Airway Pressure (BiPAP)
•Description: BiPAP devices provide two levels of pressure: a
higher pressure during inspiration (IPAP) and a lower pressure
during expiration (EPAP). This differential pressure supports
ventilation by assisting inhalation and reducing the work of
breathing.
•Applications: Used in conditions such as chronic obstructive
pulmonary disease (COPD) exacerbations, acute respiratory
failure, and neuromuscular disorders.
•Advantages: Effective in reducing work of breathing, improves
ventilation and oxygenation, and more comfortable due to variable
pressures.
•Disadvantages: More complex than CPAP, may require more
adjustments, and potential for air leaks around the mask.
3. Automatic Positive Airway Pressure (APAP)
•Description: APAP devices automatically adjust the level of
positive airway pressure in response to the patient's needs
throughout the night or usage period. These devices monitor
breathing patterns and make real-time adjustments to the pressure
levels.
•Applications: Often used for obstructive sleep apnea, especially
in patients whose pressure requirements vary.
•Advantages: Provides customized pressure levels, improving
comfort and effectiveness.
•Disadvantages: More expensive and technologically complex,
potential for delayed response in pressure adjustment.
4. Non-Invasive Positive Pressure Ventilation (NIPPV)
•Description: General term encompassing both CPAP and BiPAP,
NIPPV devices provide positive airway pressure to support
respiratory function. They can be set to deliver a predetermined
pressure (fixed) or adjust based on patient needs (adaptive).
•Applications: Used in acute and chronic respiratory conditions,
including acute respiratory distress, chronic respiratory
insufficiency, and during the weaning process from invasive
ventilation.
•Advantages: Reduces the need for intubation, lower risk of
complications compared to invasive methods, and can be used in
various settings including home care.
•Disadvantages: Requires patient cooperation, mask fit and
comfort issues, and potential for air leaks.
Types of Non-Invasive Negative Pressure Ventilators
1. Iron Lung
• Description: The iron lung, also known as a tank ventilator, is one of
the earliest types of negative pressure ventilators. It encases the
patient's body (except the head) in a cylindrical chamber. By creating a
vacuum inside the chamber, the machine lowers the pressure around the
body, causing the chest to expand and air to be drawn into the lungs.
• Applications: Historically used during polio epidemics for patients
with paralytic respiratory muscles. Currently, it is rarely used but serves
as a foundational technology for understanding negative pressure
ventilation.
• Advantages: Effective for patients with diaphragmatic or intercostal
muscle paralysis.
• Disadvantages: Bulky and cumbersome, limits patient mobility, and
not practical for acute care settings.
2. Chest Cuirass
•Description: The chest cuirass is a shell-like device that fits over
the patient's thorax, creating a seal. A pump generates negative
pressure within the cuirass, resulting in chest expansion and
inhalation. The cuirass is more compact and less restrictive
compared to the iron lung.
•Applications: Used in patients with chronic respiratory
insufficiency, neuromuscular diseases, and certain spinal cord
injuries.
•Advantages: More portable and comfortable than the iron lung,
allows for better patient mobility, and can be used intermittently.
•Disadvantages: May not provide sufficient ventilation for
patients with severe respiratory failure, and achieving an airtight
seal can be challenging.
3. Exoskeleton Negative Pressure Ventilators
•Description: These devices are designed to be worn like a jacket
or vest. They utilize a negative pressure pump to facilitate
breathing by intermittently creating negative pressure around the
thorax. Some modern versions are more lightweight and can be
used during sleep or rest periods.
•Applications: Suitable for patients with chronic conditions such
as chronic obstructive pulmonary disease (COPD), amyotrophic
lateral sclerosis (ALS), or muscular dystrophy.
•Advantages: Lightweight and portable, allows for greater patient
mobility, and can be used at home.
•Disadvantages: Limited to patients with sufficient spontaneous
breathing effort, and less effective in acute respiratory failure.
TYPES OF
VENTILATOR
ALARMS
1. High-Pressure Alarm
Description: This alarm sounds when the pressure in the ventilator circuit
exceeds a preset maximum limit.
Causes:
•Airway Obstruction: Blockages in the endotracheal tube (ETT) or
tracheostomy tube due to mucus plugs or kinking.
•Bronchospasm: Sudden constriction of the muscles in the walls of the
bronchioles.
•Coughing: Patient coughing against the ventilator can increase airway
pressure.
•Patient-ventilator asynchrony: When the patient's breathing pattern
does not match the ventilator's settings.
Actions:
•Check the Airway: Suction the ETT or tracheostomy tube to
remove any blockages.
•Reassess Ventilator Settings: Adjust the pressure settings or
modes to better match the patient's needs.
•Administer Bronchodilators: If bronchospasm is the cause,
bronchodilators may help.
2. Low-Pressure Alarm
Description: This alarm sounds when the pressure in the
ventilator circuit falls below a preset minimum limit.
Causes:
•Disconnection: The circuit may have become disconnected from
the patient.
•Leaks: Air leaks in the ventilator circuit, around the ETT or
tracheostomy tube, or in the patient’s airway.
•Circuit Malfunction: Issues with the ventilator tubing or
components.
Actions:
•Check Connections: Ensure all connections in the ventilator
circuit are secure.
•Inspect for Leaks: Look for leaks in the tubing or around the
airway interface.
•Verify Settings: Confirm that the ventilator settings are
appropriate and have not been inadvertently changed.
3. Apnea Alarm
Description: This alarm activates when the ventilator does not
detect any patient-initiated breaths within a preset time interval.
Causes:
•Respiratory Arrest: The patient may have stopped breathing.
•Sedation: Over-sedation or medication effects causing
temporary cessation of breathing.
•Mechanical Failure: Ventilator malfunction or disconnection.
Actions:
•Check the Patient: Immediately assess the patient for signs of
respiratory arrest or distress.
•Manual Ventilation: Provide manual ventilation using a bag-
valve mask if necessary.
•Review Sedation: Reassess the level of sedation and adjust
medications as needed.
4. Low Tidal Volume Alarm
Description: This alarm sounds when the tidal volume delivered to the patient is
lower than the preset minimum.
Causes:
•Leaks: Air leaks in the circuit or around the ETT or tracheostomy tube.
•Partial Obstruction: Partial blockage in the airway or ventilator tubing.
•Patient Effort: Inadequate patient effort in triggering the ventilator.
Actions:
•Inspect for Leaks: Check the entire ventilator circuit for any air leaks.
•Clear Obstructions: Suction the airway and ensure the ventilator tubing is not
kinked.
•Adjust Settings: Ensure the tidal volume settings are appropriate and consider
adjusting the sensitivity of the ventilator.
5. High Tidal Volume Alarm
Description: This alarm is triggered when the tidal volume delivered exceeds the
preset maximum limit.
Causes:
•Increased Patient Effort: The patient may be taking deep breaths.
•Improper Settings: The ventilator settings may be too high for the patient’s
current needs.
Actions:
•Assess the Patient: Determine if the patient is over-breathing due to anxiety or
pain.
•Review Ventilator Settings: Adjust the tidal volume settings to match the
patient’s respiratory needs.
•Provide Support: Offer reassurance or sedatives if the patient is anxious.
6. High Respiratory Rate Alarm
Description: This alarm activates when the patient’s respiratory rate exceeds the preset
maximum limit.
Causes:
•Distress or Pain: The patient may be experiencing pain or anxiety.
•Fever or Infection: Increased metabolic demand can raise the respiratory rate.
•Ventilator Settings: Inadequate ventilatory support causing the patient to over-
breathe.
Actions:
•Assess the Patient: Evaluate for signs of distress, pain, or fever.
•Adjust Ventilator Support: Increase the level of ventilatory support if necessary.
•Treat Underlying Conditions: Address pain, anxiety, or infection as appropriate.
7. Low Respiratory Rate Alarm
Description: This alarm sounds when the patient’s respiratory rate falls below the
preset minimum limit.
Causes:
•Sedation or Medication: Over-sedation or effects of medications reducing the
respiratory rate.
•Neurological Issues: Conditions affecting the brain or nervous system.
•Mechanical Failure: Issues with the ventilator detecting breaths.
Actions:
•Check the Patient: Immediately assess the patient for sedation levels and
neurological status.
•Review Medications: Adjust sedation or medications if necessary.
•Manual Ventilation: Provide manual ventilation if the patient is not breathing
adequately.
8. High FiO2 Alarm
Description: This alarm is triggered when the fraction of inspired
oxygen (FiO2) exceeds the preset maximum limit.
Causes:
•Incorrect Settings: FiO2 settings may be set too high.
•Mechanical Issue: Malfunction in the oxygen delivery system.
Actions:
•Verify Settings: Ensure that the FiO2 settings are appropriate for the
patient’s condition.
•Check Equipment: Inspect the ventilator and oxygen delivery system
for any malfunctions.
9. Low FiO2 Alarm
Description: This alarm sounds when the fraction of inspired oxygen
(FiO2) falls below the preset minimum limit.
Causes:
•Supply Issues: Oxygen supply interruption or depletion.
•Equipment Malfunction: Problems with the ventilator’s oxygen
delivery system.
Actions:
•Check Oxygen Supply: Ensure that the oxygen source is connected and
functioning correctly.
•Inspect Equipment: Check the ventilator and tubing for any
malfunctions or disconnections.
INDICATIONS FOR
MECHANICAL
VENTILATION
Acute respiratory distress syndrome (ARDS)
Chronic obstructive pulmonary disease (COPD) exacerbations
Severe pneumonia
Trauma affecting the respiratory system
Neurological conditions affecting the ability to breathe (e.g.,
spinal cord injury, stroke)
During and post major surgeries requiring general anesthesia
ROLE AND
RESPONSIBILITY
OF NURSE
1. Patient Assessment and Monitoring
a. Initial Assessment:
•Conduct a thorough initial assessment of the patient's respiratory status,
including breath sounds, respiratory rate, effort, and oxygen saturation.
•Evaluate the patient's medical history and current condition to
understand the need for mechanical ventilation.
b. Continuous Monitoring:
•Monitor the patient's vital signs, including heart rate, blood pressure,
respiratory rate, and oxygen saturation.
•Observe the patient for signs of respiratory distress, such as labored
breathing, cyanosis, or use of accessory muscles.
•Regularly assess the patient's mental status and level of comfort.
2. Ventilator Setup and Management
a. Ventilator Settings:
•Collaborate with the respiratory therapist and physician to set
appropriate ventilator parameters, such as tidal volume, respiratory rate,
FiO2, and PEEP.
•Ensure that the ventilator settings are tailored to the patient's specific
needs and condition.
b. Equipment Check:
•Perform routine checks on the ventilator to ensure it is functioning
correctly and safely.
•Inspect the ventilator circuit for any leaks, disconnections, or blockages.
•Ensure that all alarms are set correctly and are functioning.
3. Patient Care and Comfort
a. Airway Management:
•Ensure the endotracheal tube (ETT) or tracheostomy tube is
correctly positioned and secured.
•Perform regular oral care and suctioning to prevent the buildup of
secretions and reduce the risk of ventilator-associated pneumonia
(VAP).
b. Positioning:
•Reposition the patient regularly to prevent pressure ulcers and
promote lung expansion.
•Use strategies such as prone positioning if indicated to improve
oxygenation.
4. Infection Control
a. Hygiene Practices:
Adhere to strict hand hygiene and use personal protective
equipment (PPE) to reduce the risk of infection.
Ensure the ventilator circuit is changed according to hospital
protocols to minimize the risk of infection.
b. VAP Prevention:
Implement measures to prevent ventilator-associated pneumonia,
such as elevating the head of the bed, providing oral care, and
using subglottic suctioning.
5. Patient and Family Education
a. Education and Communication:
•Educate the patient and their family about the purpose of
mechanical ventilation and the care involved.
•Provide information on what to expect during the course of
ventilation and address any concerns or questions they may have.
b. Emotional Support:
•Offer emotional support to the patient and family, helping them
cope with the stress and anxiety associated with mechanical
ventilation.
6. Documentation and Reporting
a. Accurate Documentation:
•Document all aspects of patient care, including ventilator settings,
changes in the patient's condition, and interventions performed.
•Record any incidents or complications related to mechanical ventilation.
b. Communication with Healthcare Team:
•Communicate regularly with the respiratory therapist, physician, and
other members of the healthcare team regarding the patient's status and
any changes in ventilator settings.
•Report any significant changes in the patient's condition promptly to the
appropriate healthcare provider.
7. Emergency Management
a. Handling Ventilator Alarms:
•Respond promptly to ventilator alarms, identifying and addressing
the cause of the alarm.
•Ensure that backup equipment is available and functioning in case
of ventilator failure.
b. Emergency Procedures:
•Be prepared to perform manual ventilation using a bag-valve
mask (BVM) if the ventilator malfunctions or during transport.
•Participate in emergency drills and training to stay proficient in
handling ventilator-related emergencies.
8. Weaning and Extubation
a. Weaning Process:
•Assist in the gradual reduction of ventilator support as the
patient’s condition improves.
•Monitor the patient closely for signs of readiness for weaning,
such as improved respiratory function and stable vital signs.
b. Extubation:
•Prepare for and assist with the extubation process, ensuring all
necessary equipment is ready.
•Monitor the patient closely post-extubation for any signs of
respiratory distress or complications.
Mechanical ventilator.pptx

Mechanical ventilator.pptx

  • 1.
    MS. SONAM SHARMA ASST.PROFESSOR MECHANICAL VENTILATOR
  • 3.
    A mechanical ventilator,also known as a respirator, is used in critical care settings to support patients with respiratory failure, severe lung injury, or during surgery when general anesthesia is used. It delivers controlled and regulated amounts of air, often enriched with oxygen, to the patient's lungs.
  • 5.
    1. Control Panel: •User Interface: Touchscreen or buttons for setting parameters. • Display: Shows real-time data and waveforms of respiratory parameters. 2. Breathing Circuit: • Inspiratory and Expiratory Limbs: Tubing that delivers air to the patient and carries exhaled air away. • Filters: Prevent contamination and infection. • Humidifier: Adds moisture to the air to prevent drying of the respiratory tract. • Heat Moisture Exchanger (HME): A passive humidification system used in some circuits.
  • 6.
  • 7.
  • 8.
  • 9.
    3. Ventilator Modes: •Volume-Controlled Modes: Deliver a preset volume of air. • Pressure-Controlled Modes: Deliver air until a preset pressure is reached. • Combined Modes: Include elements of both volume and pressure control. 4. Sensors and Monitors: • Flow Sensors: Measure the amount of air being delivered. • Pressure Sensors: Measure the pressure in the airway. • Oxygen Sensors: Monitor the concentration of oxygen being delivered.
  • 10.
  • 11.
    5. Alarms andSafety Features: • High/Low Pressure Alarms: Indicate if the pressure in the system is outside of the set parameters. • Apnea Alarm: Alerts if the patient stops breathing. • Disconnect Alarm: Alerts if there is a break in the circuit.
  • 12.
  • 13.
    Tidal Volume (Vt):The amount of air delivered to the lungs with each breath, usually set between 6-8 mL/kg of ideal body weight. Respiratory Rate (RR): The number of breaths delivered per minute, typically set between 12-20 breaths per minute. Fraction of Inspired Oxygen (FiO2): The concentration of oxygen in the air mixture delivered, ranging from 21% (room air) to 100%. Positive End-Expiratory Pressure (PEEP): A pressure applied at the end of exhalation to keep the alveoli open, typically set between 5-20 cm H2O. Inspiratory to Expiratory Ratio (I Ratio): The duration of the inhalation phase compared to the exhalation phase, often set at 1:2.
  • 14.
  • 15.
    1. Initial Assessmentand Indication: • Determine the need for mechanical ventilation based on clinical assessment, blood gas analysis, and underlying medical conditions. Intubation: • Insert an endotracheal tube (ETT) or tracheostomy tube to secure the airway and connect it to the ventilator. Ventilator Setup: • Select appropriate mode of ventilation based on the patient’s condition. • Set initial parameters such as tidal volume, respiratory rate, FiO2 (fraction of inspired oxygen), and PEEP (positive end-expiratory pressure).
  • 16.
    2. Ongoing Monitoringand Adjustment: • Continuously monitor the patient’s vital signs, blood gases, and ventilator waveforms. • Adjust settings as needed to optimize ventilation and oxygenation while minimizing the risk of lung injury. Weaning: • Gradually reduce ventilator support as the patient’s condition improves. • Conduct spontaneous breathing trials to assess readiness for extubation. Extubation: • Remove the endotracheal tube once the patient can maintain adequate breathing on their own.
  • 17.
  • 18.
    1. Acute CareVentilators These ventilators are used in intensive care units (ICUs) and are designed for critically ill patients. They offer advanced features, various ventilation modes, and extensive monitoring capabilities. Features: • Multiple Ventilation Modes: Acute care ventilators support various modes such as Volume-Controlled Ventilation (VCV), Pressure-Controlled Ventilation (PCV), and combined modes. • Monitoring: Continuous monitoring of vital parameters such as tidal volume, respiratory rate, and airway pressures. • Alarms: Safety alarms for high/low pressure, disconnection, and apnea.
  • 19.
    Usage Scenarios: •Acute RespiratoryDistress Syndrome (ARDS): These ventilators are essential for managing severe lung injury. •Post-Surgery: Patients recovering from major surgeries may need these ventilators for respiratory support. •Chronic Conditions: Patients with chronic respiratory diseases like COPD during acute exacerbations.
  • 20.
    2. Transport Ventilators Theseportable ventilators are used during the transport of critically ill patients within the hospital or between different healthcare facilities. Features: • Portability: Lightweight and battery-operated for mobility. • Simplicity: Often simpler interface and fewer modes than ICU ventilators, but still capable of providing essential respiratory support. • Durability: Built to withstand the rigors of transport and varying environmental conditions.
  • 21.
    Usage Scenarios: •Inter-Hospital Transfers: Transportingpatients to specialized centers. •In-Hospital Transport: Moving patients from the ICU to diagnostic departments like radiology or surgery
  • 23.
    3. Home Ventilators Theseventilators are designed for long-term use at home, providing support for patients with chronic respiratory failure. Features: • User-Friendly Interface: Simplified controls for easy use by non-professional caregivers. • Safety Features: Built-in alarms and monitoring to ensure safe operation. • Portability: Compact and lightweight for home use. Usage Scenarios: • Chronic Respiratory Conditions: Patients with conditions like muscular dystrophy. • Weaning: Patients transitioning from hospital care to home care.
  • 25.
  • 26.
    Invasive mechanical ventilation(IMV) is a critical life-support technique used to assist or replace spontaneous breathing in patients with severe respiratory failure or other conditions affecting their ability to breathe independently. This method involves the insertion of a tube into the patient's airway, through which a mechanical ventilator delivers controlled breaths. IMV is commonly used in intensive care units (ICUs), during major surgeries, and in emergency settings.
  • 27.
    Indications for InvasiveMechanical Ventilation •Acute Respiratory Failure: Conditions such as ARDS, pneumonia, and severe asthma exacerbations. •Chronic Respiratory Failure: Advanced COPD, neuromuscular diseases, or end-stage lung diseases. •During Surgery: To maintain adequate ventilation and oxygenation during procedures requiring general anesthesia. •Severe Hypoxemia: When non-invasive methods are insufficient to maintain adequate oxygen levels. •Severe Hypercapnia: Elevated levels of carbon dioxide that cannot be managed by non-invasive means. •Airway Protection: For patients with compromised airway reflexes due to coma, drug overdose, or severe trauma.
  • 28.
    Components of anInvasive Mechanical Ventilation System •Endotracheal Tube (ETT) or Tracheostomy Tube: A tube placed into the trachea through the mouth (endotracheal) or through a surgical opening in the neck (tracheostomy) to provide a direct airway. •Mechanical Ventilator: A machine that delivers controlled breaths to the patient through the ETT or tracheostomy tube. •Ventilator Circuit: Tubing that connects the ventilator to the patient's airway.
  • 29.
    Modes of InvasiveMechanical Ventilation 1. Volume-Controlled Ventilation (VCV) • Description: Delivers a preset tidal volume with each breath, ensuring a consistent volume of air. • Advantages: Provides reliable minute ventilation. • Disadvantages: Can cause barotrauma if the airway pressures become too high. 2. Bilevel Positive Airway Pressure (BiPAP) •Description: Delivers two levels of pressure: higher during inhalation (IPAP) and lower during exhalation (EPAP). •Advantages: Supports both inspiration and expiration, useful in chronic respiratory conditions. •Disadvantages: Typically used non-invasively but can be adapted for invasive use.
  • 30.
    3. Pressure-Controlled Ventilation(PCV) •Description: Delivers breaths until a preset pressure is reached, with the tidal volume varying based on lung compliance. •Advantages: Lower risk of barotrauma. •Disadvantages: Variable tidal volumes can affect minute ventilation. 4. Assist-Control Ventilation (ACV) •Description: The ventilator delivers a preset number of breaths at a set tidal volume or pressure but also allows the patient to initiate additional breaths at the same settings. •Advantages: Provides full support while allowing patient-initiated breaths. •Disadvantages: Risk of hyperventilation if the patient breathes excessively.
  • 31.
    5. Synchronized IntermittentMandatory Ventilation (SIMV) •Description: Combines mandatory breaths with patient-initiated breaths, synchronizing the ventilator with the patient's efforts. •Advantages: Useful for weaning patients off the ventilator. •Disadvantages: Can be less comfortable if synchronization is not optimal. 6. Pressure Support Ventilation (PSV) •Description: Provides a preset level of pressure support during spontaneous breaths initiated by the patient. •Advantages: Reduces the work of breathing and is often used in weaning. •Disadvantages: Requires the patient to have sufficient spontaneous breathing effort.
  • 32.
  • 33.
    Non-invasive positive pressureventilators (NIPPV) provide ventilatory support without the need for endotracheal intubation or tracheostomy. They deliver pressurized air through a mask or similar interface, facilitating breathing by increasing airway pressure and thus assisting or completely supporting the patient’s respiratory efforts. NIPPV is widely used in various clinical settings, from emergency care to chronic management, due to its effectiveness and reduced risk of complications compared to invasive ventilation.
  • 34.
    Types of Non-InvasivePositive Pressure Ventilators 1. Continuous Positive Airway Pressure (CPAP) • Description: CPAP devices deliver a constant level of positive airway pressure throughout the entire respiratory cycle. This continuous pressure keeps the airways open, improving oxygenation and reducing the work of breathing. • Applications: Primarily used for obstructive sleep apnea (OSA), and also beneficial in acute cardiogenic pulmonary edema and other conditions causing hypoxemia. • Advantages: Simple to use, effective in preventing airway collapse, and improves oxygenation. • Disadvantages: Can be uncomfortable for some patients, does not provide ventilatory support (only supports airway patency).
  • 36.
    2. Bi-Level PositiveAirway Pressure (BiPAP) •Description: BiPAP devices provide two levels of pressure: a higher pressure during inspiration (IPAP) and a lower pressure during expiration (EPAP). This differential pressure supports ventilation by assisting inhalation and reducing the work of breathing. •Applications: Used in conditions such as chronic obstructive pulmonary disease (COPD) exacerbations, acute respiratory failure, and neuromuscular disorders. •Advantages: Effective in reducing work of breathing, improves ventilation and oxygenation, and more comfortable due to variable pressures. •Disadvantages: More complex than CPAP, may require more adjustments, and potential for air leaks around the mask.
  • 38.
    3. Automatic PositiveAirway Pressure (APAP) •Description: APAP devices automatically adjust the level of positive airway pressure in response to the patient's needs throughout the night or usage period. These devices monitor breathing patterns and make real-time adjustments to the pressure levels. •Applications: Often used for obstructive sleep apnea, especially in patients whose pressure requirements vary. •Advantages: Provides customized pressure levels, improving comfort and effectiveness. •Disadvantages: More expensive and technologically complex, potential for delayed response in pressure adjustment.
  • 40.
    4. Non-Invasive PositivePressure Ventilation (NIPPV) •Description: General term encompassing both CPAP and BiPAP, NIPPV devices provide positive airway pressure to support respiratory function. They can be set to deliver a predetermined pressure (fixed) or adjust based on patient needs (adaptive). •Applications: Used in acute and chronic respiratory conditions, including acute respiratory distress, chronic respiratory insufficiency, and during the weaning process from invasive ventilation. •Advantages: Reduces the need for intubation, lower risk of complications compared to invasive methods, and can be used in various settings including home care. •Disadvantages: Requires patient cooperation, mask fit and comfort issues, and potential for air leaks.
  • 41.
    Types of Non-InvasiveNegative Pressure Ventilators 1. Iron Lung • Description: The iron lung, also known as a tank ventilator, is one of the earliest types of negative pressure ventilators. It encases the patient's body (except the head) in a cylindrical chamber. By creating a vacuum inside the chamber, the machine lowers the pressure around the body, causing the chest to expand and air to be drawn into the lungs. • Applications: Historically used during polio epidemics for patients with paralytic respiratory muscles. Currently, it is rarely used but serves as a foundational technology for understanding negative pressure ventilation. • Advantages: Effective for patients with diaphragmatic or intercostal muscle paralysis. • Disadvantages: Bulky and cumbersome, limits patient mobility, and not practical for acute care settings.
  • 43.
    2. Chest Cuirass •Description:The chest cuirass is a shell-like device that fits over the patient's thorax, creating a seal. A pump generates negative pressure within the cuirass, resulting in chest expansion and inhalation. The cuirass is more compact and less restrictive compared to the iron lung. •Applications: Used in patients with chronic respiratory insufficiency, neuromuscular diseases, and certain spinal cord injuries. •Advantages: More portable and comfortable than the iron lung, allows for better patient mobility, and can be used intermittently. •Disadvantages: May not provide sufficient ventilation for patients with severe respiratory failure, and achieving an airtight seal can be challenging.
  • 45.
    3. Exoskeleton NegativePressure Ventilators •Description: These devices are designed to be worn like a jacket or vest. They utilize a negative pressure pump to facilitate breathing by intermittently creating negative pressure around the thorax. Some modern versions are more lightweight and can be used during sleep or rest periods. •Applications: Suitable for patients with chronic conditions such as chronic obstructive pulmonary disease (COPD), amyotrophic lateral sclerosis (ALS), or muscular dystrophy. •Advantages: Lightweight and portable, allows for greater patient mobility, and can be used at home. •Disadvantages: Limited to patients with sufficient spontaneous breathing effort, and less effective in acute respiratory failure.
  • 47.
  • 48.
    1. High-Pressure Alarm Description:This alarm sounds when the pressure in the ventilator circuit exceeds a preset maximum limit. Causes: •Airway Obstruction: Blockages in the endotracheal tube (ETT) or tracheostomy tube due to mucus plugs or kinking. •Bronchospasm: Sudden constriction of the muscles in the walls of the bronchioles. •Coughing: Patient coughing against the ventilator can increase airway pressure. •Patient-ventilator asynchrony: When the patient's breathing pattern does not match the ventilator's settings.
  • 49.
    Actions: •Check the Airway:Suction the ETT or tracheostomy tube to remove any blockages. •Reassess Ventilator Settings: Adjust the pressure settings or modes to better match the patient's needs. •Administer Bronchodilators: If bronchospasm is the cause, bronchodilators may help.
  • 50.
    2. Low-Pressure Alarm Description:This alarm sounds when the pressure in the ventilator circuit falls below a preset minimum limit. Causes: •Disconnection: The circuit may have become disconnected from the patient. •Leaks: Air leaks in the ventilator circuit, around the ETT or tracheostomy tube, or in the patient’s airway. •Circuit Malfunction: Issues with the ventilator tubing or components.
  • 51.
    Actions: •Check Connections: Ensureall connections in the ventilator circuit are secure. •Inspect for Leaks: Look for leaks in the tubing or around the airway interface. •Verify Settings: Confirm that the ventilator settings are appropriate and have not been inadvertently changed.
  • 52.
    3. Apnea Alarm Description:This alarm activates when the ventilator does not detect any patient-initiated breaths within a preset time interval. Causes: •Respiratory Arrest: The patient may have stopped breathing. •Sedation: Over-sedation or medication effects causing temporary cessation of breathing. •Mechanical Failure: Ventilator malfunction or disconnection.
  • 53.
    Actions: •Check the Patient:Immediately assess the patient for signs of respiratory arrest or distress. •Manual Ventilation: Provide manual ventilation using a bag- valve mask if necessary. •Review Sedation: Reassess the level of sedation and adjust medications as needed.
  • 54.
    4. Low TidalVolume Alarm Description: This alarm sounds when the tidal volume delivered to the patient is lower than the preset minimum. Causes: •Leaks: Air leaks in the circuit or around the ETT or tracheostomy tube. •Partial Obstruction: Partial blockage in the airway or ventilator tubing. •Patient Effort: Inadequate patient effort in triggering the ventilator. Actions: •Inspect for Leaks: Check the entire ventilator circuit for any air leaks. •Clear Obstructions: Suction the airway and ensure the ventilator tubing is not kinked. •Adjust Settings: Ensure the tidal volume settings are appropriate and consider adjusting the sensitivity of the ventilator.
  • 55.
    5. High TidalVolume Alarm Description: This alarm is triggered when the tidal volume delivered exceeds the preset maximum limit. Causes: •Increased Patient Effort: The patient may be taking deep breaths. •Improper Settings: The ventilator settings may be too high for the patient’s current needs. Actions: •Assess the Patient: Determine if the patient is over-breathing due to anxiety or pain. •Review Ventilator Settings: Adjust the tidal volume settings to match the patient’s respiratory needs. •Provide Support: Offer reassurance or sedatives if the patient is anxious.
  • 56.
    6. High RespiratoryRate Alarm Description: This alarm activates when the patient’s respiratory rate exceeds the preset maximum limit. Causes: •Distress or Pain: The patient may be experiencing pain or anxiety. •Fever or Infection: Increased metabolic demand can raise the respiratory rate. •Ventilator Settings: Inadequate ventilatory support causing the patient to over- breathe. Actions: •Assess the Patient: Evaluate for signs of distress, pain, or fever. •Adjust Ventilator Support: Increase the level of ventilatory support if necessary. •Treat Underlying Conditions: Address pain, anxiety, or infection as appropriate.
  • 57.
    7. Low RespiratoryRate Alarm Description: This alarm sounds when the patient’s respiratory rate falls below the preset minimum limit. Causes: •Sedation or Medication: Over-sedation or effects of medications reducing the respiratory rate. •Neurological Issues: Conditions affecting the brain or nervous system. •Mechanical Failure: Issues with the ventilator detecting breaths. Actions: •Check the Patient: Immediately assess the patient for sedation levels and neurological status. •Review Medications: Adjust sedation or medications if necessary. •Manual Ventilation: Provide manual ventilation if the patient is not breathing adequately.
  • 58.
    8. High FiO2Alarm Description: This alarm is triggered when the fraction of inspired oxygen (FiO2) exceeds the preset maximum limit. Causes: •Incorrect Settings: FiO2 settings may be set too high. •Mechanical Issue: Malfunction in the oxygen delivery system. Actions: •Verify Settings: Ensure that the FiO2 settings are appropriate for the patient’s condition. •Check Equipment: Inspect the ventilator and oxygen delivery system for any malfunctions.
  • 59.
    9. Low FiO2Alarm Description: This alarm sounds when the fraction of inspired oxygen (FiO2) falls below the preset minimum limit. Causes: •Supply Issues: Oxygen supply interruption or depletion. •Equipment Malfunction: Problems with the ventilator’s oxygen delivery system. Actions: •Check Oxygen Supply: Ensure that the oxygen source is connected and functioning correctly. •Inspect Equipment: Check the ventilator and tubing for any malfunctions or disconnections.
  • 60.
  • 61.
    Acute respiratory distresssyndrome (ARDS) Chronic obstructive pulmonary disease (COPD) exacerbations Severe pneumonia Trauma affecting the respiratory system Neurological conditions affecting the ability to breathe (e.g., spinal cord injury, stroke) During and post major surgeries requiring general anesthesia
  • 62.
  • 63.
    1. Patient Assessmentand Monitoring a. Initial Assessment: •Conduct a thorough initial assessment of the patient's respiratory status, including breath sounds, respiratory rate, effort, and oxygen saturation. •Evaluate the patient's medical history and current condition to understand the need for mechanical ventilation. b. Continuous Monitoring: •Monitor the patient's vital signs, including heart rate, blood pressure, respiratory rate, and oxygen saturation. •Observe the patient for signs of respiratory distress, such as labored breathing, cyanosis, or use of accessory muscles. •Regularly assess the patient's mental status and level of comfort.
  • 64.
    2. Ventilator Setupand Management a. Ventilator Settings: •Collaborate with the respiratory therapist and physician to set appropriate ventilator parameters, such as tidal volume, respiratory rate, FiO2, and PEEP. •Ensure that the ventilator settings are tailored to the patient's specific needs and condition. b. Equipment Check: •Perform routine checks on the ventilator to ensure it is functioning correctly and safely. •Inspect the ventilator circuit for any leaks, disconnections, or blockages. •Ensure that all alarms are set correctly and are functioning.
  • 65.
    3. Patient Careand Comfort a. Airway Management: •Ensure the endotracheal tube (ETT) or tracheostomy tube is correctly positioned and secured. •Perform regular oral care and suctioning to prevent the buildup of secretions and reduce the risk of ventilator-associated pneumonia (VAP). b. Positioning: •Reposition the patient regularly to prevent pressure ulcers and promote lung expansion. •Use strategies such as prone positioning if indicated to improve oxygenation.
  • 66.
    4. Infection Control a.Hygiene Practices: Adhere to strict hand hygiene and use personal protective equipment (PPE) to reduce the risk of infection. Ensure the ventilator circuit is changed according to hospital protocols to minimize the risk of infection. b. VAP Prevention: Implement measures to prevent ventilator-associated pneumonia, such as elevating the head of the bed, providing oral care, and using subglottic suctioning.
  • 67.
    5. Patient andFamily Education a. Education and Communication: •Educate the patient and their family about the purpose of mechanical ventilation and the care involved. •Provide information on what to expect during the course of ventilation and address any concerns or questions they may have. b. Emotional Support: •Offer emotional support to the patient and family, helping them cope with the stress and anxiety associated with mechanical ventilation.
  • 68.
    6. Documentation andReporting a. Accurate Documentation: •Document all aspects of patient care, including ventilator settings, changes in the patient's condition, and interventions performed. •Record any incidents or complications related to mechanical ventilation. b. Communication with Healthcare Team: •Communicate regularly with the respiratory therapist, physician, and other members of the healthcare team regarding the patient's status and any changes in ventilator settings. •Report any significant changes in the patient's condition promptly to the appropriate healthcare provider.
  • 69.
    7. Emergency Management a.Handling Ventilator Alarms: •Respond promptly to ventilator alarms, identifying and addressing the cause of the alarm. •Ensure that backup equipment is available and functioning in case of ventilator failure. b. Emergency Procedures: •Be prepared to perform manual ventilation using a bag-valve mask (BVM) if the ventilator malfunctions or during transport. •Participate in emergency drills and training to stay proficient in handling ventilator-related emergencies.
  • 70.
    8. Weaning andExtubation a. Weaning Process: •Assist in the gradual reduction of ventilator support as the patient’s condition improves. •Monitor the patient closely for signs of readiness for weaning, such as improved respiratory function and stable vital signs. b. Extubation: •Prepare for and assist with the extubation process, ensuring all necessary equipment is ready. •Monitor the patient closely post-extubation for any signs of respiratory distress or complications.