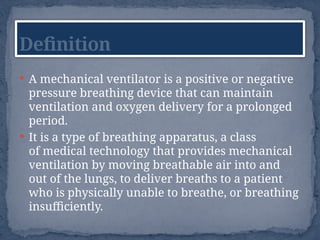
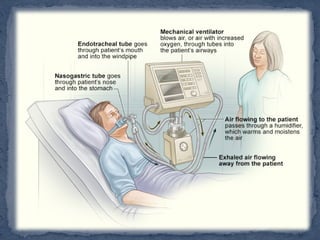
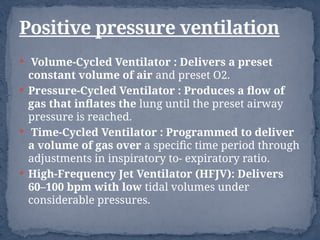
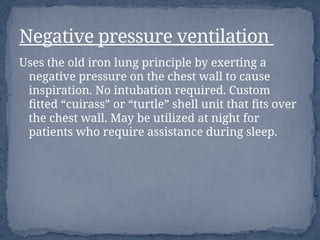
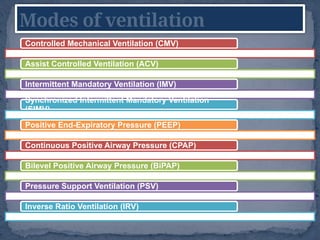
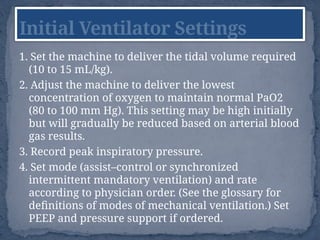
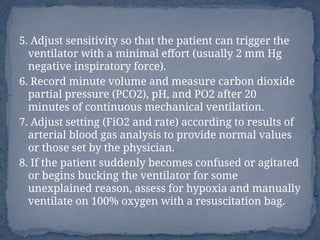
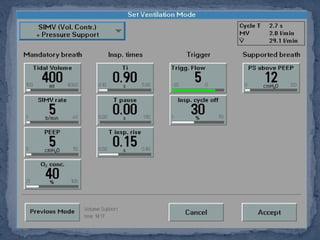
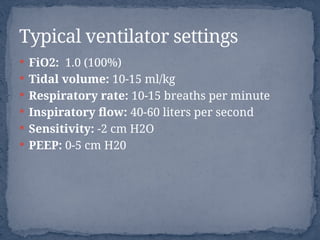
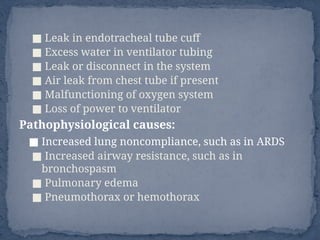
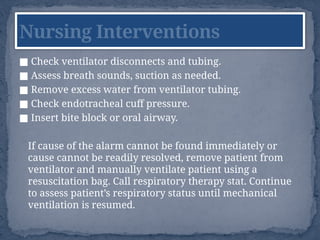
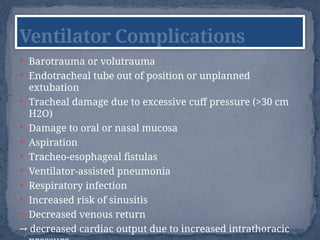
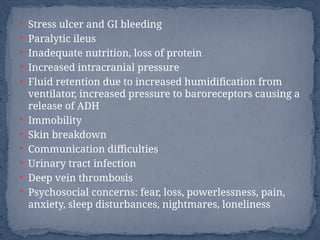
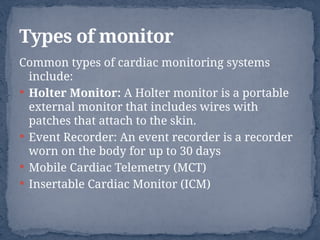
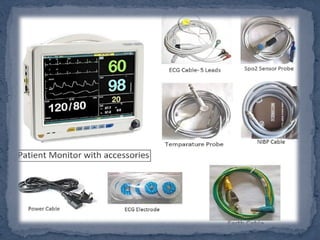
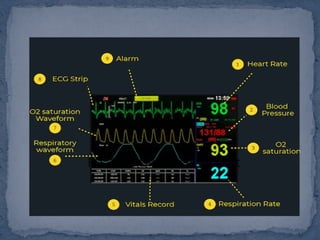
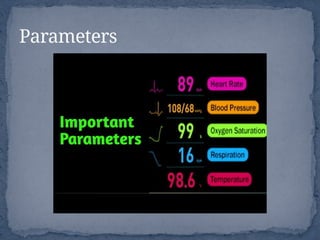
SPECIAL EQUIPMENTS
IN CRITICAL CARE
UNIT
VENTILATORS
 A mechanical ventilator is a positive or negative
pressure breathing device that can maintain
ventilation and oxygen delivery for a prolonged
period.
 It is a type of breathing apparatus, a class
of medical technology that provides mechanical
ventilation by moving breathable air into and
out of the lungs, to deliver breaths to a patient
who is physically unable to breathe, or breathing
insufficiently.
Definition
 PaO2 < 50 mm Hg with FiO2 > 0.60
 PaO2 > 50 mm Hg with pH < 7.25
 Vital capacity < 2 times tidal volume
 Negative inspiratory force < 25 cm H2O
 Respiratory rate > 35/min
 Cardiac arrest
 Acute respiratory failure
 Central nervous system problems which depress the drive to breathe
(e.g., cerebrovascular accident). Š
 Neuromuscular problems which lead to the failure of the peripheral
nerves and muscles that aid respirations (e.g., multiple sclerosis). Š
 Musculoskeletal and pleural dysfunctions (e.g., flail chest) Š
 Problems with the airways themselves (e.g., asthma) Reduction in the
Š
ability to exchange gases (e.g., pneumonia)
Indications
Mechanical
Ventilation
Positive pressure
Volume-Cycled Ventilator
Pressure-Cycled Ventilator
Time-Cycled Ventilator
High-Frequency Jet Ventilator
(HFJV)
Negative pressure
Uses the old iron lung principle
by exerting a negative pressure
on the chest wall to cause
inspiration.
Classification of Ventilators
 Volume-Cycled Ventilator : Delivers a preset
constant volume of air and preset O2.
 Pressure-Cycled Ventilator : Produces a flow of
gas that inflates the lung until the preset airway
pressure is reached.
 Time-Cycled Ventilator : Programmed to deliver
a volume of gas over a specific time period through
adjustments in inspiratory to- expiratory ratio.
 High-Frequency Jet Ventilator (HFJV): Delivers
60–100 bpm with low tidal volumes under
considerable pressures.
Positive pressure ventilation
Uses the old iron lung principle by exerting a
negative pressure on the chest wall to cause
inspiration. No intubation required. Custom
fitted “cuirass” or “turtle” shell unit that fits over
the chest wall. May be utilized at night for
patients who require assistance during sleep.
Negative pressure ventilation
Controlled Mechanical Ventilation (CMV)
Assist Controlled Ventilation (ACV)
Intermittent Mandatory Ventilation (IMV)
Synchronized Intermittent Mandatory Ventilation
(SIMV)
Positive End-Expiratory Pressure (PEEP)
Continuous Positive Airway Pressure (CPAP)
Bilevel Positive Airway Pressure (BiPAP)
Pressure Support Ventilation (PSV)
Inverse Ratio Ventilation (IRV)
Modes of ventilation
■ Controlled Mechanical Ventilation (CMV):
Machine controls rate of breathing. Delivery of preset volume (TV) and
rate regardless of patient’s breathing pattern. Sedation or paralyzing agent
(e.g., Pavulon) usually required.
■ Assist Controlled Ventilation (ACV):
Patient controls rate of breathing. Inspiratory effort triggers delivery of
preset volume.
■ Intermittent Mandatory Ventilation (IMV):
Patient breathes spontaneously (own tidal volume) between ventilator
breaths of a preset volume and rate.
■ Synchronized Intermittent Mandatory Ventilation (SIMV):
A form of pressure support ventilation. Administers mandatory ventilator
breath at a preset level of positive airway pressure. Monitors negative
inspiratory effort and augments patient’s spontaneous tidal volume or
inspiratory effort. Synchronized with patient’s breathing pattern..
■ Positive End-Expiratory Pressure (PEEP):
Increases oxygenation by increasing functional residual capacity (FRC).
Keeps alveoli inflated after expiration. Can use lower O2 concentrations
with PEEP; decreases risk of O2 toxicity. Ordered as 5–10 cm H2O.
■ Continuous Positive Airway Pressure (CPAP): Maintains positive
pressure throughout the respiratory cycle of a spontaneously
breathing patient. Increases the amount of air remaining in the
lungs at the end of expiration. Less complications than PEEP.
Ordered as 5–10 cm H2O.
■ Bilevel Positive Airway Pressure (BiPAP):
Same as CPAP but settings can be adjusted for both inspiration and
expiration.
■ Pressure Support Ventilation (PSV):
Patient’s inspiratory effort is assisted by the ventilator to a certain
level of pressure. Patient initiates all breaths and controls flow rate
and tidal volume. Decreases work of breathing.
■ Inverse Ratio Ventilation (IRV):
All breaths are pressure limited and time cycled. Inspiratory time
usually set longer than expiratory time.
IMV, SIMV, CPAP, BiPAP and PSV can all be used in the weaning
process.
 FiO2 (Fractional inspired oxygen):
listed as a number between 0 and 1. A FiO2 of .5 means the patient
will be receiving 50% oxygen, and FiO2 of 1.0 means the patient will
be receiving 100% oxygen.
 Respiratory rate :
The rate at which the ventilator is set to provide respirations per
minute.
 Tidal volume :
The amount of air the patient will receive with each breath.
Remember that as one reduces the flow rate the tidal volume will
increase thus producing better alveolar ventilation (Penduloft
effect). Š
 Peak flow:
Velocity of air per unit of time, typically written as liters/min. Š
Ventilator controls
 ŠPressure limit :
A preset cut off for the machine in order to reduce the
incidence of barotrauma. Š
 Sensitivity:
The amount of negative pressure generated by the patient as
they initiate a breath that is required to trigger the ventilator
into allowing a flow of air.
 Positive end expiratory pressure (PEEP):
Helps maintain alveolar function by leaving a small amount
of residual pressure on the alveoli. Two purposes are met,
one, the alveoli are “splinted” open and two, the increased
gas pressure forces oxygen across the alveolar membrane. Š
Not many ventilators will have this setting since mechanical
ventilation is typically performed at two times the normal
tidal volume.
1. Set the machine to deliver the tidal volume required
(10 to 15 mL/kg).
2. Adjust the machine to deliver the lowest
concentration of oxygen to maintain normal PaO2
(80 to 100 mm Hg). This setting may be high initially
but will gradually be reduced based on arterial blood
gas results.
3. Record peak inspiratory pressure.
4. Set mode (assist–control or synchronized
intermittent mandatory ventilation) and rate
according to physician order. (See the glossary for
definitions of modes of mechanical ventilation.) Set
PEEP and pressure support if ordered.
Initial Ventilator Settings
5. Adjust sensitivity so that the patient can trigger the
ventilator with a minimal effort (usually 2 mm Hg
negative inspiratory force).
6. Record minute volume and measure carbon dioxide
partial pressure (PCO2), pH, and PO2 after 20
minutes of continuous mechanical ventilation.
7. Adjust setting (FiO2 and rate) according to results of
arterial blood gas analysis to provide normal values
or those set by the physician.
8. If the patient suddenly becomes confused or agitated
or begins bucking the ventilator for some
unexplained reason, assess for hypoxia and manually
ventilate on 100% oxygen with a resuscitation bag.
 FiO2: 1.0 (100%)
 Tidal volume: 10-15 ml/kg
 Respiratory rate: 10-15 breaths per minute
 Inspiratory flow: 40-60 liters per second
 Sensitivity: -2 cm H2O
 PEEP: 0-5 cm H20
Typical ventilator settings
Sample Criteria for Weaning: Readiness
 Alert and cooperative
 FIO2 < 40%–50% and PEEP <5–8 cm H2O
 Hemodynamically stable
 pH >7.34
 PaO2 >80 mm Hg
 PaCO2 <45 mm Hg
 PaO2/FIO2 ratio >200
 Vital capacity 15 mL/kg and minute ventilation <10
 Hemoglobin >7–9 g/dL and serum electrolytes within normal limits
 Spontaneous respirations >6 b/min. or <35 b/min.
 Negative inspiratory pressure –30 cm H2O
 Relatively afebrile with limited respiratory secretions
 Inotropes reduced or unchanged within previous 24 hrs
 Sedation discontinued
Weaning
 T-tube weaning:
Place patient on T-tube circuit on same FIO2 as on ventilatory assistance.
Monitor ABGs after 30 min. Provide a brief rest period on the ventilator as
needed and continue to monitor ABGs until satisfactory. Extubate when
patient is rested, good spontaneous respiratory effort, and ABGs within
acceptable parameters.
 IMV/SIMV weaning:
Decrease IMV rate every 1–4 hrs. Monitor spontaneous breaths. Obtain
ABGs within 30 min. of ventilator change. Allows for gradual change from
positive-pressure ventilation to spontaneous- pressure ventilation.
 PSV:
Use low levels of PSV (5–10 cm H2O). Decrease in 3–6 cm of H2O
increments. Useful in retraining respiratory muscles due to long-term
ventilation.
 CPAP/BiPAP:
Provides expiratory support, maintains positive intrathoracic pressure.
BiPAP adds inspiratory support to CPAP. Prevents respiratory muscle fatigue.
Weaning Methods
T-Tube
Ventilator alarms should never be ignored or turned off. They
may be muted or silenced temporarily until problem is resolved.
Checklist of Common Causes of Ventilator Alarms
 Patient causes:
■ Biting down on endotracheal tube
■ Patient needs suctioning
■ Coughing
■ Gagging on endotracheal tube
■ Patient “bucking” or not synchronous with the ventilator
■ Patient attempting to talk
■ Patient experiences period of apnea
 Mechanical causes:
■ Kinking of ventilator tubing
■ Endotracheal tube cuff may need more air
Ventilator Alarms
■ Leak in endotracheal tube cuff
■ Excess water in ventilator tubing
■ Leak or disconnect in the system
■ Air leak from chest tube if present
■ Malfunctioning of oxygen system
■ Loss of power to ventilator
Pathophysiological causes:
■ Increased lung noncompliance, such as in ARDS
■ Increased airway resistance, such as in
bronchospasm
■ Pulmonary edema
■ Pneumothorax or hemothorax
■ Check ventilator disconnects and tubing.
■ Assess breath sounds, suction as needed.
■ Remove excess water from ventilator tubing.
■ Check endotracheal cuff pressure.
■ Insert bite block or oral airway.
If cause of the alarm cannot be found immediately or
cause cannot be readily resolved, remove patient from
ventilator and manually ventilate patient using a
resuscitation bag. Call respiratory therapy stat. Continue
to assess patient’s respiratory status until mechanical
ventilation is resumed.
Nursing Interventions
 Barotrauma or volutrauma
 Endotracheal tube out of position or unplanned
extubation
 Tracheal damage due to excessive cuff pressure (>30 cm
H2O)
 Damage to oral or nasal mucosa
 Aspiration
 Tracheo-esophageal fistulas
 Ventilator-assisted pneumonia
 Respiratory infection
 Increased risk of sinusitis
 Decreased venous return
→ decreased cardiac output due to increased intrathoracic
Ventilator Complications
 Stress ulcer and GI bleeding
 Paralytic ileus
 Inadequate nutrition, loss of protein
 Increased intracranial pressure
 Fluid retention due to increased humidification from
ventilator, increased pressure to baroreceptors causing a
release of ADH
 Immobility
 Skin breakdown
 Communication difficulties
 Urinary tract infection
 Deep vein thrombosis
 Psychosocial concerns: fear, loss, powerlessness, pain,
anxiety, sleep disturbances, nightmares, loneliness
1. Managing Mechanical Ventilation
Prior intubation assessment:
 Investigate the etiology of respiratory failure.
 Observe changes in the level of consciousness.
 Assess the client’s respiratory rate, depth, and pattern,
including the use of accessory muscles.
 Assess the client’s heart rate and blood pressure.
 Auscultate the lung for normal or adventitious breath sounds.
 Assess the skin color and examine the lips and nailbeds for
cyanosis.
 Monitor oxygen saturation using pulse oximetry.
 Monitor arterial blood gases (ABGs) as indicated.
Nursing Care of a mechanically
ventilated patient
After intubation assessment:
 Assess for correct endotracheal (ET) tube placement
through observation of a symmetrical rise of both chest
sides, auscultation of bilateral breath sounds, and X-ray
confirmation.
 Assess for the client’s comfort and the ability to cooperate
while on mechanical ventilation.
 Assess the ventilator settings and alarm system every
hour.
 Count the client’s respirations for 1 full minute and
compare with desired respirations and ventilator set rate.
 Maintain the client’s airway. Use the oral or nasal airway
as needed.
 Maintain the client in a High-Fowler’s position as
tolerated. Frequently check the position.
Preparation for endotracheal intubation:
 Notify the respiratory therapist to bring a
mechanical ventilator.
 Prepare the following equipment: ET tubes of
different sizes; blades, laryngoscope, and stylet;
syringe, benzoin, and waterproof tape or other
securing materials; and local anesthetic agent
(e.g., Xylocaine spray or jelly, benzocaine spray,
cocaine, lidocaine, and cotton-tipped
applicators.
 Administer sedation as ordered.
 Assisting with intubation
 Place the client in a supine position, hyperextending the
neck unless contraindicated, and align the client’s
oropharynx, posterior oropharynx, and trachea.
 Apply cricoid pressure (Sellick maneuver) as directed by
the healthcare provider.
 Preoxygenate the client as indicated.
 Assist with the verification of correct ET tube placement.
Use an end-tidal carbon dioxide detector as indicated.
 Continue with manual Ambu bag ventilation until the ET
tube is stabilized. Assist in securing the ET tube once tube
placement is confirmed.
 Document the ET tube position, noting the centimeter
reference marking on the ET tube.
 Institute mechanical ventilation with prescribed settings.
 Anticipate the need for nasogastric and/or oral gastric
suction.
 Administer muscle-paralyzing agents, sedatives, and
opioid analgesics as ordered.
 Examine the cuff volume by checking whether the client
can talk or make sounds around the tube or whether
exhaled volumes are significantly less than the volumes
delivered. To correct this, slowly inflate the cuff with air
until no leak is detected. Notify the respiratory therapist
to check cuff pressure.
 Position the client by elevating the head of the bed if
possible.
 Inflate the endotracheal tube cuff properly. Check cuff
inflation every 4 to 8 hours.
 Note inspired humidity and temperature; use a heat
moisture exchanger (HME), as indicated.
2. Promoting Patent Airway Clearance
 Assess airway patency.
 Observe the color, odor, quantity, and consistency of
sputum.
 Auscultate the lungs for the presence of normal or
adventitious breath sounds.
 Monitor oxygen saturation prior to and after suctioning
using pulse oximetry.
 Assess arterial blood gases (ABGs).
 Monitor for peak airway pressures and airway resistance.
 Monitor ET tube placement.
 Note excessive coughing, increased dyspnea,
high-pressure alarm on the ventilator, and
visible secretions in the endotracheal or
tracheostomy tube.
 Explain the suctioning procedure to the client;
give reassurance throughout the procedure.
 Encourage deep breathing and coughing
exercises. Promote early ambulation when
possible.
 Turn the client in every two hours.
 Institute airway suctioning as indicated based
on the presence of adventitious breath sounds
and/or increased ventilatory pressure.
 Use closed in-line suction.
 Hyperoxygenated as ordered.
 Instruct client in coughing techniques, if
possible, during suctioning, such as splinting,
the timing of breathing, and “step-cough”, as
indicated.
 Administer intravenous therapy and aerosol
bronchodilators as indicated.
 Administer humidified oxygen as prescribed.
 Consult a respiratory therapist for chest
physiotherapy as indicated.
3. Reducing Anxiety and Fear
 Assess the client’s understanding of the need for
mechanical ventilation and the threat presented by
the situation.
 Assess the client for signs of anxiety.
 Observe the client’s physical responses.
 Assess previous coping strengths of the client and
family members and their current areas of ability and
control.
 Encourage clients and family members to
acknowledge and express fears. Acknowledge their
expressions of concern.
 Reduce distracting stimuli. Inform the client of
alarms on the ventilatory system, and reassure the
client about the close proximity of health care
personnel to respond to the alarms.
 Educate the client and family about safety precautions
when managing mechanical ventilators, such as
backup power and oxygen supplies and emergency
equipment for suctioning.
 Display a confident, calm manner and understanding
attitude. Be available to the client for support, as well
as for explanations of the client’s care and progress.
 Provide relaxation techniques.
 Encourage sedentary diversional activities.
 Encourage visiting family and friends and promote
optimism.
 Promote spiritual care as appropriate.
 Reinforce education about cognitive behavioral
therapy (CBT).
 Refer to the psychiatric liaison clinical nurse specialist,
psychiatrist, or hospital chaplain, as appropriate.
4. Administering Medications and Pharmacological
Support
Induction agents
 Etomidate
 Ketamine
Paralyzing agents
 Rocuronium
 Succinylcholine
Opioids
 Morphine
 Fentanyl
Diuretics
• Furosemide (Lasix)
• Hydrochlorothiazide (HCTZ)
Vasopressors and inotropes
• Norepinephrine
• Epinephrine
• Dopamine
• Dobutamine
Broad-spectrum antibiotics
Vancomycin and Linezolid
Antifungals agents
• Fluconazole
• Voriconazole
5. Preventing Respiratory Injury Risk
Review the ventilator settings every hour, especially
the tidal volume and plateau pressures. Notify the
respiratory unit of any discrepancy in the ventilator
settings immediately
Assess respiratory rate and rhythm including the
work of breathing.
Assess arterial blood gas results and monitor
oxygen saturation.
Assess for the signs of barotrauma: the client with
crepitus, subcutaneous emphysema, altered chest
excursion, asymmetrical chest, abnormal ABGs, a
shift in trachea, restlessness, evidence of
pneumothorax on chest x-ray studies.
Auscultate breath sounds.
Monitor chest x-ray reports daily and obtain a stat
portable chest x-ray film if barotrauma is
suspected.
Monitor plateau pressures with the respiratory
therapist.
Make sure that the ventilator alarms are on.
Listen for alarms. Know the range in which the
ventilator will set off the alarm and how to
troubleshoot.
 Suction the client only when necessary.
Lower the ventilator tidal volume settings, as
indicated.
Provide early nutritional support, as
appropriate.
Ensure proper sedation and pain management.
Assist in performing tube thoracostomy,
emergency needle thoracostomy, or large-bore
thoracostomy.
Observe for air leaks in the water-seal chamber.
Clamp the tubing to determine the origin of the
air leak, as indicated
6. Optimizing Cardiac Function
Assess the client’s level of consciousness,
blood pressure, heart rate, and hemodynamic
parameters if in place (central venous
pressure, pulmonary artery diastolic pressure
(PADP), and pulmonary capillary wedge
pressure, cardiac output).
Assess the capillary refill, skin temperature,
and peripheral pulses.
Monitor for dysrhythmias.
Auscultate heart sounds.
Monitor fluid balance and urine output.
Assess the client’s response to activity and
promote rest appropriately.
Monitor liver function test results.
Maintain an optimal fluid balance.
Provide small, easily digested meals and
instruct to limit caffeine intake, as
appropriate.
Measure cardiac output parameters and other
functional parameters as appropriate.
 Notify the healthcare provider immediately of
signs of a decrease in cardiac output and
anticipate possible ventilator setting changes.
Assist in inserting a Swan-Ganz catheter in the
ICU settings, and perform PEEP studies.
Administer medications as ordered (diuretics,
inotropic agents).
CARDIAC MONITOR
A cardiac event monitor is a device that you
control to record the electrical activity of your
heart (ECG). This device is about the size of a
pager. It records your heart rate and rhythm.
Cardiac event monitors are used when you need
long-term monitoring of symptoms that occur
less than daily.
Definition
Common types of cardiac monitoring systems
include:
 Holter Monitor: A Holter monitor is a portable
external monitor that includes wires with
patches that attach to the skin.
 Event Recorder: An event recorder is a recorder
worn on the body for up to 30 days
 Mobile Cardiac Telemetry (MCT)
 Insertable Cardiac Monitor (ICM)
Types of monitor
 It monitors cardiovascular pressures and cardiac
output.
 Oxygen saturation of the arterial blood can also
be monitored continuously.
 It can be interconnected in critical care areas to
allow for continual observation of several
patients fro central display.
 Continuous cardiovascular and pulmonary
monitoring allows for prompt identification and
initiation of treatment.
Purpose
Parameters
 Accurate lead placement and good skin
preparation will reduce false readings.
 Skin that is clean and dry will allow better
adherence of electrodes and a more accurate
ECG.
 Daily assessment of skin is important in
preventing skin excoriation and/or pressure area
injury at the site of electrodes.
Care and maintenance of
monitor
 Maintenance
 Check battery status on telemetry device each
shift.The device will alarm when batteries need
changing
 Electrodes should be changed on a daily basis
 The need for telemetry should be reviewed on a
daily basis, this is the joint responsibility of the
treating team, bedside nurse and AUM
 All electrical equipment and outlets are grounded to avoid
electrical shock and artifact (electrical activity caused by
interference).
 The nurse should plug in the monitor, turn on power, and
connect the cable if not already attached.
 He or she should connect the lead wires to the proper position
and ensure that color-coded wires match the color-coded cable.
 If the device is not color coded, the right arm (RA) wire should
be attached to the RA outlet, the left arm (LA) wire attached to
the LA outlet, and so forth.
 The nurse should open the electrode package, and attach an
electrode to each lead wire. The hands should be washed and
the procedure should be explained to the patient
Role of nursing officer
 Privacy should be ensured for the patient, and the patient
should be clean and dry to prevent electrical shock.
 Next, the chest should be exposed and the sites selected
for electrode placement.
 Using the rough patch on the electrode, a dry washcloth,
or gauze pad, each site should be rubbed briskly until it
reddens, but care should be taken not to damage or break
the skin.
 Dead skin cells are removed in this manner, thereby
promoting better electrical conduction.
 Patients who are extremely hairy may need to be shaved
prior to application of the electrodes
 If the electrode has dried out, which can happen if
the electrode package is opened before immediate
use, it should be discarded and another used.
 The nurse should apply one electrode to each site,
press one side of the electrode against the skin, and
pull gently.
 Then, the opposite side of the electrode should be
pressed against the skin.
 The nurse should press two fingers on the
electrode in a circular pattern to affix the gel and
stabilize the electrode, then repeat for each
electrode.
 To avoid potential artifact, do not place the
electrodes on bony prominences or hairy areas.

POWERPOINT PRESENTATION ON SPECIAL EQUIPMENTS

  • 1.
  • 2.
  • 3.
     A mechanicalventilator is a positive or negative pressure breathing device that can maintain ventilation and oxygen delivery for a prolonged period.  It is a type of breathing apparatus, a class of medical technology that provides mechanical ventilation by moving breathable air into and out of the lungs, to deliver breaths to a patient who is physically unable to breathe, or breathing insufficiently. Definition
  • 5.
     PaO2 <50 mm Hg with FiO2 > 0.60  PaO2 > 50 mm Hg with pH < 7.25  Vital capacity < 2 times tidal volume  Negative inspiratory force < 25 cm H2O  Respiratory rate > 35/min  Cardiac arrest  Acute respiratory failure  Central nervous system problems which depress the drive to breathe (e.g., cerebrovascular accident). Š  Neuromuscular problems which lead to the failure of the peripheral nerves and muscles that aid respirations (e.g., multiple sclerosis). Š  Musculoskeletal and pleural dysfunctions (e.g., flail chest) Š  Problems with the airways themselves (e.g., asthma) Reduction in the Š ability to exchange gases (e.g., pneumonia) Indications
  • 6.
    Mechanical Ventilation Positive pressure Volume-Cycled Ventilator Pressure-CycledVentilator Time-Cycled Ventilator High-Frequency Jet Ventilator (HFJV) Negative pressure Uses the old iron lung principle by exerting a negative pressure on the chest wall to cause inspiration. Classification of Ventilators
  • 7.
     Volume-Cycled Ventilator: Delivers a preset constant volume of air and preset O2.  Pressure-Cycled Ventilator : Produces a flow of gas that inflates the lung until the preset airway pressure is reached.  Time-Cycled Ventilator : Programmed to deliver a volume of gas over a specific time period through adjustments in inspiratory to- expiratory ratio.  High-Frequency Jet Ventilator (HFJV): Delivers 60–100 bpm with low tidal volumes under considerable pressures. Positive pressure ventilation
  • 8.
    Uses the oldiron lung principle by exerting a negative pressure on the chest wall to cause inspiration. No intubation required. Custom fitted “cuirass” or “turtle” shell unit that fits over the chest wall. May be utilized at night for patients who require assistance during sleep. Negative pressure ventilation
  • 10.
    Controlled Mechanical Ventilation(CMV) Assist Controlled Ventilation (ACV) Intermittent Mandatory Ventilation (IMV) Synchronized Intermittent Mandatory Ventilation (SIMV) Positive End-Expiratory Pressure (PEEP) Continuous Positive Airway Pressure (CPAP) Bilevel Positive Airway Pressure (BiPAP) Pressure Support Ventilation (PSV) Inverse Ratio Ventilation (IRV) Modes of ventilation
  • 11.
    ■ Controlled MechanicalVentilation (CMV): Machine controls rate of breathing. Delivery of preset volume (TV) and rate regardless of patient’s breathing pattern. Sedation or paralyzing agent (e.g., Pavulon) usually required. ■ Assist Controlled Ventilation (ACV): Patient controls rate of breathing. Inspiratory effort triggers delivery of preset volume. ■ Intermittent Mandatory Ventilation (IMV): Patient breathes spontaneously (own tidal volume) between ventilator breaths of a preset volume and rate. ■ Synchronized Intermittent Mandatory Ventilation (SIMV): A form of pressure support ventilation. Administers mandatory ventilator breath at a preset level of positive airway pressure. Monitors negative inspiratory effort and augments patient’s spontaneous tidal volume or inspiratory effort. Synchronized with patient’s breathing pattern.. ■ Positive End-Expiratory Pressure (PEEP): Increases oxygenation by increasing functional residual capacity (FRC). Keeps alveoli inflated after expiration. Can use lower O2 concentrations with PEEP; decreases risk of O2 toxicity. Ordered as 5–10 cm H2O.
  • 12.
    ■ Continuous PositiveAirway Pressure (CPAP): Maintains positive pressure throughout the respiratory cycle of a spontaneously breathing patient. Increases the amount of air remaining in the lungs at the end of expiration. Less complications than PEEP. Ordered as 5–10 cm H2O. ■ Bilevel Positive Airway Pressure (BiPAP): Same as CPAP but settings can be adjusted for both inspiration and expiration. ■ Pressure Support Ventilation (PSV): Patient’s inspiratory effort is assisted by the ventilator to a certain level of pressure. Patient initiates all breaths and controls flow rate and tidal volume. Decreases work of breathing. ■ Inverse Ratio Ventilation (IRV): All breaths are pressure limited and time cycled. Inspiratory time usually set longer than expiratory time. IMV, SIMV, CPAP, BiPAP and PSV can all be used in the weaning process.
  • 13.
     FiO2 (Fractionalinspired oxygen): listed as a number between 0 and 1. A FiO2 of .5 means the patient will be receiving 50% oxygen, and FiO2 of 1.0 means the patient will be receiving 100% oxygen.  Respiratory rate : The rate at which the ventilator is set to provide respirations per minute.  Tidal volume : The amount of air the patient will receive with each breath. Remember that as one reduces the flow rate the tidal volume will increase thus producing better alveolar ventilation (Penduloft effect). Š  Peak flow: Velocity of air per unit of time, typically written as liters/min. Š Ventilator controls
  • 14.
     ŠPressure limit: A preset cut off for the machine in order to reduce the incidence of barotrauma. Š  Sensitivity: The amount of negative pressure generated by the patient as they initiate a breath that is required to trigger the ventilator into allowing a flow of air.  Positive end expiratory pressure (PEEP): Helps maintain alveolar function by leaving a small amount of residual pressure on the alveoli. Two purposes are met, one, the alveoli are “splinted” open and two, the increased gas pressure forces oxygen across the alveolar membrane. Š Not many ventilators will have this setting since mechanical ventilation is typically performed at two times the normal tidal volume.
  • 15.
    1. Set themachine to deliver the tidal volume required (10 to 15 mL/kg). 2. Adjust the machine to deliver the lowest concentration of oxygen to maintain normal PaO2 (80 to 100 mm Hg). This setting may be high initially but will gradually be reduced based on arterial blood gas results. 3. Record peak inspiratory pressure. 4. Set mode (assist–control or synchronized intermittent mandatory ventilation) and rate according to physician order. (See the glossary for definitions of modes of mechanical ventilation.) Set PEEP and pressure support if ordered. Initial Ventilator Settings
  • 16.
    5. Adjust sensitivityso that the patient can trigger the ventilator with a minimal effort (usually 2 mm Hg negative inspiratory force). 6. Record minute volume and measure carbon dioxide partial pressure (PCO2), pH, and PO2 after 20 minutes of continuous mechanical ventilation. 7. Adjust setting (FiO2 and rate) according to results of arterial blood gas analysis to provide normal values or those set by the physician. 8. If the patient suddenly becomes confused or agitated or begins bucking the ventilator for some unexplained reason, assess for hypoxia and manually ventilate on 100% oxygen with a resuscitation bag.
  • 18.
     FiO2: 1.0(100%)  Tidal volume: 10-15 ml/kg  Respiratory rate: 10-15 breaths per minute  Inspiratory flow: 40-60 liters per second  Sensitivity: -2 cm H2O  PEEP: 0-5 cm H20 Typical ventilator settings
  • 19.
    Sample Criteria forWeaning: Readiness  Alert and cooperative  FIO2 < 40%–50% and PEEP <5–8 cm H2O  Hemodynamically stable  pH >7.34  PaO2 >80 mm Hg  PaCO2 <45 mm Hg  PaO2/FIO2 ratio >200  Vital capacity 15 mL/kg and minute ventilation <10  Hemoglobin >7–9 g/dL and serum electrolytes within normal limits  Spontaneous respirations >6 b/min. or <35 b/min.  Negative inspiratory pressure –30 cm H2O  Relatively afebrile with limited respiratory secretions  Inotropes reduced or unchanged within previous 24 hrs  Sedation discontinued Weaning
  • 20.
     T-tube weaning: Placepatient on T-tube circuit on same FIO2 as on ventilatory assistance. Monitor ABGs after 30 min. Provide a brief rest period on the ventilator as needed and continue to monitor ABGs until satisfactory. Extubate when patient is rested, good spontaneous respiratory effort, and ABGs within acceptable parameters.  IMV/SIMV weaning: Decrease IMV rate every 1–4 hrs. Monitor spontaneous breaths. Obtain ABGs within 30 min. of ventilator change. Allows for gradual change from positive-pressure ventilation to spontaneous- pressure ventilation.  PSV: Use low levels of PSV (5–10 cm H2O). Decrease in 3–6 cm of H2O increments. Useful in retraining respiratory muscles due to long-term ventilation.  CPAP/BiPAP: Provides expiratory support, maintains positive intrathoracic pressure. BiPAP adds inspiratory support to CPAP. Prevents respiratory muscle fatigue. Weaning Methods
  • 21.
  • 22.
    Ventilator alarms shouldnever be ignored or turned off. They may be muted or silenced temporarily until problem is resolved. Checklist of Common Causes of Ventilator Alarms  Patient causes: ■ Biting down on endotracheal tube ■ Patient needs suctioning ■ Coughing ■ Gagging on endotracheal tube ■ Patient “bucking” or not synchronous with the ventilator ■ Patient attempting to talk ■ Patient experiences period of apnea  Mechanical causes: ■ Kinking of ventilator tubing ■ Endotracheal tube cuff may need more air Ventilator Alarms
  • 23.
    ■ Leak inendotracheal tube cuff ■ Excess water in ventilator tubing ■ Leak or disconnect in the system ■ Air leak from chest tube if present ■ Malfunctioning of oxygen system ■ Loss of power to ventilator Pathophysiological causes: ■ Increased lung noncompliance, such as in ARDS ■ Increased airway resistance, such as in bronchospasm ■ Pulmonary edema ■ Pneumothorax or hemothorax
  • 24.
    ■ Check ventilatordisconnects and tubing. ■ Assess breath sounds, suction as needed. ■ Remove excess water from ventilator tubing. ■ Check endotracheal cuff pressure. ■ Insert bite block or oral airway. If cause of the alarm cannot be found immediately or cause cannot be readily resolved, remove patient from ventilator and manually ventilate patient using a resuscitation bag. Call respiratory therapy stat. Continue to assess patient’s respiratory status until mechanical ventilation is resumed. Nursing Interventions
  • 25.
     Barotrauma orvolutrauma  Endotracheal tube out of position or unplanned extubation  Tracheal damage due to excessive cuff pressure (>30 cm H2O)  Damage to oral or nasal mucosa  Aspiration  Tracheo-esophageal fistulas  Ventilator-assisted pneumonia  Respiratory infection  Increased risk of sinusitis  Decreased venous return → decreased cardiac output due to increased intrathoracic Ventilator Complications
  • 26.
     Stress ulcerand GI bleeding  Paralytic ileus  Inadequate nutrition, loss of protein  Increased intracranial pressure  Fluid retention due to increased humidification from ventilator, increased pressure to baroreceptors causing a release of ADH  Immobility  Skin breakdown  Communication difficulties  Urinary tract infection  Deep vein thrombosis  Psychosocial concerns: fear, loss, powerlessness, pain, anxiety, sleep disturbances, nightmares, loneliness
  • 27.
    1. Managing MechanicalVentilation Prior intubation assessment:  Investigate the etiology of respiratory failure.  Observe changes in the level of consciousness.  Assess the client’s respiratory rate, depth, and pattern, including the use of accessory muscles.  Assess the client’s heart rate and blood pressure.  Auscultate the lung for normal or adventitious breath sounds.  Assess the skin color and examine the lips and nailbeds for cyanosis.  Monitor oxygen saturation using pulse oximetry.  Monitor arterial blood gases (ABGs) as indicated. Nursing Care of a mechanically ventilated patient
  • 28.
    After intubation assessment: Assess for correct endotracheal (ET) tube placement through observation of a symmetrical rise of both chest sides, auscultation of bilateral breath sounds, and X-ray confirmation.  Assess for the client’s comfort and the ability to cooperate while on mechanical ventilation.  Assess the ventilator settings and alarm system every hour.  Count the client’s respirations for 1 full minute and compare with desired respirations and ventilator set rate.  Maintain the client’s airway. Use the oral or nasal airway as needed.  Maintain the client in a High-Fowler’s position as tolerated. Frequently check the position.
  • 29.
    Preparation for endotrachealintubation:  Notify the respiratory therapist to bring a mechanical ventilator.  Prepare the following equipment: ET tubes of different sizes; blades, laryngoscope, and stylet; syringe, benzoin, and waterproof tape or other securing materials; and local anesthetic agent (e.g., Xylocaine spray or jelly, benzocaine spray, cocaine, lidocaine, and cotton-tipped applicators.  Administer sedation as ordered.
  • 30.
     Assisting withintubation  Place the client in a supine position, hyperextending the neck unless contraindicated, and align the client’s oropharynx, posterior oropharynx, and trachea.  Apply cricoid pressure (Sellick maneuver) as directed by the healthcare provider.  Preoxygenate the client as indicated.  Assist with the verification of correct ET tube placement. Use an end-tidal carbon dioxide detector as indicated.  Continue with manual Ambu bag ventilation until the ET tube is stabilized. Assist in securing the ET tube once tube placement is confirmed.
  • 31.
     Document theET tube position, noting the centimeter reference marking on the ET tube.  Institute mechanical ventilation with prescribed settings.  Anticipate the need for nasogastric and/or oral gastric suction.  Administer muscle-paralyzing agents, sedatives, and opioid analgesics as ordered.  Examine the cuff volume by checking whether the client can talk or make sounds around the tube or whether exhaled volumes are significantly less than the volumes delivered. To correct this, slowly inflate the cuff with air until no leak is detected. Notify the respiratory therapist to check cuff pressure.
  • 32.
     Position theclient by elevating the head of the bed if possible.  Inflate the endotracheal tube cuff properly. Check cuff inflation every 4 to 8 hours.  Note inspired humidity and temperature; use a heat moisture exchanger (HME), as indicated. 2. Promoting Patent Airway Clearance  Assess airway patency.  Observe the color, odor, quantity, and consistency of sputum.  Auscultate the lungs for the presence of normal or adventitious breath sounds.  Monitor oxygen saturation prior to and after suctioning using pulse oximetry.  Assess arterial blood gases (ABGs).  Monitor for peak airway pressures and airway resistance.
  • 33.
     Monitor ETtube placement.  Note excessive coughing, increased dyspnea, high-pressure alarm on the ventilator, and visible secretions in the endotracheal or tracheostomy tube.  Explain the suctioning procedure to the client; give reassurance throughout the procedure.  Encourage deep breathing and coughing exercises. Promote early ambulation when possible.  Turn the client in every two hours.  Institute airway suctioning as indicated based on the presence of adventitious breath sounds and/or increased ventilatory pressure.
  • 34.
     Use closedin-line suction.  Hyperoxygenated as ordered.  Instruct client in coughing techniques, if possible, during suctioning, such as splinting, the timing of breathing, and “step-cough”, as indicated.  Administer intravenous therapy and aerosol bronchodilators as indicated.  Administer humidified oxygen as prescribed.  Consult a respiratory therapist for chest physiotherapy as indicated.
  • 35.
    3. Reducing Anxietyand Fear  Assess the client’s understanding of the need for mechanical ventilation and the threat presented by the situation.  Assess the client for signs of anxiety.  Observe the client’s physical responses.  Assess previous coping strengths of the client and family members and their current areas of ability and control.  Encourage clients and family members to acknowledge and express fears. Acknowledge their expressions of concern.  Reduce distracting stimuli. Inform the client of alarms on the ventilatory system, and reassure the client about the close proximity of health care personnel to respond to the alarms.
  • 36.
     Educate theclient and family about safety precautions when managing mechanical ventilators, such as backup power and oxygen supplies and emergency equipment for suctioning.  Display a confident, calm manner and understanding attitude. Be available to the client for support, as well as for explanations of the client’s care and progress.  Provide relaxation techniques.  Encourage sedentary diversional activities.  Encourage visiting family and friends and promote optimism.  Promote spiritual care as appropriate.  Reinforce education about cognitive behavioral therapy (CBT).  Refer to the psychiatric liaison clinical nurse specialist, psychiatrist, or hospital chaplain, as appropriate.
  • 37.
    4. Administering Medicationsand Pharmacological Support Induction agents  Etomidate  Ketamine Paralyzing agents  Rocuronium  Succinylcholine Opioids  Morphine  Fentanyl Diuretics • Furosemide (Lasix) • Hydrochlorothiazide (HCTZ)
  • 38.
    Vasopressors and inotropes •Norepinephrine • Epinephrine • Dopamine • Dobutamine Broad-spectrum antibiotics Vancomycin and Linezolid Antifungals agents • Fluconazole • Voriconazole 5. Preventing Respiratory Injury Risk Review the ventilator settings every hour, especially the tidal volume and plateau pressures. Notify the respiratory unit of any discrepancy in the ventilator settings immediately
  • 39.
    Assess respiratory rateand rhythm including the work of breathing. Assess arterial blood gas results and monitor oxygen saturation. Assess for the signs of barotrauma: the client with crepitus, subcutaneous emphysema, altered chest excursion, asymmetrical chest, abnormal ABGs, a shift in trachea, restlessness, evidence of pneumothorax on chest x-ray studies. Auscultate breath sounds. Monitor chest x-ray reports daily and obtain a stat portable chest x-ray film if barotrauma is suspected. Monitor plateau pressures with the respiratory therapist. Make sure that the ventilator alarms are on.
  • 40.
    Listen for alarms.Know the range in which the ventilator will set off the alarm and how to troubleshoot.  Suction the client only when necessary. Lower the ventilator tidal volume settings, as indicated. Provide early nutritional support, as appropriate. Ensure proper sedation and pain management. Assist in performing tube thoracostomy, emergency needle thoracostomy, or large-bore thoracostomy. Observe for air leaks in the water-seal chamber. Clamp the tubing to determine the origin of the air leak, as indicated
  • 41.
    6. Optimizing CardiacFunction Assess the client’s level of consciousness, blood pressure, heart rate, and hemodynamic parameters if in place (central venous pressure, pulmonary artery diastolic pressure (PADP), and pulmonary capillary wedge pressure, cardiac output). Assess the capillary refill, skin temperature, and peripheral pulses. Monitor for dysrhythmias. Auscultate heart sounds. Monitor fluid balance and urine output. Assess the client’s response to activity and promote rest appropriately. Monitor liver function test results.
  • 42.
    Maintain an optimalfluid balance. Provide small, easily digested meals and instruct to limit caffeine intake, as appropriate. Measure cardiac output parameters and other functional parameters as appropriate.  Notify the healthcare provider immediately of signs of a decrease in cardiac output and anticipate possible ventilator setting changes. Assist in inserting a Swan-Ganz catheter in the ICU settings, and perform PEEP studies. Administer medications as ordered (diuretics, inotropic agents).
  • 43.
  • 44.
    A cardiac eventmonitor is a device that you control to record the electrical activity of your heart (ECG). This device is about the size of a pager. It records your heart rate and rhythm. Cardiac event monitors are used when you need long-term monitoring of symptoms that occur less than daily. Definition
  • 45.
    Common types ofcardiac monitoring systems include:  Holter Monitor: A Holter monitor is a portable external monitor that includes wires with patches that attach to the skin.  Event Recorder: An event recorder is a recorder worn on the body for up to 30 days  Mobile Cardiac Telemetry (MCT)  Insertable Cardiac Monitor (ICM) Types of monitor
  • 46.
     It monitorscardiovascular pressures and cardiac output.  Oxygen saturation of the arterial blood can also be monitored continuously.  It can be interconnected in critical care areas to allow for continual observation of several patients fro central display.  Continuous cardiovascular and pulmonary monitoring allows for prompt identification and initiation of treatment. Purpose
  • 49.
  • 50.
     Accurate leadplacement and good skin preparation will reduce false readings.  Skin that is clean and dry will allow better adherence of electrodes and a more accurate ECG.  Daily assessment of skin is important in preventing skin excoriation and/or pressure area injury at the site of electrodes. Care and maintenance of monitor
  • 51.
     Maintenance  Checkbattery status on telemetry device each shift.The device will alarm when batteries need changing  Electrodes should be changed on a daily basis  The need for telemetry should be reviewed on a daily basis, this is the joint responsibility of the treating team, bedside nurse and AUM
  • 52.
     All electricalequipment and outlets are grounded to avoid electrical shock and artifact (electrical activity caused by interference).  The nurse should plug in the monitor, turn on power, and connect the cable if not already attached.  He or she should connect the lead wires to the proper position and ensure that color-coded wires match the color-coded cable.  If the device is not color coded, the right arm (RA) wire should be attached to the RA outlet, the left arm (LA) wire attached to the LA outlet, and so forth.  The nurse should open the electrode package, and attach an electrode to each lead wire. The hands should be washed and the procedure should be explained to the patient Role of nursing officer
  • 53.
     Privacy shouldbe ensured for the patient, and the patient should be clean and dry to prevent electrical shock.  Next, the chest should be exposed and the sites selected for electrode placement.  Using the rough patch on the electrode, a dry washcloth, or gauze pad, each site should be rubbed briskly until it reddens, but care should be taken not to damage or break the skin.  Dead skin cells are removed in this manner, thereby promoting better electrical conduction.  Patients who are extremely hairy may need to be shaved prior to application of the electrodes
  • 54.
     If theelectrode has dried out, which can happen if the electrode package is opened before immediate use, it should be discarded and another used.  The nurse should apply one electrode to each site, press one side of the electrode against the skin, and pull gently.  Then, the opposite side of the electrode should be pressed against the skin.  The nurse should press two fingers on the electrode in a circular pattern to affix the gel and stabilize the electrode, then repeat for each electrode.  To avoid potential artifact, do not place the electrodes on bony prominences or hairy areas.