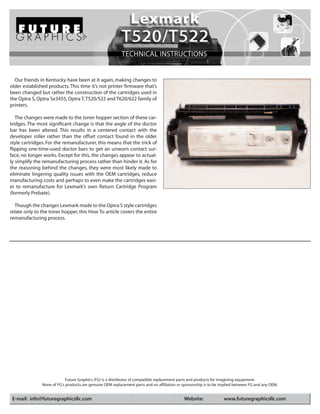
NEWLEXMARKT520TECH

           Technical Instructions                          Supplies                                            Tools       1
        CORPORATE                          Toner                                            Spring Hook
        LOS ANGELES, USA                   Drum                                             Philips Screwdriver
        US 1 800 394.9900
        Int’l +1 818 837.8100              Lint free cloth                                  Small Flat blade Screwdriver
        FAX 1 800 394.9910                 99% Isopropyl Alcohol                            X-Acto Knife
        Int’l +1 818 838.7047              Cotton Swabs
                                           Wiper Blade
        ATLANTA, USA
        US 1 877 676.4223
        Int’l +1 678 919.1189
        FAX 1 877 337.7976       Photo 1
        Int’l +1 770 516.7794
                                                                         Step 1
        KANSAS CITY, USA                                                 Place the cartridge upside down on the work
        US 1 913 871.1700
        FAX 1 913 888.0626
                                                                         bench so the drum faces up and the gear end
                                                                         of the toner hopper is facing towards you.
        MIAMI, USA                                                       (See Photo 1)
        US 1 800 595.4297
        Int’l +1 305 594.3396
        FAX 1 800 522.8640
        Int’l +1 305 594.3309

        NEW YORK, USA
        US 1 800 431.7884
        Int’l +1 631 588.7300    Photo 2
        FAX 1 800 431.8812
        Int’l +1 631 588.7333                                            Step 2
        TORONTO, CAN                                                     Using a small flat blade screwdriver, pry the
        CAN 1 877 848.0818                                               developer roller drive gear from the shaft of
        Int’l +1 905 712.9501
        FAX 1 877 772.6773                                               the roller. (See Photo 2)
        Int’l +1 905 712.9502

        BUENOS AIRES, ARG
        ARG 0810 444.2656
        Int’l +011 4583.5900
        FAX +011 4584.3100

        MELBOURNE, AUS           Photo 3
        AUS 1 800 003. 100                                               Step 3
        Int’l +62 03 9561.8102
        FAX 1 800 004.302                                                Rotate the cartridge so the toner hopper
        Int’l +62 03 9561-7751                                           label faces you. Using needle nose pliers or a
        SYDNEY, AUS                                                      spring hook, remove the tension springs from
        AUS 1 800 003.100                                                each side of the toner hopper.
        Int’l +62 02 9648.2630                                           (See Photo 3 and Photo 4)
        FAX 1800 004.302
        Int’l +62 02 9548.2635

        MONTEVIDEO, URY
        URY 02 902.2001
        Int’l +5982 902.2001
        FAX +5982 900.0858       Photo 4

        JOHANNESBURG, S.A.
        S.A. +27 11 974.6155
        FAX +27 11 974.3593

        SÃO PAULO, BRAZIL
        Int’l +55 11 5524.8000

        RAANANA, ISRAEL
        ISR 09 760.12.39
        Int’l +972 9760.12.39
        ISR 052.38.555.82
        Int’l +972 5238.555.82

 E-mail: info@futuregraphicsllc.com                                   Website:         www.futuregraphicsllc.com
REV. 1/25/05
2                                                     New Lexmark T520 Technical Instructions

                                            Photo 5
                                                           Step 4
                                                           While holding onto the toner hopper with
                                                           your left hand, carefully bend the waste
              Notes                                        hopper away from the gear side of the toner
                                                           hopper using your right hand. Lift the right
                                                           side of the toner hopper up away from the
                                                           waste hopper. (See Photo 5)


                                            Photo 6
                                                           Step 5
                                                           Separate the toner hopper and waste hopper.
                                                           (See Photo 6) Set the toner hopper aside.


                                            Photo 7
                                                           Step 6
                                                           Using a small flat blade screwdriver remove
                                                           the “C” clip from the drum axle on the drive
                                                           gear end of the drum. (See Photo 7)


                                            Photo 8
                                                           Step 7
                                                           While holding onto the drive gear on the
                                                           drum, slide the drum axle out from the small
                                                           (contact) gear end of the waste hopper.
                                                           (See Photo 8)


                                            Photo 9
                                                           Step 8
                                                           Lift the drum from the waste hopper.
                                                           (See Photo 9) If you plan on reusing the
                                                           drum, place the drum in a protected area
                                                           and out of the light.


    Need trust-worthy, detailed Technical
    Instructions for another engine?
    Visit: www.futuregraphicsllc.com
New Lexmark T520 Technical Instructions                                                                                         3

Photo 10
                                    Step 9
                                    Lift the waste hopper by the handle so the
                                    hopper is up on its end. Using a X-Acto knife
                                    cut the wiper blade sealing foam that            Step 15
                                    attaches the wiper blade to the waste
                                                                                     Apply padding powder to the
                                    hopper. (See Photo 10)
                                                                                     drum. Place the drum into the
                                                                                     waste hopper. (See Photo 15)


Photo 11
                                    Step 10
                                    Once again place the waste hopper flat on
                                                                                    Photo 15
                                    the work bench. Using a Philips screwdriver
                                    remove the two screws that hold the wiper
                                    blade to the waste hopper. (See Photo 11)


                                     Step 11
                                     Using a small flat blade screwdriver pry the
Photo 12                             wiper blade away from the waste hopper.
                                     (See Photo 12) Remove the wiper blade.

                                                                                     Step 16
                                     Step 12
                                                                                     Slide the drum axle through the
                                     Dump the waste toner from the hopper.           drum starting from the small (con-
                                     Using dry compressed air or a vacuum,           tact) gear side of the waste hop-
                                     clean the waste hopper. Visually inspect the    per. (See Photo 16)
                                     waste hopper recovery blade. If the blade is
                                     wavy, nicked, or torn the blade will have to
                                     be replaced.


Photo 13                                                                            Foto 16
                                    Step 13
                                    Apply padding powder to the new wiper
                                    blade. Place the new blade onto the waste
                                    hopper and install the two screws that hold
                                    the blade in place. (See Photo 13)


Photo 14
                                    Step 14
                                    Flip the waste hopper over. Place a strip of
                                    sealing tape over the area where the wiper
                                    blade and waste hopper meet.
                                    (See Photo 14)


                                                                                       Need help with a particular remanu-
                                                                                       facturing problem?
                                                                                       Call the Technical Resource Center from
                                                                                       8am - 5pm PST: 800 394.9900
4                                                  New Lexmark T520 Technical Instructions

                                      Photo 19
                                                            Step 20
                                                            Carefully remove the doctor blade tension
                                                            spring from the hopper.
 Step 17
                                                            (See Photo 19)
 Install the “C” clip onto the drum
 axle. (See Photo 17)                                       NOTE: Do not let the tension spring slip and
                                                            hit the developer roller. This will scratch the
                                                            roller and could cause print defects.


Photo 17                              Photo 20


                                                            Step 21
                                                            Remove the developer roller contact from the
                                                            side of the toner hopper.
                                                            (See Photo 20)


                                      Photo 21
 Step 18
 Set the waste hopper aside in a                            Step 22
 protected area out of the light.                           Slide the brass developer roller contact
                                                            bearing from the end of the hopper.
 Step 19                                                    (See Photo 21)
 Remove the two square white plas-
 tic tabs that secure the doctor
 blade tension spring in place.
 (See Photo 18) These plastic tabs
 are new to the Lexmark cartridges                          Step 23
 and are used to prevent the ten-     Photo 22              While holding the shaft of the developer
 sion spring from moving during                             roller, lift the roller out from the hopper and
 shipping. It is recommended that                           slide the developer roller axle out from the
 they be reinstalled during the                             toner hopper gear end plate.
 assembly process.                                          (See Photo 22)


Photo 18                              Photo 23


                                                            Step 24
                                                            Remove the mylar shims from the ends of the
                                                            developer roller (See Photo 23)
                                                            Clean the shims using a lint free cloth.


E-mail: info@futuregraphicsllc.com               Website:           www.futuregraphicsllc.com
New Lexmark T520 Technical Instructions                                                                                             5

Photo 24
                                    Step 25
                                    To clean the developer roller to take a lint
                                    free cloth, add a small amount of alcohol,           Step 29
                                    then soak the cloth with distilled water.            Dump out the toner from the toner
                                    Place the axle of the developer roller into a        hopper. Using dry compressed
                                    drill. Clean the roller using the lint free cloth    air or a vacuum clean the toner
                                    while the roller is rotating in the drill.           hopper. NOTE: Make sure you clean
                                    (See Photo 24)                                       the doctor bar sealing foam well.
                                    NOTE: DO NOT USE straight alcohol to
                                    clean the developer roller. Straight alcohol
                                    will cause the roller to swell and could
Photo 25
                                    cause the roller to crack.                           Step 30
                                                                                         Clean the developer roller end
                                    NOTE: Removal of the doctor blade in the             sealing gills using a swab and
                                    new style cartridges is easier due to the fact       alcohol. (See Photo 29)
                                    that no sealing tape or putty is used to hold
                                    the blade in place. A foam strip has been            NOTE: The gills on the new style
                                    added behind the doctor blade to prevent             cartridges are different than those
                                    toner leaking. The doctor blade is held in           on the old style cartridges. They
                                    place by two white plastic tabs found on             are narrower and there are more of
                                    each end of the toner hopper.                        them. Cleaning the gills will help
                                    (See Photo 25)                                       prevent toner from leaking out
Photo 26
                                                                                         from the ends of the developer
                                                                                         roller.
                                    Step 26
                                    To remove the doctor blade press down on the
                                                                                        Photo 29
                                    ends of the blade. (See Photo 26)

                                    NOTE: To ensure the best print quality when
                                    remanufacturing the new style cartridges it is
                                    important that the doctor bar is replaced.
                                    When remanufacturing the old style cartridges
                                    it was possible the flip the doctor bar around
Photo 27                            giving you a new unworn surface area on the
                                    bar. With the new style cartridges the doctor
                                    bar wears in the center of the bar so flipping
                                    the bar is not an option.
                                                                                         Step 31
                                                                                         Visually inspect the inner toner
                                                                                         hopper sealing blade. If the blade is
                                    Step 27                                              damaged it will cause leaking and
                                                                                         must be replaced. The inner toner
                                    Pull the encoder wheel off the end of the
                                                                                         hopper sealing blade is now
                                    toner hopper. (See Photo 27)
                                                                                         attached to a plastic support piece
                                                                                         that serves as the outer toner
                                                                                         hopper blade. To replace the blade
Photo 28                                                                                 pry the plastic support piece out
                                    Step 28                                              from the toner hopper. Attach the
                                    Remove the fill plug from the side of the            new inner sealing blade to the
                                    hopper. (See Photo 28)                               plastic support piece and attach
                                                                                         the support piece to the toner
                                    NOTE: The fill plugs on the new style                hopper.
                                    cartridges don’t have the filters on them like
                                    the old style cartridges. A vent has been              Need help with a particular remanu-
                                    added to the top of the toner hopper and               facturing problem?
                                    covered with tape.                                     Call the Technical Resource Center from
                                                                                           8am - 5pm PST: 800 394.9900
6                                                  New Lexmark T520 Technical Instructions

                                     Photo 30
                                                           Step 32
                                                           Slide the new doctor bar under the white
           Notes                                           plastic tabs on each side of the toner hopper.
                                                           Lift the doctor bar contact and push the bar
                                                           up till the bar is positioned against the last
                                                           two posts of the plastic tabs. (See Photo 30)


                                     Photo 31
                                                           Step 33
                                                           Place the two mylar shims on the ends of the
                                                           developer roller. Slide the keyed end of the
                                                           developer roller axle into the gear assembly
                                                           end plate. (See Photo 31)


                                     Photo 32
                                                           Step 34
                                                           Install the brass contact bearing onto the
                                                           opposite end of the developer roller axle.
                                                           Slide the developer roller contact into place.
                                                           (See Photo 32)


                                     Photo 33
                                                           Step 35
                                                           Reinstall the doctor bar tension spring so the
                                                           “V”stamp on the spring points away from the
                                                           toner hopper. Place the white plastic tabs
                                                           onto the doctor bar next to the ends of the
                                                           spring. (See Photo 33)


                                     Photo 34
                                                           Step 36
                                                           Fill the toner hopper with the correct amount
                                                           of toner. (See Photo 34) Reinstall the toner
                                                           hopper fill plug.


E-mail: info@futuregraphicsllc.com              Website:          www.futuregraphicsllc.com
New Lexmark T520 Technical Instructions                                                                                             7

Photo 35
                                     Step 37
                                     Place the encoder wheel onto the toner
                                     hopper agitator shaft. (See Photo 35)
                                                                                         Step 41
                                                                                         Install the developer roller drive
                                                                                         gear onto the developer roller axle.
                                                                                         (See Photo 40)


Photo 36
                                     Step 38
                                                                                        Photo 40
                                     Place the waste hopper top down on the
                                     work bench with the waste hopper away
                                     from you.Turn the toner hopper upside down
                                     install the left side of the toner hopper first.
                                     (See Photo 36)


Photo 37
                                    Step 39
                                    While holding onto the toner hopper with your
                                    left hand, carefully bend the waste hopper           Step 42
                                    away from the gear side of the toner hopper          Test the cartridge.
                                    using your right hand. Push the right side of
                                    the toner hopper toward the waste hopper.
                                    (See Photo 37)


Photo 38
                                    Step 40
                                                                                                      Notes
                                    Using a spring hook reattach the tension
                                    springs to each end of the toner hopper.
                                    (See Photo 38 and 39)


Photo 39


                                                                                           Need help with a particular remanu-
                                                                                           facturing problem?
                                                                                           Call the Technical Resource Center from
                                                                                           8am - 5pm PST: 800 394.9900
Our friends in Kentucky have been at it again, making changes to
older established products. This time it’s not printer firmware that’s
been changed but rather the construction of the cartridges used in
the Optra S, Optra Se3455, Optra T, T520/522 and T620/622 family of
printers.

   The changes were made to the toner hopper section of these car-
tridges. The most significant change is that the angle of the doctor
bar has been altered. This results in a centered contact with the
developer roller rather than the offset contact found in the older
style cartridges. For the remanufacturer, this means that the trick of
flipping one-time-used doctor bars to get an unworn contact sur-
face, no longer works. Except for this, the changes appear to actual-
ly simplify the remanufacturing process rather than hinder it. As for
the reasoning behind the changes, they were most likely made to
eliminate lingering quality issues with the OEM cartridges, reduce
manufacturing costs and perhaps to even make the cartridges easi-
er to remanufacture for Lexmark’s own Return Cartridge Program
(formerly Prebate).

  Though the changes Lexmark made to the Optra S style cartridges
relate only to the toner hopper, this How To article covers the entire
remanufacturing process.


                            Future Graphics (FG) is a distributor of compatible replacement parts and products for imagining equipment.
               None of FG's products are genuine OEM replacement parts and no affiliation or sponsorship is to be implied between FG and any OEM.


 E-mail: info@futuregraphicsllc.com                                                          Website:              www.futuregraphicsllc.com

Manual de Recarga Lexmark T520 | T522

  • 1.
    NEWLEXMARKT520TECH Technical Instructions Supplies Tools 1 CORPORATE Toner Spring Hook LOS ANGELES, USA Drum Philips Screwdriver US 1 800 394.9900 Int’l +1 818 837.8100 Lint free cloth Small Flat blade Screwdriver FAX 1 800 394.9910 99% Isopropyl Alcohol X-Acto Knife Int’l +1 818 838.7047 Cotton Swabs Wiper Blade ATLANTA, USA US 1 877 676.4223 Int’l +1 678 919.1189 FAX 1 877 337.7976 Photo 1 Int’l +1 770 516.7794 Step 1 KANSAS CITY, USA Place the cartridge upside down on the work US 1 913 871.1700 FAX 1 913 888.0626 bench so the drum faces up and the gear end of the toner hopper is facing towards you. MIAMI, USA (See Photo 1) US 1 800 595.4297 Int’l +1 305 594.3396 FAX 1 800 522.8640 Int’l +1 305 594.3309 NEW YORK, USA US 1 800 431.7884 Int’l +1 631 588.7300 Photo 2 FAX 1 800 431.8812 Int’l +1 631 588.7333 Step 2 TORONTO, CAN Using a small flat blade screwdriver, pry the CAN 1 877 848.0818 developer roller drive gear from the shaft of Int’l +1 905 712.9501 FAX 1 877 772.6773 the roller. (See Photo 2) Int’l +1 905 712.9502 BUENOS AIRES, ARG ARG 0810 444.2656 Int’l +011 4583.5900 FAX +011 4584.3100 MELBOURNE, AUS Photo 3 AUS 1 800 003. 100 Step 3 Int’l +62 03 9561.8102 FAX 1 800 004.302 Rotate the cartridge so the toner hopper Int’l +62 03 9561-7751 label faces you. Using needle nose pliers or a SYDNEY, AUS spring hook, remove the tension springs from AUS 1 800 003.100 each side of the toner hopper. Int’l +62 02 9648.2630 (See Photo 3 and Photo 4) FAX 1800 004.302 Int’l +62 02 9548.2635 MONTEVIDEO, URY URY 02 902.2001 Int’l +5982 902.2001 FAX +5982 900.0858 Photo 4 JOHANNESBURG, S.A. S.A. +27 11 974.6155 FAX +27 11 974.3593 SÃO PAULO, BRAZIL Int’l +55 11 5524.8000 RAANANA, ISRAEL ISR 09 760.12.39 Int’l +972 9760.12.39 ISR 052.38.555.82 Int’l +972 5238.555.82 E-mail: info@futuregraphicsllc.com Website: www.futuregraphicsllc.com REV. 1/25/05
  • 2.
    2 New Lexmark T520 Technical Instructions Photo 5 Step 4 While holding onto the toner hopper with your left hand, carefully bend the waste Notes hopper away from the gear side of the toner hopper using your right hand. Lift the right side of the toner hopper up away from the waste hopper. (See Photo 5) Photo 6 Step 5 Separate the toner hopper and waste hopper. (See Photo 6) Set the toner hopper aside. Photo 7 Step 6 Using a small flat blade screwdriver remove the “C” clip from the drum axle on the drive gear end of the drum. (See Photo 7) Photo 8 Step 7 While holding onto the drive gear on the drum, slide the drum axle out from the small (contact) gear end of the waste hopper. (See Photo 8) Photo 9 Step 8 Lift the drum from the waste hopper. (See Photo 9) If you plan on reusing the drum, place the drum in a protected area and out of the light. Need trust-worthy, detailed Technical Instructions for another engine? Visit: www.futuregraphicsllc.com
  • 3.
    New Lexmark T520Technical Instructions 3 Photo 10 Step 9 Lift the waste hopper by the handle so the hopper is up on its end. Using a X-Acto knife cut the wiper blade sealing foam that Step 15 attaches the wiper blade to the waste Apply padding powder to the hopper. (See Photo 10) drum. Place the drum into the waste hopper. (See Photo 15) Photo 11 Step 10 Once again place the waste hopper flat on Photo 15 the work bench. Using a Philips screwdriver remove the two screws that hold the wiper blade to the waste hopper. (See Photo 11) Step 11 Using a small flat blade screwdriver pry the Photo 12 wiper blade away from the waste hopper. (See Photo 12) Remove the wiper blade. Step 16 Step 12 Slide the drum axle through the Dump the waste toner from the hopper. drum starting from the small (con- Using dry compressed air or a vacuum, tact) gear side of the waste hop- clean the waste hopper. Visually inspect the per. (See Photo 16) waste hopper recovery blade. If the blade is wavy, nicked, or torn the blade will have to be replaced. Photo 13 Foto 16 Step 13 Apply padding powder to the new wiper blade. Place the new blade onto the waste hopper and install the two screws that hold the blade in place. (See Photo 13) Photo 14 Step 14 Flip the waste hopper over. Place a strip of sealing tape over the area where the wiper blade and waste hopper meet. (See Photo 14) Need help with a particular remanu- facturing problem? Call the Technical Resource Center from 8am - 5pm PST: 800 394.9900
  • 4.
    4 New Lexmark T520 Technical Instructions Photo 19 Step 20 Carefully remove the doctor blade tension spring from the hopper. Step 17 (See Photo 19) Install the “C” clip onto the drum axle. (See Photo 17) NOTE: Do not let the tension spring slip and hit the developer roller. This will scratch the roller and could cause print defects. Photo 17 Photo 20 Step 21 Remove the developer roller contact from the side of the toner hopper. (See Photo 20) Photo 21 Step 18 Set the waste hopper aside in a Step 22 protected area out of the light. Slide the brass developer roller contact bearing from the end of the hopper. Step 19 (See Photo 21) Remove the two square white plas- tic tabs that secure the doctor blade tension spring in place. (See Photo 18) These plastic tabs are new to the Lexmark cartridges Step 23 and are used to prevent the ten- Photo 22 While holding the shaft of the developer sion spring from moving during roller, lift the roller out from the hopper and shipping. It is recommended that slide the developer roller axle out from the they be reinstalled during the toner hopper gear end plate. assembly process. (See Photo 22) Photo 18 Photo 23 Step 24 Remove the mylar shims from the ends of the developer roller (See Photo 23) Clean the shims using a lint free cloth. E-mail: info@futuregraphicsllc.com Website: www.futuregraphicsllc.com
  • 5.
    New Lexmark T520Technical Instructions 5 Photo 24 Step 25 To clean the developer roller to take a lint free cloth, add a small amount of alcohol, Step 29 then soak the cloth with distilled water. Dump out the toner from the toner Place the axle of the developer roller into a hopper. Using dry compressed drill. Clean the roller using the lint free cloth air or a vacuum clean the toner while the roller is rotating in the drill. hopper. NOTE: Make sure you clean (See Photo 24) the doctor bar sealing foam well. NOTE: DO NOT USE straight alcohol to clean the developer roller. Straight alcohol will cause the roller to swell and could Photo 25 cause the roller to crack. Step 30 Clean the developer roller end NOTE: Removal of the doctor blade in the sealing gills using a swab and new style cartridges is easier due to the fact alcohol. (See Photo 29) that no sealing tape or putty is used to hold the blade in place. A foam strip has been NOTE: The gills on the new style added behind the doctor blade to prevent cartridges are different than those toner leaking. The doctor blade is held in on the old style cartridges. They place by two white plastic tabs found on are narrower and there are more of each end of the toner hopper. them. Cleaning the gills will help (See Photo 25) prevent toner from leaking out Photo 26 from the ends of the developer roller. Step 26 To remove the doctor blade press down on the Photo 29 ends of the blade. (See Photo 26) NOTE: To ensure the best print quality when remanufacturing the new style cartridges it is important that the doctor bar is replaced. When remanufacturing the old style cartridges it was possible the flip the doctor bar around Photo 27 giving you a new unworn surface area on the bar. With the new style cartridges the doctor bar wears in the center of the bar so flipping the bar is not an option. Step 31 Visually inspect the inner toner hopper sealing blade. If the blade is Step 27 damaged it will cause leaking and must be replaced. The inner toner Pull the encoder wheel off the end of the hopper sealing blade is now toner hopper. (See Photo 27) attached to a plastic support piece that serves as the outer toner hopper blade. To replace the blade Photo 28 pry the plastic support piece out Step 28 from the toner hopper. Attach the Remove the fill plug from the side of the new inner sealing blade to the hopper. (See Photo 28) plastic support piece and attach the support piece to the toner NOTE: The fill plugs on the new style hopper. cartridges don’t have the filters on them like the old style cartridges. A vent has been Need help with a particular remanu- added to the top of the toner hopper and facturing problem? covered with tape. Call the Technical Resource Center from 8am - 5pm PST: 800 394.9900
  • 6.
    6 New Lexmark T520 Technical Instructions Photo 30 Step 32 Slide the new doctor bar under the white Notes plastic tabs on each side of the toner hopper. Lift the doctor bar contact and push the bar up till the bar is positioned against the last two posts of the plastic tabs. (See Photo 30) Photo 31 Step 33 Place the two mylar shims on the ends of the developer roller. Slide the keyed end of the developer roller axle into the gear assembly end plate. (See Photo 31) Photo 32 Step 34 Install the brass contact bearing onto the opposite end of the developer roller axle. Slide the developer roller contact into place. (See Photo 32) Photo 33 Step 35 Reinstall the doctor bar tension spring so the “V”stamp on the spring points away from the toner hopper. Place the white plastic tabs onto the doctor bar next to the ends of the spring. (See Photo 33) Photo 34 Step 36 Fill the toner hopper with the correct amount of toner. (See Photo 34) Reinstall the toner hopper fill plug. E-mail: info@futuregraphicsllc.com Website: www.futuregraphicsllc.com
  • 7.
    New Lexmark T520Technical Instructions 7 Photo 35 Step 37 Place the encoder wheel onto the toner hopper agitator shaft. (See Photo 35) Step 41 Install the developer roller drive gear onto the developer roller axle. (See Photo 40) Photo 36 Step 38 Photo 40 Place the waste hopper top down on the work bench with the waste hopper away from you.Turn the toner hopper upside down install the left side of the toner hopper first. (See Photo 36) Photo 37 Step 39 While holding onto the toner hopper with your left hand, carefully bend the waste hopper Step 42 away from the gear side of the toner hopper Test the cartridge. using your right hand. Push the right side of the toner hopper toward the waste hopper. (See Photo 37) Photo 38 Step 40 Notes Using a spring hook reattach the tension springs to each end of the toner hopper. (See Photo 38 and 39) Photo 39 Need help with a particular remanu- facturing problem? Call the Technical Resource Center from 8am - 5pm PST: 800 394.9900
  • 8.
    Our friends inKentucky have been at it again, making changes to older established products. This time it’s not printer firmware that’s been changed but rather the construction of the cartridges used in the Optra S, Optra Se3455, Optra T, T520/522 and T620/622 family of printers. The changes were made to the toner hopper section of these car- tridges. The most significant change is that the angle of the doctor bar has been altered. This results in a centered contact with the developer roller rather than the offset contact found in the older style cartridges. For the remanufacturer, this means that the trick of flipping one-time-used doctor bars to get an unworn contact sur- face, no longer works. Except for this, the changes appear to actual- ly simplify the remanufacturing process rather than hinder it. As for the reasoning behind the changes, they were most likely made to eliminate lingering quality issues with the OEM cartridges, reduce manufacturing costs and perhaps to even make the cartridges easi- er to remanufacture for Lexmark’s own Return Cartridge Program (formerly Prebate). Though the changes Lexmark made to the Optra S style cartridges relate only to the toner hopper, this How To article covers the entire remanufacturing process. Future Graphics (FG) is a distributor of compatible replacement parts and products for imagining equipment. None of FG's products are genuine OEM replacement parts and no affiliation or sponsorship is to be implied between FG and any OEM. E-mail: info@futuregraphicsllc.com Website: www.futuregraphicsllc.com