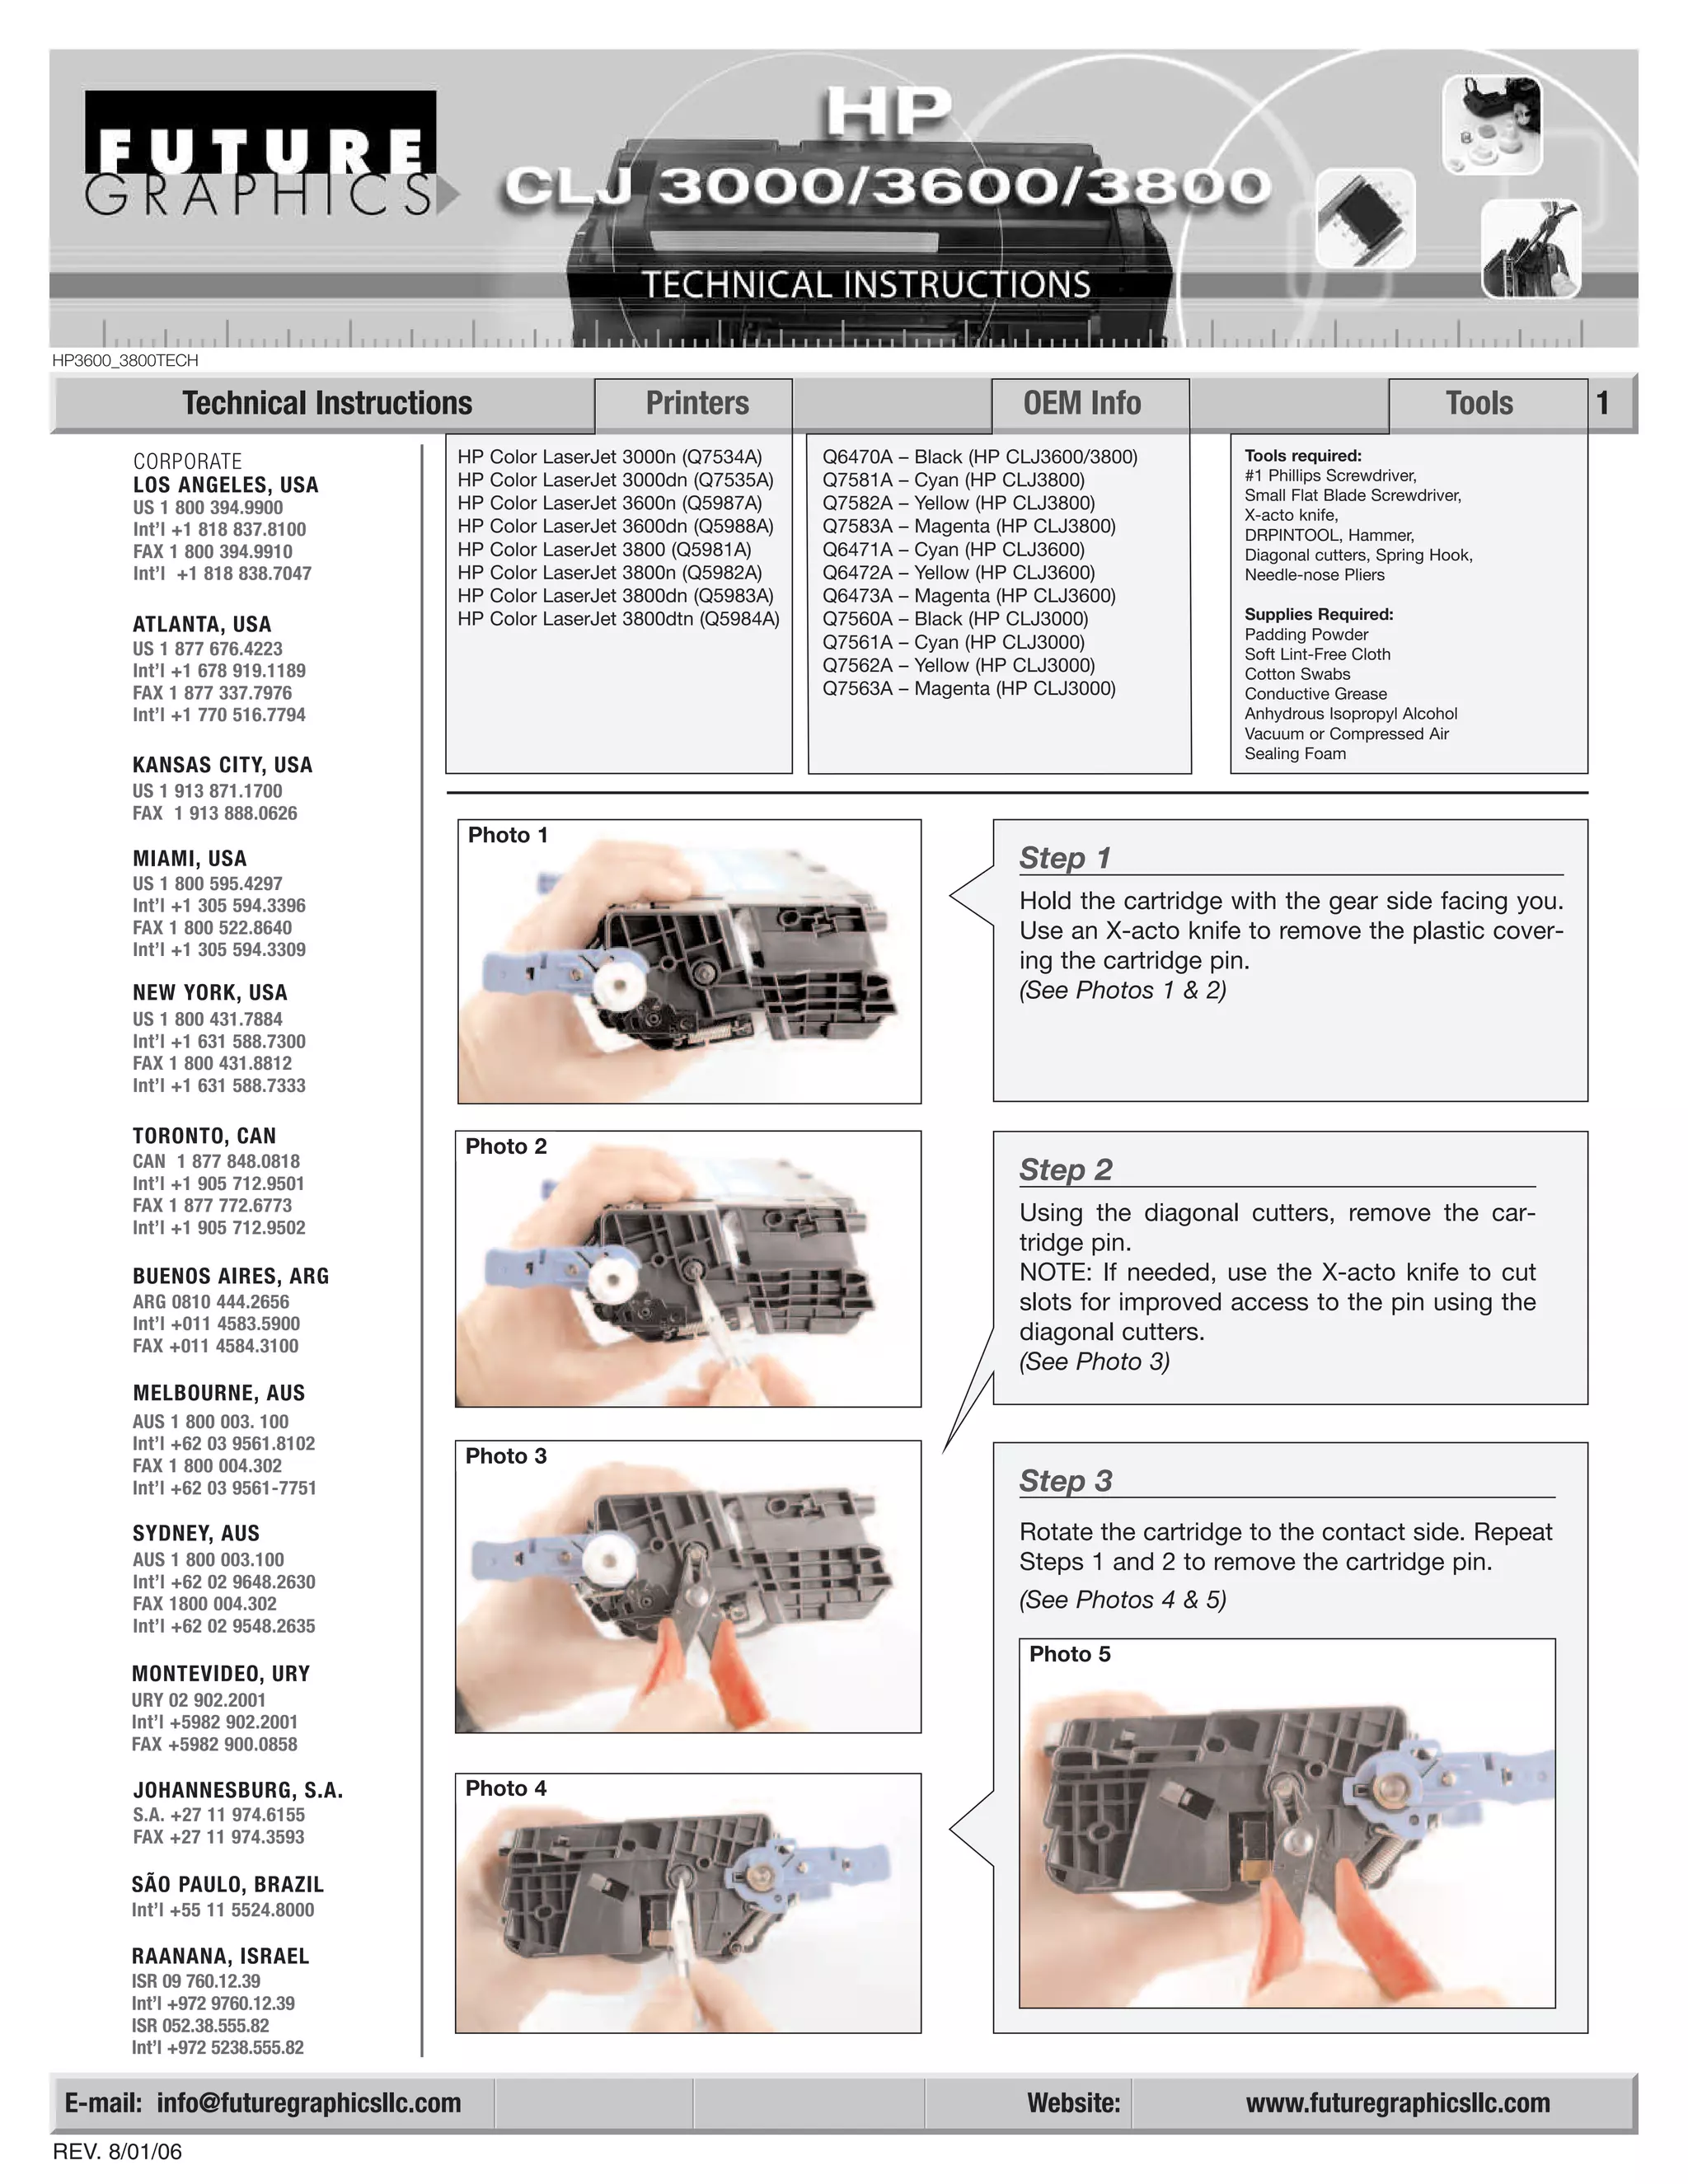
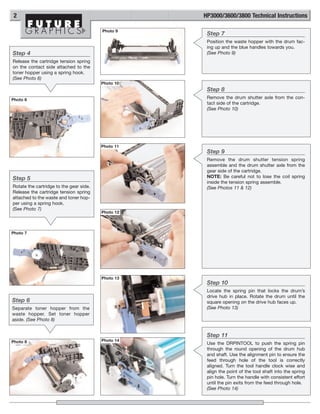
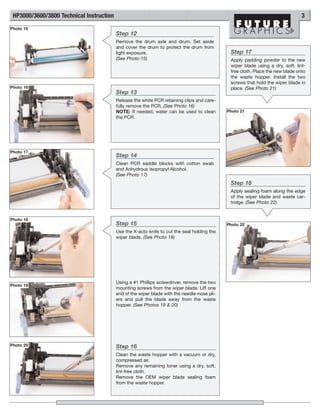
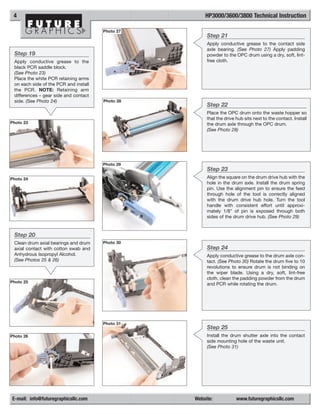
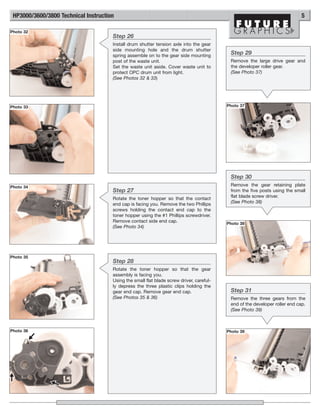
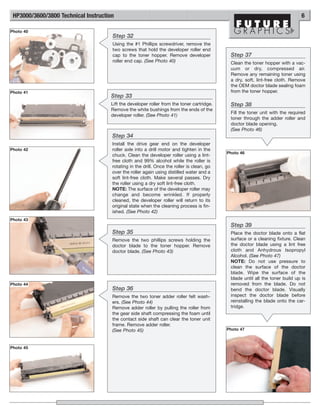
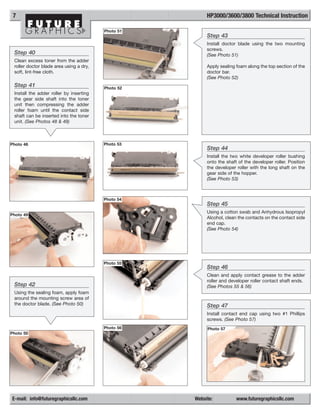
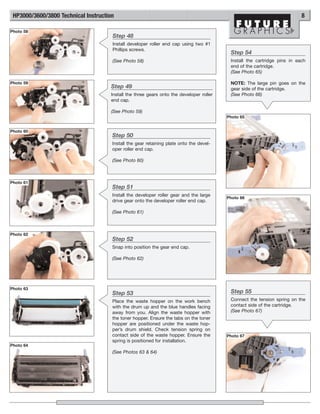
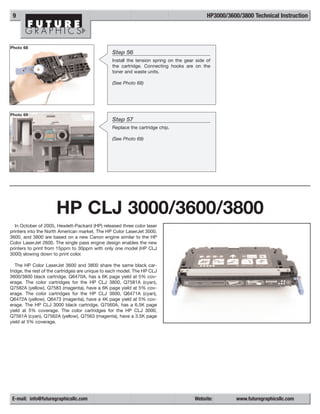
The document provides technical instructions for servicing HP Color LaserJet 3000n, 3600n, 3800, and related printer models. It consists of 45 steps describing how to disassemble parts like the toner cartridge and waste hopper, clean components, replace parts like the wiper blade and doctor blade, and reassemble the cartridge. Tools and supplies needed are also listed. The instructions include photos to illustrate each step of the process.
This document provides technical instructions for repairing or replacing parts in HP 4200 and HP 4300 printers. It describes 10 steps for removing and replacing the cartridge contact end cap, including releasing the drum shutter arm clip, removing the shutter arm and tension spring, opening the drum shutter, drilling a hole in the contact end cap, and breaking the plastic welds holding the end cap to the toner hopper. Photos are included to illustrate each step. The document also lists compatible printer models, their specifications, and recommended tools and supplies for repairs.
Manual de Recarga HP P3005 | M3027 | M3035.Valejet
The document provides technical instructions for remanufacturing HP P3005 toner cartridges. It outlines 41 steps to disassemble and reassemble the cartridge, including removing components like the drum, doctor blade, and mag roller. Tools and supplies needed are listed such as a drill, padding powder, and conductive grease. Photos accompany each step to illustrate the process. Brief specifications of the HP P3005 printer and commonality with prior HP 2400 cartridges are also mentioned.
This document provides technical instructions for remanufacturing toner cartridges for the HP4500/4550 printer. It outlines 10 steps for removing the drum from the cartridge, including removing screws, plates, and other parts. Photos accompany each step to illustrate the process. Contact information is provided for technical support and additional instruction guides.
The document provides technical instructions for replacing color cartridges in HP 3500/3700 printers. It consists of 20 steps detailing how to: 1) release tension springs and remove plastic covers; 2) use tools to remove the cartridge pins; 3) separate the toner and waste hoppers; 4) remove the drum, drive hub pin and axle; 5) clean the printer components using specific supplies; and 6) replace the wiper blade and sealing foam. The instructions include photos to illustrate each step.
This document provides step-by-step technical instructions for cleaning and replacing parts in several HP printer cartridge models. It outlines 19 steps to disassemble the cartridge, remove components like the drum, PCR, and wiper blade. Photos accompany each step to illustrate the process. The instructions aim to allow for thorough cleaning or repairs of the cartridge.
Manual de Recarga Samsung ML 1630 | SCX 4500Valejet
This document provides technical instructions for disassembling and reassembling Samsung ML-1630 and SCX-4500 printer cartridges. It includes 37 steps and accompanying photos to guide the removal and replacement of components like the toner hopper, waste hopper, drum, chip, and doctor blade. Contact and location information is also provided for Future Graphics, the distributor of compatible replacement parts.
The document provides technical instructions for repairing the HP2100 toner cartridge. It describes 10 steps to disassemble the cartridge, including removing the plastic side plate, drum axle pin, photoreceptor cartridge, and wiper blade. The instructions explain how to clean each part with recommended tools and materials and then reassemble the cartridge.
This document provides technical instructions for remanufacturing an HP Laserjet 5P or 6P toner cartridge. The instructions are presented in 27 steps with accompanying photos. The steps include separating the two halves of the cartridge, removing and cleaning internal components like the drum, doctor blade, and mag roller, replacing the toner seal, and refilling with new toner. Special instructions are provided for cartridges that were previously sealed with glue or foam.
This document provides technical instructions for replacing printer cartridges and components in Lexmark T420 and T430 printers. It includes:
1) A list of required tools and supplies including screwdrivers, pliers, isopropyl alcohol, and new toner, wiper blade, drum.
2) 14 steps with accompanying photos describing how to remove and replace the toner hopper, drum, wiper blade, and doctor blade.
3) Contact information for Lexmark service centers worldwide.
This document provides technical instructions for remanufacturing toner cartridges. It consists of 37 steps detailing how to disassemble, clean, and reassemble various parts like the drum, toner hopper, and gears. Key steps include splitting the toner hopper, applying seals, filling with toner, and rejoining the two main cartridge sections. The instructions are accompanied by photos to illustrate each step in the remanufacturing process.
The document provides technical instructions for remanufacturing toner cartridges for various printer models, including the HP 4L, 4P, and Canon FX-2. It outlines a 9 step process that involves removing screws and plastic clips to separate the cartridge into its main components in order to clean it and replace the toner. Key steps include releasing the drum cover, separating the toner and waste hoppers, removing the toner mixer gear, and cleaning sensor windows before resealing the cartridge.
This document provides technical instructions for replacing parts in Ricoh fax machines and printers. It describes 14 steps for replacing the drum, wiper blade, and PCR in Ricoh 1135/1435 toner cartridges. Photos illustrate each step, such as using screwdrivers and Torx drivers to remove screws and pins, separating the toner and waste hoppers, cleaning components with swabs and compressed air, and reassembling the cartridge. Contact information is provided for technical support.
The document provides technical instructions for replacing components in the Samsung CLP-600 printer. It describes 20 steps for taking the printer cartridge apart and cleaning or replacing parts like the drum, developer roller, gears, and chip. Photos accompany each step to illustrate the process. The instructions are intended to guide replacement of parts with non-OEM alternatives supplied by Future Graphics.
The document provides technical instructions for replacing components in an HP LaserJet P3015 printer, including removing the drum drive axle, cartridge pins, separating the cartridge, removing the wiper blade, photoconductor roller (PCR), chip, cleaning various parts, applying new grease and reinstalling components. Over 14 steps are outlined with accompanying photos to illustrate the process.
The document provides technical specifications and instructions for several Samsung printer models, including the CLP-500, CLP-550, and CLP-510. It lists the toner yields for each printer model and color. It also provides step-by-step photo instructions for replacing toner cartridges and chips on the CLP-500 and CLP-510 printers. Contact information is given for several Future Graphics locations that provide supplies and replacement parts.
This document provides product specifications for various LCD and LCM models from A-TOPS Electronics. It includes specifications for character LCDs, graphic LCDs, TFT modules, COG graphic LCD modules, energy meter LCDs, and petrol pump dispenser displays. The models range from small character displays to larger TFT touchscreen modules. Key specifications listed include matrix size, outline dimensions, viewable area, controller, and LCD type. Contact information is provided for A-TOPS Electronics.
The document provides technical instructions for recycling a Samsung ML5000 toner cartridge. It consists of 18 steps detailing how to disassemble the cartridge by removing screws and clips, separate the two sections, clean out the toner, remove gears and other internal parts, replace a blown fuse, and reassemble the cartridge. Photos accompany each step to illustrate the disassembly and reassembly process. Contact information is provided at the bottom for technical support.
The document provides results from a shooting championship held in Pune, India from August 3-9, 2011. It lists the scores of 63 competitors in the men's 10m rifle individual and team event over 6 series of shots. Parmendra Kumar from the Army won with a score of 593, followed by Aribam Dicky Sharma also from the Army with 593.
The document discusses the use of digital breast tomosynthesis (DBT) at Kwong Wah Hospital. Key points:
- DBT provides clearer images of microcalcifications and non-calcified lesions compared to digital mammography alone, improving cancer detection and evaluation.
- Studies show DBT combined with digital mammography can reduce false positives and recall rates compared to digital mammography alone.
- The Oslo Tomosynthesis Screening Trial found the combination of DBT and digital mammography increased cancer detection by 27% while reducing false positives by 15%, though positive predictive value was similar, at a cost of doubling exam time.
This document provides technical instructions for remanufacturing HP 4500/4550 color toner cartridges. It consists of 14 steps for disassembling the cartridge, cleaning components, replacing parts as needed, refilling with toner, and reassembling. Photos accompany each step to illustrate the process. Contact information is provided for technical support.
The document provides technical instructions for remanufacturing HP 4500/4550 toner cartridges. It includes 14 steps for removing and replacing various cartridge components like the contact pin, shutter lock, mag roller, doctor blade, and toner hopper. Photos illustrate each step. Contact and ordering information is provided for Future Graphics, the distributor of compatible replacement parts.
This document provides technical instructions for replacing toner cartridges in several HP printer models, including the HP4250 and HP4350. It describes 10 steps for removing the drum shutter and contact end cap from the cartridge, including using various tools like screwdrivers and drill bits. Photos are included to illustrate each step of the process.
The document provides instructions for remanufacturing toner cartridges and drum units for the Lexmark E120 printer. It describes 15 steps for remanufacturing the toner hopper, including removing and cleaning various components like the doctor blade, developer roller, and drive gears. It also outlines 14 steps for remanufacturing the drum unit, such as removing the drum, PCR, and wiper blade to clean them. Finally, it provides a 3-step process for resetting the drum counter.
The document provides technical instructions for servicing the Xerox Phaser 5400 laser printer, which was released in 2001 with a monthly duty cycle of 200,000 pages and cartridge capacity of 20,000 pages. The instructions include 27 steps for disassembling, cleaning, and reassembling the printer's cartridge components like the drum, toner unit, and doctor blade. Tools and supplies needed include screwdrivers, pliers, padding powder, isopropyl alcohol, and compressed air.
This document provides technical instructions for repairing an imageCLASS MF6500 printer cartridge. It consists of 48 steps with accompanying photos detailing how to disassemble and reassemble the cartridge. Key components that are replaced include the drum, wiper blade, doctor blade, seals and pins. The instructions guide the user through cleaning, lubricating and replacing parts within the waste hopper, toner hopper and drum sections to refurbish the cartridge.
Manual de Recarga Lexmark Optra M410 | M412Valejet
This document provides technical instructions for replacing parts in Lexmark Optra M410 and M412 printers. It describes 11 steps for replacing the toner hopper, drum, wiper blade, and developer roller. Photos are provided to illustrate each step, which involves removing specific screws and parts like the toner hopper, drum shaft, and contact plate. The instructions aim to guide replacement of these parts in a way that minimizes damage and restores print functionality.
This document provides technical instructions for replacing toner cartridges in various printer models. It lists contact information for AXTECH offices around the world and then provides 14 steps with accompanying photos detailing how to disassemble a toner cartridge, empty the waste hopper, clean components, replace the drum and refill with toner. It concludes by comparing specifications of different OEM cartridge types.
This document provides technical instructions for replacing parts in Lexmark T420 and T430 printers. It includes the following steps:
1) Remove the developer roller drive gear from the print cartridge.
2) Remove the toner hopper tension springs and separate the toner hopper from the waste hopper.
3) Remove the drum from the waste hopper by taking off the "C" clip and pulling out the drum axle.
The instructions provide detailed photos to illustrate each step in the replacement process. Replacement parts that may be needed include the toner, wiper blade, drum, and doctor blade tension spring.
This document provides technical instructions for disassembling and cleaning an HP2600 toner cartridge. It consists of 44 steps with accompanying photos detailing how to remove individual parts like the drum, toner hopper, doctor blade, and seals. The instructions also describe using various tools and fixtures to facilitate disassembly and reassembly. The overall goal is to properly disassemble, clean, and reassemble the toner cartridge.
The document provides technical instructions for disassembling and reassembling an HP5000 printer cartridge. It contains 24 steps with accompanying photos to guide the removal and cleaning of components like the drum, doctor blade, toner hopper, and waste hopper. It also lists replacement parts and supplies that can be used during the remanufacturing process.
This document provides technical remanufacturing instructions for the Brother HL-1240/1440/1450/1470N/P2500 MFP toner cartridge. It outlines 12 steps to disassemble and reassemble the cartridge, including removing the developer roller, emptying the toner, cleaning components, and refilling with new toner. The instructions are accompanied by 6 photos illustrating key steps. It also lists printer models compatible with the cartridge and replacement parts available from Future Graphics.
This document provides technical instructions for remanufacturing Lexmark C52X printer cartridges. It describes 12 steps for removing components like gears, handles, and doctor blades to clean the cartridge parts. Photos illustrate each step, like using a spring hook to remove a retaining clip from the supply roller drive axle. The goal is to thoroughly clean the toner tank area, developer roller, and other parts before refilling with new toner.
This document provides technical instructions for refilling a laser printer toner cartridge. It consists of 9 steps for taking the cartridge apart, cleaning components like the drum, PCR, and waste hopper, and replacing parts like the wiper blade. Photos accompany each step to illustrate the process. The instructions note that certain screws and components like the wiper blade should be replaced each time for optimal performance.
The document provides technical instructions for replacing components in a HP1012 toner cartridge. It consists of 42 steps with accompanying photos detailing how to disassemble the cartridge, clean components, replace the drum, doctor blade, and other parts, and reassemble the cartridge. For cartridges without a fill plug, it provides additional instructions on using a hole saw to create a toner fill port. The instructions are intended to guide a technician through a full refurbishment of the HP1012 cartridge.
The document provides technical instructions for replacing the drum unit in several Brother printer models. It includes 14 steps and 11 accompanying photos to guide removal of the drum unit components like the corona wire assembly, cleaning brush, and drum. Information on resetting the drum counter after replacement is also provided.
Manual utilizado nos modelos Sharp AL 1000 para impressoras AL 1010 | AL 1020 | AL 1041 | AL 1200 | AL 1220 | AL 1250 | AL 1551 | AL 1631 | AL 1641 | AL 1661 | XD100.
Manual de Recarga Samsung 5050 | 5100 | 5500 | ML 5000Valejet
This document provides technical instructions for recycling a Samsung ML5000 toner cartridge. It includes 23 steps with accompanying photos detailing how to disassemble the cartridge into its main components. The steps cover removing screws and clips, separating sections, cleaning individual parts like the drum, developer roller, and PCR, and reassembling the cartridge. Contact information and part numbers are also listed for compatible printer models and replacement components available from Future Graphics.
This document provides technical instructions for remanufacturing toner cartridges for several HP printer models, including the HP5500, HP5550, and related models. It outlines 49 detailed steps for disassembling and cleaning the cartridge components, replacing consumables, and reassembling the cartridge. The instructions include photos to illustrate each step in the remanufacturing process.
The document provides technical instructions for remanufacturing a Fuji Xerox P-880 printer cartridge. It details 40 steps for taking the cartridge apart, cleaning components, replacing parts like the doctor blade and wiper blade, and refilling the toner hopper. Photos accompany each step to illustrate the process. Common remanufacturing problems and solutions are also listed.
Manual de Recarga Xerox Phaser 6130 1320 106R01278Valejet
This document provides instructions for remanufacturing toner cartridges for the Dell 1320c and Xerox Phaser 6130/N printers. It lists the printers and OEM cartridge part numbers that can be remanufactured. The 14 step process involves separating the toner and waste tanks, cleaning parts, replacing the toner, and reassembling the cartridge. Tools and supplies needed include a screwdriver, spring hook, cloth, vacuum or compressed air.
Manual de Recarga Xerox N24 N32 N40 113R173Valejet
This document provides technical instructions for remanufacturing toner cartridges for several printer models, including the Xerox N24/32/40. The instructions are presented in 21 steps with accompanying photos. The steps include removing parts like the drum, photoconductive roller (PCR), and wiper blade. The parts are then cleaned before new padding powder and parts are installed to reassemble the cartridge. Assistance from a technical resource center is offered for any remanufacturing problems.
O documento fornece instruções passo-a-passo para recarregar um cartucho de toner Xerox M15/4118, incluindo remover o cartucho e depósito de toner, despejar o toner antigo, adicionar 200g de novo toner, recolocar o depósito e cartucho, e testar.
The document provides instructions for remanufacturing the toner cartridge for the Samsung SCX-4725 multifunction printer. It describes disassembling the cartridge by removing the end caps, waste chamber, gears, photoreceptor drum, and developer roller. It also details cleaning components like the photoreceptor drum, primary charging roller, and doctor blade. The instructions aim to guide remanufacturers on properly reassembling the cartridge and replacing its chip after refilling it with new toner.
Manual de Recarga Samsung ML 1710 | SCX 4216 | SCX 4200 | SCX 4100Valejet
This document provides technical instructions for remanufacturing the Samsung ML1710 toner cartridge. It consists of 18 steps with accompanying photos detailing how to disassemble the cartridge by removing screws and clips, clean various components using dry air or mild soap and water, and reassemble the cartridge. The goal is to refurbish the cartridge to like-new condition for reuse.
Manual de Recarga Samsung ML 1650 | ML 1651N | ML1650D8Valejet
The document provides instructions for disassembling and reassembling toner cartridges for the Samsung ML-6060 and ML-1650 printer engines. It describes the printers that originally used these engines, including models from NEC, Xerox, IBM, and Samsung. It notes that while the cartridges use similar internal components, molding differences prevent interchangeability between printer models. Standard and high-yield cartridge yields are listed for some models. The disassembly and reassembly process is largely the same for both cartridge types, with one small difference relating to a drive belt on the ML-1650 cartridge gear assembly.
Manual de Recarga Samsung ML 2251N | ML 2251NP | ML 2251W | ML 2250Valejet
This document provides instructions for remanufacturing the Samsung ML-2250 toner cartridge. It describes removing and replacing various cartridge components like the toner hopper, gears, and chip. Common cartridge problems like a dirty primary charge roller or scratched drum could cause issues like streaks or ghosting in prints. The document also lists error codes indicated by the printer's LED lights.
Este documento proporciona instrucciones detalladas para la remanufacturación del cartucho de tóner Samsung CLP-610 en 39 pasos. Describe las herramientas y suministros necesarios y cada paso del proceso, incluyendo la remoción y limpieza de componentes como el cilindro fotosensible, rodillos y cuchillas, y la instalación de un chip nuevo y llenado de tóner. También lista impresoras compatibles y precios de cartuchos.
The document provides instructions for remanufacturing Samsung CLP 600/650 toner cartridges. It details removing the cartridge pins using a specialized tool to separate the cartridge halves. The contact end plate and gear-side end plate are then removed by taking out screws to access the internal components. Gears and other parts can be accessed and replaced after removing the end plates. Tools including screwdrivers and pliers are needed along with new toner and smartchips for remanufacturing.
Manual de Recarga Okidata C7000 | C7100 EspanholValejet
This document provides instructions for remanufacturing toner cartridges for Okidata C7000/C7100 printers. It describes the 20 step process for disassembling the cartridge, which includes removing the toner housing, cylinder unit cover, dose blade, side covers, and various internal components like the PCR and OPC. The final step is to replace the fuse, clean and refill the cartridge, then reassemble it in reverse order.
Manual de Recarga Okidata C5500 | 6100 EspanholValejet
Este documento proporciona instrucciones para remanufacturar cartuchos de toner para impresoras Okidata C5500/5600/5700/5800/5900/6000/6100. Describe cómo desmontar el cartucho, vaciar el toner usado, limpiarlo y volver a llenarlo con nuevo toner, así como reemplazar el chip. También explica la diferencia entre cartuchos iniciales y de reposición.
O documento fornece instruções passo a passo para desmontar e limpar o cartucho de toner e a unidade do cilindro da impressora Okidata C3400. Ele explica como remover cada peça, limpá-la adequadamente e remontá-la para reutilização.
Este documento proporciona instrucciones detalladas para desmontar y volver a montar un cartucho de toner para impresoras Okidata C9000/9500. Las instrucciones explican cómo desmontar los 22 componentes principales del cartucho, incluidos el cilindro, la cuchilla dosificadora, el rodillo de revelación y el OPC. Luego, las instrucciones indican volver a montar el cartucho limpio y recargado siguiendo los pasos en orden inverso.
This document provides instructions for remanufacturing toner cartridges for Okidata C7000/C7100 printers. It describes the 20 step process for disassembling the cartridge, which includes removing the toner housing, cylinder unit cover, dose blade, side covers, and various internal components like the PCR and OPC. The final step is to replace the fuse, clean and refill the cartridge, then reassemble it in reverse order.
This document provides 9 steps for cleaning and maintaining a QMS2400TECH cartridge. Step 1 instructs removing an end cap with 3 screws to access the developer roller. Step 2 has the user remove the doctor blade cover with 2 latches. Step 3 explains removing the white center bearing by lifting a center tab and rotating the cap counterclockwise. Step 4 details removing the silver shoulder screw on the Recovery/Toner Hopper Seal Plate assembly to access the center bearing plate. Step 5 guides removing the developer roller shaft along with both bearings and driver gear. Step 6 instructs removing 2 screws on each side of the developer doctor blade assembly to carefully pry it forward. Step 7 removes the Recovery/Toner Hop
The document provides technical instructions for replacing toner cartridges in the Minolta-QMS Magicolor 2300 series of printers. It describes 20 steps for removing and replacing components like end caps, sensors, bearings, and covers. Tools needed include small Phillips screwdrivers and cotton swabs. Replacement cartridges listed include high and standard capacity toners for cyan, magenta, yellow, and black, as well as OPC drums and waste toner boxes.
Manual de Recarga Lexmark T640 | T642 | T644Valejet
This document provides technical instructions for refurbishing Lexmark T640, T642, and T644 printer cartridges. It includes 30 steps with corresponding photos to guide removal and replacement of components like the toner hopper, drum, developer roller, doctor blade, and wiper blade. Specifications are provided for the printer models, cartridge part numbers, and yields. Tools and supplies needed to complete the refurbishing are also listed.
1. HP3600_3800TECH
Technical Instructions Printers OEM Info Tools 1
CORPORATE HP Color LaserJet 3000n (Q7534A) Q6470A – Black (HP CLJ3600/3800) Tools required:
HP Color LaserJet 3000dn (Q7535A) Q7581A – Cyan (HP CLJ3800) #1 Phillips Screwdriver,
LOS ANGELES, USA Small Flat Blade Screwdriver,
US 1 800 394.9900 HP Color LaserJet 3600n (Q5987A) Q7582A – Yellow (HP CLJ3800)
X-acto knife,
Int’l +1 818 837.8100 HP Color LaserJet 3600dn (Q5988A) Q7583A – Magenta (HP CLJ3800) DRPINTOOL, Hammer,
FAX 1 800 394.9910 HP Color LaserJet 3800 (Q5981A) Q6471A – Cyan (HP CLJ3600) Diagonal cutters, Spring Hook,
Int’l +1 818 838.7047 HP Color LaserJet 3800n (Q5982A) Q6472A – Yellow (HP CLJ3600) Needle-nose Pliers
HP Color LaserJet 3800dn (Q5983A) Q6473A – Magenta (HP CLJ3600)
HP Color LaserJet 3800dtn (Q5984A) Q7560A – Black (HP CLJ3000) Supplies Required:
ATLANTA, USA Padding Powder
US 1 877 676.4223 Q7561A – Cyan (HP CLJ3000)
Soft Lint-Free Cloth
Int’l +1 678 919.1189 Q7562A – Yellow (HP CLJ3000) Cotton Swabs
FAX 1 877 337.7976 Q7563A – Magenta (HP CLJ3000) Conductive Grease
Int’l +1 770 516.7794 Anhydrous Isopropyl Alcohol
Vacuum or Compressed Air
Sealing Foam
KANSAS CITY, USA
US 1 913 871.1700
FAX 1 913 888.0626
Photo 1
MIAMI, USA Step 1
US 1 800 595.4297
Int’l +1 305 594.3396 Hold the cartridge with the gear side facing you.
FAX 1 800 522.8640 Use an X-acto knife to remove the plastic cover-
Int’l +1 305 594.3309
ing the cartridge pin.
NEW YORK, USA (See Photos 1 & 2)
US 1 800 431.7884
Int’l +1 631 588.7300
FAX 1 800 431.8812
Int’l +1 631 588.7333
TORONTO, CAN Photo 2
CAN 1 877 848.0818
Int’l +1 905 712.9501
Step 2
FAX 1 877 772.6773 Using the diagonal cutters, remove the car-
Int’l +1 905 712.9502
tridge pin.
BUENOS AIRES, ARG NOTE: If needed, use the X-acto knife to cut
ARG 0810 444.2656 slots for improved access to the pin using the
Int’l +011 4583.5900
FAX +011 4584.3100
diagonal cutters.
(See Photo 3)
MELBOURNE, AUS
AUS 1 800 003. 100
Int’l +62 03 9561.8102
FAX 1 800 004.302 Photo 3
Int’l +62 03 9561-7751 Step 3
SYDNEY, AUS Rotate the cartridge to the contact side. Repeat
AUS 1 800 003.100 Steps 1 and 2 to remove the cartridge pin.
Int’l +62 02 9648.2630
FAX 1800 004.302 (See Photos 4 & 5)
Int’l +62 02 9548.2635
Photo 5
MONTEVIDEO, URY
URY 02 902.2001
Int’l +5982 902.2001
FAX +5982 900.0858
JOHANNESBURG, S.A. Photo 4
S.A. +27 11 974.6155
FAX +27 11 974.3593
SÃO PAULO, BRAZIL
Int’l +55 11 5524.8000
RAANANA, ISRAEL
ISR 09 760.12.39
Int’l +972 9760.12.39
ISR 052.38.555.82
Int’l +972 5238.555.82
E-mail: info@futuregraphicsllc.com Website: www.futuregraphicsllc.com
REV. 8/01/06
2. 2 HP3000/3600/3800 Technical Instructions
Photo 9
Step 7
Position the waste hopper with the drum fac-
ing up and the blue handles towards you.
Step 4 (See Photo 9)
Release the cartridge tension spring
on the contact side attached to the
toner hopper using a spring hook.
(See Photo 6)
Photo 10
Step 8
Photo 6 Remove the drum shutter axle from the con-
tact side of the cartridge.
(See Photo 10)
Photo 11
Step 9
Remove the drum shutter tension spring
assemble and the drum shutter axle from the
gear side of the cartridge.
Step 5 NOTE: Be careful not to lose the coil spring
inside the tension spring assemble.
Rotate the cartridge to the gear side. (See Photos 11 & 12)
Release the cartridge tension spring
attached to the waste and toner hop-
per using a spring hook.
(See Photo 7)
Photo 12
Photo 7
Photo 13
Step 10
Locate the spring pin that locks the drum’s
drive hub in place. Rotate the drum until the
Step 6 square opening on the drive hub faces up.
Separate toner hopper from the (See Photo 13)
waste hopper. Set toner hopper
aside. (See Photo 8)
Step 11
Photo 8 Photo 14
Use the DRPINTOOL to push the spring pin
through the round opening of the drum hub
and shaft. Use the alignment pin to ensure the
feed through hole of the tool is correctly
aligned. Turn the tool handle clock wise and
align the point of the tool shaft into the spring
pin hole. Turn the handle with consistent effort
until the pin exits from the feed through hole.
(See Photo 14)
3. HP3000/3600/3800 Technical Instruction 3
Photo 15
Step 12
Remove the drum axle and drum. Set aside
and cover the drum to protect the drum from
light exposure. Step 17
(See Photo 15) Apply padding powder to the new
wiper blade using a dry, soft, lint-
free cloth. Place the new blade onto
the waste hopper. Install the two
screws that hold the wiper blade in
Photo 16 place. (See Photo 21)
Step 13
Release the white PCR retaining clips and care-
fully remove the PCR. (See Photo 16)
NOTE: If needed, water can be used to clean Photo 21
the PCR.
Photo 17
Step 14
Clean PCR saddle blocks with cotton swab
and Anhydrous Isopropyl Alcohol.
(See Photo 17)
Step 18
Apply sealing foam along the edge
of the wiper blade and waste car-
tridge. (See Photo 22)
Photo 18
Step 15 Photo 22
Use the X-acto knife to cut the seal holding the
wiper blade. (See Photo 18)
Using a #1 Phillips screwdriver, remove the two
Photo 19
mounting screws from the wiper blade. Lift one
end of the wiper blade with the needle-nose pli-
ers and pull the blade away from the waste
hopper. (See Photos 19 & 20)
Photo 20 Step 16
Clean the waste hopper with a vacuum or dry,
compressed air.
Remove any remaining toner using a dry, soft,
lint-free cloth.
Remove the OEM wiper blade sealing foam
from the waste hopper.
4. 4 HP3000/3600/3800 Technical Instruction
Photo 27
Step 21
Apply conductive grease to the contact side
axle bearing. (See Photo 27) Apply padding
Step 19 powder to the OPC drum using a dry, soft, lint-
Apply conductive grease to the free cloth.
black PCR saddle block.
(See Photo 23)
Place the white PCR retaining arms
on each side of the PCR and install
the PCR. NOTE: Retaining arm
differences – gear side and contact
side. (See Photo 24) Photo 28
Step 22
Place the OPC drum onto the waste hopper so
that the drive hub sits next to the contact. Install
Photo 23 the drum axle through the OPC drum.
(See Photo 28)
Photo 29
Step 23
Photo 24 Align the square on the drum drive hub with the
hole in the drum axle. Install the drum spring
pin. Use the alignment pin to ensure the feed
through hole of the tool is correctly aligned
with the drum drive hub hole. Turn the tool
handle with consistent effort until approxi-
mately 1/8” of pin is exposed through both
sides of the drum drive hub. (See Photo 29)
Step 20
Clean drum axial bearings and drum Photo 30
axial contact with cotton swab and Step 24
Anhydrous Isopropyl Alcohol. Apply conductive grease to the drum axle con-
(See Photos 25 & 26) tact. (See Photo 30) Rotate the drum five to 10
revolutions to ensure drum is not binding on
the wiper blade. Using a dry, soft, lint-free
cloth, clean the padding powder from the drum
Photo 25
and PCR while rotating the drum.
Photo 31
Step 25
Photo 26 Install the drum shutter axle into the contact
side mounting hole of the waste unit.
(See Photo 31)
E-mail: info@futuregraphicsllc.com Website: www.futuregraphicsllc.com
5. HP3000/3600/3800 Technical Instruction 5
Photo 32
Step 26
Install drum shutter tension axle into the gear
side mounting hole and the drum shutter
spring assemble on to the gear side mounting
Step 29
post of the waste unit. Remove the large drive gear and
Set the waste unit aside. Cover waste unit to the developer roller gear.
protect OPC drum unit from light. (See Photo 37)
(See Photos 32 & 33)
Photo 33 Photo 37
Step 30
Photo 34 Remove the gear retaining plate
Step 27 from the five posts using the small
Rotate the toner hopper so that the contact flat blade screw driver.
end cap is facing you. Remove the two Phillips (See Photo 38)
screws holding the contact end cap to the
toner hopper using the #1 Phillips screwdriver.
Remove contact side end cap. Photo 38
(See Photo 34)
Photo 35
Step 28
Rotate the toner hopper so that the gear
assembly is facing you.
Using the small flat blade screw driver, careful-
ly depress the three plastic clips holding the
gear end cap. Remove gear end cap. Step 31
(See Photos 35 & 36) Remove the three gears from the
end of the developer roller end cap.
(See Photo 39)
Photo 36 Photo 39
6. HP3000/3600/3800 Technical Instruction 6
Photo 40
Step 32
Using the #1 Phillips screwdriver, remove the
two screws that hold the developer roller end
cap to the toner hopper. Remove developer Step 37
roller end cap. (See Photo 40) Clean the toner hopper with a vac-
uum or dry, compressed air.
Remove any remaining toner using
a dry, soft, lint-free cloth. Remove
the OEM doctor blade sealing foam
Photo 41 from the toner hopper.
Step 33
Lift the developer roller from the toner cartridge. Step 38
Remove the white bushings from the ends of the
Fill the toner unit with the required
developer roller. (See Photo 41)
toner through the adder roller and
doctor blade opening.
(See Photo 46)
Step 34
Install the drive gear end on the developer
Photo 42 roller axle into a drill motor and tighten in the
Photo 46
chuck. Clean the developer roller using a lint-
free cloth and 99% alcohol while the roller is
rotating in the drill. Once the roller is clean, go
over the roller again using distilled water and a
soft lint-free cloth. Make several passes. Dry
the roller using a dry soft lint-free cloth.
NOTE: The surface of the developer roller may
change and become wrinkled. If properly
cleaned, the developer roller will return to its
original state when the cleaning process is fin-
ished. (See Photo 42)
Photo 43
Step 39
Step 35 Place the doctor blade onto a flat
Remove the two phillips screws holding the surface or a cleaning fixture. Clean
doctor blade to the toner hopper. Remove the doctor blade using a lint free
doctor blade. (See Photo 43) cloth and Anhydrous Isopropyl
Alcohol. (See Photo 47)
NOTE: Do not use pressure to
clean the surface of the doctor
blade. Wipe the surface of the
blade until all the toner build up is
Photo 44 removed from the blade. Do not
Step 36 bend the doctor blade. Visually
Remove the two toner adder roller felt wash- inspect the doctor blade before
ers. (See Photo 44) reinstalling the blade onto the car-
Remove adder roller by pulling the roller from tridge.
the gear side shaft compressing the foam until
the contact side shaft can clear the toner unit
frame. Remove adder roller.
(See Photo 45) Photo 47
Photo 45
7. 7 HP3000/3600/3800 Technical Instruction
Photo 51
Step 43
Install doctor blade using the two mounting
screws.
Step 40 (See Photo 51)
Clean excess toner from the adder
roller doctor blade area using a dry, Apply sealing foam along the top section of the
soft, lint-free cloth. doctor bar.
(See Photo 52)
Step 41 Photo 52
Install the adder roller by inserting
the gear side shaft into the toner
unit then compressing the adder
roller foam until the contact side
shaft can be inserted into the toner
unit. (See Photos 48 & 49)
Photo 48 Photo 53
Step 44
Install the two white developer roller bushing
onto the shaft of the developer roller. Position
the developer roller with the long shaft on the
gear side of the hopper.
(See Photo 53)
Photo 54
Step 45
Using a cotton swab and Anhydrous Isopropyl
Photo 49
Alcohol, clean the contacts on the contact side
end cap.
(See Photo 54)
Photo 55
Step 46
Clean and apply contact grease to the adder
roller and developer roller contact shaft ends.
Step 42 (See Photos 55 & 56)
Using the sealing foam, apply foam
around the mounting screw area of
the doctor blade. (See Photo 50) Step 47
Install contact end cap using two #1 Phillips
screws. (See Photo 57)
Photo 56 Photo 57
Photo 50
E-mail: info@futuregraphicsllc.com Website: www.futuregraphicsllc.com
8. HP3000/3600/3800 Technical Instruction 8
Photo 58
Step 48
Install developer roller end cap using two #1
Phillips screws.
Step 54
(See Photo 58) Install the cartridge pins in each
end of the cartridge.
(See Photo 65)
Photo 59 NOTE: The large pin goes on the
Step 49 gear side of the cartridge.
Install the three gears onto the developer roller (See Photo 66)
end cap.
(See Photo 59)
Photo 65
Photo 60
Step 50
Install the gear retaining plate onto the devel-
oper roller end cap.
(See Photo 60)
Photo 61
Step 51
Install the developer roller gear and the large
Photo 66
drive gear onto the developer roller end cap.
(See Photo 61)
Photo 62
Step 52
Snap into position the gear end cap.
(See Photo 62)
Photo 63
Step 53 Step 55
Place the waste hopper on the work bench Connect the tension spring on the
with the drum up and the blue handles facing contact side of the cartridge.
away from you. Align the waste hopper with (See Photo 67)
the toner hopper. Ensure the tabs on the toner
hopper are positioned under the waste hop-
per’s drum shield. Check tension spring on
contact side of the waste hopper. Ensure the Photo 67
spring is positioned for installation.
Photo 64
(See Photos 63 & 64)
9. 9 HP3000/3600/3800 Technical Instruction
Photo 68
Step 56
Install the tension spring on the gear side of
the cartridge. Connecting hooks are on the
toner and waste units.
(See Photo 68)
Photo 69
Step 57
Replace the cartridge chip.
(See Photo 69)
HP CLJ 3000/3600/3800
In October of 2005, Hewlett-Packard (HP) released three color laser
printers into the North American market. The HP Color LaserJet 3000,
3600, and 3800 are based on a new Canon engine similar to the HP
Color LaserJet 2600. The single pass engine design enables the new
printers to print from 15ppm to 30ppm with only one model (HP CLJ
3000) slowing down to print color.
The HP Color LaserJet 3600 and 3800 share the same black car-
tridge, the rest of the cartridges are unique to each model. The HP CLJ
3600/3800 black cartridge, Q6470A, has a 6K page yield at 5% cov-
erage. The color cartridges for the HP CLJ 3800, Q7581A (cyan),
Q7582A (yellow), Q7583 (magenta), have a 6K page yield at 5% cov-
erage. The color cartridges for the HP CLJ 3600, Q6471A (cyan),
Q6472A (yellow), Q6473 (magenta), have a 4K page yield at 5% cov-
erage. The HP CLJ 3000 black cartridge, Q7560A, has a 6.5K page
yield at 5% coverage. The color cartridges for the HP CLJ 3000,
Q7561A (cyan), Q7562A (yellow), Q7563 (magenta), have a 3.5K page
yield at 5% coverage.
E-mail: info@futuregraphicsllc.com Website: www.futuregraphicsllc.com