Manual utilizado nos modelos Sharp AL 1000 para impressoras AL 1010 | AL 1020 | AL 1041 | AL 1200 | AL 1220 | AL 1250 | AL 1551 | AL 1631 | AL 1641 | AL 1661 | XD100.
Manual utilizado nos modelos Sharp AL 1000 para impressoras AL 1010 | AL 1020 | AL 1041 | AL 1200 | AL 1220 | AL 1250 | AL 1551 | AL 1631 | AL 1641 | AL 1661 | XD100.
1. HP2300TECH
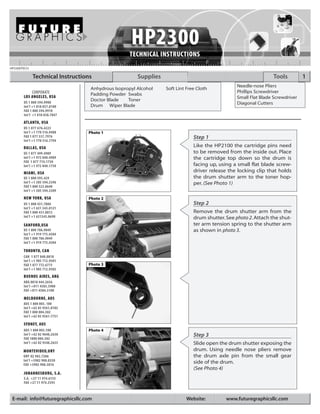
Technical Instructions Supplies Tools 1
Needle-nose Pliers
Anhydrous Isopropyl Alcohol Soft Lint Free Cloth
CORPORATE Phillips Screwdriver
Padding Powder Swabs
LOS ANGELES, USA Small Flat Blade Screwdriver
US 1 800 394.9900
Doctor Blade Toner
Drum Wiper Blade Diagonal Cutters
Int’l +1 818 837.8100
FAX 1 800 394.9910
Int’l +1 818 838.7047
ATLANTA, USA
US 1 877 676.4223
Int’l +1 770 516.9488 Photo 1
FAX 1 877 337.7976
Int’l +1 770 516.7794
Step 1
DALLAS, USA Like the HP2100 the cartridge pins need
US 1 877 499.4989 to be removed from the inside out. Place
Int’l +1 972 840.4989 the cartridge top down so the drum is
FAX 1 877 774.1750
Int’l +1 972 840.1750 facing up, using a small flat blade screw-
MIAMI, USA driver release the locking clip that holds
US 1 800 595.429 the drum shutter arm to the toner hop-
Int’l +1 305 594.3396 per. (See Photo 1)
FAX 1 800 522.8640
Int’l +1 305 594.3309
NEW YORK, USA Photo 2
US 1 800 431.7884 Step 2
Int’l +1 631 345.0121
FAX 1 800 431.8812 Remove the drum shutter arm from the
Int’l +1 631345.0690 drum shutter. See photo 2. Attach the shut-
SANFORD,USA ter arm tension spring to the shutter arm
US 1 800 786.9049 as shown in photo 3.
Int’l +1 919 775.4584
FAX 1 800 786.9049
Int’l +1 919 775.4584
TORONTO, CAN
CAN 1 877 848.0818
Int’l +1 905 712.9501
FAX 1 877 772.6773 Photo 3
Int’l +1 905 712.9502
BUENOS AIRES, ARG
ARG 0810 444.2656
Int’l +011 4583.5900
FAX +011 4584.3100
MELBOURNE, AUS
AUS 1 800 003. 100
Int’l +62 03 9561.8102
FAX 1 800 004.302
Int’l +62 03 9561-7751
SYDNEY, AUS
AUS 1 800 003.100 Photo 4
Int’l +62 02 9648.2630 Step 3
FAX 1800 004.302
Int’l +62 02 9548.2635 Slide open the drum shutter exposing the
MONTEVIDEO,URY drum. Using needle nose pliers remove
URY 02 902.7206 the drum axle pin from the small gear
Int’l +5982 900.8358 side of the drum.
FAX +5982 908.3816
(See Photo 4)
JOHANNESBURG, S.A.
S.A. +27 11 974.6155
FAX +27 11 974.3593
E-mail: info@futuregraphicsllc.com Website: www.futuregraphicsllc.com
2. 2 HP 2300 Technical Instructions
Photo 5
Step 4
With your left hand press the waste hop-
per and toner hopper together, while lift-
ing the small gear end of the drum out
from the cartridge.
(See Photos 5)
Photo 6
Step 5
Using needle nose pliers, grasp the PCR
by the metal shaft and remove.
(See Photos 6)
NOTE: Clean the PCR using a mild soap
and water.
Photo 7 Photo 8
Step 6
Locate the cartridge pins on each side of
the cartridge next to the metal stamping
of the wiper blade. Using a screwdriver
press the in towards the outside of the
cartridge. (See Photo 7 and 8).
Photo 9 Photo 10
Step 7
Using diagonal cutters remove the
cartridge pins from the both sides of the
cartridge. (See Photo 9 and 10).
Step 8
Separate the two sections of the car-
tridge
Photo 11
Step 9
Using a Phillips screwdriver remove the
two screws holding the wiper blade to
the waste hopper (See Photo 11). Remove
the wiper blade.
Step 10
Dump the waste toner from the hopper.
Need trust-worthy, detailed Technical
Instructions for another engine? Using a vacuum or dry compressed air,
Visit: www.futuregraphicsllc.com clean the waste hopper.
3. HP 2300 Technical Instructions 3
Photo 12
Step 11
Apply padding powder to the wiper
blade. Place the wiper blade onto the
waste hopper. Install the two screws Step 17
that hold the wiper blade in place. Pull the gear housing end cap
(See Photo 12) from the end of toner hopper.
(See Photo 17)
Photo 13 Photo 17
Step 12
Clean the PCR saddles using a swab and
alcohol, and apply new conductive
grease to the black conductive saddle.
Install the cleaned PCR.
(See Photo 13)
Photo 14
Step 13 Step 18
Apply padding powder to the drum. Carefully rotate the cartridge
Install the drive gear side of the drum into 180°, remove the two Phillip
the bearing hub. Slide the drum axle pin screws from the contact mag
into the small gear side of the drum. roller contact end cap.
(See Photo 14) (See Photo 18)
Photo 15 Photo 18
Step 14
Set the waste hopper section of the car-
tridge aside and cover.
Step 15
Remove the drum shutter bar from each
side of the toner hopper and remove the
shutter. (See Photo 15)
Photo 16
Step 16
Using a Phillips screwdriver, remove the
two screws that hold the toner hopper
gear housing end cap to the hopper.
(See Photo 16)
Need help with a particular remanu-
facturing problem?
Call the Technical Resource Center from
8am - 5pm PST: 800 394.9900
4. 4 HP 2300 Technical Instructions
Photo 21
Step 20
Lift the mag roller out from the toner
hopper. Remove the black drive gear, the
Step 19
stabilizing bar and the mag roller bush-
Using a small flat blade screwdriver ings from the ends of the mag roller (See
press down on the locking clip that Photo 21). Using dry compressed air or a
holds the contact end cap to the vacuum, clean the toner off the mag
toner hopper (See Photo 19). roller. Clean the roller using a lint-free
Remove the end cap. NOTE: Do not cloth and a mag roller cleaner. The mag
lose the white bearing that sits roller bushings should be cleaned using a
inside the contact end cap. lint-free cloth and alcohol.
Photo 22
(See Photo 20) NOTE: Do not lose the C-bearing that sits
inside the stabilizing bar. Using a vacuum
or dry compressed air, clean the mag
roller.
Step 21
Photo 19 Remove the two screws holding the doc-
tor blade to the toner hopper (See Photo
22). NOTE: The two screws used to hold
the doctor blade are longer than the nor-
mal cartridge screws. Make sure the cor-
Photo 23 rect screws are used when reassembling
the toner hopper.
Step 22
Remove both mag roller scrapers from
Photo 20
each end of the mag roller. (See Photo 23)
Photo 24
Step 23
Lift out the doctor blade (See Photo 24).
Clean the doctor blade first using com-
pressed air or a vacuum, then using a lint
free cloth and alcohol
Photo 25
Step 24
Remove the mylar spacers that sit behind
the doctor blade on each end of the toner
hopper. (See Photo 25)
E-mail: info@futuregraphicsllc.com Website: www.futuregraphicsllc.com
5. HP 2300 Technical Instructions 5
Step 25 Step 27
Clean the toner hopper using a vacuum Install the two mylar shims that sit
or dry compressed air. under the doctor blade. Step 33
Slide the gear housing end cap
Step 26 Step 28 onto the toner hopper. Install
Fill the toner hopper using the correct Place the doctor blade onto the toner the two screws that hold the
gram fill. hopper. end cap to the hopper.
(See Photo 30)
Photo 26 Photo 30
Step 29
Set the mag roller scrapers onto each end
of the doctor blade and install the two
large screws that hold the doctor blade in
place. (See Photo 26)
Step 30
Slide the black mag roller bushing onto
the contact side of the mag roller, and the
Photo 27 green bushing onto the drive gear side of
Step 34
the roller. Install the stabilizing bar onto
Install the drum shutter bar into
the mag roller with the C-bear facing
the slots on each end of the
towards the mag roller bushing. The mag
toner hopper.
roller drive gear will fit onto the mag
(See Photo 31)
roller either way, however the flat side of
the drive gear needs to face the mag
roller-stabilizing bar and the side of the
gear that has the dimples faces outward.
(See Photo 27) Photo 31
Photo 28
Step 31
Place the mag roller into the toner hop-
per. (See Photo 28)
Photo 29
Step 32
Press the mag roller contact end cap onto
the toner hopper. Install the two screws
that hold the end cap. (See Photo 29)
Need help with a particular remanu-
facturing problem?
Call the Technical Resource Center from
8am - 5pm PST: 800 394.9900
6. 6 HP 2300 Technical Instructions
Photo 32
Step 35
Slide the drum shutter arm onto the
Notes alignment post and install the shutter
arm to the drum shutter.
(See Photo 32)
Open the shutter to engage the tension
spring.
(See Photo 33)
Photo 33
Photo 34
Step 36
Holding the drum shutter open join the
toner hopper and waste hopper together.
Install the long cartridge pin on the drive
gear side of the cartridge and the short
cartridge pin on the small gear side of the
cartridge.
(See Photo 34 and 35)
Step 37
Photo 35
Test the cartridge.
FAX NUMBERS
Los Angeles, USA Atlanta, USA Dallas, USA Miami, USA New York, USA Sanford, USA
US 1 800 394.9910 US 1 877 337.7976 US 1 877 744.1750 US 1 800 522.8640 US 1 800 431.8812 US 1 800 786.9049
Int’l + 818 838.7047 Int’l +1 770 516.7794 Int’l +1 972 840.1750 Int’l +1 305 594.3309 Int’l +1 631 345.0690 Int’l +1 919 775.4584
Toronto, CAN Sydney, AUS Melbourne, AUS Buenos Aires, ARG Montevido, URY
CAN 1 877 772.6773 AUS 1 800 004.302 AUS 1 800 004.302 Int’l +011 4584.3100 Int’l +5982 908.3816
Int’l +1 905 712.9502 Int’l +62 02 9648.2635 Int’l +62 03 9561.7751
E-mail: info@futuregraphicsllc.com Website: www.futuregraphicsllc.com
7. ENGINE COMPATIBILITY:
2300/ 2300n/ 2300d/ 2300dn/ 2300dtn: 25 ppm, Duty Cycle 50,000 pages
2300L: 20 ppm, Duty Cycle 30,000 pages
Released in March 2003, the HP2300 series of printers Detected” before going to ready. There are two other dis-
are the first new HP laser printers to hit the market this advantage to using the cartridge without the chip. The
year. Designed around an improved version of the HP2200 first is that the machine will never display toner low (the
engine, the performance of the HP2300 rivals that of the cartridge will continue to run until it is stopped by the
HP4100 more than it does the HP2200. The HP2300 fea- user). The second problem is with the Supplies Status
tures 1200 x 1200 dpi resolution, has a print speed of 25 Page. All the information that is normally displayed, esti-
pages per minute (except the HP2300L, which can only mated pages remaining, toner low reached, toner out
print 20ppm) and can deliver the first page in just 10 sec- reached, etc., are replaced by a warning. “ A non Hewlett-
onds. At an estimated starting price of $600 for the base Packard supply had been detected. Certain features (such
model HP2300L, which is lower than the price of the as remaining toner value data) may not be available as a
HP2200 and $700 for the HP2300, which is about $300 less result of using this non Hewlett-Packard supply” .
then the HP4100.
The use of a cartridge with a used or “spent” chip has dis-
Like the machine the toner cartridge looks very similar advantages as well. The first being that the display will
to the HP2200, the most notable changes being the continually flash “Replace Cartridge” The biggest problem
.
design of the toner hopper and the green chip that is on being the information on the supply status page will be
the top left side of the waste hopper. The same style chips incorrect. The toner gauge will read 0% or 1%, the estimat-
as found on the HP4200 and HP4300, are used to store ed pages remaining will always read 0, and the toner low
information such as the cartridge serial number, the car- and toner out message will always read reached. The only
tridge manufacturing date, the number of pages printed information that may be useful will be the pages printed
using that cartridge, as well as “toner low” and “toner out” with this supply, however it will continue adding to the
status. All this information can be viewed by running a previous total, having not been reset.
Printer Supplies Status Page. The HP2300 will run with a
The cartridge itself (Q2610A) holds approximately 360
used or “spent” chip, or with no chip at all, however steps
grams of toner and yields an estimated 6,000 pages @ 5%
must be taken and messages must be overlooked to run
coverage, that is 1,000 pages more than the HP2200. The
the cartridge.
estimated street price of this cartridge is around $128.
Without a chip the machine will display a “10.10.00 Since the cartridge is similar to the HP2200 some of the
Supplies Memory Error” To use the cartridge without the
. same components can be used, testing is underway to
chip the green button with the check on it must be ensure optimal print performance.
pressed. The machine will then display “Non HP Cartridge
FUTURE GRAPHICS PRODUCTS AVAILABLE:
Wiper Blade . . . . . . . . . . . . . . . . . . . . . . . . . . . . . .HP2100WBLADEK Fill Plug . . . . . . . . . . . . . . . . . . . . . . . . . . . . . . . . . . .HP2100FILLPLUG
PCR . . . . . . . . . . . . . . . . . . . . . . . . . . . . . . . . . . . . . . .HP4000PCREQ Onyx Seal . . . . . . . . . . . . . . . . . . . . . . . . . . . . . . . . .HP4100SEALONYX
Doctor Blade Mylar Shims . . . . . . . . . . . . . . . . .HP4100 Perimeter Sealing Foam . . . . . . . . . . . . . . . . . . .HP4000PERIMETER
Doctor Blade Scarpers . . . . . . . . . . . . . . . . . . . .HP4100 Toner Hopper Clips . . . . . . . . . . . . . . . . . . . . . . .EXCLIP4MM
Mag Roller Contact . . . . . . . . . . . . . . . . . . . . . . .EXCONTACT
Mag Roller Bushings . . . . . . . . . . . . . . . . . . . . . .HP4000BUSHIING
Toner Hopper Retaining Blade . . . . . . . . . . . . .HP4000RBLADET
Waste Hopper Recovery Blade . . . . . . . . . . . . .HP4000RBLADEW
E-mail: info@futuregraphicsllc.com Website: www.futuregraphicsllc.com
8. PRINTER MODEL COMPATIBILITY
PRINTER MODEL OEM NUMBER
HP LaserJet 2300 Q2610A
HP LaserJet 2300dn Q2610A
HP LaserJet 2300dn Q2610A
HP LaserJet 2300dtn Q2610A
HP LaserJet 2300L Q2610A
HP LaserJet 2300n Q2610A
FUTURE GRAPHICS PRODUCT LISTING
Produc t Description Item Number Pack Qt y.
Drum AEG HP2100AEGNT 5/60
Hopper Cap Fill Hole Plug HP2100FILLPLUG 100
Hopper Rail Clip 4mm Metal Sure-Grip, Use 10 per cartridge EXCLIP4MM 500
Mag Roller Bushing Small/Short and Large/Long, Set of Two, Sold per Set HP4000BUSHING 100
Mag Roller Contact Two-Piece Floating Style EXCONTACT 100
PCR New, Soft Foam Type, Extra Quiet (Works with HP4500 Color Cartridge) HP4000PCREQ 10
Retaining Blade .002 x .400 x 9.63, Fits Under Mag Roller) HP4000RBLADET 100
Seal Metalized, Heat-Sealed to Plastic Support, Adhesive, Onyx HP4100SEALONYX 50
Seal Perimeter Foam,Onyx One-Piece Full Perimeter Seal Channel Foam, Adhesive, Black HP4000PERIMETER 50
Wiper Blade Kuroki HP2100WBLADEK 10/200
Los Angeles, USA Atlanta, USA Dallas, USA Miami, USA New York, USA Sanford, USA
US 1 800 394.990 US 1 877 676.4223 US 1 877 499.4989 US 1800 595.4297 US 1 800 431.7884 US 1 800 786.9041
Int’l +1 818 837.8100 Int’l +1 770 516.9488 Int’l +1 972 840.4989 int’l +1 305594.3396 Int’l +1 631 345.0121 Int’l +1 919 775.4551
FAX 1 800 394.9910 FAX 1 877 337.7976 FAX 1 877 744.1750 FAX 1 800 522.8640 FAX1 800 431.8812 FAX 1 800 786.9049
Int’l + 818 838.7047 Int’l +1 770 516.7794 Int’l +1 972 840.1750 Int’l +1 305 594.3309 Int’l +1 631 345.0690 Int’l +1 919 775.4584
Toronto, CAN Sydney, AUS Melbourne, AUS Buenos Aires, ARG Montevido, URY
CAN 1 877 848.0818 AUS 1 800 003.100 AUS 1 800 003.100 ARG 0810 444.2656 URY 02 902.7206
Int’l 1 905 712.9501 Int’l +62 02 9648.2630 Int’l +62 03 9561.8102 FAX +011 4584.3100 FAX +5982 908.3816
FAX 1 877 772.6773 FAX 1 800 004.302 FAX 1 800 004.302
Int’l +1 905 712.9502 Int’l +62 02 9648.2635 Int’l +62 03 9561.7751
Future Graphics (FG) is a distributor of compatible replacement parts and products for imagining equipment.
None of FG's products are genuine OEM replacement parts and no affiliation or sponsorship is to be implied between FG and any OEM.