Manual de Recarga HP Canon EX 92298A.
•
0 likes•338 views

Manual de Recarga HP Canon EX 92298A. ValeJET shop. www.valejetshop.com.br

Recommended
Recommended
More Related Content
What's hot
What's hot (12)
Viewers also liked
Viewers also liked (14)
Similar to Manual de Recarga HP Canon EX 92298A.
Similar to Manual de Recarga HP Canon EX 92298A. (20)
More from Valejet
More from Valejet (11)
Recently uploaded
Recently uploaded (20)
Manual de Recarga HP Canon EX 92298A.
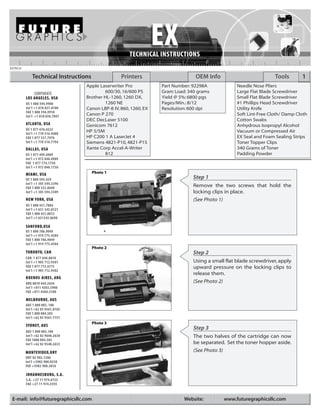
- 1. EXTECH Technical Instructions Printers OEM Info Tools 1 Apple Laserwriter Pro Part Number: 92298A Needle Nose Pliers CORPORATE 600/30, 16/600 PS Gram Load: 340 grams Large Flat Blade Screwdriver LOS ANGELES, USA Brother HL-1260, 1260 DX, Yield @ 5%: 6800 pgs Small Flat Blade Screwdriver US 1 800 394.9900 1260 NE Pages/Min.: 8/12 #1 Phillips Head Screwdriver Int’l +1 818 837.8100 Canon LBP-8 IV, 860, 1260, EX Resolution: 600 dpi Utility Knife FAX 1 800 394.9910 Int’l +1 818 838.7047 Canon P 270 Soft Lint-Free Cloth/ Damp Cloth DEC DecLaser 5100 Cotton Swabs ATLANTA, USA Genicom 7612 Anhydrous Isopropyl Alcohol US 1 877 676.4223 HP 5/5M Vacuum or Compressed Air Int’l +1 770 516.9488 FAX 1 877 337.7976 HP C200 1 A LaserJet 4 EX Seal and Foam Sealing Strips Int’l +1 770 516.7794 Siemens 4821-P10, 4821-P15 Toner Topper Clips DALLAS, USA Xante Corp Accel-A-Writer 340 Grams of Toner US 1 877 499.4989 812 Padding Powder Int’l +1 972 840.4989 FAX 1 877 774.1750 Int’l +1 972 840.1750 MIAMI, USA Photo 1 US 1 800 595.429 Step 1 Int’l +1 305 594.3396 FAX 1 800 522.8640 Remove the two screws that hold the Int’l +1 305 594.3309 locking clips in place. NEW YORK, USA (See Photo 1) US 1 800 431.7884 Int’l +1 631 345.0121 FAX 1 800 431.8812 Int’l +1 631345.0690 SANFORD,USA US 1 800 786.9049 Int’l +1 919 775.4584 FAX 1 800 786.9049 Int’l +1 919 775.4584 Photo 2 TORONTO, CAN Step 2 CAN 1 877 848.0818 Int’l +1 905 712.9501 Using a small flat blade screwdriver, apply FAX 1 877 772.6773 upward pressure on the locking clips to Int’l +1 905 712.9502 release them. BUENOS AIRES, ARG ARG 0810 444.2656 (See Photo 2) Int’l +011 4583.5900 FAX +011 4584.3100 MELBOURNE, AUS AUS 1 800 003. 100 Int’l +62 03 9561.8102 FAX 1 800 004.302 Int’l +62 03 9561-7751 Photo 3 SYDNEY, AUS Step 3 AUS 1 800 003.100 Int’l +62 02 9648.2630 The two halves of the cartridge can now FAX 1800 004.302 Int’l +62 02 9548.2635 be separated. Set the toner hopper aside. MONTEVIDEO,URY (See Photo 3) URY 02 902.7206 Int’l +5982 900.8358 FAX +5982 908.3816 JOHANNESBURG, S.A. S.A. +27 11 974.6155 FAX +27 11 974.3593 E-mail: info@futuregraphicsllc.com Website: www.futuregraphicsllc.com
- 2. 2 EX Technical Instructions Photo 4 Step 4 Loosen the drum axle plate by removing the two screws that hold the plate in posi- Notes tion, and then remove the axle plate. (See Photo 4) NOTE: The two screws that hold the drum axle plate are shorter than the other screws. Make sure you use the proper screws when re-installing the drum axle. Photo 5 Step 5 Holding the OPC shutter open, remove the drum from the cartridge. If you plan to use the OEM drum a second cycle, clean the drum with isopropyl alcohol and a cot- ton pad. Using another cotton pad, wipe the drum to remove any residue left by the alcohol. Please wrap the drum in paper and set aside in a dark, protected place. (See Photo 5) Photo 6 Step 6 Remove the PCR from the clips. Clean the PCR with a slightly damp clean lint-free cloth. Make sure that the PCR is complete- ly dry before it is re-installed. (See Photo 6) NOTE: Alcohol can damage the coating of the PCR and is not recommended unless it has been recoated and recommended by Photo 7 the manufacturer. In our testing, we found that we could get a few cycles out of the black PCR. Unfortunately, most cartridges come with the grey PCR which is less durable and will not make it multiple cycles. The grey PCRs will need to be recoated after the first cycle. Step 7 To remove the wiper blade, remove the two Phillips screws holding it in position. (See Photo 6a) NOTE: On this cartridge we recommend replacing the wiper blade every time. Step 8 Need trust-worthy, detailed Technical Dump the waste toner out of the hopper. Using a vacuum or compressed air, remove Instructions for another engine? Visit: www.futuregraphicsllc.com any toner remaining in the waste hopper.
- 3. EX Technical Instructions 3 Step 9 Visually check the recovery blade for waviness or kinks. If any are found, it needs to be replaced. To do so, peel the old blade away from the waste hopper. Remove any adhesive remaining on the waste hopper, using some alcohol and a cotton swab. Notes Install the new recovery blade. Make sure the blade is installed straight and without waves to prevent leaking. Photo 10 Step 10 Reassemble waste hopper in the reverse order. Before installing the PCR, apply padding powder to the drum and install it in the waste hopper. Rotate the drum three or four revolutions to remove most of the padding powder and to prevent the wiper blade from flipping. Removing the drum, clean the PCR contacts with alcohol and a cotton swab. (See Photo 10) Install the PCR and then re-install the drum. Photo 11 (This keeps the PCR from becoming too contaminated with padding powder.) Set aside with the drum covered. Step 11 On the toner hopper, remove the two screws holding the mag roller end cap on the gear side, and remove the end cap. (See Photo11) Photo 12 Step 12 Remove the four gears. (See Photo12) Step 13 Rotate the toner hopper 180 degrees, remove the two screws holding the mag roller contact end cap and remove the Photo 14 end cap. NOTE: Clean the contact with a cotton swab and alcohol. Step 14 Need help with a particular remanu- facturing problem? Lift out the mag roller. Call the Technical Resource Center from (See Photo14) 8am - 5pm PST: 800 394.9900
- 4. 4 EX Technical Instructions Photo 15 Step 15 Remove the stabilizing bars and mag roller bushings from the nag roller. Notes (See Photo 15) Using a vacuum or compressed air, clean the remaining toner off the mag roller. Using a cotton pad and mag roller clean- er, clean off any toner residue still on the mag roller. If the coating of the roller is worn, the roller will have to be recoated. Photo 16 Step 16 Remove the two Phillips screws holding the metering blade (doctor blade) and remove the blade. (See Photo 16) Step 17 Dump out the old toner from the toner hopper. Using a vacuum or compressed air, clean out any toner remaining the Photo 18 toner hopper. Step 18 Use alcohol and a cotton swab to clean the toner sensor bar. (See Photo 13) NOTE: Be very careful not to bend the toner sensor bar. Photo 19 Step 19 If you are not going to seal the cartridge, go ahead and fill the toner hopper with 340 grams of EX toner. (See Photo 19) Reassemble the toner hopper in reverse order. If you are going to seal the car- tridge by splitting the hopper, continue to the next step. Photo 20 Step 20 Hold the toner hopper in your left hand with the opening for the mag roller facing up and the gear side away from you. Using a large flat blade screwdriver, gen- tly pry apart the upper and lower half on the non-label side of the hopper. Need trust-worthy, detailed Technical Instructions for another engine? (See Photo 20) Visit: www.futuregraphicsllc.com
- 5. EX Technical Instructions 5 Photo 21a Step 21 Next, insert a small flat blade screwdriver into the gap to maintain the tension Notes while you gently pry apart the label side of the cartridge. Lifting up on the square alignment pin, work your way along slow- ly. (See Photo 21a and 21b) Photo 21b Step 22 You’ll find the hopper will split along the seam without the need to cut it. Finally, Photo 22 pry apart near the round alignment pin on the gear end of the label side, and sep- arate the two halves. (See Photo 22) Step 23 If the round alignment pin breaks, use a 3/16 inch drill bit and drill out the broken alignment pin. Replace it with an after- market alignment pin. Photo 24 Step 24 Remove all of the OEM seal from the toner hopper. (See Photo 24) Use alcohol and a cloth to clean any remaining seal left on the toner hopper. Photo 25a Step 25 Remove the toner agitator drive assembly by pinching the two prongs together from the inside of the toner hopper using needle nose pliers. (See Photo 25a) Need help with a particular remanu- facturing problem? Call the Technical Resource Center from 8am - 5pm PST: 800 394.9900
- 6. 6 EX Technical Instructions Photo 25b Step 25 cont. Inspect the felt washer to make sure that Notes toner will not leak through the washer to make sure that toner will not leak through the washer. If the washer looks good, re-install; if it looks like toner will leak through, the washer will need to be replaced. (See Photo 25b) Photo 26 Step 26 You can seal this cartridge using a heat seal or an adhesive foam gasket type seal as you prefer. (See Photo 26) Step 27 Holding the mag roller section of the split toner hopper, use a vacuum or com- pressed air to clean the two seal end foams. Photo 28 Step 28 Using a utility knife, cut away the plastic pin that obstructs aftermarket seals. (See Photo 28) Photo 29 Step 29 With a damp cloth, clean the plastic area between the seal end foam and apply the seal foam strip. (See Photo 29) Photo 30 Step 30 Remove the fill plug from the toner hop- per and fill with toner. (See Photo 30)
- 7. EX Technical Instructions 7 Photo 31 Step 31 Fold the tail of the seal back across the toner hopper and realign the alignment pins. Reconnect the two halves of the Notes toner hopper back together. Install the toner hopper clips that hold the toner hopper together. (See Photo 31) Step 32 Reassemble the toner hopper in reverse order. Step 33 Apply a small bead of toner to the mag roller for post testing. Turn the mag roller to distribute toner evenly across the mag roller. Photo 34 Step 34 Connect the two halves of the cartridge and reinstall the locking clips and screws. You can now post test your cartridge to check for defects. (See Photo 34) Need help with a particular remanu- facturing problem? Call the Technical Resource Center from 8am - 5pm PST: 800 394.9900
- 8. 8 EX Technical Instructions Engine Fact Sheet TARGET MARKET ENGINE SOLD TO The Hewlett Packard LaserJet 4 was targeted at companies with workgroup printing reqiurements. These machines were typically sold direct or through HP authorized resellers. FUTURE GRAPHICS PRODUCT LISTING PRODUCT DESCRIPTION ITEM # PACK QT Y. Hopper O-Ring Toner agitator Bar Washer, White felt EXORING 50 Hopper Rail 4mm Metal Sure-Grip, Use 10 per Cartridge EXCLIP4MM 500 Mag Roller Bushing Universal, Set of Two EXBUSHING1 100 Mag Roller Contact Two-Piece Floating Style EXCONTACT 100 Mag Roller Sleeve New, Black Surface, Onyx EXMAGONYX 10 PCR New, Onyx EXPCRONYX 10 Recovery Blade Mylar .002 x .320 x 9.5 HP4000RBALDEW 100 Retaining Blade .002 x .312 x 8.6, Fits Under Mag Roller HP4000RBALDET 100 Seal Adhesive GoldSeal, Foam EXGOLDSEAL 50 Seal Adhesive Onyx, Plastic back EXSEALONYX 50 Seal Adhesive Onyx, Gray, Foam EXSEALONYXP 50 Seal PVC Separator Card, 11 3/8 x 2 3/4, Green Litho Tab EXSEALCARD 50 Seal Channel Rail Foam EX Gray EXRAILFOAM 100 Seal Pull Tab Black, Adhesive EXPULLTAB 50 Toner 340 gm Bottle, ONYX EXONYX340 10 Toner 340 gm Bottle, Ultra Graphics EXTNRU340 10 Toner 380 gm Bottle, ONYX EXONYX380 10 Toner 380 gm Bottle, Ultra Graphics EXTNRU380 10 Toner Bulk Bag, 22 lb Per Fill – Box of 1, ONYX, Sold per Box EXONYX10KG 1 Toner Bulk Bag, 22 lb Per Fill – Box of 1, Ultra Graphics, Sold Per Box EXU10KG 1 Toner, MICR 340 gm Bottle EXMICR340 10 Toner, MICR Bulk Bag, 22 lb Per Fill – Box of 1, Sold Per Box EXMICR10KG 1 Wiper Blade Kuroki EXWBLADEK 10/200 Future Graphics (FG) is a distributor of compatible replacement parts and products for imagining equipment. None of FG's products are genuine OEM replacement parts and no affiliation or sponsorship is to be implied between FG and any OEM. E-mail: info@futuregraphicsllc.com Website: www.futuregraphicsllc.com