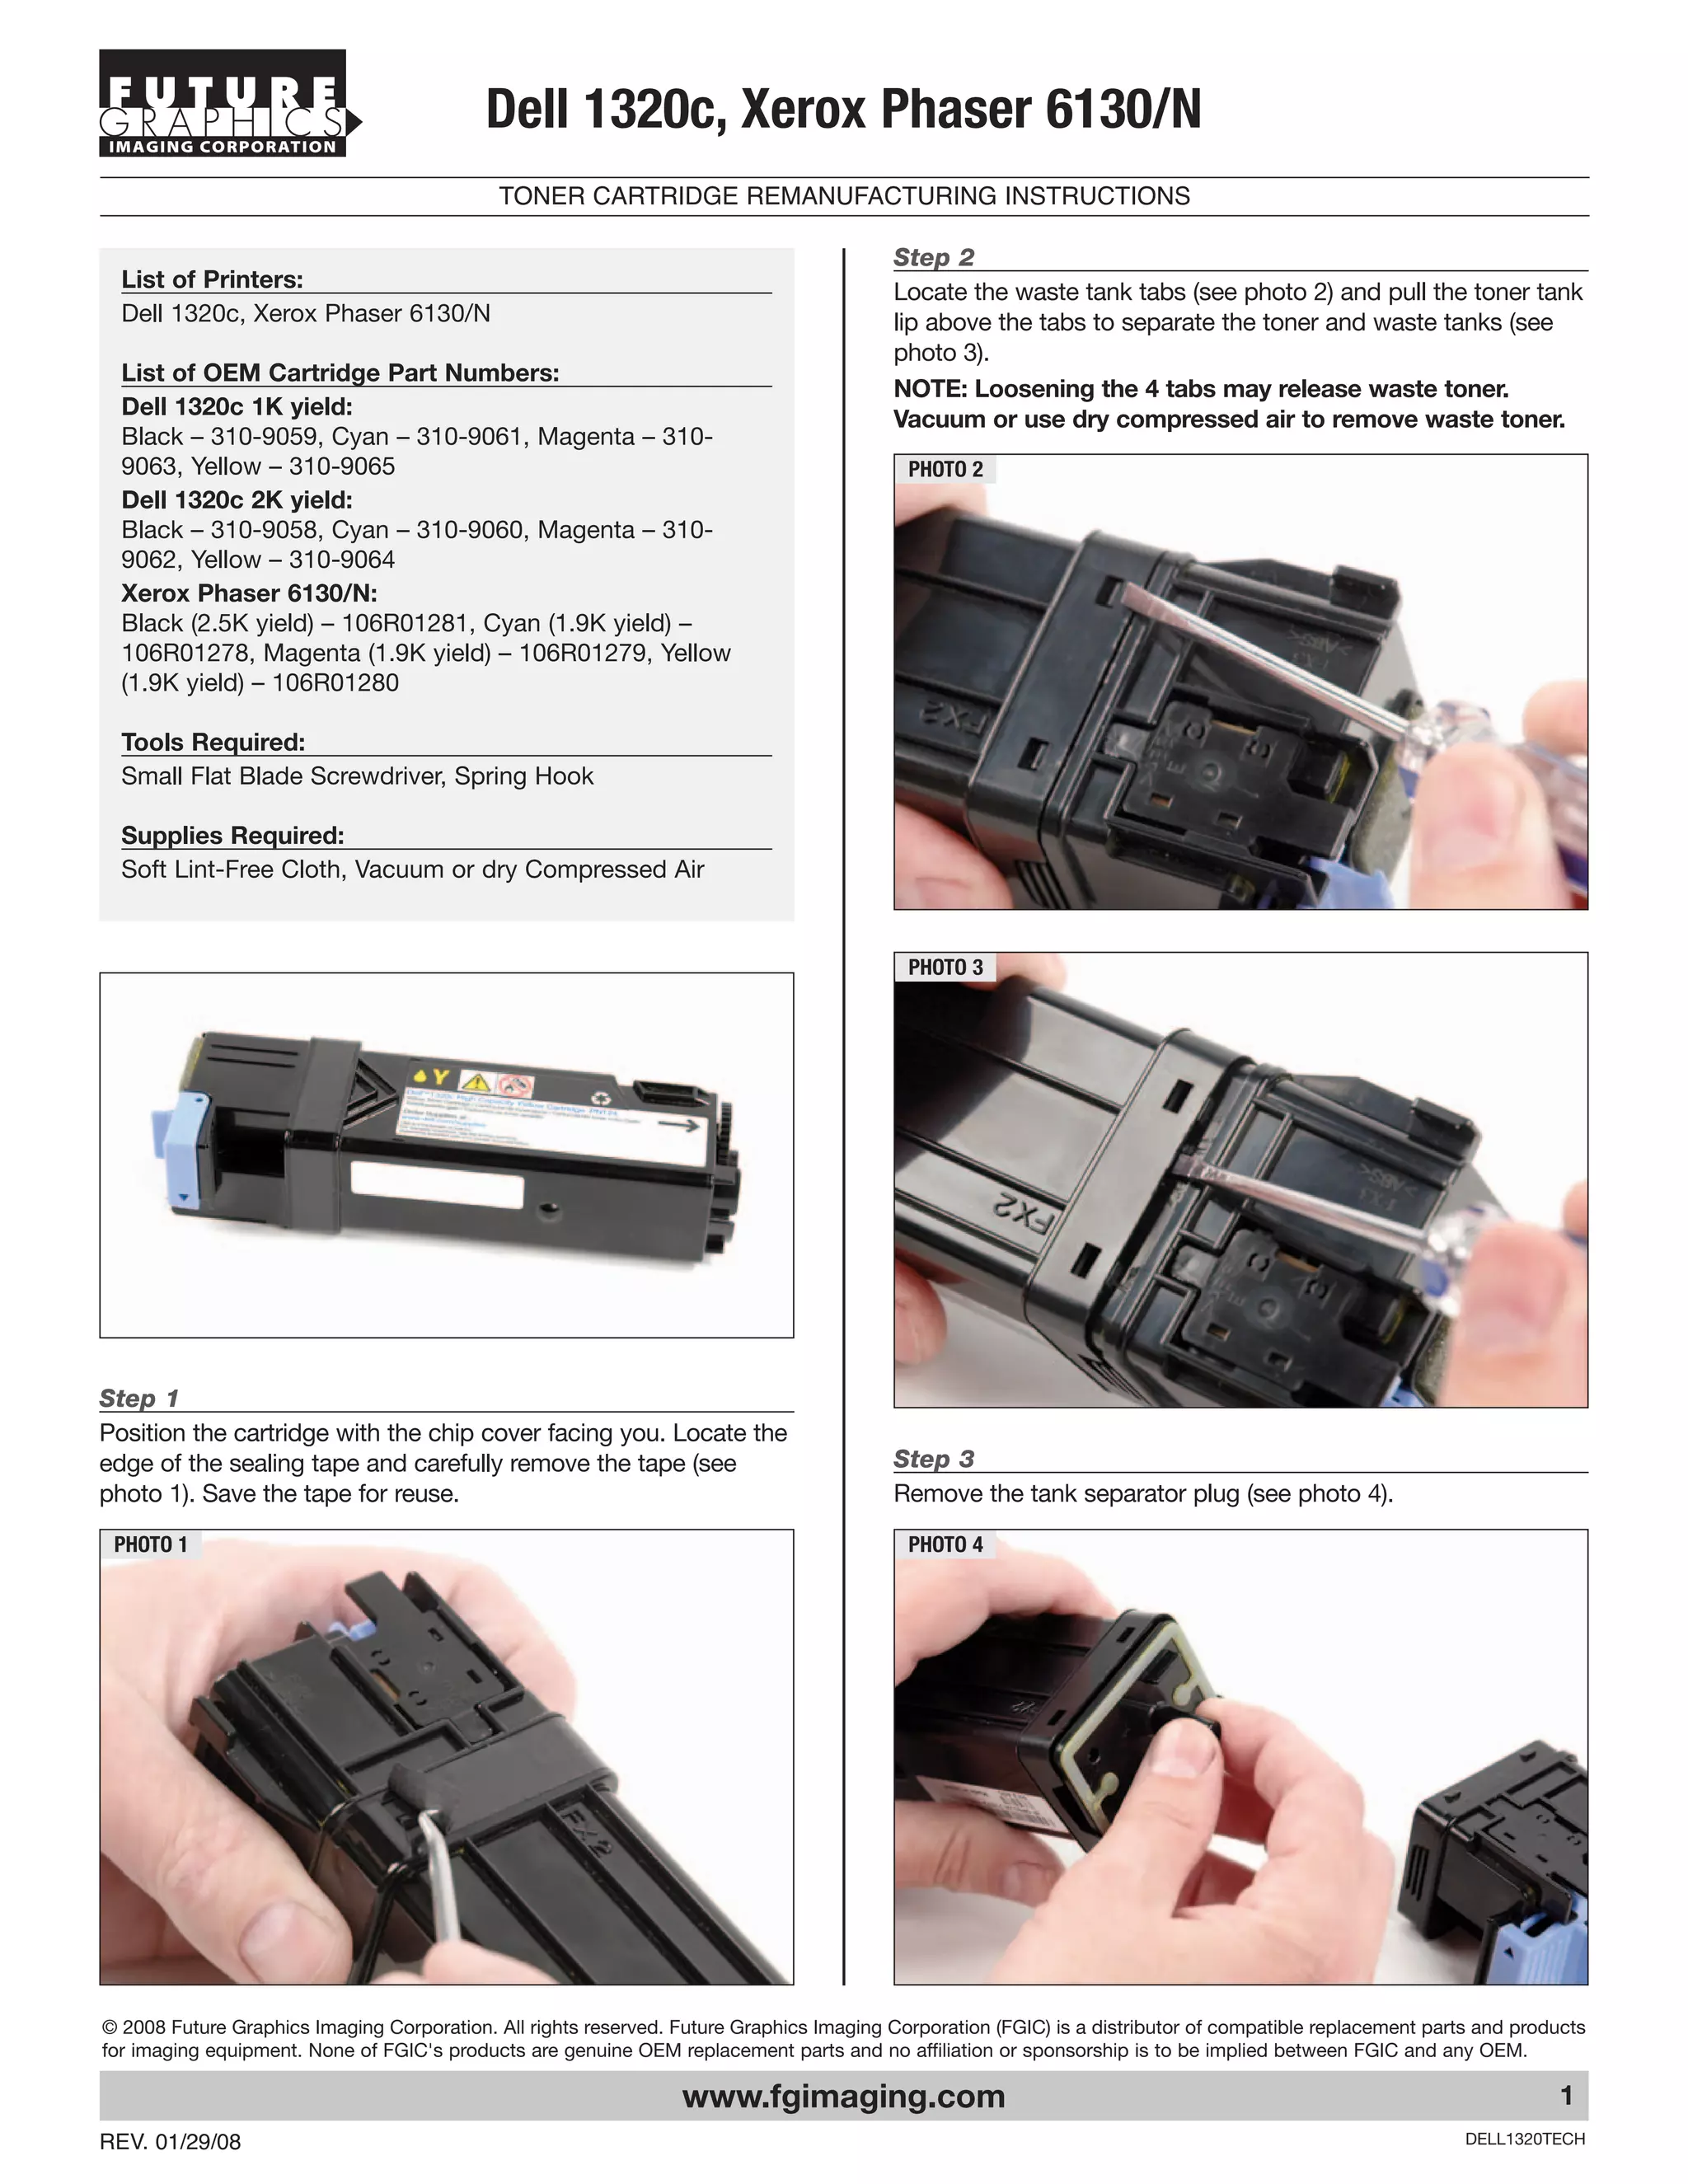
IMAGING CORPORATION
                                           Dell 1320c, Xerox Phaser 6130/N
                                             TONER CARTRIDGE REMANUFACTURING INSTRUCTIONS

                                                                                          Step 2
  List of Printers:                                                                       Locate the waste tank tabs (see photo 2) and pull the toner tank
  Dell 1320c, Xerox Phaser 6130/N                                                         lip above the tabs to separate the toner and waste tanks (see
                                                                                          photo 3).
  List of OEM Cartridge Part Numbers:
                                                                                          NOTE: Loosening the 4 tabs may release waste toner.
  Dell 1320c 1K yield:
                                                                                          Vacuum or use dry compressed air to remove waste toner.
  Black – 310-9059, Cyan – 310-9061, Magenta – 310-
  9063, Yellow – 310-9065                                                                  PHOTO 2
  Dell 1320c 2K yield:
  Black – 310-9058, Cyan – 310-9060, Magenta – 310-
  9062, Yellow – 310-9064
  Xerox Phaser 6130/N:
  Black (2.5K yield) – 106R01281, Cyan (1.9K yield) –
  106R01278, Magenta (1.9K yield) – 106R01279, Yellow
  (1.9K yield) – 106R01280

  Tools Required:
  Small Flat Blade Screwdriver, Spring Hook

  Supplies Required:
  Soft Lint-Free Cloth, Vacuum or dry Compressed Air


                                                                                           PHOTO 3


Step 1
Position the cartridge with the chip cover facing you. Locate the
edge of the sealing tape and carefully remove the tape (see                               Step 3
photo 1). Save the tape for reuse.                                                        Remove the tank separator plug (see photo 4).

 PHOTO 1                                                                                   PHOTO 4


© 2008 Future Graphics Imaging Corporation. All rights reserved. Future Graphics Imaging Corporation (FGIC) is a distributor of compatible replacement parts and products
for imaging equipment. None of FGIC's products are genuine OEM replacement parts and no affiliation or sponsorship is to be implied between FGIC and any OEM.

                                                                  www.fgimaging.com                                                                                  1
REV. 01/29/08                                                                                                                                              DELL1320TECH
IMAGING CORPORATION
                                           Dell 1320c, Xerox Phaser 6130/N
                                             TONER CARTRIDGE REMANUFACTURING INSTRUCTIONS

Step 4                                                                                    Step 8
Remove toner outlet cover (see photo 5).                                                  Clean the seal area on the toner tank (see photo 8).

 PHOTO 5                                                                                   PHOTO 8


Step 5
Clean any remaining toner out using a vacuum or dry com-
pressed air.                                                                              Step 9
                                                                                          Install the tank separator plug (see photo 9).
Step 6
Using a soft lint-free cloth, clean the seal area on the tank sepa-                        PHOTO 9
rator plug (see photo 6).

 PHOTO 6


                                                                                          Step 10
Step 7                                                                                    Install the waste tank. Use the waste tank latch and the round
Replace the toner outlet cover (see photo 7) and fill the toner                           tab on the toner tank to correctly align the waste unit (see photo
tank with fresh toner.                                                                    10).

 PHOTO 7                                                                                   PHOTO 10


© 2008 Future Graphics Imaging Corporation. All rights reserved. Future Graphics Imaging Corporation (FGIC) is a distributor of compatible replacement parts and products
for imaging equipment. None of FGIC's products are genuine OEM replacement parts and no affiliation or sponsorship is to be implied between FGIC and any OEM.

                                                                  www.fgimaging.com                                                                                  2
REV. 01/29/08                                                                                                                                              DELL1320TECH
IMAGING CORPORATION
                                           Dell 1320c, Xerox Phaser 6130/N
                                             TONER CARTRIDGE REMANUFACTURING INSTRUCTIONS

Step 11                                                                                   Step 14
Install the sealing tape. Use the previous impressions on the                             Install a new chip into the cover and reinstall the chip cover.
tape as a starting point to align the sealing tape (see photo 11).
NOTE: Remove all toner from the tape seal area to insure a
proper seal.

PHOTO 11
                                                                                                                         NOTES


Step 12
Remove the chip cover (see photo 12).

PHOTO 12


Step 13
Remove the chip from the cover (see photo 13).

PHOTO 13


© 2008 Future Graphics Imaging Corporation. All rights reserved. Future Graphics Imaging Corporation (FGIC) is a distributor of compatible replacement parts and products
for imaging equipment. None of FGIC's products are genuine OEM replacement parts and no affiliation or sponsorship is to be implied between FGIC and any OEM.

                                                                  www.fgimaging.com                                                                                  3
REV. 01/29/08                                                                                                                                              DELL1320TECH

Manual de Recarga Xerox Phaser 6130 1320 106R01278

  • 1.
    IMAGING CORPORATION Dell 1320c, Xerox Phaser 6130/N TONER CARTRIDGE REMANUFACTURING INSTRUCTIONS Step 2 List of Printers: Locate the waste tank tabs (see photo 2) and pull the toner tank Dell 1320c, Xerox Phaser 6130/N lip above the tabs to separate the toner and waste tanks (see photo 3). List of OEM Cartridge Part Numbers: NOTE: Loosening the 4 tabs may release waste toner. Dell 1320c 1K yield: Vacuum or use dry compressed air to remove waste toner. Black – 310-9059, Cyan – 310-9061, Magenta – 310- 9063, Yellow – 310-9065 PHOTO 2 Dell 1320c 2K yield: Black – 310-9058, Cyan – 310-9060, Magenta – 310- 9062, Yellow – 310-9064 Xerox Phaser 6130/N: Black (2.5K yield) – 106R01281, Cyan (1.9K yield) – 106R01278, Magenta (1.9K yield) – 106R01279, Yellow (1.9K yield) – 106R01280 Tools Required: Small Flat Blade Screwdriver, Spring Hook Supplies Required: Soft Lint-Free Cloth, Vacuum or dry Compressed Air PHOTO 3 Step 1 Position the cartridge with the chip cover facing you. Locate the edge of the sealing tape and carefully remove the tape (see Step 3 photo 1). Save the tape for reuse. Remove the tank separator plug (see photo 4). PHOTO 1 PHOTO 4 © 2008 Future Graphics Imaging Corporation. All rights reserved. Future Graphics Imaging Corporation (FGIC) is a distributor of compatible replacement parts and products for imaging equipment. None of FGIC's products are genuine OEM replacement parts and no affiliation or sponsorship is to be implied between FGIC and any OEM. www.fgimaging.com 1 REV. 01/29/08 DELL1320TECH
  • 2.
    IMAGING CORPORATION Dell 1320c, Xerox Phaser 6130/N TONER CARTRIDGE REMANUFACTURING INSTRUCTIONS Step 4 Step 8 Remove toner outlet cover (see photo 5). Clean the seal area on the toner tank (see photo 8). PHOTO 5 PHOTO 8 Step 5 Clean any remaining toner out using a vacuum or dry com- pressed air. Step 9 Install the tank separator plug (see photo 9). Step 6 Using a soft lint-free cloth, clean the seal area on the tank sepa- PHOTO 9 rator plug (see photo 6). PHOTO 6 Step 10 Step 7 Install the waste tank. Use the waste tank latch and the round Replace the toner outlet cover (see photo 7) and fill the toner tab on the toner tank to correctly align the waste unit (see photo tank with fresh toner. 10). PHOTO 7 PHOTO 10 © 2008 Future Graphics Imaging Corporation. All rights reserved. Future Graphics Imaging Corporation (FGIC) is a distributor of compatible replacement parts and products for imaging equipment. None of FGIC's products are genuine OEM replacement parts and no affiliation or sponsorship is to be implied between FGIC and any OEM. www.fgimaging.com 2 REV. 01/29/08 DELL1320TECH
  • 3.
    IMAGING CORPORATION Dell 1320c, Xerox Phaser 6130/N TONER CARTRIDGE REMANUFACTURING INSTRUCTIONS Step 11 Step 14 Install the sealing tape. Use the previous impressions on the Install a new chip into the cover and reinstall the chip cover. tape as a starting point to align the sealing tape (see photo 11). NOTE: Remove all toner from the tape seal area to insure a proper seal. PHOTO 11 NOTES Step 12 Remove the chip cover (see photo 12). PHOTO 12 Step 13 Remove the chip from the cover (see photo 13). PHOTO 13 © 2008 Future Graphics Imaging Corporation. All rights reserved. Future Graphics Imaging Corporation (FGIC) is a distributor of compatible replacement parts and products for imaging equipment. None of FGIC's products are genuine OEM replacement parts and no affiliation or sponsorship is to be implied between FGIC and any OEM. www.fgimaging.com 3 REV. 01/29/08 DELL1320TECH