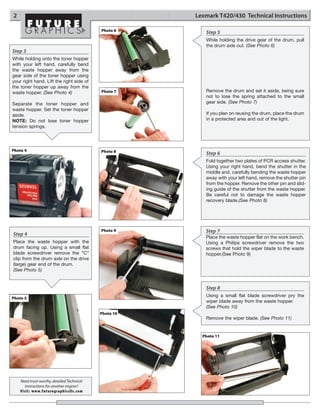
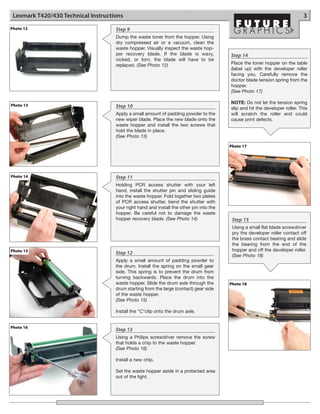
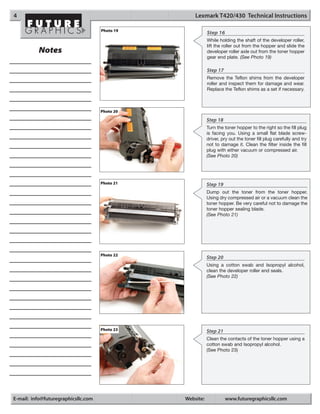
T420/430TECH

               Technical Instructions           Printers/Supplies                                                                      Tools       1
                                     Printers:                                                                      Needlenose Pliers
              CORPORATE              Lexmark T420dn                                                                 Phillips Screwdriver
          LOS ANGELES, USA           Lexmark T430/430d/430dn                                                        Small Flat Blade Screwdriver
          US 1 800 394.9900                                                                                         Spring Hook
          Int’l +1 818 837.8100
          FAX 1 800 394.9910
                                     Supplies:                                                                      X-Acto Knife
          Int’l +1 818 838.7047      T420 High Yield Return Program Print Cartridge                12A7415
                                     T420 Return Program Print Cartridge                           12A7410          Supplies Required:
          ATLANTA, USA               T420 High Yield Print Cartridge                               12A7315          Toner
          US 1 877 676.4223          T420 Print Cartridge                                          12A7310          Wiper Blade
          Int’l +1 770 516.9488                                                                                     Drum
          FAX 1 877 337.7976
          Int’l +1 770 516.7794      T430   High Yield Return Program Print Cartridge              12A8425          Lint free cloth
                                     T430   Return Program Print Cartridge                         12A8420          99% isopropyl alcohol
         DALLAS, USA                 T430   High Yield Print Cartridge                             12A8325          Cotton Swabs
         US 1 877 499.4989           T430   Print Cartridge                                        12A8320
         Int’l +1 972 840.4989
         FAX 1 877 774.1750
         Int’l +1 972 840.1750     Photo 1                                                   Step 1
          MIAMI, USA
          US 1 800 595.429
                                                                                             Place the cartridge top down on the table with
          Int’l +1 305 594.3396                                                              the drum facing up and the gear end of the
          FAX 1 800 522.8640                                                                 toner hopper is facing towards you. Using a
          Int’l +1 305 594.3309
                                                                                             small flat blade screwdriver, pry off the devel-
          NEW YORK, USA                                                                      oper roller drive gear and set it aside.
          US 1 800 431.7884                                                                  (See Photo 1)
          Int’l +1 631 345.0121
          FAX 1 800 431.8812
          Int’l +1 631345.0690

         SANFORD,USA
         US 1 800 786.9049
         Int’l +1 919 775.4584
         FAX 1 800 786.9049
         Int’l +1 919 775.4584     Photo 2                                                   Step 2
          TORONTO, CAN                                                                       Rotate the cartridge to the right so the toner
          CAN 1 877 848.0818                                                                 hopper is facing you. Using a spring hook or
          Int’l +1 905 712.9501                                                              needle nose pliers, gently remove the toner
          FAX 1 877 772.6773                                                                 hopper tension springs from the posts at each
          Int’l +1 905 712.9502
                                                                                             side. (See Photo 2 and 3)
          BUENOS AIRES, ARG
          ARG 0810 444.2656
          Int’l +011 4583.5900
          FAX +011 4584.3100

          MELBOURNE, AUS
         AUS 1 800 003. 100
         Int’l +62 03 9561.8102
         FAX 1 800 004.302
         Int’l +62 03 9561-7751

          SYDNEY, AUS              Photo 3
          AUS 1 800 003.100
          Int’l +62 02 9648.2630
          FAX 1800 004.302
          Int’l +62 02 9548.2635

         MONTEVIDEO,URY
         URY 02 902.7206
         Int’l +5982 900.8358
         FAX +5982 908.3816

          JOHANNESBURG, S.A.
          S.A. +27 11 974.6155
          FAX +27 11 974.3593


E-mail: info@futuregraphicsllc.com                                                      Website:             www.futuregraphicsllc.com
2                                                      Lexmark T420/430 Technical Instructions

                                            Photo 6
                                                          Step 5
                                                          While holding the drive gear of the drum, pull
                                                          the drum axle out. (See Photo 6)
Step 3
While holding onto the toner hopper
with your left hand, carefully bend
the waste hopper away from the
gear side of the toner hopper using
your right hand. Lift the right side of
the toner hopper up away from the
waste hopper. (See Photo 4)                 Photo 7       Remove the drum and set it aside, being sure
                                                          not to lose the spring attached to the small
Separate the toner hopper and                             gear side. (See Photo 7)
waste hopper. Set the toner hopper
aside.                                                    If you plan on reusing the drum, place the drum
NOTE: Do not lose toner hopper                            in a protected area and out of the light.
tension springs.


Photo 4                                     Photo 8       Step 6
                                                          Fold together two plates of PCR access shutter.
                                                          Using your right hand, bend the shutter in the
                                                          middle and, carefully bending the waste hopper
                                                          away with your left hand, remove the shutter pin
                                                          from the hopper. Remove the other pin and slid-
                                                          ing guide of the shutter from the waste hopper.
                                                          Be careful not to damage the waste hopper
                                                          recovery blade.(See Photo 8)


                                            Photo 9       Step 7
Step 4
                                                          Place the waste hopper flat on the work bench.
Place the waste hopper with the                           Using a Philips screwdriver remove the two
drum facing up. Using a small flat                        screws that hold the wiper blade to the waste
blade screwdriver remove the “C”                          hopper.(See Photo 9)
clip from the drum axle on the drive
(large) gear end of the drum.
(See Photo 5)


                                                          Step 8
                                                          Using a small flat blade screwdriver pry the
Photo 5
                                                          wiper blade away from the waste hopper.
                                                          (See Photo 10)
                                            Photo 10
                                                          Remove the wiper blade. (See Photo 11)


                                                         Photo 11


    Need trust-worthy, detailed Technical
      Instructions for another engine?
    Visit: www.futuregraphicsllc.com
Lexmark T420/430 Technical Instructions                                                                                       3
Photo 12                             Step 9
                                     Dump the waste toner from the hopper. Using
                                     dry compressed air or a vacuum, clean the
                                     waste hopper. Visually inspect the waste hop-
                                     per recovery blade. If the blade is wavy,            Step 14
                                     nicked, or torn, the blade will have to be
                                     replaced. (See Photo 12)                             Place the toner hopper on the table
                                                                                          (label up) with the developer roller
                                                                                          facing you. Carefully remove the
                                                                                          doctor blade tension spring from the
                                                                                          hopper.
                                                                                          (See Photo 17)

                                                                                          NOTE: Do not let the tension spring
Photo 13                             Step 10                                              slip and hit the developer roller. This
                                     Apply a small amount of padding powder to the        will scratch the roller and could
                                     new wiper blade. Place the new blade onto the        cause print defects.
                                     waste hopper and install the two screws that
                                     hold the blade in place.
                                     (See Photo 13)

                                                                                          Photo 17


Photo 14                             Step 11
                                     Holding PCR access shutter with your left
                                     hand, install the shutter pin and sliding guide
                                     into the waste hopper. Fold together two plates
                                     of PCR access shutter, bend the shutter with
                                     your right hand and install the other pin into the
                                     hopper. Be careful not to damage the waste
                                     hopper recovery blade. (See Photo 14)                 Step 15
                                                                                           Using a small flat blade screwdriver
                                                                                           pry the developer roller contact off
                                                                                           the brass contact bearing and slide
                                                                                           the bearing from the end of the
Photo 15                                                                                   hopper and off the developer roller.
                                     Step 12                                               (See Photo 18)
                                     Apply a small amount of padding powder to
                                     the drum. Install the spring on the small gear
                                     side. This spring is to prevent the drum from
                                     turning backwards. Place the drum into the
                                     waste hopper. Slide the drum axle through the        Photo 18
                                     drum starting from the large (contact) gear side
                                     of the waste hopper.
                                     (See Photo 15)

                                     Install the “C”clip onto the drum axle.


Photo 16
                                     Step 13
                                     Using a Philips screwdriver remove the screw
                                     that holds a chip to the waste hopper.
                                     (See Photo 16)

                                     Install a new chip.

                                     Set the waste hopper aside in a protected area
                                     out of the light.
4                                                   Lexmark T420/430 Technical Instructions

                                     Photo 19
                                                           Step 16
                                                           While holding the shaft of the developer roller,
                                                           lift the roller out from the hopper and slide the
          Notes                                            developer roller axle out from the toner hopper
                                                           gear end plate. (See Photo 19)

                                                           Step 17
                                                           Remove the Teflon shims from the developer
                                                           roller and inspect them for damage and wear.
                                                           Replace the Teflon shims as a set if necessary.


                                     Photo 20

                                                           Step 18
                                                           Turn the toner hopper to the right so the fill plug
                                                           is facing you. Using a small flat blade screw-
                                                           driver, pry out the toner fill plug carefully and try
                                                           not to damage it. Clean the filter inside the fill
                                                           plug with either vacuum or compressed air.
                                                           (See Photo 20)


                                     Photo 21              Step 19
                                                           Dump out the toner from the toner hopper.
                                                           Using dry compressed air or a vacuum clean the
                                                           toner hopper. Be very careful not to damage the
                                                           toner hopper sealing blade.
                                                           (See Photo 21)


                                     Photo 22
                                                           Step 20
                                                           Using a cotton swab and Isopropyl alcohol,
                                                           clean the developer roller end seals.
                                                           (See Photo 22)


                                     Photo 23              Step 21
                                                           Clean the contacts of the toner hopper using a
                                                           cotton swab and Isopropyl alcohol.
                                                           (See Photo 23)


E-mail: info@futuregraphicsllc.com              Website:             www.futuregraphicsllc.com
Lexmark T420/430 Technical Instructions                                                           5


Photo 24
                                     Step 22
                                     Clean the underside of the doctor bar with a
                                     cotton swab and isopropyl alcohol.
                                     (See Photo 24)
                                                                                           Notes
                                     Step 23
                                     Visually inspect the inner sealing blade. If the
                                     blade is damaged it will cause leaking and
                                     must be replaced.


Photo 25

                                     Step 24
                                     Clean the developer roller with a compressed
                                     air. Place the axle of the developer roller into a
                                     drill. Take a lint free cloth, add a small amount
                                     of alcohol, then soak the cloth with water.
                                     Clean the roller using the lint free cloth while
                                     the roller is rotating in the drill.
                                     (See Photo 25)


Photo 26                             Step 25
                                     Clean the developer roller shaft with a cotton
                                     swab and alcohol. (See Photo 26)


Photo 27                             Step 26
                                     Install the Teflon shims on each end of the
                                     developer roller and slide the keyed end of the
                                     developer roller axle into the gear assembly
                                     end plate. Lower the other end into position
                                     being careful not to damage the Teflon shim on
                                     that side. (See Photo 27)


Photo 28                             Step 27
                                     Using a small flat blade screwdriver or needle
                                     nose pliers pry the developer roller contact off
                                     the developer roller shaft and install the brass
                                     contact bearing onto the end of the developer
                                     roller shaft. Slide it into place on the end of the
                                     toner hopper.
                                     (See Photo 28)
6                                                                   Lexmark T420/430 Technical Instructions

                                                      Photo 31
                                                                            Step 30
                                                                            Place the waste hopper top down on the work
                                                                            bench with the waste hopper away from you.
 Step 28                                                                    Turn the toner hopper upside down, install the
                                                                            left side of the toner hopper first.
 Reinstall the doctor bar tension
 spring so the“V” stamp on the                                              While holding onto the toner hopper with your
 spring points away from the toner                                          left hand, carefully bend the waste hopper
 hopper. (See Photo 29)                                                     away from the gear side of the toner hopper
                                                                            using your right hand. Push the right side of
                                                                            the toner hopper toward the waste hopper.
                                                                            (See Photo 31)
Photo 29
                                                      Photo 32
                                                                            Step 31
                                                                            Using a spring hook reattach the tension
                                                                            springs to each end of the toner hopper.
                                                                            (See Photo 32)


                                                      Photo 33
                                                                            Step 32
  Step 29                                                                   Install the developer roller drive gear onto the
                                                                            developer roller axle. (See Photo 33)
  Fill the toner hopper with the
                                                                            The cartridge is now ready to test.
  correct amount of toner and
  reinstall the toner hopper fill plug.
  (See Photo 30)
                                                                            NOTE: The difference between T-420 and
                                                                            T-430 cartridges is a notch in the center of the
                                                                            front side of the T-430 cartridge waste section.
                                                                            (See Photos 34 and 35)


                                                      Photo 34              T-420 CARTRIDGE
Photo 30


                                                      Photo 35              T-430 CARTRIDGE


Future Graphics (FG) is a distributor of compatible
replacement parts and products for imagining
equipment. None of FG's products are genuine
OEM replacement parts and no affiliation or spon-
sorship is to be implied between FG and any OEM.


  E-mail: info@futuregraphicsllc.com                             Website:             www.futuregraphicsllc.com

Manual de Recarga Lexmark T420

  • 1.
    T420/430TECH Technical Instructions Printers/Supplies Tools 1 Printers: Needlenose Pliers CORPORATE Lexmark T420dn Phillips Screwdriver LOS ANGELES, USA Lexmark T430/430d/430dn Small Flat Blade Screwdriver US 1 800 394.9900 Spring Hook Int’l +1 818 837.8100 FAX 1 800 394.9910 Supplies: X-Acto Knife Int’l +1 818 838.7047 T420 High Yield Return Program Print Cartridge 12A7415 T420 Return Program Print Cartridge 12A7410 Supplies Required: ATLANTA, USA T420 High Yield Print Cartridge 12A7315 Toner US 1 877 676.4223 T420 Print Cartridge 12A7310 Wiper Blade Int’l +1 770 516.9488 Drum FAX 1 877 337.7976 Int’l +1 770 516.7794 T430 High Yield Return Program Print Cartridge 12A8425 Lint free cloth T430 Return Program Print Cartridge 12A8420 99% isopropyl alcohol DALLAS, USA T430 High Yield Print Cartridge 12A8325 Cotton Swabs US 1 877 499.4989 T430 Print Cartridge 12A8320 Int’l +1 972 840.4989 FAX 1 877 774.1750 Int’l +1 972 840.1750 Photo 1 Step 1 MIAMI, USA US 1 800 595.429 Place the cartridge top down on the table with Int’l +1 305 594.3396 the drum facing up and the gear end of the FAX 1 800 522.8640 toner hopper is facing towards you. Using a Int’l +1 305 594.3309 small flat blade screwdriver, pry off the devel- NEW YORK, USA oper roller drive gear and set it aside. US 1 800 431.7884 (See Photo 1) Int’l +1 631 345.0121 FAX 1 800 431.8812 Int’l +1 631345.0690 SANFORD,USA US 1 800 786.9049 Int’l +1 919 775.4584 FAX 1 800 786.9049 Int’l +1 919 775.4584 Photo 2 Step 2 TORONTO, CAN Rotate the cartridge to the right so the toner CAN 1 877 848.0818 hopper is facing you. Using a spring hook or Int’l +1 905 712.9501 needle nose pliers, gently remove the toner FAX 1 877 772.6773 hopper tension springs from the posts at each Int’l +1 905 712.9502 side. (See Photo 2 and 3) BUENOS AIRES, ARG ARG 0810 444.2656 Int’l +011 4583.5900 FAX +011 4584.3100 MELBOURNE, AUS AUS 1 800 003. 100 Int’l +62 03 9561.8102 FAX 1 800 004.302 Int’l +62 03 9561-7751 SYDNEY, AUS Photo 3 AUS 1 800 003.100 Int’l +62 02 9648.2630 FAX 1800 004.302 Int’l +62 02 9548.2635 MONTEVIDEO,URY URY 02 902.7206 Int’l +5982 900.8358 FAX +5982 908.3816 JOHANNESBURG, S.A. S.A. +27 11 974.6155 FAX +27 11 974.3593 E-mail: info@futuregraphicsllc.com Website: www.futuregraphicsllc.com
  • 2.
    2 Lexmark T420/430 Technical Instructions Photo 6 Step 5 While holding the drive gear of the drum, pull the drum axle out. (See Photo 6) Step 3 While holding onto the toner hopper with your left hand, carefully bend the waste hopper away from the gear side of the toner hopper using your right hand. Lift the right side of the toner hopper up away from the waste hopper. (See Photo 4) Photo 7 Remove the drum and set it aside, being sure not to lose the spring attached to the small Separate the toner hopper and gear side. (See Photo 7) waste hopper. Set the toner hopper aside. If you plan on reusing the drum, place the drum NOTE: Do not lose toner hopper in a protected area and out of the light. tension springs. Photo 4 Photo 8 Step 6 Fold together two plates of PCR access shutter. Using your right hand, bend the shutter in the middle and, carefully bending the waste hopper away with your left hand, remove the shutter pin from the hopper. Remove the other pin and slid- ing guide of the shutter from the waste hopper. Be careful not to damage the waste hopper recovery blade.(See Photo 8) Photo 9 Step 7 Step 4 Place the waste hopper flat on the work bench. Place the waste hopper with the Using a Philips screwdriver remove the two drum facing up. Using a small flat screws that hold the wiper blade to the waste blade screwdriver remove the “C” hopper.(See Photo 9) clip from the drum axle on the drive (large) gear end of the drum. (See Photo 5) Step 8 Using a small flat blade screwdriver pry the Photo 5 wiper blade away from the waste hopper. (See Photo 10) Photo 10 Remove the wiper blade. (See Photo 11) Photo 11 Need trust-worthy, detailed Technical Instructions for another engine? Visit: www.futuregraphicsllc.com
  • 3.
    Lexmark T420/430 TechnicalInstructions 3 Photo 12 Step 9 Dump the waste toner from the hopper. Using dry compressed air or a vacuum, clean the waste hopper. Visually inspect the waste hop- per recovery blade. If the blade is wavy, Step 14 nicked, or torn, the blade will have to be replaced. (See Photo 12) Place the toner hopper on the table (label up) with the developer roller facing you. Carefully remove the doctor blade tension spring from the hopper. (See Photo 17) NOTE: Do not let the tension spring Photo 13 Step 10 slip and hit the developer roller. This Apply a small amount of padding powder to the will scratch the roller and could new wiper blade. Place the new blade onto the cause print defects. waste hopper and install the two screws that hold the blade in place. (See Photo 13) Photo 17 Photo 14 Step 11 Holding PCR access shutter with your left hand, install the shutter pin and sliding guide into the waste hopper. Fold together two plates of PCR access shutter, bend the shutter with your right hand and install the other pin into the hopper. Be careful not to damage the waste hopper recovery blade. (See Photo 14) Step 15 Using a small flat blade screwdriver pry the developer roller contact off the brass contact bearing and slide the bearing from the end of the Photo 15 hopper and off the developer roller. Step 12 (See Photo 18) Apply a small amount of padding powder to the drum. Install the spring on the small gear side. This spring is to prevent the drum from turning backwards. Place the drum into the waste hopper. Slide the drum axle through the Photo 18 drum starting from the large (contact) gear side of the waste hopper. (See Photo 15) Install the “C”clip onto the drum axle. Photo 16 Step 13 Using a Philips screwdriver remove the screw that holds a chip to the waste hopper. (See Photo 16) Install a new chip. Set the waste hopper aside in a protected area out of the light.
  • 4.
    4 Lexmark T420/430 Technical Instructions Photo 19 Step 16 While holding the shaft of the developer roller, lift the roller out from the hopper and slide the Notes developer roller axle out from the toner hopper gear end plate. (See Photo 19) Step 17 Remove the Teflon shims from the developer roller and inspect them for damage and wear. Replace the Teflon shims as a set if necessary. Photo 20 Step 18 Turn the toner hopper to the right so the fill plug is facing you. Using a small flat blade screw- driver, pry out the toner fill plug carefully and try not to damage it. Clean the filter inside the fill plug with either vacuum or compressed air. (See Photo 20) Photo 21 Step 19 Dump out the toner from the toner hopper. Using dry compressed air or a vacuum clean the toner hopper. Be very careful not to damage the toner hopper sealing blade. (See Photo 21) Photo 22 Step 20 Using a cotton swab and Isopropyl alcohol, clean the developer roller end seals. (See Photo 22) Photo 23 Step 21 Clean the contacts of the toner hopper using a cotton swab and Isopropyl alcohol. (See Photo 23) E-mail: info@futuregraphicsllc.com Website: www.futuregraphicsllc.com
  • 5.
    Lexmark T420/430 TechnicalInstructions 5 Photo 24 Step 22 Clean the underside of the doctor bar with a cotton swab and isopropyl alcohol. (See Photo 24) Notes Step 23 Visually inspect the inner sealing blade. If the blade is damaged it will cause leaking and must be replaced. Photo 25 Step 24 Clean the developer roller with a compressed air. Place the axle of the developer roller into a drill. Take a lint free cloth, add a small amount of alcohol, then soak the cloth with water. Clean the roller using the lint free cloth while the roller is rotating in the drill. (See Photo 25) Photo 26 Step 25 Clean the developer roller shaft with a cotton swab and alcohol. (See Photo 26) Photo 27 Step 26 Install the Teflon shims on each end of the developer roller and slide the keyed end of the developer roller axle into the gear assembly end plate. Lower the other end into position being careful not to damage the Teflon shim on that side. (See Photo 27) Photo 28 Step 27 Using a small flat blade screwdriver or needle nose pliers pry the developer roller contact off the developer roller shaft and install the brass contact bearing onto the end of the developer roller shaft. Slide it into place on the end of the toner hopper. (See Photo 28)
  • 6.
    6 Lexmark T420/430 Technical Instructions Photo 31 Step 30 Place the waste hopper top down on the work bench with the waste hopper away from you. Step 28 Turn the toner hopper upside down, install the left side of the toner hopper first. Reinstall the doctor bar tension spring so the“V” stamp on the While holding onto the toner hopper with your spring points away from the toner left hand, carefully bend the waste hopper hopper. (See Photo 29) away from the gear side of the toner hopper using your right hand. Push the right side of the toner hopper toward the waste hopper. (See Photo 31) Photo 29 Photo 32 Step 31 Using a spring hook reattach the tension springs to each end of the toner hopper. (See Photo 32) Photo 33 Step 32 Step 29 Install the developer roller drive gear onto the developer roller axle. (See Photo 33) Fill the toner hopper with the The cartridge is now ready to test. correct amount of toner and reinstall the toner hopper fill plug. (See Photo 30) NOTE: The difference between T-420 and T-430 cartridges is a notch in the center of the front side of the T-430 cartridge waste section. (See Photos 34 and 35) Photo 34 T-420 CARTRIDGE Photo 30 Photo 35 T-430 CARTRIDGE Future Graphics (FG) is a distributor of compatible replacement parts and products for imagining equipment. None of FG's products are genuine OEM replacement parts and no affiliation or spon- sorship is to be implied between FG and any OEM. E-mail: info@futuregraphicsllc.com Website: www.futuregraphicsllc.com