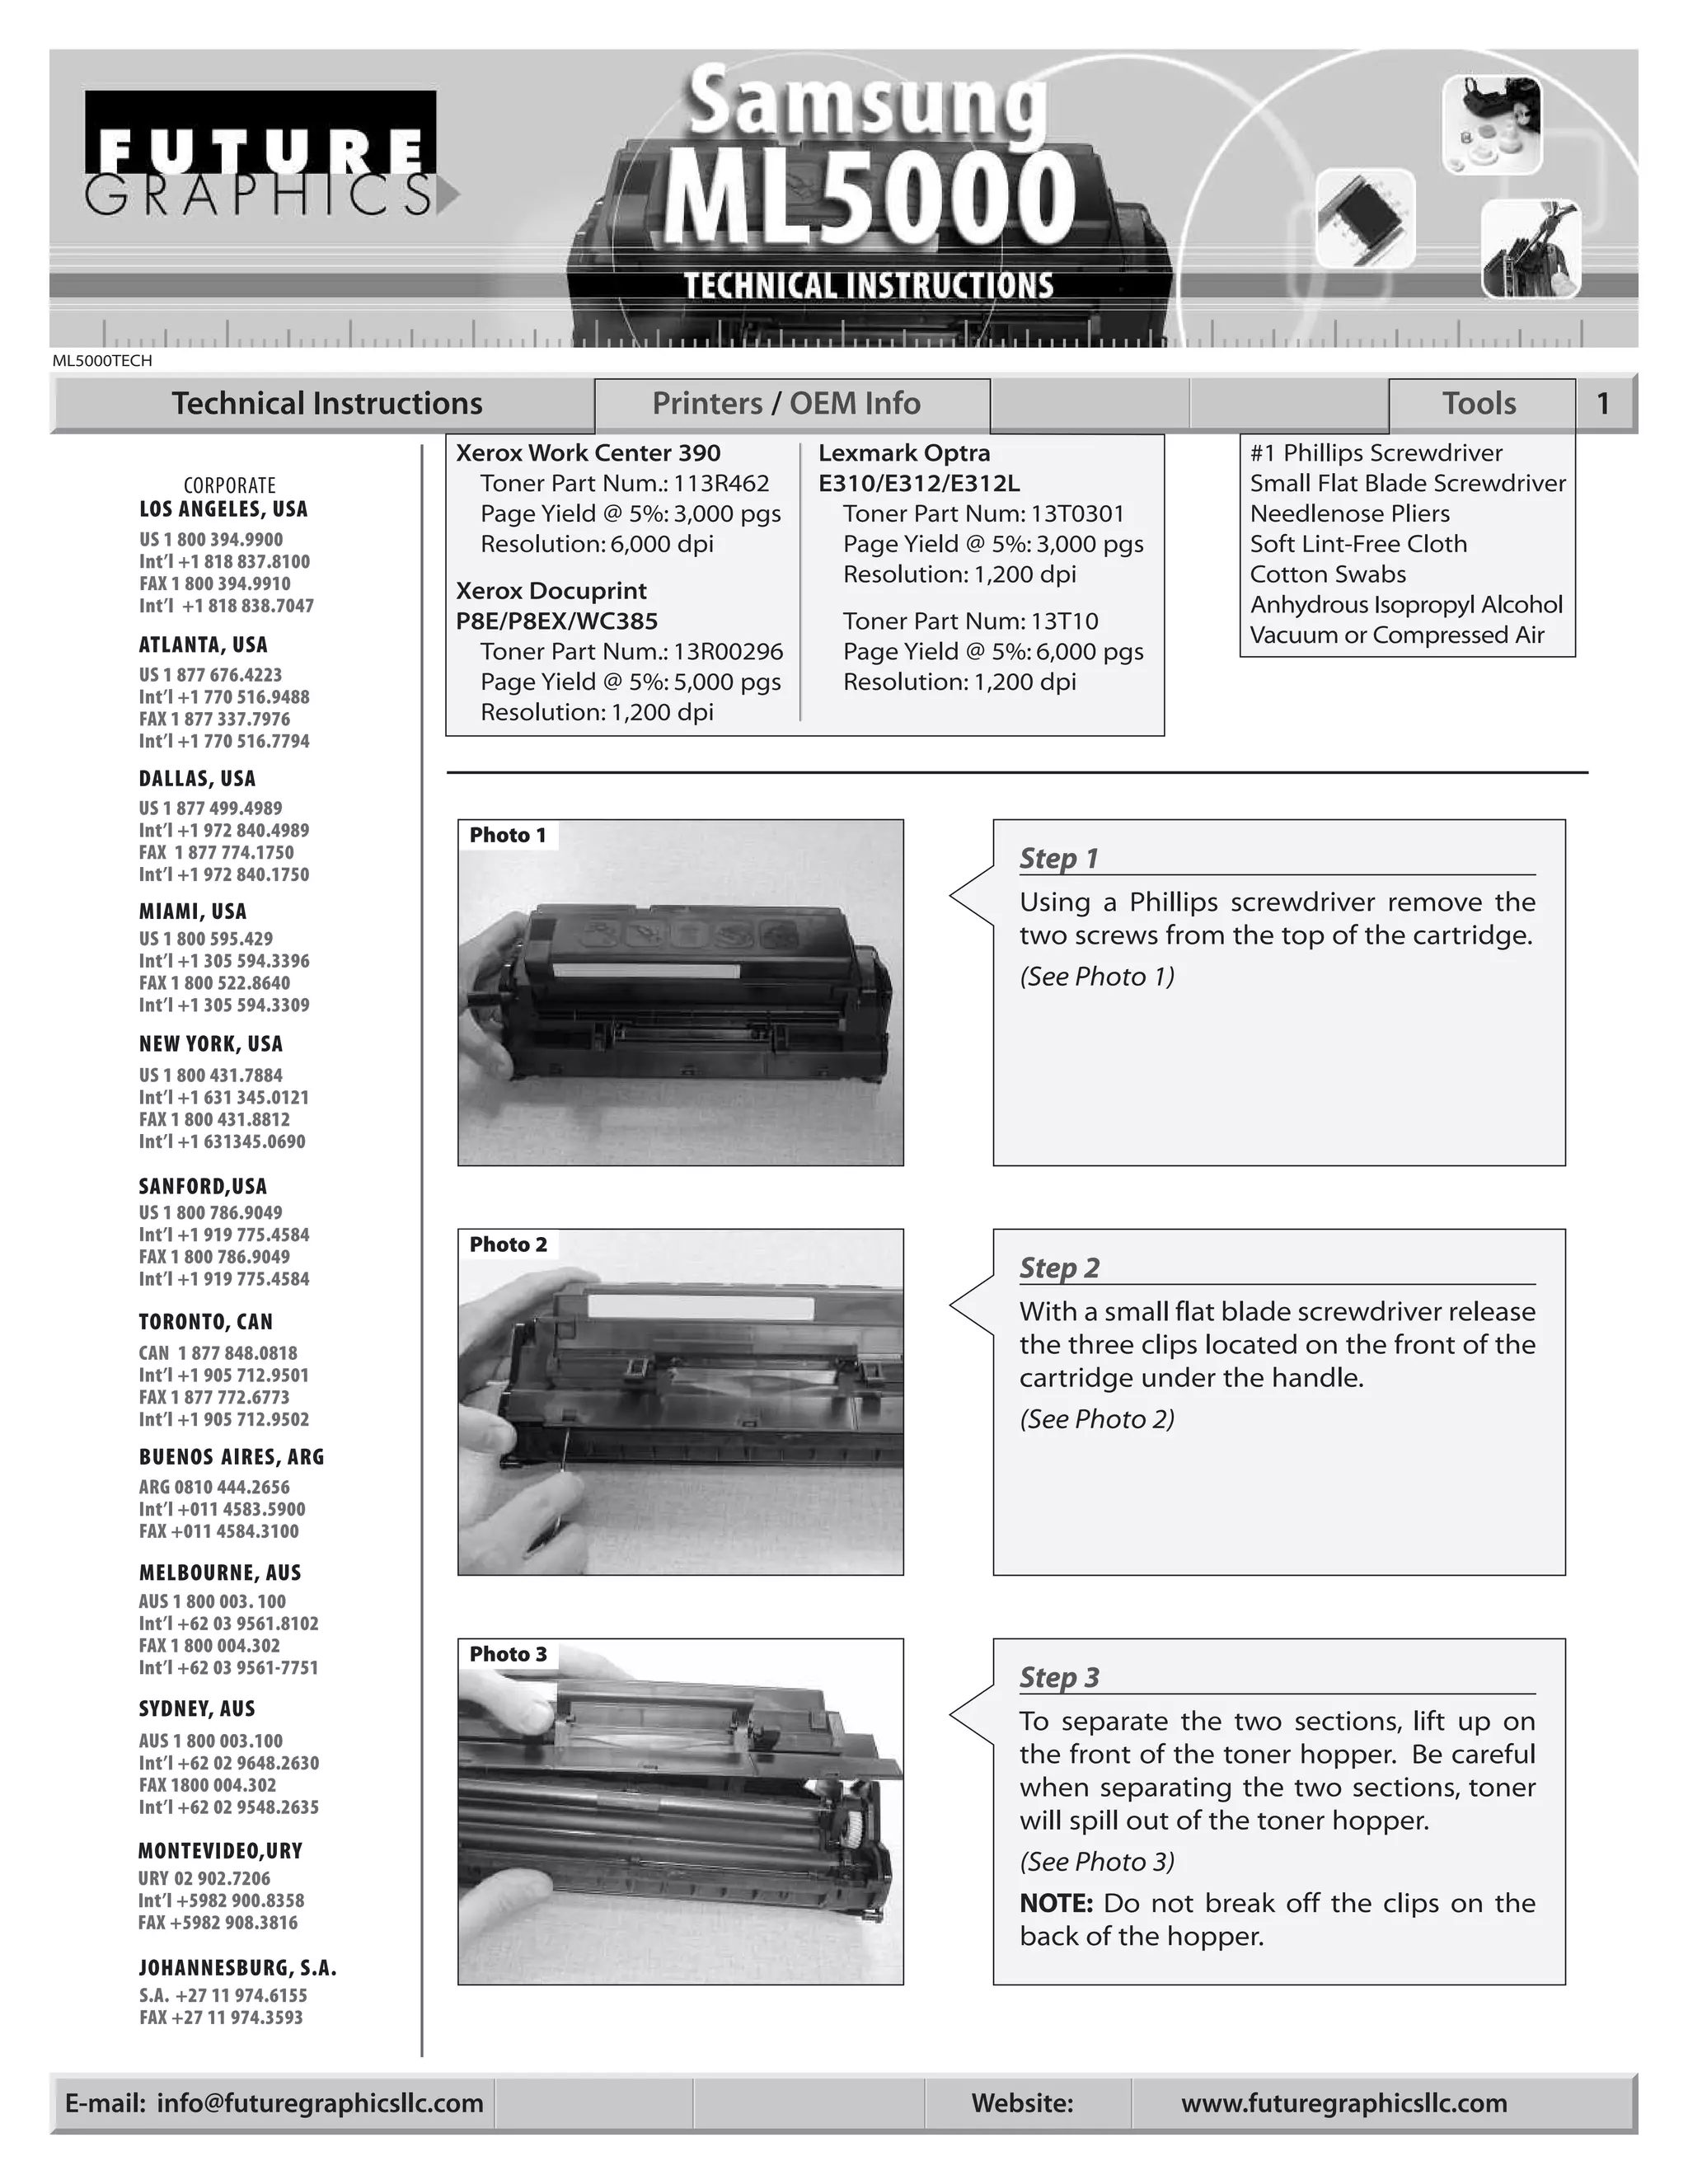
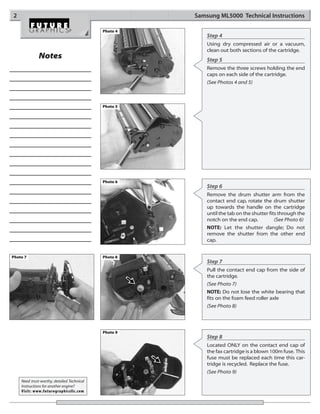
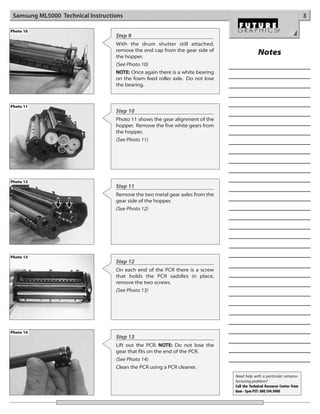
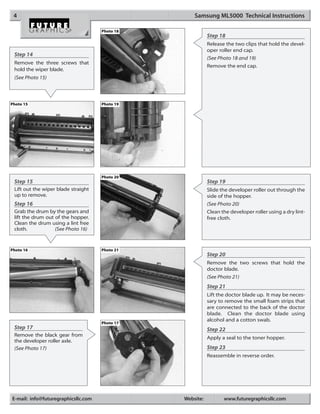
ML5000TECH

             Technical Instructions              Printers / OEM Info                                                 Tools         1
                                 Xerox Work Center 390          Lexmark Optra                       #1 Phillips Screwdriver
            CORPORATE              Toner Part Num.: 113R462     E310/E312/E312L                     Small Flat Blade Screwdriver
        LOS ANGELES, USA           Page Yield @ 5%: 3,000 pgs     Toner Part Num: 13T0301           Needlenose Pliers
        US 1 800 394.9900          Resolution: 6,000 dpi          Page Yield @ 5%: 3,000 pgs        Soft Lint-Free Cloth
        Int’l +1 818 837.8100
        FAX 1 800 394.9910                                        Resolution: 1,200 dpi             Cotton Swabs
                                 Xerox Docuprint
        Int’l +1 818 838.7047                                                                       Anhydrous Isopropyl Alcohol
                                 P8E/P8EX/WC385                   Toner Part Num: 13T10
        ATLANTA, USA                                                                                Vacuum or Compressed Air
                                   Toner Part Num.: 13R00296      Page Yield @ 5%: 6,000 pgs
        US 1 877 676.4223          Page Yield @ 5%: 5,000 pgs     Resolution: 1,200 dpi
        Int’l +1 770 516.9488
        FAX 1 877 337.7976         Resolution: 1,200 dpi
        Int’l +1 770 516.7794
        DALLAS, USA
        US 1 877 499.4989
        Int’l +1 972 840.4989     Photo 1
        FAX 1 877 774.1750                                                       Step 1
        Int’l +1 972 840.1750
        MIAMI, USA                                                               Using a Phillips screwdriver remove the
        US 1 800 595.429                                                         two screws from the top of the cartridge.
        Int’l +1 305 594.3396
        FAX 1 800 522.8640                                                       (See Photo 1)
        Int’l +1 305 594.3309
        NEW YORK, USA
        US 1 800 431.7884
        Int’l +1 631 345.0121
        FAX 1 800 431.8812
        Int’l +1 631345.0690

        SANFORD,USA
        US 1 800 786.9049
        Int’l +1 919 775.4584
                                  Photo 2
        FAX 1 800 786.9049
        Int’l +1 919 775.4584                                                    Step 2
        TORONTO, CAN                                                             With a small flat blade screwdriver release
        CAN 1 877 848.0818                                                       the three clips located on the front of the
        Int’l +1 905 712.9501                                                    cartridge under the handle.
        FAX 1 877 772.6773
        Int’l +1 905 712.9502                                                    (See Photo 2)
        BUENOS AIRES, ARG
        ARG 0810 444.2656
        Int’l +011 4583.5900
        FAX +011 4584.3100

        MELBOURNE, AUS
        AUS 1 800 003. 100
        Int’l +62 03 9561.8102
        FAX 1 800 004.302         Photo 3
        Int’l +62 03 9561-7751
                                                                                 Step 3
        SYDNEY, AUS
                                                                                 To separate the two sections, lift up on
        AUS 1 800 003.100
        Int’l +62 02 9648.2630                                                   the front of the toner hopper. Be careful
        FAX 1800 004.302                                                         when separating the two sections, toner
        Int’l +62 02 9548.2635
                                                                                 will spill out of the toner hopper.
        MONTEVIDEO,URY
                                                                                 (See Photo 3)
        URY 02 902.7206
        Int’l +5982 900.8358                                                     NOTE: Do not break off the clips on the
        FAX +5982 908.3816
                                                                                 back of the hopper.
        JOHANNESBURG, S.A.
        S.A. +27 11 974.6155
        FAX +27 11 974.3593


 E-mail: info@futuregraphicsllc.com                                          Website:          www.futuregraphicsllc.com
2                                                     Samsung ML5000 Technical Instructions

                                            Photo 4
                                                          Step 4
                                                          Using dry compressed air or a vacuum,
                                                          clean out both sections of the cartridge.
              Notes                                       Step 5
                                                          Remove the three screws holding the end
                                                          caps on each side of the cartridge.
                                                          (See Photos 4 and 5)


                                            Photo 5


                                            Photo 6
                                                          Step 6
                                                          Remove the drum shutter arm from the
                                                          contact end cap, rotate the drum shutter
                                                          up towards the handle on the cartridge
                                                          until the tab on the shutter fits through the
                                                          notch on the end cap.           (See Photo 6)
                                                          NOTE: Let the shutter dangle; Do not
                                                          remove the shutter from the other end
                                                          cap.


Photo 7                                     Photo 8
                                                          Step 7
                                                          Pull the contact end cap from the side of
                                                          the cartridge.
                                                          (See Photo 7)
                                                          NOTE: Do not lose the white bearing that
                                                          fits on the foam feed roller axle
                                                          (See Photo 8)


                                            Photo 9
                                                          Step 8
                                                          Located ONLY on the contact end cap of
                                                          the fax cartridge is a blown 100m fuse. This
                                                          fuse must be replaced each time this car-
                                                          tridge is recycled. Replace the fuse.
                                                          (See Photo 9)
    Need trust-worthy, detailed Technical
    Instructions for another engine?
    Visit: www.futuregraphicsllc.com
Samsung ML5000 Technical Instructions                                                                                   3

Photo 10
                                   Step 9
                                   With the drum shutter still attached,
                                   remove the end cap from the gear side of
                                   the hopper.
                                                                                            Notes
                                   (See Photo 10)
                                   NOTE: Once again there is a white bearing
                                   on the foam feed roller axle. Do not lose
                                   the bearing.


Photo 11
                                   Step 10
                                   Photo 11 shows the gear alignment of the
                                   hopper. Remove the five white gears from
                                   the hopper.
                                   (See Photo 11)


Photo 12
                                   Step 11
                                   Remove the two metal gear axles from the
                                   gear side of the hopper.
                                   (See Photo 12)


Photo 13
                                   Step 12
                                   On each end of the PCR there is a screw
                                   that holds the PCR saddles in place,
                                   remove the two screws.
                                   (See Photo 13)


Photo 14
                                   Step 13
                                   Lift out the PCR. NOTE: Do not lose the
                                   gear that fits on the end of the PCR.
                                   (See Photo 14)
                                   Clean the PCR using a PCR cleaner.
                                                                               Need help with a particular remanu-
                                                                               facturing problem?
                                                                               Call the Technical Resource Center from
                                                                               8am - 5pm PST: 800 394.9900
4                                                  Samsung ML5000 Technical Instructions

                                     Photo 18
                                                           Step 18
                                                           Release the two clips that hold the devel-
                                                           oper roller end cap.
 Step 14
                                                           (See Photo 18 and 19)
 Remove the three screws that
                                                           Remove the end cap.
 hold the wiper blade.
 (See Photo 15)


Photo 15                             Photo 19


                                     Photo 20
 Step 15                                                   Step 19
 Lift out the wiper blade straight                         Slide the developer roller out through the
 up to remove.                                             side of the hopper.
 Step 16                                                   (See Photo 20)
 Grab the drum by the gears and                            Clean the developer roller using a dry lint-
 lift the drum out of the hopper.                          free cloth.
 Clean the drum using a lint free
 cloth.            (See Photo 16)


Photo 16                             Photo 21
                                                           Step 20
                                                           Remove the two screws that hold the
                                                           doctor blade.
                                                           (See Photo 21)
                                                           Step 21
                                                           Lift the doctor blade up. It may be neces-
                                                           sary to remove the small foam strips that
                                                           are connected to the back of the doctor
                                                           blade. Clean the doctor blade using
                                                           alcohol and a cotton swab.
                                     Photo 17
 Step 17                                                   Step 22
 Remove the black gear from
                                                           Apply a seal to the toner hopper.
 the developer roller axle.
 (See Photo 17)                                            Step 23
                                                           Reassemble in reverse order.


E-mail: info@futuregraphicsllc.com              Website:          www.futuregraphicsllc.com
ENGINE FACT SHEETT


PRINTER MODEL COMPATIBILITY
   PRINTER MODEL                                                                  OEM NUMBER

   Lexmark Optra E310                                                             13T0101

   Lexmark Optra E312                                                             13T0101

   Lexmark Optra E312L                                                            13T0101

   Olivetti PGL 8L

   Samsung ML-5000A                                                               ML+5000D5

   Samsung ML-5000G                                                               ML+5000D5

   Samsung ML-5050G                                                               ML+5000D5

   Samsung ML-5100A                                                               ML+5000D5

   Xerox Docuprint P8e                                                            113R296

   Xerox Docuprint P8ex                                                           113R296

   Xerox WorkCentre 385                                                           113R296

   Xerox WorkCentre 390                                                           113R462


FUTURE GRAPHICS PRODUCT LISTING
  Produc t                 Description                                                                     Item N umb er                   Pack Qt y.
  Cartridge Box Label      Two-Color Self-Adhesive                                                         ML5000LABEL                     100
  Cartridge Tech Guide     Remanufacturing Instructions                                                    ML5000TECH                      1
  Developer Roller                                                                                         ML5000DVRROL                    10
  Doctor Blade             Doctor Bar With Sponge                                                          ML5000DRBLADEG                  10
  Drum                     AEG                                                                             ML5000AEG                       5/60
  Drum                                                                                                     ML5000DRUMG                     15/50
  Fuse                     Drum Unit Reset Fuse, Fax                                                       ML5000FUSED                     10
  PCR                      For Printer (Not for Fax), New, Onyx                                            ML5000PCR                       10
  Seal                     Adhesive Goldseal                                                               ML5000GOLDSEAL                  50
  Seal                     Adhesive Onyx, Reinforced                                                       ML5000SEALONYXR                 50
  Toner                    Bulk Bag, 22 lb Per-Fil - Box of 1, Sold per Box                                ML500010KG                      1
  Toner                    160gm Bottle                                                                    ML5000TNR160                    10
  Wiper Blade                                                                                              ML5000WBLADEG                   10/200


  Los Angeles, USA                Atlanta, USA                 Dallas, USA                Miami, USA               New York, USA               Sanford, USA
US 1 800 394.990            US 1 877 676.4223            US 1 877 499.4989         US 1800 595.4297            US 1 800 431.7884          US 1 800 786.9041
Int’l +1 818 837.8100       Int’l +1 770 516.9488        Int’l +1 972 840.4989     int’l +1 305594.3396        Int’l +1 631 345.0121      Int’l +1 919 775.4551
FAX 1 800 394.9910          FAX 1 877 337.7976           FAX 1 877 744.1750        FAX 1 800 522.8640          FAX1 800 431.8812          FAX 1 800 786.9049
Int’l + 818 838.7047        Int’l +1 770 516.7794        Int’l +1 972 840.1750     Int’l +1 305 594.3309       Int’l +1 631 345.0690      Int’l +1 919 775.4584

           Toronto, CAN                   Sydney, AUS                     Melbourne, AUS            Buenos Aires, ARG                 Montevido, URY
     CAN 1 877 848.0818             AUS 1 800 003.100                 AUS 1 800 003.100            ARG 0810 444.2656                URY 02 902.7206
     Int’l 1 905 712.9501           Int’l +62 02 9648.2630            Int’l +62 03 9561.8102       FAX +011 4584.3100               FAX +5982 908.3816
     FAX 1 877 772.6773             FAX 1 800 004.302                 FAX 1 800 004.302
     Int’l +1 905 712.9502          Int’l +62 02 9648.2635            Int’l +62 03 9561.7751


                              Future Graphics (FG) is a distributor of compatible replacement parts and products for imagining equipment.
                 None of FG's products are genuine OEM replacement parts and no affiliation or sponsorship is to be implied between FG and any OEM.

Manual de Recarga Samsung 5050 | 5100 | 5500 | ML 5000

  • 1.
    ML5000TECH Technical Instructions Printers / OEM Info Tools 1 Xerox Work Center 390 Lexmark Optra #1 Phillips Screwdriver CORPORATE Toner Part Num.: 113R462 E310/E312/E312L Small Flat Blade Screwdriver LOS ANGELES, USA Page Yield @ 5%: 3,000 pgs Toner Part Num: 13T0301 Needlenose Pliers US 1 800 394.9900 Resolution: 6,000 dpi Page Yield @ 5%: 3,000 pgs Soft Lint-Free Cloth Int’l +1 818 837.8100 FAX 1 800 394.9910 Resolution: 1,200 dpi Cotton Swabs Xerox Docuprint Int’l +1 818 838.7047 Anhydrous Isopropyl Alcohol P8E/P8EX/WC385 Toner Part Num: 13T10 ATLANTA, USA Vacuum or Compressed Air Toner Part Num.: 13R00296 Page Yield @ 5%: 6,000 pgs US 1 877 676.4223 Page Yield @ 5%: 5,000 pgs Resolution: 1,200 dpi Int’l +1 770 516.9488 FAX 1 877 337.7976 Resolution: 1,200 dpi Int’l +1 770 516.7794 DALLAS, USA US 1 877 499.4989 Int’l +1 972 840.4989 Photo 1 FAX 1 877 774.1750 Step 1 Int’l +1 972 840.1750 MIAMI, USA Using a Phillips screwdriver remove the US 1 800 595.429 two screws from the top of the cartridge. Int’l +1 305 594.3396 FAX 1 800 522.8640 (See Photo 1) Int’l +1 305 594.3309 NEW YORK, USA US 1 800 431.7884 Int’l +1 631 345.0121 FAX 1 800 431.8812 Int’l +1 631345.0690 SANFORD,USA US 1 800 786.9049 Int’l +1 919 775.4584 Photo 2 FAX 1 800 786.9049 Int’l +1 919 775.4584 Step 2 TORONTO, CAN With a small flat blade screwdriver release CAN 1 877 848.0818 the three clips located on the front of the Int’l +1 905 712.9501 cartridge under the handle. FAX 1 877 772.6773 Int’l +1 905 712.9502 (See Photo 2) BUENOS AIRES, ARG ARG 0810 444.2656 Int’l +011 4583.5900 FAX +011 4584.3100 MELBOURNE, AUS AUS 1 800 003. 100 Int’l +62 03 9561.8102 FAX 1 800 004.302 Photo 3 Int’l +62 03 9561-7751 Step 3 SYDNEY, AUS To separate the two sections, lift up on AUS 1 800 003.100 Int’l +62 02 9648.2630 the front of the toner hopper. Be careful FAX 1800 004.302 when separating the two sections, toner Int’l +62 02 9548.2635 will spill out of the toner hopper. MONTEVIDEO,URY (See Photo 3) URY 02 902.7206 Int’l +5982 900.8358 NOTE: Do not break off the clips on the FAX +5982 908.3816 back of the hopper. JOHANNESBURG, S.A. S.A. +27 11 974.6155 FAX +27 11 974.3593 E-mail: info@futuregraphicsllc.com Website: www.futuregraphicsllc.com
  • 2.
    2 Samsung ML5000 Technical Instructions Photo 4 Step 4 Using dry compressed air or a vacuum, clean out both sections of the cartridge. Notes Step 5 Remove the three screws holding the end caps on each side of the cartridge. (See Photos 4 and 5) Photo 5 Photo 6 Step 6 Remove the drum shutter arm from the contact end cap, rotate the drum shutter up towards the handle on the cartridge until the tab on the shutter fits through the notch on the end cap. (See Photo 6) NOTE: Let the shutter dangle; Do not remove the shutter from the other end cap. Photo 7 Photo 8 Step 7 Pull the contact end cap from the side of the cartridge. (See Photo 7) NOTE: Do not lose the white bearing that fits on the foam feed roller axle (See Photo 8) Photo 9 Step 8 Located ONLY on the contact end cap of the fax cartridge is a blown 100m fuse. This fuse must be replaced each time this car- tridge is recycled. Replace the fuse. (See Photo 9) Need trust-worthy, detailed Technical Instructions for another engine? Visit: www.futuregraphicsllc.com
  • 3.
    Samsung ML5000 TechnicalInstructions 3 Photo 10 Step 9 With the drum shutter still attached, remove the end cap from the gear side of the hopper. Notes (See Photo 10) NOTE: Once again there is a white bearing on the foam feed roller axle. Do not lose the bearing. Photo 11 Step 10 Photo 11 shows the gear alignment of the hopper. Remove the five white gears from the hopper. (See Photo 11) Photo 12 Step 11 Remove the two metal gear axles from the gear side of the hopper. (See Photo 12) Photo 13 Step 12 On each end of the PCR there is a screw that holds the PCR saddles in place, remove the two screws. (See Photo 13) Photo 14 Step 13 Lift out the PCR. NOTE: Do not lose the gear that fits on the end of the PCR. (See Photo 14) Clean the PCR using a PCR cleaner. Need help with a particular remanu- facturing problem? Call the Technical Resource Center from 8am - 5pm PST: 800 394.9900
  • 4.
    4 Samsung ML5000 Technical Instructions Photo 18 Step 18 Release the two clips that hold the devel- oper roller end cap. Step 14 (See Photo 18 and 19) Remove the three screws that Remove the end cap. hold the wiper blade. (See Photo 15) Photo 15 Photo 19 Photo 20 Step 15 Step 19 Lift out the wiper blade straight Slide the developer roller out through the up to remove. side of the hopper. Step 16 (See Photo 20) Grab the drum by the gears and Clean the developer roller using a dry lint- lift the drum out of the hopper. free cloth. Clean the drum using a lint free cloth. (See Photo 16) Photo 16 Photo 21 Step 20 Remove the two screws that hold the doctor blade. (See Photo 21) Step 21 Lift the doctor blade up. It may be neces- sary to remove the small foam strips that are connected to the back of the doctor blade. Clean the doctor blade using alcohol and a cotton swab. Photo 17 Step 17 Step 22 Remove the black gear from Apply a seal to the toner hopper. the developer roller axle. (See Photo 17) Step 23 Reassemble in reverse order. E-mail: info@futuregraphicsllc.com Website: www.futuregraphicsllc.com
  • 5.
    ENGINE FACT SHEETT PRINTERMODEL COMPATIBILITY PRINTER MODEL OEM NUMBER Lexmark Optra E310 13T0101 Lexmark Optra E312 13T0101 Lexmark Optra E312L 13T0101 Olivetti PGL 8L Samsung ML-5000A ML+5000D5 Samsung ML-5000G ML+5000D5 Samsung ML-5050G ML+5000D5 Samsung ML-5100A ML+5000D5 Xerox Docuprint P8e 113R296 Xerox Docuprint P8ex 113R296 Xerox WorkCentre 385 113R296 Xerox WorkCentre 390 113R462 FUTURE GRAPHICS PRODUCT LISTING Produc t Description Item N umb er Pack Qt y. Cartridge Box Label Two-Color Self-Adhesive ML5000LABEL 100 Cartridge Tech Guide Remanufacturing Instructions ML5000TECH 1 Developer Roller ML5000DVRROL 10 Doctor Blade Doctor Bar With Sponge ML5000DRBLADEG 10 Drum AEG ML5000AEG 5/60 Drum ML5000DRUMG 15/50 Fuse Drum Unit Reset Fuse, Fax ML5000FUSED 10 PCR For Printer (Not for Fax), New, Onyx ML5000PCR 10 Seal Adhesive Goldseal ML5000GOLDSEAL 50 Seal Adhesive Onyx, Reinforced ML5000SEALONYXR 50 Toner Bulk Bag, 22 lb Per-Fil - Box of 1, Sold per Box ML500010KG 1 Toner 160gm Bottle ML5000TNR160 10 Wiper Blade ML5000WBLADEG 10/200 Los Angeles, USA Atlanta, USA Dallas, USA Miami, USA New York, USA Sanford, USA US 1 800 394.990 US 1 877 676.4223 US 1 877 499.4989 US 1800 595.4297 US 1 800 431.7884 US 1 800 786.9041 Int’l +1 818 837.8100 Int’l +1 770 516.9488 Int’l +1 972 840.4989 int’l +1 305594.3396 Int’l +1 631 345.0121 Int’l +1 919 775.4551 FAX 1 800 394.9910 FAX 1 877 337.7976 FAX 1 877 744.1750 FAX 1 800 522.8640 FAX1 800 431.8812 FAX 1 800 786.9049 Int’l + 818 838.7047 Int’l +1 770 516.7794 Int’l +1 972 840.1750 Int’l +1 305 594.3309 Int’l +1 631 345.0690 Int’l +1 919 775.4584 Toronto, CAN Sydney, AUS Melbourne, AUS Buenos Aires, ARG Montevido, URY CAN 1 877 848.0818 AUS 1 800 003.100 AUS 1 800 003.100 ARG 0810 444.2656 URY 02 902.7206 Int’l 1 905 712.9501 Int’l +62 02 9648.2630 Int’l +62 03 9561.8102 FAX +011 4584.3100 FAX +5982 908.3816 FAX 1 877 772.6773 FAX 1 800 004.302 FAX 1 800 004.302 Int’l +1 905 712.9502 Int’l +62 02 9648.2635 Int’l +62 03 9561.7751 Future Graphics (FG) is a distributor of compatible replacement parts and products for imagining equipment. None of FG's products are genuine OEM replacement parts and no affiliation or sponsorship is to be implied between FG and any OEM.